
Trails
Besides the thirty-five 3500 foot peaks in the Catskills, there are many other smaller mountains to climb. In addition, there are hundreds of miles of trails to hike. There are also MANY other places to hike also. I have divided the Trails section into list of All Trail, the Catskills, the Shawangunks, Bear Mt/Harriman, East Hudson, West Hudson, New Jersey and Other Trails. The All Trails list includes over 400 different trails and may load slowly on your computer. The "divided" list should load more quickly.
You can view all the Trails here.
Clicking on ![]() will bring up an index of trails. Clicking on
will bring up an index of trails. Clicking on ![]() will return you to the top of the page.
will return you to the top of the page.
Acra Point Loop
| Quick Look | ||||
|---|---|---|---|---|
| Difficulty | Round trip | Total climb | Internet Maps | |
| 5.1 mi | 1100 ft | AllTrails | ||
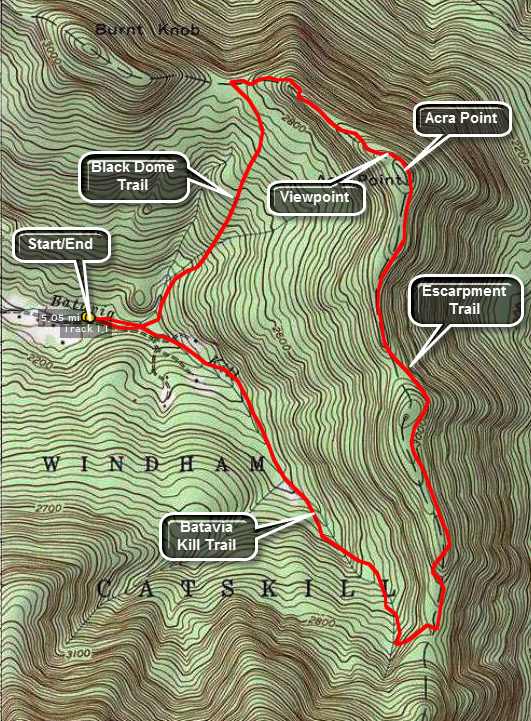 Park at trail head parking area on Black Dome or Big Hollow Road. Be aware that past a certain
point this road is considered seasonal and may not be plowed or maintained. During the winter
the trailhead parking is almost never plowed and parking is limited along the shoulders of the road.
The trail head is just BEFORE the parking area on the right. Find the red-blazed Black Dome Trail
and immediately cross the Batavia Kill on a bridge. After a short walk, re-cross the Batavia Kill
and continue on the trail for about 1.1 miles. This second crossing has no bridge and can be tricky at times! Look over your shoulder occasionally to see the
imposing presence of Blackhead, Black Dome and Thomas Cole Mountains. This walk winds its way
upward through mixed hardwood and spruce forest until it meets the blue-blazed Escarpment Trail.
Park at trail head parking area on Black Dome or Big Hollow Road. Be aware that past a certain
point this road is considered seasonal and may not be plowed or maintained. During the winter
the trailhead parking is almost never plowed and parking is limited along the shoulders of the road.
The trail head is just BEFORE the parking area on the right. Find the red-blazed Black Dome Trail
and immediately cross the Batavia Kill on a bridge. After a short walk, re-cross the Batavia Kill
and continue on the trail for about 1.1 miles. This second crossing has no bridge and can be tricky at times! Look over your shoulder occasionally to see the
imposing presence of Blackhead, Black Dome and Thomas Cole Mountains. This walk winds its way
upward through mixed hardwood and spruce forest until it meets the blue-blazed Escarpment Trail.
Turn right on The Escarpment Trail and head toward Acra Point. The terrain now is more rugged and steeper. There is a hint of views to both the north and south on both sides of the trail but they are not clear. Walk off the trail on the left to get a view to the north toward Albany or wait until just after the top of Acra Point. After about .7 miles you will be at the summit of Acra Point. The best views to the south and west are from a lookout BEFORE the summit. The path is well-traveled and is easy to find. When you walk out onto the rock shelf, you are treated to a spectacular view of the three mountains and the Camel's Hump. The views down the Black Dome Valley to the west are also excellent. From here you can also see Burnt Knob and behind and to the right Windham Mountain.
Continue on the Escarpment Trail for another 1.75 miles. The trail skirts a hill nearly as high as Acra. Views to the north from the trail continue to be elusive.The trail descends but has several short ascents before it heads down to meet the Batavia Kill Trail. The Escarpment Trail continues up over Blackhead Mountain. As you descend the trail toward the Batavia Kill Trail junction it looks very much as if you MUST ascend this mountain! Turn right on the yellow-blazed Batavia Kill Trail to return to the parking area. This trail goes on for about 1 mile and ends. Be sure to turn right and follow the red-blazed Black Dome Trail and the signs to the parking area about .6 miles away. If you turn left, you will be climbing to the col between Blackhead and Black Dome! Bridges span the widest and deepest water crossings near the end of the trail. There is also evidence of a dam and the foundations of a mill on the Batavia Kill.
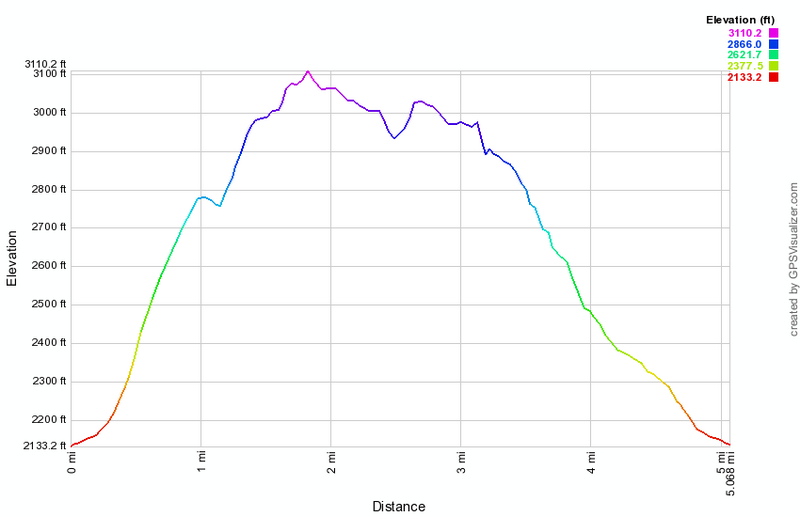 (The image at the left shows the profile of the hike. Remember that all vertical profiles are relative!)
Acra Point and Burnt Knob
| Quick Look | ||||
|---|---|---|---|---|
| Difficulty | Round trip | Total climb | Internet Maps | |
| 4.2 mi | 1320 ft | AllTrails | ||
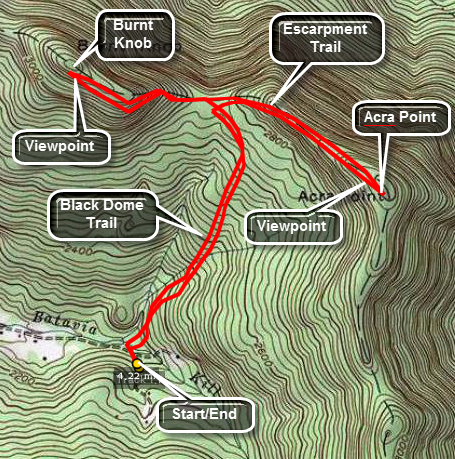 Park at trail head parking area on Black Dome or Big Hollow Road. Be aware that past a certain
point this road is considered seasonal and may not be plowed or maintained. During the winter
the trailhead parking is almost never plowed and parking is limited along the shoulders of the road.
The trail head is just BEFORE the parking area on the right. Find the red-blazed Black Dome Trail
and immediately cross the Batavia Kill on a bridge. After a short walk, re-cross the Batavia Kill
and continue on the trail for about 1.1 miles. This second crossing has no bridge and can be tricky at times! Look over your shoulder occasionally to see the
imposing presence of Blackhead, Black Dome and Thomas Cole Mountains. This walk winds its way
upward through mixed hardwood and spruce forest until it meets the blue-blazed Escarpment Trail.
Park at trail head parking area on Black Dome or Big Hollow Road. Be aware that past a certain
point this road is considered seasonal and may not be plowed or maintained. During the winter
the trailhead parking is almost never plowed and parking is limited along the shoulders of the road.
The trail head is just BEFORE the parking area on the right. Find the red-blazed Black Dome Trail
and immediately cross the Batavia Kill on a bridge. After a short walk, re-cross the Batavia Kill
and continue on the trail for about 1.1 miles. This second crossing has no bridge and can be tricky at times! Look over your shoulder occasionally to see the
imposing presence of Blackhead, Black Dome and Thomas Cole Mountains. This walk winds its way
upward through mixed hardwood and spruce forest until it meets the blue-blazed Escarpment Trail.
Turn right on The Escarpment Trail and head toward Acra Point. The terrain now is more rugged and steeper. There is a hint of views to both the north and south on both sides of the trail but they are not clear. Walk off the trail on the left to get a view to the north toward Albany or wait until just after the top of Acra Point. After about .7 miles you will be at the summit of Acra Point. The best views to the south and west are from a lookout BEFORE the summit. The path is well-traveled and is easy to find. When you walk out onto the rock shelf, you are treated to a spectacular view of the three mountains and the Camel's Hump. The views down the Black Dome Valley to the west are also excellent. From here you can also see Burnt Knob and behind and to the right Windham Mountain.
Retrace your steps back down to the junction of the Black Dome Trail and the Escarpment Trail. Continue straight ahead toward Burnt Knob. The summit is only about .5 miles from the trail junction but it is eroded and steep in some places. During the winter the snow conditions may make it almost impossible to negotiate. The best views are on the left of the trail just BEFORE the summit. Several short spur trails lead out to viewpoints. If you continue passed the summit you will descend slightly. Just before a steeper descent on the way to Windham High Peak look ahead for a nice view of this peak. The view is better in fall and winter when there are few leaves on the trees. Turn around and retrace your path back to the trail junction. Turn right to go back to the car.
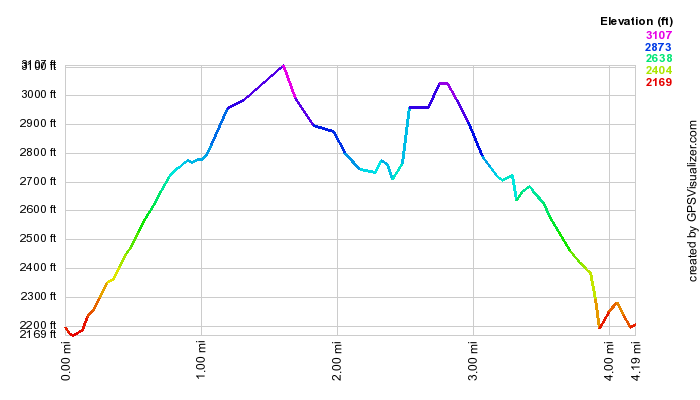 (The image at the left shows the profile of the hike. Remember that all vertical profiles are
relative!)
(The image at the left shows the profile of the hike. Remember that all vertical profiles are
relative!)
Albany County Line to Fawn Lake
| Quick Look | ||||
|---|---|---|---|---|
| Difficulty | Round trip | Total climb | Internet Maps | |
| 11.5 mi. | 1550 ft. | AllTrails | ||
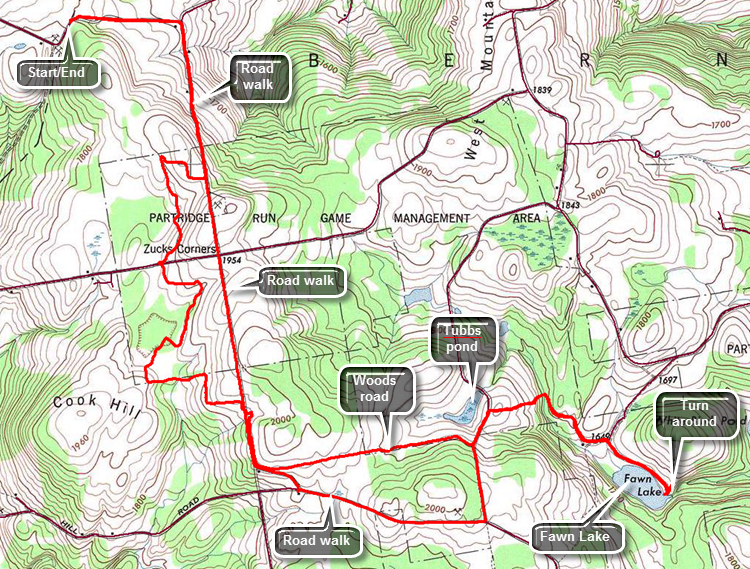
Head north on Route 30 through Margaretville, Roxbury, Grand Gorge, North Blenheim and Middleburgh. Just over the Route 30 bridge in Middleburgh, turn right on Route 145 and follow it to the other side of town to Huntersland Road. Turn left on Huntersland Road and drive 2.7 miles and make a left on Lawton Hollow Road. After driving 3.9 miles on Lawton Hollow Road, pull over to the left side of the road where there is a shale pit and room for several cars. Just passed this spot on the right is a "Welcome to Albany County" sign. The first .5 miles of the hike is slightly downhill on Lawton Hollow Road to the intersection with Bradt Hollow Road. Walk south on Bradt Hollow Road for about .7 miles gaining about 260 feet in the process. There aren't many aqua blazes but watch for a brown and yellow sign for the Partridge Run Wildlife Management Area on the left side of the road. It has blazes that indicate a right turn onto a snowmobile trail. The trail is usually mowed but may be overgrown with grass and weeds. From this point on most of the trail follows snowmobile and Nordic ski trails and woods roads. The aqua blazes are very clear in most cases. At 2.1 miles cross High Point Road and begin walking through stands of Norway spruce and red pine. At about 2.7 miles there is a beaver pond and the trail parallels it for a short distance and then turns right shortly after that. The trail stays near the pond briefly and then turns away from it to the left. Begin an uphill walk which brings you to Bradt Hollow Road at 3.6 miles. Walk out onto the road and turn right and almost immediately left onto a gravel road. Take the next right into a snowmobile trail but watch carefully as the blazes are hidden. The snowmobile trail parallels the road for at least a quarter mile and then begins to swing east away from the road. Begin to follow an extremely straight woods road which seems to be the boundary between private and state land. Walk mostly downhill for about a mile to Beaver Road. Turn left on Beaver Road and walk downhill for about .2 miles where the trail turns right off the road at 5.1 miles. Continue downhill on a snowmobile trail that leads to Tubbs Pond which is not marked on all maps. Continue across the bridge just downstream from the dam. From the parking area, continue to walk on the access road to 5.8 miles then turn right on Fawn Lake Road. It is only about .4 miles to the end of the road at the Fawn Lake parking area. The road parallels the lake shore most of the way. The Long Path continues through the parking area to the left onto a snowmobile trail. This is the turnaround point for the hike and as always you may simply follow your route back to the car. Walking the back roads provides and interesting alternative. Retrace your route back to Tubbs Pond and back up to Beaver Road. Turn left on Beaver Road and continue passed the trail. Walk .3 miles out to Bradt Hollow Road and turn right on Bradt Hollow Road. Walk .9 miles to the intersection with Cook Hill Road. There was a small parking area here and a sign describing the wildlife management area. Follow Bradt Hollow Road to the right. The road is exceptionally straight and heads almost due north. At 9.9 miles cross High Point Road and at 10.3 miles you will be back at the point where you turned off the road onto the trail earlier in the day. It is just .7 miles back to Lawton Hollow Road. Turn left and walk the .5 miles back to the car.
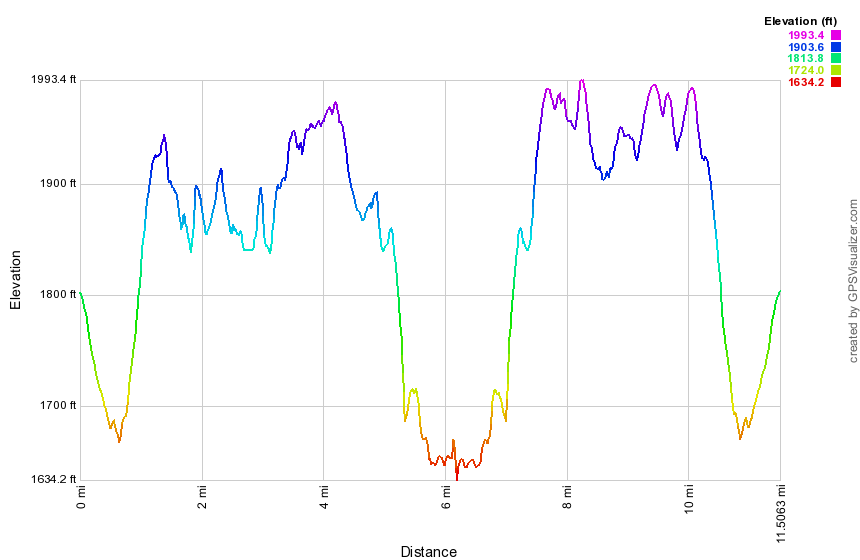 (The image below shows the profile of the hike. Remember that all vertical profiles are relative!)
Alder Lake: Around Lake Clockwise
| Quick Look | ||||
|---|---|---|---|---|
| Difficulty | Round trip | Total climb | Internet Maps | |
| 1.7 mi. | 145 ft. | AllTrails | ||
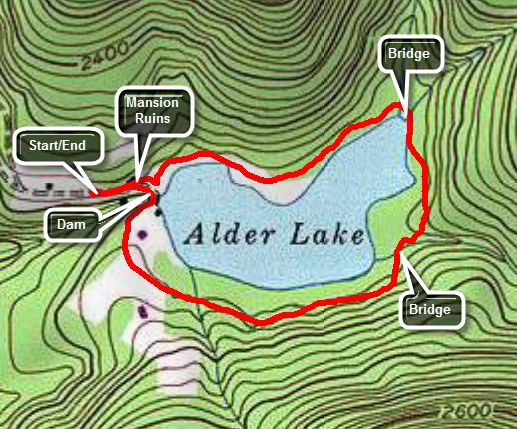 Take the Beaverkill Road from Livingston Manor and drive for about twenty minutes to the Alder Creek Road. Alder Creek Road is a left turn off the Beaverkill Road about two miles after it makes a sharp right turn near the Barkaboom Road that goes to the Little Pond State Campgrounds. Go to the end of Alder Creek Road and turn right into the access road to Alder Lake. Bearing left will take you over to the Millbrook-Arena Road on Cross Mountain Road. Park in the parking lot and walk toward the lake passing the stonework which is all that remains of the Coykendall Mansion. Walk down the left side of the "lawn" and follow the trail around the lake. There are several places to walk out to the shore of the lake. Directly across the lake is Cradle Rock Ridge. At .8 miles the Millbrook Ridge Trail turns left. Stay on the main trail around the lake and cross the bridge that spans Alder Creek. Stay on the woods road and follow the blazes as they guide you around the lake. The trail is sited away from the lakeshore and you will see primitive campsites between you and the water. As you near the southern end of the lake you will break out into an open area. Walk to the dam and cross over to the other side. Walk up the path toward the remains of the mansion and back to the parking area.
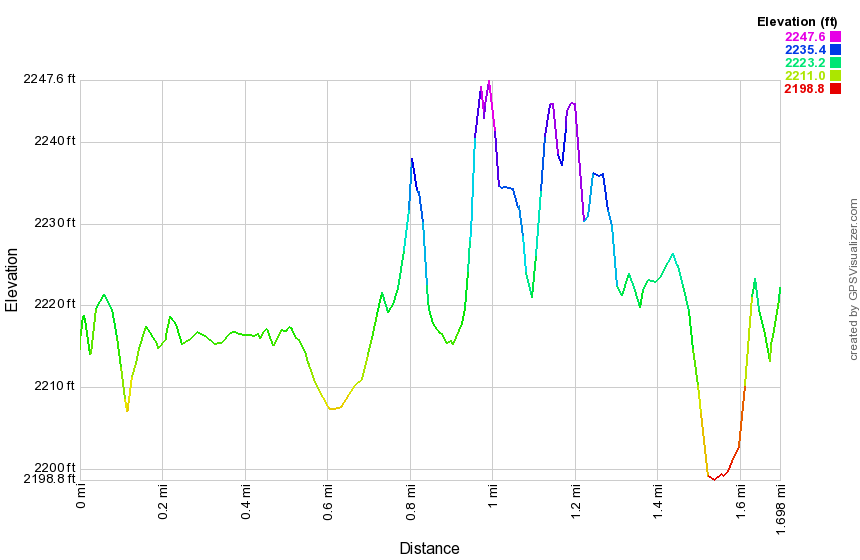 (The image at the left shows the profile of the hike.)
Alder Lake: Around Lake Counterclockwise
| Quick Look | ||||
|---|---|---|---|---|
| Difficulty | Round trip | Total climb | Internet Maps | |
| 1.8 mi. | 145 ft. | AllTrails | ||
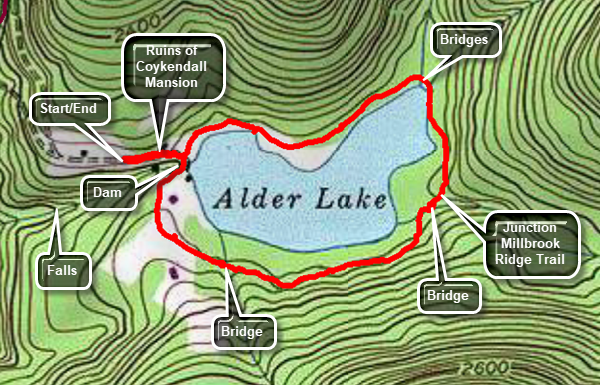 Take the Beaverkill Road from Livingston Manor and drive for about twenty minutes to the Alder Creek Road. Alder Creek Road is a left turn off the Beaverkill Road about two miles after it makes a sharp right turn near the Barkaboom Road that goes to the Little Pond State Campgrounds. Go to the end of Alder Creek Road and turn right into the access road to Alder Lake. Bearing left will take you over to the Millbrook-Arena Road on Cross Mountain Road. Park in the parking lot and walk toward the lake passing the stonework which is all that remains of the Coykendall Mansion. Walk down the right side of the "lawn" and turn right to walk over the dam. Follow the trail around the lake in a counterclockwise direction. Stay on the woods road and follow the blazes as they guide you around the lake. The trail is sited away from the lakeshore and you will see primitive campsites between you and the water. There are several places to walk out to the shore of the lake. Just before the junction with the Millbrook Ridge Trail on the right you will cross the bridge over Alder Creek. At the junction stay on the main trail around the lake and cross the two bridges that span two other inlet streams. Walk along the north shore of the lake on a flat trail. Directly across the lake is Cradle Rock Ridge. As you near the western end of the lake you will be back at the "lawn". Walk up the path toward the remains of the mansion and back to the parking area.
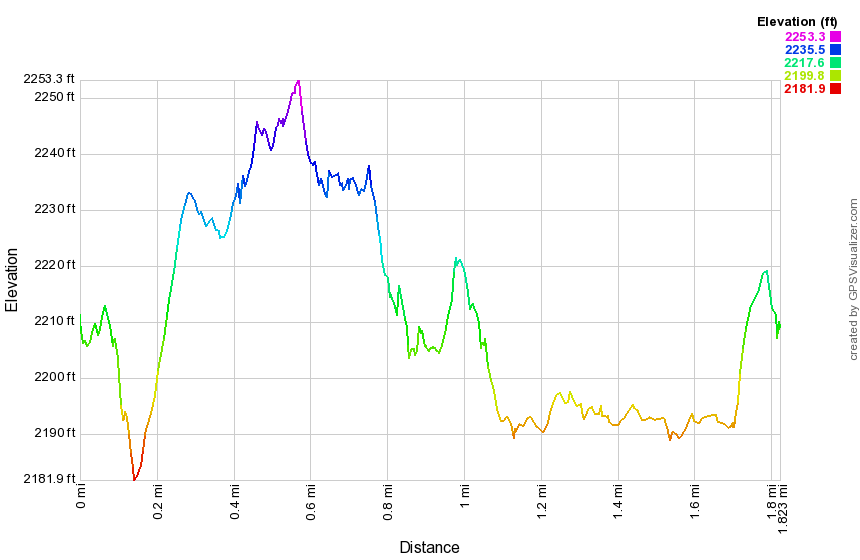 (The image at the left shows the profile of the hike.)
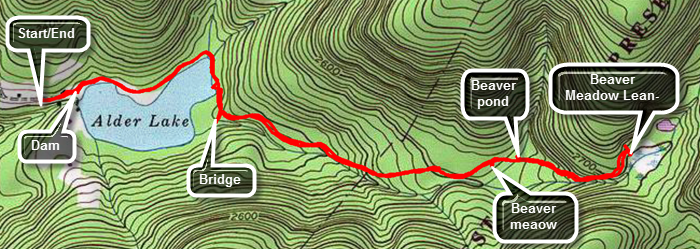
Alder Lake: Beaver Meadow Lake Loop
| Quick Look | ||||
|---|---|---|---|---|
| Difficulty | Round trip | Total climb | Internet Maps | |
| 4.9 mi. | 770 ft. | AllTrails | ||
 Take the Beaverkill Road from Livingston Manor and drive for about twenty minutes to the Alder Creek Road. Alder Creek Road is a left turn off the Beaverkill Road about two miles after it makes a sharp right turn near the Barkaboom Road that goes to the Little Pond State Campgrounds. Go to the end of Alder Creek Road and turn right into the access road to Alder Lake. Bearing left will take you over to the Millbrook-Arena Road on Cross Mountain Road. Park in the parking lot and walk toward the lake passing the stonework which is all that remains of the Coykendall Mansion. Walk down the left side of the "lawn" and follow the trail around the lake. There are several places to walk out to the shore of the lake. Directly across the lake is Cradle Rock Ridge. At .8 miles turn left on the Millbrook Ridge Trail that continues all the way to Balsam Lake Mountain. The trail can be wet and muddy in places and there may be some blowdowns to contend with. For the next 1.5 miles the trail climbs and then levels off several times. The elevation gain is several hundred feet but the grade is never more than 12% and averages around 6%. There isn't too much to see along the way but the trail parallels Alder Creek which generates a pleasant sound on most days. Along the way there are several beaver meadows including one at the lean-to. Arrive at the lean-to at about 2.4 miles. Walking down to the beaver meadow in front of the lean-to leads to a nice view. Walk back up to the main trail and turn right. Walk another .1 miles for a view of another beaver meadow right on the trail. Turn around and head back the way you came. At 4 miles turn left on the loop trail around Alder Lake to complete the loop around the lake. Continue to follow the trail as it empties out into a small field near the dam. Walk to the dam and cross it. Walk back up to the parking area to your car.
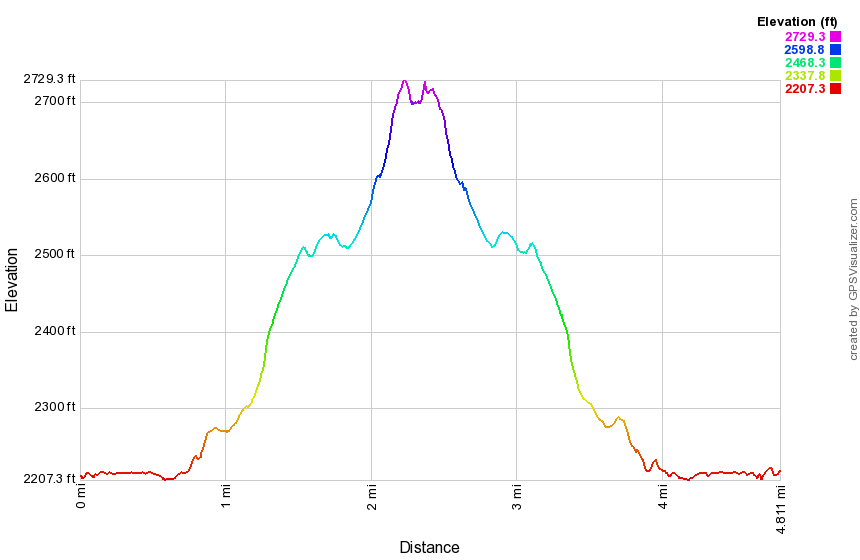
 (The image at the left shows the profile of the hike.)
Alder Lake: Beaver Meadow Lean-to (out and back)
| Quick Look | ||||
|---|---|---|---|---|
| Difficulty | Round trip | Total climb | Internet Maps | |
| 4.8 mi. | 690 ft. | AllTrails | ||
 Take the Beaverkill Road from Livingston Manor and drive for about twenty minutes to the Alder Creek Road. Alder Creek Road is a left turn off the Beaverkill Road about two miles after it makes a sharp right turn near the Barkaboom Road that goes to the Little Pond State Campgrounds. Go to the end of Alder Creek Road and turn right into the access road to Alder Lake. Bearing left will take you over to the Millbrook-Arena Road on Cross Mountain Road. Park in the parking lot and walk toward the lake passing the stonework which is all that remains of the Coykendall Mansion. Walk down the left side of the "lawn" and follow the trail around the lake. There are several places to walk out to the shore of the lake. Directly across the lake is Cradle Rock Ridge. At .8 miles turn left on the Millbrook Ridge Trail that continues all the way to Balsam Lake Mountain. The trail can be wet and muddy in places and there may be some blowdowns to contend with. For the next 1.5 miles the trail climbs and then levels off several times. The elevation gain is several hundred feet but the grade is never more than 12% and averages around 6%. There isn't too much to see along the way but the trail parallels Alder Creek which generates a pleasant sound on most days. Along the way there are several beaver meadows including one at the lean-to. Arrive at the lean-to at about 2.4 miles. Walking down to the beaver meadow in front of the lean-to leads to a nice view. Walk back up to the main trail and turn left and head back the way you came. At 4 miles turn right on the loop trail around Alder Lake to retrace your route to the parking area. Continue to follow the trail as it empties out into a small field near the dam and spillway for the lake. Walk back up the hill to the parking area and your car.
 (The image at the left shows the profile of the hike.)
Alder Lake to Big Pond (out and back)
| Quick Look | ||||
|---|---|---|---|---|
| Difficulty | Round trip | Total climb | Internet Maps | |
| 5.9 mi. | 1392 ft. | AllTrails | ||
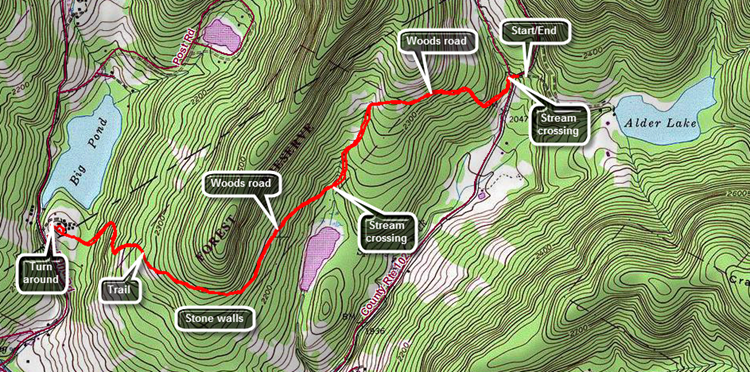 Take the Beaverkill Road from Livingston Manor and drive for about twenty minutes to the Alder Creek Road. Alder Creek Road is a left turn off the Beaverkill Road about two miles after it makes a sharp right turn near the Barkaboom Road that goes to the Little Pond State Campgrounds. Go to the end of Alder Creek Road and turn right into the access road to Alder Lake. Bearing left will take you over to the Millbrook-Arena Road on Cross Mountain Road. Park just before the gate into Alder Lake. Parking in the lot at Alder Lake will increase the length of the hike slightly but is preferable when the gate is open and the road is in good condition. Begin by walking down the road to where the trail enters the woods at the entrance to the Cross Mountain Hunting Camp. The first obstacle is crossing Alder Creek can be a little high when it rains. Start to hike along a broad woods road which is marked with red blazes. Over the next half mile gain about 300 feet climbing to the shoulder of a ridge. The trail is easy to follow but watch for the posted signs on either side of the state land. From the ridge start to descend on the same woods road to a small stream. The descent is almost a mirror image of the ascent as the trail drops about 300 feet in half a mile. As the trail approaches the stream, the trail markers indicate a slight turn to the west off the woods road and across the stream. There is very large open area just below the stream crossing which you Mayan to investigate. Cross the stream as the trail begins follow another well-defined woods road. Climb to the shoulder of another ridge gaining 200 feet over the next half mile. At 1.8 miles the trail turns to the west heading directly toward Big Pond. At 2 miles begin a .75 mile descent losing over 400 feet as the trail heads toward Big Pond. As you approach Big Pond, you will pass through a nice stand of evergreen trees and the trail makes a few turns. As the trail nears the upper perking area at Big Pond, there is a stone retaining wall on the right side of the trail. The front of the wall is only 18 inches high but one side is about 3 feet and has a pipe coming out of it. This remains a mystery. Hike out to the parking area and sign the register before turning around to start back. On the walk back notice an extensive network of stone walls in the area if you did not see them on the way out. The walls were on both sides of the trail and, in some places, the trail crossed the walls. The work it took to collect the stones and the skill needed to turn them into stone walls that have stood for so many years is truly impressive! Continue to reface your steps crossing Alder Creek and walking back on the road to your car.
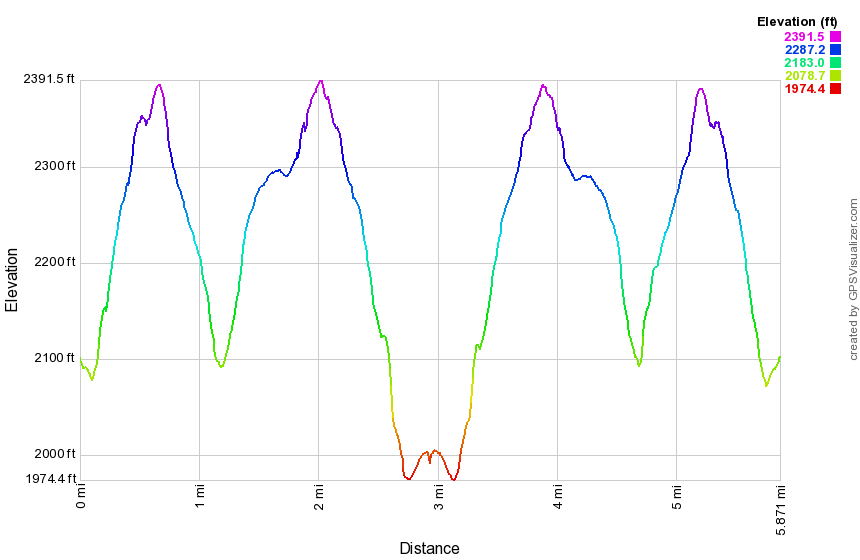 (The image at the left shows the profile of the hike.)
Alder Lake: Bushwhack
| Quick Look | ||||
|---|---|---|---|---|
| Difficulty | Round trip | Total climb | Internet Maps | |
| 10.3 mi. | 2143 ft. | AllTrails | ||
_map.png) Take the Beaverkill Road from Livingston Manor and drive for about twenty minutes to the Alder Creek Road. Alder Creek Road is a left turn off the Beaverkill Road about two miles after it makes a sharp right turn near the Barkaboom Road that goes to the Little Pond State Campgrounds. Go to the end of Alder Creek Road and turn right into the access road to Alder Lake. Bearing left will take you over to the Millbrook-Arena Road on Cross Mountain Road. Park in the parking lot and walk back down the driveway/access road to a woods road that turns left up to another small parking area and then continues parallel to Cross Mountain Road for some distance. When the woods road begins to dip down to Cross Mountain Road, turn UP the hill and find your route to the top. You may find all woods roads along the way so feel free to explore. There are several different places where the ground levels and then continues up again. Eventually you will be on flatter ground near the summit where you will find some ledges. Walking along the ledges may reveal some glimpses over to Barkaboom Mountain. Walk around on the relatively flat summit and you may find a cairn that looks like it once marked property lines. When you are done on the top, turn south to head back to the parking area. Again, woods roads can be found but this area is full of prickers and the open woods roads allow them to grow more easily. The first part of the descent is gentle but then becomes very steep. Wander round to find your best route down. Watch for glimpses of Alder lake as you descend back to the parking area.
Take the Beaverkill Road from Livingston Manor and drive for about twenty minutes to the Alder Creek Road. Alder Creek Road is a left turn off the Beaverkill Road about two miles after it makes a sharp right turn near the Barkaboom Road that goes to the Little Pond State Campgrounds. Go to the end of Alder Creek Road and turn right into the access road to Alder Lake. Bearing left will take you over to the Millbrook-Arena Road on Cross Mountain Road. Park in the parking lot and walk back down the driveway/access road to a woods road that turns left up to another small parking area and then continues parallel to Cross Mountain Road for some distance. When the woods road begins to dip down to Cross Mountain Road, turn UP the hill and find your route to the top. You may find all woods roads along the way so feel free to explore. There are several different places where the ground levels and then continues up again. Eventually you will be on flatter ground near the summit where you will find some ledges. Walking along the ledges may reveal some glimpses over to Barkaboom Mountain. Walk around on the relatively flat summit and you may find a cairn that looks like it once marked property lines. When you are done on the top, turn south to head back to the parking area. Again, woods roads can be found but this area is full of prickers and the open woods roads allow them to grow more easily. The first part of the descent is gentle but then becomes very steep. Wander round to find your best route down. Watch for glimpses of Alder lake as you descend back to the parking area.
_gra.png) (The image at the left shows the profile of the hike.)
(The image at the left shows the profile of the hike.)
Alder Lake: Little Pond
| Quick Look | ||||
|---|---|---|---|---|
| Difficulty | Round trip | Total climb | Internet Maps | |
| 10.3 mi. | 2143 ft. | AllTrails | ||
 Take the Beaverkill Road from Livingston Manor and drive for about twenty minutes to the Alder
Creek Road. Alder Creek Road is a left turn off the Beaverkill Road about two miles after it makes
a sharp right turn near the Barkaboom Road that goes to the Little Pond State Campgrounds. Go to
the end of Alder Creek Road and turn right into the access road to Alder Lake. Bearing left will take you over to the Millbrook-Arena Road on Cross Mountain Road. Park in the parking lot and walk back down the driveway/access road and cross Alder Creek Road. Finding the red-blazed
Touch-Me-Not Trail can be tricky and once found it can be hard to follow in places as it is NOT clearly marked. The trail rises and falls over
the shoulders of several mountains. After 3.5 miles you arrive at the Big Pond trail head parking area on the Barkaboom Rd. Walk down the access road to the main road.
Turn right on the road and follow it for a short distance then make a left up into the woods. After
another .75 miles, you will be near the top of Touch-Me-Not Mountain. At this point turn left and hike
1.15 miles to Little Pond Campgrounds on the blue Campgrounds Trail. This descent is a steep, at times, but
short. Walk .85 miles down the access road/driveway to the Barkaboom Road and make a right.
Walk a short distance to the Beaverkill Road and turn left. Walk on the Beaverkill Road for about
1.4 miles and make a left on Alder Creek Road. Alder Lake parking is about 2.5 miles away at the end
of the road.
Take the Beaverkill Road from Livingston Manor and drive for about twenty minutes to the Alder
Creek Road. Alder Creek Road is a left turn off the Beaverkill Road about two miles after it makes
a sharp right turn near the Barkaboom Road that goes to the Little Pond State Campgrounds. Go to
the end of Alder Creek Road and turn right into the access road to Alder Lake. Bearing left will take you over to the Millbrook-Arena Road on Cross Mountain Road. Park in the parking lot and walk back down the driveway/access road and cross Alder Creek Road. Finding the red-blazed
Touch-Me-Not Trail can be tricky and once found it can be hard to follow in places as it is NOT clearly marked. The trail rises and falls over
the shoulders of several mountains. After 3.5 miles you arrive at the Big Pond trail head parking area on the Barkaboom Rd. Walk down the access road to the main road.
Turn right on the road and follow it for a short distance then make a left up into the woods. After
another .75 miles, you will be near the top of Touch-Me-Not Mountain. At this point turn left and hike
1.15 miles to Little Pond Campgrounds on the blue Campgrounds Trail. This descent is a steep, at times, but
short. Walk .85 miles down the access road/driveway to the Barkaboom Road and make a right.
Walk a short distance to the Beaverkill Road and turn left. Walk on the Beaverkill Road for about
1.4 miles and make a left on Alder Creek Road. Alder Lake parking is about 2.5 miles away at the end
of the road.
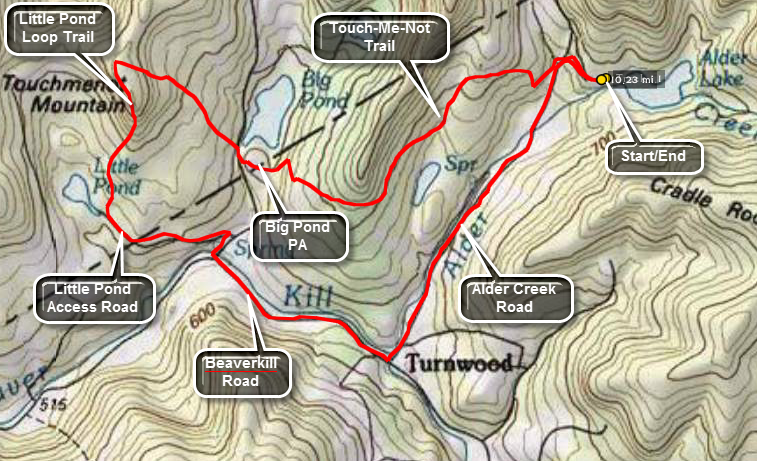
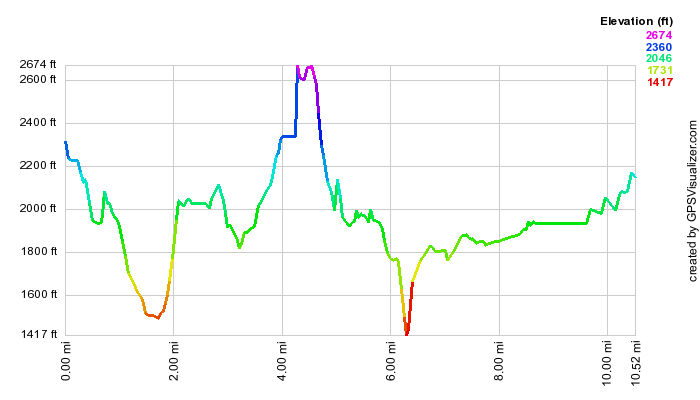 (The image at the left shows the profile of the hike. The highest point is near the summit of Touch-Me-Not Mountain. The lowest spot is the junction of the Barkaboom and Beaverkill Roads.)
Alder Lake: Millbrook Ridge
| Quick Look | ||||
|---|---|---|---|---|
| Difficulty | Round trip | Total climb | Internet Maps | |
| 9.1 mi. | 1960 ft. | AllTrails | ||
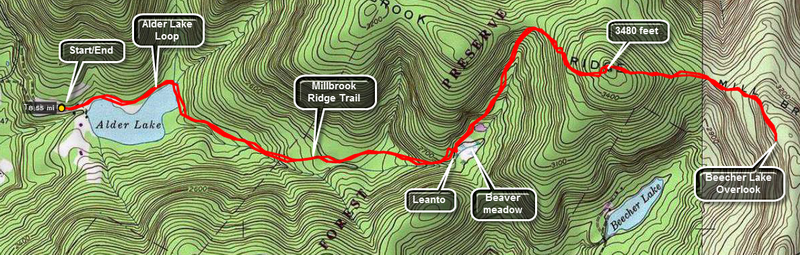
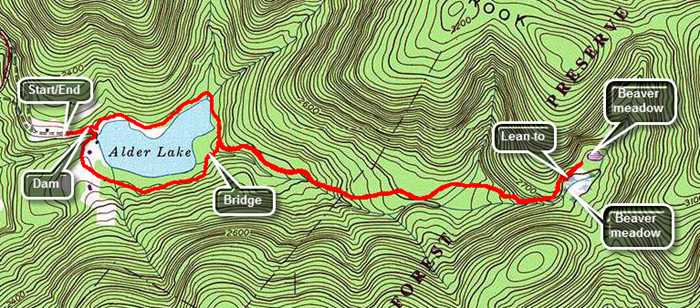
I had lived in Livingston Manor for 25 years before I managed to visit Alder Lake. Several people had told me how beautiful it is but I just hadn't made it there. The lake IS very pretty and is frequented by many people. Campsites dot the entire perimeter of the lake. The Alder Lake Loop Trail is about 1.6 miles and suitable for beginners with only a slight rise on one side. The hikes to the Beecher Lake overlook or to Balsam Lake Mountain on the other hand have several steep areas and can be quite a challenge. The distances, 8 and 13 miles respectively, may also be daunting for some. The map above shows the out and back route from Alder Lake along Millbrook Ridge to the Beecher Lake overlook. I have labeled some of the points of interest along the way. The Beecher Lake overlook is beautiful with a nice view of the lake and the Zen Buddhist monastery that is on its shores.
Take the Beaverkill Road from Livingston Manor and drive for about twenty minutes to the Alder Creek Road. Alder Creek Road is a left turn off the Beaverkill Road about two miles after it makes a sharp right turn near the Barkaboom Road that goes to the Little Pond State Campgrounds. Go to the end of Alder Creek Road and turn right into the access road to Alder Lake. Park in the parking lot and walk to the lake. The Coykendall Mansion house that stood on the grounds has been removed by New York State as they did not have the money to maintain or restore it. Now only the stone work remains. As you walk toward the lake you stay to the left on the red Alder Lake loop trail. After about .8 miles on this trail the yellow Millbrook Ridge trail breaks off heading east. The trail ascends very gently and after about 1.5 miles on the trail you arrive at the Beaver Meadow lean-to and spring. There once was a large beaver pond here but it is now being reclaimed and forming a meadow.
Back on the trail you will pass another pond on your right after which the trail climbs more steeply. After about 1.35 miles you are at the highest point on the ridge (3480 ft). The trail then descends slightly before another ascent to the overlook; a distance of another 1.1 miles. Along the Wat the trail does not head directly east but loops north and then southeast back t the viewpoint. The overlook has been obscured by the trees that have grown up over the years and it is easier to get a view when there are no leaves on the trees. The return trip simply reverses your trip out. When you get to the Alder Lake loop trail, you can go the other way around to add a little variety.
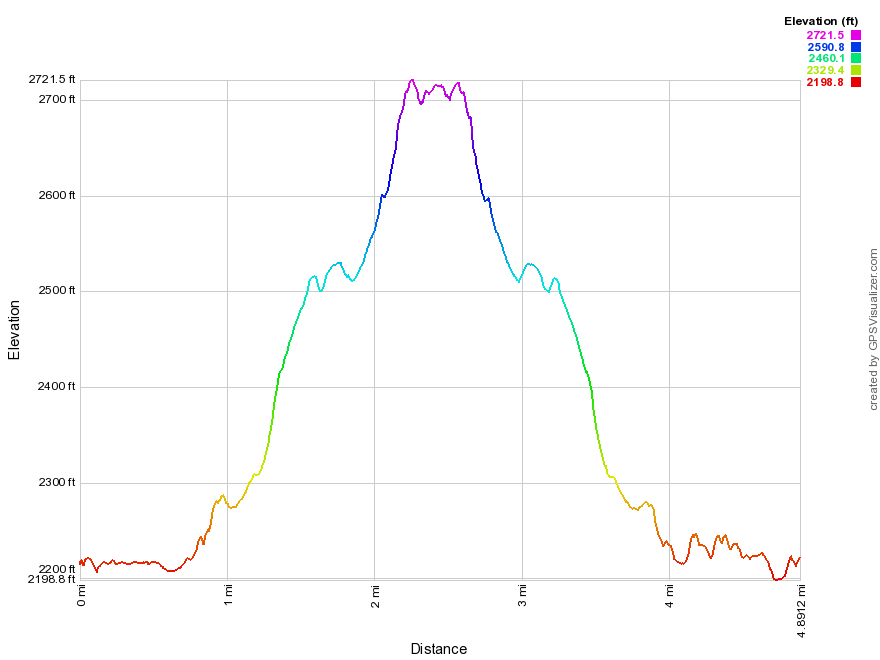
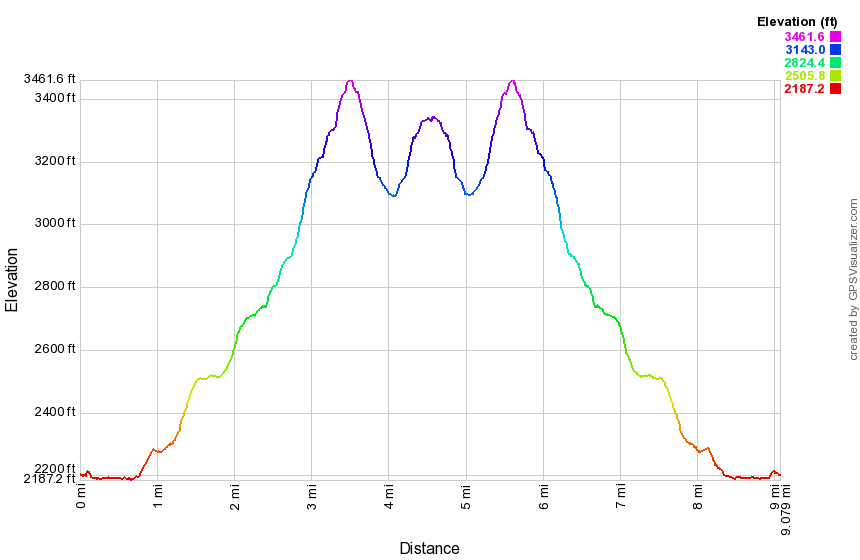 (The image shows the vertical profile of the entire out and back route.)
Andes Rail Trail (Complete)
| Quick Look | ||||
|---|---|---|---|---|
| Difficulty | Round trip | Total climb | Internet Maps | |
| 3.7 mi. | 735 ft. | AllTrails | ||
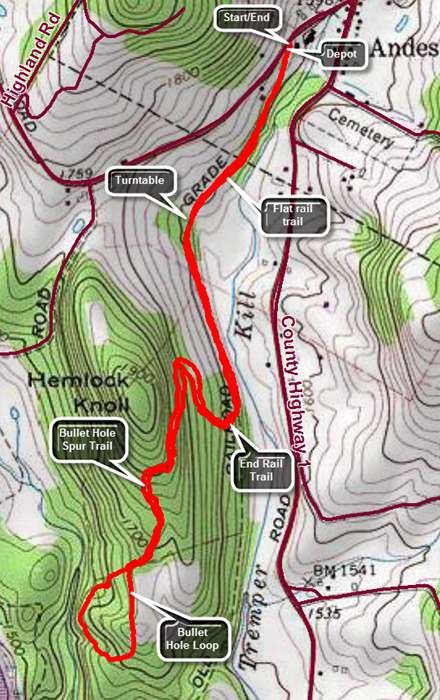 The trailhead for the Andes Rail Trail is located at 266 Depot St, Andes, NY. One way to get there is to drive north on Tremperskill Road ROM where Route 30 crosses the Pepacton Reservoir at the Dunraven Bridge. When the road ends in Andes, turn left and drive less than a quarter mile to the sign that says "Andes Rail Trail" on the left. You may also follow Route 28 from the Margaretville area. In Andes when Route 28 turns right to head north, continue straight ahead for another quarter mile to the sign that says "Andes Rail Trail" on the left. There isn't really much of a parking area but try to park by the gate leaving enough for someone to open the gate if they needed to do so. Start your by walking through the gate to the Andes Depot which was constructed in 1907 and was donated by the Decker family. A kiosk near the depot explains a little about the rail trail which follows the railroad bed of the Delaware and Northern Railroad. Shortly after the depot, there is a wooden walkway that spans the only really wet spot on the trail. A little after that there is an open spot with a nice view down the Tremperskill. At this point there is a "high road" and a "low road" with the suggestion that the high road be used when the main trail is muddy. This occurs several other places along the trail. Hiked under the trees for a short time before coming to another nice view and an interpretive sign. The sign explains that the foundation is the remains of the Andes turntable that was used to turn engines around. No pictures exist of the original structure but it was called an "Armstrong turntable" since the engineer and fireman had to use their "strong arms" to pivot the engine! Enter the woods again and cross a small bridge. There are regular "bumps" on the trail which are the railroad ties which were not been removed. A couple of ties are exposed along the way. Another interpretive sign explains that there had been two trestles on the rail line in the area. Both had been featured in movies from the early 20th century! After walking a little farther, the flat rail trail ends and the Bullet Hole Spur Trail begins. Continued on the trail which immediately begins to climb and the easy walking ends. A major switchback takes the trail north before heading south again with the trail always climbing. The trail passes through some hardwoods and then enters a hemlock forest as it climbs to the shoulder of Hemlock Knoll. There are some interesting rock formations along the way. Continue until the trail comes to a stone wall with a break that allows a view of the surrounding hills which is not impressive but pretty. Pass over the stone wall where it has been turned into steps and come to the loop at the end of the Bullet Hole Spur Trail. Continue straight ahead and walk through a planted red pine plantation. The trail eventually joins a woods road that parallels the Temperskill. The loop is only half a mile long and soon you will be back at the point where it started. Retrace your steps back to the car.
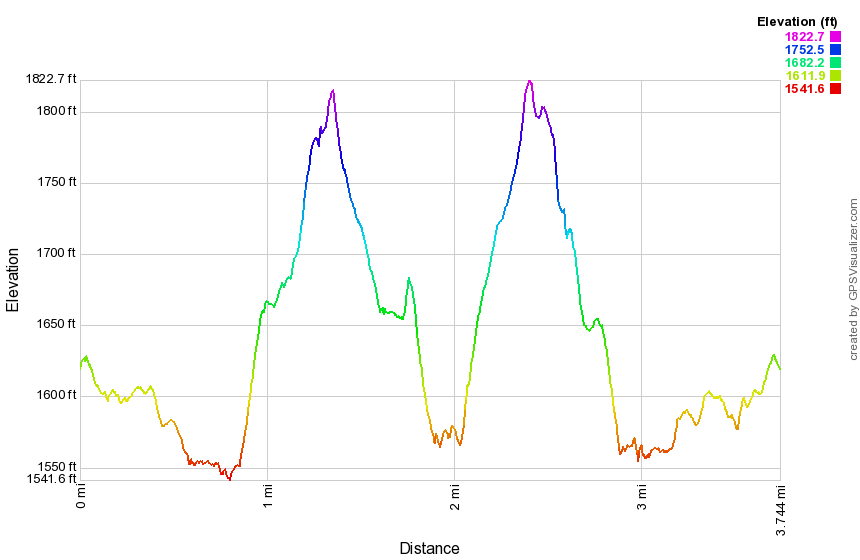 (The image shows the vertical profile of the entire out and back route.)
Angel Falls
| Quick Look | ||||
|---|---|---|---|---|
| Difficulty | Round trip | Total climb | Internet Maps | |
| 0.6 mi. | 137 ft. | AllTrails | ||
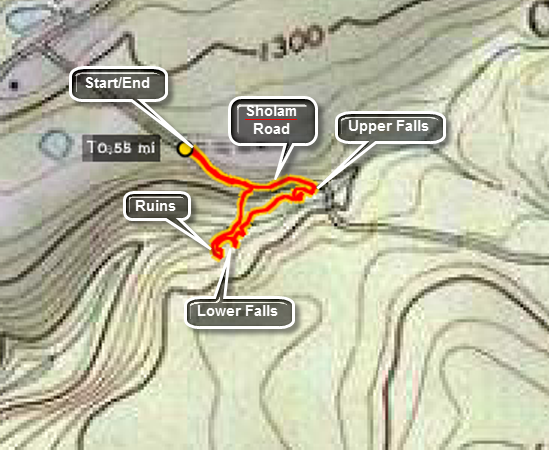 Turn onto Route 55A from Route 55 just east of the TriValley School in Grahamsville. Take the first right hand turn as Route 55A continues around the Rondout Reservoir. Drive for a little over 4 miles and turn left on Yaegerville Road just before Route 55A crosses a creek on a bridge. After 1.2 miles turn right on Sholam Road which is now a DEAD END. Park at the end of the paved road near the power right-of-way but avoid parking on private property or blocking the private driveway. The DEP signs are confusing with some saying TRESPASSING and others inviting hikers to hike. Walk down the old road which is now crumbling. This road stays above the streambed for Trout Creek until it reaches the upper falls. You may walk to the stream above the falls before following the informal path that parallels the stream. Some paths lead down to the streambed to points that give excellent views of the upper falls. These paths are DANGEROUS under the best conditions! Continue on the informal paths which parallel the stream until you get to the area of the lower falls. The lower falls do not have a drop as high as the upper falls but they are beautiful in their own way. Walk to the rock shelf that allows access to the top of the lower falls to take some pictures. Continue along the creek and observe the stone foundations built next to the falls. Walk out to the stream bed using great caution to get a glimpse of the lower falls. When you are finished, head up the steep bank back to the old road and your car.
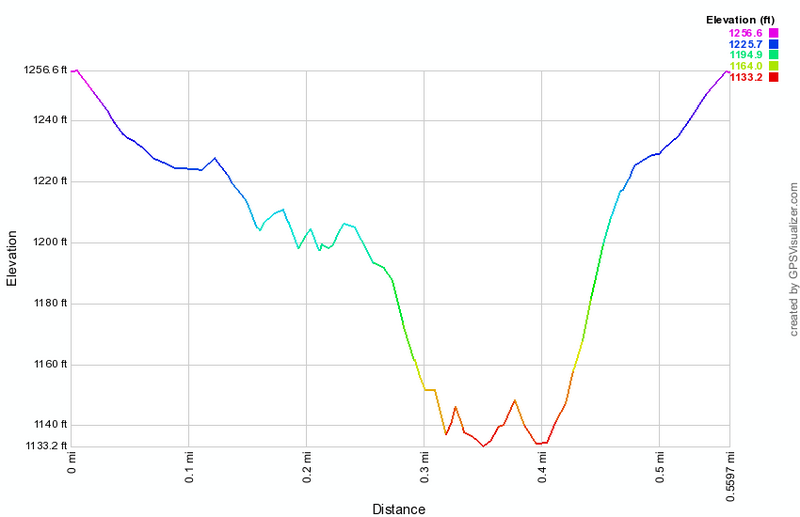 (The image shows the vertical profile of the entire out and back route.)
Anthony's Nose and Bear Mountain
| Quick Look | ||||
|---|---|---|---|---|
| Difficulty | Round trip | Total climb | Internet Maps | |
| 8.5 miles | 2400 feet | AllTrails | ||
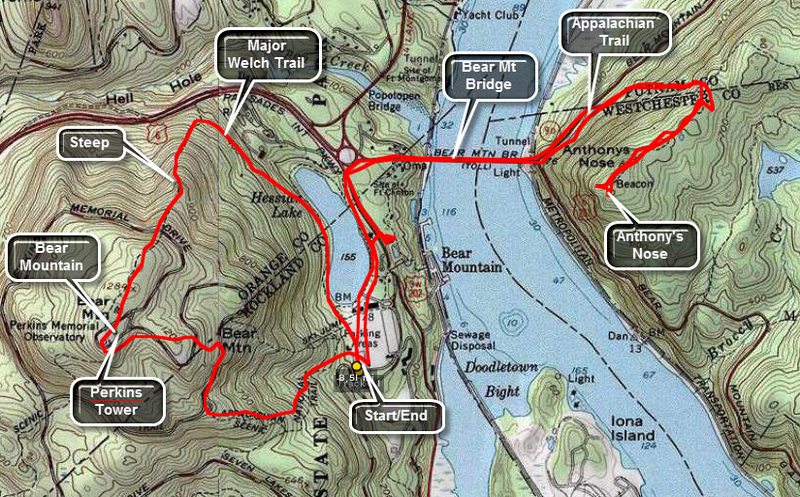 Park in any of the parking lots at the Bear Mountain Inn off Route 202/9W. The two trails that allow
access to Bear Mountain are the Appalachian Trail and the Major Welch Trail. Begin by walking passed the skating rink
and down to the footpath around Hessian Lake. Stay to the left of the lake and look for the red on white blazes that
mark the Major Welch Trail. Watch carefully for TWO of the blazes which signify the place where the trail turns left
and into the woods. At first this trail slowly climbs passed the Overlook Lodge and the ascent seems easy. Look are
definitely deceiving! Shortly the trail begins its real ascent which becomes steep and difficult at times with
several short but interesting scrambles over exposed rock face. About 2/3 of the way up the mountain, the trail
crosses Perkins Drive and then heads back into the woods. Near the top of the climb are several lookouts with
spectacular views of the Hudson River and the Bear Mountain Bridge. The trail continues on to the top of the mountain
and the Perkins Tower.
Park in any of the parking lots at the Bear Mountain Inn off Route 202/9W. The two trails that allow
access to Bear Mountain are the Appalachian Trail and the Major Welch Trail. Begin by walking passed the skating rink
and down to the footpath around Hessian Lake. Stay to the left of the lake and look for the red on white blazes that
mark the Major Welch Trail. Watch carefully for TWO of the blazes which signify the place where the trail turns left
and into the woods. At first this trail slowly climbs passed the Overlook Lodge and the ascent seems easy. Look are
definitely deceiving! Shortly the trail begins its real ascent which becomes steep and difficult at times with
several short but interesting scrambles over exposed rock face. About 2/3 of the way up the mountain, the trail
crosses Perkins Drive and then heads back into the woods. Near the top of the climb are several lookouts with
spectacular views of the Hudson River and the Bear Mountain Bridge. The trail continues on to the top of the mountain
and the Perkins Tower.
From here find the white blazes of the AT as it heads down the mountain. This trail is not as steep as the Major Welch as it winds its way down the mountain. The trail briefly intersects a road where you should turn right and follow it to a small parking area that overlooks the river. The trail turns right onto a road but immediately turns left and down into the woods. Continue following the AT. It will intersect the yellow blazed Suffern Bear Mountain Trail near the bottom. Turn left at this point and make your way back to the parking area.
At this point you can end the hike and feel very satisfied with the sights you have seen or you can set out to Anthony's Nose. Walk toward Hessian Lake but this time head to the right. Watch for the white blazes of the AT and the 1777 markers. You may take the tunnel under 9W and follow the AT through the zoo. This costs $1, is sometimes closed AND DOES NOT ALLOW PETS. You can also follow the shoulder of 9W to the Bear Mountain traffic circle. Cross here and head for the pedestrian Walkway on the north OR south side of the bridge. Take a moment to enjoy the views up and own the river. Straight ahead at the other end of the bridge rises Anthony's Nose. At the end of the bridge turn left and walk the shoulder of 9D for about .2 miles. Look for the white AT blazes and a trail head kiosk on the right side of the road. Here the AT turns up into the woods. The trail initially winds its way toward the rocky crag which is Anthony's Nose. Shortly it turns upward with several steep portions. A few level parts and switchbacks help you catch your breath. At the top the AT heads northeast to the left. Turn to the right on the woods road through Camp Smith. This trail is marked by blue blazes and heads directly toward your destination. Near the end of the trail there is an obvious blazed turn to the left. This DOES NOT lead to the Nose but does give some interesting views if the river and the surrounding mountains. Turn right at this T and you are at Anthony's Nose. Walk out to any of the prominent rock outcrops to get incredible views up and down the river. Be careful as there is no protection from a short but fast fall 900 feet to the river below. The views down on the bridge and to the water itself ARE breath taking. The way back is simply to retrace your steps perhaps taking the walkway on the other side of the bridge.
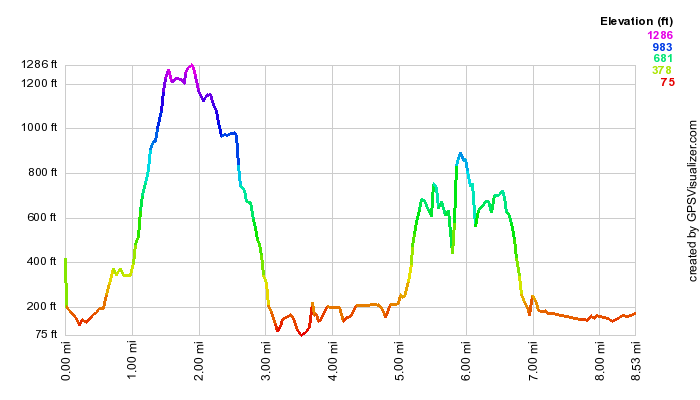 (The image at the left shows the profile of the hike. Remember that all vertical profiles are relative!)
Anthony's Nose: AT from Route 9D
| Quick Look | ||||
|---|---|---|---|---|
| Difficulty | Round trip | Total climb | Internet Maps | |
| 1.8 miles | 790 feet | AllTrails | ||
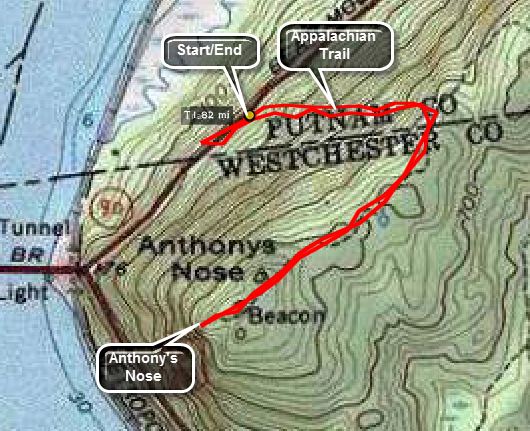 Travel north on Route 9D from the eastern end of the Bear Mountain Bridge. There are several places to park cars along the shoulder or in pulloffs. Be careful walking along Route 9D as the cars travel too fast and the road is too narrow. The trailhead is marked by a sign on the right side of 9D headed north just after the bridge. There is no trail register here but the markings are the white blazes of the AT. The trail initially winds its way toward the rocky crag which is Anthony's Nose. Shortly it turns upward with several steep portions. A few level parts and
switchbacks help you catch your breath. At the top, after only .5 miles, the AT heads northeast to the left. Turn RIGHT onto this wide woods road to head toward Anthony's Nose. As you approach the edge of the cliffs, turn up to your right to get to the lookout. Return to your car by reversing the route.
Travel north on Route 9D from the eastern end of the Bear Mountain Bridge. There are several places to park cars along the shoulder or in pulloffs. Be careful walking along Route 9D as the cars travel too fast and the road is too narrow. The trailhead is marked by a sign on the right side of 9D headed north just after the bridge. There is no trail register here but the markings are the white blazes of the AT. The trail initially winds its way toward the rocky crag which is Anthony's Nose. Shortly it turns upward with several steep portions. A few level parts and
switchbacks help you catch your breath. At the top, after only .5 miles, the AT heads northeast to the left. Turn RIGHT onto this wide woods road to head toward Anthony's Nose. As you approach the edge of the cliffs, turn up to your right to get to the lookout. Return to your car by reversing the route.
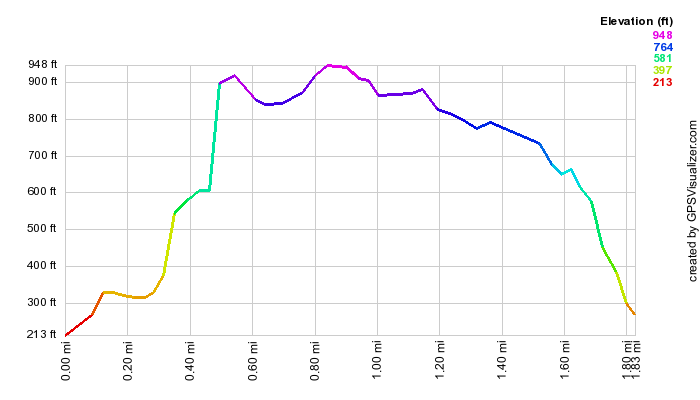
(The image at the left shows the profile of the hike. Remember that all vertical profiles are relative!)
Anthony's Nose: Camp Smith Trail from Route 202
| Quick Look | ||||
|---|---|---|---|---|
| Difficulty | Round trip | Total climb | Internet Maps | |
| 2.1 miles | 850 feet | AllTrails | ||
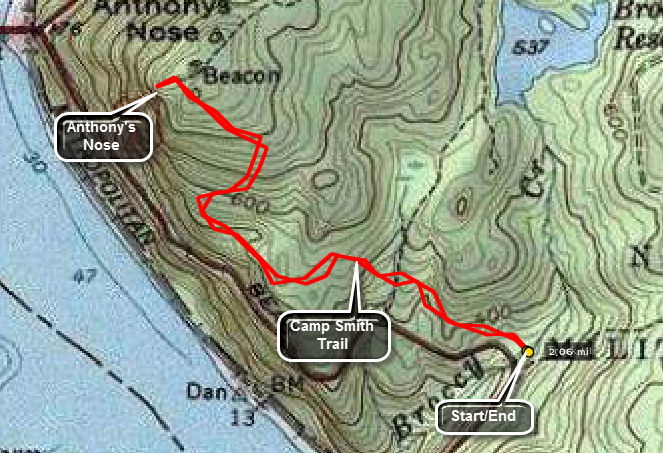 Travel south on Route 9D from the eastern end of the Bear Mountain Bridge for about 1.1 miles and turn left on Route 202 (Jack Woods Road). Watch for the small parking area on the left. Park and start hiking north on the Camp Smith Trail. The trail immediately starts to gain some elevation, drops a little and then ascends to Anthony's Nose. At the top of the climb bear slightly to the left to get to the lookout. Return to your car by reversing the route.
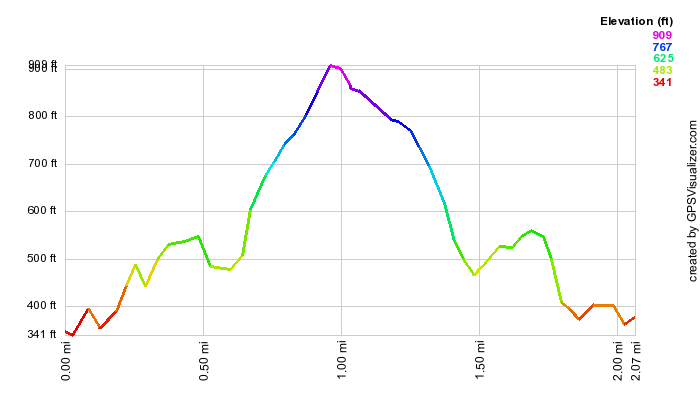
(The image at the left shows the profile of the hike. Remember that all vertical profiles are relative!)
Anthony's Nose: From South Mountain Pass
| Quick Look | ||||
|---|---|---|---|---|
| Difficulty | Round trip | Total climb | Internet Maps | |
| 3.2 miles | 950 feet | AllTrails | ||
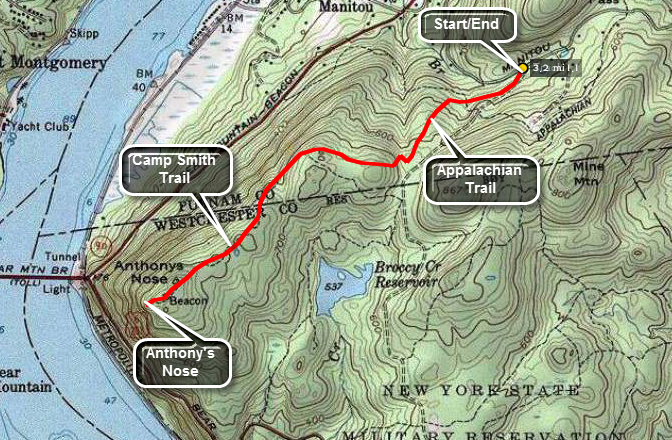 Travel north on Route 9D from the eastern end of the Bear Mountain Bridge for about 1.4 miles and turn on Manitou Road on the right. At the T turn right on South Mountain Pass Road. Drive .5 miles and watch for the small trail head parking on the right. Get on the wide woods road which is the Appalachian Trail.Follow the trail to the right as it starts level and then gains some elevation. At around 1 mile the AT heads right and down to the river. Continue straight ahead to Anthony's Nose. As you approach the edge of the cliffs, turn up to your right to get to the lookout. Return to your car by reversing the route.
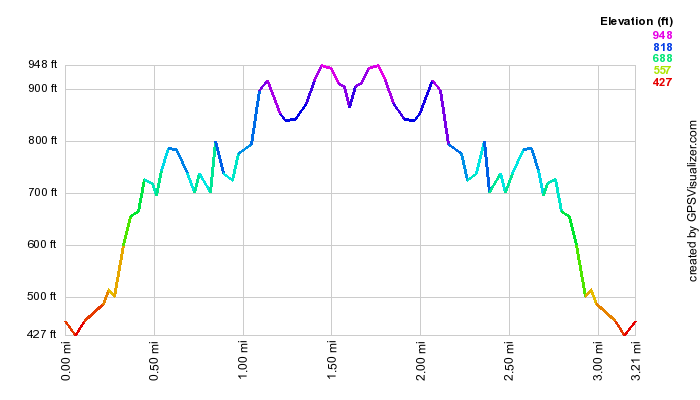
(The image at the left shows the profile of the hike. Remember that all vertical profiles are relative!)
Anthony's Nose: Phelps Mine and Camp Smith Trail
| Quick Look | ||||
|---|---|---|---|---|
| Difficulty | Round trip | Total climb | Internet Maps | |
| 6.7 miles | 2550 feet | AllTrails | ||
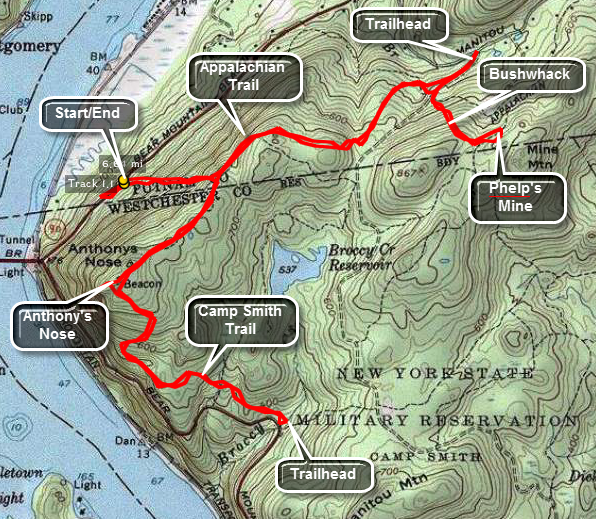 Travel north on Route 9D from the eastern end of the Bear Mountain Bridge. There are several places to park cars along the shoulder or in pulloffs. Be careful walking along Route 9D as the cars travel too fast and the road is too narrow. The trailhead is marked by a sign on the right side of 9D headed north just after the bridge. There is no trail register here but the markings are the white blazes of the AT. The trail initially winds its way toward the rocky crag which is Anthony's Nose. Shortly it turns upward with several steep portions. A few level parts and
switchbacks help you catch your breath. At the top, after only .5 miles, the AT heads northeast to the left. Turn onto this wide woods road to head toward South Mountain Pass trailhead. The road is wide but rocky. Follow the blazes as they turn left into the woods. Obey the posted signs which mark Camp Smith, an active Army National Guard training site! The trail rolls up and down and switches back and forth several times. After about 1 mile it meets another woods road. Turn left and walk out to the trailhead if you wish. On to the way back you will have to bushwhack up the mountain to find the mine. Look for an informal campsite and head up and east. The Phelps mine is clearly marked on the NYNJTC maps. At some point you may hit another woods road that leads directly to the mine.
Travel north on Route 9D from the eastern end of the Bear Mountain Bridge. There are several places to park cars along the shoulder or in pulloffs. Be careful walking along Route 9D as the cars travel too fast and the road is too narrow. The trailhead is marked by a sign on the right side of 9D headed north just after the bridge. There is no trail register here but the markings are the white blazes of the AT. The trail initially winds its way toward the rocky crag which is Anthony's Nose. Shortly it turns upward with several steep portions. A few level parts and
switchbacks help you catch your breath. At the top, after only .5 miles, the AT heads northeast to the left. Turn onto this wide woods road to head toward South Mountain Pass trailhead. The road is wide but rocky. Follow the blazes as they turn left into the woods. Obey the posted signs which mark Camp Smith, an active Army National Guard training site! The trail rolls up and down and switches back and forth several times. After about 1 mile it meets another woods road. Turn left and walk out to the trailhead if you wish. On to the way back you will have to bushwhack up the mountain to find the mine. Look for an informal campsite and head up and east. The Phelps mine is clearly marked on the NYNJTC maps. At some point you may hit another woods road that leads directly to the mine.
As you approach the mine you will notice a slope of "rusty" tailings. Look up the right and walk in that direction and you will see an old, rusty fence surrounding the adit to the mine. At least one section of the fence is down allowing access to the mine adit. Be VERY careful around the mine entrance. The stones are loose and the mine is DEEP! Outside the fence and a little to the right is an airshaft with a grate. Looking through the tailings and mine waste may reveal some mineral samples. The mine was originally opened as an iron mine but copper, zinc and sulfur were all extracted. When you have had enough, retrace your route back to the woods road and follow the At back to where you ascended from 9D. Continue straight ahead for .5 miles to Anthony's Nose. Depending on the season and the weather the views here can be quite different. They are always interesting but may be clearer or more beautiful on a particular day. The Bear Mountain Bridge is directly below and the Popolopen Gorge Bridge and footbridge below are visible. Bear Mountain with the Perkins Tower are directly across the Hudson. Looking south reveals Iona Island and Indian Point. Depending on the day you may see trains on the tracks on the west side of the river, pleasure boats and barges on the river and birds riding the air currents.
Return to the blue trail from Anthony's Nose and walk straight ahead to another viewpoint. This one has a USGS seal at the top. Continue on down the blue Camp Smith Trail. The trail descends for 1 mile until it reaches a trailhead on Route 202 north of the bridge. (Continuing along this trail for just under 2 miles will bring you to the start of the trail at the Hudson Highlands Gateway.) Along the way there are a few other viewpoints but none as nice as Anthony's Nose. At the trailhead turn around and retrace your path to Anthony's Nose and then to the trail that leads down and back to the car.
 (The image at the left shows the profile of the hike. Remember that all vertical profiles are
relative!)
(The image at the left shows the profile of the hike. Remember that all vertical profiles are
relative!)
Ashokan High Point: Kanape Brook Loop
| Quick Look | ||||
|---|---|---|---|---|
| Difficulty | Round trip | Total climb | Internet Maps | |
| 9.1 mi. | 2370 ft. | AllTrails | ||
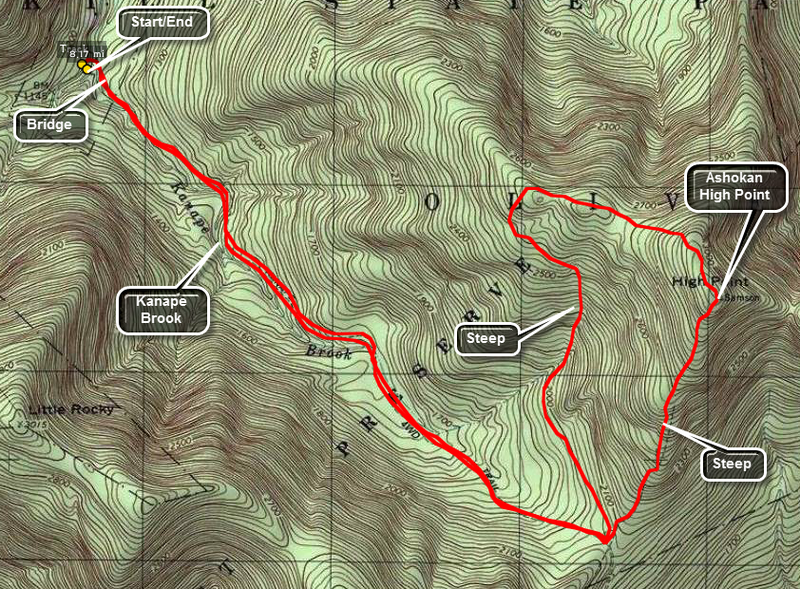
Park at the Kanape Brook PA trailhead on the Peekamoose Road. Walk across the road and toward the Kanape Brook to pick up the trail. The first 2.7 miles is a rather gentle uphill walk. Much of the first part of the trail parallels Kanape Brook which can be heard as you walk along the trail. Several small bridges and culverts cross tributaries which increase the volume of the brook. The trail here is a wide road typical of logging or quarrying roads that run throughout the Catskills. At the 2.7 mile mark make a pronounced left. The trail now narrows to a footpath but is marked and well-worn. You are immediately faced with a choice! The trail straight ahead continues upward for about 1 mile to the Ashokan High Point. This trail gains about 1000 feet over the mile and there are several steep areas. Most of these five areas have stone steps which make the climb easier. The trail to the left is longer but generally easier to climb. This 2.5 mile trail meanders up to the High Point. Stay to the right and ascend the steeper path using the other trail to descend forming a loop. Once at the High Point itself you have a beautiful view of the mountains and valleys directly to the east. Depending on the foliage cover, you may be able to see a hint of the reservoir a little farther north or to the left as you gaze from the lookout. A little farther to the north and west the trail opens into several fields and can become hard to follow. Some visitors have built a fire circle surrounded by stone chairs. Walking to the north and east side of the field gives you a spectacular view of the Ashokan Reservoir. The view is NOT clear and is blocked by trees making the best viewing times when the leaves are not on the trees. Turning your gaze a little more to the north and west reveals the Burrough's Range with the unmistakable outline of Wittenberg, Cornell, and Slide Mountains. After taking in the view, head to the left of the fireplace and follow a path into the woods to pick up the trail again. This 2.5 mile trail meanders down from the High Point back to the trail junction where you met it the first time. There are several steep and rocky areas to negotiate. Along the way there is at least one prominent path leading northwest but seemingly into nowhere. When the trail bends sharply to the left you can head southwest on a bushwhack which is steep in many places but will cut some distance off your return trip. Back at the trail junction it is only a matter of following the main trail back to the car.
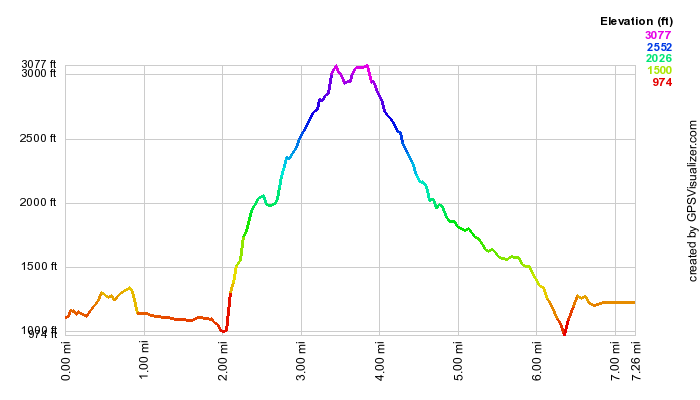
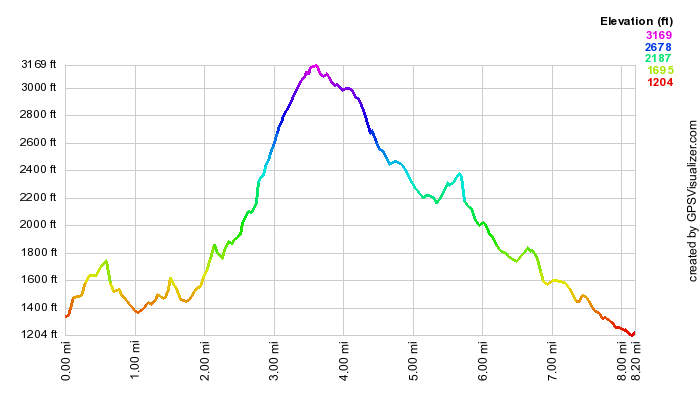 (The image at the left shows the profile of the loop hiking route. Remember that all vertical profiles are relative!)
Ashokan High Point: Kanape Brook Trail (only)
| Quick Look | ||||
|---|---|---|---|---|
| Difficulty | Round trip | Total climb | Internet Maps | |
| 5.5 mi. | 1055 ft. | AllTrails | ||
Park at the Kanape Brook PA trailhead on the Peekamoose Road. Walk across the road and toward the Ashokan to pick up the trail. The first 2.7 miles is a rather gentle uphill walk. Much of the first part of the trail parallels Kanape Brook which can be heard as you walk along the trail. Several small bridges and culverts cross tributaries which increase the volume of the brook. The trail here is a wide road typical of logging or quarrying roads that run throughout the Catskills. Shortly after getting on the trail watch for a stone refining wall on the left side of the trail. A little farther along is a spring and cistern also on the left side of the trail. At the 2.7 miles the trail makes a pronounced left for the last mile to the High Point. This trail is steep at about 21%. For this hike turn around and retrace your path back to your car.
 (The image at the left shows the profile of the out and back hiking route. Remember that all vertical profiles are relative!)
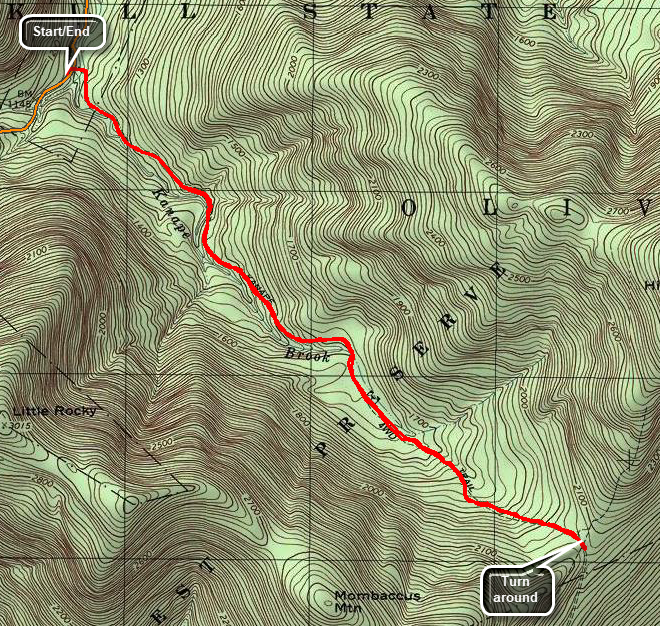
Ashokan High Point: Kanape Brook Out and Back
| Quick Look | ||||
|---|---|---|---|---|
| Difficulty | Round trip | Total climb | Internet Maps | |
| 7.3 mi. | 2140 ft. | AllTrails | ||

Park at the Kanape Brook PA trailhead on the Peekamoose Road. Walk across the road and toward the
Ashokan to pick up the trail. The first 2.7 miles is a rather gentle uphill walk. Much of the first
part of the trail parallels Kanape Brook which can be heard as you walk along the trail. Several
small bridges and culverts cross tributaries which increase the volume of the brook. The trail hear
is a wide road typical of logging or quarrying roads that run throughout the Catskills. At the 2.7 mile
mark make a pronounced left. The trail now narrows to a footpath but is marked and well-worn. You are
immediately faced with a choice! The trail straight ahead continues upward for about 1 mile to the
Ashokan High Point. This trail gains about 1000 feet over the mile and there are several steep areas.
Most of these areas have stone steps which make the climb easier. The trail to the left is longer but
generally easier to climb. This 2.5 mile trail meanders up to the High Point. Once at the High Point
itself you have a beautiful view of the mountains and valleys directly to the east. Depending on the
foliage cover, you may be able to see a hint of the reservoir a little farther north or to the
left as you gaze from the lookout. A little farther to the north and west the trail opens into several
fields and can become hard to follow. Some visitors have built a fire circle surrounded by stone
chairs. Walking to the north and east side of the field gives you a spectacular view of the
Ashokan Reservoir. The view is NOT clear and is blocked by trees making the best viewing times when
the leaves are not on the trees. Turning your gaze a little more to the north and west reveals
the Burrough's Range with the unmistakable outline of Wittenberg, Cornell, and Slide Mountains. To get back to your car turn around and retrace your path back to the parking area. The out and back allows a quick descent of the steeper sections for those who don't mind this sort of thing.
 (The image at the left shows the profile of the out and back hiking route. Remember that all vertical profiles are relative!)
Ashokan High Point: Kanape Brook Trail (only)
| Quick Look | ||||
|---|---|---|---|---|
| Difficulty | Round trip | Total climb | Internet Maps | |
| 5.5 mi. | 1055 ft. | AllTrails | ||
Park at the Kanape Brook PA trailhead on the Peekamoose Road. Walk across the road and toward the Ashokan to pick up the trail. The first 2.7 miles is a rather gentle uphill walk. Much of the first part of the trail parallels Kanape Brook which can be heard as you walk along the trail. Several small bridges and culverts cross tributaries which increase the volume of the brook. The trail here is a wide road typical of logging or quarrying roads that run throughout the Catskills. Shortly after getting on the trail watch for a stone refining wall on the left side of the trail. A little farther along is a spring and cistern also on the left side of the trail. At the 2.7 miles the trail makes a pronounced left for the last mile to the High Point. This trail is steep at about 21%. For this hike turn around and retrace your path back to your car.
(The image at the left shows the profile of the out and back hiking route. Remember that all vertical profiles are relative!)
Ashokan High Point and Little Ashokan: Kanape Brook Loop
| Quick Look | ||||
|---|---|---|---|---|
| Difficulty | Round trip | Total climb | Internet Maps | |
| 9.8 mi. | 2820 ft. | AllTrails | ||
Park at the Kanape Brook PA trailhead on the Peekamoose Road. Walk across the road and toward the Ashokan to pick up the trail. The first 2.7 miles is a rather gentle uphill walk. Much of the first part of the trail parallels Kanape Brook which can be heard as you walk along the trail. Several small bridges and culverts cross tributaries which increase the volume of the brook. The trail here is a wide road typical of logging or quarrying roads that run throughout the Catskills. At the 2.7 mile mark make a pronounced left. The trail now narrows to a footpath but is marked and well-worn. You are immediately faced with a choice! The trail straight ahead continues upward for about 1 mile to the Ashokan High Point. This trail gains about 1000 feet over the mile and there are several steep areas. Most of these areas have stone steps which make the climb easier. The trail to the left is longer but generally easier to climb. Once at the High Point itself you have a beautiful view of the mountains and valleys directly to the east. Depending on the foliage cover, you may be able to see a hint of the reservoir a little farther north or to the left as you gaze from the lookout.
From the High Point you may be able to see a path directly down between some of the rocks or a path further on leading down. This is the way to Little Ashokan High Point. The walk is about .5 miles and there is drop of about 350 feet to the lowest point before climbing back up to Little Ashokan. Whether or not you can find the path is not too important. just walk in the general direction and watch for the numerous steep areas and actual cliffs. Little Ashokan is filled with blueberry and huckleberry bushes which can make walking interesting unless you are on show shoes. Near the highest point are several flat rocks that make a good viewpoint back to the High Point and over to the Mombaccus-Little Rocky ridge. Dropping down a little to some lower paths and walking around to the left offers some more views but the reservoir is hard to see unless the leaves are off the trees. Views may be possible but unobstructed views for photography are few. After wandering around some, head back to the High Point more or less the way you came. From the High Point continue on the main trail. In a short distance on the left you may get some views in a small clearing. A little farther to the north and west the trail opens into several fields and can become hard to follow. Some visitors have built a fire circle surrounded by stone chairs. Walking to the north and east side of the field gives you a view of the Ashokan Reservoir. The view is NOT clear and is blocked by trees making the best viewing times when the leaves are not on the trees. Turning your gaze a little more to the north and west reveals the Burrough's Range with the unmistakable outline of Wittenberg, Cornell, and Slide Mountains. After taking in the view, head to the left of the fireplace and follow a path into the woods to pick up the trail again. This 2.5 mile trail meanders down from the High Point back to the trail junction where you met it the first time. There are several steep and rocky areas to negotiate. Along the way there is at least one prominent path leading northwest but seemingly into nowhere. When the trail bends sharply to the left you can head southwest on a bushwhack which is steep in many places but will cut some distance off your return trip. Back at the trail junction it is only a matter of following the main trail back to the car.
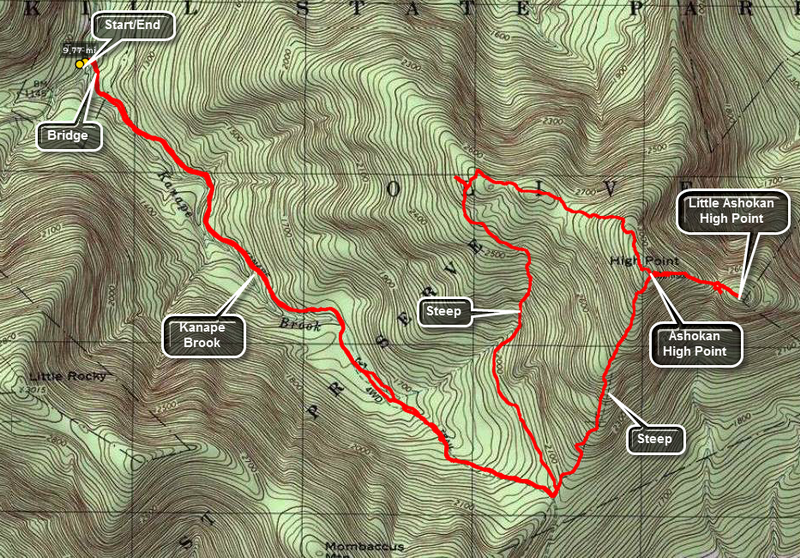
 (The image at the left shows the profile of the loop hiking route. Remember that all vertical profiles are relative!)
Ashokan High Point and Little Ashokan: Kanape Brook Out and Back
| Quick Look | ||||
|---|---|---|---|---|
| Difficulty | Round trip | Total climb | Internet Maps | |
| 8.5 mi. | 2717 ft. | AllTrails | ||
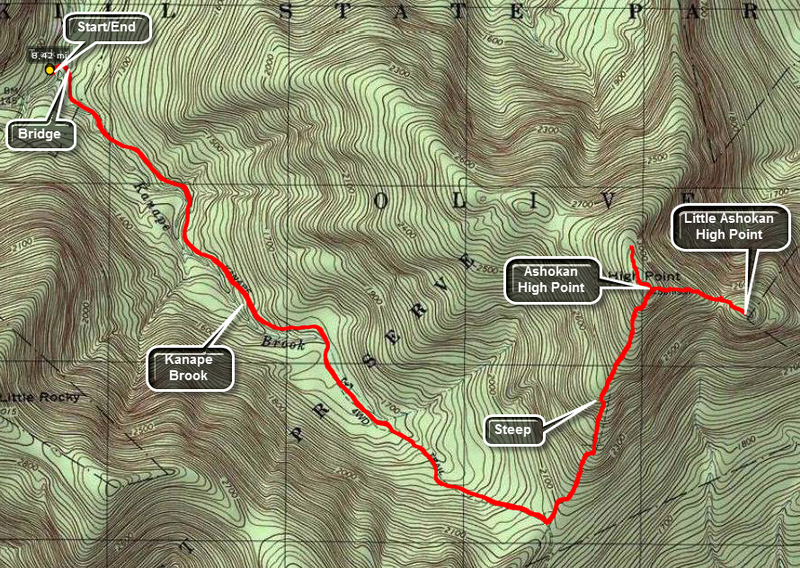
Park at the Kanape Brook PA trailhead on the Peekamoose Road. Walk across the road and toward the Ashokan to pick up the trail. The first 2.7 miles is a rather gentle uphill walk. Much of the first part of the trail parallels Kanape Brook which can be heard as you walk along the trail. Several small bridges and culverts cross tributaries which increase the volume of the brook. The trail here is a wide road typical of logging or quarrying roads that run throughout the Catskills. At the 2.7 mile mark make a pronounced left. The trail now narrows to a footpath but is marked and well-worn. You are immediately faced with a choice! The trail straight ahead continues upward for about 1 mile to the Ashokan High Point. This trail gains about 1000 feet over the mile and there are several steep areas. Most of these areas have stone steps which make the climb easier. The trail to the left is longer but generally easier to climb. Once at the High Point itself you have a beautiful view of the mountains and valleys directly to the east. Depending on the foliage cover, you may be able to see a hint of the reservoir a little farther north or to the left as you gaze from the lookout.
From the High Point you may be able to see a path directly down between some of the rocks or a path further on leading down. This is the way to Little Ashokan High Point. The walk is about .5 miles and there is drop of about 350 feet to the lowest point before climbing back up to Little Ashokan. Whether or not you can find the path is not too important. just walk in the general direction and watch for the numerous steep areas and actual cliffs. Little Ashokan is filled with blueberry and huckleberry bushes which can make walking interesting unless you are on show shoes. Near the highest point are several flat rocks that make a good viewpoint back to the High Point and over to the Mombaccus-Little Rocky ridge. Dropping down a little to some lower paths and walking around to the left offers some more views but the reservoir is hard to see unless the leaves are off the trees. Views may be possible but unobstructed views for photography are few. After wandering around some, head back to the High Point more or less the way you came. From the High Point continue on the main trail. In a short distance on the left you may get some views in a small clearing. A little farther to the north and west the trail opens into several fields and can become hard to follow. Some visitors have built a fire circle surrounded by stone chairs. Walking to the north and east side of the field gives you a view of the Ashokan Reservoir. The view is NOT clear and is blocked by trees making the best viewing times when the leaves are not on the trees. Turning your gaze a little more to the north and west reveals the Burrough's Range with the unmistakable outline of Wittenberg, Cornell, and Slide Mountains. After taking in the view, turn around and retrace your steps following the route you took on the ascent back to your car at the parking area.
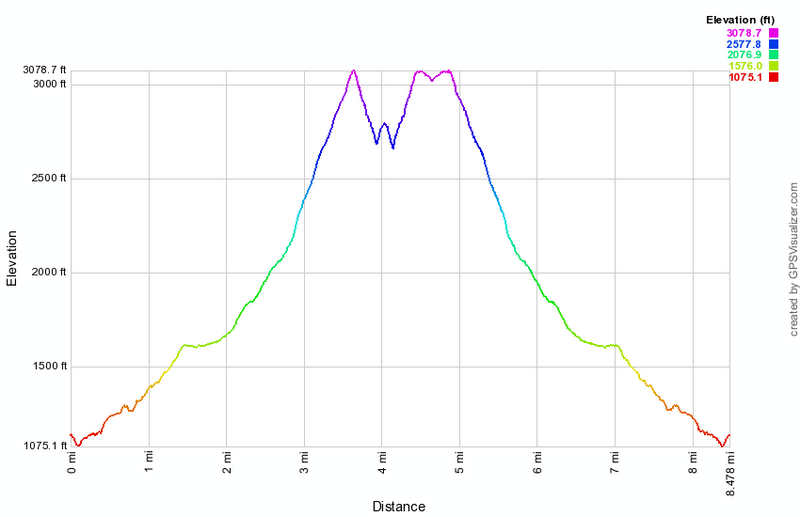 (The image at the left shows the profile of the loop hiking route. Remember that all vertical profiles are relative!)
Ashokan Quarry (DEP)
| Quick Look | ||||
|---|---|---|---|---|
| Difficulty | Round trip | Total climb | Internet Maps | |
| 2.0 mi. | 280 ft. | AllTrails | ||
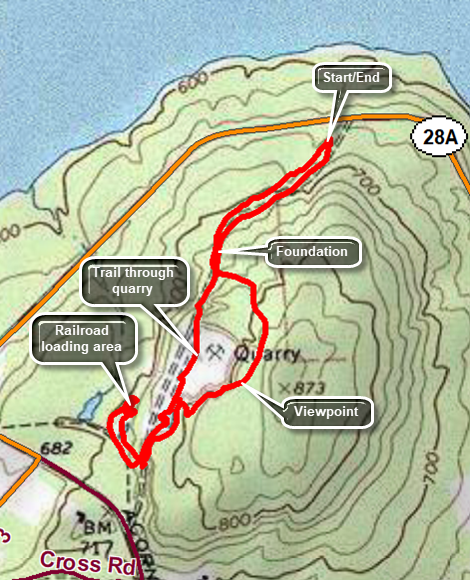 From the intersection of Routes 28A and 28 near Boiceville turn south near Onteora High School on Route 28A. Drive 7.8 miles to the parking lot on the left. The parking lot is very well done and can accommodate at least 10 cars. Walk out the back of the parking area near the kiosk to get on the trail. The first part of the trail is covered in angular stones which may be uncomfortable. Just before the first trail junction at .3 miles, there is an interesting foundation on the left side of the trail. Most stone foundations are laid up from field stone but this one was obviously constructed of quarried stone. Turn left at the first trail junction and start a slight uphill walk. At about .6 miles there is a nice viewpoint. There are views to the north and west and into the quarry below. The Yale Quarry was used to obtain stone for the building of the dam for the Ashokan Reservoir. Continued on the trail along the top of the quarry. The trail drops down to another level. Survey the quarry floor below and notice the small pond which has formed there. Follow the trail along the edge of the quarry and then around the end as it drops down toward the quarry floor. At .9 miles, turn left on a spur trail that runs down to a stone loading platform and some other interesting ruins. The quarried stone was loaded onto railroad cars to be transported to the site of the dam. Walk back up to the main trail and turn left. Almost immediately the trail comes to the floor of the quarry. From here you can get a closer look at the vernal pond and the high "walls" that were formed as the stone was removed. After this the trail passes through an area where there are piles of discarded stone and the dust formed as the stone was quarried. Continued along the trail where there may be fewer markers . Just before the first trail junction there is a large stone massif on the right side of the trail. Continue straight ahead to walk back to the parking area.
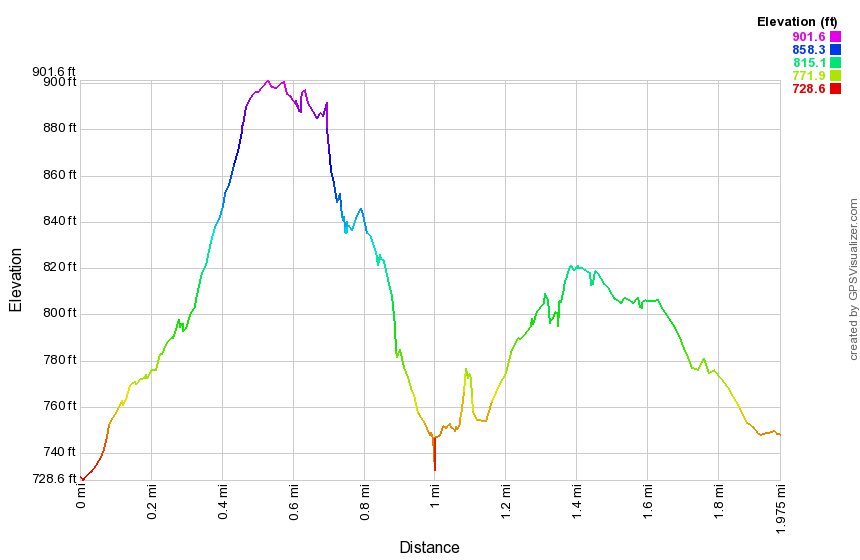 (The image at the left shows the profile of the hike. Remember that all vertical profiles are relative!)
Balsam Lake Mt to Alder Lake
| Quick Look | ||||
|---|---|---|---|---|
| Difficulty | Round trip | Total climb | Internet Maps | |
| 7.8 mi. | 2630 ft. | AllTrails | ||
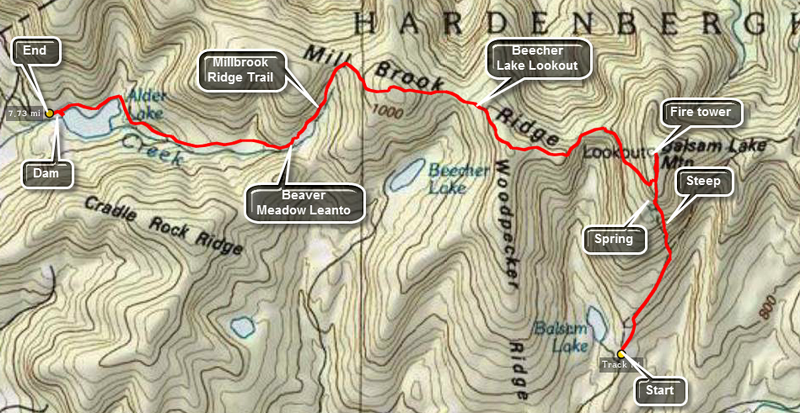
Park at the trailhead at the end of the Beaverkill Road. The public road dead ends at this spot and a private road continues to the Balsam Lake Lodge. There are several choices to make when climbing this mountain. Find the blue-blazed Dry Brook Ridge Trail and hike about .9 miles. At this point turn left on the red-blazed Balsam Lake Trail. The climb is rather steep but after about .85 miles you will be at the summit. As you climb, you will see the trail to the Balsam Lake Mt lean-to on the left after about .5 miles. Walk another .1 miles and there will be an obvious piped spring on the right. Just above the spring the trail levels. Continue for another .2 miles and you will see the yellow-blazed Millbrook Ridge Trail to Alder Lake on the left. Continue for another .15 miles to the fire tower. The fire tower at the top offers a spectacular view in all directions. Balsam Lake Mountain is the westernmost in the Catskill Park and the tower offers an unhindered 360 degree view. Thirty-three of the other 34 peaks are visible with only Thomas Cole, hiding behind Hunter Mt., out of view.
Turn back on the Balsam Lake Mt. trail to the Millbrook Ridge Trail and turn right. This trail descends for a while and then ascends again. After 1.95 miles there is a lookout over Beecher Lake. There is a Zen Monastery on the shore. In another 1.1 miles including a short climb you will be at the highest point on the ridge. The elevation here is 3480 feet which means that it is one large boulder away from being another Catskill 35! In 1.35 miles you will be at the Beaver Meadow lean-to and spring. Several of these "beaver meadows" can be found along the trail and they all offer a home to a variety of wildlife. A walk of about 1.5 miles will bring you to the red-blazed Alder Lake Trail. Turn left or right and walk .8 miles to the Alder Lake parking area.
At Alder Lake you can reverse your steps and hike back to Balsam Lake. This makes for a LONG 15 mile hike. It may be more enjoyable to hike with a friend and leave a car at both trailheads. You could, of course, reverse this hike which would give a slightly different perspective. At Alder Lake be sure to look at the remains of the mansion built by shipping tycoon Samuel Coykendall. New York State recently removed all but the stonework after determining it would be impossible to restore the once stately edifice.
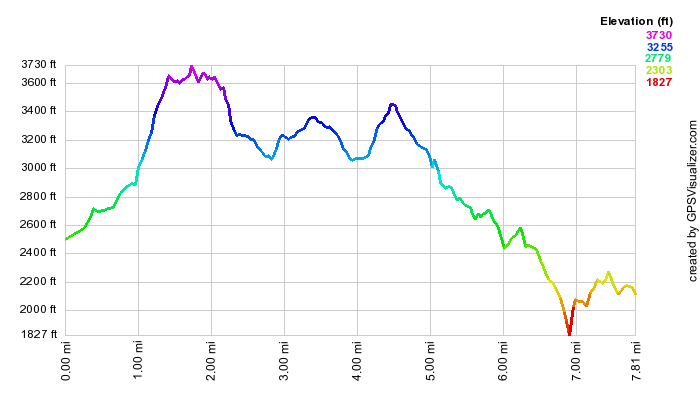 (The image at the left shows the profile of the hike. Remember that all vertical profiles are relative!)
Balsam Lake Mt and Vly Pond
| Quick Look | ||||
|---|---|---|---|---|
| Difficulty | Round trip | Total climb | Internet Maps | |
| 7.5 mi. | 2900 ft. | AllTrails | ||

Park at the trailhead at the end of the Beaverkill Road. The public road dead ends at this spot and a private road continues to the Balsam Lake Lodge. There are several choices to make when climbing this mountain. Find the blue-blazed Dry Brook Ridge Trail and hike about .9 miles. At this point turn left on the red-blazed Balsam Lake Trail. The climb is rather steep but after about .85 miles you will be at the summit. As you climb, you will see the trail to the Balsam Lake Mt lean-to on the left after about .5 miles. Walk another .1 miles and there will be an obvious piped spring on the right. Just above the spring the trail levels. Continue for another .2 miles and you will see the yellow-blazed Millbrook Ridge Trail to Alder Lake on the left. Continue for another .15 miles to the fire tower. The fire tower at the top offers a spectacular view in all directions. Balsam Lake Mountain is the westernmost in the Catskill Park and the tower offers an unhindered 360 degree view. Thirty-three of the other 34 peaks are visible with only Thomas Cole, hiding behind Hunter Mt., out of view.
Continue your hike down the back side of Balsam Lake. At the trail junction turn right to return to your car. DO NOT get in your car. Walk to the other side of the parking area and pick up the Hardenburgh Trail to Vly Pond.

(The image above shows the profile of the hike. Remember that all vertical profiles are relative!)
Balsam Lake to Beaverkill (Vly Pond)
| Quick Look | ||||
|---|---|---|---|---|
| Difficulty | Round trip | Total climb | Internet Maps | |
| 4.7 mi. | 840 ft. | AllTrails | ||
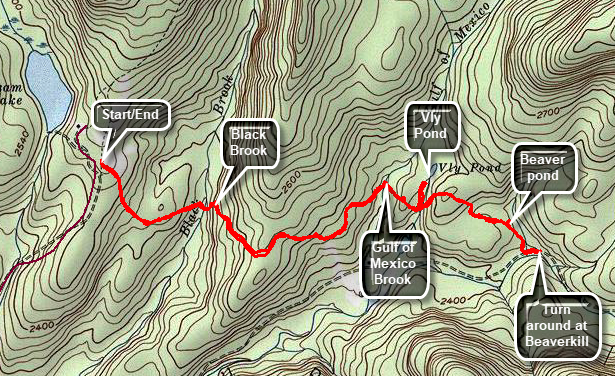
From Livingston Manor head toward Roscoe on Old Rt 17. Turn right on the Beaverkill Road and continue north through Lew Beach and Turnwood. Continue to the end of the road and park in the parking area on the right side of the road. The Neversink Hardenburgh Trail is at the back right corner of the parking area. The first half mile of the trail loses about 200 feet to a bridge that crosses Black Brook. From Black Brook the trail climbs gaining back the elevation that was lost over .35 miles. The trail rolls a little and then descends to Gulf of Mexico Brook. At 1.5 miles the trail crosses the outlet stream from Vly Pond. Turn left here and bushwhack a few hundred feet upstream to the pond. Looking from the beaver dam toward the upper end of the pond reveals Doubletop in the background. Return to the main trail and turn left on the main trail. From the Vly outlet brook the trail climbs some and then starts to drop down. At 2.3 miles there is a small body of water on the left side of the trail. Followed the path to the little pond and then walk back out to the main trail. Turn left and continue on the main trail. At 2.5 miles cross a small stream and almost immediately the Beaverkill appears. The trail turns left and parallels the stream. When you are satisfied, turn around and retrace your route to the parking area.
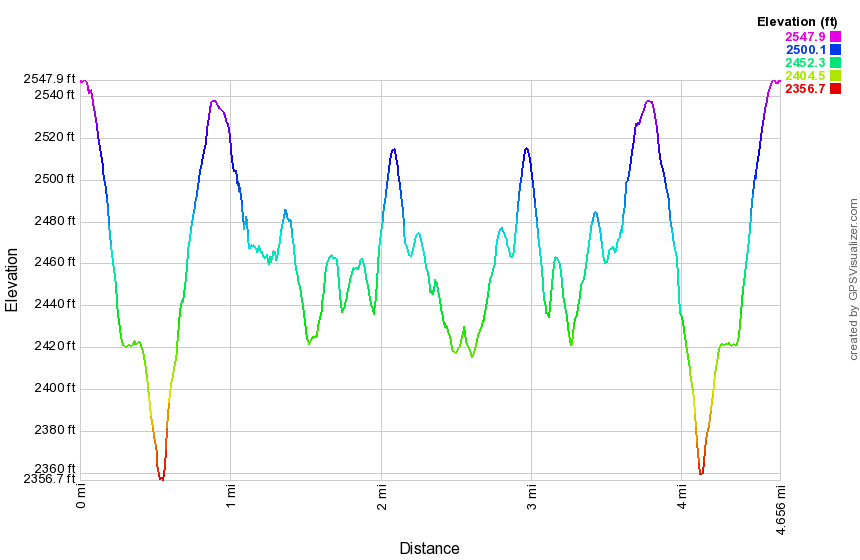 (The image below shows the profile of the hike. Remember that all vertical profiles are relative!)
Balsam Lake to Beaverkill Ford
| Quick Look | ||||
|---|---|---|---|---|
| Difficulty | Round trip | Total climb | Internet Maps | |
| 6.1 mi. | 1000 ft. | AllTrails | ||
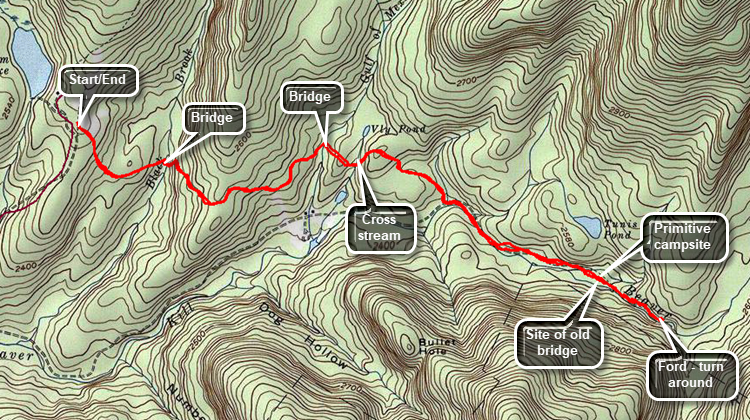
From Livingston Manor head toward Roscoe on Old Rt 17. Turn right on the Beaverkill Road and continue north through Lew Beach and Turnwood. Continue to the end of the road and park in the parking area on the right side of the road. The Neversink Hardenburgh Trail is at the back right corner of the parking area. The first half mile of the trail loses about 200 feet to a bridge that crosses Black Brook. From Black Brook the trail climbs gaining back the elevation that was lost over .35 miles. The trail rolls a little and then descends to Gulf of Mexico Brook. At 1.5 miles the trail crosses the outlet stream from Vly Pond. From the Vly outlet brook the trail climbs some and then starts to drop down. At 2.3 miles there is a small body of water on the left side of the trail. At 2.5 miles cross a small stream and almost immediately the Beaverkill appears. Turn left and walk along the stream which parallels the stream. The trail follows a wide woods road along the Beaverkill. At 2.8 miles there is a primitive campsite on the left side of the trail with a fire ring and some benches. In this area a bridge used to span the stream. There are no remaining pieces of the bridge but the spot is very obvious. The trail continues but the woods road ends. The trail moves away from the edge of the stream before coming back down to the water. The trail crosses the river at a ford at 3 miles. Turn around and retrace your route back to the parking area.
 (The image below shows the profile of the hike. Remember that all vertical profiles are relative!)
Basha Kill towards Wurtsboro
| Quick Look | ||||
|---|---|---|---|---|
| Difficulty | Round trip | Total climb | Internet Maps | |
| 4.7 mi. | 96 ft. | AllTrails | ||
 The Basha Kill is a 2400 acre wetland and wildlife preserve in the southern part of Sullivan County. Among other things it is home to at least 50 species of birds and especially bald eagles. The remains of the Port Jervis to Kingston branch of the O&W forms a rail trail on the southeastern shore. On the northwestern shore is the D&H Canal and the towpath. The two can be combined for a loop using Haven Road to cross the marsh on the northern end and Otisville Road to swing around the southern end. This loop is over 10 miles and would be difficult for beginning hikers!
Take Route 17/I 86 to exit 113 and head south on Route 209 toward Port Jervis. After 1.7 miles turn left on Haven Road. Follow the road as it crosses the Basha Kill. At the first intersection turn left and park in the large lot. Head northeast on the old railroad bed which makes up a good part of the SRT in this area. There are no blazes for either the SRT or Long Path but the route is clear as it simply follows the railbed. Within a short distance there is a nice viewpoint over the Basha Kill to the ridges beyond. At about .5 miles there is a path to the left leads to an observation tower with good views to the north and west. You may choose to visit the tower on the way out or on the way back. You may encounter a few wet areas on the trail and some mud. There are also several places where old wooden bridges cross the water. These bridges are slowly deteriorating and the whole atmosphere is one of neglect. At 1.8 miles there is an underpass beneath the highway allows hikers and wildlife to pass without a problem! At 2.3 miles the trail ends at Pennsylvania Avenue just outside of Wurtsboro. Turn around and retrace your steps to the car.
(The profile of the hike is not posted as the walk is almost completely flat and the profile makes it look much more daunting!)
Basha Kill Tower
| Quick Look | ||||
|---|---|---|---|---|
| Difficulty | Round trip | Total climb | Internet Maps | |
| 2.3 mi. | 94 ft. | AllTrails | ||
 The Basha Kill is a 2400 acre wetland and wildlife preserve in the southern part of Sullivan County. Among other things it is home to at least 50 species of birds and especially bald eagles. The remains of the Port Jervis to Kingston branch of the O&W forms a rail trail on the southeastern shore. On the northwestern shore is the D&H Canal and the towpath. The two can be combined for a loop using Haven Road to cross the marsh on the northern end and Otisville Road to swing around the southern end. This loop is over 10 miles and would be difficult for beginning hikers!
Take Route 17/I 86 to exit 113 and head south on Route 209. After about 1.7 miles Haven Road appears on the left. Turn left here and drive to the parking area on the left to park. Start your hike by walking southeast on Haven Road through the marsh toward the rail trail on the eastern shore. Turned left or northeast on the rail trail. The trail here is relatively firm even when it has been raining. After about a mile watch for a trail to an observation tower and turn left on this unmarked trail. Within .1 miles you will be at the tower which is more of an observation platform. There are nice views over the marsh to the north and west. Return to the main trail and turn right to retrace your steps to the car.
(The profile of the hike is not posted as the walk is almost completely flat and the profile makes it look much more daunting!)
Bear Mt. And Lion's Head (CT)
| Quick Look | ||||
|---|---|---|---|---|
| Difficulty | Round trip | Total climb | Internet Maps | |
| 13.2 mi. | 3205 ft. | AllTrails | ||
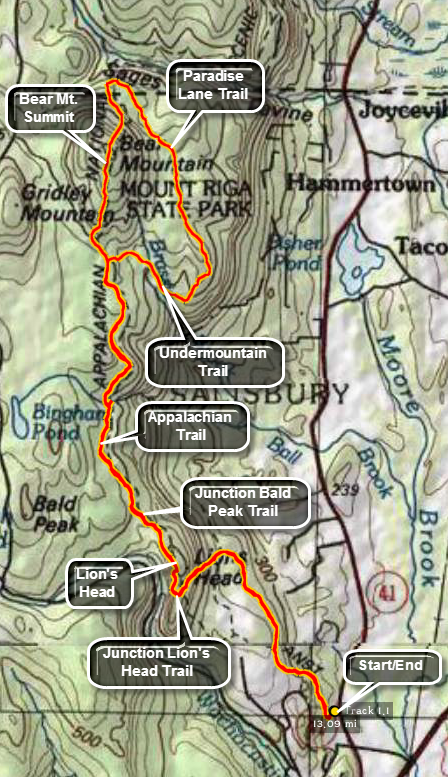 Bear Mt. is the highest peak in the state but the highest point is further north and west on the shoulder of Mount Frisell which is mostly in Massachusetts.
Park at the AT parking lot .8 miles north of the Route 44/Route 41 junction in Salisbury, CT. on Route 41. The entrance to the parking area is VERY narrow and not well marked. The parking area will accommodate 8 to 10 cars and is a popular place for many day hikers. The trailhead has a large signboard and a privy maintained by the AMC. The first part of the trail to the Lion's Head is wide and pretty smooth and the elevation gain is minimal. Several turns and switchbacks make the climb even easier. At about 1.4 miles you will cross a running stream with cool, clear water. At just over 2.0 miles the Lion's Head Trail joined from the left coming in from Bunker Hill Road. From this junction the trail becomes rockier and harder to walk. It also becomes much steeper as it ascends the Lion's Head with the very last part being an open rock outcrop. After another .25 miles, at about 2.3 miles into the hike, you will arrive at the viewpoint known as the Lion's Head. The views from here are expansive but be prepared to share the view with others! Leave the Lion's head and continue on the AT north toward Bear Mt. At 2.64 miles the Bald Peak Trail joins the AT from the left. The AT in this area is not exposed but instead runs under a leafy canopy most of the way meaning that it is protected but has no views. Along the way to Bear Mt. there are several places to camp and a few water sources. The Riga Lean-to comes up at 3.0 miles into the hike, followed by the Ball Brook campsite at 3.5 miles and the Brassie Brook Lean-to at 4.25 miles. In another .6 miles you will arrive at Riga Junction where the Undermountain Trail comes in from Route 41. Continue on the AT to the junction with Bear Mt. Road at 5.0 miles. From here the trail becomes much rockier and steeper. The AT winds up and over many rocky outcrops offering some limited viewpoints. You arrive at the summit of Bear Mountain at about 5.55 miles and the elevation is 2330 feet. At the top of the mountain is a stone pyramid more than large enough to accommodate 20 people. You can walk to the top of the pyramid to get views to the north and east but the views west and south are limited. To hike a loop head down the north side of Bear Mt. on the AT. The AT down Bear Mt. To the north is very steep. Most northern sides of mountains in this area are steeper than their southern counterparts due to the way glaciation eroded the rock. At a little more than 6.0 miles you will cross the border into Massachusetts and then arrive at a trail junction. Straight ahead the AT leads to Sage's Ravine. Turn right on the Paradise Lane Trail which immediately begins to gain some elevation. At 6.5 miles you will pass the Paradise Lane Group Campsite. From here the trail is flat or slightly downhill for the next 1.15 miles until you reached the junction with the Undermountain Trail at 7.6 miles. Turn right on the Undermountain Trail and start toward the AT at the Riga Junction. At 7.9 miles there is a bog. At 8.6 miles you will be back on the AT where you should turn left to head back to the Lion's Head and eventually the car. A long 2.4 mile stretch of the AT put you back at the Lion's Head. The hike back to the car is downhill.
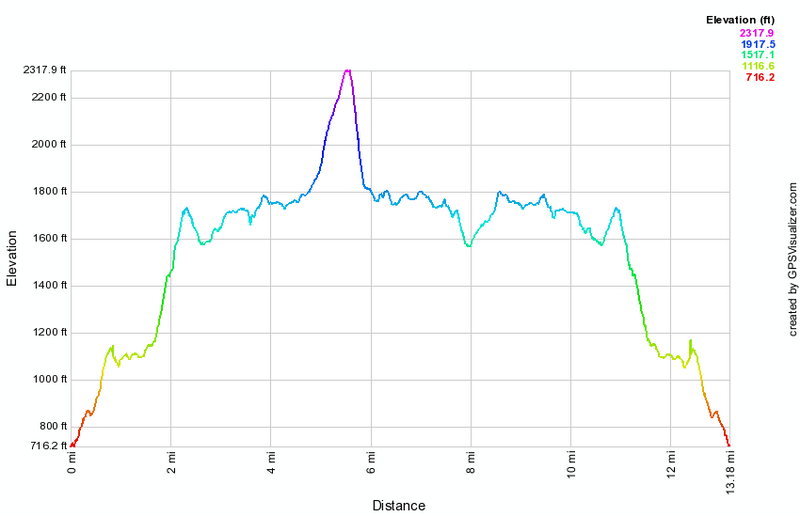 (The image at the left shows the profile of the hike. Remember that all vertical profiles are relative!)
Bear Mountain: Bear and West Mountains
| Quick Look | ||||
|---|---|---|---|---|
| Difficulty | Round trip | Total climb | Internet Maps | |
| 7.9 mi. | 2540 ft. | AllTrails | ||
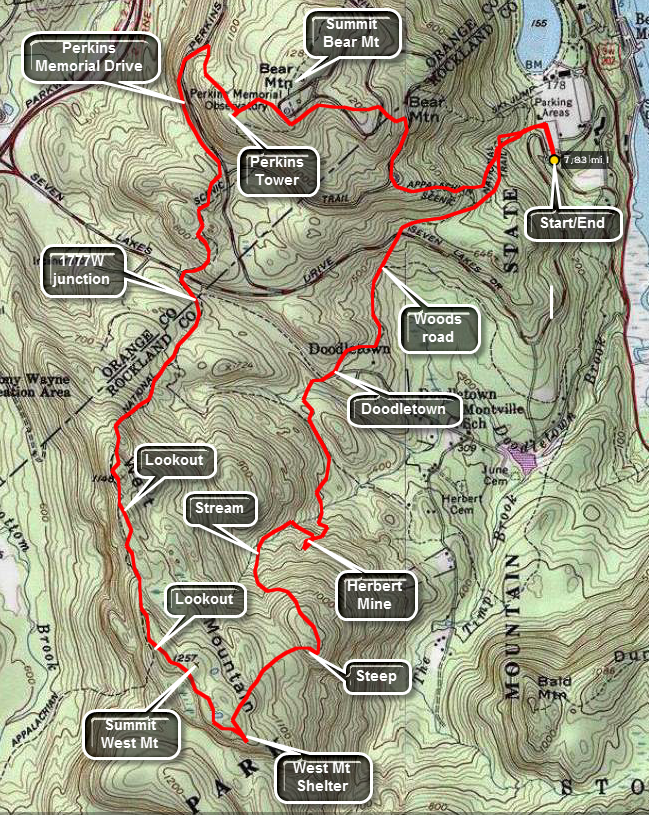 The easiest place to park to start this hike is at the Bear Mountain Inn parking area next to Hessian Lake. Parking costs $6 per car but there is lots of it and bathroom facilities are available. There area several ways to get to the parking area but Route 9W north or south is the easiest way. You can also take Seven Lakes Drive from Long Mountain Parkway (Route 6). Stay on Seven Lakes Drive through another traffic circle. Park in the back parking area. Walk the outdoor ice rink but turn left up the hill before it. At the top of a short, steep hill there is a road which is also marked with the yellow blazes of the Suffern-Bear Mountain Trail and the white blazes of the Appalachian Trail. Follow these blazes as the trail curves first to the right and then to the left as it descends and crosses a small stream. The trails then begin a continuous although not steep ascent. After only about .3 miles the AT turns to the right. Stay on the SBM Trail.
This trail continues to climb slightly before descending to cross Seven Lakes Drive after about .45 miles. It then continues to descend after meeting an old woods road until it meets the Doodletown Bridal Path after about .6 miles. Turn right here and follow the yellow blazes as the trail descends to Doodletown Brook after .5 miles. The brook is easily crossed in this area. On the left you may notice some paths down to another branch of the brook. These paths are created by other hikers looking for the Herbert Mine. Walk down to and across the brook and toward the rock to the south and slightly west. Watch for the LARGE piles of mine tailings and climb the hillside toward this mine debris. The main working of the Herbert Mine is a an open cut into the hillside which is impossible to miss. The cut appears to be 30 to 40 feet long and twenty feet high at the end. The cut in this area is filled with water but may go underground. When you have finished, walk up the hillside above the cut for a fresh perspective. There are several other pits and cuts in the area. Walk back west and northwest toward the brook. The SBM Trail is on the other side of the stream.
The trail now begins to ascend through laurel and begins to offer glimpses of some spectacular views. Wait since the best views are yet to come. There are several short buy steep climbs over rock piles before the trail breaks out into the open and continues to ascend to the summit of West Mountain and the West Mountain Ridge. After a little more than a mile it intersects with the blue blazed Timp-Torne Trail. You will want to turn right here to get back to bear Mountain but first turn left. In less than .1 miles is the West Mountain Shelter. The views from here are spectacular. Bald Mountain and The Timp are clearly visible. There is a nice view down to the Hudson River and on a clear day the Skyline of New York City can be seen. Retrace your steps and follow the blue and yellow blazes as they run concurrently.
In less than .25 miles the SBM trail turns left and heads south and west. Stay on the Timp-Torne Trail and in about the same distance the Appalachian Trail comes in from the left. The trails now wander along the ridge with interesting views on both sides. After 1.15 miles the trail split with the Timp-Torne Trail continuing on north and slightly west toward The Torne. Stay on the AT as it turns right and starts a long descent. Just before the descent are several views points over the Hudson River. Look carefully for the Bear Mountain Bridge. The Perkins Tower on the top of Bear Mountain can easily be scene straight ahead. It looks very close but there is a significant descent and ascent before reaching it. As you descend you will see the red Fawn Trail go off to the right. In .6 miles the AT crosses Seven Lakes Drive. Just before this the 1777W Trail crosses the AT. Turning right on this trail leads back to the Suffern-Bear Mountain Trail which may be an easier way to return to the parking area.
After crossing the road the AT ascends to the top of Bear Mountain at the Perkins Tower. The trail does undulate at times but the net results is always up. After .5 miles the AT meets the road and runs along Perkins Drive for .4 miles before cutting back into the forest and starting the final ascent to the tower. There are several viewpoints along Perkins Drive which are quite nice. After about .5 miles of ascent, the Perkins Tower comes into view. The views from Bear Mountain are nice but the views from West Mountain are better. Bear Mountain is more talked about since Perkins Drive allows easier access than the trails to West Mountain
After taking in the walk back to the AT and follow it down the mountain to the parking area. The trail crosses the road twice and goes through the picnic area. After ,4 miles it joins a road for about .25 miles before again entering the woods and descending. in .4 miles the AT again meets the SBM Trail that you were on earlier in the day. Retrace your path for .3 miles back to the car.
 (The image at the left shows the profile of the hike. Remember that all vertical profiles are
relative!)
(The image at the left shows the profile of the hike. Remember that all vertical profiles are
relative!)
Bear Mountain: Bear Mt and The Torne
| Quick Look | ||||
|---|---|---|---|---|
| Difficulty | Round trip | Total climb | Internet Maps | |
| 8.4 mi. | 3420 ft. | AllTrails | ||
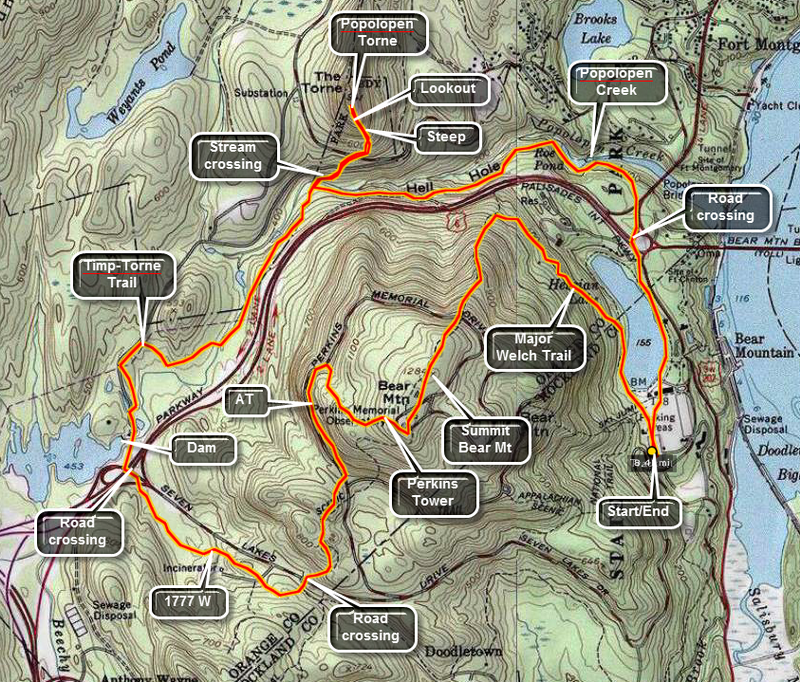
The easiest place to park to start this hike is at the Bear Mountain Inn parking area next to Hessian Lake. Parking costs $6 per car but there is lots of it and bathroom facilities are available. There area several ways to get to the parking area but Route 9W north or south is the easiest way. You can also take Seven Lakes Drive from Long Mountain Parkway (Route 6). Stay on Seven Lakes Drive through another traffic circle. Park in the back parking area. Walk along the front of the outdoor ice rink and continue on the pathway on the left side of the lake. Just before the end of the lake, watch for the spot where the red on white blazes turn left off the pathway and start up the hill at about .5 miles. The Major Welch Trail can be steep at times and runs across several exposed rock faces. The rocks can be slippery even when dry but are treacherous when wet.
At 1.5 miles the trail ascends sharply and crosses Perkins Drive for the first time. Go across the road and pick up the trail slightly to the left. As you ascend now occasionally look over your shoulder. As you near the top of the climb wonderful views of the Bear Mountain Bridge will appear below. You can also Se up and down the river for some distance depending on the weather. At 1.71 miles cross Perkins Drive again and walk passed the tower to the lookout area. Here you can see the river below and get good views of the surrounding area. On a clear day it is possible to see the Manhattan skyline to the south. When you are done. walk on Perkins Drive through the parking area to the left of the tower. Look for the white blazes of the at coming up the hill. Turn left and descend until you meet Perkins Drive at 2,25 miles. As you walk down this section of the trail you will cross several rocky areas and walk through laurel "tunnels".
Walk down the road following the AT until it enters the woods on the right at 2.7 miles. Be careful of the vehicle traffic when the road is open. Continue to follow the AT and cross Seven Lakes Drive at 3.1 miles. Immediately after crossing the road look for the metal disks that are labeled 1777W. They should appear on your right just after crossing the road. Get on this trail and follow it until 3.88 miles where it again meets Seven Lakes Drive. Walk along the road following the blazes as the trail crosses over Rout 9W. Turn right at 3.95 miles and watch for Queensboro Lake and its dam at 4.05 miles. You will be on a paved pathway briefly until it becomes more rustic after it passes a building on your left. At 4.3 miles the trail intersects a woods road and the signage is unclear. Turn RIGHT onto the road and watch for the blazes as the trail shortly turns right at 4.4 miles.
At 4.7 miles the trail crosses a creek on an interesting "bridge". The exact nature of this bridge and some of the "structures" next to it are unclear. At 5.35 miles the trail splits. Straight ahead the trail leads to Route 9W. For now turn left and cross a substantial footbridge across Popolopen Creek. Follow the trail as it turns right unto a road and then immediately left up into the woods. At 5.5 miles the trail crosses Mine Road and then begins to wind around to the "back" of The Torne. From here the trail ascends STEEPLY up The Torne. There are several rocks scrambles and the ascent can be VERY tricky when the rock is wet or covered in ice or snow. As you ascend views of Bear Mountain and the Hudson River come into view. The Bear Mountain Bridge and Anthony's Nose are spread out below. The top of The Torne is completely open and has little vegetation making it ideal for viewing in all directions. You can look up and down the river and east and west. Don't miss the monument at the top constructed of rocks carried from the base of The Torne to the top to remember members of the armed services killed in the war in Iraq. When you are done retrace your steps carefully back to the bridge and up the hill to the trail you cam in one from the southeast.
> Turn to your left at 6.1 miles and to the east. Walk the trail along Popolopen Gorge and the creek. At 7.1 miles watch for a dam on your left. The view varies depending on the foliage on the trees. Continue on the trail until it meets the road at 7.27 miles. BE CAREFUL at this point as you walk the road up to the Bear Mountain traffic circle and cross over to the far side to get to Hessian Lake and the path around it at 7.55 miles. Follow the paved path around the lake by turning left and heading toward the Bear Mountain and back to the parking lot to complete the 8.4 mile trip.
 (The image at the left shows the profile of the hike. Remember that all vertical profiles are
relative!)
(The image at the left shows the profile of the hike. Remember that all vertical profiles are
relative!)
Bear Mountain: Cornell Mine Trail to Bald Mountain
| Quick Look | ||||
|---|---|---|---|---|
| Difficulty | Round trip | Total climb | Internet Maps | |
| 3.0 miles | 1290 ft | AllTrails | ||
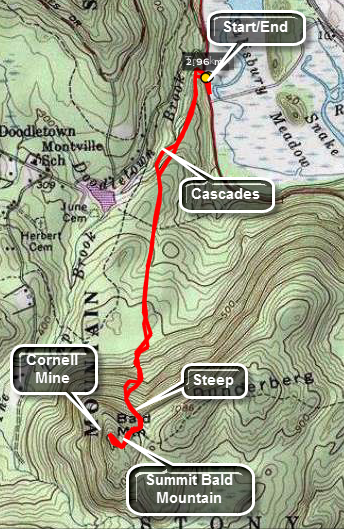 Park on Route 9W where it meets Route 202 from the Bear Mountain traffic circle. The parking is just
after a small bridge over Doodletown Creek. Cross the road and get on the trail just to the left of the
bridge. The blazes for the Cornell Mine Trail are blue and quite visible. Like all the trails in the
park there is no sign that announces the beginning of the trail. After a short climb the trail levels
and then rolls for a while. When the water levels are high the creek has several nice rapids and small
falls. As you are walking you cannot help but notice that up ahead the land rises quickly. When the
trail does start to climb it starts gently but rapidly increases in difficulty. Most of the
climbing would be almost impossible without the switchbacks, Switchbacks add to the hiking distance
but make the climbing easier. Just when you think the hardest part is over near the top, the last few
hundred feet get steeper! Near the top the trail ends where it meets the Ramapo-Dunderberg Trail.
Turn right on this red blazed trail. A short hike puts you on Bald Mountain facing directly
toward Bear Mountain. The Perkins Tower is clearly visible almost two miles to the north. Just down
from the summit of the mountain are several depressions and one tunnel that make up the Cornell
Mines. At this point you can retrace your way back down the Cornell Mine Trail or use one of
the trails on the other side of Bald Mountain to make a loop.
Park on Route 9W where it meets Route 202 from the Bear Mountain traffic circle. The parking is just
after a small bridge over Doodletown Creek. Cross the road and get on the trail just to the left of the
bridge. The blazes for the Cornell Mine Trail are blue and quite visible. Like all the trails in the
park there is no sign that announces the beginning of the trail. After a short climb the trail levels
and then rolls for a while. When the water levels are high the creek has several nice rapids and small
falls. As you are walking you cannot help but notice that up ahead the land rises quickly. When the
trail does start to climb it starts gently but rapidly increases in difficulty. Most of the
climbing would be almost impossible without the switchbacks, Switchbacks add to the hiking distance
but make the climbing easier. Just when you think the hardest part is over near the top, the last few
hundred feet get steeper! Near the top the trail ends where it meets the Ramapo-Dunderberg Trail.
Turn right on this red blazed trail. A short hike puts you on Bald Mountain facing directly
toward Bear Mountain. The Perkins Tower is clearly visible almost two miles to the north. Just down
from the summit of the mountain are several depressions and one tunnel that make up the Cornell
Mines. At this point you can retrace your way back down the Cornell Mine Trail or use one of
the trails on the other side of Bald Mountain to make a loop.

(The image above shows the profile of the hike. Remember that all vertical profiles are relative!)
Bear Mountain: Loop
| Quick Look | ||||
|---|---|---|---|---|
| Difficulty | Round trip | Total climb | Internet Maps | |
| 3.4 miles | 1200 feet | AllTrails | ||
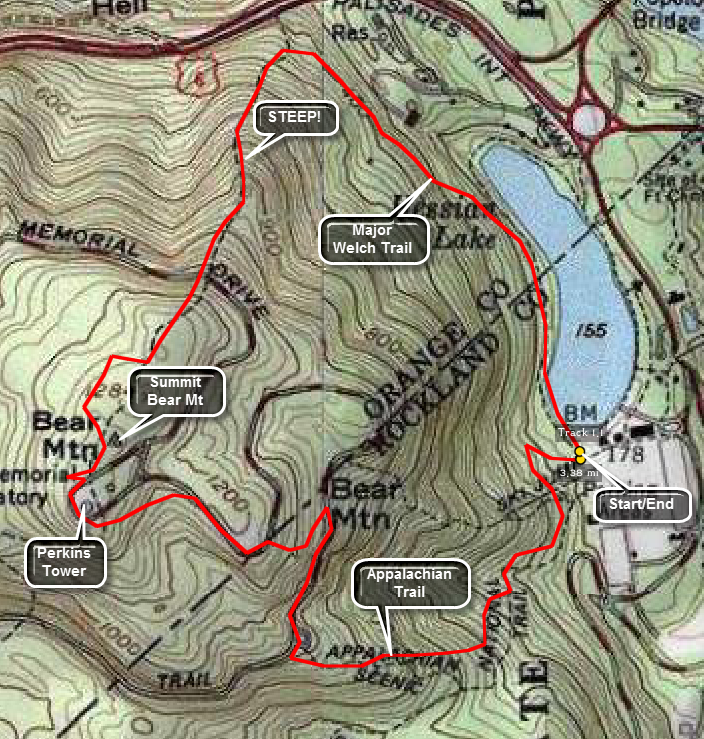 Park in any of the parking lots at the Bear Mountain Inn off Route 9W. The two trails that allow
access to Bear Mountain are the Appalachian Trail and the Major Welch Trail. Anyone not familiar
with the area will probably miss the point at which the Major Welch Trail leaves the paved loop
around Hessian Lake. I recommend taking the Appalachian Trail up the mountain the first time and
using the Major Welch to return. Head for the outdoor ice skating rink. As you walk from the rink
to Hessian Lake, a paved trail leads up a hill. This was the access road to the old ski jump which
has not been used for MANY years. Follow the white blazes of the Appalachian Trail as it winds its
way up the mountain. In some spots there are some bare rock faces to climb up at angles over 40
degrees. Some people go around while others go right up the rock. The trail meets a dead end road
with a circle that many people use to view the river valley below. Walk up the road for a short
while watching for a SMALL sign for the tower on your left. As you head up to the tower there are
several opportunities to walk off the trail to a lookout to take in the view. The trail crosses
Perkins Memorial drive several times. You can lose the trail at times but just keep heading for the
tower. The view from the top is very nice on a clear day. Be sure to look south. About two miles
away is Bald Mountain which is also a popular destination for hikers. Walk around the tower clockwise
and down the access road. Walk off to your right and try to find the red blazed Major Welch Trail.
Just after this trail begins there are several spectacular lookouts. The trail then begins a rather
steep descent toward Hessian Lake. This trail also has some open and bare rock faces to negotiate.
There are several additional opportunities for views but none are as good as at the top. Eventually
the trail meets the paved loop trail around Hessian Lake. Turn right for the short way back or turn
left to enjoy a walk around the lake. Make a mental note of where the Major Welch trail meets the path
so that you can reverse the loop next time.
Park in any of the parking lots at the Bear Mountain Inn off Route 9W. The two trails that allow
access to Bear Mountain are the Appalachian Trail and the Major Welch Trail. Anyone not familiar
with the area will probably miss the point at which the Major Welch Trail leaves the paved loop
around Hessian Lake. I recommend taking the Appalachian Trail up the mountain the first time and
using the Major Welch to return. Head for the outdoor ice skating rink. As you walk from the rink
to Hessian Lake, a paved trail leads up a hill. This was the access road to the old ski jump which
has not been used for MANY years. Follow the white blazes of the Appalachian Trail as it winds its
way up the mountain. In some spots there are some bare rock faces to climb up at angles over 40
degrees. Some people go around while others go right up the rock. The trail meets a dead end road
with a circle that many people use to view the river valley below. Walk up the road for a short
while watching for a SMALL sign for the tower on your left. As you head up to the tower there are
several opportunities to walk off the trail to a lookout to take in the view. The trail crosses
Perkins Memorial drive several times. You can lose the trail at times but just keep heading for the
tower. The view from the top is very nice on a clear day. Be sure to look south. About two miles
away is Bald Mountain which is also a popular destination for hikers. Walk around the tower clockwise
and down the access road. Walk off to your right and try to find the red blazed Major Welch Trail.
Just after this trail begins there are several spectacular lookouts. The trail then begins a rather
steep descent toward Hessian Lake. This trail also has some open and bare rock faces to negotiate.
There are several additional opportunities for views but none are as good as at the top. Eventually
the trail meets the paved loop trail around Hessian Lake. Turn right for the short way back or turn
left to enjoy a walk around the lake. Make a mental note of where the Major Welch trail meets the path
so that you can reverse the loop next time.
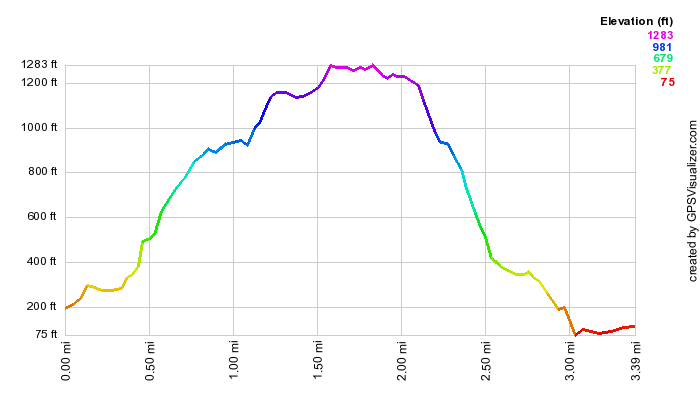 (The image at the left shows the profile of the hike. Remember that all vertical profiles are
relative!)
(The image at the left shows the profile of the hike. Remember that all vertical profiles are
relative!)
Bear Mountain: Steps Trail Loop
| Quick Look | ||||
|---|---|---|---|---|
| Difficulty | Round trip | Total climb | Internet Maps | |
| 10.3 miles | 2182 feet | AllTrails | ||
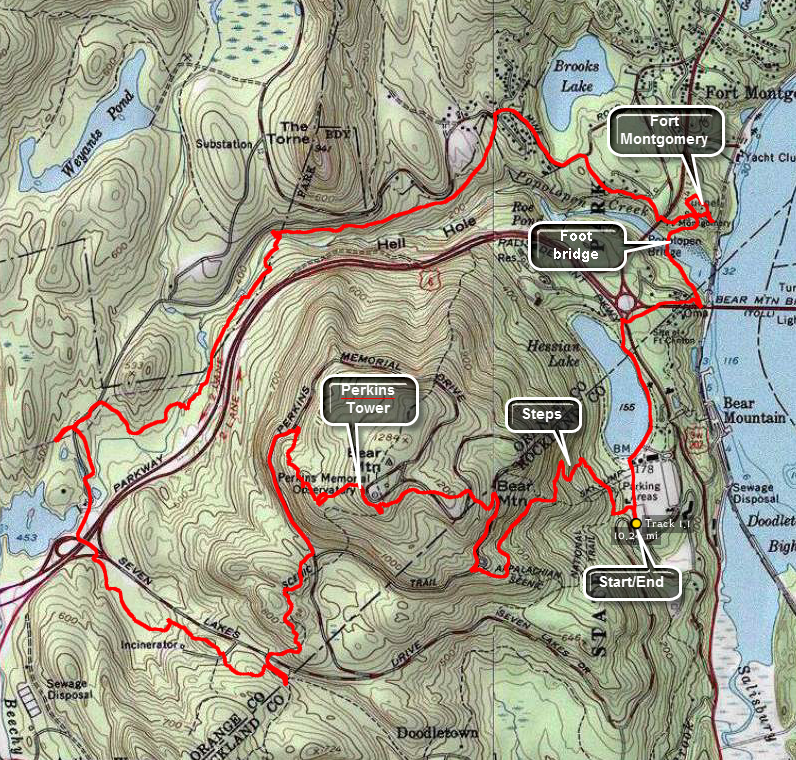 Park in any of the parking lots at the Bear Mountain Inn off Route 9W. The three trails that allow access to Bear Mountain are the Appalachian Trail, the Major Welch Trail and the new Steps Trail. Anyone not familiar with the area will probably miss the point at which the Major Welch Trail leaves the paved loop around Hessian Lake. I recommend taking the Appalachian Trail or the Steps Trail up the mountain the first time. This route uses the Steps Trail and then forms a big loop around the bear Mountain Park.
Head for the outdoor ice skating rink. As you walk from the rink to Hessian Lake, a paved trail leads up a hill. This was the access road to the old ski jump which has not been used for MANY years. At the top of the first climb DO NOT turn left on the road but continue straight ahead to climb the Steps Trail. The "steps" are hundreds of stone steps cut on the mountain and placed by volunteers to alleviate the damage to the ecology from the large volume of visitors to this area. The trail meets a dead end road with a circle that many people use to view the river valley below. Walk up the road for a short while watching for a SMALL sign for the tower on your left. As you head up to the tower there are several opportunities to walk off the trail to a lookout to take in the view. The trail crosses Perkins Memorial drive several times. You can lose the trail at times but just keep heading for the tower. The view from the top is very nice on a clear day. Be sure to look south. About two miles away is Bald Mountain which is also a popular destination for hikers. You may also see West Mountain with its stone shelter. The skyline of New York City can be seen to the south.
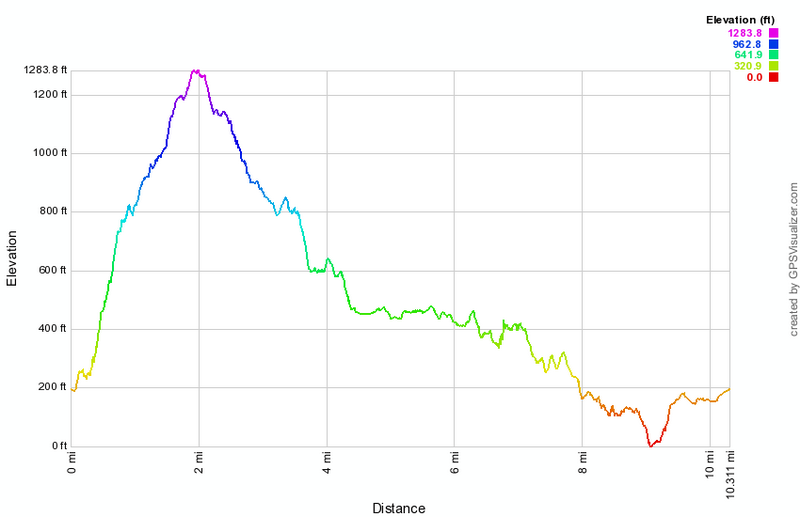 (The image at the left shows the profile of the hike. Remember that all vertical profiles are relative!)
Bear Mountain: The Torne from Popolopen Gorge
| Quick Look | ||||
|---|---|---|---|---|
| Difficulty | Round trip | Total climb | Internet Maps | |
| 6.7 mi. | 1415 ft. | AllTrails | ||
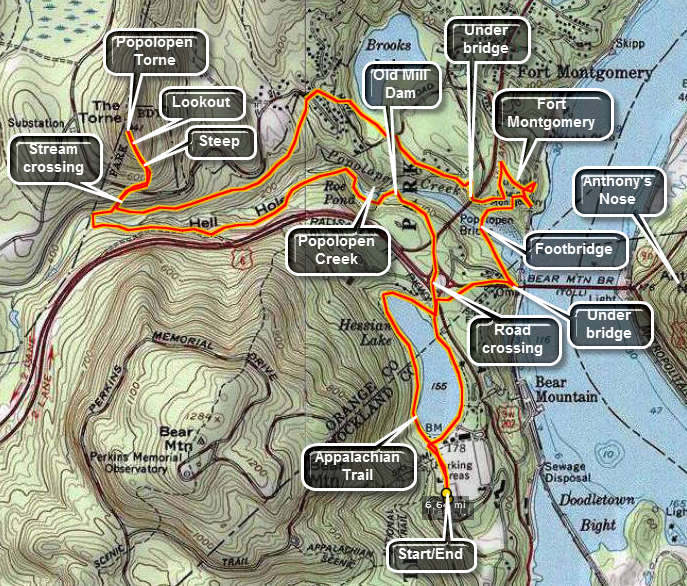 The easiest place to park to start this hike is at the Bear Mountain Inn parking area next to Hessian Lake. parking costs $6 but there is lots of it and bathroom facilities are available. There area several ways to get to the parking area but Route 9W north or south is the easiest way. You can also take Seven Lakes Drive from Long Mountain Parkway (Route 6). Stay on Seven Lakes Drive through another traffic circle. Park in the back parking area. Walk toward the outdoor skating rink and down the hill toward Hessian Lake. Walk around Hessian Lake on the right or east side. You will be walking north toward the Bear Mountain Traffic Circle. Leave the path and walk up toward Route 9W and the traffic circle. CAREFULLY cross the traffic circle and walk along Route 9W north as it leaves the traffic circle. Watch for three red on white rectangular blazes on the left side of the road. This is the beginning of the Popolopen Gorge Trail.
The P-G Trail more or less parallels Popolopen Creek and the sights and sounds are very pleasing. The trail rises and falls but continuously gains some elevation. At times you are closer to the creek than others. In a short distance is a dam on the creek and the remains of a mill with the millpond behind the dam. As you continue along the trail you will see a rather impressive hill on your right. This is The Torne, the object of the hike. You will also find "manhole" covers at regular intervals. These are access points for the West Point Aqueduct. The noise of traffic competes with the babble of the brook as the trail comes very close to Route 6 in places. On the far bank of the creek a stone "wall" is noticeable. This supports the Timp-Torne, 177 and 1179 trails that you will use on your return. After a little more than a mile, you will be at the junction with the Blue marked Timp-Torne Trail.
Make a left turn at this point and head down toward the creek. Don't worry about finding a way across. There is a brand new metal footbridge. Take some time to enjoy the sights and sounds of the creek before continuing on to the other side. After a slight ascent the trail turns left. The turn is marked but a woods road also goes left. This is typical of the area where trails and woods roads cross each other frequently. Generally the trails are well-marked but a map, compass and GPS can all be VERY helpful. In a short distance the Timp-Torne Trail turns left while the 1777 and 1779 Trails continue straight ahead. Turn left and ascend slightly to Mine Road. Go across the road and find the trail marking on the other side. Now get ready to climb.
The trail up the Torne is steep at times and, in several areas, passes over rock outcroppings with some tricky food and hand holds. CAUTION: Wet, icy and snowy conditions will make this ascent dangerous! The trail follows the pattern of short steep ascents followed by flatter areas for recovery. There are very few workarounds available. As you climb be sure to look around at the views back to Bear Mountain and down to the Hudson River. You can see the Bear Mountain Bridge and Anthony's Nose clearly. Of course, These views are not as good as the ones from the top. Continue on up until there is no more up. At the top of the Torne is a stone cairn. As the sign explains, the stones were all carried form the bottom of the hill to the top to commemorate the sacrifice of soldiers fighting overseas. The cairn is also decorated with many Boy Scout emblems as this is a popular destination for scout troop hikes.
From the top you can retrace your path back to the junction with the 1777 and 1779 Trails. You can also follow the Timp-Torne trail as it makes a sort of loop and continues on another route down the Torne. No matter which path you take you will cross over Mine Road again and meet up with the other trails. You can, of course, retrace your steps to the car but staying on the north side of the creek is a nice alternative. turn left on the Timp-Torne, 1777 and 1779. Notice the stone support beneath the trail that was visible from the other bank. The trail rises and falls on the way toward Brooks Lake. At one point you will come to a road. Turn right and continue on down the road watching for trail markers on the left side. When you turn into the woods you will see Brooks Lake appear almost immediately. This areas was opened in 2005 and is used by residents for camping and day use.
Continue passed Brook Lake up to a road. Turn left on the road and immediately pick up the trail on the other side. The trail continues to the woods and then leads to another road. Walk down the road and turn back onto the trail on the right. This short trail leads to the West Redoubt of the Revolutionary War era Fort Montgomery. From the Redoubt, return to the main trail and walk UNDER the Popolopen Creek Bridge and Route 9W. After a short ascent, the Fort Montgomery visitor's center will be straight ahead. Take some time to walk around the fort. Only the stone foundations of the buildings remain but placards explain the fort's construction and significance. There are foundations for the barracks, guard house, powder magazine and necessaries. The sight of the North Redoubt and Main Battery are marked. A replicate 32 pound cannon is at the site of the main battery. The views from this area are beautiful and help to explain why a fort was erected at this site. When you are done, walk back to and behind the visitor's center. Walk down a little hill to the creek and an impressive suspension footbridge. From the footbridge there are incredible views of the Bear Mountain Bridge and Anthony's Nose on the left and Popolopen Creek and the Popolopen Creek Bridge on the other.
The trail continues across another much smaller footbridge and up and under the Bear Mountain Bridge. The view from under the bridge is interesting. The trail leads up through the museum and zoo. If these are closed or if you hike with your dog, take the trail to the right which leads up to the toll booths and bypasses the zoo. From here walk west toward the traffic circle and cross over Route 9W to Hessian Lake. Walk back the way you originally came at the beginning of the hike or continue on around Hessian Lake. On the other side look for the red trail markings of the Major Welch Trail that is one of the trails to the top of Bear Mountain. The Appalachian Trail and the Suffern-Bear Mountain Trail also pass through this area. Return to your car on one of the many pathways.
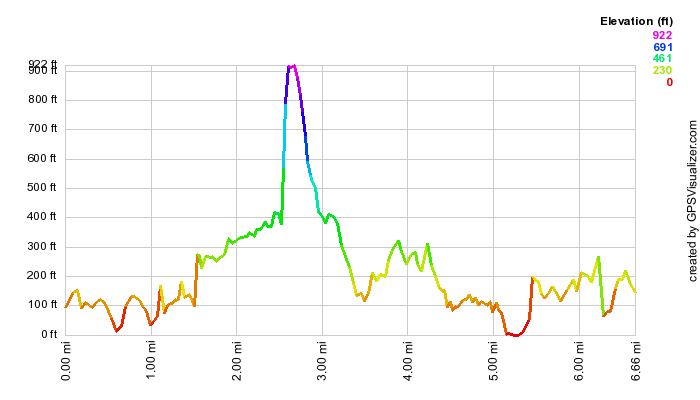 (The image at the left shows the profile of the hike. Remember that all vertical profiles are
relative!)
(The image at the left shows the profile of the hike. Remember that all vertical profiles are
relative!)
Bear Mountain: The Timp to The Torne with Bear Mountain
| Quick Look | ||||
|---|---|---|---|---|
| Difficulty | Round trip | Total climb | Internet Maps | |
| 14.3 mi. | 4607 ft. | AllTrails | ||
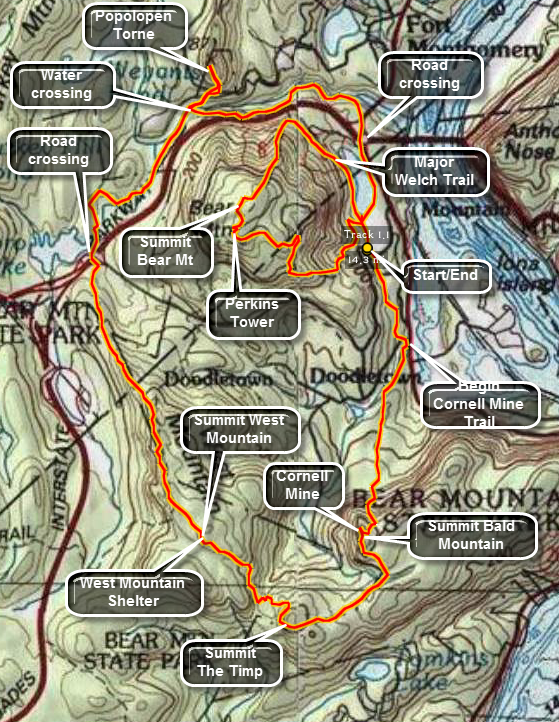 The easiest place to park to start this hike is at the Bear Mountain Inn parking area next to Hessian Lake. Parking costs $7 but there is lots of it and bathroom facilities are available. There area several ways to get to the parking area but Route 9W north or south is the easiest way. You can also take Seven Lakes Drive from Long Mountain Parkway (Route 6). Stay on Seven Lakes Drive through another traffic circle. Park in the back parking area. Walk south toward the tunnel that goes under the road and watch for the red 1777E trail. Stay on this trail until the blue Cornell Mine Trail branches to the left and turn here to walk down to Route 9W. Walk along route 9W for a hundred feet and turn right into the woods along a small stream. You may want to walk down to the stream to tale pictures as there are several small waterfalls. The trail remains relatively flat for about a mile until it starts to climb Bald Mountain. The climb isn't too long and a few switchbacks make the trip easier if a little longer. In about .33 miles you will be at the end of the Cornell Mine Trail. Turn right on the red Ramapo-Dunderberg Trail and walk to the summit of Bald Mountain. At the summit there is a large open self of rock that has great views to the north of the Bear Mountain Bridge and West Mountain with its stone shelter. When you are done, walk back to the trail and head south.
The descent down Bald Mountain is steep in places and runs across some open rock but in manageable. At times you are surrounded by huge blocks of rock. Stay on the trail as it turns southwest and ignore the junctions with the red 1777 trail after about .7 miles. In another .2 miles turn right on the blue Timp-Torne Trail and ascend to the top of The Timp. From the top of The Timp there are nice views of Bald Mountain and Tompkins Lake below. On clear days you may also be able to see the New York City skyline. Leave The Timp and continue on the blue trail as it descends The Timp into the area between it and the West Mountain ridge. The climb up to West Mountain is steep at times but isn't very long. In about .8 miles you will be near the highest point and will arrive at the West Mountain shelter. The shelter is very busy during peak hiking times and is well-constructed out of stone. From here you can look back at The Timp and also have a chance to get another view of the city skyline. Take some pictures and then continue on the blue trail passing two trail junction with the yellow Suffern-Bear Mountain Trail. In about .35 miles the Appalachian Trail comes in from the left and runs along with the Timp-Torne Trail for some distance.
Continue on the ridge along the blue trail. There are nice views to the left including some down to the Anthony Wayne State park parking lots. Soon the AT breaks to the right and the trail travels along a rocky ridge before descending over some open rock. You will pass the junction with the red Fawn Trail and the white Anthony Wayne Trail. The Timp-Torne Trail then intersects Seven Lakes Drive which you must cross with EXTREME caution. This is about 2 miles from the West Mountain shelter. Cross Seven Lakes Drive and walk along the opposite shoulder and over the overpass. Cross to the other side of the road and head down the paved path toward Queensboro Lake. This paved road soon turns to dirt and then in about .4 miles a sign warns "Shooting Range"! At this point the trail turns right and you should follow it.
The trail roams through some woods and crosses a stream on a narrow "bridge" before paralleling the stream on the high bank. In about a mile it turn to the left and crosses a stream on a well-constructed bridge. From here the trail ascends some stone steps, turns to the right, follows a woods road and then turns left up a hill. It crosses Mine Road and then begins a series of switchbacks up to The Torne. From the bridge it is about .25 miles to the beginning of the ascent up The Torne. This ascent is STEEP and passes over several areas of open rock with little to hold onto and not much good footing. One area requires you to make a choice of making it up a 60 degrees sloping rock or up and over a 4 foot drop. Trying to ascend and descend The Torne when it is wet or icy is a recipe for disaster. The ascent is only about .2 miles. Just before the summit is a viewpoint that looks down over the Hudson and the Bear mountain Bridge. To the right Bear Mountain is visible. At the summit is a 5 foot rock cairn. The rocks were carried from the bottom of the hill to the top to commemorate soldiers killed in Iraq and Afghanistan. When you are done, retrace your oath back to the bridge and walk back up to the main trail.
Turn left on the red Popolopen Gorge Trail which parallels the creek high on the bank but eventually drops almost to water level. Near the end of this trail is an old mill dam which holds back the creek and forms a pleasing waterfall. After 1.3 miles, the trail ends at Route 9W. Cross the road carefully and turn right and walk up to the traffic circle. Find the best way to continue across the circle and to the walkway around the lake. You may turn left and return to the car or continue on around the lake to ascend Bear Mountain. If you do want to go up the mountain, turning right may be a better idea. The walk to the head of the lake is about .5 miles. Turn right here to continue around the lake. Around .3 miles watch for the red blazes of the Major Welch Trail as they turn left into the woods.
The Major Welch trail starts out mildly but quickly becomes steep and ascend over some open rock. One place is so steep a chain is provided to help pull yourself up. After .8 miles of some serious climbing, the trail crosses Perkins Drive and continues to climb to the summit of Bear Mountain. Along the way are several fantastic viewpoints that look down on the river and the bridge. In about .5 miles the trail passes the Perkins Tower to another excellent lookout. After taking in the views, walk to the left and look for the white blazes of the AT that you will follow back to the lake. The trail weaves back and forth, reaches a dead end road to a circular parking area and then continues its descent down the mountain. Continue to follow the trail and in about 1.35 miles you will be a the top of a downhill that lead back to the lake. Walk down the hill and take a right at the bottom of the hill. Walk passed the ice rink to the parking lot and your car.
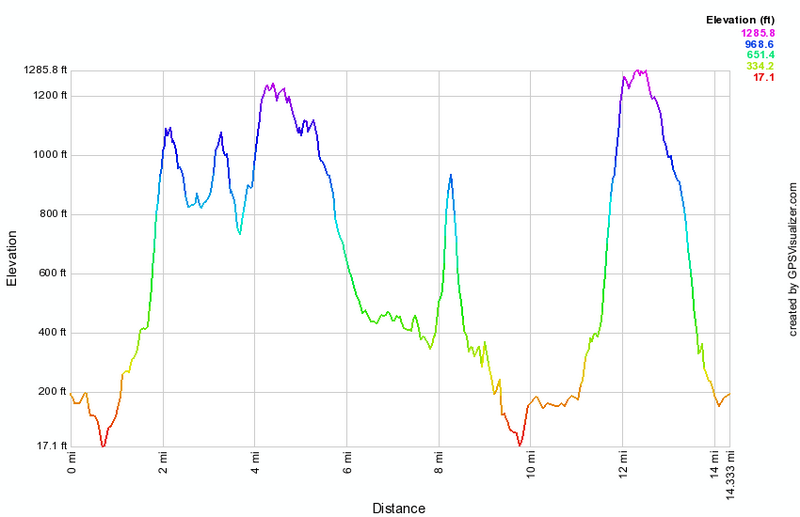 (The image at the left shows the profile of the hike. Remember that all vertical profiles are relative!)
Bear Spring: Central Loop
| Quick Look | ||||
|---|---|---|---|---|
| Difficulty | Round trip | Total climb | Internet Maps | |
| 9.3 mi. | 1600 ft. | AllTrails | ||
 Caution: The trails at Bear Spring State Park are primarily constructed for horses and snowmobiles. The wide well-kept trails are easy to walk but poorly marked. You cannot really get lost but you can wander around a lot.
Take County Route 206 to the top of Bear Spring Mountain near Walton, NY. Turn onto East Trout Brook Road and drive south. Pass Launt Pond on your right and then drive 1.3 miles further. Park on the left side of the road in the parking area. Cross the road to get on trail 4 to the Fork Mountain ridge. The trail rises 750 feet from the road to the ridge over 1.2 miles. At the top of the ridge turn right or northwest to hike along the Fork Mountain Ridge. A little more than 2 miles into the hike and you will be at the first of three clear cut areas on the hike. No one has been able to tell me the reason for theses clear cuts but they are all done with state approval. The trail continues northwest over a few bumps and at 3.3 miles into the hike you cross West Trout Brook Road to continue on the trail. Continue almost directly north now toward Route 206 and cross the road again to walk through the main parking area. Follow the trail through the woods and out across a field. Look for the opening directly across the field. The trail parallels Route 206, crosses East Trout Brook Road and then ascends slightly before dropping to Wilson Hollow Road. This woods road is a grassy track and has never been paved but shows up on many maps with the same prominence as Route 206! At this point you will be at were at the second and largest clear cut area. Follow Wilson Hollow Road along the large clear cut area before the road entered the woods. Watch for Trail 11 on the right at about 6.8 miles into the hike. This trail leads back down to East Trout Brook Road and to another trail that will take you back to your car. It is an alternative route. Continue on the main trail/road passing another trail down within .6 miles of Trail 11. Continue to the McCoy Hill Shortcut at 7.7 miles. This trail turns right and runs along the edge of a field before descending through the forest to the last clear cut. Watch for a short path to the right that leads to a small field with a view over the clear cut and across to Fork Mountain. A little further down another trail comes in from the left. Stay on the main trail passing a pond and two final trail junctions before arriving at Middle Pond on East Trout Brook. Walk over the bridge and up to your car,
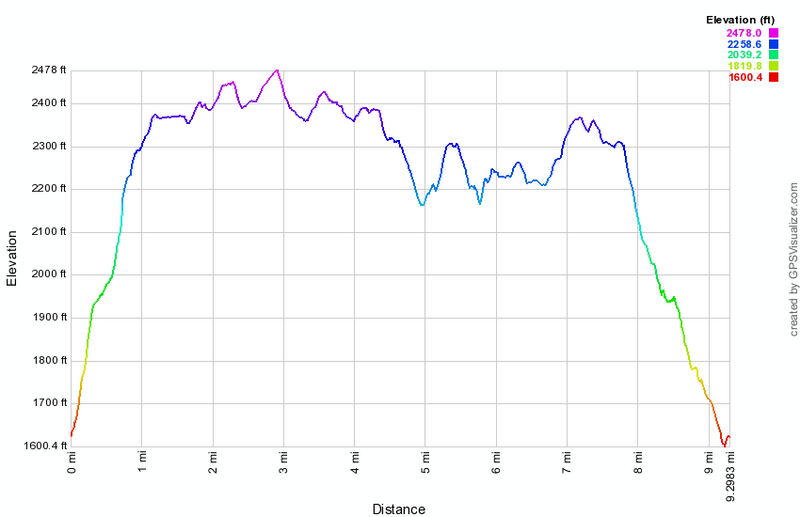 (The image at the left shows the profile of the hike. Remember that all vertical profiles are relative!)
Bear Spring: Central and Eastern Ridge Loop
| Quick Look | ||||
|---|---|---|---|---|
| Difficulty | Round trip | Total climb | Internet Maps | |
| 9.3 mi. | 1515 ft. | AllTrails | ||
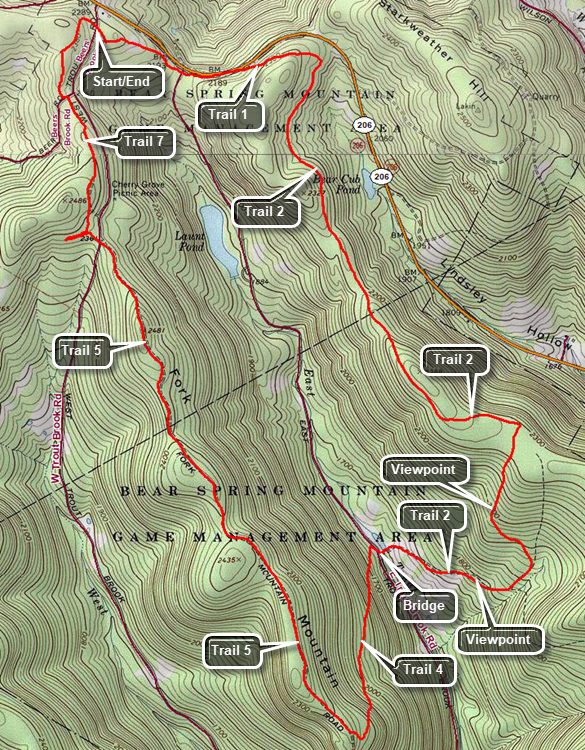 Caution: The trails at Bear Spring State Park are primarily constructed for horses and snowmobiles. The wide well-kept trails are easy to walk but poorly marked. You cannot really get lost but you can wander around a lot.
Take County Route 206 to the top of Bear Spring Mountain near Walton, NY. Turn onto West Trout Brook Road and park in the lot on the left side of the road just above the state DPW facility. Cross the road to get on Trail 7. Follow that trail until it crosses Beers Brook Road at .5 miles. Walk to the left on the road and pick up the trail again. At 1.1 miles the trail comes to a T. Turn left and walk out to cross West Trout Brook Road to Trail 5. Follow Trail 5 for 2.45 miles as it heads south and rolls over some small hills. After Fork Mountain the trail descends some. At 3.6 miles turn left on Trail 4 which descends steeply for .9 miles to East Trout Brook Road. This trail may not be well-maintained. At the bottom of the descent cross the road and pick up Trail 2 in the parking lot. Walk down the hill to the bridge that crosses the dam that impounds Middle Pond. Continue uphill on Trail 2 watching for some nice views down the valley on the right of the trail. At 5.2 miles Trail 2 heads to the right. Stay left to pick up Trail 3 up the hill. This is a long climb and some nice views appear just before the trail enters the woods. Trail 3 levels at the top of the hill and passes along the edge of a field. At the T, turn left to again pick up Trail 2 which travels along the eastern ridge. The trail rolls some over 2.7 miles heading toward Route 206. At about 7.3 miles there is an old clear cut on the right but it is now grown in so that there aren't many views. At 8.1 miles turn left on Trail 1 and make a short ascent. Where the trail splits stay right on Trail 1 which descends to East Trout Brook Road. Cross the road and continue uphill through the woods. The trail crosses a field and there may not be much of a path through the field. Watch for the point where the trail enters the woods on the other side of the field. Follow Trail 1 through the woods to the parking area.
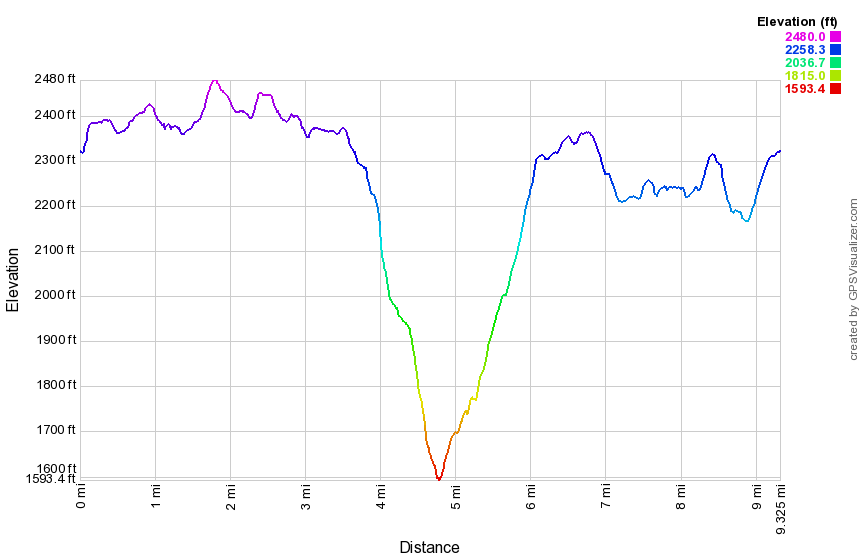 (The image at the left shows the profile of the hike. Remember that all vertical profiles are relative!)
Bear Spring: East Road Loop from Route 206
| Quick Look | ||||
|---|---|---|---|---|
| Difficulty | Round trip | Total climb | Internet Maps | |
| 4.4 mi. | 940 ft. | AllTrails | ||
 Caution: The trails at Bear Spring State Park are primarily constructed for horses and snowmobiles. The wide well-kept trails are easy to walk but poorly marked. You cannot really get lost but you can wander around a lot.
Take County Route 206 to the top of Bear Spring Mountain near Walton, NY. Near the top of the mountain turn south on East Trout Brook Road. Drive 2.2 miles to the parking pulloff on the left for Middle Pond. Head down the trail to the pond and cross the bridge. Start up the trail toward McCoy Hill and then turn left on an unmarked path. At .4 miles the trail breaks out into a field. Follow the edge of the field along the brook and look for game paths as you bushwhack along the creek parallel to East Trout Brook Road. Your route may vary slightly from mine but as long as you stay between the brook and the rising land on the right you will be OK. There are a few wet spots to cross and you may chose to cross the tributaries to the main brook in some places. At about 1.3 miles you should catch a glimpse of the parking area. Cross one final stream crossing to get to the lot. Head across the parking area to the gate and start up the snowmobile trail. The first part of the trail is very steep averaging a 20% grade but only for about .15 miles. At 1.5 miles the trail turns southeast but continues to climb for the next .5 miles at about a 10% grade. At 2 miles the trail stops climbing and actually descends slightly before flattening out and following the contour of the hill for .4 miles. At 2.4 miles the trail begins to climb again and shortly after turns sharply to the left heading north. This only lasts for about .3 miles when it intersects the "main" trail on the ridge. Turn right to follow the trail toward the McCoy Hill Cutoff. The trail is mostly flat to the next junction. At 2.95 miles turn right onto the McCoy Hill Cutoff and walk along the edge of the field heading toward the woods on the other side. Head down the hill toward Middle Pond. The next 1.25 miles are all downhill at a comfortable 10% grade. There is an open area on the right with some nice views of the valley. At 3.8 miles the main trail comes in from the left but continue straight ahead down the hill. There is a small pond on the left with some more nice views. Cross the bridge at Middle Pond and walk the hill to the car in the parking area.
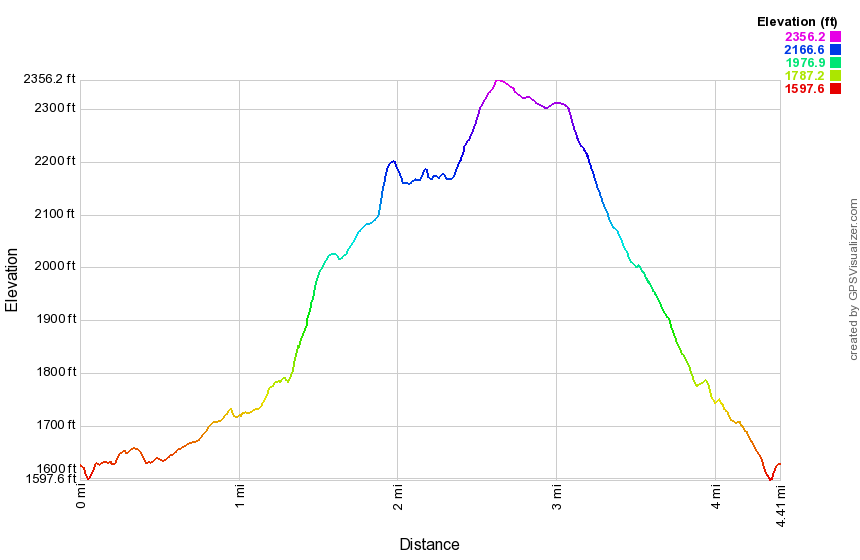 (The image at the left shows the profile of the hike. Remember that all vertical profiles are relative!)
Bear Spring: East Road Loop from Route 206
| Quick Look | ||||
|---|---|---|---|---|
| Difficulty | Round trip | Total climb | Internet Maps | |
| 6.9 mi. | 1013 ft. | AllTrails | ||
 Caution: The trails at Bear Spring State Park are primarily constructed for horses and snowmobiles. The wide well-kept trails are easy to walk but poorly marked. You cannot really get lost but you can wander around a lot.
Take County Route 206 to the top of Bear Spring Mountain near Walton, NY. Park in the bus turnaround just south of East Trout Brook Road. Hike a little north on Route 206 and then turn left onto a woods road that is also a snowmobile and hiking trail. The trails in the Bear Spring WMA are truly multi-use and are frequently used by people riding horses. Continued to walk straight ahead along the road just above a clear cut area. Smaller trees and brush along the edge of the road may block the best views of the valley and the hills on the other side. You may get some glimpses through the brush and the only way to get a good view is to fight through the brush and briars to the edge of the clear cut area. Continue on the main trail walking into an area with trees on both sides. The trail starts to climb a little and at 1.4 miles and 2.0 miles trails on the right descend from the ridge to the parking area just south of Launt Pond on East Trout Brook Road. At 2.3 miles turn right and walk on the edge of a filed down the McCoy Hill Cutoff. It is a long descent toward a nice viewpoint on the right. When the trail opens up at the viewpoint, you may be able to get views down the valley to the south and across to the Fork Mountain Ridge to the west. Continue down the hill skirting another clear cut area on the right. At 3.2 miles you will have descended to a trail junction and a nice view of the trees on top of the ridge above the clear cut. Continue to descend on the trail toward Middle Pond. Along the way there are several nice views to the south and west to the Fork Mountain Ridge. At Middle Pond walk across the bridge at the outlet end over the spillway and out to East Trout Brook Road. Turn right on the road and get ready to regain the elevation lost in descending from the ridge. The road walk is easier than the trail and at 5.2 miles you will come to the southern end of Launt Pond after having already gained 300 feet of elevation back. Walk over to the outlet to the pond which is a very popular camping, swimming and boating destination in the summer. Walk back out to the road to continue your hike. At 6.2 miles you will be at Route 206 after gaining over 600 feet. Just before the road is a trail on the right. The road is easier to walk than the trail but the trail is safer! Turn right to walk back to the car to complete the hike.
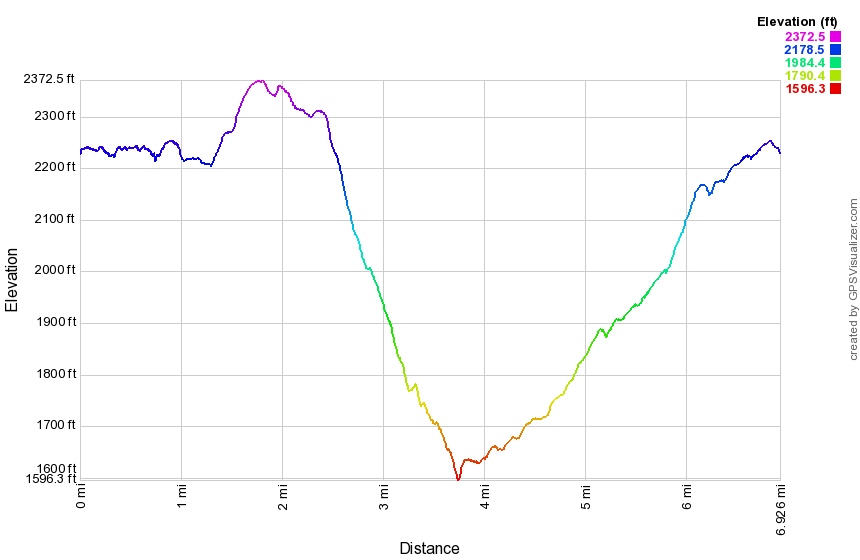 (The image at the left shows the profile of the hike. Remember that all vertical profiles are relative!)
Bear Spring: East Trout Brook Loop
| Quick Look | ||||
|---|---|---|---|---|
| Difficulty | Round trip | Total climb | Internet Maps | |
| 6.3 mi. | 1262 ft. | AllTrails | ||
 Caution: The trails at Bear Spring State Park are primarily constructed for horses and snowmobiles. The wide well-kept trails are easy to walk but poorly marked. You cannot really get lost but you can wander around a lot.
Take County Route 206 to the top of Bear Spring Mountain near Walton, NY. Turn right on East trout Brook Road and drive south. Pass Launt pond on your right and then drive 1.3 miles further. Park on the left side of the road in the parking area. Walk down the wide path/road and across the dam that creates a small pond. Continue straight ahead up the hill on the wide grassy snowmobile/horse trail. The trail climbs steadily now toward the ridge. At .35 miles a trail marked "New Trail" comes in on the left. Continue straight ahead to .68 miles. You will be in an area that has been clear cut, one of several in the park. Turn right and continue climbing until the trail junction at 1.23 miles. Turn left up the hill to the ridge. The climb ends at 1.61 miles into the hike. The trail now "rolls" along the ridge and starts a turn from east to northwest at about 1.85 miles. At 3.0 miles pass by a turn to the left through a field. This trail leads back to the trail junction at the base of the clear cut and is a good "early out". Continue to 3.33 miles and turn left down another wide trail. This trail initially heads south but them goes through a switchback that again turns northwest. The trail loses 715 feet to a parking area on East Trout Brook Road at 4.6 miles. You can walk the road south from here to your car. Make a sharp left turn onto a trail marked "New Trail" to avoid the road walk. This trail heads southeast for 1.3 miles until it reaches the trail junction at 5.9 miles you passed earlier. The trail is longer than the road walk and does ascend briefly in a few spots. Turn right and walk back to the dam and across the top to your car.
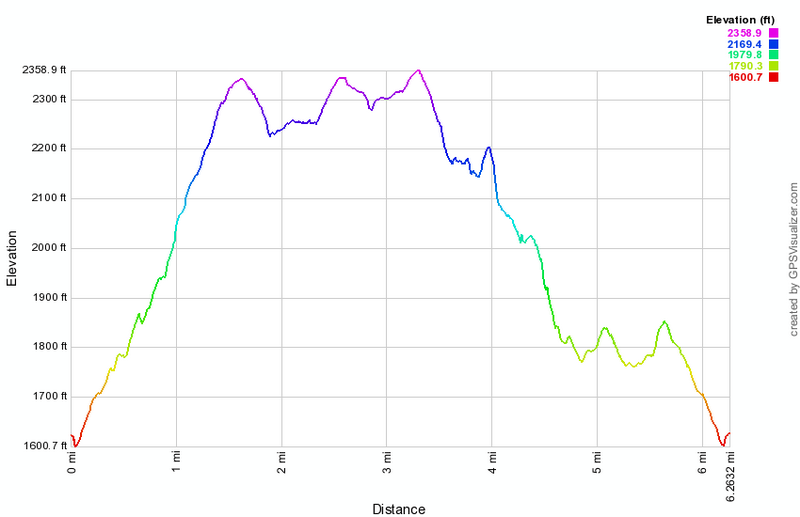 (The image at the left shows the profile of the hike. Remember that all vertical profiles are relative!)
Bear Spring: Eastern Trails
| Quick Look | ||||
|---|---|---|---|---|
| Difficulty | Round trip | Total climb | Internet Maps | |
| 7.6 mi. | 1253 ft. | AllTrails | ||
 Caution: The trails at Bear Spring State Park are primarily constructed for horses and snowmobiles. The wide well-kept trails are easy to walk but poorly marked. You cannot really get lost but you can wander around a lot.
Take County Route 206 to the top of Bear Spring Mountain near Walton, NY. Park in the large pull off on the left hand side of the road just before the turn onto East Trout Brook Road. To start the hike, walk up the road to a wide woods road with a gate on your left. This is Wilson Hollow Road which is also Trail 2 on the horse trails map of the area. As you walk in on this wide trail, you will immediacies notice a clear cut area extending more than half a mile on your left. The trail will continue to rise a little as you walk with no steep uphill or downhill section. in the first 3 miles. At 1.3 miles Trail 11 will enter from the right as it climbs the ridge from just south of Launt Pond on East Trout Brook Road. At 2.3 miles Trail 3 joins from the right. This is where you will return after the loop. At this point the trail descends a little and then climbs slightly. Along the way the trail heads more to the southeast and a snowmobile trail comes in on the left from Downsville. Soon the trail begins to head down until at around 4 miles Trail 12 comes in from the left. Continue to bear to the right and follow Trail 2 as it continues to the lowest point on the hike, the junction with Trail 3 at 4.5 miles. Turn right here on Trail 3 to walk back up to the ridge to the area you passed earlier. At this point in the hike you may think you are in the wrong place but what your are looking at is ANOTHER clear cut area. After the turn Trail 3 climbs to a field that looks down over the clear cut area but also looks down the hollow for some good photographic opportunities. Continue on Trail 3 until it meets Trail 2 back on the ridge about 5.3 miles into the hike. Turn left and follow Wilson Hollow Road for the next 2.3 miles back to the car.
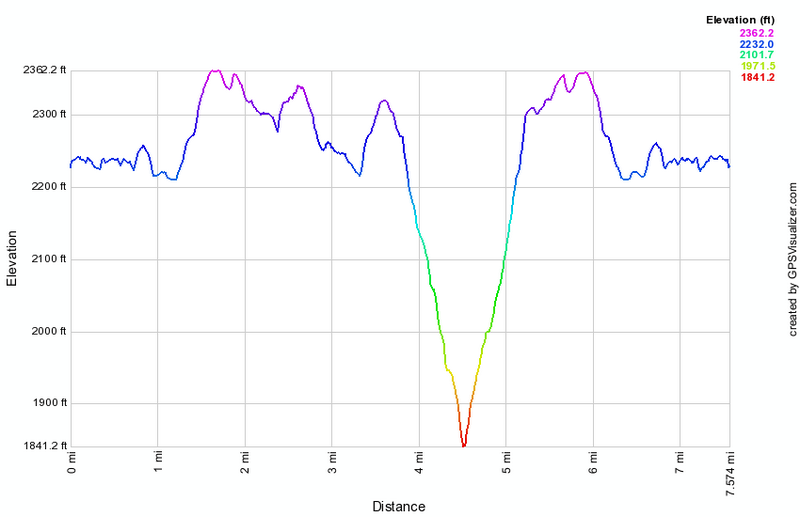 (The image at the left shows the profile of the hike. Remember that all vertical profiles are relative!)
Bear Spring: Eastern Trails (Clockwise)
| Quick Look | ||||
|---|---|---|---|---|
| Difficulty | Round trip | Total climb | Internet Maps | |
| 7.6 mi. | 1053 ft. | AllTrails | ||
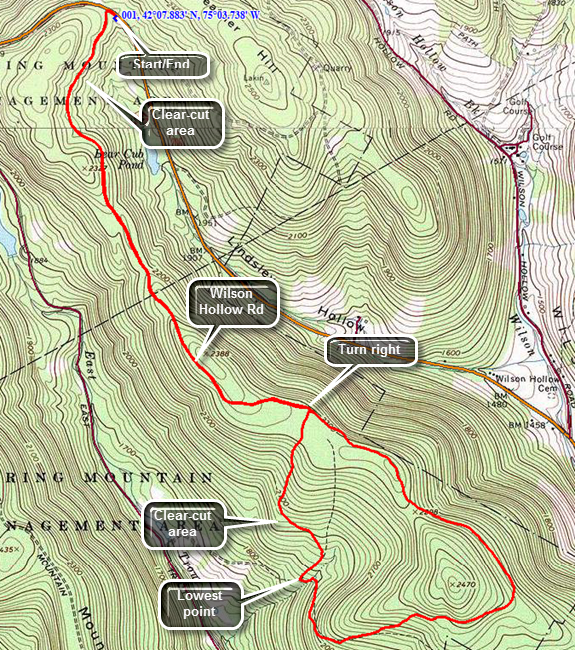 Caution: The trails at Bear Spring State Park are primarily constructed for horses and snowmobiles. The wide well-kept trails are easy to walk but poorly marked. You cannot really get lost but you can wander around a lot.
Take County Route 206 to the top of Bear Spring Mountain near Walton, NY. Park in the large pull off on the left hand side of the road just before the turn onto East Trout Brook Road. To start the hike, walk up the road to a wide woods road with a gate on your left. This is Wilson Hollow Road which is also Trail 2 on the horse trails map of the area. As you walk in on this wide trail, you will immediacies notice a clear cut area extending more than half a mile on your left. The trail will continue to rise a little as you walk with no steep uphill or downhill section. in the first 3 miles. At 1.3 miles Trail 11 will enter from the right as it climbs the ridge from just south of Launt Pond on East Trout Brook Road. At 2.3 miles Trail 3 joins from the right. Turn to the right here and walk along the edge of the field until the trail enters the woods. At this point the trail descends almost 500 feet to the lowest point on the hike. On the way down the trail there is a nice lookout into the valley below. At the bottom of the descent turn left to start to loop around and back up to the ridge heading mostly east. Of course, the payment for a descent is an ascent back to the ridge. In just about a mile you will regain the elevation you lost on the way down. Along the way you will pass a sign on a snowmobile trail to the right that says "Downsville". Continue to walk the woods road east. At about 4.2 miles the trail turns northwest to circle the summit of a hill on your left and head back toward the parking area. From the point of the turn back to the trail junction where you turned right earlier is about 1.15 miles. When you arrive back at the junction, you will know exactly how far you have to go to get back! The hike back along Wilson Hollow road is 2.2 miles and is mostly downhill.
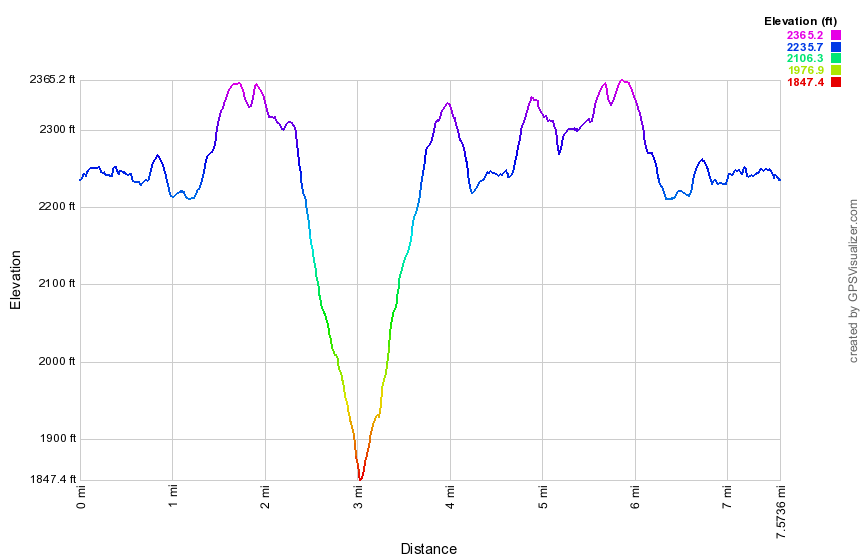 (The image at the left shows the profile of the hike. Remember that all vertical profiles are relative!)
Bear Spring: Eastern Trails from trailhead
| Quick Look | ||||
|---|---|---|---|---|
| Difficulty | Round trip | Total climb | Internet Maps | |
| 7.6 mi. | 1253 ft. | AllTrails | ||
 Caution: The trails at Bear Spring State Park are primarily constructed for horses and snowmobiles. The wide well-kept trails are easy to walk but poorly marked. You cannot really get lost but you can wander around a lot.
Take County Route 206 to the top of Bear Spring Mountain near Walton, NY. Turn onto West Trout Brook Road and park at the main trailhead parking on the left hand side of the road. To start the hike, get on the trail just to the left of the information kiosk. These trails are for horseback riding and are not marked like hiking trails.Continue on this trail through a field and down a hill to where the trail crosses East Trout Brook Road. Continue across and bear left where the trail splits. Ascend a hill to another trail junction on the other side. Turn left and walk down the hill to a woods road. This is Wilson Hollow Road which is also Trail 2 on the horse trails map of the area. As you walk in on this wide trail, you will immediacies notice a clear cut area extending more than half a mile on your left. The trail will continue to rise a little as you walk with no steep uphill or downhill section. in the first 3 miles. At 2.25 miles Trail 11 will enter from the right as it climbs the ridge from just south of Launt Pond on East Trout Brook Road. At 3.1 miles Trail 3 joins from the right. Turn here and skirt the edge of a field before entering the woods and heading downhill. For .8 miles the trail loses 460 feet to the lowest point on the hike. Another clearcut area will appear on the right as you near the end of this section. There are some nice vies down the valley. At the bottom of the hill turn left and start to climb back up to the ridge. In a little more than half a mile the trail splits and you should continue by bearing left up to the ridge. The trail makes an abrupt change in direction from east to northwest and at 6.3 miles you will be back to where you started the loop. Follow Wilson Hollow Road back almost to Route 206. Turn left up the hill and follow your route back to the main trailhead.
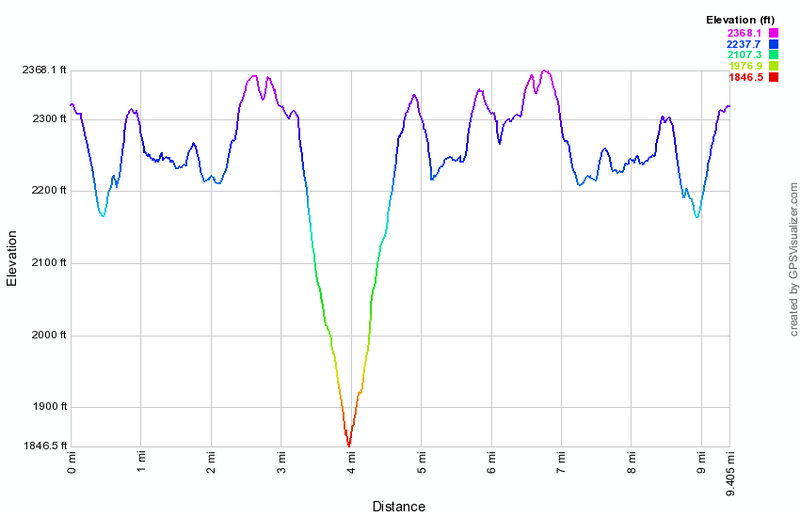 (The image at the left shows the profile of the hike. Remember that all vertical profiles are relative!)
Bear Spring: Launt Pond Loop
| Quick Look | ||||
|---|---|---|---|---|
| Difficulty | Round trip | Total climb | Internet Maps | |
| 5.9 mi. | 1027 ft. | AllTrails | ||
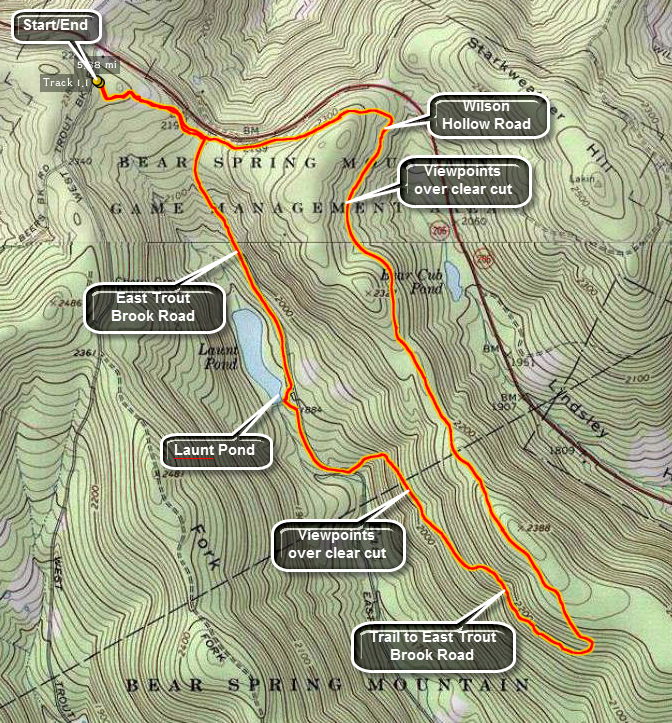 Caution: The trails at Bear Spring State Park are primarily constructed for horses and snowmobiles. The wide well-kept trails are easy to walk but poorly marked. You cannot really get lost but you can wander around a lot.
Take County Route 206 to the top of Bear Spring Mountain near Walton, NY. Turn onto West Trout Brook Road and park at the main trailhead parking on the left hand side of the road. To start the hike, get on the trail just to the left of the information kiosk. These trails are for horseback riding and are not marked like hiking trails.Continue on this trail through a field and down a hill to where the trail crosses East Trout Brook Road. Continue across and bear left where the trail splits. Ascend a hill to another trail junction on the other side. Turn left and walk down the hill to a woods road. This is Wilson Hollow Road which is also Trail 2 on the horse trails map of the area. As you walk in on this wide trail, you will immediacies notice a clear cut area extending more than half a mile on your left. The trail will continue to rise a little as you walk with no steep uphill or downhill section. in the first 3 miles. At 2.25 miles Trail 11 will enter from the right as it climbs the ridge from just south of Launt Pond on East Trout Brook Road. At 2.85 miles another woods road joins from the right. Turn right here walk down the trail to a nearly 180 degree turn at 3.0 miles. As you continue on this trail, a break in the trees on the left reveals another clearcut area. The trail ends, after 1.4 miles and a drop of 550 feet, at a parking area on East Trout Brook Road just south of Launt Pond. Turn right and walk .3 miles up to the pond. This is a favorite picnic and boating area during the season. Head back out to the road and turn left. Walk about a mile north on the road and gain around 300 feet. As you near Route 206, you will see the trail that you used to cross the road earlier in the hike. Turn left and follow your path from earlier back to the car.
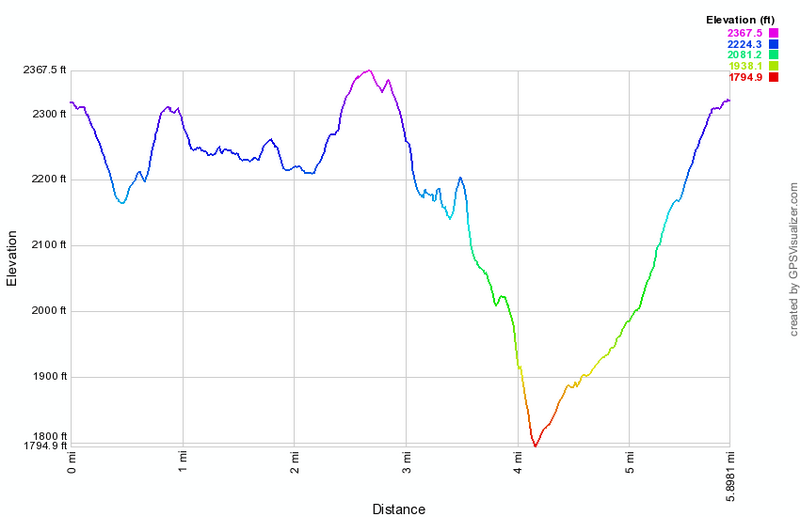 (The image at the left shows the profile of the hike. Remember that all vertical profiles are relative!)
Bear Spring: Launt Pond Loop
| Quick Look | ||||
|---|---|---|---|---|
| Difficulty | Round trip | Total climb | Internet Maps | |
| 4.0 mi. | 630 ft. | AllTrails | ||
 Caution: The trails at Bear Spring State Park are primarily constructed for horses and snowmobiles. The wide well-kept trails are easy to walk but poorly marked for hiking. You cannot really get lost but you can wander around a lot.
Take County Route 206 to nearly the top of Bear Spring Mountain near Walton, NY. Pull off the road to the large parking area on the left just before East Trout Brook Road. To start the hike, walk west along the shoulder of Route 206 to the woods road or trail on the left. This is Wilson Hollow Road which is also Trail 2 on the horse trails map of the area. As you walk in on this wide trail, you will immediately notice a clear cut area extending more than half a mile on your left. The trail will continue to rise a little as you walk with no steep uphill or downhill section. At around 1.3 miles Trail 11 will be on the right as it climbs the ridge from just south of Launt Pond on East Trout Brook Road.Turn right on this trail and descend 430 feet over the next .7 miles to a parking area on East Trout Brook Road. Turn right on the road and hike .3 miles north to Launt Pond. The pond has a dam at the outlet end and is a pretty spot to stop in any season. During the summer, there is a beach for swimming and canoe and kayak rental. Across the road from the pond is a camping area. After looking around, get back on the road and walk 1 mile north where the trail crosses just short of Route 206. Turn right on the trail and stay left at the fork. Walk over a hill and down the other side to Wilson Hollow Road. Turn left and walk back out to your car.
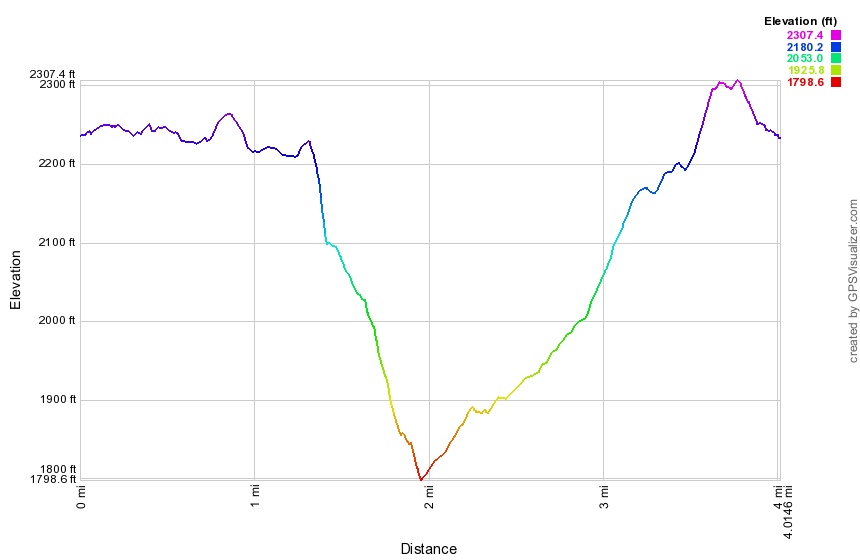 (The image at the left shows the profile of the hike. Remember that all vertical profiles are relative!)
Bear Spring: Northeastern Trails
| Quick Look | ||||
|---|---|---|---|---|
| Difficulty | Round trip | Total climb | Internet Maps | |
| 6.0 mi. | 1100 ft. | AllTrails | ||
 Caution: The trails at Bear Spring State Park are primarily constructed for horses and snowmobiles. The wide well-kept trails are easy to walk but poorly marked. You cannot really get lost but you can wander around a lot. This hike is the result of some wandering.
Take County Route 206 to the top of Bear Spring Mountain near Walton, NY. Turn into the park on West Bear trout Brook Road which is the main entrance. Only a few hundred feet in there will be a large trail head parking area on the left. There is a large hand-painted wooden sign that shows the numbers horse trails. Memorize it since the copies, if there are any, at he trail junctions are useless. Note also that there are many additional trails and roads that form loops and are not shown on any maps.
Exit the parking area on the trail to the left of the sign which should be Trail 2. Almost immediately you will be at an open field with no clues where to go. Walk straight across the field to the trail on the other side. At .5 miles you will cross East Trout Brook Road and immediately be confronted with three possible trails. Bear to the left and up the hill. At 1.0 mile there will be a trail junction which is almost a T with no signs. Turn right to continue with this description or left which is the "correct" way to go. Bearing left the trail ascends to the top of a little plateau with open forest. The trail heads southwest but then turns northwest and descends right back to East Trout Brook Road. Walk .8 miles down the road to Launt Pond. Although this is a road walk the pond is beautiful and well worth the trip. Launt Pond is not on any of the main trails but can be reached by spur trails. After spending some time at the pond, walk down the road about .3 miles to the next big parking area on the left. Just before the parking area enter the woods on Trail 11. Trail 11 winds back and forth but travels mostly east and up to meet Wilson Hollow Road which is part of Trail 2. Turn left or north and follow the wide road for about 1.2 miles at which point you will be within sight of Route 206. As you approach this area you will see a large clear cut area on the left. Turn left up the hill and make the first right. If this looks familiar, it should. This is the area where you made a short loop earlier. Head back to the parking area on Trail 2 which is only 1`.1 miles away. Other loops are possible using Trail 2 which extends much farther south.
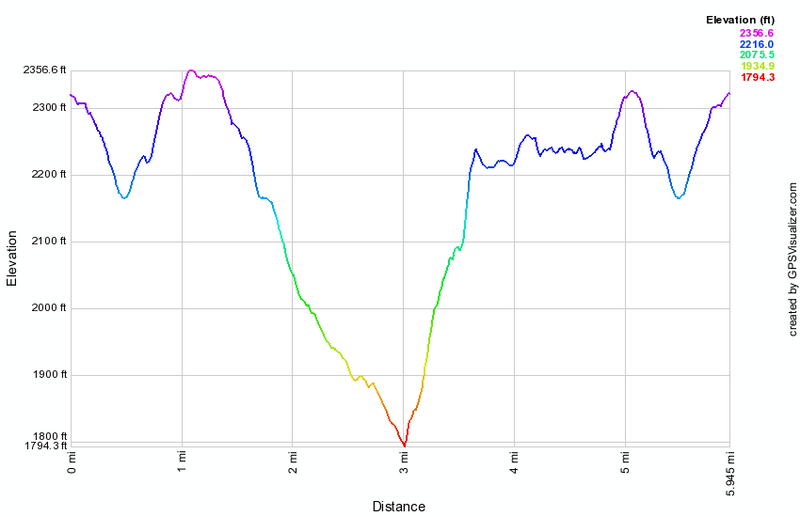 (The image at the left shows the profile of the hike. Remember that all vertical profiles are relative!)
Bear Spring: Ridge Loop
| Quick Look | ||||
|---|---|---|---|---|
| Difficulty | Round trip | Total climb | Internet Maps | |
| 8.9 mi. | 1447 ft. | AllTrails | ||
_map.png) Caution: The trails at Bear Spring State Park are primarily constructed for horses and snowmobiles. The wide well-kept trails are easy to walk but poorly marked. You cannot really get lost but you can wander around a lot.
Caution: The trails at Bear Spring State Park are primarily constructed for horses and snowmobiles. The wide well-kept trails are easy to walk but poorly marked. You cannot really get lost but you can wander around a lot.Take County Route 206 to the top of Bear Spring Mountain near Walton, NY. At the top of the hill turn onto West Trout Brook Road and drive south a short distance to the large parking area on the left. Walk just less than a mile south on West Trout Brook Road and turn left onto the trail that runs over Fork Mountain. This is the central ridge of the three at the park and serves as part of the Finger Lakes Trail. The walk SSE on the trail for another 2.4 miles until Trail 4 turns left off the ridge. The walk along the ridge rolls some but does not gain or lose much elevation. Trail 4 is steep and drops 655 feet in less than a mile. The trail ends at East Trout Brook Road. Cross the road to the parking lot and then walk down the trail to Middle Pond. Approach Middle Pond quietly as you may spot a blue heron, a beaver or other wildlife. Walk straight ahead and up the hill on the trail. At 4.6 miles a trail appears on the left but you should continue up the hill to 4.9 miles where the trail splits. Notice the large clear cut area on the left as there are several in the area. Keep to the left to take the McCoy Hill Cutoff to the top of the eastern ridge. There is at least one viewpoint along the way and at 5.7 miles you will walk through a field to meet the trail along the eastern ridge. Turn left on this trail and walk along the ridge. At 6.0 miles a wide woods road heads back down off the ridge to East Trout Brook Road. Further along at 6.6 miles, another trail heads down to the camping area at Launt Pond. Continue straight ahead and at 7.2 miles another large clear cut area will appear on your right. Another clear cut is visible on the hillside across Route 206. At 7.8 miles turn right and walk up a short hill. Bear right at the first form and walk up a little and then down to East Trout Brook Road. The final .4 miles is uphill and crosses a large field before you are back at the parking area.
_gra.png) (The image below shows the profile of the hike. Remember that all vertical profiles are relative!)
(The image below shows the profile of the hike. Remember that all vertical profiles are relative!)
Bear Spring: Southeastern Trails
| Quick Look | ||||
|---|---|---|---|---|
| Difficulty | Round trip | Total climb | Internet Maps | |
| 6.2 mi. | 1475 ft. | AllTrails | ||
 Caution: The trails at Bear Spring State Park are primarily constructed for horses and snowmobiles. The wide well-kept trails are easy to walk but poorly marked. You cannot really get lost but you can wander around a lot. This hike is the result of some wandering.
Take County Route 206 to the top of Bear Spring Mountain near Walton, NY. Turn onto East Trout Brook Road which is a paved road that connects to Trout Brook Road and Route 30 at Shinhopple. Drive south on the road for about 2.2 miles passing Launt Pond on your right. Park at the roadside pulloff near Middle Pond. There will be a dam and bridge at the outlet of the pond which will allow you to cross East Trout Brook. You may also drive north on Trout Brook Road from Route 30 in Shinhopple. Bear right where West and East Trout Brook Roads separate. The parking area will be about 2.2 miles from where the roads diverge. It may be possible to park at the large parking area where the two roads separate but crossing East Trout Brook in this area on Trail 8 can be difficult in all but the driest times. There is no bridge!
After crossing the bridge at Middle Pond turn right and follow Trail 8 as it roughly parallels the creek.
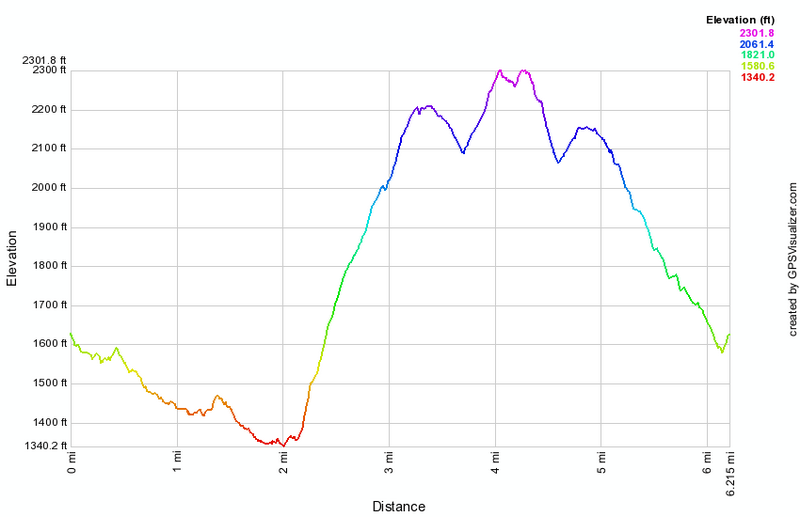
(The image above shows the profile of the hike. Remember that all vertical profiles are relative!)
Bear Spring: Southeastern Trails (clockwise)
| Quick Look | ||||
|---|---|---|---|---|
| Difficulty | Round trip | Total climb | Internet Maps | |
| 5.8 mi. | 1270 ft. | AllTrails | ||
 Caution: The trails at Bear Spring State Park are primarily constructed for horses and snowmobiles. The wide well-kept trails are easy to walk but poorly marked. You cannot really get lost but you can wander around a lot. This hike is the result of some wandering.
Take County Route 206 to the top of Bear Spring Mountain near Walton, NY. Turn onto East Trout Brook Road which is a paved road that connects to Trout Brook Road and Route 30 at Shinhopple. Drive south on the road for about 2.2 miles passing Launt Pond on your right. Park at the roadside pulloff near Middle Pond. There will be a dam and bridge at the outlet of the pond which will allow you to cross East Trout Brook. Continue straight ahead and almost immediately start to climb the hill toward the McCoy Hill Cutoff. Ignore the side trails on the left and at .7 miles turn right where the trail splits. Follow the wide horse trail as it heads south while continuing to climb toward the ridge. The trail surface is very level which make sit easy to walk. At 1.2 miles the trail splits again. Stay to the right to continue east and southeast. At 1.4 mile follow the trail as it turns south and begins to snake along the ridge. At his point there is a "Danger! Keep Out!" sign on the trail straight ahead which is another good reason to turn right! After descending for a short distance, the trail again heads up the ridge and slightly to the east. At 2.1 miles you will still be headed south and will hit the highest point on the hike at 2300 feet. After the high point, start to descend and head southwest. At 2.5 mile you should pick up Finger Lakes Trail blazes as it comes up from East Trout Brook Road. Hike up the last hill in front of you and at 2.85 miles start a descent still heading south. At 3.2 miles turn sharply right or to the west and begin a .75 mile descent to East Trout Brook losing 625 feet in the process. Most of the trail down is old woods road or new logging road so the walk was pretty easy. The trail parallels a small stream. At 4 miles you will be in a field near East Trout Brook. You may turn right and follow the trail back to the car but it is often very wet. If you walk slightly to the left of the small pond, you can cross a bridge to East Trout Brook Road and hike back on the road. This is not quite as scenic as the trail but MUCH easier (an drier) walking. Walk the 1.7 miles back to the car gaining 300 feet in the process.
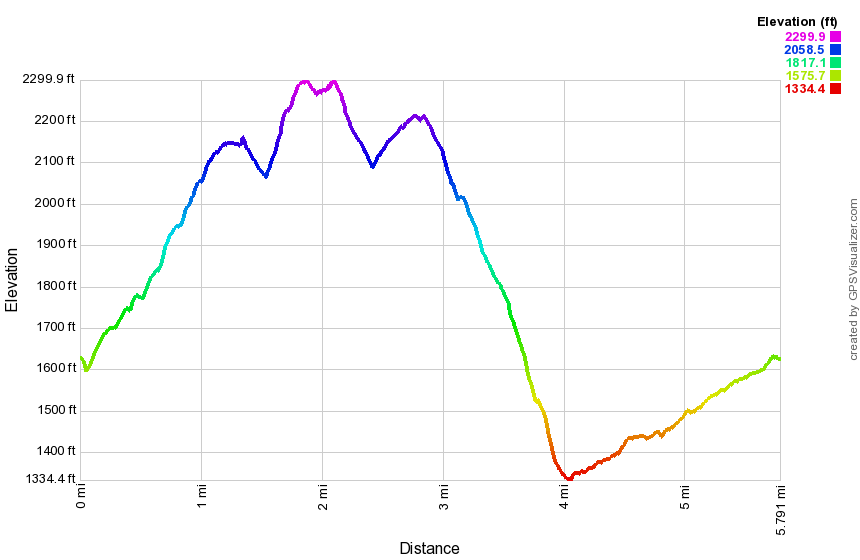 (The image below shows the profile of the hike. Remember that all vertical profiles are relative!)
Bear Spring: Trail 4
| Quick Look | ||||
|---|---|---|---|---|
| Difficulty | Round trip | Total climb | Internet Maps | |
| 1.9 mi. | 690 ft. | AllTrails | ||
 Caution: The trails at Bear Spring State Park are primarily constructed for horses and snowmobiles. The wide well-kept trails are easy to walk but poorly marked. You cannot really get lost but you can wander around a lot.
Take County Route 206 to the top of Bear Spring Mountain near Walton, NY and watch for East Trout Brook Road on your left. Turn left on East Trout Brook Road heading south and passing Launt Pond on your right. After 2.2 miles park on the left side of the road in the parking area near Middle Pond. Cross the road and head up Trail 4 to the junction with Trail 5 on the ridge. UP is the operative word since Trail 4 is pro ably the steepest trail in the park. It only gains 690 feet but it does so in about 1 mile. Ignore the trail head signs that say .6 miles since a careful inspection will show this is "as the crow flies". The trail is steep with some very steep sections and near the top there is a switchback on the horse trail. Just before the junction with Trail 5 on the ridge is a sharp right turn. Once you are on top you can simply walk back to the car or make this part of a longer or MUCH longer loop.
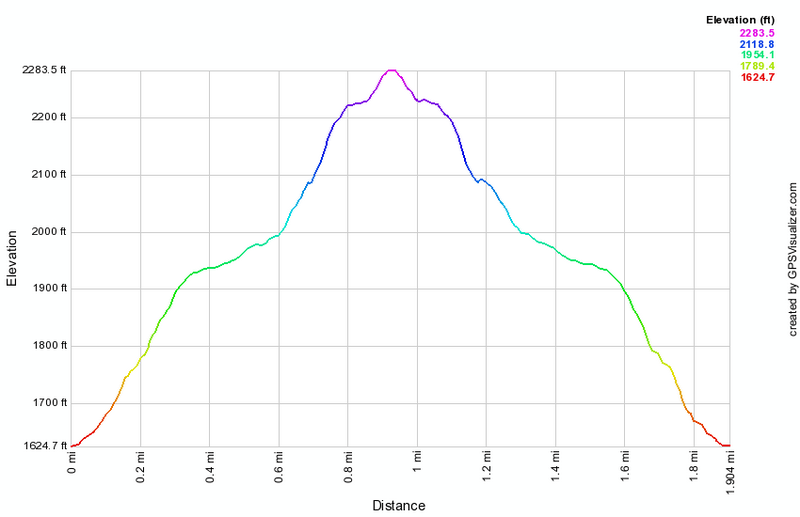
(The image above shows the profile of the hike. Remember that all vertical profiles are relative!)
Bear Spring: Trout Brook
| Quick Look | ||||
|---|---|---|---|---|
| Difficulty | Round trip | Total climb | Internet Maps | |
| 3.7 mi. | 527 ft. | AllTrails | ||
 Caution: The trails at Bear Spring State Park are primarily constructed for horses and snowmobiles. The wide well-kept trails are easy to walk but poorly marked. You cannot really get lost but you can wander around a lot.
Take County Route 206 to the top of Bear Spring Mountain near Walton, NY and watch for East Trout Brook Road on your left. Turn left on East Trout Brook Road heading south and passing Launt Pond on your right. After 2.2 miles park on the left side of the road in the parking area near Middle Pond. Walk down to the dam and then turn right on the trail. The trail parallels Trout Creek for most of its length but moves away through fields and forest in places. The trail can be very wet at times. Walk as far as you like and then turn around to return. There are a number of ways to extend the distance and difficulty of the hike.
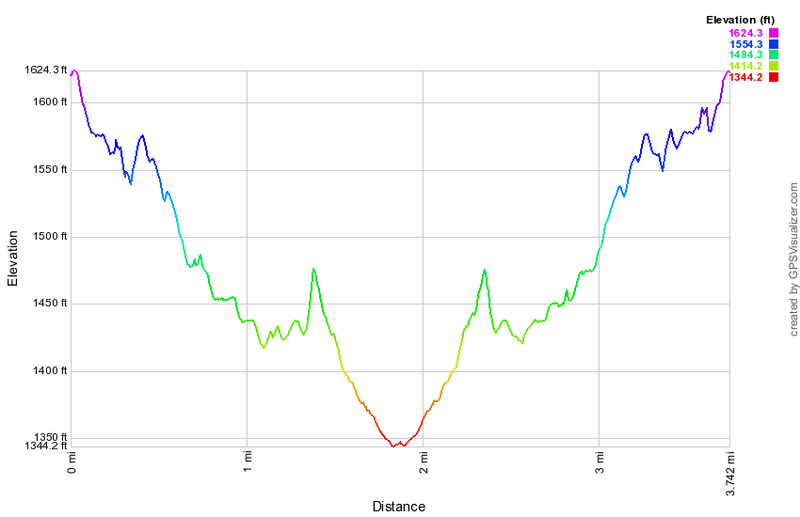
(The image above shows the profile of the hike. Remember that all vertical profiles are relative!)
Bear Spring: Western Loop
| Quick Look | ||||
|---|---|---|---|---|
| Difficulty | Round trip | Total climb | Internet Maps | |
| 12.2 mi. | 2100 ft. | AllTrails | ||
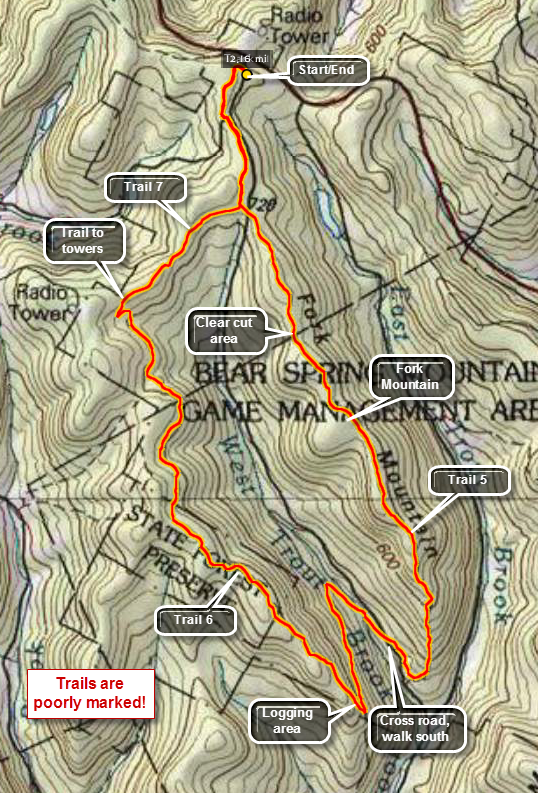 Caution: The trails at Bear Spring State Park are primarily constructed for horses and snowmobiles. The wide well-kept trails are easy to walk but poorly marked. You cannot really get lost but you can wander around a lot.
Take County Route 206 to the top of Bear Spring Mountain near Walton, NY. Turn into the park on West Bear trout Brook Road which is the main entrance. Only a few hundred feet in there will be a large trail head parking area on the left. There is a large hand-painted wooden sign that shows the numbers horse trails. Memorize it since the copies, if there are any, at he trail junctions are useless. Note also that there are many additional trails and roads that form loops and are not shown on any maps.
Exit the parking area on the trail across the road which should be Trail 7. Within .5 miles you will cross Beers Brook Road and the trail continues on the other side as it parallels West Trout Brook Road. The trail is wide open and grassy and wanders back and forth across the ridge and generally gains a little elevation. At 1.1 miles the trail bears to the right and continues until it meets the trail to the Houck Mountain towers at about 2.2 miles. Turn left and walk a short distance to the next junction and turn right staying on the horse trail marked with the blue horse trail markers. There are few markers that designate the trail numbers and at some point Trail 7 changes to Trail 6 at least according to the sign back at trail head. As you walk along the ridge for the next 3.25 miles to the south and then southeast, you may begin to wonder if you are going the right way. At the and of the ridge the trail starts to descend for about .45 miles to a switchback almost 6 miles into the hike! After the switchback, walk about .8 miles to the next switchback and then another ,5 miles to West Trout Brook Road. You will be about 7.3 miles into the hike and will have dropped almost 1000 feet from the ridge. Cross the road and walk a little to the right to continue on Trail 6. Now its time to regain that 1000 feet you dropped!
From the road the trail ascends briefly and then drops through a stand of spruce trees before climbing again to a trail junction within .35 miles of the road. Finally a trail that is clearly marked! Turn left on Trail 5 and start to climb over 900 feet for the next 1.3 miles. After this there are still some ups and downs but the trail remains relatively flat as it passes Fork Mountain at 9.5 miles into the hike. At 10 miles the trail starts to descend. Along the trail at about 10.4 miles you will pass a clear cut area to the left of the trail. Somewhere around 11 miles Trail 5 ends at West Trout Brook Road. You can walk the road back to the car or cross over to get back on Trail 7 and retrace your earlier route back to the car which is only a mile away.
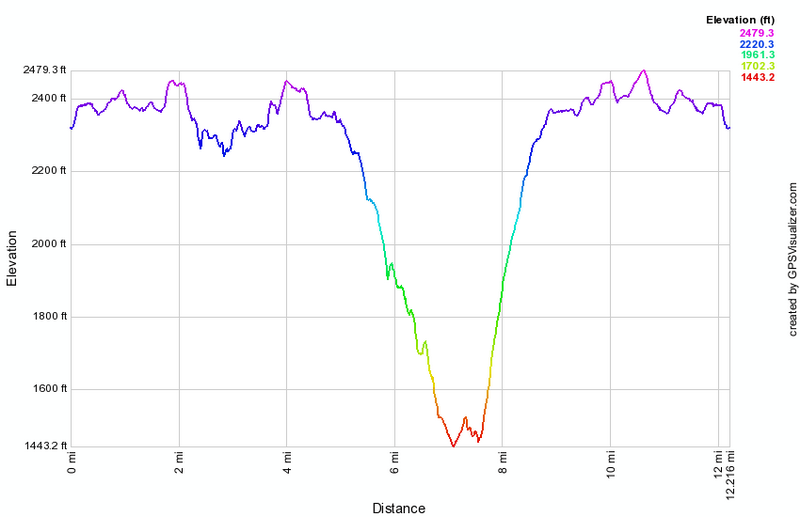 (The image at the left shows the profile of the hike. Remember that all vertical profiles are relative!)
Bearfort Ridge: Surprise Lake and West Pond
| Quick Look | ||||
|---|---|---|---|---|
| Difficulty | Round trip | Total climb | Internet Maps | |
| 3.94 mi | 1140 ft | AllTrails | ||
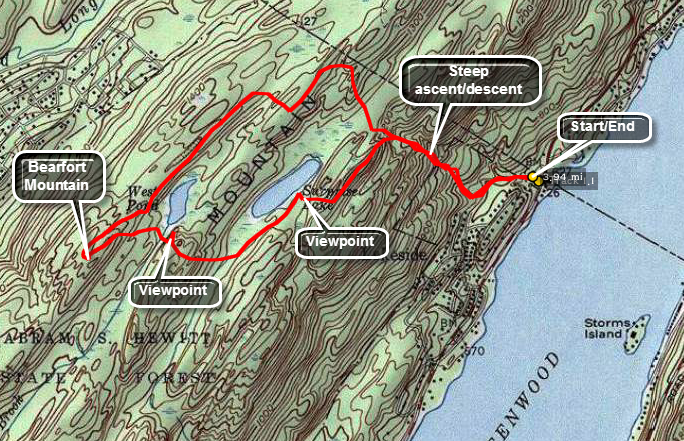
Park in the parking area on Route 210 just south of the New York border. Route 210 runs parallel to the western shore of Greenwood Lake and there are many marinas and boat ramps in the area. This parking area is hard to find as it looks like you are turning into the parking lot for one of the marinas on the side of the road away from the lake. From the parking area get on the blue State Line Trail and follow it up to the ridge. This area is popular and there may be no definite path defined. Keep watching for the trail markers as the trail ascends about 650 feet in the first .6 miles. This is almost a 20% grade and is a little steep. Near the top of the climb leave the State Line Trail and turn left on the yellow Ernest Walter Trail that travels along the ridge and to the shore of Surprise Lake where there is a nice viewpoint over the lake. Stay on the yellow trail as it descend some from the ridge and then climbs back to a lookout over West Pond about 1,5 miles into the hike. The trail can be wet at the lowest point of this descent at the end of Surprise Lake. Just after the viewpoint you will cross Green Brook and then turn almost due west off the trail to bushwhack to the highest point on the ridge which is Bearfort Mountain. There is no view from the summit so you can avoid this part if you are not completing a "list" of peaks. Back on the main trail there is an almost 180 degree turn as the trail begins to wrap around West Pond heading northeast. The trail continues almost flat as it follows the ridge line to a junction with the white Appalachian Trail at about 2.75 miles. Turn right on the AT and start to watch for the blue blazes of the State Line Trail on the right. Turn right at about 3 miles and descend almost 700 feet in the next .85 miles to return to your car.

(The image above shows the profile of the hike. Remember that all vertical profiles are relative!)
Bearfort Ridge: Surprise Lake from Warwick Turnpike
| Quick Look | ||||
|---|---|---|---|---|
| Difficulty | Round trip | Total climb | Internet Maps | |
| 5.3 mi. | 1000 ft. | AllTrails | ||
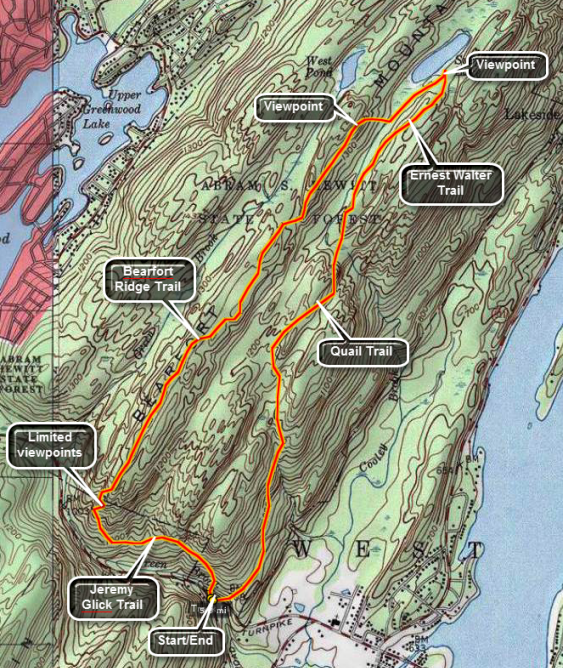 This trail follows Bearfort Ridge and leads to a secluded lake. The lookout from the ridge over Greenwood Lake is limited but nice. The route is challenging as it keeps the hiker on a spine of rock with many ups and downs.
Get on the Warwick-Greenwood Lake Turnpike. Near Greenwood Lake look for White Road that runs south. Just west of the intersection with White Road is a small parking area. If this lot is full there is another parking about a quarter mile west. Just out of the parking area there is a trail junction. Bear left on the white blazed Bearfort Ridge Trail and follow it as it ascends 630 feet in the next mile. Continue to follow the trail as it dips and rises along the ridge. Watch you footing on the rock spine that makes up most of this part of the trail At about 2.55 miles the trail meets the yellow Ernest Walter Trail. Turn right and walk to the shores of Surprise Lake for a nice view. Turn around and look for the orange blazes of the Quail Trail. This trail heads southwest and back to the car. It has its ups and downs for about a mile until at 4 miles it starts a serious downward trend. From here the trail drops over 500 feet in the last 1.3 miles until you are back at the parking area.
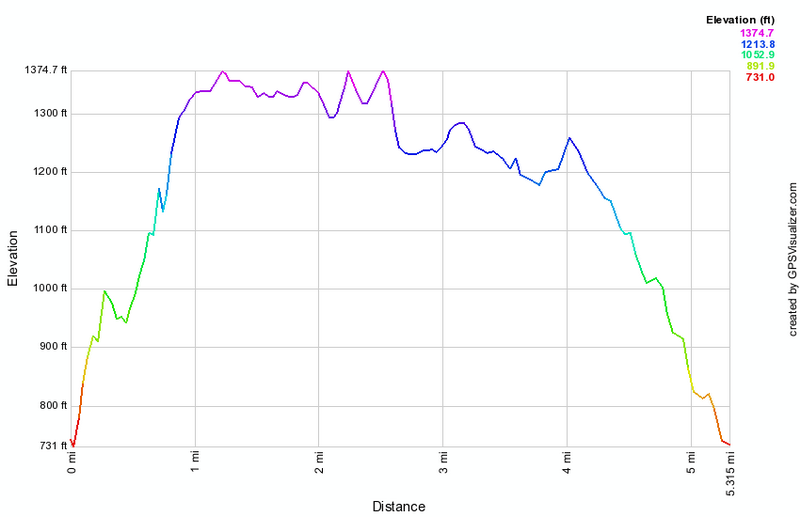
(The image above shows the profile of the hike. Remember that all vertical profiles are relative!)
Bearfort Ridge: Terrace Pond from Warwick Turnpike
| Quick Look | ||||
|---|---|---|---|---|
| Difficulty | Round trip | Total climb | Internet Maps | |
| 4.6 mi. | 1000 ft. | AllTrails | ||
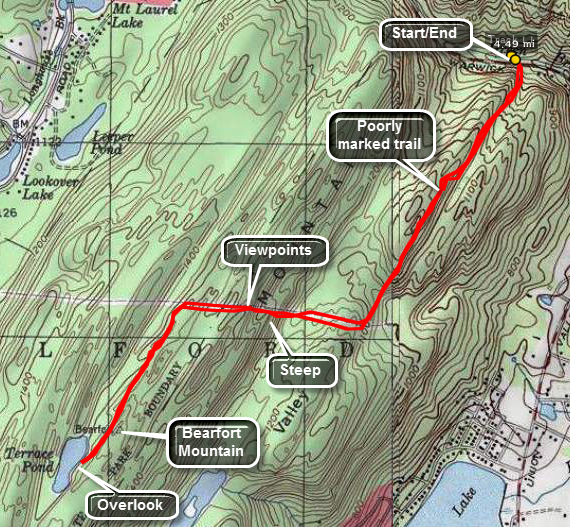 WARNING: This trail is closed as of July 2011 due to an expansion of the Tennessee Gas Pipeline Company's construction project. The new construction bisects the trail. Further construction may threaten even the AT in New Jersey!
This trail leads to a secluded glacial pond and the lookout from the ridge over Greenwood Lake is excellent. The New York City skyline is visible from the highest point. The route is challenging as it keeps the hiker on a spine of rock with many ups and downs and has several STEEP climbs.
Get on the Warwick-Greenwood Lake Turnpike. Near Greenwood Lake look for White Road that runs south. About a quarter mile west of the intersection and up the hill is a small parking area that is more of a pulloff on the north side of the road. Park here and walk across the road to get on the blue Terrace Pond North Trail. The first part of this trail runs through private property and the owners have been kind enough to allow access. For about a mile the trail ascends and the descends. Watch for an almost 90 degree right turn around 1 mile after which the trail drops slightly. In this area you will eventually start to walk UP a power line right-of-way. There are great views to the south and east along the way and the view ahead of what you are going to climb is impressive. In a short .2 miles the trail climbs about 250 feet which is close to a 30% grade! After this, the trail levels off and at 1.6 miles turns sharply off the power line and into the woods. The trail continues up slightly as it follows spines of rock until it meets the white Terrace Pond Circular Trail at about 2.1 miles. Walk to the cliffs on the south shore of the pond for a beautiful view. Above and behind you is an even higher area. This is Bearfort Mountain which is the highest point in Passaic County. You can take the short bushwhack to the summit. There are several informal paths to follow. To get back you may continue around the pond on the Circular Trail or simply retrace the path you took to the pond.If you choose to go around the pond, be aware that the east end can be very wet.
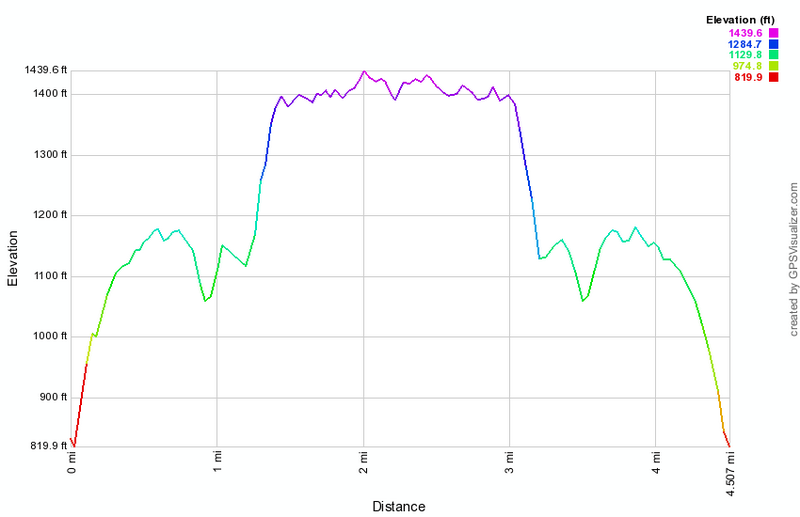 (The image at the left shows the profile of the hike. Remember that all vertical profiles are relative!)
Beaver Dam Road to Ryan Road
| Quick Look | ||||
|---|---|---|---|---|
| Difficulty | Round trip | Total climb | Internet Maps | |
| 8.6 mi. | 1615 ft. | AllTrails | ||

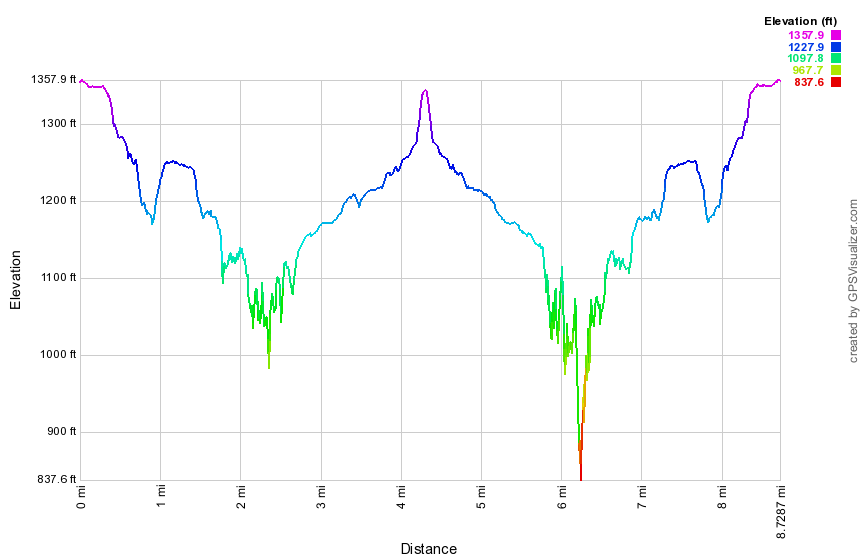 (The image at the left shows the profile of the hike. Remember that all vertical profiles are
relative!)
(The image at the left shows the profile of the hike. Remember that all vertical profiles are
relative!)
Beaverkill Campgrounds
| Quick Look | ||||
|---|---|---|---|---|
| Difficulty | Round trip | Total climb | Internet Maps | |
| 2.8 mi. | 225 ft. | Alltrails | ||
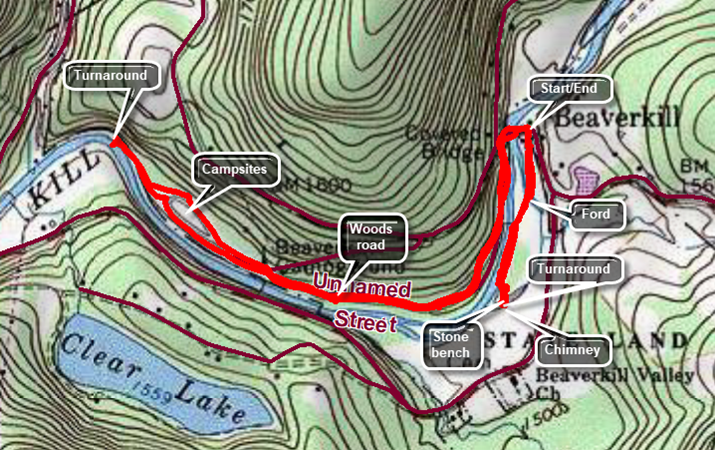 Drive north on the Beaverkill Road from Old Route 17 between Livinston Manor and Roscoe. Turn left on Campsite Road and drive to the parking area near the Beaverkill Covered Bride. Walk across the bridge and turn left on a woods road just after crossing the bridge. Walk along the woods road that parallels the river. You will begin to see several buildings that are the bathrooms for now-abandoned campsites. After about .7 miles, continue to walk west and northwest on the paved roads that serve the active campsites. You may walk passed the last campsite on a path until it ends. From the end of the path you can see the river disappear around a bend. Walk back along the same route retracing your steps to the parking area. Walk out the back of the parking area passing the bathhouse on the left. Note the concrete paving in an old streambed. At one time the river split and the water here was quite deep. This was the ford to get to the campsites on the other side. Continue to walk on the path along the river where there were once campsites. The path ends with a massive stone bench. To the left and ahead of the bench is an old wellhead. Across a small stream is an interesting chimney. Return to the parking area and your car by simply reversing your route
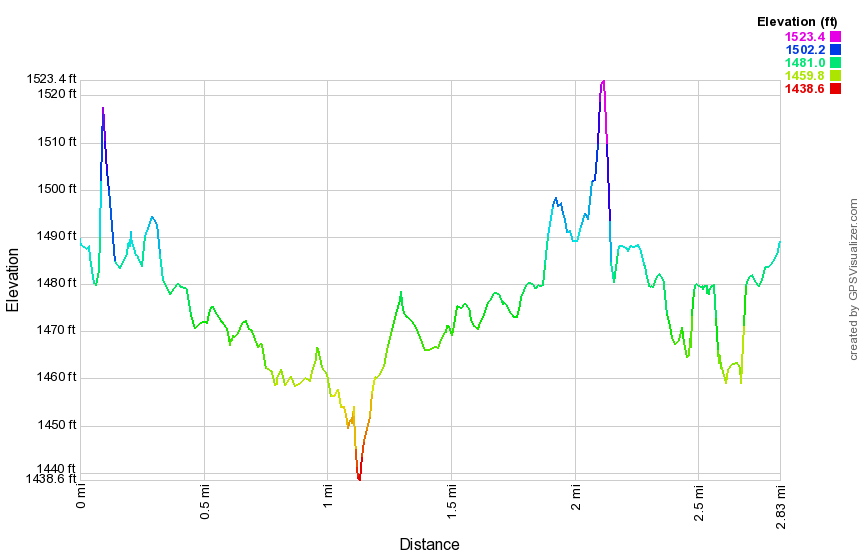
(The image above shows the profile of the hike. Remember that all vertical profiles are relative!)
Beaverkill Headwaters from Wild Meadow Road
| Quick Look | ||||
|---|---|---|---|---|
| Difficulty | Round trip | Total climb | Internet Maps | |
| 5.7 mi. | 643 ft. | AllTrails | ||
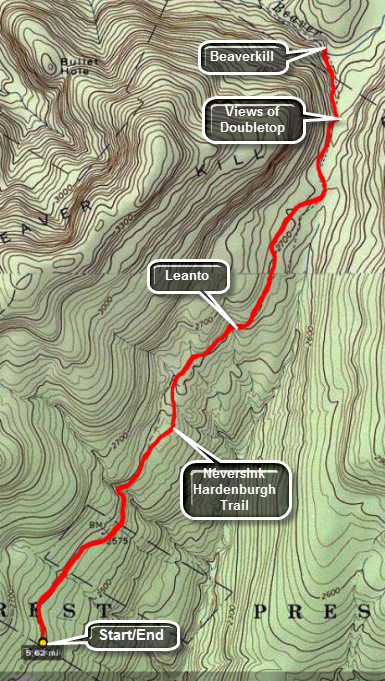 As you walk the first part of this route you will hear the waters of Fall Brook flowing roughly south. Once you get to the wetlands near the end the water will start to flow west with water feeding in from runoff from Doubletop. The headwaters of the Beaverkill are a little further north on the slopes of this mountain. The trail where it meets the Beaverkill has been eroded and crossing can be challenging even in drier weather.
Park at the end of Black Bear Road (Wild Meadow Road) in the snowplow turnaround as long as there is no snow! Walk down the road which serves as the beginning of the yellow Neversink Hardenburgh Trail in this area. Walk by the hunting camp and continue on the trail on the other side. The trail can be very wet in places. Cross over a brook and head up a little gaining some elevation. The Fall Brook lean-to is about 1.7 miles into the hike. After passing the lean-to, a swampy area appeared on the right of the trail which leads into a series of beaver ponds and beaver meadows. Doubletop Mountain is in the background. This area is the headwaters of Fall Brook which runs south and the Beaverkill which runs north and west. The trail parallels the Beaverkill for a short distance and then ENDS at the edge of the stream. Linger for some time to take some pictures and dip a toe in one of the best trout streams in the United States. When you are done, turn around and retrace your route to the car.
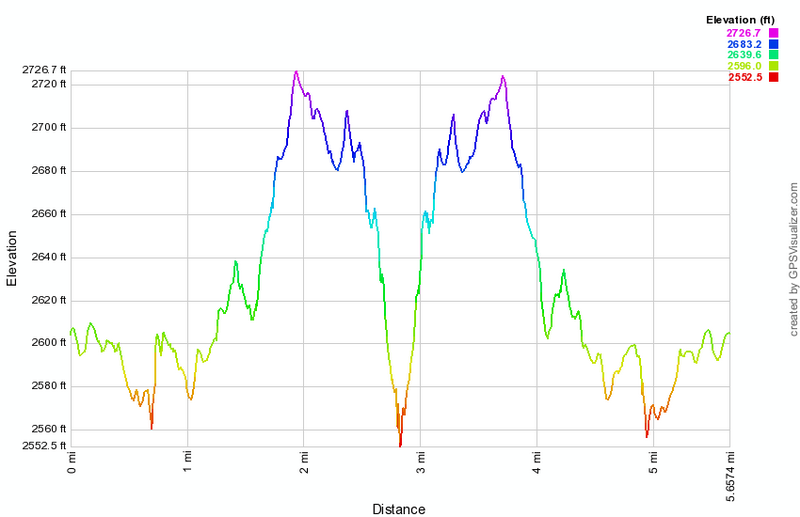
(The image above shows the profile of the hike. Remember that all vertical profiles are relative!)
Beebe Hill Fire Tower
| Quick Look | ||||
|---|---|---|---|---|
| Difficulty | Round trip | Total climb | Internet Maps | |
| 1.7 mi. | 400 ft. | AllTrails | ||
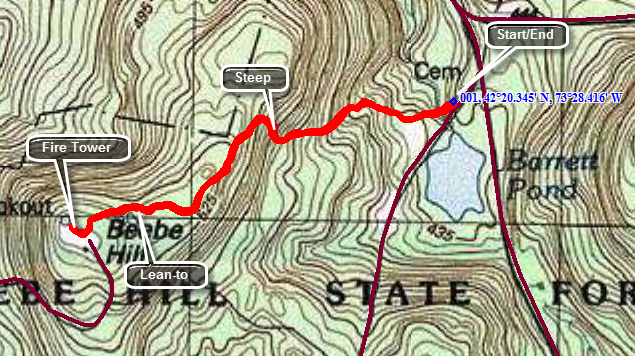 Beebe Hill State Forest is on Route 22 in Austerlitz. Turn north on Osmer Road and drive about 1.6 miles to BarrettPond on the left. The access road to the trailhead is just north of the pond. After parking you may walk through the gate and use the road to the fire tower. You may also use the trail to the left of the information kiosk. The trail is marked with a sign that says "Fire Tower 1 mile" although the distance is shorter. The trail crosses two bridges over small streams on its way to the tower. The first half mile has a few steep sections but it switches back and forth several times. After .5 miles or so you will be on the flat top of the hill and a lean-to will appear on the left. Continue to the end of the trail. There you will find an observer's cabin, another building and the tower. The tower can be climbed and the cab is open all year round. Despite the fact that the hill rises only about 300 feet there are great views in all directions. The best views are to the west where the Catskills can easily be seen.
 (The image at the left shows the profile of the hike. Remember that all vertical profiles are relative!)
Beech Hill Road to Little Pond
| Quick Look | ||||
|---|---|---|---|---|
| Difficulty | Round trip | Total climb | Internet Maps | |
| 4.1 mi. | 920 ft. | AllTrails | ||
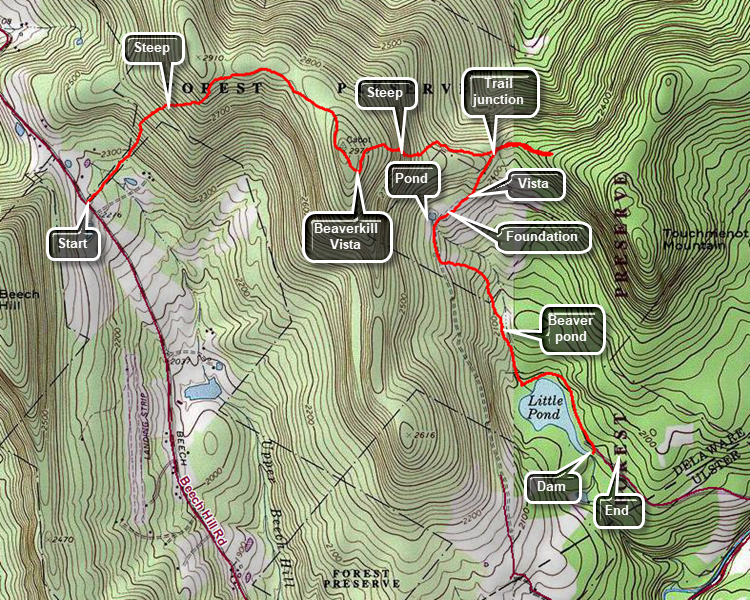
This hike is 4.1 miles with a few very steep climbs. As presented it is a one-way hike although it could be done as an 8 mile out and back. Head toward Lew Beach on the Beaverkill Road from Livingston Manor. Pass through Lew Beach toward Turnwood. Watch for a left hand turn with a road sign for Beech Hill Road. Drive up the road for about 2.6 miles and park at the parking area on the right. The hike to the Beaverkill Vista viewpoint is only 1.5 miles but a good part of it is steep. A .4 mile section in the middle ascends at a grade of 26% before it finally levels off. The first part of the trail is flat and actually descends a little and it almost always wet. At about .25 miles into the hike the trail starts to ascend and gains 575 feet over the next .5 miles. After this point the trail flattens out and rolls a little along the way to the viewpoint. At .85 miles you may notice what looks like a road off the trail on the left. I don't know much about it but it does look very much like a road. Continue without much change in elevation to 1.25 miles where the trail ascends again and then drops a little to the vista at 1.5 miles. Enjoy the view from the flat rock. Immediately below is Little Pond with Touch-Me-Not Mountain to the left. Continue on the trail as it descends the east side of Cabot Mountain. This side is even steeper than the ascent on the west. The .4 miles of the descent averages a 22% grade but small sections have a 38% grade. At the bottom of the descent the trail levels. This are is often wet and can be a sea of nettles at times. Continue to follow the trail to the junction with the yellow Little Pond Trail at 2.1 miles. Turn right on this trail as it gently descends toward Little Pond. At 2.3 miles the trail passes through an open area with views of the ridges and valleys to the east. A little further along is an old foundation on the left and a pond on the right. Continue on the trail as it follows a woods road. After a short distance, the trail turns left of the road. The trail descends to a large beaver pond and the follows a stream out to the shore of Little Pond. Turn left on the trail that loops around the pond. As you approach the parking area, stay to the right and walk to the dam which has a small bridge. This give a nice view of the pond with Cabot Mountain behind it. Walk to the parking area to a car to give you a ride back to Beech Hill.
 (The image at the left shows the profile of the out and back hike. )
Beer Mountain (Livingston Manor)
| Quick Look | ||||
|---|---|---|---|---|
| Difficulty | Round trip | Total climb | Internet Maps | |
| 1.9 mi. | 450 ft. | AllTrails | ||
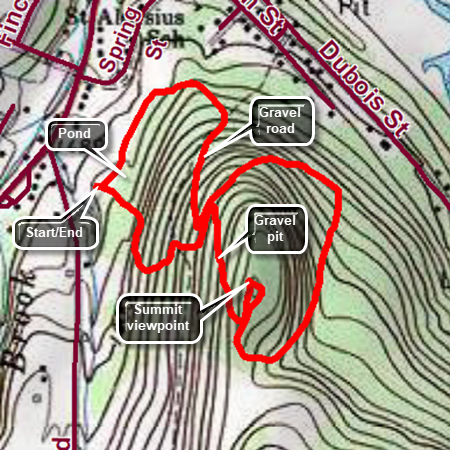
Beer Mountain is the hill behind the Upward Brewery in Livingston Manor. The property was originally purchase by a wealthy developer who hoped to build a casino on top of the hill. Those plans fell through as did the developer's fortune. Eventually, a group of businessmen bought the land and built the brewery. There is a small pond on the property and it is nicely landscaped. The owners also enhanced the hiking trails on the property and they are open to the public although I am sure the brewery would appreciate a purchase! Head south from the traffic light in Livingston Manor for about half a mile heading toward Shandelee. Turn left at the sign for the brewery just before Treyz Hill Road. Park in a space in one on the parking lots. Walk toward the hill with the brewery on your right toward the dirt path and signs where the trails begin. Start up the hill. At the trail junction, continue straight ahead. The trail soon flattens and goes through a switchback as it works its way toward the top of the hill. You will break out of the trees onto a gravel road that was built for construction vehicles to work on top of the hill. Continue straight ahead on the road to the summit of Beer Mountain. A little farther along is an area where the red shale has been removed to help build the road. Near the summit the trail continues straight ahead. Turn left to walk to the clearing at the top. The summit has a large fire pit and some picnic tables. There are limited views from the summit. Walk back to where the trail continues down the back side of the hill. This section is downhill for .35 miles and loses over 200 feet at an 11% grade. The trail has quite a few loose rocks and slippery pine needles. Near the bottom of the descent watch for a tree trunk that spans the trail about 6 feet above the ground. At the end of the descent the trail begins to ascend again. The ascent is less than a quarter mile but there is a 15% grade. The trail begins to descend to the point where you started the final ascent to the summit earlier. Turn right on the gravel road and begin to descend the gravel road. Eventually, the trail flattens as it returns to the grounds of the brewery. Walk passed the pond and back to your car.
 (The image at the left shows the profile of the out and back hike. )
Belleayre Mt: Ski Area from Giggle Hollow
| Quick Look | |||||
|---|---|---|---|---|---|
| Difficulty | Round trip | Total climb | Internet Maps | ||
| 8.0 mi. | 2335 ft. | AllTrails | |||
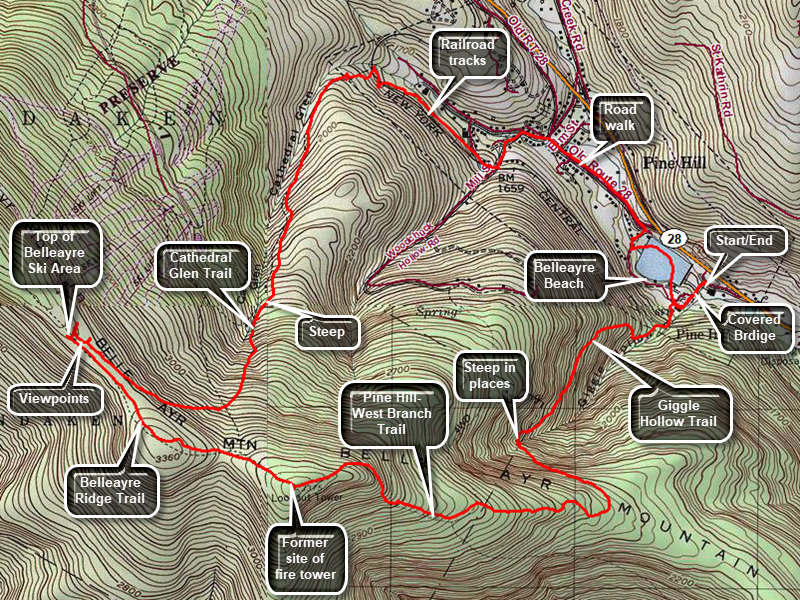 Access for the beginning of the hike is from Route 28 near Pine Hill. Watch for a sign on the south side of the road for Belleayre Beach. Turn on the access road and drive to the covered bridge. If Belleayre Beach is open, drive across the bridge and park in the first parking area on the right near the pavilions. If the area is closed, park on the gravel area on the side of access road. Walk across the bridge to the parking area near the pavilions. The blue blazed Giggle Hollow Trail leaves the upper end of the area near the pavilions heading south. Just at the start of the hike the trail passes under some railroad tracks. The trail starts to climb almost immediately and continues for its entire length of 1.8 miles gaining 1355 feet for an average 14% grade. It is steep at times and then levels until it is steep again. The trail does follow an old woods road for most of its length which makes the going easier. The trail initial heads southwest but at 1.1 miles it starts a switch back to the southeast and then another at 1.5 miles so that it is heading west. The trail is not always well marked or trimmed especially as it hears the junction with the blue blazed Pine Hill-West Branch Trail. Turn left at the end of the trail heading west toward the Belleayre summit at 2.8 miles. At 2.4 miles a lean-to is located on the right of the trail. At 2.8 miles the Pine Hill-West Branch Trail turns south toward Balsam Mountain. This was once the site of a fire tower and the remains of the anchors can be seen. There is also a USGS marker to mark the summit. Walk straight ahead to pick up the red blazed Belleayer Ridge Trail that continues northwest to the ski area. The trail ascend a little and then is flat. At 3.25 miles there is another shelter on the right of the trail. When you reach the ski area, you will see the concession stand straight ahead at 3.8 miles. There are views here to the west, southwest and south. You should walk over to the other side of the ridge where there are views down to Pine Hill and across the valley to the mountains beyond. You will also see one or more ski lifts and the ski patrol building. To return start to walk back the way you came but stay to the left on a gravel road that heads down the mountain parallel to the trail but slightly farther north. Where the road makes a sharp left turn continue straight ahead to the Cathedral Brook ski slope where the Cathedral Glen Trail is located. The trail is marked with blue blazes along the side of the slope and is very steep averaging a 21% grade for some distance. When in doubt always bear to the right as you descend. Eventually the trail enters the forest where there is an "out of Bounds" sign for skiers. At this point the trail is more of a trail and parallels a stream. The trail passes through some big evergreen trees as it levels near its end. At 6.1 miles the trail ends at some railroad tracks. Turn right and walk out the track for .6 miles to the streets of Pine Hill. Walk straight ahead off the tracks and turn left on mill street and then right on Bonnie View Avenue. At the next intersection turn right on Main Street. Continue on Main Street until just before it start up to Route 28. Stay to the right on Lake Street and follow it to the dead end. Turn right and walk across a bridge to the other side of the stream. Walk to the pond where you may choose to walk to the left or right around the pond. Walk to the parking area where you parked or across the covered bridge to your car.
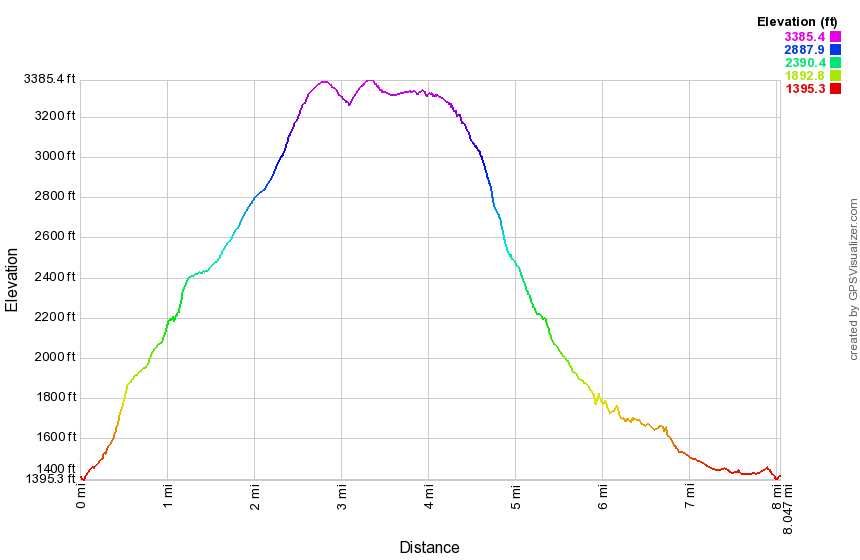 (The image at the left is the vertical profile for the out and back hike.)
Belleayre Mt: Ski Area from Lost Clove
| Quick Look | |||||
|---|---|---|---|---|---|
| Difficulty | Round trip | Total climb | Internet Maps | ||
| 6.7 mi. | 2245 ft. | AllTrails | |||
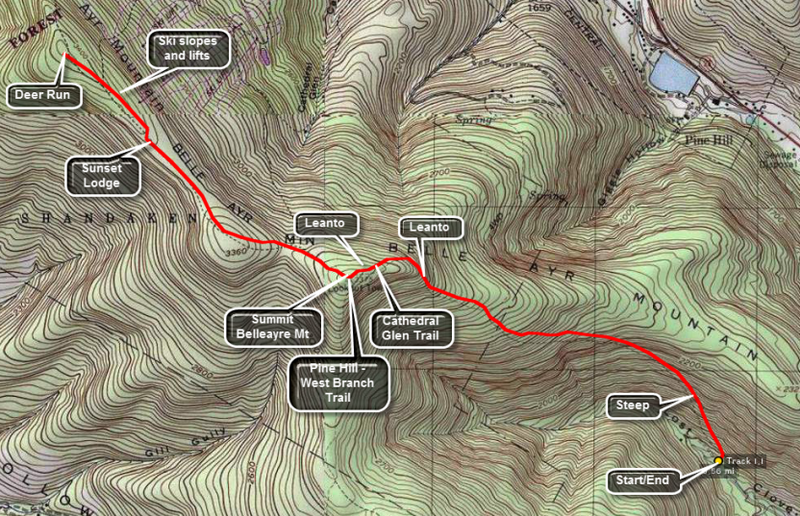 Get on Route 47, the road that runs from Big Indian on Route 28 to Claryville. Turn onto Lost Clove Road just outside the village of Big Indian. Continue for 1.5 miles on Lost Clove Road until the designated parking area on the right. The road dead ends just after this. Walk straight ahead from the parking area onto the red blazed trail. This trail is an easement on private land so stay on the trail at all times. The trail climbs 1300 feet in the next 1.3 miles! It is very steep at times and just steep at others. The trail does follow an old woods road for most of its length which makes the going easier. Some areas have loose stone which makes the footing tricky.
After 1.3 miles the trail enters the forest preserve and shortly after that ends at the blue blazed Pine Hill West Branch Trail. Turn left on this trail. The walking gets easier and a lean-to will be on the right after only .3 miles. Continue passed the lean-to for about .5 miles to the summit of Belleayre Mountain. At this point the Pine Hill West Branch trail turns south toward Balsam Mountain. Walk over the summit, through the field and slightly to your right, and pick up the red blazed Belleayre Ridge Trail. After about .3 miles, there is another lean-to on the right. Just before the lean-to the Cathedral Glen Trail turns to the right. This trail leads down through the ski slopes to the railroad tracks in Pine Hill.
Continue straight ahead on the Belleayre Ridge Trail. The signs for the various ski slopes will start to appear and then ahead will be the lifts and Sunset Lodge. You can continue straight ahead and walk all the way out to Deer Run, the last lift and ski slope on the ridge. Along the way enjoy the view down the slopes into the valley and across to the opposite hills. Be sure to walk around to the "front" of the lodge which offers a nice view of Balsam Mountain. return be retracing the path you used to ascend the mountain.
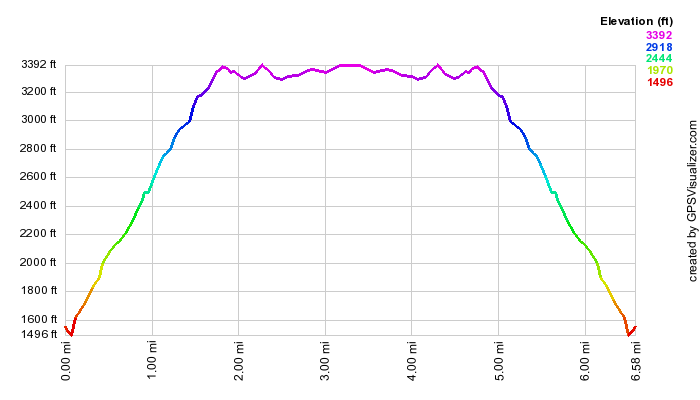 (The image at the left is the vertical profile for the out and back hike.)
Bellvale Mt: Mt Peter to Bellvale Mt
| Quick Look | |||||
|---|---|---|---|---|---|
| Difficulty | Round trip | Total climb | Internet Maps | ||
| 7.5 mi. | 987 ft. | AllTrails | |||
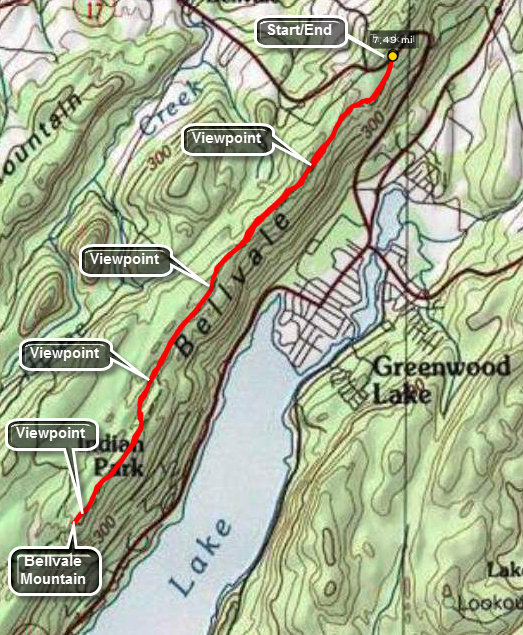 To park for this hike travel on Route 17A from Warwick to Greenwood Lake or vice versa. A little less than two miles north of the intersection of Routes 17A and 210 in Greenwood Lake there is a pulloff at the top of the hill on the south side near some rundown buildings. Park here but watch for broken glass! You may also see the white signs or blazes for the AT as it crosses the road here. Find the trail and start to walk southwest on the AT. This route starts at Mt. Peter near Warwick, NY and travels southwest paralleling Greenwood Lake. The ridge is rugged but the elevation profile accentuates the small ups and downs and makes it look far worse than it is. It part of the AT that runs along Bellvale Ridge until it gets to Bellvale Mountain. Through hikers on the AT are often found here during the summer. There are at lead four good viewpoints along the ridge that look east and south across Greenwood Lake. Bellvale Mountain is a good point for the hiker without a car spot to turn around and hike back to the car. You may continue on the trail down a steep descent and go as far as you like. One objective would be a hike around Surprise Lake but this will add over 5 miles to the hike!
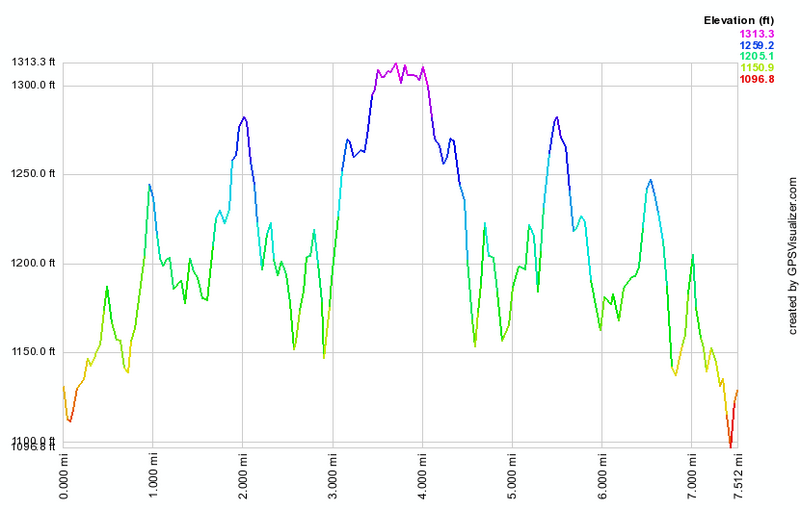
(The image above is the vertical profile for the out and back hike.)
Bellvale Mt: NYNJ Border to Village Vista
| Quick Look | |||||
|---|---|---|---|---|---|
| Difficulty | Round trip | Total climb | Internet Maps | ||
| 9.3 mi. | 1670 ft. | AllTRails | |||
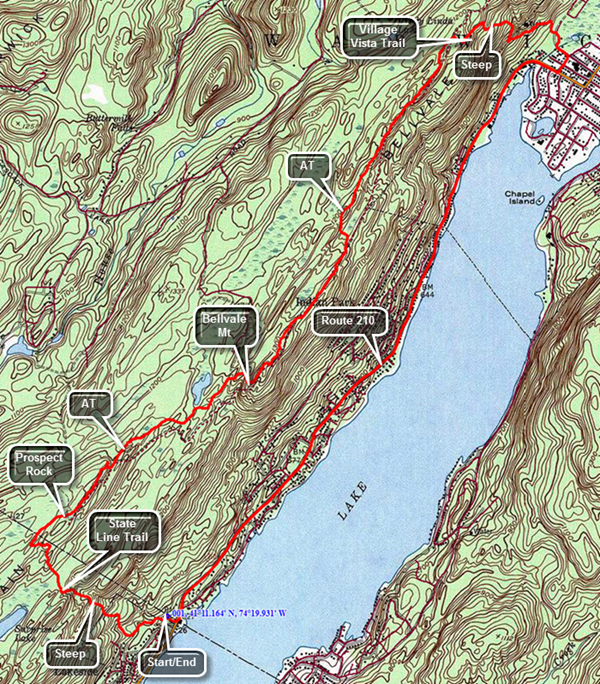 To park for this hike travel on Route 17A from Warwick to Greenwood Lake. At the bottom of the hill stay right on Route 210 through the village of Greenwood Lake. Route 210 travels along the west shore of the lake and heads toward New Jersey. Watch for a sign that says "Welcome to New Milford Township". Just before the sign turn up the driveway to the trailhead parking. Try to park so that you do not block any of the boats from the marina that shoes the parking area. Head out on the blue State Line Trail which seems to be quite popular as the ground is well-packed. In addition, people have walked off the trail wherever they want which makes the main trail hard to follow. The trail blazes can also be confusing so watch the paint very carefully. After wandering along the base of the ridge to the west for about a quarter of a mile the trail turns right or northwest and starts up the ridge. Although there are some switchbacks along the way, there are also some steep sections. The sidetracks continue to be a problem as are the faded blazes. Some parts of the trail are packed dirt but there are several sections with a lot of rocks which makes walking harder. Over the next .8 miles you will gain 650 feet to the top of the ridge. At the top of the ridge an SL sign is painted on the rocks. Turn right to get on the AT and head northeast. At 1.5 miles, you will ascend to Prospect Rock which has a flag on top. Prospect Rock is the highest point on the AT in New York state. Continue on your way from the top of Prospect Rock as the trail descends for the next .9 miles. Sometimes you will be walking along the knife edge of rock outcrops while other times you will be in the shade of pine trees with over soft, marshy ground. At 2.4 miles begin to ascend Bellvale Mountain. The ascent is .4 miles and gains about 200 feet. Along the way you will encounter several rock scrambles. One ascent is nearly vertical and has an aluminum ladder tethered to the rock face. If you are hiking with a dog, I can only tell you that Sheila made it with no problem! At the top of the climb you will be on Bellvale Mountain. Continue along the ridge as the trail repeatedly descends and ascends with open rock faces and dark stretches through the evergreens. Some ascents are steep although brief. There are several large rock cairns along the way. After a little more than 2 miles you will arrive at the Village Vista trail 4.9 miles into the hike. Turn right onto the Village Vista which starts out almost level but changes immediately as it begins to descend to the lake. There were several switchbacks but the grade is still challenging and would be more so on the ascent. The "vista" is disappointing as most of the view is blocked by trees. Continue down the trail from the vista as it become steeper and rockier. Where the trail is not rocky it can be dusty which makes getting a good grip difficult. You will eventually break out into a sand and gravel yard almost at the bottom of the ridge. The trail turns left onto a road but then immediately turns right turned back into the woods briefly until it comes out onto some local streets. you will be about 5.7 miles into the hike. Follow the streets out to Route 210. which has pretty good shoulder for walking. Route 210 is flat and level compared to the ridge with only few hills that are easily negotiated. The house numbers decrease as you approach the state border. After walking another 3.6 miles, the sign for the marina will come into view. Turn right to walk up to the car.
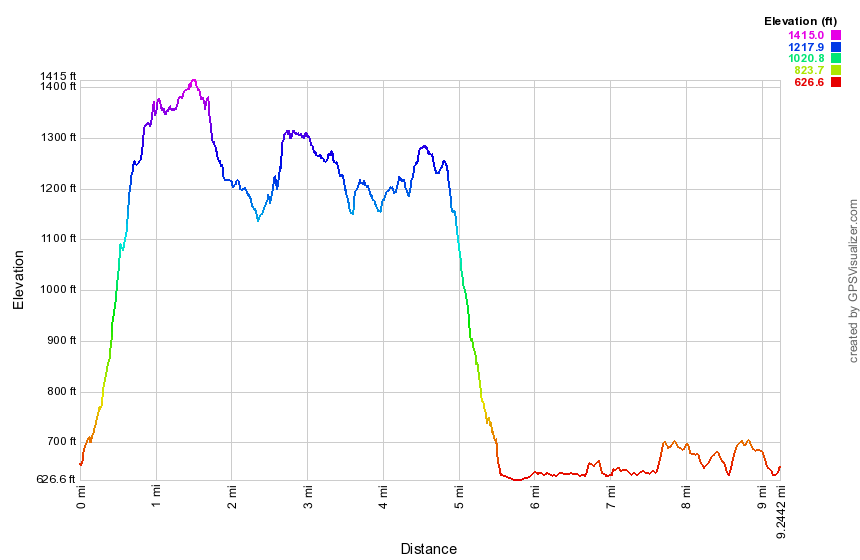
Berme Road to Berrypickers Path
| Quick Look | ||||
|---|---|---|---|---|
| Difficulty | Round trip | Total climb | Internet Maps | |
| 5.8 mi | 445 ft | AllTrails | ||
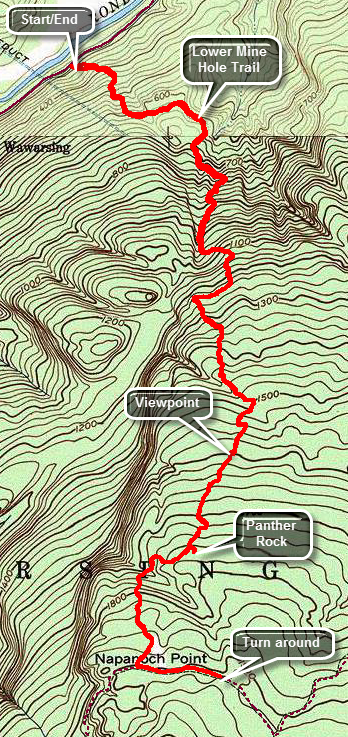 Take Route 52 through Ellenville heading east over the mountain. Just before the road began its trip up the mountain, turn left on Berme Road and drive about 4 miles to where the Long Path crosses the road. There is room for one or two cars to park on the side of the road. Follow the aqua blazes through hardwood forests consisting mostly of oak trees. The trail is pretty easy to follow as it uses woods roads and is pretty well marked. At .7 miles turn left on another woods road which is also marked as the Lower Mine Hole Trail coming up from Foordmore Road. The trail is rocky and layers of oak leaves can make it slippery underfoot. The trail heads south and continues climbing toward the ridge. At about 1.4 miles the trail turns west to avoid some ledges and then turns south again. At an elevation of about 1230 feet the typical Sam's Point and Shawangunk vegetation appears. There are now open rock faces with scrub pine and the transition is sudden and stunning. Keep looking back over your shoulder as viewpoints begin to appear. From some lookouts you can see the valley below and the mountains of the Catskills beyond to the north. Keep an eye out for the side trail on the right to Jacob's Ladder which you may want to visit. Also watch for a path on the left to Panther Rock which is a great lookout. The trail is marked with a sign saying "Panther Rock" and is blazed in white. It is only a few hundred feet out to Panther Rock but it is certainly worth the trip. Climb up to the top of Panther Rock and find views similar to other viewpoints but unobstructed and more expansive. Continue heading southwest and climbing. Just after Panther Rock descend a little and cross a stream before climbing again. At 3.4 miles you will hit the Smiley Carriageway. Turn left and walk to the beginning of the Berrypickers Trail which is only about a quarter mile away. Once you are at the beginning of the Berrypickers Path, head back down along the same path you used on the way up.
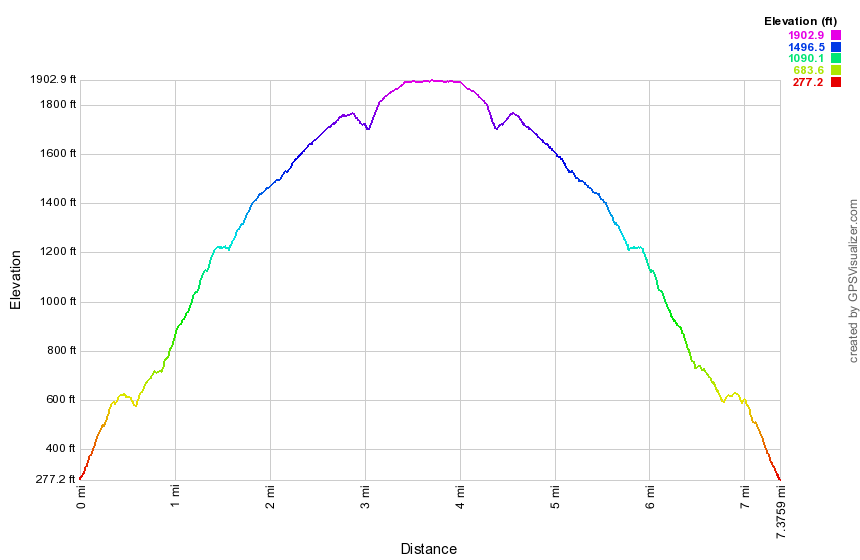 (The image at the left shows the profile of the hike. Remember that all vertical profiles are relative!)
Berme Road to Lundy Quarry
| Quick Look | ||||
|---|---|---|---|---|
| Difficulty | Round trip | Total climb | Internet Maps | |
| 5.8 mi | 445 ft | AllTrails | ||
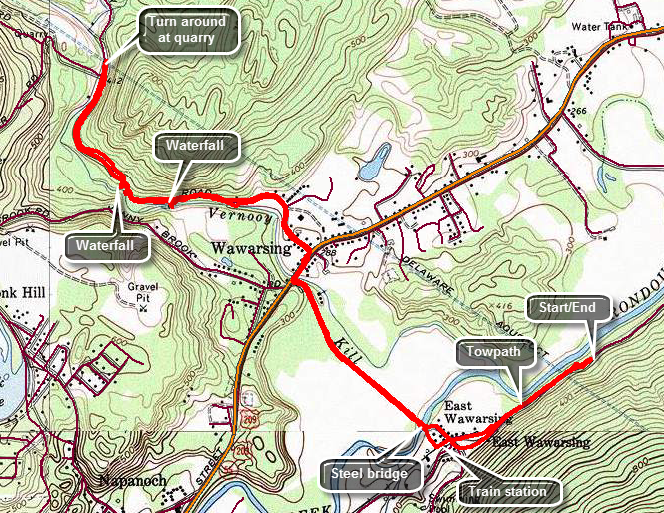 Take Route 52 through Ellenville heading east over the mountain. Just before the road began its trip up the mountain, turn left on Berme Road and drive about 4 miles to where the Long Path crosses the road. There is room for one or two cars to park on the side of the road. Cross Berme Road and walk down the bank until you spot a Long Path marker on the old D and H Canal towpath below. Follow the towpath as it parallels Berme Road. The trail is often filled with garbage and walking on the road may be preferable! At about .5 miles the towpath turns into Towpath Road which crosses Port Ben Road. Towpath Road leads back to Port Ben Road and crosses Rondout Creek on a very old metal bridge. Port Ben Road stretches out ahead passing between two fields. Walk for .7 miles on Port Ben Road to the point were it ends on Route 209. Route 209 is a busy road but it had a sidewalk on the near side so turn right and walk a short distance to Lundy Road. Turn left and head generally northwest as Lundy Road begins a very gentle ascent following the Vernooy Kill. You can hear and see various rapids on the creek. Lundy Road very quickly turns to a gravel surface but there is almost no traffic. At 2.1 miles there is an interesting waterfall caused by what looks like an old dam across the stream. At 2.4 miles into the hike there is another small waterfall. The road continues to gain some elevation and at 2.8 miles pass Cutler Road on the left. The long range plans for the Long Path include taking the trail off Lundy Road at this point and continuing along the Vernooy Kill to the falls. In a few hundred feet the quarry will be on the right side of the road at 2.9 miles. Return the way you came.
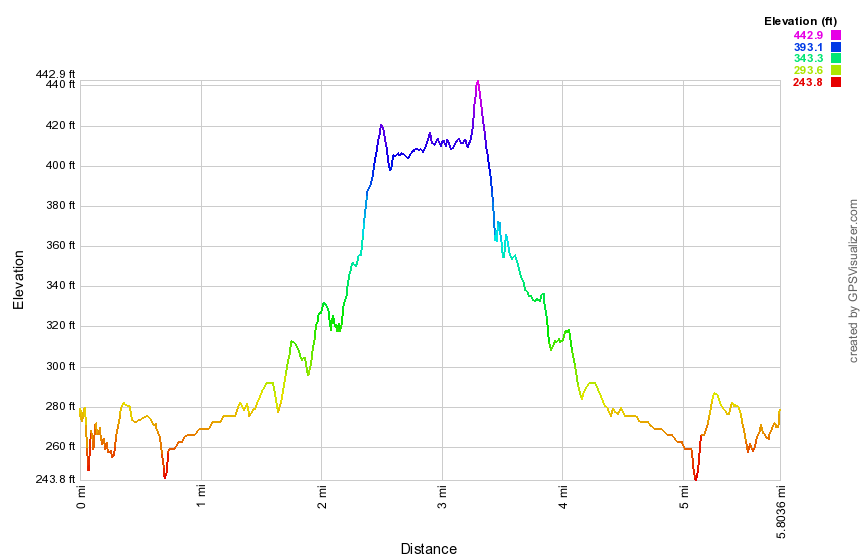 (The image at the left shows the profile of the hike. Remember that all vertical profiles are relative!)
Berry Brook Rd to Beech Hill Rd
| Quick Look | ||||
|---|---|---|---|---|
| Difficulty | Round trip | Total climb | Internet Maps | |
| 5.7 mi. | 1934 ft. | AllTrails | ||
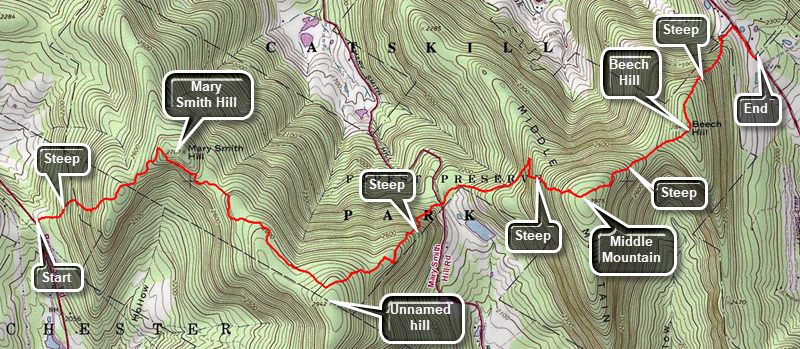
This hike is one way from Berry Brook Road to Beech Hill Road. This requires a car at Beech Hill Road and a car or a drop off at Berry Brook Road. From Livingston Manor, drive north on Old Rt 17 to Beaverkill Road on the right. Drive north on Beaverkill Road through the hamlet of Lew Beach. Turn left on Beech Hill Road, the first left after passing through Lew Beach, and drive 2.5 miles to the trailhead for the Touch-Me-Not Trail on the right. Park one car here. Drive back down Beech Hill Road to Beaverkill Road and turn right. Drive back towards Livingston Manor To Campground Road. Turn right and drive to the T in the road. Turn right and drive down to the Beaverkill State Campgrounds. Drive through the Beaverkill Covered Bridge and follow the road until it meets Berry Brook Road. Bear left and drive3.5 miles to the trailhead on the right. Find the trail register and turn right on the Mary Smith Trail which is part of the Finger Lakes Trail. The first part of the trail is an easement across private property so stay on the trail. The trail heads northeast toward Mary Smith Hill. Over the next half mile it gains 500 feet for an average grade of 20%. Within this section some parts approach a 30% grade! Pass over the top of a small hill and descended the other side before starting the climb to the shoulder of Mary Smith Hill. At .9 miles you will finish the climb as the trail turns 90 degrees and starts heading southwest. It passes by the summit of Mary Smith Hill and continues to descend until it starts up to the top of the next hill. The trail rolls a little but at 1.5 miles you will begin the climb in earnest. The trail passes by the summit of an unnamed hill at 2.2 miles and starts a long descent. Initially the descent is moderate and there is even a flat area but at 2.7 miles that changes. Over the next .4 miles you will lose 480 feet of elevation without any switchbacks to moderate the descent. This is an average of a 23% grade and continues to Mary Smith Hill Road at the bottom. Cross the road to begin the next section of trail. The sign says it is 2 miles to Beech Hill Road which seems reasonable but signs can be deceiving. After walking a short distance you will come to an interesting stone wall. After that the climb begins passing through an area that is normally wet. You are heading east and will come to a short but steep climb up what almost looks like steps. The grade is 32% but near the top there is an interesting set of ledges. There are also some outcroppings that very clearly show sedimentary layers. The climb isn't over and for the next .35 miles you will gain 400 feet at about a 20% grade. After the summit of Middle Mountain the trail descends about 300 feet to the col between Middle Mountain and Beech Hill. Now there is a short ascent of 150 feet to the top of Beech Hill after which it is all downhill. In .6 miles you will descend 500 feet to a dirt road. Turn right and walk out the dirt road to Beech Hill Road. Turn right and walk down the road to your car.
 (The image at the left shows the profile of the loop hiking route. Remember that all vertical profiles are relative!)
Berry Brook Rd to Little Spring Brook
| Quick Look | ||||
|---|---|---|---|---|
| Difficulty | Round trip | Total climb | Internet Maps | |
| 4.6 mi. | 1205 ft. | AllTrails | ||
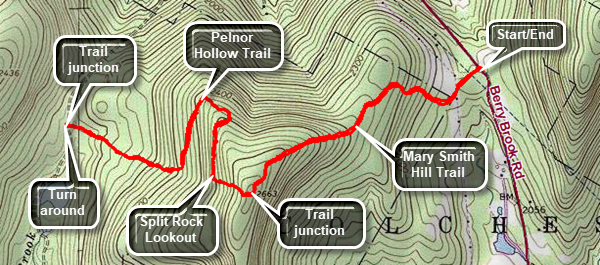
From Livingston Manor, drive north on Old Rt 17 to Beaverkill Road on the right. Drive north on Beaverkill Road through the hamlet of Lew Beach. Turn left on Beech Hill Road, the first left after passing through Lew Beach, and drive 2.5 miles to the trailhead for the Touch-Me-Not Trail on the right. Park one car here. Drive back down Beech Hill Road to Beaverkill Road and turn right. Drive back towards Livingston Manor To Campground Road. Turn right and drive to the T in the road. Turn right and drive down to the Beaverkill State Campgrounds. Drive through the Beaverkill Covered Bridge and follow the road until it meets Berry Brook Road. Bear left and drive 3.5 miles to the trailhead on the right. Find the trail register and turn left on the Mary Smith Trail which is part of the Finger Lakes Trail. Cross the road and walk through a stand of tree to a power line right of way. Bare slightly to the left and watch for a sign directing you through some grass and weeds back into the forest. The trail begins to ascend through hardwood forest passing by some impressive rock formations. Over .9 miles the trail gains 500 feet to a junction with the red blazed Pelnor Hollow Trail. Turn right and get ready to descend 165 feet in .13 miles over a 23% grade to the Split Rock Lookout. The lookout has limited views to the south and west. Continue on the FLT/Pelnor Hollow Trail heading north, then west and then south. The trail continues to descend and at 1.9 miles turns WNW toward the junction with the Little Spring Brook Trail and Campbell Mountain Trail. Some areas of the trail may be eroded. As you near the trail junction, the trail moves into an evergreen for with red pines that appear they were planted. It also becomes wetter and covered in grass. At 2.3 miles you will come to the trail junction. Turn around and retrace your route back to the parking area.
 (The image at the left shows the profile of the loop hiking route. Remember that all vertical profiles are relative!)
Big Pocono: North and South Trails
| Quick Look | ||||
|---|---|---|---|---|
| Difficulty | Round trip | Total climb | Internet Maps | |
| 7.9 mi. | 1300 ft. | AllTrails | ||
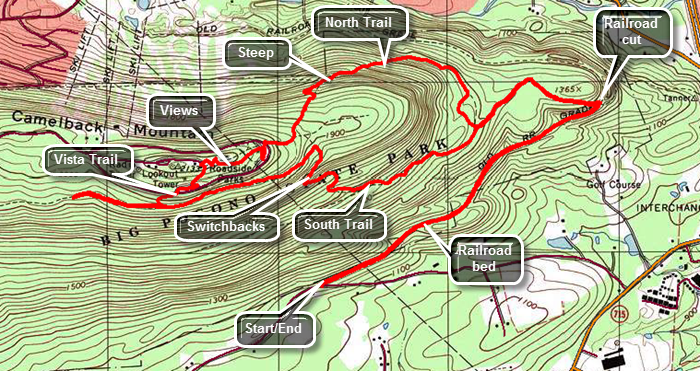 Big Pocono State Park near Mount Pocono, Pennsylvania is also the home of Camelback Mountain Ski Resort. There are nice views especially from the Indian Trail but the trails are poorly marked. There is a "healthy timber rattlesnake population" in the park. Those not wishing to hike to the top of the mountain may drive there to enjoy the views. The easiest way to get to the trailhead is to take I80 to exit 45. Drive south on Route 715 and turn right on Railroad Drive. Drove 1.2 miles to the trailhead which is marked with a sign indicating "Riday Gate" and an arrow showing "Big Pocono State Park". You may park near the gate on the right side of the road where there is room for two or three cars. There is also a spot on the opposite side of the road for about the same number of vehicles. The first part of the trail is an old railroad grade and is easy to spot. The railroad bed is well maintained, flat and smooth. In several places the trail passes through small rock cuts. As you near the spot where the trail turns up the mountain the railroad bed is built up to span a gully. At 1.3 miles the trail turns off the railroad bed and heads up the mountain in a sharp switchback. Continue to walk straight ahead to investigate the railroad cut through the rocks. This cut is more expansive than the others. Return to the trail and begin to climb the mountain. The trails are not very well marked and branch in several places. Sometimes to get to one trail you have to hike part of the way on another. The blazes are not clear and the railroad bed does not have any but they are not really necessary as it is easy to follow. At just over 1.6 miles pass a small pond off the trail on the left and then continue to follow the trail as it turns and continues to climb to a junction at 1.9 miles. Turn to the right on the North Trail which is sheltered by trees but offered no views at all. The trail does offer a pretty steep climb gaining over 600 feet in about .75 miles to Rim Road on the summit. Along the way there are several intersections with paths and trails which were quite confusing as there were no signs. Keep bearing right in each case. At one point you will come to the edge of one of the ski slopes with a limited view. At 3.1 miles intersect Rim Road and cross it into a parking lot. The trail continues straight ahead. You may ant to detour to the left and walk to the edge of the parking lot to get a view to the south and east. Walk back to where the trail crossed the road and hike .2 miles to a parking area at the top of the mountain at about 3.4 miles. A radio tower is to the left and with the old park office building next to it. To the right is an open space where a lookout tower once stood. It is still marked as present on many maps. Take some time to walk around the area and take in the views. Watch for a sign that explains that the park has a "healthy population of timer rattlesnakes". Walk over toward the bathrooms and find a round "table". The table is stainless steel with a stone mosaic on the surface. There is a large arrow and the names of various landmarks. When the opposite end of the arrow encircles the name of a landmark, the other end of the arrow points to that landmark. It is very interesting to see that it is an Eagle Scout project. Head south just passed the bathrooms and down to a parking area to pick up the South Trail for the return trip. At the parking area, turn to the right and exit the lot. Cross Rim Road and find the Vista Trail that connects to the South Trail. The trail was very short. When you hit the South Trail you may want to turn right to investigate a little but there are no views in this direction. To the left of the terminus of the Vista trail is a...vista. with limited views to the south. Continue on the South Trail which for the first half mile is flat or a little uphill. At about 4.9 miles begin the descent back to the car. The trail is very rocky and there are several switchbacks. Switchbacks are a blessing and a curse as they mitigate the steep grades but lengthen the hike. At the end of the third switchback your car is only .3 miles away but the terrain is very steep and may contain some of those rattlesnakes. As it is that .3 miles turns into a 2.4 mile walk! As you descend you will come to a junction with the Indian Trail where you should continue to follow the South Trail back to the point where you turned right onto the North Trail earlier. Walk down to the railroad cut and turned right to follow the railroad bed back to the car.
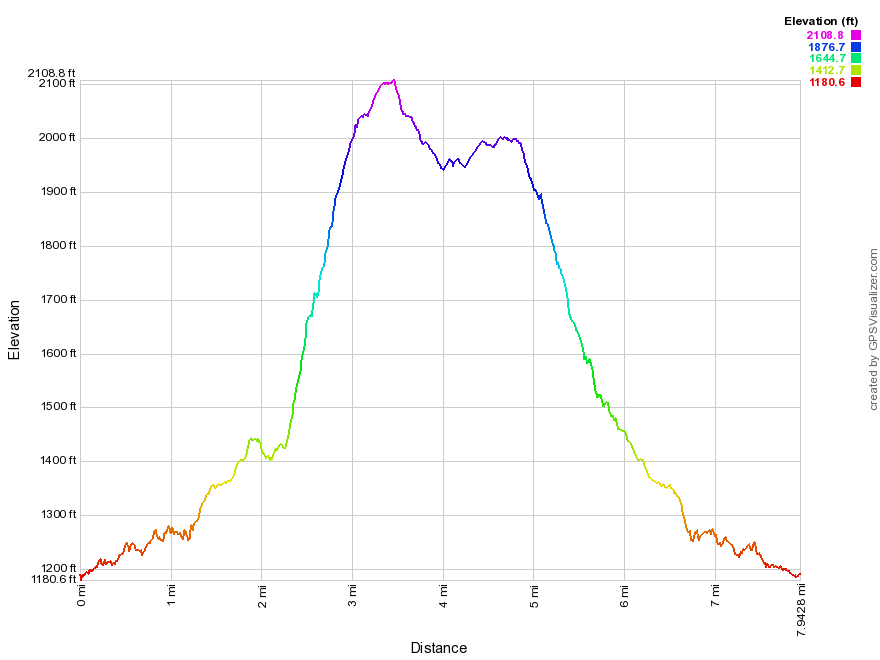 (The image at the left shows the profile of the hike. Remember that all vertical profiles are relative!)
Big Pond: Around the Pond
| Quick Look | ||||
|---|---|---|---|---|
| Difficulty | Round trip | Total climb | Internet Maps | |
| 3.8 mi. | 750 ft. | AllTrails | ||
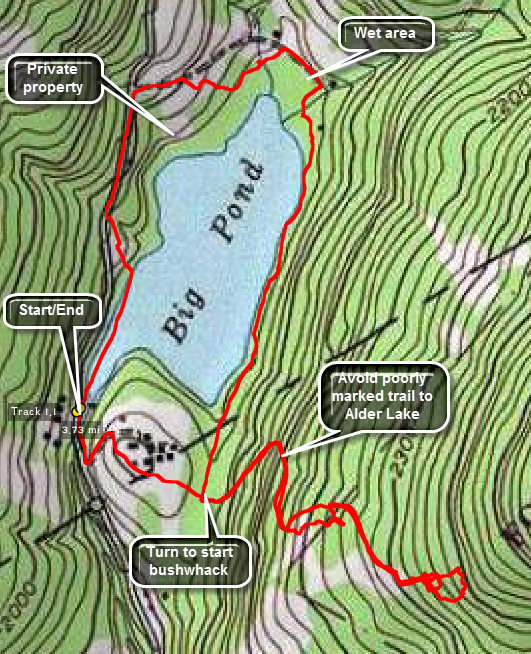 Take the Beaverkill Road from Livingston Manor and drive for about twenty minutes to the junction of Beaverkill Road and Barkaboom Road. Turn left toward the Little Pond Campgrounds. Continue passed the turn to the campgrounds on the left. Watch for a sign for the parking area for Big Pond on the right. If you get to Big Pond, you should turn around and take the first turn on the left! Park in the parking area and look for the trail register. The trail is poorly marked in places so keep an eye out for the trail markers at all times. When thee trail ahead starts the first climb turn off to the left and begin to bushwhack around the pond. On the north end and west side you will find some woods roads that lead out to Barkaboom Road. You may walk the road back to the car or walk back into the woods.
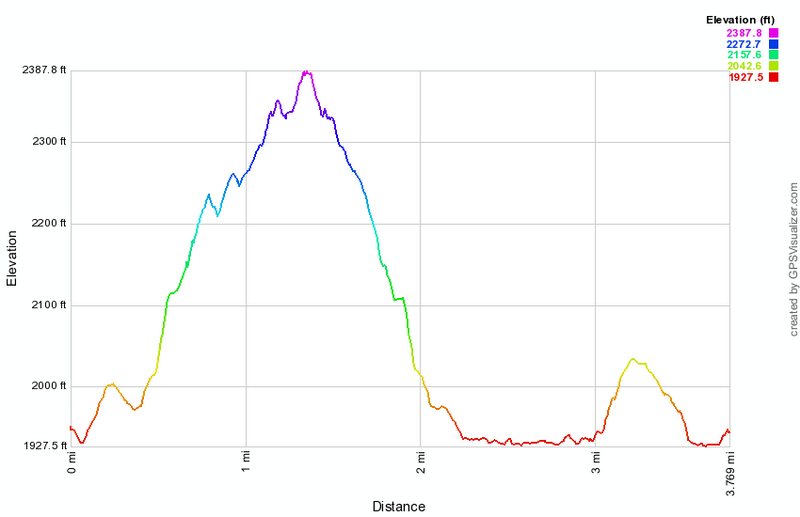
(The image above shows the profile of the hike.)
Big Pond to Alder Lake
| Quick Look | ||||
|---|---|---|---|---|
| Difficulty | Round trip | Total climb | Internet Maps | |
| 6.3 mi. | 1530 ft. | AllTrails | ||
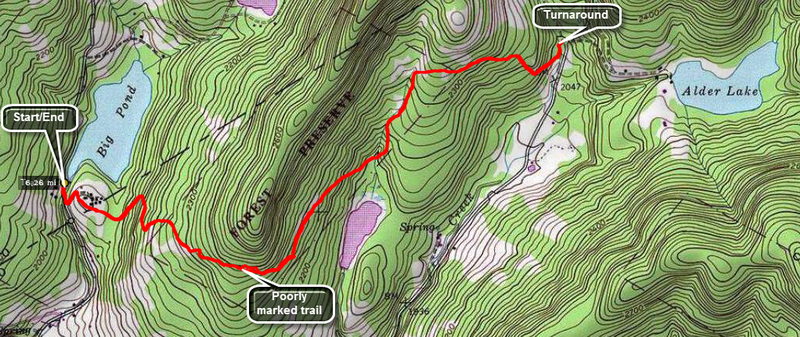 Take the Beaverkill Road from Livingston Manor and drive for about twenty minutes to the junction of Beaverkill Road and Barkaboom Road. Turn left toward the Little Pond Campgrounds. Continue passed the turn to the campgrounds on the left. Watch for a sign for the parking area for Big Pond on the right. If you get to Big Pond, you should turn around and take the first turn on the left! Park in the parking area and look for the trail register. The trail is poorly marked in places so keep an eye out for the trail markers at all times. There are some short climbs but the trail skirts most of the tops of the hills. Once you get to Alder Creek Road you may turn around or extend the hike by walking over to Alder Lake. You may even decide to walk around the lake and beyond!
 (The image at the left shows the profile of the hike.)
Big Pond to Alder Lake (complete)
| Quick Look | ||||
|---|---|---|---|---|
| Difficulty | Round trip | Total climb | Internet Maps | |
| 6.7 mi. | 1530 ft. | AllTrails | ||
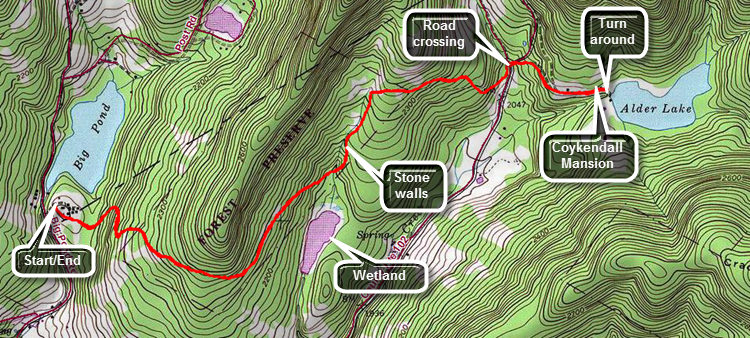 Drive north on Old Route 17 from Livingston Manor toward Roscoe. Turn right on Beaverkill Road and head toward Lew Beach. Drive through the hamlet of Lew Beach and continue on to Turnwood. As the Beaverkill Road makes a turn to the right, continue straight ahead on Barkaboom Road toward Big Pond. After less than a mile, turn right into the upper parking area for Big Pond and park in the lot.The trail starts by the trail register in the upper right corner of the lot. Although the trail has several ups and downs, it is sited so that it travels around the higher ridges in the area and sticks to the lower spots on the shoulders of those ridge. Just after the start of the hike begin to ascend along a woods road and continue to walk uphill through a pine forest. The trail had not been maintained for some years but in the Fall of 2015 a group from the Catskill Mountain Club worked on it to put it in good shape. Parts of the trail may have nettles and briars which grow quickly in season. There may be a few large blowdowns but these are usually easy to avoid or easy to climb over. At about a mile begin to descend on another woods road to an area that was once a small pond but is now mostly wetlands. Along the way note the many stonewalls and a few foundations in the area. At 1.75 miles there is a small stream which dries up rather quickly as it connects two wetland areas. Cross the stream and begin to ascend to the shoulder of another ridge from the low wetlands. At 2.2 miles the trail turns right heading east toward Alder Lake. Shortly after that begin to descend for .6 miles to Alder Creek. Cross Alder Creek which may be as easy as simply walking across in the dry seasons or may require you to look for some stepping stones when there has been a heavy rain. Cross Alder Creek Roadand continue straight ahead toward the lake on the access road. Walk through the parking area passing the remains of the Coykendall Mansion> After taking a look at the lake from the "lawn" turn around and retrace your route back to the Big Pond Parking area. Big Pond is several hundred feet below Alder Lake in elevation so the return trip may seem easier.
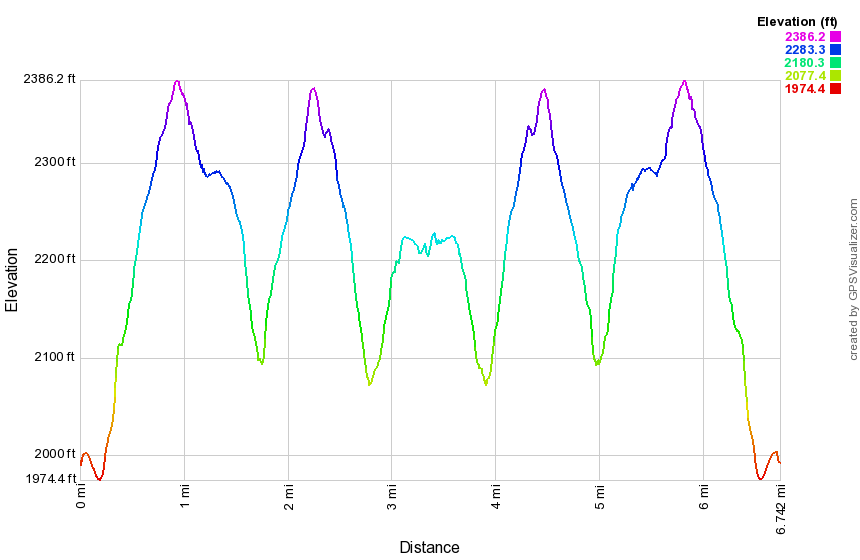 (The image at the left shows the profile of the hike.)
Big Pond to Cabot Mt (road loop)
| Quick Look | ||||
|---|---|---|---|---|
| Difficulty | Round trip | Total climb | Internet Maps | |
| 6.0 mi. | 1605 ft. | AllTrails | ||
 Take the Beaverkill Road from Livingston Manor and drive for about twenty minutes to the intersection
with Barkaboom Rd. Drive up the Barkaboom Rd for less than a mile and park at the forest preserve
parking area. Walk down the access road and up Barkaboom Road for a short distance. The trail begins
on the left and this is where the register is located. In the summer of 2006, there was a sign warning
that the trail was closed at the other end. After bushwhacking the Catskill 35's, I didn't think this
would be much of a problem and I never found the "closed" trail. After another .75 miles, you reach the
top of Touch-Me-Not Mountain. At this point turn right and stay on the red blazed trail. After .5 miles
this intersects with the yellow blazed Little Pond Trail. Stay on the red trail and get ready to climb!
Cabot Mt is only 2970' high but the ascent is somewhat steep. The Beaverkill Vista gives a beautiful
if somewhat restricted view of the Beaverkill valley. Turn around and descend Cabot. This time turn left
on the Little Pond Trail which leads to the campground access road. Follow this road out to the bathrooms
and main buildings. At this point you may take the blue Campground Trail 1.15 miles until it meets the
red Touch-Me-Not Trail. Retrace your steps back to your car at Big Pond. You may also walk .85 miles out
the Little Pond Campgrounds access road and turn left on Barkaboom Road. After .5 miles you will be back
at the car.
Take the Beaverkill Road from Livingston Manor and drive for about twenty minutes to the intersection
with Barkaboom Rd. Drive up the Barkaboom Rd for less than a mile and park at the forest preserve
parking area. Walk down the access road and up Barkaboom Road for a short distance. The trail begins
on the left and this is where the register is located. In the summer of 2006, there was a sign warning
that the trail was closed at the other end. After bushwhacking the Catskill 35's, I didn't think this
would be much of a problem and I never found the "closed" trail. After another .75 miles, you reach the
top of Touch-Me-Not Mountain. At this point turn right and stay on the red blazed trail. After .5 miles
this intersects with the yellow blazed Little Pond Trail. Stay on the red trail and get ready to climb!
Cabot Mt is only 2970' high but the ascent is somewhat steep. The Beaverkill Vista gives a beautiful
if somewhat restricted view of the Beaverkill valley. Turn around and descend Cabot. This time turn left
on the Little Pond Trail which leads to the campground access road. Follow this road out to the bathrooms
and main buildings. At this point you may take the blue Campground Trail 1.15 miles until it meets the
red Touch-Me-Not Trail. Retrace your steps back to your car at Big Pond. You may also walk .85 miles out
the Little Pond Campgrounds access road and turn left on Barkaboom Road. After .5 miles you will be back
at the car.
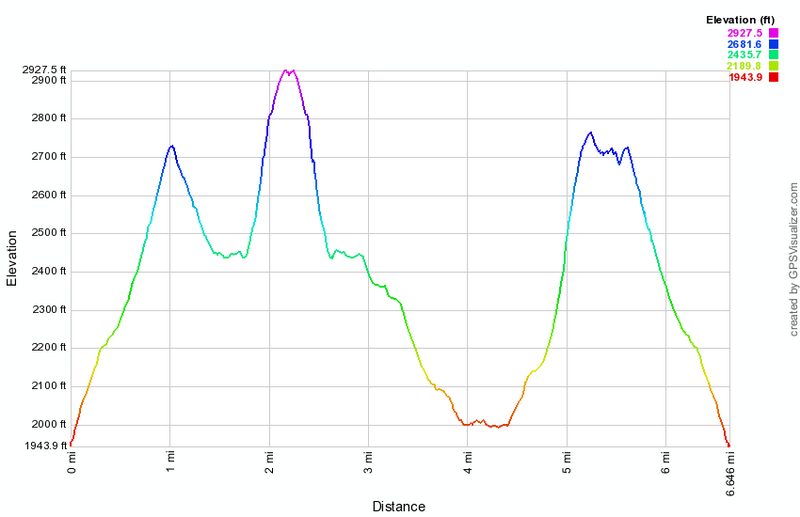 (The image at the left shows the profile of the hike. The highest point is the summit of Cabot Mountain. The lowest spot is the junction of the access road and Barkaboom Road.)
Big Pond to Cabot Mt (trail loop)
| Quick Look | ||||
|---|---|---|---|---|
| Difficulty | Round trip | Total climb | Internet Maps | |
| 6.6 mi. (east side of Little Pond) 6.6 mi. (west side of Little Pond) |
2260 ft. | AllTrails | ||
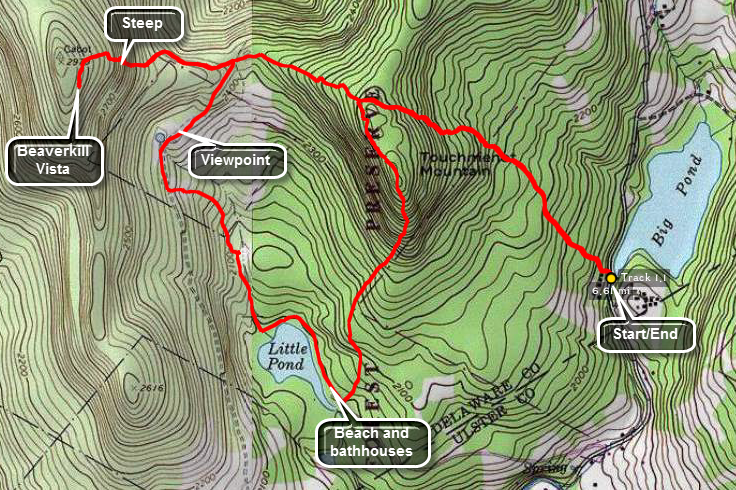 Take the Beaverkill Road from Livingston Manor and drive for about twenty minutes to the intersection
with Barkaboom Rd. Drive up the Barkaboom Rd for less than a mile and park at the forest preserve
parking area. Walk down the access road and up Barkaboom Road for a short distance. The trail begins
on the left and this is where the register is located. In the summer of 2006, there was a sign warning
that the trail was closed at the other end. After bushwhacking the Catskill 35's, I didn't think this
would be much of a problem and I never found the "closed" trail. After another .75 miles, you reach the
top of Touch-Me-Not Mountain. At this point turn right and stay on the red blazed trail. After .5 miles
this intersects with the yellow blazed Little Pond Trail. Stay on the red trail and get ready to climb!
Cabot Mt is only 2970' high but the ascent is somewhat steep. The Beaverkill Vista gives a beautiful
if somewhat restricted view of the Beaverkill Valley with Little Pond below. Turn around and descend Cabot. Turn right
on the Little Pond Trail which leads to the campgrounds. Along the way there is a nice viewpoint about a quarter mile after the trail junction. The field has an old foundation and a small pond. I always think this would be a great place to have a cabin except for the long hike to get there! As you descend from this viewpoint there may be a few small streams to cross. There is also a beaver meadow on the left of the trail. When you get to the Loop Trail around Little Pond, you may turn left or right. Turning to the right allows you to circle Little Pond and adds .2 miles to the trip. Follow the loop trail to the bathrooms and main buildings. At this point find the blue Campground Trail behind the bathrooms. This trail is steep in places as it climbs back up TouchMeNot Mountain for about 1.15 miles until it meets the
red Touch-Me-Not Trail. Turn right and retrace your steps back to your car at Big Pond. From the bathrooms you may also walk .85 miles out
the Little Pond Campgrounds access road and turn left on Barkaboom Road. After .5 miles you will be back
at the car.
Take the Beaverkill Road from Livingston Manor and drive for about twenty minutes to the intersection
with Barkaboom Rd. Drive up the Barkaboom Rd for less than a mile and park at the forest preserve
parking area. Walk down the access road and up Barkaboom Road for a short distance. The trail begins
on the left and this is where the register is located. In the summer of 2006, there was a sign warning
that the trail was closed at the other end. After bushwhacking the Catskill 35's, I didn't think this
would be much of a problem and I never found the "closed" trail. After another .75 miles, you reach the
top of Touch-Me-Not Mountain. At this point turn right and stay on the red blazed trail. After .5 miles
this intersects with the yellow blazed Little Pond Trail. Stay on the red trail and get ready to climb!
Cabot Mt is only 2970' high but the ascent is somewhat steep. The Beaverkill Vista gives a beautiful
if somewhat restricted view of the Beaverkill Valley with Little Pond below. Turn around and descend Cabot. Turn right
on the Little Pond Trail which leads to the campgrounds. Along the way there is a nice viewpoint about a quarter mile after the trail junction. The field has an old foundation and a small pond. I always think this would be a great place to have a cabin except for the long hike to get there! As you descend from this viewpoint there may be a few small streams to cross. There is also a beaver meadow on the left of the trail. When you get to the Loop Trail around Little Pond, you may turn left or right. Turning to the right allows you to circle Little Pond and adds .2 miles to the trip. Follow the loop trail to the bathrooms and main buildings. At this point find the blue Campground Trail behind the bathrooms. This trail is steep in places as it climbs back up TouchMeNot Mountain for about 1.15 miles until it meets the
red Touch-Me-Not Trail. Turn right and retrace your steps back to your car at Big Pond. From the bathrooms you may also walk .85 miles out
the Little Pond Campgrounds access road and turn left on Barkaboom Road. After .5 miles you will be back
at the car.
 (The image at the left shows the profile of the hike. The highest point is the summit of Cabot Mountain.)
Big Pond to Little Pond (road loop)
| Quick Look | ||||
|---|---|---|---|---|
| Difficulty | Round trip | Total climb | Internet Maps | |
| 4.8 mi. (west side of Little Pond) | 997 ft. | AllTrails | ||
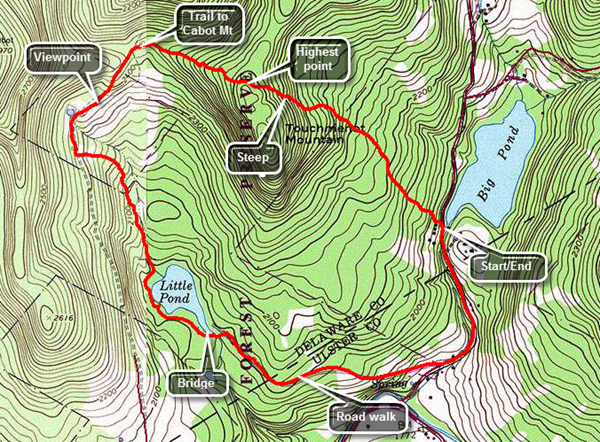 Take the Beaverkill Road from Livingston Manor and drive for about twenty minutes to the intersection with Barkaboom Rd. Drive up the Barkaboom Rd for less than a mile and park at the parking area near Big Pond. Walk across the road to the where the trail starts just north of the parking area. The first part of the trail is an old woods road and it is pretty easy to follow. The trail register is a short distance off the road. The first mile of the trail gains about 775 feet with an average grade of 15%. Some places are almost flat which means there are a few steeper places. The blazing of the trail has been extremely poor with most blazes placed too far apart. None of the turns are properly marked. When there is no snow on the ground the trail is usually easy to spot. In a few places the trail travels along the side of the hill and this can make for some tricky footing when the trail is wet or snow covered. This trail also can be covered in nettles when they are in season. The highest point on the trail is the shoulder of Touch-Me-Not Mountain. After a slight descent turn right on the yellow loop trail around Little Pond. The loop trail is very popular with campers during the season but the marking is no better than the trail from Big Pond. At 1.6 miles you will have descended through some interesting rock formations and be at the cutoff to Cabot Mountain. Continued your hike by bearing left to stay on the loop trail. At 1.8 miles you will arrive in the clearing that acts as a viewpoint. It is hard to see Little Pond from this lookout since the trees have grown up. There is also a small foundation of a long-forgotten homestead cabin. Continue to walk out a woods road from the clearing now heading south and in a few hundred feet turn left to head south to the northern shore of Little Pond. At the pond turn right to walk around the western shore of Little Pond. The view of the pond from the boat launch area is very nice with Touch-Me-Not Mountain directly across the water. Watch for a trail that turns left off the campsite road and heads to the bridge at the outlet of Little Pond. Cross the bridge and walk to the parking area. Turn right and walk on the road to the gatehouse. Walk a little less than a mile down to Barkaboom Road and turn left to hike up the road back to Big Pond where your car is parked.
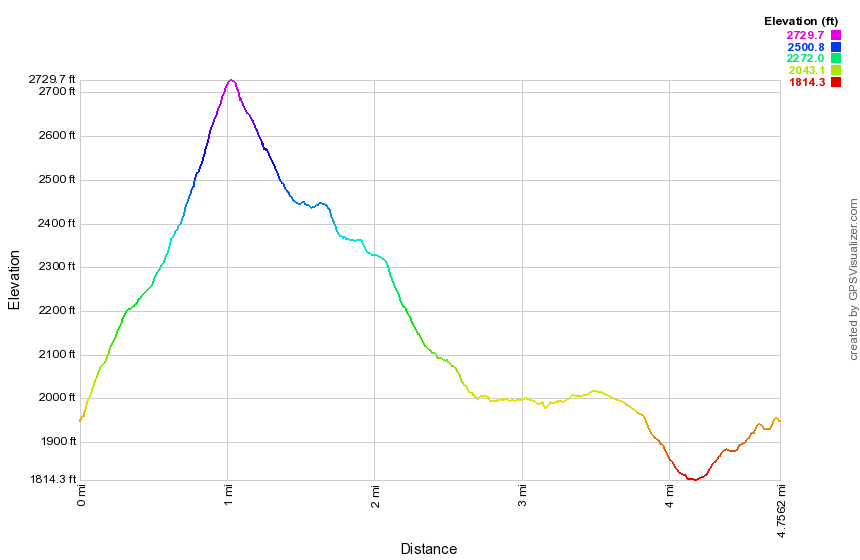 (The image shows the profile of the hike. The highest point is the shoulder of Touch-Me-Not Mountain.)
Big Pond to Touchmenot Mt
| Quick Look | ||||
|---|---|---|---|---|
| Difficulty | Round trip | Total climb | Internet Maps | |
| 2.4 mi. | 916 ft. | AllTrails | ||
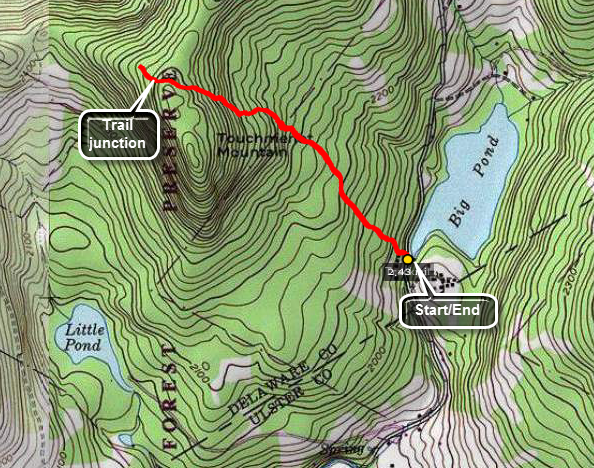 Take the Beaverkill Road from Livingston Manor and drive for about twenty minutes to the intersection
with Barkaboom Rd. Drive up the Barkaboom Rd for less than a mile and park at the forest preserve
parking area. Walk down the access road and up Barkaboom Road for a short distance. The trail begins
on the left and this is where the register is located. In the summer of 2006, there was a sign warning
that the trail was closed at the other end. After bushwhacking the Catskill 35's, I didn't think this
would be much of a problem and I never found the "closed" trail. After another .75 miles, you reach the
top of Touch-Me-Not Mountain. At this point turn right and stay on the red blazed trail. After .5 miles
this intersects with the yellow blazed Little Pond Trail. Stay on the red trail and get ready to climb!
Cabot Mt is only 2970' high but the ascent is somewhat steep. The Beaverkill Vista gives a beautiful
if somewhat restricted view of the Beaverkill valley. Turn around and descend Cabot. This time turn left
on the Little Pond Trail which leads to the campground access road. Follow this road out to the bathrooms
and main buildings. At this point you may take the blue Campground Trail 1.15 miles until it meets the
red Touch-Me-Not Trail. Retrace your steps back to your car at Bog Pond. You may also walk .85 miles out
the Little Pond Campgrounds access road and turn left on Barkaboom Road. After .5 miles you will be back
at the car.
Take the Beaverkill Road from Livingston Manor and drive for about twenty minutes to the intersection
with Barkaboom Rd. Drive up the Barkaboom Rd for less than a mile and park at the forest preserve
parking area. Walk down the access road and up Barkaboom Road for a short distance. The trail begins
on the left and this is where the register is located. In the summer of 2006, there was a sign warning
that the trail was closed at the other end. After bushwhacking the Catskill 35's, I didn't think this
would be much of a problem and I never found the "closed" trail. After another .75 miles, you reach the
top of Touch-Me-Not Mountain. At this point turn right and stay on the red blazed trail. After .5 miles
this intersects with the yellow blazed Little Pond Trail. Stay on the red trail and get ready to climb!
Cabot Mt is only 2970' high but the ascent is somewhat steep. The Beaverkill Vista gives a beautiful
if somewhat restricted view of the Beaverkill valley. Turn around and descend Cabot. This time turn left
on the Little Pond Trail which leads to the campground access road. Follow this road out to the bathrooms
and main buildings. At this point you may take the blue Campground Trail 1.15 miles until it meets the
red Touch-Me-Not Trail. Retrace your steps back to your car at Bog Pond. You may also walk .85 miles out
the Little Pond Campgrounds access road and turn left on Barkaboom Road. After .5 miles you will be back
at the car.
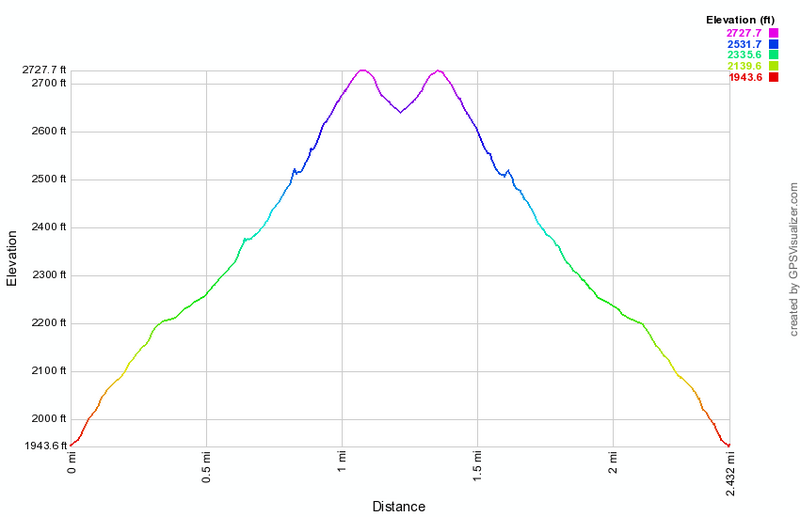 (The image at the left shows the profile of the hike.)
Black Rock Forest: Complete Loop
| Quick Look | ||||
|---|---|---|---|---|
| Difficulty | Round trip | Total climb | Internet Maps | |
| 10.4 mi. | 2267 ft. | AllTrails | ||
 From the south, get on Route 9W on the west side of the Hudson River heading north from West Point toward Newburgh. From the junction with Route 293 near the Unites States Military Academy at West Point, drive 3.5 miles north on 9W. Look for Mountain Road and the Storm King School on your right. Turn onto Mountain Road and immediately make an almost 180 degree turn into the tunnel that passes back underneath Route 9W. Use CAUTION since the tunnel is VERY NARROW! Only one car can pass through at a time. Continue straight ahead on Reservoir Road until you get to the parking area on your right.
From the north, get on Route 9W south from Newburgh to West Point. From the junction with Interstate 84 in Newburgh , drive 8.5 miles south on 9W. Look for Old West Point Road on your right. Turn right onto Old West Point Road and follow it to the junction with Reservoir Road. Turn right and continue straight ahead on Reservoir Road until you get to the parking area on your right.
The trail and route description below are representative of the MANY variations you can use in this area. A combination of trails, woods roads and roads give the hiker an opportunity to custom tailor an outing.
Find the trailhead with maps and an overview of the area. Get on the red Duggan Trail and walk about .5 miles until it meets the blue Reservoir Trail. Turn left here and cross Ben's Bridge over the stream that is the outlet for the Upper Reservoir. Follow this trail for about .5 miles as it parallels the brook and climbs to the area near the Education Center. Passed the center the yellow trail begins to climb Mount Misery. Bear right onto White Oak Road and follow it .5 miles to the Aleck Meadow Reservoir. At the reservoir turn right and walk along the shore and across a small bridge just below the spillway. At this point you will be on the yellow Stillman Trail.
Follow the Stillman Trail for .5 miles as it ascends Black Rock. Follow the Stillman Trail for about .4 miles at which you will come to a confusing intersection of roads and trails with two separate gates. Stay on the Stillman Trail by passing through the first and second gates. Just after the second gate turn right. Continue on the Stillman Trail for 1.35 miles and watch for a white trail on the left. This is the Split Rock Trail. Turn left an follow this trail for .3 miles until it meets the Sutherland Road which travels in and east-west direction. Continue walking straight ahead on the Chatfield Road between the two ponds. After only about .15 miles turn right on the yellow Secor Trail. This trail joins with the blue Chatfield Trail in only about .25 miles.
Turn right on the Chatfield Trail and walk .3 miles to the white Scenic Trail. Stay on the Scenic Trail for .25 miles and watch for the blue Eagle Cliff Spur trail on the right. Walk a few hundred feet out to Eagle Cliff. Get on the red Rut Trail and walk .15 miles to the yellow Stropel Trail. Turn left and walk a few hundred feet back to the white Scenic Trail. Continue on this trail for .35 miles to the blue Spy Rock Spur Trail on the left. Walk a few hundred feet up to Spy Rock, look around and return. Walk for about .25 miles and turn left on Continental Road. About .5 miles up the Continental Road is the Chatfield Stone House. From here continue .1 miles on the road and turn right on the while White Oak Trail to the shores of Arthur's Pond.
Continue .15 miles across the outlet of Arthur's Pond and up a short hill to the yellow Tower Vue trail. Turn right here and walk .55 miles along the shore of the pond and back to the white Scenic Trail. Turn left and continue .2 miles on the trail which is also Bog Meadow road a this point. Turn right into the woods following the white Scenic trail as it heads south and the loops north and northeast again. After .5 miles and some climbing you will be at the top of Rattlesnake Hill. In another .7 miles you will crest Hill of Pines. After about .25 miles more you will cross the blue Swamp Trail and in only a few hundred feet the white Scenic trail ends at a junction with the yellow Stillman Trail. Turn right here to ascend .15 miles to the top of Mount Misery.
Descend .15 miles down Mount Misery and turn right on White Oak Road. In .17 miles you will be at the upper Reservoir. Turn left on Reservoir Road and walk .25 miles down to the Education Center. Another easy .55 miles on the road delivers you back to your car in the parking area.
 (The image at the left shows the profile of the hike. Remember that all vertical profiles are
relative!)
(The image at the left shows the profile of the hike. Remember that all vertical profiles are
relative!)
Black Rock Forest: Black Rock Hollow Loop
| Quick Look | ||||
|---|---|---|---|---|
| Difficulty | Round trip | Total climb | Internet Maps | |
| 5.8 mi. | 1180 ft. | AllTrails | ||
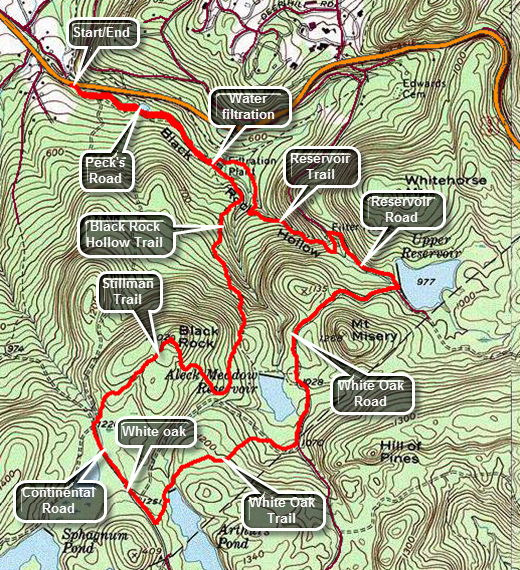 Black Rock Forest has many trails and roads. A map is essential to being able to navigate your way around this interesting but confusing maze. From the south, get on Route 9W on the west side of the Hudson River heading north from West Point toward Newburg. From the junction with Route 293 near the Unites States Military Academy at West Point, drive a little more than 4 miles north on 9W. Look for Mountain Road and the Storm King School on your right. The parking area is on the west side of the road about .7 miles passed the school. From the north, get on Route 9W on the west side of the Hudson River heading south toward West Point. From I84 it is just less than 8 miles to the parking area on the west side of Route 9W. The parking area is about a mile south of Angola Road. Pull over and park in the lot and start out on Peck's Road which has a gravel surface and is in great shape. For the first .6 miles stay on the road which has a very gradual uphill grade. When you reach the water filtration plant, the Black Rock Hollow Trail turns right off the road into the woods following and old woods road. The woods road is rocky and eroded in places but the trail is sited to avoid the worst spots. Over the next .9 miles gain almost 600 feet along a 12% grade with some steeper sections. At 1.5 miles there is a junction with the yellow Stillman Trail. Turn right to head toward Black Rock. Continue following the Stillman Trail northwest toward Black Rock. By the time you hit the highest point on Black Rock you will have gained another 260 feet in the .3 miles from the trail junction. The view from Black Rock is more than 180 degrees to the south, west and north. Look southwest or to the left to see a fire tower which is just a shell and closed to the public. To the northwest the Schunnemunk Ridge is prominent and with the Moodna Viaduct just below it. The viaduct was opened in 1909 and is still the longest and highest railroad trestle east of the Mississippi River! To the north is the Hudson River and the Newburgh-Beacon Bridge. Follow the Stillman Trail as it makes a steep descent and watch for the black deposits that give the rock its name. The descent isn't long but the first part is very steep. I have done this in the winter and spikes are almost a must if there is any ice or snow. At 2.3 miles turn left onto Continental Road and hike along the well groomed surface until you reach a large white oak tree at 2.6 miles. This tree seems to be in pretty good condition. Continue on a few hundred feet and turn left the white blazed White Oak Trail to Arthur's Pond. Continue on the trail as it crosses just below the spillway of the pond. After crossing the spillway, follow the White Oak Trail as it heads into the woods to the left. The trail comes to an end on White Oak Road. Turn right on the road and follow it as it passed along the shore of Aleck Meadow Reservoir. Continue to follow the road as it passes Aleck Meadow Reservoir and heads toward the Upper Reservoir. At the Upper Reservoir continue on Reservoir Road to the Mailey's Mill Bridge near the research center. At 4.5 miles turn left and cross over the bridge to the blue Reservoir Trail. The stream on the right once powered the mill. Continue on the trail crossing the stream on Ben's Bridge until the trail ends at the water filtration plant at 5.25 miles. Turn right on Peck's Road. From there it is only .6 miles downhill to the car.
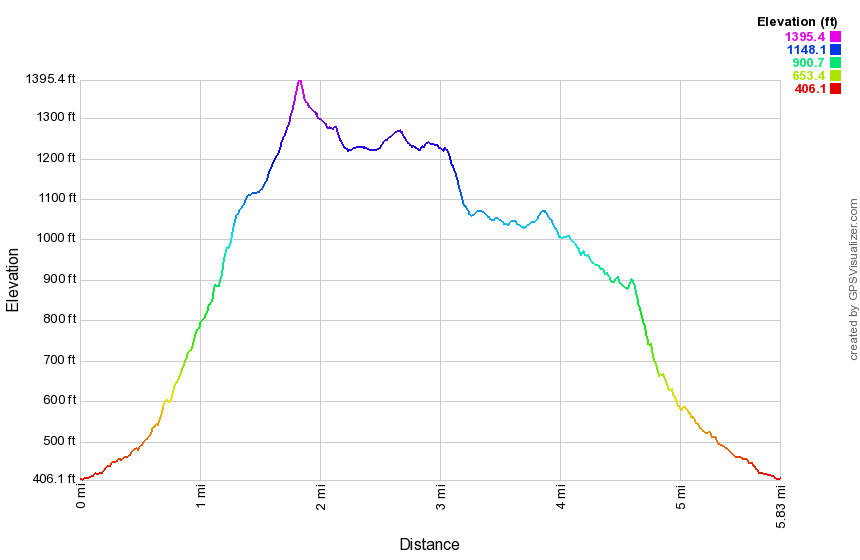
(The image at the left shows the profile of the hike. Remember that all vertical profiles are relative!)
Bramley Mountain (Glen Burnie Road)
| Quick Look | ||||
|---|---|---|---|---|
| Difficulty | Round trip | Total climb | Internet Maps | |
| 2.9 mi. | 920 ft. | AllTrails | ||
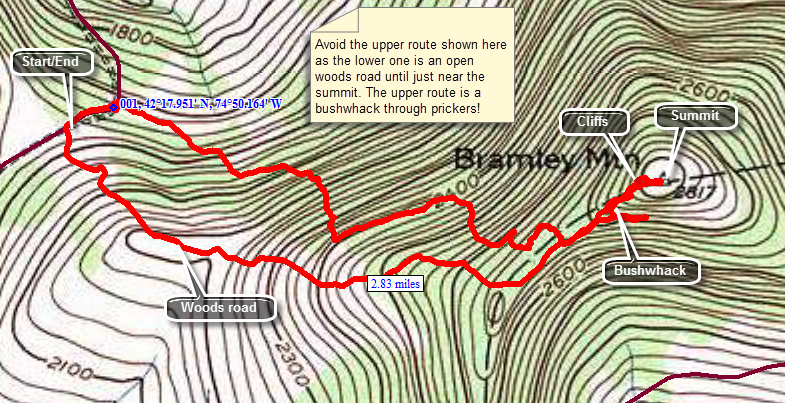 From Delhi, NY head north and east on Route 10. In East Delhi cross the river at the Fitches Covered Bridge and turn left on County Route 18. After about 2 miles turn right on Glen Burnie Road and start to look for DEP signs. After a little over .5 miles there will be a woods road on the left with a gate and some room to pull over on the side of the road. DO NOT park here and take this road. Drive a little further and you will find found another woods road with another pulloff on the left. This woods road will lead almost directly to the summit of Bramley Mountain. Follow the road for about 1.1 miles and you will find that if you continue straight ahead the road will skirt the summit. You will have to bushwhack to your left to get to the summit. The prickers here can be rather thick at times! When you run into some cliffs find a way through them and walk the short distance to the summit. You will find the piers for the firetower are still in place and a USGS marker is located nearby. Walk south to s lookout with limited views. When you are ready, return the way you came.
 (The image at the left shows the profile of the hike. Remember that all vertical profiles are relative!)
Bramley Mountain: New Trails
| Quick Look | ||||
|---|---|---|---|---|
| Difficulty | Round trip | Total climb | Internet Maps | |
| 3.7 mi. | 950 ft. | AllTrails | ||
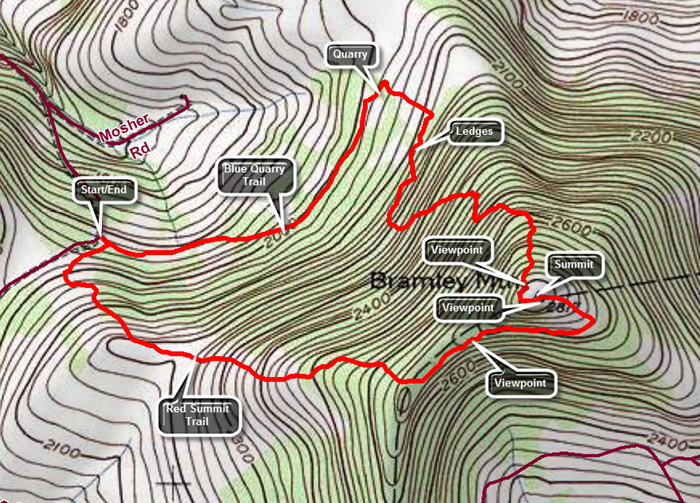 From Delhi, NY head north and east on Route 10. In East Delhi cross the river at the Fitches Covered Bridge and turn left on County Route 18. After about 2 miles turn right on Glen Burnie Road and start to look for DEP signs. After a little over .5 miles there will be a woods road on the left with a gate and some room to pull over on the side of the road. There is a trail kiosk near the gate. Park here to begin your hike with a choice of trails.
The red Summit Trail goes to the right directly to the summit over 1.8 miles.The blue Quarry Trail goes straight ahead and passes through a quarry before wending its way to the summit over 2.1 miles. Walk straight ahead on the blue Quarry Trail which follows a woods road that is very open but can be damp and muddy in some places. At about .8 miles the trail passes through the quarry and splits with blue markers going both left and right. Head to the right as the trail enters the woods and immediately turns almost 180 degrees. The trail alternates between paralleling the ridge and then heading up the mountain several times before making the final ascent. Eventually the trail turns and begins a steady climb up to the summit. It passes by several interesting ledges and rock formations. There are numerous switchbacks which make the walk longer but mitigate some of the steeper climbs. Near the top the trail passes around and through some rock ledges and the trail crew has expertly created some steps out of natural materials. Near the top at about 1.9 miles and just before the summit is a nice viewpoint with a stone bench. Turn left here and follow the trail too the summit which is only a few hundred feet away. Over the 1.1 miles from the quarry the trail gains 770 feet with and overall average grade of 13% despite the many switchbacks. At the summit you will notice the concrete pilings for the fire tower. There is also a lookout to the south and southeast and the Pisgahs near Andes are clearly visible. They were once the site of a ski area. Return to the summit and walk in the direction that the arrow points to follow markers for the red Summit Trail that will return you to the parking area. The Summit Trail starts out as wide woods road but at .15 miles from the summit a sign clearly indicates a right turn. The trail follows another woods road that is more open but is often covered in long grass. Along the ridge there is a nice view off to the left. Continue to follow the woods road as it entered the woods. As the trail approaches the road it turns right and enters the woods to start downhill to the car. This part of the trail is soft and easy walking but only lasts .15 miles until you are back at the parking area.
From Delhi, NY head north and east on Route 10. In East Delhi cross the river at the Fitches Covered Bridge and turn left on County Route 18. After about 2 miles turn right on Glen Burnie Road and start to look for DEP signs. After a little over .5 miles there will be a woods road on the left with a gate and some room to pull over on the side of the road. There is a trail kiosk near the gate. Park here to begin your hike with a choice of trails.
The red Summit Trail goes to the right directly to the summit over 1.8 miles.The blue Quarry Trail goes straight ahead and passes through a quarry before wending its way to the summit over 2.1 miles. Walk straight ahead on the blue Quarry Trail which follows a woods road that is very open but can be damp and muddy in some places. At about .8 miles the trail passes through the quarry and splits with blue markers going both left and right. Head to the right as the trail enters the woods and immediately turns almost 180 degrees. The trail alternates between paralleling the ridge and then heading up the mountain several times before making the final ascent. Eventually the trail turns and begins a steady climb up to the summit. It passes by several interesting ledges and rock formations. There are numerous switchbacks which make the walk longer but mitigate some of the steeper climbs. Near the top the trail passes around and through some rock ledges and the trail crew has expertly created some steps out of natural materials. Near the top at about 1.9 miles and just before the summit is a nice viewpoint with a stone bench. Turn left here and follow the trail too the summit which is only a few hundred feet away. Over the 1.1 miles from the quarry the trail gains 770 feet with and overall average grade of 13% despite the many switchbacks. At the summit you will notice the concrete pilings for the fire tower. There is also a lookout to the south and southeast and the Pisgahs near Andes are clearly visible. They were once the site of a ski area. Return to the summit and walk in the direction that the arrow points to follow markers for the red Summit Trail that will return you to the parking area. The Summit Trail starts out as wide woods road but at .15 miles from the summit a sign clearly indicates a right turn. The trail follows another woods road that is more open but is often covered in long grass. Along the ridge there is a nice view off to the left. Continue to follow the woods road as it entered the woods. As the trail approaches the road it turns right and enters the woods to start downhill to the car. This part of the trail is soft and easy walking but only lasts .15 miles until you are back at the parking area.
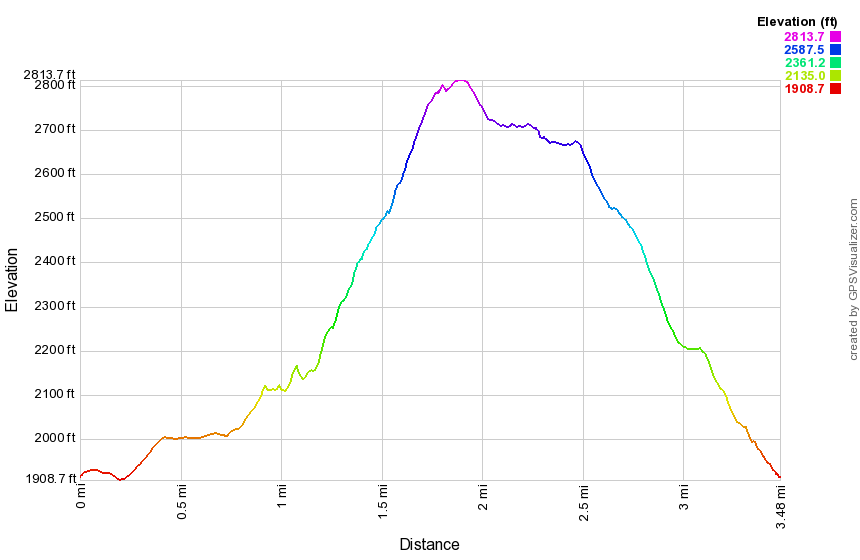 (The image at the left shows the profile of the hike. Remember that all vertical profiles are relative!)
Brock Mountain to Berry Brook Rd
| Quick Look | ||||
|---|---|---|---|---|
| Difficulty | Round trip | Total climb | Internet Maps | |
| 6.4 mi. | 1824 ft. | AllTrails | ||
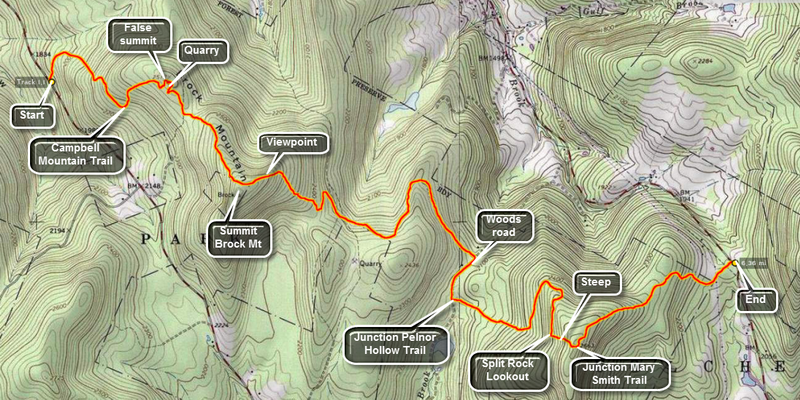 This is a one way hike that requires a car shuttle or you will have to double the distance. Another option is to have someone pick you up at the other end. Head out of Roscoe on Route 206. Turn right on Berry Brook Road just after the county line and drive for around 8 miles to the trail head parking on the right. Drop one car here and continue on Berry Brook Road to Route 30 on the Pepacton Reservoir. Turn left and continue around the reservoir to the junction with Route 206/Route 7. Turn left and drive 2.2 miles to a small parking area on the right side of the road. Park here and cross the road to pick up the blue-blazed Campbell Mountain Trail.
The trail is a wide woods road at the beginning and stays this way for most of its length. There is an immediate ascent through hardwood forest. Hiking this trail can be a real pain or a great pleasure depending on the trail maintenance. This trail is part of the Finger Lakes Trail system and is maintained by their volunteers. Blowdowns can be a problem but the bigger problem is the dense stands of prickers that can obscure the trail. For the first .5 miles the trail gains 450 feet with a few short but steep climbs. After that, it goes through the first of several switchbacks to give hikers a rest before gaining another 230 feet over the next .4 miles. At about 1 mile you reach the false summit of Brock Mountain which, on many maps and GPS units, is marked as Brock Mountain. In this area you may begin to notice piles of rock that do not look natural> There is a rather large quarry off the trail to the left. You may be able to find a woods road that leads to it but the bushwhack is easy. You will see piles of rock and a large and deep pit. When you have explored, work your way back up out of the pit and back to the trail. Back on the trail it is time to tackle the rest of the ascent up the "real" Brock Mountain. After a slight descent from the false summit, the trail ascends about 300 feet to the top of Brock Mountain at about 1.9 miles into the hike. The trail does not actually pass over the highest point on the mountain where there is purported to be a USGS benchmark but it tops out at about 2440 feet. As you start down the other side of Brock Mountain there will be a rather steep descent. Many of the trees are dead and this allows for some interesting views of the valley with another ridge beyond. Continue the hike over trail but be careful to pay close attention to where you are hiking! There are numerous paths and woods roads that cut across the main trail and the trail markers can be few and far between. At about 2.4 miles the trail heads north and then southeast after a short distance. This prominent switchback is not shown on the NYNJTC maps and can be a little confusing. At 3 miles the trail turns almost 90 degrees to the right and heads northeast. Shortly after this, at 3.3 miles, there is another 90 degrees turn to the right and the trail heads southeast. In both cases there are snowmobile trails or woods roads in the area of the turns. There are really no views along the way but the woods can be pretty in any season. In some places there are stone walls and the hint of a foundation. At 3.85 there is another 90 degree turn to the right onto an old road which is eroded but very recognizable with stone walls on both sides. The is a slight uphill but the trail is mostly level for the next .3 miles. At this point the Campbell Mountain Trail ends. To the right is the Little Spring Brook Trail that leads out to Route 206. Turn left onto the Pelnor Hollow Trail. In the next 1 mile the trail climbs over 400 feet through mixed hardwood and evergreen forest. There are some steeper climbs in places along this stretch. Near the top of this climb the trail levels and your reward is the Split Rock Lookout. At the lookout there is a large boulder and an area where part of the bedrock has separated. The views to the west are very good but there isn't much to see other than trees and mountains except for one house on the far ridge. The lookout is about 5.2 miles into the hike. From the lookout the trail ascends for about .1 miles at a 26% grade. This isn't very far but it looks like a WALL from the bottom. At 5.3 miles, turn left on the red Mary Smith Trail as the Pelnor Hollow Trail continues straight ahead. The Mary Smith Trail is an almost continuous downhill to Berry Brook Road. There are a few tricky descent through rocks and around trees. After 1.1 miles and a drop of over 500 feet you should be back at the car. When you come out of the woods and cross the power line right-of-way, watch for the point where the trail reenters the woods on the other side.
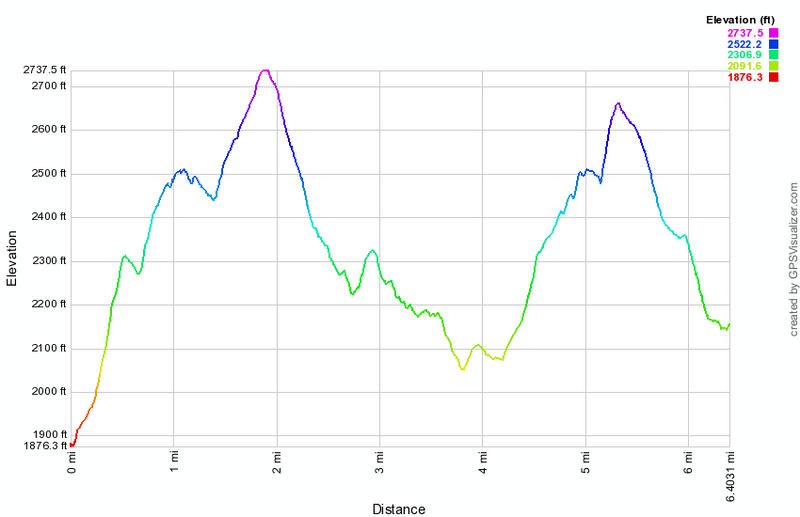 (The image at the left shows the profile of the hike. Remember that all vertical profiles are relative!)
Budd Lake Fire Tower
| Quick Look | ||||
|---|---|---|---|---|
| Difficulty | Round trip | Total climb | Internet Maps | |
| .7 mi | 115 ft | AllTrails | ||

From Route 46 in Budd Lake, NJ take Sand Shore Road north along the east shore of Budd Lake for a little more than 1.5 miles. Turn right on Fire Tower Road. Where Fire Tower Road crosses Lozier Road continue straight across. When the road branches follow the right fork and park at the dead end. Be sure to leave space for vehicles to pass through the gate especially during times of high fire alert. Walk north along the road for about .35 miles to the tower. Take some pictures and then retrace your path back to the car. Budd Lake is the largest fresh water lake in New Jersey so it may be worthwhile to visit the tower during a high fire alert so that you mat climb the tower with permission from the observer.
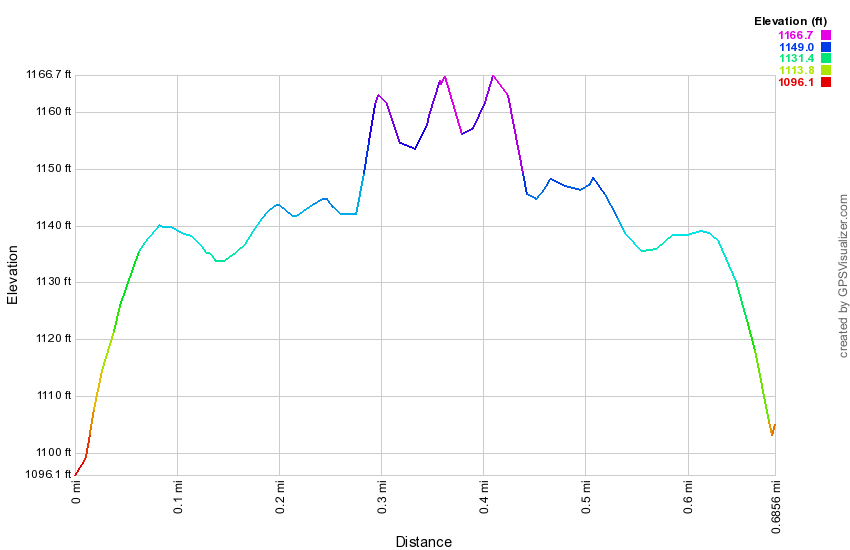 (The image at the left shows the profile of the hike. Remember that all vertical profiles are relative!)
Burnt Knob
| Quick Look | ||||
|---|---|---|---|---|
| Difficulty | Round trip | Total climb | Internet Maps | |
| 3.8 mi | 1330 ft | AllTrails | ||
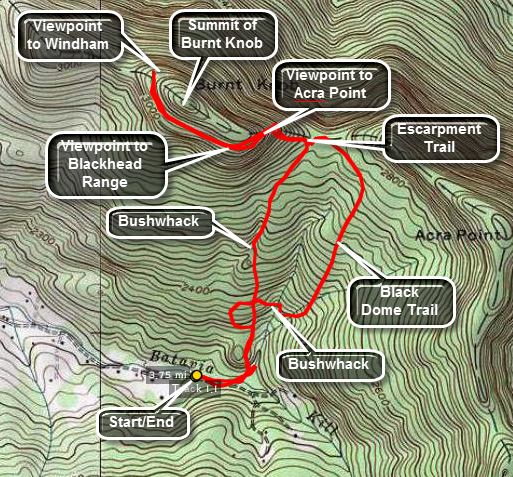 Park at trail head parking area on Black Dome or Big Hollow Road. Be aware that past a certain
point this road is considered seasonal and may not be plowed or maintained. During the winter
the trailhead parking is almost never plowed and parking is limited along the shoulders of the road.
The trail head is just BEFORE the parking area on the right. Find the red-blazed Black Dome Trail
and immediately cross the Batavia Kill on a bridge. After a short walk, re-cross the Batavia Kill
and continue on the Trail for about 1.1 miles. Look over your shoulder occasionally to see the
imposing presence of Blackhead, Black Dome and Thomas Cole Mountains. This walk winds its way
upward through mixed hardwood and spruce forest until it meets the blue-blazed Escarpment Trail.
Park at trail head parking area on Black Dome or Big Hollow Road. Be aware that past a certain
point this road is considered seasonal and may not be plowed or maintained. During the winter
the trailhead parking is almost never plowed and parking is limited along the shoulders of the road.
The trail head is just BEFORE the parking area on the right. Find the red-blazed Black Dome Trail
and immediately cross the Batavia Kill on a bridge. After a short walk, re-cross the Batavia Kill
and continue on the Trail for about 1.1 miles. Look over your shoulder occasionally to see the
imposing presence of Blackhead, Black Dome and Thomas Cole Mountains. This walk winds its way
upward through mixed hardwood and spruce forest until it meets the blue-blazed Escarpment Trail.
When the streams are running high, you may be unable to make the second crossing after the bridge without running the risk of getting very wet at the beginning of the hike! The map shown was created at such a time. It shows a bushwhack route up the west side of the stream. The bushwhack meets the Escarpment Trail just west of the "official" point which is marked by a sign.
Turn left on The Escarpment Trail and head toward Burnt Knob. The terrain now is more rugged and steeper. There is a hint of views to both the north and south on both sides of the trail but they are not clear. The final ascent onto Burnt Knob is a little steep requiring some help from your poles or surrounding roots and trees. At the top of this short but steep ascent there is a nice view to the north of the valley and a view to the east toward Acra Point. Continue on this trail for a short distance until a short spur leads of to the right. This viewpoint offers an unobstructed view of the Black Dome Valley, Acra Point and the Blackhead Range. This is a good place to stop and enjoy a snack and the view. This area is only about .35 miles from the junction with the Black Dome trail and less if you did the bushwhack.
Continue on for another .35 miles until the trail starts to descend. From here you can see Windham mountain and get some views to the south. Return by retracing your path on the trail or the bushwhack. You can return on the Black Dome Trail even if you bushwhacked up. Before the first water crossing, turn right or west for a short distance until you come to the Batavia Kill. Cross here and walk up to the top of the ridge. You should find the track of your bushwhack up. Follow this track to bushwhack back to the trail register and the parking area.
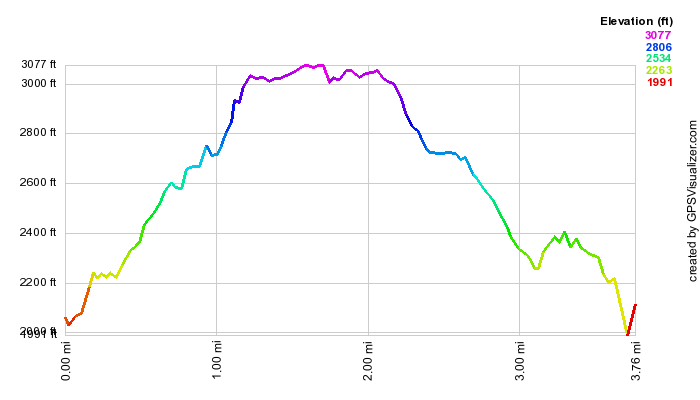 (The image at the left shows the profile of the hike. Remember that all vertical profiles are
relative!)
(The image at the left shows the profile of the hike. Remember that all vertical profiles are
relative!)
Burnt Knob and Acra Point
| Quick Look | ||||
|---|---|---|---|---|
| Difficulty | Round trip | Total climb | Internet Maps | |
| 6.5 mi | 1730 ft | AllTrails | ||
_map.png) Park at trail head parking area on Black Dome or Big Hollow Road. Be aware that past a certain
point this road is considered seasonal and may not be plowed or maintained. During the winter
the trailhead parking is almost never plowed and parking is limited along the shoulders of the road.
The trail head is just BEFORE the parking area on the left. Find the red-blazed Black Dome Trail
and immediately cross the Batavia Kill on a bridge. Immediately re-cross the Batavia Kill
and continue on the trail for about 1.1 miles where you will meet the blue Escarpment Trail. When the streams are running high, you may be unable to make the second crossing after the bridge without running the risk of getting very wet at the beginning of the hike! Look over your shoulder occasionally to see the
imposing presence of Blackhead, Black Dome and Thomas Cole Mountains.
Park at trail head parking area on Black Dome or Big Hollow Road. Be aware that past a certain
point this road is considered seasonal and may not be plowed or maintained. During the winter
the trailhead parking is almost never plowed and parking is limited along the shoulders of the road.
The trail head is just BEFORE the parking area on the left. Find the red-blazed Black Dome Trail
and immediately cross the Batavia Kill on a bridge. Immediately re-cross the Batavia Kill
and continue on the trail for about 1.1 miles where you will meet the blue Escarpment Trail. When the streams are running high, you may be unable to make the second crossing after the bridge without running the risk of getting very wet at the beginning of the hike! Look over your shoulder occasionally to see the
imposing presence of Blackhead, Black Dome and Thomas Cole Mountains.
Turn left on The Escarpment Trail and head toward Burnt Knob. The terrain now is more rugged and steeper. There is a hint of views to both the north and south on both sides of the trail but they are not clear. The final ascent onto Burnt Knob is a little steep requiring some help from your poles or surrounding roots and trees. At the top of this short but steep ascent there is a nice view to the north of the valley and a view to the east toward Acra Point. Continue on this trail for a short distance until a short spur leads of to the left at about 1.4 miles. This viewpoint offers an unobstructed view of the Black Dome Valley, Acra Point and the Blackhead Range. This is a good place to stop and enjoy a snack and the view. From this viewpoint start your bushwhack to the top of the ridge by heading straight up the spur trail and climbing UP. The bushwhack up and along the ridge to the highest point is only about .3 miles. From the top head southwest and DOWN until you meet the Escarpment Trail. Turn left to head east toward Acra Point. Pass by the turn to the parking area on The Black Dome Trail and continue up the hill to the east. At about 2.7 miles watch for a spur trail to the right which leads to another nice lookout. This one looks down the Black Dome valley and has a great view of the Blackhead Range. Spend some time here and then go back to the Escarpment Trail and turn right to walk another .5 miles to the highest spot on Acra Point. Continue along the trail to 4.9 miles where you will meet the Batavia Kill Trail. Along the way there are several ups and downs. Turn right at the trail junction to get back to your car. This last part is 1.6 miles but it is all downhill!
_gra.png) (The image at the left shows the profile of the hike. Remember that all vertical profiles are relative!)
(The image at the left shows the profile of the hike. Remember that all vertical profiles are relative!)
Buttermilk Falls State Park (NY)
| Quick Look | ||||
|---|---|---|---|---|
| Difficulty | Round trip | Total climb | Internet Maps | |
| 2.0 mi. | 760 ft. | AllTrails | ||
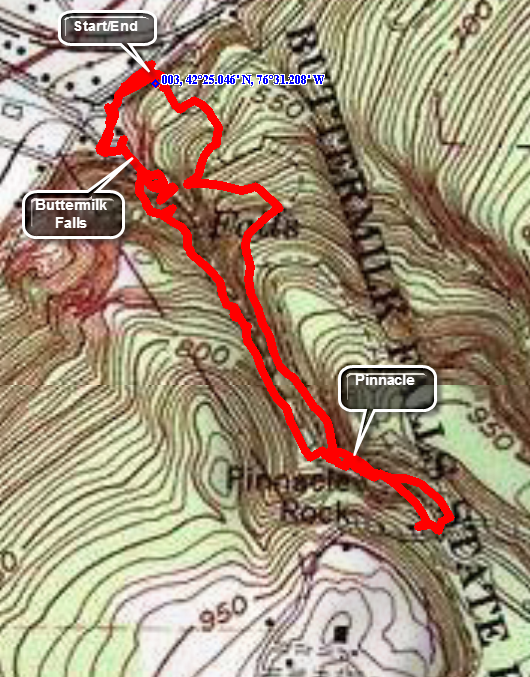
Head south on Route 13 from Ithaca, New York. Watch for signs for East Buttermilk Falls Road and Buttermilk Falls State Park on your left. The main Buttermilk Falls area is a popular swimming area and it may be hard to get good pictures of the falls from below. Walk through the swimming area to pick up the trail on the west rim of the gorge on the Gorge Trail. As you walk up the first set up steps you may be able to get better pictures. The main "falls" simply has water that passes over a wide expanse of harder bedrock and does not really fall. Over the years the stream has cut an interesting path through the rock forming the gorge. You will soon be at another falls without a sheer drop but one that is narrower and, therefore, seems to be faster flowing. As you continued along the path, you will see how the stream has meandered along the gorge and causing many different and interesting formations. Another falls will appear soon as the water passes through a narrow slot in the rocks. In several places the swirling water has cut circular "pools" in the rock which are deep with rather large diameters. More falls and more interesting formations appear along the way as the path continues climbing up the gorge. At the top of one set of steps you will see a nice three-tiered cascade. There is a lean-to on the right of the trail. Pass by the bridge that crosses the stream to make sure you see the whole gorge. There are several more falls and interesting rock formations and then you will be at Pinnacle Rock. Here a spire of rock has either pulled away from the gorge wall or, more likely, is of greater hardness than the surrounding stone. In any case, it is quite impressive standing tall right next to the path. The pattern of falls, plunge pools, and slots continues as you walk to the head of the gorge but they become less frequent as the stream volume deceases. Cross the next bridge to get to the Rim Trail on the east side of the gorge. This trail descends for most of its length but has at least one area that drops to the gorge before climbing again to the rim. In several places the trail meets a service road and the path was not well marked. The Rim Trail will take you back to the parking area.
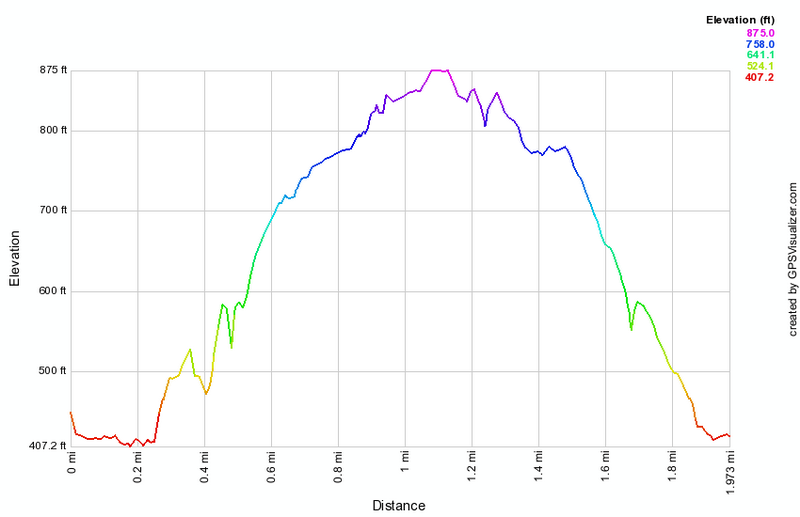 (The image at the left shows the profile of the out and back hiking route. Remember that all vertical profiles are relative!)
Cabot Mountain from Beech Hill Road
| Quick Look | ||||
|---|---|---|---|---|
| Difficulty | Round trip | Total climb | Internet Maps | |
| 3.2 mi. | 917 ft. | AllTrails | ||

Head toward Lew Beach on the Beaverkill Road from Livingston Manor. Pass through Lew Beach toward Turnwood. Watch for a right hand turn with a road sign for Beech Hill Road. Drive up the road for about 2.6 miles and park at the parking area on the right. The hike to the Beaverkill Vista viewpoint and back is only be about 3 miles but part of it is steep. The first part of the trail is flat and actually descends a little and it almost always wet. At about .25 miles into the hike the trail starts to ascend and gains 575 feet over the next .5 miles. The grade is around 25% in most places! After this point the trail flattens out and rolls a little along the way to the viewpoint. At .85 miles you may notice what looks like a road off the trail on the left. I don't know much about it but it does look very much like a road. Continue without much change in elevation to 1.25 miles where the trail ascends again and then drops a little to the vista at 1.6 miles. Turn around to retrace your steps back to the car. The challenge on the way back is to descend safely on the steeper slopes but the return is almost always faster. We were back at the car by 2:40 PM having covered 3.2 miles in just under 2 hours. The trip up took 1 hour and 10 minutes. The return journey was completed in 45 minutes.
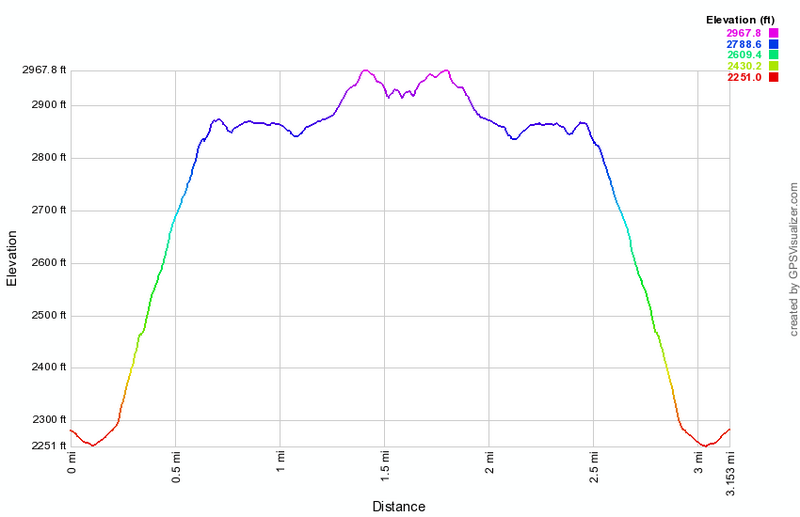 (The image at the left shows the profile of the out and back hike. )
Cabot Mountain from Big Pond (out and back)
| Quick Look | ||||
|---|---|---|---|---|
| Difficulty | Round trip | Total climb | Internet Maps | |
| 4.4 mi. | 1635 ft. | AllTrails | ||
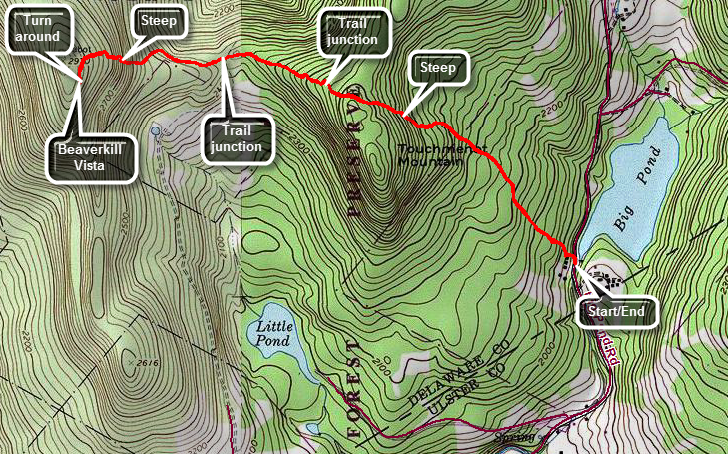
Head toward Lew Beach on the Beaverkill Road from Livingston Manor. Pass through Lew Beach toward Turnwood. Where the Beaverkill Road turns to the right just before the Turnwood Store, turn left on Barkaboom Road and drive a short distance to the parking area on the right just before Big Pond. Cross the road and start up the trail which is well marked and maintained. The trail starts rising right from the road and continues to gain elevation for just over one mile to the highest point on Tocuh-Me-Not Mountain gaining almost 800 feet along the way. Continue over the highest point on Touch-Me-Not Mountain to the trail junction with the Campground Trail. Stay to the right on the Touch-Me-Not Trail and continue to descend to about 1.6 miles where the trail meets the Little Pond Loop Trail on the left. At the junction continue straight ahead on the Touch-Me-Not Trail and prepare for the climb up Cabot Mountain. Walk along a fairly flat section of trail toward Cabot Mountain until at 1.8 miles the trail turns a little to the left and starts the ascent up Cabot Mountain. This area is often covered in nettles when they are in season! Soon you will be climbing the steep sections that pass through several different rock formations. There are several parts to the climb and each is tricky in its own way. Over the next .4 miles the trail gains 470 feet of elevation at an average grade of 24%. After the last section, the trail flattens as it follows a plateau to the Beaverkill Vista at 2.2 miles. Spend some time at the vista and the turn around and return the way you came. If you wish there are other variations on the hike which can be found elsewhere in these trail descriptions.
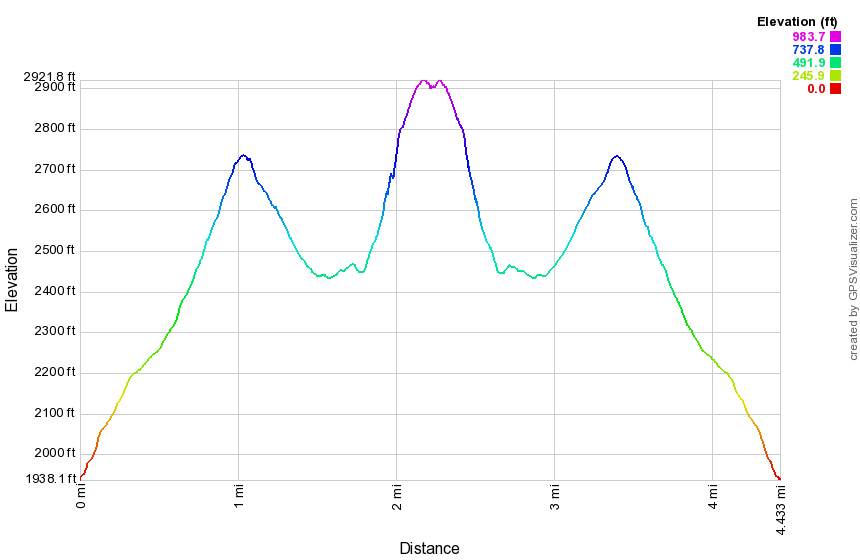 (The image at the left shows the profile of the out and back hike. )
Campbell Brook: Campbell Brook Loop
| Quick Look | ||||
|---|---|---|---|---|
| Difficulty | Round trip | Total climb | Internet Maps | |
| 7.5 mi. | 1622 ft. | AllTrails | ||
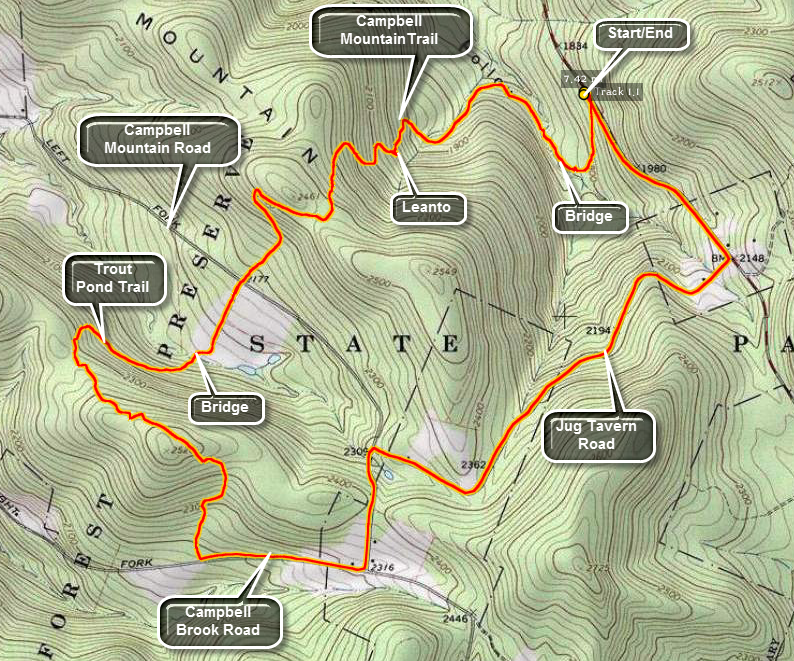
Head out of Roscoe on Route 206. As you crest Cat Hollow and start down the other side, there is a small parking area on the left side of the road after Jug Tavern Road. Park here and sign in at the trail registry. Walk down the woods road and cross a small brook which may be high when there has been significant rain or snow melt. In this area are several old foundations to explore. Walk along the trail by the brook and cross on the footbridge. The trail now begins to ascend Campbell Mountain and can be wet with running water. At about 1.2 miles there is a sharp turn or switchback to the left but it is well marked. The trail continues to ascend rather steeply and at 1.3 miles is a lean-to with privy. The highest point on the trail (2430 feet) is reached at around 1.9 miles. Continue on down the other side of the hill to Campbell Brook Road at 2.4 miles. Cross the road here and pick up the Trout Pond Trail on the other side. The trail continues to descend until you cross the bridge over Campbell Brook at 2.75 miles.From there it is a 1 mile climb to the highest point on the hike at 2510 feet. Head down the other side to Campbell Brook Road at 4.3 miles. From here it is a 3.2 mile road walk back to the car. Turn left on Campbell Brook Road. Make the next left onto Campbell Mountain Road. Turn right at the next intersection on Jug Tavern Road. Stay on Jug Tavern until it meets Route 206. Turn left and walk .7 miles downhill back to the car.
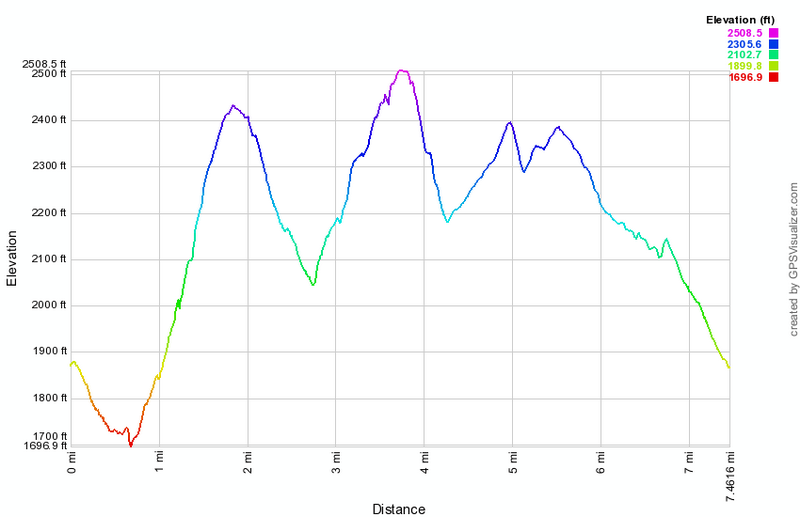 (The image at the left shows the profile of the out and back hike. )
Campbell Brook: Campbell Mountain Loop
| Quick Look | ||||
|---|---|---|---|---|
| Difficulty | Round trip | Total climb | Internet Maps | |
| 5.2 mi. | 1130 ft. | AllTrails | ||
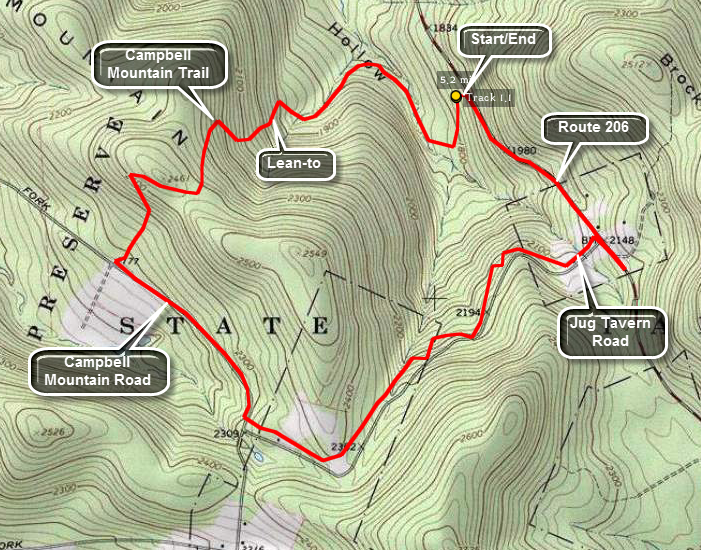
Head out of Roscoe on Route 206. As you crest Cat Hollow and start down the other side, there is a small parking area on the left side of the road after Jug Tavern Road. Park here and sign in at the trail register. Walk down the woods road and cross a small brook which may be high when there has been significant rain or snow melt. In this area are several old foundations to explore. Walk along the trail by the brook and cross on the footbridge. The trail now begins to ascend Campbell Mountain and can be wet with running water. At about 1.2 miles there is a sharp turn or switchback to the left but it is well marked. The trail continues to ascend rather steeply and at 1.3 miles is a lean-to with privy. The highest point on the trail (2430 feet) is reached at around 1.9 miles. Continue on the trail as you descend to Campbell Mountain Road. Turn left on Campbell Mountain Road and walk slightly uphill .7 miles toward the intersection with Jug Tavern Road. At the intersection turn left and continue to hike toward Route 206. There are a few hunting cabins and second homes along the road and several permanent dwellings. After about 1.5 miles turn left on Route 206 and hike downhill to complete the loop.
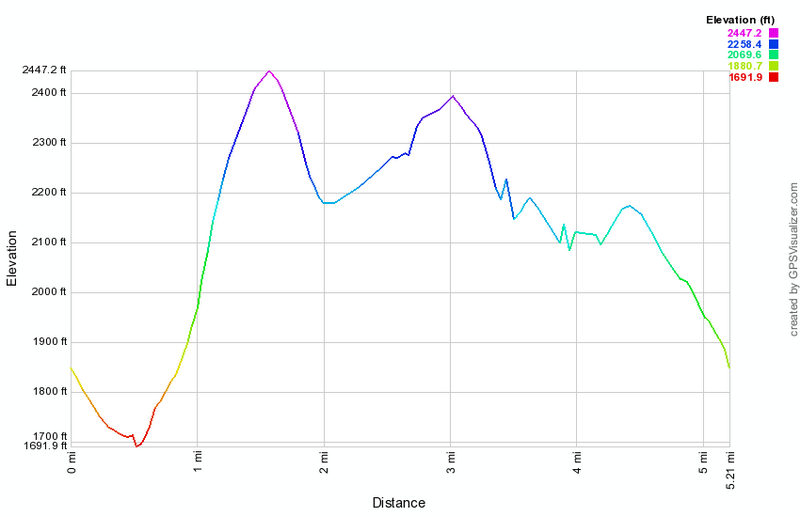
(The image at the left shows the profile of the out and back hike. )
Campbell Brook: Campbell Mountain Out and Back
| Quick Look | ||||
|---|---|---|---|---|
| Difficulty | Round trip | Total climb | Internet Maps | |
| 5.0 mi. | 1270 ft. | AllTrails | ||
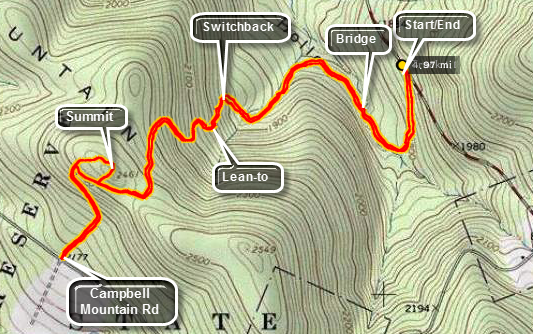
Head out of Roscoe on Route 206. As you crest Cat Hollow and start down the other side, there is
a small parking area on the left side of the road after Jug Tavern Road. Park here and sign in at the trail registry. Walk down the woods road and cross a small brook which may be high when there has been significant rain or snow melt. In this area are several old foundations to explore. Walk along the trail by the brook and cross on the footbridge. The trail now begins to ascend Campbell Mountain and can be wet with running water. At about 1.2 miles there is a sharp turn or switchback to the left but it is well marked. The trail continues to ascend rather steeply and at 1.3 miles is a lean-to with privy. The highest point on the trail (2430 feet) is reached at around 1.9 miles. You can turn around now or walk down to "tag" Campbell Brook Road. This is another .6 miles downhill which you must climb on the return trip. You can also continue and fashion a loop out of the trails and back roads in the area.
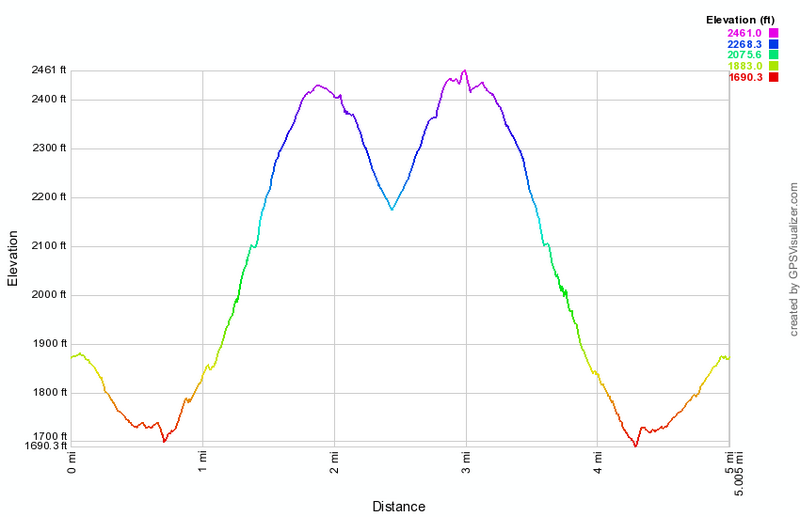 (The image at the left shows the profile of the out and back hike. )
Campbell Brook: Trout Pond to Route 206
| Quick Look | ||||
|---|---|---|---|---|
| Difficulty | Round trip | Total climb | Internet Maps | |
| 12.4 mi. | 2700 ft. | AllTrails | ||
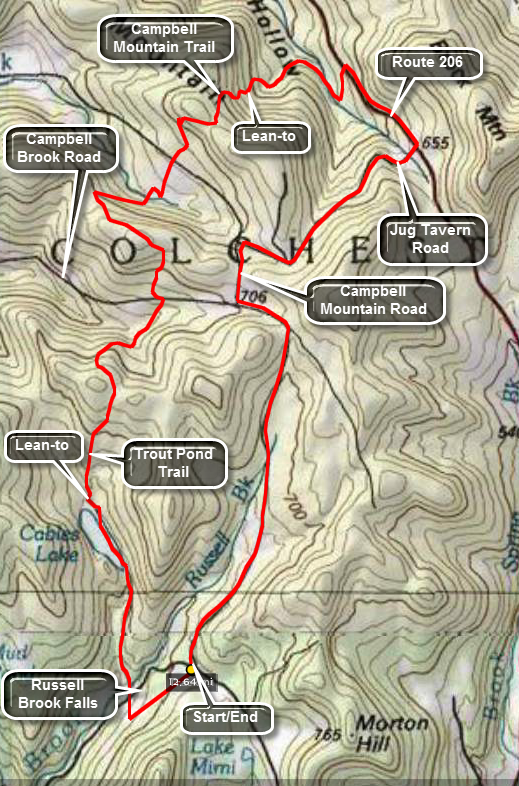 About half of this hike is on trails and the other half on back roads. Even the roads are scenic so
you don't lose much walking along them. The initial part is the same as the Trout Pond hike.
About half of this hike is on trails and the other half on back roads. Even the roads are scenic so
you don't lose much walking along them. The initial part is the same as the Trout Pond hike.
Turn left on Morton Hill Road on Route 206 just after the Rockland flats. Bear right up Morton Hill
Road until you see a parking area on the left near the sign indicates Russell Brook Road is closed.
Park here and hike down Russell Brook Road half a mile to the actual trail head. Go over the bridge and
look to your right to see a beautiful waterfall. Explore this area if you like. Back on the trail you
may go to the left or right. Go to the right and walk another 1.5 miles to the head of Trout Pond. The
trail is a gentle uphill all the way with the last quarter mile along the edge of the lake. At the
head of the lake the trail branches right to Campbell Brook. Bear right on stay on the blue-blazed
Trout Pond Trail. This trail continues for another 3.1 miles. On the way you pass over the shoulders
of two unnamed mountains. Campbell Brook and Campbell Mountain Roads are the low points in between.
The trail goes on for another 1.9 miles and up and down another mountain until it meets Route 206.
Turn right on Route 206 and walk .7 miles up the hill until you turn right on Jug Tavern Road.
After walking 1.8 miles along Jug Tavern make a left onto Campbell Brook Road. Continue walking
on this road for 3.15 miles back to the car. Campbell Brook changes to Morton Hill Road after a short
distance but there are no turns.
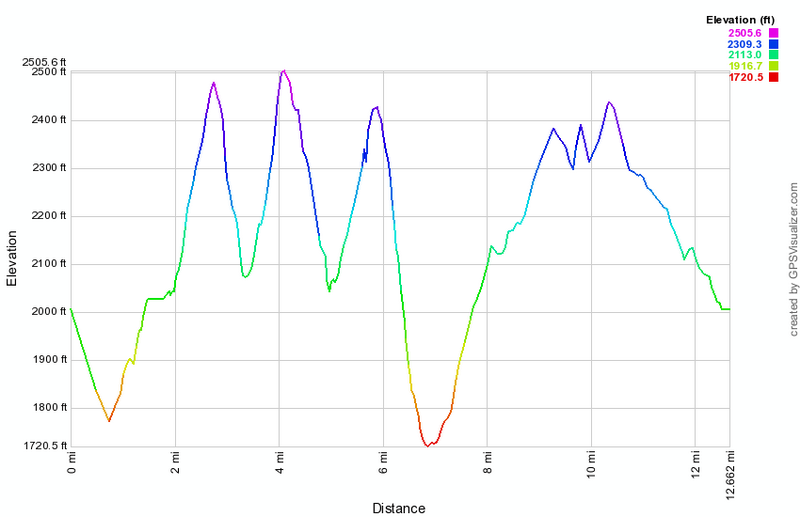
(The image above shows the profile of the hike. The vertical ascents and descent are not as pronounced as shown here since they are exaggerated by the overall distance. The first low point is the trail head register at Russell Brook. The second is at the base of the climb up to Route 206. You can see that Morton Hill Road is downhill all the way!)
Campbell Mountain: Trout Pond to Campbell Mountain Road
| Quick Look | ||||
|---|---|---|---|---|
| Difficulty | Round trip | Total climb | Internet Maps | |
| 5.1 mi. | 1320 ft. | AllTrails | ||
 A car spot for this hike is best as it is 5.1 miles one way although an out and back or a loop is certainly possible.
Drive north from Roscoe of Route 206. After cresting the top of Cat Hollow, watch for Jug Tavern Road in the left. Turn left and drive to the end of Jug Tavern Road where it intersects Campbell Mountain Road. Turn right on Campbell Mountain Road and drive about a mile to where the trail crosses the road. Park one car in the small pulloff here. Jump in the other car and drive back out the way you came to Route 206. Turn right and rive back toward Roscoe. Turn right on Morton Hill Road just before the county line and a bridge over the river. Bear right up Morton Hill Road until you see Russell Brook Road on the left. The road is passable from late spring through late fall but is rough. Drive down the road to the lower parking area. From the parking area walk down the wide woods road and cross the bridge over Russell Brook. Look to your right to see a beautiful waterfall. Explore this area if you like. Back on the trail bear right up the hill toward Trout Pond. Walk up the trail for about 1.25 miles to the outlet of Trout Pond. You may walk over to the water and take in the beauty of the pond. Continue on the trail for another .25 miles to the head of the lake. There is one lean-to straight ahead and another on a hill to the left. The trail branching to the right is the one to Campbell Brook Road. Bear right on stay on the blue-blazed
Trout Pond Trail. This trail continues for 1.8 miles passing over the shoulder of an unnamed mountain before descending toward Campbell Brook Road. The trail heads north and the ascent and descent is nearly symmetrical. At 3.2 miles the trail meets Campbell Brook Road and turns left for a few hundred feet on the road before turning right again into the forest. The next part of the trail is not used very much and may be poor blazed and maintained. In the next .5 miles you will gain 335 feet at about a 12% grade to the top of another unnamed hill. From here the trail begins to descend winding from north to northwest before turning east and then northeast as it approached Campbell Mountain Road. From the top of the hill the trail descends until just before the road where there is a slight assent.
 (The image below shows the profile of the hike. The vertical ascents and descent are not as
pronounced as shown here since they are exaggerated by the overall distance. The first low point is
the trail head register at Russell Brook. The second is at the base of the climb up to Route 206.
You can see that Morton Hill Road is downhill all the way!)
(The image below shows the profile of the hike. The vertical ascents and descent are not as
pronounced as shown here since they are exaggerated by the overall distance. The first low point is
the trail head register at Russell Brook. The second is at the base of the climb up to Route 206.
You can see that Morton Hill Road is downhill all the way!)
Campbell Mountain: Campbell Mountain Road to Trout Pond
| Quick Look | ||||
|---|---|---|---|---|
| Difficulty | Round trip | Total climb | Internet Maps | |
| 5.6 mi. | 1040 ft. | AllTrails | ||
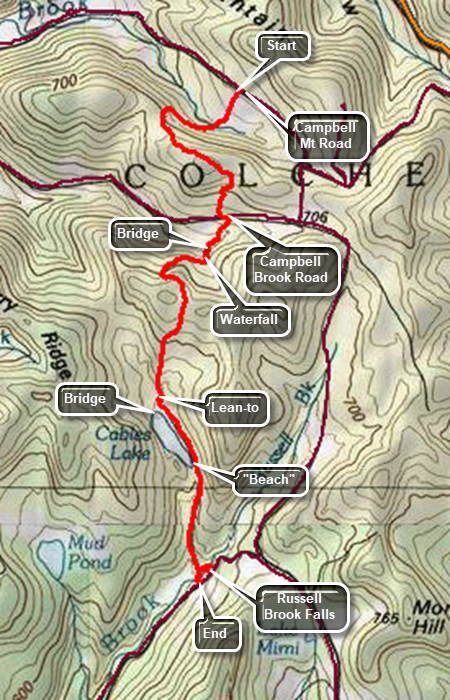 A car spot for this hike is best as it is 5.6 miles one way although an out and back or a loop is certainly possible.
Drive north from Roscoe on Route 206. Just after the Roscoe Nursing Home, turn left on Morton Hill Road. Drive to Russell Brook Road and turn left. Drive down the road to the large parking area. Park one car here. (Russell Brook Road has seasonal maintenance and may be impassable. It is possible to park on the side of Morton Hill Road near the intersection with Russell Brook Road. DO NOT park in the "lot" at the top as this is private property.) Drive back out Russell Brook Road to Morton Hill Road. Turn left and drive to Campbell Mountain Road on the right. Turn right and continue past Jug Tavern Road on the right. Drive to the spot where the trail crosses the road and there is a small parking area. The first .3 miles of the trail drops downhill heading southwest. The trail can often be wet and muddy. At .3 miles the trail begins to climb and turns west. At .75 miles the trail heads south and then southeast. The trail follows old woods roads for almost its entire length and has been eroded by water in may places. At 1.4 miles you will reach the top of the hill and begin a descent. At 1.5 miles the trail heads south toward Campbell Brook Road. The last few hundred feet of the trail is usually wet. At the road turn left and walk a short distance to the point where the trail enters the woods on the right. Descend for about .3 miles to a bridge over a stream. As you begin to ascend the hill, there is a stream to the left of the trail with a nice waterfall when the water is flowing. The trail is sited along an old woods road which was been highly eroded so that it has high sides. Walking on this trail almost has the feel of walking in a canal! The trail turns west in a switchback up the mountain until at 2.9 miles it heads south. At 3 miles the trails tops the hill and passed by a snowmobile trail on the left. Continued down the hill and you will see the water of Trout Pond and the lower lean-to. You may want to walk over to the lean-to to take a break. The bridge over the inlet stream has a nice view of the pond or you can walk out to the shore. Head down the trail to the outlet end of the lake. At the outlet end of the lake, it is worth visiting the "beach" for another view of the pond. The main trail descends toward Russell Brook and can be wet at times. After passing the trail register and trail junction, there is a path on the left which leads to Russell Brook Falls. It is a short walk to the lower falls and it might be the highlight of the hike. Informal paths lead down the streambed and uphill to a viewpoint over the upper falls. When you are back on the main trail, cross the bridge over Russell Brook and walk uphill to the car you left earlier in the parking lot.
 (The image below shows the profile of the hike. The vertical ascents and descent are not as pronounced as shown here since they are exaggerated by the overall distance.)
Cannonsville Bypass on the FLT
| Quick Look | ||||
|---|---|---|---|---|
| Difficulty | Round trip | Total climb | Internet Maps | |
| 4.6 mi. | 590 ft. | AllTrails | ||
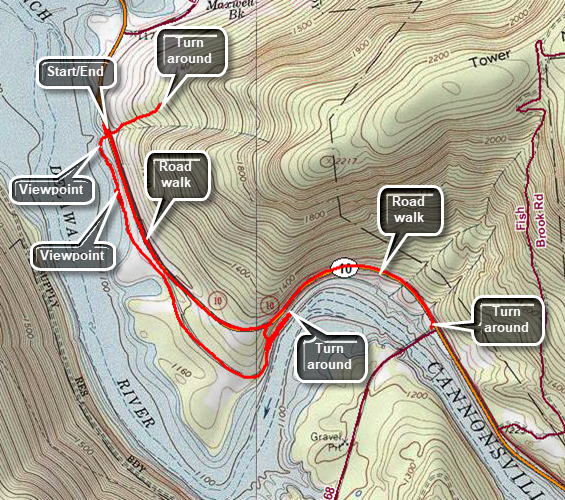 The Finger Lakes Trail is a primitive footpath that starts in Allegheny State Park on the New York - Pennsylvania border and extends 576.5 miles to end in the Catskill Park at the beginning of the Table Peekamoose Trail off the Phoenicia East Branch Trail near the Denning trailhead. There are other side trails which increase the length of the trail system. Four hundred miles of this trail is also part of the Scenic North Country Trail. The Finger Lakes Trail Conference celebrated its 50th Anniversary on June 2, 2012. To commemorate the occasion the Conference set up a series of hikes that would cover the entire length of the trail. Hikes varied in length and difficulty from 4 to 14 miles. The last section is the one described here and is mostly a road walk from The parking area on Black Bear Road (Wild Meadow Road) near Round Pond to the eastern terminus of the trail 1.2 miles from the Denning trailhead.
Take State Route 17 (I86) to exit 87A for Cadosia and find Route 268 north toward Route 10 and the Cannonsville Reservoir. Cross the Apex Bridge and turn 1.7 miles to a small parking pulloff on the left side of the road just after the Finger Lakes Trail bypass intersects the road. Walk back to the east and turn left into the woods on the FLT Bypass trail. This trail may be eroded and poorly marked with faded paint blazes. In .25 miles the trail gains 220 feet on an 18% grade to the intersection with the main FLT. Turn around and walk back down to the road. Cross the road to stay on the bypass trail that runs along the edge of the reservoir. The trail can be poorly maintained with branches across the trail in some places and thick stands of nettles and briars in others. In a short distance the trail reaches the shore of the reservoir. To the west and north are Clabber Peak, Little Clabber and Speedwell. In about .5 miles the trail joins the old path of Route 10. Turn right and walk down toward the water. Watch for the point where the road disappears beneath the water. Turne around and begin to follow the trail which follows the old route of the road. The trail runs through a gravel storage area and then continues along the old road. It passes through some grassy and open areas and then enters the woods. At about 1.6 miles from the road, the trail turns left up the bank. Continue along the road without making the turn. You will pass some cliffs and areas where the edge of the road drops straight down to the water. After less than a quarter mile the road ends. Turn around and walk back to the marked trail. Turn right and walk up the bank to Route 10 following the trail. Turn right and walk along the road to the Apex Bridge parking area. Turn around and walk 1.7 miles back to your car.
 (The image below shows the profile of the hike. The initial vertical ascent and descent smooth out the profile for the rest of the hike.)
Catskill Scenic Trail: Bloomville
| Quick Look | ||||
|---|---|---|---|---|
| Difficulty | Round trip | Total climb | Internet Maps | |
| 5.5 mi. | 280 ft. | AllTrails | ||

The Catskill Scenic Trail is a rail trail that follows the route of the old O&W and other lines for 19 miles from Bloomville to Grand Gorge. The parking area for the Bloomville trailhead is just east of Bloomville on Route 10. For the most part it is hard packed with some cinder and some short grass here and there. After a short distance, a large, round foundation appears on the left of the trail. A little farther along is a stone marker and next to it a metal housing. Continue on the trail which is mostly shaded until at .75 miles it breaks out into an open field. This continues for some distance. After passing across the field the trail crosses a small stream on a bridge where some trees give a little shade. At 1.6 miles the West Branch of the Delaware River comes close to the trail. At 2 miles cross the first bridge over the river. The builders used the original train bridge as a support structure but built a new treadway and handrails on top of it. At 2.35 miles cross another bridge and another at 2.7 miles. After walking a little farther, turn around and begin the walk back to the parking area. You may, of course, vary the length as you like.
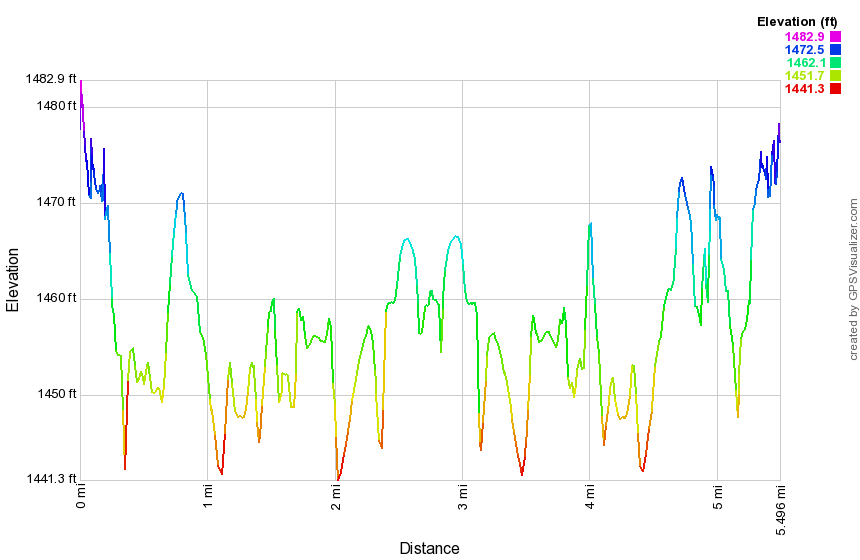
(The image at the left shows the profile of the hike. Remember that all vertical profiles are relative!)
Catskill Scenic Trail: Hobart to Grand Gorge
| Quick Look | ||||
|---|---|---|---|---|
| Difficulty | Round trip | Total climb | Internet Maps | |
| 10.7 mi. | 392 ft. | AllTrails | ||

Note: This hike is 10.7 miles ONE WAY. You will want to spot a car or arrange a ride unless you want to walk 21.4 miles! The Catskill Scenic Trail is a rail trail that follows the route of the old O&W and other lines for 19 miles from Bloomville to Grand Gorge. Drive north on Route 10 from Delhi for 17 miles to hobart. Turn right on CR-18 and drive across a beautiful stone bridge over the West Branch of the Delaware River. Park in the bank parking lot on the right on Railroad Avenue. Be sure you are not taking up a space that would be used by customers on a business day. The trail crosses Railroad Avenue and heads northeast through town and the Hobart Industrial Park. For the most part the trail is hard packed dirt with some cinder and some short grass here and there. The trail is wide and flat for its entire length but does gain some elevation on this section before descending toward Grand Gorge. The elevation gain is barely noticeable in all but a few locations. There is some beautiful countryside along the way with some farms and farm animals. Watch for views of a mountain range on the right side of the trail. The mountain with the towers is Utsayantha which overlooks Stamford. In addition to the communications towers, there is a fire tower and the Churchill Education Center. Slightly southeast of Utsaynatha and more in the foreground is Churchill Mountain. Both of these are on the Catskill Highest Hundred list. As you continue the hike, you will enter Stamford and pass by the Stamford Railroad Station which now acts as the headquarters for the Stanford Historical Society and the Catskill Scenic Trail. There are signs which indicate the distance to Grand Gorge but some of them seem to disagree. As you leave Stamford, you will see a series of walkways over and around a wetland. Signs indicate that this was part of a Stamford park.Watch for concrete mile markers along the trail. which have a "K" and a number indicating the miles to Kingston, NY. At 6.7 miles Mayham Pond will be on the left or north side of the trail. It is hard to get a clear shot of the pond but it is a pretty spot. Continue along the trail as it turns east instead of northeast. At 10.0 miles cross Bruce Pond Road where a sign announces ".7 miles to Grand Gorge". At 10.7 miles the trail intersects Route 23 with just enough room to park one car.
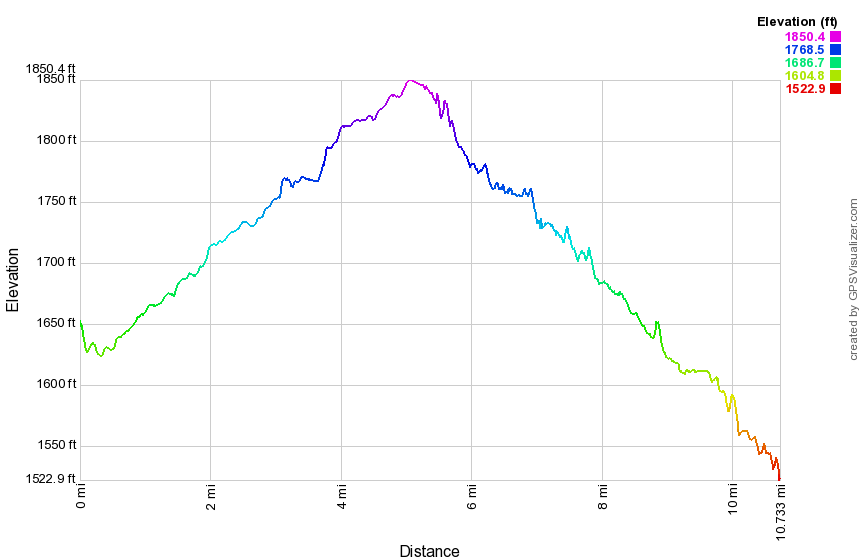
(The image at the left shows the profile of the hike. Remember that all vertical profiles are relative!)
Catskill Scenic Trail: Roxbury to Grand Gorge
| Quick Look | ||||
|---|---|---|---|---|
| Difficulty | Round trip | Total climb | Internet Maps | |
| 14.0 mi. | 670 ft. | AllTrails | ||

Note: This hike is 14.0 miles out and back. You may want to spot a car or arrange a ride to avoid the somewhat boring out and back. Watch for a beaver pond Behind the Firestone dealership as you approach Grand Gorge. Use Route 30 as a reroute. The Catskill Scenic Trail is a rail trail that follows the route of the old O&W and other lines for 19 miles from Bloomville to Grand Gorge. Drive north on Route 30 from Maragretville to Roxbury. Drive through Roxbury and Hubble Corners to Hardscrabble Road on the right. Park here and cross the road to get on the trail heading north toward Grand Gorge. The trail is wide and flat and there are no major "features". You will pass by Schultice and Irish Mountain on your right which are both on the Catskill Highest Hundred list. The water that appears on the left is part of the "Headwater of the East Branch of the Delaware River". As you approach Grand Gorge the trail crosses Route 30 to head toward Route 23. At one point it passes through a nice railroad cut. There are one or two bridges along the way. There are Laos some piles of rails and at least on pile of ties. Once you reach Route 23, turn around and walk back to your car or use the car you have spotted to avoid the long walk back.
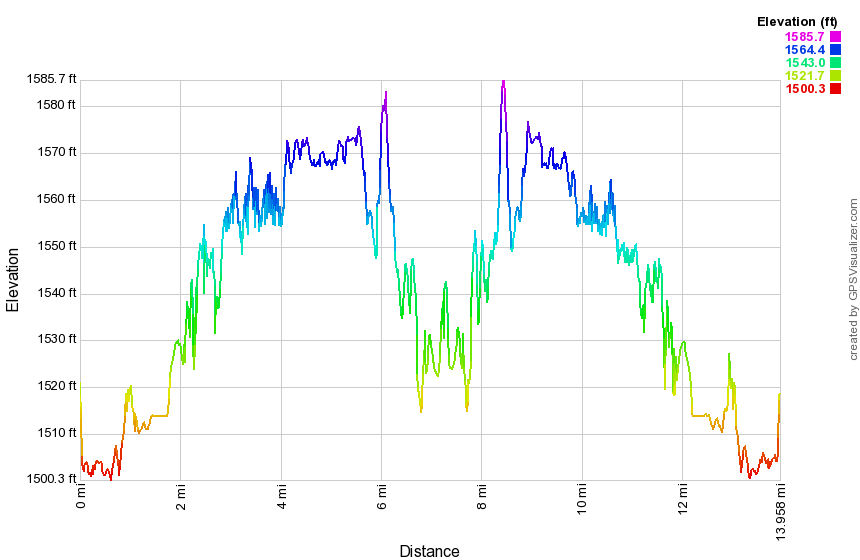
(The image at the left shows the profile of the hike. Remember that all vertical profiles are relative!)
Catskill Scenic Trail: South Kortright toward Bloomville
| Quick Look | ||||
|---|---|---|---|---|
| Difficulty | Round trip | Total climb | Internet Maps | |
| 5.0 mi. | 150 ft. | AllTrails | ||

The Catskill Scenic Trail is a rail trail that follows the route of the old O&W and other lines for 19 miles from Bloomville to Grand Gorge. Drive north on Route 10 from Delhi for 13 miles to South Kortright. Turn right on CR-18 and drive across a beautiful stone bridge over the West Branch of the Delaware River. At the end of the road, turn right and pass by the South Kortright Cemetery on the right. The trail crosses CR-18 just after the cemetery. There is no parking area for the section from South Kortright to Hobart at the point where the trail crosses CR-18. You may find parking in South Kortright or you can try parking along the road where the trail crosses CR-18 just west of the South Kortright Cemetery. For the most part the trail is hard packed with some cinder and some short grass here and there. Start your hike by heading west on the trail passing through the backyards of some South Kortright homes. The trail is wide and flat for its entire length and this section is very flat. Continue to walk along the trail passing from trees to open farmland and back into sections passing through forest. After crossing three bridges turn around and start back for the car. Watch for a sand and gravel pit on the right side of the trail. It is worth a quick look. The river parallels the trail and can be quite different depending on the level of the water.
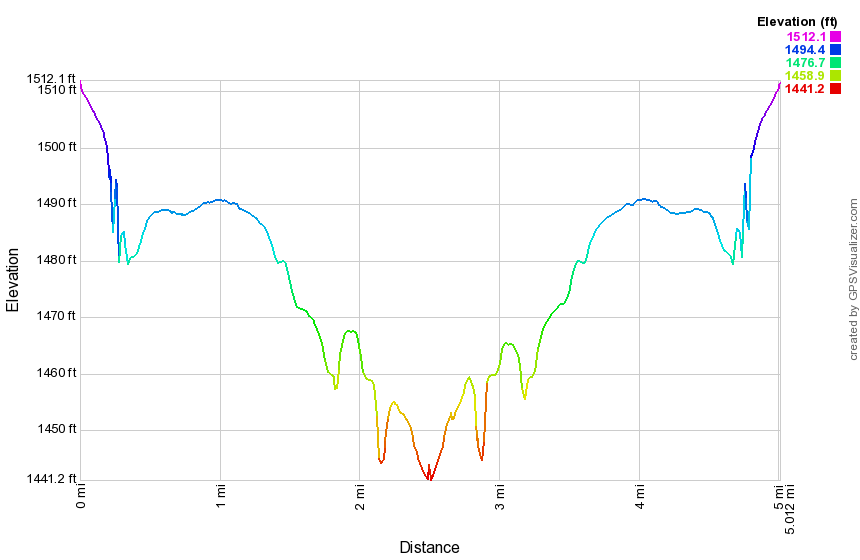
(The image at the left shows the profile of the hike. Remember that all vertical profiles are relative!)
Catskill Scenic Trail: South Kortright to Hobart
| Quick Look | ||||
|---|---|---|---|---|
| Difficulty | Round trip | Total climb | Internet Maps | |
| 8.1 mi. | 290 ft. | AllTrails | ||

The Catskill Scenic Trail is a rail trail that follows the route of the old O&W and other lines for 19 miles from Bloomville to Grand Gorge. Drive north on Route 10 from Delhi for 13 miles to South Kortright. Turn right on CR-18 and drive across a beautiful stone bridge over the West Branch of the Delaware River. At the end of the road, turn right and pass by the South Kortright Cemetery on the right. The trail crosses CR-18 just after the cemetery. There is no parking area for the section from South Kortright to Hobart at the point where the trail crosses CR-18. You may find parking in South Kortright or you can try parking along the road where the trail crosses CR-18 just west of the South Kortright Cemetery. For the most part the trail is hard packed with some cinder and some short grass here and there. Start your hike by heading east on the trail passing through the backyards of some South Kortright homes. The trail is wide and flat for its entire length but does game some elevation on this section. The elevation gain is barely noticeable in all but a few locations. At one point there is a small, fenced-in area with miniature horses and other horses across the trail. At .5 miles the trail crosses Madison Hill Road and continues on the other side. At 1.8 miles the trail crosses CR-18 on a diagonal and parallels the road briefly. At 2.8 miles the trail again comes close to CR-18. The trail crosses a farm driveway and then again crosses CR-18 at 3.2 miles. At 3.6 miles cross the first substantial bridge over Town Brook. Continued on the trail to Hobart where the trail crosses several streets and leads to Railroad Avenue. Turn around here and start the "back" part of the out and back. On the way back, you may want to turn left on Pearl Street and visit the Locust Hill Cemetery. It is large and has some interesting markers. Back on the trail continue your hike back to the car. When you return to the start, you may want to visit the South Kortright Cemetery and the duck pond next to it.
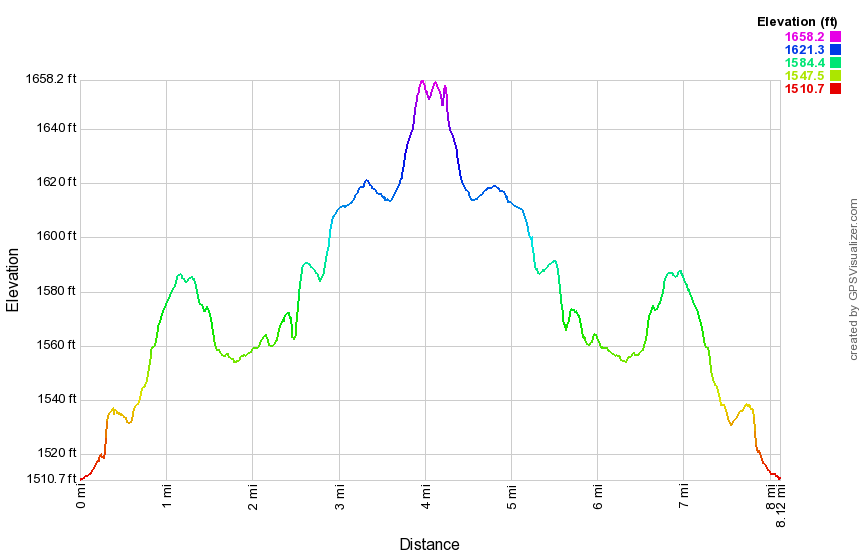
(The image at the left shows the profile of the hike. Remember that all vertical profiles are relative!)
Clapper Hollow Loops
| Quick Look | ||||
|---|---|---|---|---|
| Difficulty | Round trip | Total climb | Internet Maps | |
| 4.8 mi. | 490 ft. | AllTrails | ||
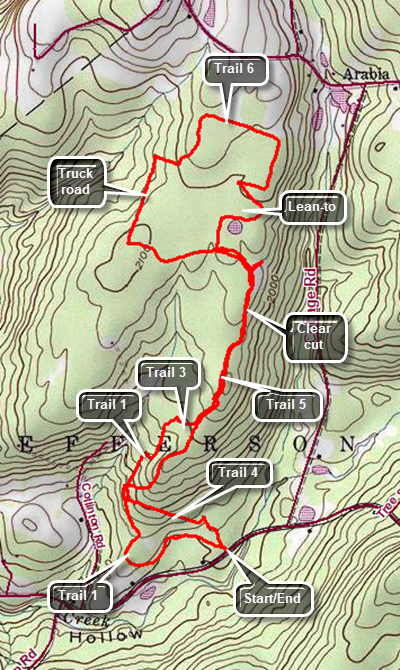 The trail in this area are not always well marked and there are many logging roads and informal paths. I suggest you print out the map you find here. This description is based on an actual hike with corrections for the extra explorations that went nowhere
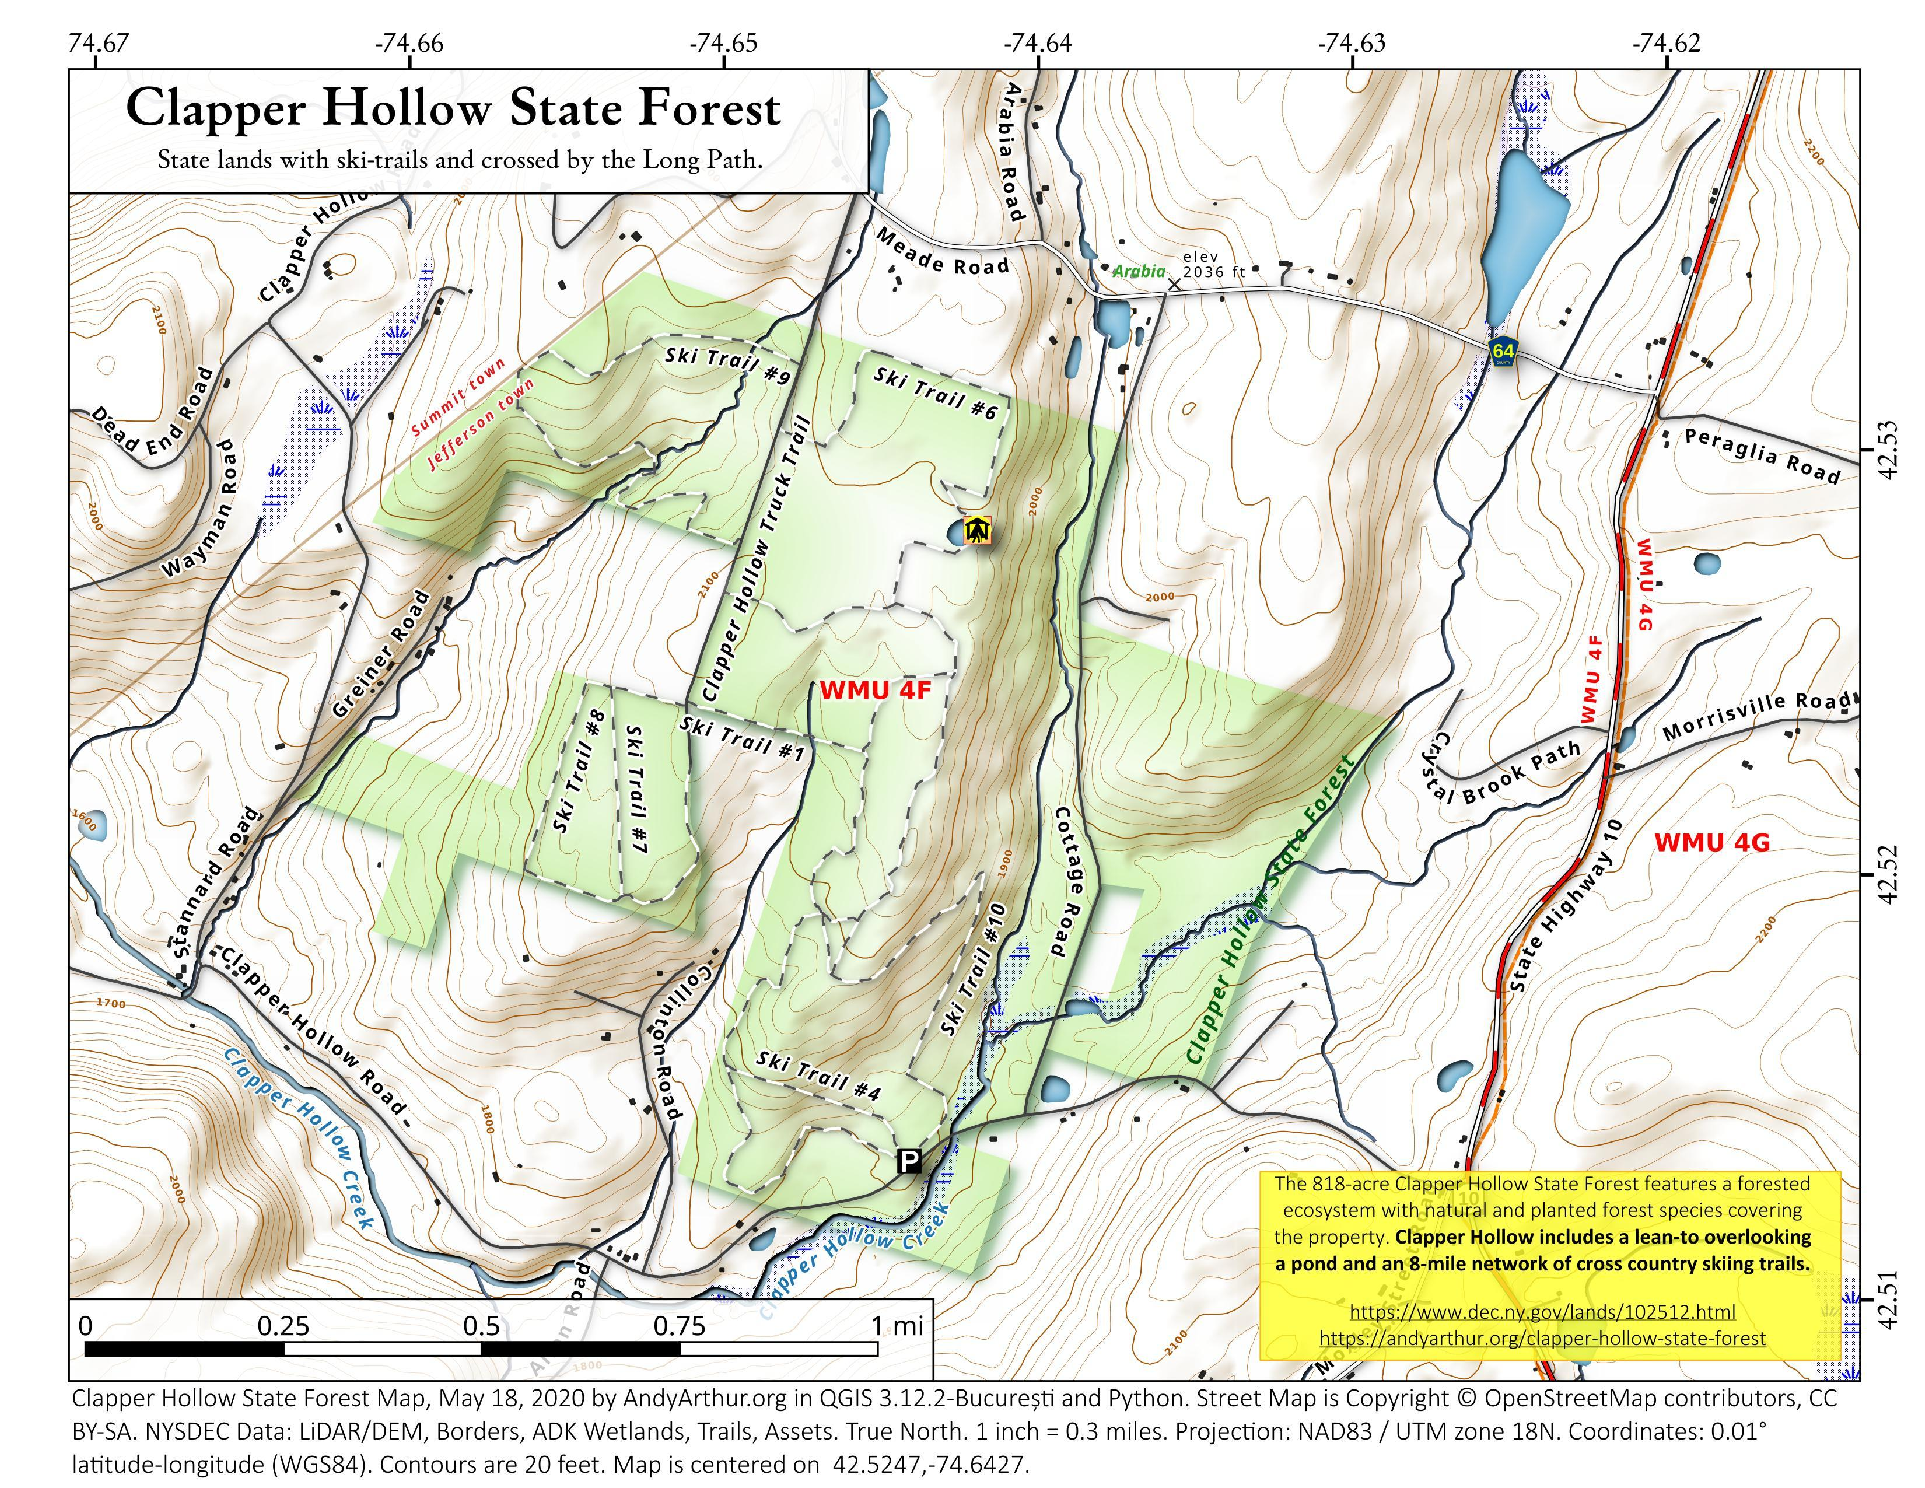
Drive north on Route 10 from Jefferson in Schoharie County for a little more than 2 miles. Turn left on Moxley St (Route 15). Make an immediate right on Clapper Hollow Road and drive a little less than 1 mile to the parking area on the right. Leave the parking area walking straight ahead on Trail 4. Walk for about .4 miles and then turn right or north on Trail 1. Walk mostly northeast on Trail 1 to .8 miles where it intersects with Trail 5. Turn left and walk uphill to 1.5 miles passing through a clear cut area. At the junction, turn right on Trail 6 and follow it to the lean-to and pond at 1.7 miles. Take some time to relax at the pond and then continue to follow Trail 6 as it makes a loop above the pond. The trail will zig-zag and then make a rectangular loop. At about 2.5 miles be careful to watch for the point where Trail 6 turns off the logging road and heads southwest briefly and then west to a road. Turn right on the road and walk down to the Clapper Hollow Truck Road. Turn left and walk along the road to 3 miles. Turn left on Trail 5 as the truck road comes to a dead end a little further on. Walk east on Trail 5 to 3.25 miles when you will have come back to the junction with Trail 6. Turn right and continue to 4 miles. Continue straight ahead on an informal path to 4.25 miles where you will again pickup Trail 1. Continue straight ahead to do a short loop. Continue to follow this trail back out to the parking area.
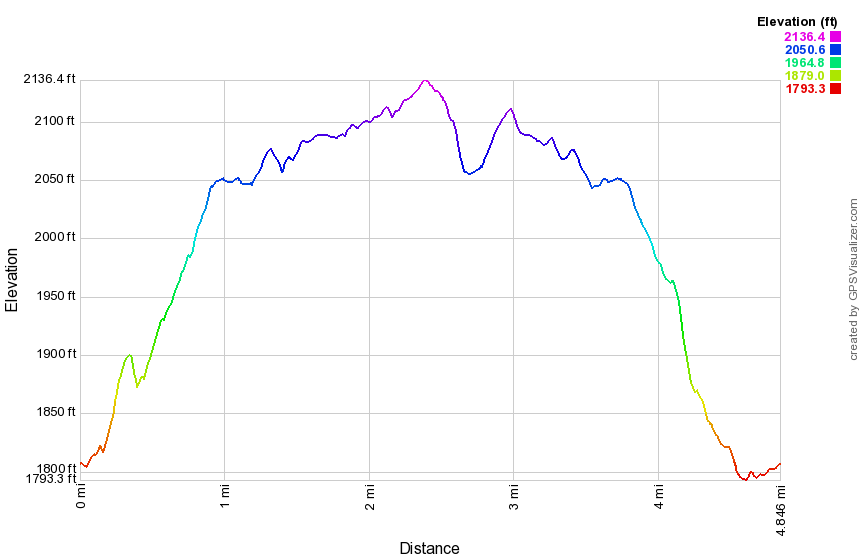 (The image at the left shows the profile of the counterclockwise loop hiking route. Remember that all vertical profiles are relative!)
Cobey Pond (PA)
| Quick Look | ||||
|---|---|---|---|---|
| Difficulty | Round trip | Total climb | Internet Maps | |
| 2.2 mi. | 245 ft. | AllTrails | ||
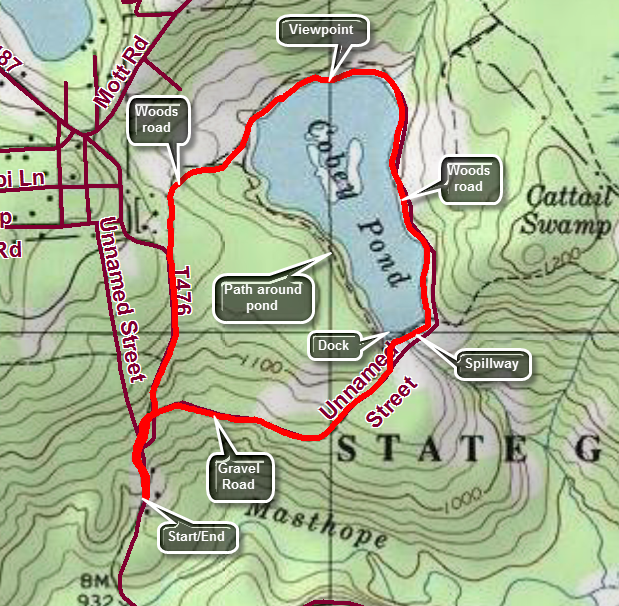
Cross the Delaware River into Pennsylvania at Narrowsburg, NY and drive west for 4 miles on SR 652. Turn left or south on Perkins Pond Road. Stay on Perkins Pond Road for 4 miles until it ends at Welcome Lake Road. The name of the road changes to Case Road as you enter the Township of Lackawaxen. Turn right on Welcome Lake Road and drove .9 miles to Masthope Road. Turn left and watch for the access road for Cobey Pond about 1 mile down the road on the left. Turn into the road and cross Masthope Creek on a small bridge. DO NOT park in the first lot but continue on the gravel road to the left. In about half a mile you will come to an upper parking area and turnaround just before a locked gate. This is the best place to park although it is not obvious as there is no signage anywhere. None of the trails are marked with any blazes and there is not a single sign to follow! Walk up the hill from the parking area toward the gate. The road is "paved" with large crushed stone which make walking difficult. You may try to stay the sides of the road. At .15 miles the road splits with the paved section heading right and a grassy section heading uphill to the left. Turn right to follow the gravel road which descends just slightly and then climbs a little to the shores of the pond. There is a dock jutting out into the water and a nice wooden bridge over the spillway. The trail continues in both directions around the pound. Turn right as it is the longer hike. After crossing the spillway and reaching the other side of the pond turn left to follow a grassy road that is completely flat around the pond. Stop at the head end of the pond as there are several small "islands" at the upper end. A little farther along the trail splits at about 1.5 miles. The trail to the left circles the shore of the pond but the trail to the right lengthens a very short hike. Turn right and follow the grassy road as it gains a little elevation heading southwest and then south. Continue along the trail completing the loop at 2 miles. Turn right to walk down the road and through the gate to your car.
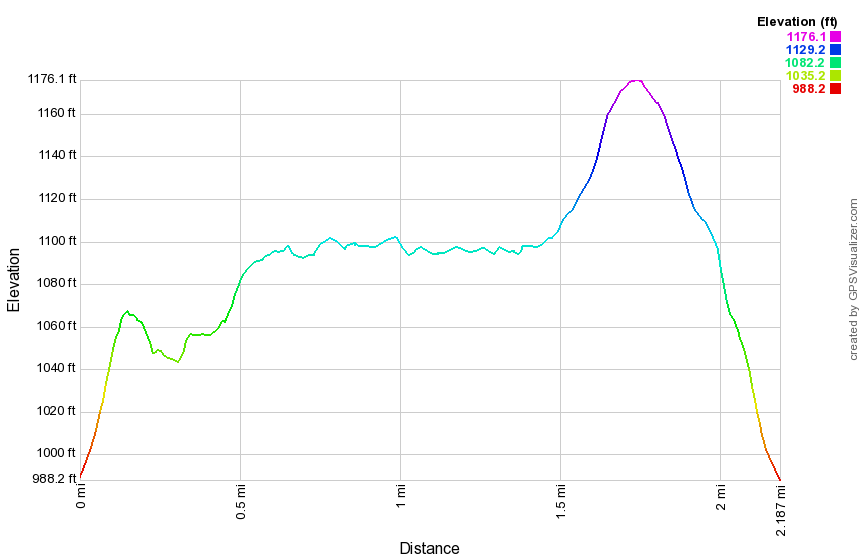 (The image at the left shows the profile of the counterclockwise loop hiking route. Remember that all vertical profiles are relative!)
Colgate Lake to Stoppel Point
| Quick Look | |||||
|---|---|---|---|---|---|
| Difficulty | Round trip | Total climb | Internet Maps | ||
| 11.9 mi. | 1947 ft. | AllTrails | |||
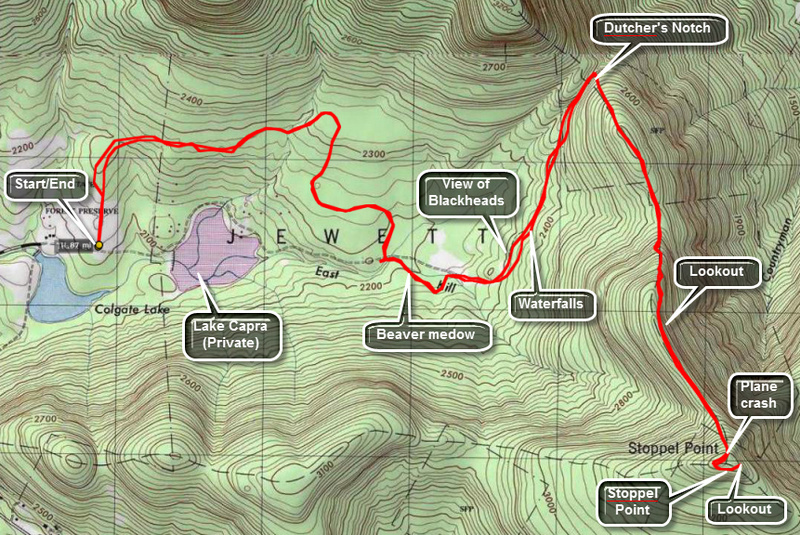
Take Route 23C north from Route 23A in Tannersville. Stay on this road until it crests the hill at Onteora Park and passes the stone church at the top. Stop here for some very nice views of the Devil's Path. Continue down the other side of the hill to East Jewett. Turn onto CR 78 which should have a sign for Colgate Lake. Pass Colgate Lake on the right and park at the DEC parking area on the left. The gate marks the beginning of the yellow-blazed Colgate Lake Trail. The trail starts through a meadow with some nice views of the surrounding mountains. After about a quarter of a mile it enters the woods. The trail is mostly flat and winds its way in back of Lake Capra which is a privately owned inholding in the Catskill Park. There are several bridges of different types over various bodies of running water.
Along the trail watch for a beaver meadow on the left at about 2.5 miles. Walk out to the beaver meadow which was once a beaver pond. There is a nice view of Blackhead Mountain from here and the meadow itself is pretty. Just passed the meadow is a beaver pond and the trail skirts this area. A little further at about 3.1 miles is another meadow with another great view of Blackhead Mountain. A few hundred feet up the trail you can cut into the woods on several informal trails or you can make your own. There is a nice small, secluded waterfall here. Back on the main trail it is another 2.3 miles to the junction of the trail with the Escarpment Trail. This last part of the walk is more uphill as you ascend to Dutcher's Notch. You will be walking between the Escarpment on your right and another ridge on your left. On your immediate left is a deep ravine. The terrain is rugged and beautiful but offers no views.
At the junction with the blue-blazed Escarpment Trail, turn right and be prepared to climb. The trail takes you up to the Escarpment which was on your right as you were coming up the Colgate Lake trail. The trail climbs some but is not too steep. Once on the Escarpment the trail is mostly flat until Stoppel Point. All along the trail you can see that you are on a ridge and that there might be interesting views especially on your left. Keep walking and wait for some real viewpoints! At 1.2 miles is a great lookout right on the trail with views to the north and northeast. Back on the trail the climbing gets steeper now as you begin to ascend to Stoppel Point. In a little less than a mile you will find the wreckage of a two-seater Piper Cub right on the trail on the left. Passed the wreck only a few hundred feet is a lookout to the south and west.
Keep walking on the trail and pass the point where your GPS might indicate the location of Stoppel Point. Walk until you find a DEC signpost and a GREAT lookout to the north and northeast. To get back just retrace your steps. Another option is to park a car at the Schutt Road parking area near North South Lake State Campgrounds. You can then walk through over North Mountain and North Point and experience the rest of the lower end of the Escarpment Trail.
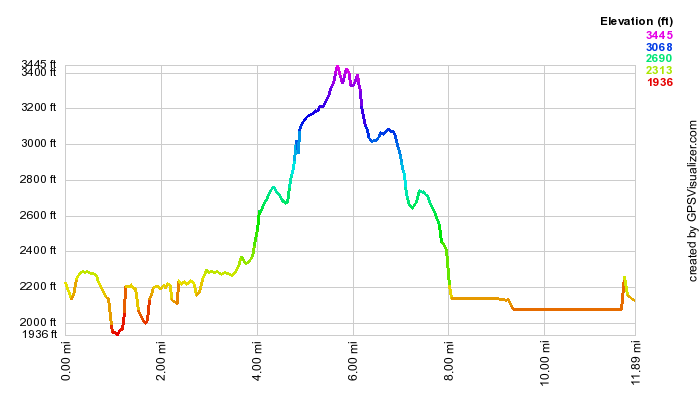 (The image above shows the profile of the out and back hike. )
Colonel's Chair
| Quick Look (Spruceton Trail) | |||||
|---|---|---|---|---|---|
| Difficulty | Round trip | Total climb | Internet Maps | ||
| 9.0 mi. | 2907 ft. | AllTrails | |||
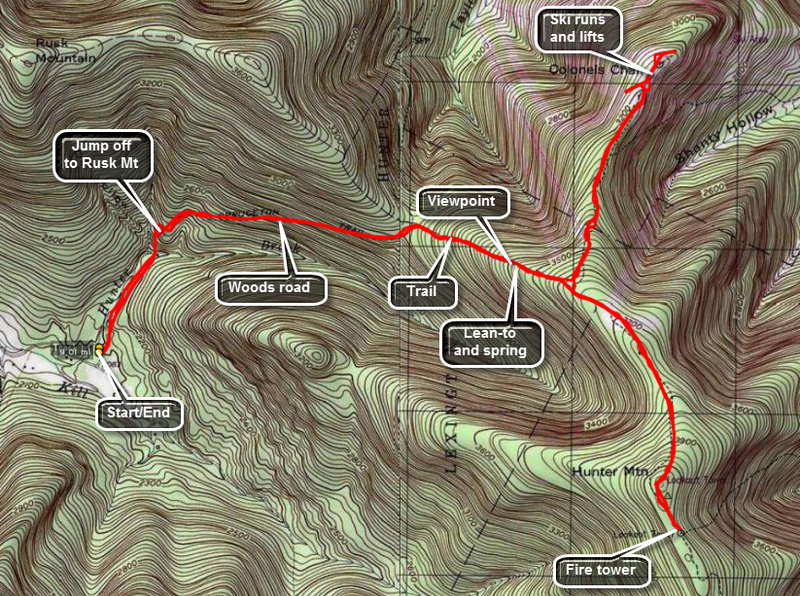 I have included the summit of Hunter Mountain on the map and profile. You can cut some time, distance and elevation by avoiding the climb to the peak. However, once you are as far as the Colonel's Chair Spur Trail the peak of Hunter is only a mile and a quarter further. The peak is the second highest in the Catskill's. It also has a fire tower which offers a spectacular view of most of the other peaks on a clear day.
Park at the large trailhead parking lot near the end of the Spruceton Road. This is the first of three parking lots and each is smaller than the previous. Find the blue-blazed Spruceton Trail which starts as a wide, gated road which follows Hunter Brook. After crossing a small bridge across the brook, you will come to a hairpin turn to the right. Look to your right as you ascend this trail for imposing views of West Kill. After 1.7 miles, the trail turns right off the road but remains fairly wide and well kept. In the winter water from the spring can overflow the trail forming ice flows that can be dangerous. In the other seasons this spring may cause the trail to be muddy. At the spring is a nice lookout which offers views of Rusk Mountain, West Kill, and, farther off, North dome and Sherrill.
Only .3 miles beyond the spring is the Colonel's Chair spur trail blazed in yellow. This trail descends almost 500 feet over 1.1 miles and ends up at the top of the Hunter Mountain ski area. Several areas are steep and, of course, must be ascended on the way back. As you walk you will notice colored and numbered trails. These are used for snowshoeing and mountain biking. Stay on the main trail which turns into a dirt road. You will pass on open area on your left which is a stone quarry. A little further on the right is a lookout and a sculpture of Rip VanWinkle. If you miss this, you can follow the signs from the ski lifts. Stay on the trail until you start to see ski lifts. At this point you can walk around to the top of the various lifts and slopes. The views of the surrounding mountains and those in the distance are beautiful. There are also great views of the village of Hunter in the valley below. Reverse your steps to climb back up to the main trail. At this point you can turn left to the summit of Hunter Mountain or right to get back to the parking area.
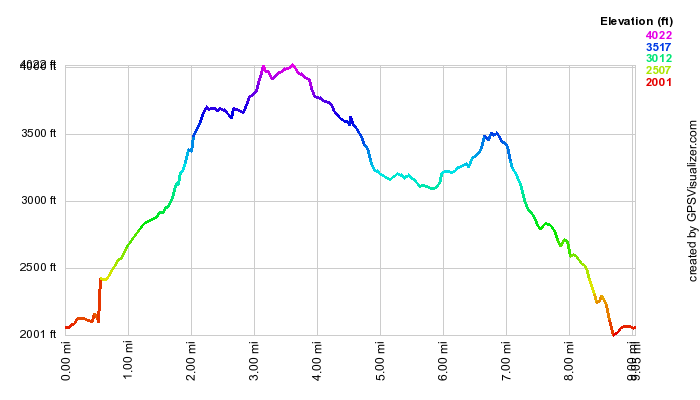 (The image above shows the profile of the out and back hike. )
Conesville to Manorkill Falls
| Quick Look | ||||
|---|---|---|---|---|
| Difficulty | Round trip | Total climb | Internet Maps | |
| 11.9 mi. | 1760 ft. | AllTrails | ||
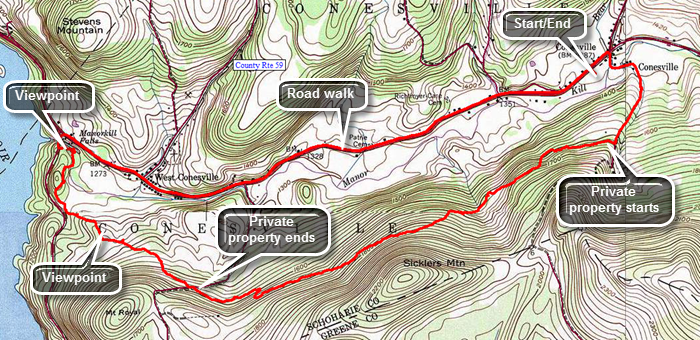
Follow Route 30 through Margaretville, Roxbury and Grand Gorge. Turn right on Route 990V and drive through Gilboa and West Conesville. Three miles after the intersection with the Prattsville Road you will be in Conesville. Park in parking lot at the firehouse as far out of the way as possible. Walk east on the main road to Champlin Road and turned right. The road has a hardpacked dirt surface and there are only a few houses near the beginning. Watch for the point where the Long Path turns right off the road. This happens after walking past a driveway on the right at about .8 miles. Just off the road is a sign explaining the trail is now on private property. There is also a small mailbox and a request for hikers to "sign in". The next 2.7 miles of hiking is through private land as the Long Path heads almost due west and just to the north of Sickler's Mountain. The route is downhill most of the way. In this area, as in so many others along the Long Path north of the Catskill Park, there really isn't a trail. There may be paint blazes on the trees but there is little evidence that a trail was constructed or that anybody walks the route very much. There is little or no maintenance in most places. It can be very hard to watch the blazes and watch your footing at the same time. At 2.2 miles you will pass north of the summit of Sickler's Mountain and there are some very interesting cliffs on the left. Remember not to violate the property owner's request that hikers stay on the "trail". Follow the paint blazes which are often placed along old woods roads. There are many more open areas which may be heavily populated by briars and nettles! As you get closer to Pangman Road there are a few places to get some views by walking off the trail. Pangman Road is about 3.5 miles into the hike and the straight line distance to Manorkill Falls is almost exactly a mile. Walk downhill from Pangman Road for .85 miles until we you can see Prattsville Road ahead through the trees. Just before you get to the road the trail comes very close to the edge of the gorge cut by the Manorkill. The Manorkill usually flows slowly and lazily below and, in its present state, does not look like it could have cut such an impressive ravine. As you approach the road, the blazes turn north to almost parallel the road. The first part is simply a zigzag through numerous blowdowns. After that, the blazes take you within sight of the Manorkill again near the area of the upper falls. The land below the trail is marked with orange paint so continue to a spot where there is a lookout down into the gorge. Several different viewpoints provide good opportunities to take pictures of the falls and rapids. Continue out to the road and turn right to walk over the road bridge. You may want to stop on the bridge and look to the right for a better view of the upper falls. The main falls is just below the bridge and it is hard to see. Walk out to Route 990V and turn right to head towards West Conesville and the Conesville. The entire walk is about 3 miles. This road always seems busy but in most places it has a wide enough shoulder.
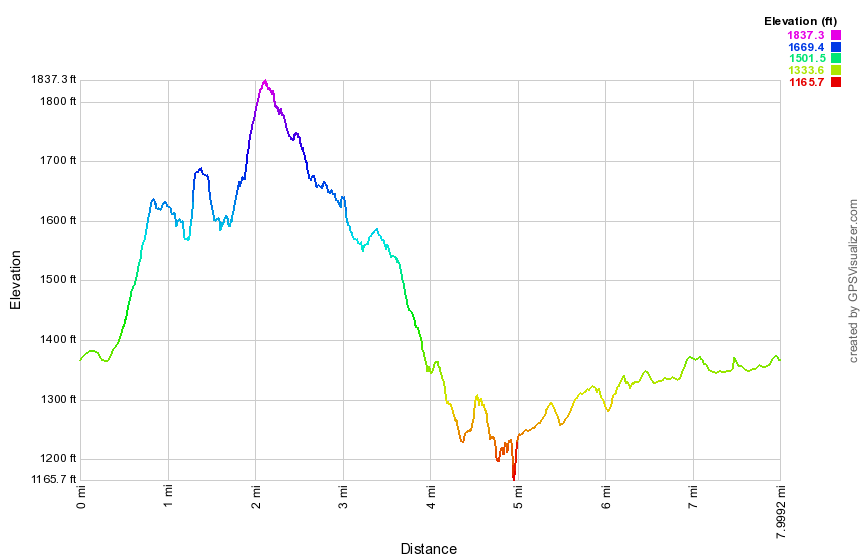 (The image below shows the profile of the hike. Remember that all vertical profiles are
relative!)
(The image below shows the profile of the hike. Remember that all vertical profiles are
relative!)
Conklin Hill Bushwhack
| Quick Look | ||||
|---|---|---|---|---|
| Difficulty | Round trip | Total climb | Internet Maps | |
| 3.1 mi. | 470 ft. | AllTrails | ||
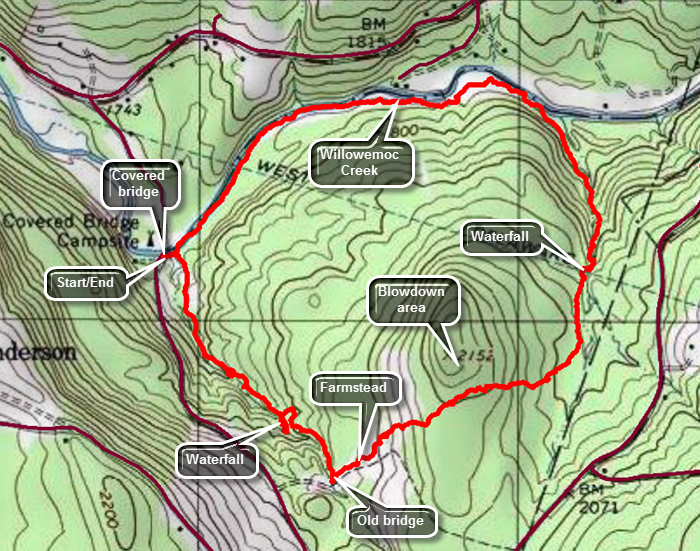 This hike is a bushwhack which follows some informal paths and woods roads. Much of it Laos follows two unnamed intermittent streams and the Willowemoc Creek. Because it is a bushwhack there are many possible routes. Make sure you have map and compass with you. From the caboose near the exit 96 exchange in Livingston Manor, drive 7.3 miles east on DeBruce Road. The road changes to Willowemoc Road after passing through Debruce. Turn right on Conklin Hill Road and drive through the covered bridge across the Willowemoc Creek. Park in the spaces just after the bridge on the left. Cross the small stream in front of your car and then turn right to hike south along the eastern bank of the stream. Follow the stream for about .7 miles passing several nice waterfalls along the stream. At .7 miles there will be the abutments for a bridge across the stream. About a quarter mile farther up the stream is another water fall. Turn left and head east-northeast through what was once a farm. You may see the foundation of the farmhouse and a little farther up a slope the remains of the barn. There are cement feed troughs with stalls for 16 cows. Continue to head east-northeast into an evergreen forest. The trees are tall and straight red pines planted by the CCC in the 1930's. You may begin to see a hill ahead or a little to the left. The trees on the hilltop were flattened by the storms from Hurricane Sandy. Walk up to the shoulder of the hill to get a good look and the continue in the direction you were going. Descend through some dense brush and small trees and work over or around some blowdowns. In a short distance the ground levels and there is a wetter area with beautiful moss. Around 1.4 miles you will find another small stream. Turn north to follow the unnamed stream which starts out very small. Continue to walk north and downstream as the volume of water begins to grow. You will be on the western side of the stream but at 1.5 miles there will be a rather impressive waterfall. Cross the top of the falls and work your way down the eastern side of the stream with the waterfall on your left. You may want to go down into the stream bed. Continue along the eastern bank of the stream watching for areas of cliffs and ledges. At 1.95 miles the stream ends at the Willowemoc Creek. Walk along the creek bed for a short distance to a nice area of exposed rock where you can walk out and see up and down the creek. Walk along the creek bed until it appears you will run out of walking space. Head up the bank and walk the path along the northern side of the Willowemoc. Some cabins and houses begin to appear on the other side and the path along the stream is very clear in most places. Soon the covered bridge will appear across the stream. You will come to the brook you crossed earlier. Cross the brook and walk up to your car.
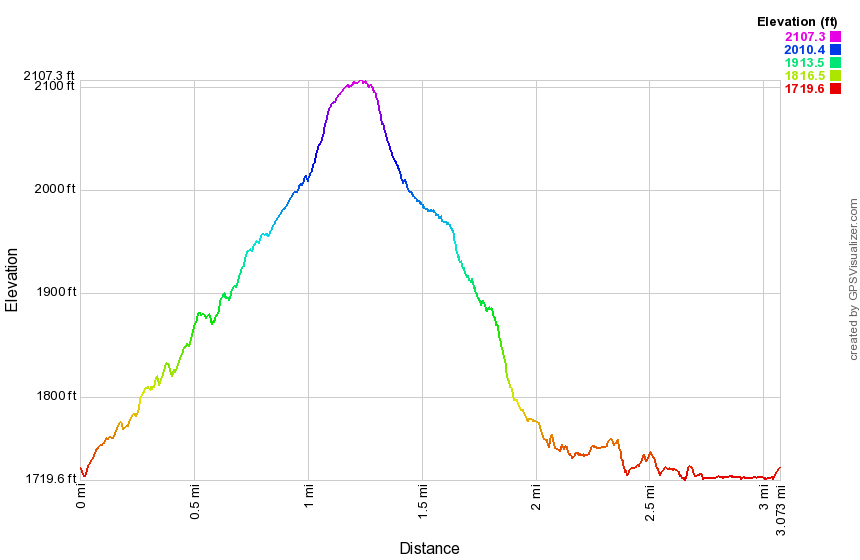 (The image below shows the profile of the hike. Remember that all vertical profiles are relative!)
Creamery Road to Doney Hollow
| Quick Look | ||||
|---|---|---|---|---|
| Difficulty | Round trip | Total climb | Internet Maps | |
| 5.2 mi. | 860 ft. | AllTrails | ||
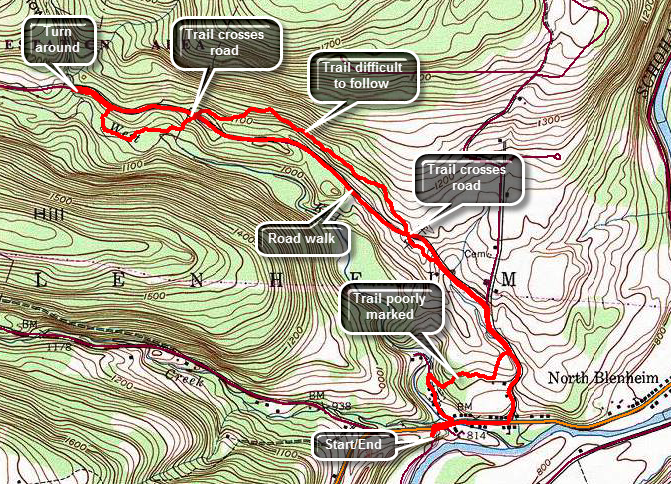
Head north on Route 30 through Margaretville, Roxbury and Grand Gorge. Continue on Route 30 passing Minekill Falls and Lansing Manor. Watch for the NYPA fishing access road on the right just before a bridge and the sign for Blenheim. Turn right and park on the shoulder of the road. Go back out to Route 30 and turn left to walk downhill to Creamery Road. Turn left onto this dead end street and watch for paint blazes on a few trees and poles. Just after the turn there is a rather large and old cemetery up on the right bank. At about .3 miles there are some blazes on the left although they may be hard to see. Head up a very steep bank and passed the cemetery on the right. Climb to some level ground and turn right to walk along the top of the ridge. This section may be VERY poorly marked so watch carefully for the blazes at about .35 miles. From this point the blazes are hit and miss and there is no trail to follow. At about .5 miles you will come out into a field where there are blazes along the edge. Walk to the corner of the field and turn left uphill at the edge of the field. At the top there is a single blaze on a tree but there was no indication of which way to turn. Turn right and look for a blaze on a tree. You may have to wade through tall grass to get to the treeline. Walk down a steep bank to come out to West Kill Road. Turn left on West Kill Road and begin a road walk. At .9 miles pass by the turnoff onto Burnt Hill Road on the right. At 1.15 miles the trail turns into the woods and ascends another steep bank through grass and briars to a small ridge. Walk along the ridge parallel to the road and within sight of it most of the time. The trail is in the woods for a little more than .1 miles then you will be right back out on the road. Cross the road and ascend another bank to start on a section of "trail" that is more like a bushwhack. Blazes are few and far between and blazes are missing at some important turns. The blazes pass above a pond where you will sidehill as best you can. At around 2.2 miles there is a single paint blaze on a tree and a choice of two equally distinct trails. Turn left and come to West Kill Road within less than a hundred feet. The trail crosses the road and an descend to the bank of the West Kill. After this descent, the blazes again become hard to find and the trail seems to meander around. The West Kill at this point is not spectacular. This section only lasts for .4 miles until you climb another steep bank. At 2.6 miles turn left on West Kill Road and walk to a small parking area near a bridge. Turn around here. You may reverse your route OR walk back on West Kill Road. The walk back on West Kill Road to Route 30 is 2.1 miles. At Route 30 turn right and walk back up the hill to the car.
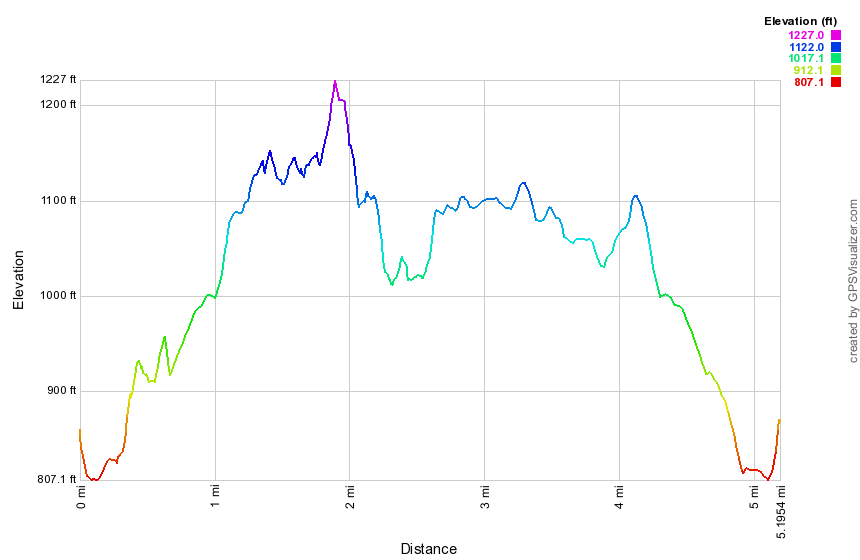 (The image below shows the profile of the hike. Remember that all vertical profiles are
relative!)
(The image below shows the profile of the hike. Remember that all vertical profiles are
relative!)
Crystal Lake
| Quick Look | ||||
|---|---|---|---|---|
| Difficulty | Round trip | Total climb | Internet Maps | |
| 2.9 mi. | 410 ft. | AllTrails | ||
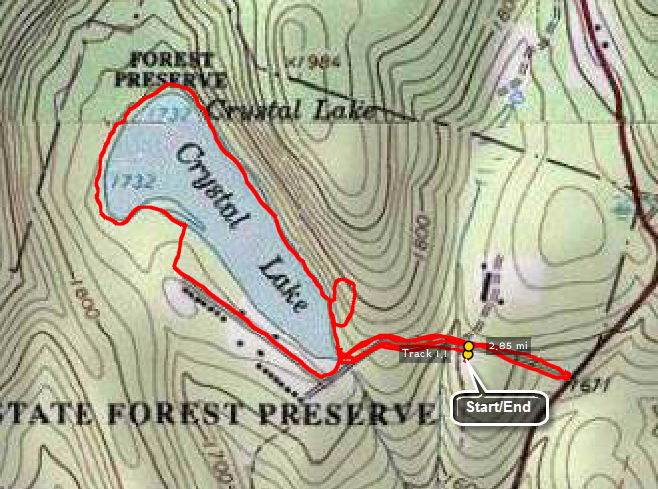 This area is a small New York State Wild Forest area between Roscoe and Fremont Center. Get on County Route 93. About halfway between the Roscoe and Fremont center watch for Tennanah Lake Road which heads north from CR 93. After the turn the parking area will be a short distance on the left. Depending on the season you may be able to drive up the access road and park in the small parking area. In the winter you will have to park on the side of the road as there is no maintenance.

(The image above shows the profile of the hike. Remember that all vertical profiles are relative!)
Damascus Forest (PA)
| Quick Look | ||||
|---|---|---|---|---|
| Difficulty | Round trip | Total climb | Internet Maps | |
| 1.1 mi. | 130 ft. | AllTrails | ||
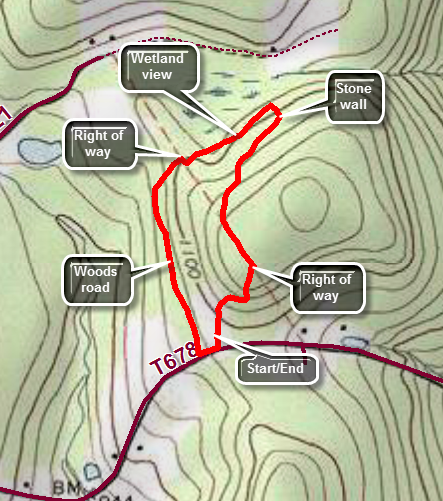
Cross the Delaware River from New York into Pennsylvania on the bridge at Cochecton. Almost immediately turn left on River Road. Follow River Road south along the river for a total of 6 miles. At 2.7 miles be sure to bear to the left to stay on River Road. Turn right on Macubbins Road and drive .7 miles to the parking area on the right. Walk through the opening in the rail fence next to the information kiosk. There aren't any visible markers but hug the edge of the field staying near the woods and you will pick up yellow paint blazes. The trail heads north through an evergreen forest gaining a little elevation. There can be a lot of debris and some blowdowns on the trail. You will quickly reach a power line right-of-way. The trail turns off the right-of-way and heads north through some more evergreen forest. Look to the left down the hill and you will see a trail which is for the return trip. At about half a mile into the hike there is a stone wall where the trail turns left and descends to the lower trail. The trail now runs along a wetland and heads southwest through some mixed softwood and hard wood forest until at .75 miles it turns south. The trail now follows a woods road which is open and ease to follow. Soon you will see the parking area up a hill on the left. There aren't many blazes to guide you so walk out to the road, turn left and then almost immediately left again into the parking area.
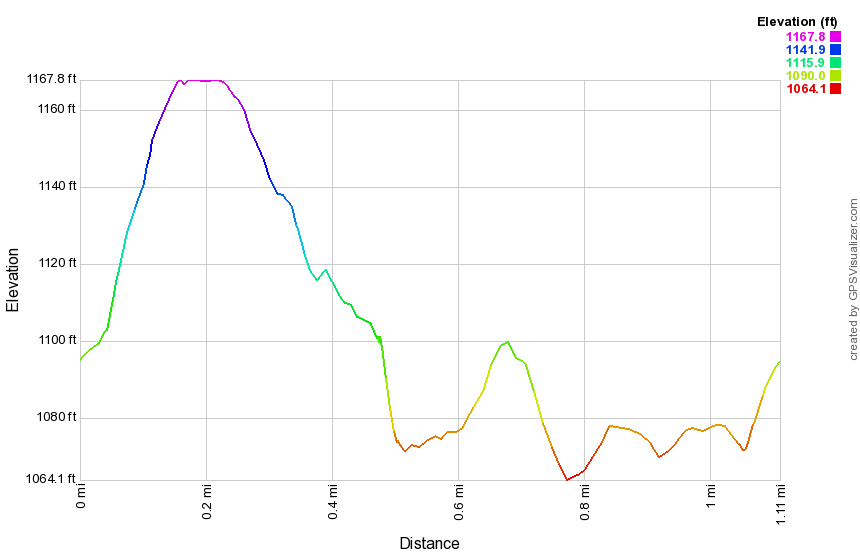 (The image at the left shows the profile of the counterclockwise loop hiking route. Remember that all vertical profiles are relative!)
Delaware Water Gap: Buttermilk Falls (NJ)
| Quick Look | ||||
|---|---|---|---|---|
| Difficulty | Round trip | Total climb | Internet Maps | |
| 5.2 mi | 1340 ft | AllTrails | ||
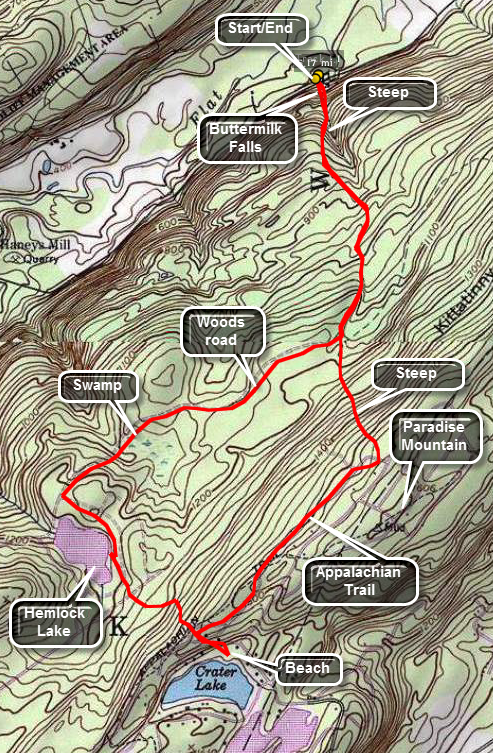
One of the hardest parts of this hike is finding the location of the highest falls in New Jersey. From Route 209 in Dingman's Ferry, Pennsylvania cross the bridge on Route 739 over the Delaware River. Turn right almost immediately on Old Mine Road. Old Mine Road quickly becomes Walpack Flatbrook Road. Stay on this road for a little over 8 miles from the bridge. Mountain Road will be on your left but is poorly marked. The road surface is as poor as the marking and may be impassable for some vehicles at certain times. Drive carefully for about 1.5 miles and park in the parking area on the left. The falls is directly across the road from the parking area. At this point you could return to your car. The hike described here takes in a few more points of interest but is not easy.
From the base of the falls hike up the trail using the wooden steps to access an observation platform about halfway up the falls. Near the top there is another platform which gives limited views to the north. Continue on the trail across a bridge and up the west side of the stream. Hike for about .9 miles and before taking a right on a woods road. This first part of the trail is steep in parts. The next 1 mile of the trail is almost flat and remains woods road for most of the way to the shores of Hemlock Lake. Along the way the trail passes by a pretty beaver pond. At the shores of Hemlock lake turn left on a dirt road and walk by the northern and eastern shore of the lake. The lake is a popular place to swim even though all the "beaches" are rocks. The trail will gain some elevation over the next .75 miles until it intersects the Appalachian Trail. Walk straight ahead across the AT and follow the paths and roads down to the shores of Crater Lake. Local legend says the lake was formed by a meteor impact but it seems entirely too shallow for this to be true. This is another popular bathing area since there is a road on the other side that runs directly to the lake. Return to the At and turn right. As you hike along the AT for the next .8 miles the trail rises only slightly. On your right is Paradise Mountain. Turn left to start to descend back to the junction with the woods road you used earlier. Stay straight ahead at the junction and walk back down the hills and the wooden steps to the parking area.
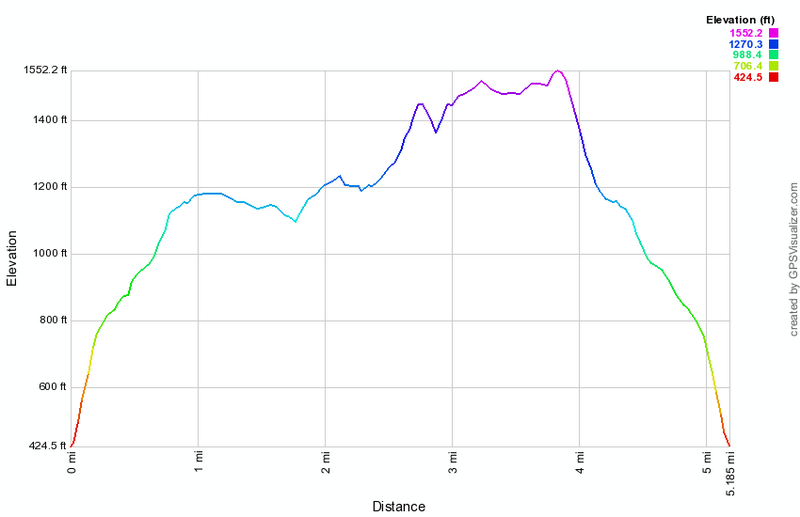
(The image at the left shows the profile of the hike. Remember that all vertical profiles are relative!)
| Quick Look | ||||
|---|---|---|---|---|
| Difficulty | Round trip | Total climb | Internet Maps | |
| 6.5 mi | 1490 ft | AllTrails | ||
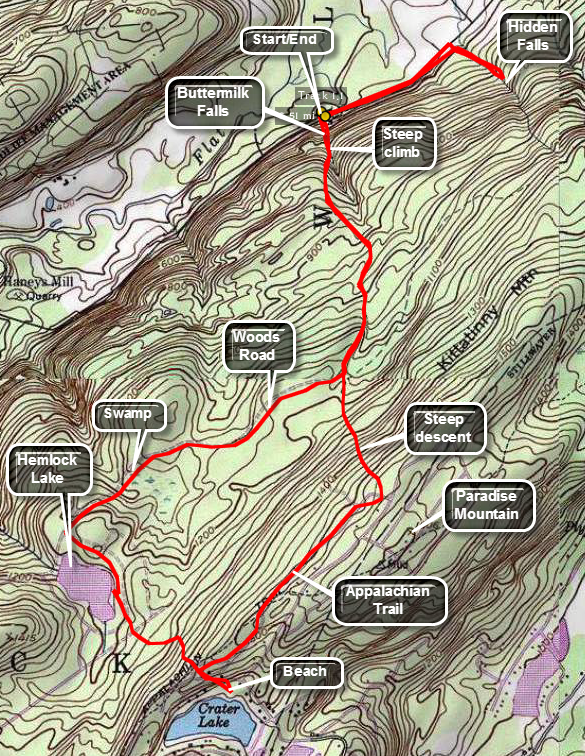
One of the hardest parts of this hike is finding the location of the highest falls in New Jersey. From Route 209 in Dingman's Ferry, Pennsylvania cross the bridge on Route 739 over the Delaware River. Turn right almost immediately on Old Mine Road. Old Mine Road quickly becomes Walpack Flatbrook Road. Stay on this road for a little over 8 miles from the bridge. Mountain Road will be on your left but is poorly marked. The road surface is as poor as the marking and may be impassable for some vehicles at certain times. Drive carefully for about 1.5 miles and park in the parking area on the left. The falls is directly across the road from the parking area. At this point you could return to your car. The hike described here takes in a few more points of interest but is not easy.
From the base of the falls hike up the trail using the wooden steps to access an observation platform about halfway up the falls. Near the top there is another platform which gives limited views to the north. Continue on the trail across a bridge and up the west side of the stream. Hike for about .9 miles and before taking a right on a woods road. This first part of the trail is steep in parts. The next 1 mile of the trail is almost flat and remains woods road for most of the way to the shores of Hemlock Lake. Along the way the trail passes by a pretty beaver pond. At the shores of Hemlock lake turn left on a dirt road and walk by the northern and eastern shore of the lake. The lake is a popular place to swim even though all the "beaches" are rocks. The trail will gain some elevation over the next .75 miles until it intersects the Appalachian Trail. Walk straight ahead across the AT and follow the paths and roads down to the shores of Crater Lake. Local legend says the lake was formed by a meteor impact but it seems entirely too shallow for this to be true. This is another popular bathing area since there is a road on the other side that runs directly to the lake. Return to the At and turn right. As you hike along the AT for the next .8 miles the trail rises only slightly. On your right is Paradise Mountain. Turn left to start to descend back to the junction with the woods road you used earlier. Stay straight ahead at the junction and walk back down the hills and the wooden steps to the parking area.
Turn right and walk about .5 miles down the road. Turn right into the woods on an informal path. Cross over the stream and walk along bank of the small creek for several hundred feet. You should see Hidden Falls at this point. Some nice views of the falls can be had from above but the banks are steep and slippery. Scrambling up the banks is DANGEROUS! It is better to take your pictures from the base of the falls. When you are done, retrace your route back to the car.
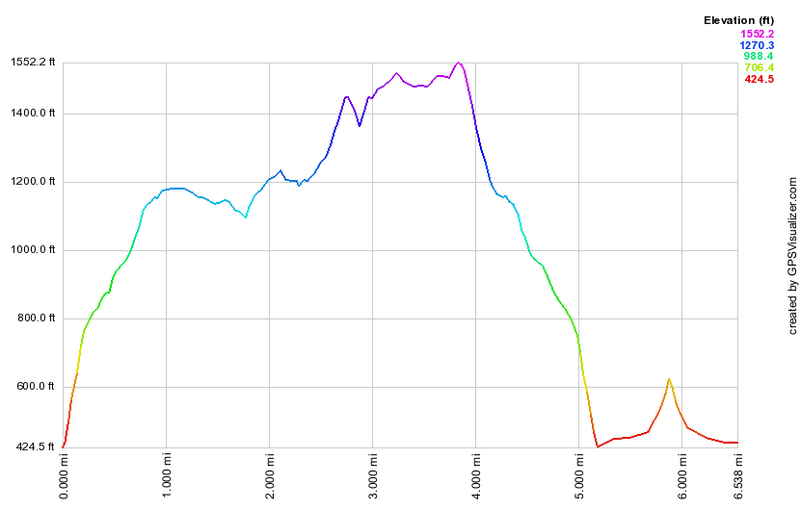 (The image at the left shows the profile of the hike. Remember that all vertical profiles are relative!)
Delaware Water Gap: Culvers Fire Tower
| Quick Look | ||||
|---|---|---|---|---|
| Difficulty | Round trip | Total climb | Internet Maps | |
| 3.3 mi | 800 ft | AllTrails | ||
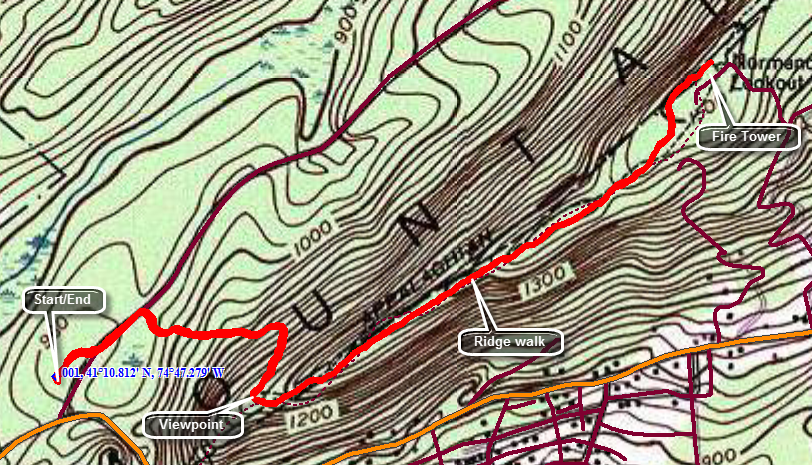
Take Rt 206 south from Milford, PA and watch for the junction with Route 560. Drive 1.7 miles from the junction passing Kittatiny Lake on the right. Turn left on Upper North Shore Road. The road splits almost immediately into Sunrise Highway, a seasonal road, and Upper North Shore Road. Turn right into the parking area. Walk out the far endow the parking area and along Sunrise Highway. Watch for the blazes of the AT in about .25 miles. Turn right into the woods and begin to ascend the ridge on a trail that switches back several times. At the top of the trail there is a nice lookout over Culvers Lake. The trail turns left or northeast from here and follows along the ridge with minimal elevation gain the rest of the way. Around 1.6 miles you will spot a tower ahead but that is the communications tower. Just around the next bend is the fire tower. the official policy is that no one is allowed to climb the towers when an observer I not present. Fortunately, there are some nice views from the ground. To return the shortest way simply retrace your path up to then tower. Several other routes from Stokes Forest are possible and include other viewpoints like Sunrise Mountain.
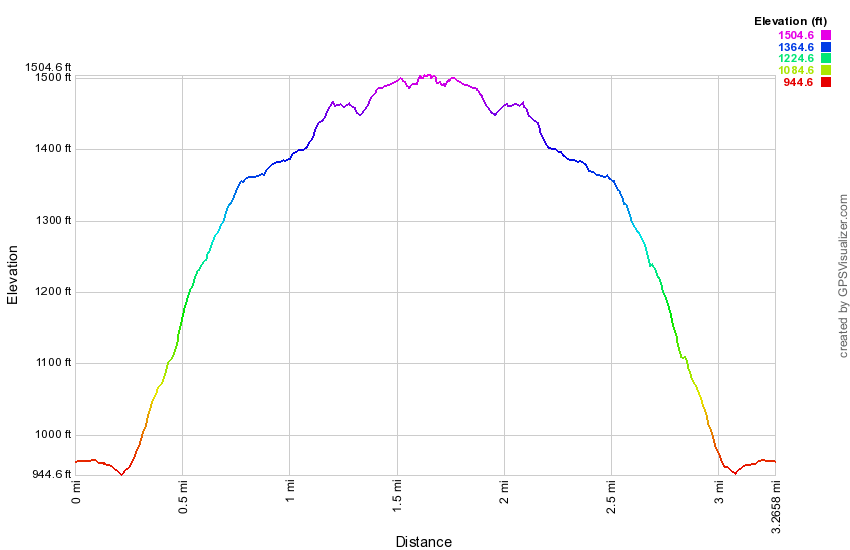 (The image at the left shows the profile of the hike. Remember that all vertical profiles are relative!)
Delaware Water Gap: Mount Minsi
| Quick Look | ||||
|---|---|---|---|---|
| Difficulty | Round trip | Total climb | Internet Maps | |
| 4.51 mi. | 1139 ft. | AllTrails | ||

From Main Street (Route 611) in Delaware Water Gap, Pennsylvania turn south on Mountain Road. Drive up the hill and watch for Lake Road on your left. Drive in and park in the lot to been the hike. Watch for the white blazes of the Appalachian Trail which will take you to the summit. You will pass by Lenape Lake on your right as the trail slowly ascends through the forest. The trail is rocky at times but not very steep. After about 1.2 miles the trail turns and starts a steeper ascent. There is a nice viewpoint here down to the river and over to Mount Tammany on the New Jersey side. As you continue to climb another viewpoint is evident at 1.8 miles. Since you are higher here, the views are generally better. The next .25 miles gets you to the relatively flat top of the mountain. Continue your walk passing a small building in the area where you can see the steps to a fire tower. The trail goes near the edge of the cliffs and side trails lead nearer the edge. Walk to the viewpoints to get good views south on the Delaware River. Turn back to start down the mountain and walkabout .45 miles from the summit. Bear left on the Mt. Minsi Fire Road. The road is not an official hiking trail but is very obvious and gives a different route down the mountain. Around 2 miles from the top Table Rock will be on your right. This large, flat rock gives another viewpoint but is no better than the ones you have already experienced. The fire road will intersect the AT just short of Lenape Lake and you can follow the trail back to the parking area.
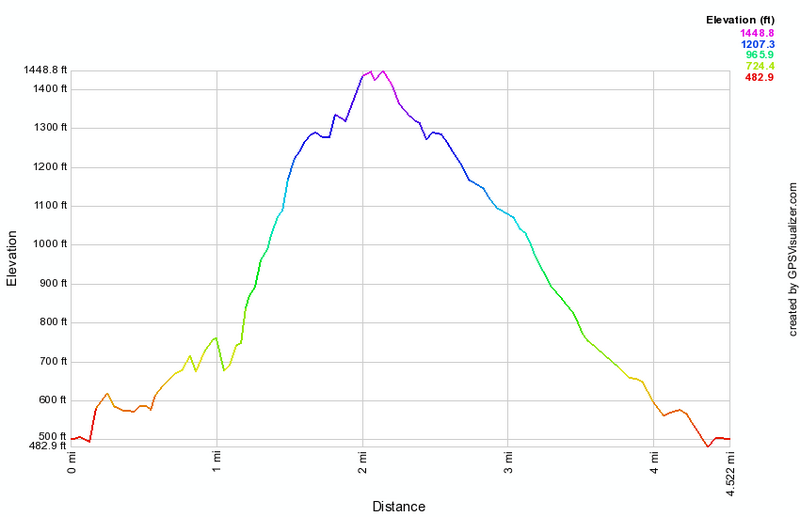 (The image below shows the profile of the hike. Remember that all vertical profiles are
relative!)
(The image below shows the profile of the hike. Remember that all vertical profiles are
relative!)
Delaware Water Gap: Mount Tammany
| Quick Look | ||||
|---|---|---|---|---|
| Difficulty | Round trip | Total climb | Internet Maps | |
| 3.2 mi. | 1190 ft. | AllTrails | ||
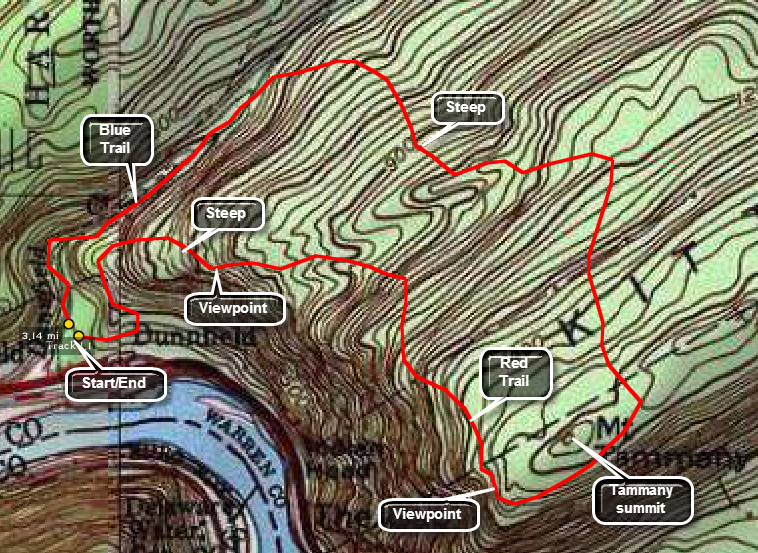
Exit Interstate 80 at the exit for the Kittatinny Point Visitors Center. Pass by the center and under Interstate 80. Park in the Dunnfield Creek parking area to begin your hike. Several routes are available. This one takes you up the Blue Dot Trail and down the Red Dot Trail although the reverse route is also interesting. In the parking area look for the kiosk and then spot the white blazes for the Appalachian Trail. After about .6 miles bear right on the green Dunnfield Creek trail but watch for another quick right onto the Blue Dot Trail. The trail gains about 850 feet over the next mile where it hits the Mount Tammany Fire Road on the ridge. The trail is rocky in many places and is a challenge but never very steep. Hike another .25 miles along the trail/fire road. The Blue Dot Trail ends and the Red Dot Trail begins at an incredible viewpoint on an open rock face. Walking down the rocks can be tricky but the views are even more rewarding.In wet or icy weather remain on the trail at the top where you will still have good views. The lookout allows you to look up and down the river. The descent on the Red Dot Trail is steeper than the ascent and there are some areas where you will have to scramble over rocks. Watch for additional viewpoints on the way down which give you another angle. The Red Dot Trail will return to the parking area but you will have to watch carefully as several informal paths confuse the issue.
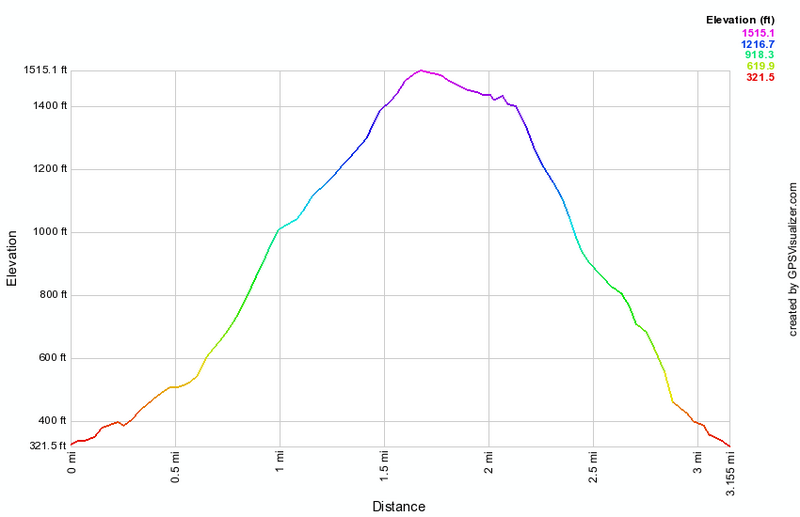 (The image at the left shows the profile of the hike. Remember that all vertical profiles are relative!)
Delaware Water Gap: Sunfish Pond by Tammany Fire Road
| Quick Look | ||||
|---|---|---|---|---|
| Difficulty | Round trip | Total climb | Internet Maps | |
| 10.8 mi | 1944 ft | AllTrails | ||
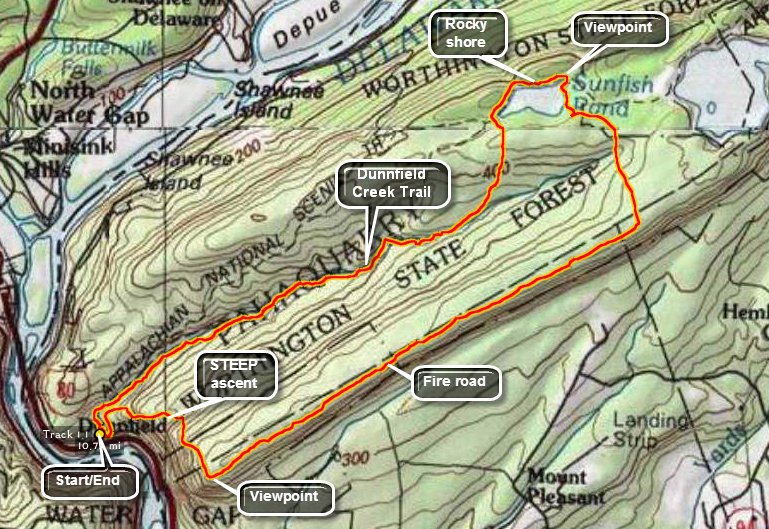
Park at the Dunnfield Creek parking area off I80 just over the New Jersey border in the Delaware Water Gap. Take the Red Dot Trail from the parking lot and get ready for a steep climb! In 1.4 miles from the parking area the trail gains 1130 feet. There are several viewpoints along the trail that look upstream through the water gap. The best reward is the open rock face near the top that acts as a lookout.Walk out carefully onto the rock face to get a good view up and down the river. The Blue Dot Trail begins where the Red Dot Trail ends at the lookout. Walk about .25 miles on the Blue Dot Trail at which point it will turn left and start down off the ridge and back to the parking area. Continue straight ahead on the Tammany Fire Road. This unmarked path stays largely on top of the ridge as it meanders for about 3 miles until it meets the Turquoise Trail to Sunfish Pond. The fire road is relatively easy to follow but there are no markings of any kind. Turn left on the blue Turquoise Trail marked by a cairn but little else. The blazes are few and far between. After about .8 miles or so on the trail it meets and starts to follow a woods road around the pond. Be sure to watch for blazes as the trail bears left to a high point overlooking Sunfish Pond. From this viewpoint head out on the Turquoise Trail which soon ends at the Appalachian Trail. Turn left to go around the pond. This part of the trail is EXTREMELY rocky and hard to walk. Continue on around the lake on the AT. At the southwest end of the lake pick up the green Dunnfield Creek Trail and start to climb a little up to a small ridge. The trail does not climb all the way to the ridge but stays close to the creek as it heads southwest toward the Delaware River. The trail is very rocky and uneven for the first mile but begins to get smoother the further along. The trail follows most of the twists and turns in the shallow creek and you will cross back and forth to avoid the steep banks on one side or the other a number of times. In about 3 miles form the pond, there is a trail junction with the Blue Dot Trail up Tammany. A bridge here crosses the creek near what is sometimes called Dunnfield Falls. The Blue Dot Trail, Dunnfield Creek Trail and the AT all come together in this area. Continue on the AT back to the parking area.
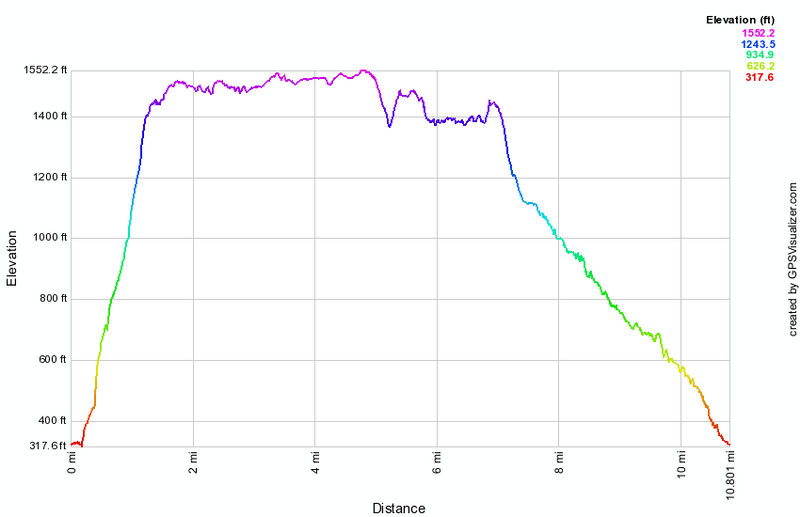 (The image at the left shows the profile of the hike. Remember that all vertical profiles are relative!)
Delhi Trails: Delhi Rail Trail
| Quick Look | ||||
|---|---|---|---|---|
| Difficulty | Round trip | Total climb | Internet Maps | |
| 3.9 mi. | 270 ft. | AllTrails | ||

From the college in the village of Delhi find Sherwood Drive to the right of the shopping center. As the road makes a sharp left turn, continue straight ahead into the parking lot. Walk uphill on the path that accesses the actual rail trail after about .25 miles. Turn left and to walk the longer section of the trail first. The surface is firm and usually dry in most places. Most of the first part of the trail is shaded by trees but parallels Route 10 so there is always the noise of traffic. The first part of the trail also parallels the West Branch of the Delaware River but at around half a mile the river swings south and away from the trail. The trail crosses at least two driveways or access roads but the trail on the other side is always easy to find. At one point the trail leaves the woods and opens up along the edge of a field. There are usually some nice views of the surrounding hills. The trail then reenters the woods. In most places there is a high bank on the right side of the trail from Route 10 but in other spots there is also a high bank on the left side of the trail. The walk is very flat and at just under 1.5 miles it meets Route 10. Turn around to head back. At 2.75 miles the access path will be on the right. Continue straight ahead to walk the other section of the trail heading east. This part of the trail is also flat and well-maintained. There isn't much to see and there are several access roads that cross the trail. After walking .4 miles from the access path, the trail seems to go to the right. After this point the trail is overgrown with weeds. Turn around and walk back to the access path, turn left and walk back to the parking area.
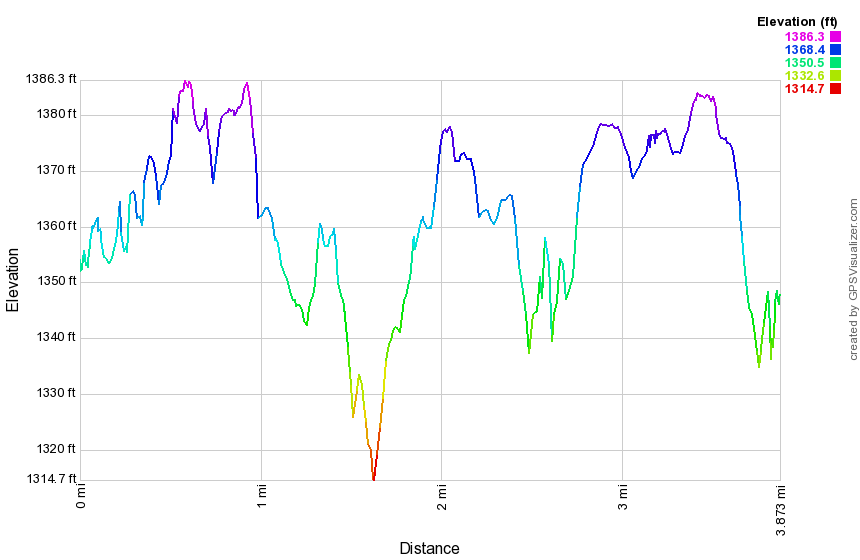
(The image at the left shows the profile of the hike. Remember that all vertical profiles are relative!)
Delhi Trails: Lennox Forest
| Quick Look | ||||
|---|---|---|---|---|
| Difficulty | Round trip | Total climb | Internet Maps | |
| 1.9 mi. | 585 ft. | AllTrails | ||

From the college in the village of Delhi find Sherwood Drive to the right of the shopping center. At the end of the road turn right on Arbor Hill Road. Drive 2.3 miles to the parking area for Lennox Memorial Forest on the left. From the parking area walk around the gate and up the hill. At the first trail junction, turn right and walk uphill heading south. The woods road will make a sharp left turn and will continue uphill and north. There are not very many markings on the trails. If you come to a junction and one trail looks well-maintain and the other overgrown take the former. At .65 miles turn right at the trail junction and get ready for a challenging uphill climb to the summit of the mountain. The trail starts off heading north but circles around at the top so that the final climb to the summit is toward the south. There is a Provo and some open space at the top of the mountain. Watch for a short trail that leads to the right and won to a lean-to and what was once a lookout. The lookout is overgrown and there is no view when leaves are on the trees. Turn around and walk back down the hill to the trail junction. Turn right and follow the trail back down to the gate and the parking area.
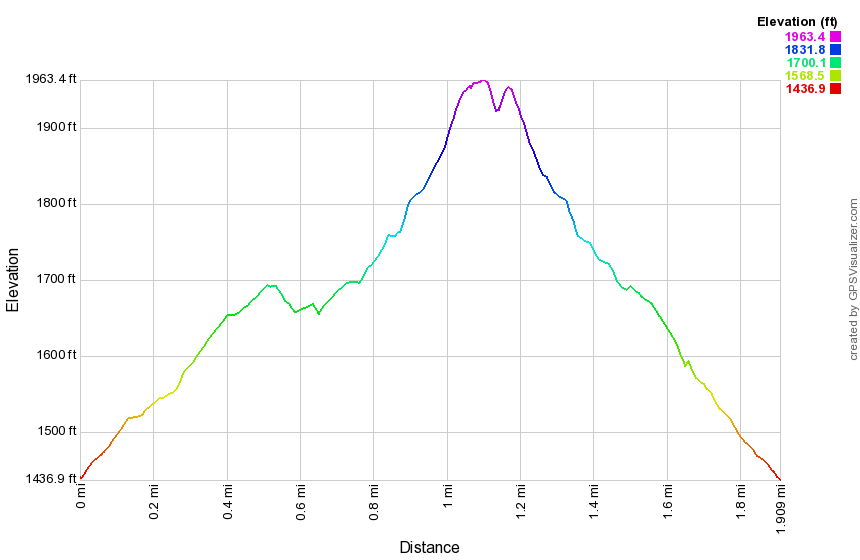
(The image at the left shows the profile of the hike. Remember that all vertical profiles are relative!)
Delhi Trails: Sheldon Loop
| Quick Look | ||||
|---|---|---|---|---|
| Difficulty | Round trip | Total climb | Internet Maps | |
| 4.6 mi. | 1585 ft. | AllTrails | ||

In the village of Delhi, turn onto Route 28 south and drive to Sheldon Drive which is a left turn just before the school on the left. Drive to the end of Sheldon Drive and park in one of the school lots. The beginning of the trail is not clearly marked from the parking area but it is near the community garden. The entire trail system is marked with black arrows on a yellow background with no change in markers for the three different trails. The trail climbs starting at the parking area but at about .4 miles there is a "wall". Over the next .3 miles the trail gains 455 feet making the average grade 28%! The trails are wide woods roads and but the steepness of the trails makes them a little beyond the ability of most beginners. The trail begins by heading to the northeast but as it began to climb to the top of the ridge it turns to the south. The walk is through pleasant hardwood forests and at about .75 miles the trail levels off briefly at the top of the ridge. The Gribley Trail now starts a short but steep descent from one hilltop before a short but steep ascent to the next. Along the way the Frightful Falls Trail comes up on the right as it ascends from below. At 1.6 miles the trail is back on top of a hill and at the highest point on the hike. The trail description mentions viewpoints but there are none that are open. Almost immediately the trail begins to descend from the high point losing over 500 feet as it heads southwest off the ridge. At 2.3 miles there is a power line right-of-way with some views down into the valley. Just before this area, there is a trail junction where the Gribley Trail ends and the Bulldog Run Trail begins. The trails are marked with only one color so it is difficult to make these distinctions. From the right-of-way the trail continues to descend as it turns almost 180 degrees to head northeast. The trail parallels Route 28 for some distance ascending as it progresses. At about 3 miles the Bulldog Run Trail turns off to the left as it headed down to Route 28 and the Immanuel Lutheran Church. Continue straight ahead on the Frightful Fall Trail which ascends to the ridge to the Gribley Trail. The trail ascends to the ridge heading east or northeast and gains 285 feet in the process for an average 18% grade. At 3.5 miles turn left on the Gribley Trail and take note of a bluestone quarry. The Gribley Trail continues to ascend to the top of the ridge gaining another 170 feet. Walk across the top of the ridge and then start back down to the parking area. The descent of this steep area can be even more challenging than the ascent! Continue to follow the trail back to your car.
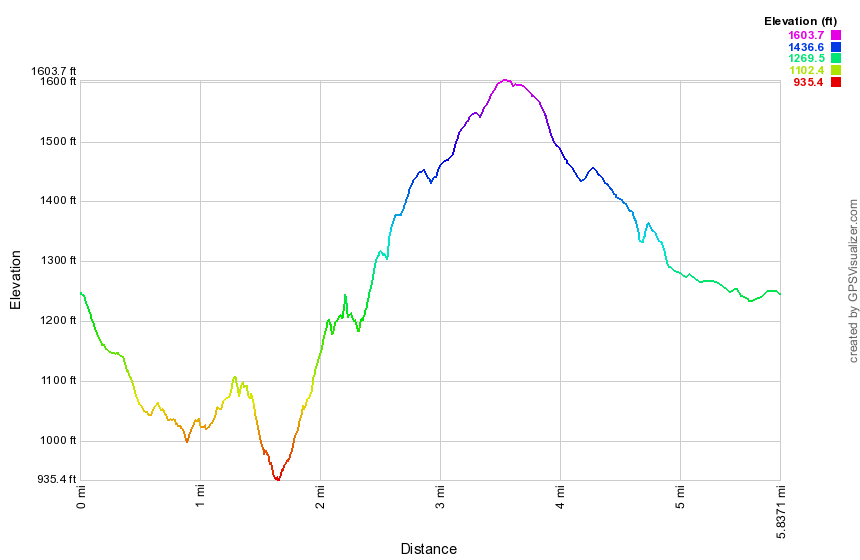
(The image at the left shows the profile of the hike. Remember that all vertical profiles are relative!)
Delhi Trails: Smith Pond
| Quick Look | ||||
|---|---|---|---|---|
| Difficulty | Round trip | Total climb | Internet Maps | |
| 2.2 mi. | 260 ft. | AllTrails | ||

The Smith Pond Trail is now closed from the Southern trailhead to the footbridge due to a landowner's decision to withdraw permission to hike. Hikers should now park On Sheldon Drive, walk down to Route 28, turn left and walk about .1 miles to the trailhead on the right. The walk out and back to the Smith Pond Bridge is about 1 miles. The Catskill Mountain Club plans to remove the southern trailhead kiosk and reroute the trail.
From the college in the village of Delhi find Sherwood Drive to the right of the shopping center. At the end of the road turn left on Arbor Hill Road. Drive .2 miles and park on the left side of the road near the kiosk for the Smith Pond Trail. It can be tricky to follow the orange disks as they sometimes branch off the prominent trail to avoid wet areas. The trail wanders up and down through grassy areas in many places and that grass may or may not be cut. At .1 miles the first deviation from the main trail occurs as the orange disks stray off to the left to avoid a wet area. This trail is not well marked and may not be trimmed so you may continue on the main trail. At about .5 miles the trail descends to a wetland. There is a bridge here that overlooks Smith Pond. Continue on trail as it crosses the wetland and begins to follow along the bank of the West Branch of the Delaware River. A little farther along the trail splits and then reunites within less than 100 feet. It then follows the edge of a field before climbing a little hill headed toward Route 28. Just before the end of the trail at the road is a lean-to on the right side of the trail. The lean-to does not appear to be used much except as a substrate for graffiti. Turn around at the road and retrace your path back to the parking area.
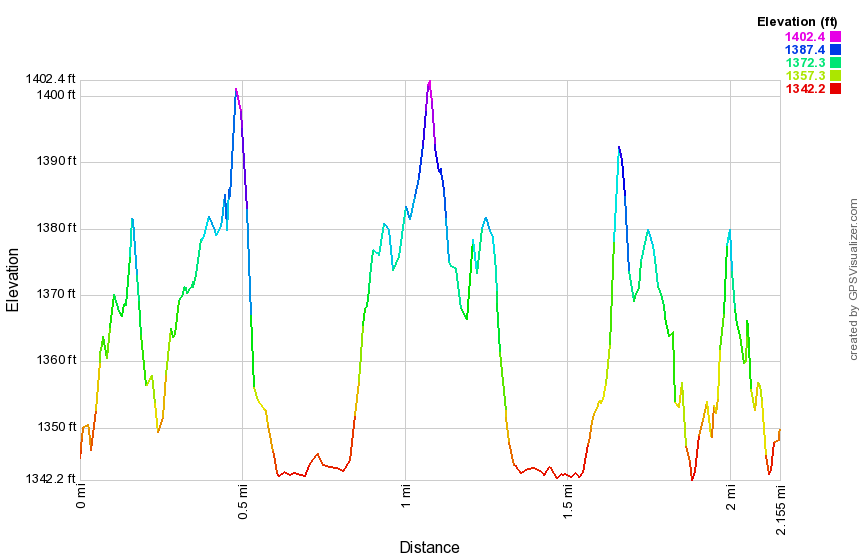
(The image at the left shows the profile of the hike. Remember that all vertical profiles are relative!)
Delhi Trails: West Branch Preserve (all trails)
| Quick Look | ||||
|---|---|---|---|---|
| Difficulty | Round trip | Total climb | Internet Maps | |
| 2.9 mi. | 990 ft. | AllTrails | ||

From the college in the village of Delhi drive about 10 miles west along Route 10 and look for a small parking area on the right side of the road. There is a sign which says "West Branch Preserve - Nature Conservancy". There are two trails here and a kiosk a short distance from the parking area shows a map. The orange trail makes a large loop and is about two miles long. It has some significant elevation gains and passes through primarily hardwood forest. The blue trail itself is about .45 miles but a loop including this trail is about 1.4 miles. This trail parallels an intermittent stream and is surrounded by evergreen trees. It is possible to hike a loop including both trails or a loop that includes either one of the trails. This description includes both trails in one hike.
From the parking area hike on the wide, grassy trail for about .3 miles to the trail junction passing a kiosk with information and maps along the way. Turn left on the orange trail. The trail was is now much more like a forest trail. Cross a small stream which may be easy or more difficult depending on the water levels. The trail may have a few sticks and blowdowns but it is easy to walk around them. Follow the well-worn trail bed and the orange markers. The trail heads north for .7 miles gaining 670 feet on an 18% grade. After a total of one mile on the trail, there is a high point and the trail turns east. In another .15 miles, the trail turns south and starts a long descent. The trail continues to descend at a slightly shallower grade than the ascent. At 1.65 miles the blazes for the blue trail come in from the right. Continue south on the orange trail until at 2 miles where the blue trail starts. Turn right and follow the trail which immediately begins an ascent. Continued on the trail watching for a series of small waterfalls at about 2.2 miles. At 2.25 miles the blue trail turns east, hits a high point and then intersects the orange trail at 2.35 miles. Turn right and retrace your steps down the orange trail. This time stay straight at the junctions and walk back out to your car.
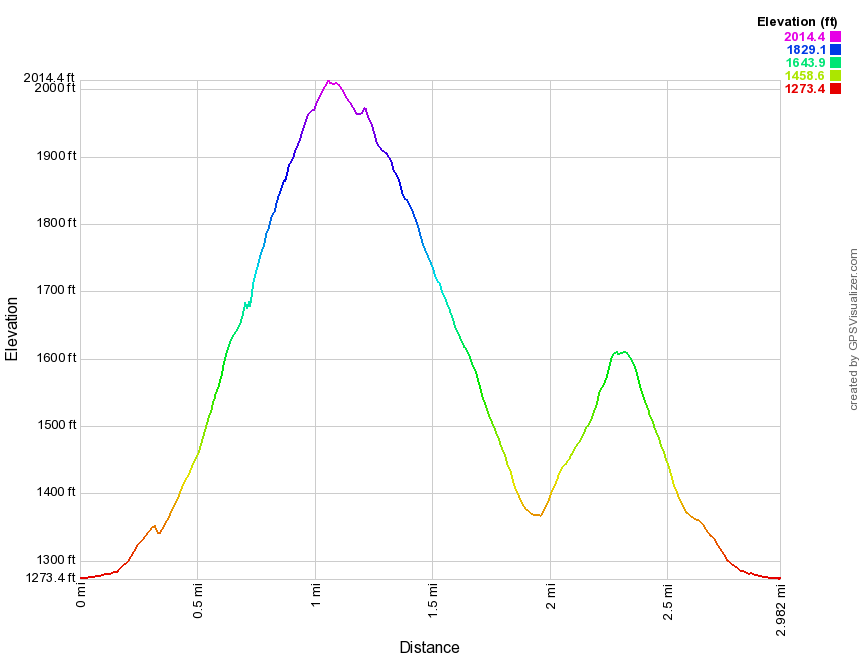
(The image at the left shows the profile of the hike. Remember that all vertical profiles are relative!)
Delhi Trails: West Branch Rail Trail
| Quick Look | ||||
|---|---|---|---|---|
| Difficulty | Round trip | Total climb | Internet Maps | |
| 5.1 mi. | 300 ft. | AllTrails | ||

From the college in the village of Delhi drive about 10 miles west along Route 10 and look for a small parking area on the right side of the road. There is a sign which says "West Branch Preserve - Nature Conservancy". The access to the rail trail is across Route 10 on a path mowed through the field. This trail extends both south and north from the access path. Both directions are out and back. This description includes hiking both ways.
From the parking area on Route 10, cross the road and hike on the wide, grassy trail for about .1 miles to the intersection with the rail trail. Turn right and walk south on the wide and grassy rail trail. The river on the left of the trail is the West Branch of the Delaware River. Watch for opportunities for views down to the river and to the hills beyond. There is at least one rapids along the way. The trail dead ends after 1.5 miles behind the county landfill. Turn around and walk back to the access path. Continue north on the rail trail. The river and wetlands are on the right side. In several, paces high banks are found on both sides of the trail. As you near the end of this section of trail there is a frog pond on the left side of the trail. The trail ends at mile 3.9 on Route 26. Turn around and walk back to the access path. Turn right on the path and walk back to the parking area.
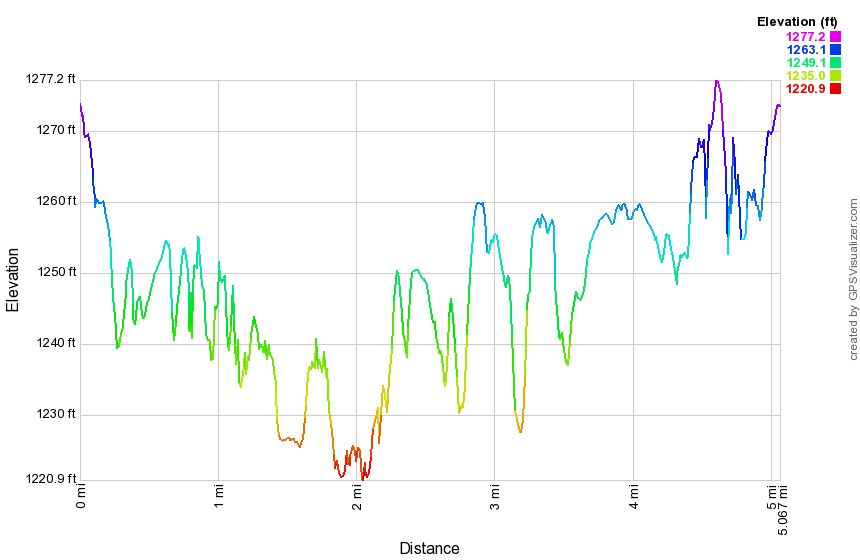
(The image at the left shows the profile of the hike. Remember that all vertical profiles are relative!)
Delhi Trails: West Branch Rail Trail (out and Back)
| Quick Look | ||||
|---|---|---|---|---|
| Difficulty | Round trip | Total climb | Internet Maps | |
| 4.8 mi. | 200 ft. | AllTrails | ||

From the college in the village of Delhi drive about 9 miles west along Route 10 to the blinking traffic light. Turn left and park in the small lot on the right side of the road. There are signs here for the snowmobile trail and the rail trail.
From the parking area, get on the trail and begin the out and back hike along the almost completely flat rail trail. All along the trail watch for opportunities for views down to the river and to the hills beyond. Shortly after getting on the trail there is a depression on the right side of the trail. When there has been sufficient rain, this area will be a frog pond. In drier times it will be a mud flat. At 1 mile a trail leads off to the right across a field to the parking for the West Branch Preserve on Route 10. Continue on the trail to 1.6 miles where a short spur trail leads down to the river bank. A short distance along the main trail is a viewpoint down to a small rapids on the river and across to the hills beyond. From this point the trail continues another .85 miles where it dead ends at the Delaware County Landfill. Turn around and retrace your route back to the parking area.
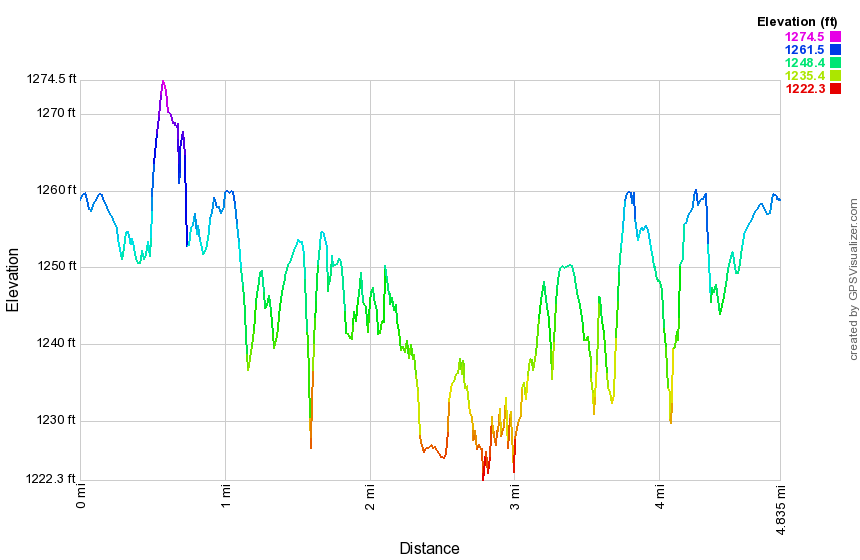
(The image at the left shows the profile of the hike. Remember that all vertical profiles are relative!)
Denman Mountain Loop
| Quick Look | ||||
|---|---|---|---|---|
| Difficulty | Round trip | Total climb | Internet Maps | |
| 6.4 mi. | 950 ft. | AllTrails | ||

Turn onto Moore Hill Road just east of the TriValley School in Grahamsville, NY. Head north staying on Moore Hill Road for about 3 miles. Park in the parking lot at the corner of Moore Hill and Glade Hill Roads. The road straight ahead is not maintained in the winter but the lot is also always plowed. Walk across the road and onto the snowmobile trail which begins a slight ascent up a shoulder of Denman Mountain but soon levels off> It descends to a trail junction at about .5 miles. A left turn at this junction leads back out to Moore Hill Road and the road that cuts over to Denman Mountain Road. Turn right to stay on the trail around the mountain. At .85 miles there will be a path or woods road on the left that leads down to some interesting stone foundations. The road is lined with stone walls on either side. The snowmobile trail continues to descend for the next mile but is always lower than the mountain on the right. Since the trail is lower, the water draining from the higher terrain makes the trail very wet in places depending on the season. At about 1.95 miles there is the ruins of a house or cabin on the right side of the trail. You have been heading mostly north but the road for your return is to the east. At 2.15 miles there is another trail junction where you should turn right and then bear to the left. For the next 1.2 miles the trail wanders back and forth and up and down but always around the mountain. Finally, at about 3.3 miles the trail turns in an easterly direction and heads directly for the road. For the next 1.5 miles the trail undulates up and down but always heads east. At 4.8 miles, you should hit the road and turn right to head south and back to the parking area. There are some interesting cliffs and one large boulder right next to the road. The road continues heading south and mostly descends with a few ups and downs until you are back at the parking area.
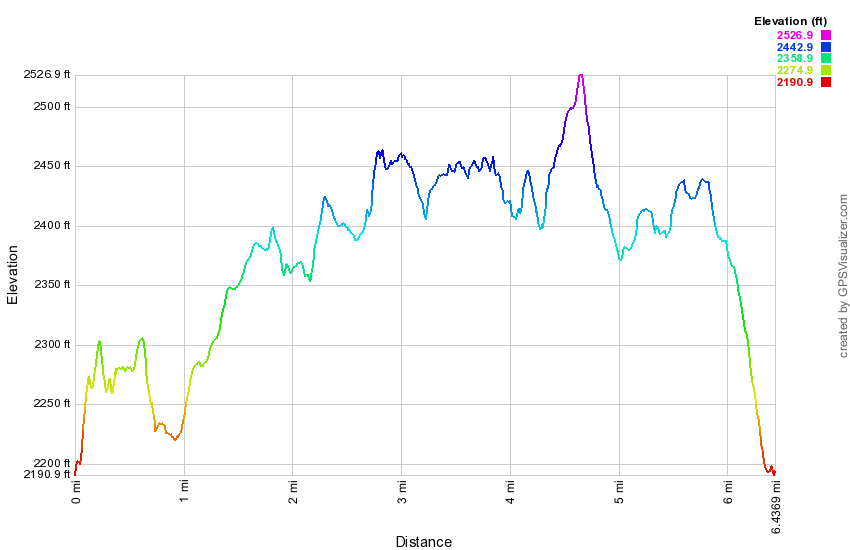
(The image at the left shows the profile of the hike. Remember that all vertical profiles are relative!)
Canopus Lake to Shenandoah Mountain
| Quick Look | ||||
|---|---|---|---|---|
| Difficulty | Round trip | Total climb | Internet Maps | |
| 8.0 mi. | 1570 ft. | AllTrails | ||

Take exit 13 south off I84 and follow Route 9 south for 6.5 miles to Route 301. Turn left on Route 301, drive 4.6 miles and park on the shoulder of Route 301 just before Canopus Lake. Walk across the road and enter the woods on the AT to start the hike. The trail is very rocky at the beginning and ascends and then descends quite a bit. In the first .5 miles gain over 200 feet and then lose most of it again before gaining it back. You may be able to glimpse views of Canopus Lake through the trees. At about 2.0 miles the trail turns right sharply and begins to climb on a switchback. At the top is a rock outcropping with a nice view of the lake and the beach below. Just a little farther along the trail there is a lookout on the left that has a view to the north and west. At about 2.85 miles you will have dropped some elevation and will hear the traffic on the Taconic State Parkway. At this point the trail starts to follow a woods road and the surface became smoother and easier to walk. Continue to follow the trail NNE until it finally breaks out onto an open rock face at almost exactly 4 miles. The trail begins to descend toward Long Hill Road at this point. There is a USGS marker at the top and a US flag painted on the rocks. Turn around if you have not spotted a car further along the trail. This would be a good idea since it allows hiking 8 miles of trail instead of 4 miles out and 4 miles back.
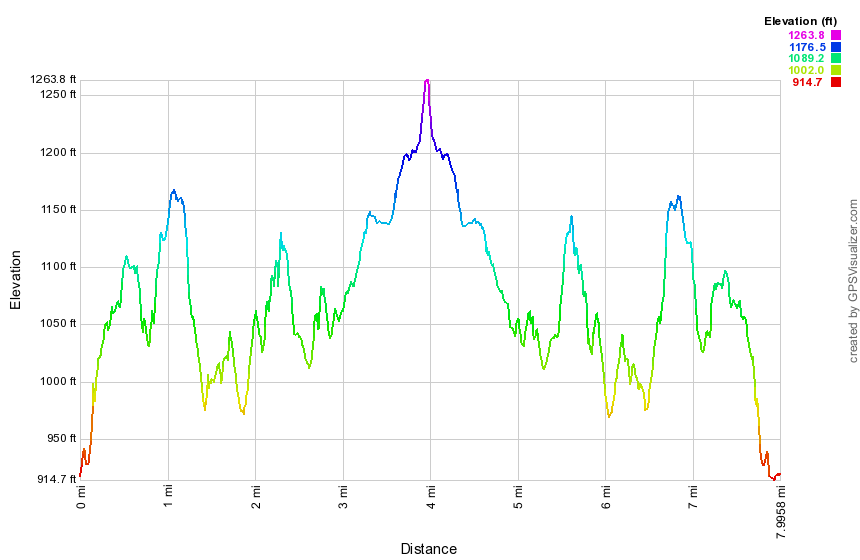 (The image at the left shows the profile of the hike. Remember that all vertical profiles are relative!)
Dennytown Rd to Canopus Lake
| Quick Look | ||||
|---|---|---|---|---|
| Difficulty | Round trip | Total climb | Internet Maps | |
| 7.9 mi. | 1440 ft. | AllTrails | ||

Take exit 13 south off I84 and follow Route 9 south for 6.5 miles to Route 301. Turn left on Route 301, drive 2.6 miles and turned right on Dennytown Rd. Drive 1.2 miles south and park in the parking area on the left where the AT crosses the road. The parking area is large with a trailhead sign and several stone buildings. Enter the woods at the back of the parking on the AT to start the hike. Ascend a low ridge and walk along the top. The trail will descend and ascend several of these ridges along the way. At 1.4 miles cross Sunk Mine Road and pick up the trail just on the other side. At 1.6 mile you will to cross a small stream that drains a beaver pond. Walk downstream a little to find a small waterfall. Just downstream from the waterfall is a round stone with a hole in the middle. This is an old millstone of some kind. Walk back to the trail and cross the stream. Inspect the beaver pond for recent activity and notice a large marsh covered in reeds downstream. There were many of these along the way. At 2.7 miles you will come to a junction with the Three Lakes Trail. Continue on the AT and you will find that you are walking on a sort of raised causeway supported by stonework. This continues for almost a mile. At 3.6 miles you will arrive at Route 301 and Canopus Lake. There are quite a few pullouts along the roadway. If you like, cross the road to get a better view of Canopus Lake. Turn around and walk northeast on the old road for less than a quarter mile where you will find the Three Lakes Trail on the right. Turned right and start south on the trail. Within a few hundred feet look for a long teach on the right side of the trail which is the Phillips Mine. Many of these mines are simple pits or trenches and they can be hard to spot unless you know what you are looking for. Explore some and then get back on the main trail. At 4.6 miles turn west just after passing a large marsh. This trail is lower than the AT and passes through more bottomland rather than staying on a ridge. At 4.9 miles descend to a small stream and cross the stream on some stones. The trail starts to ascend a ridge on a switchback. At 5.3 miles you will be at the cairn that marks the trail junction. Continue straight ahead on the Three Lakes Trail. At 5.5 miles you will pass by another lake. The trail continues without much elevation change and with a much flatter surface than the AT. At 6.7 miles the trail comes to the shores of the third lake. Just below the lake the trail crosses the outlet stream which can be difficult when the water is high. At 7 miles you will be back at Sunk Mine Road. Turn right and walk uphill for about a tenth of mile before turning south into the woods for the last stretch of trail back to the car. The final part of the trail is slightly uphill and along a small stream and another large marsh. Eventually you will cross the stream and pass by an old stone structure. From here it is a short walk through a meadow and back to the parking area.
 (The image at the left shows the profile of the hike. Remember that all vertical profiles are relative!)
Dennytown Rd to Old Albany Post Rd
| Quick Look | ||||
|---|---|---|---|---|
| Difficulty | Round trip | Total climb | Internet Maps | |
| 10.5 mi. | 2550 ft. | AllTrails | ||

Take exit 13 south off I84 and follow Route 9 south for 6.5 miles to Route 301. Turn left on Route 301, drive 2.6 miles and turned right on Dennytown Rd. Drive 1.2 miles south and park in the parking area on the left where the AT crosses the road. The parking area is large with a trailhead sign and several stone buildings. Cross the road and begin your walk by descending slightly and then climbing to a ridge. This rolling terrain is typical in the area. The trail can have some very wet places with some areas resembling a stream bed while others may have pools of water. At 1.5 miles the trail turns sharply to the north which may seem incorrect but it soon approaches a small stream and begins to follow the stream south again. Eventually the trail heads due south and continues to descend albeit with a few moderate ascents along the way. At 2.7 miles cross South Highland Road and continue to head south and to descend. Crossed Canopus Hill Road at 3.7 miles and descend to Canopus Creek. In high water the creek can be a little challenging to cross but hop from rocks to rock to log and you will get across. In front of you is Canopus Hill and while the hike to the top was only about .7 miles the elevation gain is over 400 feet with a 15% grade. Hike up the hill but watch the blazes as some are clearly wrong! One directs you to the left as the trail turns right! At the top of the hill, there is an open spot but no real viewpoint. The star on the NYNJTC maps shows a lookout a little further along on the descent but there is no lookout. Like so many marked on the maps this one has been obscured by trees over the years. The descent on the other side is steep and rocky but the elevation loss is not as great as the gain on the other side. At 4.7 miles you will have completed the descent and be very near the Old Albany Post Road. Unfortunately, the trail parallels the road for another .6 miles before crossing one more swampy area. Cross Chapman Road and the Old Albany Post Road and arrive at the end of this section of AT hike. Turn around and follow the same path directly back to the car. Of course, you will have to hike back up and over Canopus Hill and after that the route is mostly uphill. Watch for the network of wide stone walls in the area. Back at the car take some time to look at the stone shed on the left side of the parking area. Walk down to the left of the field along the Three Lakes Trail and inspect the shell of another stone building.
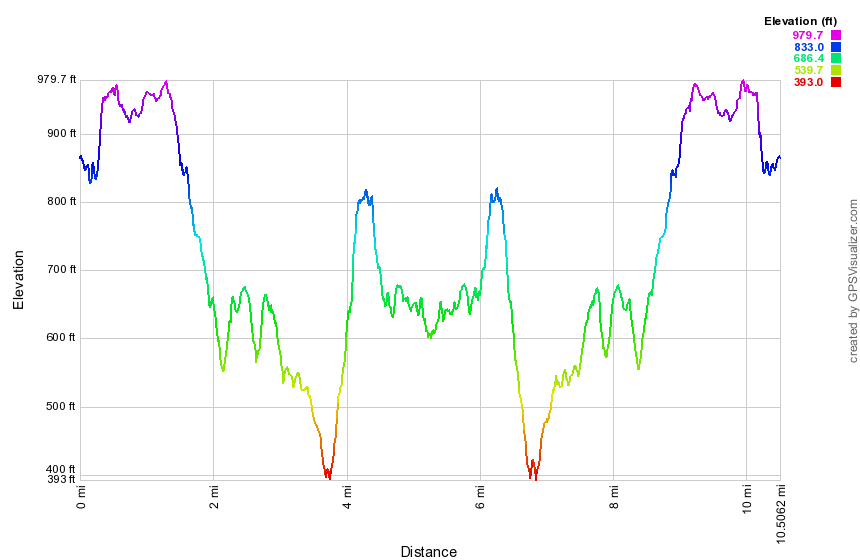 (The image at the left shows the profile of the hike. Remember that all vertical profiles are relative!)
Depot Hill to Nuclear lake
| Quick Look | ||||
|---|---|---|---|---|
| Difficulty | Round trip | Total climb | Internet Maps | |
| 9.2 mi. | 1690 ft. | AllTrails | ||

This hike is really from Route 55 to Depot Hill back to Route 55 then around Nuclear Lake and back to the car.Take the Taconic State Parkway north off I84 and then take the next exit for Route 52 toward Carmel. At the Stormville Post Office turn left on Route 216 and follow it to Route 55. Turn right on Route 55 and within 1.5 miles find the AT parking area on the left. Head south on Route 55, cross the road when you meet the AT and head west into the woods. The first part of the trail is a well-packed dirt track which is a little too close to "civilization" judging by the broken bottles. In less than half a mile cross Old Route 55 and head down a set of wooden steps. After a very short walk in the woods, cross the railroad tracks. There may be a rather large beaver ponds on the other side which can be muddy. From the tracks begin an ascent of about a mile toward the top of Depot Hill. The elevation gain is only about 540 feet but there were some steep areas. At about 1.9 miles pass by the summit of Depot Hill without actually hiking over it. Pass by some wetlands as the trail undulates some. This area of the trail just before Depot Hill Road is also very rocky. At 2.3 miles crossed Depot Hill Road which was barely a single lane gravel track at this point. If you hiked to this road before you may turn around. Continue to walk for about another .2 miles and you will overlap the hike from Route 55 to Depot Hill. Turn around and start back to Route 55.
When you are back at Route 55 you will have hiked about 5 miles. You can walk back to the car or continue across Route 55 to hike a loop around Nuclear Lake. The distance from Route 55 to Nuclear Lake appears to be about .6 miles but the trail keeps winding this way and that extending the distance to 1.2 miles. You will eventually come to the first junction with the loop trail even though the lake is not in view. The AT so far has been level in most places and rocky in a few others but there has been very little up or down. Stay on the AT along the west side of the lake. At 6.5 miles into the hike, about 1.5 miles from Route 55, you will get a look at the lake and be able to walk down to the shore. In the early 1970's there was an explosion at a small research facility on the shores of the lake. This scattered a small amount of radioactive material in the surrounding forest. The material was cleaned up and subsequent testing showed no more radiation than normal background. Shortly after the facility was closed and the building razed. Head back to the AT again and the trail becomes very rocky and descends to very near the shore of the lake. Continue around the lake and at 6.8 miles the AT turns left. Bear to the right on the loop trail around the lake. The trail stays pretty far away from the water and from the cliffs that line the eastern shore. This trail starts out fairly flat but soon becomes rocky with a few short but steep ascents and descents. At one point a path to the right leads to a very nice lookout with views of the small island and the rest of the lake. Continue on the main trail and you will soon cross the access road to the lake. Re-enter the trees and complete the loop by rejoining the AT at 7.9 miles into the hike. It is almost exactly 2 miles around the lake and you only have the 1.2 mile walk back to the car to go. As you near Route 55 you may take the blue shortcut trail on the right back to the parking area to avoid hiking along the main road.
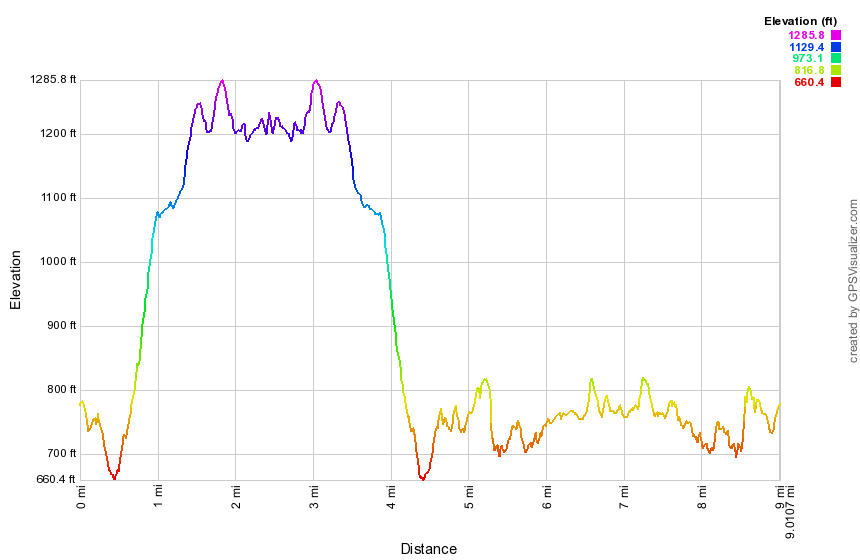 (The image at the left shows the profile of the hike. Remember that all vertical profiles are relative!)
Diamond Notch Trail
| Quick Look | ||||
|---|---|---|---|---|
| Difficulty | Round trip | Total climb | Internet Maps | |
| 4.0 mi. | 1340 ft. | AllTrails | ||

From Phoenicia follow Route 214 north to Lainsville. Turn left on Diamond Notch Road. The first part of the road is paved and even the gravel section after that is in good shape. When you reach the end of the road, continue up the grass and dirt track to the parking area. This portion of the road is at least .5 miles but may be longer and it certainly seems longer! The road is very uneven with large rocks sticking up and is only one vehicle wide. . Drive slowly and avoid the rocks to make it to the parking area. The first part of the trail seems well-used and is rather well-maintained as it passes along Hollow Tree Brook. Several spots along the trail have small cascades and falls when there is enough water in the brook. The trail becomes extremely rough trail with many rocks as you continue to ascend. At one point the trail turns to the right as it crosses a streambed and ascends a set of rock steps. The trail gains 1000 feet in elevation over 1.4 miles to Diamond Notch. At this point there is an open spot that gives limited views down the notch to the south. Walk a little farther on the trail and it levels out some and passes between the Westkill Ridge on the left and another on the right. There is a deep gorge on the left of the trail and the area is similar to Dutcher's Notch in the Blackhead Range. Begin to descend over a very rocky trail heading toward Diamond Notch Falls. Pass the Diamond Notch lean-to on the right side of the trail. Within only .5 miles you can see the bridge above Diamond Notch Falls. Walk across the bridge and down the steep bank on the left to get to the base of the falls. The falls are best when there is a good volume of water in the Westkill. When you are ready, turn around and reverse your route back to the parking area.
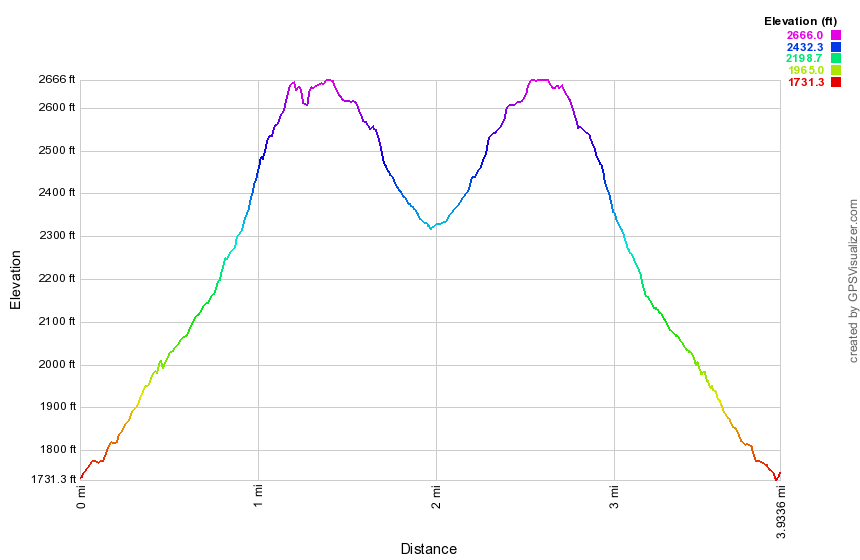
(The image at the left shows the profile of the hike. Remember that all vertical profiles are relative!)
Dickinson Hill Fire Tower
| Quick Look | ||||
|---|---|---|---|---|
| Difficulty | Round trip | Total climb | Internet Maps | |
| 3.0 mi. | 550 ft. | AllTrails | ||
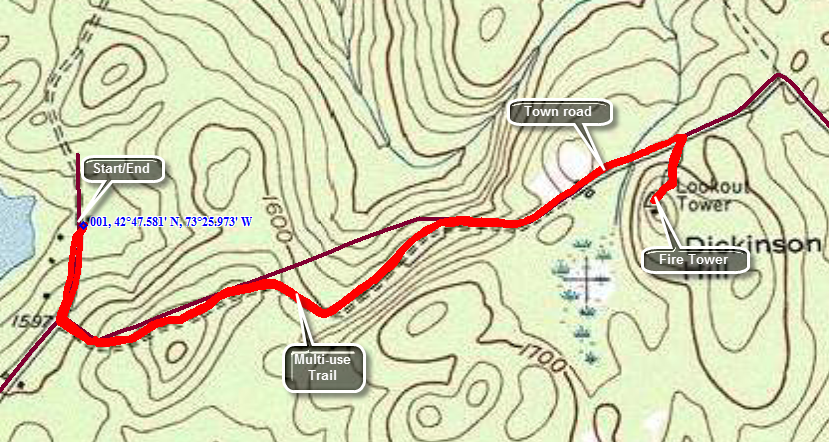 Grafton Lakes State Park is on Route 2 between Troy and Petersburg. Turn north into the park entrance and look for North Long Pond Road. This road is the one you turn onto when you enter the "Winter Entrance" to the park. Drive a little over 2 miles to the parking area at the northeast corner of Long Pond. Just before the parking area you will pass the sign for the fire tower trail on your right. Walk back up the road from the parking area and turn left onto the trail. The trail is a wide woods road and multiuse trail that has no really steep sections. After about 1.25 miles the trail ends at Fire Tower Road near a private residence. Fire Tower Road goes directly to the tower but there is no parking on the road. Walk northeast on Fire Tower Road for a few hundred feet until you are at the gated access road to the tower on the right. Walk up the access road to the tower. The tower can be climbed year round and the cab is always open. There are 360 degree views with the best views of the Catskills to the west and southwest. The only drawback is the communications tower that shares the summit of the hill.
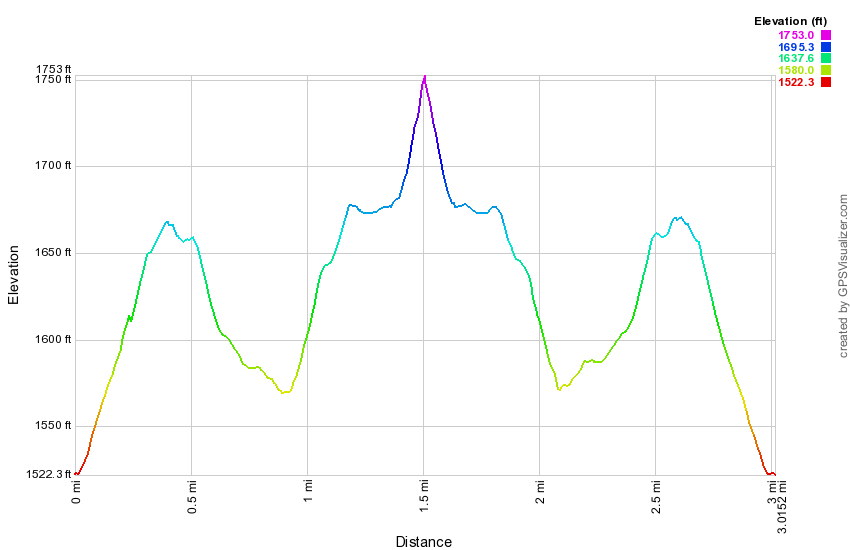 (The image at the left shows the profile of the hike. Remember that all vertical profiles are relative!)
Doney Hollow to Old Cemetery Road
| Quick Look | ||||
|---|---|---|---|---|
| Difficulty | Round trip | Total climb | Internet Maps | |
| 9.7 mi. | 1770 ft. | AllTrails | ||
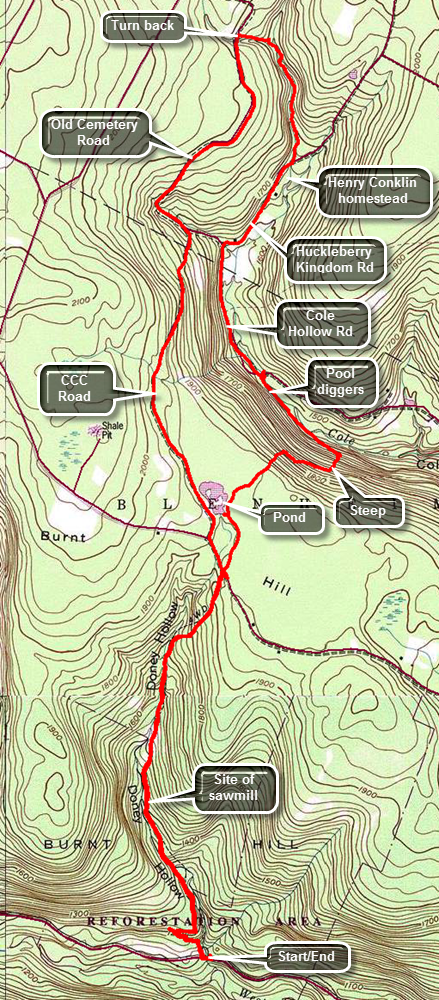
Head north on Route 30 through Margaretville, Roxbury and Grand Gorge. Just after coming to North Blenheim, turn left on West Kill Road and drive a little over two miles where there is a small pulloff on the left side of the road. Walk a little farther along the road and over a bridge to the point where the trail cuts right into the woods. The trail follows a woods road but after a short distance leaves the road to climb a bank. The woods road has been eroded by the small creek and all but disappears causing this detour. After another short distance, the trail rejoins the road. For the next 1.6 miles the trail stays mostly on woods roads paralleling a small creek. There are no majestic views over the countryside but there is a lot of evidence of past habitation. At about 1.25 miles there is a large pile of stones across the stream. This was once a dam and the site of one of two water-powered sawmills. On the other side of the trail is a set of stone steps that leads to a foundation. You will be passing by the summit of Burnt Hill. The area got its name from the frequent fires that were purposefully set in the early 1900's to improve the blueberry crops. Within a short distance, at about 1.9 miles, the trail crosses Burnt Hill Road. The road is little more than a single lane dirt and gravel woods road at this point. Cross the road and at 2.25 miles there is a short side trail on the left that leads to a small but pretty pond. A little passed the pond begin a rather steep descent to Cole Hollow Brook. In .6 miles you will have dropped over 400 feet and be at the edge of the brook. Turn left and walk another quarter mile northwest along the brook before the trail comes to Cole Hollow Road. Along the way there are several "pool diggers" in the brook. These artificial "waterfalls" oxygenate the water and help to erode small pools. Both of these actions help trout and other game fish to survive when the water level is low and the temperature rises. Turn left on Cole Hollow Road and walk to about 4 miles where the road turns left. Continue straight ahead on what is marked as Thomson Road on many maps. The old name for the road is Huckleberry Kingdom Road reflecting the importance of that "crop" in the area. Walk along this road for only about .5 miles where the trail turns left into the woods. Just before this turn there is a homestead on the right side of the road. This was the site of the home of Henry Conklin. Conklin authored the book Through Poverty’s Vale, which details the difficulty of living in area in the 1840s. The trail travels along a stream and there may be nettles to wade through since the trail is little traveled. Fortunately, the trail enters a pine forest and seems to follow a woods road which makes the hike more pleasant in several ways. At about 5 miles cross a small stream on a bridge and the trail intersects with a gravel road. You may turn around and retrace your path at this point or use the roads to form a partial loop. The road is marked as Old Cemetery Road on some maps and there is an old cemetery a little further up the Long Path. Turn right to hike south on Old Cemetery Road. Walking the roads is much easier than the trails particularly because of the level surface. At 6.3 miles stay right at a fork in the road to get on one of the many CCC roads in the area. This road has a very good gravel surface and is easy to walk although it heads uphill toward the pond and Burnt Hill. At 7.5 miles you will pass by the pond from earlier in the hike. Continue out to Burnt Hill Road and turn left to head back toward where the trail leaves Burnt Hill Road. Watch for the trail on the right which is only .1 miles from the intersection. The rest of the hike is a repeat of what you hiked earlier only in reverse.
 (The image below shows the profile of the hike. Remember that all vertical profiles are
relative!)
(The image below shows the profile of the hike. Remember that all vertical profiles are
relative!)
Dover Oak to Hoyt Road
| Quick Look | ||||
|---|---|---|---|---|
| Difficulty | Round trip | Total climb | Internet Maps | |
| 5.9 mi. | 1420 ft. | AllTrails | ||

This is one-way and uses a car spot at Hoyt Road.From Wingdale, NY head east on State Route 55 toward Connecticut. Just .2 miles before the Connecticut border, turn right on Hoyt Road. The parking area for the AT is only about .25 miles up Hoyt Road on the right. Park one car in the small lot and then drive west on Route 55 back to Wingdale. Continue west on Pleasant Ridge Road watching for Route 20 (Hoag's Corners Road) on the left. Turn left to drive south and watch for the Dover Oak on the left side of the road. The tree is hard to miss and there may be quite a few cars parked here. Be sure to head east from the tree and hike up through a field on a well-worn track. You will be in the fields or on the edge for a good part of the first mile. At about .6 miles look west and you will see a bare rock face. This is the Cat Rocks which is a popular lookout on the AT. After the first mile you will begin to descend and come to the wetlands around the Swamp River at about 1.4 miles. There is a boardwalk that crosses a small stream and then continues across the marsh. At about 2.1 miles cross the Swamp River on a bridge. At 2.35 miles you will cross the Conrail tracks and find a special station just for AT hikers. Just beyond at 2.4 miles is State Route 22 where you should turn left and hike up the road a few hundred feet to pick up the AT as it again passes through some fields. At 2.7 miles cross Hurds Corners Road and watch out for the electrified fence on the other side. Climb over the fence using the stile and take a look at an interesting wooden water tower in the field. Continue your walk up the ridge by way of the well-packed track through the fields. Enter the woods again at about 3 miles and then begin a sustained ascent at about 3.4 miles. This lasts until you gain the highest point on the hike at 4 miles. This is on Hammersley Ridge just above Quaker Lake which is to the east. Unfortunately, there are no views to be had as you walk along the ridge. From the high point on the ridge the trail is generally downhill for the next 3 miles heading northeast. Most of the walk is on packed dirt trail but there were a few rocky spots. At about 7 miles into the hike the trail turned almost due east and starts to ascend over two bumps that are part of Leather Hill. At 7.7 miles cross Leather Hill Road and continue east toward Duell Hollow Road. There is a steep descent at 8 miles which continues until you cross Duell Hollow Road. On this descent you will pass the Wiley Shelter where the trail makes a sharp right. Shortly after the shelter you will find the water supply for the shelter which is a well with a hand pump. You are getting close to your destination but the trail had one more "curve". The trail ascends from the road and then begins to head south instead of east. This maneuver is to avoid descending into the gully cut by Duell Hollow Brook. In doing so the trail turns a .2 mile hiked into something over a .5 mile detour! You will cross the brook on an interesting foot bridge with a fairly long span and a central support. There is one more short ascent on the other side and then another walk through some open fields. Just after this you will begin to descend through some trees and then break out onto Hoyt Road just north of the parking area.
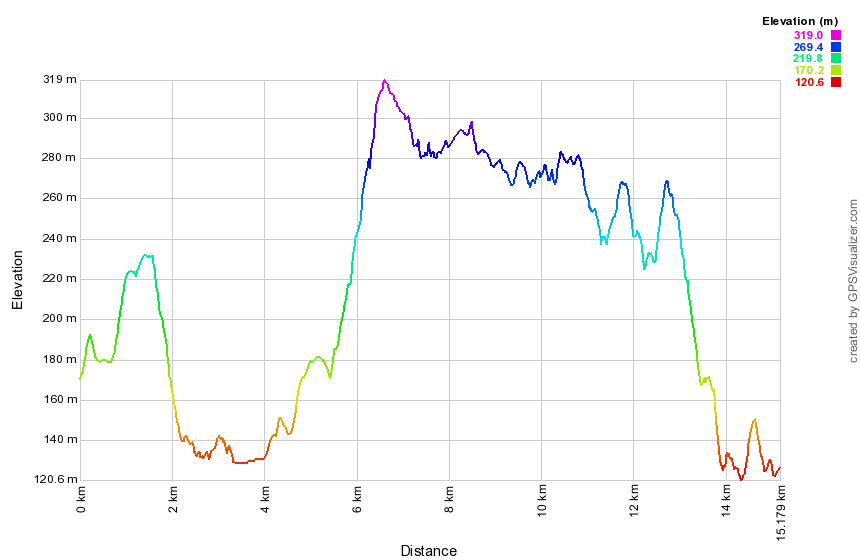 (The image at the left shows the profile of the hike. Remember that all vertical profiles are relative!)
Dover Stone Church: All Trails
| Quick Look | ||||
|---|---|---|---|---|
| Difficulty | Round trip | Total climb | Internet Maps | |
| 3.7 mi. | 830 ft. | AllTrails | ||

Drive to Dover Plains, NY and park at the Dover Plains Elementary School at 9 School St. There is no parking at the entrance to the Dover Stone Church area which is one a lane that is on private property. Walk out to Route 22, turn right and walk north about 250 feet to a yellow on blue historical sign. Turn left here and walk up a private, gravel driveway. At the top is the sign for the beginning of the Dover Stone Church area. The shape of the sign reflects the shape of the opening of the Dover Stone Church grotto! Walk down the stone steps to a beautiful lane or walkway lined with maple trees. Continue to the other end of the lane to climb the other steps. A short path leads to a sign and kiosk that explain the historical significance of the area and shows a map of the trails. Begin to follow the trail along Stone Church Brook to the bridge over the brook. Just after the bridge, there is a sign directing us to the red, blue or yellow trails. Continue straight ahead along the creek being careful as you negotiate the slippery rocks beside the creek. The rocks are almost always wet from rain, humidity or water from the brook. In a very short distance you will see the opening to the grotto. Continue to walk along the side of the creek on the stones and enter the grotto if you wish being careful as the water may be high enough to make staying dry a problem. There is a 30 foot waterfall at the far end of the grotto but its beauty very much depends on the flume of water in the creek. A low volume makes it easy to get into the grotto but also makes the waterfall pretty tame. There is also a large rock that is locally known as "The Pulpit". Exit the grotto and walk back along the slippery rocks to the trail signs. Turn right to begin walking the new trails which all start out together on a climb. The blue trail is the Overlook Point Trail and is marked as 1.75 miles out and back. The elevation at the parking lot was about 400 feet so any elevation produces a viewpoint. Follow the blue markers as first the red and then yellow trails break off. The trail follows a woods road until the very last portion which is cut through the woods and along the edge of an escarpment. The trail heads south before looping southwest and then north with a final turn to the south. After .7 miles on this trail gains about 420 feet and ends at the lookout. The trail seems to end at a point where the view is limited. Some unmarked paths lead to a rock ledge that is lower but offers a less obstructed view. Head back following the Blue trail to the upper junction with the yellow Upper Loop Trail. Turn right at 1.95 miles to hike this trail. The trail rolls a little as it drops and then climbs to the top of a little hill. At 2.2 miles there is a limited viewpoint and then the trail begins to drop back down to meet the blue trail. The walk is pleasant without too much to see. At 2.5 miles you will be back at the point where all the trails come together. Continue straight ahead to walk the red trail which is marked as the Lower Loop Trail. The first part of this trail passes through some open areas which may have a lot of weeds. It is obvious that the main attraction is the Stone Church with the Overlook Trail a distant second. The Upper and Lower loop trails seem hardly used. Follow the red trail as it heads south ascending a few small hills. At 2.9 miles the trail makes an almost 180 degree turn and heads back to the north. Soon you will be back at the trail junction heading back down to the brook. Follow the trail back out to the kiosk and then to the lane lined with maples. Head back to you car the way you came.
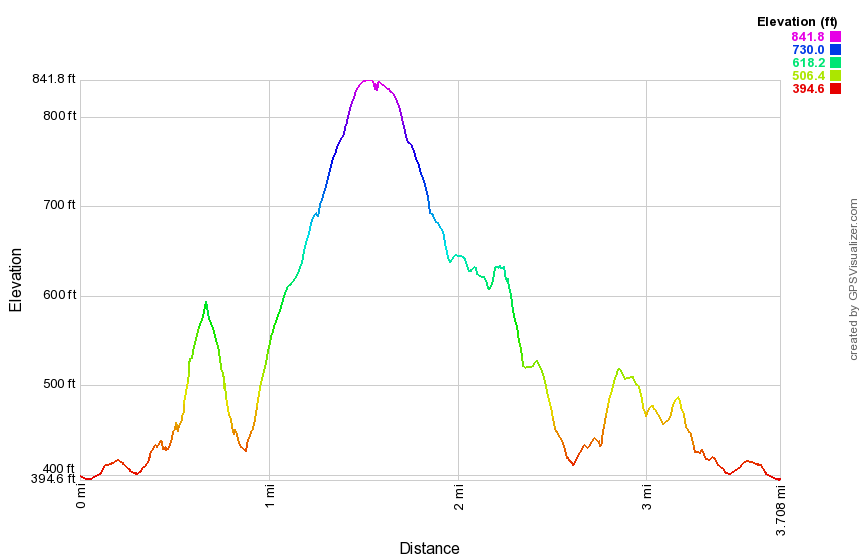
(The image at the left shows the profile of the hike. Remember that all vertical profiles are relative!)
Dry Brook: German Hollow
| Quick Look | ||||
|---|---|---|---|---|
| Difficulty | Round trip | Total climb | Internet Maps | |
| 3.3 mi. | 1425 ft. | AllTrails | ||

There are several different ways to access this area from the Margaretville and Arkville areas. The German Hollow Trail comes up to the Dry Brook Ridge trail from a side road off the Dry Brook Road. In Arkville turn south on Dry Brook Road. Watch for Chris Long Road on the right. Go to the end of the road and turn around. Park on the right side of the road opposite a house. There is room for two cars at most. The yellow German Hollow trail is a wide woods road to the Dry Brook Ridge trail and is about 1.6 miles long. The German Hollow lento is, at present, buried underneath several large trees that have crushed it! Once on the ridge you can turn around or hike the Ridge Trail to the Penguin Rocks.
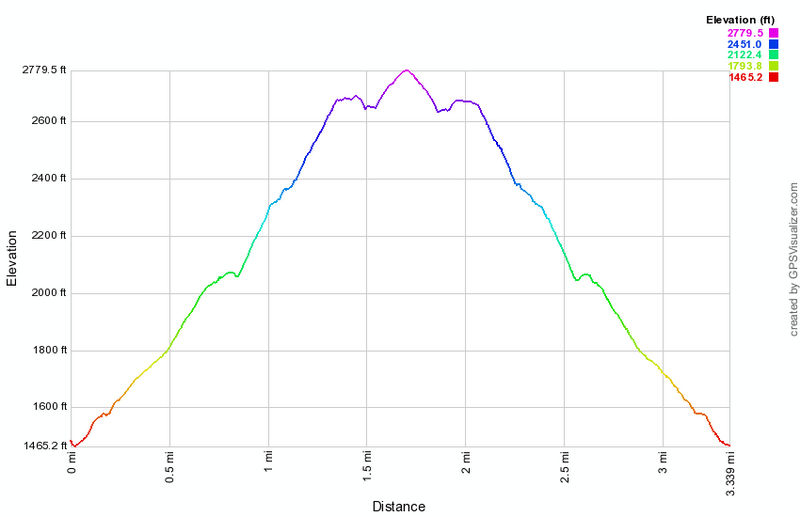 (The image below shows the profile of the hike. Remember that all vertical profiles are relative!)
Dry Brook: German Hollow to Lookouts
| Quick Look | ||||
|---|---|---|---|---|
| Difficulty | Round trip | Total climb | Internet Maps | |
| 7.1 mi. | 2240 ft. | AllTrails | ||

There are several different ways to access this area from the Margaretville and Arkville areas. The German Hollow Trail comes up to the Dry Brook Ridge trail from a side road off the Dry Brook Road. In Arkville turn south on Dry Brook Road. Watch for Chris Long Road on the right. Go to the end of the road and turn around. Park on the right side of the road opposite a house. There is room for two cars at most. The yellow German Hollow trail is a wide woods road to the Dry Brook Ridge trail and is about 1.6 miles long. The German Hollow lean-to is, at present, buried underneath several large trees that have crushed it! Once on the ridge you can turn left on the Dry Brook Ridge Trail. Walk about a mile to the junction with the Huckleberry Loop Trail gaining about 300 feet along the way. Stay on the Dry Brook Ridge Trail for another mile and gain 225 feet until a short side trail leads to thee lookouts over the Pepacton Reservoir. .
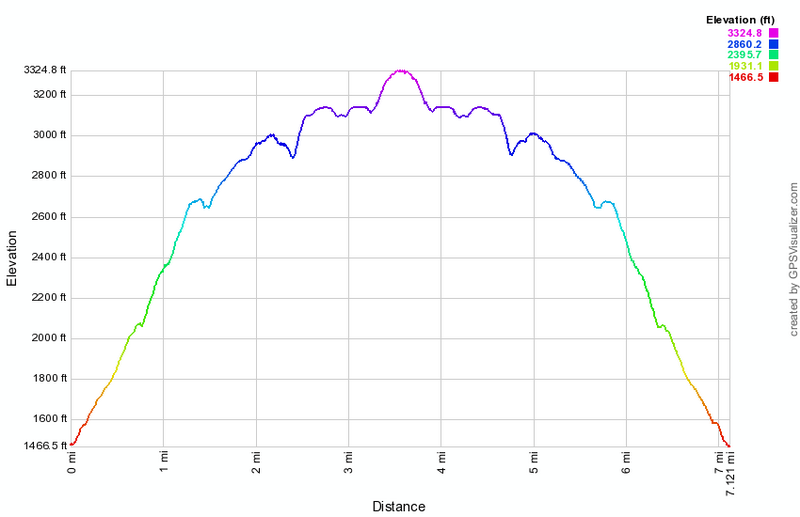
(The image above shows the profile of the hike. Remember that all vertical profiles are relative!)
Dry Brook: Hill Rd to Viewpoints
| Quick Look | ||||
|---|---|---|---|---|
| Difficulty | Round trip | Total climb | Internet Maps | |
| 5.75 mi. | 1663 ft. | AllTrails | ||

There are several different ways to access this area from the Margaretville and Arkville areas. The Dry Brook Trail starts near the Agway store in Margaretville and proceeds over Pakatakan Mountain and to the viewpoints. The German Hollow Trail comes up to the Dry Brook Ridge trail from a side road off the Dry Brook Road. This route follows the upper Huckleberry Loop Trail from the Hill Road parking area. There are also two parking areas on Huckleberry Brook Road that can be used.
From Routes 28 and 30 in Margaretville get on Southside Road. You may also use BWS Route 10 if you are coming from the Pepacton Reservoir to the west. Watch for the turn onto Huckleberry Brook Road. It is about 2 miles from Margaretville and less than a mile from the junction of BWS Route 10 with Routes 28 and 30. After turning onto Huckleberry Road, watch for the turn onto Hill Road about a quarter mile up on the right. Continue on Hill Road for a little over 1 mile until you see signs for "wild forest". The parking area will be on the right and is small with only enough room for a few cars. This should not be a problem since this route is not as popular as it should be.
After parking, cross the road and sign into the register. The trail ascends not too steeply through a pine plantation where the trees are evenly spaced. The trail is wide as it overlaps an old woods road. The floor is covered with pine needles which makes it cushioned and easy to walk on. The pine plantation slowly gives way to hardwoods and then leads into more pines. At times the trail narrows as it leaves the meandering woods road. In places it is narrow enough to have briars and nettles in the trail! After a little more than 1.5 miles the trail ends at the blue Dry Brook Trail. Turning left will take to Margaretville so turn right to continue toward the viewpoints.
The trail on the ridge is relatively flat with several small ascents and descents. There are a few parts that pass by some large rocks but without any real "scrambles". After about 1.3 miles of walking, hints of a view appear on the right. Don't stop here since the lookouts are just ahead. The first lookout is a rock shelf with several levels. There are views from all levels but the ones from the lower levels are the least obstructed. The views ate to the west over Cold Spring Hollow and the Pepacton Reservoir. The trick is to hike this route on a clear day with little humidity so that the haze does not cloud the view. You may now walk another .7 miles the another set of viewpoints and the highest point on the ridge. The views aren't much different than the ones you have just taken in so you may want to immediately turn back and make your way back to the car. The trail back can be descended quickly especially after the turn onto the Huckleberry Loop Trail.
 (The image at the left shows the profile of the hike. Remember that all vertical profiles are
relative!)
(The image at the left shows the profile of the hike. Remember that all vertical profiles are
relative!)
Dry Brook: Huckleberry Loop (complete)
| Quick Look | ||||
|---|---|---|---|---|
| Difficulty | Round trip | Total climb | Internet Maps | |
| 11.2 mi. | 2940 ft. | AllTrails | ||

There are several different ways to access this loop hike area from the Margaretville and Arkville areas. The Huckleberry Loop Trail crosses Hill Road and runs along Huckleberry Brook Road. There is a parking area on Hill Road and two on Huckleberry Brook Road. There is also a parking areas on Ploutz Road of the Millbrook Road but Ploutz Road is poorly maintained. This route starts at the Hill Road parking area and heads south to co the lower Huckleberry Loop Trail first and then proceeds up Dry Brook Ridge in a counterclockwise direction. The lower Huckleberry Loop Trail is NOT a trail for a good part of its length! Make sure you are willing to slog through heavy briars and undergrowth for about 3 miles!
From Routes 28 and 30 in Margaretville get on Southside Road. You may also use BWS Route 10 if you are coming from the Pepacton Reservoir to the west. Watch for the turn onto Huckleberry Brook Road. It is about 2 miles from Margaretville and less than a mile from the junction of BWS Route 10 with Routes 28 and 30. After turning onto Huckleberry Road, watch for the turn onto Hill Road about a quarter mile up on the right. Continue on Hill Road for a little over 1 mile until you see signs for "wild forest". The parking area will be on the right and is small with only enough room for a few cars. From the parking area walk up the road a few feet and turn right into the woods on the red Huckleberry Loop Trail.
Walk .3 miles south on the trail to the upper parking area on Huckleberry Brook Road. Bear right near the road, walk through a small open area and cross the bridge to the road. Walk west on the road for .8 miles to the lower parking area. Just passed the parking area on the left is a bridge over Huckleberry Brook. Sign the register here and get ready to start climbing right away. The trail soon merges with an old woods road and follows it until about .4 miles after the bridge. At this point it turns again and starts to climb the ridge. Be careful to make the turn to the right as the road continues straight ahead. For the next .85 miles the trail switches back several times as it climbs to the ridge line. Watch for some very large and very old hardwood and softwood trees. In addition, there are some impressive rock formation that show exceptionally clear sedimentary layers. At this point the trail begins to deteriorate. If you are lucky, someone will have cut down some of the briars, brush and undergrowth but the going will still be tough! For the next 3.5 miles you will have to hack your way through raspberry canes, briars, nettles, ferns and various bushes. You will do this without being able to see the rocks and fallen trees under foot that will trip you up. You will also be treated to several ascents and descents of small hills on your way to the parking area on Plover Road.
When you get to the trailhead on Plowboy Road you will have hiked about .4 miles but it will feel like half again as much distance. To get to Ploutz Road you will have dropped down from the ridge and then ascended to about 2400 feet. What awaits you is another 5 miles of hiking which starts with an ascent to the top of Dry Brook Ridge at almost 3500 feet. Walk across the road to the parking area and continue on the red trail. The trail now ascends for a little over a mile to the ridge. The ascent starts and ends easily but the parts in between can be steep at times! At the ridge the trail flattens and in about .35 miles you will reach the junction with the blue Dry Brook Ridge Trail. Turn left toward Margaretville and walk for about .8 miles to a viewpoint over Cold Spring Hollow and the Pepacton Reservoir. Another .7 miles of walking brings another set of lookouts with much the same view. Continue on the trail for another 1 mile until the junction with the red Huckleberry loop trail. Turn left on the trail and hike 1.55 miles back to the parking area on Hill Road. This descent is rather and you can make good time walking downhill. The trail descends not too steeply first through hardwoods and then narrows in several places as it leaves the meandering woods road. In these places some briars and nettles may encroach on the trail. After some more hard woods the trail merges with and stays on an old woods road that runs through a pine plantation where the trees are evenly spaced. The trail is wide as it overlaps an old woods road. The floor is covered with pine needles which makes it cushioned and easy to walk on. In at least one spot are some old foundations and in others stone walls.
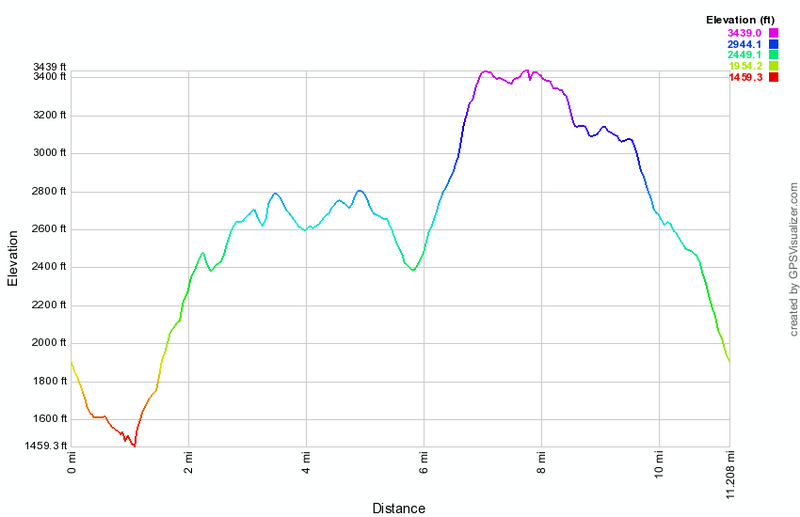 (The image at the left shows the profile of the hike. Remember that all vertical profiles are
relative!)
(The image at the left shows the profile of the hike. Remember that all vertical profiles are
relative!)
Dry Brook: From Margaretville Trailhead
| Quick Look | ||||
|---|---|---|---|---|
| Difficulty | Round trip | Total climb | Internet Maps | |
| 7.0 mi. | 2065 ft. | AllTrails | ||

This route starts at the Millbrook Trailhead and ends at the junction with the trail from Hill Road. Of, course, the hike could easily be extend by continuing out to the lookouts and beyond! In Margaretville get on Southside Road which runs parallel to Route 28 and head northeast. Park in the parking area alongside the road just after Fair St on the left. The trail starts across the road. The first 1.7 miles of the trail climbs Pakatakan Mountain and is wide woods road most of the way. A direct route up the mountain would be very steep so there are several switchbacks which also help to avoid some rather nice ledges and cliffs. The overall route shows a grade of about 12% but there are some short stretches that are around 20%! After the summit, your climb is still not over as Dry Brook Ridge is at a higher elevation. At about 2.6 miles the German Hollow Trail comes in from Arkville on the left. From German Hollow the trail climbs for another .5 miles when in inexplicably drops about 100 feet! From this point the trail turns almost due south and climbs nearly 200 feet in a little over .1 miles to Dry Brook Ridge. This is almost a 30% grade and you will feel it! To return to your car simply retrace your path. The Penguin Rocks viewpoint is only another mile along the ridge. The trail wanders back and forth and does gain an additional 225 feet of elevation but this can be a welcome respite from the steep ascent and subsequent descent of the ridge.
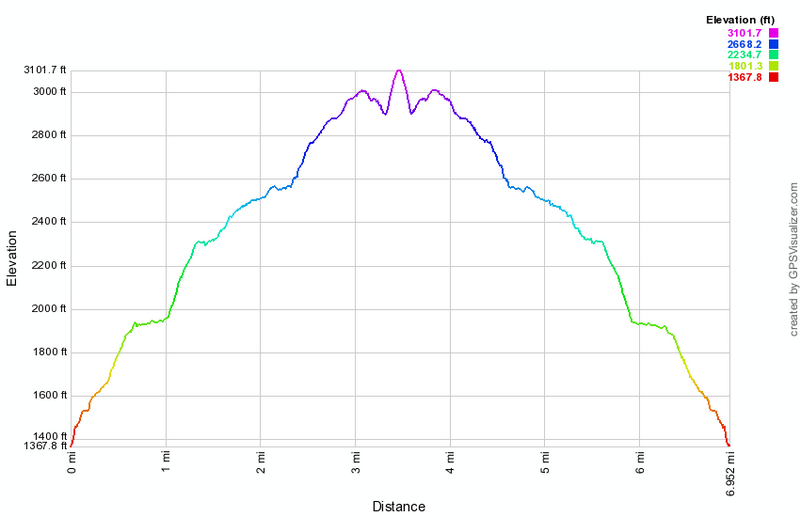
(The image at the left shows the profile of the hike. Remember that all vertical profiles are relative!)
Dry Brook: From Millbrook Trailhead
| Quick Look | ||||
|---|---|---|---|---|
| Difficulty | Round trip | Total climb | Internet Maps | |
| 6.2mi. | 1630 ft. | AllTrails | ||

This route starts at the Millbrook Trailhead and ends at the junction with the Huckleberry Loop Trail. The hike could be extended since another 1.3 miles will bring you to the Penguin Rocks lookout. You could also hike through to another trail head if you spot a car. The trail is deceptive since the elevation is gained over about three miles. However, the trail rises to 3460 feet and is #37 on the CHH list.
Get on the New York City road that leaves Margaretville and passes long the south side of the Pepacton Reservoir. After about 3.5 miles, watch for the Millbrook Arena Road on the left. Turn here and drive about 9.5 miles to the Millbrook trail head on the left. Park to begin your hike. Once you are on the Dry Brook Ridge Trail the hike is very straight forward as long as you stay on the marked trail. The trail starts up almost immediately over a small hill gaining 440 feet in the first .7 miles. It then drops almost 300 feet in the next .5 miles before starting up to the ridge. In the next mile the trail ascends to the ridge gaining 680 feet before leveling off at the top. For the next .9 miles the trail drops about 100 feet only to regain that elevation to the junction with the Huckleberry Loop trail coming up to the ridge from the west.
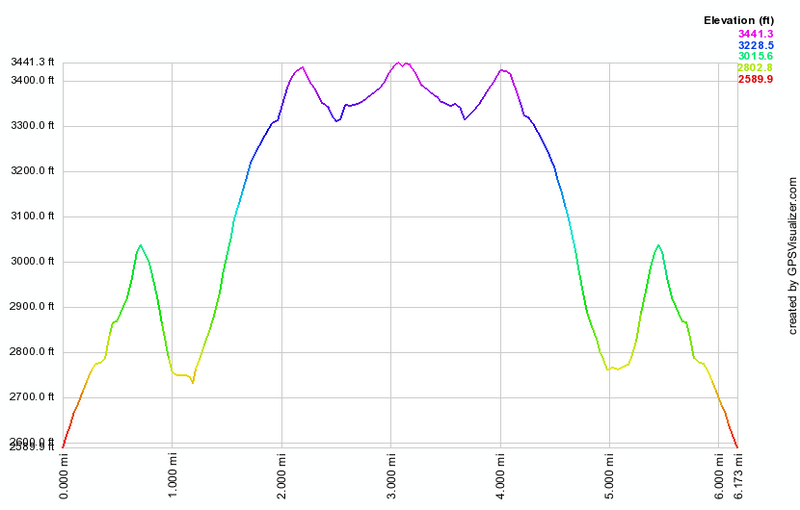
(The image at the left shows the profile of the hike. Remember that all vertical profiles are relative!)
Dry Brook: Viewpoints from Millbrook Trailhead
| Quick Look | ||||
|---|---|---|---|---|
| Difficulty | Round trip | Total climb | Internet Maps | |
| 9.4 mi. | 22440 ft. | AllTrails | ||

This route starts at the Millbrook Trailhead and is an out and back to the viewpoints over the Pepacton Reservoir. You could also hike through to another trail head if you spot a car. The trail is deceptive since the elevation is gained over about three miles. However, the trail rises to 3460 feet and is #37 on the CHH list. To get to the very highest point on the ridge you will have to bushwhack slightly to the north of the trail.
Get on the New York City road, Route 9/10, that leaves Route 28 just west of Margaretville and passes long the south side of the Pepacton Reservoir. After about 3.5 miles, watch for the Millbrook Arena Road on the left. Turn here and drive about 9.5 miles to the Millbrook trailhead on the left. Park to begin your hike. Once you are on the Dry Brook Ridge Trail the hike is very straight forward as long as you stay on the marked trail. The trail starts up almost immediately over a small hill gaining 440 feet in the first .7 miles. It then drops almost 300 feet in the next .5 miles before starting up to the ridge. In the next mile the trail ascends to the ridge gaining 680 feet before leveling off at the top. For the next .9 miles the trail drops about 100 feet only to regain that elevation to the junction with the Huckleberry Loop trail coming up to the ridge from the west. Continue passed this point for another 1.4 miles and you will arrive at the best lookout over the reservoir at 4.7 miles into the hike. Before this lookout there are several others but this one is the best. When you are done, turn around and follow your route back to the car.
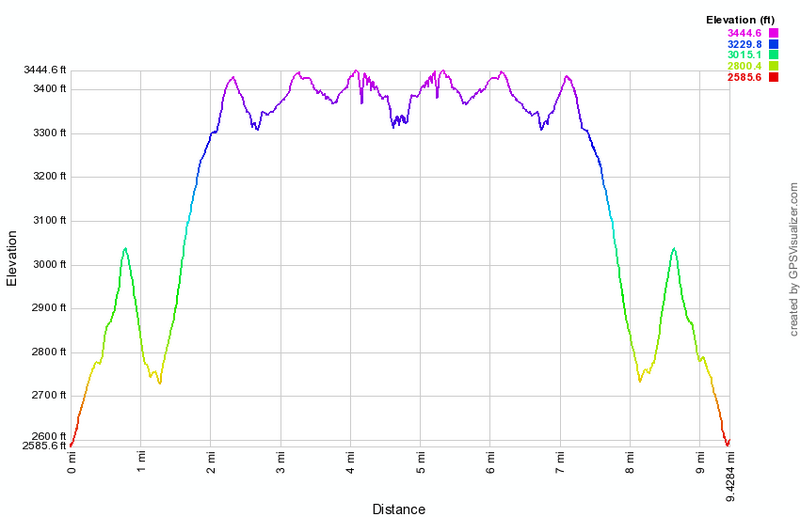
(The image above shows the profile of the hike. Remember that all vertical profiles are relative!)
Dry Brook: From Ploutz Road Trailhead
| Quick Look | ||||
|---|---|---|---|---|
| Difficulty | Round trip | Total climb | Internet Maps | |
| 5.5 mi. | 1380 ft. | AllTrails | ||

This route starts at the Ploutz Road Trailhead on the Huckleberry Loop Trail and ends at the Penguin Rocks lookout. The trail rises to 3460 feet on Dry Brook Ridge which is #37 on the CHH list.
Get on the New York City road that leaves Margaretville and passes long the south side of the Pepacton Reservoir. After about 3.5 miles, watch for the Millbrook Arena Road on the left. Turn here and drive about 6.5 miles to Ploutz Road on the left. This road is ROUGH but there is a small trail head parking area on the right as you drive up the road. Park here to begin your hike. The trail is a no nonsense affair that goes directly up to the ridge. In 1.25 miles it gains over 1000 feet and then virtually levels off on the ridge. Just out of the parking area you will cross over two parallel stone walls. These walls delineate a lane that probably lead from a barn to a pasture. Turn left along this lane and you will see that it opens into a large area bounded by stone walls. Trees have grown up in the pasture but it purpose is clear. At the top of the ridge the Huckleberry Loop Trail intersect the Dry Brook Ridge Trail. Turn left and walk about 1.4 miles to the lookouts. There are several different lookouts. The best is the last from this direction. There is a large stone ledge with several levels. The views into the hollow and over to the Pepacton are unobstructed. The only problem is a persistent haze in the valleys. Retrace your path back to the parking area.
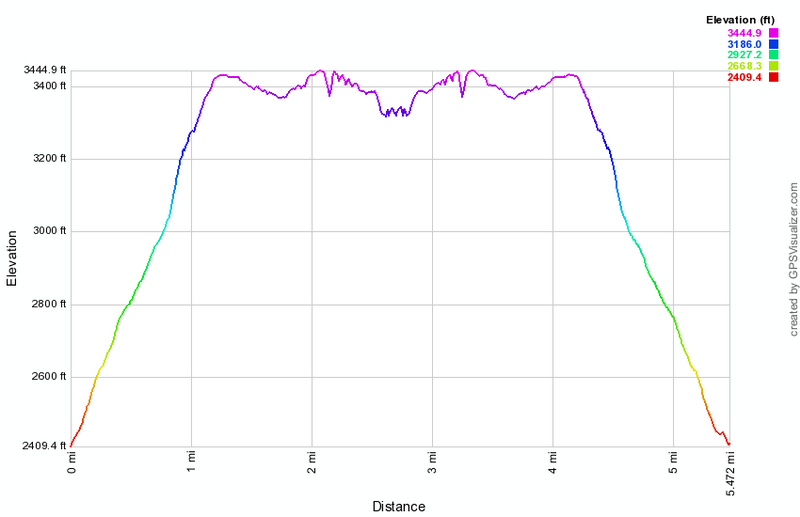
(The image above shows the profile of the hike. Remember that all vertical profiles are relative!)
Dry Brook: From Southside Trailhead
| Quick Look | ||||
|---|---|---|---|---|
| Difficulty | Round trip | Total climb | Internet Maps | |
| 9.3 mi. | 2525 ft. | AllTrails | ||

Travel west from Margaretville on Route 28. Turn left on BWS 10 and then immediately turn left on Southside Drive. Continue on this road until you pass fair Street on the left and see a "Dead End" sign. Just a little farther down the road on the right is the trailhead with room to park a couple of cars on the other side of the road. Turn around and park your car off the road just across from the trailhead. Cross the road to begin your hike as the trail starts climbing immediately gaining 525 feet in .65 miles for an average of a 15% grade. This would be much steeper but there is a series of switchbacks as the trail heads east along old woods roads. Watch for the very impressive and interesting rock ledges all along the first part of the trail. At .65 miles the trail turns south to travel along the west side of Pakatakan Mountain. At .75 miles the trail stays mostly on contour for a little while and then starts to climb again but more gently. At 1.15 miles the trail turns east and begins a steeper climb until 1.35 miles where it begins to head north still climbing but more moderately. At 1.5 miles the trail levels a little and then went through some turns which eventually result in a southeast heading for some time starting at 1.8 miles. Just after 2 miles, the trail passes by the summit of Patatakan Mountain at around 2500 feet and continues to rise toward Dry Brook Ridge. At 2.7 miles the German Hollow Trail comes in from the left. Not long after the German Hollow Trail junction is a "Lean-to" sign and the path to the German Hollow lean-to. The next section of the trail is one of the most frustrating in the Catskills. You reach a high point at 3.2 miles and then begin to descend on the trail which hugs the side of the hill. The trail loses 120 feet of elevation in the next .25 miles. At the bottom of the descent the trail turns right heading south and in .15 miles gains over 200 feet at a 26% grade. At the top of the climb is the trail junction with the Huckleberry Loop Trail that ascends from Hill Road. Continue straight ahead toward the lookouts which are about a mile away. The first .7 miles are relative flat with a series of short but steep climbs over the last .3 miles leading to the open rock face that makes up the lookouts. The lookouts give a greater than 180 degree view to the east, south and west including the Pepacton Reservoir. After taking in these views, get back on the main Dry Brook Ridge Trail and retrace your route to the car.
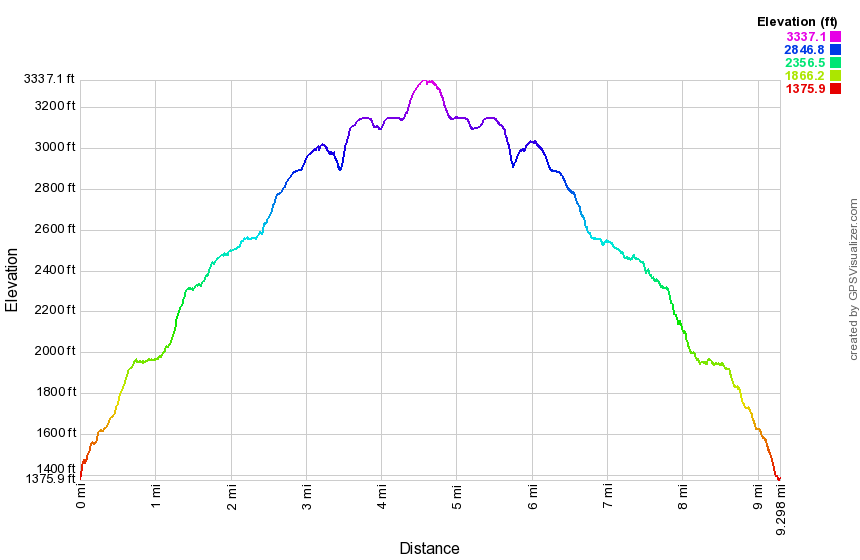
(The image above shows the profile of the hike. Remember that all vertical profiles are relative!)
Enfield Glen: Robert Treman State Park (NY)
| Quick Look | ||||
|---|---|---|---|---|
| Difficulty | Round trip | Total climb | Internet Maps | |
| 5.0 mi. | 1470 ft. | AllTrails | ||
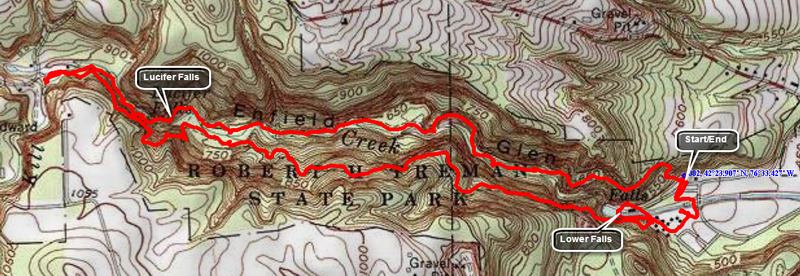
Head south on Route 13 from Ithaca, New York. Watch for signs for Buttermilk Falls State Park. Drive another 2 miles south and watch for signs for Robert Treman State Park and Park Lane. Park in the main parking area to begin the hike. The trails here parallel the glen and can be done in either direction. From the parking area head north to get on the trail that runs along the north rim of the glen. The first part of the hike has a steep ascent to the gorge rim and does not have many points of interest for over a half mile! Enfield Glen is not as developed as some other parks which means there are fewer people but also that the trails are more rugged with fewer defined viewpoints. Along the way you may be able to walk down to the stream bed and photograph some of the numerous small falls and rapids on the stream. Some places you should use your better judgment and stay on the trail as trying to get to the stream bed is dangerous! After a variety of falls and rock formations you will pass a bridge that crosses to the rim trail on the south side of the glen. Bypass this bridge to continue on to the main attraction, Lucifer Falls. Continue to limb up the path and various stairs toward the head of the glen. You will soon be walking next to a railing and a high rock wall. As you round a corner, Lucifer Falls comes into view. It is truly impressive even with low water levels and has an impressive drop. After taking in the view, walk passed this viewing area and another falls will come into view. Around another corner is a stone bridge which leads to the path on the other side of the stream. Beneath the bridge is a narrow slot which channels water into another falls. You will eventually arrive at the upper parking area where you can turn around and head back along the south rim. Before turning around you can visit an old mill and the falls that powered it. Head back to the beginning of the rim trail and climb UP to the south rim of the gorge. The trail flattens at the top but still has its downs and ups. In one place the trail drops down an impressive set of stone steps to the level of the stream. It follows the stream briefly before climbing back up to the rim. There are several viewpoints along the way with one offering a nice view down to Lucifer Falls. Near the end of the trail you can see down to the gorge and the Lower Falls. There is a swimming area for the park which sort of ruins the appearance of the falls. Below the Lower Falls a small dam holds back some water to form a pool for swimming. The gorge below this is not as high as further up but has some nice features. On the other side is some artificial stonework and a stone building. Return to the main path and follow it through an area where there are some cabins. To cross the stream there is a walkway for hikers but cars have to drive through several inches of water and ford the stream to cross!
 (The image at the left shows the profile of the out and back hiking route. Remember that all vertical profiles are relative!)
Fahnestock Mines
| Quick Look | ||||
|---|---|---|---|---|
| Difficulty | Round trip | Total climb | Internet Maps | |
| 4.0 mi. | 766 ft. | AllTrails | ||
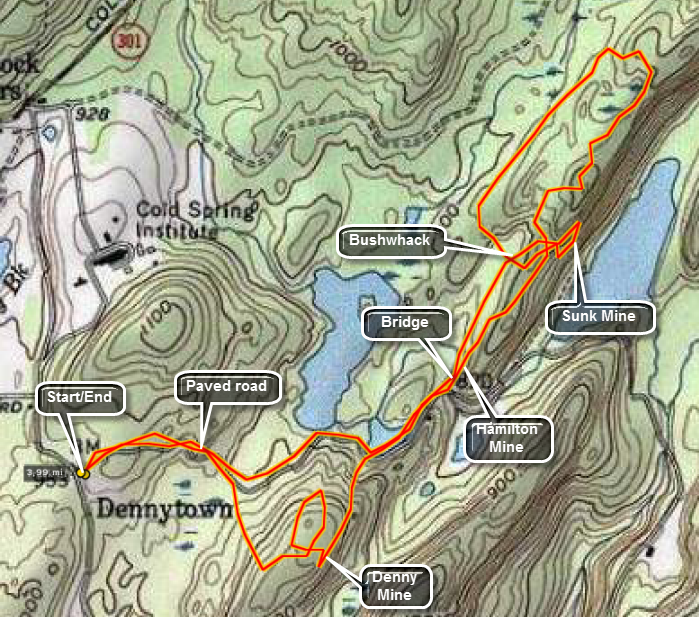 Fahnestock Park on the east side of the Hudson River in Putnam County is beautiful in its own right. It is also the site of several historic iron mines.
From Route 9D on the east side of the Hudson turn east on Route 301 and drive 5 miles to the intersection of Dennytown Road. Turn south and rive for less than a mile to the parking area on the left near the now closed Sunken Mine Road. Walk for about .3 miles on the road and then turn right into the woods to start the bushwhack to the Denny Mine. Head southeast for about .2 miles over a small hill. The Denny Mine is a large pit in the eastern side of the hill. From here head northeast and in another ,2 miles you should pick up the road/trail again. You will pass by a pond on the left. Continue on the road for only about .1 miles to where the road crosses a stream. Turn left on an unmaintained trail. Just after you start up the trail, the long open pits of the Hamilton Mine will be on your right. You can walk up to these pits to "explore" and photograph them. BE CAREFUL as many are filled with water and a fall into one would be a problem. Continue on the path for about .3 miles and then start heading to the left and over the top of the small ridge. The Sunk Mine is on the southeastern side of the ridge and is hidden. There is a steep and "slippery" descent to get down to the mine which consists of several open trenches and one large opening cut into the hillside. Inspect these features with caution as they can be precarious places. You can follow the unmaintained path back to the road and then walk the road back to the parking area. You can also follow the path to its end, only a short distance, where it intersects the blue 3 Lakes Trail. Turn left and follow this trail back to the road and then to the parking area.
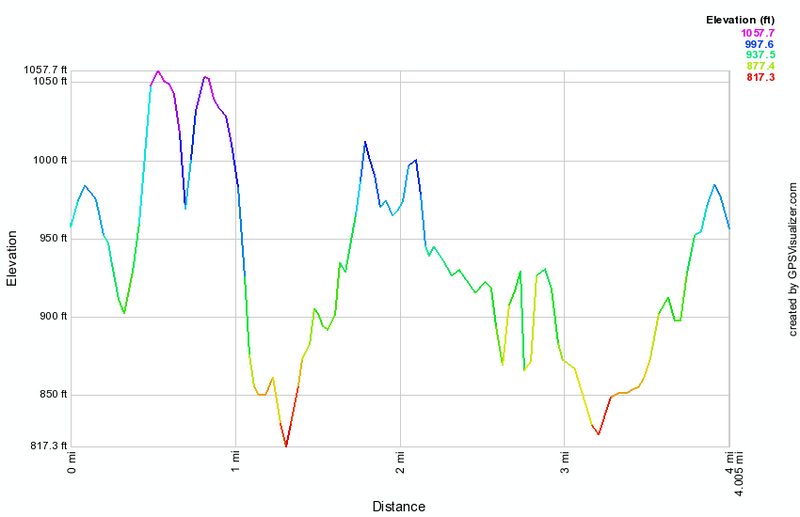 (The image at the left shows the profile of the hike. Remember that all vertical profiles are relative!)
Falls Creek
| Quick Look | ||||
|---|---|---|---|---|
| Difficulty | Round trip | Total climb | Internet Maps | |
| 2.3 mi. | 765 ft. | AllTrails | ||
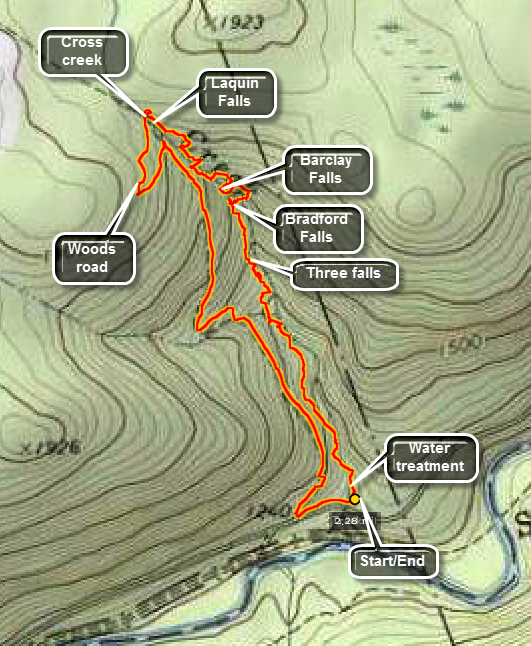
This hike is all bushwhack with no defined trails and few paths. It follows a creek through a gorge that is beautiful but can be dangerous. Although the hike is just over 2 miles it can take between 2 and 4 hours to complete! It requires scrambling over large rocks and tree stumps, crossing the stream several times and climbing up and down steep banks. Choosing the right water level can be tricky. Too much water makes hiking up the creek bed dangerous and tricky but too little water means the falls are not interesting. Take State Route 17 west from Binghamton to Waverley. At Waverley head south on State Route 220 through Towanda to Monroeton. Turned west on Route 414 to a small town called Powell. Turn left or south on Brocktown Road. Crossed two bridges and turn right onto Weston Road along Schrader Creek on your right. When the road forks, stay to the right. Cross the first narrow cement bridge and KEEP going to the second narrow cement bridge. It is a total of about 6.1 miles from the turn onto Weston/Schrader Creek Road. You will be in State Game Lands 36. Park on the right just before the bridge.
The water in Falls Creek drains from a plateau with an elevation of just under 2000 feet. The elevation of the parking area is about 1200 feet. In 1812 coal was discovered on top of the plateau. By 1856 the coal was being commercially mined and the town of Barclay was well-established on the plateau. After the coal ran out, the area became a center for logging and tanning. Most of the large hemlock forests were removed to feed this industry centered at the town of Laquin on Schrader Creek. Due to all this industry the waters of Falls Creek like many in the area are highly acidic. To counteract the acidity the state has built a water treatment facility on the creek just before the water flows into Schrader Creek. A dam diverts water through a cistern filled with limestone. The water turns a device that grinds the limestone which then dissolves in the water to neutralize the acid. The rocks in the upper part of the creek have a distinctive orange tint from the acid but those in the lower part show almost no discoloration. To hike simply head up the creek. Walk in the creek bed or on the left or right banks as you see fit. There are a few small rapids and then some falls with drops of six to twelve feet. At about .55 miles there are three small but pretty water falls in a row. Just passed the third falls you will begin to hear and then catch a glimpse of Bradford Falls. Bradford Falls is ENORMOUS compared to the ones below it! It is at least 70 feet tall. The water drops over the edge into a pool and the falls is bordered by the high stone walls of an impressive gorge. Work your way up the creek bed and you may be able to stand at the base of the falls. The next challenge is how to get out of the gorge to continue hiking upstream. Walk back down the stream until you see a spot where you can work your way up the right bank (looking upstream). Any route will be a STEEP climb up a slippery bank.You can use some of the trees to pull yourself up. Walk along the high ground briefly before descending back to the creek. Just above Bradford Falls is Barclay Falls. This waterfall is not as high as the one below but has a higher volume of water or at least a tighter chute. Climb back up to the higher ground and get ready for another descent to an area above a series of cascades and chutes on the creek below. This area has a steep bank and there may be no safe way to get down to the creek bed. Climb back up the bank and walk the high ground before starting to work your way down a steep bank toward another cascade. Once you make it down the steep bank there is a more level area. There is a ten foot cascade in this area. Walk along a little path along the creek and you will catch a glimpse of another falls. At Laquin Falls the stream passes over a receding ledge and splits to form at least two streams of water. The flow is not great as it is high on the creek but the falls is interesting. The stream is almost flat at this point with a greatly reduced volume of water. You will be at 1850 feet and near the top of the plateau. This is the end of the hike up the stream. Cross the creek here and walk along the high bank on the other side until you find a woods road. Follow the road downstream as it parallels the creek. The road becomes more defined as it descends. When it meets Schrader Creek Road turn left and walk across the bridge to the parking area.
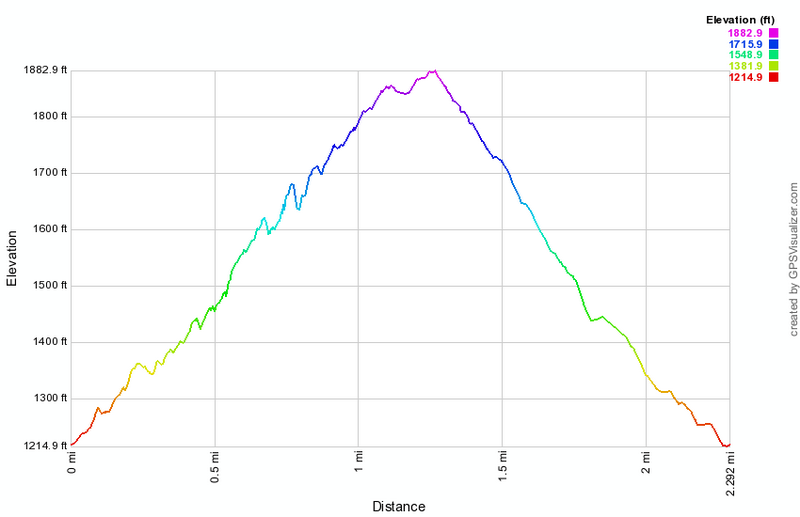 (The image at the left shows the profile of the hike. Remember that all vertical profiles are relative!)
Fawn Lake to Gifford Hollow
| Quick Look | ||||
|---|---|---|---|---|
| Difficulty | Round trip | Total climb | Internet Maps | |
| 9.2 mi. | 1460 ft. | AllTrails | ||
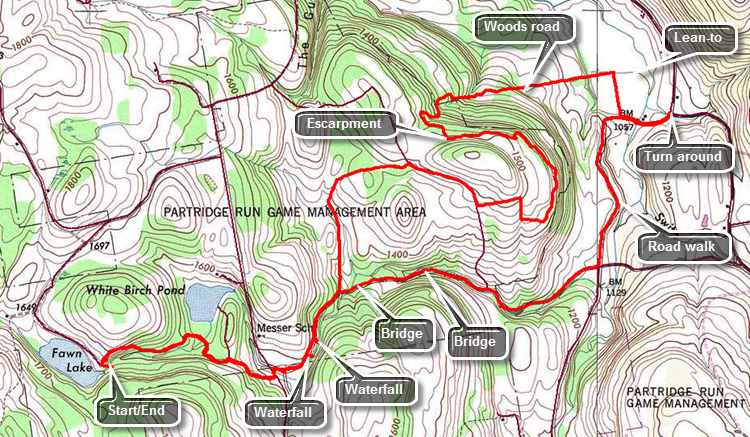
Follow Route 30 into Middleburgh and turn right to head east on Route 145 to Huntersland Road just out side of town. Turn left on Huntersland Road and drive 5.5 miles. Make a left on High Point Road. When High Point Road meets Sickle Hill Road after 3.8 miles, turn right and follow Sickle Hill Road for 1.6 miles to Fawn Lake Road. Turn right on Fawn Lake Road and drive to the parking lot at the end of the road near Fawn Lake. Begin the hike by following the trail as it leaves the upper end of the parking area on a snowmobile trail. After a slight ascent the trail begins to descend to a trail intersection at about .5 miles. Here a trail to the left branches off to White Birch Pond. Stay right on the Long Path and cross a stream on a bridge. At .8 miles the trail comes out to gravel Partridge Run Road. Turn right and walk down to Ravine Road at almost exactly one mile. The trail turns left and follows Ravine Road for a couple hundred feet before turning right again on Partridge Run Road. Continue on Partridge Run Road which is in pretty good shape but would require a high clearance vehicle to access. At 1.3 miles you may want to walk off the main trail to the right to inspect a waterfall on Partridge Run. At 1.6 miles Partridge Run Road turns to the right and descends to cross a bridge over the stream. The Long Path heads slightly left and comes to an open area. Continue passed a gate on the road and then a small pond on the right. A snowmobile trail comes in from the left. Continued ahead to a fork in the trail and bear left. The trail begins to ascend to an escarpment above Partridge Run. Unfortunately there are no viewpoints along the trail. At 2.4 miles intersect another woods road and begin to follow it until the trail turns off the road. The blazes are very clear in this area. At one point a switchback takes you along a wall of rock and then to a higher level on the escarpment. At 3.9 miles begin a switchbacked descent to the Switz Kill Valley. At 4.4 miles start to follow a woods road that parallels the edge of a field. The trail breaks out into the last field on your descent and straight ahead is the Gifford Hollow lean-to. This lean-to was finished in 2012 as an Eagle Scout project. At 5.1 miles make a sharp right and walk along the edge of a field to Gifford Hollow Road at 5.3 miles. Make a left turn onto the road and hike out to Switz Kill Road at 5.5 miles. You may now turn around and retrace your steps or try another return route. Turn around and walk back on Gifford Hollow Road passing the point where the trail intersected the road. After .75 miles, there is a sign for the Partridge Run Wildlife Management Area. Look closely when you get to this sign as what is left of Partridge Run Road turns to the right here. As you walk it is clear that at some point the stream was high enough to wash out a large part of the road. You may want to walk down to the streambed to get a closer look at the work the stream has accomplished. At about 7 miles there is a sign that says "Bridge Closed Ahead". The bridge is intact but has seen better days. At 7.2 miles cross the bridge and continue on the road until another bridge at 7.7 miles. Walk up a little hill and you will be back at the point where you were earlier in the hike just below the waterfall. Continue to walk west on Partridge Run Road until at about 8 miles you can see another waterfall on the stream below. You may want to visit this one as it has an unusual conformation. There is a drop of about 8 feet over a solid rock wall. Water shoots out from two places that have worn more deeply than the rest of the rock. Climb the bank to the road and continue out to Ravine Road. From this point on simply follow your route from earlier back to the parking area at Fawn Lake. where we had just turned around and see how e felt at that point.
 (The image at the left shows the profile of the hike. Remember that all vertical profiles are relative!)
Ferncliff Forest
| Quick Look | ||||
|---|---|---|---|---|
| Difficulty | Round trip | Total climb | Internet Maps | |
| 2.0 mi. | 285 ft. | AllTrails | ||

Ferncliff Forest is a privately owned nature and historical preserve near Rhinecliff, NY. The land at one time was owned by the Astors. Presently it has a nice pond, two lean-tos, some ruins, and a tower. The tower is an International Derrick that was relocated from South Carolina several years ago. From Rhinecliff head south on River Road. When the road splits, bear left on Mount Rutsen Road and park in the first lot on your right. From Rhinebeck head north on Route 9. Turn left onto Montgomery Street which becomes Mount Rutsen Road. Drive about 1.8 miles from Route 9 and park at the lot on your left. From the parking area follow the wide road to the pond. There may be brochures at the kiosk near the parking area but maps are hard to come by. East Tower Trail and West Tower Trail both go to the tower but are NOT well marked. Follow a trail or some paths north from the pond and then west and you should run into East Tower Trail. Follow this to the tower. The tower has some fantastic views of the Hudson River, Kingston Rhinecliff Bridge and the Catskills. There are some interesting building below and on the western shore of the river. There is no view from the hill without climbing the tower. Once you have taken in the views and taken some pictures, return to the ground and head south on the West Tower Trail. Heed the sign along the way that tells you to return to the parking area by the Circle Trail. The Circle Trail brings you to the shore of the pond. You may turn left or right to get back to the road that leads back to the car.
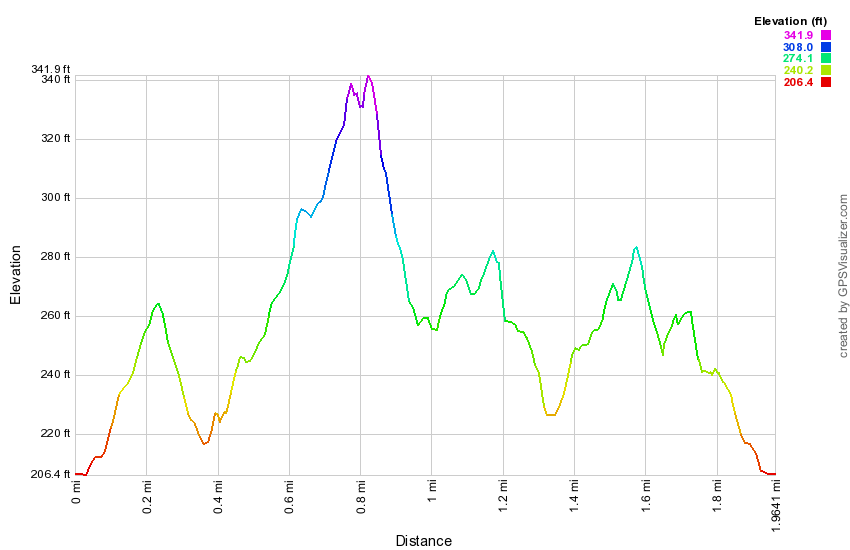 (The image at the left shows the profile of the hike. Remember that all vertical profiles are relative!)
Fillmore Glen
| Quick Look | ||||
|---|---|---|---|---|
| Difficulty | Round trip | Total climb | Internet Maps | |
| 5.0 mi. | 1650 ft. | AllTrails | ||
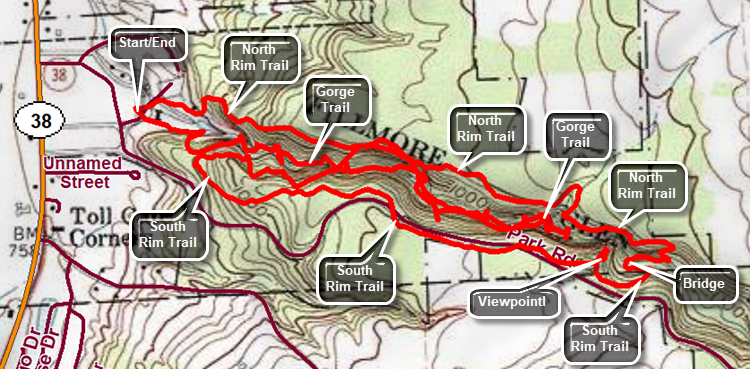
Fillmore Glen State Park is located in Moravia, NY on Route 38. The glen has many interesting geological features and historical significance. The park is named after the 13th President of the United States, Millard Fillmore, who was born in a small cabin about 5 miles from the park. A replica cabin on the grounds of the park represents the original cabin. Three main trails take hike through the gorge and along the north and south rims. Fillmore Glen is reminiscent of Watkins Glen, Enfield Glen and others but is less visited. The stream that now flows throw the glen is listed as intermittent and a visit may be more interesting when the water level is high.
As you enter the park, be sure to pick up a map that shows the various features and hiking trails. Park in the lot in front of the visitors center which has indoor picnic table and restrooms. To begin your hike walk to the right of the building toward the swimming area. There is a bridge upstream from the hiking area with signs on the near side directing you to the various trails. Turn right and walk up a long set of old stone steps. At the top of the steps, notice the very large oak tree to the left of the trail. The trail is flat for a short distance and the descends some steps to get nearer to the stream bed. At the bottom of the steps look straight ahead to see the "Cowsheds". Here the less resistant shale has been eroded away leaving the more resistant limestone above it. As you walk along the trail you will see several small water falls. The trail crosses and recrosses the stream on eight different bridges. At one point another stream enters the glen on the left side and pours down over the limestone into the main stream. This stream, like the main stream in the glen, is intermittent. Keep an eye on the stream bed and notice that in several places it is broken into large blocks. As of July 4, 2019, the Gorge Trail is closed at bridge 7 as the trail beyond that is impassable. Repairs are underway. The complete Gorge trail is about 1.5 miles. Turn around at bridge 7 and walk back to the steps that lead up to the junction of the Gorge Trail and South Rim Trail. Walk straight ahead and then turn left up the South Rim Trail. The initial part of the trail ascends at a 13% grade but this last for only about a quarter of a mile at which point the trail levels some. There is not very much to see along this trail until just before the descent to the gorge. Watch for a small "detour" on your left that takes you to a bridge and a viewpoint. The viewpoint is better when there are no leaves on the trees. To the right of the viewpoint is "The Pinnacle" where a vertical piece of rock is pulling away from the walls of the glen. Continue on the trail turning left when the blazes indicate. Walk down hill to bridge 8 and notice the lean-to on the left side of the trail. Cross the bridge and follow the red-blazed North Rim Trail. Over .2 miles the trail gains about 150 feet on a 14% grade. At the top of the climb there is another bench. Turn left to return to the car as the trail meanders some along the rim of the glen. It gains a little elevation in some spots but is primarily downhill. At one point the trail meets a small stream that had gut a gorge of its own which is perpendicular to the main glen. Walk upstream for a short distance to a bridge to cross this stream. This is the stream that you may have seen entering the main glen from the Gorge Trail. Continued on the trail and as you neared the end of the trail you will some to a series of steps which are wooden boxes filled with dirt and gravel. The wooden construction may not last as long as stone but they are much smoother and better looking. Descended the steps to the swimming area. Turned right and walk across a small lawn bearing slightly left to a foot bridge across the stream. Next to the foot bridge is a ford across the stream for cars to cross from one side of the park to the other. From hear walk back to your car. If you want, visit the cabin just to the left of the visitors center.
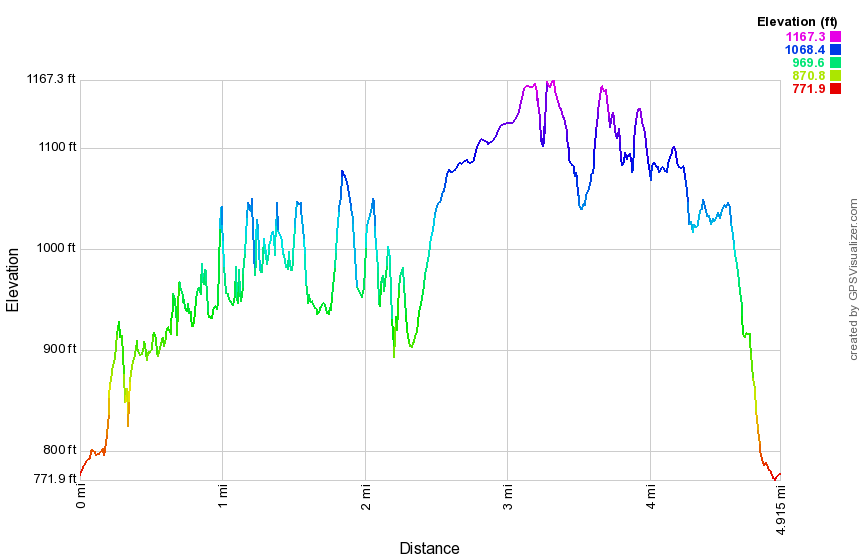 (The image at the left shows the profile of the hike. Remember that all vertical profiles are relative!)
Finger Lakes Trail: Apex Bridge to Chase Brook Road
| Quick Look | ||||
|---|---|---|---|---|
| Difficulty | Round trip | Total climb | Internet Maps | |
| 5.1 mi. | 570 ft. | AllTrails | ||
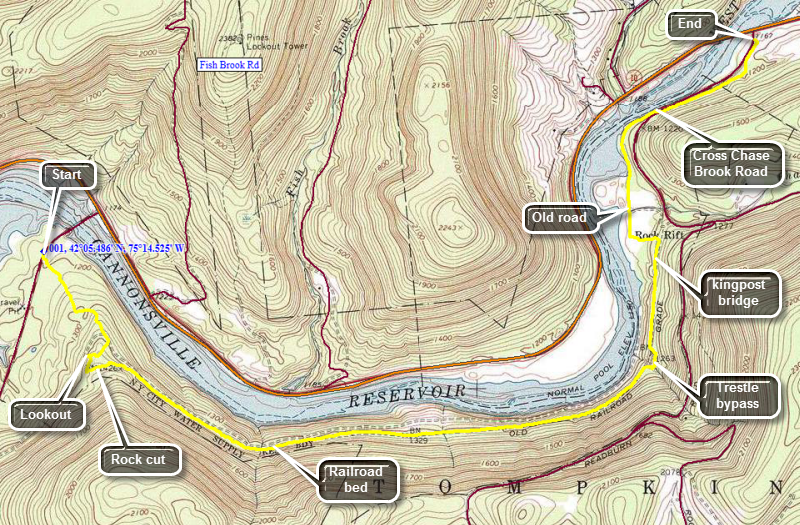 The Finger Lakes Trail starts in Allegheny State Park on the New York - Pennsylvania border and extends 576.5 miles to end in the Catskill Park at the beginning of the Table Peekamoose Trail off the Phoenicia East Branch Trail near the Denning trailhead. There are other side trails which increase the length of the trail system. Four hundred miles of this trail is also part of the Scenic North Country Trail. The Finer Lakes Trail Conference celebrated its 50th Anniversary on June 2, 2012. To commemorate the occasion the Conference set up a series of hikes that would cover the entire length of the trail. Hikes varied in length and difficulty from 4 to 14 miles. The last section is the one described here and is mostly a road walk from The parking area on Black Bear Road (Wild Meadow Road) near Round Pond to the eastern terminus of the trail 1.2 miles from the Denning trailhead.
This hike works well with a car spot since the round trip is over 10 miles one way! Depending on where you are coming from there are a number of ways to get to Chase Brook Road where you will park one car. Chase Brook Road is about 7 miles south of Walton on Route 10. You can also take the Cadosia exit from State Route 17 and go north on Route 268 to Route 10. Where Route 268 meets Route 10 is the beginning of the hike where you will park the second car. Park a car in the parking area where Route 10 meets Chase Brook road. Drive in the second car back to Route 268 and cross the Apex Bridge. park near the stop sign on the right side of the road but do not block the access to the reservoir road. Cross the road to begin the hike. The first .7 miles of the hike winds through mixed hardwood and evergreen forest gaining about 360 feet in the process. Some of the trail is one old woods roads. At the .7 mile mark you can walk off the trail to the right to a small ledge with a limited view. Back on the main trail a very short walk will bring you to a had left turn. You are now on the railroad bed of the Ontario and Western railroad and will stay on the rail bed for some time. You will immediately notice that you are passing through a rock cut and that there are no visible drill marks on the rock. The quarrymen who made the cut used the natural fissures in the rock. Near the end of the cut on the right side is a stone wall laid up to hold the bank in place. The rocks are covered with moss but the workmanship is still evident. For the next 2.5 miles you will be walking along the flat and straight rail bed. It can be wet in places but the trail is well marked. If you keep looking to the left you will see the foundations of a springhouse around the 2 mile mark. The water here is plentiful and clear. At 3.25 miles the trail leaves the railroad bed to the right and crosses a stream on a small bridge. This was necessary since the railroad crossed a trestle in this area and the trestle is no longer there! After this point the railroad bed has collapsed in several places but the trail is easy to follow. You will cross two more bridges. The last bridge is a kingpost bridge over a small stream that swells greatly with heavy rain. At 3.85 miles you will be approaching Chase Brook Road. Watch for FLT signs pointing to the left. Turn left and walk downhill to an old road. At the T, turn right and follow the old road. This can be difficult since the blazes are few and far between and the knotweed has overgrown the trail in many places. After you clear the knotweed, you will come to a grassy area and will see a gate at the top of a small hill. Walk up to the gate and across Chase Brook Road. Then trail continues on the other side and will take you to the end of Chase Brook Road where you parked a car.
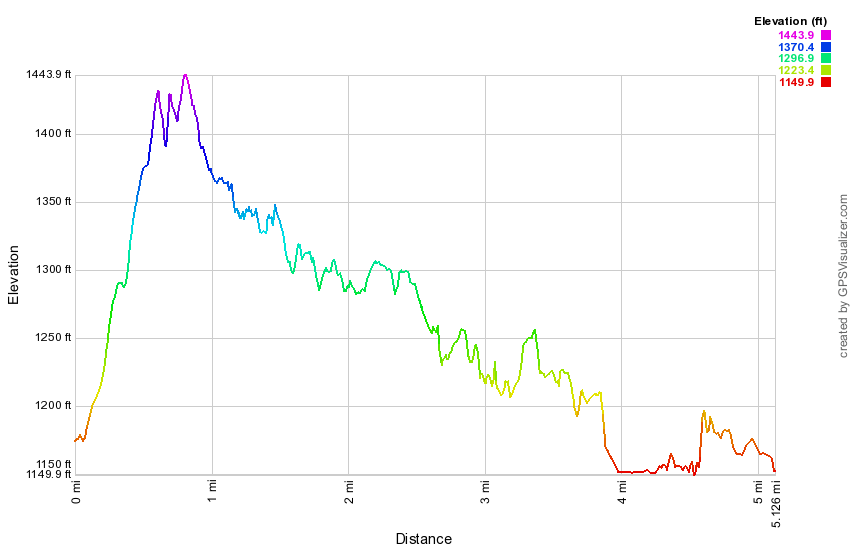 (The image at the left shows the profile of the hike. Remember that all vertical profiles are relative!)
Finger Lakes Trail: Apex Bridge to Fletcher Road
| Quick Look | ||||
|---|---|---|---|---|
| Difficulty | Round trip | Total climb | Internet Maps | |
| 12.3 mi. | 2480 ft. | AllTrails | ||
_map.png) The Finger Lakes Trail is a primitive footpath that starts in Allegheny State Park on the New York - Pennsylvania border and extends 576.5 miles to end in the Catskill Park at the beginning of the Table Peekamoose Trail off the Phoenicia East Branch Trail near the Denning trailhead. There are other side trails which increase the length of the trail system. Four hundred miles of this trail is also part of the Scenic North Country Trail. The Finer Lakes Trail Conference celebrated its 50th Anniversary on June 2, 2012. To commemorate the occasion the Conference set up a series of hikes that would cover the entire length of the trail. Hikes varied in length and difficulty from 4 to 14 miles. The last section is the one described here and is mostly a road walk from The parking area on Black Bear Road (Wild Meadow Road) near Round Pond to the eastern terminus of the trail 1.2 miles from the Denning trailhead.
The Finger Lakes Trail is a primitive footpath that starts in Allegheny State Park on the New York - Pennsylvania border and extends 576.5 miles to end in the Catskill Park at the beginning of the Table Peekamoose Trail off the Phoenicia East Branch Trail near the Denning trailhead. There are other side trails which increase the length of the trail system. Four hundred miles of this trail is also part of the Scenic North Country Trail. The Finer Lakes Trail Conference celebrated its 50th Anniversary on June 2, 2012. To commemorate the occasion the Conference set up a series of hikes that would cover the entire length of the trail. Hikes varied in length and difficulty from 4 to 14 miles. The last section is the one described here and is mostly a road walk from The parking area on Black Bear Road (Wild Meadow Road) near Round Pond to the eastern terminus of the trail 1.2 miles from the Denning trailhead.
This hike works best with a car spot since the round trip is over 12 miles! Parking one car at the end of Fletcher Road and beginning the hike at the Apex Bridge is one option. The hike described here is a loop using some roads on the return trip. Depending on where you are coming from there are a number of ways to get to Fletcher Road where you will park one car. Perhaps the best way to get there is to take the Cadosia exit from State Route 17 and go north on Route 268 to Route 10. Where Route 268 meets Route 10 is the beginning of the hike where you will park the one car in the lot at the end of the bridge. Drive south on Route 10 about 2 miles and turn right on Dryden Road. Drive north on Dryden Road and turn left after 1.5 miles on Finch Hollow Road. Turn left on Fletcher Road which is a gravel road that turns to a woods road with enough clearance for most cars. Park near the end of the road. When you get back to the Apex Bridge and are parked in the lot, walk across the road, turn left and walk north on Route 10 a very short distance to the first section of guardrail. This is where the trail starts! The beginning of the trail is rather steep but it soon levels off and begins to descend a little. The trail rolls through some gullies and finally at 1.25 miles turns left onto the woods road that once acted as an access road to the tower. The climb to the tower is steep in places but the crew who constructed the trail built in a few switchbacks to help. Over the next 1.5 miles you will be headed due north gaining a total of over 1400 feet from the parking area. The difference in elevation from the point where you turned onto the woods road is over a 1000 feet and several ascents are more than a 25% grade. At 2.8 miles you will be at the base of the tower. The bottom flights of stairs have been removed from the tower to discourage anyone from ascending and the cab is in disrepair. There is a plan to restore the tower which would be a wonderful project. The next part of the trail heads passed the tower and starts to descend. Although the trail generally loses elevation there are times when it climbs again. At about 3.1 miles the trail joins a dirt road and follows it to a bluestone quarry at 3.4 miles. Stone is still being cut here but it is not in operation every day. Continue on the road through the other side of the quarry. Soon there is a turn to the right which may not marked but is pretty obvious. Continue to follow various woods roads for the most part. Occasionally the trail will cut through the woods to get to the next road. At 3.7 miles the trail heads south instead of west and remains on then ridge where the elevation is still over 2100 feet. At 4.2 miles the trail again turns west and begins a steep descent toward Faulkner Road. Over the next .7 miles you will lose 750 feet of elevation for an average grade of 25%. You will reach the junction with the previous trail at 4.9 miles. The trail is now marked with blue blazes. Continue straight ahead on the main trail. You will descend and cross Faulkner Road at 5.4 miles. Continue across the road on the trail and follow it through some wet areas until it eventually meets Dryden Road at about 6.0 miles. Turn right on the road and walk to a Y. Turn left on Finch Hollow Road and walk short distance before turning left on Fletcher Road. This gravel road now begins an ascent and eventfully turns into a woods road in good condition. You will pass only one house on the way. A stream flows on the left side of the road. Walk about .75 miles on Fletcher Road gaining over 400 feet until you emerge in an open area where you may have parked another car. The Finger Lakes Trail goes straight ahead and into the woods. This is your turn around point if you do not have another car. Turn around and walk back down Fletcher Road, turn right on Finch Hollow Road and right on Dryden Road. At 9.4 miles you will reach the point where the trail enters the woods on the left side of Dryden Road. Continue on Dryden Road for another .8 miles until it meets Route 10 at 10.3 miles. Turn left on Route 10 and walk south on the wide shoulder for 2 miles back to your car at the Apex Bridge parking area. This return route is MUCH easier than the hike out as it is only 4.5 miles instead of 7.7 miles and is primarily downhill or flat.
_gra.png) (The image at the left shows the profile of the hike. Remember that all vertical profiles are relative!)
(The image at the left shows the profile of the hike. Remember that all vertical profiles are relative!)
Finger Lakes Trail: Arctic China SF
| Quick Look | ||||
|---|---|---|---|---|
| Difficulty | Round trip | Total climb | Internet Maps | |
| 7.1 mi. | 1360 ft. | AllTrails | ||
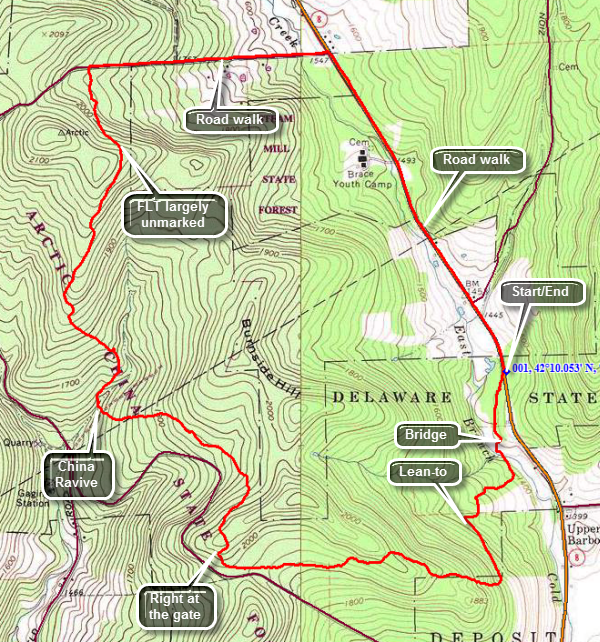 The Finger Lakes Trail starts in Allegheny State Park on the New York - Pennsylvania border and extends 576.5 miles to end in the Catskill Park at the beginning of the Table Peekamoose Trail off the Phoenicia East Branch Trail near the Denning trailhead. There are other side trails which increase the length of the trail system. Four hundred miles of this trail is also part of the Scenic North Country Trail. The Finer Lakes Trail Conference celebrated its 50th Anniversary on June 2, 2012. To commemorate the occasion the Conference set up a series of hikes that would cover the entire length of the trail. Hikes varied in length and difficulty from 4 to 14 miles. The Trail Conference continues to improve the trails and to move sections from roads to trails.
This hike can be done with a car spot, as an out and back or a loop with road walk. The route described here is the loop! Take exit 84, the Deposit exit, on State Route 17. Drive north about 9 miles on Route 8. Watch for signs for Steam Mill State Forest and a parking area on the right. The Finger Lakes Trail crosses here and you will start your hike by crossing Route 8 and walking just slightly to the right. The Finger Lakes Trail is not well marked here but you will pick up the blazes once you walk down the bank. After a short walk through the trees, the trail meets a woods road which takes you down to a stream crossing. A rat5her impressive bridge will get you across the stream as you enter some evergreens on the other side. The trail initially heads south and then west but eventually turns north and heads for Shears Road. For the next .7 miles the trail continues to gain elevation and heads south. At just over 1 mile into the hike it swings west and continues to climb to 1.5 miles. From here the trail descended gradually to an area near Dunbar Road where there is a camping area. When you come to a gate in the middle of the woods, turn right at the Y and you will eventually see some white blazes. The blazes on this entire section of trail are very old. Some blazes are covered by brush and in many areas there are quite far apart. The trail starts to gain elevation to 2.35 miles at which point it starts to drop. At 3 miles you will pass a sign explaining that the area had been planted with hardwoods in the 1903's to create a mixed forest. The hardwoods have now taken over and the softwoods ware being logged to create a hardwood forest. There is an open area on your left from the logging. The trail drops from about 2100 feet to 1650 feet over the next mile as it descends into China Ravine. The ravine itself is wide and impressive but has only a small stream running through it. There is a single plank "bridge" across the stream. Cross the stream and head up the trail parallel to the ravine. By now you will be headed north and the ravine will soon be behind you. The trail gains almost 500 feet over the next 1.2 miles. At times you will be walking through a pine forest with many smaller trees springing up on the forest floor. The smaller trees are crowding the trail and can be a little prickly. There are few if any blazes along this part of the trail. At about 4.5 miles you will enter some hardwoods and a grassy area. Again there are no blazes even when the trail came to another Y. Head right and down a hill toward Shears Road. I found one blaze along the way. When you break out onto Shears Road you may notice that there is no sign to indicate that there is a trail and the "mouth" of the trail has overgrown. Just across from the trail is room for one car on the side of the road. Turn right on Shears Road and walk .75 miles downhill to Route 8. Just after the sign for Arctic State Forest you will see when the Finger Lakes Trail enters the woods on the left along a road and heads north to Masonville. When you get to Route 8 turn right and walk the 1.35 miles back to the parking area.
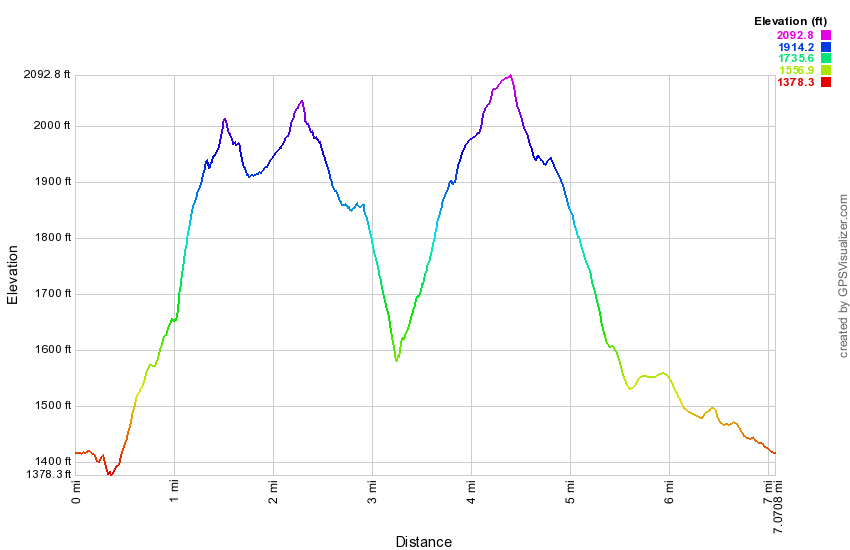 (The image at the left shows the profile of the hike. Remember that all vertical profiles are relative!)
Finger Lakes Trail: Bainbridge to Case Road
| Quick Look | ||||
|---|---|---|---|---|
| Difficulty | Round trip | Total climb | Internet Maps | |
| 5.3 mi | 925 ft. | AllTrails | ||
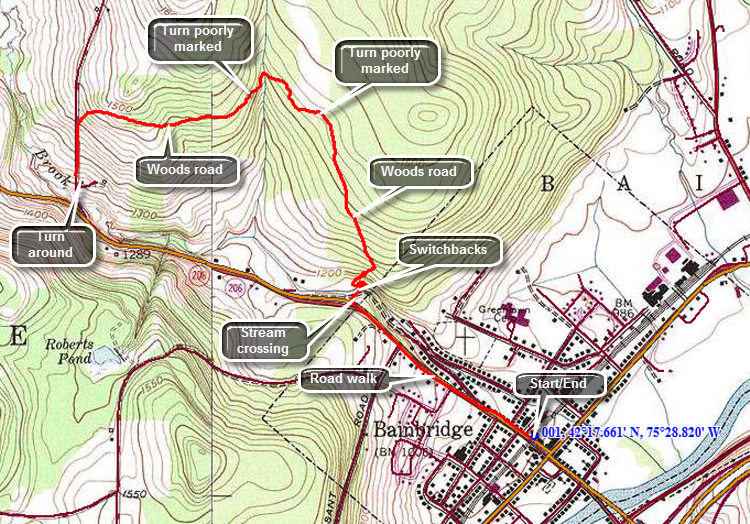 The Finger Lakes Trail starts in Allegheny State Park on the New York - Pennsylvania border and extends 576.5 miles to end in the Catskill Park at the beginning of the Table Peekamoose Trail off the Phoenicia East Branch Trail near the Denning trailhead. There are other side trails which increase the length of the trail system. Four hundred miles of this trail is also part of the Scenic North Country Trail. The Finer Lakes Trail Conference celebrated its 50th Anniversary on June 2, 2012. To commemorate the occasion the Conference set up a series of hikes that would cover the entire length of the trail. Hikes varied in length and difficulty from 4 to 14 miles. The Trail Conference continues to improve the trails and to move sections from roads to trails.
This hike can be done with a car spot but the round trip hike is only 5.3 miles! The route described here is a an out and back! There is no parking on Case Road which is why the hike starts in Bainbridge and proceeds 'backwards". The biggest problem with this hike is that the trail is VERY poorly marked. Trying to follow the blazes can be frustrating in BOTH DIRECTIONS! Go to Bainbridge and park in the municipal parking lot near the old train station. Walk northwest on Route 206 using the village sidewalks and then the shoulder of the road. At .7 miles turn right off the road at the "Welcome to Bainbridge" sign. The trail descends to Newton Brook which should be easy to cross except in the highest water conditions. The small gorge that the brook has carved here is interesting. After crossing the brook the trail begins to ascend the steep bank on the other side through a series of short switchbacks. At about 1 mile the trail meets a woods road and turns left. Initially the trail is highly eroded but once it flattens out the surface becomes easier to walk. The blazes are initially placed at and appropriate distance but the further you go the fewer they become. At around 1.5 miles the trail breaks out into an open meadow and the blazes...completely disappear! Walk nor more than twenty feet on the path and then cut through the weeds to the left where there may or may not be a path. Walk to the treeline and look for white blazes in the woods. If you are lucky, you will pick up the blazes and be able to follow them! The trail initially skirts the meadow passing through the trees at the edge. It then turns left on a woods road and descends again to Newton Brook at 1.8 miles. The brook is even smaller in this location. After crossing the brook the trail ascends the far bank, wanders through some trees and emerges on a woods road where it turns left. BE SURE to mark this spot in your mind as the blazes on the return trip are hard to spot! Continue on the woods road for about .5 miles to 2.4 miles where the trail turns left off the road and descends to Case Road. Be prepared for some VERY muddy spots along the road as ATV usage is high in the area. At Case Road turn left and walk downhill for about .2 miles to where the trail meets the road coming from the other direction. You will have walked about 2.7 mile if you did not make any wrong turns. At this point you may reverse course and head back to Bainbridge. You may also take the high water bypass route by continuing to walk down Case Road for .1 miles to the junction with Route 206. Turn left on 206 and walk 1.6 miles back to the car.
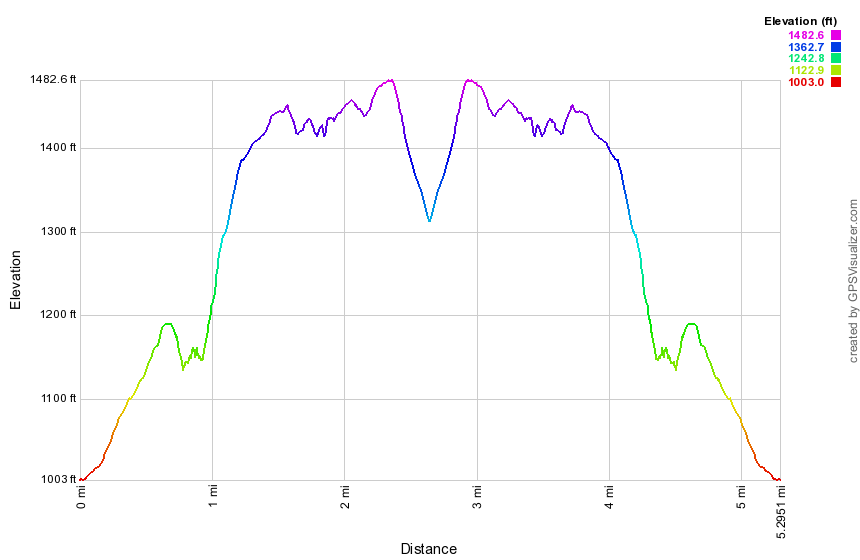 (The image at the left shows the profile of the hike. Remember that all vertical profiles are relative!)
Finger Lakes Trail: Bainbridge to Masonville
| Quick Look | ||||
|---|---|---|---|---|
| Difficulty | Round trip | Total climb | Internet Maps | |
| 16.1 mi | 1695 ft. | AllTrails | ||
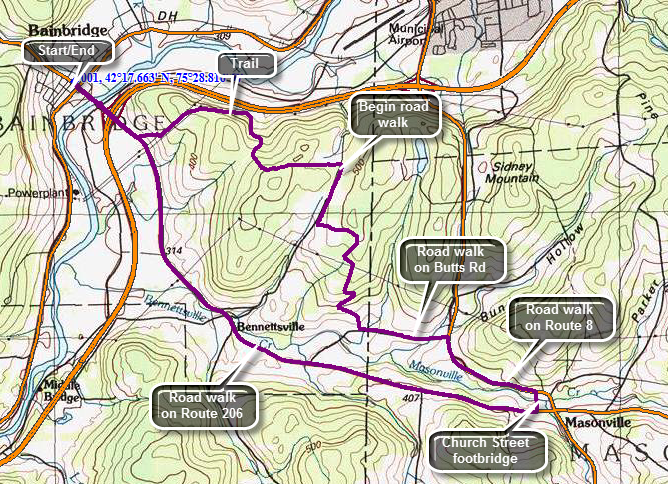 The Finger Lakes Trail starts in Allegheny State Park on the New York - Pennsylvania border and extends 576.5 miles to end in the Catskill Park at the beginning of the Table Peekamoose Trail off the Phoenicia East Branch Trail near the Denning trailhead. There are other side trails which increase the length of the trail system. Four hundred miles of this trail is also part of the Scenic North Country Trail. The Finer Lakes Trail Conference celebrated its 50th Anniversary on June 2, 2012. To commemorate the occasion the Conference set up a series of hikes that would cover the entire length of the trail. Hikes varied in length and difficulty from 4 to 14 miles. The Trail Conference continues to improve the trails and to move sections from roads to trails.
This hike should be done with a car spot since the round trip hike is 16.1 miles! The route described here is a loop using roads for the return trip! Go to Bainbridge and park in the municipal parking lot near the old train station. Walk southeast on Route 206 crossing the Susquehanna River and coming to the traffic circle. Continue through the circle staying on Route 206 and passing under I-88. The trail will cut off to the left just after a yellow house on the right about a mile into the hike. The trail goes through a field and then begins to ascend a hill. You will pass a trail register as you climb the hill. At about 1.25 miles you will to a power line right-of-way where the trail all but disappears. Depending on the season there can be some difficult weeds to push through accompanied by some nasty thorns. At about the time you will want to give up toy will come to an access road to the power lines where the vegetation diminishes. There are few markings along the way. At about 1.6 miles you will come to the top of the climb near a hill labeled "Camel's Hump". The trail follows an access road which cuts under some of the power lines and then parallels another. If the day is clear you should be able to see a nice view of the river valley and the Sidney Airport. The traffic you hear is on I88. Follow the access road under the power lines. until you start to descend a little. At 2.3 miles the trail turns south off the access road and begins to ascend.T his part of the trail is "highly eroded" and quickly deteriorates into a streambed with steep banks. You can try walking on the narrow path along the high banks but both side are undercut and the path often collapses. The best plan may be to give up and simply walk in the streambed. After .85 miles and a gain of 450 feet the trail levels off and becomes a woods road. The road heads due east toward Neff hill Road with a few small ascent and descents. At about 4 miles into the hike, the trail ends on Neff Hill Road where you should turn right. The rest of the hike will be all on roads! Walk up a small hill and then start a descent to Highland Acres Road at 4.7 miles. A brief uphill walk brings you to a right turn on Houck Road Extension. The next turn is a left on Houck Road. Over the next 1.2 miles you will drop about 400 feet to Butts Road. Along the way there are some nice views of the countryside. Turn left onto Butts Road at the bottom of the hill to head into Masonville. At the junction with Route 8 turn right to head toward Masonville which is 1.2 miles away. As you approach Masonville, turn right on Church Street and walk to the footbridge over Masonville Creek. Walk across the bridge and to the end of Church Street. Turn right on Route 206 and head back to Bainbridge. At 11.6 miles you will be at the intersection of Butts Road and Route 206. The rest of the hike back to Bainbridge is mostly downhill. There were some nice views along the way. At 15.1 miles you will at the point where you turned into the field to follow the trail much earlier in the day. It is about a mile back to the car.
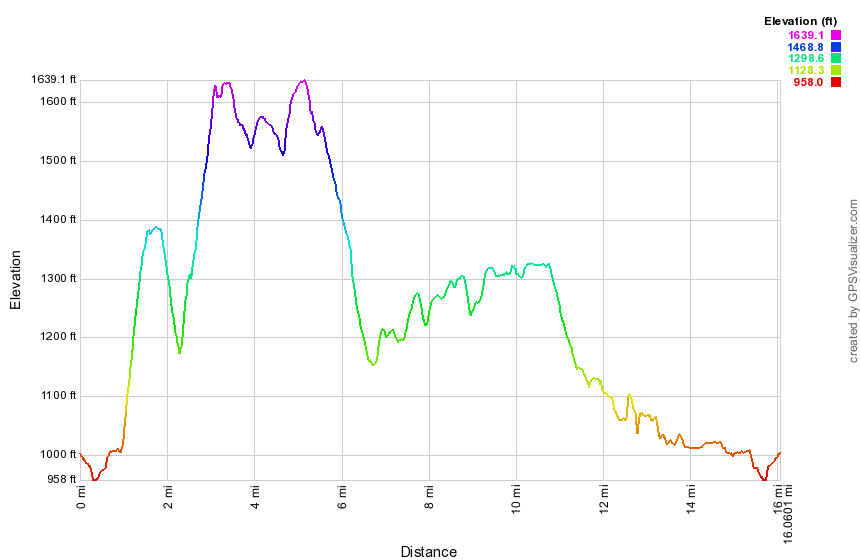 (The image at the left shows the profile of the hike. Remember that all vertical profiles are relative!)
Finger Lakes Trail: Baker Schoolhouse Road to Telephone Road
| Quick Look | ||||
|---|---|---|---|---|
| Difficulty | Round trip | Total climb | Internet Maps | |
| 12.8 mi | 1250 ft. | AllTrails | ||
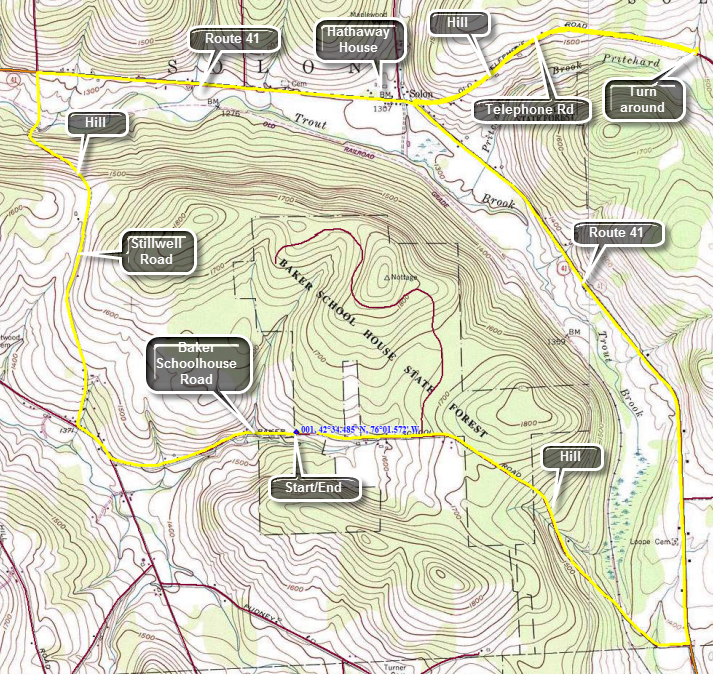 The Finger Lakes Trail starts in Allegheny State Park on the New York - Pennsylvania border and extends 576.5 miles to end in the Catskill Park at the beginning of the Table Peekamoose Trail off the Phoenicia East Branch Trail near the Denning trailhead. There are other side trails which increase the length of the trail system. Four hundred miles of this trail is also part of the Scenic North Country Trail. The Finer Lakes Trail Conference celebrated its 50th Anniversary on June 2, 2012. To commemorate the occasion the Conference set up a series of hikes that would cover the entire length of the trail. Hikes varied in length and difficulty from 4 to 14 miles. The Trail Conference continues to improve the trails and to move sections from roads to trails.
This hike is best done with a car spot since it is 6.24 miles one way for a total of 12.8 miles. The route described here is loop and is all road walking! Take Route 26 north from Whitney Point. When Route 41 splits off from Route 26 follow it north and west for about 4.8 miles. Watch for Baker Schoolhouse road on the left. Turn left and drive about .2 miles east to where the Finger Lakes Trail crosses the road. Turn around and park on the south shoulder of the road. The trail through the forest is closed after one mile so head east on Baker Schoolhouse Road toward Route 41. The road is a back road but there can be quite a bit of traffic. The first .8 miles are slightly uphill while the final 1.5 miles is downhill. Turn left on Route 41 and headed north on the wide shoulders. The next 3 miles are almost flat and the road is very straight. At 5.2 miles you will be at the junction of Route 41 and Telephone Road near Solon. Turn right onto Telephone Road and walk uphill for about .7 miles where the road levels and then starts to go downhill a little. For the next .8 miles the road descends to the point where the trail enters the woods. If you have a car parked here, your work is done. If you have only one car, turn around to start back. At the intersection continue straight ahead through Solon on Route 41 to start a loop rather than a simple out and back. In Solon you will pass by the Hathaway House which was built in 1844 by Major-General Samuel Gilbert Hathaway, the manor house was the hub of his eight thousand acre estate as well as his political career. The mansion looks as it did for more than 150 years. The General built well with walls of stone 2 feet thick. Today it is a catering house. From the intersection it is another 1.8 miles along straight and flat Route 41 to Stillwell Road. Make a left and immediately start another climb which lasts for about .6 miles until the road levels and then starts to descend to the intersection with the McGraw Marathon Road. Make a left and hike only about a quarter mile before turning left again on Baker Schoolhouse Road. Hike a little more than a mile uphill back to the car.
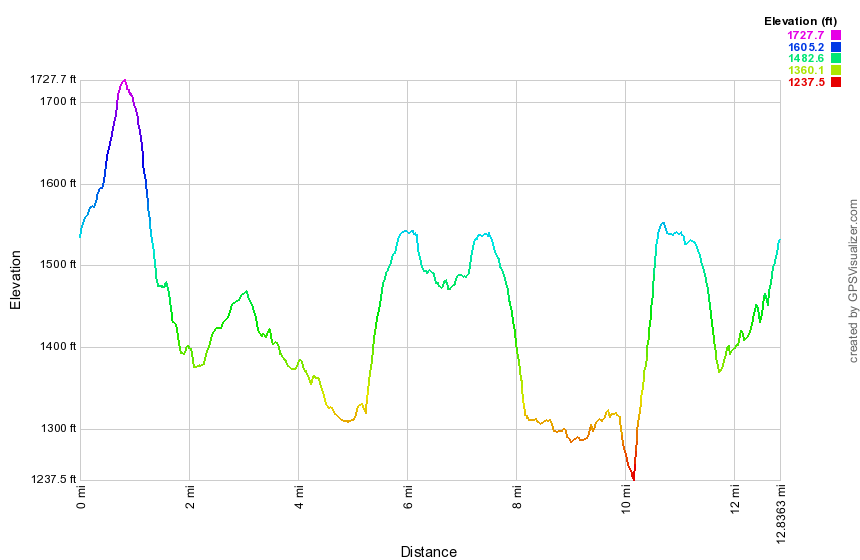 (The image at the left shows the profile of the hike. Remember that all vertical profiles are relative!)
Finger Lakes Trail: Basswood Rd to Cooper Schoolhouse Rd
| Quick Look | ||||
|---|---|---|---|---|
| Difficulty | Round trip | Total climb | Internet Maps | |
| 11.9 mi | 1450 ft. | AllTrails | ||
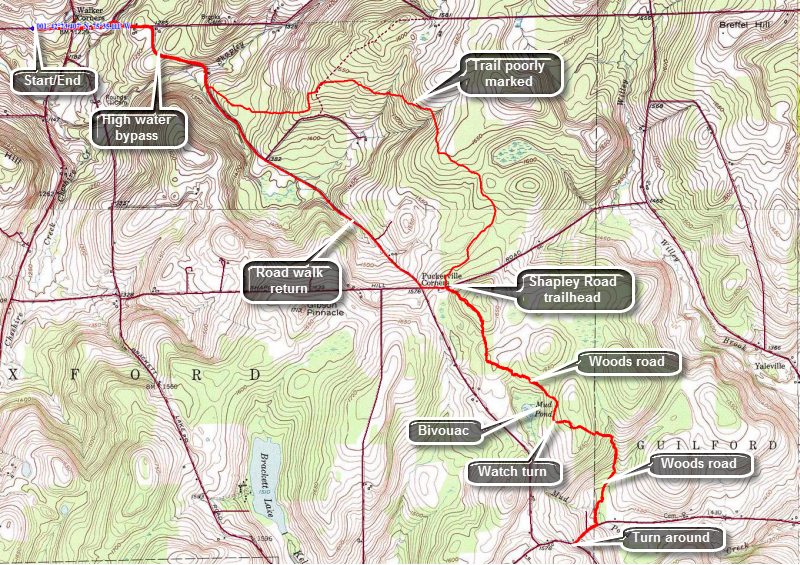 The Finger Lakes Trail starts in Allegheny State Park on the New York - Pennsylvania border and extends 576.5 miles to end in the Catskill Park at the beginning of the Table Peekamoose Trail off the Phoenicia East Branch Trail near the Denning trailhead. There are other side trails which increase the length of the trail system. Four hundred miles of this trail is also part of the Scenic North Country Trail. The Finer Lakes Trail Conference celebrated its 50th Anniversary on June 2, 2012. To commemorate the occasion the Conference set up a series of hikes that would cover the entire length of the trail. Hikes varied in length and difficulty from 4 to 14 miles. The Trail Conference continues to improve the trails and to move sections from roads to trails.
This hike is best done with a car spot since it is almost 6 miles one way for a total of 11.9 miles. The route described here is out and back with a little variation thrown in! Take Route 41 north from Afton and continue through the intersection with Route 206 where the road designation is now Route 27. Watch for Basswood Rd on the left at about 5.5 miles from the Route 206 intersection. Turn left and drive .2 miles to where the Finger Lakes Trail meets the road. Park just east of the trailhead on the south side of the road. The first part of the hike proceeds east for about .75 miles on Basswood Rd and Brookbanks Rd to the corner of Puckerville Road. At this point you can decide to stay on the main trail or take the high water bypass as there is no bridge over the creek on the main trail. To take the bypass turn right on Puckerville Road hike about .6 miles to where the trail cut into the woods to join the main Finger Lakes Trail. For the next 2.9 miles the trail passes through mostly hardwood forest and gains about 500 feet. The trail may not be well used and the blazes are faded so as to be almost invisible in some places. There are several wet areas where old half log bridges and some corduroy are positioned to try to help. Both of these can be very slippery. In one area the trail passes near a large field where the trees are few and far between. This has allowed the prickers and the ferns to take over to make the trail virtually disappear. This combined with the lack of blazes makes following the trail very difficult. Eventually the trees return and it becomes easier to follow the trail. You will pass through some fences that have openings with boards over the top to restrict the height of what can easily pass through. At 4.25 miles you will be at Shapley Road which has a small trailhead and a kiosk for Wiley Brook State Forest. When you cross Shapley Road, you will enter Wiley Brook State Forest. The trail looks more used here and it passes through a large stand of conifers which reduces the undergrowth. Hike up a hill and the trail levels off and eventually joins a well-defined woods road. Within .5 miles from Shapley Road, there is a blue-blazed spur trail on the right which leads to a bivouac area near Mud Pond. Continue on the woods road until about 5.3 miles where the trail leaves the woods road to the left. The turn is marked butt is easy to stay on the road and miss it. If you arrive at an open field, you missed the turn! After another .65 miles on the trail, you will meet a grassy road at about 6 miles. Turn right and walk .2 miles before turning off the road and back onto a trail. The trail only last for .2 miles before meeting Cooper Schoolhouse Road. Turn right and walk .2 miles to the corner of Cooper Schoolhouse Road and the Case-Guilford Road which is also marked as Town Line Road. Turn around and retrace your route back to Shapley Road. From Shapley Road you may continue on the trail back to the car. You may also turn left on Shapley Road and walk .1 miles down to Puckerville Road. Turn right and follow Puckerville Road back to Brook Banks Road, a distance of only 2.5 miles. Turn left on Brookbanks Road and walk the remaining .7 miles back to the car. This avoids rehiking some of the least interesting parts of the trail but is best done when the sun is NOT beating down on you. This route is 6.5 miles out and 5.4 miles back.
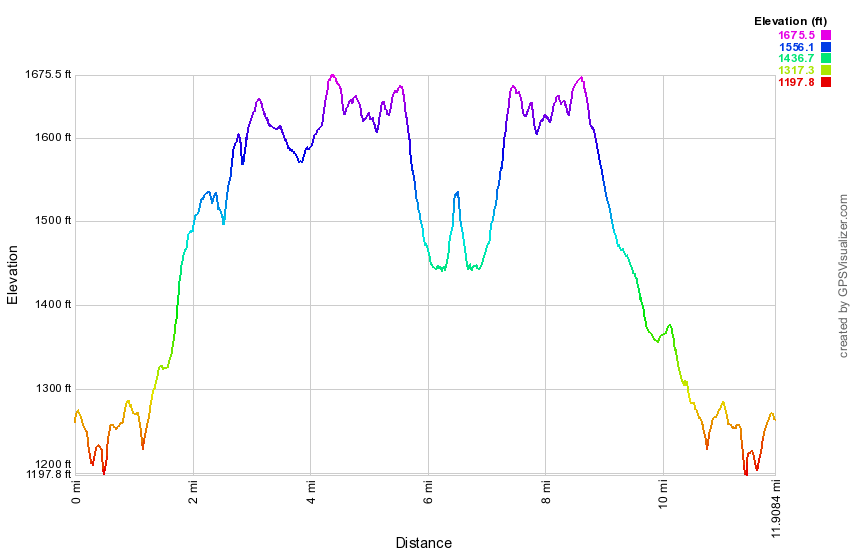 (The image at the left shows the profile of the hike. Remember that all vertical profiles are relative!)
Finger Lakes Trail: Beers Brook Road to Chase Brook Road
| Quick Look | ||||
|---|---|---|---|---|
| Difficulty | Round trip | Total climb | Internet Maps | |
| 5.1 mi. | 570 ft. | AllTrails | ||
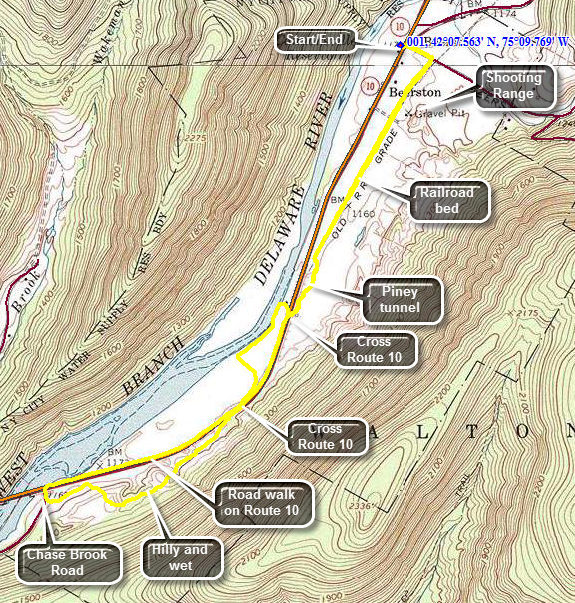 The Finger Lakes Trail starts in Allegheny State Park on the New York - Pennsylvania border and extends 576.5 miles to end in the Catskill Park at the beginning of the Table Peekamoose Trail off the Phoenicia East Branch Trail near the Denning trailhead. There are other side trails which increase the length of the trail system. Four hundred miles of this trail is also part of the Scenic North Country Trail. The Finer Lakes Trail Conference celebrated its 50th Anniversary on June 2, 2012. To commemorate the occasion the Conference set up a series of hikes that would cover the entire length of the trail. Hikes varied in length and difficulty from 4 to 14 miles. The last section is the one described here and is mostly a road walk from The parking area on Black Bear Road (Wild Meadow Road) near Round Pond to the eastern terminus of the trail 1.2 miles from the Denning trailhead.
Depending on where you are coming from there are a number of ways to get to Beers Brook Road where you will park your car. Beers Brook Road is about 5 miles south of Walton on Route 10. You can park directly across from Beers Brook Road or in the parking area slightly further north. Walk across Route 10 and listen for gunfire on the shooting range just off Beers Brook road. If you hear shooting walk south on Route 10 watching for blue blazes on the left side of the road. Turn left and follow these blue blazes to the main FLT where you should turn right. If there is no shooting, walk up Beers Brook Road for only about .1 miles and turn right on the FLT. At just less than a mile the trail goes to the left and off the old road entering a stretch of pine trees. It is usually cool in this area and the pine needles make a soft footing. At 1.2 miles the trail enters an open area and then crosses Route 10. Turn right or north on Route 10 and watch for the FLT signs. The trail wanders down to a path along the West Branch of the Delaware and the Cannonsville Reservoir. This part of the trail is pretty but also pretty buggy in season. At 1.5 miles the trail leaves the path and turns left crossing a field of tall grass and ending up at the base of the bank that forms Route 10. Walk along the base of the bank until it slowly begins to climb up to Route 10. At 1.7 miles you will again be at Route 10. Turn right or south and walk a few hundred feet until the Finger Lakes Trail sign appears on the left. The trail here cuts up into the woods and begins to get wetter and muddier. The trail for the next .8 miles rolls up and down over some little hills but continues to be wet. At around 2.5 miles you will at Chase Brook Road. To get back you can retrace your steps he the trail or walk back on Route 10. The distance on Route 10 is 2 miles and it is flat and boring! A nice option is to walk about to the first crossing you made of Route 10 at about 3.65 miles. Turn right here and go back into the woods and through the pine grove. From here retrace your route from earlier to get back to your car.
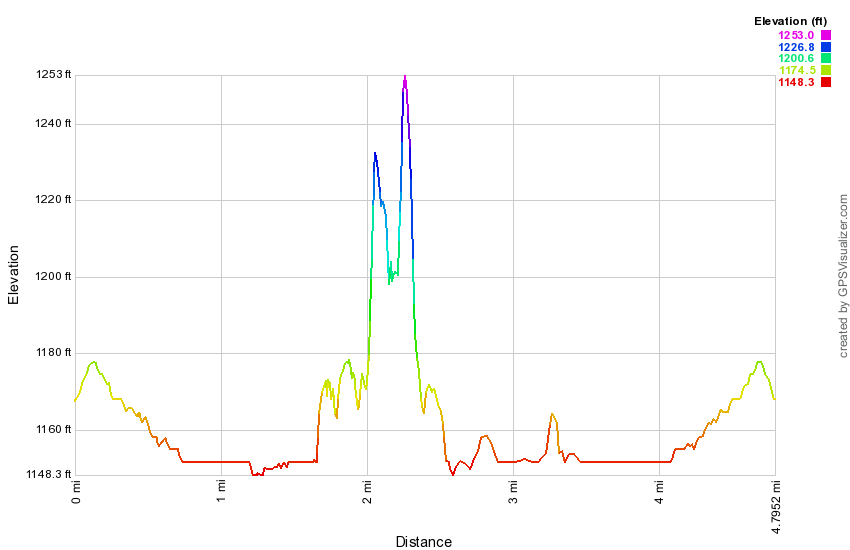 (The image at the left shows the profile of the hike. Remember that all vertical profiles are relative!)
Finger Lakes Trail: Berry Hill to East McDonough
| Quick Look | ||||
|---|---|---|---|---|
| Difficulty | Round trip | Total climb | Internet Maps | |
| 12.0 mi | 1220ft. | AllTrails | ||
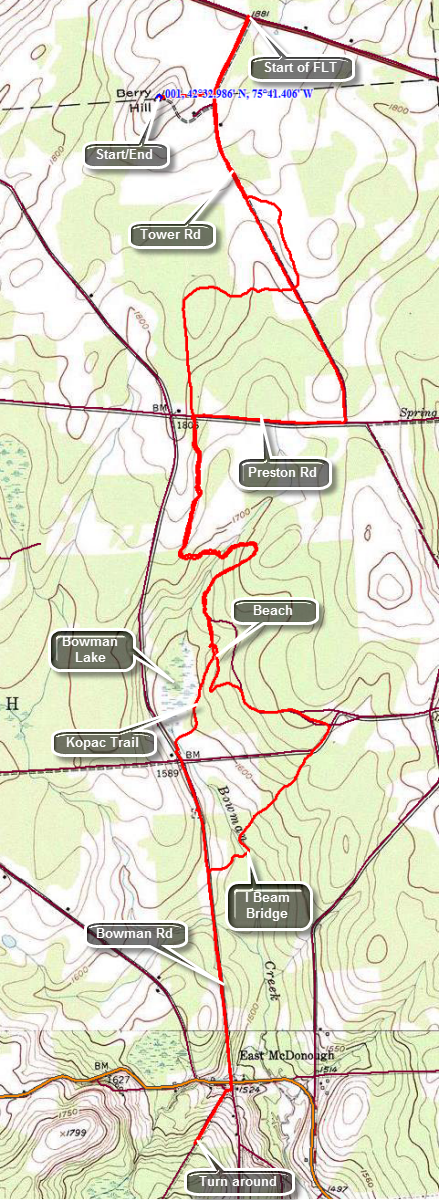 The Finger Lakes Trail starts in Allegheny State Park on the New York - Pennsylvania border and extends 576.5 miles to end in the Catskill Park at the beginning of the Table Peekamoose Trail off the Phoenicia East Branch Trail near the Denning trailhead. There are other side trails which increase the length of the trail system. Four hundred miles of this trail is also part of the Scenic North Country Trail. The Finer Lakes Trail Conference celebrated its 50th Anniversary on June 2, 2012. To commemorate the occasion the Conference set up a series of hikes that would cover the entire length of the trail. Hikes varied in length and difficulty from 4 to 14 miles. The Trail Conference continues to improve the trails and to move sections from roads to trails.
This hike is best done with a car spot since it is 6 miles one way for a total of 12.0 miles. The route described here is out and back with a little variation thrown in! Take County Route 10A west from Norwich for 5.0 miles. Continue on County Road 10 for another 3.5 miles. Turn left on Tower Rd and drive .3 miles to the access road for Berry Hill Fire Tower on the right. Turn right on the access road and park in the small lot near the tower. The tower is being used for law enforcement radio communications and is off limits to the public. You can climb the tower to the locked gate to get a slightly better view of the surrounding countryside. To begin your hike walk down the access road to Tower Road. Turn left and hike out to Route 10 where this section of the Finger Lakes Trail actually begins. At Route 10 turn around and hike back to the access road, passing it and continuing south on Tower Road. Walk about .75 miles to the point where the trail enters the forest. Walk through a stand of tall pines. At 1.2 miles cross Tower Road and head west briefly before turning south and crossing Preston Road at around 2.1 miles. The trail rolls a little but is mostly downhill at you walk south. Over the next 1.4 miles the trail makes several twists and turns but generally heads south and downhill. The trail seems to follow an old road and only leaves that road when it is blocked by blowdowns. There are some interesting rock formations along the way and a set of small bridges over some wet areas. There is also a larger bridge over a stream. All of these may be slippery when wet! At 3.5 miles you will arrive at one of the parking areas at Bowman Lake State Park. The trail heads down to the beach area. The park has a small but beautiful lake with a nice beach and a roped swimming area. Walk behind some buildings on the trail and follow the blazes until you are on the park road. Turn right on the road and walk to the next intersection and turn left to pass by the Nature Center. The trail actually follows the shoreline behind the concession stand and then comes up to the road. This route seems abandoned as if most people simply followed the road. Continue to follow the blazes on the road and you will eventually pass the park entrance and come to Sherman Road at 4.2 miles where you turn right. Walk about .1 miles down the road and turn left into the woods. The trail heads southwest for about .7 miles and along the way crosses Bowman Creek on a bridge made from a steel I beam. The I beam was laid on its side and spans the creek with a handrail on one side. Walk out to Bowman Road which goes south for about .8 miles and ends at Route 220 in East McDonough. Cross the road and walk through an opening in a chain link fence to cross a playground. On the other side is a woods road that begins a climb to a trail register at 6.0 miles. Turn around and go back to Bowman Road and do not turn onto the trail. Just passed the turn is a small, rural cemetery which is very old. Explore the Gale Cemetery if you wish. At the end of the road cross over and enter a path on the other side. The path brings you to the south shore of Bowman Lake. Continue along the shore of the lake and pick up the blue blazes of the Kopac Trich which runs around the lake. Continue to follow the blue blazes until they meet the white blazes of the Finger Lakes Trail behind the concession stand. Follow them back passed the beach and to the parking area where the trail enters the woods. Hike the trail to Preston Road and turn right on the road to Tower Road. Turn left on Tower Road. Walk the last 1.3 miles on Tower Road to the access road to the tower. Turn left and walk back up the hill to your car.
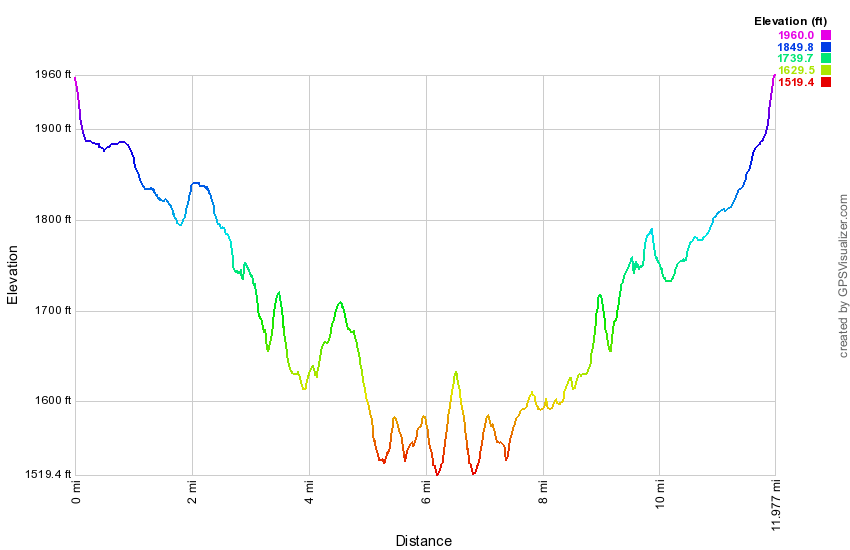 (The image at the left shows the profile of the hike. Remember that all vertical profiles are relative!)
Finger Lakes Trail: Birdseye Hollow Rd to Rt 226
| Quick Look | ||||
|---|---|---|---|---|
| Difficulty | Round trip | Total climb | Internet Maps | |
| 11.9 mi. | 885 ft. | AllTrails | ||
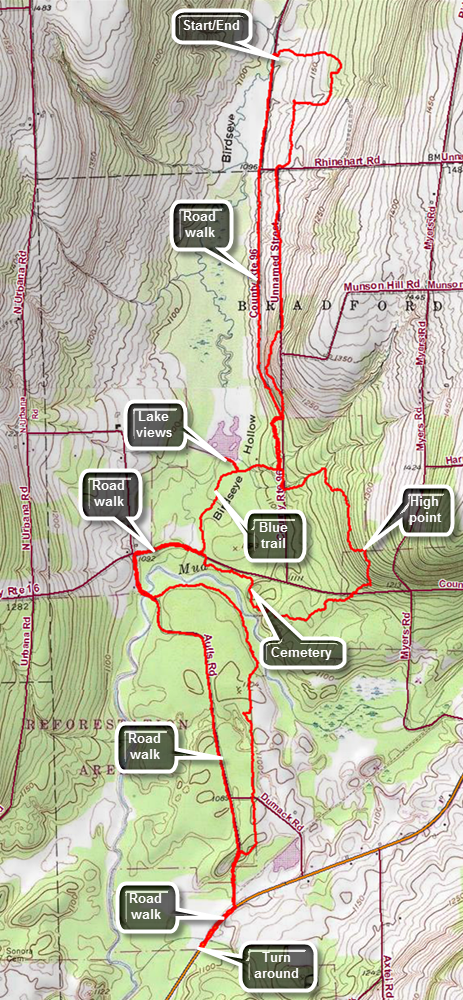
This hike starts on Birdseye Hollow Road north of Birdseye Hollow County Park. The route described here is only one way to approach the hike and uses local roads on the return trip. The county park is well worth seeing! Take exit 40 to Savona and get on Route 226 heading northeast. After about 7.5 miles, turn left on Rabbit Road which connects to Route 16. Turn left on Route 16 and drive 1.5 miles west to Birdseye Hollow Road on the right. Turn right and drive north for 2.3 miles passing Birdseye Hollow County Park. At 2.3 miles the Finger Lakes Trail crosses the road. Find a place on the shoulder to park. Cross the road and walk a little south before entering the woods to start east on the trail. The forest is an interesting mix of red pines and deciduous trees and the walk is pleasant if not particularly scenic. The trail seems to be well marked but there may be a few blowdowns blocking the trail in places. At .35 miles the trail turns south but then turns west before turning south again and crossing Rhinehart Road at 1 mile. Walk a little farther and watch for the bench dedicated to Mary Years on the left. Across from the bench is the foundation of an old farmhouse and a sign explaining a little bit about the history of the area. The trail continues south following an old woods road until 1.75 miles when it branches off the road to the right and begins to descend off the ridge. The trail has been running parallel to the road and now descends to the intersection of Munson Hollow Road and Birdseye Hollow Road at 2.1 miles. Cross the roads and follow the white blazes for the Finger Lakes Trail and the blue blazes for the park trail. At 2.4 miles there is a T in the trail where the Finger Lakes Trail turns left and the blue park trail turned right. Follow the blue blazes of the park trail as it is an "approved" shortcut. The trail comes to an area where there was a parking lot and a pavilion. The blue blazes on the trees clearly show that the trail crosses the parking lot and follows a paved walkway south of the lake. Continue on the paved path and notice lake on the right with some interesting trees and some small islands. The upper reaches are more of a wetland than a lake or pond and many dead trees are evident. You will come to a wooden causeway that spans the outlet of the lake. The middle of the bridge has a covered section. Walk across the bridge to the shore of the lake to get some nice views. When you are done, return to the blue trail as it crosses an open area and then enters the woods. The blue trail is clearly marked and very nicely maintained. There may be wet spots along the trail in wetter seasons and these are marked by the word "Wet" painted next to a set of blazes. You will soon arrive at Route 16. Turn right and followed Rt 16 toward Aulls Road making a left when you get there. Walk along the road and cross Mud Creek on a road bridge. Just beyond the bridge turn into the woods off the road following the trail. The trail heads east paralleling Mud Creek and at 4.4 miles the creek turns more to the east and the trail heads almost due south and back toward Aulls Road. At 5 miles cross the dirt surface of Dumak Road and walk another .3 miles to Aulls Road. Turn left on the road and walk out toward Route 226. At Route 226 turn right and walk a short distance to where the trail again enters the woods. Turn around here to begin the hike back to the car. Continue to walk the gravel surface of the road north toward Route 16 . At 7.7 miles turn right on Route 16. As you approach the point where you came out onto Route 16 from the blue shortcut trail, turn right into the woods on the main Finger Lakes Trail. The trail runs parallel to Route 16 for about .3 miles heading east and just before it turns south there is an old cemetery. The cemetery is mowed and trimmed but many of the stones are skew and some are toppled from their bases. Back on the trail begin to head a little south and start to climb the only really significant hill on the whole hike. Crossed Route 16 at 9 miles as the trail continues to climb up a ridge to a hike high point of 1280 feet. From here begin to descend rather quickly and at 9.7 miles the trail turns east and comes to Birdseye Hollow Road. Turn right or north and start back toward the car. In a short distance you will come to a left turn that leads back to the T in the trail where you turned onto the blue trail earlier. Follow the trail to the T and turn right to walk back out to the road. Turn left and head north on the road toward you car.
 (The image at the left shows the profile of the loop hiking route. Remember that all vertical profiles are relative!)
Finger Lakes Trail: Birdseye Hollow Rd to Winding Stair Rd
| Quick Look | ||||
|---|---|---|---|---|
| Difficulty | Round trip | Total climb | Internet Maps | |
| 12.4 mi. | 1800 ft. | AllTrails | ||
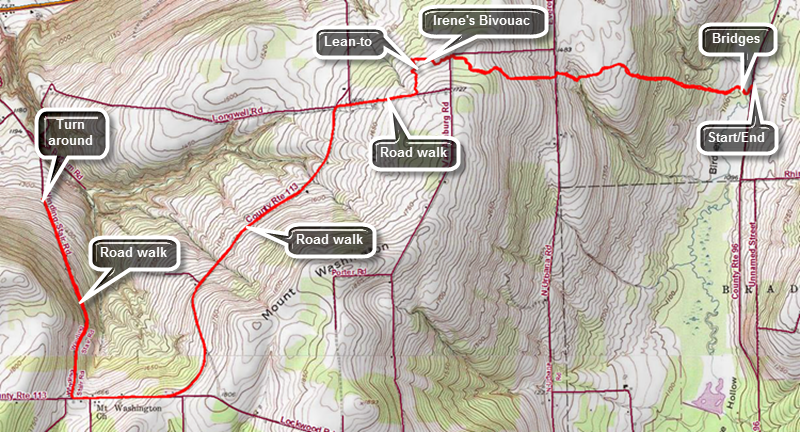
This hike starts on Birdseye Hollow Road just north of Birdseye Hollow County Park in Steuben County, NY. The route described here is a straight out and back with about 8 miles of road walking. Take exit 40 off Rt17/I86 toward Savona and get on Route 226 heading northeast. After about 7.5 miles, turn left on Myers Road which connects to Route 16. Turn left on Route 16 and drive 1.5 miles west to Birdseye Hollow Road on the right. Turn right and drive north for 2.3 miles passing Birdseye Hollow County Park. At 2.3 miles the Finger Lakes Trail crosses the road. Find a place on the shoulder to park. Walk west into the forest into the forest. The trail almost immediately crosses a stream on a set of two bridges. Walk through mostly hardwoods and be prepared to climb up to the top of a ridge. Over the first .9 miles the trail gains 375 feet with an average grade of 8%. At least the last part of the return trip is downhill! At 1.2 miles the trail crosses Urbana Road with a slight jog to the south. The land on the other side of the road is private property but the owner allows hikers on the trails. The trail here is a wide lane but there are several that cross each other so watch carefully for the blazes. The trail continues to climb and at 1.8 miles it crosses VanAmburg Road. At 2 miles there is a directional sign at the site of Irene's Bivouac. Just passed this area is a leanto. Continue on the trail passing the leanto and at 2.25 miles arrive at Longwell Road. The trail now follows local roads to the turn around point on Winding Stair Road. Turn right on Longwell Road and walk a short distance downhill to Route 113. Turn left to head southwest and watch for traffic as the road can be busy. The road rolls quite a bit and is more up hill than down for some time. Continue to the intersection with Lockwood Road on the left walking passed it to continue toward Winding Stair Road. Winding Stair Road turns right after a descent and just at the base of a long hill. After turning right, start walking down the road. Walk north losing elevation every bit of the way until you have dropped 350 feet to where the Finger Lakes Trail comes out of the woods on the left. Turn around here and start back up Winding Stair Road. Since this hike is out and back simply retrace your steps to get back to your car. Fortunately the reverse direction looks a little different. There may be some opportunities to take other routes but these involve dropping off then ridge and then climbing back up!
 (The image at the left shows the profile of the loop hiking route. Remember that all vertical profiles are relative!)
Finger Lakes Trail: Bishopville Rd to Webb Rd
| Quick Look | ||||
|---|---|---|---|---|
| Difficulty | Round trip | Total climb | Internet Maps | |
| 8.0 mi. | 1560 ft. | AllTrails | ||
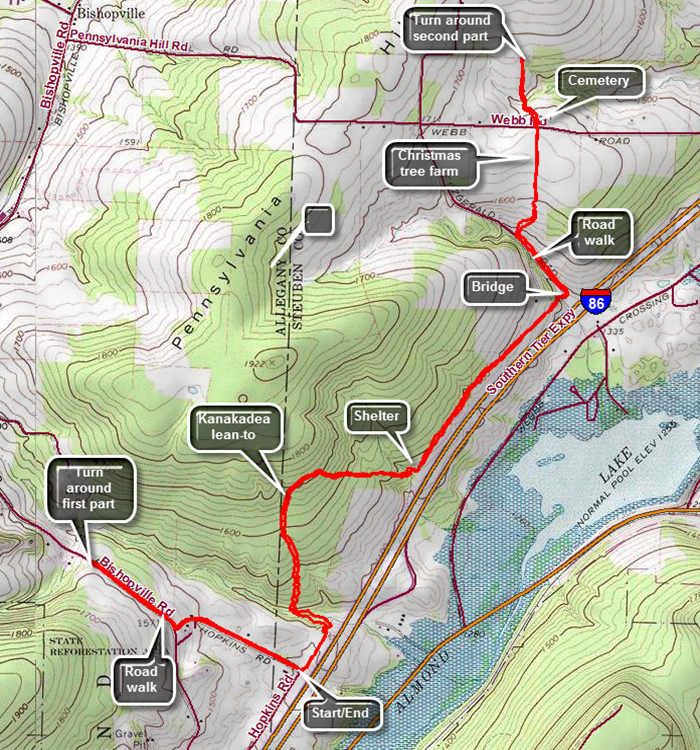
This hike is an out and back hike of a section of the FLT that replaces another section to eliminate a road walk and to visit the Kanakadea lean-to. This section opened after I hiked the original section. Those hiking after 8/20/17 will only hike this new section and may do it as part of a longer hike. There is no parking where the trail meets Bishopville Road and the best parking is at the corner of Hopkins and McIntosh Roads near Almond. Get off I86 at exit 33 westbound for Almond. Turn left off the exit onto Route 2 and then left onto Bishopville Road. After a short distance turn right onto dirt McIntosh Road and drive to where it ends at the intersection with dirt Hopkins Road. You will see the Finger Lakes Trail as it leaves the road and heads toward the right-of-way for I86. Begin the hike at 8:00 AM by walking .5 miles north on Hopkins Road and then turning right on Bishopville Road. Hike another .4 miles to where the trail meets the road.Turn around a hiked back downhill to the car.Continue the hike by following the trail though some grass toward I86. Walk down a short, steep bank to a wide trail cut next to the I86 right-of-way which opens up into a field. After passing through the open area, enter the woods. Just before two miles begin to descend a series of switchbacks to a small stream which is the lowest point on the hike. Parallel the stream for a little while and then begin to ascend the bank on another series of well-planned switchbacks. At 2.2 miles you will be at the Kanakadea Lean-to with a fire pit out front and an outhouse in back. The lean-to is large but the front is very high off the ground requiring a ladder to enter. You are now walking through Kanakadea County park, a park maintain by Steuben County. The park borders Canacadea State Forest. The trail flattens out a little but only for a short distance when a long descent begins and lass for .35 miles and losing 240 feet. Even though the park has existing blazed trails the FLT is clearly marked with white blazes. Just before 3o0 miles, descend to cross another little stream and then ascend the opposite bank. On the left side of the trail is an impressive construction not marked on the map. Someone has collected many branches and placed them between standing trees to create walls on three sides. The shelter is large with some branches supporting a tarp to form a roof. Soon after this you will come to a fence which is the boundary of the I86 right-of-way. Begin a .8 mile section of almost perfectly straight trail heading northeast toward Fitzgerald Road. This trail follows a pre-existing trail as some of the white blazes clearly are painted over older blue blazes. At 3.3 miles cross another stream and where the bank is very steep on both sides. At 3.8 miles there is a small stream with a bridge across it . The bridge was built by a summer BOCES class in 2012. The western end of the bridge is almost suspended in the air as the stream has eroded the dirt supporting it. Cross the bridge and turn left on dirt Fitzgerald Road to begin another uphill climb watching for the point where the trail enters the woods again on the right. Walk about .8 miles north and then follow the trail to the right into the woods. The trail starts to head northeast climbing through the mixed pine and hardwood forest. This section is the one that closes on September 1st but the bypass is to simply walk up Fitzgerald Road and then east on Webb Road. It is a short walk to an open area and then to an open field. Walk along the west side of the field still climbing without benefit of any blazes. There is a large Christmas tree farm on the left. At 4.4 miles start downhill to Webb Road. Crossed Webb Road where there was a cemetery on the right. The trail descends through some hardwoods to a wetland crossed by several streams. The banks of the streams are almost vertical and there were no bridges to cross. Continue through the woods along a woods road until the trail turns abruptly to the right. This is the end of this "new" section. Turn around and follow your route back to the car.
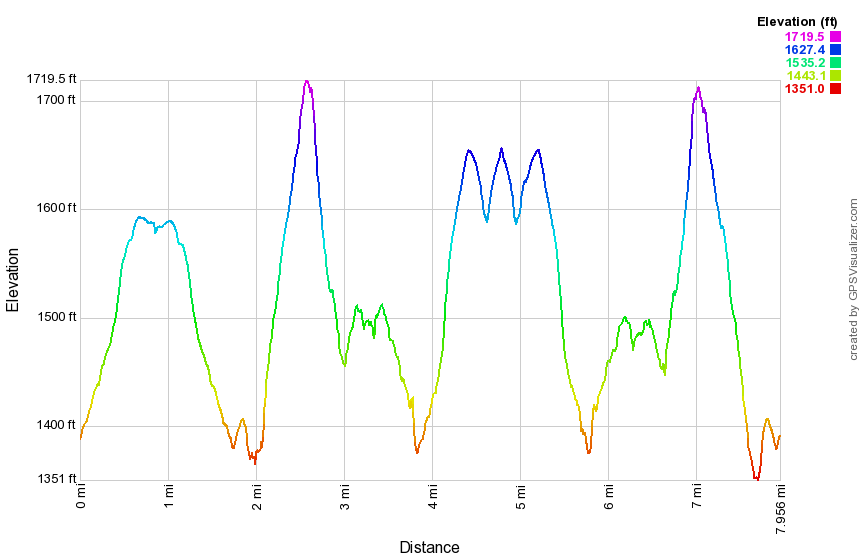 (The image at the left shows the profile of the loop hiking route. Remember that all vertical profiles are relative!)
Finger Lakes Trail: Black Bear Road
| Quick Look | ||||
|---|---|---|---|---|
| Difficulty | Round trip | Total climb | Internet Maps | |
| 5.7 mi. | 640 ft. | AllTrails | ||
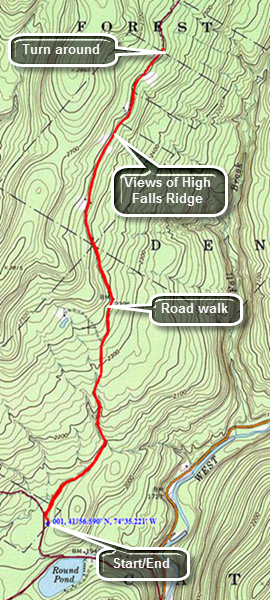 The Finger Lakes Trail starts in Allegheny State Park on the New York - Pennsylvania border and extends 576.5 miles to end in the Catskill Park at the beginning of the Table Peekamoose Trail off the Phoenicia East Branch Trail near the Denning trailhead. There are other side trails which increase the length of the trail system. Four hundred miles of this trail is also part of the Scenic North Country Trail. The Finer Lakes Trail Conference celebrated its 50th Anniversary on June 2, 2012. To commemorate the occasion the Conference set up a series of hikes that would cover the entire length of the trail. Hikes varied in length and difficulty from 4 to 14 miles. The last section is the one described here and is mostly a road walk from The parking area on Black Bear Road (Wild Meadow Road) near Round Pond to the eastern terminus of the trail 1.2 miles from the Denning trailhead.
This hike can easily be done as an out and back as the round trip is only 5.7 miles From Livingston Manor take Debruce Road which changes names from Debruce to Willowemoc to Pole along the 15 mile trip to Round Pond. When Round Pond appears on your right, turn left onto Wild Meadow Road. The road named changed from Black Bear but most people still use the old name. Drive up a short hill and park in the first lot on the right.
The hiking route is rather simple. You will now walk on the road for about 2.8 miles to the end he the "maintained" dirt and gravel road. There is a snowplow turnaround and a "Seasonal Maintenance" sign. To my knowledge there is NEVER any maintenance beyond this point! Turn around and hike back to where you parked.The out part of the hike is all uphill although it is never very steep. Along the way there are some views of the High Falls Ridge on your right. There are also several very nice hunting camps along the road.
 (The image at the left shows the profile of the hike. Remember that all vertical profiles are relative!)
Finger Lakes Trail: Black Bear to Eastern Terminus
| Quick Look | ||||
|---|---|---|---|---|
| Difficulty | Round trip | Total climb | Internet Maps | |
| 12.9 mi. | 1285 ft. | AllTrails | ||
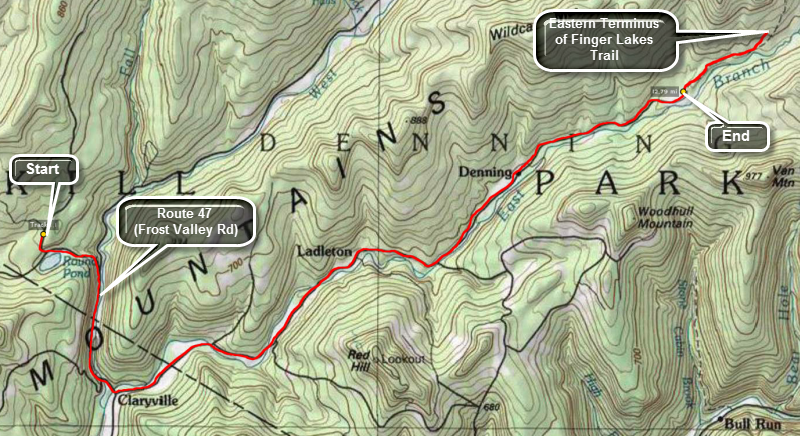 The Finger Lakes Trail starts in Allegheny State Park on the New York - Pennsylvania border and extends 576.5 miles to end in the Catskill Park at the beginning of the Table Peekamoose Trail off the Phoenicia East Branch Trail near the Denning trailhead. There are other side trails which increase the length of the trail system. Four hundred miles of this trail is also part of the Scenic North Country Trail. The Finer Lakes Trail Conference celebrated its 50th Anniversary on June 2, 2012. To commemorate the occasion the Conference set up a series of hikes that would cover the entire length of the trail. Hikes varied in length and difficulty from 4 to 14 miles. The last section is the one described here and is mostly a road walk from The parking area on Black Bear Road (Wild Meadow Road) near Round Pond to the eastern terminus of the trail 1.2 miles from the Denning trailhead.
This hike requires a car spot as it is almost 13 miles one way! From Route 17 (soon to be I86) get off at exit 96 and head away from Livingston Manor on DeBruce Road. Stay on this road as it changes names. In about 15 miles watch for Wild Meadow Road on your left across from Round Pond. This is where you will return to start your hike. At the end of the road turn right on the Frost Valley Road and continue to the end of the road. Turn left on the Claryville Road and drive all the way to the end of the road. From Route 28, turn onto the Frost Valley Road (Route 47) and continue on this road passed Panther and Slide Mountains. Pass the Frost Valley YMCA and continue to the end of the road and turn left on the Claryville Road. Drive all the way to the end of the road. From Route 55, turn north on the Claryville Road in the hamlet of Curry just outside of Grahamsville and drive all the way to the end of the road. Park one or more cars at the Denning trailhead and then drive back through Claryville. Turn right on the Frost Valley Road and drive about 1.5 miles taking a left turn onto Pole Road. The first road to the right across from Round Pond is Wild Meadow Road. Drive up the road and park in the first large parking area on the right. This is where your hike begins.
The hiking route is rather simple. You will now walk on the road back to where you parked at the Denning trailhead! The hike goes quickly since it is a road walk. Once you are through Claryville the road will eventually turn to dirt. There is at least one farm along the way and several picturesque streams. As you near the end of the road there is a slight uphill. At the Denning trailhead, continue passed your car and walk out the woods road at the end of the parking area. Walk about 1.2 miles along this trail to the junction with the trail to Table Mountain. Notice the sign for the eastern terminus of the FLT. Take a picture and return to the Denning trailhead.
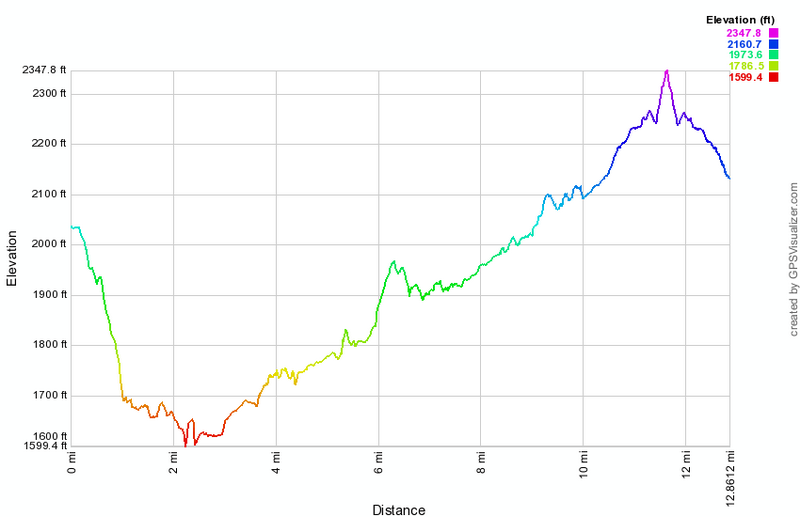 (The image at the left shows the profile of the hike. Remember that all vertical profiles are
relative!)
(The image at the left shows the profile of the hike. Remember that all vertical profiles are
relative!)
Finger Lakes Trail: Bleck Rd to Carson Rd
| Quick Look | ||||
|---|---|---|---|---|
| Difficulty | Round trip | Total climb | Internet Maps | |
| 14.3 mi | 2095 ft. | AllTrails | ||
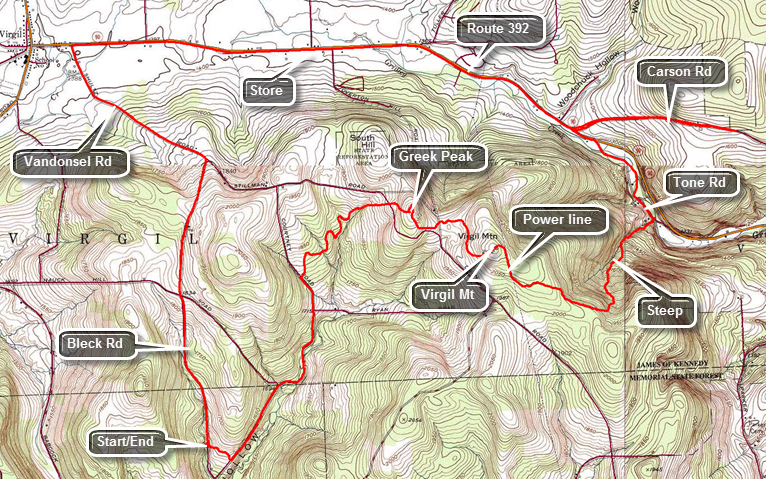 The Finger Lakes Trail starts in Allegheny State Park on the New York - Pennsylvania border and extends 576.5 miles to end in the Catskill Park at the beginning of the Table Peekamoose Trail off the Phoenicia East Branch Trail near the Denning trailhead. There are other side trails which increase the length of the trail system. Four hundred miles of this trail is also part of the Scenic North Country Trail. The Finer Lakes Trail Conference celebrated its 50th Anniversary on June 2, 2012. To commemorate the occasion the Conference set up a series of hikes that would cover the entire length of the trail. Hikes varied in length and difficulty from 4 to 14 miles. The Trail Conference continues to improve the trails and to move sections from roads to trails.
This hike can be done with a car spot since it is 14.3 miles round trip and has some significant elevation gain. The route described here is a loop using roads for the return trip! Take exit 9 on I-81 and head west on Route 221. In about 11 miles turn right on Babcock Hollow Road. In 1.8 miles bear right onto Bleck road and drive about 1 mile. Watch for the Finger Lakes Trail sign on the left side of the road. Turn around and park on the west shoulder of the road. Cross the road to begin your hike by walking up a small hill through some pines. Within less than a quarter mile the trail splits with the blue Kuzia Cutoff going left. Stay to the right on the main Finger Lakes Trail and it will soon cross Cortwright Road. The road is a woods road and the trail parallels it. The road acts as a high water bypass as the trail makes several stream crossings which may be difficult. The mileage is almost exactly the same. Turn left on the road and continue uphill for about 1.2 miles where Baldwin Road comes in on the right. At this point Cortwright Road starts to be more navigable and the main FLT comes in from the right. Continue on the road for another .2 miles to 1.6 miles where the trail crossed the ditch on the right on a small bridge and then starts an ascent of 1.2 miles to the top of the Greek Peak Ski Area. The trail heads generally northeast with a few twists and turns and even some slight descents on the way. At about 2.75 miles you should be able to see the ski lifts from the trail. You may want to walk over to the lifts to get a view to the north. Return to the trail to begin the walk to Virgil Mountain, the highest peak in the area. The drop between the two peaks is just over 100 feet. Pass the highest point which has no views and descend to a power line. There are views from here but none are spectacular especially since the power line dominate the views. Turn right to follow the right-of-way. for about .2 miles where a sign indicates that the main Finger Lakes Trail turns to the left. The yellow blazed Virgil Mountain Trail turns off to the right. Turn left to stay on the Finger Lakes Trailand get ready for the steepest descent of the day. You will lose 800 feet in the 1.3 miles from the turn to Tone Road at the bottom of the mountain. The trail at first heads ESE but at 4.5 miles turns northeast and the descent becomes steeper. At some point you will come to a steam boiler on the right side of the trail. Some stories mentioned that it is from a railroad engine but it was more likely part of a stationary installment. Continued to descend to Tone Road making a stream crossing just before the road. Walk north along Tone Road which runs parallel to Route 392 but on the other side of Gridley creek. At 6 miles cross the creek on a road bridge, turn left and walk up the road a few hundred feet to Carson Road. Turn right and hike uphill for 1 mile to the wide spot in the road where the trail enters the woods on the left. Immediately turn around and walk back Route 392. Turn right on Route 392 and walk west for 3.2 miles to Vandonsel Road. The route is almost flat and the shoulder of the road is wide although the traffic is always well above the speed limit. Very soon after starting out on Route 392 pass the Greek Peak Ski Area. There are lodges and a convention center and chair lifts that climb the hill. There was also a small zip line! Pass a small convenience store on the left and continue until you get to Vandonsel Road on the left. The road climbs to near the top of the ridge to the right turn onto Bleck Road. Turn right onto Bleck Road which continues to climb before a descent to the car. There is no way to avoid this climb of about 420 feet. It isn't a steep climb but you may be tired by this time. When you finally hit the top and start down it is only a short distance back to your car.
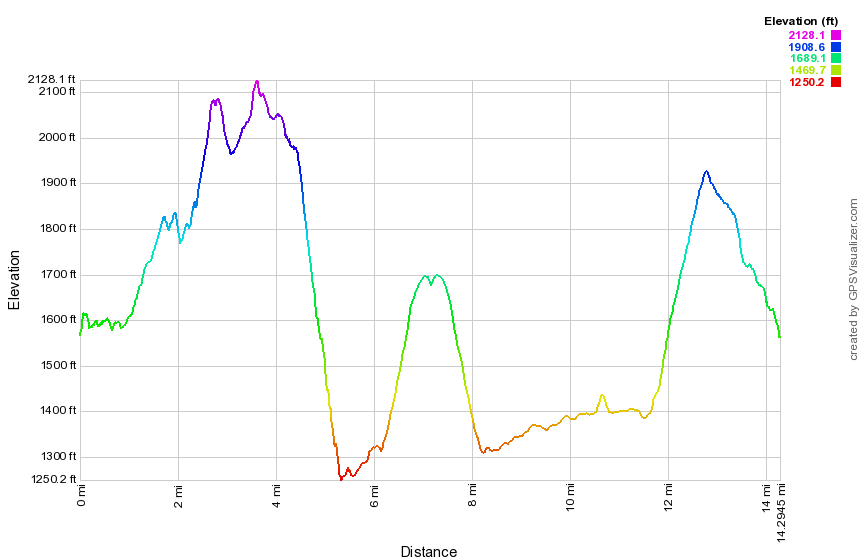 (The image at the left shows the profile of the hike. Remember that all vertical profiles are relative!)
Finger Lakes Trail: Bleck Rd to Owego Hill Rd
| Quick Look | ||||
|---|---|---|---|---|
| Difficulty | Round trip | Total climb | Internet Maps | |
| 7.7 mi | 1585 ft. | AllTrails | ||
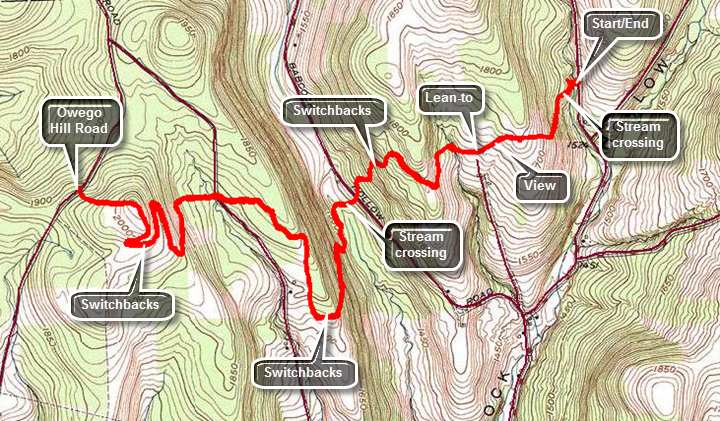 The Finger Lakes Trail starts in Allegheny State Park on the New York - Pennsylvania border and extends 576.5 miles to end in the Catskill Park at the beginning of the Table Peekamoose Trail off the Phoenicia East Branch Trail near the Denning trailhead. There are other side trails which increase the length of the trail system. Four hundred miles of this trail is also part of the Scenic North Country Trail. The Finer Lakes Trail Conference celebrated its 50th Anniversary on June 2, 2012. To commemorate the occasion the Conference set up a series of hikes that would cover the entire length of the trail. Hikes varied in length and difficulty from 4 to 14 miles. The Trail Conference continues to improve the trails and to move sections from roads to trails.
This hike can be done as an out and back as it is only 7.7 miles round trip. Take exit 9 on I-81 and head west on Route 221 for about 11 miles to Babcock Hollow Rd on the right. Turn right and drive north to where Bleck Road branches to the right. Turn right and drive about 1 mile to where the Finger Lakes Trail crosses the road. Park on the wider shoulder on the west side of the road. Begin the hike by entering the woods on the west side of the road and walking down an incline to a stream crossing. There is no bridge and the crossing can be difficult when the water is high. Parts of this trail can be very slick and slippery when they are wet! There may be standing pools of water, areas where the trail is more of a streambed and many areas of slick mud. At about .5 miles ascend a hill and find a view to the south. Just after this view is the Foxfire lean-to on the right side of the trail. Descend a little just passed the lean-to and then began an ascent to the top of a small hill. From there descend 240 feet through some switchbacks to Babcock Hollow Road. Cross the road and continue to descend to another stream crossing which lacks a bridge. On the other begin a 1 mile switchback as you head toward Hilsinger Road. The direct route is only .2 miles but has an elevation gain of 350 feet! A sign just before the switchback warns that there are steep areas ahead that can be slippery when wet! The sign mentions that there are ropes on the steepest parts. There are 3 ropes but hiking poles may be enough. Parallel Hilsinger Road for some time until at 2.5 miles the trail turns toward it and reaches the road at 2.6 miles. It is barely a road at this point. From Hilsinger Road to Owego Hill Road is only .5 miles but the trail covers 1.25 miles of switchbacks to get there. There doesn't seem to be any need for the wandering back and forth as the grade on the direct route is more than manageable! Along the way on the Finger Lakes Trail there are several different side loops which are marked in different colors. At 3.65 miles is the highest point of the hike at 2032 feet on top of some unnamed hill. From here descend to Owego Hill Road at 3.9 miles. Turn around and begin to retrace your steps back up the hill and then down through the switchbacks. It is possible to walk down Hilsinger Road to Babcock Hollow Road and then north to Bleck Road and your car but it adds a lot of mileage. Again, when crossing Babcock Hollow Road you may walk south to the junction with Bleck Road but this route adds some distance but may be quicker under certain conditions. The shortest distance back to your car is to follow the trail being careful on some of the steeper descents.
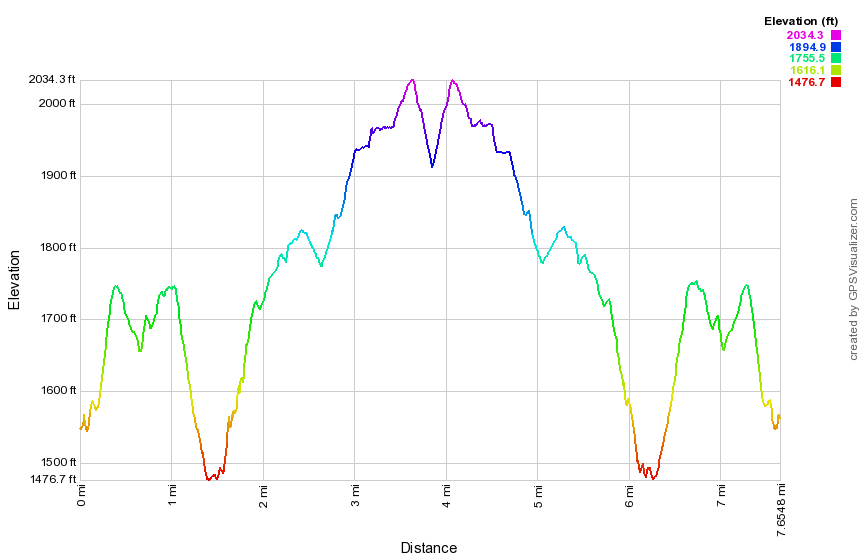 (The image at the left shows the profile of the hike. Remember that all vertical profiles are relative!)
Finger Lakes Trail: Boylan Road to Stevenson Forest Preserve
| Quick Look | ||||
|---|---|---|---|---|
| Difficulty | Round trip | Total climb | Internet Maps | |
| 9.9 mi | 1480 ft. | AllTrails | ||
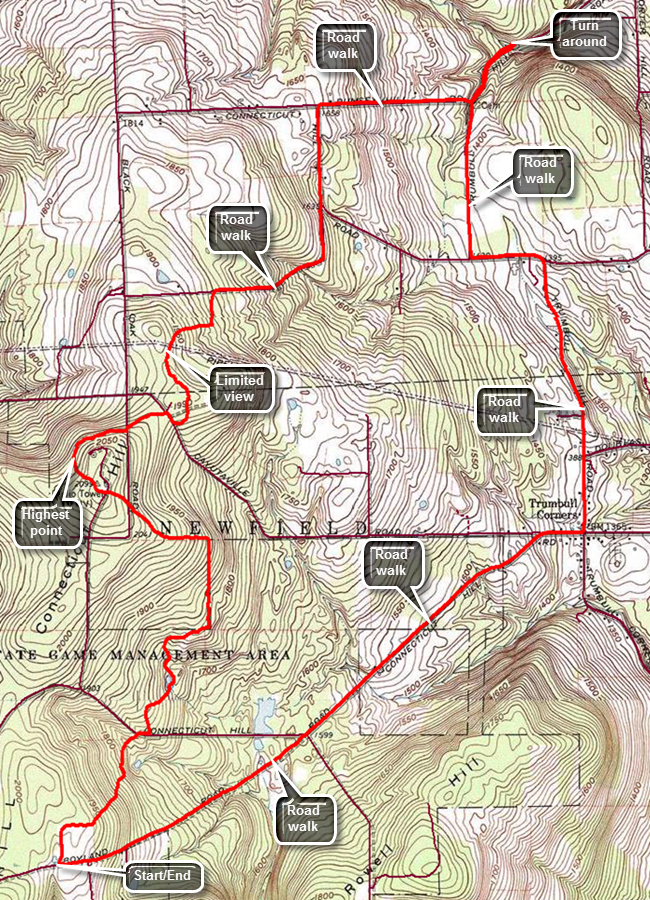 The Finger Lakes Trail is a primitive footpath that starts in Allegheny State Park on the New York - Pennsylvania border and extends 576.5 miles to end in the Catskill Park at the beginning of the Table Peekamoose Trail off the Phoenicia East Branch Trail near the Denning trailhead. There are other side trails which increase the length of the trail system. Four hundred miles of this trail is also part of the Scenic North Country Trail. The Finer Lakes Trail Conference celebrated its 50th Anniversary on June 2, 2012. To commemorate the occasion the Conference set up a series of hikes that would cover the entire length of the trail. Hikes varied in length and difficulty from 4 to 14 miles. The Trail Conference continues to improve the trails and to move sections from roads to trails.
This hike can be done with a car spot but is only 9.9 miles round trip. The first 3.5 miles is on trails while the last 6.4 miles is on local roads which makes the walking easier. Take State Route 17/I86 to exit 64 at Owego and head north from there on Route 96 through Candor and Spencer. Route 96 eventually picks up the designation as Route 34. North of Spencer turn left on Newfield Depot Road and follow it into Newfield. Watch for Trumbulls Corners Road and continue to head west. Trumbulls Corners Road changes to Blovsky Hill Road but that change which occurs at a four-way intersection may not obvious. Blovsky Hill Road ends at an intersection where you should bear right on Carter Creek Road. Somewhere along this route the paved road turns to gravel. After less than a mile watch for Lloyd Starkes Road on the right and enters the Connecticut Hill Wildlife Management Area. This road is marked "Seasonal Maintenance" and is passable but very rough. At the end make a hard left onto Boylan Road. This road is dirt and gravel but in pretty good shape until the intersection with Hulford Road where there is another "Seasonal Maintenance" sign. Fortunately, the Finger Lakes Trail crosses the road just beyond the intersection. Park on the right side where there is room for two cars or on the wide shoulder on the left. Begin your hike by crossing the road and walking southwest on the road to enter the woods on the right. The trail is very well marked and seems well used. Start by heading northeast and descending to Connecticut Hill Road which is reached at .7 miles. Cross the road and turn right to walk east a bit and then turn left or north into the woods again. At 1.3 miles the trail heads due north along a property line and then turns due west at 1.7 miles continuing to follow a private property line on state land. Continue uphill and northwest to cross Tower Road at 2 miles. At 2.2 miles pass over the summit of Connecticut Hill which at 2100 feet is the highest1 spot on the Finger Lakes Trail for 40 miles around. From the top of the hill head northeast and continue to descend crossing Cayutaville Road at 2.75 miles. Turn right on the road and walked southeast briefly before reentering the woods and heading north toward Griffin Road. The trail turns right on Griffin Road at 3.45 miles and from here to Stevenson Forest Preserve the trail follows local roads. Follow Griffin Road east and then north to where it intersects Connecticut Hill Road at 4.1 miles. Continue north on Connecticut Hill Road to 4.6 miles where Rumsey Hill Road turns right. Turn right and follow Rumsey Hill Road east dropping 300 feet in .6 miles. At the intersection with Trumbulls Corners Road turn left and walk .35 miles to the parking area for Stevenson Forest Preserve. You are now at the lowest elevation on the hike at 1250 feet and the rest of the hike would be mostly uphill. Turn around and walked back up Trumbulls Corners Road heading south and gaining some elevation. At 6.2 miles follow the road as it makes a left turn and follow it again at 6.5 miles when it makes a right turn heading south. At 7.5 miles turn right on Cayutaville Road and follow that only .1 miles uphill before bearing left on another version of Connecticut Hill Road. At 8.8 miles pass by the intersection with Lloyd Stakes Road and bear left on Boylan Road. These roads are mostly gravel and dirt but Boylan Road is a little rougher. The walk along Boylan Road is about a mile and this is where you gain the final 300 or so feet to the elevation of you car. Continue uphill passing Hulford Road on the left and finally arriving at your car.
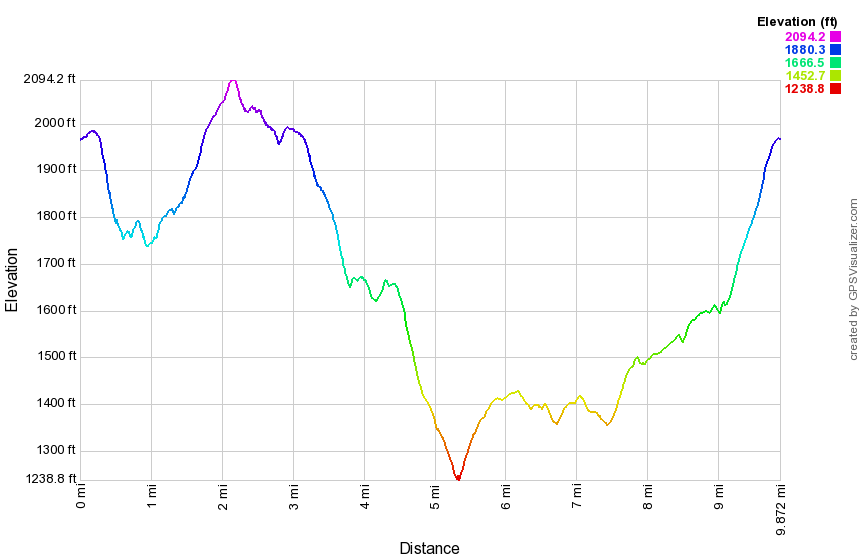 (The image at the left shows the profile of the hike. Remember that all vertical profiles are relative!)
Finger Lakes Trail: Braley Hill Road to Old 76 Road
| Quick Look | ||||
|---|---|---|---|---|
| Difficulty | Round trip | Total climb | Internet Maps | |
| 10.5 mi | 2097 ft. | AllTrails | ||
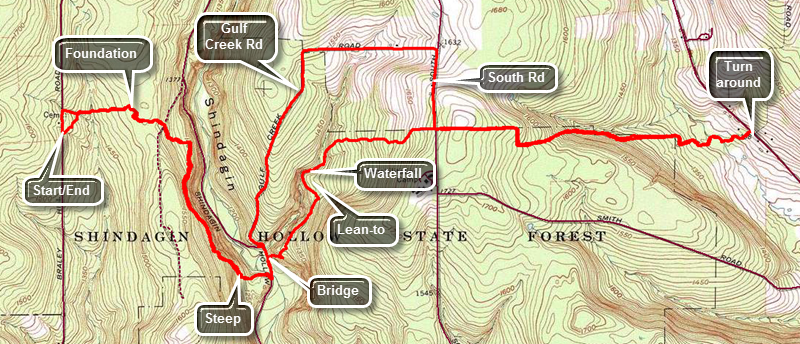 The Finger Lakes Trail starts in Allegheny State Park on the New York - Pennsylvania border and extends 576.5 miles to end in the Catskill Park at the beginning of the Table Peekamoose Trail off the Phoenicia East Branch Trail near the Denning trailhead. There are other side trails which increase the length of the trail system. Four hundred miles of this trail is also part of the Scenic North Country Trail. The Finer Lakes Trail Conference celebrated its 50th Anniversary on June 2, 2012. To commemorate the occasion the Conference set up a series of hikes that would cover the entire length of the trail. Hikes varied in length and difficulty from 4 to 14 miles. The Trail Conference continues to improve the trails and to move sections from roads to trails.
This hike can be done with a car spot since it is 10.5 miles round trip but it can easily be done as a loop using local roads for part of the return trip. The route described here employs that method. Take I81 to the Whitney Point exit, exit 8. Follow Route 79 west from Whitney Point toward Ithaca for a little over 20 miles and then turn left on Boiceville Road. After .6 miles, turn left on Central Chapel Road and then stay to the right on Braley Hill Road after 2.6 miles. Pass by the first big parking area on the left which is marked for Shindagin Hollow State Forest. Park in the next parking area on the left. Head south on Braley Hill Road for only 250 feet before turning left into the woods on the Finger Lakes Trail. The trail descends slightly to cross two small streams and then a larger one at .2 miles where there is a bivouac area. At .7 miles cross a jeep trail and continue across to the other side where you will pick up the white blazes again. Continue to descend, passing an old foundation at .8 miles. The trail makes a sharp right after this and we begins to parallel Shindagin Hollow Road some 200 feet above it with a steep dropoff to the left. At 1.5 miles begin to descend off the ridge to the road. When you come to the road at 1.8 miles you will be at the lowest spot on the hike at about 1180 feet. Turn left and walk about 500 feet up the road where you should turn right and cross the stream on a bridge. From here the trail begins to ascend again on logging road. Several of the turns are simply not marked at all so watch carefully for the blazes! At 2.5 miles enter the area surrounding the Shindagin Hollow lean-to. The area is large including the lean-to, a privy and several fire rings. The trail passes in front of the lean-to and parallels a stream. Just after the lean-to is a small cascade which tumbles over some exposed bedrock. The trail has been heading us north but now turns east and continues ascending to South Road. Along the way there were two interesting arrangements of stones. One is almost a stone wall incorporating a downed tree. The other is a large cairn. Continue on to South Road. Cross the road to a nice country lane which is wide and well-maintained. At 3.4 miles you will be at the highest point on then hike at almost 1800 feet and you will start a long descent toward Old 76 Road. At 3.6 miles the country lane ends and the trail turns to the right and continues almost due east. Continued to descend to 4.7 mile where you cross Boyer Creek on a bridge. Continue to head east and descend to Old 76 Road at 4.9 miles. Walk across the road to connect with next section. Turn around and hike back to South Road on the trail. At 6.6 miles turn right on South Road and hike north .4 miles to a left turn on Gulf Creek Road. The road heads due west and then south for 1.7 miles to Shindagin Hollow Road. It also drops over 500 feet which must be regained to get to your car. Turn left on the road and hike back to where the trail heads back up the ridge retracing your route from earlier. There are three climbs to get back to Braley Hill Road with the first being the most sustained at 340 feet. As you approach the parking area you can continue back on the Finger Lakes Trail or turn right on the blue trail which brings you out to the road just north of the parking area.
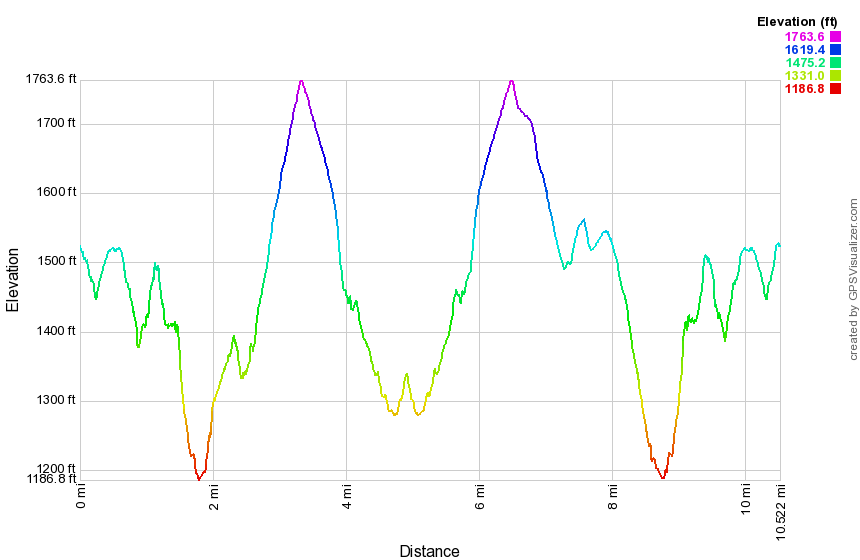 (The image at the left shows the profile of the hike. Remember that all vertical profiles are relative!)
Finger Lakes Trail: Berry Brook rd to Beech Hill Rd
| Quick Look | ||||
|---|---|---|---|---|
| Difficulty | Round trip | Total climb | Internet Maps | |
| 5.7 mi. | 1934 ft. | AllTrails | ||
This hike is one way from Berry Brook Road to Beech Hill Road. This requires a car at Beech Hill Road and a car or a drop off at Berry Brook Road. From Livingston Manor, drive north on Old Rt 17 to Beaverkill Road on the right. Drive north on Beaverkill Road through the hamlet of Lew Beach. Turn left on Beech Hill Road, the first left after passing through Lew Beach, and drive 2.5 miles to the trailhead for the Touch-Me-Not Trail on the right. Park one car here. Drive back down Beech Hill Road to Beaverkill Road and turn right. Drive back towards Livingston Manor To Campground Road. Turn right and drive to the T in the road. Turn right and drive down to the Beaverkill State Campgrounds. Drive through the Beaverkill Covered Bridge and follow the road until it meets Berry Brook Road. Bear left and drive3.5 miles to the trailhead on the right. Find the trail register and turn right on the Mary Smith Trail which is part of the Finger Lakes Trail. The first part of the trail is an easement across private property so stay on the trail. The trail heads northeast toward Mary Smith Hill. Over the next half mile it gains 500 feet for an average grade of 20%. Within this section some parts approach a 30% grade! Pass over the top of a small hill and descended the other side before starting the climb to the shoulder of Mary Smith Hill. At .9 miles you will finish the climb as the trail turns 90 degrees and starts heading southwest. It passes by the summit of Mary Smith Hill and continues to descend until it starts up to the top of the next hill. The trail rolls a little but at 1.5 miles you will begin the climb in earnest. The trail passes by the summit of an unnamed hill at 2.2 miles and starts a long descent. Initially the descent is moderate and there is even a flat area but at 2.7 miles that changes. Over the next .4 miles you will lose 480 feet of elevation without any switchbacks to moderate the descent. This is an average of a 23% grade and continues to Mary Smith Hill Road at the bottom. Cross the road to begin the next section of trail. The sign says it is 2 miles to Beech Hill Road which seems reasonable but signs can be deceiving. After walking a short distance you will come to an interesting stone wall. After that the climb begins passing through an area that is normally wet. You are heading east and will come to a short but steep climb up what almost looks like steps. The grade is 32% but near the top there is an interesting set of ledges. There are also some outcroppings that very clearly show sedimentary layers. The climb isn't over and for the next .35 miles you will gain 400 feet at about a 20% grade. After the summit of Middle Mountain the trail descends about 300 feet to the col between Middle Mountain and Beech Hill. Now there is a short ascent of 150 feet to the top of Beech Hill after which it is all downhill. In .6 miles you will descend 500 feet to a dirt road. Turn right and walk out the dirt road to Beech Hill Road. Turn right and walk down the road to your car.
(The image at the left shows the profile of the loop hiking route. Remember that all vertical profiles are relative!)
Finger Lakes Trail: Bully Hill Rd to Hornell
| Quick Look | ||||
|---|---|---|---|---|
| Difficulty | Round trip | Total climb | Internet Maps | |
| 19.7 mi. | 1600 ft. | AllTrails | ||
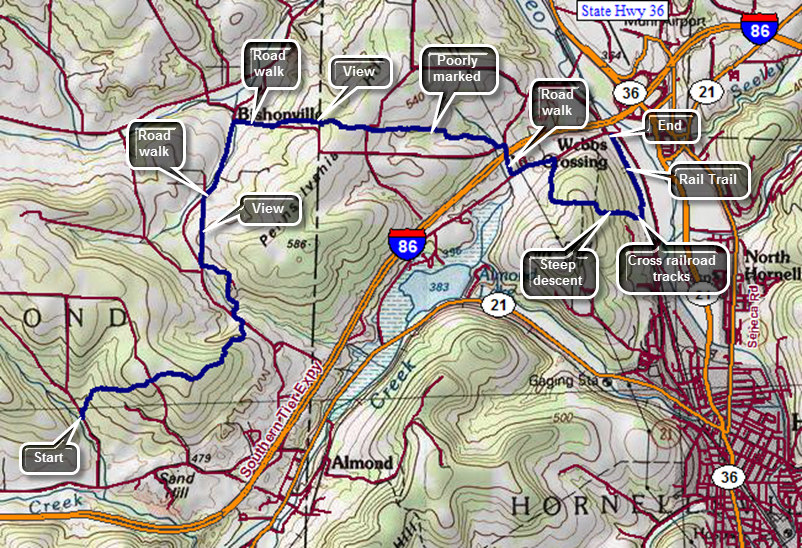
This hike starts where the trail crosses Bully Hill Rd and continues to the parking area on Route 66 near the railroad tracks west of Route 36 in Hornellsville. It covers the last 9.7 miles of FLT Map 9. This requires a car spot or shuttle or a taxi. You may be able to get a ride from a "trail angel" through the Finger Lakes Trail Conference but many are only available on weekends. Village Taxi in Bath charges what I consider reasonable fees so that you can park your car on Hughes Road and have them take you to the intersection for the beginning of the hike. Take exit 34 off I86 west (State Route 17) to Hornell. After getting off the exit turn right on Route 66 and drive west to the railroad tracks to a parking area on the left. Leave one car here or have someone pick you up at this spot. Drive back out to i86 and head west one exit to Almond. After getting off the exit turn left or west on Route 2. Drive west 1.5 miles to Bully Hill Road on the left. Turn left and rive .7 miles north to where the trail crosses the road. The trail begins to climb immediately although not too steeply and it parallels a stream which is often dry. The trails are well maintained and well marked. At 1.0 mile cross Karr Road and continue on an old woods road on the other side. The trail is well-marked and level. The trail starts to descend traveling east and ENE toward Bishopville Road. The trail descends steeply at times following an old barbed wire fence until it reaches Bishopville Road at 2.1 miles. You will have lost 440 feet since the top of the hill and will regain some of that along the hike. Turn left on the road and walk north crossing a creek on a road bridge. Just passed the bridge there is an FLT sign and some white blazes but the trail. We push through the weeds until the trail enters the woods where it is more clearly defined. The trail heads north but only for .4 miles where it meets a dirt road used by the highway department. Turn left on the road and continue to walk downhill to the intersection with Bishopville Road and Wilson Karr Road. Make a hard right onto Wilson Karr Road which has a road sign and is PAVED despite the FLT map description stating that it is a dirt road. Walk due north and uphill before starting down the other side. Continue down the hill to Bishopville Road which is not marked with a sign and does not have any FLT blazes! Turn right and start to walk north to Pennsylvania Hill Road. Turn right on Pennsylvania Hill Road which, true to its name, is an uphill climb. After about .4 miles, the trail cuts into the woods on the left. Walk up a little hill into the trees and continue on the trail as it winds through some brush and then begins to climb gently in the woods. At 4.8 miles a path leads to the left to the edge of a field where there is a nice view. Around 5.1 miles cross another woods road or farm lane and continue along a woods road in the forest. Watch for the blazes as the trail almost immediately turns off the woods road to the left. Eventually the trail starts to open up to a field ahead. The trail may be choked with weeds and hard to see but continue walking to the edge of the field. Turn left and walk uphill along the edge of the field following the path to Fitzgerald Road. The trail is direct across the road but the next section may be not well defined or maintained and may be poorly marked in many places. You will come to a field where the blazes indicate a left turn. Turn left and walk along the edge of the field watching for some faded blazes on the left which show that the trail passes through tall grass at the edge of the field and into the woods. Walk in the woods for a while and you will come to another field with no indication of where to go. Walk across the field to the northern edge to a woods road heading east. At 6.7 miles begin to cross some small stream or one stream several times. The FLT map mentions beaver ponds and a electric fence but simply continue on the trail. After the third crossing, walk up a steep bank to Webb Road at 6.8 miles. Turn left on Webb Road and then right on Doorley Road to cross over I86. At 7.2 miles turn left on Route 66 which has a lot of traffic. Walk uphill on the shoulder to the top of a small hill and then down the other side to 7.6 miles. Cross the road to head south on what the FLT map describes as a tractor lane. This lane may be covered in weeds making the climb even more difficult. At 8.0 miles the trail enters the woods which eliminates the weed problem and turns east. It continues to climb reaching a little over 1700 feet at 8.25 miles. From the high point the trail descends for .7 miles to the railroad tracks. The elevation drop is 540 feet which makes the descent rather steep. Just before the railroad tracks, the trail opens up some and there may be weeds, brush and briars obscuring the trail. Crossed the tracks carefully turn left on the rail trail to walk back to the car. The rail trail follows the railbed of the old Pittsburg Shawmut and Northern RR for .7 miles back to the parking area near Route 66.
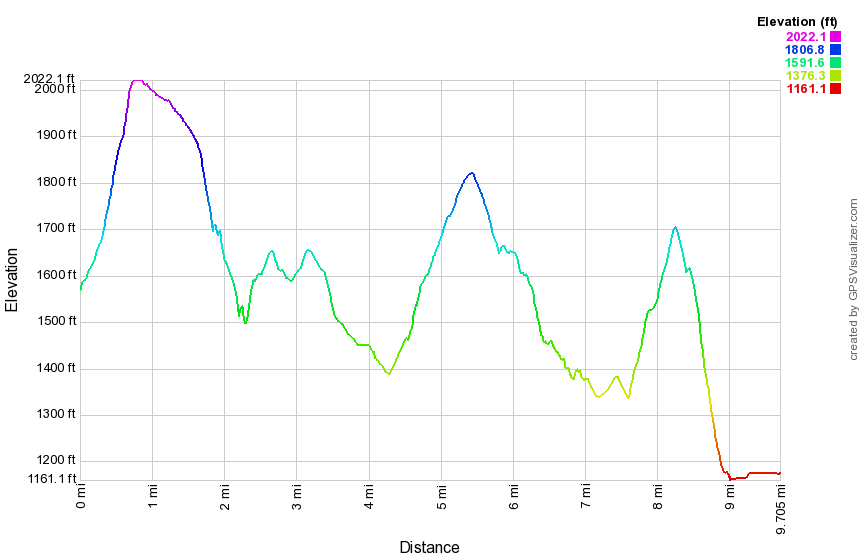 (The image at the left shows the profile of the loop hiking route. Remember that all vertical profiles are relative!)
Finger Lakes Trail: Bully Hill Rd to Slader Creek Road
| Quick Look | ||||
|---|---|---|---|---|
| Difficulty | Round trip | Total climb | Internet Maps | |
| 10.2 mi. | 1562 ft. | AllTrails | ||
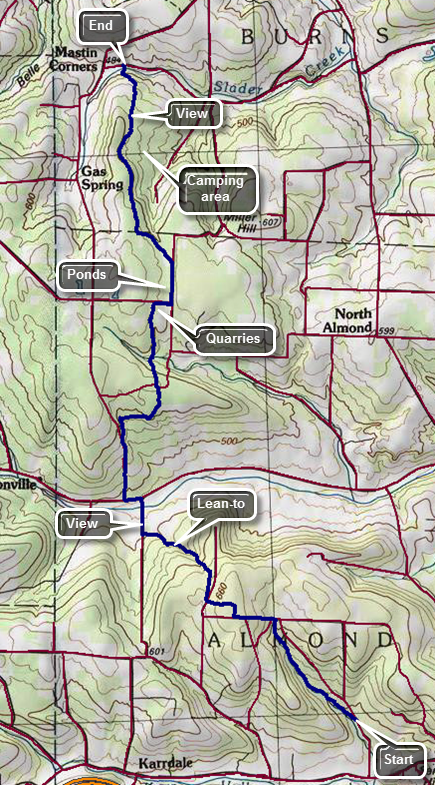
This hike starts where the trail crosses Bully Hill Rd and continues to the beginning of Map 9 on Slader Creek Road. It covers the first 10.2 miles of FLT Map 9. The hike is from south to north as is there is no parking available on Bully Hill Road. The parking on Slader Creek Road is also very limited. This requires a car spot or shuttle or a taxi. You may be able to get a ride from a "trail angel" through the Finger Lakes Trail Conference but many are only available on weekends. Village Taxi in Bath charges what I consider reasonable fees so that you can park your car on Slader Creek Road and have them take you to Bully Hill Road for the beginning of the hike. Take exit 34B off I86 west (State Route 17) to Arkport on Route 36. In Arkport watch for West Avenue just before you pass through the northern boundary of the village. Turn left on West Avenue which eventually becomes Route 961F or Route 70. I took exit 34B toward Arkport on Route 36 north. In Arkport I turned left or west on West Avenue which is Route 961F on some maps and Route 70 on others. Head north toward the village of Canaseraga looking for Tildon Hill Road on the left. After 3.8 miles turn left on Tildon Hill Road and drive west to County Route 13. Turn right or north and drive north only .7 miles to Slader Creek Road (Route 13C) on the left. Turn left and follow this road until you come to the Finger Lakes Trail trailhead just before the road meets Gas Springs Road. Park on the right shoulder just passed a driveway. You may want to check out Slader Creek as there are some reports it can be high at times. Leave one car here. Turn around and drive back out to Route 13 and head south until you come to a T. Turn left and then right on Bailey Hill Road. Turn left on Route 32 and travel a short distance to Bishopville Road. Turn right and continue on this road Until you get to Karr Valley Road (Route 2). Turn right and drive west to Bully Hill Road. Drive north .7 miles to the drop off point. Begin your hike by walking a short distance north on Bully Hill Road and then turning left into the woods. The first 1.5 miles of the trail parallels Bully Hill Road heading northwest and uphill. The trail can be muddy in spots but is very well marked and the track is very obvious. The trail also parallels a deeply cut stream bed which shows a lot of erosion but is often absolutely dry. Cross over the stream bed and then began to walk parallel to another deeply cut gorge. A little farther on walk through one of the many red pine plantations found along the Finger Lakes Trail. At Karr Road which is a dirt road turn left and walk a few hundred feet on the dirt road before walking straight into the woods on a woods road that begins a steep climb. The trail is easily visible and well marked but is often littered with sticks and branches. At the top of the hill continue almost straight ahead on another dirt road following the white blazes. Walk along the almost flat road until the trail turns right into the forest at about 2.0 miles. Walked along another woods road which eventually turns left to head toward Mike Dixon Road. Walk over some small bridges over a wet area and cross the road at 2.4 miles. The trail is directly across from the exit and parallels the road before turning and heading northwest. The walk is now through hardwood forests and begins a rather long descent. The trail is very rocky and continues to follow some impressive streambeds. At 3.2 miles pass a nice new lean-to with an outhouse and a reliable water source. At 3.7 miles the trail comes to Bush Road. Turn right to walk down to Route 32 on this dirt road which is in good shape. There aren't many photographic opportunities on this route so you may want to stop for a few shots here. Just before the trail joins Route 32 it passes over a bridge over the Canisteo River. This was also the lowest point on the hike. Turn left on paved Route 32 and walk west for about .2 miles. At Gas Springs Road turn right and start to hike uphill on this forest access road with Klipnocky State Forest on the left and private land on the right. DO NOT turn onto the snowmobile trails crossing the road. Walk up hill for about .3 miles until at 4.6 miles the trail leaves the road to the right. The trail is sighted along a woods road which is eroded and covered in branches and small tree trunks. Cross a small road and continue on the trail. At about 5.0 miles the trail veers away from Gas Springs Road to the right along a woods road. At 5.2 miles the trail turns right and descends on a few switchbacks to cross a small stream. After heading east briefly the trail turns northeast and then north at about 5.6 miles as it continues to ascend toward another dirt road. Cross the road diagonally to the left and continue hiking north. The trail is very rocky in this area as it descends for .3 miles to cross a stream and then immediately regains that elevation on the other side. At about 6.9 miles the trail passes what looks like a stone quarry. At 7.0 miles turn right onto Roots Road and walk east briefly before turning left or north on Bill Morris Forest Road. In a short distance the road comes to a nice pond. Walk along the road for about .4 miles until the trail turns left on an access road at 7.6 miles. Follow the road to a small bivouac area on the shore of a pond. Continue north on the trail transitioning from Klipnocky SF to Gas Springs SF. This part of the trail heads almost due north but rolls a little through hardwood forest. The trail continues to be well blazed and the track is worn in enough to follow even without a map. At 9.1 miles there is a trail register and a trail that leaves to the right to a camping area. From this point on the blazes on the trees may be faded and hard to find. The trail can be muddy spots. The trail descends most of the time passing a cabin in the woods and continues to meander between one woods road and the next always heading north and descending. At about 9.8 miles the trail comes out of the woods into a field passing through a gate. The farmer asks that all gates be left as they were found. This is another good spot to stop for pictures. Continue down a farm lane on the edge of the field and through another gate. The farm lane passes through a more wooded area leading down to a pasture and Slader Creek. Cross Slader Creek and pass through the gate by the road to walk over to your car.
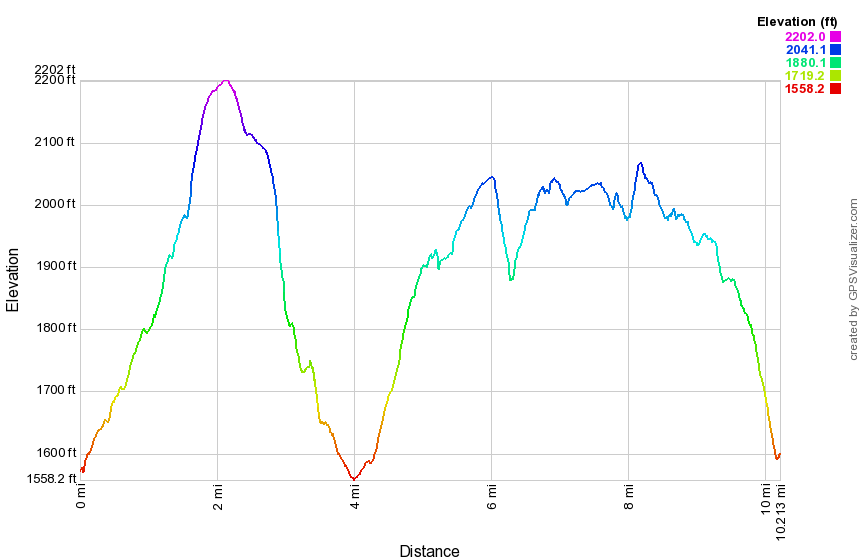 (The image at the left shows the profile of the loop hiking route. Remember that all vertical profiles are relative!)
Finger Lakes Trail: Burdett to Texas Hollow Road
| Quick Look | ||||
|---|---|---|---|---|
| Difficulty | Round trip | Total climb | Internet Maps | |
| 13.5 mi | 1960 ft. | AllTrails | ||
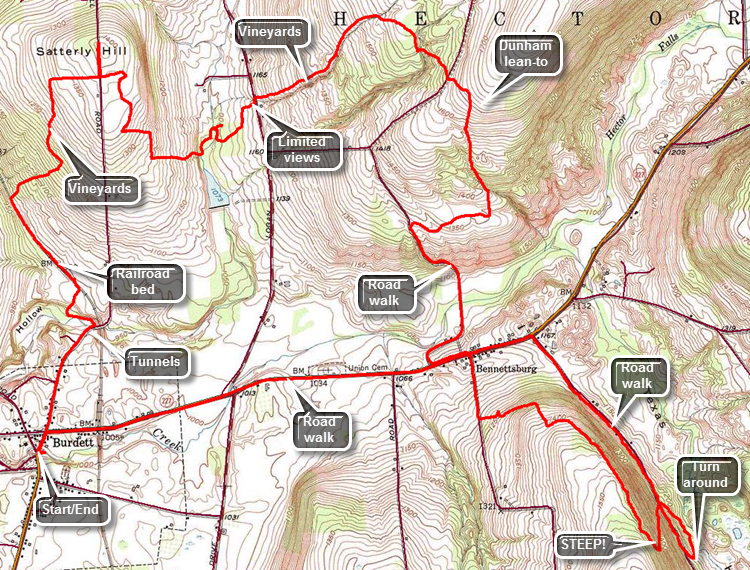 The Finger Lakes Trail is a primitive footpath that starts in Allegheny State Park on the New York - Pennsylvania border and extends 576.5 miles to end in the Catskill Park at the beginning of the Table Peekamoose Trail off the Phoenicia East Branch Trail near the Denning trailhead. There are other side trails which increase the length of the trail system. Four hundred miles of this trail is also part of the Scenic North Country Trail. The Finer Lakes Trail Conference celebrated its 50th Anniversary on June 2, 2012. To commemorate the occasion the Conference set up a series of hikes that would cover the entire length of the trail. Hikes varied in length and difficulty from 4 to 14 miles. The Trail Conference continues to improve the trails and to move sections from roads to trails.
This hike can be done with a car spot since it is 13.5 miles round trip. The "out" is 9.5 miles but the "back" is only 3.5 miles on local roads which makes the walking easier. Take State Route 17 north toward Binghamton to exit 64 at Owego. Head north from there on Route 96 through Candor and Spencer. In Spencer pick up Route 34 west to Van Etten. Turn right onto Route 224 as Route 34 heads south. Follow Route 224 for 19.2 miles as it passes through Cayuta crossing Route 13. Drive through Odessa and just outside of Montour Falls turn north on Schuyler County Route 8. Follow Route 8 for a little more than 3 miles and then turn left onto Route 9 which intersects Route 79 after 1.2 miles. Turn right and you will be in Burdett after less than a mile. Park at the fire department and village hall after asking permission or turn right at the blinking light and park at the post office. Walk to the blinking light and head north on Willow Street. At .65 miles Willow St continues on through a twin tunnel. One tunnel was for the road and the other for the stream that ran beside it. The tunnels were necessary because a railroad once ran over the road and perpendicular to it. Turn left or west on a farm lane before the tunnels which are impossible to miss. The lane is flat for a bit and then begins to climb as it turns north. At the first split in the lane stay to the right and begin to walk up toward a group of farm buildings. At about a mile another "road" goes off to the left. Turn here onto this old railroad bed and walk northwest for some time before finally spotting a faint white blaze. The railroad bed is in poor shape with large ponds in places and very muddy areas which are hard to avoid. The trail turns off the bed at 1.5 miles and heads first northeast and then due north. Upon entering the woods the trail immediately begins to gain elevation and is well-marked and obvious. Soon you will break out of the woods and hike through some abandoned vineyards. At 1.8 miles turn left and begin heading north to 2.2 miles where the trail makes a right turn to the east. Walk along some fields with views of the Catharine Valley behind and at 2.5 miles reach Slattery Hill Road. The description on the Finger Lakes Trail map mentions "views to the north and west of Seneca Lake" but there are none. Cross the road and walk through some more fields and vineyards before entering the woods. You are now well within Finger Lakes National Forest. From the road head generally south with a few jogs to the east as the trail descends to Tug Hollow Creek. At 3.7 miles crossed the creek twice and walk along it as it became deeper and wider. At 3.85 miles cross the narrow bridge and turn right. Walk uphill and cross Logan Road at 4.3 miles. On the other side of Logan Road is a "gate" and a small kiosk explaining the Finger Lakes Trail. The forest from Logan Road to Burnt Hill Road is primarily hardwood and there are some very large trees along the way. The trail ascends from the road and follows a small stream on the right heading ENE to about 5 miles where it crosses the stream and begins heading southeast. At 5.3 miles descend some and cross an impressive streambed that is often dry. After a slight ascent cross Burnt Hill Road the first time at 5.5 miles. Walk directly across the road entering the woods and continue to ascend to 5.6 miles where a long descent begins. At this point the orange blazed Interlocken Trail comes in from the north and a little farther on a side trail heads left to the Dunham lean-to. Continue on the trail heading almost due south losing elevation as you go. The trail passes through more red pines and at 6.25 miles the trail turns west to head for Burnt Hill Road again. The forest becomes more open and the trail may begin to be overgrown. At 6.6 miles turn left on Burnt Hill Road and continue to descend. The walk down the road to Route 79 is pretty easy and at 7.5 miles you will be at Route 79 after dropping over 600 feet. Turn left and walk along Route 79 for .15 miles before turning right on South Hill Road. Walk about .3 miles on the road. and at 8 miles turn left onto a farm lane. The turn is well marked and there are even some blazes on the trees that are to the left you stay on the north side of some fields while heading east. Continue to head east toward Texas Hollow Road going uphill to 8.3 miles where the trail turns south but continues to rise. The hardwood forest are pleasant as the trail continues to parallel Texas Hollow Road heading southeast but more than 300 feet above it with a steep drop off to the left. At 9.1 miles the elevation of the trail is 1550 feet and the trail begins to descend. At 9.25 miles the trail turns sharply and heads due north to Texas Hollow Road. There are several small switchbacks but the descent is very steep in places. Near the end walk down a driveway to the road. The trail crossed the road and then turns right to parallel the road for .35 miles to the access road that leads down to a pond. At the access road, turn right to walk up to Texas Hollow Road. Walk north to Route 79 for 1.25 miles with a slight uphill at the beginning and then a slight descent. Turn left on Route 79 and begin the 2.4 mile walk back to the car. The route is almost all downhill and passes by some interesting houses, a cemetery and a horse stable. At the blinking light in town, turn left and walk back to the firehouse to your car.
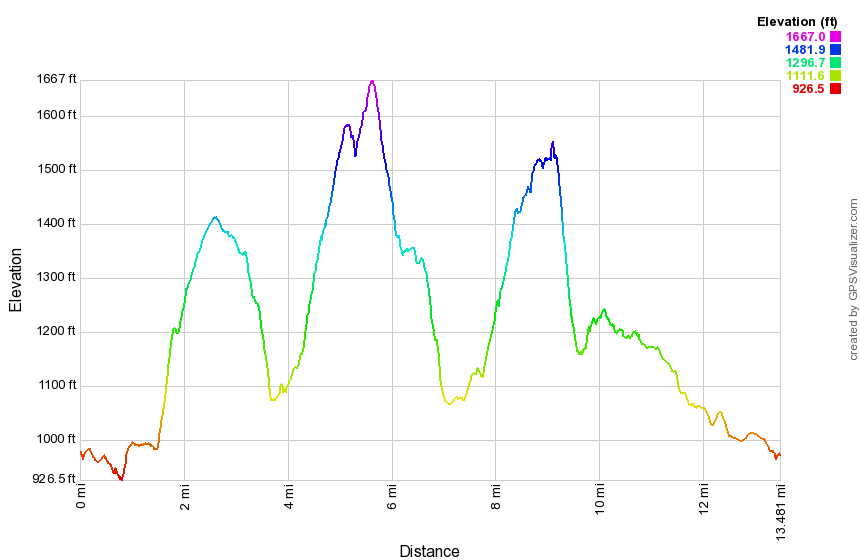 (The image at the left shows the profile of the hike. Remember that all vertical profiles are relative!)
Finger Lakes Trail: Carson Rd to West River Rd
| Quick Look | ||||
|---|---|---|---|---|
| Difficulty | Round trip | Total climb | Internet Maps | |
| 9.7 mi | 940 ft. | AllTrails | ||
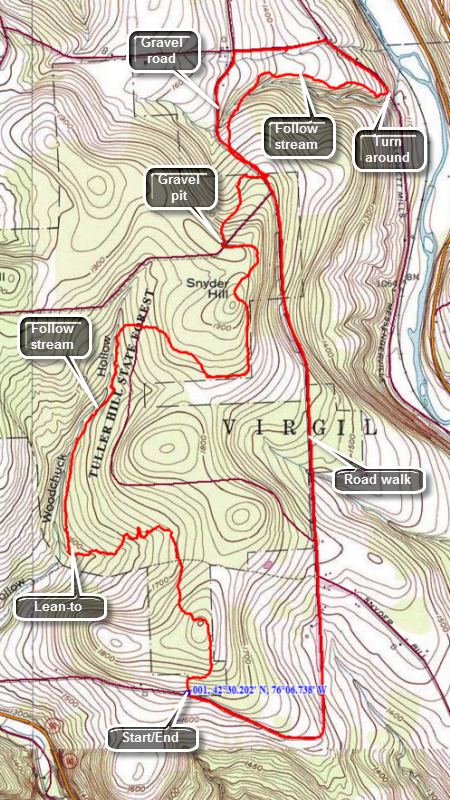 The Finger Lakes Trail starts in Allegheny State Park on the New York - Pennsylvania border and extends 576.5 miles to end in the Catskill Park at the beginning of the Table Peekamoose Trail off the Phoenicia East Branch Trail near the Denning trailhead. There are other side trails which increase the length of the trail system. Four hundred miles of this trail is also part of the Scenic North Country Trail. The Finer Lakes Trail Conference celebrated its 50th Anniversary on June 2, 2012. To commemorate the occasion the Conference set up a series of hikes that would cover the entire length of the trail. Hikes varied in length and difficulty from 4 to 14 miles. The Trail Conference continues to improve the trails and to move sections from roads to trails.
This hike can be done with a car spot but it is only 9.7 miles round trip. The route described here is a loop using roads for the return trip! Take exit 9 on I-81 and head north on Route 11. In about 4 miles turn left on Route 392. In 4 more miles make a sharp right turn on Carson Road and drive about 1 mile. Watch for the Finger Lakes Trail sign on the left side of the road. Turn around and park on the north shoulder of the road. Head out on the Finger Lakes Trail through Tuller Hill State Forest. The trail starts north through some hardwoods and climbs a little hill before descending down the other side. Around .85 miles the trail turns east and continues to descend. At 1.45 miles you will come to the edge of a stream called Neal Brook and pass the Woodchuck Hollow lean-to where the trail turns again to head north. For the next mile the trail follows the brook north climbing a little until, at 2.5 miles, it turns east and shortly thereafter crosses the Cortland Nine Road. The soil in the area has a large percentage of clay and can be very slippery especially when wet. Some of the little stream crossings have descents that are very steep and equally challenging climbs out of the stream bed on the other side. After crossing the road, the trail continues to ascend but now heads east. At 3.1 miles the trail turns north toward Snyder Hill which is not much of a climb. At 3.8 miles you will come to a cleared spot at the upper end of Pipeline Road. Watch for the blazes along the right edge of the clearing. Continue to descend a little heading northeast until you cross Snyder Hill Road at 4.25 miles. The trail turns northwest and parallels the road before heading northeast and crossing a brook. From this point on you will hear the traffic on I-81 and on a clear day you can see Hoxie Gorge Bridge. You will approach a field, walk along the edge and then return to the woods to walk parallel to another stream. The blazes here are a little confusing but you should be able to spot their general direction. The trail continues to descend as you approach West River Road and even passes through the backyard of a private residence. When you reach West River Road turn left and hike northwest on West River Road for about .3 miles gaining elevation as you go. Turn left on Stafford Road and hike another .4 miles to Snyder Hill Road. Turn left on Snyder Hill Road and hike about 2.3 mile trip south passing over two small hills. At 8.5 miles Snyder Hill Road veers to the left but continue straight ahead on Carson Road. There are several nice farms along the way, some interesting private residences and evidence of some logging operations. Carson Road eventually makes a 90 degree turn to the right and after that you will soon be back at the car.
 (The image at the left shows the profile of the hike. Remember that all vertical profiles are relative!)
Finger Lakes Trail: Comfort Road to Fisher Settlement Road
| Quick Look | ||||
|---|---|---|---|---|
| Difficulty | Round trip | Total climb | Internet Maps | |
| 12.3 mi | 1780 ft. | AllTrails | ||
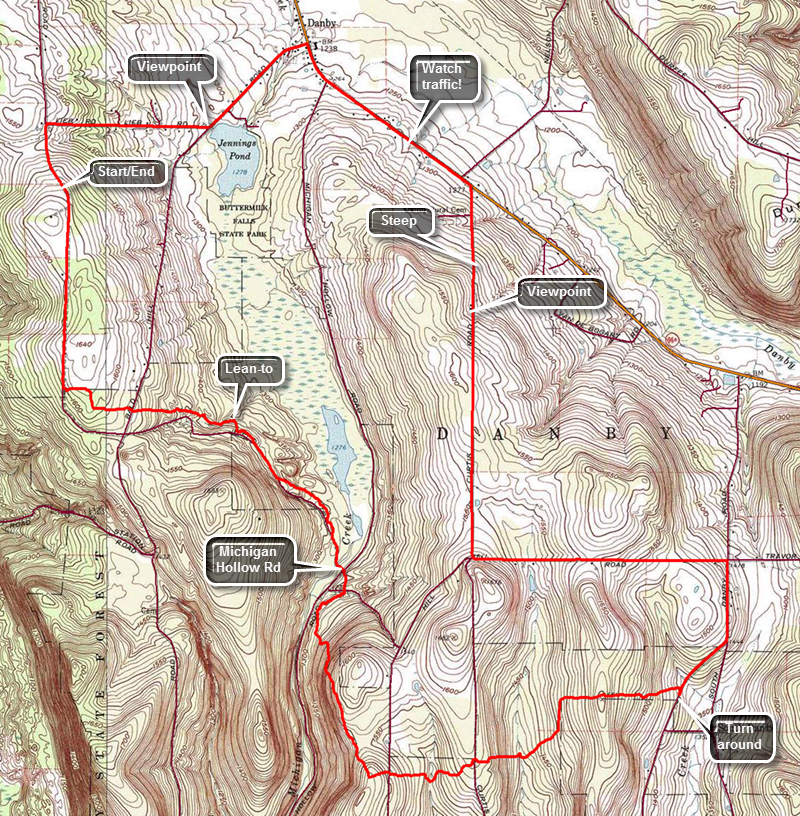 The Finger Lakes Trail is a primitive footpath that starts in Allegheny State Park on the New York - Pennsylvania border and extends 576.5 miles to end in the Catskill Park at the beginning of the Table Peekamoose Trail off the Phoenicia East Branch Trail near the Denning trailhead. There are other side trails which increase the length of the trail system. Four hundred miles of this trail is also part of the Scenic North Country Trail. The Finer Lakes Trail Conference celebrated its 50th Anniversary on June 2, 2012. To commemorate the occasion the Conference set up a series of hikes that would cover the entire length of the trail. Hikes varied in length and difficulty from 4 to 14 miles. The Trail Conference continues to improve the trails and to move sections from roads to trails.
This hike can be done with a car spot since it is 12.3 miles round trip. The return trip is on local rods which makes the walking easier. Take State Route 17/I86 to exit 64 at Owego and head north from there on Route 96 and Route 96B. After passing the "Welcome to Danby" sign watch for Bald Hill Road on the left. Turn left and continue for about .7 miles before making a right on Lieb Road. At the end of Lieb Road turn left on dirt and gravel Comfort Road. After only .2 miles the Finger Lakes Trail joins the road from the west. Turn around and park in a wide spot on the east side of the road. Start your hike by walking south on Comfort Road for a mile. After a mile, turn left into the woods at a clearly marked turn. Cross Bald Hill Road at 1.4 miles and immediately re-enter the woods on the other side. The trail passes through both hardwood and pine forests. There were several stands of red pine that were obviously planted at some time. At 1.9 miles the Chestnut lean-to will be on the left. Just after the lean-to the trail turns sharply right and comes to a logging road. Continue directly across the logging road and descend to a left turn onto a woods road as you approach Michigan Hollow Road. Cross Michigan Hollow Road and continue heading south crossing washed-out Smiley Road and a small stream. The trail begins to climb from 1290 feet at the road to 1630 feet at 4.1 miles where the trail turns east. On the way there are a few ups and downs. Cross Hill Road at 4.2 miles and descend to a small stream. After a short ascent, cross Curtis Road at 4.7 miles and again descend to a stream. This stream is wider than some in the area and has a bridge. The stream has been rerouted since the near end of the bridge is in the water. After crossing, turn right to pick up the blazes. Just after the stream, the trail turns northeast and then, at 5.3 miles, heads due east. Pass through some red pines while ascending and then began to descend to Fisher Settlement Road. The trail here may be wet and muddy and is bordered by briars and wild roses. The trail meets the road at 5.9 miles. Turn right to walk to the beginning of the next section of trail. Start your return trip by walking north to South Danby Road and heading north to Hill Road which roughly parallels Route 96B. At 6.7 miles turn left on Hill Road and get ready to ascend. The walk to the next intersection is 1.2 miles and is pretty evenly divided between uphill and then downhill. At the intersection with Curtis Road turn right on Curtis Road and walk out to Route 96B. This road also rolls some with an initial descent and then a short climb. The road starts to drop sharply at about 8.6 miles and there is a nice view of the valley below. At Route 96B turn left and walk a little over a mile to Bald Hill Road. Turn left and start to walk toward Lieb Road. Before making the right turn on Lieb Road, take a minute to view Jennings Pond on the left which is part of Buttermilk Falls State Park. Continue your walk back to the car by turning left onto Lieb Road and making a left at the end onto Comfort Road.
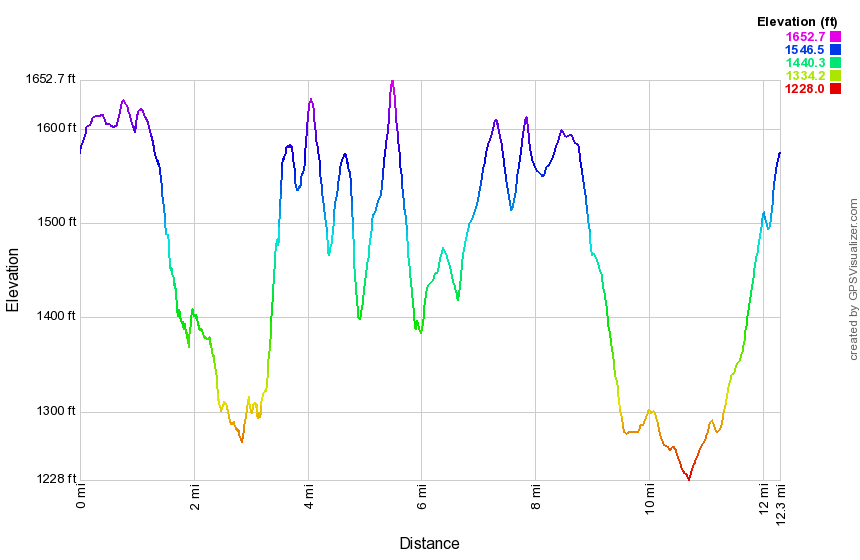 (The image at the left shows the profile of the hike. Remember that all vertical profiles are relative!)
Finger Lakes Trail: Comfort Road to Route 13
| Quick Look | ||||
|---|---|---|---|---|
| Difficulty | Round trip | Total climb | Internet Maps | |
| 13.9 mi | 1983 ft. | AllTrails | ||
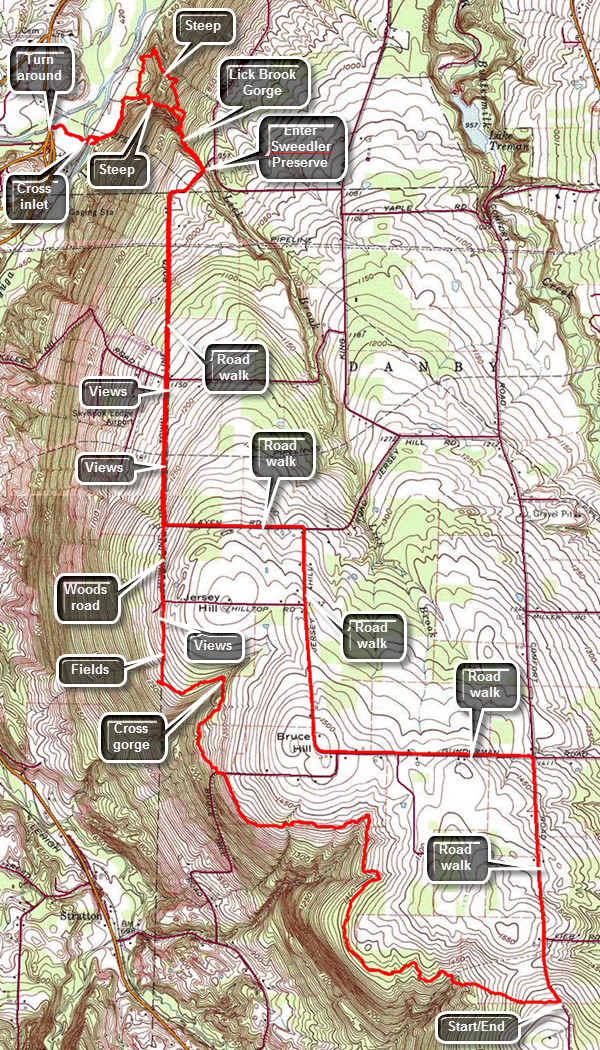 The Finger Lakes Trail is a primitive footpath that starts in Allegheny State Park on the New York - Pennsylvania border and extends 576.5 miles to end in the Catskill Park at the beginning of the Table Peekamoose Trail off the Phoenicia East Branch Trail near the Denning trailhead. There are other side trails which increase the length of the trail system. Four hundred miles of this trail is also part of the Scenic North Country Trail. The Finer Lakes Trail Conference celebrated its 50th Anniversary on June 2, 2012. To commemorate the occasion the Conference set up a series of hikes that would cover the entire length of the trail. Hikes varied in length and difficulty from 4 to 14 miles. The Trail Conference continues to improve the trails and to move sections from roads to trails.
This hike is best done with a car spot since it is 13.9 miles round trip and has some steeps spots especially in Lick Brook Gorge. The return trip is on local roads which makes the walking easier. Take State Route 17/I86 to exit 64 at Owego and head north from there on Route 96 and Route 96B. After passing the "Welcome to Danby" sign watch for Bald Hill Road on the left. Turn left and continue for about .7 miles before making a right on Lieb Road. At the end of Lieb Road turn left on dirt and gravel Comfort Road. After only .2 miles the Finger Lakes Trail joins the road from the west. Turn around and park in a wide spot on the east side of the road. Start your hike by walking across the road to pick up the trail as it heads west from Comfort Road. The trail may initially wet and descends to an abandoned road. After this, the trail follows a contour line without gaining or losing much elevation until it turns north at 2.4 miles. You will drop a little to Bruce Hill Road at 2.7 miles where the trail and turns left to briefly follow the road until turning into the woods. Shortly after entering the woods there is a double tree trunk and a large tree beyond it. After this make a slight swing to the east to avoid a deep gully formed by a tributary to the Cayuga Inlet. Come out of the woods into a field where the next blazes are not obvious. Walking across the upper part of the field and through an opening to the next field. Walk along the hedge row and pick up the white blazes on the far side. When you come to the next set of fields, you will have the same problem except there is a blaze on a tree near the middle of the field. After that blaze, there are no others you can easily spot. At the far side of the field turn right and walk along the west side of the field next to the hedgerow heading north. If you look carefully, you may see one or two old, faded white blazes. Watch for views to your left or west as the hedgerow thins. When you come to the edge of the field, cross a road or driveway and to a woods road. This is the end of Town Line Road which is grass at this point. At 4.25 miles Then line Road intersects Layen Road. Both Town Line Road and Layen Road are gravel covered at this point. Continue walking down Town Line Road losing elevation as you go. The road was absolutely straight as you cross West Jersey Hill Road on your 1.5 miles trek. Arrive at the point where the road curves to the right and continue to follow it as it crosses a bridge over Lick Brook. This is the Sweedler Nature Preserve owned by the Finger Lakes Land Trust. From the bridge you can see a deep gorge cut by this little brook. This is a popular destination with several different trails. Just after the bridge turn left at 5.9 miles to follow the Finger Lakes Trail down through the gorge. There are several small falls and many interesting rock formations along the gorge. At 6.2 miles pass by the upper falls without a good view. Just after this the Finger Lakes Trail heads away from the gorge to take a slightly less steep route. The blue Lick Gorge Trail stays to the left along the gorge. Turn right to follow the Finger Lakes Trail. You will return on the blue trail. At 6.3 miles a short spur trail on the left connects the two trails. Turn a little to the right here to follow the Finger Lakes Trail across a stream and to continue your descent along a spit of land that is between Lick Brook on the left and another stream on the right. At 6.7 miles make almost a 180 degree turn to the left and head down to Lick Brook again. The trail passes the bottom of the lower falls and which is largely hidden from the trail. Continue along the trail to the edge of Cayuga Inlet which can be deep and wide depending on the recent rainfall patterns. If you feel you can cross the stream without problems, you should have water shoes and a bag to keep your pack dry just in case. The railroad bridge that crosses the stream is a private bridge. Although there are no signs, crossing it is trespassing. This is the lowest point on the Finger Lakes Trail at about 425 feet! Since turning off the road and into the gorge area you have lost 650 feet and are over 1100 feet lower than where the car is parked. On the other side of the stream hike out to a field and continue to follow the blazes to a large parking area on the east side of Route 13. The blazes continue under a bridge across Enfield Creek. Follow the blazes to the other side then turn around and head back. Turn right after the lower falls on the blue trail. The distance to where the blue trail meets the Finger Lakes Trail is only .25 miles but in that distance the trail gains 350 feet for an average 24% slope. On the way up you may walk to the edge of the cliff and get a view of the lower falls. Farther up the trail where it starts to level out, there is a glimpse of the upper falls through the trees. Continue up to the road and turn right to start the road walk back on Town Line Road. At Layen Road turn left to walk the roads back to the car instead of taking the trail. Walk uphill on Layen Road for .6 miles and turn right onto Jersey Hill Road. The roads are very straight which makes the distances seem longer. Pass Hilltop Road on the right. After 1 mile look for left turn onto Gunderman Road. Once you turn onto Gunderman Road and watch for Comfort Road on the right. After .9 miles turn right on Comfort Road and watch for the junction with Lieb Road after about .8 miles. Your car is only .2 miles away but up a small hill.
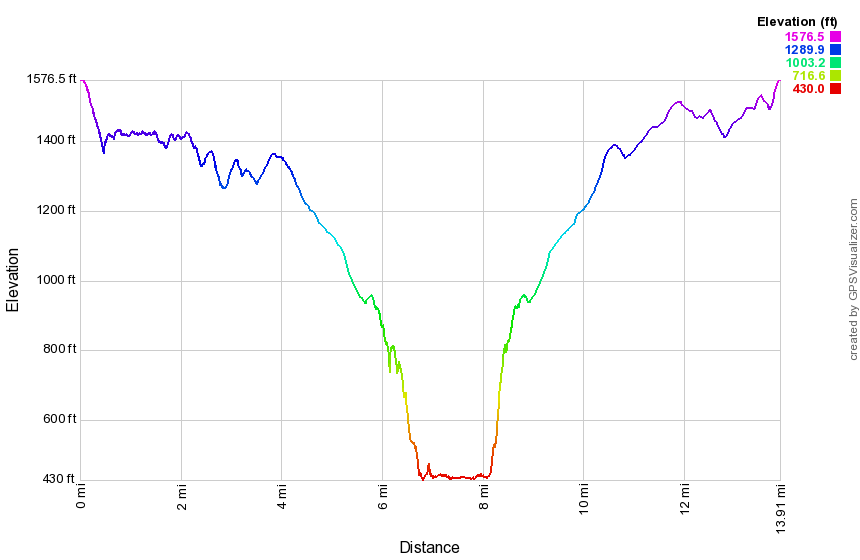 (The image at the left shows the profile of the hike. Remember that all vertical profiles are relative!)
Finger Lakes Trail: Cooper Schoolhouse Rd to Case Rd
| Quick Look | ||||
|---|---|---|---|---|
| Difficulty | Round trip | Total climb | Internet Maps | |
| 7.6 mi | 940 ft. | AllTrails | ||
 The Finger Lakes Trail starts in Allegheny State Park on the New York - Pennsylvania border and extends 576.5 miles to end in the Catskill Park at the beginning of the Table Peekamoose Trail off the Phoenicia East Branch Trail near the Denning trailhead. There are other side trails which increase the length of the trail system. Four hundred miles of this trail is also part of the Scenic North Country Trail. The Finer Lakes Trail Conference celebrated its 50th Anniversary on June 2, 2012. To commemorate the occasion the Conference set up a series of hikes that would cover the entire length of the trail. Hikes varied in length and difficulty from 4 to 14 miles. The Trail Conference continues to improve the trails and to move sections from roads to trails.
This hike can be done with a car spot but it is only 7.6 miles round trip. The route described here is a loop using roads for the return trip! Take Route 206 west from Bainbridge and watch for Case Road on the right. Turn onto Case Road and follow it to where it crosses Searles hill Road and turns to gravel and dirt. Drive to the intersection with Town Line Road and continue straight ahead to Cooper Schoolhouse Road. Park on the corner on the right side of the road. Walk southeast on Town Line Road for about .1 miles before cutting right into the woods on the trail. The next .6 miles of trail can be wet in spots but you should be able to get around or through them without too much trouble. The next .7 miles to Case Road is about the same as you climb a small hill and then hit the road. Turn right on Case Road and follow the blazes on the road for about .15 miles until the trail again cuts into the woods on the left. Over the next .9 miles the trail drops some elevation to cross Searles Hill Road and then gains it back to again cross Case Road all the while heading generally south. There are a few places along the way where the blazes are spaced apart and a few others where the weeds can be high. After crossing Case Road again the trail skirts a field and then runs along the edge of the field and some lawns. It re-enters the woods and at about 3.4 miles starts to parallel Newton Brook. The crossing of the brook at 3.6 miles should not be a problem unless the water is VERY high. Continue to walk along the brook and at 4 miles cross it again on a bridge. The trail leads to a field and then back onto some woods roads until it again met Case Road at 4.3 miles. Turn left on Case Road and use it to get back to the car. You are at the lowest point on the hike so the first part of the walk up Case Road is uphill and you will gain almost 400 feet in 1.4 miles to the point where you last crossed. Along the way watch for the point where the trail enters the woods and heads for Bainbridge. Within .5 miles, cross Searles Hill Road where Case Road turns to gravel and dirt. The next 1.5 miles is generally downhill but rolls a little.
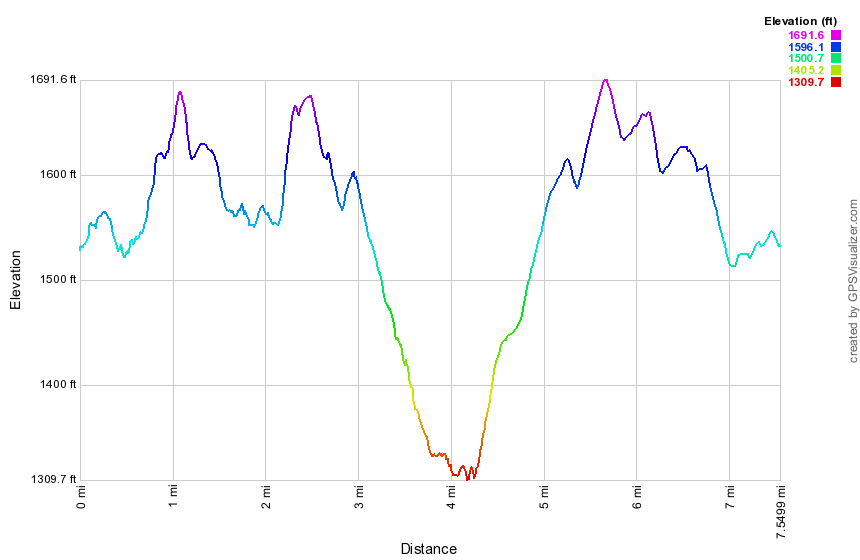 (The image at the left shows the profile of the hike. Remember that all vertical profiles are relative!)
Finger Lakes Trail: Fisher Settlement Road to Heisey Road
| Quick Look | ||||
|---|---|---|---|---|
| Difficulty | Round trip | Total climb | Internet Maps | |
| 8.0 mi | 1334 ft. | AllTrails | ||
 The Finger Lakes Trail is a primitive footpath that starts in Allegheny State Park on the New York - Pennsylvania border and extends 576.5 miles to end in the Catskill Park at the beginning of the Table Peekamoose Trail off the Phoenicia East Branch Trail near the Denning trailhead. There are other side trails which increase the length of the trail system. Four hundred miles of this trail is also part of the Scenic North Country Trail. The Finer Lakes Trail Conference celebrated its 50th Anniversary on June 2, 2012. To commemorate the occasion the Conference set up a series of hikes that would cover the entire length of the trail. Hikes varied in length and difficulty from 4 to 14 miles. The Trail Conference continues to improve the trails and to move sections from roads to trails.
This hike can be done with a car spot but it is only 8 miles round trip. The return trip is on local rods which makes the walking easier. Take State Route 17/I86 to exit 64 at Owego and head north from there on Route 96 and Route 96B. After passing through Candor watch for South Danby Road on the left. Turn left and drive about 1.3 miles to Fisher Settlement Road. Turn right and drive another .3 miles to where the trail enters the woods on the left. Turn around and parked off the road on the grassy shoulder. Start your hike by walking into the woods on the trail heading generally east toward South Danby Road. Descend for .25 miles to South Danby Road and after crossing it began an ascent of about 300 feet over the next mile. At 1.3 miles the trail turns almost 90 degrees left and heads north toward Route 96B. Descend slightly and then climb to the highest point on the hike at 1760 feet at the 2 mile mark. Just after this the trail turns slightly to the left and a spur trail goes to the Tamarack lean-to. Several parts of the trail travel through impressive stands of red pine that were obviously planted at one time. They are very tall and very regularly spaced. Over the next mile to Route 96B you will lose 560 feet heading north. There are some steep places and a few may be slippery with mud. Cross the road and pick up the trail as it turns right to parallel the road for .2 miles. The short section of trail ends at Durfee Hill Road and a sign post marks a turn to the right back out to Route 96B. A section of trail at the top of Durfee Hill Road has been closed by the landowner and the trail has been rerouted. At Route 96B turn left and walk along the shoulder for .2 miles to Heisey Road. Turn left and get ready for a climb since over the next .5 miles the elevation gain is about 435 feet to the highest point on Heisey Road. Hike down from the high point to the intersection with Eastman Hill Road. There is room to park one or two cars but the last part of Heisey Road is very washed out and would require some careful maneuvering in a vehicle. Turned around at 5.8 miles and walk back down Heisey Road to Route 96B. Turn right on Route 96B and walk 1.4 miles to South Danby Road. Turn left and walk uphill for 1.25 miles to Fisher Settlement Road. Turn right and walk the final .3 miles back to the car.
 (The image at the left shows the profile of the hike. Remember that all vertical profiles are relative!)
Finger Lakes Trail: Grover Brown Rd to Berry Hill
| Quick Look | ||||
|---|---|---|---|---|
| Difficulty | Round trip | Total climb | Internet Maps | |
| 12.4 mi | 1520 ft. | AllTrails | ||
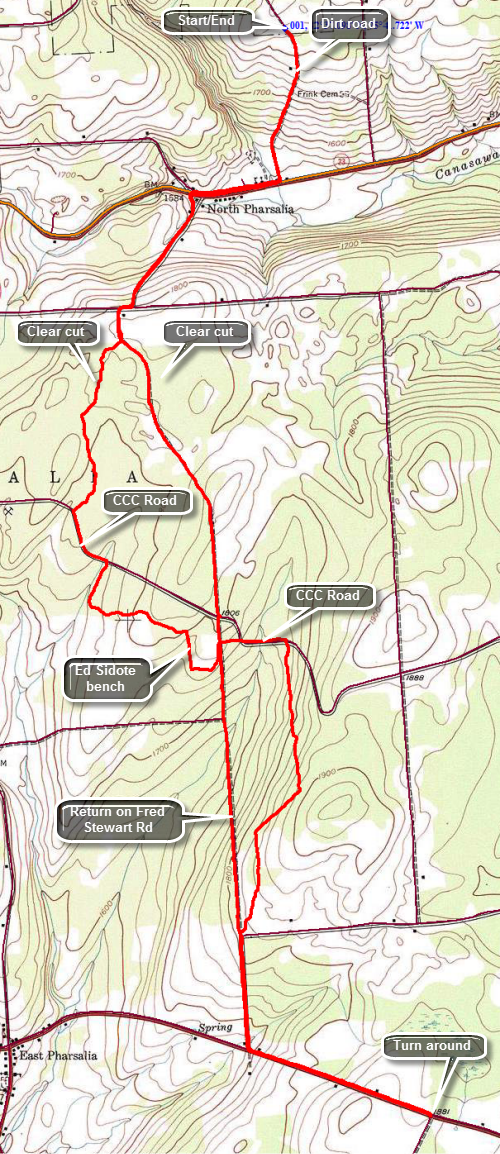 The Finger Lakes Trail starts in Allegheny State Park on the New York - Pennsylvania border and extends 576.5 miles to end in the Catskill Park at the beginning of the Table Peekamoose Trail off the Phoenicia East Branch Trail near the Denning trailhead. There are other side trails which increase the length of the trail system. Four hundred miles of this trail is also part of the Scenic North Country Trail. The Finer Lakes Trail Conference celebrated its 50th Anniversary on June 2, 2012. To commemorate the occasion the Conference set up a series of hikes that would cover the entire length of the trail. Hikes varied in length and difficulty from 4 to 14 miles. The Trail Conference continues to improve the trails and to move sections from roads to trails.
This hike is best done with a car spot since it is 6.8 miles one way for a total of 13.6 miles. The route described here is out and back with a little variation thrown in! By returning on roads the distance back is cut by 1.3 miles. Take County Route 23 west from Norwich for about 11.5 miles toward North Pharsalia. Watch for Grover Brown Road on the right which may not be marked. If you come to the intersection of Route 23 with FreStewart Road (right) and One Eye Street (right), you have gone too far. Drive up paved Grover Brown Road passing the "Seasonal Maintenance" sign where a gravel/dirt surface starts. The surface is good without too many dips or holes but you may not want to try it without an all-wheel drive vehicle. At about .6 miles from Route 23 the Finger Lakes Trail meets the road. Drive a little farther, turn around and park where the trail meets the road. To begin the hike walk .6 miles down Grover Brown Road to Route 23. Turn right and walk .7 miles along the shoulder to Fred Stewart Road on the left. This road heads south to Route 10 which is your destination. The Finger Lakes Trail, however, leaves the road several times to enter the forest. Walk south on Fred Stewart Road for .6 miles, turn right on Center Road and then make a quick left back onto Fred Stewart Road. The road at this point has a gravel surface and a "seasonal maintenance" sign but is in good shape. After walking another .1 miles, turn right into the forest. The trail surface is pretty flat with only a few rocks. In about .8 miles you will meet an old CCC road. After a short walk you will enter a clear cut area not mentioned on the map! The trail may be overgrown with prickers which flourish in the sunlight. The trail can be hard to follow in many places and there are few blazes to guide the way. The trip through the clear cut is actually short and after that you will enter an evergreen forest. When you meet the CCC road, turn left and hike along the road for .3 miles to the point where the Finger Lakes Trail leaves the road on the right. The trail now is wider and cushioned by pine needles. You will come to a stone wall where the trail turns right and just after this, at 3.6 miles, is a stone bench dedicated to Ed Sidote. Mr. Sidote chose this place. He is #3 on the FLT End-to-End list and has served the Finger Lakes Trail Conference as president and in many other capacities. Just after the bench is a stone foundation on the right. Cross the road and continue downhill to the CCC road where you will turn right. After .3 miles on the road, the trail again enters the woods on the right. Over the next 1.3 miles the trail ascends and descends a small hill staying parallel to the road until meeting it again at the intersection with Hoag-Childs Road. At this point the rest of the hike is a road walk to North Tower Road. Fred Stewart Road is now paved and the walk is downhill for .5 miles to Route 10. You will pass Dave Markham's machine shop where water is available. At Route 10 we turn left and start to walk east to North Tower Road. Route 10 is busy and has no paved shoulders for walking. It does have good sight lines so that you can get out of the way when cars or trucks are coming. The walk is mostly up hill for .8 miles to the intersection with Tower Road. If you have parked another car at the Berry Hill Fire Tower, Walk south on Tower Road for .3 miles to the access road to the fire tower. If you are by yourself, you must turn around and retrace your route back to your car. To save some distance, you can hike back all the way on Fred Stewart Road. The walk is pleasant as the road is mostly dirt and gravel and is very lightly traveled. This saves about 1.3 miles! The hike back on Route 10 was quick and we made good time back to the road intersection. I decided that we would walk back all the way on the road since it was easier to walk and had a dirt and gravel surface. It seemed that this route would also save some distance as it was absolutely straight. As we hiked the insects returned but were manageable. I kept Sheila on her leash as we had met several trucks along the way. In 1.2 miles we were at the point where the trail crossed the road and we continued north crossing the CCC Road. In another 1.3 miles we were at the point where we had first entered the woods. Along the way we passed another area where the trees were "disturbed". I stopped to take some pictures but could not decided whether this was a clear cut area or was caused by some other "disaster". We walked back out to Center Road and turned right and then left to follow Fred Stewart Road back to Route 23. From here we simply retraced our steps to Grover Brown road and then to the car. The final uphill on Grover Brown Road was easier than I thought it might be. We were back at the car at 2:10 PM having covered 12.4 miles in 4.5 hours. The vertical gain was over 1500 feet but most of this was on the roads. The trip out on the trail was 6.8 miles while the return journey was 5.5 miles saving 1.3 miles and a little over 20 minutes as I had hoped.
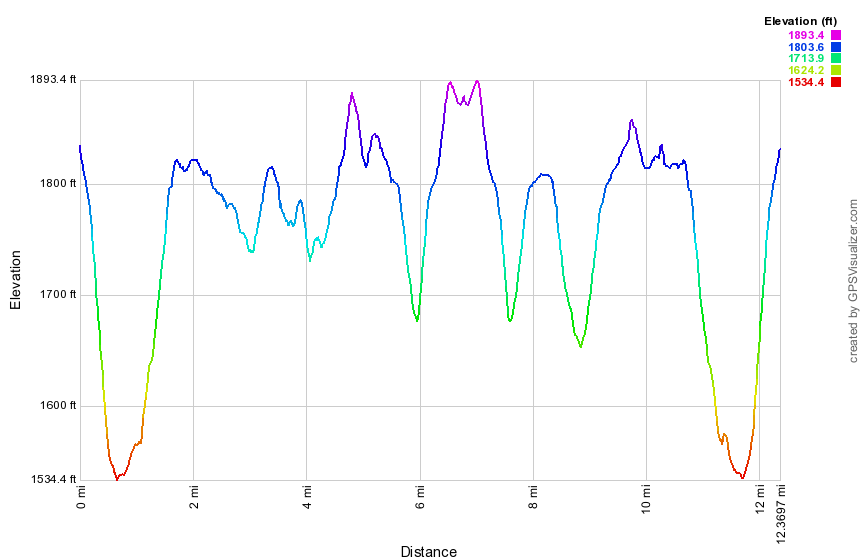 (The image at the left shows the profile of the hike. Remember that all vertical profiles are relative!)
Finger Lakes Trail: Gulf Road to Boylan Road
| Quick Look | ||||
|---|---|---|---|---|
| Difficulty | Round trip | Total climb | Internet Maps | |
| 10.5 mi | 1420 ft. | AllTrails | ||
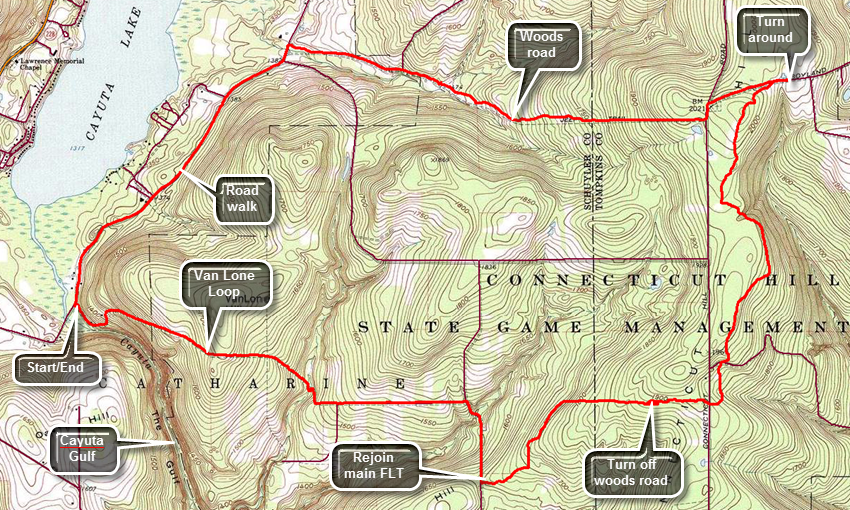 The Finger Lakes Trail is a primitive footpath that starts in Allegheny State Park on the New York - Pennsylvania border and extends 576.5 miles to end in the Catskill Park at the beginning of the Table Peekamoose Trail off the Phoenicia East Branch Trail near the Denning trailhead. There are other side trails which increase the length of the trail system. Four hundred miles of this trail is also part of the Scenic North Country Trail. The Finer Lakes Trail Conference celebrated its 50th Anniversary on June 2, 2012. To commemorate the occasion the Conference set up a series of hikes that would cover the entire length of the trail. Hikes varied in length and difficulty from 4 to 14 miles. The Trail Conference continues to improve the trails and to move sections from roads to trails.
This hike can be done with a car spot but is only 10.5 miles round trip. The first 8.8 miles is on trails and dirt roads while the last 1.7 miles is on paved local roads which makes the walking easier. Flooding early in the summer of 2015 washed out the bridges over Cayuta Creek on the main Finger Lakes Trail. It may be possible to cross the creek in drier weather but this route follows the Van Lone Hill alternate route. Take State Route 17/I86 to exit 64 at Owego and head north from there on Route 96 through Candor and Spencer. I continued on Route 17 to exit 64 at Owego and headed north from there on Route 96 through Candor and Spencer. In Spencer take Route 34 west to Van Etten. Turn right in Van Etten onto Route 224 when Route 34 heads south. Follow Route 224 for 14.7 miles as it passes through Cayuta crossing Route 13. Just short of 15 miles on Route 224, turn right to head north on Route 10 for 1.6 miles to Route 6. Turn right on Route 6 and drive about a mile to Gulf Road. Park on the shoulder of Route 6 just before Gulf Road. Start your hike by walking down Gulf Road. After a short distance on Gulf Road, the Finger Lakes Trail turns to the right to enter Cayuta Gulf. Stay to the left on Gulf Road and begin to climb Van Lone Hill on the dirt road. The road is well-maintained and has several houses. Eventually the road comes to a dead end. Continue to follow the orange blazes as they enter the woods. It is clear that the road once continued over the hill. At .75 miles reach the highest point on the trail at 1700 feet and immediately begin to descend the other side. The trail follows a deep creek bed that typically has only a trickle of water. The creek eventually crosses and then recrosses the road. From the amount of stones that are piled up it is obvious that this small creek has at times been filled to overflowing with a huge volume of water. At 1.6 miles reach Schoolhouse Road heading due east. Although the road is dirt and gravel it is in good shape. After .6 miles, turn right on Todd Road where Schoolhouse Road ends and start a slight descent. Cross a tributary of Cayuta Creek on a road bridge. Todd Road begins to ascend to the point where the main Finger Lakes Trail crosses the road. This crossing is clearly marked and at 2.6 mile turn left onto the trail as it passes through the woods on an old road. After entering the woods, the trail crosses several open areas with high grass and weeds which may not be trimmed back.The trail heads north and east and climbs some the whole way. At 3.25 miles the trail follows a well-established woods road heading due east. The blazes are few and far between but the road is very easy to follow. At about 3.8 miles watch for a turn to the left off the road. The blazes may be hard to see! The trail parallels the road heading east but may be drier and better maintained. At 4.1 miles cross another dirt road as the trail starts heading north. Many of the dirt roads in the Connecticut Hill Wildlife Management Area are called Connecticut Hill Road! Continue north on the trail and cross Cabin Road at 4.4 miles. The trail rolls some but continues to gain elevation as it heads north toward Boylan Road. At 5.9 miles hit the highest point on the hike at 2014 feet and then start to descend toward the road. The trail crosses an open area where there is no indication of where to go. You may find a narrow green strip across the open area which leads to the road. Turn right on Boylan Road and walk east to where the trail reenters the woods. From here turn around and head west on Boylan Road and turn left where it intersects the next dirt road. After a few hundred feet turn right on another dirt road. This road continues west to Route 6 which is a paved road. However, the road ends after a short distance and becomes a woods road until it again turns into a dirt road near Route 6. The route is pretty easy to follow as long as you continue to head west. The road has a gate that is sometimes shut and locked. Walk along the road for about .6 miles where, at 7.25 miles, the dirt road ends. From that point on follow the woods road west as it passes through woods and then open fields. The track is pretty easy to follow but was badly rutted in many places. Soon the road becomes more consolidated. Come to a stream where there was once a bridge. Cross the stream on the rocks. At about 8 miles the road becomes a "maintained" dirt road again which is marked as Van Loon Road on both maps and GPS. At 8.8 miles turn left on Route 6 and start south toward the car. The road passes by the eastern shore of Cayuta Lake. There are no views of the lake as the road is farther from the lake than it appears on the map and there are trees blocking the view. The walk south on Route 6 back to the car is only 1.7 miles.
 (The image at the left shows the profile of the hike. Remember that all vertical profiles are relative!)
Finger Lakes Trail: Heisey Road to Braley Hill Road
| Quick Look | ||||
|---|---|---|---|---|
| Difficulty | Round trip | Total climb | Internet Maps | |
| 9.7 mi | 1878 ft. | AllTrails | ||
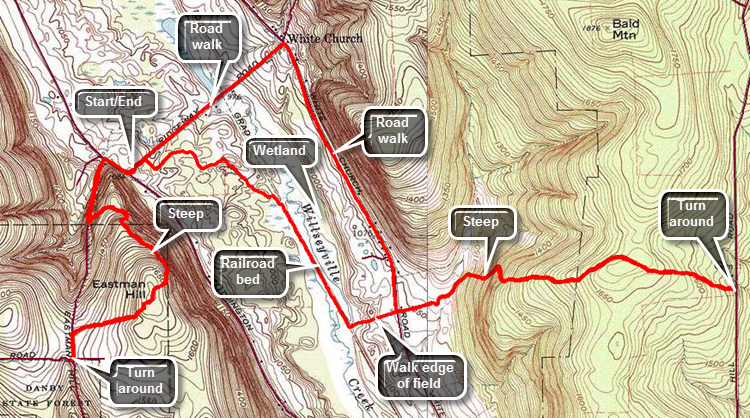 The Finger Lakes Trail is a primitive footpath that starts in Allegheny State Park on the New York - Pennsylvania border and extends 576.5 miles to end in the Catskill Park at the beginning of the Table Peekamoose Trail off the Phoenicia East Branch Trail near the Denning trailhead. There are other side trails which increase the length of the trail system. Four hundred miles of this trail is also part of the Scenic North Country Trail. The Finer Lakes Trail Conference celebrated its 50th Anniversary on June 2, 2012. To commemorate the occasion the Conference set up a series of hikes that would cover the entire length of the trail. Hikes varied in length and difficulty from 4 to 14 miles. The Trail Conference continues to improve the trails and to move sections from roads to trails.
This hike is probably best done by parking on Ridgeway Road and hiking to Heisey Road and then back. After that, hike to Braley Hill Road and then back from there. Blackman Hill Road and Heisey Road are both in poor condition which makes parking at the true beginning of map 18 very difficult. Take State Route 17/I86 to exit 64 at Owego and head north from there on Route 96 and Route 96B. After passing through Candor begin to look for Willseyville Road on the right. Turn right on this road and then right again onto Coddington Road. Drive north 4 miles, turn right on Ridgeway Road and park on the wide shoulder. Start your hike by walking back out to Route 96B and turning right to head north for about .15 miles. Turn left on a woods road after only about .15 miles. After only a short distance, another woods road goes off to the right but you should stay left and climb the hill. The trail begins a steady climb at about a 15% grade over the next .25 miles. At .42 miles there is a sharp turn to the left onto another woods road and the turn may be poorly marked. After a short distance on this road, the trail makes an abrupt turn to the right. The trail follows various woods roads of which there are many so watch the blazes carefully. A viewpoint over the Willseyville Valley is marked on the map but there is no viewpoint there anymore. At 1.1 miles you will be at the highest point on Eastman Hill having gained over 600 feet since leaving the car. So far the trail should be mostly dry but you may begin to encounter wet and muddy areas of the trail as you approach Eastman Hill Road. At 1.45 miles turn left on Eastman Hill Road which is little more than a path and walk to the intersection with Heisey Road. Turn around and walked the 1.5 miles back to the car. Continue the hike by walking northeast on Ridgeway Road for only a few hundred feet before turning right into a clearing which looks like a small park. Turn left into the woods after only a few hundred feet. The trail follows a woods road but eventually leaves the road and winds through the woods making a sharp right at about 3.5 miles. You are now descending slightly and heading southeast. At 3.85 miles turn right on a flat railroad bed which was once part of the Lebanon Valley Railroad. Begin to walk along the level bed between two wetlands. Take advantage of any opening on the left to get a good view of the extensive wetlands. At 4.4 miles the blazes indicate a sharp left turn into the woods and lead you to a field where the blazes all but disappear. Turn left and walk east to White Church Road along the north side of the field. Cross the road and walk along the north edge of another field without the aid of blazes. At 4.8 miles the trail curls around the back edge of the field to the right and blazes indicate a left turn. Follow the trail as it crosses a stream on a wooden bridge. Continue on to a grassy clearing with white blazes on stakes. The trail enters the woods and is sited on a woods road which it follows as it climbs the hill heading almost due east. Several roads cut across the trail and the blazing could be better in some places. At 5.75 miles the trail reaches 1680 feet which is a climb of about 700 feet from White Church Road. As you continue to Braley Hill Road, the trail drops about 150 feet over .4 miles. At this point you are at about 6.2 miles. Turn around and follow the trail back over the hill to White Church Road. Turn right and head north toward Ridgeway Road. The road gains a little elevation but the alternate path along open road is a welcome change. After walking about 1.2 miles on the road, turn left on Ridgeway Road at about 8.9 miles. Looking ahead the road descends to a low spot and then ascends again to the car. The low point is the old railroad bed. and the ascent to the car is actually less difficult than it looks from the intersection.
 (The image at the left shows the profile of the hike. Remember that all vertical profiles are relative!)
Finger Lakes Trail: Holiday Brook Rd to Route 206
| Quick Look | ||||
|---|---|---|---|---|
| Difficulty | Round trip | Total climb | Internet Maps | |
| 6.4 mi. | 1824 ft. | AllTrails | ||
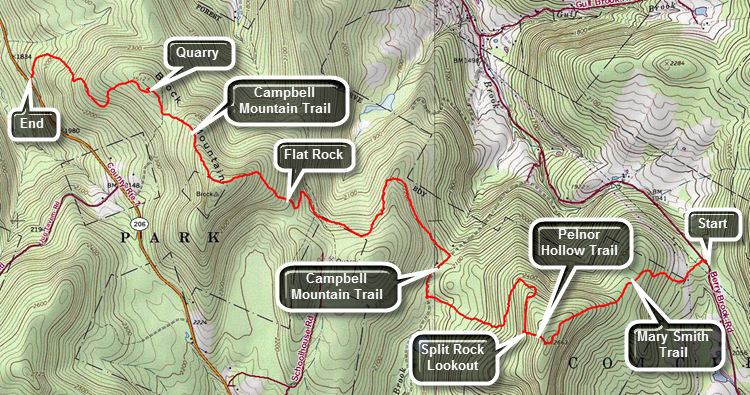 The Finger Lakes Trail is a primitive footpath that starts in Allegheny State Park on the New York - Pennsylvania border and extends 576.5 miles to end in the Catskill Park at the beginning of the Table Peekamoose Trail off the Phoenicia East Branch Trail near the Denning trailhead. There are other side trails which increase the length of the trail system. Four hundred miles of this trail is also part of the Scenic North Country Trail. The Finer Lakes Trail Conference celebrated its 50th Anniversary on June 2, 2012. To commemorate the occasion the Conference set up a series of hikes that would cover the entire length of the trail. Hikes varied in length and difficulty from 4 to 14 miles. The last section is the one described here and is mostly a road walk from The parking area on Black Bear Road (Wild Meadow Road) near Round Pond to the eastern terminus of the trail 1.2 miles from the Denning trailhead.
This hike is simply the above hike in the reverse direction which loses 300 feet in elevation. This is a one way hike that requires a car shuttle or you will have to double the distance to 12.8 miles! Another option is to have someone pick you up at the other end. Head out of Roscoe on Route 206. After passing over the top of Brock Mountain, watch for the place where the trail crosses the road just down the hill from Jug Tavern Road. Pull into the small parking area on the left. Leave a car here and load your gear into the other vehicle. Drive north toward the Pepacton Reservoir on Route 206. Turn right on Route 30. After 4.6 miles, turn right on Holiday Brook Road and drive another 2.8 miles to the trailhead parking on the left.
The trail varies from a wide woods road to a narrow foot trail along its entire length. Hiking this trail can be a real pain or a great pleasure depending on the trail maintenance. This trail is part of the Finger Lakes Trail system and is maintained by their volunteers. Blowdowns can be a problem but the bigger problem is the dense stands of prickers that can obscure the trail. Cross the road to begin the hike on the red Mary Smith Trail. Walk out of the woods and cross a powerline right-of-way. Watch carefully for the trail on the other side which enters the woods and starts to climb toward the Pelnor Hollow Trail. In 1.1 miles the trail ascends over 500 ft to the top of a hill. Along the way there are some steeper areas and some rock scrambles. At the blue Pelnor Hollow Trail, turn right and begin a steep descent to the Splitrock viewpoint. The descent is tricky but at 1.3 miles there is a lookout. The view is often hazy. Continue on the blue Pelnor Hollow Trail and over the next 1.1 miles descend 470 feet over some difficult ground to a trail junction. The signs at the junction may be absent but turn right on the blue Campbell Mountain Trail which is also a snowmobile trail. The trail is very eroded and difficult to negotiate. At 2.6 miles the trail turns left heading northwest off the snowmobile trail. Just after the junction the trail begins to ascend and eventually swings to the south. At 3.9 miles there is a serious ascent toward the top of an unnamed hill gaining 470 feet over .7 miles. The forests vary between hardwood and evergreen trees with the two often mixed. At 4.2 miles there is an open area called Flat Rock which lives up to its name. Continue on the trail reaching the highest point at 4.6 miles and then begin to descend 300 feet over .5 miles heading northwest. At 5.2 miles there is an old quarry on the right. There is a road that turned right off the trail to the quarry. There are obvious places where stone has been removed. There is also the remains of an old truck probably used in the quarrying effort. Return to the trail which winds its way west descending through mostly hardwood forest. Over the final 1.1 miles the trail loses 670 feet traveling over well-maintained trail to Route 206.
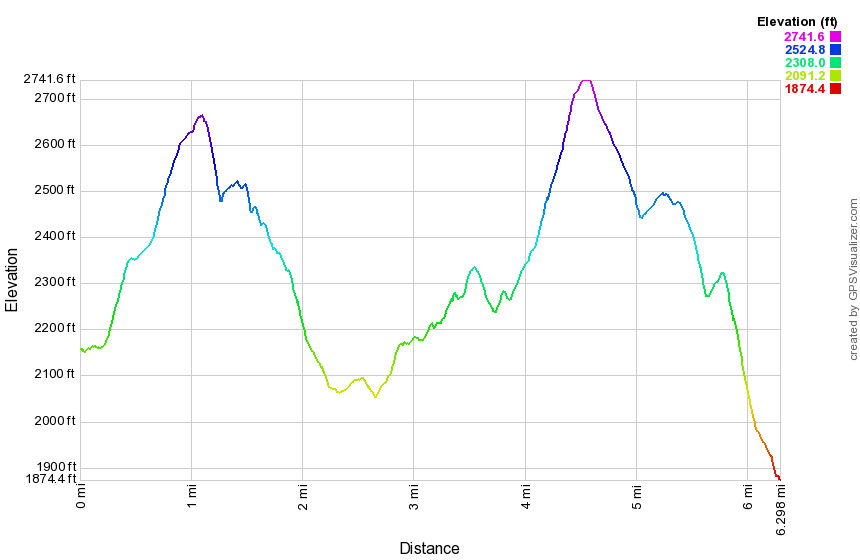 (The image at the left shows the profile of the hike. Remember that all vertical profiles are relative!)
| Quick Look | ||||
|---|---|---|---|---|
| Difficulty | Round trip | Total climb | Internet Maps | |
| 10.2 mi. | 1400 ft. | AllTrails | ||
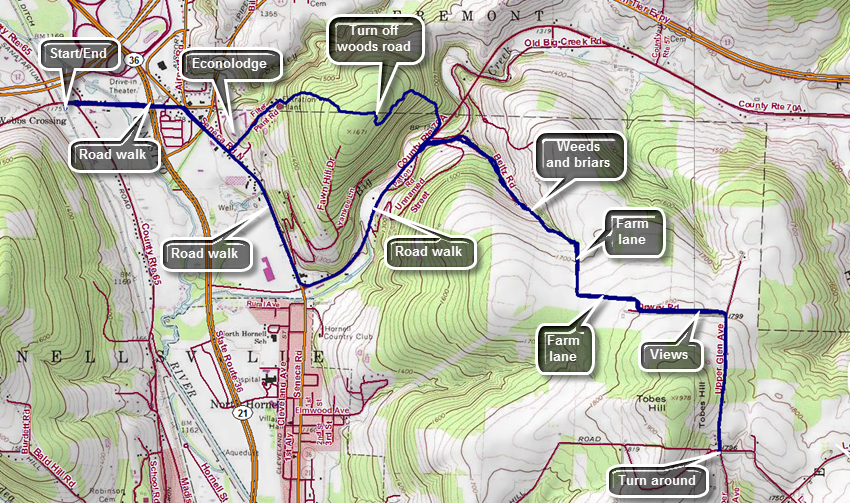
This hike starts at the parking area on Route 66 near the railroad tracks west of Route 6 in Hornellsville. It covers the first 5.2 miles of FLT Map 10! This can be done as a straight out and back hike or the roads can be used on the way back for a different view. Take exit 34 off I86 west (State Route 17) to Hornell. After getting off the exit turn right on Route 66 and drive west to the railroad tracks to a parking area on the left. Begin the hike by walking east on Route 66 to a traffic light on Route 36. Cross the intersection and continued on Route 66 watching for a right turn onto Seneca Road North at the next stop sign. Turn right to walk south along Seneca Road North crossing a branch of the Canisteo River. At .9 miles turn left into the driveway of the Econolodge to hike the section of trail that eliminates the road walk. Walk up the driveway following some blazes on the trees and poles. Continue to the right of the motel on paved road and then up the hill on a dirt road which passes the Hornell Water Filtration plant and a large water tank farther up the hill. Continue up the hill which is challenging but not very difficult. Bear right at the top of the hill. There are places where other roads branch off but the trail is clearly marked. When you hear the top of the hill and the trail levels, watch for a turn to the left. Follow the trail through a bower heading generally northeast and then east through mixed hardwood and evergreen trees. At 1.7 miles you will hit the highest point on this section and will have gained 480 feet in .8 miles. The trail now starts to descend toward Route 70A. After a short descent on the woods road, watch for the trail to turn off the road to the left at 1.8 miles. The turn may not be well marked. When you arrive at Route 70A, turn right to walk down the road. Turn left at the second road which is marked with an FLT sign and blazes. This is Beltz Road and the turn is more than 90 degrees and up a hill. After a short distance the trail turns to the left off the road following an old woods road. The road begins to parallel a streambed and there are wide gullies that seem to have been cut by a lot of running water. There is even a pretty good sized bridge on the trail. The trail has few blazes and there can be blowdowns and branches on the trail. As the woods road opens up weeds and briars may have completely overgrown the trail. Once you are back in the woods the trail is mostly dirt. At 3.5 miles turn right on a farm lane. The lane heads south until 3.7 miles when it turns east. At 4.0 miles it turns south and meets up with Dewey Road. Hiking along the lane and Dewey Road there are some nice views to the north and fields on both sides of the road. Dewey Road meets Upper Glen Road at 4.7 miles. Turn right and walk uphill passed some houses to the highest point on the hike at 4.8 miles. From here walk down Upper Glen Avenue to the intersection with Lain Road at 5.1 miles. This completes the out part of the hike. Turn around and head back up the hill on Upper Glen Avenue retracing your steps to Dewey Road. Continue to the farm lanes through the fields. Turn left into the woods and start back down the hill on the woods road. Going downhill through the weeds is easier than pushing uphill. This failure of electronic devices illustrates why all hikers should carry printed maps and a standard compass. All hikers should also know how to use these two invaluable aids. Continue down the woods road to Beltz Road and hiked down to the intersection with Route 70A at the base of the hill. Turn left onto Route 70A at 7.7 miles. Walk .9 miles west to Seneca Road North and turn right to hike north. The roads have a wide shoulder in most places. Passed the Econolodge, cross the river and at 9.6 miles turn left onto Route 66. Walk back to you car>
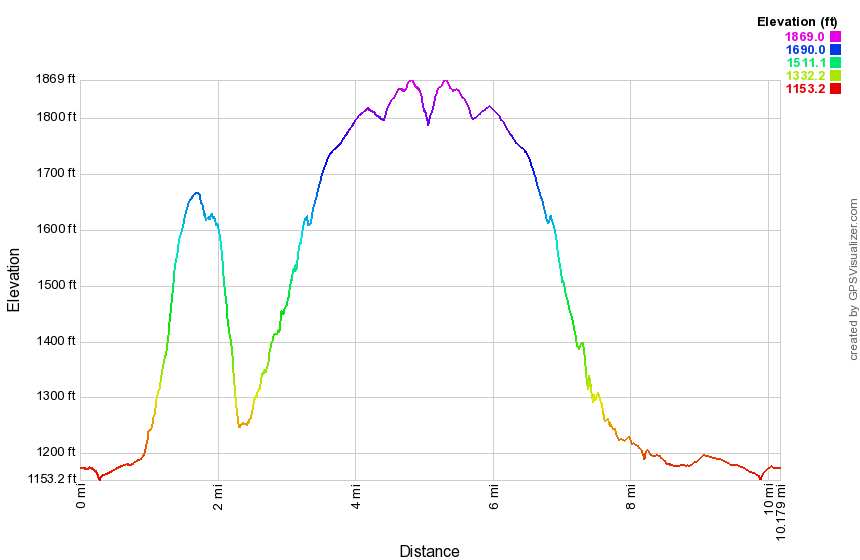 (The image at the left shows the profile of the loop hiking route. Remember that all vertical profiles are relative!)
Finger Lakes Trail: Horse Camp to Downsville
| Quick Look | ||||
|---|---|---|---|---|
| Difficulty | Round trip | Total climb | Internet Maps | |
| 6.5 mi. | 1263 ft. | AllTrails | ||
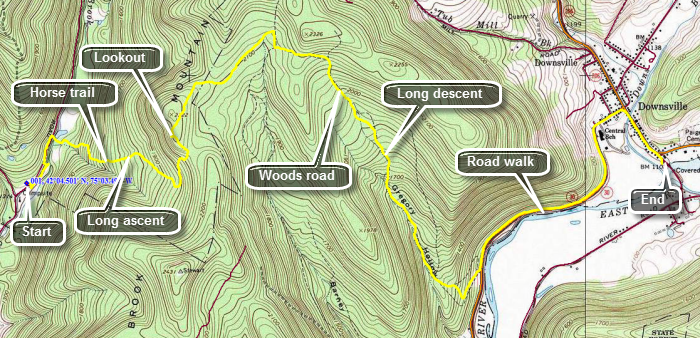 The Finger Lakes Trail starts in Allegheny State Park on the New York - Pennsylvania border and extends 576.5 miles to end in the Catskill Park at the beginning of the Table Peekamoose Trail off the Phoenicia East Branch Trail near the Denning trailhead. There are other side trails which increase the length of the trail system. Four hundred miles of this trail is also part of the Scenic North Country Trail. The Finer Lakes Trail Conference celebrated its 50th Anniversary on June 2, 2012. To commemorate the occasion the Conference set up a series of hikes that would cover the entire length of the trail. Hikes varied in length and difficulty from 4 to 14 miles. The Trail Conference continues to improve the trails and to move sections from roads to trails.
This hike is best done as a car spot as it is 6.5 miles one way! Park one car at the covered bridge park on Bridge street in Downsville, NY. Drive north from Downsville on Route 206. At the top of Bear Spring Mountain watch for East Trout Brook Road on your left. Turn left and follow this road to its intersection with West Trout Brook Road. There will be a large parking area on the right near the end with a DEC Horse Camp across the road. Park in the large lot on your right. After parking, start your hike by walking down to the road. It is possible to continue ahead into the camping area and take Trail 8 to where it crosses East Trout Brook. The problem with this approach is that the brook is often too high to cross without getting wet at the start of your hike. A better approach may be to hike about .3 miles up to the road to a snowmobile bridge on the right side of the road which crosses East Trout Brook. After crossing then bridge, take a left at the trail junction and walk a short distance to a field. Turn right and walk up the right edge of the field to begin your ascent to the ridge on Trail 12. This trail ascends to the top of the ridge over the next 1.1 miles and gains about 860 feet of elevation. At 1.7 miles you will be at the top of the ridge and there is a short side trail that leads to a lookout on the left. Take advance of the view as it is the ONLY viewpoint on the hike. The trail now levels out and actually descends some to 2.0 miles where the FLT leaves the horse trail to the right. The first few hundred feet may seem rough but soon you will join a well-defined woods road. The road mat be wet in many places and wet means insects. be sure you bring your favorite insect repellant! The road at first heads northeast and east but at about 3 miles it turns southeast and starts to descend. Over the next 1.8 miles you will lose about 1125 feet of elevation. At the bottom of the road, turn left on Route 30 and walk 1.4 miles to the stoplight in Downsville. Turn right at the light and walk down Main Street to Bridge Steep where you parked your car.
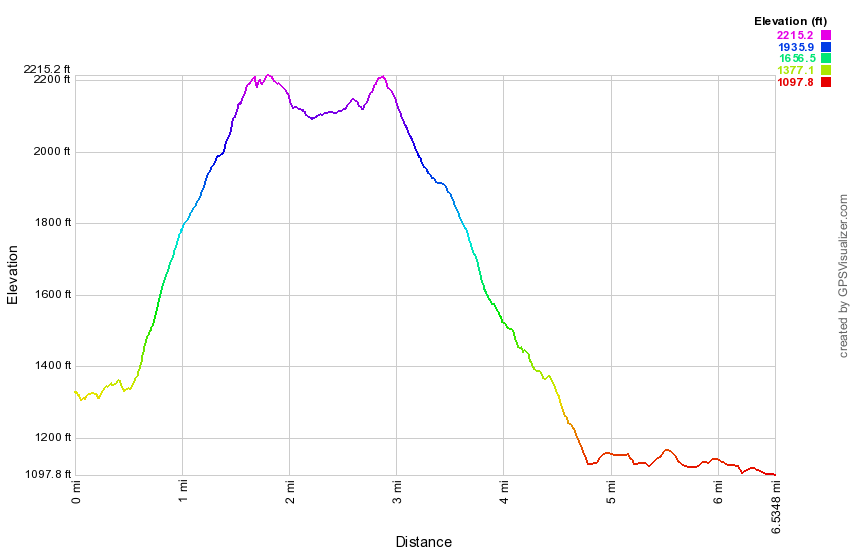 (The image at the left shows the profile of the hike. Remember that all vertical profiles are relative!)
Finger Lakes Trail: Houck Mt from Beers Brook
| Quick Look | ||||
|---|---|---|---|---|
| Difficulty | Round trip | Total climb | Internet Maps | |
| 9.5 mi. | 1950 ft. | AllTrails | ||

Take NYS Route 10 east from Walton for about 4.7 miles until you pass South River Rd on the left. Park in the parking area across the road. Walk east on Route 10 away from South River Road and after a few hundred feet turn left on Beers Brook Road. Walk about half a mile and turn right on Houck Mountain Road. The sign is hidden on the left side of the road as you make the turn. You may also see a few white blazes for the Finger Lakes Trail but these are few and very far between. Be prepared for a continuous climb over the next 1.8 miles and a gain of over 1000 feet in elevation. There are very few views especially when the leaves are on the trees but the walk is on a road which allows a good pace. After a very short descent, DOT Tower Road is a left turn. It is marked by a small Garden and a prominent sign and cannot be missed. The road rises just a little and then starts to descend to the communications towers near the top. Along the way there are several cottages or cabins and two small but pretty ponds on the right side of the road. After walking about 1.4 miles on Tower Road a sign indicates that the Finger Lakes Trail turns to the left onto some trails. Turn left here and stay on the main trail for .4 miles when the trail intersects one of the many trail in Bear Spring Wildlife Management Area. Turn to the left here to continue on the Finger Lakes Trail over Fork Mountain and into Downsville. Turn around and walk back to the main trail. If time allows, turn left and walk up to the communications towers. The array of cables is impressive. When you are ready to return, turn around a retrace your steps back to the car. The return trip is MUCH faster as it is almost completely downhill! A better way to hike this is to use a car shuttle and park one car on Route 10 and the other in Downsville or some other location.
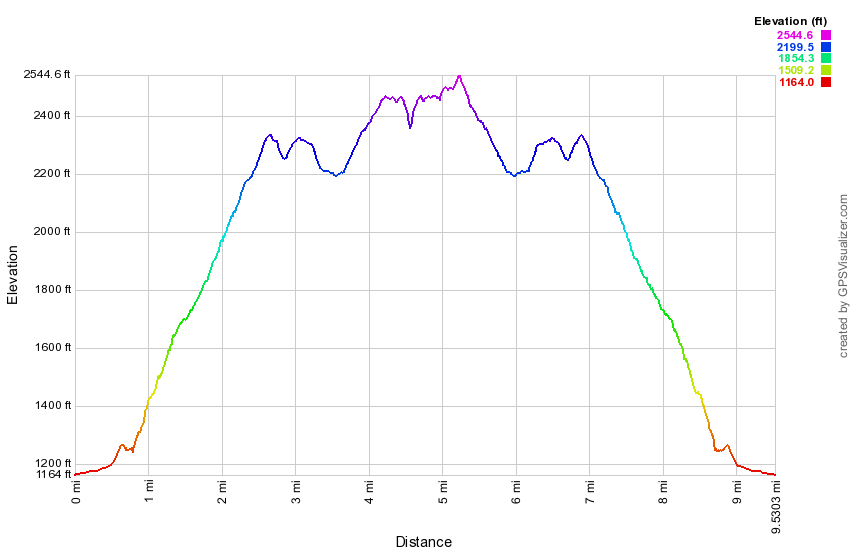 (The image at the left shows the profile of the hike. Remember that all vertical profiles are relative!)
Finger Lakes Trail: Hoxie Gorge to Baker Schoolhouse Road
| Quick Look | ||||
|---|---|---|---|---|
| Difficulty | Round trip | Total climb | Internet Maps | |
| 12.2 mi | 1830 ft. | AllTrails | ||
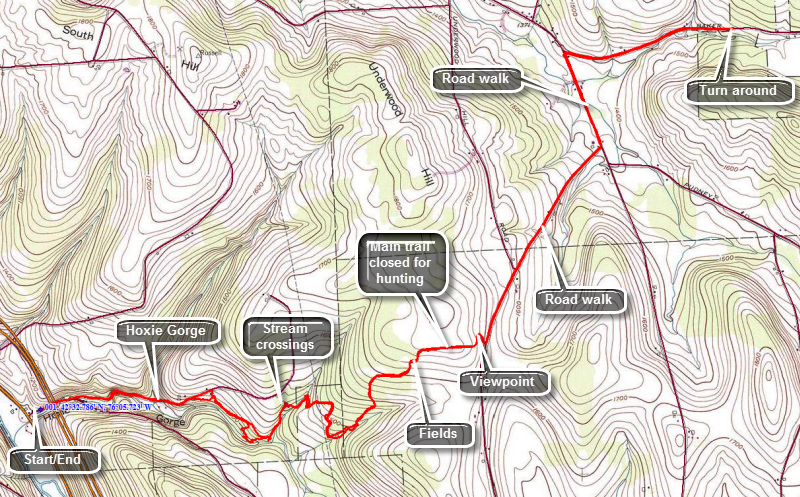 The Finger Lakes Trail starts in Allegheny State Park on the New York - Pennsylvania border and extends 576.5 miles to end in the Catskill Park at the beginning of the Table Peekamoose Trail off the Phoenicia East Branch Trail near the Denning trailhead. There are other side trails which increase the length of the trail system. Four hundred miles of this trail is also part of the Scenic North Country Trail. The Finer Lakes Trail Conference celebrated its 50th Anniversary on June 2, 2012. To commemorate the occasion the Conference set up a series of hikes that would cover the entire length of the trail. Hikes varied in length and difficulty from 4 to 14 miles. The Trail Conference continues to improve the trails and to move sections from roads to trails.
This hike is best done with a car spot since it is 6.25 miles one way for a total of 12.5 miles. The route described here is out and back with a little variation thrown in! Take Route 11 north from Marathon for about 8 miles toward Cortland. Watch for Hoxie Gorge Road on the right and turn onto this road. Just after the turn is a turn around where you should NOT park. Park on the shoulder just past the turn around. Just above you is the Hoxie Gorge Bridge on I81. Walk under the bridge on Hoxie Gorge Road. After a short walk, the road splits and you should stay to the left on Hoxie Gorge Road which is a dead end. A little farther along the road enters part of the gorge as the walls of the gorge rise on either side of the road. The road apparently is frequently washed out when this small stream swells when it rains. There are several areas which show considerable damage to the road. The road begins to gain some elevation and at about .9 miles the Finger Lakes Trail leaves the road to the right and begins to parallel the stream. SUNY Cortland has a "campus" on this road where they do environmental studies and their trail is marked with yellow markers. They also have number on the markers which must correspond to the types of trees and bushes. The Finger Lakes Trail continues to follow the stream as it drops down to the stream and then veers away from it. At around 1.4 miles the trail comes to a spot where a bridge crosses one stream and water pours out of a culvert beneath it in a sort of waterfall. From this point on the trail follows the Cortland trail for a while and crosses several small tributaries. There is a good amount of walking up and down especially when crossing these small streams. The forest begins to transition from evergreens to hardwoods as the trail heads generally east and northeast. At 2.6 miles you will start walking through some brush and weeds on the edge of a field and come out on a woods road.Continue to walk north a little then northeast and then turn almost due east when you come to the edge of a corn field. As you walk along the south edge of the field you will come to a spot where the trail makes a 90 degree turn to the left at about 3.3 miles. A sign explains that the trail is closed at this point for hunting during certain times. To take the hunting bypass do NOT turn left but continue along the fields and out to Stone Road. As you walk toward the road you may find a nice viewpoint over the corn fields and surrounding countryside. Turn left and head northeast on Stone Road for about .4 miles where the name changes to Atkins Road and Underwood Hill Road goes off to the left. Continue to walk another .75 miles mostly downhill to the McGraw Marathon Road. Turn left to head north passing several small farms on the way. It is .5 miles to our a right turn onto Baker Schoolhouse Road. After .9 miles, the Finger Lakes Trail cuts off the road to the left which marks the end of this section of the trail. If you have a car parked here, you have finished your hike. If your only car is back on Hoxie Bridge Road, retrace your route back to where you are parked. When you get to the yellow marked Cortland trails, you may simply follow them out to the road. This is a nice alternative and the trails are a little better maintained than the Finger Lakes Trail. You will break out onto Hoxie Gorge Road just above where you entered the woods. Walk downhill and through the gorge on the road to get back to your car.
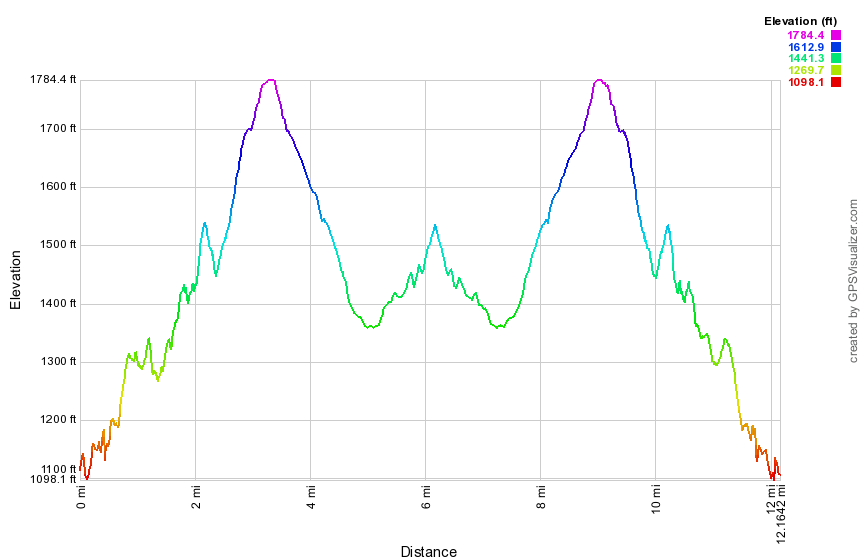 (The image at the left shows the profile of the hike. Remember that all vertical profiles are relative!)
Finger Lakes Trail: Hughes Rd to Sand Pit Rd
| Quick Look | ||||
|---|---|---|---|---|
| Difficulty | Round trip | Total climb | Internet Maps | |
| 12.2 mi. | 1430 ft. | AllTrails | ||
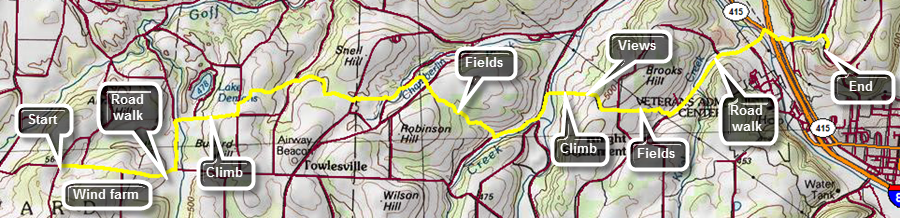
This hike starts at the intersection of Hughes Road and Turnpike Road south of Howard, NY and cover the entire 12 miles of FLT Map 11! This requires a car spot or shuttle or a taxi. You may be able to get a ride from a "trail Angle" through the Finger Lakes Trail Conference but many are only available on weekends. Village Taxi in Bath charges what I consider reasonable fees so that you can park your car on Sand Pit Road and have them take you to the intersection for the beginning of the hike. Take exit 38 from Rt17/I86 to Bath, turn right and then left onto Route 415 heading northwest. After just less than a mile, turn right on Spaudling Drive and then right on Harrisburg Hollow Road at the end. After .4 miles, turn right on Sand Pit Road and park at the wide spot on the road just below or above the point where the Finger Lakes Trail crosses the road. Drop a car here or arrange for a ride to the beginning of the hike. Head back out to Route 415 and turn right and pass under 17/86. Then left onto Route 15, Knight Settlement Road. After 3.4 miles, turn right on Turnpike Road heading west. Drive about 9 miles passing a wind farm on the left just before the junction of Hughes Road and Turnpike Road. The hike starts at this intersection as you hike east on Turnpike Road down a long hill and up the other side. At the top of the hill on the road it is time to descend the other side to Craig Road at the bottom of the hill. Turn left and walk along one of the few flat spots on the hike. At about 2 miles turn right on McCaddam Road. Despite its name the road soon turns to dirt and ascends a hill between two rows of evergreens. Top the hill and turn left on Harris Hill Road. Walk downhill and at 2.9 miles turn right into the woods. The trail may be a little overgrown as it passes along the edge of a swamp before hitting a farm lane. Follow the lane for a while until the trail turns right into the woods next to the field. The trail comes out onto another farm lane, turns left and continued on it for some time. Crossed Route 69 and begin another short ascent and then begin to walk along the top of a small ridge between two stream beds. Eventually the trail drops down to another woods road. As you approach Snell Hill Road there is an archery range on the left in the woods. Walk out to the road and turn left and then right into the woods again. The trail passes through some woods between fields before finally breaking out into some fields. Follow the blazes as the trail descends to Gay Gulf Road. Turn left here and hiked downhill a little to a bridge across a stream. The trail turns into the woods and begins a slight ascent up a hill. After a short walk in the woods you will to a field where you can walk the edge near the hedgerow to get up to Robinson Road. Cross Robinson Road and head for a lone tree in the middle of a field. The trail continues along a hedgerow which is surprisingly well marked. Follow the trail through the fields by hugging the edge of the fields. The trail eventually enters the woods again. Begin a descent of over a mile dropping 360 feet to Sinclair Road. Turn left and walk out to Campbell Creek Road. Head left or north on Campbell Creek Road dropping another 100 feet. At 7.8 miles turn right onto Cochran Road and get ready for an ascent up a significant hill. At the highest point on the hill you will have hiked about .9 miles and gained 450 feet. Keep walking on the road until at 8.8 miles the road makes a 90 degree turn right and an FLT sign on the corner indicates the trail enters the field. The blazes are well-placed and visible. Follow them as they follow the hedgerow. At one point the trail passes through the hedgerow to the other side descending all the way. At the end of the fields follow the blazes slightly uphill to the left and then turn to follow them to the right under the powerlines. Descend to Knight Settlement Road after hiking 9.5 miles. The trail crosses the road and parallels it for a short distance. This section is closed for hunting season and the bypass is to simply walk down the road. Turn left on Knight Settlement Road being careful of the traffic which can be heavy on a road with a narrow shoulder. After about half a mile the shoulder widens. The road is a gentle downhill for 1.6 miles to Route 415 and passes over the railroad tracks and runs by Knight Settlement Sand and Gravel. Carefully cross Route 415 and turn right. In a short distance turn left on Spalding Drive and continue straight ahead at the next intersection on Harrisburg Hill Road. Turn right on Sand Pit Road and walked up hill to the car.
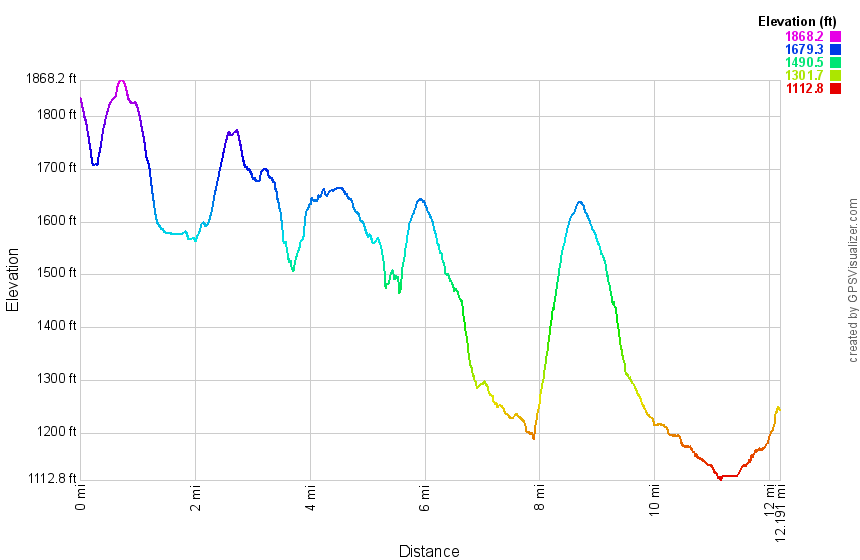 (The image at the left shows the profile of the loop hiking route. Remember that all vertical profiles are relative!)
Finger Lakes Trail: John Smith Rd to Fred Stewart Rd
| Quick Look | ||||
|---|---|---|---|---|
| Difficulty | Round trip | Total climb | Internet Maps | |
| 11.3 mi | 1030 ft. | AllTrails | ||
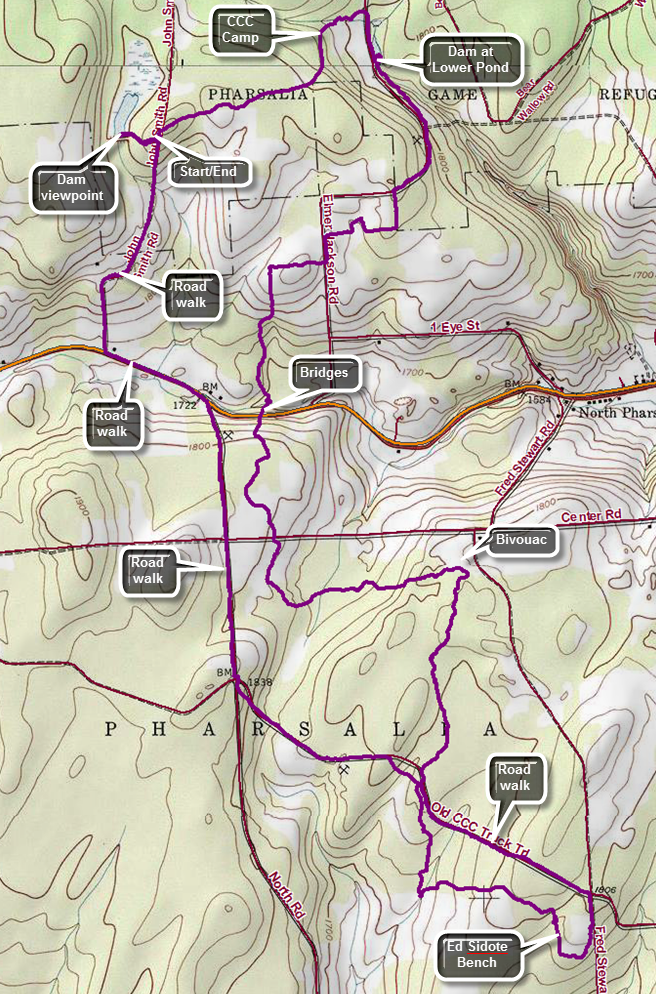 The Finger Lakes Trail is a primitive footpath that starts in Allegheny State Park on the New York - Pennsylvania border and extends 576.5 miles to end in the Catskill Park at the beginning of the Table Peekamoose Trail off the Phoenicia East Branch Trail near the Denning trailhead. There are other side trails which increase the length of the trail system. Four hundred miles of this trail is also part of the Scenic North Country Trail. The Finer Lakes Trail Conference celebrated its 50th Anniversary on June 2, 2012. To commemorate the occasion the Conference set up a series of hikes that would cover the entire length of the trail. Hikes varied in length and difficulty from 4 to 14 miles. The Trail Conference continues to improve the trails and to move sections from roads to trails.
This hike is best done with a car spot since it is 7.1 miles one way for a total of 11.3 miles. The route described uses the Finger Lakes Trail on the way "out" and local roads on the way "back" shortening the trip from 14.2 miles to 11.3 miles. Most of the roads are lightly traveled gravel roads except for a short (.6 mile) strip of Route 23. This hike travels over sections of the trail that were rerouted in the spring and summer of 2016. They replace some sections of the section before and after this hike. Take County Route 23 west from Norwich for about 13.5 miles toward North Pharsalia. Watch for John Smith Road on the right just after Elmer Jackson Road. Drive up John Smith Road for about .8 miles watching for a pulloff on the right for Jackson Pond. Park in the small parking area. Begin your hike my walking north on the road just slight until the Finger Lakes Trail crosses and turn right into the woods. The first mile is downhill and is the same as the previous route. At .8 miles you will pass by the remains of the old CCC camp. Some of the stone and concrete foundations are still in place. At 1.0 miles the trail meets Elmer Jackson Road. Turn right or south to follow the road to Lower Pond. There is a small dam at the outlet and exploring downstream of the dam yields some nice pictures. At this point the old route passed across the dam and headed out to Grover Brown Road. The new route continues farther down Elmer Jackson Road. Walk down the road about .6 miles and watch for the Finger Lakes Trail as it turns into the woods on the left just after the road swings to the right. The trail travels through the woods for only .4 miles when it again comes out to the road and follows it south for .1 miles until entering the woods on the right side of the road. The trail heads east and then turns south descending now toward Route 23. At the end of the descent, just before Route 23 are two bridges across Canasawacta Creek. The first is a simple flat bridge without railings. The second, spanning the main creek, is a beautiful kingpost bridge. Cross the bridges and follow the trail up to Route 23. After crossing the road, the trail climbs steeply up the bank but it doesn't last very long and soon levels out and rolls some. This is still the new reroute of the trail which avoids the road walk on Grover Brown Road and Route 23. The trail continues south over the top of a hill and down the other side crossing gravel covered Center Road at 3.8 miles. At 4.1 miles it turns east and then south again at 4.8 miles near a bivouac area. The old trail is marked in blue here and heads to the bivouac. Continue on the trail which is now the same as the old trail to Nine Mile DEC Truck Trail at 5.7 miles. Turn left and follow the road briefly before following the trail as it turns into the woods on the right. Continue to walk south and slightly downhill to 6.2 miles where the trail turns east. Much of the trail is what I call "roots, rocks, trees" and, while pretty, has no real remarkable features. The trail turns south again at 6.7 miles and you should watch for the Ed Sidote, Mr. FLT, bench on the left. This is also the point where a spur trail leads west to the Pharslia Woods Lean-to. Continue on the main trail east to Fred Stewart Road. Your trail hiking is now complete and you are ready for the return trip to the car using local roads. Turn left on Fred Stewart Road to head north. After a short distance, turn left on the DEC Road heading northwest toward North Road. Walk passed the area where you crossed the road earlier and at 8.8 miles arrive at North Road. Turn right to head north toward Route 23. At 9.3 miles cross Center Road and hit the paved part of North Road. From here descend for .5 miles to Route 23. Turn left and walked west for .4 miles on Route 23. Turn right and start the final .8 mile hike up John Smith Road to the car. Once at the car you may want to take the access trail down to Jackson Pond. The Finger Lakes Trail cuts below the dam but stay on the access trail to the dam to get a better look at the pond. When you are done, retrace your steps to the car.
 (The image at the left shows the profile of the hike. Remember that all vertical profiles are relative!)
Finger Lakes Trail: Maple Lane to Switzer Hill Road
| Quick Look | ||||
|---|---|---|---|---|
| Difficulty | Round trip | Total climb | Internet Maps | |
| 11.5 mi. | 1825 ft. | AllTrails | ||
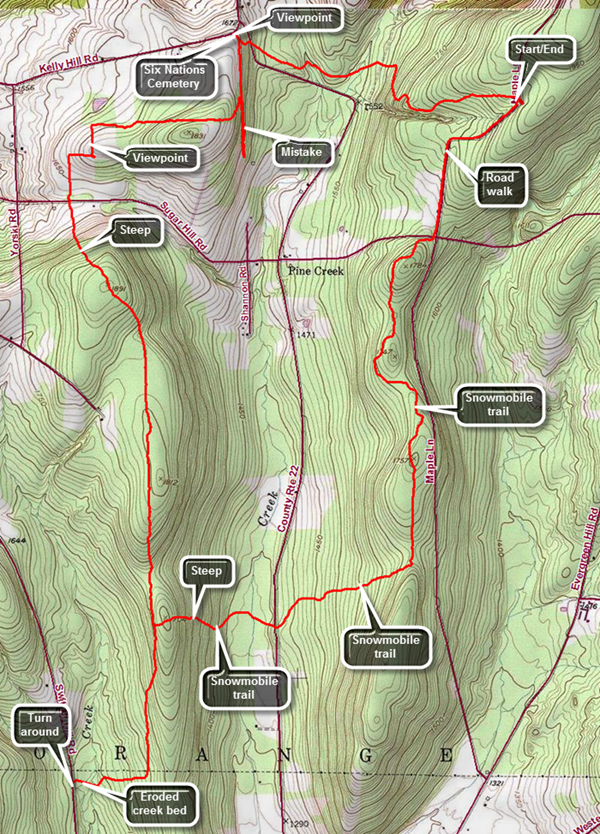
Drive south from Watkins Glen on Route 414 for 1.5 miles and then turn right and drive west on CR-16 for 5.1 miles to CR-21. Turn right and head north for 1.2 miles where CR-21 turns left. At the next intersection where Cr-21 turns right continue straight ahead on Sugar Hill Road which veins as paved and then turns to gravel. Drive 2.1 miles to Maple Lane and turn right. Drive .75 miles north to the parking area on the right.
Walk out the access road to the parking area and cross Maple Lane to head out on the trail. The first part of the trail wanders west through some red pines and then hardwoods all the while descending until it crosses a DEC dirt road at .9 miles. A downhill at the beginning of a hike feels good but means there will be an uphill at the end! The trail turns a little north and then west again as it continues to descend. The trail crosses two branches of Meads Creek which may have very little water in them. After crossing the second creek the trail begins to ascend and crossed Route 22 at 1.5 miles. The trail ascends steeply for a short time before meeting a woods road at 1.6 miles. The trail turns to the left but turn right and walk a short distance to the very old Six Nations Cemetery where there is a spectacular view to the northwest over Lake Lamoka and Lake Waneta. The stones in the cemetery are very old, hard to read and in very poor shape. Walk back to the Finger Lakes Trail which now follows a woods road slightly downhill and to the south. There are no marks or blazes anywhere to be seen but watch carefully for a turn off the woods road which occurs at right around 2 miles. The trail turns west and starts up a steep but short climb over a small hill. Hike down the other side of the hill and eventually the trail breaks out into a field. The blazes can be hard to find and require sharp eyes as there are several turns along the edges of different fields. Many of the blazes are old and the brush has overgrown them making it difficult to find the way. There is a nice view over the surrounding valleys from the high point in the fields. Finish the descent along the edge of a field and follow a woods road out to Sugar Hill Road at 3.1 miles. Just ahead on the other side of the road is a very large oak tree. From this point the trail heads due south and is very straight for some time. The trail ascends to a ridge following a woods road and is wide, well maintained and decently marked. On the initial climb you will gain 260 feet in .4 miles along a 13% grade. After this, the trail descends a little and then levels moving off the road and back onto it. You will pass one well marked snowmobile trail on the left. The trail starts to descend and at 5.1 miles another snowmobile trail appears on our left. This is the one you will use on the return trip Continue straight ahead as the trail continues south and descends off the ridge toward Switzer Hill Road. At 5.75 miles the rail turns west and continues to descend to Pine Creek. The bank here is highly eroded and you may have to look for a spot to cross safely. After crossing the creek walk out to Switzer Hill Road at 6.1 miles. Turn around and retrace your route back across the creek and up to the snowmobile trail at 7.1 miles. Turn right on the snowmobile trail and start a short ascent before the trail begins a half mile descent toward Route 22. The descent is steep at 13% and the trail descends almost 350 feet along the way. At 7.6 miles cross a bridge over Meads Creek walk out to Route 22. Cross the road and stay on the snowmobile trail heading toward Maple Lane. As you head northeast the snowmobile trail starts to climb to another ridge. The climb is not difficult but went on for .7 miles. At 8.4 miles you will come to a junction where you can turn right or left. Turn left or north on the snowmobile trail which parallels Maple Lane and heads north toward Sugar Hill Road. Do not be concerned when the trail wanders some as it will get you where you need to go. At about 10 miles the trail turns northeast and then east and parallels Sugar Hill Road until it comes to the intersection of Sugar Hill Road and Maple Lane. Cross Sugar Hill Road and begin to walk up maple Lane for .8 miles to the parking area.
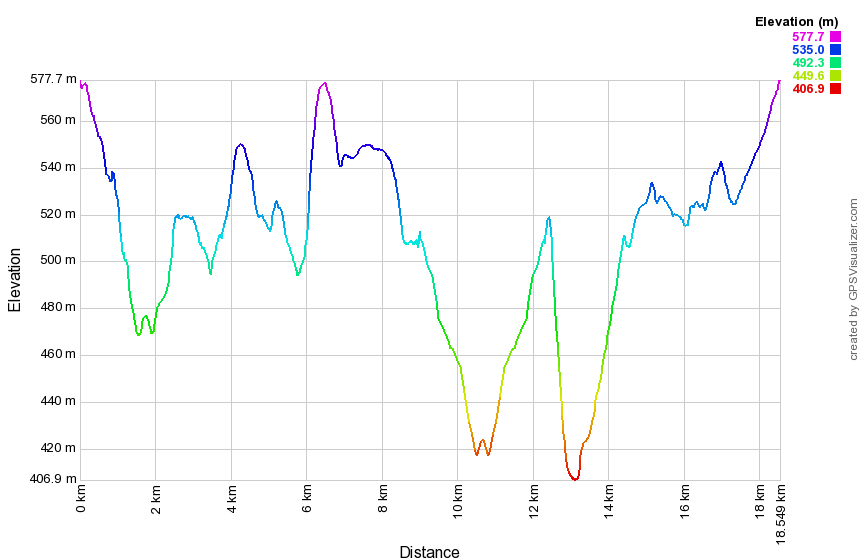 (The image at the left shows the profile of the loop hiking route. Remember that all vertical profiles are relative!)
Finger Lakes Trail: Maple Lane to Templar Road
| Quick Look | ||||
|---|---|---|---|---|
| Difficulty | Round trip | Total climb | Internet Maps | |
| 10.5 mi. | 1596 ft. | AllTrails | ||
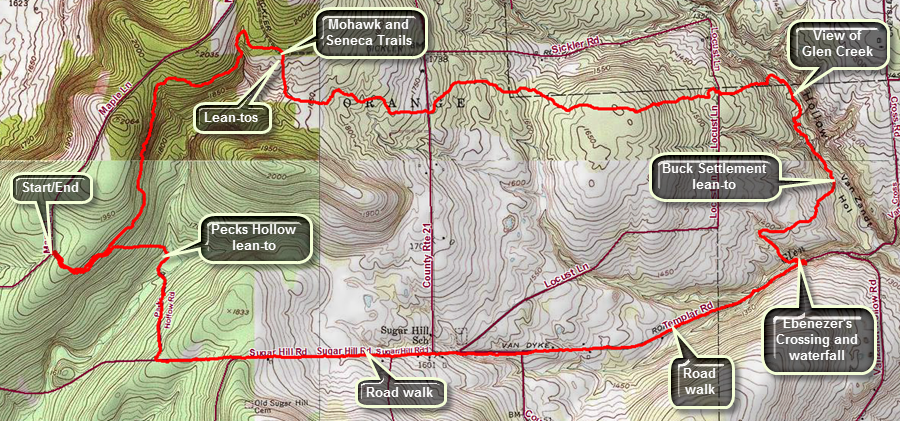
Drive south from Watkins Glen on Route 414 for 1.5 miles and then turn right and drive west on CR-16 for 5.1 miles to CR-21. Turn right and head north for 1.2 miles where CR-21 turns left. At the next intersection where Cr-21 turns right continue straight ahead on Sugar Hill Road which veins as paved and then turns to gravel. Drive 2.1 miles to Maple Lane and turn right. Drive .75 miles north to the parking area on the right.
Walk out the back of the parking area on the Finger Lakes Trail. The trail passes through a red pine plantation and descends a little. Several unmarked trails cross the Finger Lakes Trail but at .4 miles a blue trail with a "Lean-to" sign heads off to the right. That trail descends to the Parks Hollow lean-to. Follow the Finger Lakes Trail as it stays on contour around a hill. The trail has been heading north and northeast but at 1.7 miles it descends to cross a dry creek bed and then bends back to head first south and then east. At 1.8 miles cross the Mohawk Trail and at around 2 miles there is a sign on the right that indicates another lean-to and a pond. Continue straight ahead on the main trail. After 2 miles the trail turns south but soon swings east descending all the way. At 2.9 miles cross Route 21 where there is room to park along the side of the road. Continue heading east and descending. A caution on the FLT map indicated the stream crossing near the end of this section could be a problem if the water is high so use your own judgment. The Finger Lakes Trail maps suggest a highwater bypass using local roads. As you walk on the main trail you will come to a spot where there is a large pile of fieldstones. The trail up to this point is well-marked and maintained but after this location there are stretches with few blazes. Much of the trail in this area may be overgrown and with a few blowdowns. There are also a series of wooden walkways meant to bridge muddy areas. This section of the trail heads almost due east. Cross the abandoned part of Locust Lane at 4.5 miles but it is hardly recognizable as a road anymore. There is an old foundation in the area. Continue to head east as the trail continues to descend. At 4.8 miles the trail turns south-southeast along Glen Creek. At about 5 miles there is a viewpoint over the creek which can be almost dry when there has been no rain. This creek is the one that cut the gorge Watkins Glen. As the trail starts to turn away from Glen Creek, watch for a solid rock foundation on the left side of the trail. This is also the lowest point on the hike at 1237 feet. At 5.5 miles pass the Buck Settlement lean-to on the left side of the trail. Follow the trail along what looks like an old road and then cross a small stream that once cut a deep bed. Right after the crossing turn left on an old road. The road descends to a branch of Glen Creek where there are some picnic tables at a small waterfall. This is "Ebenezer's Crossing" but the waterfall may be only a trickle in the dry seasons. This stream has the potential of being a difficult crossing during high water. Walk up to Templar Roadand get ready for the road walk back to the car. Turn right on Templar Road which is covered with gravel. The hike on Templar Road is 1.4 miles and all of it is uphill. Continued straight ahead on Route 21 for .4 miles when Templar Road ends walking uphill on paved road. When Route 21 turns right to head north, continue straight ahead on Sugar Hill Road. Hike another .9 miles uphill before the road starts to descend. Walke another .4 miles downhill until the access road for the Perkins Hollow lean-to comes up on the right. Turn right and start to walk down the road. The access road descends to cross a small stream near the new lean-to site. There is a sign that says "To FLT". Walk uphill in the direction it is pointing heading first north and then west climbing the whole way. At about 10 miles the Mohawk Trail heads north toward the Sugar Hill Fire Tower and at 10.1 miles you will be back at the main Finger Lakes Trail. Turn left and retrace your steps from earlier in the day back to the parking area.
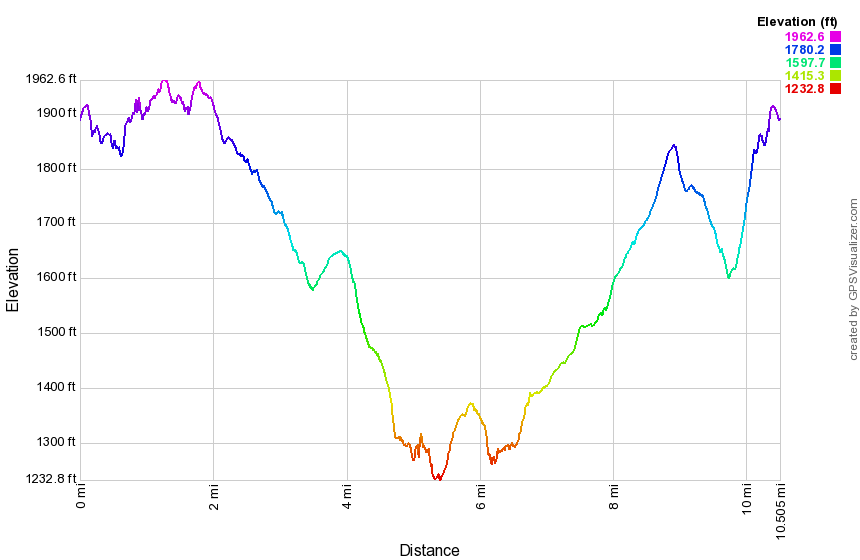 (The image at the left shows the profile of the loop hiking route. Remember that all vertical profiles are relative!)
Finger Lakes Trail: McDonough to Stone Quarry Hill Road
| Quick Look | ||||
|---|---|---|---|---|
| Difficulty | Round trip | Total climb | Internet Maps | |
| 12.6 mi | 1200 ft. | AllTrails | ||
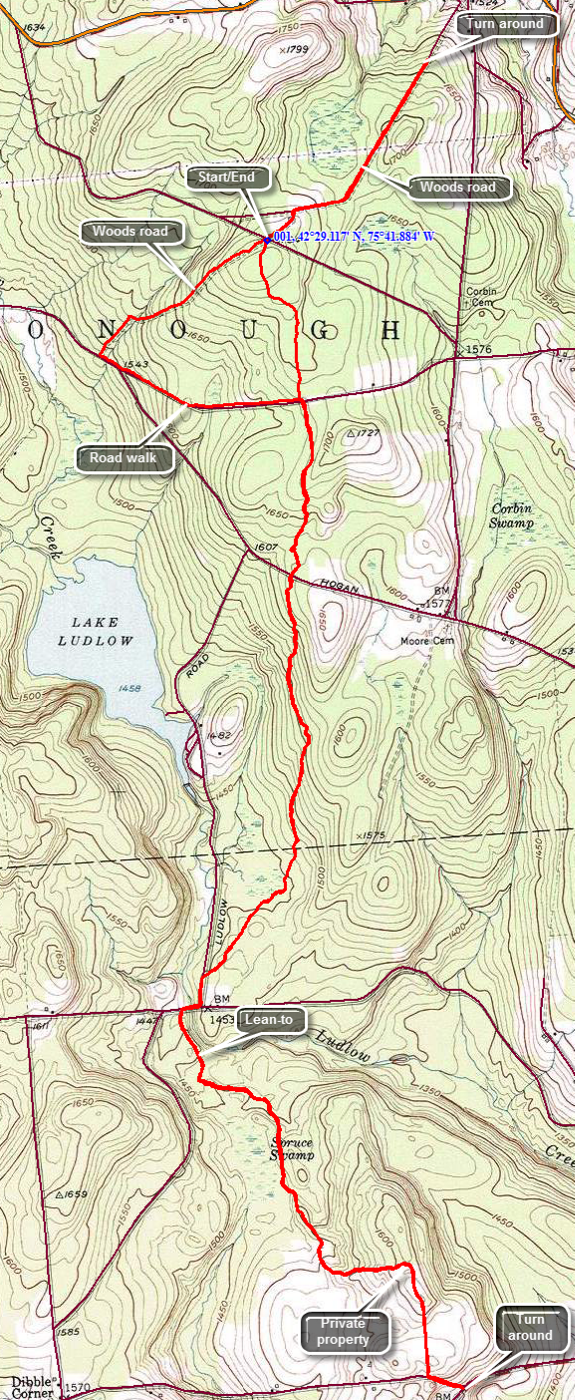 The Finger Lakes Trail starts in Allegheny State Park on the New York - Pennsylvania border and extends 576.5 miles to end in the Catskill Park at the beginning of the Table Peekamoose Trail off the Phoenicia East Branch Trail near the Denning trailhead. There are other side trails which increase the length of the trail system. Four hundred miles of this trail is also part of the Scenic North Country Trail. The Finer Lakes Trail Conference celebrated its 50th Anniversary on June 2, 2012. To commemorate the occasion the Conference set up a series of hikes that would cover the entire length of the trail. Hikes varied in length and difficulty from 4 to 14 miles. The Trail Conference continues to improve the trails and to move sections from roads to trails.
This hike is best done with a car spot since it is 6.3 miles one way for a total of 12.0 miles. The route described here is out and back with a little variation thrown in! Take Route 220 west from Oxford for 4.0 miles. Turn left onto Chestnut Road and drive for 1.4 miles to Corbin Road. Turn right on Corbin Road and then immediately left on Shortcut Road. Shortcut Road is mostly packed dirt with large cobbles. It is one car wide with deep ditches on both sides. You must drive about .7 miles to the small parking area and there area only a few pulloffs along the way. If you can't backup for some distance or feel the road is too rough an alternative is to park on Chestnut Road where the Finger Lakes Trail crosses and hike from there. At about .7 miles on Shortcut Road there is a woods road that crosses the road and signs for the Finger Lakes Trail. There is enough room to pull off the road and park one or two cars. When you are ready to hike, start north on the woods road toward the trail register in East McDonough. The road may be muddy in places with some ruts but this should only last for about .15 miles. The road is straight and hard packed after that and in about .9 miles you will be at the trail register where you can turn around and head back to the car. At the car cross the road and make a choice. The trail heads off into the woods on the left and a snowmobile trail goes straight ahead. The trail is shorter but the snowmobile trail offers some variety so that you will not be hiking the identical path on the way back. Stay on the woods road which is also a snowmobile trail and walk for .8 miles until you hit Chestnut Road. Turn left and head east on Chestnut Road for .7 miles where the Finger Lakes Trail crosses Chestnut Road. Turn south onto the Finger Lakes Trail and walk 2.2 miles to Ludlow Road. The trail seems little used and many blazes are faded. In several spots there are large blowdowns across the trail. Some had been there a long time and the trail is blazed around them. In other places you will have to work your way around the blockages and then try to find the trail on the other side. When you get to Ludlow Road turn left and follow it to Tucker Road. Turn right and cross the creek on the bridge. Just after the bridge, the trail turns left into the woods and follows a woods road. It is only a short distance to the blue blazed side trail on the left to the Ludlow Creek lean-to. The next landmark is a pile of rocks right on the trail. The map description mentions that the pile is of unknown origin with a suggestion of a Native American burial! The trail enters private land and the road becomes grassy and very marshy in places. When you get to an open field walk along the edge of the field outside a barbed wire fence. Within minutes you will pass by some buildings near Stone Quarry Hill Road with the road just beyond. Walk down to County Route 3 to the end of the trail section. Turn around and walk back to where the trail enters the field. Retrace your route back to where the Finger Lakes Trail crosses Chestnut Road. Cross the road and continue straight ahead on the trail. The trail passes through some conifers and then hardwoods. It is a much more direct than the route you took earlier and is only about .6 miles back to the car.
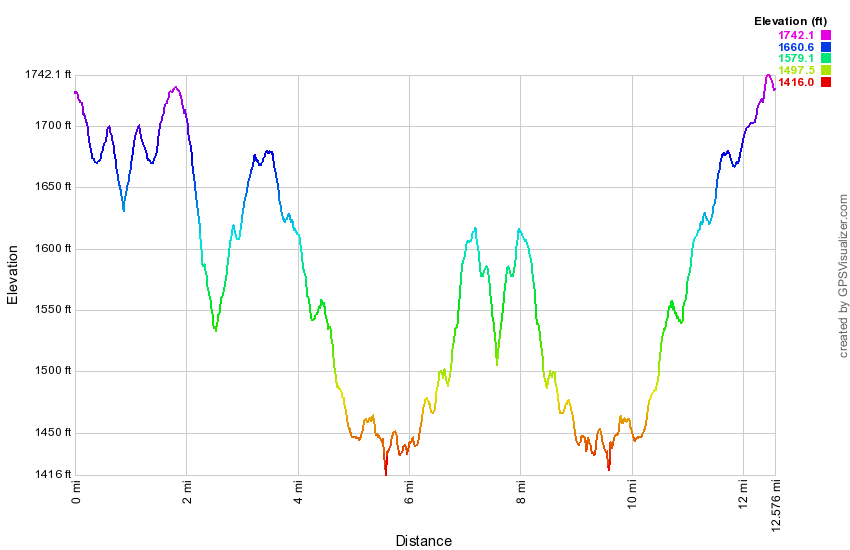 (The image at the left shows the profile of the hike. Remember that all vertical profiles are relative!)
Finger Lakes Trail: Mormon Hollow to Fletcher Road
| Quick Look | ||||
|---|---|---|---|---|
| Difficulty | Round trip | Total climb | Internet Maps | |
| 11.1 mi. | 2380 ft. | AllTrails | ||
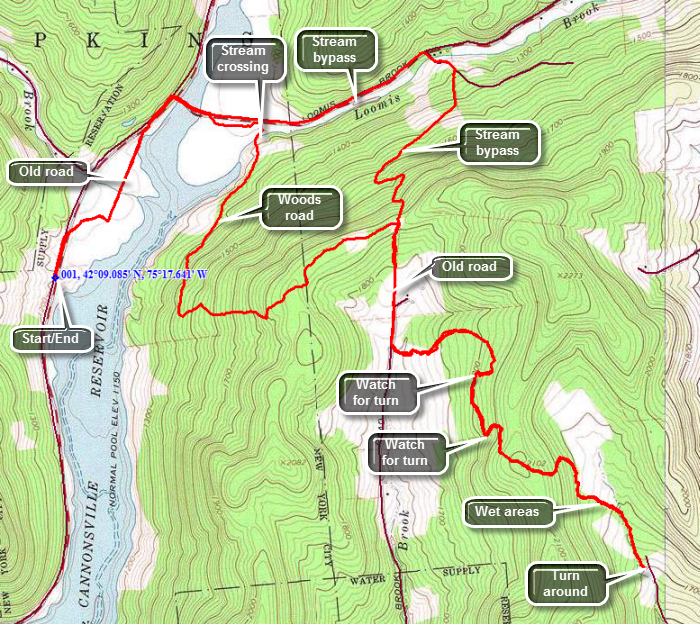 The Finger Lakes Trail starts in Allegheny State Park on the New York - Pennsylvania border and extends 576.5 miles to end in the Catskill Park at the beginning of the Table Peekamoose Trail off the Phoenicia East Branch Trail near the Denning trailhead. There are other side trails which increase the length of the trail system. Four hundred miles of this trail is also part of the Scenic North Country Trail. The Finer Lakes Trail Conference celebrated its 50th Anniversary on June 2, 2012. To commemorate the occasion the Conference set up a series of hikes that would cover the entire length of the trail. Hikes varied in length and difficulty from 4 to 14 miles. The last section is the one described here and is mostly a road walk from The parking area on Black Bear Road (Wild Meadow Road) near Round Pond to the eastern terminus of the trail 1.2 miles from the Denning trailhead.
This hike works best with a car spot since the round trip is over 11 miles one way! The hike described here is out and back. Depending on where you are coming from there are a number of ways to get to Fletcher Road where you will park one car. Perhaps the best way to get there is to take the Cadosia exit from State Route 17 and go north on Route 268 to Route 10. Where Route 268 meets Route 10 is the beginning of the hike where you will park the one car in the lot at the end of the bridge. Drive south on Route 10 about 2 miles and turn right on Dryden Road. Drive north on Dryden Road and turn left after 1.5 miles on Finch Hollow Road. Turn left on Fletcher Road which is a gravel road that turns to a woods road with enough clearance for most cars. Park near the end of the road. Drive back down Dryden Road to Route 10 and turn right. Drive about 4.6 miles to Route 27 and turn right. Drive north 4.6 miles and park on the right shoulder near a boat launch. To begin the hike walk north on Route 27 for about .1 miles to the point where the Finger Lakes Trail crosses the road. Step over the right guardrail and walk to trail down to an old road. Turn left on the road and walk along the trail which parallels Route 27 until it meets Route 47. The trail will take you back up to Route 27 for a short distance where you should turn right on Route 47. In about .5 miles the Finger Lakes Trail will turn right and enter the woods. Watch for the white blazes as you pass through some pines since the trail is not well defined. You will soon be at the edge of Loomis Brook which does not have a bridge crossing. There is a steel cable to hang onto. If you absolutely cannot cross here there is a bypass route which is described here later. After crossing the brook you will ascend on a wide woods road for about 1.25 miles gaining around 800 feet. At the top is a nice pine grove and the trail levels briefly as you walk .6 miles on a woods road across the ridge. At 3.25 miles into the hike, the trail turn sharply right on Old Chamberlain Road. Walk down the road through the forest and then out into a field. You will arrive at Chamberlain Road at about 3.6 miles. Turn right and walk down the road for only about .1 miles. Watch for an FLT disk on a pole on the left side of the road and an FLT sign across a small field against the wood line. Cross a brook on a foot bridge and begin to be very careful about watching for the white blazes. The next section of trail is not well marked in critical places. It is also wet and muddy in spots. Walk uphill to about 4.3 miles where the trail turns right and then almost immediately right again. You will descend slightly to a woods road where you will turn left and follow the road to about 4.6 miles. You will be in an area dominated by pine trees and where the blazes seem to disappear. The trail goes up the bank on your left and hooks back on itself slightly. Once you make this left turn the blazing gets better. At 4.9 miles you will be on a height of land but to get to the end of Fletcher Road you will have to walk another .8 miles and descend 400 feet! You will come out into an open area where you may have parked a car for the return trip.
If you did not have two cars, you will have to hike back to your car by reversing your route. There are some options along the way. First you will have to turn around and climb the .8 miles and 400 feet you just descended. From the top walk down the other side to Chamberlain Road, turn right, walk back to Old Chamberlain Road and turn left to walk through the field and forest. At he right hand turn at the top of Old Chamberlain Road, around 8.1 miles you will see the blue blazes of the high water bypass route. This is the route you may use if Loomis Brook is too high to cross. Walk straight ahead and follow the bypass trail as it descends through several switchbacks on a woods road. Continue to follow the blazes for about a mile until you are on Lewis Road where you will turn left and walk down to Route 47. Turn left on Route 47 and walk towards Route 27. At around 9.85 miles the bypass trail turns left into the woods to pick up the main Finger Lakes Trail through the stand of pines. The walk lasts only .2 miles when you will be back on Route 47 so you may elect to stay on the road. Walk out to Route 27 and turn left. You may walk the road for .8 miles back to the car or follow the Finger Lakes Trail by turning left on the trail and continuing back the way you came.
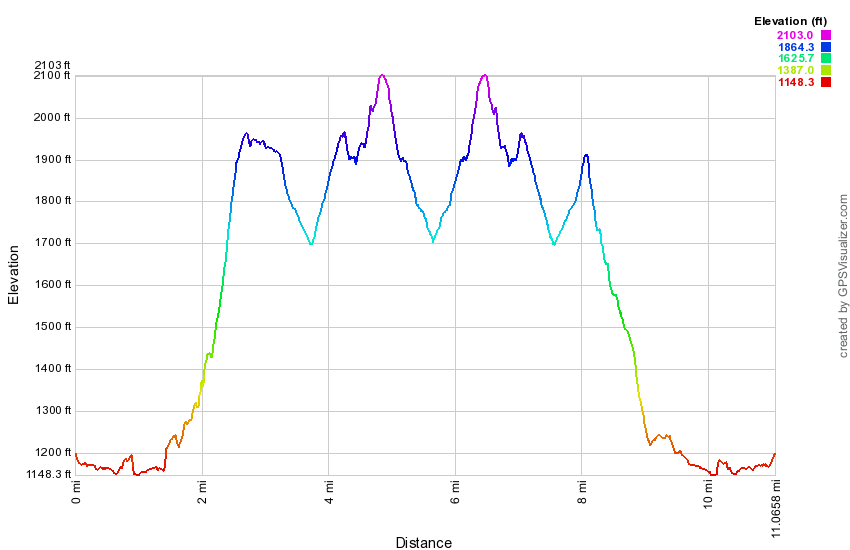 (The image at the left shows the profile of the hike. Remember that all vertical profiles are relative!)
Finger Lakes Trail: Old 76 Road to Route 79
| Quick Look | ||||
|---|---|---|---|---|
| Difficulty | Round trip | Total climb | Internet Maps | |
| 11.6 mi | 1416 ft. | AllTrails | ||
 The Finger Lakes Trail starts in Allegheny State Park on the New York - Pennsylvania border and extends 576.5 miles to end in the Catskill Park at the beginning of the Table Peekamoose Trail off the Phoenicia East Branch Trail near the Denning trailhead. There are other side trails which increase the length of the trail system. Four hundred miles of this trail is also part of the Scenic North Country Trail. The Finer Lakes Trail Conference celebrated its 50th Anniversary on June 2, 2012. To commemorate the occasion the Conference set up a series of hikes that would cover the entire length of the trail. Hikes varied in length and difficulty from 4 to 14 miles. The Trail Conference continues to improve the trails and to move sections from roads to trails.
This hike can be done with a car spot since it is 10.4 miles round trip but it can easily be done as a loop using local roads for the return trip. The route described here is the loop! Much of this trail is unmaintained and sparsely marked. Keep a close eye on the blazes at all times and be prepared to search for the next marker. A map, compass and description of the trail is mandatory. A GPS unit is helpful. Take I81 to the Whitney Point exit, exit 8. Follow Route 79 west from Whitney Point toward Ithaca for a little over 13 miles and then turn left on West Creek Road. Eventually this road becomes Old 76 Road in Speedsville. Head northwest for 2.6 miles from the STOP sign in Speedsville watching for McGrath Road on the right. This is an abandoned road and there is little indication of its location except for a slightly wider spot in the road. The Finger Lakes Trail crossing is also poorly marked. Pull over and park on the east side of the Old 76 Road. The trail from Old 76 Road to Level Green Road is now closed by the removal of landowner permission. Walk .9 miles northwest on Old 76 Road. Turn right on Yaple Road and walk 1.2 miles northeast to the intersection with Blackman Hill Road and Level Green Road. Turn right and stay right on Level Green Road. Walk 1.1 miles southeast on Level Green Road to where the trail crosses the road. Turn left onto the trail. Start your hike my entering the woods on what is left of McGrath Road which is a rocky and usually muddy and wet mess. Continue on this "road" following whatever blazes you can until about .45 miles. Turn right onto a woods road and follow some blazes to .7 miles. The road turns right here but you should continue straight ahead on a sort of "lane". This can be hard to spot depending on the condition of the blazes and the amount of trail maintenance that has been done. At about .9 miles you will come to a to a stream and the blazes again don't help much. Turn left and cross the stream to a path that climbs a hill. There are no blazes that can be seen from the other side! The trail is now was obvious but there are only a few blazes. Enter an evergreen forest which is part of Potato Hill State Forest. The trail here it in better condition and the blazes are easier to see but little maintenance has been done. At just under 2 miles cross Level Green Road which at this point is a dirt road. Continue to walk along the trail gaining elevation slightly heading north. At 4.35 miles the trail approaches Blackman Hill Road and runs parallel until crosses the road at 4.45 miles. The trail on the other side follows a short road or driveway and then enters a field. Follow the eastern edge of the field to the northeast corner. Walk to the left or northeast along the edge of the field until you find the trail on the left. The trail begins to follow a well-defined logging road which makes several twists and turns. At 4.9 miles the trail begins to leave the logging road to the left. Be careful to follow the blazes and not the road! At 5.2 miles begin a descent that ends up at Route 79. The woods road may be wet but is a least well blazed. At 5.9 miles we begin to walk along the bank of West Owego Creek high above the water. The descent continues with a few short climbs along the way. The trail is barely etched into the side of the hill doesn't seem to get much use from hikers. At 6.7 miles turn right following the blazes toward Route 79. There is a nice bridge and a walkway over a wet and marshy area. Walk out to Route 79 and turn left to walk to Level Green Road for the trip back. It is .85 miles to the left turn onto Level Green Road. When you turn left, you will see a long stretch of rather flat road ahead. From Route 79 to Blackman Hill Road is about 1.85 miles and there is, in fact, a slight ascent of about 200 feet. At 9.5 miles we turn right on Yaple Road and continue to climb until the road begins to descend to Old 76 Road at 10.6 miles. Turn left onto Old 76 Road and walk another .9 miles to your car.
 (The image at the left shows the profile of the hike. Remember that all vertical profiles are relative!)
Finger Lakes Trail: Otselic SF to Grover Brown Road
| Quick Look | ||||
|---|---|---|---|---|
| Difficulty | Round trip | Total climb | Internet Maps | |
| 12.6 mi | 1200 ft. | AllTrail | ||
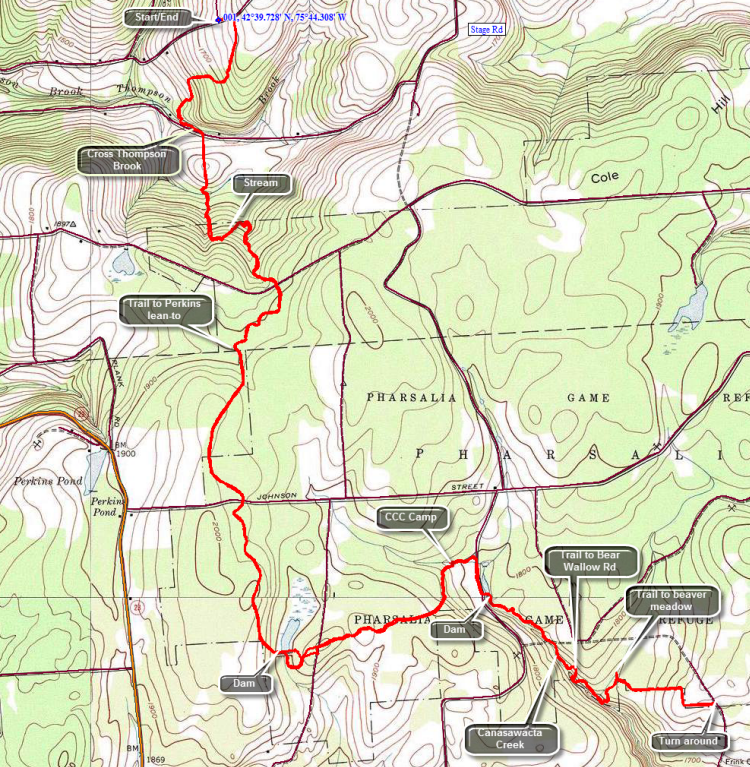 The Finger Lakes Trail starts in Allegheny State Park on the New York - Pennsylvania border and extends 576.5 miles to end in the Catskill Park at the beginning of the Table Peekamoose Trail off the Phoenicia East Branch Trail near the Denning trailhead. There are other side trails which increase the length of the trail system. Four hundred miles of this trail is also part of the Scenic North Country Trail. The Finer Lakes Trail Conference celebrated its 50th Anniversary on June 2, 2012. To commemorate the occasion the Conference set up a series of hikes that would cover the entire length of the trail. Hikes varied in length and difficulty from 4 to 14 miles. The Trail Conference continues to improve the trails and to move sections from roads to trails.
This hike is best done with a car spot since it is 6.9 miles one way for a total of 13.8 miles. The route described here is out and back with a little variation thrown in! Take the exit for Whitney Point off of I-81. Follow Route 26 north for about 29 miles passing through South Otselic. Watch for Stage Road on your right shortly after passing through town. Drive to the end of the road and turn left on Will Warner Road. The road is dirt and gravel and not maintained during the winter after a certain point. Drive 1 mile on Warner Road and you will find an access road to Otselic SF on the right. Park at the end of the road at the intersection out of the way of "traffic". Begin your hike by walking east on Warner Road for about .1 miles. Turn right into the forest and almost immediately run into some wet spots on the trail. Over the next .7 miles the trail drops over 300 feet to Thompson Brook before ascending slightly to meet Stage Road. You will have to walk back up this hill at the end of you hike if you do not have a car shuttle. As we were losing elevation I thought about the return trip knowing that I would be tired. I stopped at Thompson Brook to take a few pictures before walking up to Stage Road. Once on Stage Road we turn left and walk a few hundred feet up the road to where the trail crosses the ditch and heads into a field. Hug the left edge of the field but do not be surprised if you find only one or two blazes. Over the next 1.1 miles the trail continues to ascend but dips several times to cross streams. Most of the streams do not have bridges and several crossing could be tricky in highwater. Watch for small waterfalls along the way during periods of high water. Crossed Church Road at about 2 miles at which point the trail levels some and the surface becomes more even. Pass a trail register and then at around 2.5 miles we pass a blue blazed trail on the right to the Perkins Pond Lean-to. The trail to the lean-to is .4 miles. At 3.3 miles cross Johnson Street. The trail has gained a little elevation and you will be hiking at about 2040 feet before descending to the dam at the south end of Jackson Pond. Walk to the spillway, turn right and descend through a small filed or clearing to pick up the blazes of the Finger Lakes Trail. Follow the blazes as they cross the access road and lead you to John Smith Road. Cross the road and continue into the forest where the trail now turns east instead of south and levels off before starting to descend again. Along the way at about 5.5 miles you will pass through and old CCC camp. (Your mileage may vary since I made some errors along the way. The mileages on the Finger Lakes Trail maps seem pretty accurate.) In just 80 years the forest has reclaimed most of the buildings. At 5.7 miles you will hit Elmer Jackson Road where you should turn right. Walk down the road following the blazes until you approach a small pond with a kiosk for the Pharsalia Wildlife Management Area. Turned left and walk over the dam at the end of the pond. Note the interesting spillway underneath the bridge. Continue across the dam and take a right to follow Canasawacta Creek for the next mile as the trail drops to the creek and then ascends several times until pulling away from the creek and starting a steep ascent at 6.7 miles. At about 6.4 miles you will pass a blue trail that heads out to Bear Wallow Road where there is parking and shortly after another blue blazed trail that leads to a beaver meadow. Continue on the main trail which skirts the DEC boundary line with private property and follows a woods road. At just under 7.5 miles, you will be at the point where the trail meets Grover Brown Road. There is enough room to park one or two cars here. The road is dirt and gravel but is no worse than some of her other roads in the area. It is less than a mile to Route 23 in North Pharsalia. If you have a car parked here, you can relax on the drive back to Otselic SF. If you have only one car, turn around and follow your route 7 miles back to your car!
 (The image at the left shows the profile of the hike. Remember that all vertical profiles are relative!)
Finger Lakes Trail: Otselic SF to John Smith Road
| Quick Look | ||||
|---|---|---|---|---|
| Difficulty | Round trip | Total climb | Internet Maps | |
| 9.1 mi | 1558 ft. | AllTrails | ||
The Finger Lakes Trail is a primitive footpath that starts in Allegheny State Park on the New York - Pennsylvania border and extends 576.5 miles to end in the Catskill Park at the beginning of the Table Peekamoose Trail off the Phoenicia East Branch Trail near the Denning trailhead. There are other side trails which increase the length of the trail system. Four hundred miles of this trail is also part of the Scenic North Country Trail. The Finer Lakes Trail Conference celebrated its 50th Anniversary on June 2, 2012. To commemorate the occasion the Conference set up a series of hikes that would cover the entire length of the trail. Hikes varied in length and difficulty from 4 to 14 miles. The Trail Conference continues to improve the trails and to move sections from roads to trails.
This hike can be done with a car spot but it is only 9.1 miles round trip. The route described here is out and back with a little variation thrown in! Take the exit for Whitney Point off of I-81. Follow Route 26 north for about 29 miles passing through South Otselic. Watch for Stage Road on your right shortly after passing through town. Drive to the end of the road and turn left on Will Warner Road. The road is dirt and gravel and not maintained during the winter after a certain point. Drive 1 mile on Warner Road and you will find an access road to Otselic SF on the right. Park at the end of the road at the intersection out of the way of "traffic". Begin your hike by walking east on Warner Road for about .1 miles. Turn right into the forest and almost immediately run into some wet spots on the trail. Over the next .7 miles the trail drops over 300 feet to Thompson Brook before ascending slightly to meet Stage Road. You will have to walk back up this hill at the end of you hike if you do not have a car shuttle. As we were losing elevation I thought about the return trip knowing that I would be tired. I stopped at Thompson Brook to take a few pictures before walking up to Stage Road. Once on Stage Road we turn left and walk a few hundred feet up the road to where the trail crosses the ditch and heads into a field. Hug the left edge of the field but do not be surprised if you find only one or two blazes. Over the next 1.1 miles the trail continues to ascend but dips several times to cross streams. Most of the streams do not have bridges and several crossing could be tricky in highwater. Watch for small waterfalls along the way during periods of high water.Crossed Church Road at about 2 miles at which point the trail levels some and the surface becomes more even. Pass a trail register and then at around 2.5 miles we pass a blue blazed trail on the right to the Perkins Pond Lean-to. The trail to the lean-to is .4 miles. At 3.3 miles cross Johnson Street. The trail has gained a little elevation and you will be hiking at about 2040 feet before descending to the dam at the south end of Jackson Pond. Walk to the spillway, turn right and descend through a small field or clearing to pick up the blazes of the Finger Lakes Trail. Follow the blazes as they cross the access road and lead you to John Smith Road. Turn around a retrace your route back to the car.
(The image at the left shows the profile of the hike. Remember that all vertical profiles are relative!)
Finger Lakes Trail: Route 13 to Stevenson Forest Preserve
| Quick Look | ||||
|---|---|---|---|---|
| Difficulty | Round trip | Total climb | Internet Maps | |
| 15.5 mi | 2133 ft. | AllTrails | ||
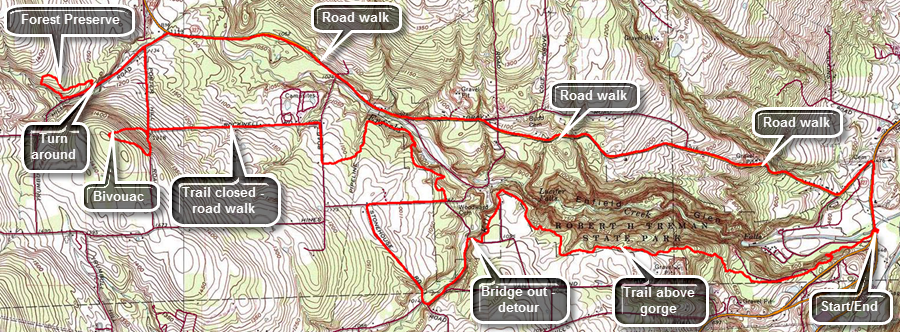 The Finger Lakes Trail is a primitive footpath that starts in Allegheny State Park on the New York - Pennsylvania border and extends 576.5 miles to end in the Catskill Park at the beginning of the Table Peekamoose Trail off the Phoenicia East Branch Trail near the Denning trailhead. There are other side trails which increase the length of the trail system. Four hundred miles of this trail is also part of the Scenic North Country Trail. The Finer Lakes Trail Conference celebrated its 50th Anniversary on June 2, 2012. To commemorate the occasion the Conference set up a series of hikes that would cover the entire length of the trail. Hikes varied in length and difficulty from 4 to 14 miles. The Trail Conference continues to improve the trails and to move sections from roads to trails.
This hike is best done with a car spot since it is !5.5 miles round trip. This is divided into the "out" which is 10 miles of trail and road walking and the "back" which is 5.5 miles of road walking. The return trip is on local roads which makes the walking easier. Take State Route 17/I86 to exit 64 at Owego and head north from there on Route 96 through Candor and Spencer. Route 96 eventually picks up the designation as Route 34 and they both merge with Route 13. At the point where they begin to merge there is a parking area on the east side of the road. If you cross the bridge over Enfield Creek, you have gone too far. Start your hike by walking under the road bridge along Enfield Creek and following the white blazes through a flat and damp area. Cross a park road and continue through some damp areas. Begin to climb to the rim of the gorge cut by Enfield Creek. Enfield Creek is the lowest point on the Finger Lakes Trail so some climbing will always be involved when starting there! At about a mile come to the Sierra Shelter and watch for the left turn right before it. The next section of trail may be overgrown with briars and weeds. At around 2 miles most of your climbing is done and you will have gained about 630 feet since leaving the car. you may hear the water in Enfield Creek as it flows over various cascades and waterfalls. Walked west for some time through stands of red pine and some hardwood. The trail rolls some especially when crossing small tributaries of the main creek. At 2.25 miles begin to head northwest sticking to a route that parallels the creek but well above it. At 2.9 miles start to head southwest joining a park road briefly and then entering the forest again. When you come to a Y in the trail, the main Finger Lakes Trail continues straight ahead toward the bridge of the Fish Kill. The bridge has been washed away so stay to the left and walk out to Butternut Creek Road. Turn right on this gravel road and walked first downhill and then uphill to 3.7 miles where the road joins Van Ostrand Road. After a short distance, turn right on Douglas Road and then stay to the right on Stonehouse Road. This road heads north and uphill for about .7 miles to Woodard Road at 4.5 miles. Turn right and walk less than half a mile to where the Finger Lakes Trail crosses the road. The sign on the right side of the road announces the bridge is out and indicates it is only 3.5 miles back to the car. You have already walked 5 miles so the detour adds about 1.5 miles to the hike. Turn left into the woods and head north and northwest generally following Enfield Creek. Parts of this section of trail may not be well trimmed. The trail travels close to the creek and you can hear the traffic on Route 327 on the other side. At 5.9 miles the trail turns left and starts heading southwest toward Hines Road. Intersect Hines Road at 6.35 miles and turn right to walk due north for a quarter mile to Rockwell Road. Turn left on Rockwell Road and begin to walk due west toward Potter Hill Road. After about .75 miles watch for a trail on the left which connects to the main Finger Lakes Trail and runs parallel to Potter Hill Road. Part of the trail in this area has been closed by a landowner. If you miss the trail, continue another .25 miles to Potter Hill Road. Turn left on Potter Hill Road and hike uphill for .15 miles to where the trail crosses the road. Turn right into the woods and walk uphill to 7.75 miles where the trail makes a sharp right to head back of to the road. The quarter mile hike back out to Potter Hill Road is all downhill. Turn left on Potter Hill Road and begin to walk .5 miles north to Trumbulls Corners Road. Turn left on Trumbulls Corners Road and walk slightly uphill until you see the white blazes enter the woods just after crossing a creek on a road bridge. Turn right into the woods and watch for the blazes which go off to the left a little and then start to climb a steep pitch. The entire loop is less than a mile and has no views except for the large hemlock trees. The trail rejoins Trumbulls Corners Road at the parking area for Stevenson Forest Preserve. Turned left and walk 2. miles back to where you entered the woods. Continue on Trumbulls Corners Road passing the turn on Potter Hill Road and walking out to Route 327. Turn right on Route 327 and start the 5.5 mile return trip to the car. There are several short climbs along the way but the route is mostly downhill as you drop from about 1100 feet to 425 feet. At 13.4 miles there are no more climbs as you head downhill to Route 13. Pass the entrance to Robert Treman Park and then walk out to Route 13. Be careful crossing this busy road! Turn right and walk on the shoulder of the road back to the parking area.
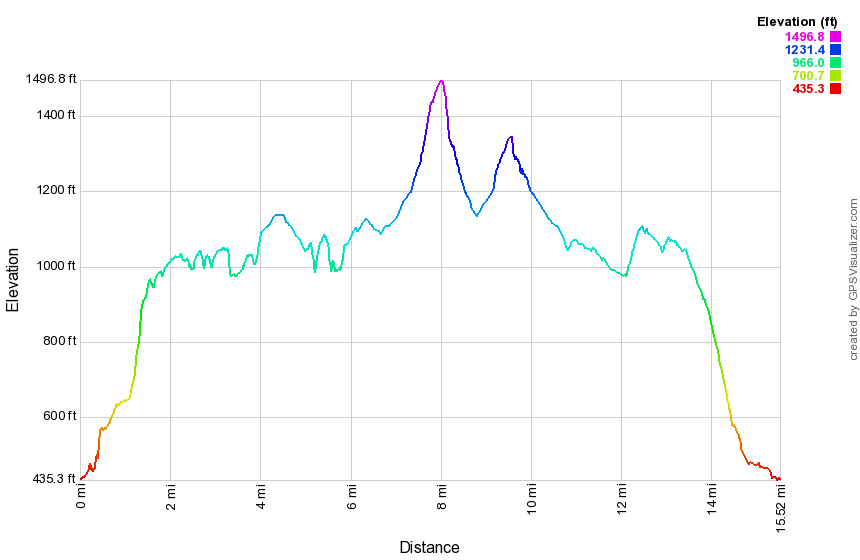 (The image at the left shows the profile of the hike. Remember that all vertical profiles are relative!)
Finger Lakes Trail: Rt 13 to Winding Stair Rd
| Quick Look | ||||
|---|---|---|---|---|
| Difficulty | Round trip | Total climb | Internet Maps | |
| 12.4 mi. | 2100 ft. | AllTrails | ||
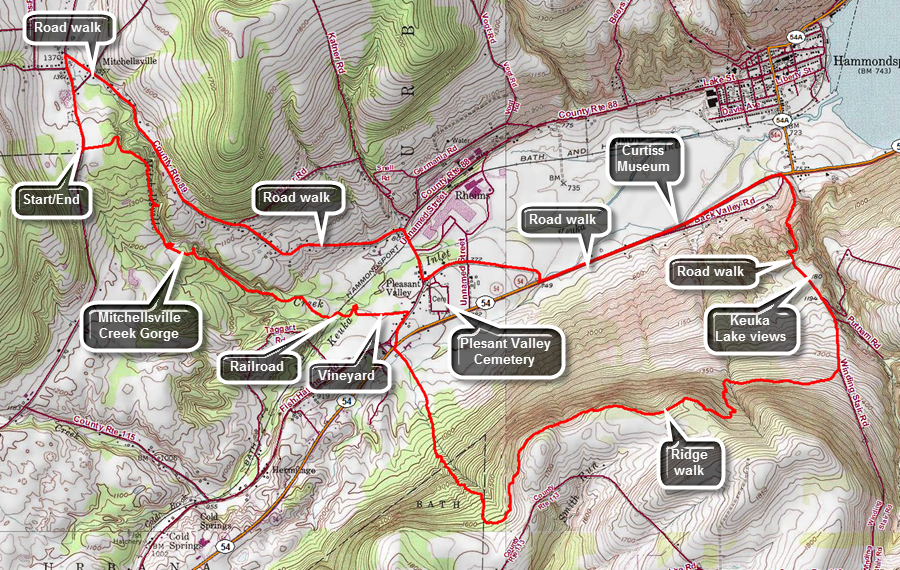
This hike starts on Rt 13 just south of Mitcellsville, NY. The route described here is only one way to approach the hike and uses local roads on the return trip. Take exit 38 from Rt17/I86 to Bath, turn right and then right again onto Route 415 heading east and south. Watch for Liberty Street on the left at a traffic light. Turn left and follow Liberty Street until it bends right and Haverling Street goes left. Bear left onto Haverling Street which become Route 13 north to Mitchellsville. Drive 4.8 miles north to where the Finger Lakes Trail crosses the road. Turn around and park on the wide shoulder on the west side of the road. We crossed Route 13 and walked through a mowed area of a field between two fields of soybeans that looked ready to harvest. The grass was wet and as we entered the shadow of the trees there was still frost on the ground. We came to the trail through the woods and started to walk along the Mitchellsville Creek Gorge. The gorge is mentioned as "very special" on the Finger Lakes Trail map description and several websites tout it as an interesting place. Many of the waterfalls are hidden by trees and are impossible to see. You may be able to get a few glimpses but good views are hard to come by! The depth of the gorge and the rock walls are impressive and it is a nice walk. At various places along the trail paths lead out to precarious viewpoints into the gorge. These are very unsafe and afford few views worth the risk. At about .9 miles the trail opens out into a field. Turn sharply left and walk down to the creek if you would like to see a very small waterfall and have a good view of the gorge walls. Walk back up to the field and turn left and walk along the edge of a field to pick up the trail as it reenters the woods. Continue to descend on the Finger Lakes Trail to an unused railroad track at around 2 miles. Turn left and walk along the track and then a trail to a bridge at 2.2 miles. Walk up to an open field and out to a vineyard. The Finger Lakes Trail follows the edge of the vineyard out to Route 88. At the road turn right and follow it out to the town hall. The trail crosses the lawn and turns right on Route 54 by the Vinehurst Motel. Just passed the motel turn left and walk along a dirt road before the trail continues straight ahead beginning the ascent of a ridge. Strangely, the trail follows one of two parallel woods roads, crosses over to the other, enters the woods on a trail for a hundred feet and then returns to the original woods road! You are now headed south or southeast and over the next .75 miles the trail gains over 700 feet at an 18% grade. The woods are now mostly hardwoods and at one point the trail comes to a field, follows the edge and then reenters the woods. At 3.9 miles the trail begins to turn north, northeast and then east. The trail rolled along the ridge never really attains the highest point. At 5.4 miles it begins to descend and a t 5.8 miles the June Big Trail heads to the north to the Glen Curtiss Museum. Continue to descend on the trail until it reaches Winding Stair Road at 6.4 miles. Turn left and start to descend to the valley. At around 6.9 miles watch for a space to open up on the right side of the road and a dirt road heading off into a field. From this spot there are excellent views of the Keuka Lake. Head down the road to Route 54 arriving at the main road at 7.5 miles. You will have now dropped 1030 feet from the top of the ridge! Turn left and began a long walk along Route 54. Fortunately the road has wide shoulders but watch out for quickly moving traffic. At 8.2 miles you will see the entrance to the Glenn Curtiss Museum with a DC-3 parked in a field. Just after the museum turn right on South Valley Road to get to Route 88 which heads back toward Mitchellsville. Follow the road and as you approach Route 88 watch for the Pleasant Valley Cemetery on the left. This is the resting place of Glenn Curtiss and a sign details his life. Turned right on Route 88 and walk about .3 miles to the intersection with Route 89. Turn left and get ready to regain all the elation you lost coming down into the valley! The road starts to climb almost immediately and it seems like it goes on forever. The valley has an elevation of 800 feet and over 1.35 miles you will climb to 1370 feet where the road levels off. Here Route 88 parallels the Mitchellsville Creek Gorge and across you can look to the trail you hiked when you first started the hike. At 11.9 miles turn left at the intersection with Route 13. Do a little more climbing to get back to the car.
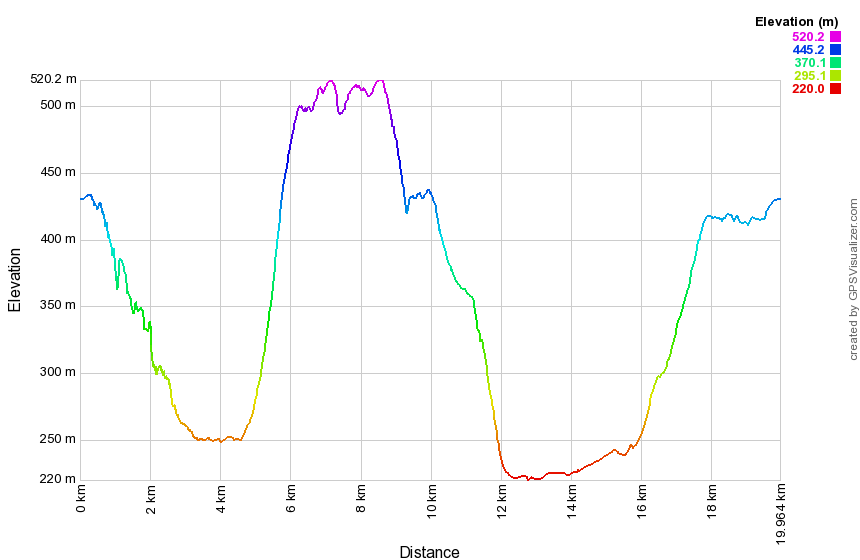 (The image at the left shows the profile of the loop hiking route. Remember that all vertical profiles are relative!)
Finger Lakes Trail: Rt 206 to Downsville
| Quick Look | ||||
|---|---|---|---|---|
| Difficulty | Round trip | Total climb | Internet Maps | |
| 7.0 mi. | 1136 ft. | AllTrails | ||
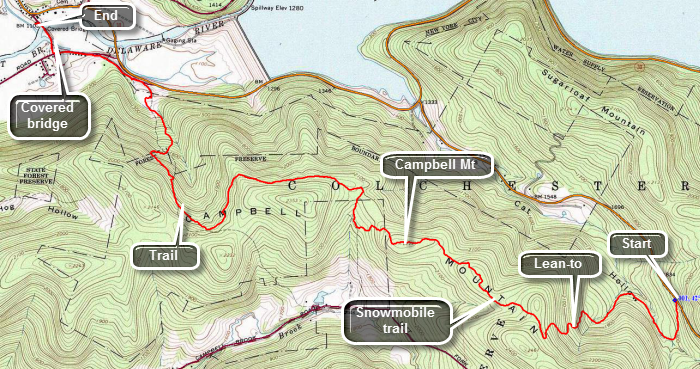 The Finger Lakes Trail starts in Allegheny State Park on the New York - Pennsylvania border and extends 576.5 miles to end in the Catskill Park at the beginning of the Table Peekamoose Trail off the Phoenicia East Branch Trail near the Denning trailhead. There are other side trails which increase the length of the trail system. Four hundred miles of this trail is also part of the Scenic North Country Trail. The Finer Lakes Trail Conference celebrated its 50th Anniversary on June 2, 2012. To commemorate the occasion the Conference set up a series of hikes that would cover the entire length of the trail. Hikes varied in length and difficulty from 4 to 14 miles. The Trail Conference continues to improve the trails and to move sections from roads to trails.
This hike is best done as a car spot as it is 7 miles one way! Park one car at the covered bridge park on Bridge street in Downsville, NY. Drive east from Downsville on Route 30. Turn right on Route 206 toward Roscoe. From the turn, drive a little over 2 miles to where the FLT cross the road and there is a small parking area on the right side of the road. After parking, start your hike by walking down the trail on the right side of the road. The trail descends until about .7 miles when it starts to climb. Several switchbacks over the next .9 miles make the 600 foot climb easier. On the ascent you will pass the Campbell Mountain lean-to on your left. At about 1.6 miles, near the top of the climb, turn right at the FLT sign and register at the box. The trail follows a snowmobile trail and relies on the red markers to guide the hiker. There are few FLT white blazes or signs on this route and, at times, you may wonder if you are still on the trail. At around 3.3 miles watch for a "Downsville" sign on the right side of the trail and turn here. Missing this sign can be easy and will leave you wondering where you are! This trail again is not well marked but remains easy to follow as it passes around he north side of a hill as it travels west toward Downsville. If you look to your right you may be able to spot the Pepacton Reservoir especially when there are fewer leaves on the trees. At about 4.8 miles, watch for a turn to the right as the LT now leaves the snowmobile trail and heads down to another woods road. There are white blazes here but you may have to look closely to see them. At about 5.5 miles the trail again turns right and down the hill to pick up another woods road. This road parallels a stream until it crosses that stream and you enter the backyard. Stay to the right and walk to the driveway of the residence. At the end of the driveway, turn left on Mink Brook Road. Walk down to Back River Road and continue straight ahead. Take the first street on the right which is bridge street. Walk down the street and over the covered bridge to the car you parked there earlier.
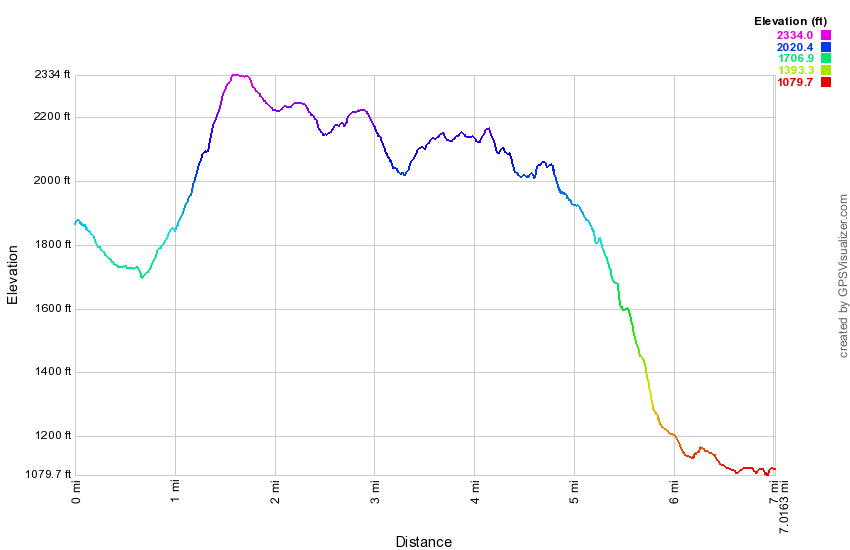 (The image at the left shows the profile of the hike. Remember that all vertical profiles are relative!)
Finger Lakes Trail: Rt 226 to Sexton Hollow Road
| Quick Look | ||||
|---|---|---|---|---|
| Difficulty | Round trip | Total climb | Internet Maps | |
| 11.6 mi. | 1885 ft. | AllTrails | ||
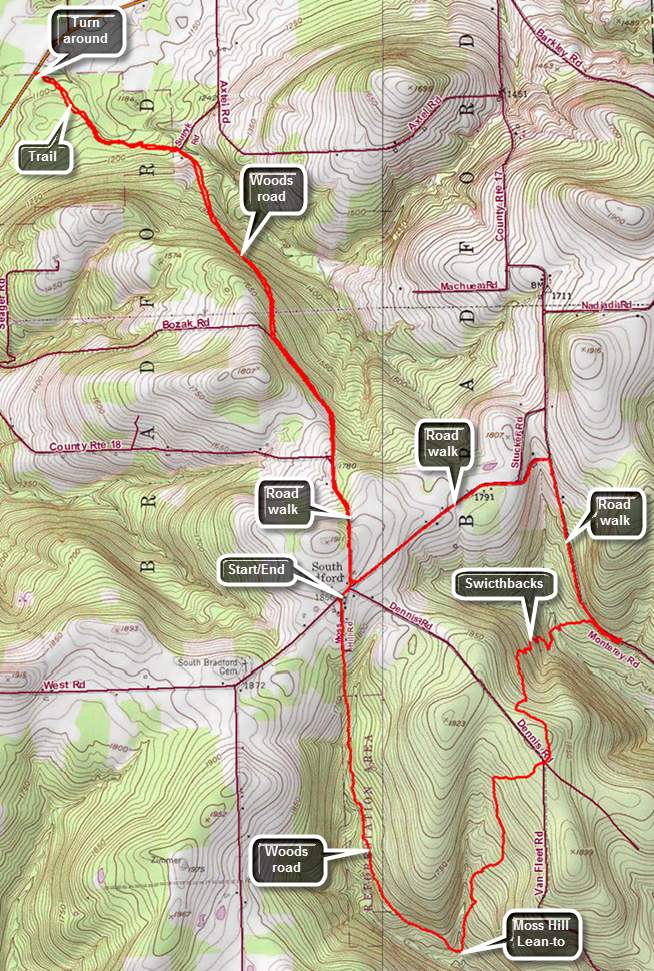
This hike actually starts on Route 17 near Moss Hill Road and makes a southern loop to Sexton Hollow Road and the returns to Route 18 to continue the Finger Lakes Trail to Route 226. If you are sure you can make the 11.6 miles, simply park where the trail crosses Route 226 and do the hike from there. Take exit 41 from Route17/I86 and turn right. Turn left on Clawson Road which shortly becomes County Route 17. After 6.6 miles, Moss Hill Road will be on the right but the shoulder is marked with NO PARKING signs. Turn around and park on the opposite side of the road as there are no signs there. Cross Route 17 to Moss Hill Road and begin to hike south on the paved surface. After only a short distance the pavement ends and the trail continues on a woods road. This road was obviously once part of Moss Hill road but is now abandoned. The trail follows the road and then veers off only to return several times. The blazes on this section of trail are very clear. There isn't much to see on the hike but the walk is all downhill as the trail heads south to the Moss Hill Lean-to. After 1.7 miles, you will be in the area of the lean-to after dropping 490 feet. A short spur trail leads to the lean-to and the blazes for the Crystal Hills Branch Trail are also visible. Of course, every descent has an ascent and the trail begins to ascend from the lean-to heading generally north and east. Again, there are no views or specific attractions. At 2.8 miles cross Dennis Road which has a dirt surface after gaining back 470 feet of elevation. The trail then begins to descend again heading for Sexton Hollow Road. At 3.4 miles the trail begins to head east rather than north and also descends a rather steep grade. There are several switchbacks that help make the descent easier. There are many side paths and woods roads in the area but the marking remains good throughout. At 3.8 miles cross a generally reliable stream. At 4 miles, you can see Sexton Hollow Road. The trail parallels the road for a short distance until it crosses the road. This is the end of the first section of the Finger Lakes Trail on this hike.
Turn left and walk .85 miles north on Monterey Road gaining elevation until you turn left on Route 17. Walk about a mile back to the intersection with Route 18. Turn right and walk a little more uphill on Route 18 to a sort of viewpoint to the south and east. The road starts to descend and at 6.6 miles turns sharply left. The trail continues straight ahead on Bozak Road which is labeled as "Seasonal Maintenance" but looks more like "No Maintenance". The gravel road starts to descend and at 7.2 miles it turns left while the trail turns right onto a woods road through the forest. The trail is still descending which means the return trip will be mostly uphill. At about 8 miles the trail comes out onto pavement near Sutryk Road but the trail almost immediately turns left back into the woods. Follow the trail as it continues to descend toward Route 226. This part of the trail is one of the few places where it does not follow a woods road of some kind. At 8.8 miles the trail crosses Route 226 which happens to be the lowest point on the hike. Turn around and retrace your route ascending all the way back to Route 18. Walk back to the intersection with Route 17, turn right and find your car a few hundred feet away.
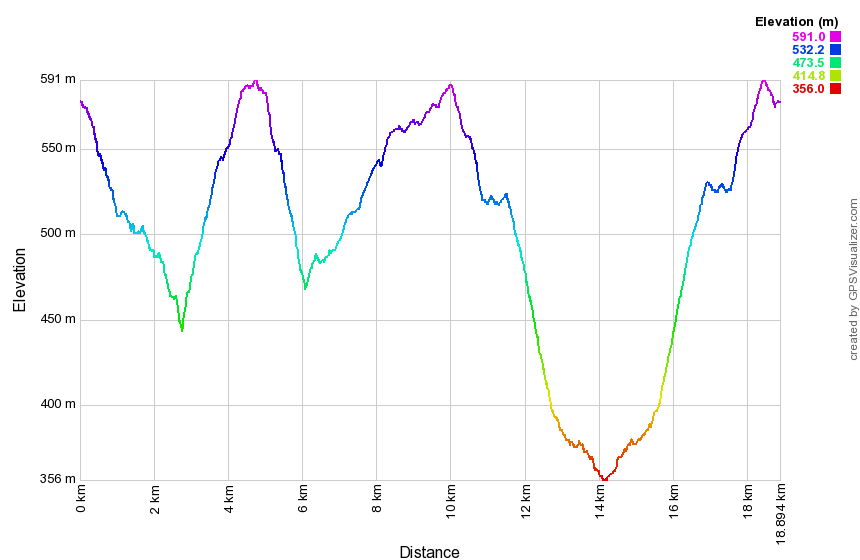 (The image at the left shows the profile of the loop hiking route. Remember that all vertical profiles are relative!)
Finger Lakes Trail: Sand Pit Rd to Rt 13
| Quick Look | ||||
|---|---|---|---|---|
| Difficulty | Round trip | Total climb | Internet Maps | |
| 13.6 mi. | 2150 ft. | AllTrails | ||
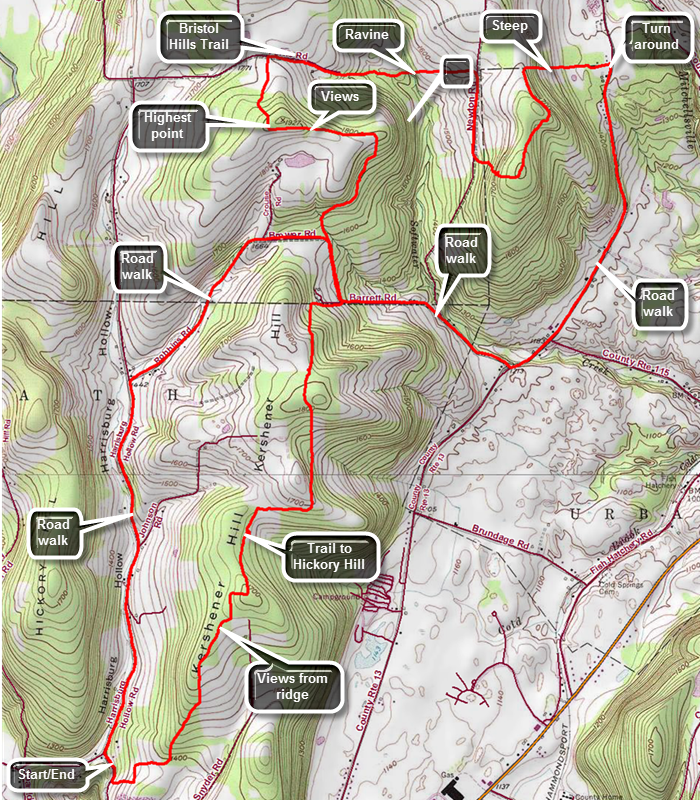
This hike starts on Sand Pit Rd NW of Bath, NY. The route described here is only one way to approach the hike and uses local roads on the return trip. Take exit 38 from Rt17/I86 to Bath, turn right and then left onto Route 415 heading northwest. After just less than a mile, turn right on Spaudling Drive and then right on Harrisburg Hollow Road at the end. After .4 miles, turn right on Sand Pit Road and park at the wide spot on the road just below the point where the Finger Lakes Trail crosses the road. Walk up the road and turn left into the woods and immediately begin to climb. Head northeast for about 1.4 miles gaining almost 500 feet and watch for some nice views as the trail alternates between woods and fields. The trail is wide and well kept following woods roads in many places and breaking out into corn fields. The views from the fields are nice but not spectacular. At 1.7 miles pass by a small pond with structure on its southern shore. Turn right and walk down the spur trail to the shores of the pond. Continuing on this trail takes you to the Hickory Hill Campground. Return to the main trail making a right turn and arriving at the Hickory Hill leanto at about 1.8 miles. The leanto has a privy, picnic table, fire ring, and a nice view of some far away hills. The trail continues north as it ascends Kershener Hill at 1820 feet. From the hill begin a descent to Robbins Road at 3.1 miles. Turn left and walk up Robbins Road for about .3 miles and then turn right into the woods. Walk along the woods road and try to find your way using the FLTC unusual trail blazes. Eventually the trail breaks out into a field and continues around the edge. You may notice an interesting set of wooden stakes on a hill in the middle of the field. Continue to walk around the field and you may see a little hut just off the trail. The structure has four partitioned stalls with a small bench in each one but the function is not clear. Continue to follow the road along the edge of the field and you will begin to get some nice views to the left. The road ascends a little hill and the views get better. Along the side of the trail are two stone benches so that hikers can enjoy the views. This is the highest spot on the hike at 1900 feet. Continue to walk along the trail on the road and turn right into the woods. There is a sheltered bench called the "Puckerbush Overlook" just inside the woods. Continue on the trail following a woods road as it passes by some houses and then comes to Ferris Road at 5 miles. Turn right and follow the road down hill and due east until it eventually becomes a woods road. The trail follows the road for some time and then enters the woods only to come back onto the road. At 5.3 miles the Bristol Hills Branch Trail heads north. The road is very eroded and hard to walk in some places. Descend to a deep ravine and follow the trail down into the ravine and across it. The ravine which was cut by Softwater Creek but now is completely dry. Walk up the opposite bank which is steep but within .3 miles you will come to Newton Road. Turn right on Newton Road and walk downhill for about .4 miles on packed and the loose dirt and gravel. The trail then turns into the woods to the left and begins to climb again. The climb is steep averaging 16% even with the switchbacks but it is only .3 miles to the top of the hill. The trail has been heading east but at the top of the hill it turns north and immediately begins a descent on a woods road. This is gentle at first but at 7.3 miles the trail turns east again and begins a steep descent to Route 13 at 7.7 miles. At Route 13 turn right and begin to WA south. At 9 miles pass Cold Spring Road on the left and at the top of the hill turn right on Robbins Road and begin the hike over the ridge. At 10.2 miles you will be on the section of Robbins Road that you hiked earlier. This time hike up the hill and then continue on the road instead of turning into the woods. Walk downhill for a pleasant 1.25 miles. Near the Harrisburg Hollow Road the surface is paved which makes walking easier. At the intersection on the right side of the road is a strange structure. It is very tall and thin with a door and three stained glass windows with a cross on the side. Continue the hike by turning left on Harrisburg Hollow Road and walking south. Walk the final 1.8 miles downhill and south on the road. Turn left on Sand Pit Road and walked 300 feet uphill to your car.
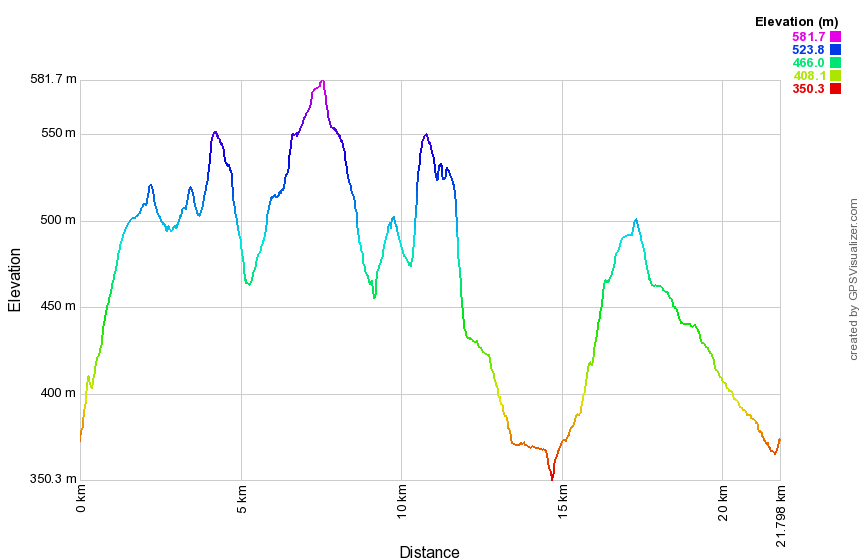 (The image at the left shows the profile of the loop hiking route. Remember that all vertical profiles are relative!)
Finger Lakes Trail: Sexton Hollow Road to Switzer Hill Road
| Quick Look | ||||
|---|---|---|---|---|
| Difficulty | Round trip | Total climb | Internet Maps | |
| 10.2 mi. | 2270 ft. | AllTrails | ||
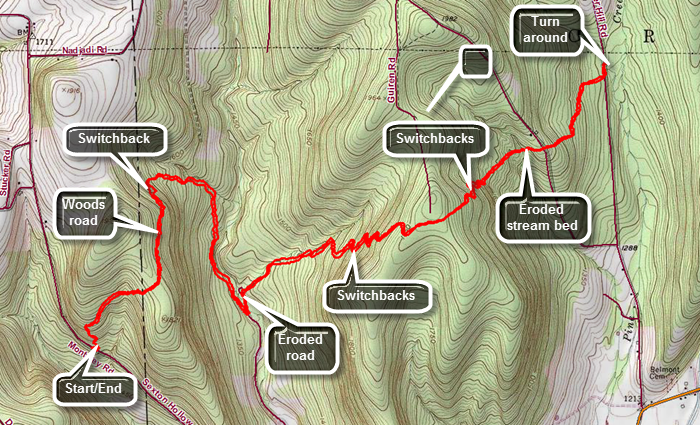
Take exit 42 from Route17/I86 and turn right or northeast on Route 16 toward Monterey. After 7.6 miles, turn left on Sexton Hollow Road which turns to dirt and gravel and then back to pavement. Watched for FLT signs just after the road became paved again and changes names to Monterrey Road. Pull over on the shoulder of the road just passed the trail entrance and made sure you are off the pavement.
Walk south on the road to the trail entrance and head northeast up the hill. The first part of the trail heads northeast and climbs a hill for .6 miles gaining 275 feet with several switchbacks along the way. Continue down the other side of the hill on a woods road which heads north. Watch for a turn to the right onto a switchback at about 1 mile. The switchback crosses the woods road several times At 1.1 miles the trail turns east and then at 1.5 miles it turns south. Along the way it crosses a few small stream that may have some water. At one point the trail empties out onto a gas well access road. Turn left and walk uphill on the road briefly before turning left into the woods again. At around 2 miles the trail parallels a stream bed for some time and approaches Corbett Hollow Road. Walk down to Corbett Hollow Road at 2.1 miles and made a sharp left turn. The road isn't much of a road as it is dirt with a lot of grass which becomes more and more eroded the further you go. Watch for the turn to the right off the "road" and enter the woods to continue the hike. The Finger Lakes Trail map description indicates a bivouac site north of the turn at the turn around point on the road. The next section of trail has 12 switchbacks to make the climb up the hill easier by making the grade smaller. Walk along the trail next to a stream bed and then start the first switchback at about 2.6 miles. Over about 1.3 miles from Corbett Hollow Road to the top of the climb the trail gains 640 feet averaging a 10% grade. At the top of the climb cross a gas well access road and walk the flat summit before starting to descend the other side. Descend the east side of the hill for about .7 miles losing 400 vertical feet to a small stream bed. The stream bed is highly eroded and it is difficult to climb the opposite bank. On the other side is a set a steps and a switchback that led to Goundry Hill Road. Cross the dirt and gravel road and continue to descend through a mixed hardwood and pine forest. At 5 miles the trail comes to Switzer Hill Road at an elevation of 1390 feet. Turn left and walk a short distance north to the point where the trail reentered the woods. This is the turn around point. The hike is a true out and back so turn around and retrace your route back to your car on Sexton Hollow Road. You may appreciate the switchbacks more on the way back!
 (The image at the left shows the profile of the loop hiking route. Remember that all vertical profiles are relative!)
Finger Lakes Trail: Shears Road to Masonville
| Quick Look | ||||
|---|---|---|---|---|
| Difficulty | Round trip | Total climb | Internet Maps | |
| 12.7 mi. | 2370 ft. | AllTrails | ||
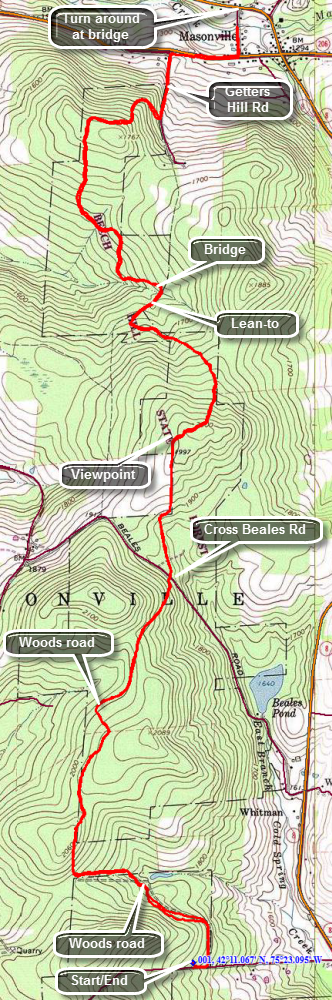 The Finger Lakes Trail starts in Allegheny State Park on the New York - Pennsylvania border and extends 576.5 miles to end in the Catskill Park at the beginning of the Table Peekamoose Trail off the Phoenicia East Branch Trail near the Denning trailhead. There are other side trails which increase the length of the trail system. Four hundred miles of this trail is also part of the Scenic North Country Trail. The Finer Lakes Trail Conference celebrated its 50th Anniversary on June 2, 2012. To commemorate the occasion the Conference set up a series of hikes that would cover the entire length of the trail. Hikes varied in length and difficulty from 4 to 14 miles. The Trail Conference continues to improve the trails and to move sections from roads to trails.
This hike is best done with a car spot as it is 6.4 miles one way. It can be done as an out and back. The route described here is the out and back! Take exit 84, the Deposit exit, on State Route 17. Drive north about 10 miles on Route 8. Watch for signs for Steam Mill State Forest and a parking area on the right. Go past the parking area and watch for an ice cream stand on the left and Hardwood Hills Golf Course on the right. Turn left on Shears Road and watch for the sign for Arctic China State Forest on the right. Park on the left side of the road just passed the sign. Walk back down the road passed the sign and turn left on a woods road to begin your hike. The trail begins on a woods road and is well marked with numerous blazes. Some sections of the Finger Lakes Trail seem to be unused and the blazes are faded and very far apart. This trail is well blazed for the entire length and seems to be used by hikers, bikers and horses. The trail stays on the woods road and heads west for just less than a mile climbing slightly all the way. At this point it turns north and continues to climb to just over a mile before descending to Beales Road. At Beales road there is a trailhead kiosk and limited parking. The trail enters an evergreen forest and winds its way through the trees until again hitting a woods road. The road climbs very gently passing a field on the left. At 3.0 miles there is a viewpoint over the field and across the valley to the west over some hills. A small bench provides a resting spot and was placed there by the TriTown Hikers. After hitting a high point, the trail begins to descend over the next mile. At 4.2 miles there is a blue spur trail to the right. The trail goes to the Getter Hill lean-to just 250 feet off the trail. The lean-to was built in 2011 and has the typical open front with a fireplace but also sports a picnic table, an outhouse and a nearby stream. After the lean-to trail is a low point as you cross a bridge over a stream and then the trail begins to climb again. The trail climbs for about .8 miles and then starts to descend, meeting another woods road. From here it is all downhill to Masonville. At 5.7 miles you will hit Getter Hill Road. Turn left to descend the dirt road which soon turns to pavement. The walk down the road is short. As you near Route 206 turn right on a grassy lane which runs parallel to the road. Once on Route 206 turn right and walk along the road for .2 miles before turning left on Church Street. Just .1 miles more and you will be at the Church Street Bridge which is your destination. The bridge was a road bridge at one time but had been closed to cars. The Finger Lakes Trail Conference donated decking which was installed by the people of Masonville to make a nice foot bridge over Masonville Creek. If you have spotted a car here your hike is over. If your car is back on Shears Road, turn around and retrace your steps! The ascents may seem a little harder on the way back.
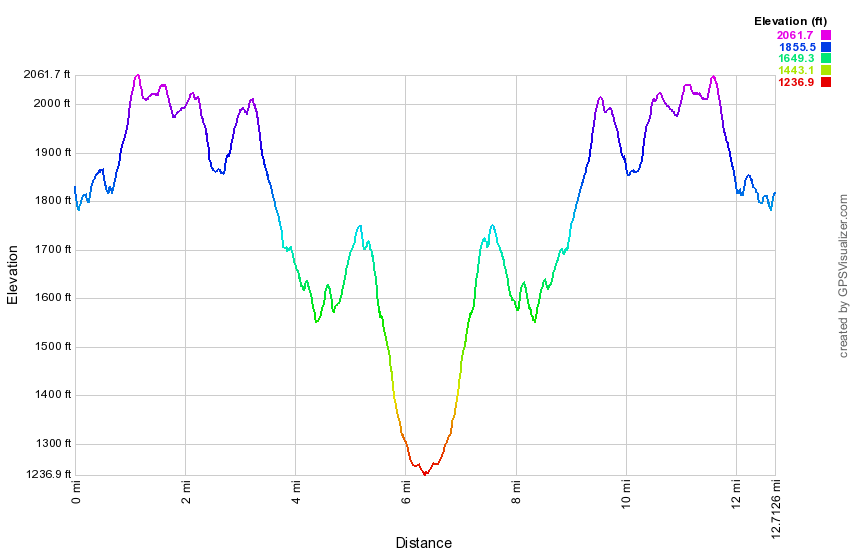 (The image at the left shows the profile of the hike. Remember that all vertical profiles are relative!)
Finger Lakes Trail: Paradise Hill to Ridge Road
| Quick Look | ||||
|---|---|---|---|---|
| Difficulty | Round trip | Total climb | Internet Maps | |
| 14.2 mi | 2170 ft. | AllTrails | ||
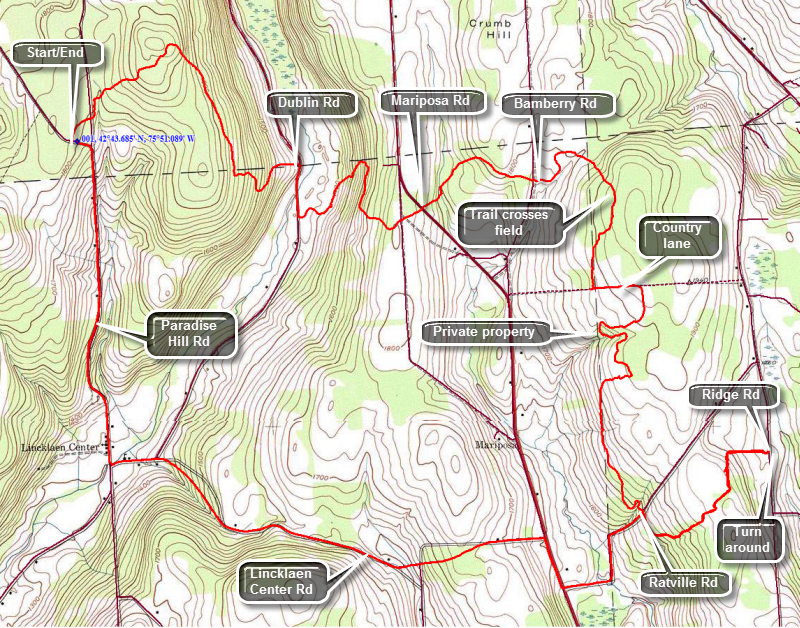 The Finger Lakes Trail starts in Allegheny State Park on the New York - Pennsylvania border and extends 576.5 miles to end in the Catskill Park at the beginning of the Table Peekamoose Trail off the Phoenicia East Branch Trail near the Denning trailhead. There are other side trails which increase the length of the trail system. Four hundred miles of this trail is also part of the Scenic North Country Trail. The Finer Lakes Trail Conference celebrated its 50th Anniversary on June 2, 2012. To commemorate the occasion the Conference set up a series of hikes that would cover the entire length of the trail. Hikes varied in length and difficulty from 4 to 14 miles. The Trail Conference continues to improve the trails and to move sections from roads to trails.
This hike is best done with a car spot since it is 8.4 miles one way for a total of 14.2 miles. The route described here is out and back with roads use to shorten the "back" or return trip. Take the exit for Whitney Point off of I-81. Follow Route 26 north for about 21 miles northeast To Pitcher. Turn left on Route 12 and drive 8 miles through Lincklaen. Turn right on Route 12B, the Lincklaen Center Road.Drive about 2 miles and continue straight ahead on Paradise Hill Road through Lincklaen Center. Drive about 1.6 miles up the hill to just passed where Woods Road, a seasonal maintenance road heads off to the right. Park off the road on the shoulder. To begin your hike pick up the Finger Lakes Trail on the right or east side of the road. Within a few minutes you will cross Woods Road and begin ascending a Stage Coach Hill. As soon as you hit the high point you begin to descend dropping almost 600 feet to Dublin Road where you should turn right 2 miles into the hike. There is excellent parking on Dublin Road and although the surface is dirt and gravel driving it is no problem. Walk down Dublin Road for .3 miles and then turn into the woods on the left. It is only .5 miles to Mariposa Road but several switchbacks stretch this to 1 mile. Along the way you will gain over 400 feet of elevation before you cross the road. It is less than a mile from Mariposa Road to Bamberry road and the trail undulates a little along the way. At 3.5 miles you will cross a stream on a nicely built bridge. It was the only bridge across any of the streams on the hike but most of the stream are almost dry except using the wettest seasons. After crossing the bridge, head uphill on the trail. As you cross Bamberry Road the trail enters private property. In only .4 miles from the road there is a junction with the Link Trail which connects with the North Country Trail. The North Country Trail when completed will stretch from Crown Point, NY to North Dakota passing through seven states over 4600 miles! In New York the trail will follow much of the Finger Lakes Trail starting at the trail junction with the Link Trail. Just passed the Link Trail and is a sign that says "FLT to Adirondacks, Long Path, Catskills". From this point the map is relatively silent about the next two miles which is a shame since this is by far the trickiest part of the hike! Somewhere around 4.9 miles you will enter a field. The grass is often high. Look for white blazes on posts as you cross he field as there is only the hint of a trail. Head across the field and watch for white blazes on the trees on the other side. You should be turning left to follow the trail just inside the tree line. Follow these blazes through some high grass and brambles until you come to a barbed wire fence with a stile that has a white blazes. Turn left to head east along a country lane which has only a few blazes. Walk along the lane for about .2 miles as it skirts the edge of the field after which you should turn south and enter a pine forest. The next section of trail is constructed to head south while staying out of the farm fields and to do this it takes several interesting turns. A little further along the trail you will pass by the shore the of a small pond. Continue along the trail as it descends to Ratville Road 7.3 miles. There is a place to pull a car off the road here. Cross Ratville Road and hike a little over a mile to Ridge Road. The trail ascends and then descends a small hill along the way. The last part of the trail follows a nice stone wall for some distance before crossing Ridge Road at 8.4 miles where there is plenty of room to park several cars. If you have a car parked there, your hike is done. Otherwise, turn around here and head back over the hill to Ratville Road. Turn left on the dirt and gravel road and walk downhill and then slightly uphill until you get to Mariposa Road. Turn right on Mariposa Road and walk .3 miles. Turn left on Lincklaen Center Road and walk up a hill. Stay on Lincklaen Center Road for about 2.3 miles as it loses about 400 feet to the intersection with Paradise Hill Road in Lincklaen Center. Turn right on Paradise Hill Road and walk through Lincklaen Center and then start to climb Paradise Hill Road. The distance back to the car is 1.6 miles and we you will gain 460 feet.
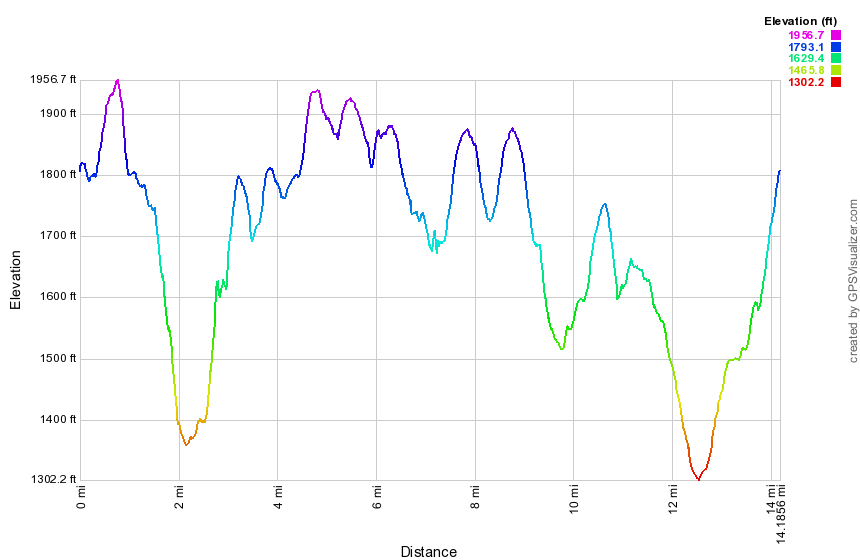 (The image at the left shows the profile of the hike. Remember that all vertical profiles are relative!)
Finger Lakes Trail: Purvis Rd to Owego Hill Rd
| Quick Look | ||||
|---|---|---|---|---|
| Difficulty | Round trip | Total climb | Internet Maps | |
| 11.7 mi | 1710 ft. | AllTrails | ||
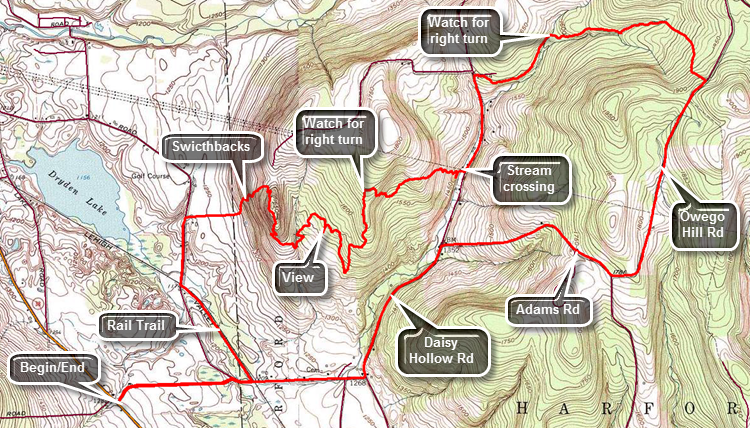 The Finger Lakes Trail starts in Allegheny State Park on the New York - Pennsylvania border and extends 576.5 miles to end in the Catskill Park at the beginning of the Table Peekamoose Trail off the Phoenicia East Branch Trail near the Denning trailhead. There are other side trails which increase the length of the trail system. Four hundred miles of this trail is also part of the Scenic North Country Trail. The Finer Lakes Trail Conference celebrated its 50th Anniversary on June 2, 2012. To commemorate the occasion the Conference set up a series of hikes that would cover the entire length of the trail. Hikes varied in length and difficulty from 4 to 14 miles. The Trail Conference continues to improve the trails and to move sections from roads to trails.
This hike can be done with a car spot since it is 11.7 miles round trip and has some elevation gain. The route described here is a loop using roads for the return trip! Take exit 9 on I-81 and head west on Route 221 to the junction with Route 38. Turn right and drive north for 2.5 miles. Turn right on Purvis Road and park on the widest part of the shoulder on the right side of the road. Begin the hike by walking east on Purvis Road for .6 miles and then turn right on Willow Crossing. After crossing a road bridge, there is a small parking area on the left. This is part of the Jim Schug Trail which is a rail trail. The Finger Lakes Trail uses a small part of the rail trail. Turn left onto the trail which is absolutely flat and smooth and well maintained. At 1.4 miles turn right on Lake Road where the rail trail continues straight. Hike to 1.7 miles where the trail enters a field between two houses. A track is mowed between the two houses and heads due east toward a hill. The trail may be wet and muddy in spots but it is easy to follow. Just before starting into the woods, turn around for a nice view including Dryden Lake. The trail up the hill has many switchbacks which makes the path less steep but adds to the distance. Not far into the woods is a very large oak tree with an Finger Lakes Trail register on one side. Continue to the top of the hill heading generally eastward. There is a Field View Trail on the right which you may ant to investigate. At 3.25 miles there is a nice lookout on the right side of the trail which you can get to by walking through the woods to an opening. Continue to hike back on the main trail. Be aware that the land you are traveling on is private and landowners have given permission for the Finger Lakes Trail Conference to use the land. The trail can be extremely wet and muddy. The trail is not as well marked as the eastern portion and blazes are few and far between with turns not clearly marked. At 4.2 miles be careful not to miss the point where the trail turns right just before the power line right-of-way. Follow the trail through some areas which can be very wet as it descended the hill roughly paralleling the right-of-way. Eventually the trail crosses under the power line in a swampy area. Continue to follow the trail through many twists and turns and switchbacks heading east toward Daisy Hollow Road. As you approached the road, the trail descends to a stream. The trail is highly eroded and there are few no white blazes. Down by the stream there are some blazes. Cross the stream and arrive at Daisy Hollow Road. Turn left on Daisy Hollow Road and walk .6 miles up a hill. At 5.55 miles turn right off the road and enter the woods for about a 2 mile hike to Owego Hill Road. The trail continues heading east paralleling an intermittent stream. At about 6.15 miles watch for the point where the trail turns right and crosses a stream. The turn may not be marked and the turn is easy to miss! Continue to follow the trail east paralleling the stream and gaining some elevation. Followed the trail as it turns south at about 6.8 miles crossing a small stream. At 7.2 miles the trail crosses Owego Hill Road which is definitely a "seasonal maintenance only". Turn right and follow the road to 8.5 miles and turn right on Adams Road. Follow Adams Road for about 1 mile to the intersection with Daisy Hollow Road. Turn left and follow Daisy Hollow Road .9 miles to Willow Crossing. Turn right and walk .7 miles to Purvis Road passing the rail trail on the way. Turn left on Purvis Road and walk .6 miles back to your car.
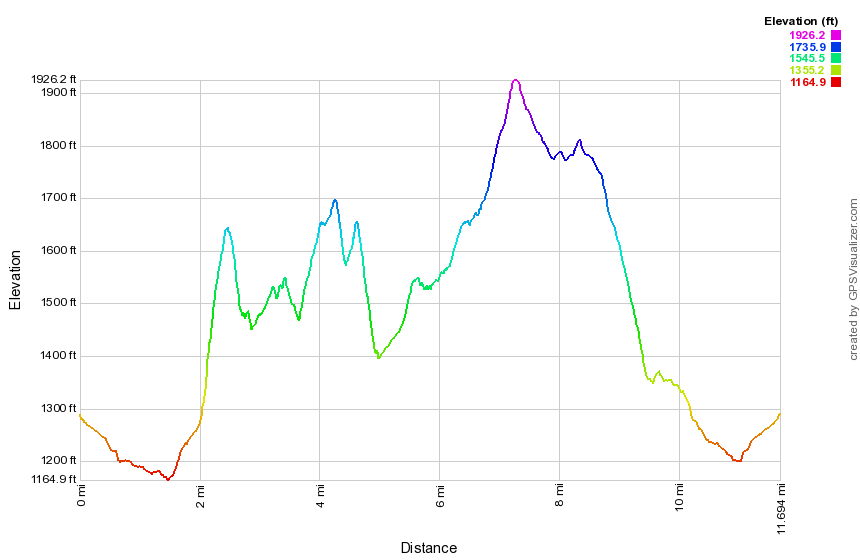 (The image at the left shows the profile of the hike. Remember that all vertical profiles are relative!)
Finger Lakes Trail: Ridge Road to Otselic SF
| Quick Look | ||||
|---|---|---|---|---|
| Difficulty | Round trip | Total climb | Internet Maps | |
| 14.6 mi | 2170 ft. | AllTrails | ||
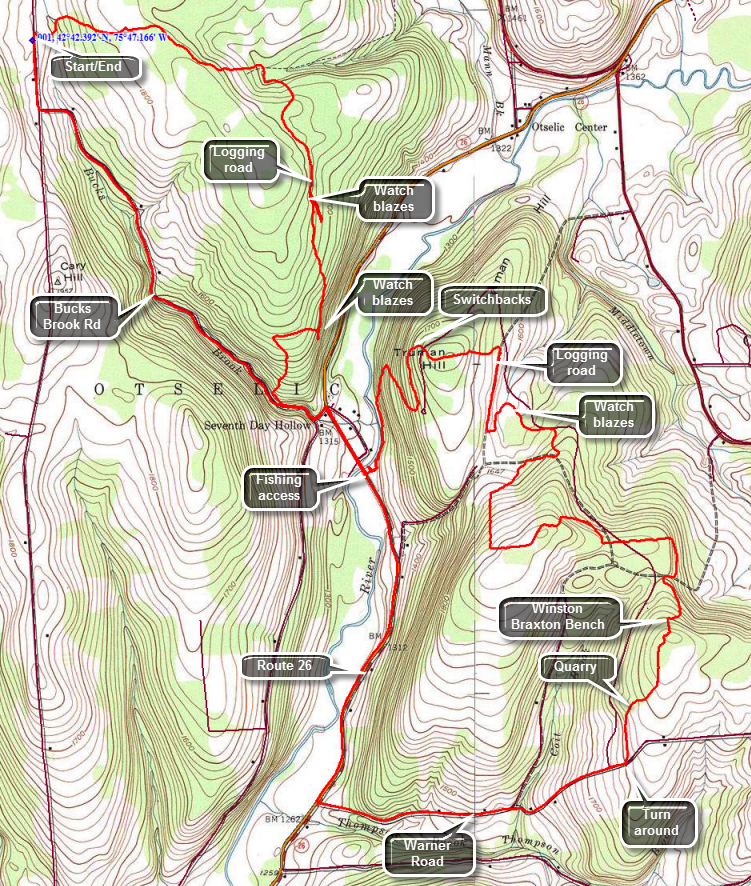 The Finger Lakes Trail starts in Allegheny State Park on the New York - Pennsylvania border and extends 576.5 miles to end in the Catskill Park at the beginning of the Table Peekamoose Trail off the Phoenicia East Branch Trail near the Denning trailhead. There are other side trails which increase the length of the trail system. Four hundred miles of this trail is also part of the Scenic North Country Trail. The Finer Lakes Trail Conference celebrated its 50th Anniversary on June 2, 2012. To commemorate the occasion the Conference set up a series of hikes that would cover the entire length of the trail. Hikes varied in length and difficulty from 4 to 14 miles. The Trail Conference continues to improve the trails and to move sections from roads to trails.
This hike is best done with a car spot since it is 8.6 miles one way for a total of 17.2 miles. The route described here is out and back with roads used to shorten the "back" or return trip. Take the exit for Whitney Point off of I-81. Follow Route 26 north to South Otselic. Turn left on County Route 13 and then turn right on Maple St which becomes Ridge Road. After 4.25 miles on Ridge Road, you will pass Buck Brook Road and then the Finger Lakes Trail crossing about .3 miles after that.Park on the shoulder and begin your hike by entering the woods on the east side of the road. The trail almost immediately crosses a small brook and from there ascends a small hill. It drops to another stream at 1.2 miles into the hike. The trail skirts McDermott Hill on the right and begins to follow a well-defined logging road. Watch carefully since the trail veers right off the logging road at about 1.9 miles. The trail climbs a bit and then rejoins the logging road and continues to descend. Once again watch for the blazes that leave the trail to the right as the logging road starts to descend. The trail starts to ascend through the woods and then over the next .4 miles descends about 250 feet to Bucks Brook Road. Turn left at the road and walk .3 miles out to Route 26. Turn right on Route 26 and hike down the wide shoulder for .35 miles crossing the Otselic River to a fishing access on the right side. Walk through the parking area to the old road beyond. Turn left ion the road and bear slightly to the right and up a trail that parallels the river. you will have to hike up the path to find some white blaze indicating the Finger Lakes Trail. The trail follows the river but stays high on the bank for a short distance. At about 4.6 miles the trail begins a series of switchbacks to climb Truman Hill. From the river you will climb about 550 feet to the top of Truman Hill crossing a road just before the summit. After the summit the trail descends the other side of the hill to another road where the trail parallels but does not meet the road. This part of the trail can be confusing since there are so many twists and turns. At 5.6 miles turn south onto a logging road and stay on the road for about .3 miles. Turn left off the road and loop back north almost parallel to the road. Over the next 1.25 miles you will be headed north, then east, then south, then west and then south again gaining about 350 feet along the way. The trail now heads east for the next .9 miles gains and then loses elevation in the process. You will now be hiking in primarily evergreen forest. At about 8 miles you will begin another 200 foot ascent for about half a mile passing the Winston Braxton Memorial Bench along the way. You are now headed south and downhill. After passing through an old quarry you will walk through some more pines and at 9.2 miles you will be on Warner Road. If you have a car parked here, use it to return to Ridge Road. If you have only one car back at Ridge head east on Warner Road for 1.35 miles to Route 26. Along the way the road becomes paved and drops 560 feet. When you reach Route 26, turn right and head north toward the intersection with Bucks Brook Road. Route 26 has pretty good shoulders in most places but most vehicles travel quite a bit above the speed limit! You will only be on the main road for 1.8 miles. At 12 miles you will pass the fishing access area and at 12.3 miles you should turn left on Valley View Road. It is a short walk to Buck Brook Road where you turn right and head northwest along the brook. The walk up Bucks Brook Road is scenic with several small cascades that are varied and interesting, The walk up Bucks Brook Road is about 2 miles to Ridge Road and the elevation we gain is about 425 feet. At 14.3 miles at the end of Bucks Brook Road, turn right on Ridge Road and walked the final .3 miles back to the car.
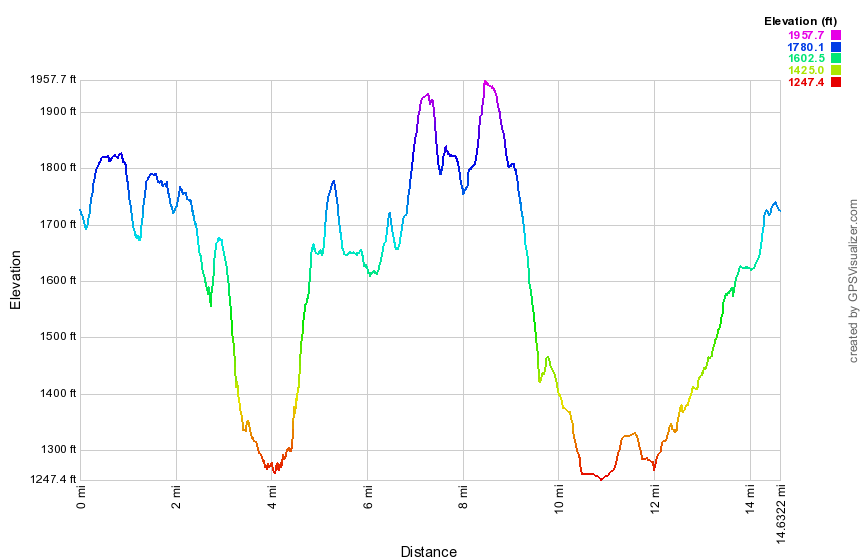 (The image at the left shows the profile of the hike. Remember that all vertical profiles are relative!)
Finger Lakes Trail: Route 79 to Purvis Rd
| Quick Look | ||||
|---|---|---|---|---|
| Difficulty | Round trip | Total climb | Internet Maps | |
| 14.8 mi | 2370 ft. | AllTrails | ||
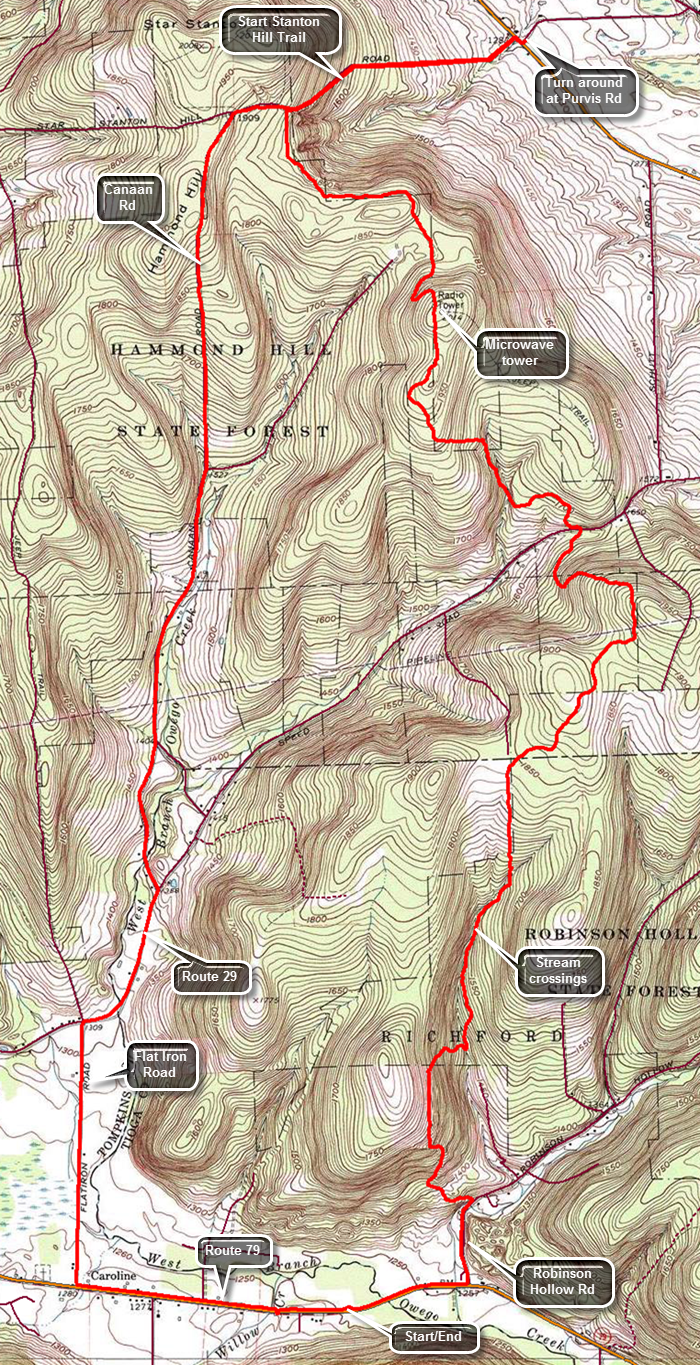 The Finger Lakes Trail starts in Allegheny State Park on the New York - Pennsylvania border and extends 576.5 miles to end in the Catskill Park at the beginning of the Table Peekamoose Trail off the Phoenicia East Branch Trail near the Denning trailhead. There are other side trails which increase the length of the trail system. Four hundred miles of this trail is also part of the Scenic North Country Trail. The Finer Lakes Trail Conference celebrated its 50th Anniversary on June 2, 2012. To commemorate the occasion the Conference set up a series of hikes that would cover the entire length of the trail. Hikes varied in length and difficulty from 4 to 14 miles. The Trail Conference continues to improve the trails and to move sections from roads to trails.
This hike can be done with a car spot since it is 14.8 miles round trip and has some elevation gain. The route described here is a loop using roads for the return trip! Take exit 8 on I-81 and head west on Route 79 for about 15.5 miles to Robinson Hollow Road on the right. Drive passed the road and park in the snowplow turnaround on the other side of a stream. DO NOT park here during months when there is snow or your car may be towed! Start walking east on Route 79 toward Robinson Hollow Road for .4 miles. Turn left on Robinson Hollow Road and walk about .4 miles. After crossing a road bridge, Robinson Hollow Road bends to the right. At this point the trail turns off the road to the left. Start to climb a woods road that gains 450 feet in the first .5 miles for a 15% grade. The trail may be very wet in spots especially after rain. The trail is well-marked in most spots and you won't have to stop and guess where you should go next. After climbing, the trail drops down to a stream bed and starts crossing it several times. Continue to follow the stream until 2.4 miles climbing slightly along the way until the trail crosses the stream again heading mostly north. The trail climbs heading north with a few swings to avoid steep climbs or other obstacles. At 3.7 miles the trail reaches 1950 feet and begins to descend to the Harford-Slaterville Road or Route 117. Cross the road to stay on the trail and continue north crossing another stream at about 4.8 miles. The trail begins an ascent to 2015 feet which is the highest point on this route. At the high point there is a microwave facility to the right of the trail. Begin a slight descent to Star Stanton Hill Road which at about 7.1 miles. The "road" is little more than a washed out gully. Turn right and follow the trail downhill for about a mile to Route 38. Turn right on the main road and then immediately left on Purvis Road. This is the end of map section 18. Turn around to return the way you came up the hill on the trail. At the point where the trail turns left off the "road", continue straight ahead to Canaan Road. The trail markings indicate a snowmobile trail and it is a short walk to a trail junction with clear signage. A sign points south with a label for "Caroline 6 miles" and Canaan Road. Canaan Road is an abandoned town road which is now part of the Hammond Hill State Forest. At 10.6 miles Red Man Run Road comes in from the left. Continue south on Canaan Road without turning and in another half mile the road becomes paved. At 11.7 miles pass Luddington road on the left and continue downhill to 12.2 miles. Turn right on Harford Road or Route 29 and walked west to Flat Iron Road where you should turn left at 12.8 miles. Route 79 is about a mile away but the road is so straight and flat you can see all the way to your next turn. This road is flanked by farms and on the right side by the Goetchius Wetland Preserve. This is an 80 acre preserve owned by the Finger Lakes Land Trust in Tompkins County. The wetlands drain both to the north and south. At Route 79, turn left or east and start to hike the last mile back to the car. The road has a wide shoulder which was fortunate since the traffic seems to travel somewhat above the speed limit!
 (The image at the left shows the profile of the hike. Remember that all vertical profiles are relative!)
Finger Lakes Trail: Solon Pond Rd to Stoney Brook RD
| Quick Look | ||||
|---|---|---|---|---|
| Difficulty | Round trip | Total climb | Internet Maps | |
| 12.1 mi | 1835 ft. | AllTrails | ||
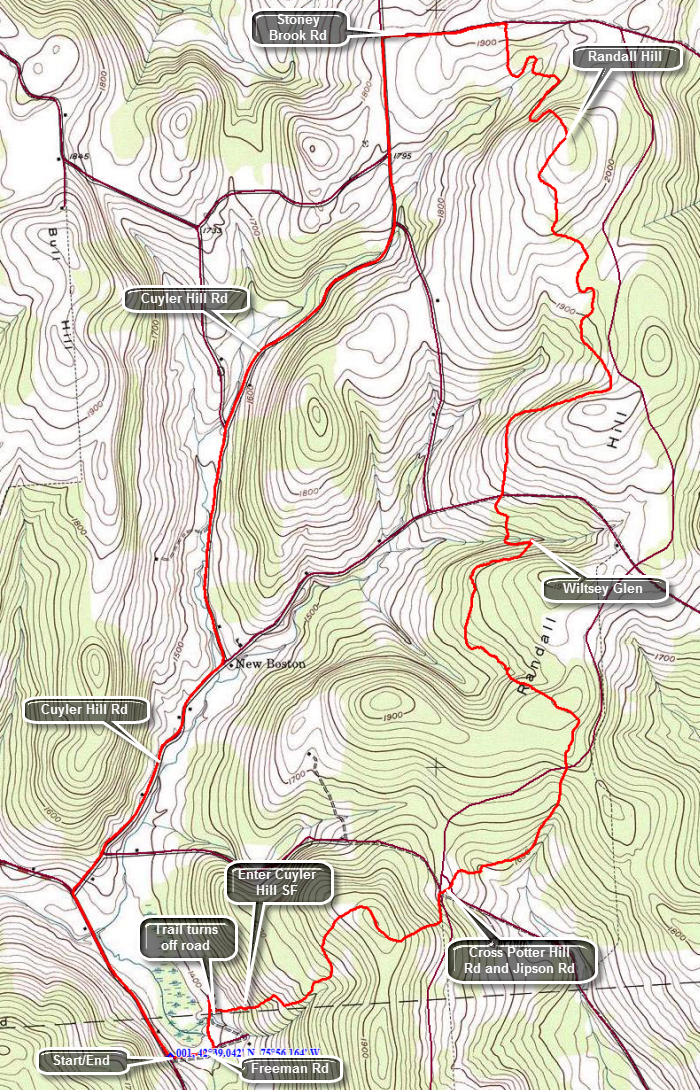 The Finger Lakes Trail starts in Allegheny State Park on the New York - Pennsylvania border and extends 576.5 miles to end in the Catskill Park at the beginning of the Table Peekamoose Trail off the Phoenicia East Branch Trail near the Denning trailhead. There are other side trails which increase the length of the trail system. Four hundred miles of this trail is also part of the Scenic North Country Trail. The Finer Lakes Trail Conference celebrated its 50th Anniversary on June 2, 2012. To commemorate the occasion the Conference set up a series of hikes that would cover the entire length of the trail. Hikes varied in length and difficulty from 4 to 14 miles. The Trail Conference continues to improve the trails and to move sections from roads to trails.
This hike is best as a car spot since it is 7.2 miles out and 5 miles back. The route described here is a loop that uses local back roads for the return trip. Take exit 8 off I 81 at Whitney Point and follow Routes 41 and 26 north and east to Cheningo Solon Pond Rd. Drive north on the road for about 6.5 miles to Freeman Road. Park on the side of Freeman Road near the intersection. Walk down Freeman Road following the white blazes. The road curves slightly at the bottom and you should watch as the trail turns abruptly left just before an old farmhouse that is now a hunting camp. The trail goes down into a deep ditch and then passes through a sea of waist high weeds! This area can also be wet and marshy. The weeds and marshy ground don't last long and soon the trail climbs a small hill as it enters Cuyler Hill State Forest. Over the next mile the trail climbs almost 600 feet to the top of a hill and then descended to Potter Hill Road at 1.8 miles. From Potter Hill Road climb a little more and then drop to the edge of a small stream and follow it uphill until you again cross Potter Hill Road at 2.6 miles. From Potter Hill Road to Randall Hill Road the trail rolls up and down while heading north and a little west to skirt the summit of a hill. As you approach Randall Hill Road the trail descends to an unnamed brook and a bivouac area called Wiltsey Glen. There is a fire ring and a good water source. Here the trail turns west to follow the brook briefly and heads up to Randall Hill Road at 4.25 miles. An orange trail on the left goes to the Rose Hollow Bivouac Area shortly after crossing the road. At 6.2 miles you will hit the highest point on the hike as you summit 2084 foot Randall Hill. From here it is only about .5 miles to Stoney Brook Road but a series of switchbacks lengthens that to about a mile. Arrive at Stoney Brook Road after hiking 7.2 miles. If you have a car parked here, your hiking is done. If you only have one car, turn left on Stoney Brook Road and hike the short distance out tom Cuyler Hill Road where you should turn left. At 8.4 miles pass Enzes Road on the left. As you walk down Cuyler Hill Road you will be between two low ridges. It is a pretty walk and along the way there is a nice, piped spring. At 10.3 miles Randall Hill Road comes in from the left. Turn left on Cheningo Solon Pond Road at 11.4 miles and start the last part of the hike back to the car.
 (The image at the left shows the profile of the hike. Remember that all vertical profiles are relative!)
Finger Lakes Trail: South Oxford Bridge to Basswood Rd
| Quick Look | ||||
|---|---|---|---|---|
| Difficulty | Round trip | Total climb | Internet Maps | |
| 6.8 mi | 700 ft. | AllTrails | ||
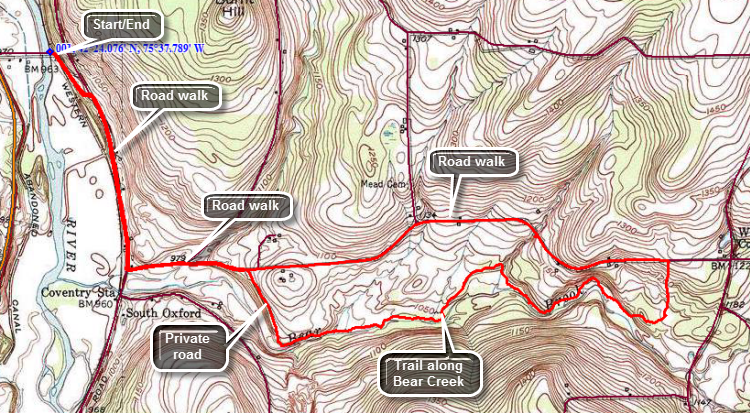 The Finger Lakes Trail starts in Allegheny State Park on the New York - Pennsylvania border and extends 576.5 miles to end in the Catskill Park at the beginning of the Table Peekamoose Trail off the Phoenicia East Branch Trail near the Denning trailhead. There are other side trails which increase the length of the trail system. Four hundred miles of this trail is also part of the Scenic North Country Trail. The Finer Lakes Trail Conference celebrated its 50th Anniversary on June 2, 2012. To commemorate the occasion the Conference set up a series of hikes that would cover the entire length of the trail. Hikes varied in length and difficulty from 4 to 14 miles. The Trail Conference continues to improve the trails and to move sections from roads to trails.
This hike can be done as a car spot but it is only 6.8 miles. The route described here is out and back with a little loop thrown in! Take Route 12 south from Oxford for about 4 miles. Watch for South Oxford Bridge Road on the left. Turn left on the road and drive across the bridge over the Chenango River. Park in the small pullout on the left side of the road before the railroad tracks. The white blazes of the Finger Lakes Trail lead Southbridge Road up to Route 32. Turn right on Route 32 and walk south for .7 miles. Turn left on Basswood Road.and walk slightly uphill for .4 miles. Turn right onto a private woods road and walk through a gate on the The trail description on the Finger Lakes Trail Conference maps is a little unclear from this point on but the blazes are very clear. The trail winds its way down to Bear Creek and then begins to parallel the stream. The description on the map mentions waterfalls but there are NO WATERFALLS. There are a few areas where some water drops one or at the most two feet over some rocks with some deeper pools. At about 3.4 miles the trail begins to pull away from the creek and starts uphill towards Basswood Road. This part of the trail can get very overgrown with brush and weeds. Sometimes you may have to hack through milkweed and goldenrod just to make a path. In other areas, there may only be a low "tunnel" through the bushes. Soon you will briefly enter a stand of conifers near the trail register and just before entering the field that takes you up to Basswood Road. Once you hike up to the road you may turn around and reverse your hike through the woods. You may also turn left on Basswood Road and hike back to where you turned onto the private road. It is easier walking and saves a little less than a mile. For 1.7 miles you will walk mostly downhill on the road until you are at the private woods road. From this point is was about .4 miles back to Route 32 and then 1.1 miles back to the car.
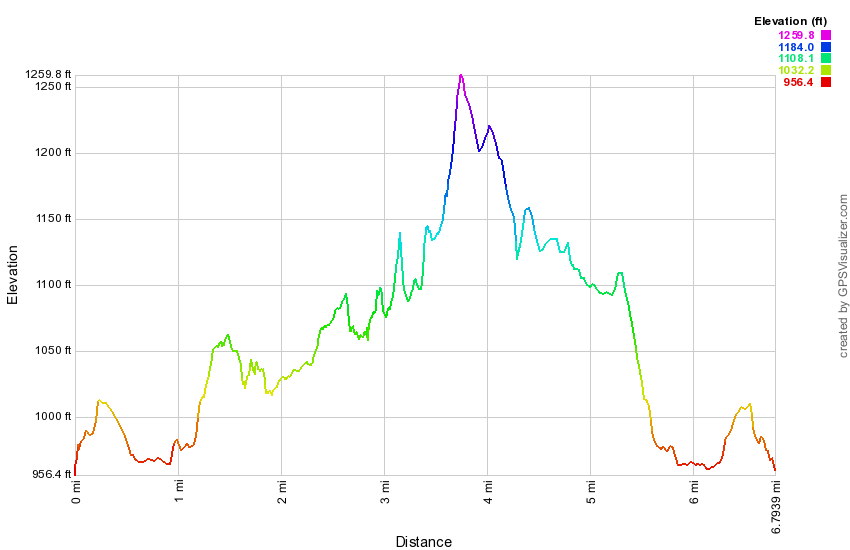 (The image at the left shows the profile of the hike. Remember that all vertical profiles are relative!)
Finger Lakes Trail: Steam Mill SF to Mormon Hollow
| Quick Look | ||||
|---|---|---|---|---|
| Difficulty | Round trip | Total climb | Internet Maps | |
| 10.4 mi. | 2600 ft. | AllTrails | ||
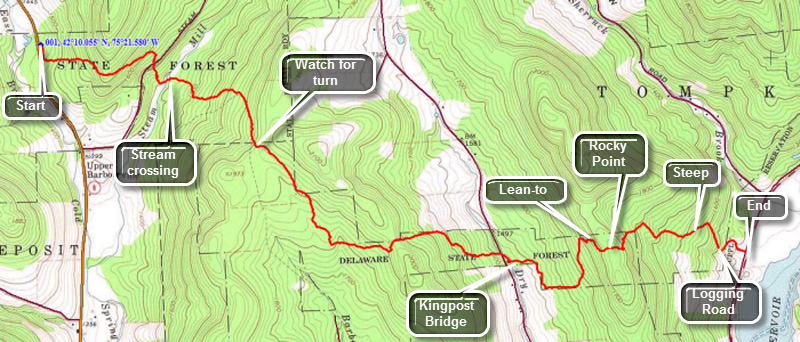 The Finger Lakes Trail starts in Allegheny State Park on the New York - Pennsylvania border and extends 576.5 miles to end in the Catskill Park at the beginning of the Table Peekamoose Trail off the Phoenicia East Branch Trail near the Denning trailhead. There are other side trails which increase the length of the trail system. Four hundred miles of this trail is also part of the Scenic North Country Trail. The Finer Lakes Trail Conference celebrated its 50th Anniversary on June 2, 2012. To commemorate the occasion the Conference set up a series of hikes that would cover the entire length of the trail. Hikes varied in length and difficulty from 4 to 14 miles. The Trail Conference continues to improve the trails and to move sections from roads to trails.
This hike is best done as a car spot as it is 5.2 miles one way! The route described here is out and back! Take exit 84, the Deposit exit, on State Route 17. Drive north about 9 miles on Route 8. Watch for signs for Steam Mill State Forest and a parking area on the right. The Finger Lakes Trail crosses here and leaves the back right corner of the parking area. The trail follows an old logging road and begins to gain some elevation as you walk along a stone wall. The trail description from the Finger Lakes Trail Conference describes a viewpoint at the height of land but it seems to have grown in. There is a view of a logged area but nothing else. Descend the other side of the hill and drop down to Steam Mill Road. Cross the road and then walk across the brook. Next you will hike about .5 miles across some wetlands and then through some evergreens. Eventually this turns to hardwoods until you came out on Barbour Brook Road. Turn left on the road and continue to walk uphill until the trail turns off the road at the beginning of a snowmobile trail. Watch carefully here and DO NOT take the snowmobile trail bow follow the white Finger Lakes Trail blazes over the hill. You will reach a high point of land and then descend a little before climbing again to a ridge. From here the trail descends steeply for the next .6 miles losing 500 feet. At the bottom of the descent you will cross Dry Brook Road and come to a camping area next to the stream. There is a nice kingpost bridge constructed as an Eagle Scout project in 1994. From here you will begin to ascend again as you head for the Dry Brook lean-to. The wettest parts of the trail are spanned by planks held together with screening. Within .2 miles you will pass a blue blazed trail on the left which leads to a cistern for water. Continue to climb and in another .4 miles you will be at the Dry Brook lean-to. It has a fire pit and picnic tables in front. Continue to climb for another .2 miles to Rocky Point. There are several large boulders here which must be of glacial origin since they are on the highest point around. Continued over Rocky Point and then descend steeply on the trail for about .3 miles to a logging road. Turn left on the logging road and follow it and the white blazes for another .7 miles down to Route 27 near the Cannonsville Reservoir. The drop to the road is almost 800 feet! If you have parked a car near here, walk to the car. If your car is back at Steam Mill SF, turn around and hike back!
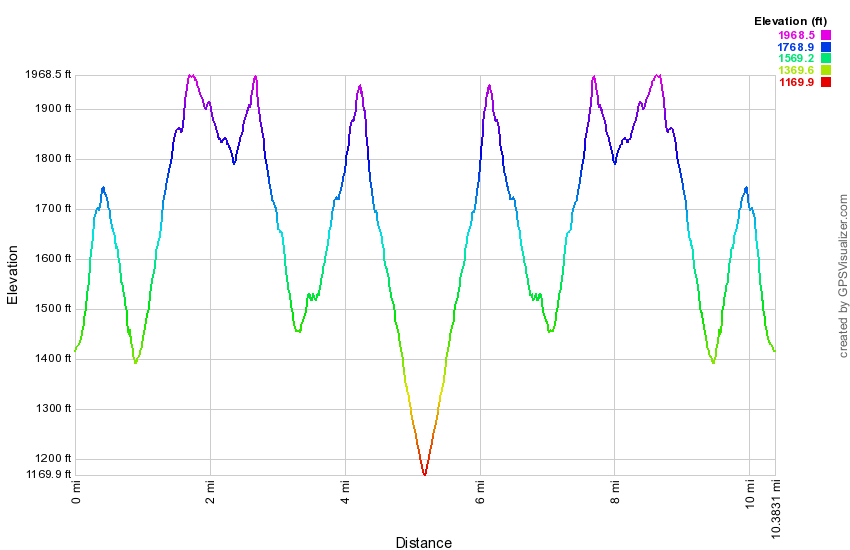 (The image at the left shows the profile of the hike. Remember that all vertical profiles are relative!)
Finger Lakes Trail: Steve Russell Hill Rd to Hoxie Gorge
| Quick Look | ||||
|---|---|---|---|---|
| Difficulty | Round trip | Total climb | Internet Maps | |
| 9.8 mi | 1565 ft. | AllTrails | ||
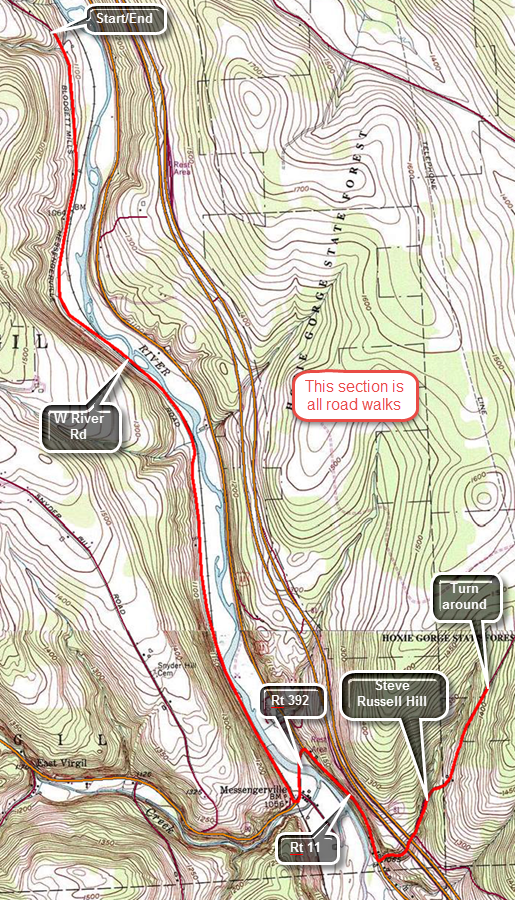 The Finger Lakes Trail is a primitive footpath that starts in Allegheny State Park on the New York - Pennsylvania border and extends 576.5 miles to end in the Catskill Park at the beginning of the Table Peekamoose Trail off the Phoenicia East Branch Trail near the Denning trailhead. There are other side trails which increase the length of the trail system. Four hundred miles of this trail is also part of the Scenic North Country Trail. The Finer Lakes Trail Conference celebrated its 50th Anniversary on June 2, 2012. To commemorate the occasion the Conference set up a series of hikes that would cover the entire length of the trail. Hikes varied in length and difficulty from 4 to 14 miles. The Trail Conference continues to improve the trails and to move sections from roads to trails.
This hike can be done with a car spot since it is 4.9 miles one way for a total of 9.8 miles and because the scenery is not that interesting. The route described here a loop using local roads for the return trip. Take Route 11 north from Marathon for 3.5 miles to Steve Russell Hill Road on the right. Turn right onto this dirt and gravel road and pass under the high bridges for I81. Where the road splits continue straight ahead passing the "seasonal Maintenance" sign. Be careful as you drive up the road as there are some deep gullies and large rocks. Once I even encountered a tree that had just fallen across the road. Find where the Finger Lakes Trail enters the woods on the left. Park in the wide spot on the left shoulder. This trail can be slippery when wet and insect repellant is a good idea. If you hike with a dog, note the sign that warns about high porcupine activity. The trail initial drops to a stream heading northwest and is well-marked in most places. At .8 miles cross a small stream on a bridge and arrive at a nice pond. After the pond he trail descends on some steps and meanders back and forth and up and down turning north at 1.2 miles. Continue to cross small streams walking up and down some hills. The traffic noise from I81 is obvious and you may be able to see the cars on the highway. Somewhere between 2 and 3 miles the blazing seems to change for the worse. Some turns were not well-marked and the blazes become harder to spot and farther apart. At 3 miles begin an ascent of 350 feet and at 3.9 miles pick up a woods road that leads to a DEC dirt road. Walk along the road and hit the high point of the hike at 1770 feet 4.2 miles into the hike. From here the road descends to the Hoxie Gorge Freetown Road at 4.8 miles. Cross the road to continue the hike to where the old trail used to come in from Hoxie Gorge Road. The trail is more of the same thing you have been hiking with several small stream crossings. Somewhere around 5.3 miles the trail joins a nice woods road and turns right to parallel a more substantial stream. As you walk along this road, notice several small cascades. You will pass a Cornell University Environmental sign as you near your destination. Arrive at an area where a stream spread across the trail and the main Finger Lakes Trail turns right while a Cornell trail goes left. The trail that goes to the left used to be the main Finger Lakes Trail before the newest reroute. At this junction there is also an old stone bridge with a large culvert underneath it. Turn around to head back to Hoxie Gorge Freetown Road. Turn left and start to hike southeast along the road. At At 8 miles turn right on Merihew Road. Turn right onto Steve Russell Hill Road at 8.8 miles to complete the loop. Walk uphill for about a quarter mile and then downhill the final .7 miles to the car>
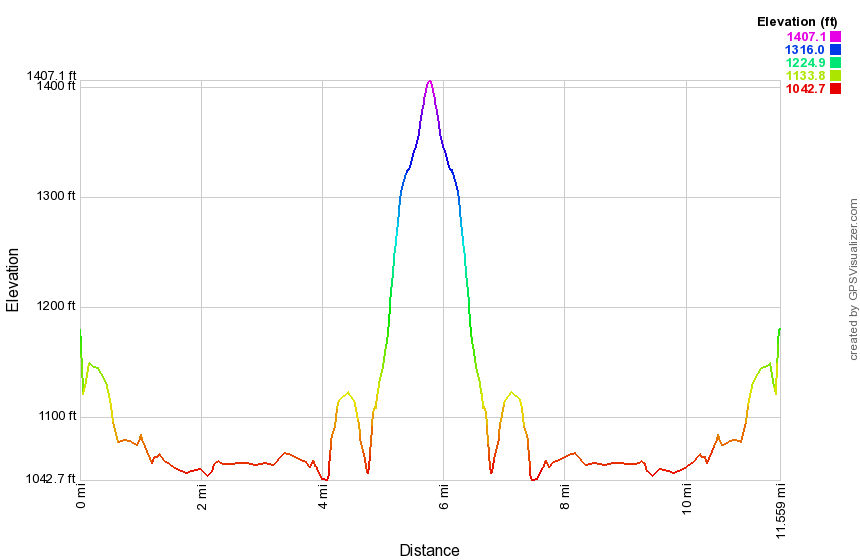 (The image at the left shows the profile of the hike. Remember that all vertical profiles are relative!)
Finger Lakes Trail: Stone Quarry Hill Rd to South Oxford Bridge
| Quick Look | ||||
|---|---|---|---|---|
| Difficulty | Round trip | Total climb | Internet Maps | |
| 10.6 mi. | 1650 ft. | AllTrails | ||
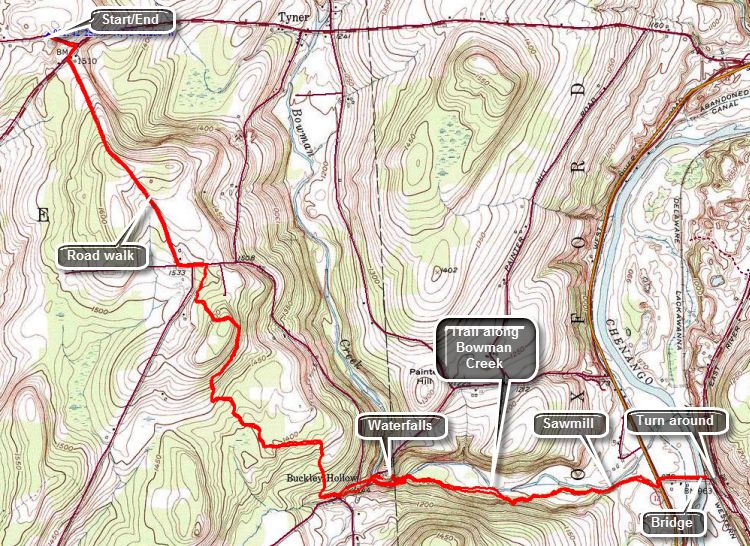 The Finger Lakes Trail starts in Allegheny State Park on the New York - Pennsylvania border and extends 576.5 miles to end in the Catskill Park at the beginning of the Table Peekamoose Trail off the Phoenicia East Branch Trail near the Denning trailhead. There are other side trails which increase the length of the trail system. Four hundred miles of this trail is also part of the Scenic North Country Trail. The Finer Lakes Trail Conference celebrated its 50th Anniversary on June 2, 2012. To commemorate the occasion the Conference set up a series of hikes that would cover the entire length of the trail. Hikes varied in length and difficulty from 4 to 14 miles. The Trail Conference continues to improve the trails and to move sections from roads to trails.
This hike is best done as a car spot as it is 5.3 miles one way! The route described here is out and back! Take Route 12 south from Oxford. In 1.8 miles turn right on Route 3 heading west. After 3 miles, watch for Stone Quarry Hill Road on the right. Turn on the road and drive a few hundred feet to a log house on the right. Park on the grass just before the house next to the FLT sign. Walk down the road to Route 3 and turn right and then immediately left on Fred Wilcox Road. The road rolls a little as it passes some houses and a farm. At 1.3 miles continue on the road as it bends to the left and turns into French Road. Walk .2 miles more to the beginning of the trail through the forest on the right which is clearly marked. The trail climbs a little over a small hill and then starts to descend. The woods were mostly hardwoods and some areas may be wet. The trail here seems used by hikers and horses alike! Over the next 1.9 miles you will drop about 500 feet in elevation eventually hitting a woods road and then skirting the edge of a field to end up at Buckley Corners. At the corners the trail is clearly visible on the other side of the road. Cross the road and you will quickly come to one of several stiles on the trail. These stiles are triangular frames with crosspieces that straddled the fences. They allow you to climb up and over the fence. In most cases the fences are in disrepair and the stiles are superfluous but they add an interesting touch. The trail now parallels Bowman Creek and you can hear, and sometimes see, the water below. For the next 1.7 miles the trail runs along the creek and, in general, descended as you head toward Route 12. In several spots you may gain a little elevation and then drop it again as the trail avoids deep drops into some small ravines. Near the end of the trail there is a sign that described a sawmill that existed on the creek in 1875. You may be able to spot the foundations down near the stream bed. Cross another stile and then walk along the edge of a field to a short trail that leads down to Route 12. Turn left and walk a few hundred feet to South Oxford Bridge Road where you should turn right. It is a short walk to the bridge over the Chenango River. Just before the river are faint remnants of the Chemung Canal in a cornfield. On the other side of the bridge ware some abandoned Conrail tracks and a small parking area. If you parked a car here you are done with your hike. If your car is at Stone Quarry Hill Road, turn around an retrace your rote. As you return along Bowman Creek there is a path that leads down to the stream but the bank is very steep. This is about 3.6 miles from the beginning of the trail or 6.7 miles on the return trip. The falls is very nice even in low water. The stream is shallow in most places but there is a deep pool. Back on the main trail walk back out to Buckley Corners. Walk back along the edge of the field and then start a long but gradual 1.5 mile climb regaining the 500 feet you lost earlier in the hike. At 8.9 miles you will hit the high point on the trail and then descend to French Road where you turn left to begin the road walk back to the car.
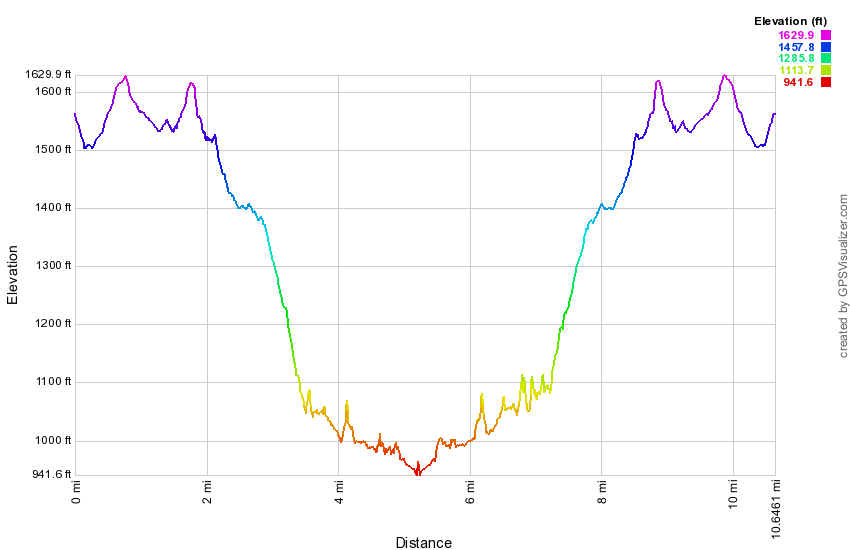 (The image at the left shows the profile of the hike. Remember that all vertical profiles are relative!)
Finger Lakes Trail: Stoney Brook Rd to Paradise Hill Rd (Chippewa Falls)
| Quick Look | ||||
|---|---|---|---|---|
| Difficulty | Round trip | Total climb | Internet Maps | |
| 15.6 mi. | 2330 ft. | AllTrails | ||
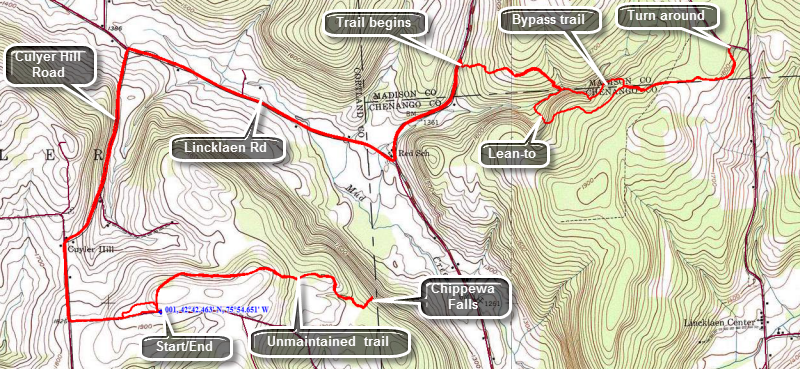 The Finger Lakes Trail starts in Allegheny State Park on the New York - Pennsylvania border and extends 576.5 miles to end in the Catskill Park at the beginning of the Table Peekamoose Trail off the Phoenicia East Branch Trail near the Denning trailhead. There are other side trails which increase the length of the trail system. Four hundred miles of this trail is also part of the Scenic North Country Trail. The Finer Lakes Trail Conference celebrated its 50th Anniversary on June 2, 2012. To commemorate the occasion the Conference set up a series of hikes that would cover the entire length of the trail. Hikes varied in length and difficulty from 4 to 14 miles. The Trail Conference continues to improve the trails and to move sections from roads to trails.
This hike is best done as a car spot as it is 6.6 miles one way! The route described here is out and back and includes an additional 3 miles out and back to Chippewa Falls which is not part of the main Finger Lakes Trail! Take I81 north from Binghamton and get off at exit 11. Head northeast on Route 13 for 15 miles. Turn right on Lincklaen Road and drive 2 miles to Cuyler Hill Road. Turn right on Cuyler Hill Road and drive 1.5 miles to Stoney Brook Road on the left. Stoney Brook Road is dirt and gravel and is quite rough so drive carefully. Drive up the hill and passed the first parking area on the left where the forest begins. Drive a little farther to where the Finger Lakes Trail crosses and park on the shoulder of the road. To begin your hike cross the road and enter the forest. Walk to the first trail junction where an orange spur trail heads right to Chippewa Falls. Turn left to follow the Finger Lakes Trail and the Onondaga Trail back out to Stoney Brook Road at .3 miles. Turn right and walk to toward Cuyler Hill Road. At Cuyler Hill Road turn right and walk downhill for over 1.5 miles to Lincklaen Road where you should turn right. Lincklaen Road has good shoulders and a good sight lines so walking it isn't too bad. At 3.5 miles you will pass from Cortland County into Chenango County. At 3.6 miles make a left onto County Rt 12 and at 4.2 miles enter Madison County. After walking uphill slightly, look for the Finger Lakes Trail sign on the right side the of the road at 4.4 miles. Cross the road and climb a small hill on a woods road. Soon the trail turns left off the road and continues to ascend the hill through mostly hardwoods. The trail is well marked and maintained and walking is pleasant. Ahead at 5.0 miles is a stream described as "reliable" on the map. The map also mentions a bypass trail but this trail only bypasses the lean-to ahead and is really just a shortcut. The stream is nearly dry in the summer but can swell when there is heavy rain. The trail passes through evergreen trees and their needles make a nice, soft carpet for walking. At 5.2 miles you will come to the Paradise Garden Lean-to complete with fireplace and picnic table. Just before hitting a logging road at 6.1 miles, you should noticed the orange bypass trail on the left. Continue across the logging road and walk through some pines along the edge of a large field. Soon you will descend through some hardwoods to Paradise Hill Road where you can get in your second car if you have a shuttle or turn around to hike back to Stoney Brook Road. On the way back you may want to take the bypass trail which is even less used than the main Finger Lakes Trail. It is an interesting change from the main trail. It has a short but steep descent to the "reliable" stream. From the stream retrace your steps back to the road an walk back to your car at Stoney Brook Road.
At this point you are done with the main hike but you may want to visit Chippewa Falls. Be warned that the falls is all but dry in the summer and is better views in the spring or after head rains! Also be aware that the trail is not maintained and you may have to walk through high ferns and prickers and around significant blowdown. Cross Stoney Brook Road to begin the hike to the falls. Only .1 miles in you will come to the trail junction where you should continue straight ahead on the orange spur trail. The Finger Lakes Trail used to take this route until the landowner and the base of Chippewa Falls rescinded his permission to allow hiking on his land. The white blazes have been removed and replaced with the orange ones. The trail climbs a little initially but then drops over 350 feet in the last .8 miles to the falls. The trail parallels a stream for the last part of the hike and the amount of water in the stream is a clue to how much is going over the falls. When you arrive at the falls, the drop from top to bottom is truly impressive. Stay on the side you are on since the viewing is better. Do NOT descend further than the top of the falls as it is private property. Various sources list the height as being from 50 to 200 feet with the actual height being somewhere between. When you are ready, return the way you came for a total of about 3 miles.
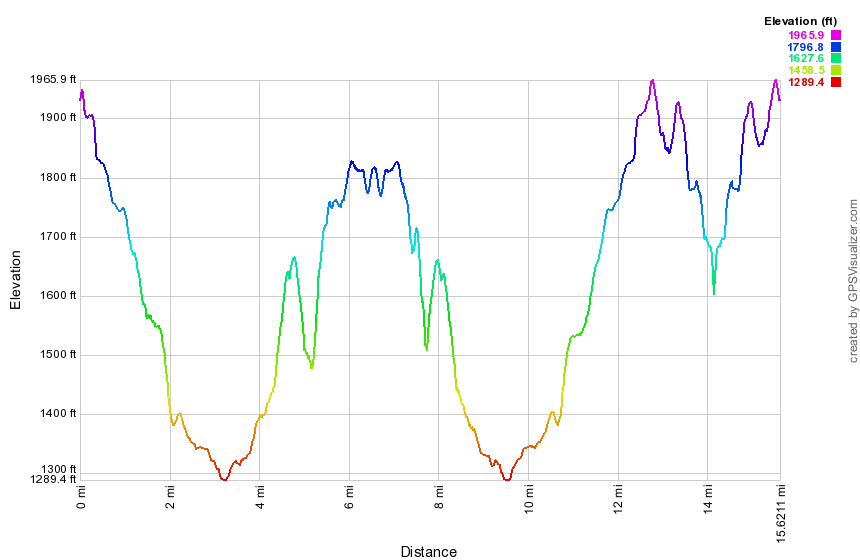 (The image at the left shows the profile of the hike. Remember that all vertical profiles are relative!)
Finger Lakes Trail: Telephone Rd to Solon Pond Rd
| Quick Look | ||||
|---|---|---|---|---|
| Difficulty | Round trip | Total climb | Internet Maps | |
| 16.0 mi. | 2772 ft. | AllTrails | ||
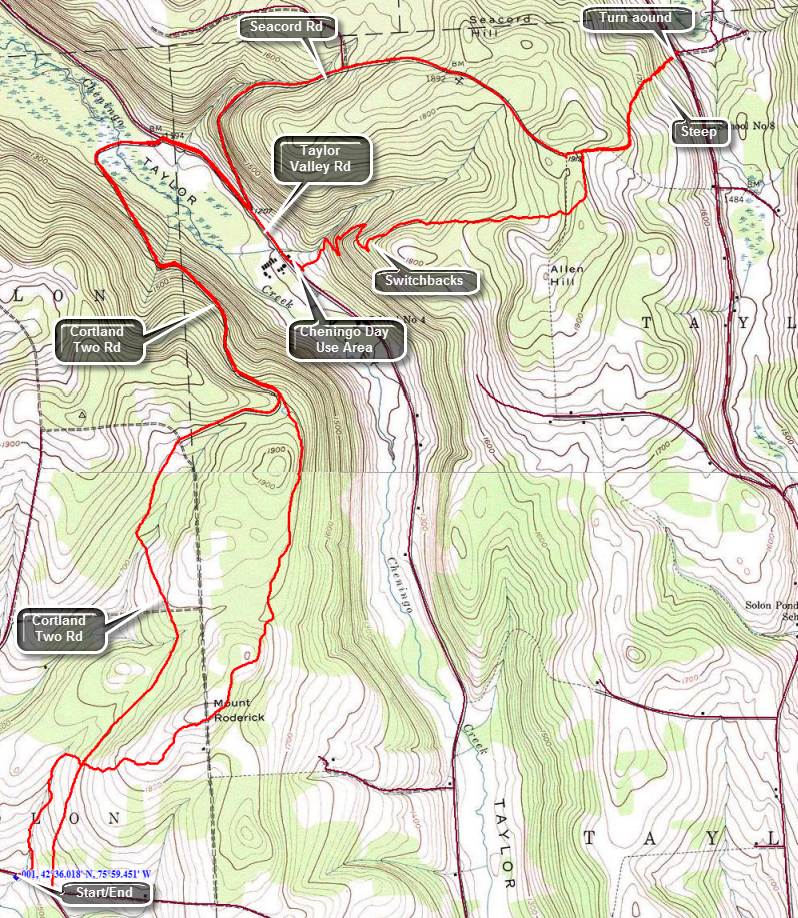 The Finger Lakes Trail starts in Allegheny State Park on the New York - Pennsylvania border and extends 576.5 miles to end in the Catskill Park at the beginning of the Table Peekamoose Trail off the Phoenicia East Branch Trail near the Denning trailhead. There are other side trails which increase the length of the trail system. Four hundred miles of this trail is also part of the Scenic North Country Trail. The Finer Lakes Trail Conference celebrated its 50th Anniversary on June 2, 2012. To commemorate the occasion the Conference set up a series of hikes that would cover the entire length of the trail. Hikes varied in length and difficulty from 4 to 14 miles. The Trail Conference continues to improve the trails and to move sections from roads to trails.
This hike is best done as a car spot as it is at least 7.8 miles one way! The route described here is out and back using back roads on the "back" to add some variety Take I81 north from Binghamton and get off at exit 10. Head east on Route 41 for about 6 miles. As Route 41 curves to the south, continue straight ahead on Telephone Road and drive 1.3 miles to a large parking area on the right. Park in the lot then cross the road and turn right. A few hundred feet up the road we turn left or north and into the woods to start the hike. The trail starts to ascend right from the beginning and by the time you cross the Cortland Two Road it has gained over 200 feet. The Cortland Two is a dirt and gravel road that connects Telephone Road to Taylor Valley Road and runs almost 5 miles between them. Cross the road and begin to ascend Mount Roderick. At 1.4 miles you will pass by the summit after gaining another 200 feet. The trail is usually well maintained as you pass through Taylor Valley State Forest. After the summit of Mount Roderick the trail drops a little and skirts another hill. At 3 miles the trail meets the Cortland Two Road and begins a long descent. The map description warns that high water might make Cheningo Creek difficult to cross so you may want to stay on the Cortland Two until you get to Taylor Valley Road. The walk down Cortland Two is 1.7 miles. Along the way the trail cuts off to the right and crosses Cheningo Creek on some large stepping stones. The trail is definitely the shorter way to go. Near the end of the descent on Cortland Two Road the road turns from north to east and crosses Cheningo Creek and a very marshy area associated with it. At the Taylor Valley Road turn right and hike .8 miles on the shoulder to the Cheningo Day Use Area. As you enter the day use area head to the right side and look for a woods road-hog will have white blazes. This was the only place you might have a problem with the blazes! Followed the road for a short distance before the trail turns right and heads up Allen Hill. Over the next .6 miles you will climb through several switchbacks that turn a 20+ % grade into 12%. The trail begins to level at the top of a hill. Over the next .7 miles it continues to gain elevation to the west shoulder of Allen Hill whose highest point is on private land. Begin a descent and you will soon come to a woods road where you should turn right to continue a long descent to Solon Pond Road. Over the next .9 miles the trail loses over 500 feet! Once you arrive at the road in the vicinity of Freeman Road you can get in the car you have parked there or turn around to hike back to your car on Telephone Road. Climb to the junction of the woods road and the trail. Instead of turning left to continue on the trail, go straight ahead to meet Seacord Road and turn right. Walk 2.2 miles down Seacord Road to Taylor Valley Road dropping over 700 feet of elevation. Turn right on Taylor Valley Road and hike back to the Cortland TWO on the left. At 13.25 miles you will be in the area where the trail leaves the Cortland Two to the left. Continue straight on the road back to the car. Over the next 1.3 miles the road ascends, drops and ascends again. After the last ascent, it is all downhill for the next 1.4 miles to Telephone Road. At the road turn right and walk the .1 miles back to the car.
 (The image at the left shows the profile of the hike. Remember that all vertical profiles are relative!)
Finger Lakes Trail: Templar Road to Watkins Glen
| Quick Look | ||||
|---|---|---|---|---|
| Difficulty | Round trip | Total climb | Internet Maps | |
| 9.4 mi. | 1920 ft. | AllTrails | ||
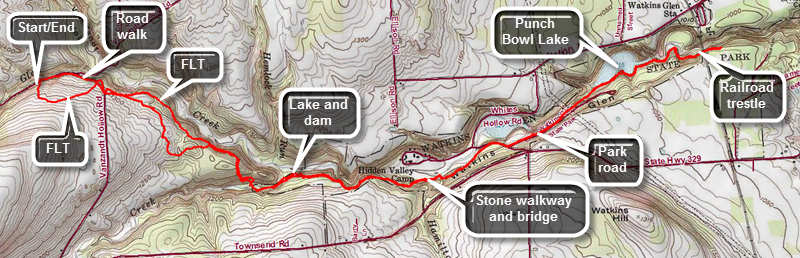
Drive west from Watkins Glen on Route 329 for 5.2 miles being sure to stay right on Route 329 at the intersection with Route 17. As Route 329 turns south, turn right of north on VanZandt Hollow Road. Drive 1.2 miles on VanZandt Hollow Road to the intersection with dirt Templar Road. Turn left and drive .2 miles on Templar Road where the Finger Lakes Trail crosses. Park on the side of the road. Just west of the parking is Ebenezer's Crossing and a small waterfall heavily dependent on rainstorms for its volume.
Cross the road to begin your hike by climbing up the steep bank until the trail levels off. It then descends and crosses VanZandt Hollow Road at .4 miles. The trail enters the woods on the other side for only about .1 miles and then comes back out to VanZandt Hollow Road. Turn left and walk up the hill a few steps to a Finger Lakes Trail sign. Walk off the road and immediately turn left and walk down a path looking for white blazes. This is VRY POORLY marked. DO NOT walked straight ahead off the road and onto the lane next to the farmer's fields as you will be trespassing! The trail here comes back out to a cleared area and then heads to the left back into the trees. Be careful to look sharp as the marking are not obvious. The trail follows a narrow path which may be overgrown by brush and can be poorly maintained. The trail rolls some but at one point comes very close to the edge of the gorge giving good views. Continue on the trail watching carefully for blazes. At 1.2 miles the Finger Lakes Trail crosses the boundary with Watkins Glen State Park although it may not be obvious. At 1.6 miles or so there is a steep descent to the floor of the glen. The trail crosses the stream at 1.7 miles at Julie's Crossing. During the dry seasons there may be no water present at all. After heavy rains or in the spring hikers may want to use the high water bypass marked on the Finger Lakes Trail Map 14. The crossing may not be well marked so you may have top search for the white blazes on the other side of the stream bed. At 2.6 miles watch for Hidden Valley 4H Camp to the right of the trail. Just after this get ready for a surprise. You will find stonework and a stone pathway just like those found in the main glen. A small wooden bridge crosses Hamilton Creek and this is a beautiful place to stop. Continue on the trail as it follows a woods road out to White Hollow Road at 3.1 miles. Turn right on the road and walk uphill a short distance and then turn left on an old park road. At 3.5 miles the trail leaves the road to the left and follows the rim of the gorge until you reach Punch Bowl Lake at 3.9 miles. There is a beautiful picnic pavilion here but there is no potable water, no privy and no camping! Walk passed the lake and you will find a viewpoint that allows you to get a good look at the dam. Continue on the trail to the Norfolk Southern railroad trestle at 4.9 miles. Walk a little farther if you like to make sure you overlap other hikes. The South Rim Trail continues down to Route 329 in Watkins Glen where it crosses Route 14 and follows city streets on the way to the southern end of Seneca Lake. Turn around and follow the trail back to your car. There don't seem to be any shortcuts on local roads unless you need the high water bypass.
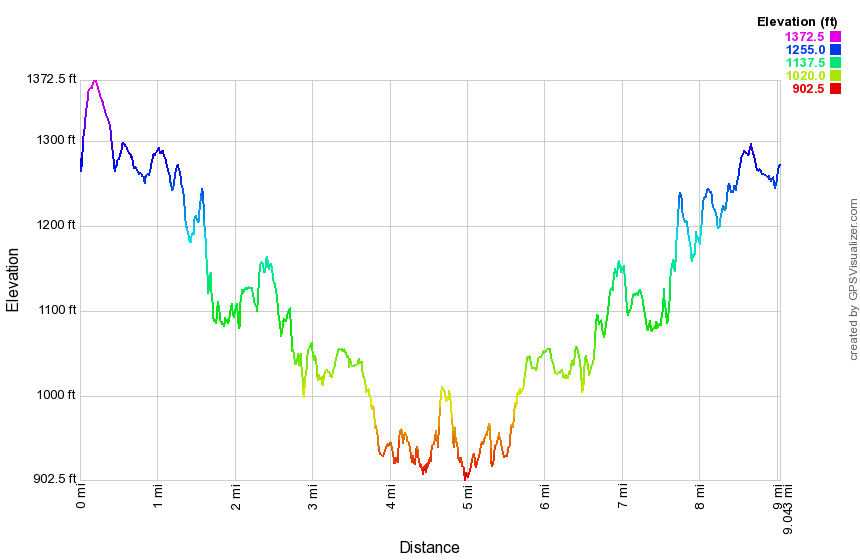 (The image at the left shows the profile of the loop hiking route. Remember that all vertical profiles are relative!)
Finger Lakes Trail: Texas Hollow Road to Gulf Road
| Quick Look | ||||
|---|---|---|---|---|
| Difficulty | Round trip | Total climb | Internet Maps | |
| 16.5 mi | 1700 ft. | AllTrails | ||
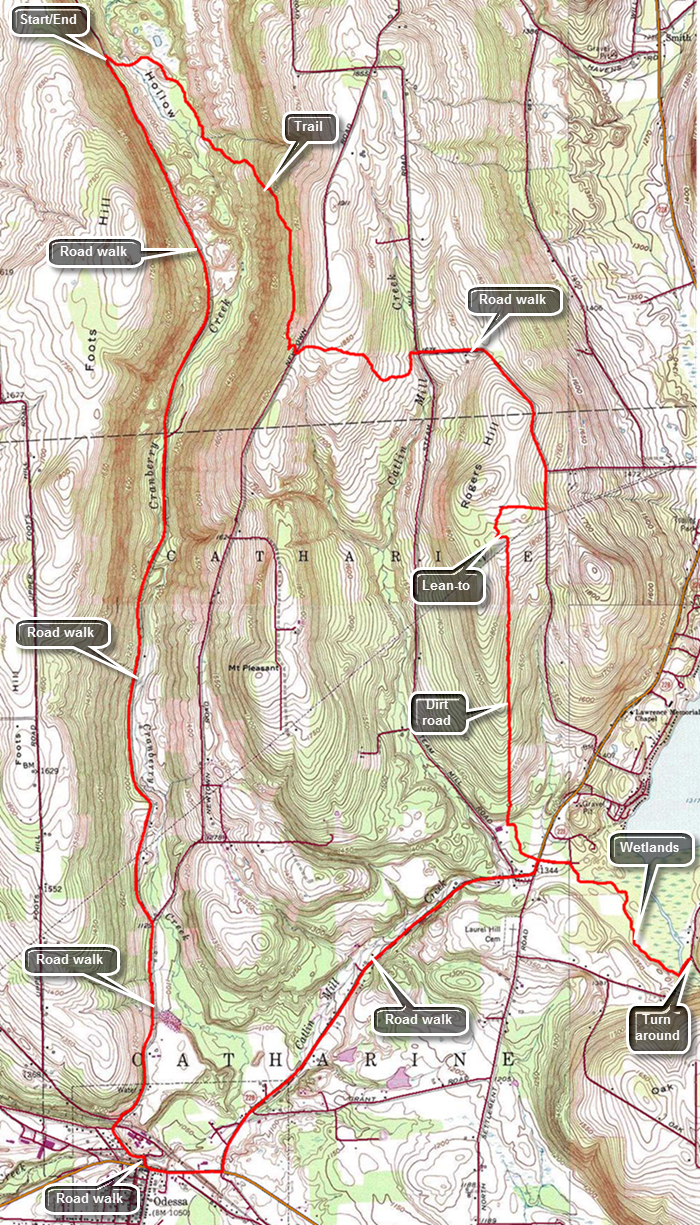 The Finger Lakes Trail is a primitive footpath that starts in Allegheny State Park on the New York - Pennsylvania border and extends 576.5 miles to end in the Catskill Park at the beginning of the Table Peekamoose Trail off the Phoenicia East Branch Trail near the Denning trailhead. There are other side trails which increase the length of the trail system. Four hundred miles of this trail is also part of the Scenic North Country Trail. The Finer Lakes Trail Conference celebrated its 50th Anniversary on June 2, 2012. To commemorate the occasion the Conference set up a series of hikes that would cover the entire length of the trail. Hikes varied in length and difficulty from 4 to 14 miles. The Trail Conference continues to improve the trails and to move sections from roads to trails.
This hike should be done with a car spot since it is 16.5 miles round trip and only 7.2 miles "out". The 7.2 miles out is on trails and dirt roads while the last 9.3 miles is on dirt and paved local roads which makes the walking easier. Another approach is to simply reverse the hike at the turn around point which would reduce the length to 14.4 miles. Take State Route 17/I86 to exit 64 at Owego and head north from there on Route 96 through Candor and Spencer. In Spencer pick up Route 34 west to Van Etten. Turn right onto Route 224 as Route 34 heads south. Followed Route 224 for 16.4 miles as it passes through Cayuta crossing Route 13. In Odessa turn right on Mill St and then left onto Brooklyn Terrace. At the top of the hill continue straight ahead on Texas Hollow Road and stay to the left when the road splits. Drive 5.4 miles to a gated access road that has a "Finger Lakes Trail" on the right. Park on the right shoulder of the road before the access road. Begin your hike walking down the gated access road to pick up the white blazes of the Finger Lakes Trail at the base of the road. There is a nice pond here and a wooden walkway that crosses over some very wet ground. Be careful as you cross the walkway as hikers have reported some aggressive bees in the area! Continue around the pond heading southeast and then south. Since you are in a "hollow", there will be some climbing to get out. None of the ascents are long or steep but over the first 1.4 miles the trail gains over 650 feet. The trail is easy to follow by the way it was worn in and by the blazing. The blazing is odd in places with the non-standard blaze over blaze to indicate a turn without the direction of the turn being clear. There are some turns indicated where there are none and several other turns left unmarked. At 2.1 miles cross Newton Road which is dirt and gravel. The trail starts heading east and ascends slightly before dropping to Steam Mill Road at 2.9 miles. When the trail leaves the woods on Steam mill Road, continue straight ahead on dirt and gravel Carly Road. Continued on the road as it turned right at the top of a small hill. At about 3.6 miles there is a nice view of the surrounding hills and valleys. Continue on the road as it descends a little and then passes Hosenfeldt Road on the left. At the top of the next hill turn right on Seneca Highlands which is a private road. There are signs that indicate that the area is used for motocross events and other motorsports. The road leads to a private picnic area and pond with the Rogers Hill lean-to at 4.4 miles. Continue to follow the blazes as they lead back out onto a dirt road that heads due south. This section of trail continues for about 1.7 miles turning slightly southeast near the end. The drop in elevation is gentle but at the intersection with Route 228 at 6.1 miles the elevation loss is almost 500 feet. Continue straight ahead on South Pine Road passing the Schuyler County Veterans Park on the right. It is a small park but nicely designed to honor the county's veterans. Continue down the road until at 6.2 miles where the trail turns right. For the next .9 miles head southeast along the wetlands adjacent to Cayuta Creek. The trail can be wet in spots. At Route 6, turn left and walk to Gulf Road where you will turn around at 7.2 miles. Reverse your route and Walk to Route 228. Turn left on Route 228 and follow it as it turns right at the next intersection to head toward Route 224 and Odessa. Over the next 2.25 miles hike downhill losing about 320 feet along the way. The shoulders are wide and the traffic generally light. At Route 224 turn right and hike .4 miles into Odessa turning right on Mill St and then left on Brooklyn Terrace. At the top of the hill continue straight ahead on Texas Hollow Road for 5.4 miles. The very first part of the road is a rather steep uphill followed by a short descent. After that the road climbs slightly until 15.6 miles with the last mile being a slight descent. At 12.2 miles Newton Road branches to the right and Texas Hollow road changes to dirt and gravel. Be sure to stay left on Texas Hollow Road.
 (The image at the left shows the profile of the hike. Remember that all vertical profiles are relative!)
| Quick Look | ||||
|---|---|---|---|---|
| Difficulty | Round trip | Total climb | Internet Maps | |
| 10.5 mi. | 2244 ft. | AllTrails | ||
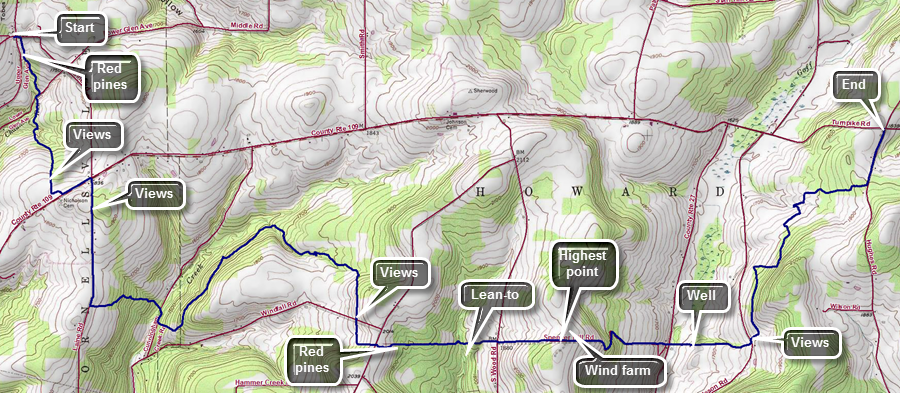
This hike starts at the intersection of Lain Road and Upper Glen Road east of Hornell, NY and covers 10.5 miles of FLT Map 10! This requires a car spot or shuttle or a taxi. You may be able to get a ride from a "trail angel" through the Finger Lakes Trail Conference but many are only available on weekends. Village Taxi in Bath charges what I consider reasonable fees so that you can park your car on Hughes Road and have them take you to the intersection for the beginning of the hike. Take exit 35 from Rt17/I86 to Howard, take Route 27 south from Howard to Turnpike Road (Route 109). Turn left or east and drive less than a mile to Hughes Road. Drop a car here or arrange for a ride to the beginning of the hike. Head west on Turnpike Road for 5.3 miles and turn right on Lain Road. Drive 1.25 miles north to the intersection with Upper Glen Road. The hike starts at this intersection as you hike east on Lain Road for about 150 feet. Watch for the FLT sign on the right and turn into the woods. There is a nice pine plantation here as you hike south toward Lower Glen Road. Cross Lower Glen Road at .5 miles and then start an ascent toward Turnpike Road. You will break out into a field and continue to walk uphill with some nice views to the right at about 1.2 miles. Continue along the edge of the field turning left into the woods just before Turnpike Road. After a brief walk in the pines, you will come out on Turnpike Road. Turn left to walk east to Lain Road and turn right to travel south on Lain Road. Begin to ascend to a hilltop and then continue downhill to the next turn. At 2.4 miles turn left off Lain Road heading east through the woods descending through a hardwood forest. At Cunningham Creek Road you will have dropped 400 feet in .6 miles. The FLT emerges next to Cider Creek Hard Cider in Canisteo. Turn right on the road and walk less than .1 miles to the point where the FLT turns left on an ATV trail. The ATV track is one of the steeper climbs on the hike at 19% but it only lasts about .2 miles. Be sure to watch for the blazes indicating a turn to the left at 3.2 miles. The trail follows Cunningham Creek for about a mile with the creek far below and to the west. At 4.2 miles turn right onto a logging road and start uphill before turning left on another woods road which seems flat at first but is slightly uphill. The trails here may be muddy especially if it has rained and there is active logging in the area. At 4.6 miles the trail seems to continue out of the woods into a field. DO NOT go this way but watch for the blazes indicating that the trail turns off the road to the left. Follow the blazes as they lead through the woods very near the edge of some fields and up toward Windfall Road. This trail may be poorly marked and show little signs of use with almost no track to follow. At 5.3 miles you will come to Windfall Road with some nice views. Cross Windfall Road and walk along the edge of a field until entering the woods and turning left following the trail. Head east and cross Burt Hill Road at 5.6 miles traveling along the northern boundary of Burt Hill State Forest. Walk through another red pine plantation. The trails in this area may be muddy and there can be a lot of roots along the way. The trail begins to descend and at 6.2 miles passes the spur trail to the right to a lean-to. At 6.4 miles cross South Woods Road and continue straight ahead on Spencer Hill Road which is a seasonal use road. At the top of the hill a wind farm came into view and a little farther along there is a small "park" on the right with some signs explaining how the wind farm operates. This is the highest point on the hike. Continue down the hill passing a farmhouse on the left and following Spenser Hill Road until just before it met Stephens Gulch Road. The trail goes off the road to the left following a shady path next to a creek. Watch for animals on the right as you near Stephens Gulch Road. There are horses, goats and a burro in the pastures at various times. Continue down to the road crossing it to a farm lane on the other side. Start up the hill and watch for a well on the right with cold and very refreshing water. Continue up the farm lane until it meets Burleson Road. Turned left and watch for some views straight ahead and some more windmills from the wind farm on the left. Turn right on the trail which follows a path cut through a brushy field until it again enters the woods. From this point on the trail may be poorly maintained and poorly marked. At 8.8 miles the trail comes out of the woods to a junction where paths lead in three directions. To stay on the trail turn right more than 90 degrees and follow the white blazes. Head east walking uphill on a steep but short ascent through the forest. At 9 miles the trail turns north and begins to follow the contour lines so there is less climbing. In about a quarter mile the trail comes out to an open area with mowed paths. Turn left and then right on the paths and walk along the edge of the forest until the path starts to turn right. You should find an opening in the forest on the left and you should turn left even though there may be no blazes visible. After a short distance, there are white blazes marking the trail. At 9.5 miles descend to a small stream where a blaze indicates a right turn. The trail is completely washed out and no blazes are visible on the other side. Cross the stream and head right along the other bank until you pick up the blazes again. The trail turns north briefly and then at 9.6 miles it turns east continuing toward Hughes Road. Wander through the woods trying to find blazes until you make it out to the road at 10.1 miles. Turn left to walk north .35 miles on Hughes Road to your car.
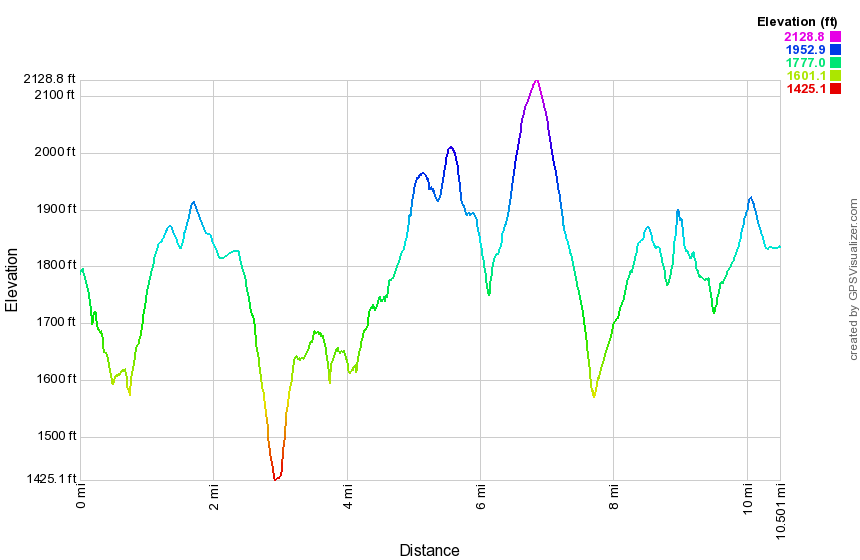 (The image at the left shows the profile of the loop hiking route. Remember that all vertical profiles are relative!)
Finger Lakes Trail: Watkins Glen State Park (South Rim)
| Quick Look | ||||
|---|---|---|---|---|
| Difficulty | Round trip | Total climb | Internet Maps | |
| 2.6 mi. | 782 ft. | AllTrails | ||
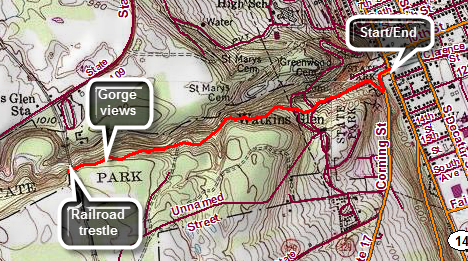
Begin your hike at the intersection of Route 329 and Route 14 or Franklin Street on the west side of Watkins Glen. There is a parking fee if you use the Watkins Glen State Park lot. The lot fills quickly especially on weekends. Public parking is available elsewhere in the village.
Walk a little less than 500 feet south on Route 329 and then turn right onto the Finger Lakes Trail as in enters the park on the South Rim Trail. The 1.3 mile trip out to the railroad trestle is all uphill but the trip back is, of course, downhill. The South Rim trail is farther away from the gorge than the other trails but still offers some nice views. At .4 miles a spur trail leaves the Finger Lakes Trail to the south to a parking area with a kiosk where the trail system is explained. At about .9 miles look to your right for some fine views of the gorge below. The views are even better when the leaves are not on the trees. You will soon see camping areas on your left. Just after the camping areas is the railroad trestle for the Norfolk Southern Railway. Walk under it and just a little farther and the turn around and walk back to where you started. You may want to walk some of the gorge trails on the way back since this is such a short hike. Not many people hike the South Rim Trail but the rails in the gorge are very popular. Choosing a weekday in the off-season give you the best chance of a little solitude in the gorge.
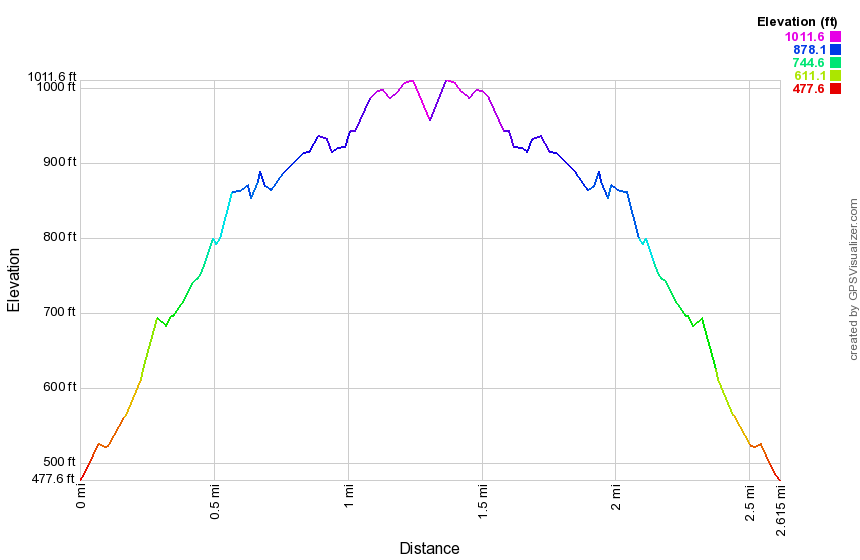 (The image at the left shows the profile of the loop hiking route. Remember that all vertical profiles are relative!)
Finger Lakes Trail: Watkins Glen to Burdett
| Quick Look | ||||
|---|---|---|---|---|
| Difficulty | Round trip | Total climb | Internet Maps | |
| 9.1 mi | 1075 ft. | AllTrails | ||
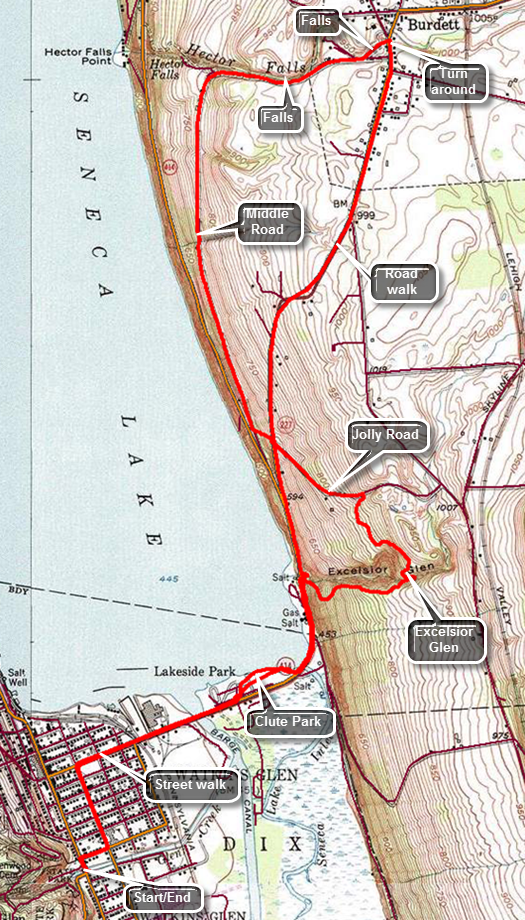 The Finger Lakes Trail is a primitive footpath that starts in Allegheny State Park on the New York - Pennsylvania border and extends 576.5 miles to end in the Catskill Park at the beginning of the Table Peekamoose Trail off the Phoenicia East Branch Trail near the Denning trailhead. There are other side trails which increase the length of the trail system. Four hundred miles of this trail is also part of the Scenic North Country Trail. The Finer Lakes Trail Conference celebrated its 50th Anniversary on June 2, 2012. To commemorate the occasion the Conference set up a series of hikes that would cover the entire length of the trail. Hikes varied in length and difficulty from 4 to 14 miles. The Trail Conference continues to improve the trails and to move sections from roads to trails.
This hike can be done with a car spot since it is 9.1 miles round trip but can easily be done without one since much of the hike is on local roads. Drive north on State Route 17 to exit 52B at Horseheads. From there it is 16.5 miles north on Route 14 to the entrance to Watkins Glen State Park. Find a place to park near the park entrance but be sure to ask permission if you want to use the parking lot for a local business. From the park entrance walk one block north on Route 14 to 10th Street. Turned right and walked one block to North Decatur Street.Make a left and walk six blocks north to Route 414 and turn right. Walk the remaining .6 miles to Clute Park on the southern shore of Seneca Lake. Walk down toward the shore watching for white blazes on the trees. Follow them east as they lead back out to Route 414. Cross Seneca Lake Inlet on a road bridge and then continue to follow Route 414 as it turns north and starts to climb away from the lake. Look for the blazes that indicate a turn to the right as the trail passes through Excelsior Glen. The blazes may be absent so at about 1.75 miles watch for a stream that cuts through the rock on the right side of the road. Cross the road and to find the trail blazes and a register. The Finger Lakes Trail almost immediately turns right and starts to climb. There are also numerous other trails that appear to enter the glen following the stream. The trail begins to climb steeply and soon passes by the base of some short cliffs. The layers of rock are interesting. Continue to climb and at about 2.3 miles the trail starts to turn north and gets closer to the creek. There are several small cascades which were really nice. Soon the trail descends to the streambed above one of the falls. The descent is a little steep and can be slippery. You will have to walk across the streambed here which is why this route comes with a warning to avoid it when there are high water conditions! The trail continues heading north out of the glen and through some thick vegetation in places. At 2.8 miles the rail meets Jolly Road where the blazes indicate a turn but do not indicate the direction. Turn left and start heading northwest on Jolly Road and descend 190 feet before crossing Route 79. After crossing the road, pick up a short section of trail that descends to Middle Road. Middle Road is a dirt road that is situated between Route 414 and Route 79. It leads to Factory Street in Burdett and has very little traffic. It has some excellent views of Seneca Lake along its length. At 4.6 miles Middle Road turns east and starts to parallel Hector Falls Creek. You may hear the water in the creek below and catch some glimpses of falls and cascades. Eventually Middle Road becomes Factory Street as you enter Burdett. At 5.2 miles turn left onto Mill Street and watch for the falls on the creek. Walk to the end of Mill Street and cross Route 79 to the firehouse and village hall. This is the turn around point of the hike. Turn right on Route 79 heading south using the sidewalks in Burdett and then the wide shoulder of the road. The walk starts out slightly uphill and then becomes flat. At 6.2 miles begin a 1.25 mile descent dropping 530 feet to the area near the lake. Follow the trail back into the park and the back out onto Route 414. Reverse your route from earlier in the day through the streets back to the car.
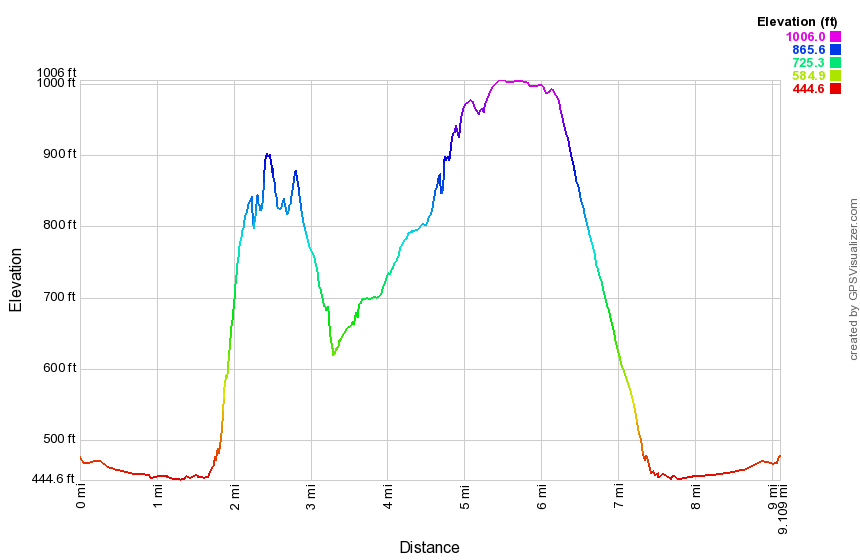 (The image at the left shows the profile of the hike. Remember that all vertical profiles are relative!)
Finger Lakes Trail: West River Rd to Steve Russell Hill Rd
| Quick Look | ||||
|---|---|---|---|---|
| Difficulty | Round trip | Total climb | Internet Maps | |
| 11.6 mi | 740 ft. | AllTrails | ||
The Finger Lakes Trail is a primitive footpath that starts in Allegheny State Park on the New York - Pennsylvania border and extends 576.5 miles to end in the Catskill Park at the beginning of the Table Peekamoose Trail off the Phoenicia East Branch Trail near the Denning trailhead. There are other side trails which increase the length of the trail system. Four hundred miles of this trail is also part of the Scenic North Country Trail. The Finer Lakes Trail Conference celebrated its 50th Anniversary on June 2, 2012. To commemorate the occasion the Conference set up a series of hikes that would cover the entire length of the trail. Hikes varied in length and difficulty from 4 to 14 miles. The Trail Conference continues to improve the trails and to move sections from roads to trails.
This hike is best done with a car spot since it is 5.8 miles one way for a total of 11.6 miles and because the scenery is not that interesting. The route described here is strict out and back without any variations. Take Route 11 north from Marathon for a little more than 7 miles toward Cortland. Watch for Route 392 on the left. Turn left on 392 and then make the next right onto West River Road. The road is dirt and gravel with some large potholes. Drive 3.8 miles until you see where the Finger Lakes Trail crosses the road. Park on the right side just passed the guard rails. Hike south on West River Road for 3.9 miles. The road does not get much traffic and parallels the railroad tracks and Tioughnionda River for the entire distance. Turn left on Route 392 and walk east crossing the river on the road bride. At Route 11 turn right or south and hike along the wide shoulder of the road. Be careful as the traffic here is heavy and fast moving. Just after .6 miles, watch for Steve Russell Hill Rd on the left.Tturn left on the dirt and gravel road and begin a mostly gentle ascent that lasts until you turn around at 5.8 miles. At 4.9 miles pass under the high bridges of I81. Just after these bridges the road splits with the better road turning to the right. Continue straight ahead for another .8 miles to the point where the Finger Lakes Trail enters the forest on the left. Turn around and retrace your route if you do not have a car parked at this end.
(The image at the left shows the profile of the hike. Remember that all vertical profiles are relative!)
Fort Lee to New York Border
| Quick Look | |||
|---|---|---|---|
| Difficulty | Round trip | Total climb | Internet Maps |
| 13.5 mi. | 1265 ft. | AllTrails | |
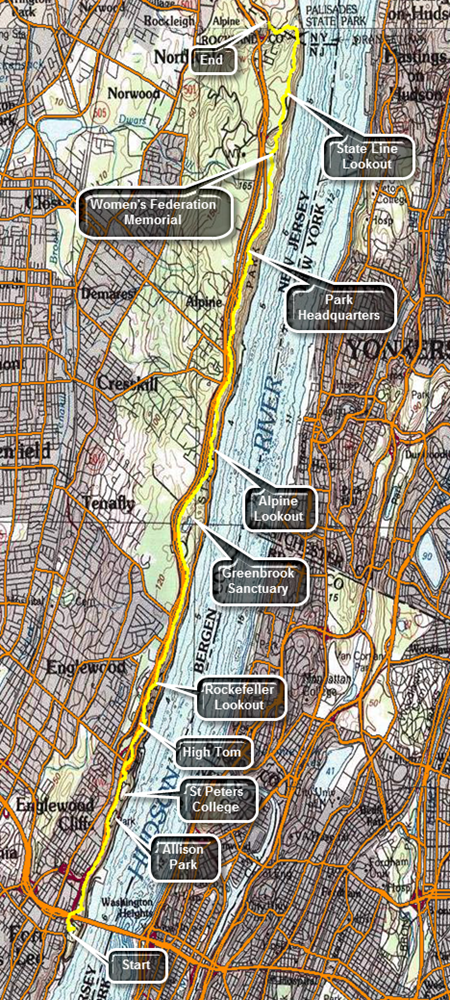
This hike is 13.5 miles ONE WAY. Unless you feel you can cover 27 miles, you will need to arrange a car spot or a ride.Take exit 11, Nyack, off the NYS Thruway. After getting off the exit turn left on Route 59 and then right on Route 9W not far down the road. Head south on Route 9W passing through Palisades and turning left onto Ludlow Lane at the state border. Park on the shoulder of Route 9W just north of the bus stop as far off into the grass as possible. Call a car service for a ride to Fort Lee or drive another car to Fort Lee Historical Park to start the hike. The easiest route is to get on the Palisades Parkway just south of where you are parked. Get off at exit one and take Route 505 south. The entrance to Fort Lee Historical Park is on the left after you pass under I95. The first part of the trail goes out to Route 505 where it heads north and passes under I95. Right after this it goes up a set of stairs on the right and then crosses another road on a pedestrian bridge. From here the Long Path passes through a wooded strip of land that is for the most part sandwiched between the Palisades Parkway on the west and the escarpment and Hudson River on the east. At about .5 miles there is a side trail that goes out to a viewpoint which is the first of many you will encounter. The George Washington Bridge and the city skyline are prominent from this lookout. Walk a little farther and there is another lookout. At the base of the cliff there is what looks like a park and the views of the Palisades cliffs are impressive. This general pattern repeats itself many times throughout the hike. At .8 miles blue and white trail blazes mark the Carpenter's Trail to the right that leads to the Shore Trail. At about 1.6 miles there is an iron fence ahead of us and the Long Path blazes turn to the left around Allison Park. Walk passed the entrance to the park, along the access road and then on a narrow strip of land near the parkway. Walk in front of St. Peter's College at about 2.1 miles. After passing the college, there is another viewpoint. At 2.5 miles descend some steps to East Palisades Avenue, turned right and then almost immediately left to cross the road. The aqua blazes go up some steps and then onto the trail along the edge of the cliffs. There are again nice views to the east side of the Hudson. At about 3.1 miles the Long Path turns left but there is a nice viewpoint straight ahead. Walked on an unmarked trail to the top of High Tom for some great views. Continue on the Long Path to some more great views at about 3.5 miles at the Rockefeller Lookout. At 4.6 mils there is another lookout at Clinton Point opposite East Clinton Avenue. After another viewpoint, there is a chain link fence a fence at 5.1 miles. Walk along the fence until you cross a stream and a road at 5.4 miles. There is a gate in the fence which surrounds Greenbrook Santuary which is a private sanctuary that preserves areas of forest and habitats that were once common in the area. Continue on the Long Path dipping twice to cross streams. At 6.25 miles a red trail, the Huyler's Landing Trail leaves the Long Path to the right and heads down to the Shore Path. Continue straight ahead on the Long Path which again runs along the cliffs. At about 6.75 miles reach the Alpine Lookout which has several different viewpoints. The largest one is near the top of a short hill with views up and down the river. Continue along a stone wall and then enter the woods again. The trail is on an old paved surface again and passes by several stone walls and some foundations. Continue walking along the trail with the parkway on the left and glimpses of the cliffs and river on the right. At 8.35 miles descend a hill to the Alpine Access Road bordered by a stone wall. The trail turns right and passed through a tunnel under the road. On the other side the trail begins to ascend a very rocky trail as it heads toward the headquarters for the New Jersey section of the Palisades Interstate Park. The trail continues at the far end of the parking area and passes through hardwood and evergreen forests. At 9.3 miles there is a path to the right which has a short bridge out to a rock outcrop. Walk across the bridge and out onto the rocks for some more nice views of the river. Over the next mile or so the trail follows some dirt and gravel roads while other paths cross the trail. Watch the aqua blazes carefully and you will have no trouble staying on the Long Path. At 10.7 miles there is a clearing with a small "castle". This is a monument to the New Jersey Federation of Women's Clubs which played a big part in preserving lands on the Palisades. The monument also has another good lookout. Climb the stairs to the top of the monument if you like although there are no better views from the top. Continue on the Long Path by descending some stone steps. Pass a blue and white trail, the Forest View Trail which descends to the Shore Trail. At 11.2 miles cross the access road to the State Line Lookout. There are many ski trails in the area but the aqua blazes are always very prominent. Continue to follow the blazes until at 11.7 miles and you will be behind the State Line Lookout snack bar. The trail turns left here but walk out to this very large viewpoint. Walk back to the trail and follow it as it winds its way back to the old access road. Walk along the road until the trail turns to the right into the woods again. At 12.4 miles there is a chain link fence that marks the state border. The Long Path turns right here and begins to descend a set of stone steps which are steep at times. Turn left and pass through a gate into New York continuing to descend on the steps. At 12.8 miles the descent ends and you cross a small stream on a bridge. A white trail to the right leads down to the Peanut Leap Cascade and the remnants of Lawrence Gardens. Continue on the trail which can be wet at times in these lower spots. The trail heads up a hill and soon meets Ludlow Lane. Walk back to your car on Route 9W.
 (The image at the left shows the profile of the hike. Remember that all vertical profiles are relative!)
Frick Pond (Counterclockwise)
| Quick Look | ||||
|---|---|---|---|---|
| Difficulty | Round trip | Total climb | Internet Maps | |
| 2.2 mi. | 200 ft. | AllTrails | ||
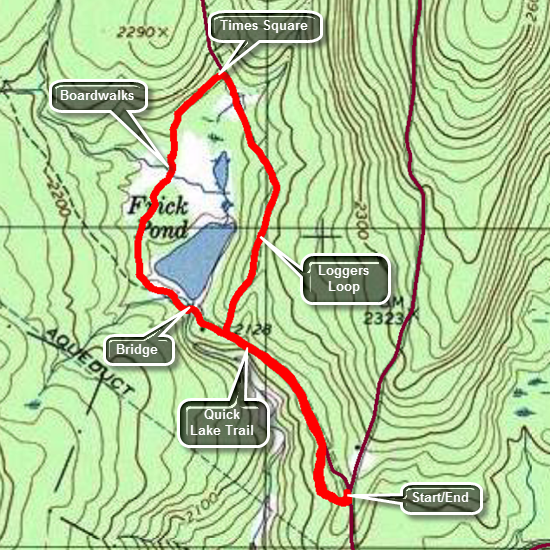 The area around Frick Pond, Hodge Pond and Quick Lake is covered with trails. There are numerous
possibilities for short of long hikes. The area is "relatively" flat and there are no "views".
There is, however, some beautiful scenery.
The area around Frick Pond, Hodge Pond and Quick Lake is covered with trails. There are numerous
possibilities for short of long hikes. The area is "relatively" flat and there are no "views".
There is, however, some beautiful scenery.
Take DeBruce Road from Livingston Manor for about six miles then turn left on Mongaup Rd. Where the road splits bear left on Beech Mountain Rd. and park in the parking lot on the left. Find the red-blazed Quick Lake Trail and follow it for .5 miles to the junction with the yellow-blazed Logger's Loop. Turn right to get on the Loggers Loop Trail. The trail makes a slight ascent as it heads north toward Times Square. In a little over a mile you will be at Times Square, the junction of the Logger's Loop, Big Rock Trail and the trail around the back of Frick Pond. Turn left and follow the trail around the back of Frick Pond. You will cross two small bridges over streams that feed the wetlands on the north side of the pond. The trail passes through a grove of evergreen trees. To cross another stream and stay above the wetlands the trail passes over a boardwalk before coming to the junction with the red-blazed Quick Lake Trail. Continue straight ahead and cross two small bridges on the way to the outlet of Frick Pond. Cross the outlet bridge and walk up the hill to the right. Within a short distance you will be back at the junction with the Loggers Loop. Continue straight ahead and back to your car.
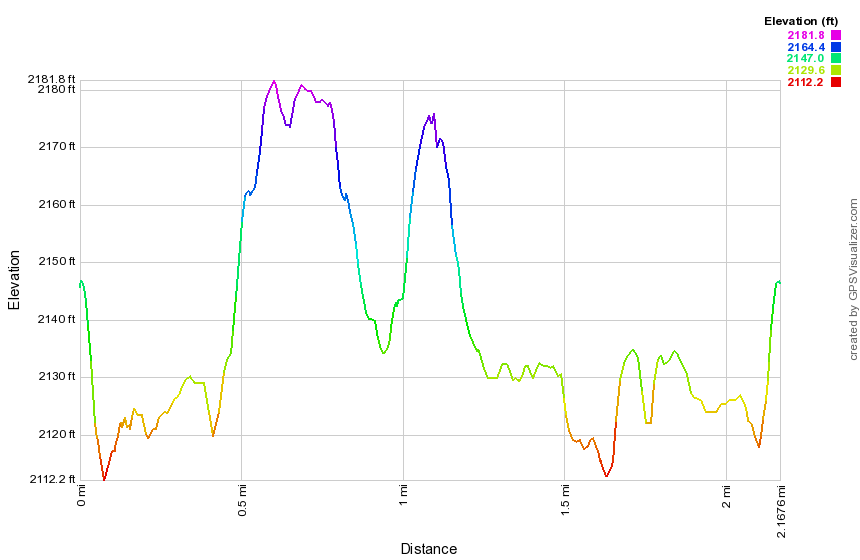
(The image above shows the profile of the hike. Remember that all vertical profiles are relative!)
Frick Pond (Clockwise)
| Quick Look | ||||
|---|---|---|---|---|
| Difficulty | Round trip | Total climb | Internet Maps | |
| 2.2 mi. | 200 ft. | AllTrails | ||
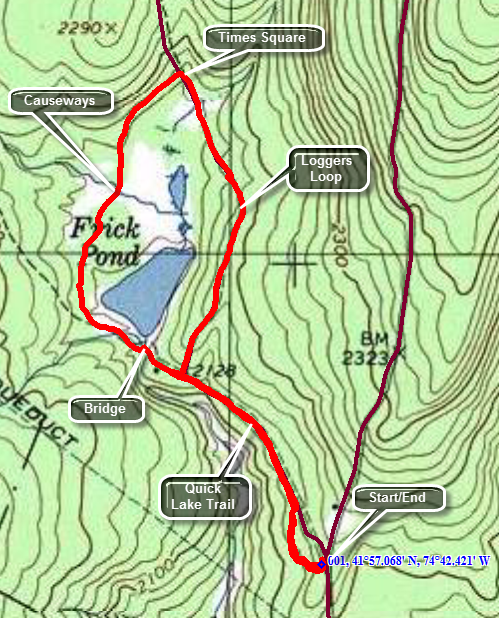 The area around Frick Pond, Hodge Pond and Quick Lake is covered with trails. There are numerous
possibilities for short of long hikes. The area is "relatively" flat and there are no "views".
There is, however, some beautiful scenery.
The area around Frick Pond, Hodge Pond and Quick Lake is covered with trails. There are numerous
possibilities for short of long hikes. The area is "relatively" flat and there are no "views".
There is, however, some beautiful scenery.
Take DeBruce Road from Livingston Manor for about six miles then turn left on Mongaup Rd. Where the road splits bear left on Beech Mountain Rd. and park in the parking lot on the left. Find the red-blazed Quick Lake Trail and follow it for .5 miles to the junction with the yellow-blazed Logger's Loop. Turn left to stay on the Quick Lake Trail. You will cross over the bridge at the outlet to Frick Pond. This is a beautiful spot to take pictures in all four seasons and under most lighting conditions. Continue around the pond and at about .7 miles there will be a trail junction. Bear to the right and walk around the "back" of the pond on an unnamed trail. You will cross over several wooden "bridges" or "causeways" over running water and marshy areas. BE CAREFUL as these wooden bridges are usually in the shade, grow moss readily and can be VERY SLIPPERY. After another .5 miles of walking you will be at Times Square, a four way trail junction. Turn right on the yellow Loggers Loop Trail and continue to circle Frick Pond. At 1.75 miles you will have completed the loop. Turn left and follow the red Quick Lake Trail back to your car.
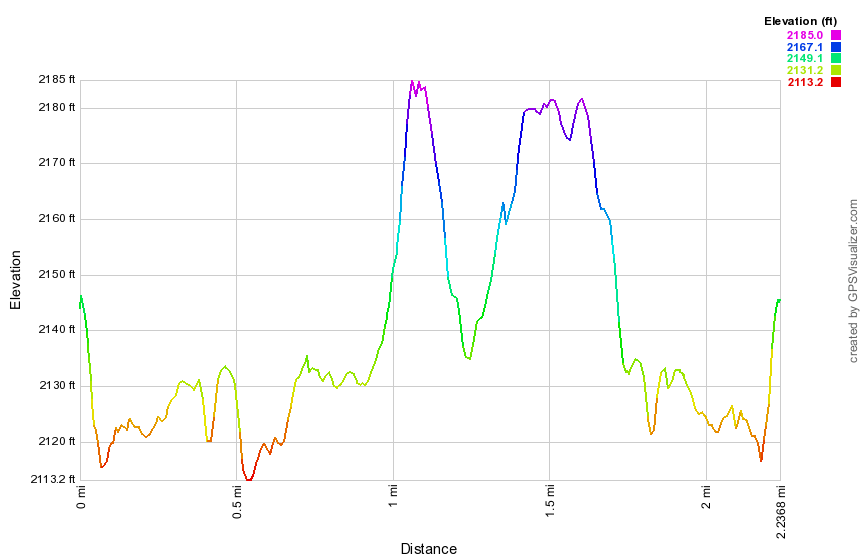
(The image below shows the profile of the hike. Remember that all vertical profiles are relative!)
Frick Pond (Counterclockwise)
| Quick Look | ||||
|---|---|---|---|---|
| Difficulty | Round trip | Total climb | Internet Maps | |
| 2.2 mi. | 160 ft. | AllTrails | ||
The area around Frick Pond, Hodge Pond and Quick Lake is covered with trails. There are numerous possibilities for short of long hikes. The area is "relatively" flat and there are no "views". There is, however, some beautiful scenery.
Take DeBruce Road from Livingston Manor for about six miles then turn left on Mongaup Rd. Where the road splits bear left on Beech Mountain Rd. and park in the parking lot on the left. Find the red-blazed Quick Lake Trail and follow it for .5 miles to the junction with the yellow-blazed Logger's Loop. Turn right to get on the Loggers Loop. The trail rises briefly and then descends gently to a four-way junction called Times Square. Turn left at Times Square on the Big Rock Trail which will take you around the north and west side of the pond. You will cross over several wooden "bridges" or "causeways" over running water and marshy areas. BE CAREFUL as these wooden bridges are usually in the shade, grow moss readily and can be VERY SLIPPERY. After passing over these bridges the Big Rock Trail ends at the Quick Lake Trail. Turn left on the Quick Lake Trail and continue to the bridge over the outlet stream to Frick Pond. This is a great place to stop and take some pictures of the pond. To the right is a high hill called Flynn's Point which is the highest point in Sullivan County. Continue to follow the Quick Lake Trail up a hill to Gravestone Junction. Continue straight ahead back to the trail register. At the register bear right on the Quick Lake Trail back to the parking area.
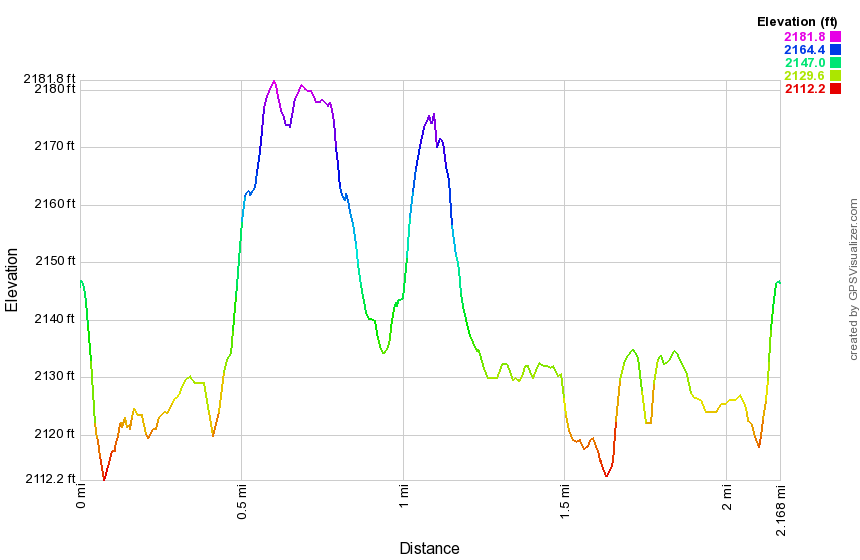
(The image below shows the profile of the hike. Remember that all vertical profiles are relative!)
Frick Pond: Frick Pond: Quick Lake, Logger's Loop and Big Rock Trails
| Quick Look | ||||
|---|---|---|---|---|
| Difficulty | Round trip | Total climb | Internet Maps | |
| 3.9 mi. | 400 ft. | AllTrails | ||
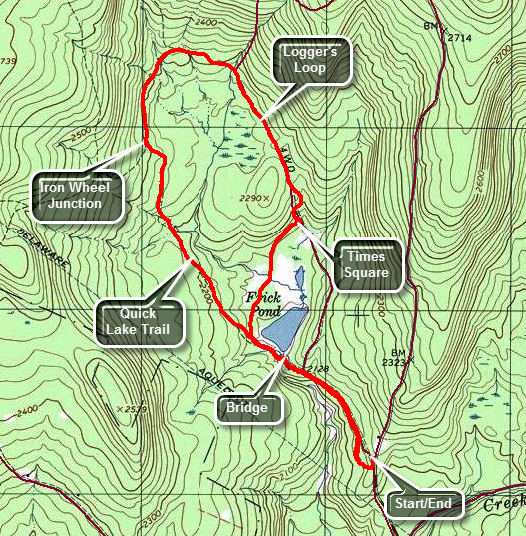 The area around Frick Pond, Hodge Pond and Quick Lake is covered with trails. There are numerous possibilities for short of long hikes. The area is "relatively" flat and there are no "views". There is, however, some beautiful scenery.
Take DeBruce Road from Livingston Manor for about six miles then turn left on Mongaup Rd. Where the road splits bear left on Beech Mountain Rd. and park in the parking lot on the left. Find the red-blazed Quick Lake Trail and follow it for .5 miles to the junction with the yellow-blazed Logger's Loop. Turn left to stay on the Quick Lake Trail. You will cross over the bridge at the outlet to Frick Pond. This is a beautiful spot to take pictures in all four seasons and under most lighting conditions. Continue around the pond and at about .7 miles there will be a trail junction. Bear to the left to stay on the red Quick Lake Trail start to walk slightly uphill toward Iron Wheel Junction. You will walk through a "spruce tunnel" and cross a small stream. At 1.5 miles you will be at Iron Wheel junction. Turn right on the yellow blazed Logger's Loop and head towards Times Square, a four way trail junction. The trail has a very gentle uphill and begins to swing to the east to start the loop back. At 1.85 miles you will reach the northern apex of the loop and start east and south. The trail now is mostly downhill with a few "bumps". At 2.7 miles you will arrive at Times Square where you should turn right on the yellow Blazed Big Rock Trail and walk around the "back" of the pond. You will cross over several wooden "bridges" or "causeways" over running water and marshy areas. BE CAREFUL as these wooden bridges are usually in the shade, grow moss readily and can be VERY SLIPPERY. Turn left at the next trail junction on the Quick Lake Trail and follow your path from earlier along the Quick Lake Trail back to your car.
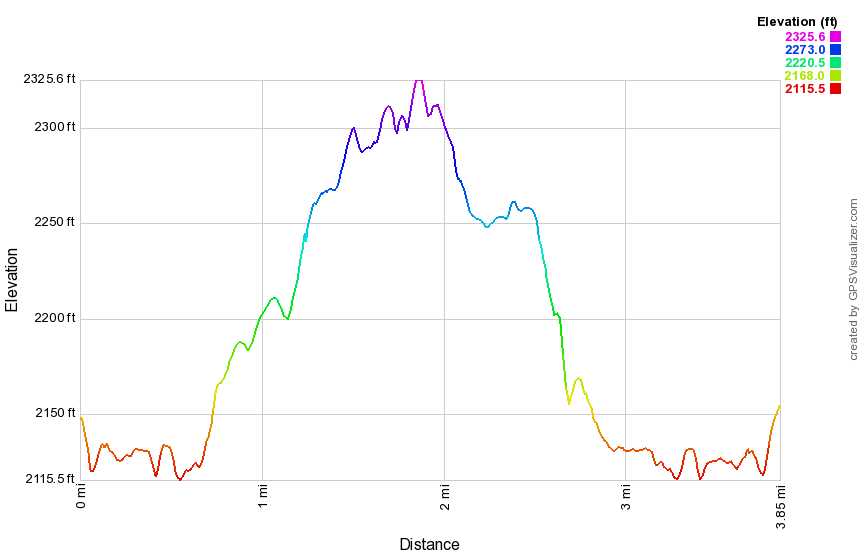 (The image below shows the profile of the hike. Remember that all vertical profiles are relative!)
Frick Pond: Quick Lake, Big Rock, and Logger's Loop Trails
| Quick Look | ||||
|---|---|---|---|---|
| Difficulty | Round trip | Total climb | Internet Maps | |
| 3.9 mi. | 400 ft. | AllTrails | ||
The area around Frick Pond, Hodge Pond and Quick Lake is covered with trails. There are numerous
possibilities for short of long hikes. The area is "relatively" flat and there are no "views".
There is, however, some beautiful scenery.
Take DeBruce Road from Livingston Manor for about six miles then turn left on Mongaup Rd. Where the road splits bear left on Beech Mountain Rd. and park in the parking lot on the left. Find the red-blazed Quick Lake Trail and follow it for .5 miles to the junction with the yellow-blazed Logger's Loop. Turn left to stay on the Quick Lake Trail. You will cross over the bridge at the outlet to Frick Pond. This is a beautiful spot to take pictures in all four seasons and under most lighting conditions. Continue around the pond and at about .7 miles there will be a trail junction. Bear to the right and walk around the "back" of the pond on the yellow blazed Big Rock Trail. You will cross over several wooden "bridges" or "causeways" over running water and marshy areas. BE CAREFUL as these wooden bridges are usually in the shade, grow moss readily and can be VERY SLIPPERY. After another .5 miles of walking you will be at Times Square, a four way trail junction. Turn left on the yellow Loggers Loop Trail and walk up a hill continuing on the Logger's Loop. At 2.4 miles you will be at Iron Wheel Junction. Turn left on the red blazed Quick Lake Trail to head back toward Frick Pond. At 3.2 miles you will have looped back to the trail around the back of Frick Pond. Continue straight ahead and cross the bridge over the Frick Pond outlet. Follow The Quick Lake trail back to the parking area.
 (The image below shows the profile of the hike. Remember that all vertical profiles are relative!)
Frick Pond: Quick Lake, Big Rock and Flynn Trails
| Quick Look | ||||
|---|---|---|---|---|
| Difficulty | Round trip | Total climb | Internet Maps | |
| 4.0 mi. | 775 ft. | AllTrails | ||
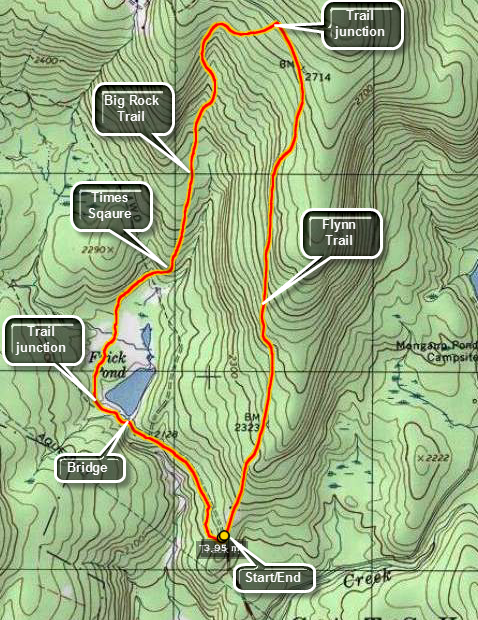 The area around Frick Pond, Hodge Pond and Quick Lake is covered with trails. There are numerous
possibilities for short of long hikes. The area is "relatively" flat and there are no "views".
There is, however, some beautiful scenery.
The area around Frick Pond, Hodge Pond and Quick Lake is covered with trails. There are numerous
possibilities for short of long hikes. The area is "relatively" flat and there are no "views".
There is, however, some beautiful scenery.
Take DeBruce Road from Livingston Manor for about six miles then turn left on Mongaup Rd. Where the road
splits bear left on Beech Mountain Rd. and park in the parking lot on the left. Find the red-blazed
Quick Lake trail and follow it for .5 miles to the junction with the yellow-blazed Logger's Loop.
Turn left to stay on the Quick Lake Trail. You will cross over the bridge at the outlet to Frick Pond. This is a beautiful spot to take pictures in all four seasons and under most lighting conditions. Continue around the pond and at about .7 miles there will be a trail junction. Bear to the right and walk around the "back" of the pond on an unnamed trail. You will cross over several wooden "bridges" or "causeways" over running water and marshy areas. BE CAREFUL as these wooden bridges are usually in the shade, grow moss readily and can be VERY SLIPPERY. After another .5 miles of walking you will be at Times Square, a four way trail junction. Continue straight ahead on the Big Rock Trail. This is the most challenging part of the hike at the trail gains about 650 feet of elevation over the next 1.1 miles. At the highest point on the Big Rock Trail there is a trail junction with the Flynn Trail. Turning left will take you to Hodge Pond. Turn right to go down the Flynn Trail and back to your car. The walk is about 1.7 miles but it is all down hill. When you approach the gate at the bottom of the trail, continue to follow the trail to the left into the woods. The cabin straight ahead is private property and may be occupied.
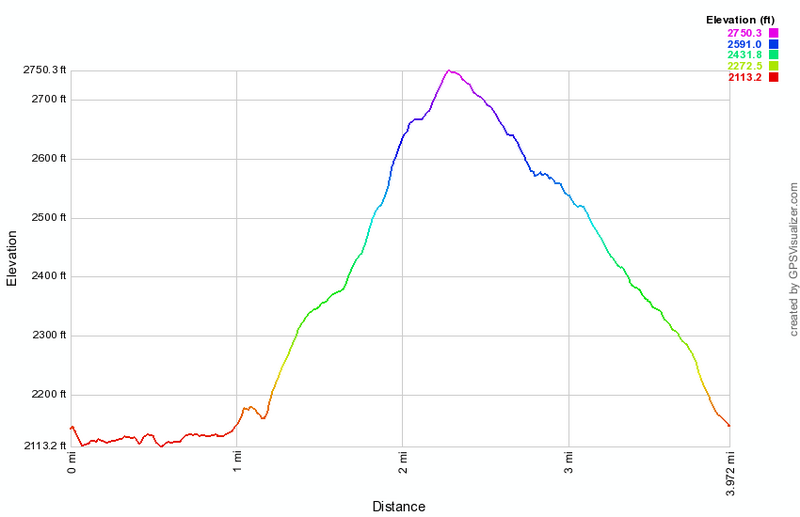
(The image above shows the profile of the hike. Remember that all vertical profiles are relative!)
Frick Pond: Flynn, Big Rock and Quick Lake Trails
| Quick Look | ||||
|---|---|---|---|---|
| Difficulty | Round trip | Total climb | Internet Maps | |
| 4.0 mi. | 747 ft. | AllTrails | ||
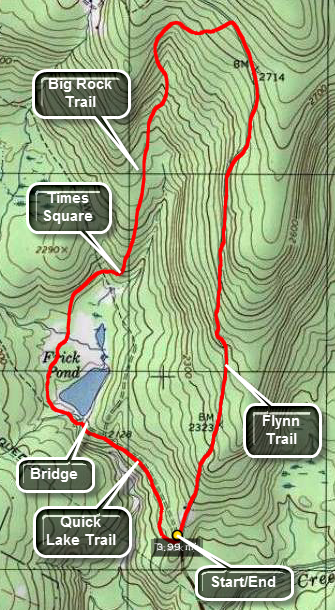 The area around Frick Pond, Hodge Pond and Quick Lake is covered with trails. There are numerous possibilities for short of long hikes. The area is "relatively" flat and there are no "views".
There is, however, some beautiful scenery.
The area around Frick Pond, Hodge Pond and Quick Lake is covered with trails. There are numerous possibilities for short of long hikes. The area is "relatively" flat and there are no "views".
There is, however, some beautiful scenery.
Take DeBruce Road from Livingston Manor for about six miles then turn left on Mongaup Rd. Where the road splits bear left on Beech Mountain Rd. and park in the parking lot on the left. Walk across the road to pick up the Flynn Trail. The cabin straight ahead on the road is private property and may be occupied. The hike up the Flynn Trail is 1.7 miles that is all uphill. The elevation gain to the junction with the Big Rock Trail is around 600 feet so the grade is not too great. Turn left at the top of the Flynn Trail and head down the Big Rock Trail to the four-way trail junction called Times Square. The distance is about 1.1 miles with a drop of around 580 feet. Continue straight ahead on the Big Rock Trail around the "back" of Frick Pond. This trail has several wooden bridges and walkways that can be slick when wet. From Times Square to the bridge at the outlet of Frick Pond is about .6 miles and is almost flat. From the bridge walk up the hill to the right to Gravestone Junction. Stay to the right here to walk the trail which becomes a woods road and leads back to the trail register. At the trail register turn right to stay on the trail and arrive back at the parking area.
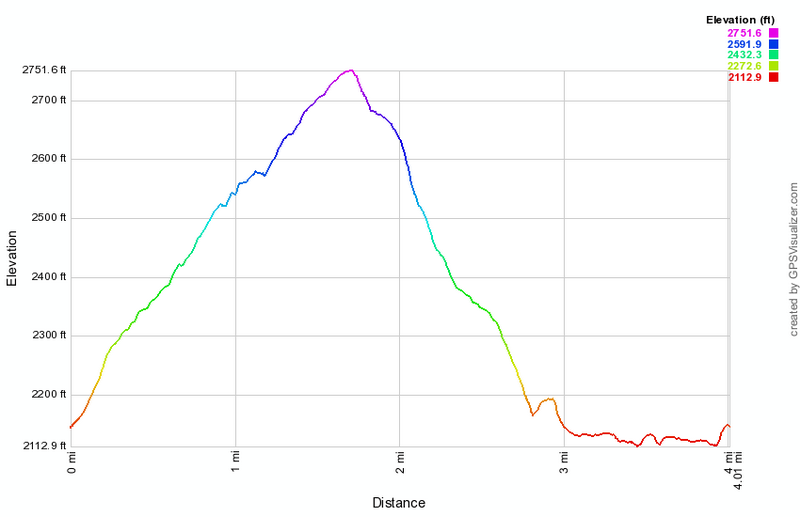
(The image above shows the profile of the hike. Remember that all vertical profiles are relative!)
Frick Pond: Flynn, Big Rock, Loggers Loop and Quick Lake Trails (short)
| Quick Look | ||||
|---|---|---|---|---|
| Difficulty | Round trip | Total climb | Internet Maps | |
| 4.0 mi. | 705 ft. | AllTrails | ||
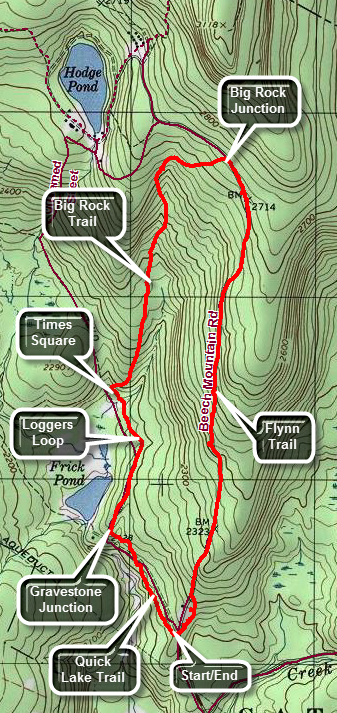 The area around Frick Pond, Hodge Pond and Quick Lake is covered with trails. There are numerous possibilities for short of long hikes. The area is "relatively" flat and there are no "views". There is, however, some beautiful scenery.
Take DeBruce Road from Livingston Manor for about six miles then turn left on Mongaup Rd. Where the road splits bear left on Beech Mountain Rd. and park in the parking lot on the left. Walk across the road to pick up the Flynn Trail. The cabin straight ahead on the road is private property and may be occupied. The hike up the Flynn Trail is 1.7 miles that is all uphill. The elevation gain to the junction with the Big Rock Trail is around 600 feet so the grade is not too great. Turn left at the top of the Flynn Trail and head down the Big Rock Trail to the four-way trail junction called Times Square. The distance is right around 1.1 miles with a drop of around 580 feet. Turn left on the yellow Logger's Loop Trail to head toward Gravestone Junction. This section is about .6 miles and starts with a slight uphill. At Gravestone junction turn left on the red blazed Quick Lake Trail. At the trail register you may turn right to stay on the trail or continue straight ahead on the woods road. Both ways lead to the parking areas.
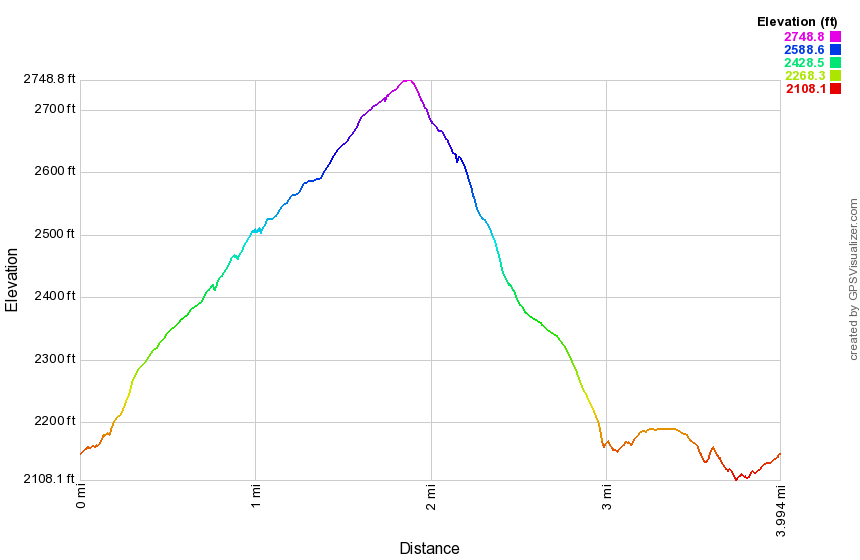
(The image above shows the profile of the hike. Remember that all vertical profiles are relative!)
Frick Pond: Logger's Loop Clockwise
| Quick Look | ||||
|---|---|---|---|---|
| Difficulty | Round trip | Total climb | Internet Maps | |
| 3.7 mi. | 408 ft. | AllTrails | ||
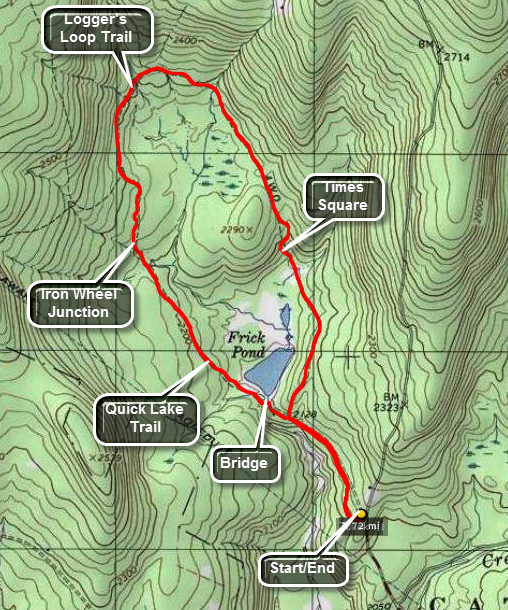 The area around Frick Pond, Hodge Pond and Quick Lake is covered with trails. There are numerous possibilities for short of long hikes. The area is "relatively" flat and there are no "views". There is, however, some beautiful scenery.
Take DeBruce Road from Livingston Manor for about six miles then turn left on Mongaup Rd. Where the road splits bear left on Beech Mountain Rd. and park in the parking lot on the left. Find the red-blazed Quick Lake Trail which leaves the back of the larger parking lot. At the first junction turn left onto a woods road at the trail register. Continue about .4 miles to the junction with the yellow-blazed Logger's Loop. Stay to the left here to go to Frick Pond which is just .1 miles away. Follow the Quick Lake Trail over the bridge and bear left at the next trail junction to stay of red Quick Lake Trail. At about 1.5 miles you will be at Iron Wheel Junction which is marked by a set of ... iron wheels. The Quick Lake Trail turns left here and heads toward Hodge Pond. Turn right on the yellow Logger's Loop Trail. The trail ascends slightly and then begins a descent to Times Square at 2.75 miles. The name indicates that many trails cross at this point. Continue straight ahead on the Logger's Loop Trail which will bring you back to the trail junction near Frick Pond at 3.3 miles. Walk back out the way you came on the red Quick Lake Trail which will bring you back to the parking area.
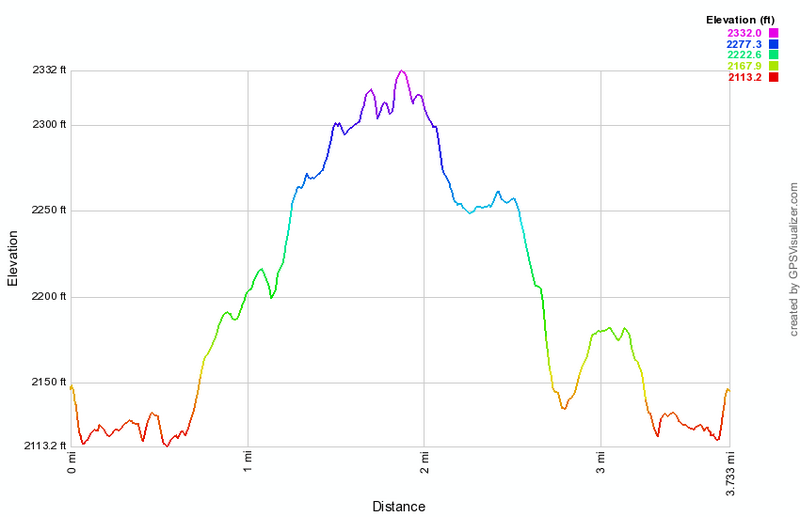
(The image shows the profile of the hike. Remember that all vertical profiles are relative! This image suggests some rugged and steep ascents and descents but the trail is really rather FLAT.)
Frick Pond: Logger's Loop Counterclockwise
| Quick Look | ||||
|---|---|---|---|---|
| Difficulty | Round trip | Total climb | Internet Maps | |
| 3.7 mi. | 408 ft. | AllTrails | ||
The area around Frick Pond, Hodge Pond and Quick Lake is covered with trails. There are numerous possibilities for short of long hikes. The area is "relatively" flat and there are no "views". There is, however, some beautiful scenery.
Take DeBruce Road from Livingston Manor for about six miles then turn left on Mongaup Rd. Where the road splits bear left on Beech Mountain Rd. and park in the parking lot on the left. Find the red-blazed Quick Lake Trail which leaves the back of the larger parking area. At the first junction turn left onto a woods road at the trail register. Continue about .4 miles to the junction with the yellow-blazed Logger's Loop. Turn right here and walk to Times Square, a junction of several trails, at 1 mile. Continue straight across the intersection to stay on the yellow Logger's Loop heading northwest. The trail will head uphill slightly and begin to loop around until you are walking south toward Iron Wheel Junction. Arrive at Iron Wheel Junction at 2.2 miles and turn left on the red Quick Lake Trail to head back toward Frick Pond. At 3 miles you will be at another trail junction. Turn right to head toward the outlet of Frick Pond. Cross the bridge and walk to the right up the small hill. At the next trail junction continue straight ahead to the trail register. Turn right and walk back to the parking area.

(The image shows the profile of the hike. Remember that all vertical profiles are relative! This image suggests some rugged and steep ascents and descents but the trail is really rather FLAT.)
Frick Pond: Loggers Loop, Big Rock and Flynn Trails
| Quick Look | ||||
|---|---|---|---|---|
| Difficulty | Round trip | Total climb | Internet Maps | |
| 3.9 mi. | 720 ft. | AllTrails | ||
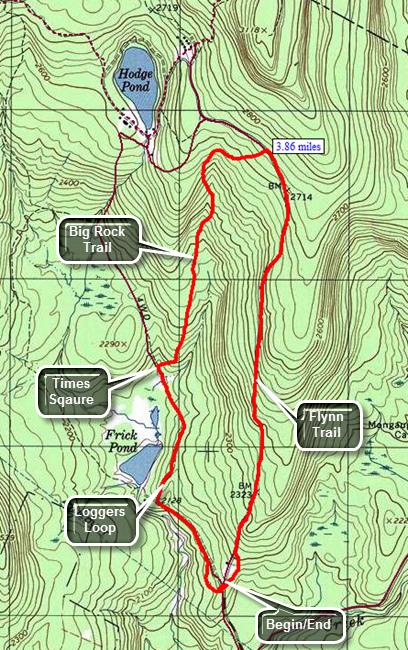 The area around Frick Pond, Hodge Pond and Quick Lake is covered with trails. There are numerous possibilities for short of long hikes. The area is "relatively" flat and there are no "views". There is, however, some beautiful scenery.
Take DeBruce Road from Livingston Manor for about six miles then turn left on Mongaup Rd. Where the road splits bear left on Beech Mountain Rd. and park in the parking lot on the left. Find the red-blazed Quick Lake Trail at the back of the larger parking area and follow it for .5 miles to the junction with the yellow-blazed Logger's Loop. Turn right onto the Loggers Loop and start to walk to Times Square. The first part of this trail is slightly uphill but then descends to a four-way trail junction called, Times Square. The area around Times Square can be wet but there is usually a way to avoid the worst area. Turn right and start up the yellow blazed Big Rock Trail which is well-drained with few wet or muddy areas. The distance from Times Square to the Flynn Trail is 1.1 miles and gains just under 600 feet in elevation. The average grade is less than 10% but seems steep in comparison to the flatter trails in the area. At the top of the hill is the Flynn Trail. Turn right to head back to the car on the Flynn Trail. which is downhill for 1.7 miles to the parking area. At the gate, turn left to finish the hike on the Flynn Trail and avoid the private property around the cabin.
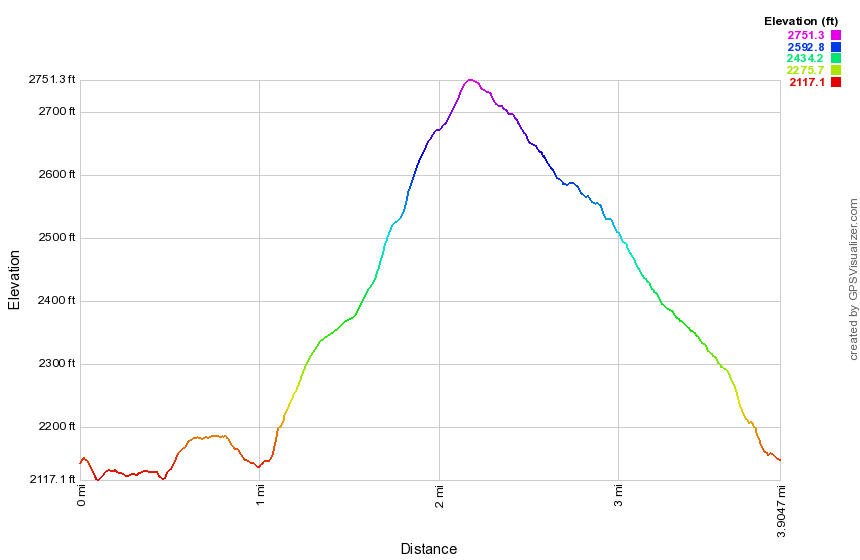
(The image shows the profile of the hike. Remember that all vertical profiles are relative!)
Frick Pond: Loggers Loop Figure 8
| Quick Look | ||||
|---|---|---|---|---|
| Difficulty | Round trip | Total climb | Internet Maps | |
| 4.5 mi. | 373 ft. | AllTrails | ||
 The area around Frick Pond, Hodge Pond and Quick Lake is covered with trails. There are numerous possibilities for short of long hikes. The area is "relatively" flat and there are no "views". There is, however, some beautiful scenery.
Take DeBruce Road from Livingston Manor for about six miles then turn left on Mongaup Rd. Where the road splits bear left on Beech Mountain Rd. and park in the parking lot on the left. Find the red-blazed Quick Lake Trail at the back of the larger parking area or walk out the back of the smaller parking area on a woods road. Both routes will lead to the trail register. From the trail register walk out the woods road which is blazed red as the Quick Lake Trail. At Gravestone Junction turn left and head toward the pond down a short hill. You may want to spend some time at the bridge across the outlet stream. Continue on the trail around the pond in a clockwise direction. At the next junction with the Big Rock Trail turn right to follow it around the pond. Along the way you will walk across wooden walkways which can be slippery when wet. Cross the two bridges across the inlet to the pond and continue around the pond to the four-way intersection known as Times Square. Turn left on the Loggers Loop and start up a long hill. When you crest the hill you will find a seasonal pond on the right which may be filled with water or dry. The rest of the Loggers Loop is overall uphill as you continue toward Iron Wheel Junction. There are some impressive rock ledges to the right but otherwise the trail has no significant points of interest. Iron Wheel Junction is where the Loggers Loop meets the Quick Lake Trail. Continuing straight ahead at this point leads to Junkyard Junction where the Flynn Trail leads to Hodge Pond. The Quick Lake Trail continues on to Quick Lake where it ends. Turn left to follow the Quick Lake Trail back towards Frick Pond. Cross over the stream in the forest by jumping or using stepping stones. Continue on the trail toward Frick Pond passing through a "spruce tunnel". The trail coming out of the woods can be wet and muddy at times. At the next junction with the Big Rock Trail turn left and again walk the Big Rock Trail clockwise around Frick Pond. At Times Square turn right and start out on the other section of the Loggers Loop. This section is mostly uphill. After hitting the highest point, you will start downhill toward Gravestone Junction passing some primitive campsites on the right. At the next junction turn left on the Quick Lake Trail heading back to the parking area. You will pass the trail register and be back in the parking area in about .4 miles.
<

(The image shows the profile of the hike. Remember that all vertical profiles are relative!)
Frick Pond: Flynn, Big Rock, Quick Lake and Logger's Loop Trails
| Quick Look | ||||
|---|---|---|---|---|
| Difficulty | Round trip | Total climb | Internet Maps | |
| 5.6 mi. | 908 ft. | AllTrails | ||
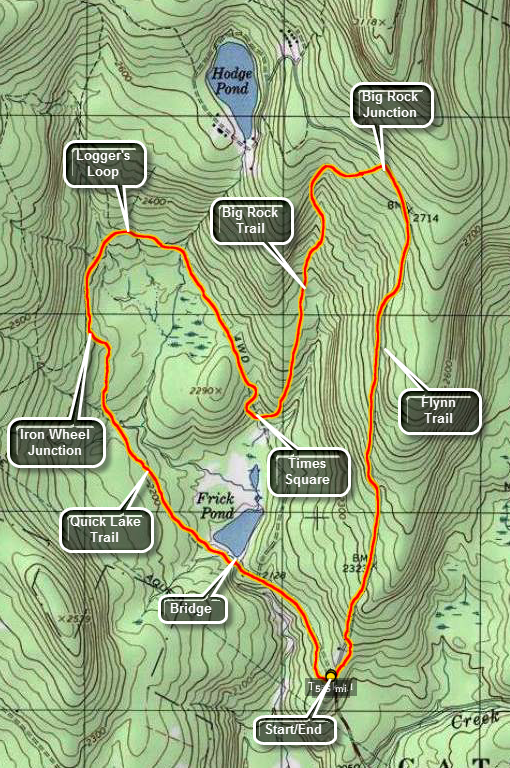 The area around Frick Pond, Hodge Pond and Quick Lake is covered with trails. There are numerous possibilities for short of long hikes. The area is "relatively" flat and there are no "views". There is, however, some beautiful scenery.
Take DeBruce Road from Livingston Manor for about six miles then turn left on Mongaup Rd. Where the road
splits bear left on Beech Mountain Rd. and park in the parking lot on the left. Cross the road and start up the blue Flynn Trail which rises continuously but gently to a junction with the Big Rock Trail at 1.7 miles. The overall elevation gain is about 600 feet but the grade is less than 7%. At the junction turn left on the red Big Rock Trail which is also a snowmobile trail. The trail heads east for .25 miles and then turns south continuing to descend a total of 585 feet over another .9 miles. At 2.85 miles into the hike the trail meets Time Square, a trail junction with trails in four different directions. Turn right on the yellow Logger's Loop which starts and ascent to the northwest. The trail turns west at 3.5 miles and then turns south until it meets the Quick Lake trail at Iron Wheel Junction 4.1 miles into the hike. Turn left on the Quick Lake Trail heading south and then southeast toward the bridge across the outlet of Frick Pond at 5.0 miles. Along the way the trail crosses a small stream in the woods and then passes through a "spruce tunnel". The bridge at the outlet end of Frick Pond is a good spot to stop and take some pictures of this pretty pond. The mountain to the right is Flynn's Point the high point in Sullivan County. Continue up the hill on the red Quick Lake Trail to Gravestone Junction and back to the parking area.
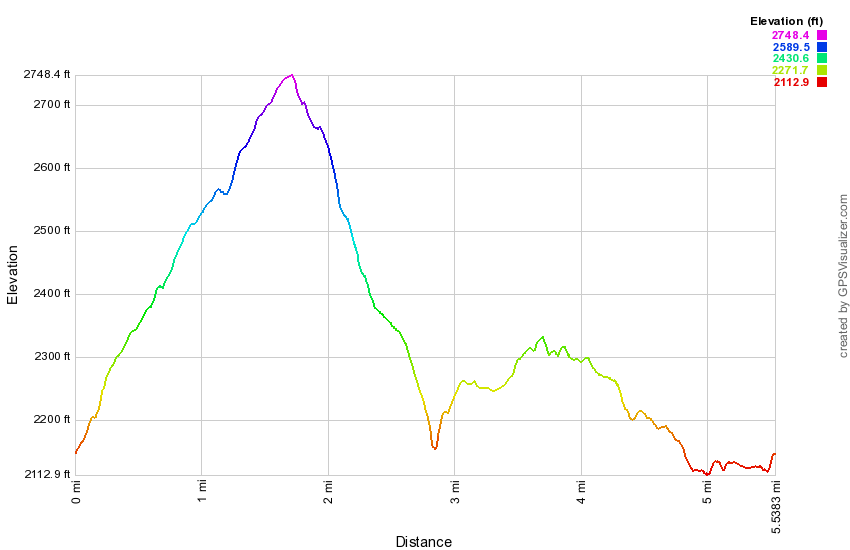
(The image above shows the profile of the hike. Remember that all vertical profiles are relative!)
Frick Pond: Quick Lake, Loggers Loop, Big Rock and Flynn Trails
| Quick Look | ||||
|---|---|---|---|---|
| Difficulty | Round trip | Total climb | Internet Maps | |
| 5.6 mi. | 908 ft. | AllTrails | ||
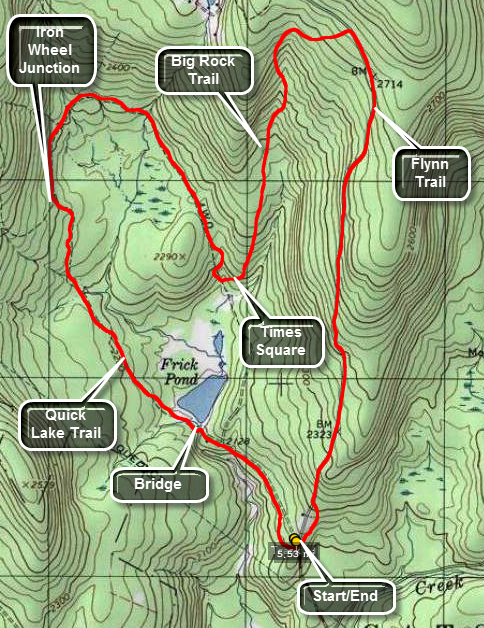 The area around Frick Pond, Hodge Pond and Quick Lake is covered with trails. There are numerous possibilities for short of long hikes. The area is "relatively" flat and there are no "views". There is, however, some beautiful scenery.
Take DeBruce Road from Livingston Manor for about six miles then turn left on Mongaup Rd. Where the road splits bear left on Beech Mountain Rd. and park in the parking lot on the left. Find the red-blazed Quick Lake trail and follow it for .5 miles to the junction with the yellow-blazed Logger's Loop. Turn left to stay on the Quick Lake Trail. You will cross over the bridge at the outlet to Frick Pond. This is a beautiful spot to take pictures in all four seasons and under most lighting conditions. Continue around the pond and at about .7 miles there will be a trail junction. Bear to the left on the Quick Lake Trail and continue to follow it through the "spruce tunnel" and across the little stream through the woods. The trail meets the Logger's Loop at Iron Wheel Junction 1.5 miles into the hike. Follow the yellow Logger's Loop as it heads north and then east finishing up on a descent to the south toward Times Square, The trail meets others at Times Square at 2.75 miles. Turn left and get ready for an ascent on the Big Rock Trail. The trail heads NNE ascending 500 feet over .85 miles and then turning east. It intersects the Flynn Trail at 3.85 miles at the highest point on the hike. Turn right on the blue Flynn Trail and enjoy a 1.7 mile descent back to the parking area as the trail drops 600 feet. As the trail nears the gate at the end of the old Beech Mountain Road turn left following the Flynn Trail through the woods to avoid the private property around the cabin.
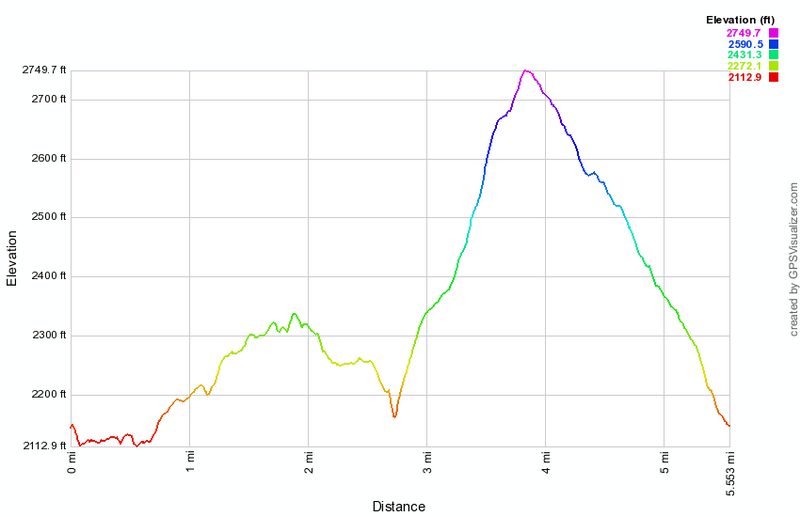
(The image above shows the profile of the hike. Remember that all vertical profiles are relative!)
Frick and Hodge Ponds: Big Rock, Flynn and Quick Lake Trails
| Quick Look | ||||
|---|---|---|---|---|
| Difficulty | Round trip | Total climb | Internet Maps | |
| 7.3 mi. | 1130 ft. | AllTrails | ||
_map.png) The area around Frick Pond, Hodge Pond and Quick Lake is covered with trails. There are numerous possibilities for short of long hikes. The area is "relatively" flat and there are no "views". There is, however, some beautiful scenery.
The area around Frick Pond, Hodge Pond and Quick Lake is covered with trails. There are numerous possibilities for short of long hikes. The area is "relatively" flat and there are no "views". There is, however, some beautiful scenery.
Take DeBruce Road from Livingston Manor for about six miles then turn left on Mongaup Rd. Where the road splits bear left on Beech Mountain Rd. and park in the parking lot on the left. Find the Quick Lake Trail which leaves the back right corner of the larger parking area. Follow this out to the register box where you should turn left to continue on the Quick Lake Trail. At the first trail junction bear left and walk down to the bridge across the outlet from Frick Pond. Continue on around the pond and bear right at the next junction so that you wrap around the "back" of Frick Pond. Continue on this trail to Times Square, a junction with trails in all 4 cardinal directions. Walk straight ahead and start UP the Big Rock Trail which gains 600 feet in a little over a mile and meets the Flynn Trail. Turn left on the Flynn Trail and follow it .7 miles down to Hodge Pond. There is a woods road that branches to the right along the way but you should avoid this. From Hodge Pond turn right to walk up a hill and around the pond counterclockwise of a jeep road. Watch for the Flynn Trail as it branches off from the northwest corner of the pond. Turn right to follow the Flynn Trail for about .5 miles to Junkyard Junction where you should turn left to get on the Quick Lake Trail which will take you back to the parking area. In 1.4 miles a snowmobile trail will branch to the right. Stay on the Quick Lake Trail for another .2 miles to Iron Wheel Junction. The Logger's Loop is straight ahead but you should turn right to follow the Quick Lake trail back to the outlet of Frick Pond in about 1 mile. From the bridge at the outlet end of Frick Pond follow the Quick Lake Trail up the hill to Gravestone Junction. Stay to the right on the Quick Lake Trail to walk .5 miles back to the parking area.
_gra.png)
(The image above shows the profile of the hike. Remember that all vertical profiles are relative!)
Frick and Hodge Ponds: Big Loop
| Quick Look | ||||
|---|---|---|---|---|
| Difficulty | Round trip | Total climb | Internet Maps | |
| 8.5 mi. | 1260 ft. | AllTrails | ||
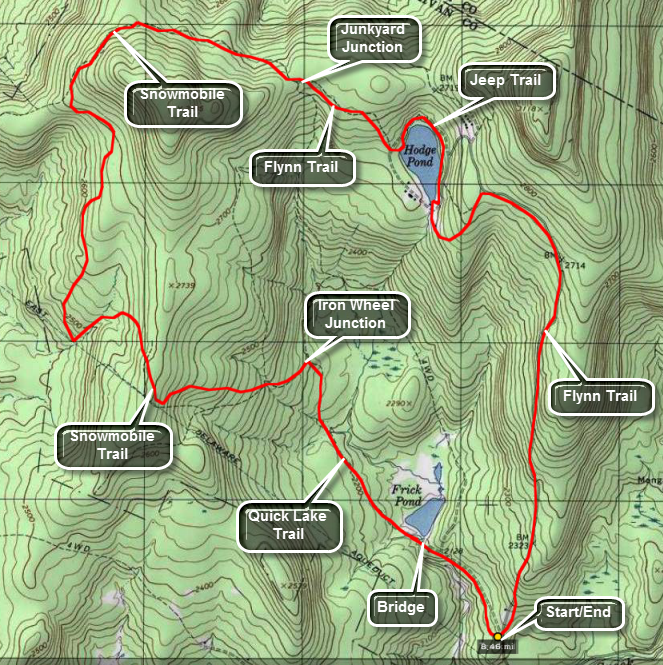 The area around Frick Pond, Hodge Pond and Quick Lake is covered with trails. There are numerous possibilities for short of long hikes. The area is "relatively" flat and there are no "views". There is, however, some beautiful scenery.
Take DeBruce Road from Livingston Manor for about six miles then turn left on Mongaup Rd. Where the road splits bear left on Beech Mountain Rd. and park in the parking lot on the left. Find the red-blazed Quick Lake trail and follow it for .5 miles to the junction with the yellow-blazed Logger's Loop. Turn left to stay on the Quick Lake Trail. Cross the bridge over the Frick Pond outlet and continue around the pond. At the next trail unction bear left to stay on the Quick Lake Trail to Iron Wheel Junction. After 1.5 miles, turn left at Iron Wheel junction to stay on the Quick Lake Trail. The Logger's Loop heads to the right here. At the next junction bear left off the Quick Lake Trail and onto a snowmobile trail. This trail at first heads west and crests a hill at 2.2 miles. After this the trail begins to drop and turns to head almost due north. Continue to follow the main snowmobile trail and ignore the many side trails and paths. At about 3.9 miles the snowmobile trail intersects the Quick Lake Trail at Coyote Junction. Turn right and follow the red-blazed Quick Lake Trail for 1.1 miles to Junkyard Junction where the Flynn Trail begins. Continue straight ahead on the Flynn Trail passing a gate and walking almost to the shore of Hodge Pond.When you reach the trail around the pond, turn left and follow the jeep trail around the back of the pinto the outlet. Continue straight ahead to pick up the Flynn Trail and walk up the hill passing a woods road on the left. Walk passed another gate and at 6.9 miles reach a four-way intersection with a snowmobile trail on the left and the Big Rock Trail on the right. Continue straight ahead staying on the Flynn Trail to the parking area. From the junction the distance is 1.7 miles and it is almost all downhill. Near the end of the hike turn left at the last gate to avoid walking passed the cabin on private property.
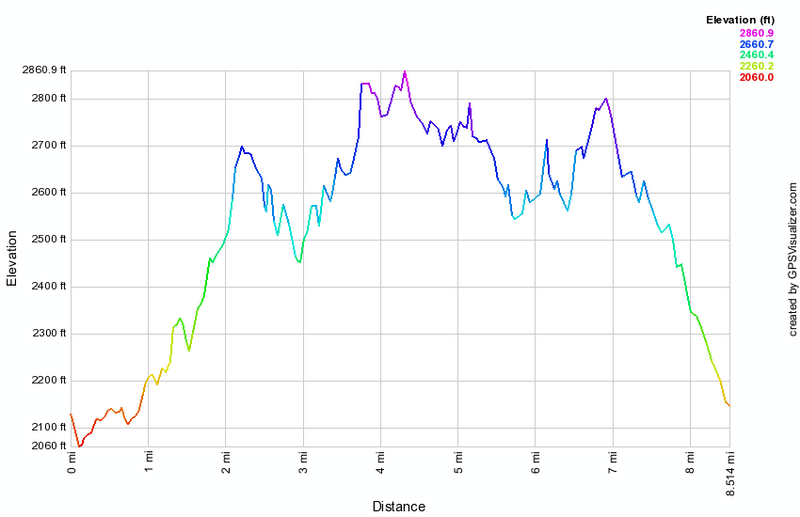
(The image above shows the profile of the hike. Remember that all vertical profiles are relative!)
Frick and Hodge Ponds: Quick Lake, Big Rock and Flynn Trails
| Quick Look | ||||
|---|---|---|---|---|
| Difficulty | Round trip | Total climb | Internet Maps | |
| 6.0 mi. | 900 ft. | AllTrails | ||
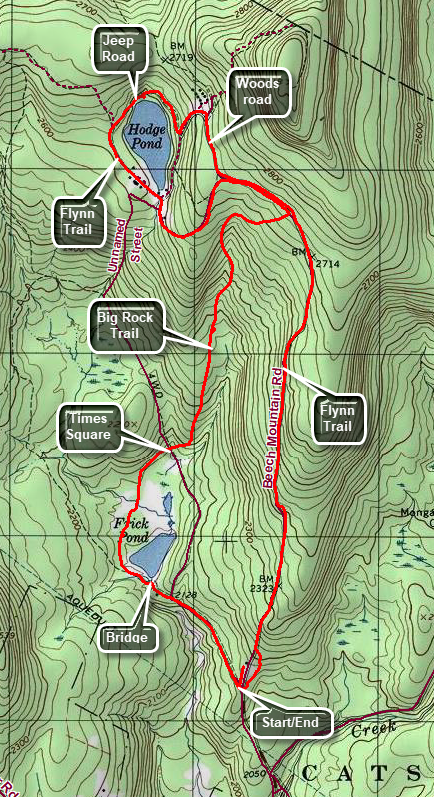 The area around Frick Pond, Hodge Pond and Quick Lake is covered with trails. Some are hiking trails while others are snowmobile trails or woods roads. There are numerous possibilities for short or long hikes. The area is "relatively" flat and there are no "views". There is, however, some beautiful scenery with two small ponds.
Take DeBruce Road from Livingston Manor for about six miles then turn left on Mongaup Rd. Where the road splits bear left on Beech Mountain Rd. and park in the parking lot on the left. Find the red-blazed Quick Lake trail and follow it for .5 miles to the junction with the yellow-blazed Logger's Loop at Gravestone Junction. Turn left to stay on the Quick Lake Trail. Walk down the hill to Frick Pond and across the bridge. At the next trail junction at .7 miles bear right on the Big Rock Trail toward Times Square. At Times Square, continue straight ahead on the Big Rock Trail. This trail rises almost 600 feet over 1.1 miles to the junction with the Flynn Trail. Turn left and continue on the flat part of the Flynn Trail to the junction with a woods road. Stay to the left and descend to the clearing at the outlet end of Hodge Pond. Walk over to the shore if you like but return to the Flynn Trail to walk along the west side of Hodge Pond. At 3.3 miles the Flynn Trail turns left up a hill. Turn right on a jeep road that goes around the upper end of the pond. At the next junction, turn left and walk up the hill to a woods road. Turn right and walk back to the Flynn Trail. Turn left on the Flynn Trail and walk back to the junction with the Big Rock Trail. Continue straight ahead on the Flynn Trail. Walk 1.7 miles mostly downhill and back to the parking area.
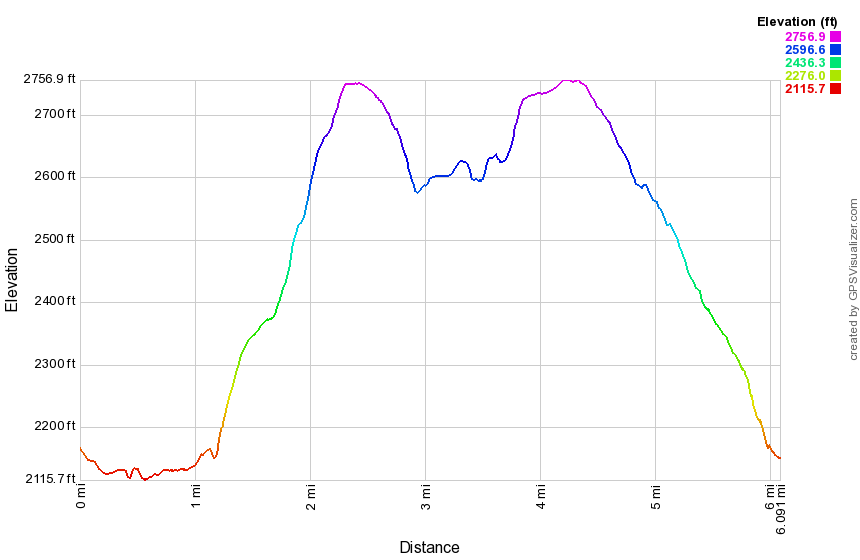
(The image shows the profile of the hike. Remember that all vertical profiles are relative!)
Frick and Hodge Ponds: Big Rock, Logger's Loop, Quick Lake and Flynn Trails
| Quick Look | ||||
|---|---|---|---|---|
| Difficulty | Round trip | Total climb | Internet Maps | |
| 6.9 mi. | 860 ft. | AllTrails | ||
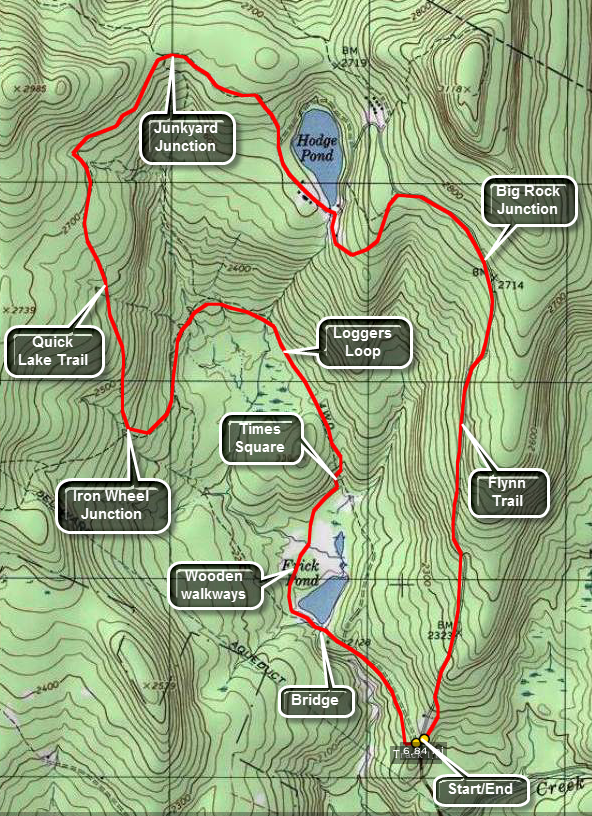 The area around Frick Pond, Hodge Pond and Quick Lake is covered with trails. There are numerous possibilities for short of long hikes. The area is "relatively" flat and there are no "views". There is, however, some beautiful scenery.
Take DeBruce Road from Livingston Manor for about six miles then turn left on Mongaup Rd. Where the road splits bear left on Beech Mountain Rd. and park in the parking lot on the left. From the larger parking lot find the Quick Lake Trail to walk out toward Hodge Pond. At the first junction bear left to Frick Pond and cross over the bridge at the outlet to the pond. At the next junction the Quick Lake Trail bears left. Bear right around the back of the pond. You will encounter some wooden walkways that can be very slippery even when there is no ice. The next junction is Times Square at about 1.0 mile into the hike. Turn left on the yellow Logger's Loop Trail to begin an a gentle ascent over the next 1.2 miles. At 2.25 miles you will be at Iron Wheel Junction where you will continue straight ahead on the red Quick Lake Trail. Over the next 1.5 miles you will gain about 435 feet in elevation to Junkyard Junction at the 3.7 mile mark. None of the climbing is very steep but it is continuous. At Junkyard Junction turn right on the blue Flynn Trail which is mostly flat with a descent ear the end. At the yellow gate bear to the right in the Flynn Trail and walk down to near the shore of Hodge Pond. Turn right and follow the Flynn Trail to the outlet end of Hodge Pond at about 4.5 miles. You may turn left and go around the back of the pond which has some nice views and adds only a little mileage to the hike. From the outlet continue on the Flynn Trail as it climbs to the highest point on the hike at the Big Rock Junction at the 5.2 mile mark. Continue straight ahead on the Flynn Trail which goes back DOWN to the parking area. Near the end of the trail just before the iron gate turn left into the woods and stay on the Flynn Trail. This avoids a small cabin which is usually occupied.
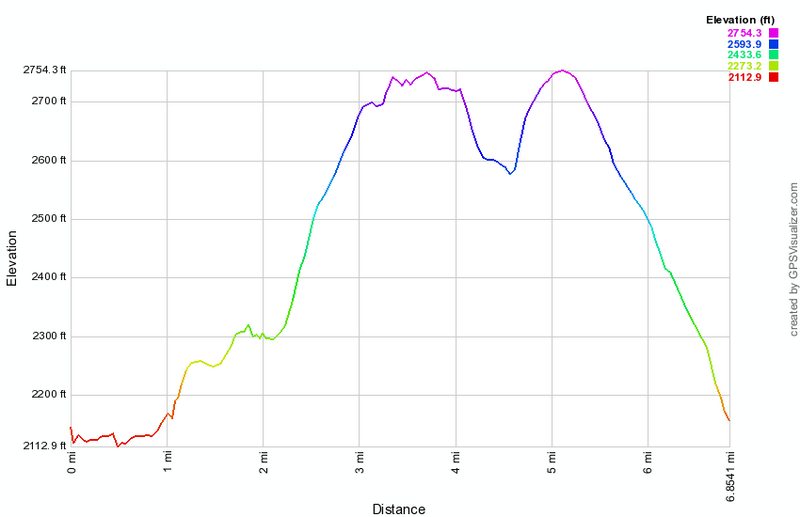
(The image above shows the profile of the hike. Remember that all vertical profiles are relative!)
Frick and Hodge Ponds: Flynn, Quick Lake, Logger's Loop and Big Rock Trails
| Quick Look | ||||
|---|---|---|---|---|
| Difficulty | Round trip | Total climb | Internet Maps | |
| 7.0 mi. | 915 ft. | AllTrails | ||
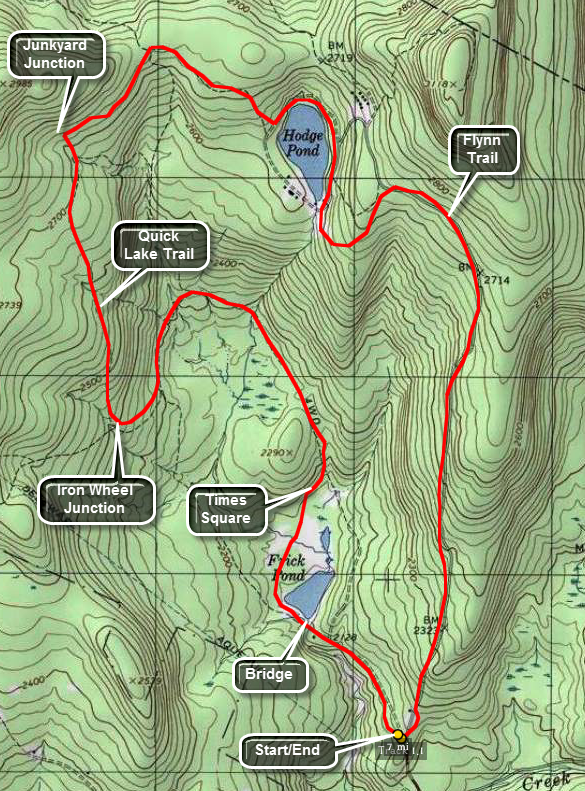 The area around Frick Pond, Hodge Pond and Quick Lake is covered with trails. There are numerous
possibilities for short of long hikes. The area is "relatively" flat and there are no "views".
There is, however, some beautiful scenery.
The area around Frick Pond, Hodge Pond and Quick Lake is covered with trails. There are numerous
possibilities for short of long hikes. The area is "relatively" flat and there are no "views".
There is, however, some beautiful scenery.
Take DeBruce Road from Livingston Manor for about six miles then turn left on Mongaup Rd. Where the road
splits bear left on Beech Mountain Rd. and park in the parking lot on the left. Walk across the road to find the blue Flynn Trail. This trail begins to gain elevation immediately until you reach the Big Rock Trail junction at 1.7 miles. Continue straight ahead and then bear left at the next intersection to head down to Hodge Pond at 2.3 miles. Walk to the right of the pond and up a hill on an unmarked jeep trail. Continue around the back of the lake and watch for the blue markings of the Flynn Train appear on your right at about 2.85 miles.Turn right on the Flynn Trail and walk to Junkyard Junction at 3.4 miles. Turn left on the red Quick Lake Trail which begins a long descent to Iron Wheel Junction at 4.8 miles. Continue your hike by walking straight ahead on the yellow Logger's Loop which descends to Times Square at 6.0 miles. Turn right to walk around the back of Frick Pond over a series of wooden walkways. The walkways pass over some very wet areas and are a great help but they can be VERY slippery. At the end of this short trail you will be back on the red Quick Lake trail and should turn left to the out let of Frick Pond at 6.6 Miles. From the bridge over the outlet turn right up the hill to follow the Quick Lake Trail back to your car. Just after the trail register be sure to turn right as the way straight ahead may take you to a private cabin.
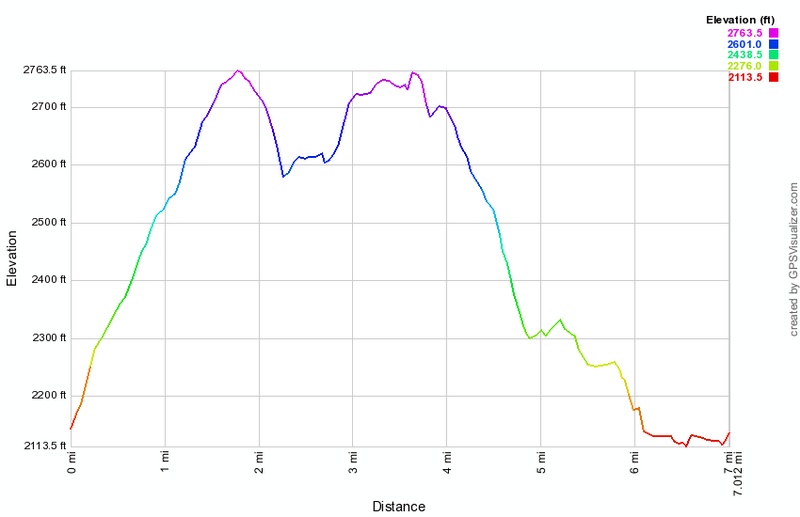
(The image above shows the profile of the hike. Remember that all vertical profiles are relative!)
Frick and Hodge Ponds: Quick Lake and Flynn Trails (back)
| Quick Look | ||||
|---|---|---|---|---|
| Difficulty | Round trip | Total climb | Internet Maps | |
| 6.7 mi. | 1000 ft. | AllTrails | ||
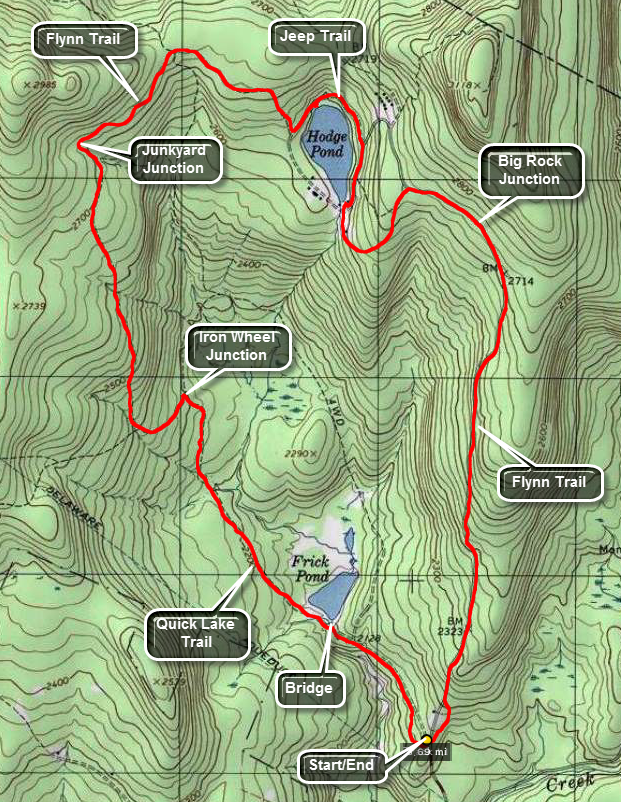 The area around Frick Pond, Hodge Pond and Quick Lake is covered with trails. There are numerous
possibilities for short of long hikes. The area is "relatively" flat and there are no "views".
There is, however, some beautiful scenery.
The area around Frick Pond, Hodge Pond and Quick Lake is covered with trails. There are numerous
possibilities for short of long hikes. The area is "relatively" flat and there are no "views".
There is, however, some beautiful scenery.
Take DeBruce Road from Livingston Manor for about six miles then turn left on Mongaup Rd. Where the road
splits bear left on Beech Mountain Rd. and park in the parking lot on the left. Find the red-blazed
Quick Lake trail and follow it for .5 miles to the junction with the yellow-blazed Logger's Loop.
Turn left to stay on the Quick Lake Trail. After .25 miles the Big Rock Trail will branch to the right.
Stay on the Quick Lake trail for another .85 miles to Iron Wheel Junction. Logger's Loop is to the right. Turn left to stay on the Quick Lake Trail for another 1.6 miles to Junkyard Junction. Now turn right onto the blue-blazed Flynn Trail. As you approach Hodge Pond, you may turn left and walk around the back of the pond to walk to the outlet in .6 miles Take some time to look at all the little "wonders of nature" the pond has to offer. Face the pond at the outlet and turn 180 degrees to continue on the Flynn Trail. Walk .7 miles and the Big Rock Trail will come in on your right. Continue
on the Flynn Trail for 1.7 miles until you are back at the Frick Pond Parking Area.

(The image above shows the profile of the hike. Remember that all vertical profiles are relative!)
Frick and Hodge Ponds: Quick Lake and Flynn Trails (front)
| Quick Look | ||||
|---|---|---|---|---|
| Difficulty | Round trip | Total climb | Internet Maps | |
| 6.1 mi. | 879 ft. | AllTrails | ||
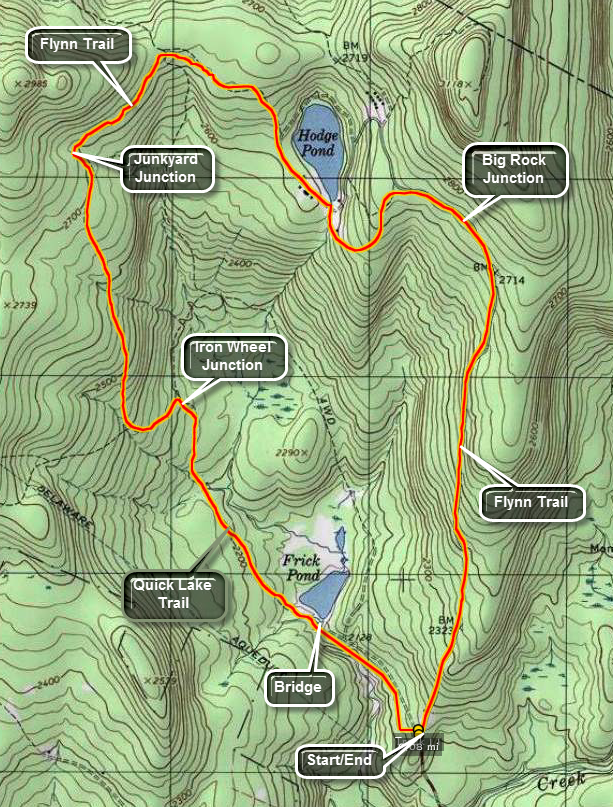 The area around Frick Pond, Hodge Pond and Quick Lake is covered with trails. There are numerous
possibilities for short of long hikes. The area is "relatively" flat and there are no "views".
There is, however, some beautiful scenery.
The area around Frick Pond, Hodge Pond and Quick Lake is covered with trails. There are numerous
possibilities for short of long hikes. The area is "relatively" flat and there are no "views".
There is, however, some beautiful scenery.
Take DeBruce Road from Livingston Manor for about six miles then turn left on Mongaup Rd. Where the road
splits bear left on Beech Mountain Rd. and park in the parking lot on the left. Find the red-blazed
Quick Lake trail and follow it for .5 miles to the junction with the yellow-blazed Logger's Loop.
Turn left to stay on the Quick Lake Trail. After .25 miles the Big Rock Trail will branch to the right.
Stay on the Quick Lake trail for another .85 miles to Iron Wheel Junction. Logger's Loop is to the right. Turn left to stay on the Quick Lake Trail for another 1.6 miles to Junkyard Junction. Now turn
right onto the blue-blazed Flynn Trail. As you approach Hodge Pond, turn right and you will be at the outlet after .4 miles. Take some time to look at all the little "wonders of nature" the pond has to offer. Face the pond at the outlet and turn 180 degrees to continue on the Flynn Trail. Walk .7 miles and the Big Rock Trail will come in on your right. Continue
on the Flynn Trail for 1.7 miles until you are back at the Frick Pond Parking Area.
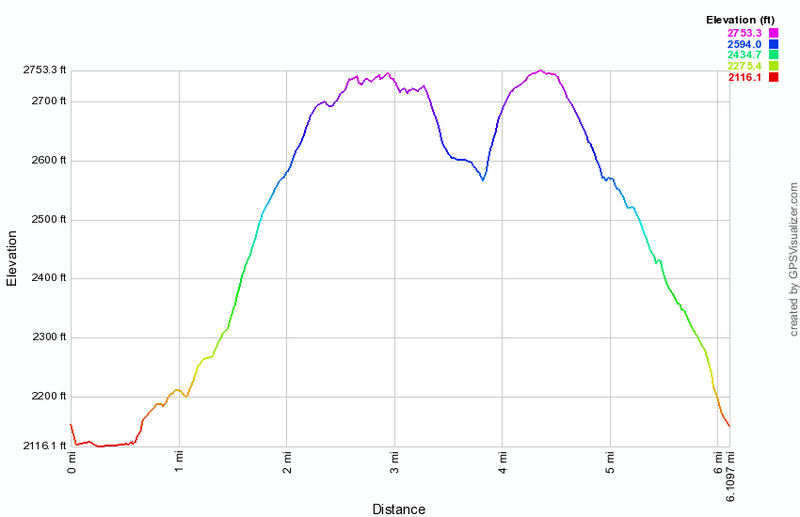
(The image above shows the profile of the hike. Remember that all vertical profiles are relative!)
Frick and Hodge Ponds: Quick Lake and Flynn Trails (jeep trail)
| Quick Look | ||||
|---|---|---|---|---|
| Difficulty | Round trip | Total climb | Internet Maps | |
| 6.4 mi. | 925 ft. | AllTrails | ||
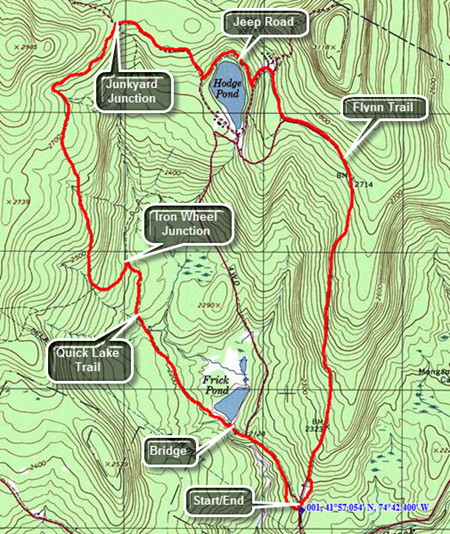 The area around Frick Pond, Hodge Pond and Quick Lake is covered with trails. There are numerous possibilities for short of long hikes. The area is "relatively" flat and there are no "views". There is, however, some beautiful scenery.
Take DeBruce Road from Livingston Manor for about six miles then turn left on Mongaup Rd. Where the road splits bear left on Beech Mountain Rd. and park in the parking lot on the left. Find the red-blazed Quick Lake trail and follow it for .5 miles to the junction with the yellow-blazed Logger's Loop. Turn left to stay on the Quick Lake Trail. After .25 miles a trail will branch to the right. Stay on the Quick Lake trail for another .85 miles to Iron Wheel Junction. The Logger's Loop is to the right. Turn left to stay on the Quick Lake Trail for another 1.6 miles to Junkyard Junction. Now turn right onto the blue-blazed Flynn Trail. As you approach Hodge Pond, turn left to walk around the back of the pond on an old jeep road. On the other side of the road at about 4 miles turn left and walk up the hill. At the next junction turn right and follow the woods road back out to the Flynn Trail. At 4.4 miles turn left on the Flynn Trail. By 4.7 miles you will be at the junction with the Big Rock Trail on the right and a snowmobile trail on the left. Continue on the Flynn Trail for 1.7 miles until you are back at the Frick Pond Parking Area.

(The image above shows the profile of the hike. Remember that all vertical profiles are relative!)
Frick and Hodge Ponds: Mongaup Pond
| Quick Look | ||||
|---|---|---|---|---|
| Difficulty | Round trip | Total climb | Internet Maps | |
| 7.6 mi. | 1150 ft. | AllTrails | ||
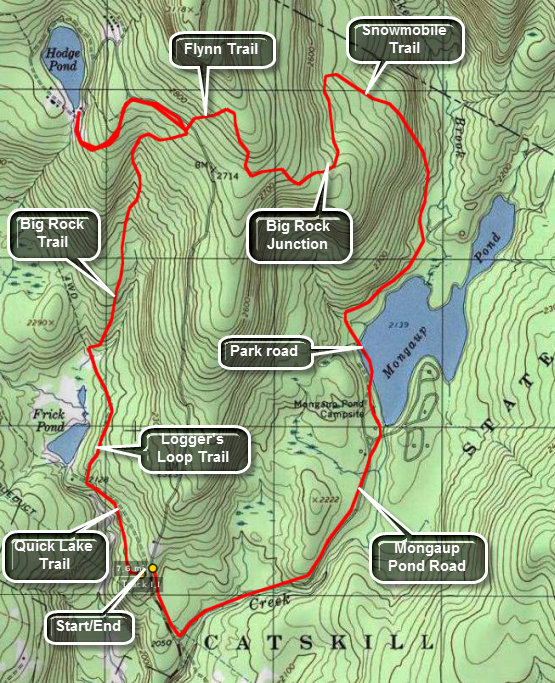 The area around Frick Pond, Hodge Pond and Quick Lake is covered with trails. There are numerous
possibilities for short of long hikes. The area is "relatively" flat and there are no "views".
There is, however, some beautiful scenery.
The area around Frick Pond, Hodge Pond and Quick Lake is covered with trails. There are numerous
possibilities for short of long hikes. The area is "relatively" flat and there are no "views".
There is, however, some beautiful scenery.
Take DeBruce Road from Livingston Manor for about six miles then turn left on Mongaup Rd. Where the road
splits bear left on Beech Mountain Rd. and park in the parking lot on the left. Find the red-blazed
Quick Lake trail and follow it for .5 miles to the junction with the yellow-blazed Logger's Loop.
If you turn left here, Frick pond is just .1 miles. Turn right on Logger's Loop and follow it for
.55 miles to Times Square. The name indicates that many trails cross at this point. Turn right here
onto the yellow-blazed Big Rock Trail. Continue on this trail for 1.1 miles until it crosses the
blue-blazed Flynn Trail. Several areas on Big Rock have significant but not severe climbs. Turn left
on the Flynn Trail and hike .45 miles to Hodge Pond. From here retrace the last .45 miles on the Flynn
Trail until the intersection with Big Rock Trail. Turn left onto the snowmobile trail and get ready for
a short climb. This trail meanders for about 2.3 miles until it intersects the paved Loop Road at the
Mongaup Pond State Campsite. Turn right on the loop road and walk about .75 miles to the gatehouse.
Walk out the access road for about 1.1 miles and make a right on Beech Mountain Road. After .3 miles,
you will be back at the Frick Pond Parking area.

(The image above shows the profile of the hike. Remember that all vertical profiles are relative!)
Frick and Mongaup Ponds: Road Loop Clockwise
| Quick Look | ||||
|---|---|---|---|---|
| Difficulty | Round trip | Total climb | Internet Maps | |
| 7.0 mi. | 1100 ft. | AllTrails | ||
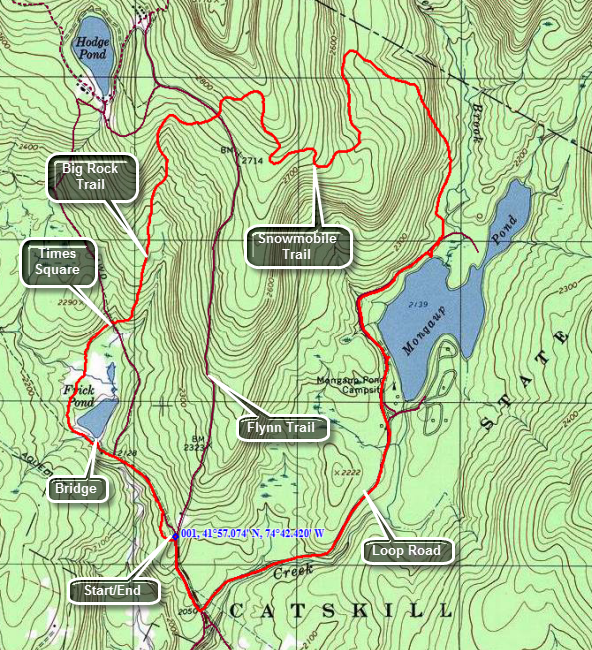 The area around Frick Pond, Hodge Pond and Quick Lake is covered with trails. There are numerous
possibilities for short of long hikes. The area is "relatively" flat and there are no "views".
There is, however, some beautiful scenery.
The area around Frick Pond, Hodge Pond and Quick Lake is covered with trails. There are numerous
possibilities for short of long hikes. The area is "relatively" flat and there are no "views".
There is, however, some beautiful scenery.
Take DeBruce Road from Livingston Manor for about six miles then turn left on Mongaup Rd. Where the road
splits bear left on Beech Mountain Rd. and park in the parking lot on the left. Find the red-blazed
Quick Lake trail and follow it for .5 miles to the junction with the yellow-blazed Logger's Loop.
Turn left here and walk to Frick Pond which is just .1 miles away. Cross the bridge at the outlet to Frick Pond. At the next trail junction bear right to go around the pond on the yellow-blazed trail. Walk to the next trail junction which is called Times Square as several trails cross here. You will be about 1.2 miles into the hike. Continue straight ahead on the Big Rock Trail and get ready for an ascent to the Flynn Trail. Over the next the next 1.1 miles you will gain 580 feet to the junction with the Flynn Trail. Continue straight ahead on the snowmobile trail and gain another 150 to the top of the hill and a long descent. The trail now heads south then east and then north before turning southeast and then south until it meets the loop road at Mongaup Pond. When you reach the loop road you will be at 4.6 miles and will have lost 735 feet from the top of the hill. Turn right ion the loop road and head toward the entrance to the campgrounds about a mile away. Walk out the road for 1.1 miles to the intersection with Beech Mountain Road. Turn right and head up a small hill and back to your car.
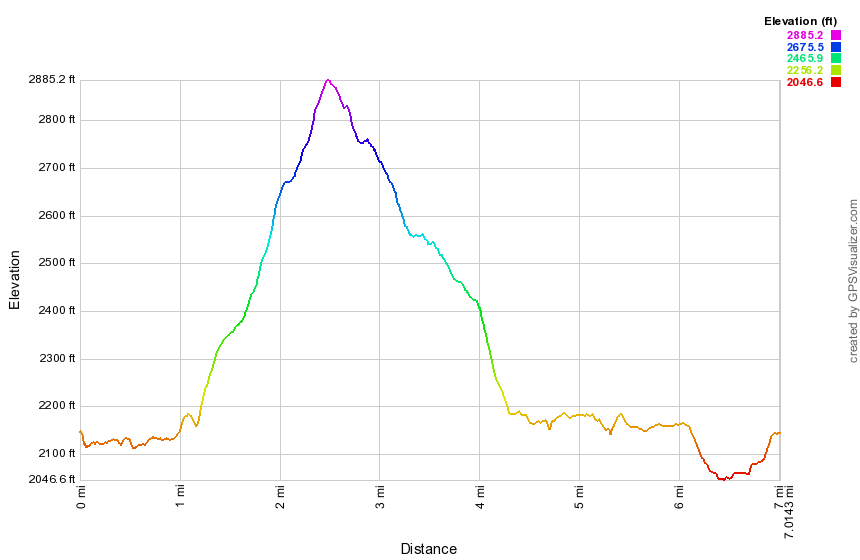
(The image above shows the profile of the hike. Remember that all vertical profiles are relative!)
Frick and Mongaup Ponds: Road Loop Counterclockwise
| Quick Look | ||||
|---|---|---|---|---|
| Difficulty | Round trip | Total climb | Internet Maps | |
| 7.0 mi. | 1100 ft. | AllTrails | ||
The area around Frick Pond, Hodge Pond and Quick Lake is covered with trails. There are numerous
possibilities for short of long hikes. The area is "relatively" flat and there are no "views".
There is, however, some beautiful scenery.
Take DeBruce Road from Livingston Manor for about six miles then turn left on Mongaup Rd. Where the road splits bear left on Beech Mountain Rd. and park in the parking lot on the left. Walk back down Beech Mountain Road toward the intersection with the road to Mongaup Pond. Turn left and walk mostly uphill and parallel to the outlet stream from the pond. At the park entrance, walk through the entrance and stay left to take the road on the west side of the pond. About a quarter mile from the entrance there is an observation deck on the right with nice views of the pond. Continue on the road and in a short distance there is another nice place to take pictures on the pond. There is a bench here if you want to relax and take a break. Back on the road walk a few hundred feet up the road and turn left onto an access road and then quickly left again onto the snowmobile trail. The trail in this area passes by a swampy area and is often wet with numerous insects. At 2.7 miles the trail begins to head northwest instead of north and then the climb begins. At 3.3 miles the trail makes a sharp turn and starts heading south but continues to climb. Another turn at 3.7 miles sends you eastward toward the Flynn Trail. At 4.1 miles the trail turns north continuing its meanders. At 4.5 miles two things happen as the trail turns east again and finally reaches the high point on the hike. You will have ascended over 700 feet in 1.8 miles! Continue over the top and down to the junction with the Flynn and Big Rock Trails. Continue straight ahead on the Big Rock Trail. There are three places where the trail drops quickly and then levels off. The last place brings you to Times Square where the Logger's Loop and Big Rock Trail cross. This area is almost always wet. Walk straight across Time Square to continue on the Big Rock Trail around the back of Frick Pond. This trail can be wet in places. Cross two bridges across the inlet stream, After the bridges there are some wooden walkways which are slippery when wet. These walkways are in bad shape as the support underneath them continues to rot away. My concerns to the DEC have so far gone unanswered. Without these walkways the hike would be considerably less enjoyable! Arrive at the end of the Big Rock Trail at the Quick Lake Trail and turn left to head toward the bridge at the outlet of Frick Pond. When you arrive at the bridge, take some time to enjoy a beautiful scene. The highest ground in the distance and on the right is Flynn's Point which may be the highest point in Sullivan County. When you are done, head up the hill and out the Quick Lake Trail to the car. At Gravestone Junction simply continue straight ahead on the red blazed Quick Lake Trail. The trail may be wet in some places but should be easy to walk around. At the register, turn right and walk out the Quick Lake Trail to the larger parking area and back to your car.
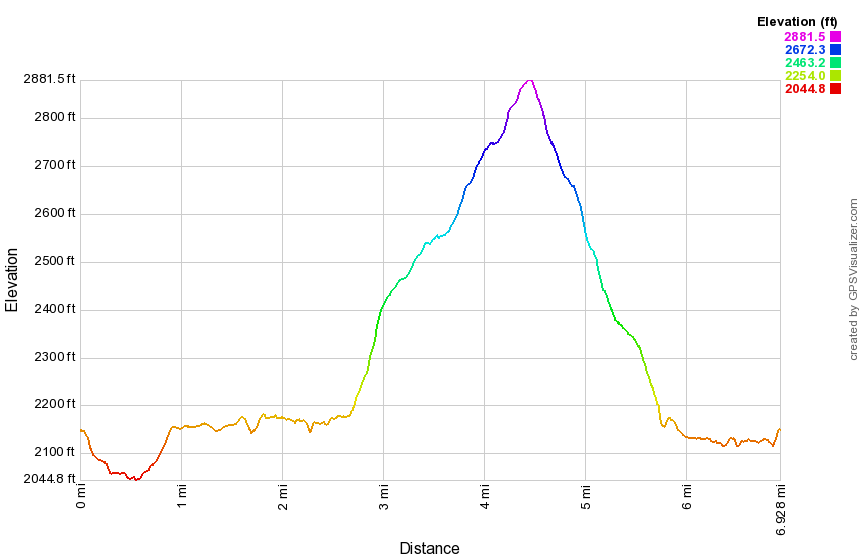
(The image above shows the profile of the hike. Remember that all vertical profiles are relative!)
Frick and Mongaup Ponds: Quick Lake, Logger's Loop and Big Rock Trails
| Quick Look | ||||
|---|---|---|---|---|
| Difficulty | Round trip | Total climb | Internet Maps | |
| 8.5 mi. | 1260 ft. | AllTrails | ||
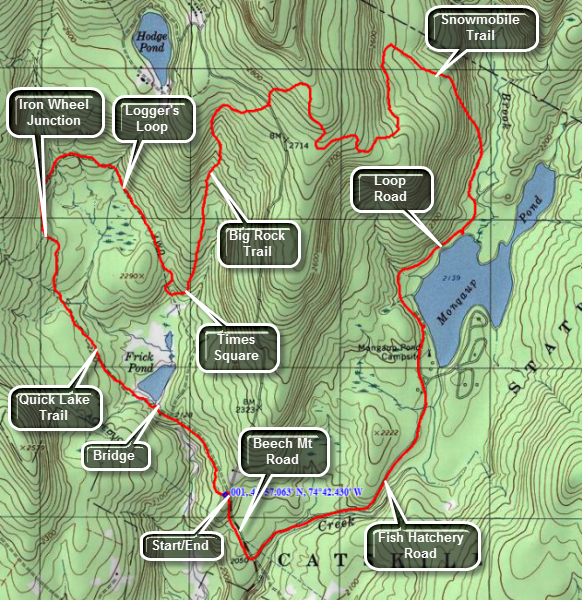 The area around Frick Pond, Hodge Pond and Quick Lake is covered with trails. There are numerous
possibilities for short of long hikes. The area is "relatively" flat and there are no "views".
There is, however, some beautiful scenery.
The area around Frick Pond, Hodge Pond and Quick Lake is covered with trails. There are numerous
possibilities for short of long hikes. The area is "relatively" flat and there are no "views".
There is, however, some beautiful scenery.
Take DeBruce Road from Livingston Manor for about six miles then turn left on Mongaup Rd. Where the road
splits bear left on Beech Mountain Rd. and park in the parking lot on the left. Find the red-blazed
Quick Lake trail and follow it for .5 miles to the junction with the yellow-blazed Logger's Loop.
Turn left here and go to the bridge at the outlet Frick Pond. Cross the bridge and bear to the left at the trail junction to stay on the Quick Lake Trail. Continue on the Quick Lake trail to Iron Wheel Junction at 1.5 miles into the hike. Turn to the right to get on the yellow-blazed Logger's Loop Trail. The trail rolls some with a descent near the end. After 1.2 miles, you will be at Times Square. Turn left here at start up the Big Rock Trail which ascends 600 feet in 1.1 miles until it meets the Flynn Trail. Continue straight ahead on the snowmobile trail and continue your ascent to the highest point on the hike at about 2850 feet. The snowmobile trail now descends to the shore on Mongaup Pond. The distance "as the crow flies" is less than a mile but the trail is routed to avoid ledges that a snowmobile could not negotiate. Over 1.9 miles the trail drops about 700 feet. Turn right on the loop road and walk a mile to the gatehouse. Walk 1.1 miles to the junction with Beech Mountain road. Turn right and walk .25 miles back to the car.
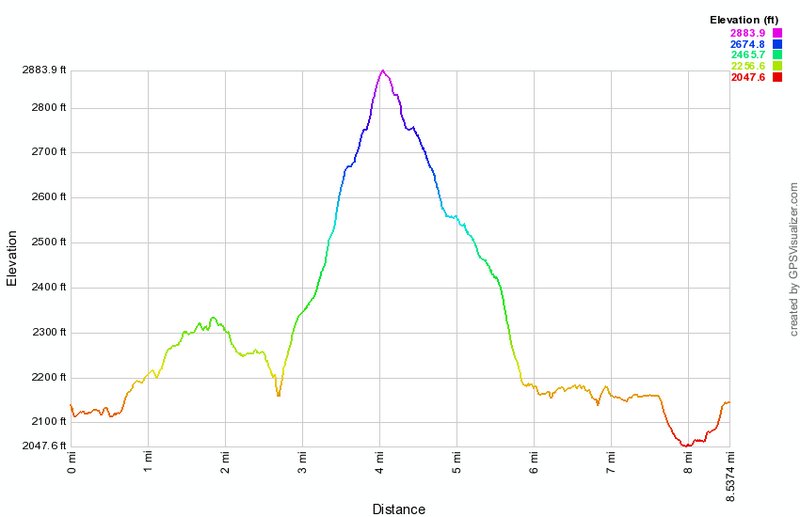
(The image shows the profile of the hike. Remember that all vertical profiles are relative!)
Frick and Mongaup Ponds: Quick Lake, Logger's Loop, Big Rock and Snowmobile Trails
| Quick Look | ||||
|---|---|---|---|---|
| Difficulty | Round trip | Total climb | Internet Maps | |
| 10.6 mi. | 1922 ft. | AllTrails | ||
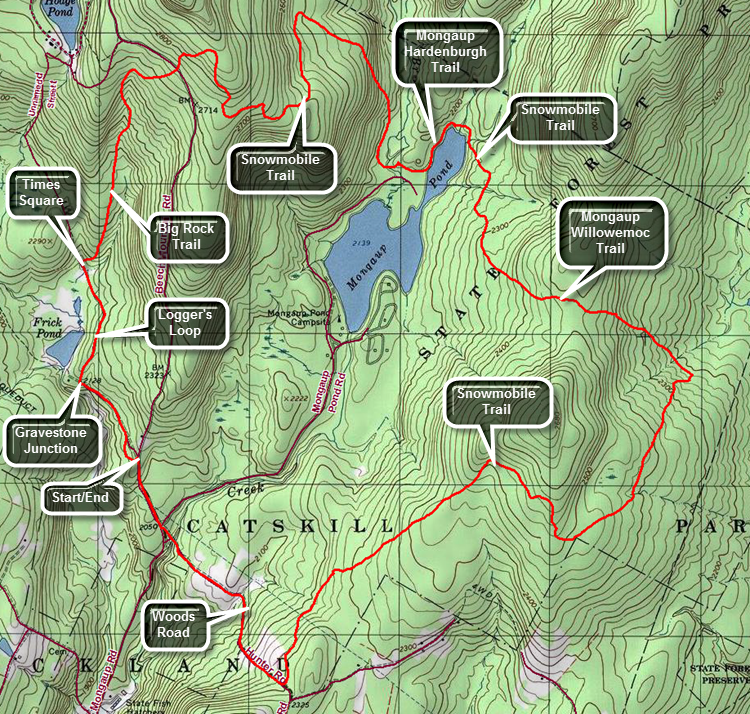 The area around Frick Pond, Hodge Pond and Quick Lake is covered with trails. There are numerous possibilities for short of long hikes. The area is "relatively" flat and there are no "views". There is, however, some beautiful scenery.
Take DeBruce Road from Livingston Manor for about six miles then turn left on Mongaup Rd. Where the road splits bear left on Beech Mountain Rd. and park in the parking lot on the left. Find the red-blazed Quick Lake trail and follow it for .5 miles to the junction with the yellow-blazed Logger's Loop. At Gravestone Junction turn right to walk the Logger's Loop to Times Square. Turn right to take the Big Rock Trail up to the junction with the Flynn Trail. The hike up the hill is about 1.1 miles and gains 600 feet. At the Flynn Trail continue straight ahead on the snowmobile trail as it heads liver to Mongaup Pond. The first part of the snowmobile trail gains some elevation to a high point. The 2.25 mile walk to Mongaup Pond is mostly downhill after cresting the hill. There isn't much to see along the way but the walk is pleasant enough. You will arrive at the loop road at about 4.3 miles. Turn left to walk the road to the blue Mongaup Hardenburgh Trail marked after a short distance by a sign. Turn left to follow the trail north around the upper part of the pond. At the head end of the pond the Mongaup Hardenburgh Trail turns slightly left to head north toward Hardenburgh and the Beaverkill Road. Stay on the path around the pond which is also a snowmobile trail. Walked about half a mile on a slight uphill to the junction with the yellow. Mongaup Willowemoc Trail. This trail starts out pretty flat but in a very short distance ascends and the descends a hill. At 6.5 miles arrive at Butternut Junction where the Mongaup Willowemoc Trail continues southeast to Willowemoc. Turn right on the snowmobile trail which is named the Azeala Loop. It heads mostly southwest and back toward the Mongaup Road. This trail meanders back and forth and is fairly long. Keep hiking as the trail turns one way and then the other. After hiking 2.9 miles from Butternut Junction you will arrive at a woods road that was once a public road between the Mongaup Road and Terwilliger Road. Turn right and begin hiking downhill for the next .8 miles. Downhill should be fun and relaxing but numerous rocks and washouts along the trail made this downhill harder. Cross the small bridge that spans Mongaup Creek, and walk out to the road and up Beech Mountain Road back to your car.

(The image the profile of the hike. Remember that all vertical profiles are relative!)
Friday View
| Quick Look | ||||
|---|---|---|---|---|
| Difficulty | Round trip | Total climb | Internet Maps | |
| 2.3 mi. | 1500 ft. | AllTrails | ||
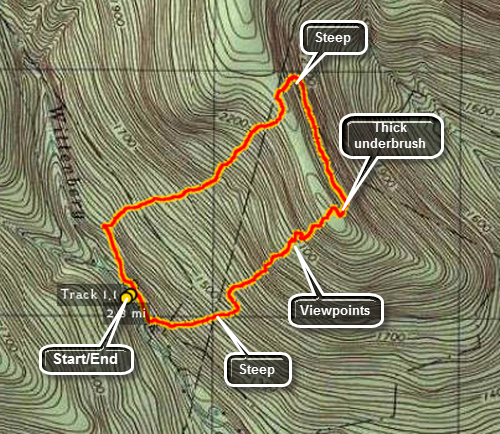 From Grahamsville, turn onto Route 52A near the TriValley School. Stay on the road until the hamlet of Sundown where
the road turns left. Bear to the right on Peekamoose Rd. and continue on the road looking for Moonhaw Rd.
on the left. From Route 28, turn west on Route 28A and then head south. Turn right and head west on Watson Hollow Road, the road that goes to Peekamoose and Sundown. Watch for Moonhaw Road on the right after about mile. Turn onto Moonhaw Rd. and drive to the end. Park on the right just before the gates to the private driveway.
From Grahamsville, turn onto Route 52A near the TriValley School. Stay on the road until the hamlet of Sundown where
the road turns left. Bear to the right on Peekamoose Rd. and continue on the road looking for Moonhaw Rd.
on the left. From Route 28, turn west on Route 28A and then head south. Turn right and head west on Watson Hollow Road, the road that goes to Peekamoose and Sundown. Watch for Moonhaw Road on the right after about mile. Turn onto Moonhaw Rd. and drive to the end. Park on the right just before the gates to the private driveway.
Since this is a bushwhack all the way your route may vary. From the parking area, cross Wittenberg Brook and turn right to walk parallel to the brook on a woods road for about .1 miles. Turn left and UP the mountain. The climb will be steep no matter what route you pick and there will be some rock scrambles and some ledges to negotiate. As you climb be sure to stop occasionally and look behind you for views of Friday and Balsam Cap. You may even get a view of the cabin on the shoulder of Friday. Your views will depend on the season and the leaf coverage. As you near the top of the unnamed mountain the underbrush gets VERY thick. It is almost impossible to push across the ridge to the northwest. Continue north or a little northeast to drop down off the ridge. You may find a woods road or path on the other side. Walk about .4 miles or so and then head back up and over the ridge in a generally southwest direction. long this walk you may have views of Samuel's Point. As you hit the top of the ridge push back through the brush and head for the edge of the ledges. Start to work your way down the hill north of your ascent route. This route is less steep and has less brush. You may find a woods road or two along the way. Once you are near Wittenberg Brook turn left or southeast to follow the brook back to the parking area.
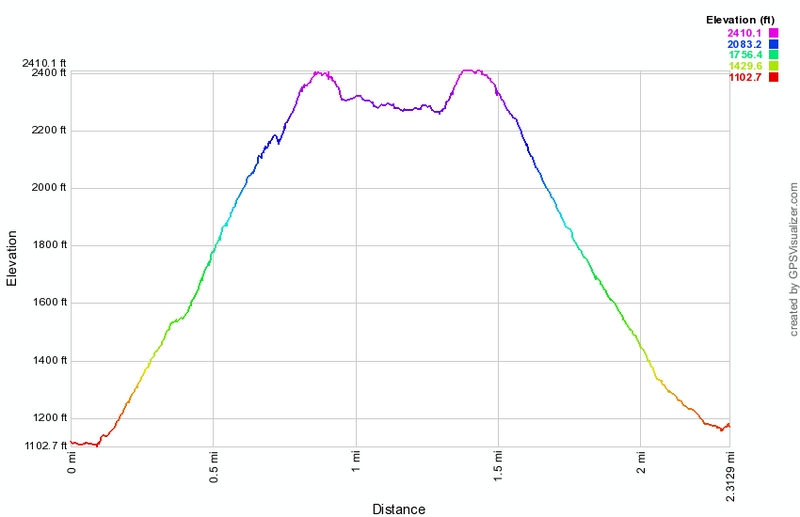
(The image at the left shows the profile of the hike.)
Giant Ledge
| Quick Look | ||||
|---|---|---|---|---|
| Difficulty | Round trip | Total climb | Internet Maps | |
| 3.2 mi. | 1190 ft. | AllTrails | ||
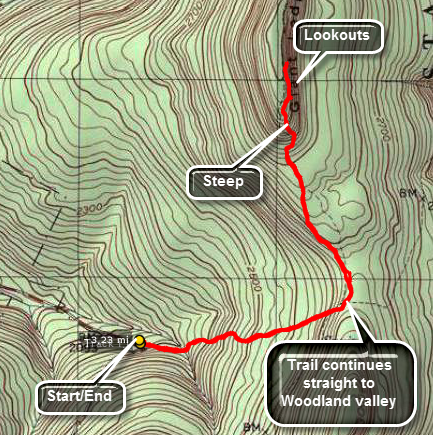 Park at the trailhead on the Frost Valley Road just after Winnisook Lake on the hairpin turn. Find
the yellow-blazed Phoenicia-East Branch trail and hike .65 miles to the blue-blazed Giant Ledge -
Panther Mountain Trail. This ascent is rather gradual with a few short, steep areas thrown in. After
about .75 miles, you reach Giant Ledge. Here there are a series of ledges that look to the east and
offer a view of Wittenberg and Slide. The return hike simply reverses the trip out. The total distance
is just over 3 miles making it perfect to get into shape.
Park at the trailhead on the Frost Valley Road just after Winnisook Lake on the hairpin turn. Find
the yellow-blazed Phoenicia-East Branch trail and hike .65 miles to the blue-blazed Giant Ledge -
Panther Mountain Trail. This ascent is rather gradual with a few short, steep areas thrown in. After
about .75 miles, you reach Giant Ledge. Here there are a series of ledges that look to the east and
offer a view of Wittenberg and Slide. The return hike simply reverses the trip out. The total distance
is just over 3 miles making it perfect to get into shape.
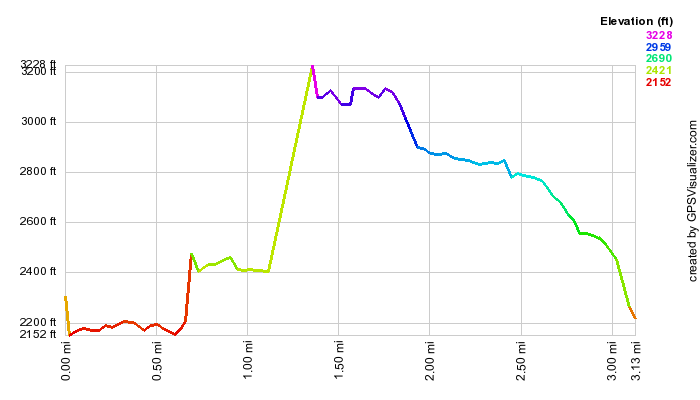
(The image above shows the profile of the hike. This profile only reflects the hike out to Giant Ledge. The hike back is the same only in reverse; descending rather than ascending.)
Giant Ledge with bushwhack
| Quick Look | ||||
|---|---|---|---|---|
| Difficulty | Round trip | Total climb | Internet Maps | |
| 4.5 mi. | 1437 ft. | AllTrails | ||
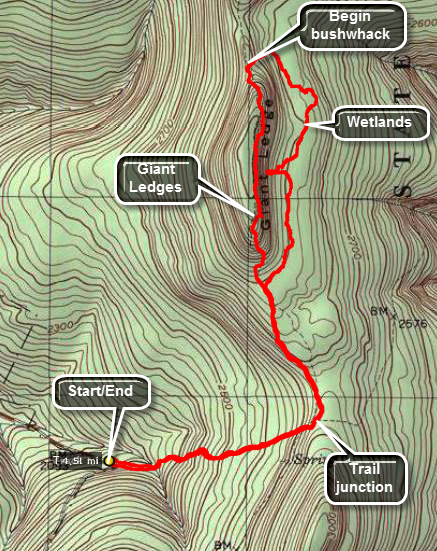 Park at the trailhead on the Frost Valley Road just after Winnisook Lake on the hairpin turn. Find
the yellow-blazed Phoenicia-East Branch trail and hike .65 miles to the blue-blazed Giant Ledge -
Panther Mountain Trail. This ascent is rather gradual with a few short, steep areas thrown in. After
about .75 miles, you reach Giant Ledge. Here there are a series of ledges that look to the east and
offer a view of Wittenberg and Slide. Continue on the trail until you are in the col, the lowest point between Giant Ledge and Panther. Turn right to begin your bushwhack and walk down the slope to an area of flat ground at the base of the ridges. This is an interesting place to explore. There are several wetlands areas that are interesting. You can work your way up to the base of the cliffs and even climb up on the debris below. Keep heading on a course parallel to the cliffs and you will soon be back on the main trail back to the car. . The total distance
is just over 4.5 miles making it perfect to get into shape.
Park at the trailhead on the Frost Valley Road just after Winnisook Lake on the hairpin turn. Find
the yellow-blazed Phoenicia-East Branch trail and hike .65 miles to the blue-blazed Giant Ledge -
Panther Mountain Trail. This ascent is rather gradual with a few short, steep areas thrown in. After
about .75 miles, you reach Giant Ledge. Here there are a series of ledges that look to the east and
offer a view of Wittenberg and Slide. Continue on the trail until you are in the col, the lowest point between Giant Ledge and Panther. Turn right to begin your bushwhack and walk down the slope to an area of flat ground at the base of the ridges. This is an interesting place to explore. There are several wetlands areas that are interesting. You can work your way up to the base of the cliffs and even climb up on the debris below. Keep heading on a course parallel to the cliffs and you will soon be back on the main trail back to the car. . The total distance
is just over 4.5 miles making it perfect to get into shape.
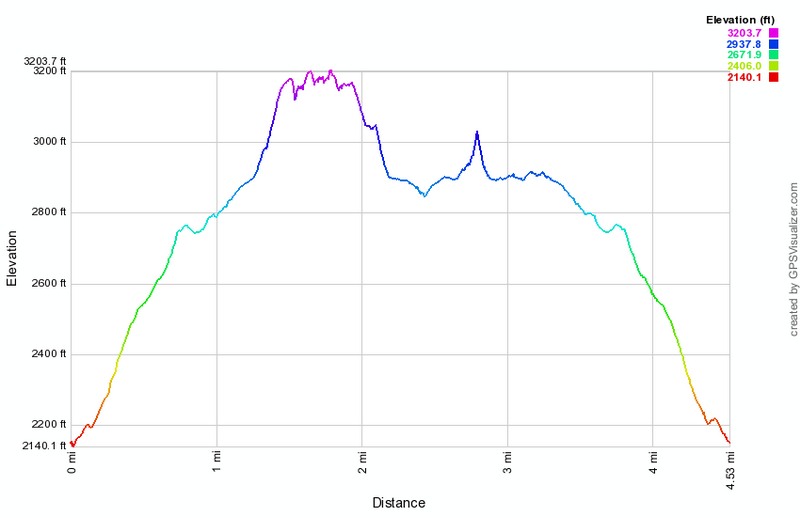
(The image below shows the profile of the hike.)
Gifford Hollow to Willsie Road
| Quick Look | ||||
|---|---|---|---|---|
| Difficulty | Round trip | Total climb | Internet Maps | |
| 6.8 mi. | 830 ft. | AllTrails | ||
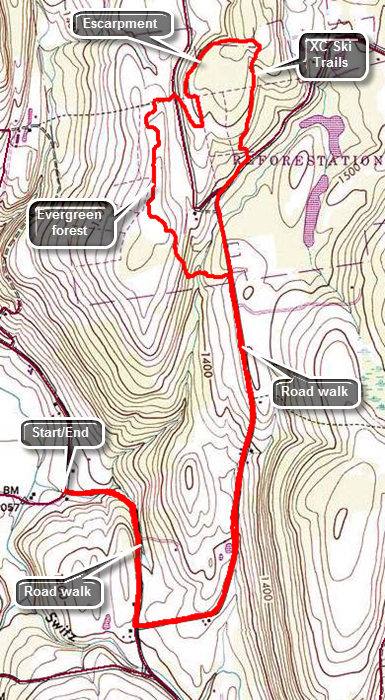
Follow Route 30 into Middleburgh and turn right to head east on Route 145 to Cotton Hill Road just outside of town. Turn left on Cotton Hill Road and drive 8.3 miles to Route 443, the Helderburg Trail. Make a left and drive 1.3 miles to Switz Kill Road (CR-1). Turn right and follow it 4.0 miles to Gifford Hollow Road on the right. Park on the shoulder of the road at the intersection. Start by walking south on Switz Kill Road for about .7 miles. Turn left onto Willsie Road which is flat momentarily and then begins to climb gently up a hill. As you climb up the hill and reach the top at 1.8 miles there are nice views across Partridge Run to the Catskills. Continue to walk along the road. At 2.1 miles the blazes on a telephone pole indicate a left turn. There seems to be a woods road on the left but just passed this the trail turned into the woods. Walk uphill and then down through some stands of pine and spruce with hardwoods between them. There are several stone walls to cross. At 3.1 miles cross Irish Hill Road where there is a shale pit and room to park a few cars. The trail ascends briefly and the aqua blazes share the trees with state cross country ski trail markers. As you walk along the trail pay attention to the blazes as there are numerous woods roads, trails and ski trails that cross the path. In general, the aqua blazes are good enough to guide your course. Begin to walk along an escarpment at about 3.3 miles. Cross several more stone walls as you reach the highest point on the hike at 3.75 miles. Here it looks as if the trail continues straight ahead but the blazes lead to the right. Start to descend through some pines until you intersected Woolsie Road at 4.2 miles. Turn right on Willsie Road to hike back to the car.
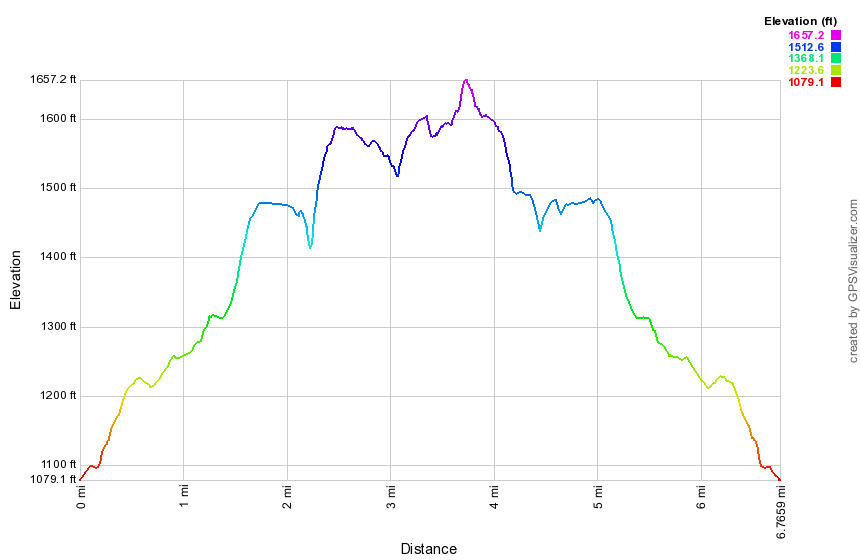 (The image at the left shows the profile of the hike. Remember that all vertical profiles are relative!)
Giggle Hollow
| Quick Look | ||||
|---|---|---|---|---|
| Difficulty | Round trip | Total climb | Internet Maps | |
| 5.2 mi. | 1575 ft. | AllTrails | ||
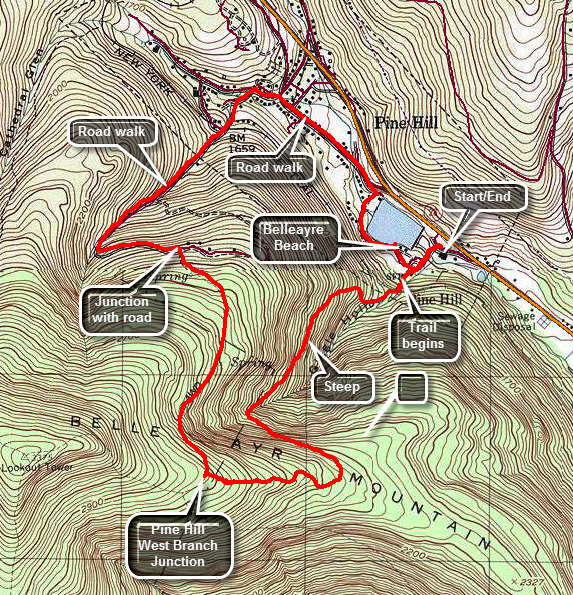 From Route 28 turn west on Friendship Road just southeast of Pine Hill. Drive to the covered bridge. If the gate is open, drive across and park in the lot near the top of the hill. If the gate is closed, park on Friendship Road southeast of the access road across the bridge. Walk across the bridge and up the access road to where the road turns right. Continue straight ahead to an area that had a pavilion. Walk to the back of the area where there is a register box at the beginning of the trail which is blazed accessional with blue discs. There are also signs indicating distances to various points. The trail passes directly under railroad tracks that run across a bridge.As you start up the trail realize that UP is the most important word since for the next .9 miles the trail follows a woods roads to the southwest averaging a 20% grade. The trail is marked as unmaintained on the maps and this is a good description. The woods road is rocky and a layer of slippery leaves can add to the difficulty of the climb. The blue trail markers are few and are often missing when another trail or road branches off. There can be quite a bit of blowdown on the trail which can be navigated around but certainly doesn't add to the enjoyment of the experience. At 1.1 miles the trail turns 90 degree to the left to head southeast. The trail continues to climb but at a gentler grade to 1.5 miles where it turns to the west. The grade now is more shallow at this point. After about .25 miles the trail opens up and the area may be filled with briars. It is difficult to tell where the trail goes but look carefully ahead to find the next blue marker. Keep heading west to find the trail junction. Turn right and head down the Pine Hill West Branch Trail toward Pine Hill. For the next .9 miles follow the trail as it heads north and down the mountain. At just passed 3 miles the trail meets a dirt road. Turn left onto the road to follow it west as it continues to descend. At 3.4 miles the road turns to the northeast and at 3.7 miles the paved road known as Woodchuck Hollow Road begins. Watch for a gated road or driveway on the right complete with stone pillars. Walk under the railroad bridge on Mill Street.Turn right on Bonnieview Avenue and then right onto Main Street. It is only a short walk down Main Street to Lake Street. At the end of Lake Street walk passed the gate and onto the road that leads back to Belleayre Beach. After a short walk the lake comes into view with a white sand beach and small building. Visit the beach if you would like then walk across the parking lot to complete the loop. Follow the road won the hill to the left and across the covered bridge to your car.
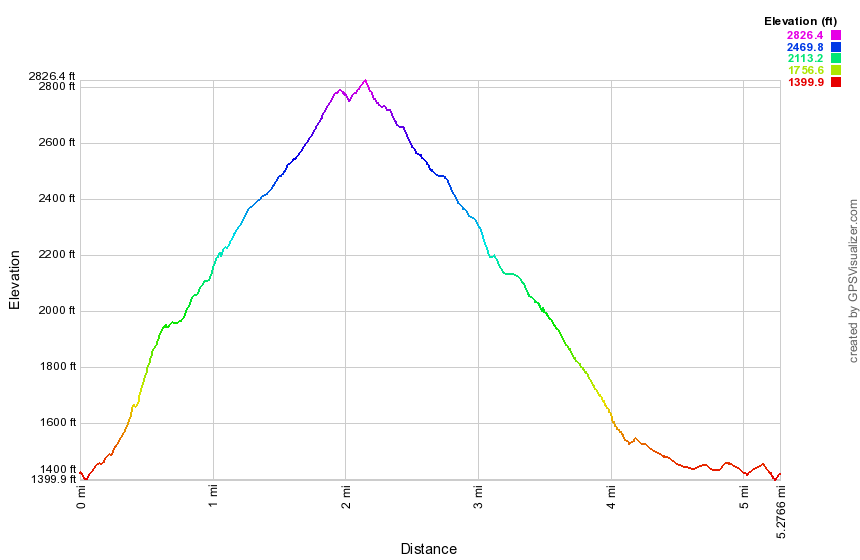
(The image below shows the profile of the hike.)
Glenwood Rd to Route 94
| Quick Look | ||||
|---|---|---|---|---|
| Difficulty | Round trip | Total climb | Internet Maps | |
| 7.7 mi | 1070 ft | AllTrails | ||
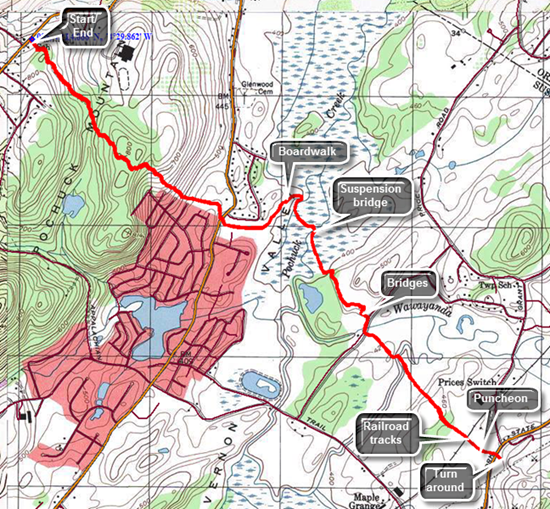
Drive over the New York New Jersey line on the Pulaski Highway which soon become Route 517. Watch for a right hand turn onto Route 565 which is Glenwood Road. Pass Vernon Township High School on the left with a blinking light. About .4 miles after this, the AT crosses the road with a small pulloff on the right. If you reach Glenwood Mountain Road, you have gone too far. Cross the street and walk up the wooden stairs to get on the AT. The first .9 miles of trail heads southeast through some hardwood forest. You will gain a little elevation and then lose it as you pass by Vernon Township High School. You may be able to hear students on the athletic fields and you will cross several paths or ATV tracks. After gaining the top of a small hill, there is a continuous descent for the next .7 miles which results in losing 385 feet to where the trail crosses Route 517. As you reach the road you may find a number of cars parked along the shoulder. The Pochuck Boardwalk is very popular. Cross the road to start the boardwalk. The boardwalk is an impressive feat as it is a sturdy structure that crosses Pochuck Marsh and Pochuck Creek. It stretches about a mile and has a suspension bridge that spans the creek. The boardwalk is two to three feet above the level of the marsh and is supported by steel pipes driven into the underlying strata. Occasional steel cables tether the structure in place. The vegetation along the edges of the walk is usually trimmed back in all places where it is possible. The boardwalk stops where the trail enters the woods and then begins on the other side. Watch for red-winged blackbird, turtles, snakes and many other animals. At 2.3 miles you will approach Pochuck Creek which is spanned by a suspension bridge. This is a truly remarkable structure which stands at least 15 feet above the level of the creek. It is well-anchored on both ends and has sturdy cables which hold the deck in place. Continued along the boardwalk until it enters the woods on the other side of the swamp. The trail remains flat and crosses a small stream on a bridge and then crosses Wawayanda Creek on a larger bridge. You will come to a path which looks like a rail trail and is marked as Canal Road on most maps. Turn right and walk a few feet to where the trail turns off to the left. There are some wet areas between you and Route 94 which are crossed by puncheons. At 3.7 miles cross the Conrail tracks. Stiles are provided to cross the fencing that was erected on either side of the tracks but the parade of hikers has pushed the fence aside making them unnecessary. On the other side of the tracks is an open field with Route 94 just beyond. The field can be pretty wet and puncheons stretch across it almost to the road. On the other side of the road is Wawayanda Mountain. When you reach the road, you may turn around or cross to the parking area on the other side and read the sign board. When you are ready, turn around and reverse your route to get back to the car.
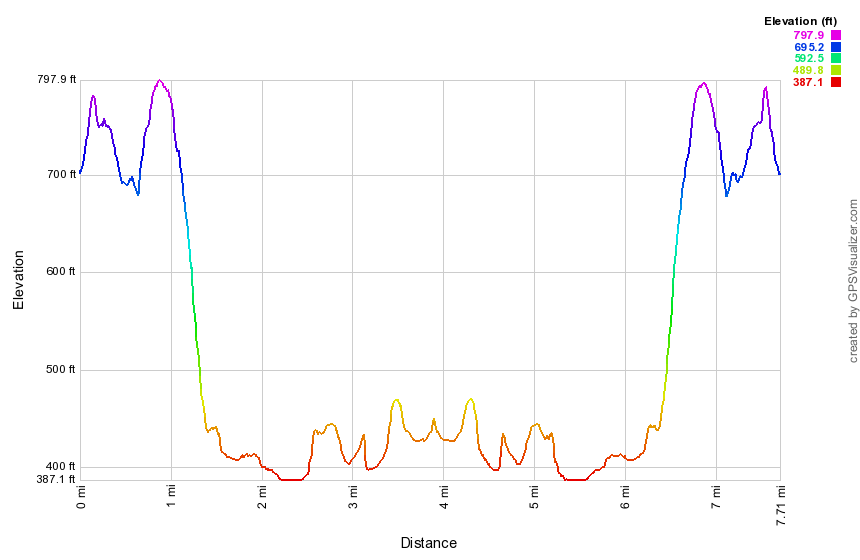 (The image at the left shows the profile of the hike. Remember that all vertical profiles are relative!)
Glenwood Rd to Wallkill Refuge
| Quick Look | ||||
|---|---|---|---|---|
| Difficulty | Round trip | Total climb | Internet Maps | |
| 9.7 mi | 1960 ft | AllTrails | ||
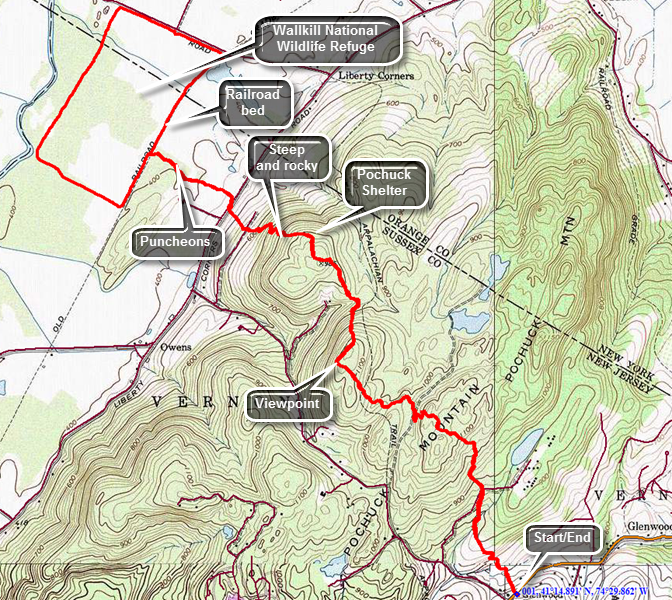
Drive over the New York New Jersey line on the Pulaski Highway which soon becomes Route 517. Watch for a right hand turn onto Route 565 which is Glenwood Road. Pass Vernon Township High School on the left with a blinking light. About .4 miles after this, the AT crosses the road with a small pulloff on the right. If you reach Glenwood Mountain Road, you have gone too far. The first .1 miles is a slight downhill and there are some puncheons over marshy ground before an ascent of about 1 mile. At about .6 miles the trail we crosses a dirt road labeled Louemma Lane. Continue to hike to the top of a small hill gaining almost 500 feet in the first mile. After a slight drop, you will again gain about the same elevation and come to a lookout. The viewpoint is limited but you can see what looks like a marsh below. This is the Wallkill National Wildlife Refuge. The trail travels mostly through hardwood forest and is a mixture of packed dirt in some spots and rocky traverses in others. From the viewpoint the trail starts a gentle descent which turns into a steeper, rockier descent a little further on. You will lose over 500 feet of elevation in just .6 miles. The trail crosses Lake Wallkill Road and then runs about .5 miles through a rather damp area. Puncheons elevate the trail out of the marshy ground for a good part of this distance. At the end you will come to a wide "road" on the edge of a marsh. The trail turns left here and follows an old railroad grade for .25 miles before turning right. Continue around the marsh and after about .5 miles make another right turn. At about 5 miles make another right turn onto a path that parallels Oil City Road. The path along the road is about .5 miles. At the end make a right turn back onto the railroad grade. In another .5 miles you will be back at the spot where the AT comes out of the woods. Turn left and head back toward the car. Most of the climbs are easier than they were as descents. There isn't too much remarkable along the trail but you might stop at the viewpoint again. Return to the car by retracing your route from earlier
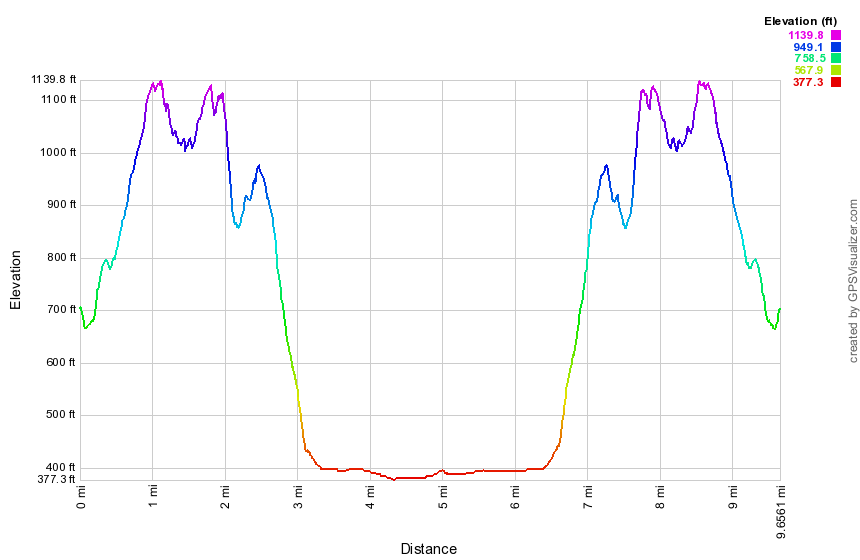 (The image at the left shows the profile of the hike. Remember that all vertical profiles are relative!)
Greystone Fire Tower
| Quick Look | ||||
|---|---|---|---|---|
| Difficulty | Round trip | Total climb | Internet Maps | |
| 0 mi | 0 ft | AllTrails | ||
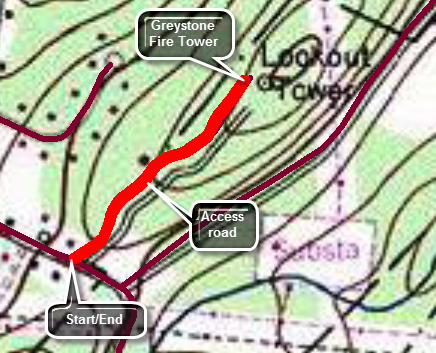
This was a hard tower to find but an easy one to hike. There is an access road that goes directly to the tower. The map and profiles here show parking at then of the access road but this is not really necessary. At 92 feet Greystone is the tallest tower in New Jersey. From Route 10 heading east toward Denville turn right on Miller Mountain Road. After only .25 miles, bear right on Zeek Road. Follow Zeek Road until it ends at Casterline Road. Turn right on Casterline and then right again on the unmarked access road. Drive to the end of the road and park near the tower. You will have to visit this tower during fire season as it is fenced and cannot be climbed unless an observer is present.
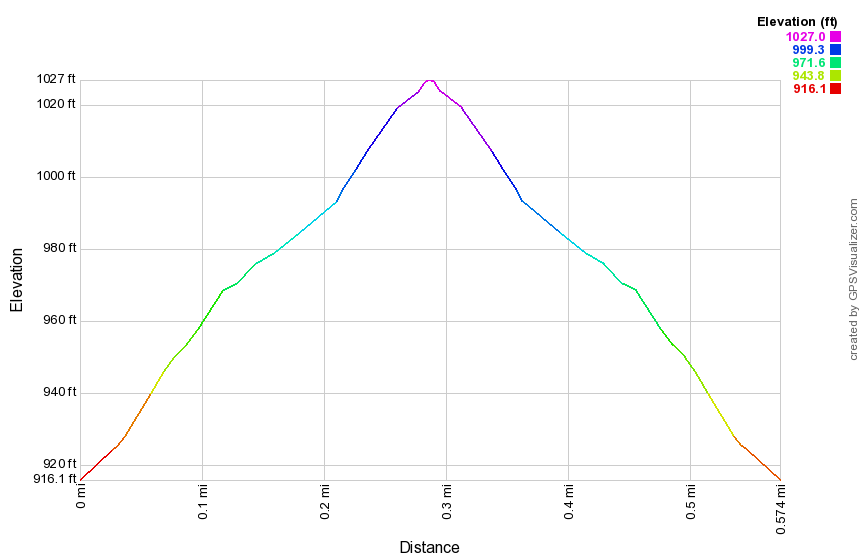 (The image at the left shows the profile of the hike. Remember that all vertical profiles are relative!)
Hanging Rock Falls
| Quick Look | ||||
|---|---|---|---|---|
| Difficulty | Round trip | Total climb | Internet Maps | |
| .5 mi. | 250 ft. | AllTrails | ||

The Falls is located on Ulster Heights Road in Greenfield Park just west of Evansville. There IA a small parking area on the west side of Ulster Heights Road about .4 Niles south of the intersection with Marcus Road. Park in the pulloff and then follow a path down hill to a woods road. Turn to the right and follow the woods road and a path out to the Beer Kill. The path passes over some exposed bedrock. The stream is called the Beer Kill because the water is slightly yellow and foams as it runs over the rocks. Walk out to the edge of the stream to see a falls. BE CAREFUL as you walk on the rocks as they can be slippery and it is a long way down! Look downstream to see other falls that are even more impressive. Follow some of the informal paths downstream to see at lest two more falls. Eventually you will come to an almost vertical descent where it may be a good idea to stop. When you have finished exploring, head back the way you cam or explore a little.
 (The image at the left shows the profile of the hike. Remember that all vertical profiles are relative!)
Harriman: Almost Perpendicular and Claudius Smith Den
| Quick Look | ||||
|---|---|---|---|---|
| Difficulty | Round trip | Total climb | Internet Maps | |
| 7.3 mi. | 1926 ft. | AllTrails | ||
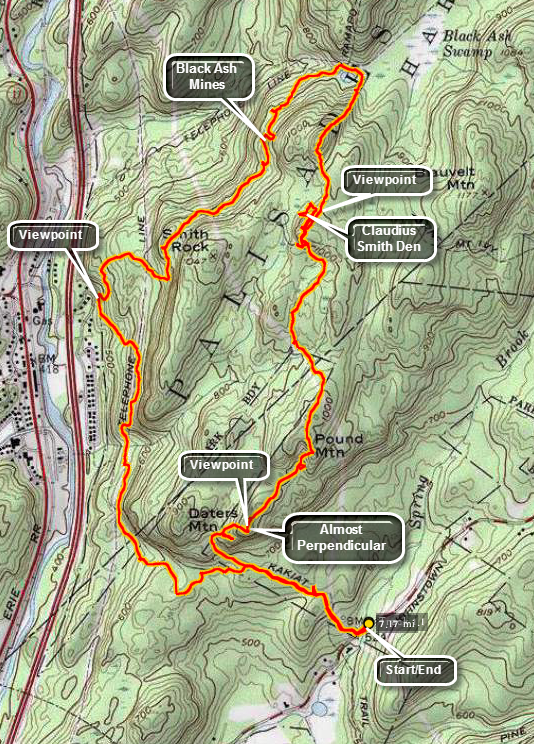
Take Seven Lakes Drive southwest from the Long Mountain traffic circle near Bear Mountain. Pass through the Tiorati Circle staying on Seven Lakes Drive until the Reeves Education Center appears on your left. Take the next right and immediately turn right again onto Johnsontown Road. Park on the edge of the traffic circle at the end of the road.
Walk back toward the road from the traffic circle and look for the blue disc trail. The blue disc trail turns up the hill to the northwest just before entering the traffic circle. The first part runs along the access road for maintenance of a gas pipeline. The trail then cuts into the woods and parallels the pipeline briefly before heading more northwest. After about .85 miles of hiking a high rock formation appears on the left. You may go off the trail and up to the lookout where there are limited views. Back on the main trail continue to hike and almost immediately you will hit a very steep little climb which is hardly perpendicular! The top is about 960 feet in elevation and only a mile from the start of the hike. It offers excellent views particularly to the south and east. Continue your hike down from the viewpoint into a little "valley" surrounded by several high rock formations. The trail then ascends Pound Mountain and descends again as it approaches Elbow Brush at about 1.9 miles. Elbow Brush is a narrow passage between the bedrock and a piece that has pulled away over the years. This area can be avoided in one of several ways but it is interesting and not all that narrow. In this area there are other jumbles of rocks with some places to walk through. Continue to hike to the junction with the Tuxedo Mount Ivy Trail. This trail runs roughly east-west but you want to continue on the blue disc trail. The blue discs may be hard to find as they proceed straight ahead and directly up the rock face to another viewpoint at 2.3 miles. Just across on the next hill you can see Smith's Rock but it is hard to determine where Claudius Smith's "den" is located. To get to the "hideout", go back to the trail junction and take the red Tuxedo Mt Ivy trail west to the base of the cliff that forms the lookout. You will would find the "den" there within a few hundred feet. It first appears as an opening on the right of the trail. You can walk into this "cave" and make your way to the other side. Back on the trail walk to the base of the cliff to find the rest of the den in the form of a rock overhang. There is a fire pit here. Smith was raised in Brookhaven on Long Island but his family moved to Smith' Clove (Monroe) in the early 1740's. His family was well-respected and when war broke out many became Loyalists. Claudius led a band of men who defended the Loyalists in Orange County and attacked the rebels. Eventually he became so notorious that Governor George Clinton offered a $1200 reward for his capture. Claudius Smith was hanged in Goshen, NY in 1179 as were two of his sons. After inspecting the den and rock formations, go back up to the blue disc trail. You will pass by a large rock that appears to have primitive petroglyphs painted on it. The scene depicts hunters with weapons attacking some animal with a series of trees in the background. On closer inspection the work looks more modern than ancient. Finding the blue disc trail after the lookout can be difficult. Walk down the open rock face watching for the markings which head off slightly to the right. There are only a few faded blazes on the rock. The trail starts to descend after crossing over another viewpoint and at about 3.4 miles start to look for the junction with the Victory Trail marked with blue V's. Turn left or west and hike a short distance to the trail junction with the Ramapo Dunderberg Trail heading southwest. This is relatively flat between some hills on the east and a drop off to the west. Begin looking for some evidence of the Black Ash mines like the tailings piles. At about 4.0 miles you will notice a tailings pile to the left of the trail. Walk up to it and find one of the openings for the Black Ash mine just behind it. The adit is flooded but still interesting. Walk down to the trail and continue south and find a second adit to the Black Ash mine very near the trail on the right. The trail continues to be open and easy to follow and at 4.7 miles there is a nice viewpoint down to Tuxedo and the Thruway. This lookout also has views to the hills beyond. The trail begins to descend as it approaches Tuxedo Park and the Thruway. Just after descending to a small parking area, turn left or south-southeast on the white Kakiat Trail which will help you complete the loop back to the blue disc trail and the car. The Dater Mine is near the trail junction with the blue disc trail. The Kakiat Trail follows a woods road and immediately begins to ascend to an old telephone line right-of-way. The ascent is only about .3 miles and about 200 feet. As you near the junction with the blue disc trail various paths and roads lead up the mountain toward the direction of the Dater Mine. From here it is only .2 miles to the blue disc trail and .7 miles back to the car.
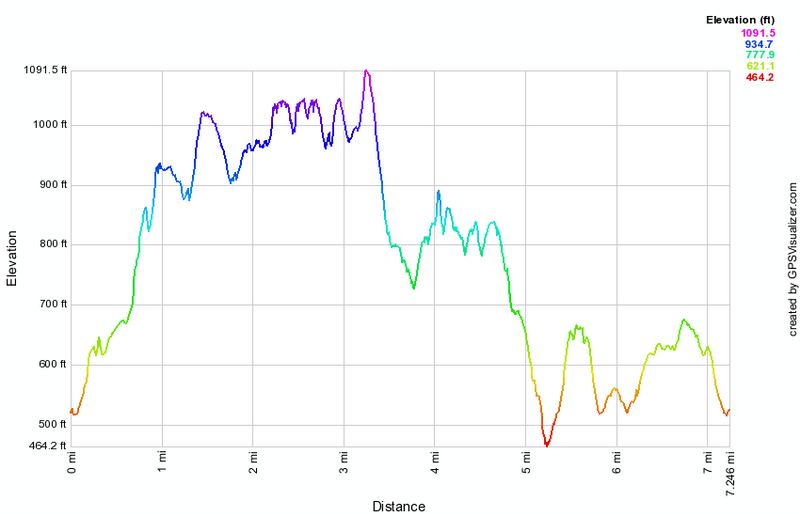 (The image at the left shows the profile of the hike. Remember that all vertical profiles are relative!)
Harriman: Anthony Wayne Loop
| Quick Look | ||||
|---|---|---|---|---|
| Difficulty | Round trip | Total climb | Internet Maps | |
| 5.9 mi. | 1540 ft. | AllTrails | ||
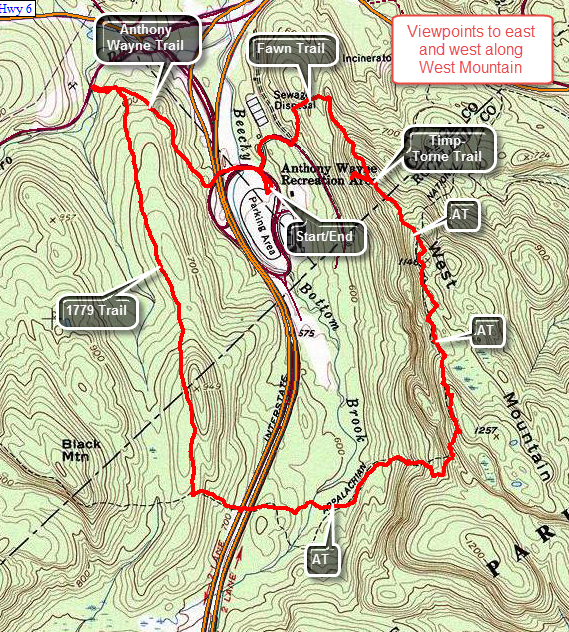
Take the Long Mountain Parkway to the Long Mountain traffic circle. From there get on the Palisades parkway south for one exit south to the Anthony Wayne Recreation Area. Pay the entrance fee if it is the season and park in the large parking area.From the car walk back to the bridge over the parkway where you will see white marking for the Anthony Wayne Trail. The trail soon cuts right or north into the woods. Followed it as it gains some elevation to about .6 miles. Watch for the blue blazed 1779 Trail on your left as you start to descend. It may be hard to spot as the disks are faded and there is no sign to call your attention to the trail. Over the next mile or so the trail keeps gaining some elevation but really seems quite flat. At 2.1 miles the trail begins to descend and at about 2.4 miles you will be at the junction with the AT where you should turn left. The trail now descends until it crosses the Palisades Parkway.Once on the other side continue to lose elevation until about 3 miles when the trail begins to ascend the West Mountain ridge. The ascent is about 600 feet in the next .7 miles. Some parts of the trail are steeper than others but there are several switchbacks to help make the trip easier if not shorter. Continued climbing until we you are near the top of the ridge. and watch as the AT markings go to the left with little notice. Turn north or left and follow the AT which is also marked with blue blazes in this area for the Timp-Torne Trail. On a nice day, it is worth the side-trip to head south to the West Mountain Shelter which offers a great view toward the south on the Hudson River. On a good day the New York City skyline is clearly visible. As you hike north along the ridge, there are many views to the west and several opportunities to get a view east as well. The views to the west are mostly of forest but the views to the east and north include a few peeks at the river and Bear Mountain. As you continue north the Perkins Tower on Bear Mountain becomes more and more prominent. You will begin losing elevation and at about 4.5 miles the AT heads to the right. Stay to the left on the blue trail. Continue north and begin to look for the Fawn Trail marked with a red F. At one point the trail becomes very narrow requiring you to slip between some rocks. Just after this you will have to descend over an open rock face. Just below this is the trail intersection with the Fawn Trail back to the Anthony Wayne Recreation Area. Follow this trail as it continues down off the ridge. Eventually the trail crosses some of the woods roads associated with the park and within a few minutes you will be back at the road that leaves the park. Cross the road and walk over to your car.
 (The image at the left shows the profile of the hike. Remember that all vertical profiles are relative!)
Harriman: Boston, Garfield, Greenwood, Surebridge Mines
| Quick Look | ||||
|---|---|---|---|---|
| Difficulty | Round trip | Total climb | Internet Maps | |
| 10.6 mi. | 1825 ft. | AllTrails | ||
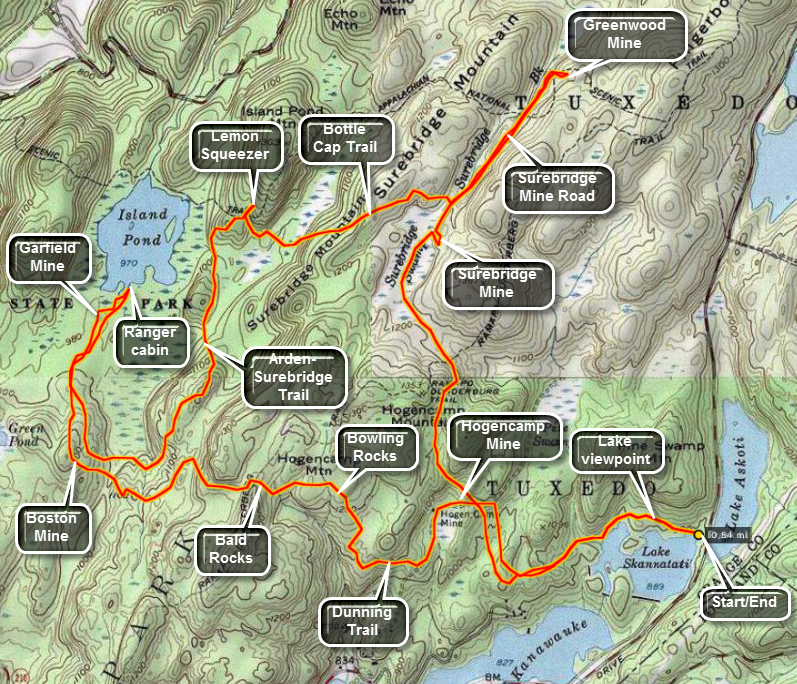
Take Seven Lakes Drive southwest from the Long Mountain Circle near Bear Mountain. Pass through the Tiorati Circle staying on Seven Lakes Drive. Just passed Lake Tiorati there are two lakes, one on each side of the road. These are Lakes Askoti and Skanatati. Pull into the parking area on the right next to Lake Skanatati. This lake is larger than it looks as you will see when you hike along the shore and see it from above. The trails start to the right of the lake. Bear to the left on the Long Path marked with aqua paint. As you walk along this path there are several opportunities to walk down to the lake to get a better view. After following the shoreline of the lake the Long Path continues west and then turns north. At 1.1 miles the Long Path meets the yellow marked Dunning Trail.
Bear left on the Dunning Trail past the workings of the Hogencamp Mine on the right. There is a swamp on the left and some tailings from the mine. The trail ascends a hill to an area that overlooks Little Long Pond. Continue up the hill to a long flat area of bedrock. There are several large boulders lying on the flat area. these are called the Bowling rocks. The trail winds down and up until it meets the Ramapo-Dunderberg Trail after about 1.2 miles. Just to the left up the RD Trail is the area known as the Bald Rocks. The exposed bedrock in this area has interesting striations. Continue on the Dunning Trail through this area.
In .25 miles the Dunning Trail meets and runs concurrently with the White Bar Trail for another .25 miles. At this point turn right to stay on the Dunning Trail. Stay on the Dunning Trail and in about .3 miles begin to look for mine tailings. This is the Boston Mine. There are two surface pits with their associated tailings. To find the Island Pond Road walk north or slightly northeast until you see the red triangles that mark the Arden-Surebridge Trail. Turn left on this trail and follow it until it meets the road. After several hundred feet the ASB Trail turns left. Continue on the road until it forks and take the left fork. The road appears to end but work your way through the laurel until you are almost at the lake shore. Here you will find an exploratory pit and a water filled trench. There are also some tailings from the Garfield Mine. Walk back out to where the road forks and take the right fork. This part of the road ends on the shore of Island Pond. The pond is beautiful and the ruins of an old stone ranger station can be found here.
Turn around and take the road back to where the ASB Trail meets the road. Turn left onto the trail. this trail heads southeast and then turns northeast as it heads toward the Lemon Squeezer about 1.6 miles away. The trail initially is relatively flat but then climbs to the top of a ridge. From here it goes up and down until the Lemon Squeezer. Stop here an spend some time investigating the lemon Squeezer. The AT ascends through this area but you will be returning to the ASB Trail after finishing at the Lemon Squeezer. Continue on the SB Trail and the Long Path for about .25 miles until the Bottle Cap Trail leaves to the left. The Bottle Cap Trail is marked by bottle caps nailed to the trees. The trail immediately ascends to the top of Surebridge Mountain. Continue on the trail over the top of the ridge and down the other side to a wet area to find the Surebridge Mine Trail. The total distance on the trail is about .6 miles and a stone cairn marks the road.
Turn left on the road and walk .6 miles to the Greenwood Mine. Watch for the white blazes of the AT on the right and almost immediately after that the tailings of the mine on the left and a mine opening on the right. The opening is filled with water. Continue on the trail to find another trench on the right. Turn right and walk up the hillside. Wander around looking for mine tailings. Above the mine tailings there will always be a mine working of some kind. The Greenwood mine has several trenches some with underground openings. Return to the road and walk .6 miles back to the Bottle Cap Trail junction. Stay on the mine road and watch for the first workings of the Surebridge Mine on the left. Walk off the trail to the left. There are several piles of tailings. Look for three different trenches at least one of which appears to extend underground. There are several exploratory pits and one deep shaft. The shaft is vertical but seems to turn horizontally at the bottom. Most of these workings are filled with water. Return to the mine road.
After .35 miles you will join the ASB Trail and the Long Path and the trail junction called Times Square. Find the Long Path and walk .4 miles over the hill to the Hogencamp Mine. Another .4 miles takes you to the Dunning Trail Long Path junction where you began the loop earlier in the day. Walk 1.1 miles back to the parking area.
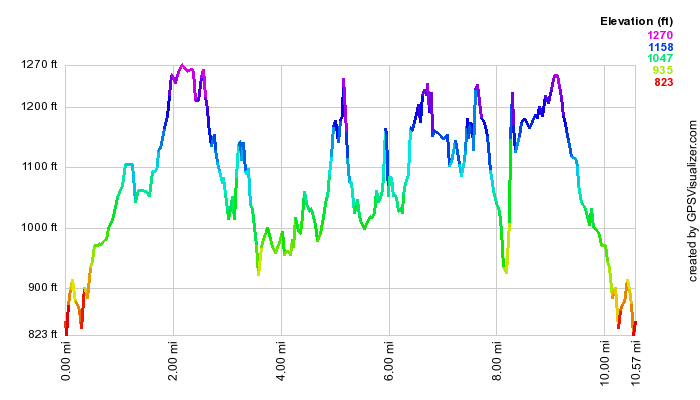 (The image at the left shows the profile of the hike. Remember that all vertical profiles are
relative!)
(The image at the left shows the profile of the hike. Remember that all vertical profiles are
relative!)
Harriman: Bradley Mine
| Quick Look | ||||
|---|---|---|---|---|
| Difficulty | Round trip | Total climb | Internet Maps | |
| 2.8 mi. | 800 ft. | AllTrails | ||
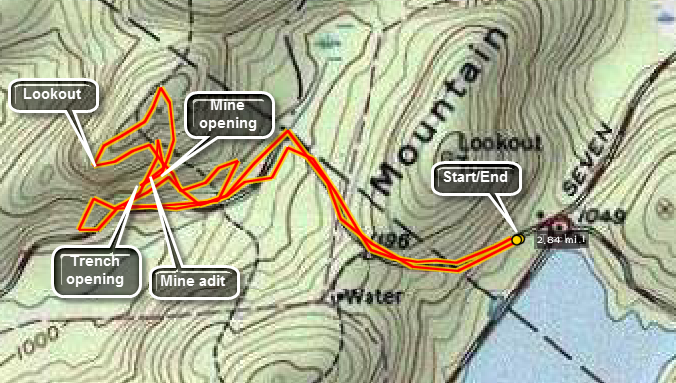
Take Seven Lakes Drive southwest from the Long Mountain Circle near Bear Mountain. Drive 3.7 miles and park at the Lake Tiorati parking area. Walk up to Arden Road which is closed during the winter. Walk on the road for .5 miles where the Long Path crosses the road. The road turns ninety degrees to the left at this point. Walk another .3 miles along the road and watch for a woods road that cuts up and to the right. Walk up the road and the entrance to the Bradley Mine cut will appear directly ahead. Walk into the cut to the end where the actual entrance to the underground is located. The mine is usually filled with water. It is possible to enter this cavern during the dry season. Notice the air shaft up and to the right. Walk back out through the cut and around the opening to the left. Walk up the hillside to find the opening to the air shaft. You can now wander over the hillside and up to the top of the hill. There are not too many additional evidences of mining activity. A large, flat work area is evident at the top and there is a nice view to the west. After looking around, retrace your steps to the road. Walk to road back to the car.
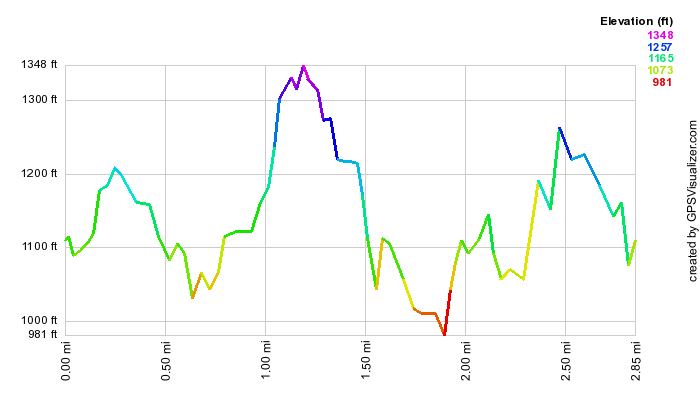 (The image at the left shows the profile of the hike. Remember that all vertical profiles are
relative!)
(The image at the left shows the profile of the hike. Remember that all vertical profiles are
relative!)
Harriman: Cranberry, Spanish, Silver, Lewis Mines
| Quick Look | ||||
|---|---|---|---|---|
| Difficulty | Round trip | Total climb | Internet Maps | |
| 7.8 mi. | 1477 ft. | AllTrails | ||
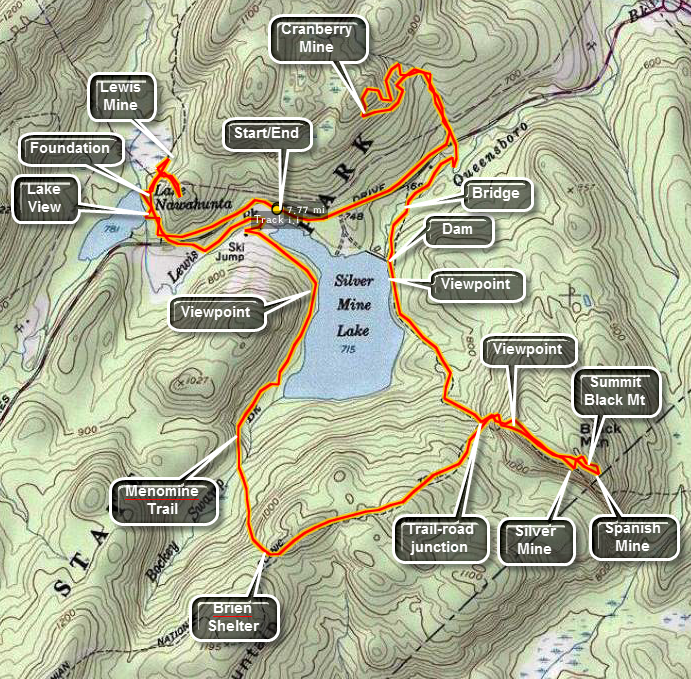
Take Seven Lakes Drive southwest from the Long Mountain Circle near Bear Mountain. Drive 1.5 miles and park at the Silvermine Lake parking area. Walk about .5 miles northeast back up Seven lakes Drive. Just after an abandoned comfort station on the right is a brook that runs under the road. Turn left and walk up the left side of the brook. You may see an informal path where other hikers have walked but no specific trail exists. In .3 miles a woods road runs east-west. Turn left or west and walk a short distance to find the opening of the Cranberry Mine. The mine extends into the hillside for almost 100 feet. The adit has been walled up and an iron door once blocked the entrance. You may walk into the mine but it is VERY dark and a good light is a must! On the floor of the mine is the a single gauge railroad track used for ore carts.
Walk back out the entrance and head slightly northeast to find an iron door in front of a corrugated tin roof. This may have been a powder magazine or storage facility. Walk up the hillside and look for other piles of mine waste. There are at least two other shallow trenches and one air shaft. After investigating the mine workings, walk back down the mine road to the brook and back out to the road. Cross the road and follow the woods road to the bridge over the stream. This is the Silvermine Ski Road. Continue on the road for 1.1 miles to the junction with the AT and Ramapo-Dunderberg Trail. Along the way you can visit the dam at the outlet of Silvermine Lake and there are several nice viewpoints for the lake.
Turn left on the trail and get ready for a short but steep ascent of Black Mountain. After the first part of the ascent there is a nice lookout over Silvermine Lake. Continue on the trail to the top of the mountain about .4 miles away from the trail junction. The summit of Black Mountain has a nice view of the Hudson River and of the Perkins Tower on Bear Mountain. Look for piles of tailings and a small, deep pit which is the Spanish Mine. Walk back up the hillside parallel to the trail to find another pile of mine waste and another pit or trench. Get back on the trail and descend the steep rock outcropping. At the base of this outcropping look for a path around to the other side of the rock face. The footing here is difficult. Walk along and look at the rock face. After a short distance, you will see a hole blasted into the side of the mountain with a small amount of mine waste below it. This is the Silver Mine although silver was probably never the object. Return to the main trail and hike back down black Mountain to the junction of the ski road and the AT and RD Trails.
Continue on the trails up and down over some varied terrain. After .8 miles, descend a rock area to the William Brien Memorial Shelter. This is a rock shelter with four wooden bunk beds. Turn right onto the yellow blazed Menomine Trail which winds its way back to the parking area along the western shore of Silvermine Lake. After 1.6 miles, you will be back to the Silvermine Lake parking area. Continue to follow the Menomine Trail through the parking and picnic areas to Seven Lakes Drive. Cross Seven lakes Drive and continue on the trail for .2 miles until it starts around Lake Nawahunta. Bear right on the Nawahunta Fire Road and watch for the opening to the Lewis Mine on the right opposite a swamp on the left. The trench that forms the Lewis Mine extends a short distance into the hillside. Back at the trail-road junction there is a stone foundation on the lake side of the trail. It is not clear what this may have been but its structure suggests it was a storage building. Walk back out to the road and return .4 miles to the parking area.
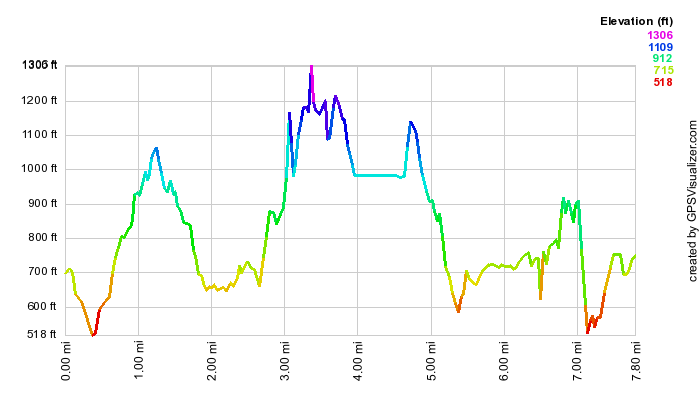 (The image at the left shows the profile of the hike. Remember that all vertical profiles are
relative!)
(The image at the left shows the profile of the hike. Remember that all vertical profiles are
relative!)
Harriman: Doodletown and The Mines
| Quick Look | ||||
|---|---|---|---|---|
| Difficulty | Round trip | Total climb | Internet Maps | |
| 6.3 mi. | 1850 ft. | AllTrails | ||
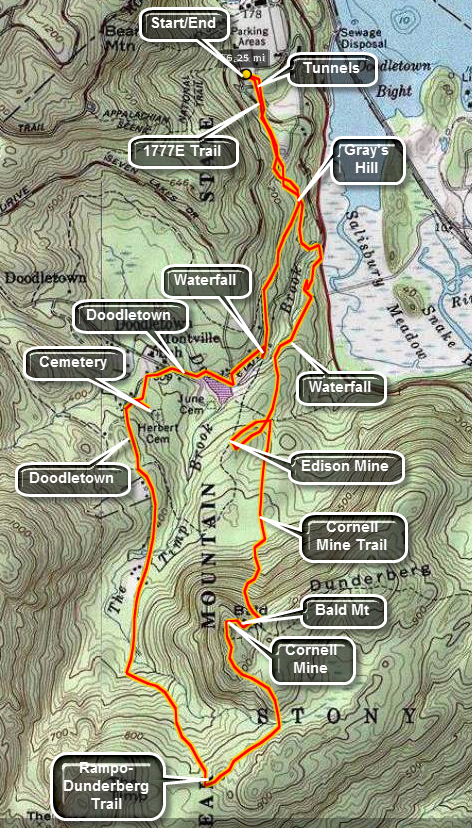 The easiest place to park to start this hike is at the Bear Mountain Inn parking area next to Hessian Lake. Parking costs $6 per car but there is lots of it and bathroom facilities are available. There area several ways to get to the parking area but Route 9W north or south is the easiest way. You can also take Seven Lakes Drive from Long Mountain Parkway (Route 6). Stay on Seven Lakes Drive through another traffic circle. Park in the back parking area. Walk toward the "tunnel" that goes under Perkins Drive. Bear to your right and head towards the other tunnel. Before entering, look at the sign which shows the settlement of Doodletown. These signs occur several times along the 1777 Trail that goes through this late 19th and early 20th century site. The building sites are all numbered, a plaque has been placed near all the major sites and some include an explanation and sketch of the building All the remaining buildings were razed in 1957 so that all that remains are the stone foundations, stone steps and the cemeteries. Enter the tunnel and get on the 1777E Trail.
After .5 miles on the 1777E Trail, you will reach the junction of the red blazed 1777 Trail to the right and the blue blazed Cornell Mine Trail to the left. Bear right onto the 1777 Trail. In another, .5 miles a sign pointing to the left indicates a path to a swimming hole and waterfall. Only a few hundred feet down this path is a bridge over a small stream. There is a nice cascade here with rapids and a deep pool at the base of the falls. The path continues but turn around after enjoying the babbling brook and return to the main path. All of the "trails" here are wide woods roads and some show signs of pavement. Back on the main path you will begin your walk through the Doodletown settlement. The first site is the foundation of the Steinman home. Further down the path is the area were the old schoolhouse stood on the right side of the trail. On the left side is a man made pond.
Continue up the road following the red dot on a white rectangle markings of the 1777 Trail. Where the trail bears to the left is the site of the Siegel home. Further up the road are the steps of the Dunkel house on the right. A little further up the road on the left is the lane that leads to the Herbert/Weyant cemetery. This is about .6 miles from the trail junction and the waterfall path. Many of the grave markers have the names of the members of these two prominent families. Walk back out to the main trail and continue on up the hill. There are numerous home sites marked by stone pillars, foundations or simple signs. As you continue on the road, you will see the outline of Bald Mountain on the left. The mountain looks steep and uninviting at first, however, the trail that you are on wraps around to the more gentle ascent on the opposite side. After walking up another small hill the signage indicates the end of Doodletown settlement. The wide and open road reverts to more of a trail but is still relatively easy walking.
After 1.4 miles from the cemetery lane the red blazed Ramapo-Dunderberg Trail crosses the 1777 Trail. Turn left here and be prepared for a path that is more of a trail; narrow and with more elevation changes. Soon you will be climbing Bald Mountain. The trail initially climbs a small rock outcropping and then descends into a hardwood forest and crosses a small stream. It then ascends to another higher point before dropping a little. The trail then begins the climb up Bald Mountain. Near the summit the trail undulates some before arriving at the summit. The summit is about .7 miles from the junction with the 1777 Trail. The views from the summit are magnificent. The Perkins Tower on Bear Mountain is clearly visible. The Hudson River lies below with the Bear Mountain Bridge, Anthony's Nose, Mount Taurus, Storm King and Breakneck Ridge to the north. From this point you can get back on the R-D Trail and follow it to the junction with the Cornell Mine Trail or you can walk north over the "edge" of Bald Mountain to look for the Cornell Mine.
To find the Cornell Mine walk north down the slope of the mountain and head slightly right or east. Look for many small to medium sized rocks in a pile. These are tailings from the iron mines. Many of these rocks will show "rust". You may find several open pits and gashes cut into the hillside. These are part of the mining complex but a more interesting mine is to be found. Further down the slope is the main entrance to the Cornell Mine which is cut directly into the bedrock of the mountain. The tailing from the mine lie below it on the slope. The mine adit is usually filled with water except in the driest times. The tunnel appears to be block just a short distance into the mine. After exploring, continue east along the slope looking for the red markings of the R-D Trail or the blue ones from the Cornell Mine Trail. If you hit the R-D first, turn left and continue down until the Cornell Mine Trail branches to the left.
Be careful as you descend the Cornell Mine Trail. The initial descent is steep and strewn with rocks some of which are covered by leaves. This can be a slippery, unstable situation leading to falls and injuries. The rocks grow into boulders lower down the trail until it flattens and the trail widens and passes through hardwood trees. After about .85 miles, there is a junction with a woods road . On top of a hill on your left is ANOTHER mine. Walk over toward this hill. If you skirt the top of the hill to the right, you will see the mine tailings. Walk to the top of the hill and look for a depression in the earth. This is not just a pit but a shaft sunk into the rock. The Edison is Thomas Edison who experimented with magnetically separating the iron from the ore. This "loop" is about .3 miles. Walk back to the trail and continue toward Route 202.
In about .5 miles the trail passes very close to Doodletown Brook and an area where there is a nice waterfall and swimming hole. In fact, this is the SAME place you were and the beginning of the hike but you are on the other side of the brook. Walk down to the brook to get a better look at the water. There are several areas of rapids and a man made dam. After exploring some, return to the trail. Route 202 is just .1 miles further down the trail. Just before the road is another nice section of rapids. At the highway turn left and walk a short distance on the left shoulder before turning left and continuing on the Cornell Mine Trail. Climb Grays Hill which was once part of the King's Road and then the Albany Road. Follow the blue trail markers as the trail turns off the paved path to the right and heads up through some brush. This part of the trail is often wet! In .25 miles you will be back at the junction with the 1777E trail where you were earlier tin the day. Continue straight ahead to retrace your steps through the tunnels and to the parking area only .5 miles away.
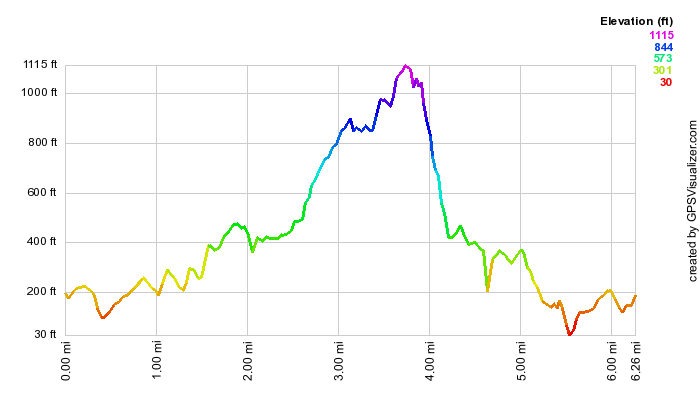 (The image at the left shows the profile of the hike. Remember that all vertical profiles are
relative!)
(The image at the left shows the profile of the hike. Remember that all vertical profiles are
relative!)
Harriman: Dunderberg Mountain Loop
| Quick Look | ||||
|---|---|---|---|---|
| Difficulty | Round trip | Total climb | Internet Maps | |
| 6.7 mi | 2200 ft | AllTrails | ||
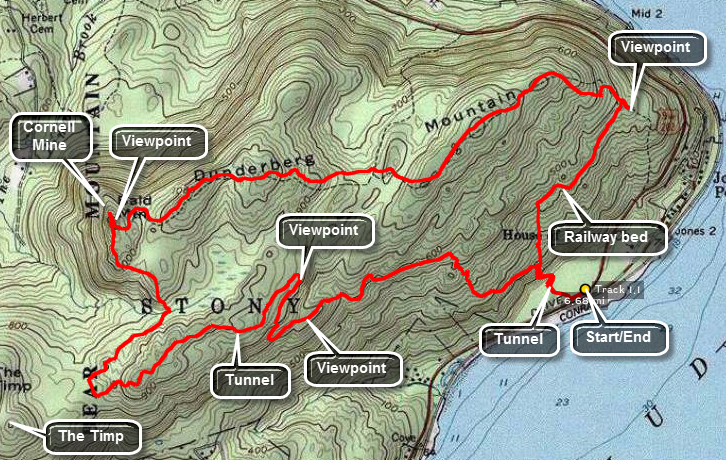 The parking for the trail head is on Route 9W about a mile south of the junction with Route
202. It is just north of the Anchor Monument on 9W. Once parked walk south on 9W for a short
distance. Watch for a small stake with blaze markings. The blazes should be blue for the
Timp-Torne Trail and a red circle on a white background for the Ramapo-Dunderberg Trail.
Be prepared to ascend a steep grade up to the first level of the Dunderberg Ridge. Watch
for a small laid stone tunnel on your left just as the steep climb begins. As you climb you
will begin to get some nice views of the Hudson River, the towns that line it and the power
plants that use the water for cooling. These views are nice but nothing compared to the ones
you WILL get as you ascend to the top of the ridge.
The parking for the trail head is on Route 9W about a mile south of the junction with Route
202. It is just north of the Anchor Monument on 9W. Once parked walk south on 9W for a short
distance. Watch for a small stake with blaze markings. The blazes should be blue for the
Timp-Torne Trail and a red circle on a white background for the Ramapo-Dunderberg Trail.
Be prepared to ascend a steep grade up to the first level of the Dunderberg Ridge. Watch
for a small laid stone tunnel on your left just as the steep climb begins. As you climb you
will begin to get some nice views of the Hudson River, the towns that line it and the power
plants that use the water for cooling. These views are nice but nothing compared to the ones
you WILL get as you ascend to the top of the ridge.
The trail splits at the top of the short ascent. The blue blazed Timp-Torne trail goes left while the red blazed Ramapo-Dunderberg Trail heads off to the right. Both the trails parallel or cross railway beds that are the remains of an aborted spiral railway from the late 1890's. Although it was never completed much of the work that was done is still visible. Turn left an follow the blue blazes. This trail alternates flat sections along the railbed with steep but short climbs up to the next level of the ridge. Several areas have switchbacks to make the climbing easier. There are also several rock scrambles which keep things interesting. As you hike, keep a lookout for the tunnel entrance blasted into the mountain's rock. It will be on your right and is unmistakable. It was never completed and is a dead end. Just passed the tunnel is a great example of how the railway bed was built up and leveled off. After ascending to the highest point on the one side of the ridge the trail drops a little before the climb up to The Timp. The views from here are excellent to the south, west and north. Almost directly west is West Mountain. Look carefully to spot the West Mountain Shelter. From this point there are several options that vary slightly in distance and difficulty.
The first option is to turn around and return the way you came to the low area where the 1777 trail crosses the Timp-Torne Trail The 1777 trail crosses at the lowest point in the area. Turn left onto this trail and walk for a VERY short distance. Keep a lookout for the red blazed Ramapo-Dunderberg Trail on the right.
Another option is to continue down the Timp-Torne Trail off The Timp for a short distance to the junction with the Ramapo-Dunderberg Trail. Turn right onto the trail marked by the red circles on a white rectangle.
The longest, most difficult and therefore most rewarding option is to continue on the Timp-Torne Trail as it descends into a low area on the other side of the Timp. This is quite a drop from the top of the Timp and is steep at times. The blue trail intersects on old road and turns left following the road for a short distance. The trail then heads right into the woods, up a hill and toward the Torne. Continue on up the road looking for the red and white markers on the right that announce the beginning of the Ramapo-Dunderberg Trail. Follow this trail passed any other trails or roads that turn off of it. The trail skirts the lower edge of the Timp and passes many impressive talus slopes as it winds its way around the Timp. Eventually it turns left and heads STRAIGHT UP THE TIMP! This is a rather long and difficult climb which has few level areas until it nears the top of the Timp. Eventually you will be back at the junction with the blue Timp-Torne Trail near the top of the Timp. DO NOT turn but continue on the read and white marked trail.
The Ramapo-Dunderberg Trail rises and falls several times on the approach to Bald Mountain. The climb up Bald is steep at times but not impossible. Bald has views directly north to Bear Mountain which can be recognized by the Perkins Tower at the top. Looking down and in a northeasterly direction you can easily see the Bear Mountain Bridge. Below the summit of Bald are several depressions and one tunnel that make up the Cornell Mines. Continue on the red blazed trail and pass the point where the blue blazed Cornell Mine trail meets it from the north. You will soon pass over Dunderberg Mountain. This can easily be missed since it is not much higher than the other points on the ridge. As you continue to hike, you will begin to get a hint of the scenic views that the eastern end of this ridge has to offer. Several climbs pass through swampy areas and lead to the eastern end of the ridge. Apparently a forest fire swept through this area since most of the trees are dead and show scorch marks. The dead trees combined with the remaining rock outcroppings gives this area an eerie, desolate appearance. As you reach the top of the easternmost part of the ridge the Hudson comes into view along with the communities and industry that line its shore. The view from the ridge proper is virtually unimpeded but several side trails lead to lookouts with breathtaking views of the river.
The trail turns south and then west as it completes the loop back to where you started. A laid stone pylon is present in the area where the donkey engine was to be place for the spiral railway. From this area the trail is almost all graded railroad bed. Large angular stone do not make the best footing and do not cushion a fall. The trail flattens as it approaches the end. Here there are several more good examples of level railroad bed hinting at the work done on the railway.
 (The image at the left shows the profile of the hike. Remember that all vertical profiles are relative!)
Harriman: Dunderberg Mountain - The Timp Loop
| Quick Look | ||||
|---|---|---|---|---|
| Difficulty | Round trip | Total climb | Internet Maps | |
| 7.8 mi | 2323 ft | AllTrails | ||

The parking for the trail head is on Route 9W about a mile south of the junction with Route 202. It is just north of the Anchor Monument on 9W. Once parked walk south on 9W for a short distance. Watch for a small stake with blaze markings. The blazes should be blue for the Timp-Torne Trail and a red circle on a white background for the Ramapo-Dunderberg Trail. Be prepared to ascend a steep grade up to the first level of the Dunderberg Ridge. Watch for a small laid stone tunnel on your left just as the steep climb begins. As you climb you will begin to get some nice views of the Hudson River, the towns that line it and the power plants that use the water for cooling. These views are nice but nothing compared to the ones you WILL get as you ascend to the top of the ridge.
The trail splits at the top of the short ascent. The blue blazed Timp-Torne trail goes left while the red blazed Ramapo-Dunderberg Trail heads off to the right. Both the trails parallel or cross railway beds that are the remains of an aborted spiral railway from the late 1890's. Although it was never completed much of the work that was done is still visible. Turn left an follow the blue blazes. This trail alternates flat sections along the railbed with steep but short climbs up to the next level of the ridge. Several areas have switchbacks to make the climbing easier. There are also several rock scrambles which keep things interesting. As you hike, keep a lookout for the tunnel entrance blasted into the mountain's rock. It will be on your right and is unmistakable. It was never completed and is a dead end. Just passed the tunnel is a great example of how the railway bed was built up and leveled off. After ascending to the highest point on the one side of the ridge the trail drops a little before the climb up to The Timp. The views from here are excellent to the south, west and north. Almost directly west is West Mountain. Look carefully to spot the West Mountain Shelter. From this point there are several options that vary slightly in distance and difficulty.
The first option is to turn around and return the way you came to the low area where the 1777 trail crosses the Timp-Torne Trail The 1777 trail crosses at the lowest point in the area. Turn left onto this trail and walk for a VERY short distance. Keep a lookout for the red blazed Ramapo-Dunderberg Trail on the right.
Another option is to continue down the Timp-Torne Trail off The Timp for a short distance to the junction with the Ramapo-Dunderberg Trail. Turn right onto the trail marked by the red circles on a white rectangle.
The longest, most difficult and therefore most rewarding option is to continue on the Timp-Torne Trail as it descends into a low area on the other side of the Timp. This is quite a drop from the top of the Timp and is steep at times. The blue trail intersects on old road and turns left following the road for a short distance. The trail then heads right into the woods, up a hill and toward the Torne. Continue on up the road looking for the red and white markers on the right that announce the beginning of the Ramapo-Dunderberg Trail. Follow this trail passed any other trails or roads that turn off of it. The trail skirts the lower edge of the Timp and passes many impressive talus slopes as it winds its way around the Timp. Eventually it turns left and heads STRAIGHT UP THE TIMP! This is a rather long and difficult climb which has few level areas until it nears the top of the Timp. Eventually you will be back at the junction with the blue Timp-Torne Trail near the top of the Timp. DO NOT turn but continue on the read and white marked trail.
The Ramapo-Dunderberg Trail rises and falls several times on the approach to Bald Mountain. The climb up Bald is steep at times but not impossible. Bald has views directly north to Bear Mountain which can be recognized by the Perkins Tower at the top. Looking down and in a northeasterly direction you can easily see the Bear Mountain Bridge. Below the summit of Bald are several depressions and one tunnel that make up the Cornell Mines. Continue on the red blazed trail and pass the point where the blue blazed Cornell Mine trail meets it from the north. You will soon pass over Dunderberg Mountain. This can easily be missed since it is not much higher than the other points on the ridge. As you continue to hike, you will begin to get a hint of the scenic views that the eastern end of this ridge has to offer. Several climbs pass through swampy areas and lead to the eastern end of the ridge. Apparently a forest fire swept through this area since most of the trees are dead and show scorch marks. The dead trees combined with the remaining rock outcroppings gives this area an eerie, desolate appearance. As you reach the top of the easternmost part of the ridge the Hudson comes into view along with the communities and industry that line its shore. The view from the ridge proper is virtually unimpeded but several side trails lead to lookouts with breathtaking views of the river.
The trail turns south and then west as it completes the loop back to where you started. A laid stone pylon is present in the area where the donkey engine was to be place for the spiral railway. From this area the trail is almost all graded railroad bed. Large angular stone do not make the best footing and do not cushion a fall. The trail flattens as it approaches the end. Here there are several more good examples of level railroad bed hinting at the work done on the railway.
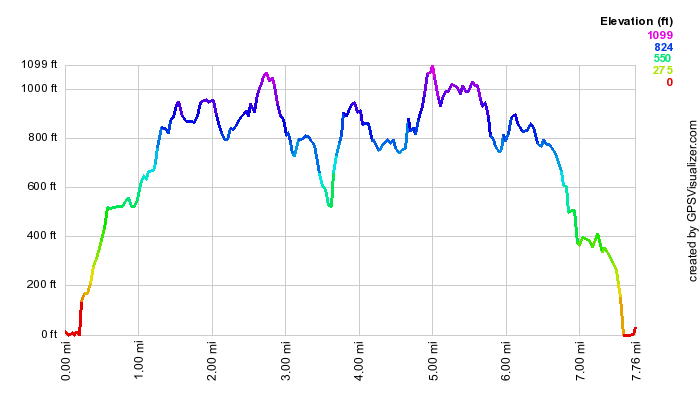 (The image at the left shows the profile of the hike. Remember that all vertical profiles are
relative!)
(The image at the left shows the profile of the hike. Remember that all vertical profiles are
relative!)
Harriman: Dunderberg Mountain Loop to The Timp
| Quick Look | ||||
|---|---|---|---|---|
| Difficulty | Round trip | Total climb | Internet Maps | |
| 8.0 mi | 2263 ft | AllTrails | ||
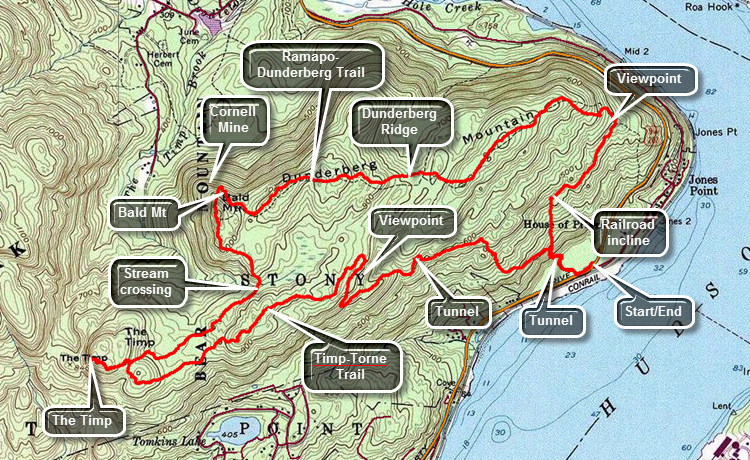
The parking for the trail head is on Route 9W about a mile south of the junction with Route 202. It is just north of the Anchor Monument on 9W. Once parked walk south on 9W for a short distance. Watch for a small stake with blaze markings. The blazes should be blue for the Timp-Torne Trail and a red circle on a white background for the Ramapo-Dunderberg Trail. Be prepared to ascend a steep grade up to the first level of the Dunderberg Ridge. Watch for a small laid stone tunnel on your left just as the steep climb begins. As you climb you will begin to get some nice views of the Hudson River, the towns that line it and the power plants that use the water for cooling. These views are nice but nothing compared to the ones you WILL get as you ascend to the top of the ridge.
The trail splits at the top of the short ascent. The blue blazed Timp-Torne trail goes left while the red blazed Ramapo-Dunderberg Trail heads off to the right. Both the trails parallel or cross railway beds that are the remains of an aborted spiral railway from the late 1890's. Although it was never completed much of the work that was done is still visible. Turn left an follow the blue blazes. This trail alternates flat sections along the railbed with steep but short climbs up to the next level of the ridge. Several areas have switchbacks to make the climbing easier. There are also several rock scrambles which keep things interesting. As you hike, keep a lookout for the tunnel entrance blasted into the mountain's rock at about 1 mile into your hike. It will be on your right and is unmistakable. It was never completed and is a dead end. Just passed the tunnel is a great example of how the railway bed was built up and leveled off. Continue on the blue trail and you will cross the 1777 Trail at 2.6 miles. You will begin to climb to a high point an a rock outcrop. This is marked as the Timp on some maps and GPS units but it is not. After ascending to this high point on the ridge the trail drops a little before the climb up to The Timp. At 3 miles you will come to the junction with the Ramapo-Dunderberg Trail. Stay to the left on the blue Timp-Torne Trail to get to the Timp. The views from the summit are excellent to the south, west and north. Slightly to the northwest is West Mountain. Look carefully to spot the West Mountain Shelter. More to the north is the Perkins Tower on Bear Mountain and below it the Bear Mountain Bridge. To the south you can see the New York City skyline.
Retrace your steps to back down the Timp to the junction with the Ramapo-Dunderberg Trail. Turn left to start your return trip. Follow this trail passed any other trails or roads that turn off of it. The Ramapo-Dunderberg Trail rises and falls several times on the approach to Bald Mountain. The climb up Bald is steep at times but not impossible. There are views directly north to Bear Mountain which can be recognized by the Perkins Tower at the top. Looking down and in a northeasterly direction you can easily see the Bear Mountain Bridge. Below the summit of Bald are several depressions and one tunnel that make up the Cornell Mines. Continue on the red blazed trail and pass the point where the blue blazed Cornell Mine trail meets it from the north. You will soon pass over Dunderberg Mountain. This can easily be missed since it is not much higher than the other points on the ridge. As you continue to hike, you will begin to get a hint of the scenic views that the eastern end of this ridge has to offer. Several climbs pass through swampy areas and lead to the eastern end of the ridge. Apparently a forest fire swept through this area since most of the trees are dead and show scorch marks. The dead trees combined with the remaining rock outcroppings gives this area an eerie, desolate appearance. As you reach the top of the easternmost part of the ridge the Hudson comes into view along with the communities and industry that line its shore. The view from the ridge proper is virtually unimpeded but several side trails lead to lookouts with breathtaking views of the river.
The trail turns south and then a little west as it completes the loop back to where you started. There is another nice lookout just above Jones Point and there is a white spur trail leading to it. Further along the main trail is a laid stone pylon is present in the area where the donkey engine was to be place for the spiral railway. From this area the trail is almost all graded railroad bed. Large angular stone do not make the best footing and do not cushion a fall. The trail flattens as it approaches the trail junction with the Timp-Torne Trail. Here there are several more good examples of level railroad bed hinting at the work done on the railway. Turn left at the junction and retrace your steps back down the trail to the parking area.
 (The image at the left shows the profile of the hike. Remember that all vertical profiles are
relative!)
(The image at the left shows the profile of the hike. Remember that all vertical profiles are
relative!)
Harriman: Elk Pen to Little Dam Lake
| Quick Look | ||||
|---|---|---|---|---|
| Difficulty | Round trip | Total climb | Internet Maps | |
| 6.8 mi. | 2093 ft. | AllTrails | ||
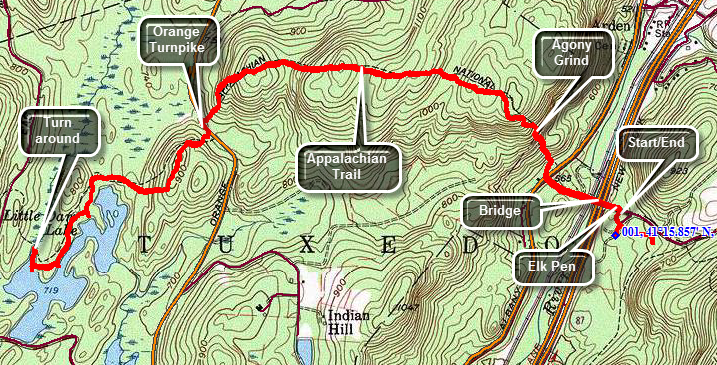
Take the exit for Route 17 south to Harriman off Route 17. This is the last exit before the tolls heading east or the first exit after the tolls heading west. Drive south toward Tuxedo for about 4 miles and turn left on Arden Valley Road. There will be a sign for Harriman State Park on Route 17. Drive across the bridge over Interstate 87 and park in the parking area on the right.
Start your hike by exiting the parking area to the west and hiking a short trail to Arden Valley Road. Turn left on the road and hike back out to Route 17. Cross the road and watch for the white blazes of the At slightly to the right. Enter the woods and hike a short distance to a set of steps on the hillside. A sign indicates various destinations along the AT and their distances. Your objective is Little Dam Lake about 2.8 mile ahead. What the sign does not say is that you will be hiking up and down hills for most of the trip. The first climb is called Agony Grind and, depending on your level of fitness, may live up to its name. The trail ascends over 500 feet in about.35 making the average grade around 26%. The ground levels a little at the top before descending slightly and then climbing up to the top of another hill which is higher than the first. You will pass through some dwarf pines at about 1.25 miles. Continue your journey by descending from the top of the hill and then climbing another. At 1.8 miles you will be at the top of a hill and ready to descend to cross the Orange Turnpike. Descend to the road and turn left to pick up the AT about 200 feet south. Upon entering the woods you will be confronted by another hill. Just before the ascent you may find a cooler with jugs of water by the side of the trail. A "trail angel" named John leaves apples and bananas and other snacks as well as the water. Climb to the top of the last hill before the lake and you may find a shelter constructed by John. Hiked down the hill and follow the AT along the northern shore of Little Dam Lake and then southwest along the western shore> You will find that the trail crosses a stream using some large boulders as stepping stones. A bridge once stood here but was damaged in a storm. Once you have reached the stones you may continue across and hike many hike toward Fitzgerald Falls, the Wildcat Shelter and Mount Peter. Turn around and retrace your steps back to the car.
 (The image at the left shows the profile of the hike. Remember that all vertical profiles are relative!)
Harriman: Lake Massawippa to Route 32
| Quick Look | ||||
|---|---|---|---|---|
| Difficulty | Round trip | Total climb | Internet Maps | |
| 13.5 mi. | 1430 ft. | AllTrails | ||
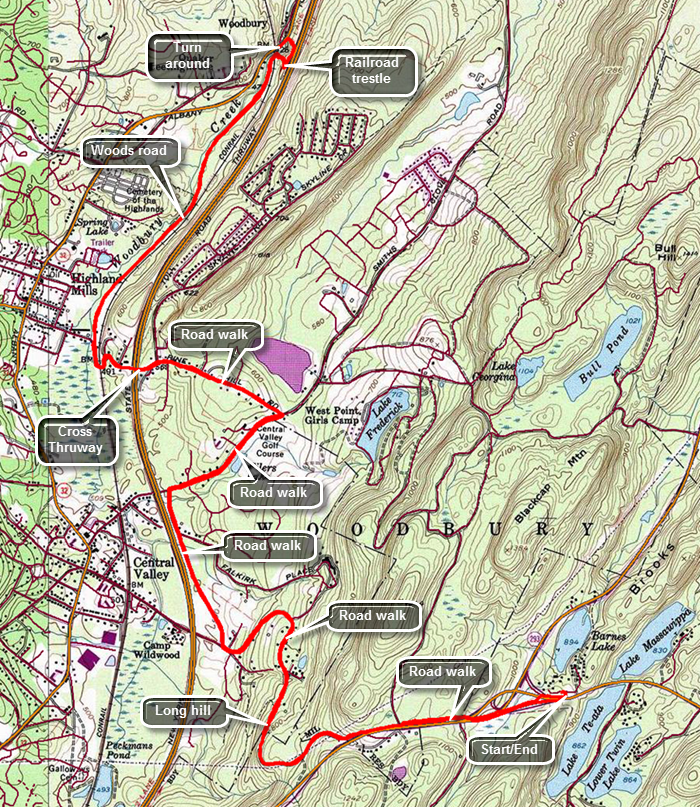 Take I86, the Quickway, to the exit just before the Harriman toll plaza and get on Route 6 East. Drive 3.8 miles to the parking area on the left just before Lake Massawippa. You may also take Route 6 West from the Bear Mountain traffic circle and the parking area will be on the right just after the lake. Walk out to Route 6, carefully cross the road and walk for a half mile on the shoulder of Route 6. Just passed the intersections with Route 293 cross the road and walk into the woods. Watch for a trail and the aqua blazes of the Long Path. Turn left and follow the trail as it parallels Route 6. At .8 miles the trail comes out of the woods to the shoulder of Route 6 and at about 1 mile it turns right and begins a long downhill section at the point where the guardrail begins. Walk downhill on a track or path and pass through a gate in a fence. Almost immediately you will be on an old, abandoned road heading north. You may get views of the Woodbury Commons shopping center and Monroe-Woodbury High School. This road starts as Old Route 6 and then is marked as Estrada Road. At about 1.7 miles there is a chain across the road and a turnaround. Some descriptions give this as a parking area but there are several "official" signs that said "No Parking"! Walk down Estrada Road following the aqua blazes. At 2.6 miles at the bottom of the hill and just before crossing the Thruway, turn right on Abrams Road which runs parallel to the Thruway. Traffic here is usually minimal and the shoulder is wide enough to walk on. At 3.3 miles turn right onto Smith Clove Road and walk about .6 miles northeast. This road has almost no shoulder at the beginning and traffic can be heavy. Watch for some very expensive houses and a large, well-maintained golf club. At 3.9 miles turn left on Pine Hill Road and walk .7 miles until you cross over the Thruway. Continue to descend Pine Hill Road passing through an underpass under the Metro North tracks. At 4.9 miles the road turns left but you should continue straight ahead onto a woods road. The woods road is wide and open and acts as a right-of-way for a gas pipeline. The road travels along Woodbury Creek and the trip is pretty. Except for the traffic noise from the Thruway the setting could be mistaken for anyplace in the Catskills. The road swings to the northeast and then back north for about 1.5 miles. It is very flat. At 6.45 miles walk under a railroad trestle and near Woodbury Creek. Just after walking under the trestle, turn right heading east and walk up a steep bank to a fence. Walk around the end of the fence and turn left. Walk along it for about .1 miles when the trail will bring you out to the berm that runs along the shoulder of the Thruway. Walk north along the berm for a hundred feet and then turned left into the woods. Follow the aqua blazes over a fence and down a steep bank to Route 32. At the road turn left, walk across a bridge over the creek and stop just short of the trestle. Look across the road at a drive way and find a "Long Path" sign and aqua blazes on the other side. This is your turnaround point since the next section starts here. To get back to the car, turn around and retrace your route.
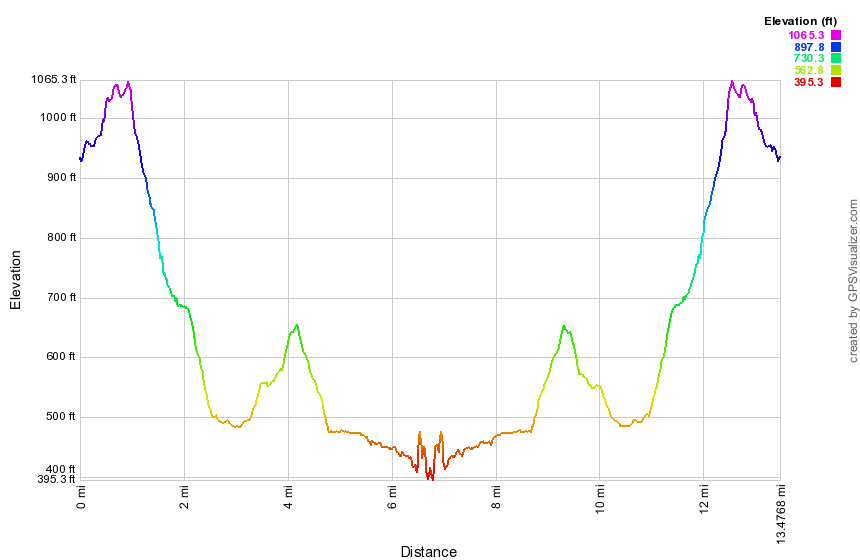 (The image below shows the profile of the hike. Remember that all vertical profiles are relative!)
Harriman: Lake Sebago to Cascade of Slid
| Quick Look | ||||
|---|---|---|---|---|
| Difficulty | Round trip | Total climb | Internet Maps | |
| 6.1 mi. | 1310 ft. | AllTrails | ||
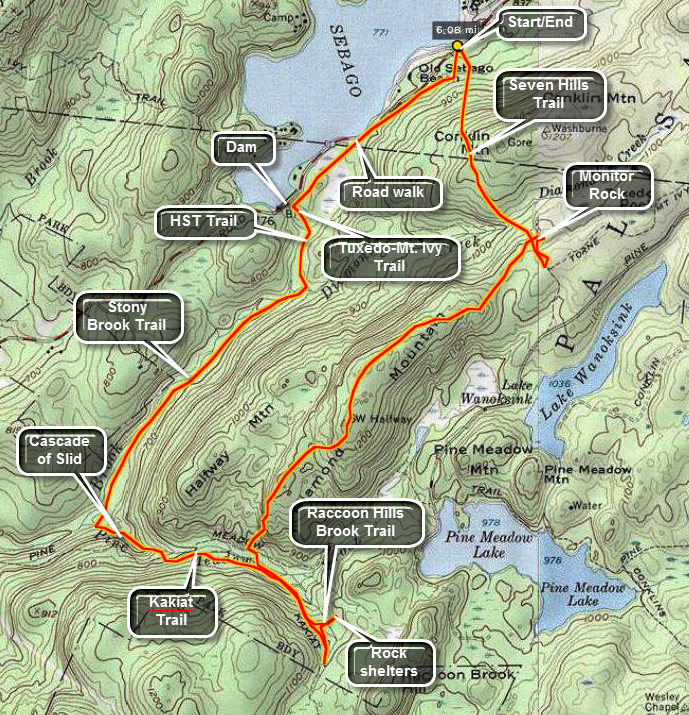
Take Seven Lakes Drive southwest from the Long Mountain Circle near Bear Mountain. Pass through the Tiorati Circle staying on Seven Lakes Drive. Pass through the Kanawauke Circle and continue southwest on Seven Lakes Drive until the parking area for the Lake Sebago boat launch on the right. Walk out the driveway to Seven Lakes Drive and cross to the other side. The start of the Seven Hills Trail is marked by three blue on white blazes. The trail ascends Conklin Mountain for about .75 miles before turning right or southeast. Look to the left at this turn to see a high rock cliff with a boulder perched on top. This is Monitor Rock and is worth the short climb on the path to the left. After returning from Monitor Rock, continue up the woods road before making the turn on the trail. Watch for another path to the left and follow it to another set of boulders and a red brick "structure". Return to the woods road, turn right and go back to the area where the Seven Hills trail turns southwest. Make the turn and start to walk along the Diamond Mountain ridge.
After about .5 miles there is a nice lookout over Lake Sebago. Continue on the trail passing a large boulder called the "cracked diamond". The trail flattens as it passes over some exposed rock and starts to descend. The views here are not spectacular and include mostly featureless forest. After passing the area where the HST Trail follows the Seven Hills trail, the trail begins to descend and the descent is STEEP in several different places. The trail descends to a stream. Turn left and follow the blue blazes to the bridge across the stream. The trail soon bears to the right. Follow the white blazes of the Kakiat Trail to the left. Within .25 miles the black blazes of the Raccoon Brook Hills trail turns off to the left. Follow this trail down to the brook and cross it. At the base of the rock ledges and cliffs are several rock shelters once used by Native Americans. Numerous artifacts were recovered from these shelters and placed in the Harriman Museum. Retrace your path to the area of the bridge over the stream.
Follow the red blazes of the Pine Meadow Trail for about .25 miles until it meets the orange blazed HST Trail. Turn right on this trail and cross the bridge. Below the bridge is a cascade of water over several different drops called the Cascade of Slid. Follow the white blazes of the Kakiat Trail until it meets the yellow blazed Stony Brook Trail just before another bridge. The Stony Brook Trail parallels Stony Brook and is a nice, relatively flat walk beside a stream. This trail continue for a little over a mile until it meets the HST and then the Tuxedo-Mt. Ivy Trail. In about .3 miles you will be at the base of the Lake Sebago dam. Walk the .75 miles back to the parking area on the Seven Lakes Drive.
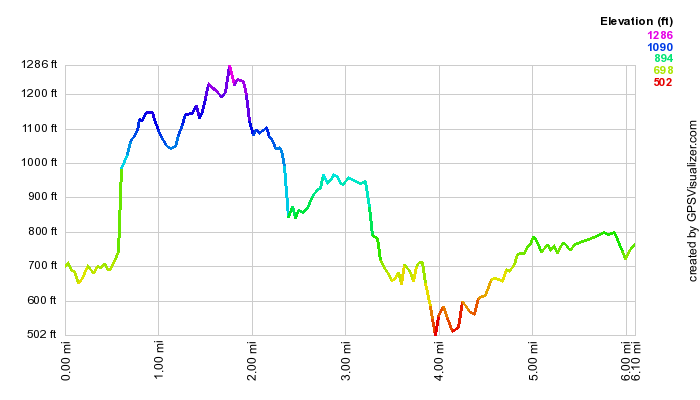 (The image at the left shows the profile of the hike. Remember that all vertical profiles are
relative!)
(The image at the left shows the profile of the hike. Remember that all vertical profiles are
relative!)
Harriman: Lake Skanatati to Pine Swamp Mountain
| Quick Look | ||||
|---|---|---|---|---|
| Difficulty | Round trip | Total climb | Internet Maps | |
| 5.6 mi. | 980 ft. | AllTrails | ||
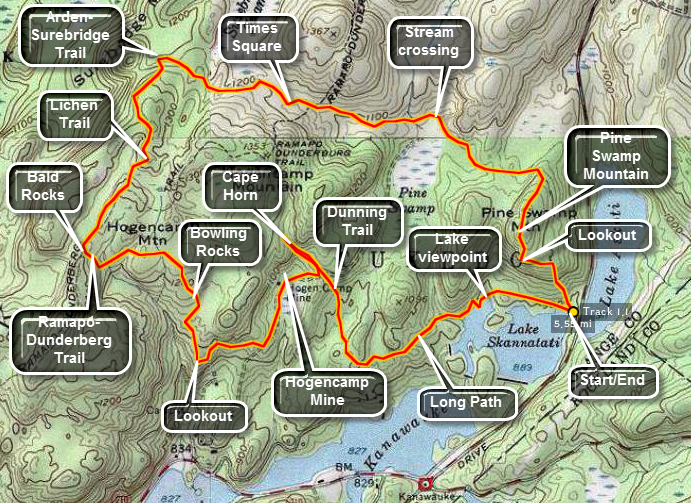
Take Seven Lakes Drive southwest from the Long Mountain Circle near Bear Mountain. Pass through the Tiorati Circle staying on Seven Lakes Drive. Just passed Lake Tiorati there are two lakes, one on each side of the road. These are Lakes Askoti and Skanatati. Pull into the parking area on the right next to Lake Skanatati. This lake is larger than it looks as you will see when you hike along the shore and see it from above. The trails start to the right of the lake. Bear to the left on the Long Path marked with aqua paint. As you walk along this path there are several opportunities to walk down to the lake to get a better view. After following the shoreline of the lake the Long Path continues west and then turns north. At 1.1 miles the Long Path meets the yellow marked Dunning Trail.
Continue north on the Long Path for about .2 miles. The trail ascends gently passed some really impressive rock formations and a cold mountain stream. Continue up the trail until you see a pair of glacial erratics on a hill above you. There was extensive mining in this area and you may see the opening of mine adits, mine pits and equipment. Turn around and hike back to the junction with the Dunning Trail. Turn right and follow the Dunning Trail west .15 miles. In this area there are extensive tailings from the Hogencamp Iron Mines. There are also open pits and at least one adit. The trail continues south and then west for .45 miles before turning abruptly north. In this area, there is a nice lookout over Little Long Pond. This is a good place to stop for a rest before continuing north.
Take the Dunning Trail north as it ascends about .3 miles to the Bowling Rocks. Here there is a long narrow open rock face with several medium sized boulders. All that is needed are some "pins". Continue walking another .35 miles to the Bald Rocks and the junction with the Ramapo-Dunderberg Trail. The Bald Rocks can be accessed from an unmarked trail just before the RD junction or turn left on the RD and walk up a slight incline to the Bald Rocks. At the trail junction turn right on the red marked RD Trail. This trail has many open rock faces some of which are flat but MANY of which are tilted. These areas can be slippery when wet, cold when windy and IMPOSSIBLE when icy. The trail descends into a swale with a small stream. There is a log bridge here. On the other side the trail ascends up a short rock scramble and then up an open rock face. The RD Trail goes up and over the top. At the top look down to you left to see a small pond often frequented by wildlife. Continue for several hundred feet on the RD Trail. Look straight ahead to see a large glacial erratic that looks a little like the prow of a ship. Return to the top of the rock outcrop and turn right. Watch for the blue L on a white background that marks the Lichen trail. The total distance from the Dunning-RD junction is about .35 miles.
The Lichen Trail runs to an elevated rock plateau and continues straight ahead off the plateau and down to the left. After wrapping around a rock outcrop to the right the trail ascends over...an open rock face. From this point is a nice lookout over Island Pond. The trail continues .35 miles along open rock and descends steeply down to the Arden-Surebridge Trail which is marked with red triangles. Turn right on the ASB Trail and continue over relatively flat but often wet ground for .45 miles to Times Square. This is a junction of four trails and a woods road. The trails are well marked but make sure you continue ahead and slightly to the right on the ASB Trail. This trail has its ups and downs as it continues .45 miles to the junction with the Dunning Trail. Pick your way across a stream that eventually empties into Pine Swamp and stay on the ASB Trail. South on the Dunning Trail are the remains of the Pine Swamp Iron Mine. This mine has an adit that can be entered in drier weather and a large stope.
The ASB Trail continues east for .5 miles and then turns directly south and starts to climb Pine Swamp Mountain. In .2 miles you will be at the top of the mountain. The climb is not difficult and proceeds along a wide woods road. From the top of Pine Swamp Mountain are several nice lookouts over the surrounding lakes. Directly south is lake Skanatati and just beyond the two part of Lake Kanawauke. Around to the left Lake Askoti is partly visible with Little Long Pond on the extreme right. After taking some time to enjoy the view and take pictures, get back on the trail and descend to the parking lot .35 miles away. This descent is steep in spots with one short rock scramble.
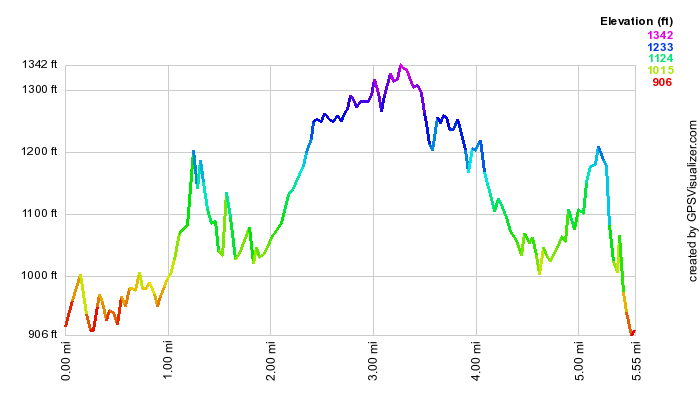 (The image at the left shows the profile of the hike. Remember that all vertical profiles are
relative!)
(The image at the left shows the profile of the hike. Remember that all vertical profiles are
relative!)
Harriman: Lake Skanatati to St. John's Road
| Quick Look | ||||
|---|---|---|---|---|
| Difficulty | Round trip | Total climb | Internet Maps | |
| 3.5 mi. | 555 ft. | AllTrails | ||
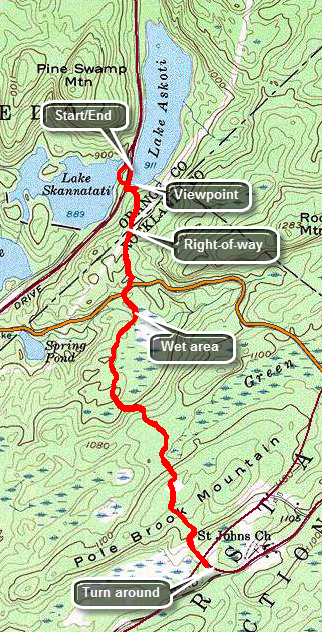
Take Seven Lakes Drive southwest from the Long Mountain Circle near Bear Mountain. Pass through the Tiorati Circle staying on Seven Lakes Drive. Just passed Lake Tiorati there are two lakes, one on each side of the road. These are Lakes Askoti and Skannatati. Pull into the parking area on the right next to Lake Skannatati. Walk out the far end of the parking area following the aqua blazes. Walk up to the road, hop the guard rail and cross to the other side. Follow the blazes onto a gravel and cinder road until they veer to the right. The trail leads to a woods road and stays on it for a short distance before the leaving the road and starting a gentle climb. Crossed a right-of-way with a telephone cable and three stands of open wire. At .4 miles you will hit the top of the hill and then drop to Route 106 at .5 miles. Turn right on the road and walk a few hundred feet to the Long Path blazes on the left. The trail crosses a marshy area on some thin slats nailed to some thin rails. Head south toward Lake Welch Drive and St. John's Road as the trail gains about 175 feet from 1 mile to 1.4 miles. Along the way there is a small foundation on the right side of the trail. The trail travels over a flat area and then begins the descent from the little ridge to Lake Welch Drive. With the road in sight watch for a woods road which is lined on either side by large boulders. Walk out to Lake Welch Drive, cross the road and find the Long Path blazes on the right side of St. John's Road. Walk along the trail for a few feet and then turned around and retrace your route to the car. Further down St. John's road is the St. John's in the Wilderness Church is a beautiful, old church with a rich history. Each year the church holds a special Palm Sunday service for hikers. I have never been inside but hope to attend services there this next year. The architecture from the outside is worth a visit.
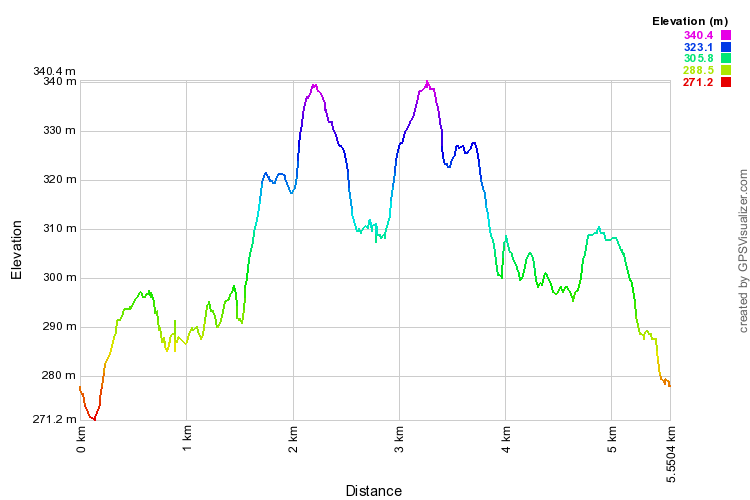 (The image at the left shows the profile of the hike. Remember that all vertical profiles are relative!)
Harriman: Lake Tiorati to Brien Shelter
| Quick Look | ||||
|---|---|---|---|---|
| Difficulty | Round trip | Total climb | Internet Maps | |
| 8.2 mi. | 1650 ft. | AllTrails | ||
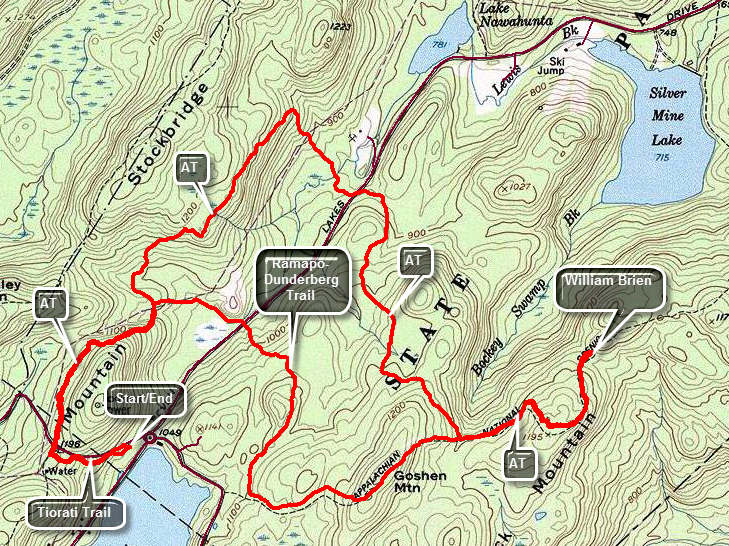
Take Seven Lakes Drive southwest from the Long Mountain Circle near Bear Mountain. At the Tiorati Circle turn right on Arden Valley Road and park in the parking area on the left. Find the blue blazed Tiorati Trail that leaves the parking area heading west and roughly parallelling Arden Valley Road. After about .3 miles, the blue trail ends at the AT and Ramapo-Dunderberg Trail. Turn right and follow the trail blazes. The trail undulates a bit but then descends and at about 1 mile the Ramapo-Dunderberg Trail heads off to the right. Stay on the AT and head northeast along the shoulder of Stockbridge Mountain ridge. At 1.75 miles you will begin to drop about 300 feet until you crossed Seven Lakes Drive at 2.5 miles. From the road the trail continues on a woods road but the AT markings are very faded compared to the bright white on the western side. After a short distance on the woods road, the trail cuts into the woods heading south then southeast. At 3.5 miles you regain the 300 feet you dropped on the other side of the road. At 3.7 miles the Ramapo-Dunderberg Trail turns right as you continue on the AT following the white blazes to the left. The trail gains a little elevation and then begins to drop. The William Brien Shelter will appear at 4.4 miles. You are now ready to return so turn around and retrace your path back to the junction with the Ramapo-Dunderberg Trail at 5.2 miles. Head left to use this trail to return. The trail meanders up and down and generally heads WSW. At 6.1 miles it heads north and then east before crossing Seven Lakes Drive at 6.8 miles. At 7.2 miles you will meet the AT again. Turn left heading west toward Arden Valley Road. The .75 miles back to the road is all uphill but it is not steep. Cross the road and turn left shortly after to take the Tiorati Trail back to the car.
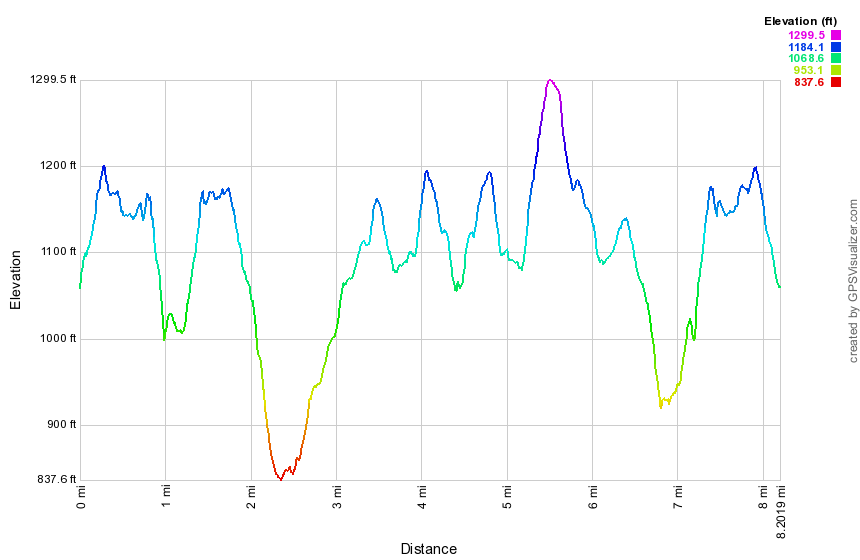 (The image at the left shows the profile of the hike. Remember that all vertical profiles are
relative!)
(The image at the left shows the profile of the hike. Remember that all vertical profiles are
relative!)
Harriman: Lake Tiorati to Hippo Rock
| Quick Look | ||||
|---|---|---|---|---|
| Difficulty | Round trip | Total climb | Internet Maps | |
| 4.9 mi. | 1040 ft. | AllTrails | ||
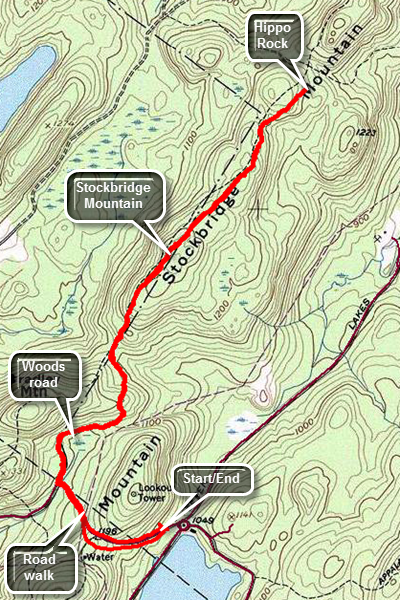
Take Seven Lakes Drive southwest from the Long Mountain Circle near Bear Mountain. At the Tiorati Circle turn right on Arden Valley Road and park in the parking area on the left. Walk up to the Arden Valley Road and head west and north on the road. Walk up and down the hill, to find the Long Path at the point where the road makes a sharp left. The aqua blazes are clear on both the rocks and trees. Turn right onto a wide woods road and walk passed a gate heading north and then north northeast. At 1 mile the trail turns to the north again and rises over the top of a ridge and descends down the other side. The forest is all hardwoods and very open. As you come down off the first, small ridge you enter the area between two ridges. It is very rocky as is typical of Harriman. Begin to climb up the Stockbridge Ridge to Stockbridge Mountain. The climb looks steep on the profile but is only about a 10% grade. At the top of the mountain is a flat, open area with a limited view. Descend from Southbridge Mountain still heading north and continue north along the trail as it rolls some. Hippo Rock is a large and precariously balanced glacial erratic on the left side of the trail. As you descend a hill at 2.5 miles the rock will be directly ahead and is unmistakable. When you are done at the rock, turn around and retrace your route back to the car.
 (The image at the left shows the profile of the hike. Remember that all vertical profiles are relative!)
Harriman: Lake Tiorati to Lemon Squeezer
| Quick Look | ||||
|---|---|---|---|---|
| Difficulty | Round trip | Total climb | Internet Maps | |
| 7.1 mi. | 1700 ft. | AllTrails | ||
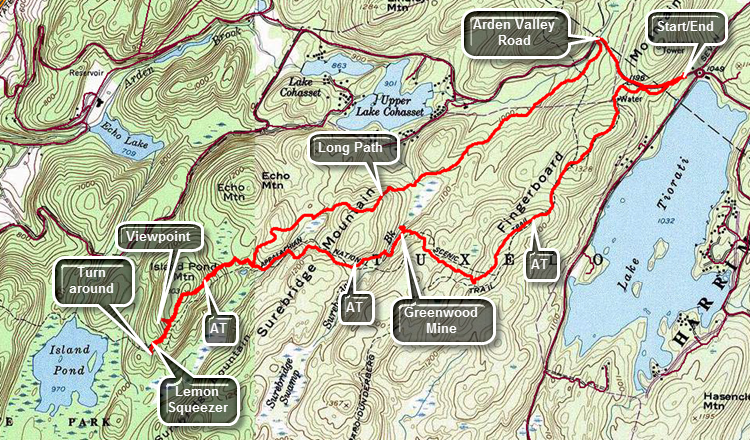
Take Seven Lakes Drive southwest from the Long Mountain Circle near Bear Mountain. At the Tiorati Circle turn right on Arden Valley Road and park in the parking area on the left. Find the blue blazed Tiorati Trail that leaves the parking area heading west and roughly parallelling Arden Valley Road. After about .3 miles, the blue trail ends at the AT and Ramapo-Dunderberg Trail. Turn left and follow the trail blazes. Almost immediately you will pass by a new steel water storage tank on the right and the old cement and wooden cistern on the left. The trail begins to climb to the top of the Fingerboard Mountain Ridge. The trail generally ascends and you will hit 1375 feet at the highest point which is a little more than 400 feet higher than the parking area. You can see Lake Tiorati below if there are no leaves on the trees but there is never a good enough vantage point to take pictures. The trail surface is typical for Harriman with areas of open rock faces alternating with jumbles of rocks and a few clear areas between! Watch for the numerous glacial erratics that litter the park. There ware three small but interesting "pink" boulders in one area which may be "pinks schist". At 1.3 miles you will be at the highest point of the ridge you will then drop almost all the elevation you gained as you hike downhill to Surebridge Brook. Do not cross the brook here but turn left to follow the AT along the brook. Watch for the tailings piles from the Greenwood Mine. The Harriman area is full of iron mines that date back as far as the period of the American Revolution. Some are just small pits while others like the Greenwood Mine are much bigger. Most of the Greenwood Mine is now underwater but the main adit and the tailings are visible along the trail. There is another large adit up on the hillside. Continue on the AT until it crosses the brook at 2.2 miles. Ascend a small hill and then walk back down the other side to the junction with the Long Path at 3 miles. Continue on the AT and begin the steepest climb of the day to the top of Island Pond Mountain. As you descend the other side watch for a nice lookout off to the right that has a beautiful view of Island Pond. Walk back to the trail and down the other side of the mountain to the area of the Lemon Squeezer. The Lemon Squeezer on the AT in Harriman is one of at least four that I know of and each is different and interesting in its own right. You will come to a point on the AT where there is a sheer drop of at least 10 feet with only a few handholds. You may try this descent or opt for the easy way which is marked by a sign that says ... "Easy Way"! Work your way back over to the Squeezer which is a narrow slot that you have to walk through. Walk back through the Squeezer and return to the junction with the Long Path. You will have to climb up and over Island Pond Mountain again. At 4.5 miles turn left or northeast on the Long Path. For the next 2.1 miles you will struggle over some very rocky terrain. Along the way you will hike up and down at least three hills. Nothing is very steep or very high but the constant hike over the rocks begins to become uncomfortable. Finally at 6.6 miles you will hit the Arden Valley Road. Turn right and walk on the flat, hard surface up a hill. Simply stay on the road and walk back to the car at the Lake Tiorati Circle parking area.
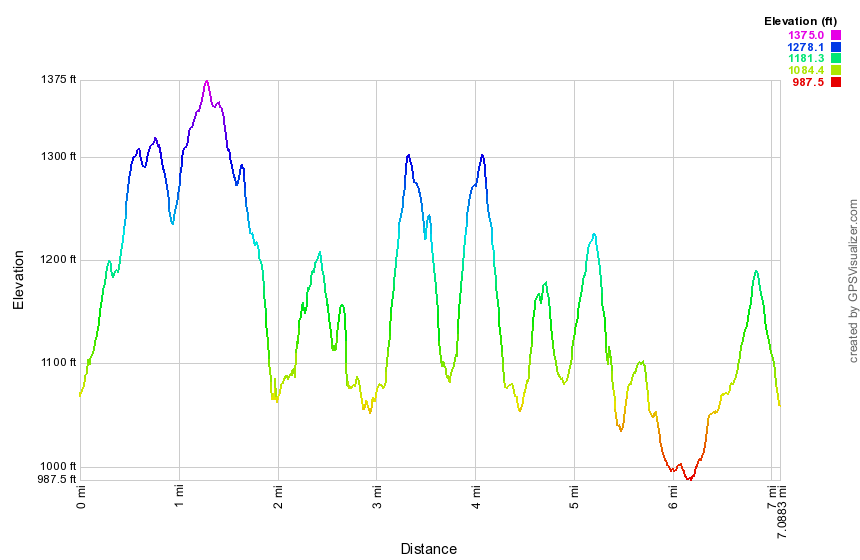 (The image at the left shows the profile of the hike. Remember that all vertical profiles are relative!)
Harriman: Long Path to 1779 Trail Loop
| Quick Look | ||||
|---|---|---|---|---|
| Difficulty | Round trip | Total climb | Internet Maps | |
| 10.9 mi. | 2170 ft. | AllTrails | ||
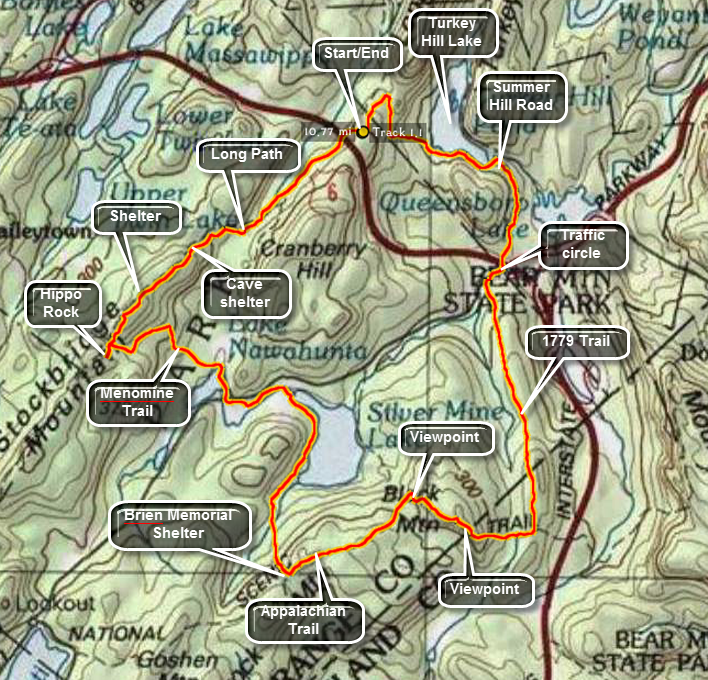 Take I86, the Quickway, to the exit just before the Harriman toll plaza and get on Route 6 East. Drive a little more than 4 miles to the parking area on the left where the Long Path crosses the road. You may also take Route 6 West from the Bear Mountain traffic circle for less than a mile. In this case the parking area is on the right. From here the Long Path heads northeast toward Long Mountain and passes the Torrey Memorial on the way. Walk out the exit for the parking area and across the road since this hike heads in the opposite direction. The Long Path crosses almost directly across from the exit to the parking area. The trail follows wide woods roads in many places. Be careful as you hike since there are many fire roads and other paths that crisscross the trails and it is easy to get lost even with a map. The Long path heads almost directly southwest and climbs around 400 feet in the first 1.8 miles. Just before another climb there is a series of rock overhangs which are labeled "cave shelter" on the NYNJTC maps. Climb to the top of the rise and walk along a flat part of the trail to a rock shelter at 2.0 miles. The shelter faces west and the map marks it as a viewpoint. Like so many of the places that were once viewpoints the trees have grown to block most of the view. Descend to the junction with the yellow Menomine Trail but continue straight ahead to Hippo Rock at 2.3 miles into the hike. This rock really does look like a hippo from the front. Head back to the trail junction and turn right on the yellow Menomine Trail heading generally southeast. The trail is a long descent along a woods road and soon you will pass Lake Nawahunta. At 3.6 miles cross Seven Lakes Drive and head toward Silvermine Lake. Walk the trail along the west shore of the lake. Over the next .6 miles the trail gains 320 feet to the site of the Brien Memorial Shelter. The shelter is about 5.3 miles into the hike. Turn left onto the Appalachian Trail and starting up a short, steep rock climb. This trail is marked in white for the AT but also has red blazes as it is part of the Ramapo Dunderberg Trail. After reaching the top of the rock scramble, the trail flattens some with a few ups and downs. For about .9 miles from the shelter the trail rolls up and down slightly until at 7.2 miles it turns to the right. Now you are hiking southeast rather than northeast and starting up Black Mountain. After a short but steep climb there is a viewpoint over Silvermine Lake. Continue on to the summit at 7.7 miles into the hike. The views here include the New York City skyline. From the summit start down a very steep descent of almost 400 feet in .35 miles. A little further on turn left and head almost due north on the blue 1779 Trail. The trail parallels the Palisades Parkway which is just over a ridge to the right. There are no views but the 1.6 miles to Seven Lakes drive near the Long Mountain traffic circle is pleasant enough. At the traffic circle cross the road and head directly into the woods. DO NOT walk further up the road as the trail there is not marked and it will take you out of the way. Find a marker on a tree and then look ahead across the construction yard for another on a pole! Walk to the back left corner of the yard a find the trail and the markers. Enter the woods to continue the hike. The trail heads north toward the Popolopen Gorge Trail and Turkey Hill Lake just skirting a climb up Summer Hill. After about .6 miles, you may walk straight ahead on Summer Hill Road rather than take the circuitous route on the trail. If you want to stay on the trail, turn to the right. Be sure to turn left at the next trail junction! Just before you cross a small stream look for the trail on the left. It may be hard to spot since it is marked for an approach from the opposite direction. Stay on the trail and you will soon be at the dam for the lake. Continue around the west shore of the lake which has several spots to stop and take pictures. From the dam it is all uphill for the next .9 miles until you hit the Long Path again at 12.2 miles. Turn left on the Long Path and hike the .3 miles back to the car.
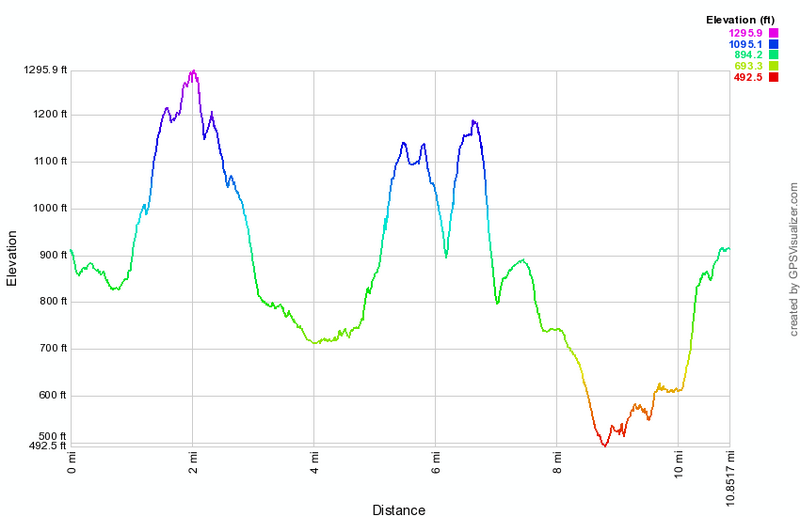 (The image at the left shows the profile of the hike. Remember that all vertical profiles are relative!)
Harriman: ORAK Ruins from St. John's Church
| Quick Look | ||||
|---|---|---|---|---|
| Difficulty | Round trip | Total climb | Internet Maps | |
| 6.7 mi. | 1295 ft. | AllTrails | ||
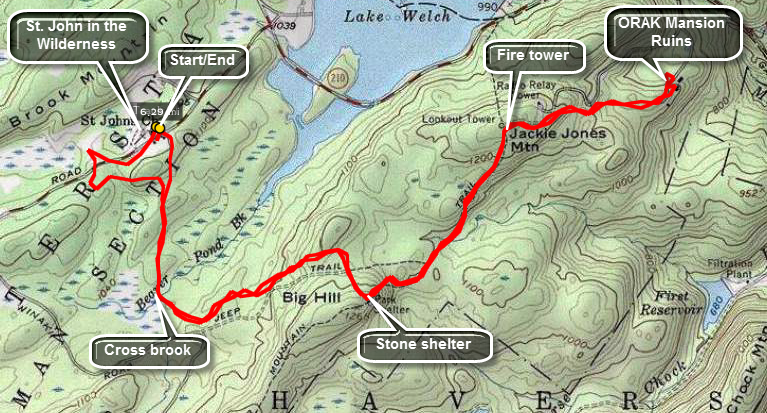
Take Seven Lakes Drive southwest from the Long Mountain Circle near Bear Mountain. Pass through the Tiorati Circle staying on Seven Lakes Drive. Pass through the Kanawauke Circle and continue southwest on Seven Lakes Drive until the sign for Lake Sebago Beach. Stay to the left and turn left to go toward Lake Welch Drive. Turn onto Lake Welch Drive and watch for St. John's Road, the first road on the right. Turn here and drive until you see St. John in the Wilderness Church on the left. Park in the parking lot. Walk back down the road for .3 miles toward Lake Welch Drive. At the end of the road just before Lake Welch Drive turn right off the road and begin to follow the aqua blazes of the Long Path. The trail alternates between trail and wider woods road in many places. It also makes several twists and turns and rolls over hills and at least one mountain. At .45 miles the trail bends sharply to the left and at .65 it turns onto a woods road to the right. The road also continues to the left and is a shortcut back to the church. After climbing a bit, you now descend to cross Beaver Pond Brook in a swampy area. Along but narrow causeway gets you across this area. Just after the causeway, notice the large grove of red pine which was probably planted in the area. At 1.2 miles the trail again turns to the left and parallels Pine Meadow Road. Stay on the trail as it rises to 1.7 miles and then turns right to cross the wide road. At 1.8 miles the trail tops out at Big Hill and the Big Hill Shelter. The shelter is the typical stone structure with dual fireplaces at the entrance and a pit in front. There is a limited view east to the Hudson. Here the Suffern Bear Mountain Trail comes in from the right and joins the Long Path for a short distance.
The trails now descend a rather steep slop. Watch straight ahead and you will see two large communications towers in the distance on Jackie Jones Mountain. To the left of these towers is a shorter fire tower where you are headed. At about 2.0 miles the Long Path bears right on a woods road. Follow the yellow SBM Trail to the left as it descends slightly and crosses a brook. At 2.15 miles the trail crosses Pine Meadow Road and begins the ascent up Jackie Jones Mountain. This mountain and Rockhouse Mountain are the highest points in Rockland County. At 2.7 miles , at the top of the mountain stands a now closed fire tower. Although the cab is closed, you can climb the tower for the view. Be careful as some of the boards look better than others. Also, if there is any wind at ground level it may be at a somewhat higher velocity near the top of the tower. The tower does offer good views for 360 degrees on the landing just below the cab. Back on the ground continue on the SBM Trail as it begins a descent passed the communications towers on the left. The trail bears to the right and passes over an open rock face. Maps mark this as a viewpoint but the view is limited by trees which have grown. The trail continues to descend and at about 3.0 mikes you will begin to see some stonework and foundations.
This marks the ruins of the ORAK mansion constructed in 1923 by an executive of the company that produced KARO syrup. The mansion was torn down years later but much of the stonework still remains. At first it doesn't look like much but keep walking toward the paved driveway. Bear right to what look like an open clearing. You are standing in what was once the dining room. To the left is a curved stone wall with excellent craftsmanship. The wall has and arched doorway and small, round windows. The owner liked ships and the sea and the dining room was built to resemble a ship. Walk back to and down the driveway. On the right are the foundations of other building. If you continue to walk on the driveway, the gatehouse, which is mostly intact, will be on the left. The trail at this point continues out to Gate hill Road or Route 106. Along the way is another mansion constructed by Rose Renard of Red Rose Tea fame. Turn around and walk back on the driveway. You may want to walk off to the right to see the remains of other outbuildings. When you are finished exploring, follow your route all the way back to the parking area and your car.
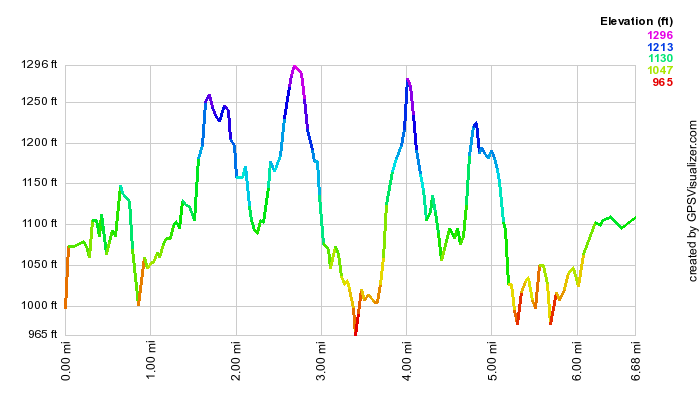 (The image at the left shows the profile of the hike. Remember that all vertical profiles are relative!)
Harriman: Pine Swamp and Hogencamp Mines
| Quick Look | ||||
|---|---|---|---|---|
| Difficulty | Round trip | Total climb | Internet Maps | |
| 4.1 mi. | 850 ft. | AllTrails | ||
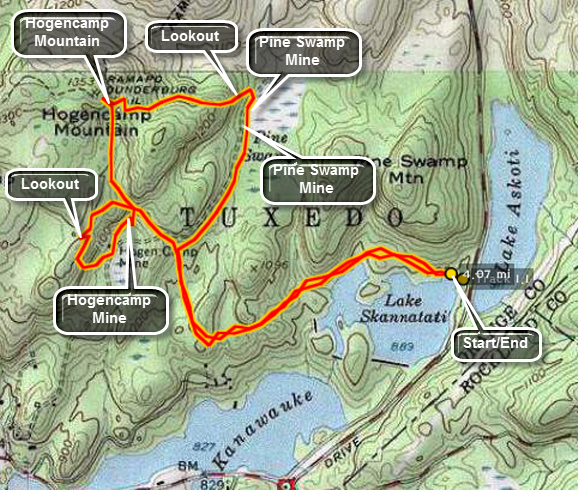
Take Seven Lakes Drive southwest from the Long Mountain Circle near Bear Mountain. Pass through the Tiorati Circle staying on Seven Lakes Drive. Just passed Lake Tiorati there are two lakes, one on each side of the road. These are Lakes Askoti and Skanatati. Pull into the parking area on the right next to Lake Skanatati. This lake is larger than it looks as you will see when you hike along the shore and see it from above. The trails start to the right of the lake. Bear to the left on the Long Path marked with aqua paint. As you walk along this path there are several opportunities to walk down to the lake to get a better view. After following the shoreline of the lake the Long Path continues west and then turns north. At 1.1 miles the Long Path meets the yellow marked Dunning Trail.
Bear right on the Dunning Trail and walk .5 miles watching for the Pine Swamp on the right and tailings piles on the left. As son as you see the tailing cut up the hill to the left watching for the paths other hikers have used. You should end up in a small area with pine trees. Straight ahead is the cut of the Pine Swamp Mine with walls 20 to 30 feet high. The entrance to the mine is straight ahead. It may be a little wet getting to the adit but the ore vein ran upward in this mine. Walk into the mine and carefully climb upward. Stop to look at the drill marks on the walls. Near the top of the mine is an air shaft. Work your way back down to the entrance and turn right and climb up the hill. Watch for the opening of the air shaft an the hill. At this point you can return to the Dunning Trail and follow it to Times Square. At Times Square take the Long Path over the hill to the Hogencamp Mine. You may also walk cross country and bushwhack from the hill above the Pine Swamp Mine to Hogencamp Mountain.
From the Long Path find a path to the top of Hogencamp Mountain. This is easier than finding the trail to the top. There is a nice view in all directions from the top of Hogencamp Mountain even though its elevation is not particularly great. Work your way back down to the Long Path. As you walk along the Long Path toward the mine keep an eye out for foundations that indicate buildings that were once part of the extensive Hogencamp Mining Complex. Eventually you will be walking along a small stream and between some large boulders on the left and a rock out cropping on the right. Walk past this are and watch for a path that goes down and to the right. This path leads to the most interesting cut of the mine. This cut passes into the rock under the trail you were just hiking. It is filled with water so it is hard to determine the depth. When you are in the cut, turn around and let your eye follow the trenches that parallel the base of the hill.
Walk along the base of the hill and in and out of the trenches. Be sure to walk down to the Dunning Trail to see the tailings piles on the left. You will also see a pit with a large pipe emerging vertically from the pit which is filled with water. Walk back up toward the base of the hill and watch for a deep hole. You may also see some laid stone which may have been part of some foundation. You may return to the Dunning Trail and walk back to the junction with the Long Path where you started the loop. If you have some additional time, climb the hill and walk the ridge above the mine. There are some views of the surrounding countryside and of the mine below. Keep walking and you will intersect the Long Path above the mine where you were before. Walk down the Long Path and to the junction with the Dunning Trail. Stay on the Long Path and retrace your path to the parking area.
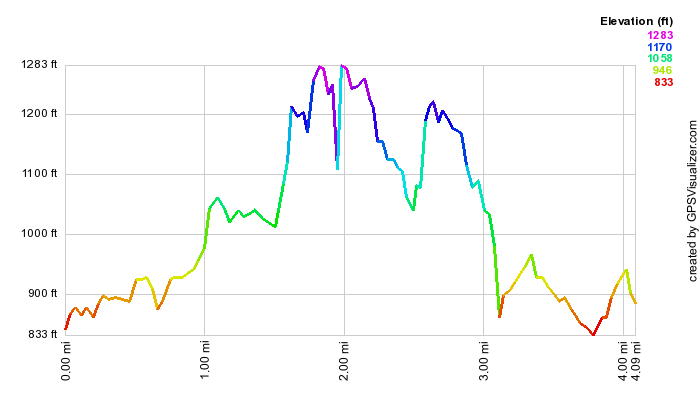 (The image at the left shows the profile of the hike. Remember that all vertical profiles are
relative!)
(The image at the left shows the profile of the hike. Remember that all vertical profiles are
relative!)
Harriman: Pingyp Mountain
| Quick Look | ||||
|---|---|---|---|---|
| Difficulty | Round trip | Total climb | Internet Maps | |
| 4.1 mi. | 920 ft. | AllTrails | ||
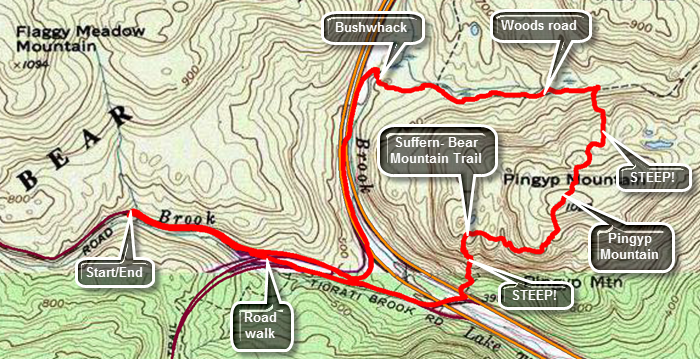
Take exit 16 off the Palisades Parkway and head west on Lake Welch Drive. When the road splits stay right on Tiorati Brook Road. Drive ,4 miles and park on thesauri shoulder of the road in a large roadside parking area. Start the hike by walking east on the road toward the parkway. The road is narrow with no shoulder and the cars move rather swiftly. The walk is downhill and you will have to walk back up this grade at the end of the hike. Continue on the road until it merges with Lake Welch Drive and then continue until you see the yellow blazes of the Suffern-Bear Mountain Trail coming in from the right at about .8 miles. The blazes are old and not very distinct but they lead to an overpass over the southbound parkway to the northbound lanes. You should see the trail on the other side of the road. Wait until there was a big gap in the traffic before crossing. As soon as you cross the road, the climb starts passing through some rocks. This might be the steepest hike in the park and it was some very narrow ledges and areas that require some rock scrambling. As you ascend the trail take advantage of any views to take pictures since the top of the mountain is wooded. On the climb from the parkway to the first place where the trail levels is .2 miles but the vertical gain is 380 feet for a 35% average grade. There are two more smaller climbs after this but each has a certain "charm". Along the way you will pass by the memorial plaque to Harold Scutt who sited the trail in 1930 and died shortly thereafter in a plane crash. The second climb has an interesting steep slab of rock to negotiate while the third had a crevice to scramble up. The first step up the crevice is huge and requires some upper body strength to make it up. After that, there the trail winds and gains some elevation to the summit of the mountain. Start to descend the north side of the mountain. It is not as steep as the route up but reaches over a 25% grade in places. At 2.1 miles the Suffern-Bear Mountain Trail reaches the base of the mountain and turns right on a woods road marked "Pines" on the map. This can be used to hike a longer loop of about 7 miles using the Red Cross and Beech Trails as well as Tiorati Brook Road. Turn left or west on the road as it heads toward the parkway paralleling a stream. Follow the road which is not blazed but pretty easy to find. You may have to detour several times as the road runs through low areas that are now marshes filled with impressive stands of phragmites. As you near the parkway, the road becomes less distinct and you will have to bushwhack your way through some brush. Depending on which route you take you will most likely have to cross Stillwater Brook. The brook is deep in places but you should be able to find some stepping stones to get you across. Walk south along the northbound lanes and then cross to the wide, wooded median. Walk the median until exit 16 and cross to Lake Welch Drive. Follow Lake Welch Drive and Tiorati Brook Road for .7 miles uphill back to the car.
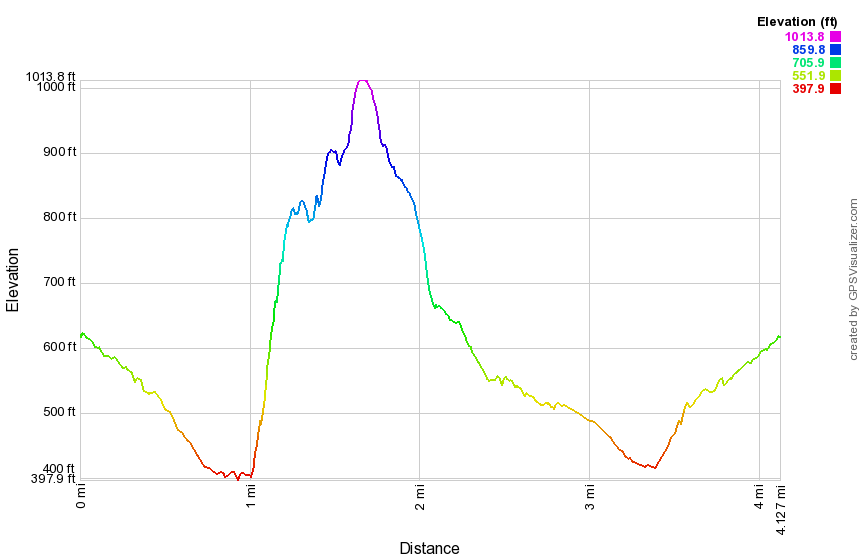 (The image at the left shows the profile of the hike. Remember that all vertical profiles are
relative!)
(The image at the left shows the profile of the hike. Remember that all vertical profiles are
relative!)
Harriman: Ramapo Torne and Russian Bear
| Quick Look | ||||
|---|---|---|---|---|
| Difficulty | Round trip | Total climb | Internet Maps | |
| 6.8 mi. | 1893 ft. | AllTrails | ||
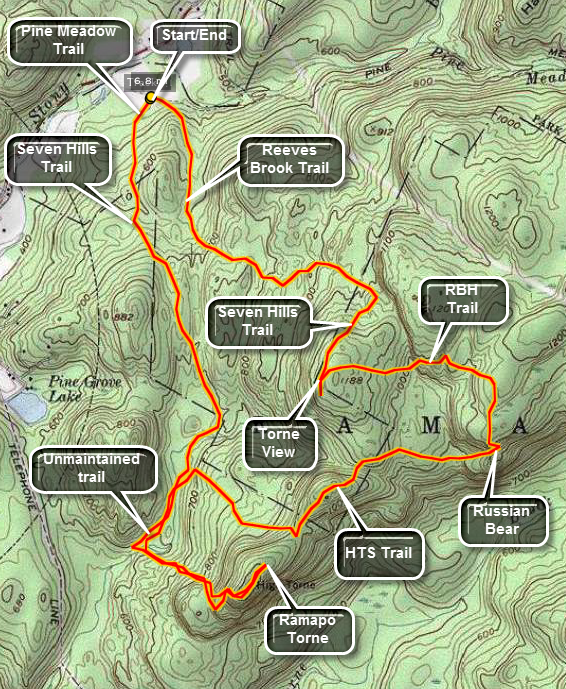
Take Seven Lakes Drive southwest from the Long Mountain Circle near Bear Mountain. Pass through the Tiorati Circle staying on Seven Lakes Drive. Pass through the Kanawauke Circle and continue southwest on Seven Lakes Drive until the parking area for the Reeves Brook Visitor's Center appears on the left. Walk to the back right of the parking area and walk briefly through a field on the red marked Pine Meadow Trail. Watch for the blue blazes of the Seven Hills Trail on the left. Continue along this trail as it rises over a hill and then descends to a junction with the orange blazed HST Trail. Turn right here and walk another .2 miles to the base of the Ramapo Torne. Turn left here and start a steep ascent to the first level of the Torne. Watch carefully as you ascend to the first level for the orange blazes that go to the left and start the ascent of the second level of the Torne. This is another steep ascent over some large, scattered boulders. At the top of the second level is one more short ascent to the very top of the Torne. Stop here to take in the views in all directions.
You can return to the trail junction and get on the blue Seven Hills Trail that leads to the HST Trail. The easier route is to continue over the Torne on the orange HST Trail. Stay on this trail as it rolls up and down. Before an obvious descent look straight ahead at the rock outcropping which is the Russian Bear. The trail descends to crosses a small stream and then begins to ascend up the Russian Bear. the trail winds around this tall rock outcropping to a set of stairs on the other side. The ascent is steep but short and the stairs help. Be sure to look back toward the Ramapo Torne for a great view. After taking in the views in all directions, follow the orange trail over the Russian Bear and watch for the black blazes of the Raccoon Brook Hills Trail.
Turn left on the black trail and walk along a steep cliff called the Pulpit. Look DOWN to the area below where you will soon be after a steep descent off the Pulpit. After the descent, look back at the Pulpit. This view makes the reason for the name more obvious. Continue on the black trail passed the white Reeves Brook Trail until it again meets the blue Seven Hills Trail. Turn left on this trail and walk a short distance until the trail starts to descend. Look ahead to the Ramapo Torne. This is Torne View. Retrace your steps to the trail junction but continue straight ahead on the blue trail. As this trail begins to descend it crosses the white Reeves Brook Trail. Turn left here and continue on this trail as it descends back toward the parking area. This trail is hard to follow at times so watch for the blazes on the trees and rocks. The trail follows a stream which has several small cascades along the way. As the trail descends an old woods road it meets the red Pine Meadow Trail. Turn left here and walk back to the parking area.
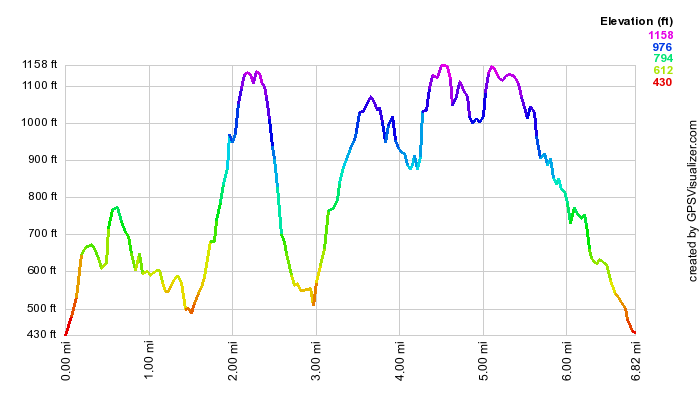 (The image at the left shows the profile of the hike. Remember that all vertical profiles are
relative!)
(The image at the left shows the profile of the hike. Remember that all vertical profiles are
relative!)
Harriman: Route 106 to Elk Pen
| Quick Look | ||||
|---|---|---|---|---|
| Difficulty | Round trip | Total climb | Internet Maps | |
| 9.3 mi. | 1936 ft. | AllTrails | ||
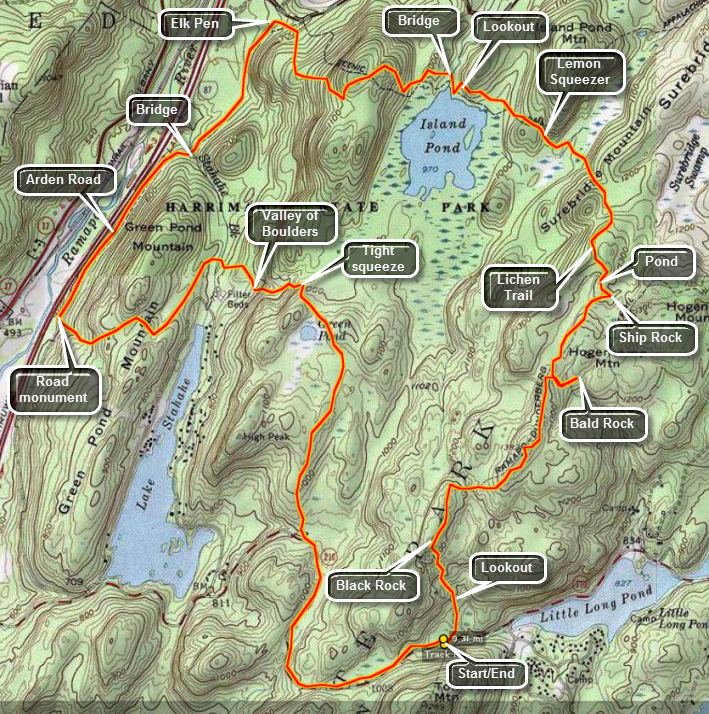
Take Seven Lakes Drive southwest from the Long Mountain Circle near Bear Mountain. Pass through the Tiorati Circle staying on Seven Lakes Drive. At the Kanawauke Circle take Route 106 west passing between the two parts of Lake Kanawauke. The next body of water on the left is Little Long Pond. Just passed Little Long Pond on a slight upgrade will be a parking area on the right for up to ten cars. There are no trailhead markers but this is the place to park. After parking walk into the woods straight ahead and watch for the red markers of the Ramapo-Dunderberg Trail.
Hike through some trees to an area with enormous and impressive rock formation. Hike up and through these formations for about .25 miles until you are on an exposed rock face with a good view of the surrounding terrain and the hills in the distance. Get back on the RD and hike across the rocky spine surrounded by a few trees. After another .25 miles you will be at Black Rock which also gives nice views. As you hike keep looking for the best views since they aren't always at specific named places along the way. In about .8 miles you will be at the Bald Rocks in an open area where many glacial erratics lie on top of strangely marked bedrock. Just after this area the yellow Dunning Trail turns left to Hogencamp Mountain and the Hogencamp Mine. To the left the trail leads to the White Bar Trail and on to the Nubian Trail near Valley of the Boulders.
Continue on the RD passing Hogencamp Mountain on the right. After ascending some open slabs of rock, take in the nice views of the immediate area, the hills and valleys afar and the little pond just below. bear right on the Rd and descend off the ridge for just a short distance. Ahead and slightly to the left will be a large glacial erratic sitting among some trees. Use you imagination to see the prow of a ship sailing into the forest. This is Ship Rock. You can continue on the RD to Times Square and return on the Arden-Surebridge Trail. It may be easier to retrace your steps back to the open rock faces and turn right on the Lichen Trail marked with a blue L on a white background. This trail has some nice viewpoints and is worth the walk. Keep a careful watch for the markers as they may be hard to spot. The Lichen Trail is only about .4 miles long. It passes over a rocky outcrop and then drops around it before rising over more open rock faces. At this point Island Pond can be seen at a distance on the left. At the bottom of a short, steep descent turn left on the red marked Arden-Surebridge Trail which runs concurrently with the aqua blazes of the Long Path.
In .8 miles you will hook up with a section of the white blazed Appalachian Trail just passed the Lemon Squeezer. Before this trail junction are several others that can mislead and confuse. An unmarked trail named the Bottle Cap is the first to appear on the right. Just a few hundred feet later the aqua blazes turn right as the Long Path leaves to the north. In this same area the white blazes of the White Bar Trail appear on the left. Stay on the red trail to an area where you will see some tight passages between the rocks. This is the Lemon Squeezer, The trail does not actually pass through the Lemon Squeezer but feel free to examine this area and walk through the tight "canyons". Just after this the red blazes turn abruptly left as the A-SB Trail turns south. Continue straight ahead on the Appalachian Trail as it works its way passed Island Pond. You will want to get a better view of this little pond but each potential viewpoint is blocked by trees. Stay on the AT as it descends to a flat area just above the pond. Walk to your right to a rock ledge and a beautiful view of this body of water. Return to the AT and cross the outlet of the pond on a small wooden footbridge. Observe the stonework that seems to form a sluice out of the pond.
The AT then ascends form the pond outlet and snakes its way over Green Pond Mountain. The ascent and descent have a few steeper areas but the switchbacks take car of most of these. As you start to descend, you may notice the sounds of traffic. At this point you are headed toward the Elk Pen which is adjacent to the New York State Thruway. After 1.4 miles on the AT and at the bottom of the hill near the Elk Pen turn left on the Arden-Surebridge Trail which runs along the surface of the old Arden Road once called the Harriman Flat Road. In .3 miles the A-SB turns left but you should continue straight ahead on the Stahahe Brook Trail and the Arden Road. After another .3 miles, this trail turns left into the woods just after crossing Stahahe Brook. Stop at the bridge to enjoy the sights and sounds of the brook running under the bridge. Bear right to stay on the Arden Road which now parallels the Thruway for .85 miles. At this point a marker commemorates the road and the builder by stating "showing the advantages of building flat roads in hilly country". Just after this memorial are the white marks of the Nurian Trail which will lead all the way back to the parking area. This trail crosses the Thruway on a raised overpass!
The Nurian Trail now climbs back over the Green pond Mountain Ridge and has a few challenging areas. In .8 miles it crosses Stahahe Brook on a double bridge where the Stahahe Brook Trail enters from the left. Be sure to bear right in this area turning east and southeast on the Nurian Trail. Within .25 miles the trail ascends slightly and then descends into a boulder strewn stream bed. This is the Valley of Boulders and is impressive for the number and variety of large rocks. the trail ascends steeply out of the valley but several switchbacks eliminate all but a few sharp climbs. In one area the trail ascends passed and through some large rock formations. The trail ascends some and joins several woods roads and other trails including the White Bar and Dunning Trails. The Nurian Trail will lead back to the RD just south of Black Rock. You can take the RD back to the parking area by retracing your steps. You may also turn right on the wide Island Pond Road as it come up on your right. After about 1 mile on this road you will be at Route 106. Turn left on the road and walk 1.2 miles back to car. Along the way you will notice a large parking area on the right for the White Bar trail as it turns south. This is the ONLY parking area with any signs or trailhead markers. Several more parking areas or pulloffs will be on the left.
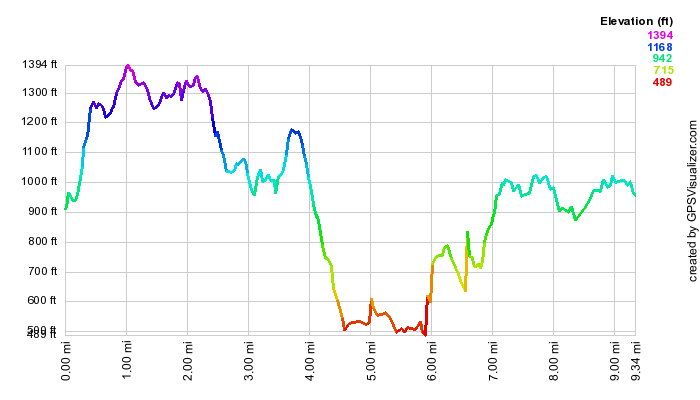 (The image at the left shows the profile of the hike. Remember that all vertical profiles are
relative!)
(The image at the left shows the profile of the hike. Remember that all vertical profiles are
relative!)
Harriman: Silvermine Lake to Black Mountain
| Quick Look | ||||
|---|---|---|---|---|
| Difficulty | Round trip | Total climb | Internet Maps | |
| 5.0 mi. | 990 ft. | AllTrails | ||
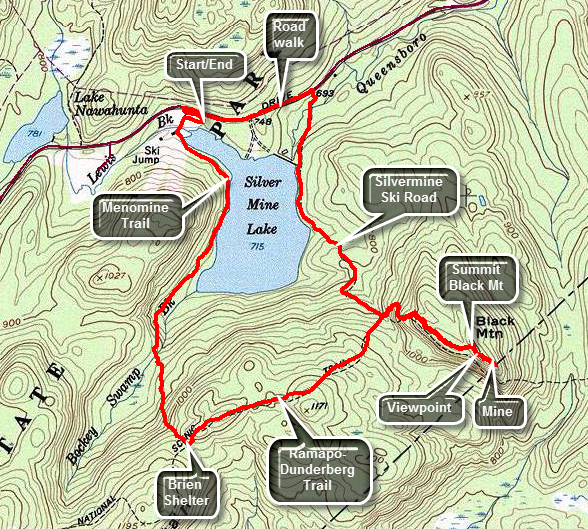
Take Seven Lakes Drive southwest from the Long Mountain Circle near Bear Mountain. Watch for the parking area for Silvermine Lake on the left before the Tiorati Circle. There are ski slopes visible from the road and parking area. Walk out of the parking area toward the lake. The yellow Menomine Trail is to the right and follows the western shore heading south. The trail is reactively flat but very rocky. There are some nice views of the lake and Black Mountain from the trail as it passes along the edge of the lake. At about .9 miles the trail begins to gain some elevation. Continue to climb to the top where the trail levels off briefly and the Brien Shelter. Just passed the shelter look for the white and red dot on white blazes of the Appalachian and Ramapo-Dunderberg Trails on the left starting near a big tree. Turn left and follow the trails up a short but steep rock scramble. In the .7 miles from the start of the climb passed the shelter the elevation gain is 400 feet. The trails head ENE and drop and the climb again. At 1.9 miles begin a descent of 250 feet over .4 miles to the Silvermine Ski Road. Cross the ski road to begin the climb up Black Mountain. The climb starts off steeply and then alternates between flatter sections and steeper ones with a rock scramble right at the top. At about 2.4 miles there is a nice viewpoint that overlooks Silvermine Lake. Continue up the trail to the short rock scrambled to the top of Black Mountain. To the right watch for a faint path that leads down to a mine that was cut into the face of the cliffs. Once at the top take in the views of the Hudson River to the east. If you walk around a little following some of the paths at the top, you may find several depressions that were dug to mine iron. The mines must not have been very productive as there are almost no tailings. Head back down the trails the way you came being careful on the steeper sections. When you are back at the Silvermine Ski Road, turn right and follow it as it winds its way down to the shore of the lake. The road is interesting and obviously well-constructed. It dates back to when the entire park belonged to the Harriman family. Follow the road as it descended toward the lake and then parallels it until the outlet of the lake. The road then turns from north to northeast and follows the brook until crossing it on a bridge. Continue to follow the ski road until it intersects Seven Lakes Drive. Turn left and walked the road .6 miles back to the car.
 (The image shows the profile of the hike. Remember that all vertical profiles are
relative!)
(The image shows the profile of the hike. Remember that all vertical profiles are
relative!)
Harriman: Torrey Memorial
| Quick Look | ||||
|---|---|---|---|---|
| Difficulty | Round trip | Total climb | Internet Maps | |
| 1.2 mi. | 360 ft. | AllTrails | ||
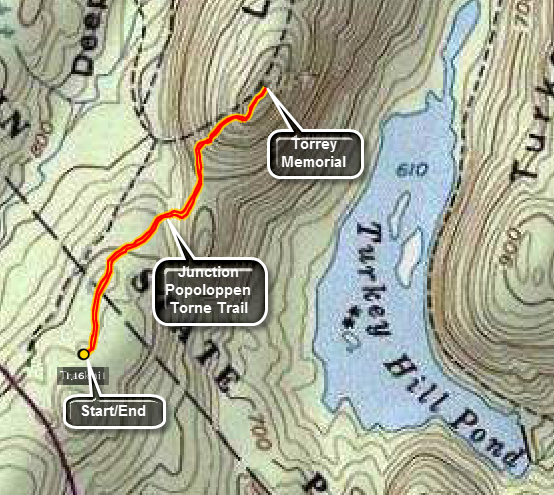 Take I86, the Quickway, to the exit just before the Harriman toll plaza and get on Route 6 East. Drive a little more than 4 miles to the parking area on the left where the Long Path crosses the road. You may also take Route 6 West from the Bear Mountain traffic circle for less than a mile. In this case the parking area is on the right. From here the Long Path heads northeast toward Long Mountain and passes the Torrey Memorial on the way. Raymond Torrey was a founding member of the new York New Jersey Trail Conference and instrumental in the creation of the Long Path. The first part of the trail descends and crosses the Popolopen Torne Trail. Stay on the Long Path and start a short ascent up a hill. The trail flattens out at the top and the memorial is a message carved into the exposed bedrock at the top of the ridge. The views are good and you see the Perkins Tower on Bear Mountain. Turkey Hill Lake lies below with its rocky but secluded shores. This hike definitely has a lot to offer for very little effort.
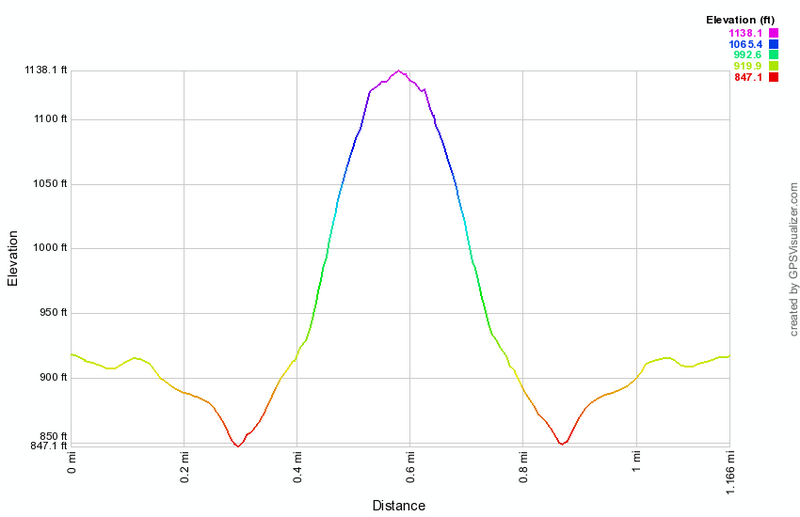 (The image below shows the profile of the hike. Remember that all vertical profiles are relative!)
Harriman: Turkey Hill to Route 6
| Quick Look | ||||
|---|---|---|---|---|
| Difficulty | Round trip | Total climb | Internet Maps | |
| 7.2 mi. | 1887 ft. | AllTrails | ||
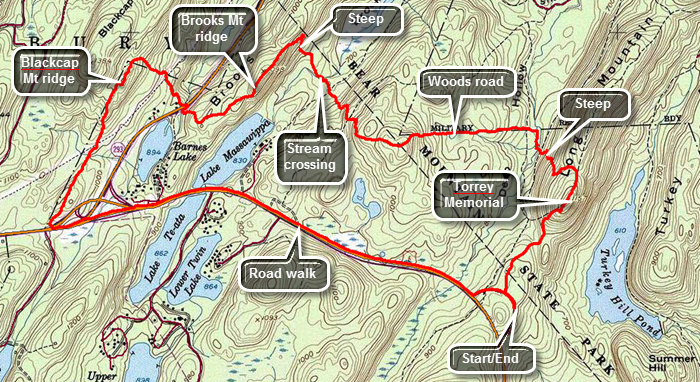 Take I86, the Quickway, to the exit just before the Harriman toll plaza and get on Route 6 East. Drive a little more than 4 miles to the parking area on the left where the Long Path crosses the road. You may also take Route 6 West from the Bear Mountain traffic circle for less than a mile. In this case the parking area is on the right. From here the Long Path heads northeast toward Long Mountain and passes the Torrey Memorial on the way. Raymond Torrey was a founding member of the new York New Jersey Trail Conference and instrumental in the creation of the Long Path. The first part of the trail descends and crosses the Popoloppen Torne Trail. Stay on the Long Path and start a short ascent up a hill. The trail flattens out at the top at around .7 miles is the memorial with a message carved into the exposed bedrock. The views are good and you see the Perkins Tower on Bear Mountain. Turkey Hill Lake lies below with its rocky but secluded shores. Continue following the aqua blazes and over the next half mile drop 420 feet as the trail descends the steep side of the ridge. Several switchbacks moderate the grade but it still averages 15%. When a layer of damp leaves covers the slippery rocks a quick descent is impossible. At about a mile the well-worn track seems to go straight ahead but the trail turns to the right. Near the bottom of the descent cross a stream by hopping from rock to rock which is easy when the water level is low. There is a "bridge" present but it has seen better days. The construction consisted of two logs that were cut on site to span the stream. The "decking" is made of branches lashed to the logs with very old rope. At 1.25 miles the trail turns to the left and starts to travel due west on what looks like a right-of-way or woods road. On the right are signs indicating that the land is part of the West Point Military Reservation. Start an ascent of 470 feet over .66 miles to the top of Howell Mountain. Near the top of the ascent is a rock outcropping where large cubical blocks of rocks have split off. As you begin to descend the 430 feet from Howell Mountain you can see the next ridge. The descent has a few switchbacks to help where the slope is the steepest. At the bottom of the descent cross the outlet stream to Lake Massawippa on large stepping stones placed by a trail crew. The Brooks Mountain ridge lies ahead and hiking directly up the ridge would have mean gaining over 200 feet in about 400 feet! Fortunately the trail turns north to ascend on a shallower slope and then turns southwest in a major switchback at about 2.8 miles. The trail picks up a woods road that gently ascends the ridge to the summit at 1080 feet. There are only limited views from the top. Descend off the ridge heading southwest until at 3.6 miles you come to Route 293. Along the way the trail shifts direction turning to the northwest. Walk up to the road passing a culvert that directs Popolopen Creek under the pavement. Cross the road and face another ascent up the Blackcap Mountain ridge. Blackcap Mountain has a maximum elevation of 1381 feet but the trail turns southwest at less than 1200 feet. Continued to walk through hardwood forest and begin the climb up the ridge. At 4 miles and about 1180 feet the trail turns 90 degrees and heads southwest again along the base of the ridge. For about a mile the trail is straight as an arrow heading southwest toward Route 6. There are some ups and downs in the trail but nothing compared to the ridges you have already crossed. The trail does not actually intersect Route 6 but as you near the road it is easy to walk out to the pavement. Cross Route 6 and eventually Route 293 as well. The traffic can be very heavy but the shoulders are wide. At 5.6 miles Route 6 passes between Lake Massawippa and Lake Te-Ata. Continue on Route 6 back to the parking area on the left.
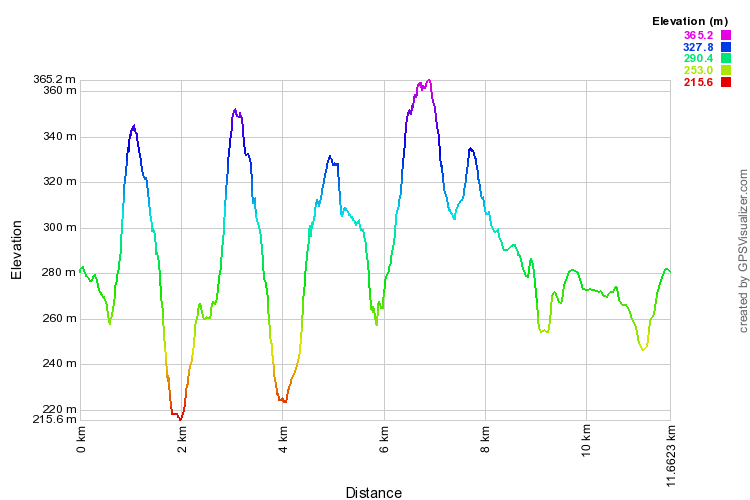 (The image below shows the profile of the hike. Remember that all vertical profiles are relative!)
Hartley Road to Mountain Road
| Quick Look | ||||
|---|---|---|---|---|
| Difficulty | Round trip | Total climb | Internet Maps | |
| 14.8 mi. | 1360 ft. | AllTrails | ||
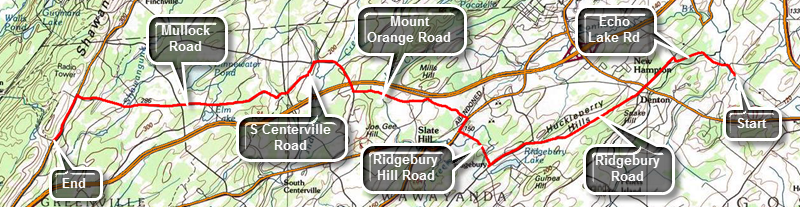 This route is a one way hike from east to west. This requires a you to spot a car at the end or get a ride. The 29.6 mile roundtrip would be difficult! Take exit 113 off State Route 17 to get on Route 209 south toward Port Jervis. Drive to the Guymard Turnpike and turn left to follow the winding road over the ridge to Mountain Road. Turn right on Mountain Road and drive 3 miles south to the trailhead on the right. Park slightly south of the beginning of the trail as there is a pullout that can accommodate three or four cars. Drop a car here. Drive to Hartley Road just west of Goshen. The easiest way to do this may be to drive south on Mountain Road to I84 and then take I84 to Middletown. From Middletown take Route 17 east to the Fletcher Street exit, exit 126. Turn right and right again onto Cheechunk Road. Drive about 1.7 miles west to Hartley Road. Turn left to the Heritage Trail pulloff only a few hundred feet in on the right. Start by hiking north on Hartley Road to Echo Lake Road. Turn left on Echo Lake Road and head west. After a short distance, cross over the Walkill River and pass Echo Lake at .75 miles. At 1.2 miles continue turn left slightly onto CR 50 heading west. Pass by the Wawayanda Inn and at 2 miles crossed Route 6. From this point on the road rolls some but overall gains elevation most of the time. After Route 6, cross Denton Hill Road and stay right on Ridgebury Road. The walk on Ridgebury Road is close to 3 miles to the intersection with Ridgebury Hill Road. Turn right at just over 5 miles and watch for the left turn onto Wilcox Road. Wilcox Road is only about .2 miles long and then the trail is back on Ridgebury Hill Road. Despite the fact that this is a road walk the blazes are there and pretty easy to spot. Continue north on Ridgebury Hill Road until it meets Route 6 where you turn right. Walk north on Route 6 for about .25 miles before turning left on McBride Road. At the end of McBride Road turn left on CR 49 and then almost immediately right on R. Hunter Road. Within a short distance R. Hunter Road becomes Mount Orange Road. The further west you hike the more rural the area becomes and the more elevation you gain. After about a mile Mount Orange Road turns sharply right and crosses over I84. Continue north and then west on Mount Orange Road until about 9.4 miles where the trail turns left onto Remey Road. The walk on Remey Road is short as it soon meets South Centerville Road that heads south and west to 10.1 miles. Continue straight ahead on Mullock Road which begins a nice climb ! Houses get farther apart and there are fewer cars. Mullock Road seems to go on forever as it gains elevation heading west toward Mountain Road. It crosses several roads on the way and passes an old cemetery. At 13.9 miles turn left onto Mountain Road for the final .9 miles back to the car.
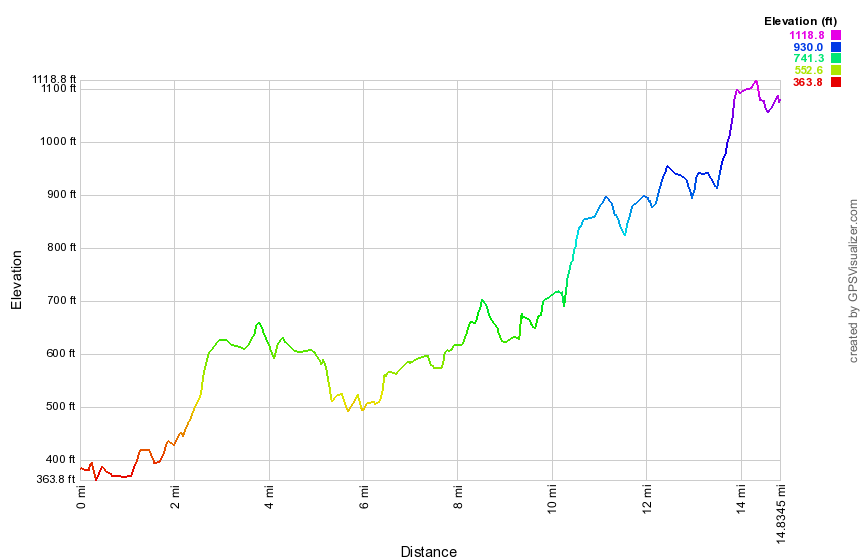 (The image below shows the profile of the hike. Remember that all vertical profiles are relative!)
Heberly Run: Waterfall Bushwhack
| Quick Look | ||||
|---|---|---|---|---|
| Difficulty | Round trip | Total climb | Internet Maps | |
| 4.6 mi | 688 ft | AllTrails | ||
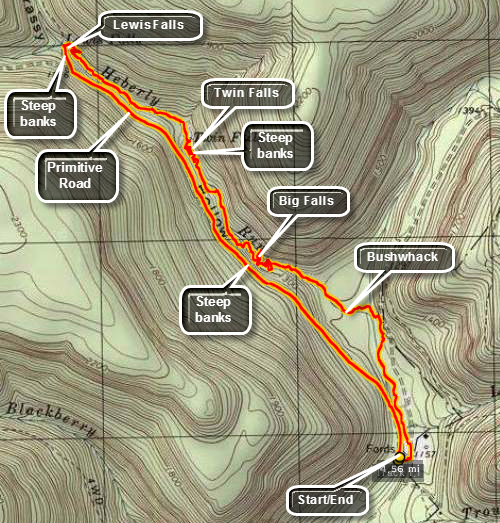
From Route 118 turn north onto Central Road. In Center take a right onto Jamison City Road. in Jameson City continue straight ahead on T720 to Sate Game Lands #13. Park in the parking area at the end of the road where you can go no further. This hike is a bushwhack up Herberly Run to three different waterfalls. The waterfalls are more interesting after a heavy rain but this makes them harder to access.
To begin the hike walk over to the stream and start walk along the far bank or in the stream bed itself. Keep working upstream for about a mile when you will be in the area of Big Falls. Since you are probably below the falls at this point, you will have to work your way up a steep embankment to continue the hike. A path exists on the left bank looking upstream but it is slippery even when not very wet. Continue to walk up the left bank until around 1.9 miles when Twin Falls will appear. This falls is smaller than Big Falls but is pretty in its own right. Once you are done inspecting these falls try climbing out of the gorge on the right bank. This will take you to the upper drop of Twin Falls where you may be able to walk or wade across to the right bank and access the path along the left bank above the falls. At around 2.65 miles Lewis Falls should come into view. The gorge at Lewis Falls is deeper than at the other two falls and the banks are impossible to scale. Walk back downstream until you can work your way out of the gorge preferably on the right side. From here you can walk to the top of Lewis Falls. There is a path that follows Herberly Run and then Shanty Run until it cuts across the plateau and comes back down. The path is indistinct and not well marked! Cross the stream above Lewis Falls and walk out to Grassy Hollow Road. This is a grass and dirt road that the Game Commission opens during hunting season. It makes the walk back to the car fairly easy. Along the way you can hear Heberly Run and catch glimpses of the water.
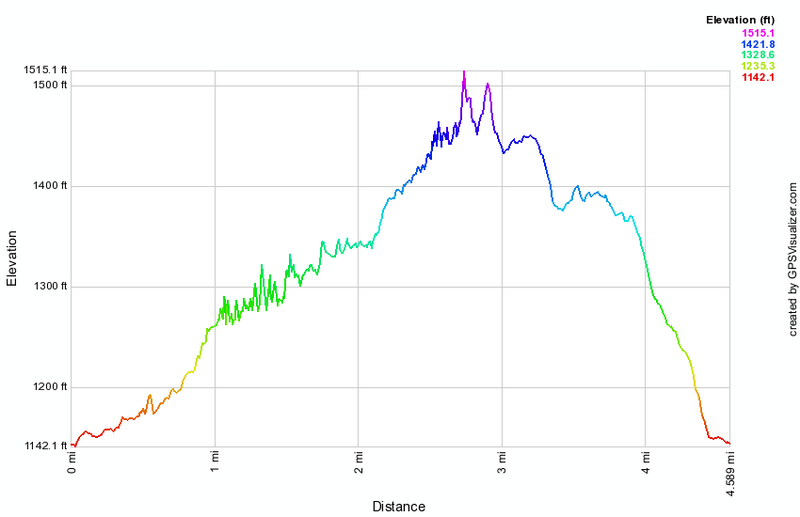 (The image at the left shows the profile of the hike. Remember that all vertical profiles are relative!)
Heritage Trail
| Quick Look | ||||
|---|---|---|---|---|
| Difficulty | Round trip | Total climb | Internet Maps | |
| 11.6 mi. | 360 ft. | AllTrails | ||
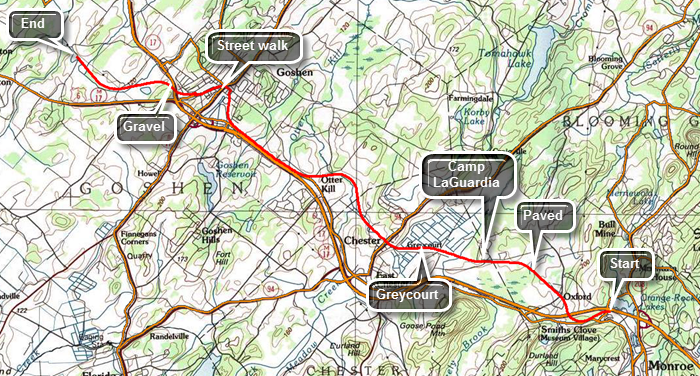 This route is a one way hike from east to west. This requires a you to spot a car at the end or get a ride. The 23.2 mile roundtrip would be difficult.Take the Fletcher Street exit, exit 126, off Route 17 heading east. Turn right and right again onto Cheechunk Road. Drive about 1.7 miles west to Hartley Road. Turn left and park at the Heritage Trail pulloff only a few hundred feet in on the right. Drop a car here. Drive back out to Route 17 and take exit 129. Park in the Heritage Trail parking lot on the right before the large commuter lots on the left. The trail starting in Monroe is a hard paved surface which makes walking it very easy. Throughout the walk you will meet other people who are walking and running some with their dogs. You will also meet people on bicycles. Everyone seems very respectful of the other people using the trail and many use it several times a week. Within .75 miles the trail passes under Route 17. Shortly after that there is a small cemetery nestled between the trees on the right side of the trail. It acts as a reminder that this area of Orange County has been settled for some time. There isn't much indication that the trail was once a railroad bed except where the trail crossed over another road. In several, places the tracks and original bridge are still intact. At about 1 mile the farmlands begin and you can catch glimpses of the countryside through the trees. You can still hear the noise of traffic but the atmosphere is very rural. Around 2.5 miles the trail passes by Camp Laguardia but most of the building are hidden by the high bank on the left side of the trail. There is also some fencing at various points along the route. Around 3.8 miles you will see the flat open fields of a black dirt region on the right or north of the trail. Just before the trail enters the village of Chester there is a railroad siding at Greycourt. A signboard tells the history of the area. As you enter Chester, there is an old railroad station on the left. The next section of trail is a little more than 4 miles and ends in Goshen. There is a lot of farmland on both sides of the trail. There are also three different marble benches dedicated to various people along the way. Where the trail crosses several roads traffic usually stops for pedestrians in the cross walk. There is even a portable toilet at one intersection. The village of Goshen is 8.5 miles from Monroe. Turned right on St. James Place and then left onto South Church Street. Continue on South Church and turn left on West Main after crossing Route 207. Keep looking for the aqua blazes on poles and signs. About .5 miles from South Church there is a large cemetery and the turn to the left is clearly marked with aqua blazes. Followed the blazes across the street and down a lane to the beginning of the last section of the Heritage Trail. From the village of Goshen to its end on Hartley Road, the trail is "paved" with crushed stone or it is simply packed earth. There are fewer people using this section. Pass under Route 17 at about 9.65 miles and continue on the flat, straight section. The predominant view on either side of the trail is a series of ponds and wetlands. There is one sign indicating that the Audubon Society maintains a bird sanctuary in the area. There is one final bench near the bird sanctuary with no dedication. After this it is a quick walk to Hartley Road.
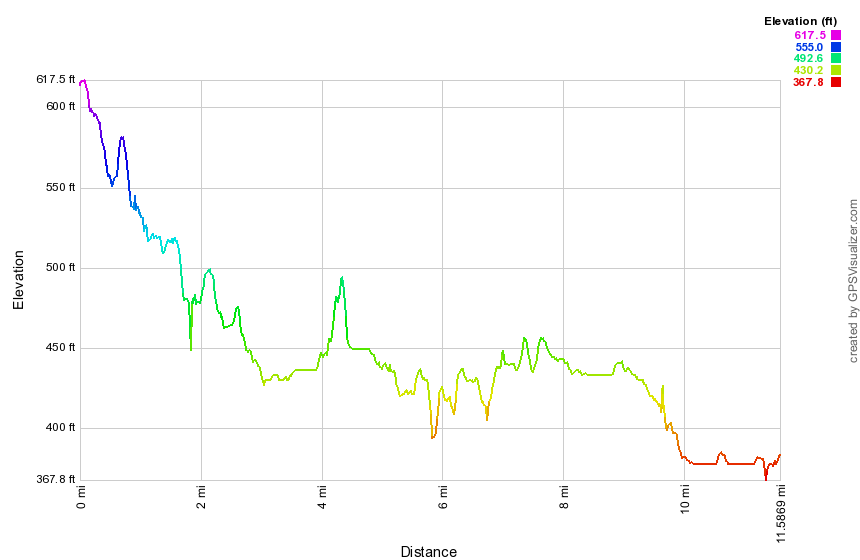 (The image below shows the profile of the hike. Remember that all vertical profiles are relative!)
Hickok Brook Loop
| Quick Look | ||||
|---|---|---|---|---|
| Difficulty | Round trip | Total climb | Internet Maps | |
| 3.8 mi | 350 ft | AllTrails | ||
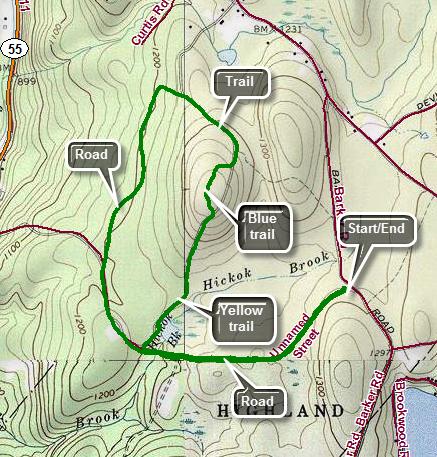
Drive south on Route 55 toward Eldred. Turn left at the light in Eldred on CR-32 (Proctor Road) and drive 1.45 miles to Barker Road on the right. Turn right on Barker Road and drive .6 miles to the parking area on the right. The parking area is marked with the typical yellow on brown sign. Park in the lot. Start the hike by walking on the gravel road heading first southwest and then west. At .7 miles a road will turn off to the left. Continue straight ahead and at .8 miles turn right on a road that becomes a yellow-blazed trail. The trail passes by a pond and you may want to pause for a moment to take in the site. Continue on the yellow trail walking uphill just slightly. When you reach 1.35 miles, you will see a "Private Property" sign. Look carefully to you left to find a blue-blazed trail that avoid the private property. The blue trail lasts only .25 miles before it rejoins the woods road that was the yellow trail. You may or may not see markers here but stay on the woods road and bear left. At 2 miles the trail meets the gravel road. Turn left and walk the road back to where you turned off the road earlier in the hike at about 3 miles. Continue on the road to walk the .8 miles back to your car. There are some side paths in the area and one other road but they hold nothing of interest except solitude.
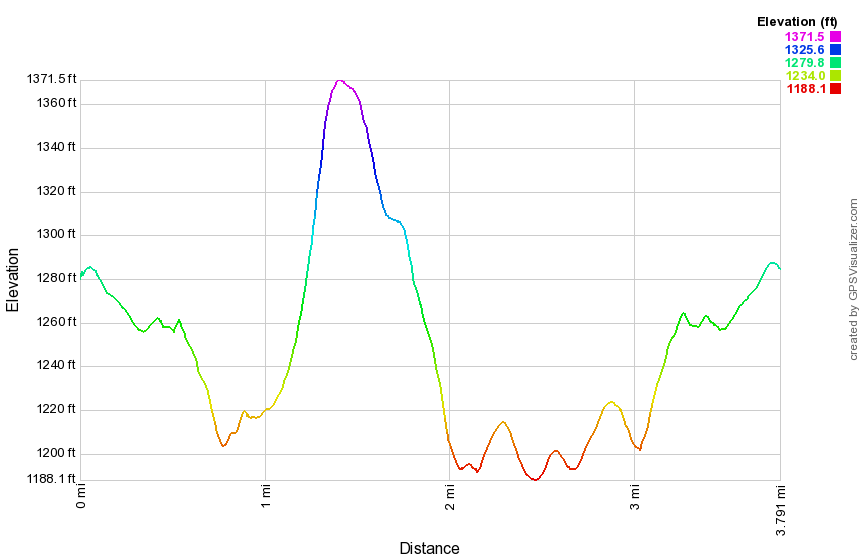
(The image at the left shows the profile of the hike. Remember that all vertical profiles are relative!)
High Falls (Frost Valley)
| Quick Look | ||||
|---|---|---|---|---|
| Difficulty | Round trip | Total climb | Internet Maps | |
| 4.7 mi | 915 ft | AllTrails | ||
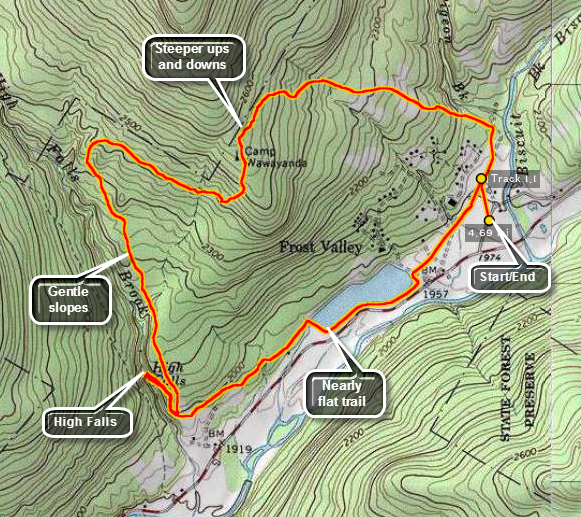
From the north or south use Ulster County Route 47, the Frost Valley Road, to drive to the Frost Valley YMCA Camp. The entire camp is private property that guests may hike without a fee. If you are not a guest, you may be asked to pay a day use fee. Obtain a trail map at the office. Walk the camp roads toward Lake Cole and pick up the blue Lake Cole Trail that passes between the lake and the main road. Walk to the end of Lake Cole and over the bridge across the dam. Pick up the yellow High Falls Trail and bear to the right where it splits. do NOT turn onto the red Line Shack Trail. The yellow High falls Trail ends at the blue Spring Ridge Trail but a path leads down to the falls which has an observation platform. If you are only interested in the falls, return the way you came. Walk back up the hill to the trail junction and turn left on the blue Spring Ridge Trail. Where the blue trail turns to the right bear to the left on the yellow Panhandle Trail. This is the first trail that gains any elevation as the rest are almost flat. The Panhandle Trail loops around to meet the red Line Shack Trail. When the blue Rocky Road Trail branches off to the left follow it downhill until it intersects the red Perimeter trail near the camp. Find some camp roads that will give you the most direct route back to your car.
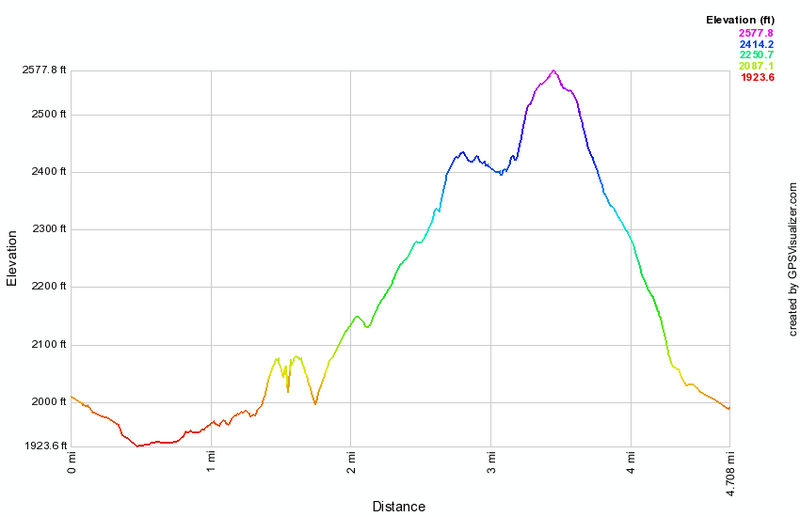
(The image at the left shows the profile of the hike. Remember that all vertical profiles are relative!)
High Falls (Philmont)
| Quick Look | ||||
|---|---|---|---|---|
| Difficulty | Round trip | Total climb | Internet Maps | |
| 1.2 mi. | 240 ft. | AllTrails | ||
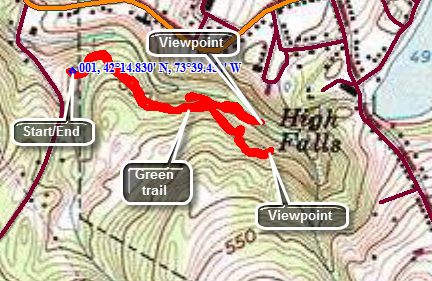 High Falls is located on Roxbury Road in Philmont. Turn south on Roxbury Road from Route 217 which runs through Philmont. The parking area will be several hundred feet along on the left after ascending a small hill. A trail leaves the parking area and crosses a bridge. Stay on the Green Trail which leads to the overlook of the falls. There is also a Blue Trail and a Red Trail in the park. The Red Trail heads more uphill before ending up a the lookout. The Blue Trail is lower and a spur on that trail leads down to an unmarked trail along the stream bed. There is a bench on this trail opposite a small falls. It is possible to scramble along the rocks to get to an area across from the base of High Falls on the other bank of the stream. The viewpoint is quite good and offers a head-on view of the falls which has a drop of over 100 feet.
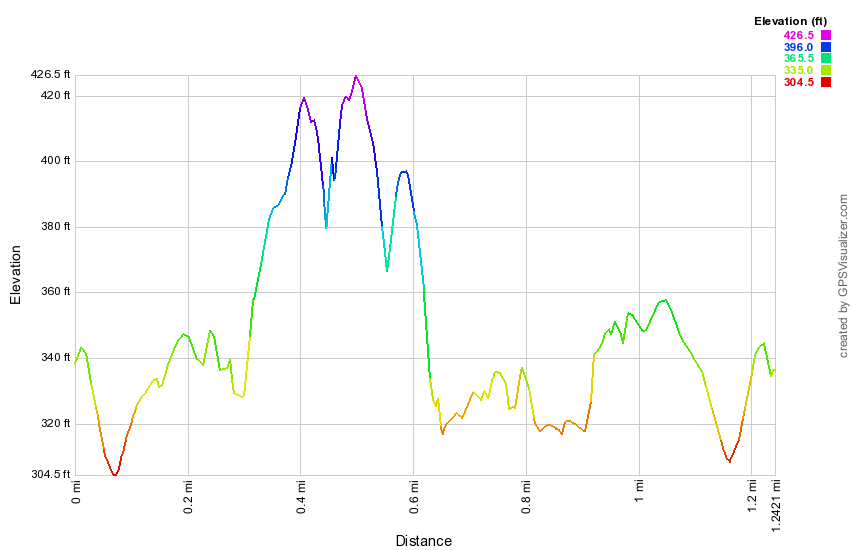 (The image at the left shows the profile of the hike. Remember that all vertical profiles are relative!)
High Point: Lake Rutherford
| Quick Look | ||||
|---|---|---|---|---|
| Difficulty | Round trip | Total climb | Internet Maps | |
| 6.8 mi | 920 ft | AllTrails | ||
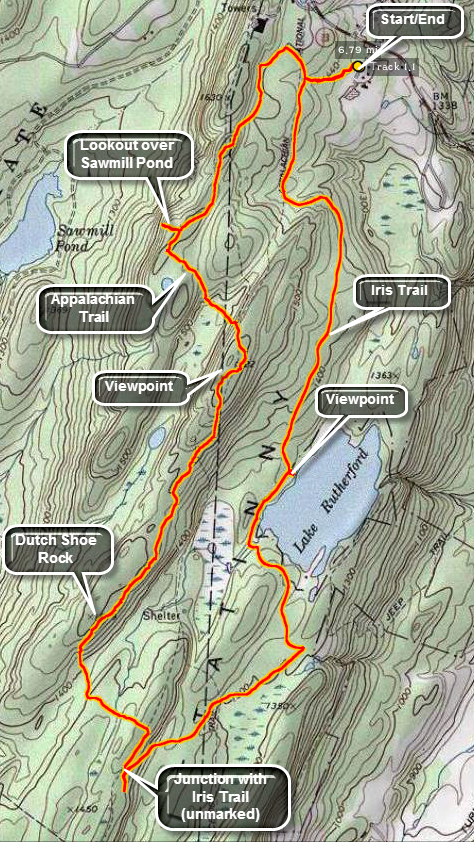
Park in the parking area off Route 23 just south of the park office and maintenance buildings. Find the white blazes of the Appalachian Trail and begin to hike southwest. The trail has its ups and downs and within about 1 mile the Blue Dot Trail turns off to the right. This trail descends steeply to Sawmill Lake which has a campground area. Walk down the trail until it starts the steep descent. At this point there is a great view to the west over the lake. Back on the main trail you will ascend top a small ridge at about .75 miles which has some nice viewpoints to the west and east. The trail now descends to around 2.75 miles to the area near Dutch Shoe Rock. A side trail leads left to a shelter and there are several viewpoints in this area. The trails starts a steep descent for about .25 miles and then regains some of that elevation to about 3.5 miles where the At and the red Iris Trail run together briefly. The trail junction is poorly marked but you should make an almost 180 degree turn to get on the Iris Trail to head northeast. This trail runs along the base of the ridge and has few views. At 4.4 miles watch for a sharp left where the trail turns north to avoid a restricted area. At around 5 miles the trail passes by Lake Rutherford and there are several spots to get views down to and across the lake. From the lake the trail starts to climb back up to the elevation of the parking area. The red Iris Trail ends at the AT and another yellow trail begins. Be sure to turn right on the AT to get back to your car.
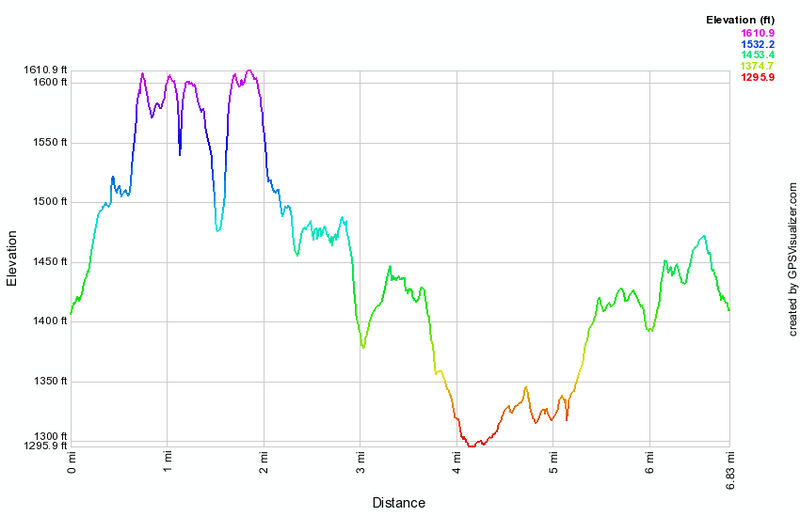
(The image above shows the profile of the hike. Remember that all vertical profiles are relative!)
Hodge Pond (Quick Lake, Logger's Loop, Big Rock, and Flynn Trails)
| Quick Look | ||||
|---|---|---|---|---|
| Difficulty | Round trip | Total climb | Internet Maps | |
| 5.1 mi. | 850 ft. | AllTrails | ||
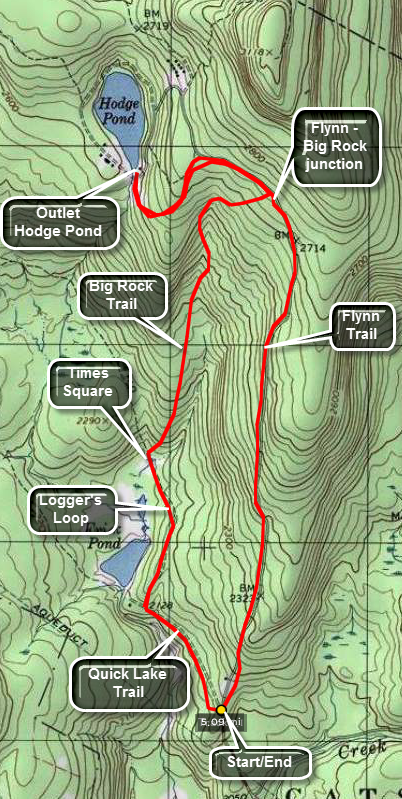 The area around Frick Pond, Hodge Pond and Quick Lake is covered with trails. There are numerous
possibilities for short of long hikes. The area is "relatively" flat and there are no "views".
There is, however, some beautiful scenery.
The area around Frick Pond, Hodge Pond and Quick Lake is covered with trails. There are numerous
possibilities for short of long hikes. The area is "relatively" flat and there are no "views".
There is, however, some beautiful scenery.
Take DeBruce Road from Livingston Manor for about six miles then turn left on Mongaup Rd. Where the road
splits bear left on Beech Mountain Rd. and park in the parking lot on the left. Find the red-blazed
Quick Lake trail and follow it for .5 miles to the junction with the yellow-blazed Logger's Loop.
If you turn left here, Frick pond is just .1 miles. Turn left on Logger's Loop and follow it for
.55 miles to Times Square. The name indicates that many trails cross at this point. Turn right here
onto the yellow-blazed Big Rock Trail. Continue on this trail for 1.1 miles until it crosses the
blue-blazed Flynn Trail. Several areas on Big Rock have significant but not severe climbs. Turn left
on the Flynn Trail and hike .45 miles to Hodge Pond. From here you can continue on the Flynn Trail until
it meets the Quick Lake Trail. At this point turn left and hike back to Frick Pond. This adds quite
a bit to the distance! A quicker route is to retrace the last .45 miles on the Flynn Trail until the intersection with Big Rock
Trail. Continue straight ahead for 1.7 miles to the parking area.

(The image above shows the profile of the hike. Remember that all vertical profiles are relative!)
Hodge Pond (Flynn Trail)
| Quick Look | ||||
|---|---|---|---|---|
| Difficulty | Round trip | Total climb | Internet Maps | |
| 4.9 mi. | 800 ft. | AllTrails | ||
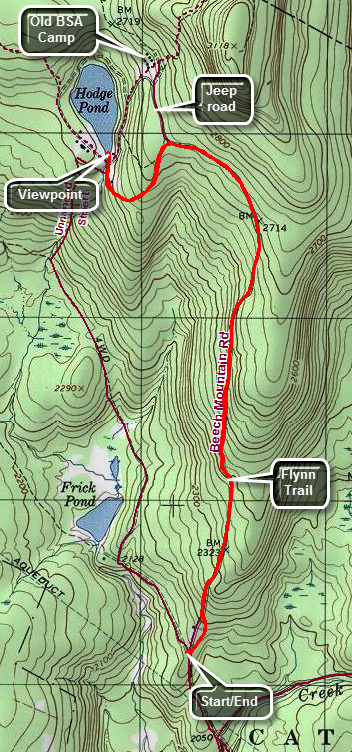 The area around Frick Pond, Hodge Pond and Quick Lake is covered with trails. There are numerous possibilities for short of long hikes. The area is "relatively" flat and there are no "views". There is, however, some beautiful scenery.
Take DeBruce Road from Livingston Manor for about six miles then turn left on Mongaup Rd. Where the road splits bear left on Beech Mountain Rd. and park in the parking lot on the left. Cross the road to get on the blue blazed Flynn Trail. Walk through the woods until the trail meets a woods road and turn right. This is the old Beech Mountain Road which led to the Beech Mountain Boy Scout Camp. Walk uphill on this wide road for 1.7 miles to the junction with the Big Rock Trail on the left. Continue straight ahead on the Flynn Trail. After passing through a yellow gate, you will be on property owned by the Open Spaces Institute which allows hikers to cross their property. At the next intersection bear left to continue down to Hodge Pond on the Flynn Trail. The Flynn Trail turns left and crosses the outlet stream. Walk straight ahead to the shores of Hodge Pond. Take in the beauty of this secluded pond before turning around a retracing your route back to your car. There are many other possible ways to get back to the parking area and moist are longer than simply retracing your steps. Make up your own hike or see some of the others on this site.
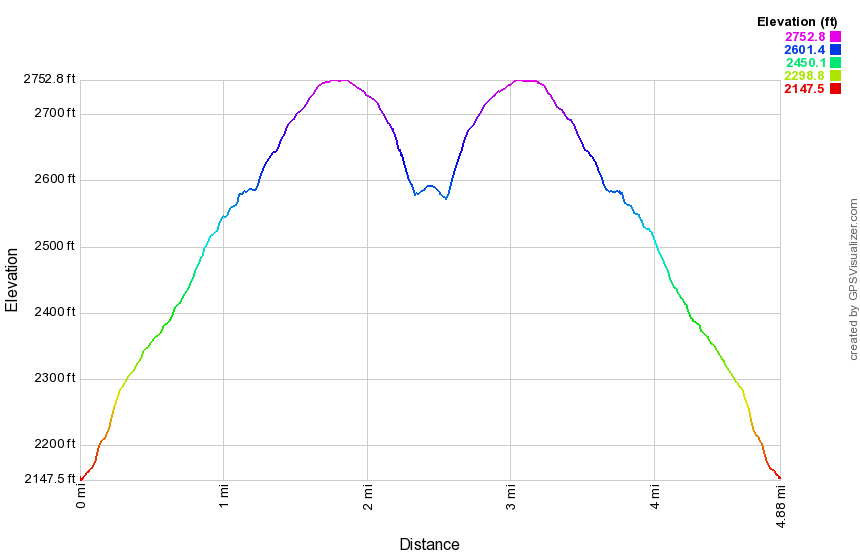
(The image above shows the profile of the hike. Remember that all vertical profiles are relative!)
Hodge Pond Loop (Flynn and Jeep Trails)
| Quick Look | ||||
|---|---|---|---|---|
| Difficulty | Round trip | Total climb | Internet Maps | |
| 5.7 mi. | 820 ft. | AllTrails | ||
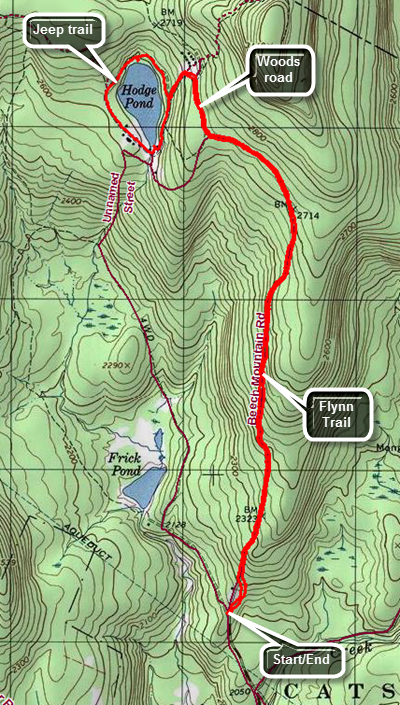 The area around Frick Pond, Hodge Pond and Quick Lake is covered with trails. There are numerous possibilities for short of long hikes. The area is "relatively" flat and there are no "views". There is, however, some beautiful scenery.
Take DeBruce Road from Livingston Manor for about six miles then turn left on Mongaup Rd. Where the road splits bear left on Beech Mountain Rd. and park in the parking lot on the left. Cross the road to the start of the blue Flynn Trail. Walk the trail until it meets a woods road which is the extension of the Beech Mountain Road. Turn right and walk uphill to the junction with the Big Rock Trail on the left and the snowmobile trail on the right at 1.7 miles. Walk straight ahead staying on the Flynn Trail. Pass through the gate which marks the beginning of the Open Spaces Institute property around Hodge Pond. At the next trail junction the Flynn Trail turns left. Turn right to stay on the old Beech Mountain Road heading for site of the Beech Mountain Boy Scout Camp. At the next junction turn left to walk down toward Hodge Pond. At the next junction turn right to get on the jeep trail that goes around the back of the pond. As you warp around the pond the jeep trail will meet the Flynn Trail at 2.75 miles. Bear to the left on the blue Flynn Trail to complete your loop around Hodge Pond. You will pass through a clearing and then come to another clearing with HodgPond to the left. Continue straight ahead and then turn left on the jeep trail. Walk up the hill that you descended earlier. Turn right at the top and then left when you reach the next intersection WI the Flynn Trail. Turn left on the Flynn Trail and walk to the junction with the Big Rock Trail. Continue straight ahead on the Flynn Trail for a 1.7 mile walk downhill and back to the parking area.
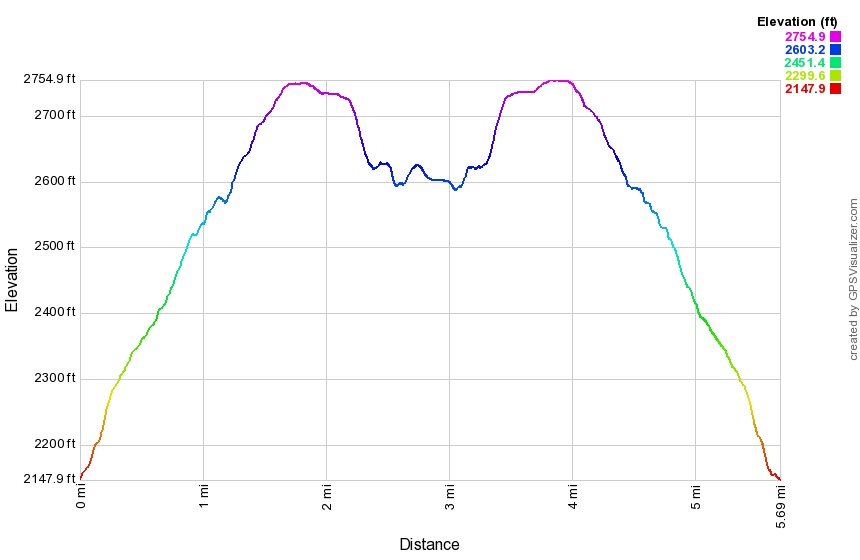
(The image above shows the profile of the hike. Remember that all vertical profiles are relative!)
Hodge Pond Loop (Flynn Trail)
| Quick Look | ||||
|---|---|---|---|---|
| Difficulty | Round trip | Total climb | Internet Maps | |
| 5.9 mi. | 930 ft. | AllTrails | ||
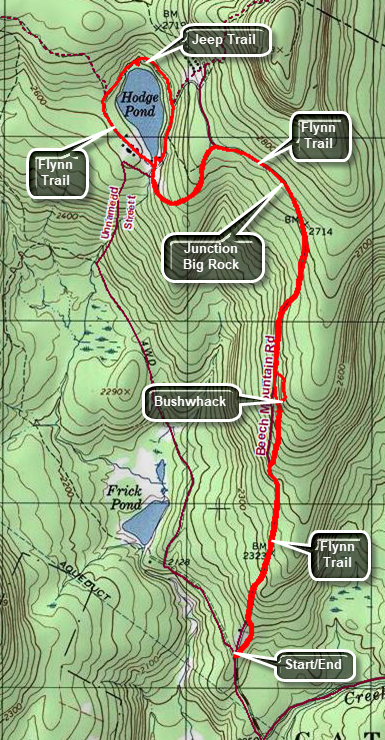 The area around Frick Pond, Hodge Pond and Quick Lake is covered with trails. There are numerous possibilities for short of long hikes. The area is "relatively" flat and there are no "views". There is, however, some beautiful scenery.
Take DeBruce Road from Livingston Manor for about six miles then turn left on Mongaup Rd. Where the road splits bear left on Beech Mountain Rd. and park in the parking lot on the left. Cross the road to the start of the blue Flynn Trail. Walk the trail until it meets a woods road which is the extension of the Beech Mountain Road. Turn right and walk uphill to the junction with the Big Rock Trail on the left and the snowmobile trail on the right at 1.7 miles. Walk straight ahead staying on the Flynn Trail. Pass through the gate which marks the beginning of the Open Spaces Institute property around Hodge Pond. At the next trail junction the Flynn Trail turns left. Turn left to stay on the Flynn Trail heading for Hodge Pond. The Flynn Trail will break out into a clearing at the outlet end of Hodge Pond at 2.4 miles. After spending some time at Hodge Pond, walk to the right of the pond and along the east side on an old jeep trail. Walk around the pond to the point where the jeep trail meets the Flynn Trail. Turn left and follow the Flynn Trail back to the clearing at the outlet end of Hodge Pond. Turn right and walk up the hill. Bear to the right and follow the Flynn Trail back to the junction with the Big Rock Trail. Continue straight ahead through the junction and back down the Flynn Trail toward the parking area. As you approach the gate, be sure to bear to the left on the Flynn Trail to avoid the private property around the cabin.
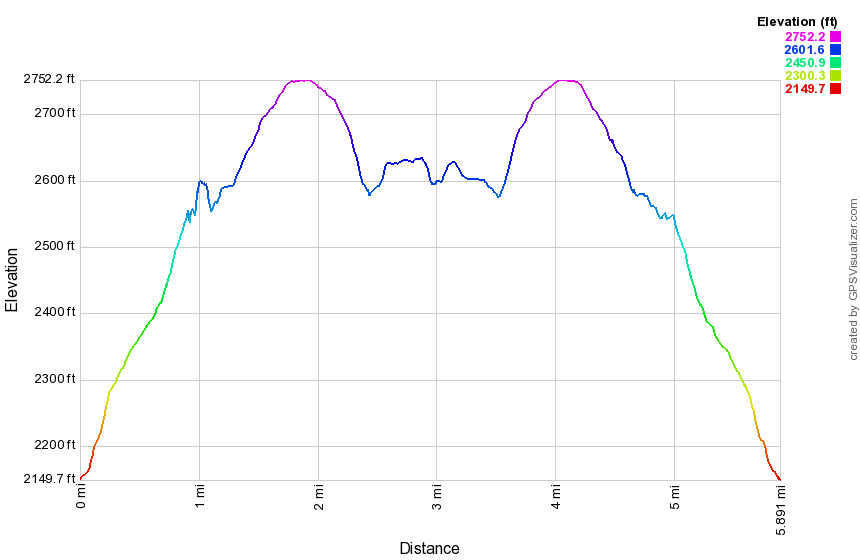
(The image shows the profile of the hike. Remember that all vertical profiles are relative!)
Hodge and Frick Ponds: Beech Mt BSA Camp (Flynn, Big Rock and Quick Lake Trails)
| Quick Look | ||||
|---|---|---|---|---|
| Difficulty | Round trip | Total climb | Internet Maps | |
| 6.2 mi. | 980 ft. | AllTrails | ||
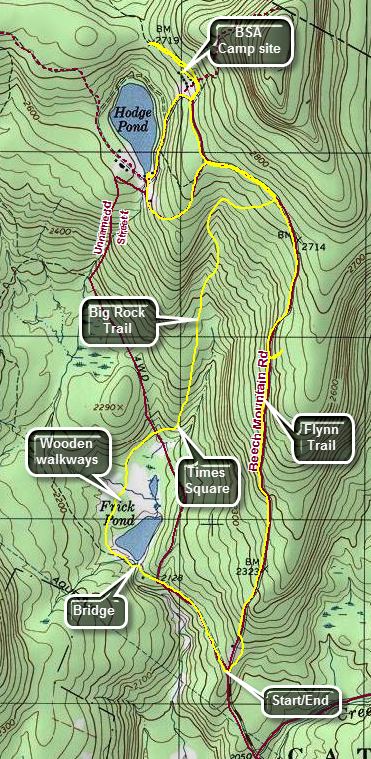 The area around Frick Pond, Hodge Pond and Quick Lake is covered with trails. There are numerous possibilities for short or long hikes. The area is "relatively" flat and there are no "views". There is, however, some beautiful scenery.
Take DeBruce Road from Livingston Manor for about six miles then turn left on Mongaup Rd. Where the road splits bear left on Beech Mountain Rd. and park in the parking lot on the left. Cross the road and start out on the Flynn Trail as it passes trough the woods to avoid the private property around the cabin. At the end of the trail turn right on the woods road that is the Flynn Trail. Walk up the trail for 1.7 miles gaining 650 feet along the way. At 1.1 miles you may want to walk off the trail to the right to an open area that covers several acres. The area has a thin layer of dirt over bedrock but there is no indication of how it formed. There is a woods road that runs from the Flynn Trail which was once Beech Mountain Road to the south ends of this area. Some people have suggested that dirt and gravel was taken from this area when the road was built. Return to the main Flynn Trail and turn right to continue on the trail. At 1.7 miles you will be at a four-way trail junction with the snowmobile trail from Mongaup Pond on the right and the Big Rock Trail on the left. Continue straight ahead on the Flynn Trail heading toward Hodge Pond. At the next trail junction stay right to walk on the woods road heading toward the site of the old Beech Mountain Boy Scout Camp. In about half a mile pass the left turn down to Hodge Pond. Stay on the road to a Y where and stay left to get to the camp site. Walk off the road to the left to inspect some of the remaining buildings. Walk back out to the road, turn right and walk to the road down to Hodge Pond. Turn right to walk downhill toward the water and turn left on the road around the pond. Walk down to the open area at the outlet end of the pond. Turn around and walk south into the woods on the Flynn Trail heading up the hill. At the next trail junction bear right and walk the Flynn Trail to the trail junction with the Big Rock Trail. Turn right to head down the Big Rock Trail to Times Square. The walk downhill is 1.1 miles and drops 600 feet to Times Square. Continue straight ahead on the Big Rock Trail around the north and west side of Frick Pond. Continue on the trail passing over the two small bridges that carry the trail over the inlet streams. Pass under some evergreen trees and cross the long wooden walkways. Follow the Big Rock Trail to the junction with the Quick Lake Trail and turn left. Walk over the bridge at the outlet of Frick Pond. Walk up the hill to Gravestone Junction and continue straight ahead on the Quick Lake Trail. Pass the trail register and continue on the woods road back to the car.
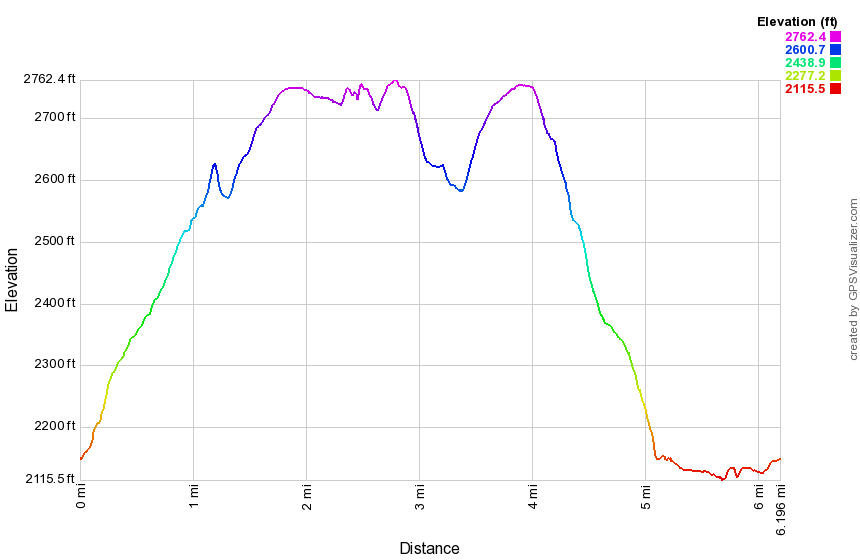
(The image above shows the profile of the hike. Remember that all vertical profiles are relative!)
Hodge and Frick Ponds (Flynn and Quick Lake Trails)
| Quick Look | ||||
|---|---|---|---|---|
| Difficulty | Round trip | Total climb | Internet Maps | |
| 6.4 mi. | 950 ft. | AllTrails | ||
 The area around Frick Pond, Hodge Pond and Quick Lake is covered with trails. There are numerous
possibilities for short of long hikes. The area is "relatively" flat and there are no "views".
There is, however, some beautiful scenery.
The area around Frick Pond, Hodge Pond and Quick Lake is covered with trails. There are numerous
possibilities for short of long hikes. The area is "relatively" flat and there are no "views".
There is, however, some beautiful scenery.
Take DeBruce Road from Livingston Manor for about six miles then turn left on Mongaup Rd. Where the road
splits bear left on Beech Mountain Rd. and park in the parking lot on the left. Find the blue-blazed
Flynn Trail across the road and follow it for 1.7 miles to the junction with the Big Rock Trail. Continue straight ahead toward Hodge Pond. In a short distance a woods road bears to the right. You may continue straight ahead on the trail to the pond. Bear right and then take the next left down toward Hodge Pond. Take the next right to walk around the back of the pond. The next right will put you back on the Flynn Trail. Continue on the Flynn Trail to Junkyard Junction where the Flynn Trail ends at the Quick Lake Trail turn left and stay on the Quick Lake trail for 2.1 miles to the bridge at the outlet of Frick Pond. Along the way you will pas through Iron Wheel Junction. Here the yellow-blazed Logger's Loop Trail goes straight ahead. Bear to the right to stay on the red-blazed Quick Lake Trail. After walking over the bridge at Frick Pond continue for about another .5 miles back to the parking area.
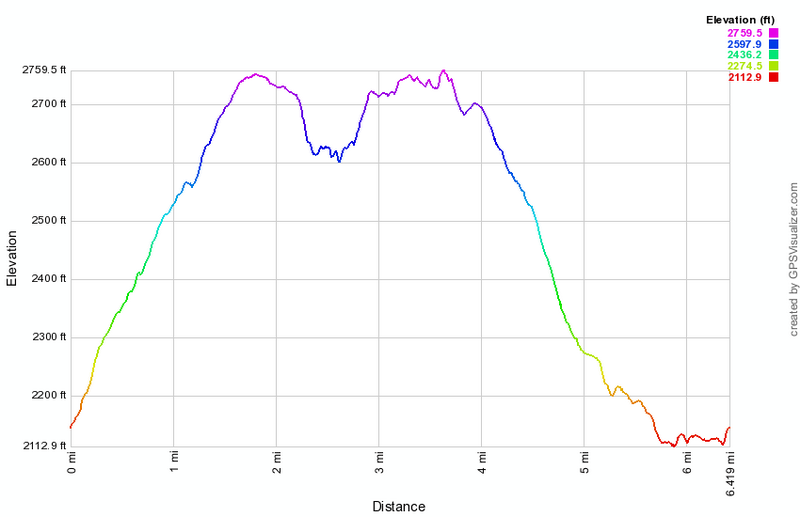
(The image above shows the profile of the hike. Remember that all vertical profiles are relative!)
Hodge and Frick Ponds: Flynn and Quick Lake Trail
| Quick Look | ||||
|---|---|---|---|---|
| Difficulty | Round trip | Total climb | Internet Maps | |
| 6.4 mi. | 920 ft. | AllTrails | ||
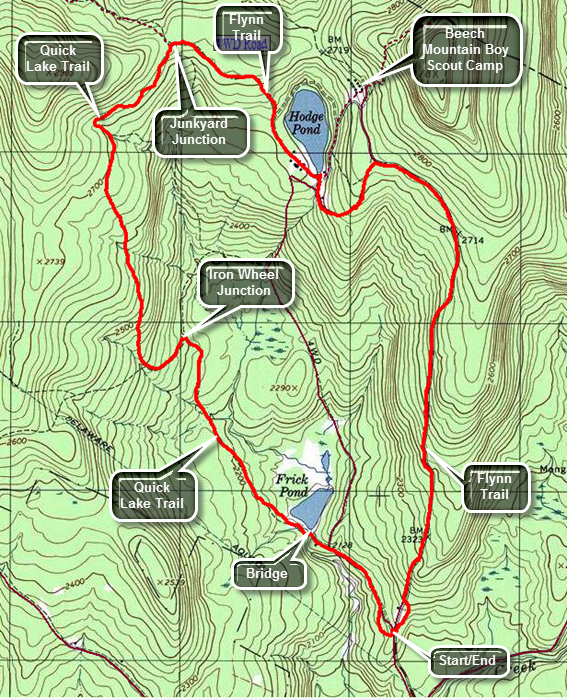 The area around Frick Pond, Hodge Pond and Quick Lake is covered with trails. Some are hiking trails while others are snowmobile trails or woods roads. There are numerous possibilities for short or long hikes. The area is "relatively" flat and there are no "views". There is, however, some beautiful scenery with two small ponds.
Take DeBruce Road from Livingston Manor for about six miles then turn left on Mongaup Rd. Where the road splits bear left on Beech Mountain Rd. and park in one of the parking lots on the left. Cross the road to find the blue blazed Flynn Trail which heads up the hill through the woods to avoid the cabin which is private property. Walk 1.7 miles uphill to the junction with the Big Rock Trail on the left and the snowmobile trail from Mongaup Pond on the right. Continue straight ahead on the Flynn Trail. At 2 miles there is another trail junction with a woods road going off to the right. Stay to the left and follow the Flynn Trail down to the shores of Hodge Pond. The trail turns left just before you get to the pond but you will probably want to walk straight ahead and investigate the pond. Follow the Flynn Trail across the outlet stream of the pond. At 2.8 miles bear to the left to continue to follow the Flynn Trail. Going straight ahead will take you around the back of the pond on an old jeep road. Walk up the hill to a gate and bear to the left following the Flynn Trail. At 3.3 miles you will be at Junkyard Junction where the Flynn Trail ends at the red blazed Quick Lake Trail. Turn left on the Quick Lake Trail and walk mostly downhill for 1.6 miles to Iron Wheel Junction at 4.9 miles. The yellow blazed Logger's Loop continues straight ahead. Turn right to stay on the Quick Lake Trail. Walk another .8 miles to 5.75 miles and another trail junction. To the left a trail goes around the back of Frick Pond and ends up at Times Square, a four-way trail junction. Continue straight ahead following the Quick Lake Trail to the bridge across the outlet of Frick Pond. As you stand on the bridge the mountain in the background to the right is Beech Mountain, the highest point in Sullivan County at 3118 feet. Continue on the trail climbing a small hill and passing the Logger's Loop on the left. Continue another .4 miles back to the car. When you pass the trail register, be sure to turn right and follow the Quick Lake Trail back to the parking area. The woods road that continues straight ahead leads to private property.
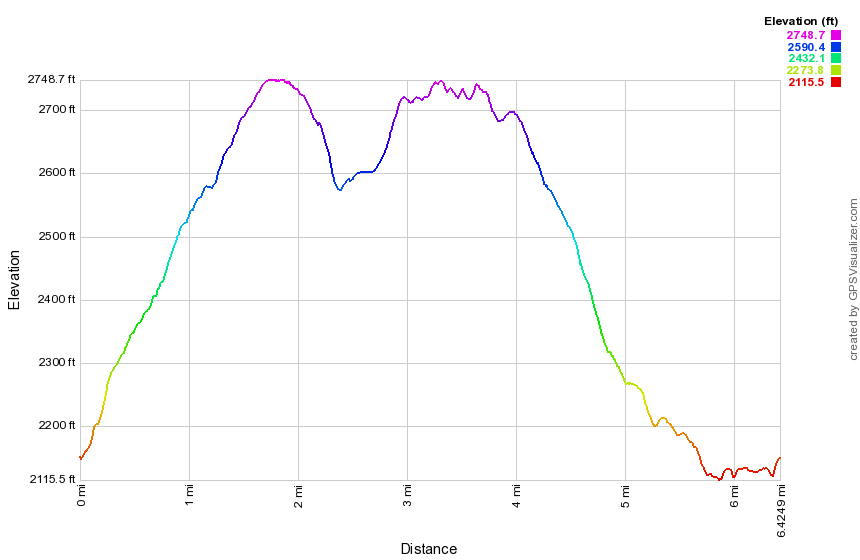
(The image shows the profile of the hike. Remember that all vertical profiles are relative!)
Hodge and Frick Ponds (Flynn, Big Rock and Quick Lake Trails)
| Quick Look | ||||
|---|---|---|---|---|
| Difficulty | Round trip | Total climb | Internet Maps | |
| 6.0 mi. | 912 ft. | AllTrails | ||
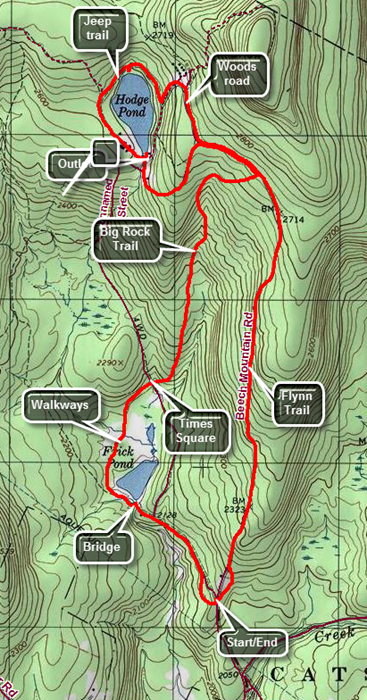 The area around Frick Pond, Hodge Pond and Quick Lake is covered with trails. There are numerous possibilities for short of long hikes. The area is "relatively" flat and there are no "views". There is, however, some beautiful scenery.
Take DeBruce Road from Livingston Manor for about six miles then turn left on Mongaup Rd. Where the road splits bear left on Beech Mountain Rd. and park in the parking lot on the left. Find the blue-blazed Flynn Trail across the road and follow it for 1.7 miles to the junction with the Big Rock Trail. Continue straight ahead toward Hodge Pond. In a short distance a woods road bears to the right. Bear to the right on the woods road and at the next trail junction turn left and walk down toward Hodge pond. At the next intersection turn right on a jeep trail around the back of the pond. When you hit the blue blazed Flynn Trail again, tune left to continue around the pond. When you reach the clearing at yen outlet end of the pond, turn left and walk to the shore of the pond for a break. Turn around and walk straight ahead for the opening in the trees where you will pick up the Flynn Trail again. Walk up the hill and back along the flat part of the Flynn Trail through the gate to the junction with the Big Rock Trail. At this point you will have hiked 3.8 miles. Turn right and hike downhill on the Big Rock trail for 1.1 miles to Times Square. Continue straight ahead on the Big Rock Trail around the north end of the pond and then down the west side. You will walk over some wooden bridges and walkways that can be slippery when wet. When you reach the red blazed Quick Lake Trail turn left and hike to the bridge over the outlet of Frick Pond. This is a good place to observe the pond. Continue your hike by walking up the hill to Gravestone Junction where you will continue straight ahead on the Quick Lake Trail. This part of the hike is emotively flat but may be wet and muddy. At the trail register box, turn right to stay on the Quick Lake trail which will take you to the larger of the two parking areas.
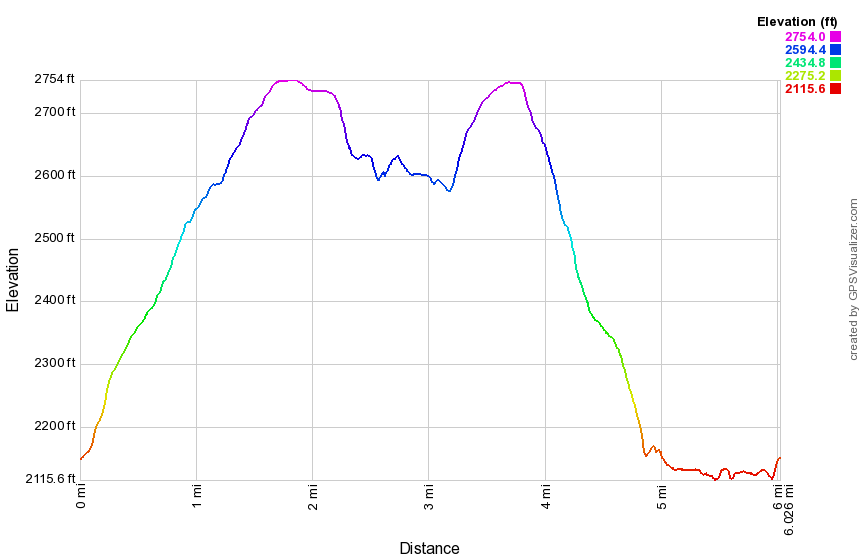 (The image below shows the profile of the hike. Remember that all vertical profiles are relative!)
Hodge and Frick Ponds (Flynn, Jeep, Big Rock and Quick Lake Trails)
| Quick Look | ||||
|---|---|---|---|---|
| Difficulty | Round trip | Total climb | Internet Maps | |
| 5.5 mi. | 850 ft. | AllTrails | ||
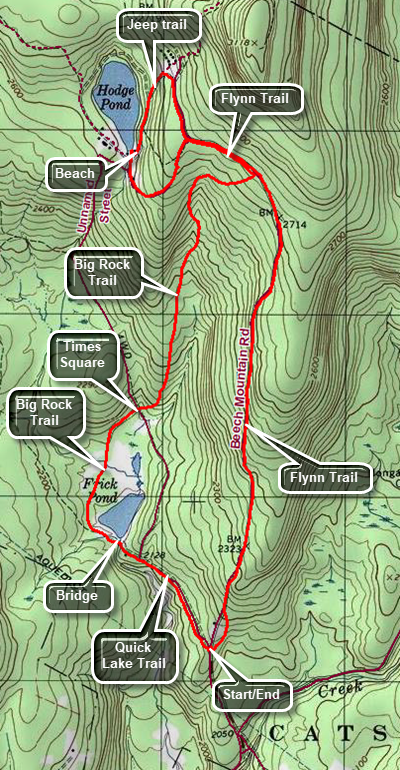 The area around Frick Pond, Hodge Pond and Quick Lake is covered with trails. There are numerous possibilities for short of long hikes. The area is "relatively" flat and there are no "views". There is, however, some beautiful scenery.
Take DeBruce Road from Livingston Manor for about six miles then turn left on Mongaup Rd. Where the road splits bear left on Beech Mountain Rd. and park in the parking lot on the left. Find the blue-blazed Flynn Trail across the road and follow it for 1.7 miles to the junction with the Big Rock Trail. Continue straight ahead toward Hodge Pond. In a short distance a woods road bears to the right. Continue straight ahead on the Flynn Trail which will bring you to a clearing at the outlet end of Hodge Pond. Walk over to the shore if you wish. When you are ready to continue, walk up the hill on the east side of the pond bearing right where the trail splits. At the top of the hill, turn right to walk out to the Flynn Trail. Turn left on the Flynn Trail to head back to the junction with the Big Rock Trail. Turn right and hike downhill on the Big Rock trail for 1.1 miles to Times Square. Continue straight ahead on the Big Rock Trail around the north end of the pond and then down the west side. You will walk over some wooden bridges and walkways that can be slippery when wet. When you reach the red blazed Quick Lake Trail turn left and hike to the bridge over the outlet of Frick Pond. This is a good place to observe the pond. Continue your hike by walking up the hill to Gravestone Junction where you will continue straight ahead on the Quick Lake Trail. This part of the hike is mostly flat but may be wet and muddy. At the trail register box, turn right to stay on the Quick Lake trail which will take you to the larger of the two parking areas.
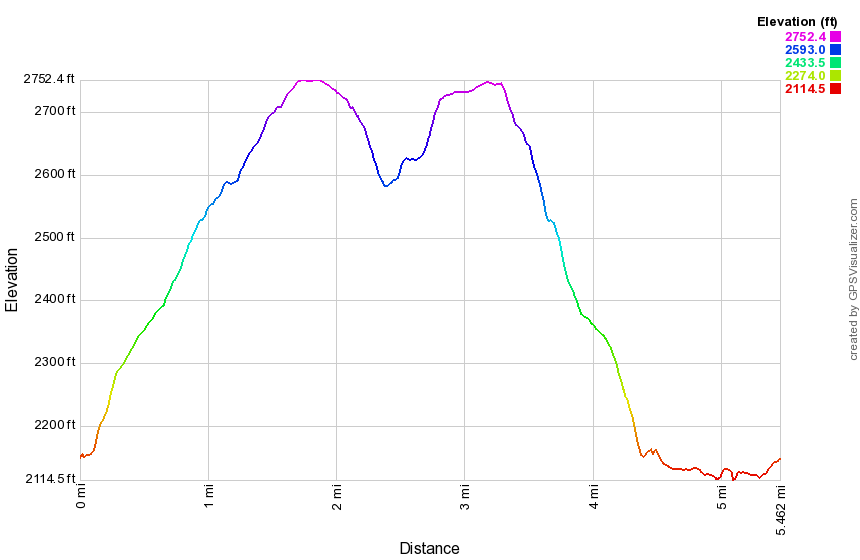 (The image below shows the profile of the hike. Remember that all vertical profiles are relative!)
Hodge and Frick Ponds (Flynn, Big Rock and Quick Lake Trails - Hodge Loop)
| Quick Look | ||||
|---|---|---|---|---|
| Difficulty | Round trip | Total climb | Internet Maps | |
| 6.3 mi. | 935 ft. | AllTrails | ||
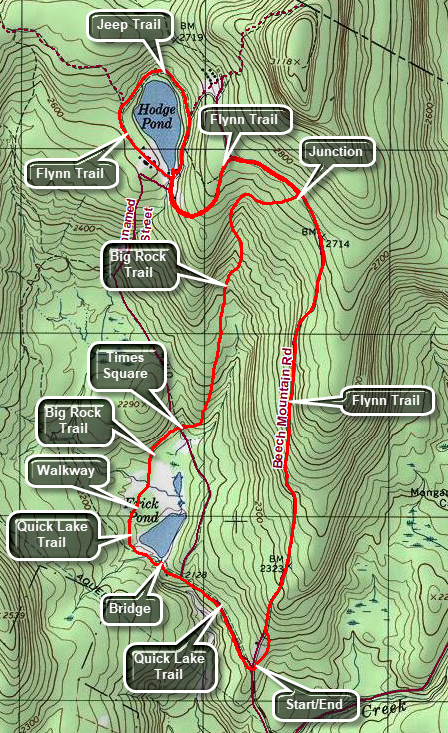 The area around Frick Pond, Hodge Pond and Quick Lake is covered with trails. There are numerous possibilities for short of long hikes. The area is "relatively" flat and there are no "views". There is, however, some beautiful scenery.
Take DeBruce Road from Livingston Manor for about six miles then turn left on Mongaup Rd. Where the road splits bear left on Beech Mountain Rd. and park in the parking lot on the left. Find the blue-blazed Flynn Trail across the road and follow it for 1.7 miles to the junction with the Big Rock Trail. Continue straight ahead toward Hodge Pond. In a short distance a woods road bears to the right. Bear to the left on the Flynn Trail and walk down to the field at the outlet end of Hodge Pond. Visit the shores of the pond. When you are finished walk to the right and up a hill on the jeep trail that goes around the back of the pond. When you reach the blue blazed Flynn Trail again, turn left to continue around the pond. When you reach the clearing at the outlet end of the pond, turn right and walk to the opening in the trees where you will continue on the Flynn Trail. Walk up the hill and back along the flat part of the Flynn Trail through the gate to the junction with the Big Rock Trail. At this point you will have hiked 4.1 miles. Turn right and hike downhill on the Big Rock trail for 1.1 miles to Times Square. Continue straight ahead on the Big Rock Trail around the north end of the pond and then down the west side. You will walk over some wooden bridges and walkways that can be slippery when wet. When you reach the red blazed Quick Lake Trail turn left and hike to the bridge over the outlet of Frick Pond. This is a good place to observe the pond. Continue your hike by walking up the hill to Gravestone Junction where you will continue straight ahead on the Quick Lake Trail. This part of the hike is relatively flat but may be wet and muddy. At the trail register box, turn right to stay on the Quick Lake Trail or continue straight ahead on the woods road. Both ways will lead you to the two parking areas.
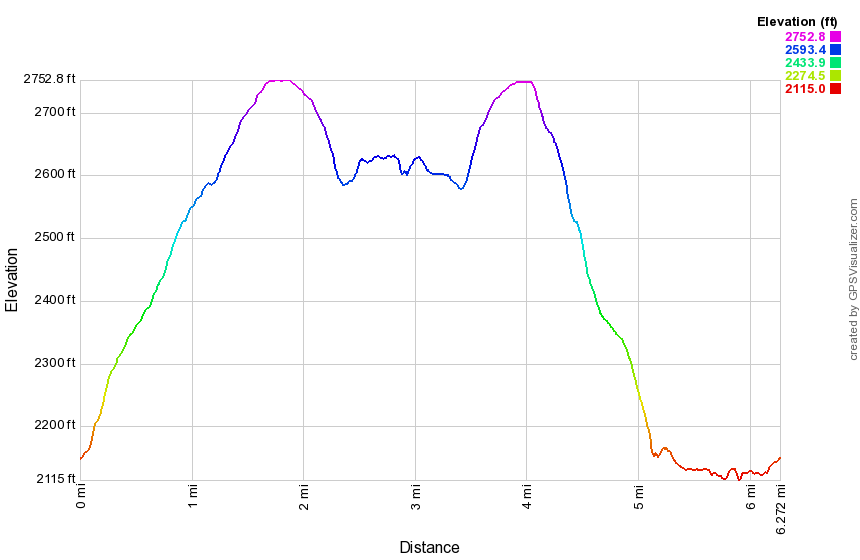 (The image below shows the profile of the hike. Remember that all vertical profiles are relative!)
Hodge and Frick Ponds (Flynn, Big Rock, Loggers Loop and Quick Lake Trails)
| Quick Look | ||||
|---|---|---|---|---|
| Difficulty | Round trip | Total climb | Internet Maps | |
| 7.7 mi. | 1105 ft. | AllTrails | ||
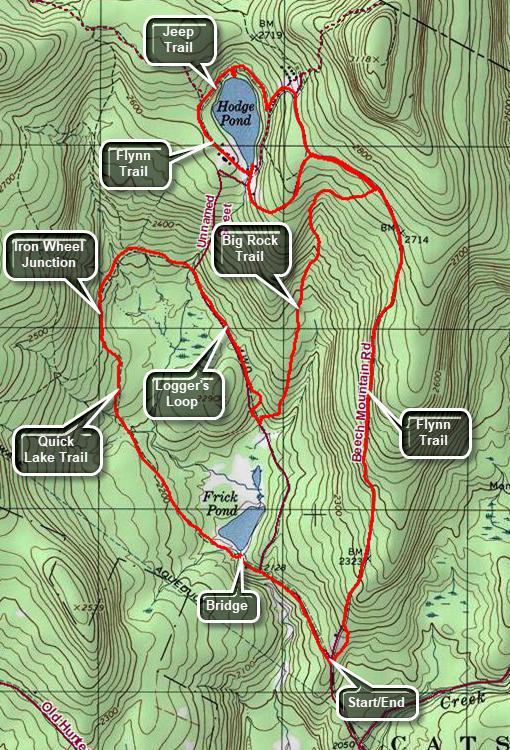 The area around Frick Pond, Hodge Pond and Quick Lake is covered with trails. There are numerous possibilities for short of long hikes. The area is "relatively" flat and there are no "views". There is, however, some beautiful scenery.
Take DeBruce Road from Livingston Manor for about six miles then turn left on Mongaup Rd. Where the road splits bear left on Beech Mountain Rd. and park in the parking lot on the left. Find the blue-blazed Flynn Trail across the road and follow it for 1.7 miles to the junction with the Big Rock Trail. Continue straight ahead toward Hodge Pond. In a short distance a woods road bears to the right. Bear to the right on the woods road and at the next trail junction turn left and walk down toward Hodge pond. At the next intersection turn right on a jeep trail around the back of the pond. When you hit the blue blazed Flynn Trail again, turn left to continue around the pond. When you reach the clearing at the outlet end of the pond, turn left and walk to the shore of the pond for a break. Turn around and walk straight ahead for the opening in the trees where you will pick up the Flynn Trail again. Walk up the hill and back along the flat part of the Flynn Trail through the gate to the junction with the Big Rock Trail. At this point you will have hiked 3.8 miles. Turn right and hike downhill on the Big Rock trail for 1.1 miles to Times Square. Turn right on the Logger's Loop and begin to hike uphill. The trail flattens and then undulates some for a total of 1.25 miles. You will be at Iron Wheel Junction after hiking a total of 6.25 miles. Turn left on the Quick Lake Trail and get ready for a mostly downhill walk. The trail can be wet at times and you will have to cross a small stream in the woods. At 7 miles the Big Rock Trail will come in from the left. Continue on the Quick Lake Trail by bearing right. At 7.2 miles you will cross a bridge over the outlet stream from Frick Pond. Continue up the hill to Gravestone Junction. Stay straight ahead on the Quick Lake Trail which will bring you back to your car in the parking area.
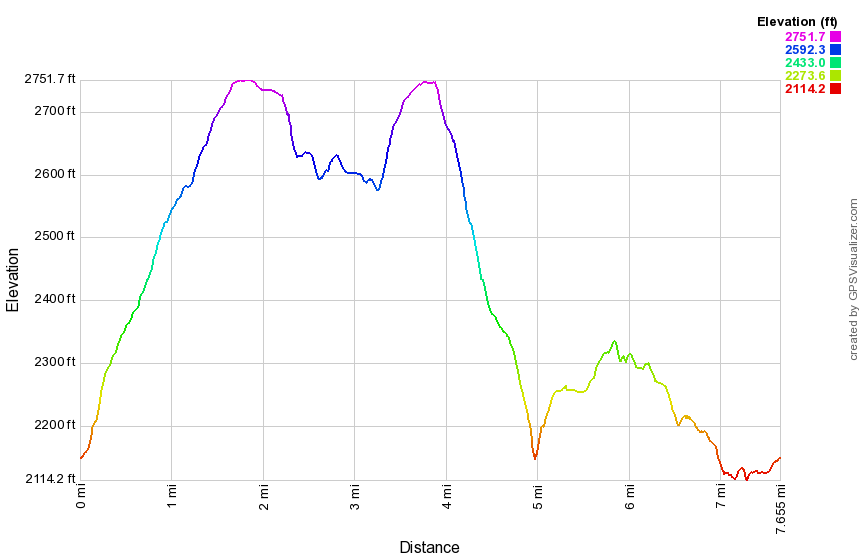 (The image below shows the profile of the hike. Remember that all vertical profiles are relative!)
Hodge and Frick (Logger's Loop, Big Rock, Flynn and Quick Lake Trails)
| Quick Look | ||||
|---|---|---|---|---|
| Difficulty | Round trip | Total climb | Internet Maps | |
| 6.3 mi. | 973 ft. | AllTrails | ||
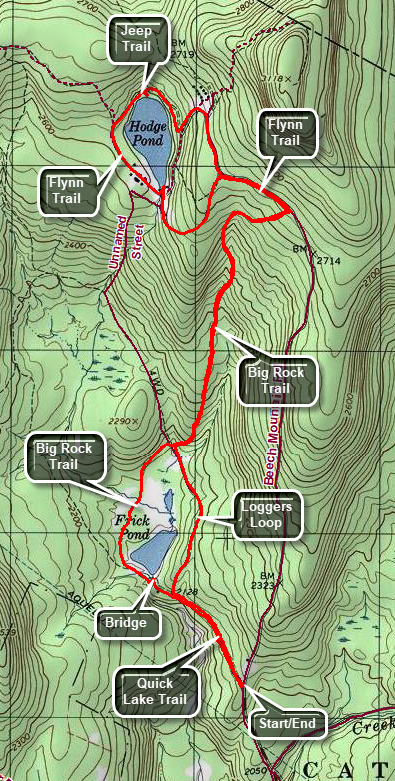 The area around Frick Pond, Hodge Pond and Quick Lake is covered with trails. There are numerous possibilities for short of long hikes. The area is "relatively" flat and there are no "views". There is, however, some beautiful scenery.
Take DeBruce Road from Livingston Manor for about six miles then turn left on Mongaup Rd. Where the road splits bear left on Beech Mountain Rd. and park in the smaller parking lot on the right. Walk out the back of the parking area on a woods road to the trail register. Pick up the Quick Lake Trail from the register to Gravestone Junction where the trail splits. Turn right on the Loggers Loop and begin to walk the trail toward Times Square at 1 mile. Turn right on the Big Rock Trail and climb 600 feet in 1.1 miles to the Flynn Trail. Turn left on the Flynn Trail and awl the flat trail to the next trail junction Bear left to stay on the Flynn Trail and walk downhill to the clearing at the outlet end of Hodge Pond. Walk over to the shore if you wish and then walk back to the Flynn
Trail which follows the western shore of the Pond. When the trail splits and the Flynn trail bears left, stay right and follow the jeep trail around the north side of Hodge Pond. You may walk down the informal paths to the shores of the pond for a nice view. Continue on the jeep trail and up a small hill. Turn left on the woods road and walk up a steep but short hill to what was once the Beech Mountain Road. Turn right and walk back to the Flynn Trail. Turn left and walk the flat trail back to the junction with the Big Rock Trail. Turn right and descend the Big Rock Trail to Fumes Square. Continue straight ahead on the Big Rock Trail and around to the west side of Frick Pond. Walk through a forest of large evergreens and over two bridges. Continue over the wooden walkways until the Big Rock Trail ends at the Quick Lake Trail. Turn left and walk the Quick Lake Trail to the bridge at the outlet of Frick Pond. Cross the bridge and walk up the hill to continue on the Quick Lake trail back to the parking areas.
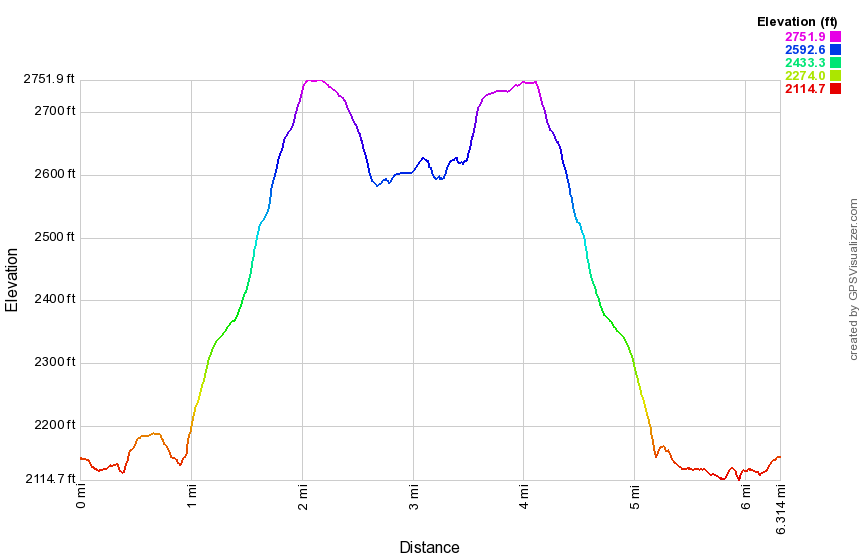 (The image below shows the profile of the hike. Remember that all vertical profiles are relative!)
Hodge and Frick (Logger's Loop, Quick Lake, Flynn, Big Rock Trails)
| Quick Look | ||||
|---|---|---|---|---|
| Difficulty | Round trip | Total climb | Internet Maps | |
| 7.8 mi. | 1102 ft. | AllTrails | ||
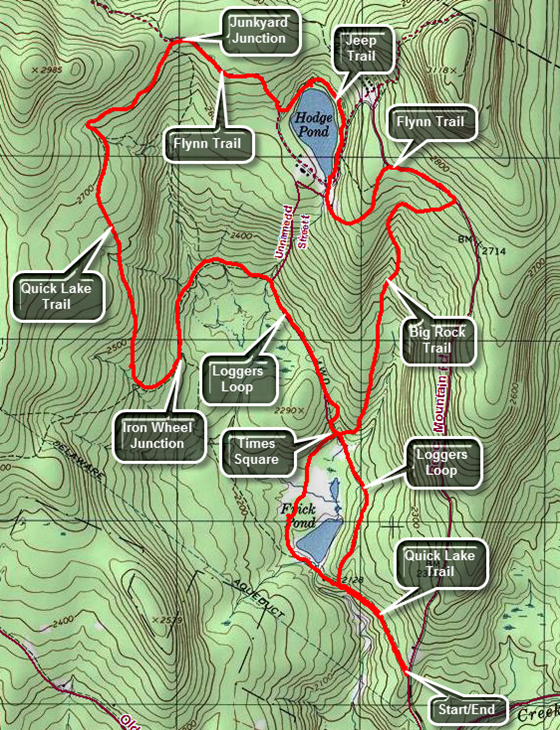 The area around Frick Pond, Hodge Pond and Quick Lake is covered with trails. There are numerous possibilities for short of long hikes. The area is "relatively" flat and there are no "views". There is, however, some beautiful scenery.
Take DeBruce Road from Livingston Manor for about six miles then turn left on Mongaup Rd. Where the road splits bear left on Beech Mountain Rd. and park in the smaller parking lot on the right. Walk out the back of the parking area on a woods road to the trail register. Pick up the Quick Lake Trail from the register to Gravestone Junction where the trail splits. Turn right on the Loggers Loop and begin to walk the trail toward Times Square at 1 mile. Continue straight ahead on the yellow Loggers Loop as it climbs uphill and heads north then northwest for about .85 miles gaining 195 feet. Crest a small hill and then walk the rest of the way downhill slightly to Iron Wheel Junction at 2.2 miles. At the trail junction continue straight ahead toward Junkyard Junction beginning a long and uphill climb. The trail climbs about 500 feet in 1.6 miles as it heads primarily north. At 3.3 miles the trail turns northeast and continues uphill to Junkyard Junction. At 3.8 miles reach the junction and turn right on the Flynn Trail heading southeast toward Hodge Pond. After passing through the gate, walk downhill toward the shore of Hodge Pond. Turn left to follow the jeep trail around the head end of the pond. After a short walk, turn right and walk down to the edge of the water for a nice view of Hodge Pond. Walk back up Ti the jeep trail and turn right to continue down the trail and woods road to the outlet end of Hodge Pond. This is also a nice place to stop for a rest and a view. After viewing the pond, turn completely around and walk toward the Flynn Trail where it enters the woods and heads up the hill. This half mile stretch gains only 150 feet but can be tiring. At the top of the hill at 5.3 miles turn right to stay on the Flynn Trail as it heads toward the junction with the Big Rock Trail. This section of the trail is very flat. Turn right at 5.6 miles and start down the Big Rock Trail heading west to 5.8 miles where the trail turns south. In the 1.1 miles from the junction with the Flynn Trail to Times Square the Big Rock Trail drops 600 feet. At 5.6 miles pass straight through Times Square continuing on the Big Rock Trail around the back of Frick Pond. The trail passes over two bridges and a series of wooden walkways that can be slippery when wet. Continue to the end of the big Rock Trail and turned left on the Quick Lake Trail. It is a short hike to the bridge over the outlet stream at Frick Pond. This is a nice viewpoint. Head up the hill to Gravestone Junction. At the junction stay right on the Quick Lake Trail and walk back to you car.
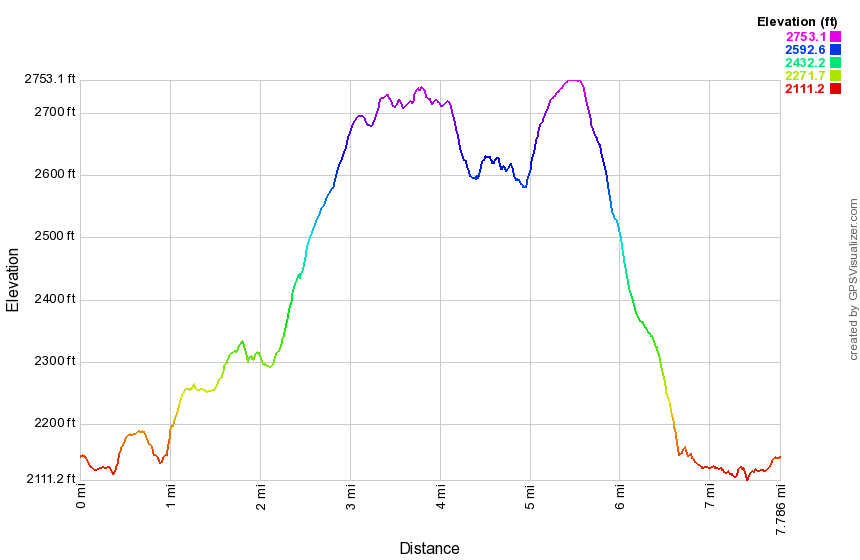 (The image below shows the profile of the hike. Remember that all vertical profiles are relative!)
Hodge and Frick Ponds (Lookout - Flynn and Quick Lake Trails)
| Quick Look | ||||
|---|---|---|---|---|
| Difficulty | Round trip | Total climb | Internet Maps | |
| 7.7 mi. | 1285 ft. | AllTrails | ||
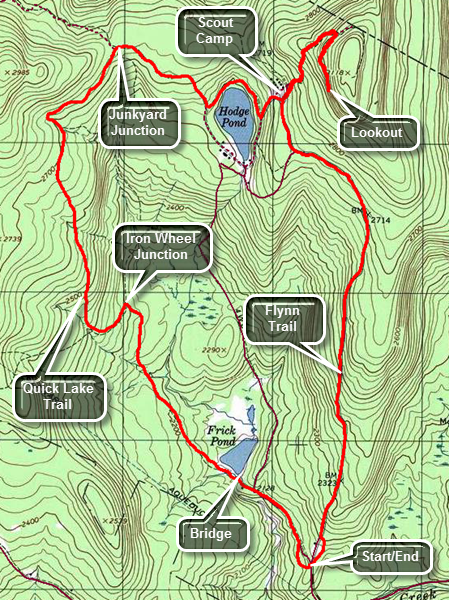 The area around Frick Pond, Hodge Pond and Quick Lake is covered with trails. There are numerous
possibilities for short of long hikes. The area is "relatively" flat and there are no "views".
There is, however, some beautiful scenery.
The area around Frick Pond, Hodge Pond and Quick Lake is covered with trails. There are numerous
possibilities for short of long hikes. The area is "relatively" flat and there are no "views".
There is, however, some beautiful scenery.
Take DeBruce Road from Livingston Manor for about six miles then turn left on Mongaup Rd. Where the road
splits bear left on Beech Mountain Rd. and park in the parking lot on the left. Find the blue-blazed
Flynn Trail across the road and follow it for 1.7 miles to the junction with the Big Rock Trail. Continue straight ahead toward Hodge Pond. In a short distance a woods road bears to the right. You may continue straight ahead on the trail to the pond. Bear right and then at the next junction continue straight ahead and up the hill on a woods road. At about 2.7 miles watch for a trail that goes to the right as the road turns to the left. This area is above the spring house on the right of the road and is unmarked but very clear. Walk about a quarter mile to the large rock shelf that acts as a lookout over Hodge Pond. Trees have grown up to block the lookout so the best view is when there are no leaves on those trees. Turn around and follow your route back to the spot where you went straight ahead on the woods road up the hill. You will see some cabins on the right which are the remains of the Beech Mountain Boy Scout Camp. Continue straight ahead and take the next right that leads down toward Hodge Pond. Take the next right to walk around the back of the pond on an old Jeep trail. The next right will put you back on the Flynn Trail. Continue on the Flynn Trail to Junkyard Junction where the Flynn Trail ends at the Quick Lake Trail. Turn left and stay on the Quick Lake trail for 2.1 miles to the bridge at the outlet of Frick Pond. Along the way you will pass through Iron Wheel Junction. Here the yellow-blazed Logger's Loop Trail goes straight ahead. Bear to the right to stay on the red-blazed Quick Lake Trail. After walking over the bridge at Frick Pond continue for about another .5 miles back to the parking area.
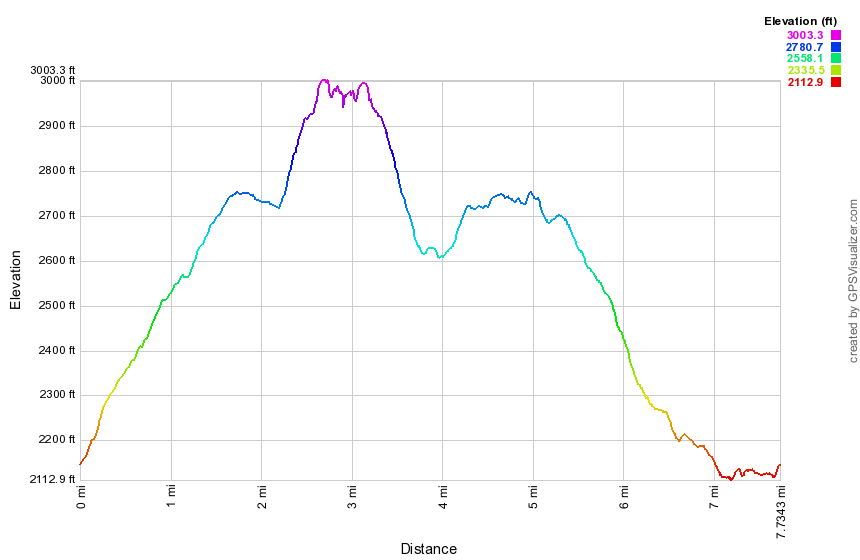 (The image below shows the profile of the hike. Remember that all vertical profiles are relative!)
Hodge and Frick Ponds (Lookout Loop - Flynn and Quick Lake Trails)
| Quick Look | ||||
|---|---|---|---|---|
| Difficulty | Round trip | Total climb | Internet Maps | |
| 8.1 mi. | 1330 ft. | AllTrails | ||
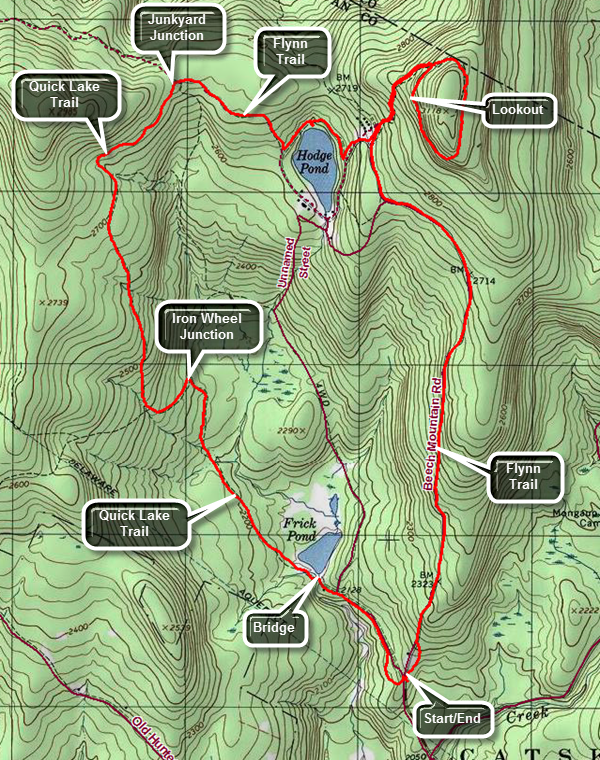 The area around Frick Pond, Hodge Pond and Quick Lake is covered with trails. There are numerous possibilities for short of long hikes. The area is "relatively" flat and there are no "views". There is, however, some beautiful scenery.
Take DeBruce Road from Livingston Manor for about six miles then turn left on Mongaup Rd. Where the road splits bear left on Beech Mountain Rd. and park in the parking lot on the left. Find the blue-blazed Flynn Trail across the road and follow it for 1.7 miles to the junction with the Big Rock Trail. Continue straight ahead toward Hodge Pond. In a short distance a woods road bears to the right. Bear right and then at the next junction continue straight ahead and up the hill on a woods road. At about 2.7 miles watch for a trail that goes to the right as the road turns to the left. This area is above the spring house on the right of the road and is unmarked but very clear. Walk about a quarter mile to the large rock shelf that acts as a lookout over Hodge Pond. From the lookout continue on the woods road around the higher ground on your left. This higher ground is Flynn's Point on Beech Mountain and is the highest point in Sullivan County at 3118 feet. Continue to circle Beech Mountain until you are back at the dirt road where you should turn left and walk back down the hill to the turn down to Hodge Pond. Turn right at 4 miles and walk down toward the pond. As you near the shore, turn right on the jeep road that goes around the upper end of the pond. At the next trail junction, turn right to hike up the blue-blazed Flynn Trail. Hiked up the hill and pass through the gate where the Flynn Trail turns to the left. This part of the trail is flat and often muddy. At 5 miles arrive at Junkyard Junction where the Flynn Trail ends. Turne left on the red blazed Quick Lake Trail to start back toward the parking area. The hike back to the car is mostly downhill! At 6.6 miles you will be at Iron Wheel Junction which is marked by...a set of iron wagon wheels. The yellow blazed Logger's Loop continues straight ahead. Turn right to stay on the Quick Lake Trail. Hike down the trail and cross a small stream and walk through the "Spruce tunnel". Pass the junction with the yellow blazed Big Rock Trail on the left and arrive at the bridge across the outlet of Frick Pond at 7.5 miles. Cross the bridge and walk up the hill to Gravestone Junction. Continue straight ahead toward the parking lot. Follow the Quick Lake Trail to the register where you should turn right to get back to your car.
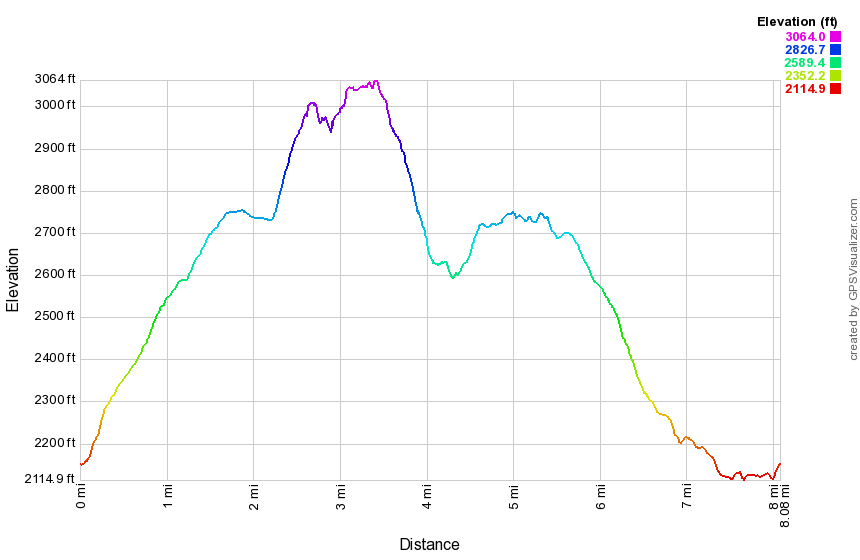 (The image below shows the profile of the hike. Remember that all vertical profiles are relative!)
Hodge and Frick Ponds (Two Lookouts Loop - Flynn and Quick Lake Trails)
| Quick Look | ||||
|---|---|---|---|---|
| Difficulty | Round trip | Total climb | Internet Maps | |
| 8.6 mi. | 1234 ft. | AllTrails | ||
 The area around Frick Pond, Hodge Pond and Quick Lake is covered with trails. There are numerous possibilities for short of long hikes. The area is "relatively" flat but there are some views from Beech Mouain.
Take DeBruce Road from Livingston Manor for about six miles then turn left on Mongaup Rd. Where the road splits bear left on Beech Mountain Rd. and park in the parking lot on the left. Find the blue-blazed Flynn Trail across the road and follow it for 1.7 miles to the junction with the Big Rock Trail. Continue straight ahead toward Hodge Pond. In a short distance a woods road bears to the right. Bear right and then at the next junction continue straight ahead and up the hill on a woods road. At about 2.7 miles watch for a trail that goes to the right as the road turns to the left. Follow the road to the right as it ascends and then descends. The road turns right and comes to a grassy area with a greater than 180 degree viewpoint. The view extends from Balsam Lake Mountain on the left to Papoose on the right. The view in any season is truly spectacular. Continue on the woods road that passes by the lookout and ascends a small hill to another woods road. This road loops around Beech Mountain but does noir access the high point. Turn right on this road and follow it as it continues turning right as it circles the summit. Watch for a lookout on the left which looks down over Hodge Pond. Continue on the woods road until it meets the road that you used earlier in the hike. Turn left and follow the road back down the hill. Watch for a road on the right that heads downhill to Hodge Pond. Turn right and continue on the road passing by a right that leads to a jeep trail that goes around the head end of Hodge Pond. The woods road will lead to the clearing at the outlet end of Hodge Pond. Spend some time at the pond. When you are done walk toward the outlet end of the pond to pick up the Flynn Trail. Beaver activity may make walking on the trail across the outlet difficult. Once across, continue on the Flynn Trall watching for the point that it heads left away from the pond. Follow the trail uphill until it passes through a gate and levels off. This area is flat and may be wet at times. In a short time you will come to a junction with the red-blazed Quick Lake Trail at Junkyard Junction. Turn left and walk downhill for about 1.6 miles to Iron Wheel junction where the Quick Lake Trail turns right. Continue to follow this trail through areas that can often be wet and muddy. Cross a small stream and walk through a spruce tunnel. The trail breaks out into the open and passes by a junction with the yellow-blazed Big Rock Trail on the left. Cross two small bridges and arrive at the bridge over the outlet of Frick Pond. Continue on the trail as it climbs a small hill and leads to Gravestone Junction where the Logger's Loop starts on the left. Continue on the Quick Lake Trail by bearing right. The trail will pass the trail register and lead back to the parking lot where you started.
 (The image below shows the profile of the hike. Remember that all vertical profiles are relative!)
Hodge and Frick Ponds (Flynn, Jeep and Quick Lake Trails)
| Quick Look | ||||
|---|---|---|---|---|
| Difficulty | Round trip | Total climb | Internet Maps | |
| 6.4 mi. | 920 ft. | AllTrails | ||
The area around Frick Pond, Hodge Pond and Quick Lake is covered with trails. There are numerous
possibilities for short of long hikes. The area is "relatively" flat and there are no "views".
There is, however, some beautiful scenery.
Take DeBruce Road from Livingston Manor for about six miles then turn left on Mongaup Rd. Where the road
splits bear left on Beech Mountain Rd. and park in the parking lot on the left. Find the blue-blazed
Flynn Trail across the road and follow it for 1.7 miles to the junction with the Big Rock Trail. Continue straight ahead toward Hodge Pond. In a short distance a woods road bears to the right. You may continue straight ahead on the trail to the pond. Bear right and then take the next left down toward Hodge Pond. Take the next right to walk around the back of the pond. The next right will put you back on the Flynn Trail. Continue on the Flynn Trail to Junkyard Junction where the Flynn Trail ends at the Quick Lake Trail turn left and stay on the Quick Lake trail for 2.1 miles to the bridge at the outlet of Frick Pond. Along the way you will pas through Iron Wheel Junction. Here the yellow-blazed Logger's Loop Trail goes straight ahead. Bear to the right to stay on the red-blazed Quick Lake Trail. After walking over the bridge at Frick Pond continue for about another .5 miles back to the parking area.
(The image at the left shows the profile of the hike. Remember that all vertical profiles are relative!)
Hodge and Frick Ponds (Flynn and Quick Lake Trails)
| Quick Look | ||||
|---|---|---|---|---|
| Difficulty | Round trip | Total climb | Internet Maps | |
| 6.3 mi. | 910 ft. | AllTrails | ||
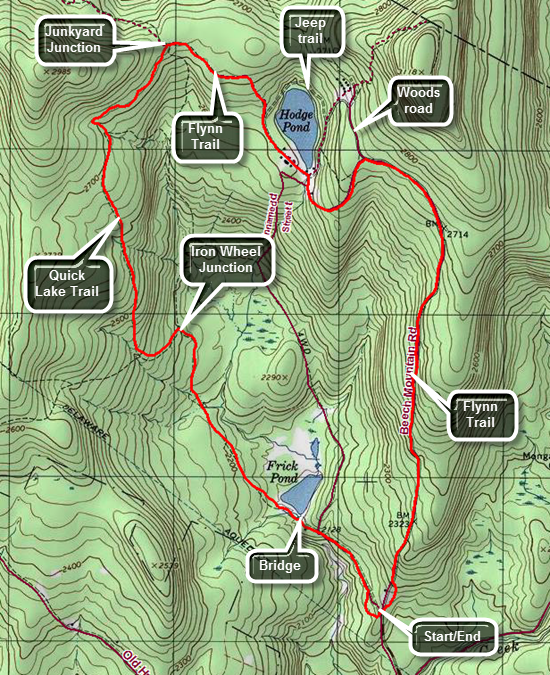 The area around Frick Pond, Hodge Pond and Quick Lake is covered with trails. There are numerous possibilities for short of long hikes. The area is "relatively" flat and there are no "views". There is, however, some beautiful scenery.
Take DeBruce Road from Livingston Manor for about six miles then turn left on Mongaup Rd. Where the road splits bear left on Beech Mountain Rd. and park in the parking lot on the left. Find the blue-blazed Flynn Trail across the road and follow it for 1.7 miles to the junction with the Big Rock Trail. Continue straight ahead toward Hodge Pond. In a short distance a woods road bears to the right. Continue straight ahead on the trail to the pond. Walk down the hill on the Flynn Trail to Hodge Pond. The trail turns left and crosses the outlet stream. You may want to walk over to the shores of the pond and relax for a few minutes. Continue on the blue Flynn Trail along the western edge of Hodge Pond. Watch for the blazes as they bear to the left at a junction with a jeep trail that continues around the back of the pond. Follow the blue blazes of the Flynn trail up the hill to a gate. Follow the trail as it turns left here and continues to Junkyard Junction. At Junkyard Junction the Flynn Trail ends at the Quick Lake Trail. Turn left and stay on the Quick Lake Trail for 1.6 miles until you get to Iron Wheel Junction where you will see ...a set of iron wagon wheels. The yellow Logger's Loop continues straight ahead. Turn right to stay on the red Quick Lake Trail. You will continue to hike mostly downhill and will cross a small stream in the woods. Pass by the next trail junction with the yellow Big Rock Trail. Cross the outlet of Frick Pond on a bridge. This is another nice place to stop for a few minutes. Continue up the hill following the Quick Lake Trail and passing by Gravestone Junction, an intersection with the yellow Logger's Loop. At the trail register turn right and walk out to the parking area on the Quick Lake Trail.
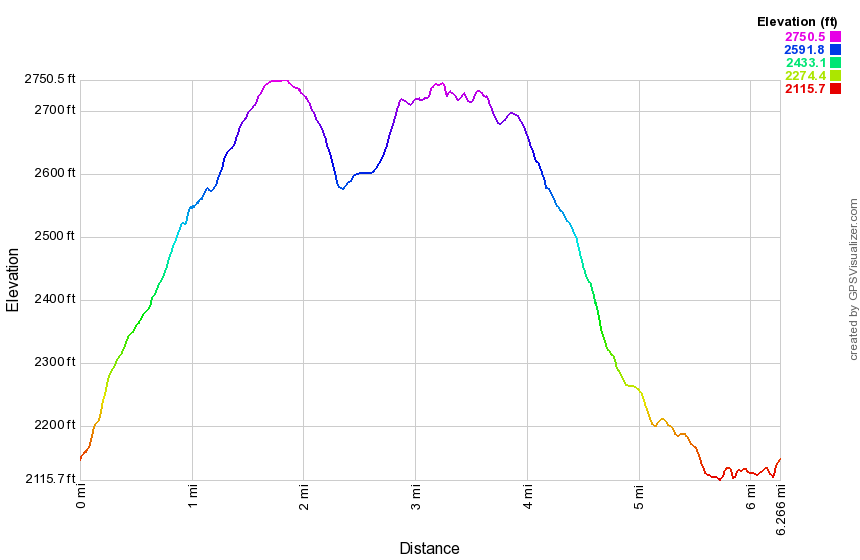 (The image below shows the profile of the hike. Remember that all vertical profiles are relative!)
Hodge and Frick Ponds (Flynn, Big Rock and Quick Lake Trails)
| Quick Look | ||||
|---|---|---|---|---|
| Difficulty | Round trip | Total climb | Internet Maps | |
| 5.6 mi. | 950 ft. | AllTrails | ||
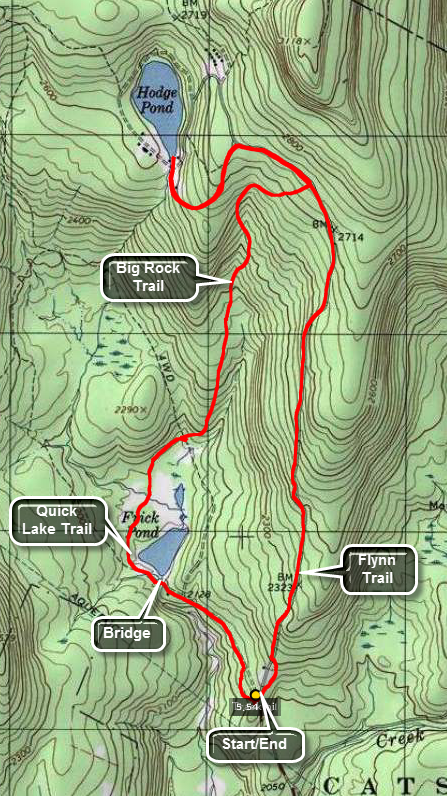 The area around Frick Pond, Hodge Pond and Quick Lake is covered with trails. There are numerous
possibilities for short of long hikes. The area is "relatively" flat and there are no "views".
There is, however, some beautiful scenery.
The area around Frick Pond, Hodge Pond and Quick Lake is covered with trails. There are numerous
possibilities for short of long hikes. The area is "relatively" flat and there are no "views".
There is, however, some beautiful scenery.
Take DeBruce Road from Livingston Manor for about six miles then turn left on Mongaup Rd. Where the road splits bear left on Beech Mountain Rd. and park in the parking lot on the left. Find the blue-blazed Flynn Trail across the road and follow it for 1.7 miles to the junction with the Big Rock Trail. Continue straight ahead toward Hodge Pond. In a short distance a woods road bears to the right. You may continue straight ahead on the trail to the pond. If you bear right, then take the next left and walk down toward Hodge Pond bearing to your left. Return the way you came to the Big Rock Trail junction. Turn right and head down the big Rock Trail to Times Square. Continue straight ahead around the back of Frick Pond. There are several wooden bridges and walkways here that can be very slippery when wet. Make a left on the Quick Lake Trail to continue around the pond. You will cross the bridge over the out let of the pond. Head up the small hill and bear right at the trail junction to get back to the parking area.
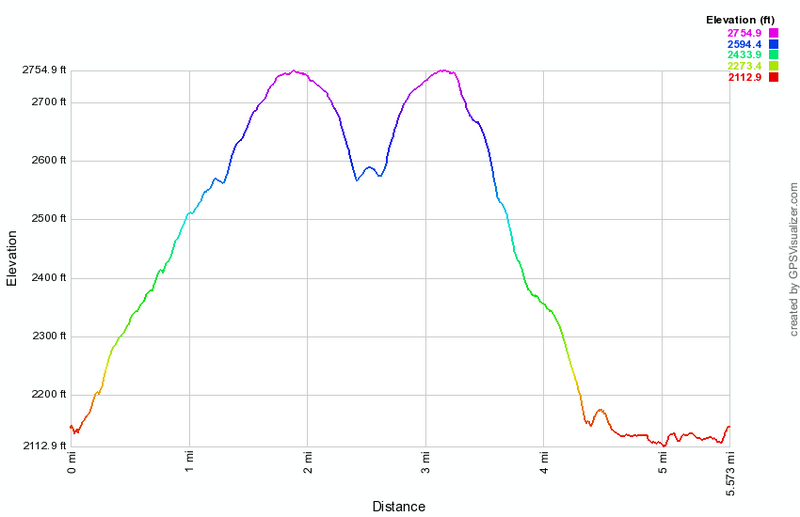
(The image above shows the profile of the hike. Remember that all vertical profiles are relative!)
Hodge and Frick Ponds: Beech Mt BSA Camp (Flynn, Big Rock and Quick Lake Trails)
| Quick Look | ||||
|---|---|---|---|---|
| Difficulty | Round trip | Total climb | Internet Maps | |
| 6.2 mi. | 980 ft. | AllTrails | ||
The area around Frick Pond, Hodge Pond and Quick Lake is covered with trails. There are numerous possibilities for short or long hikes. The area is "relatively" flat and there are no "views". There is, however, some beautiful scenery.
Take DeBruce Road from Livingston Manor for about six miles then turn left on Mongaup Rd. Where the road splits bear left on Beech Mountain Rd. and park in the parking lot on the left. Cross the road and start out on the Flynn Trail as it passes trough the woods to avoid the private property around the cabin. At the end of the trail turn right on the woods road that is the Flynn Trail. Walk up the trail for 1.7 miles gaining 650 feet along the way. At 1.1 miles you may want to walk off the trail to the right to an open area that covers several acres. The area has a thin layer of dirt over bedrock but there is no indication of how it formed. There is a woods road that runs from the Flynn Trail which was once Beech Mountain Road to the south ends of this area. Some people have suggested that dirt and gravel was taken from this area when the road was built. Return to the main Flynn Trail and turn right to continue on the trail. At 1.7 miles you will be at a four-way trail junction with the snowmobile trail from Mongaup Pond on the right and the Big Rock Trail on the left. Continue straight ahead on the Flynn Trail heading toward Hodge Pond. At the next trail junction stay right to walk on the woods road heading toward the site of the old Beech Mountain Boy Scout Camp. In about half a mile pass the left turn down to Hodge Pond. Stay on the road to a Y where and stay left to get to the camp site. Walk off the road to the left to inspect some of the remaining buildings. Walk back out to the road, turn right and walk to the road down to Hodge Pond. Turn right to walk downhill toward the water and turn left on the road around the pond. Walk down to the open area at the outlet end of the pond. Turn around and walk south into the woods on the Flynn Trail heading up the hill. At the next trail junction bear right and walk the Flynn Trail to the trail junction with the Big Rock Trail. Turn right to head down the Big Rock Trail to Times Square. The walk downhill is 1.1 miles and drops 600 feet to Times Square. Continue straight ahead on the Big Rock Trail around the north and west side of Frick Pond. Continue on the trail passing over the two small bridges that carry the trail over the inlet streams. Pass under some evergreen trees and cross the long wooden walkways. Follow the Big Rock Trail to the junction with the Quick Lake Trail and turn left. Walk over the bridge at the outlet of Frick Pond. Walk up the hill to Gravestone Junction and continue straight ahead on the Quick Lake Trail. Pass the trail register and continue on the woods road back to the car.
(The image above shows the profile of the hike. Remember that all vertical profiles are relative!)
Hodge Pond: Logger's Loop, Big Rock, Flynn and Quick Lake Trails
| Quick Look | ||||
|---|---|---|---|---|
| Difficulty | Round trip | Total climb | Internet Maps | |
| 7.5 mi. | 1110 ft. | AllTrails | ||
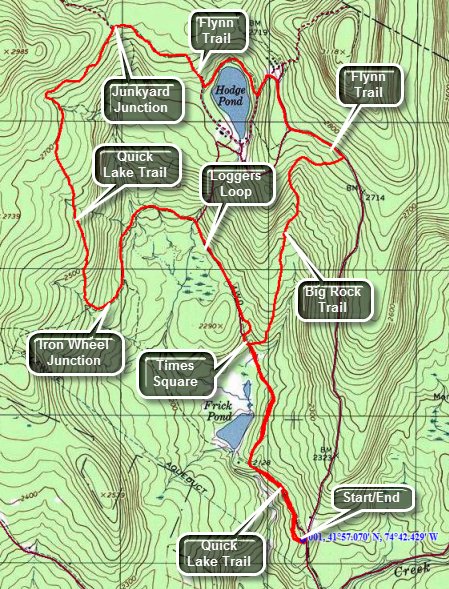 The area around Frick Pond, Hodge Pond and Quick Lake is covered with trails. There are numerous possibilities for short of long hikes. The area is relatively flat and there are only a few views. There is some beautiful scenery.
Take DeBruce Road from Livingston Manor for about six miles then turn left on Mongaup Rd. Where the road splits bear left on Beech Mountain Rd. and park in the parking lot on the left. Find the red-blazed Quick Lake Trail out of the main parking area. As you come out of the woods by the trail register, turn left on the woods road. After walking about .5 miles, you will be at a fork in the trail. Bear right onto the yellow-blazed Loggers Loop trail and head toward Times Square. At the trail junction known as Times Square, about 1 mile from the parking area, turn right on the red-blazed Big Rock Trail and get ready for a 1.1 mile climb of 600 feet to the junction with the Flynn Trail. Turn left on the blue-blazed Flynn Trail to head toward Hodge Pond. You will walk passed a gate on the trail and will arrive at another fork in the trail at about 2.4 miles. Bear to the right and walk a short distance to the area of the old Beech Mountain Boy Scout Camp where you will see some old buildings just ahead. Turn left and walk down to the jeep trail around Hodge Pond. Turn right and walk around the back of the pond. The next right will put you back on the blue-blazed Flynn Trail. Walk up a small hill and away from the pond to another gate. Walk passed the gate on the Flynn Trail until the trail ends where it meets the red-blazed Quick lake trail at Junkyard Junction. You will be about 3.7 miles into the hike. Turn left and walk down the Quick Lake trail until you get to Iron Wheel Junction at about 5.25 miles. Continue straight ahead on the yellow-blazed Loggers Loop. This trail continues mostly downhill and back to Times Square at about 6.5 miles. Continue straight ahead and retrace your earlier route to get back to the car.
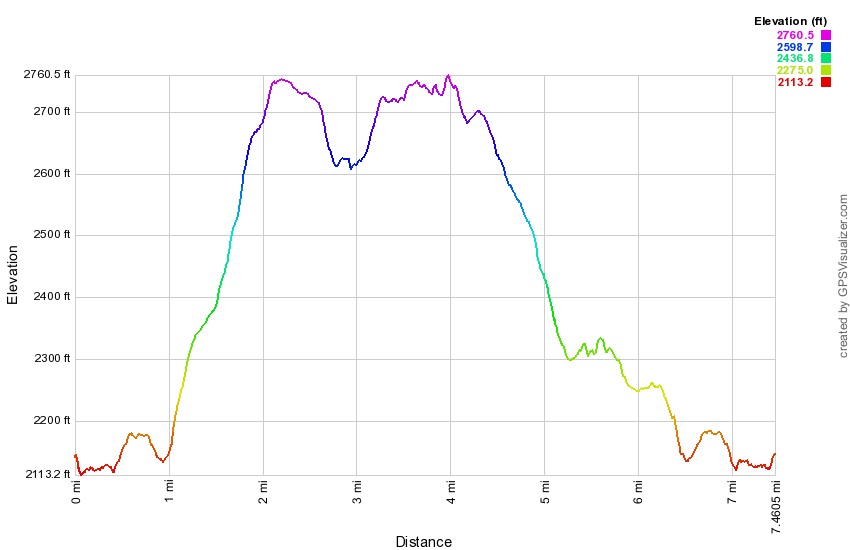 (The image below shows the profile of the hike. Remember that all vertical profiles are relative!)
Hodge Pond: Logger's Loop, Quick Lake and Flynn Trails
| Quick Look | ||||
|---|---|---|---|---|
| Difficulty | Round trip | Total climb | Internet Maps | |
| 7.3 mi. | 1010 ft. | AllTrails | ||
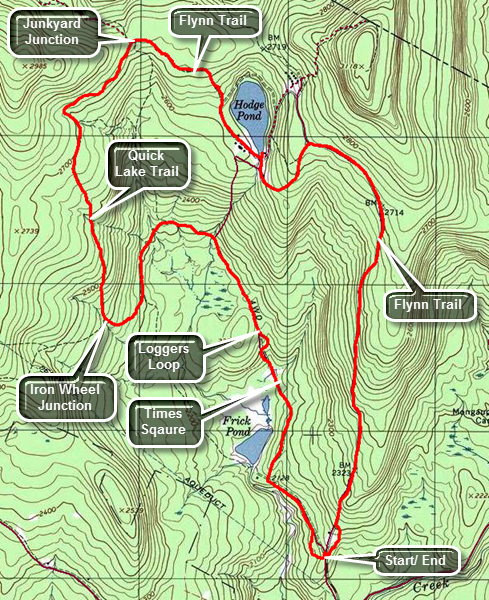 The area around Frick Pond, Hodge Pond and Quick Lake is covered with trails. There are numerous possibilities for short of long hikes. The area is relatively flat and there are only a few views. There is some beautiful scenery.
Take DeBruce Road from Livingston Manor for about six miles then turn left on Mongaup Rd. Where the road splits bear left on Beech Mountain Rd. and park in the parking lot on the left. Find the red-blazed Quick Lake Trail out of the main parking area. As you come out of the woods by the trail register, turn left on the woods road. After walking about .5 miles, you will be at a fork in the trail. Bear right onto the yellow-blazed Loggers Loop trail and head toward Times Square. At the trail junction known as Times Square, about 1 mile from the parking area, continue straight ahead on the Loggers Loop. The trail continues north and then begins to loop west before heading south to Iron Wheel junction at 2.3 miles. Continue straight ahead on the Quick Lake Trail and begin along climb toward Junkyard Junction at 3.9 miles. The trail heads north and the northeast to the junction with the Flynn Trail. Turn right on the Flynn Trail which is mostly flat until you are near Hodge Pond. Turn right and cloning on the Flynn Trail to the outlet of Hodge Pond at 4.8 miles. Bear to the right at the open field to stay on the Flynn Trail and get ready for one more climb. At 5.5 miles the Big Rock Trail comes in from the right and a snowmobile trail is on the left. Continue straight ahead for another 1.7 miles to the parking area. This part of the trail is all downhill. Near the end there is a gate. Bear to the left at the gate to continue on the trail and to avoid the private property around the cabin.
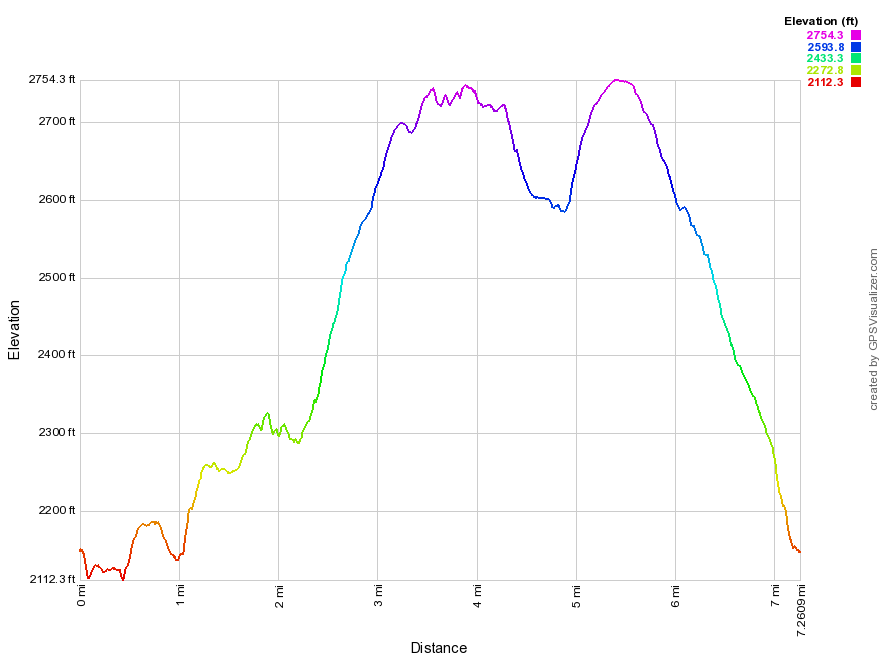 (The image shows the profile of the hike. Remember that all vertical profiles are relative!)
Hodge Pond Lookout: Flynn Trail (out and back)
| Quick Look | ||||
|---|---|---|---|---|
| Difficulty | Round trip | Total climb | Internet Maps | |
| 5.8 mi. | 1020 ft. | AllTrails | ||
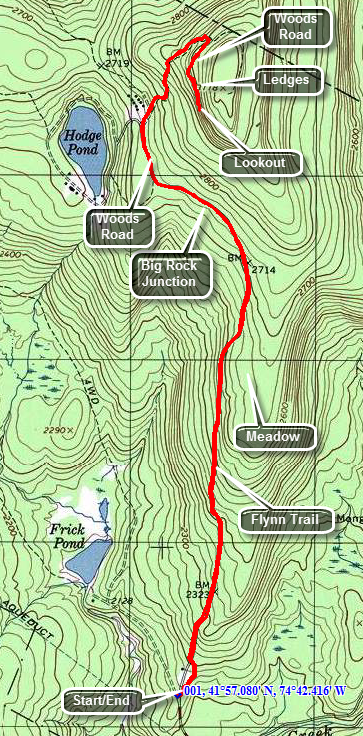 The area around Frick Pond, Hodge Pond and Quick Lake is covered with trails. There are numerous possibilities for short of long hikes. The area is relatively flat and there are only a few views. There is some beautiful scenery.
Take DeBruce Road from Livingston Manor for about six miles then turn left on Mongaup Rd. Where the road splits bear left on Beech Mountain Rd. and park in the parking lot on the left. Find the blue-blazed Flynn Trail across the road and follow it for 1.7 miles to the junction with the Big Rock Trail. Continue straight ahead toward Hodge Pond. In a short distance a woods road bears to the right. Bear right on the woods road. Shortly a trail will turn left and go down to Hodge Pond. Continue straight ahead and pass another woods road on the left. This road continues out to Shin Creek Road in Lew Beach. At this junction are some old cabins that are all that remains of the Beech Mountain Boy Scout Camp. Continue straight ahead and up the hill for about .5 miles. At 2.7 miles into the hike a woods road turns sharply to the right, climbs briefly and then levels off. Take this turn and continue walking until a large, pointed rock appears on the right. Walk just past the rock to a ledge that overlooks Hodge Pond and the hills to the west. By this time you will have hiked 2.9 miles. If you climb the ledges behind the lookout, you will be at the highest point in Sullivan County at just over 3100 feet. When you have taken in the site turns around and retrace your steps to the car. There are, of course, many other possible return routes that take in both Hodge and Frick Ponds.
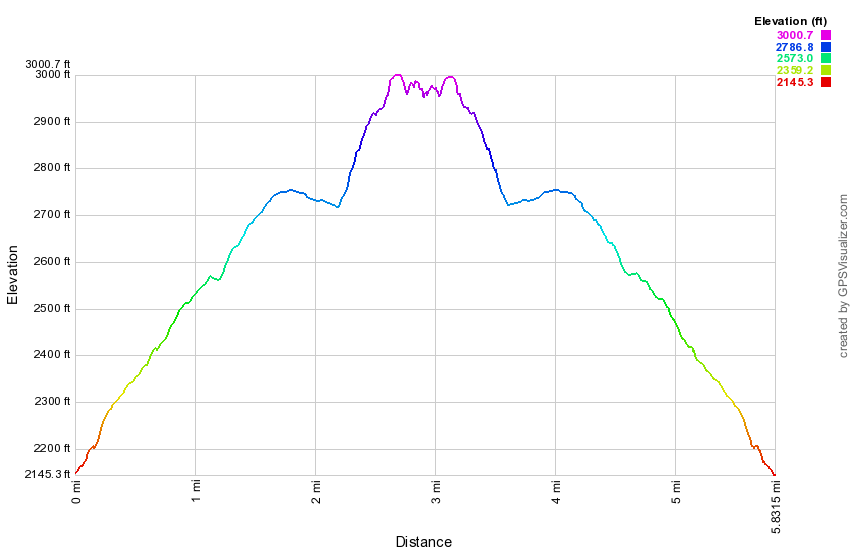 (The image below shows the profile of the hike. Remember that all vertical profiles are relative!)
Hodge Pond Lookouts: Flynn Trail (counterclockwise loop)
| Quick Look | ||||
|---|---|---|---|---|
| Difficulty | Round trip | Total climb | Internet Maps | |
| 6.1 mi. | 1080 ft. | AllTrails | ||
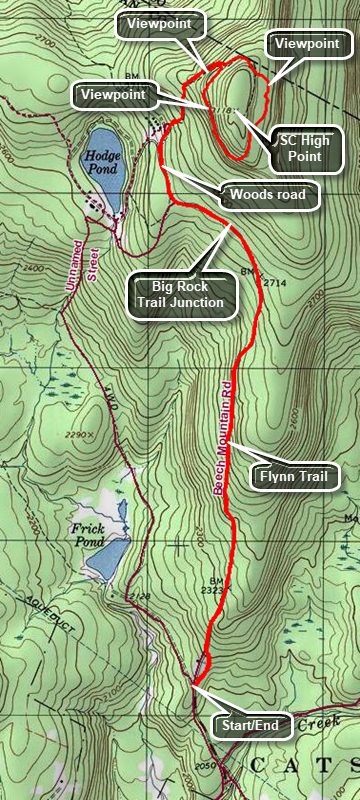 The area around Frick Pond, Hodge Pond and Quick Lake is covered with trails. There are numerous possibilities for short of long hikes. The area is relatively flat and there are only a few views. There is some beautiful scenery.
Take DeBruce Road from Livingston Manor for about six miles then turn left on Mongaup Rd. Where the road splits bear left on Beech Mountain Rd. and park in the parking lot on the left. Find the blue-blazed Flynn Trail across the road and follow it for 1.7 miles to the junction with the Big Rock Trail. Continue straight ahead toward Hodge Pond. In a short distance a woods road bears to the right. Bear right on the woods road. Shortly a trail will turn left and go down to Hodge Pond. Continue straight ahead and pass another woods road on the left. This road continues out to Shin Creek Road in Lew Beach. At this junction there were some old cabins that were part of the Beech Mountain Boy Scout Camp. These cabins were leveled in 2021 by the Beaverkill Land Trust. Continue straight ahead and up the hill for about .4 miles where there is a viewpoint to the west on the left side of the road. Continue a short distance on the woods road and at 2.7 miles into the hike a woods road turns sharply to the right. Take this turn and climb briefly. The path levels off and continues to a large, pointed rock on the right. Walk just past the rock to a ledge that overlooks Hodge Pond and the hills to the west. By this time you will have hiked 2.9 miles. When you are done turn around and look at the ledges behind the lookout. Atop these ledges is the summit of Beech Mountain, the highest point in Sullivan County at 3118 feet. Continue of the woods road to walk around the base of the summit of Beech Mountain in a counterclockwise direction. There are some interesting ledges and cliffs on the east side of the mountain on your left. When the road splits stay to the right and continue to a lookout with a clear view to the east. You will be able to see many of the3500 foot peaks of the Catskills. Continue on the woods road passing a herd path to Mongaup Mountain on the right. Ascend a small hill and continue to the point where the woods road meets the road where you started the loop. Bear right and start the long descent back to the junction by the former Boy Scout camp. Walk straight ahead to the junction with the Flynn Trail. Turn left and walk the Flynn Trail back to the parking area.
 (The image below shows the profile of the hike. Remember that all vertical profiles are relative!)
Hodge Pond Lookouts: Flynn Trail (loop with SC high point)
| Quick Look | ||||
|---|---|---|---|---|
| Difficulty | Round trip | Total climb | Internet Maps | |
| 6.5 mi. | 1180 ft. | AllTrails | ||
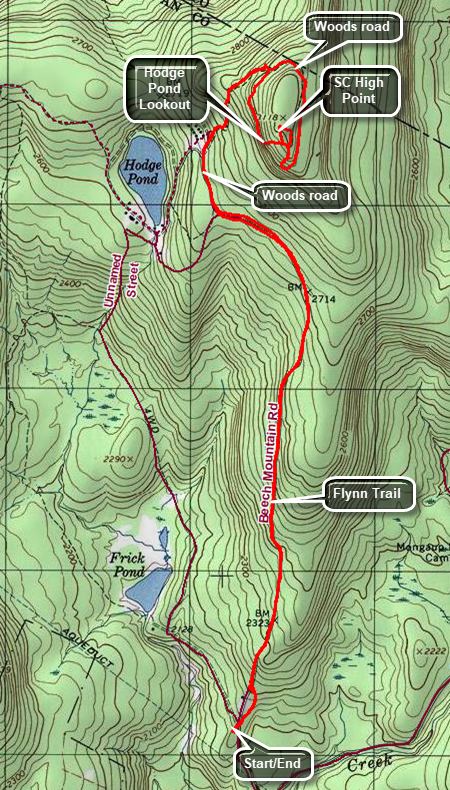 The area around Frick Pond, Hodge Pond and Quick Lake is covered with trails. There are numerous possibilities for short of long hikes. The area is relatively flat and there are only a few views. There is some beautiful scenery.
Take DeBruce Road from Livingston Manor for about six miles then turn left on Mongaup Rd. Where the road splits bear left on Beech Mountain Rd. and park in the parking lot on the left. Find the blue-blazed Flynn Trail across the road and follow it for 1.7 miles to the junction with the Big Rock Trail. Continue straight ahead toward Hodge Pond. In a short distance a woods road bears to the right. Bear right on the woods road. Shortly a trail will turn left and go down to Hodge Pond. Continue straight ahead and pass another woods road on the left. This road continues out to Shin Creek Road in Lew Beach. At this junction are some old cabins that are all that remains of the Beech Mountain Boy Scout Camp. Continue straight ahead and up the hill for about .4 miles where there is a viewpoint to the west. Continue a short distance on the woods road and at 2.7 miles into the hike a woods road turns sharply to the right. Take this turn and climb briefly. The path levels off and continues to a large, pointed rock on the right. Walk just past the rock to a ledge that overlooks Hodge Pond and the hills to the west. By this time you will have hiked 2.9 miles. When you are done turn around and look for a way to climb the ledges behind the lookout. Once at the top look for the highest point you can find which will be the highest point in Sullivan County at 3118 feet. Find a way to walk back down off the top of Beech Mountain to the woods road. Turn left and walk around Beech Mountain counterclockwise. There are some interesting ledges and cliffs on the east side of the mountain. If you walk off the road into the woods to the east, you may be able to find a lookout with a clear view. Walk back to the woods road and continue to the point where the woods road meets the road you walked up. Turn left and walk up a hill and then start the long descent back to the junction by the Boy Scout camp. Walk straight ahead to the junction with the Flynn Trail. Turn left and walk the Flynn Trail back to the parking area.
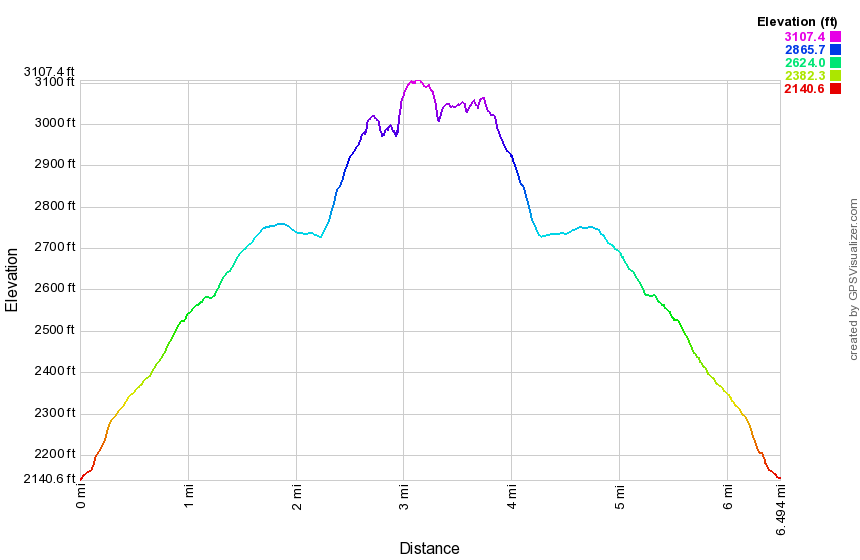 (The image below shows the profile of the hike. Remember that all vertical profiles are relative!)
Hodge Pond: Lookout and Pond (Flynn Trail)
| Quick Look | ||||
|---|---|---|---|---|
| Difficulty | Round trip | Total climb | Internet Maps | |
| 6.4 mi. | 1180 ft. | AllTrails | ||
![]() The area around Frick Pond, Hodge Pond and Quick Lake is covered with trails. There are numerous possibilities for short of long hikes. The area is relatively flat and there are only a few views. There is some beautiful scenery.
The area around Frick Pond, Hodge Pond and Quick Lake is covered with trails. There are numerous possibilities for short of long hikes. The area is relatively flat and there are only a few views. There is some beautiful scenery.
Take DeBruce Road from Livingston Manor for about six miles then turn left on Mongaup Rd. Where the road splits bear left on Beech Mountain Rd. and park in the parking lot on the left. Find the blue-blazed Flynn Trail across the road and follow it for 1.7 miles to the junction with the Big Rock Trail. Continue straight ahead toward Hodge Pond. In a short distance a woods road bears to the right. Bear right on the woods road. Shortly a trail will turn left and go down to Hodge Pond. Continue straight ahead and pass another woods road on the left. This road continues out to Shin Creek Road in Lew Beach. At this junction are some old cabins that are all that remains of the Beech Mountain Boy Scout Camp. Continue straight ahead and up the hill for about .5 miles. At 2.7 miles into the hike a woods road turns sharply to the right, climbs briefly and then levels off. Take this turn and continue walking until a large, pointed rock appears on the right. Walk just past the rock to a ledge that overlooks Hodge Pond and the hills to the west. By this time you will have hiked 2.9 miles. If you climb the ledges behind the lookout, you will be at the highest point in Sullivan County at just over 3100 feet. When you have taken in the sigh, walk the wood road back to the dirt road. Turn left and walk back down the hill skipping the first left turn and taking the next. Walk down the woods road toward Hodge Pond. Bear left and walk to the field at the south end of Hodge Pond. Walk over to the edge of the pond if you like. It is a nice spot to relax for a few minutes. When you are ready, turn around 1rr80 degrees and head south on the Flynn Trail. Climb a short hill to the junction where you turned right of the Flynn Trail some time before. Continue on the Flynn Trail back to the airing area.
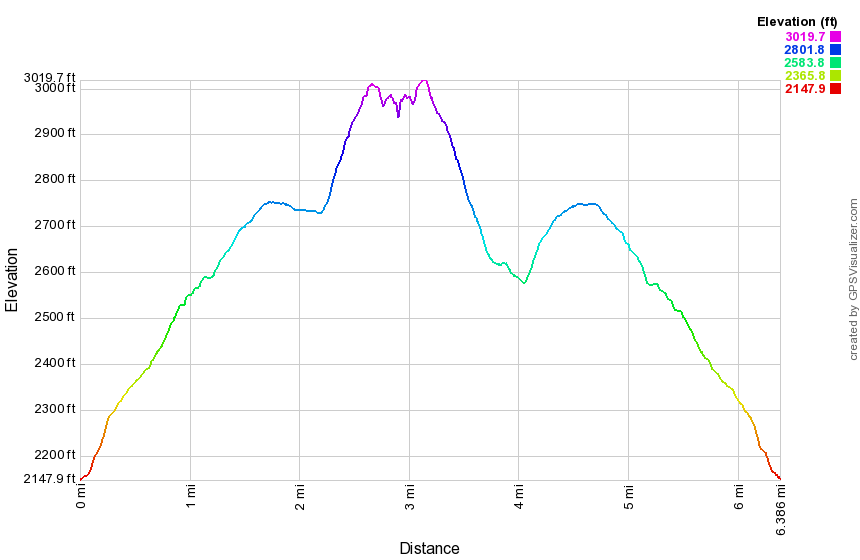 (The image below shows the profile of the hike. Remember that all vertical profiles are relative!)
Hodge Pond Lookout Loop (Flynn, Big Rock and Quick Lake Trails)
| Quick Look | ||||
|---|---|---|---|---|
| Difficulty | Round trip | Total climb | Internet Maps | |
| 6.8 mi. | 1125 ft. | AllTrails | ||
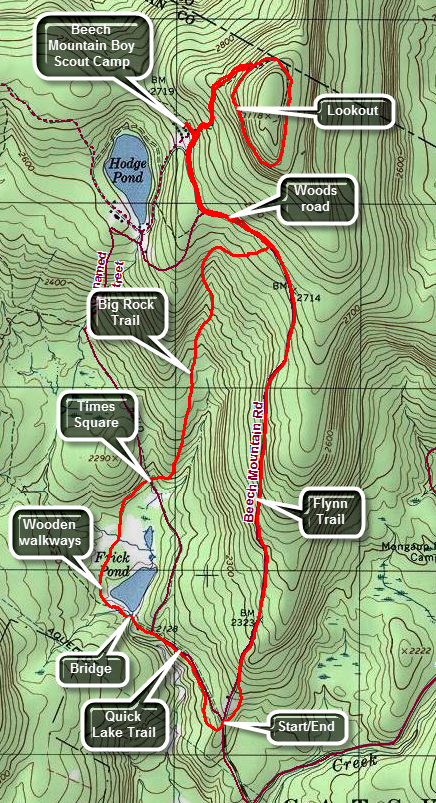 The area around Frick Pond, Hodge Pond and Quick Lake is covered with trails. There are numerous possibilities for short of long hikes. The area is relatively flat and there are only a few views. There is some beautiful scenery.
Take DeBruce Road from Livingston Manor for about six miles then turn left on Mongaup Rd. Where the road splits bear left on Beech Mountain Rd. and park in the parking lot on the left. Find the blue-blazed Flynn Trail across the road and follow it for 1.7 miles to the junction with the Big Rock Trail. Continue straight ahead toward Hodge Pond. In a short distance a woods road bears to the right. Bear right on the woods road. Shortly a trail will turn left and go down to Hodge Pond. Continue straight ahead and pass another woods road on the left. This road continues out to Shin Creek Road in Lew Beach. At this junction are some old cabins that are all that remains of the Beech Mountain Boy Scout Camp. Continue straight ahead and up the hill for about .5 miles. At 2.7 miles into the hike a woods road or trail turns sharply to the right, climbs briefly and then levels off. Take this turn and continue walking until a large, pointed rock appears on the right. Walk just past the rock to a ledge that overlooks Hodge Pond and the hills to the west. By this time you will have hiked 2.8 miles. After enjoying the view, get back on the trail and continue around the hill. This hill is Flynn's Point and may be the highest spot in Sullivan County. Bear to the left when the trail splits and at 3.4 miles you will be back on the dirt road that you walked up. Turn left and continue back to the junction with the Big Rock Trail at 4.6 miles. Turn right on the Big Rock Trail and walk downhill for 1.1 miles losing almost 600 feet along the way. At Times Square continue straight ahead to walk around the back of Frick Pond. Here is a nice spruce tunnel and some wooden walkways. Be careful on the walkways as they are VERY SLIPPERY when wet. Turn left at the next trail junction and walk to the bridge across the outlet of Frick Pond. Continue on the trail up a small hill to Gravestone Junction. Continue straight ahead to the trail register on the Quick Lake Trail. Turn right here and walk back to the parking area.
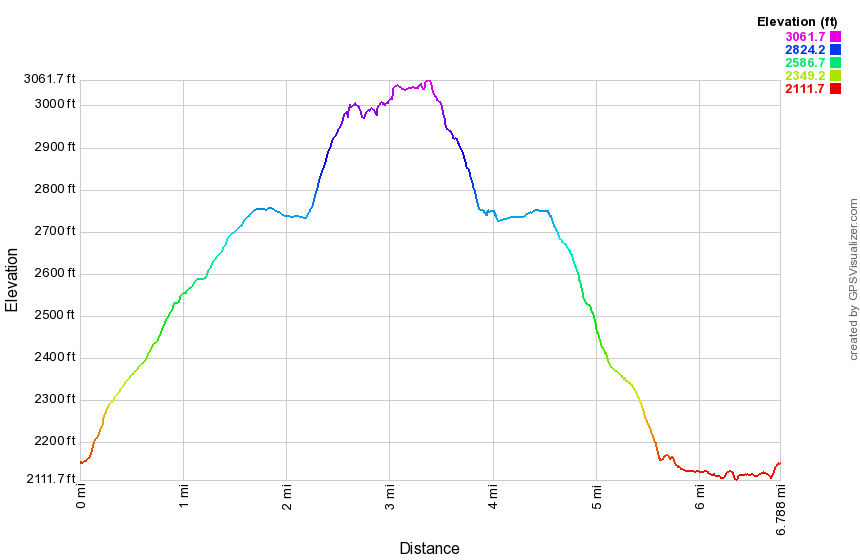 (The image below shows the profile of the hike. Remember that all vertical profiles are relative!)
Hodge Pond Lookout and Frick Pond (features)
| Quick Look | ||||
|---|---|---|---|---|
| Difficulty | Round trip | Total climb | Internet Maps | |
| 7.5 mi. | 1390 ft. | AllTrails | ||
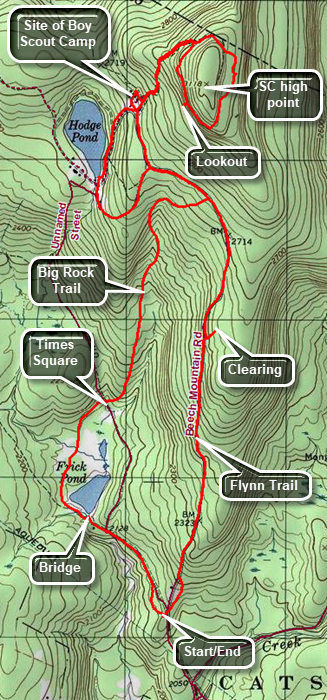 The area around Frick Pond, Hodge Pond and Quick Lake is covered with trails. There are numerous possibilities for short of long hikes. The area is relatively flat and there are only a few views. There is some beautiful scenery.
Take DeBruce Road from Livingston Manor for about six miles then turn left on Mongaup Rd. Where the road splits bear left on Beech Mountain Rd. and park in the parking lot on the left. Find the blue-blazed Flynn Trail across the road and follow it for 1.7 miles to the junction with the Big Rock Trail. At 1.1 miles there is a path to the right which leads to an interesting clearing. The clearing may have been formed when dirt from the area was used to construct Beech Mountain Road to the Beech Mountain Boy Scout Camp. Continue straight ahead toward Hodge Pond. In a short distance a woods road bears to the right. Bear right on the woods road. Shortly a trail will turn left and go down to Hodge Pond. Continue straight ahead to another woods road on the left. This road continues out to Shin Creek Road in Lew Beach. At this junction there were some old cabins that were all that remained of the Beech Mountain Boy Scout Camp. You can visit the area if you wish. Continue straight ahead and up the hill for about .5 miles. Watch for a spring house on the right. Where the road turns sharply to the right there is a lookout on the left. Just after the lookout is a path on the right side of the road. Continue to the top of the hill on the road and start down the other side of the hill. There is a nice lookout to the Burroughs Range on the left side of the road. Continue on the road and walk up to another woods road of path that forms a loop around Beech Mountain. The highest point on this mountain is Flynn's Point, the high point of Sullivan County. Stay to the left to walk clockwise around the mountain watching for some interesting ledges and boulders. At 3.5 miles there is a lookout to the west over Hodge Pond on the left of the trail. Be careful if you walk out onto the flat rock that makes up this viewpoint. Get back on the path and continue in a clockwise direction back to the road. Turn left and walk back down the dirt road to a path on the right just passed the road that runs out to Shin Creek. Turn right on this road which leads down to Hodge Pond. At the next junction stay to the left and walk on the woods road to the clearing at the southern end of Hodge Pond. Walk over to the shore of Hodge Pond to take in the beauty of the pond. When you are done, turn around and walk to where the Flynn Trail enters the woods. Walk up the hill to the junction with the woods road. Stay to the right on the Flynn Trail and walk back to the junction with the Big Rock Trail at 5.3 miles. Turn right on the Big Rock Trail and walk downhill for 1.1 miles losing almost 600 feet along the way. At Times Square continue straight ahead to walk around the back of Frick Pond. There may be a few wet or muddy spots but there is a nice spruce tunnel and some wooden walkways. Be careful on the walkways as they are VERY SLIPPERY when wet. Turn left at the trail junction with the Quick Lake Trail. Walk to the bridge across the outlet of Frick Pond which is a nice place to take a quick break before retuning to your car. Continue on the trail up a small hill to Gravestone Junction. Continue straight ahead to the trail register on the Quick Lake Trail watching for the memorial marker on the right that gives the junction its name. At the trail register, turn right here and walk back to the parking area.
 (The image below shows the profile of the hike. Remember that all vertical profiles are relative!)
Hodge Pond: Shin Creek
| Quick Look | ||||
|---|---|---|---|---|
| Difficulty | Round trip | Total climb | Internet Maps | |
| 4.0 mi. | 680 ft. | AllTrails | ||
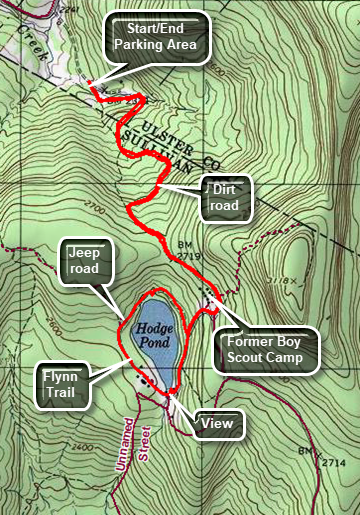 The area around Frick Pond, Hodge Pond and Quick Lake is covered with trails. There are numerous possibilities for short of long hikes. The area is relatively flat and there are only a few views. There is some beautiful scenery.
Drive north on Old Route 17 from Livingston Manor toward Roscoe. Turn right on the Beaverkill Road and drive north to the four corners just after the Beaverkill Valley fire house. Turn right on Shin Creek Road and drive 4 miles to a seasonal maintenance road on the right. Shin Creek Road is very rough in places and becomes narrow. Drive up the dirt road for about .3 miles to a large parking lot on the left side of the road just before a gate. The road heads southeast and climbs about 460 feet in 1.5 miles. A stream paralleled the road for part of the way. At 1.5 miles the road levels off and passes the former site of the Beech Mountain Boy Scout Camp. Walk to the road junction and turn right. Pass by a road on the right and turn right at the next road that leads downhill toward the shore of Hodge Pond. Take the next road to the right which loops around the back of Hodge Pond. When you reach the blue blazed Flynn Trail, turn left and continue along the west side of the pond. When you come out of the woods, walk across the field and back into the woods. At the clearing at the outlet end of Hodge Pond, take some time to walk to the shores of the pod and enjoy the view. When you are done, walk to the trail that ascends a hill on the eastern side of the pond. You will recognize the next trail junction. Stay to the right and climb the hill. At the next trail junction turn left, skip the next left, and the turn left on the road back to the car. Follow the road downhill and back to the car.
 (The image below shows the profile of the hike. Remember that all vertical profiles are relative!)
Hodge Pond Lookouts: Shin Creek clockwise
| Quick Look | ||||
|---|---|---|---|---|
| Difficulty | Round trip | Total climb | Internet Maps | |
| 4.3 mi. | 920 ft. | AllTrails | ||
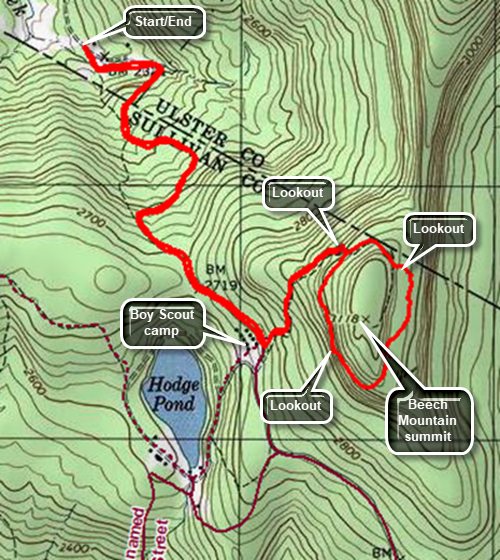 The area around Frick Pond, Hodge Pond and Quick Lake is covered with trails. There are numerous possibilities for short of long hikes. The area is relatively flat and there are only a few views. There is some beautiful scenery.
Drive north on Old Route 17 from Livingston Manor toward Roscoe. Turn right on the Beaverkill Road and drive north to the four corners just after the Beaverkill Valley fire house. Turn right on Shin Creek Road and drive 4 miles to a seasonal maintenance road on the right. Shin Creek Road is very rough in places and becomes narrow. Drive up the dirt road for about .3 miles to a large parking lot on the left side of the road just before a gate. The road heads southeast and climbs about 460 feet in 1.15 miles. A stream parallels the road for part of the way. At 1.5 miles the road levels off and passes the former site of the Beech Mountain Boy Scout Camp. Walk to the road junction and turn left. Walk up the hill toward the summit of Beech Mountain, the highest point in Sullivan County. At 1.65 miles the road makes a sharp right turn. Just after the turn a trail turns off to the right. Bear to the left and continue uphill briefly. The road then descends and turns rig before opening into a clearing. The views to the east take in the Burroughs Range and the Devil's Path. Continue along the path and up a slight incline to the woods road that circles Beech Mountain. Turn left and walk clockwise on the trail until at 2.3 miles you arrive at a west facing lookout over Hodge Pond. Continue along the trail back to the woods road you ascended on the way out. Turn left and walk down the road to the trail junction at the base of the hill. Turn right and follow the road downhill back to the car.
 (The image below shows the profile of the hike. Remember that all vertical profiles are relative!)
Huckleberry Point
| Quick Look | ||||
|---|---|---|---|---|
| Difficulty | Round trip | Total climb | Internet Maps | |
| 4.4 miles | 1165 ft. | AllTrails | ||

Turn onto Bloomer Rd. off Route 23A just west of Tannersville. At the Y in the road bear left onto Platte Clove Rd. Continue on this road passed the Platte Clove Community and the Platte Kill Preserve. Turn into the parking lot for Kaaterskill High Peak on your left. You may also access Platte Clove Road from the east in West Saugerties. Be aware that this road is "limited maintenance" and may be "closed" from late fall to early spring. At the parking area Look for the aqua-blazed Long Path or the darker blue markers. The "trail" here is really a very wide woods road that is traveled by local landowners. It is wide and easy to follow but may be rocky and muddy in places. Continue to follow the markers for about 1.05 miles where the yellow Huckleberry Point Trail goes off to the right. Turn here and continue on the trail.
The initial part of this trail passes through and area that has stone piles and some deteriorated foundations which are evidence of how the land was once settled. At about .35 miles into the trail cross a small stream which can be high after heavy rains. The trail now begins to roll significantly with several ascents and descents. None of these are long or steep but they may surprise you. The trail also passes through a variety of hardwoods, evergreens and bushes. Several time you may think you are at the Point. After about 1 mile, the trail ends and you will be at Huckleberry Point. A series of rock ledges give views south the Overlook and Plattekill Mountains. The fire tower and TV antennae on Overlook can be seen. To the west is a view deep into Platte Clove. Looking down from these dizzying heights also reveals more of the Clove. To the east are views of the Hudson River. You may climb down the rock ledges for different views. Be careful since a fall from this elevation could be hazardous to your health. Some of the ledges are narrow with loose rock and little to hold onto. There is an informal trail that works its way to the east but few viewpoints are open. After enjoying all the views turn around and reverse your route back to the car.
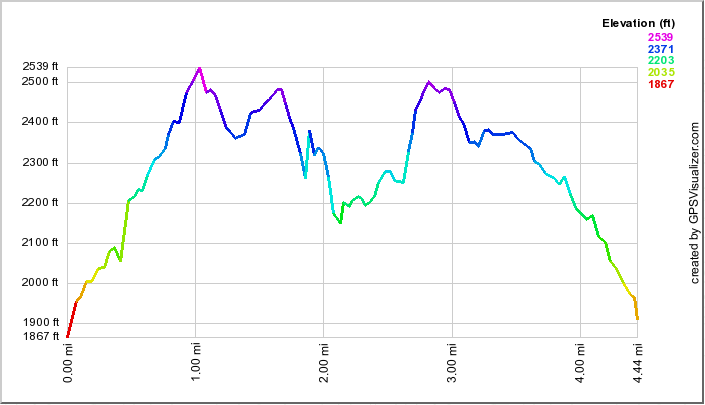
(The image at the left shows the profile of the hike. Remember that all vertical profiles are relative! Although this profile looks menacing, the elevation gains are seldom more than 50 ft!)
Hudson Highlands: Breakneck Ridge and Mount Taurus
| Quick Look | ||||
|---|---|---|---|---|
| Difficulty | Round trip | Total climb | Internet Maps | |
| 6.2 mi. | 1940 ft. | AllTrails | ||
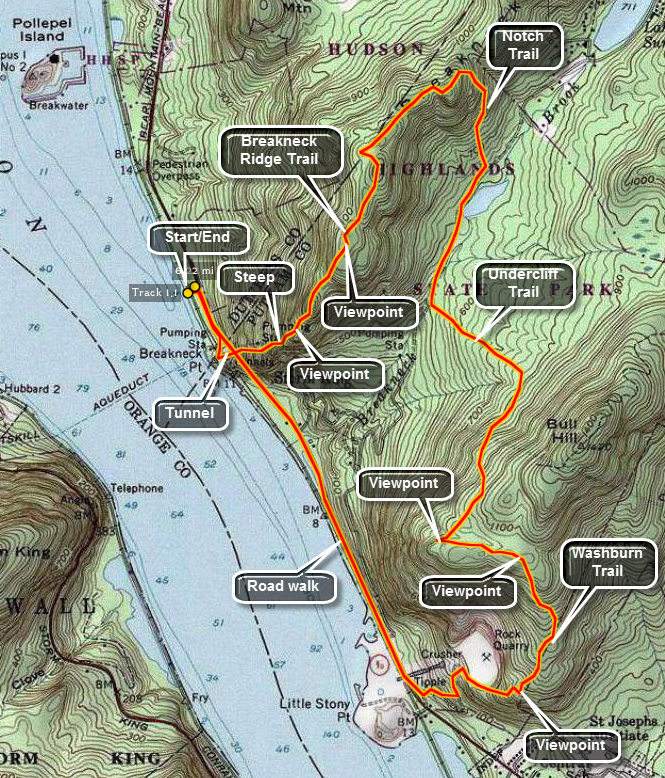 Get on State Route 9D on the east side of the Hudson River. Between Beacon and Cold Spring is a tunnel where the road passes under the railroad tracks. Just north of the tunnel is a parking lot which is often full on the weekends. Park along the road if the lot is filled. Walk south on 9D on the west side of the road. Just before the tunnel is another area to park. Turn off here and follow the trail UP! Your adventure is about to begin!
The first thing you will notice is that the views start immediately! Storm King Mountain is just across the river. Upriver you can see Bannerman Island with its castle. Looking north the United States Military Academy at West point can be seen. As you turn around to walk further up the trail the hike initially seems manageable as you walk through some trees on a dirt trail. As soon as you clear the trees you can see the task ahead of you! The trail rises some 1200 feet in about half a mile. Many of the ascent are just short of technical rope climbs. Using both feet and hands is often necessary. Fortunately, most areas have somewhat easier ascents to the left or right of the main trail. As you climb there are places to stop and rest. These spots also afford excellent viewpoints over the Hudson and the surrounding areas. There are several places where you will be sure you are at the top until you look a little further on and there is another ascent. In most cases there is a slight descent before the next ascent making things more interesting. Finally the trail winds its way around the last part of the mountain fairly close to the edge and makes the last ascent. The top here is fairly flat with plenty of areas to stop and get a snack and marvel at the views!
The trail continues on in a northeast direction toward Sunset Point and South Beacon Mountain. The tower has been completely restored and is safe to climb to the cab. The steps, landings and cab floor are all open grid steel which can be a little disconcerting but perfectly safe. The entire hike is long and would be difficult to complete for some ! As you hike the trail goes through a series of rolling ascents and descents. Shortly after the "top" of the initial, steep climb is a trail to the left. This is the Breakneck Ridge Bypass Trail and offers the first opportunity to shorten the hike. Continuing on the trail there are several places where the paint marking are faint and where woods roads invitingly cross the trail. Stay on the Breakneck Ridge Trail as many of these other side routes take you FAR away from where you want to be. The next cutoff is the Notch trail which leads off to the right and down the ridge back toward Route 9D and Cold Spring. Turn right on the Notch Trail and begin to descend through several switchbacks and passed some impressive cliffs on the right. The trail leads through an open forest to the pond just north of the Cornish dairy barn just .5 miles from the start of the trail. Continue on down the trail for another .2 miles where the Undercliff-Overcliff Trail crosses. Turn left to go up and over Mount Taurus. This trail is seldom steep but ascends until it reaches its highest point on Bull Hill. At times it follows woods roads. In several places the walls that shored up the sides of the road are visible and in very good shape. Several switchbacks make the climb easier until after about 1 mile several viewpoints open up near the highest point on the trail.
Continue on this trail as it heads east and then south down Bull Hill. There are lookouts along this trail down into Cold Spring and across the river to West Point. You will pass by the quarry on your right and then descend an old road to the Little Stony Point parking area on Route 9D with the scariest part of the hike yet to come. Walk along Route 9D for 1.25 miles. There is NO SHOULDER and cars travel MUCH TOO FAST! Near the end of the trip walk through the tunnel to arrive back at your car after about 6.25 miles of hiking.
 (The image at the left shows the profile of the hike. Remember that all vertical profiles are
relative!)
(The image at the left shows the profile of the hike. Remember that all vertical profiles are
relative!)
Hudson Highlands: Breakneck Ridge and Little Stony Point
| Quick Look | ||||
|---|---|---|---|---|
| Difficulty | Round trip | Total climb | Internet Maps | |
| 6.0 mi. | 1690 ft. | AllTrails | ||
 WARNING: This hike requires two cars or a walk along busy Route 9D which as no shoulder. Get on State Route 9D on the east side of the Hudson River. Between Beacon and Cold Spring is a tunnel where the road passes under the railroad tracks. Just north of the tunnel is a parking lot which is often full on the weekends. Continue on Route 9D to the parking area for Little Stony Point and Mount Taurus. Park one car here and then head north again to the tunnel. Park along the road if the lot is filled. Walk south on 9D on the west side of the road. Just before the tunnel is another area to park. Turn off here and follow the trail UP! Your adventure is about to begin!
The first thing you will notice is that the views start immediately! Storm King Mountain is just across the river. Upriver you can see Bannerman Island with its castle. Looking north the United States Military Academy at West point can be seen. As you turn around to walk further up the trail the hike initially seems manageable as you walk through some trees on a dirt trail. As soon as you clear the trees you can see the task ahead of you! The trail rises some 1200 feet in about half a mile. Many of the ascent are just short of technical rope climbs. Using both feet and hands is often necessary. Fortunately, most areas have somewhat easier ascents to the left or right of the main trail. As you climb there are places to stop and rest. These spots also afford excellent viewpoints over the Hudson and the surrounding areas. There are several places where you will be sure you are at the top until you look a little further on and there is another ascent. In most cases there is a slight descent before the next ascent making things more interesting. Finally the trail winds its way around the last part of the mountain fairly close to the edge and makes the last ascent. The top here is fairly flat with plenty of areas to stop and get a snack and marvel at the views!
The trail continues on in a northeast direction toward Sunset Point and South Beacon Mountain. The first side trail you pass is the yellow Undercliff Trail on the right followed by the red Bypass Trail on the right. Continue passed both of these to the blue Cornish Trail on the right. Descend this trail to the area of a pond and an old barn. This farm was associated with the Cornish Estate further down the trail. The barn is very interesting. Follow the Cornish Trail down to the river as it widens and becomes a paved driveway for the former Cornish Estate. A large cistern appears on the right and then the remains of a greenhouse. Walk down the driveway to the greenhouse. Not too much father along are the remains of the main house which was ravaged by fire. Vegetation and vines have recaptured most of the structure giving it a surreal appearance. The paved driveway continues down parallel to the river and the railroad tracks until it ends at a gate on Route 9D. Keep on the path as it winds its way back to the parking lots.
At the parking area, take the time to walk around Little Stony Point. This is an area of land that pushes out into the Hudson. Try turning right after crossing over the train tracks. This path will take you to a beautiful sandy beach right on the Hudson with incredible views north toward Storm King, Breakneck ridge and Pollepel Island. Continue on around the point in a counterclockwise direction. Take in the views as they change from north to west and then south. The fact that you are at river level gives an entirely different feel than viewing the same area from "above". As you walk notice the large rock outcropping on you left. This makes an excellent vantage point. Continue on around to the point where you started. Just as you see the footbridge over the tracks there is a trail to the left that leads to the top of the rock outcrop. It is an easy walk with only a few rough spots. Your reward are some beautiful views of the river below. When you are done looking up and down the river, retrace your steps to the car.
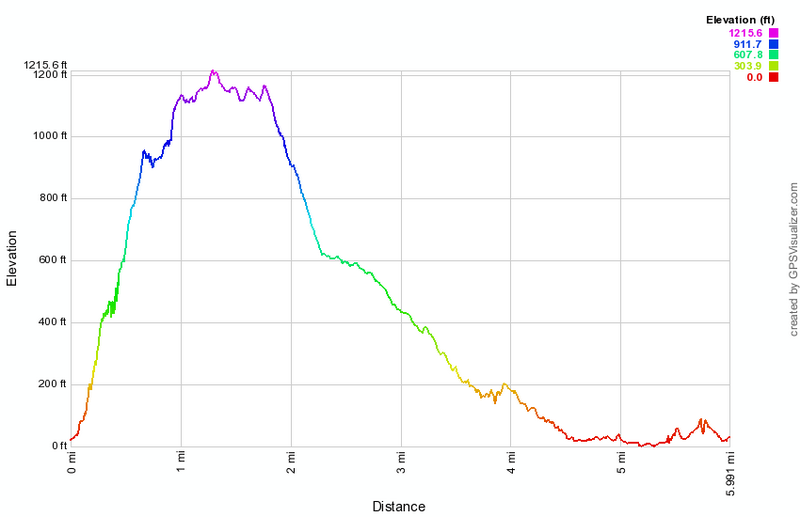 (The image at the left shows the profile of the hike. Remember that all vertical profiles are relative!)
Hudson Highlands: Breakneck Ridge to Bypass Trail
| Quick Look | ||||
|---|---|---|---|---|
| Difficulty | Round trip | Total climb | Internet Maps | |
| 3.2 mi. | 1433 ft. | AllTrails | ||
 Get on State Route 9D on the east side of the Hudson River. Between Beacon and Cold Spring is a tunnel where the road passes under the railroad tracks. Just north of the tunnel is a parking lot which is often full on the weekends. Park along the road if the lot is filled. Walk south on 9D on the west side of the road. Just before the tunnel is another area to park. Turn off here and follow the trail UP! Your adventure is about to begin!
The first thing you will notice is that the views start immediately! Storm King Mountain is just across the river. Upriver you can see Bannerman Island with its castle. Looking north the United States Military Academy at West point can be seen. As you turn around to walk further up the trail the hike initially seems manageable as you walk through some trees on a dirt trail. As soon as you clear the trees you can see the task ahead of you! The trail rises some 1200 feet in about half a mile. Many of the ascent are just short of technical rope climbs. Using both feet and hands is often necessary. Fortunately, most areas have somewhat easier ascents to the left or right of the main trail. As you climb there are places to stop and rest. These spots also afford excellent viewpoints over the Hudson and the surrounding areas. There are several places where you will be sure you are at the top until you look a little further on and there is another ascent. In most cases there is a slight descent before the next ascent making things more interesting. Finally the trail winds its way around the last part of the mountain fairly close to the edge and makes the last ascent. The top here is fairly flat with plenty of areas to stop and get a snack and marvel at the views!
Just after the summit the trail start to descend and the Breakneck Bypass Trail turns left. Turn here and be ready to keep turning sharply to the left as the Bypass Trail makes nearly a 180 degrees turn to parallel the Breakneck Ridge trail before heading a little more north and down the ridge. The trail descends almost 800 feet over the next .7 miles to a junction with the Wilkinson Trail. Turn left on a woods road and walk less than .5 miles to Route 9D. Turn left on Route 9D and walk the .15 miles back to the parking area.
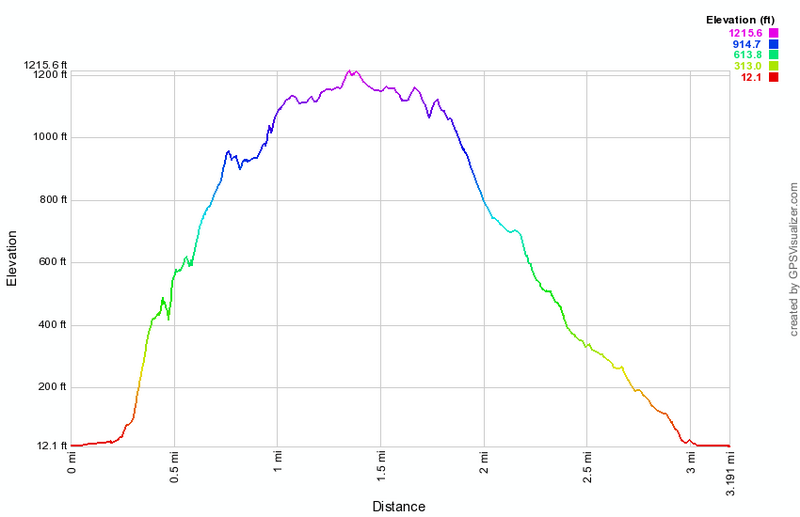 (The image at the left shows the profile of the hike. Remember that all vertical profiles are
relative!)
(The image at the left shows the profile of the hike. Remember that all vertical profiles are
relative!)
Hudson Highlands: Breakneck Ridge to South Beacon Mountain
| Quick Look | ||||
|---|---|---|---|---|
| Difficulty | Round trip | Total climb | Internet Maps | |
| 8.2 mi. | 2995 ft. | AllTrails | ||
The first thing you will notice is that the views start immediately! Storm King Mountain is just across the river. Upriver you can see Bannerman Island with its castle. Looking north the United States Military Academy at West point can be seen. As you turn around to walk further up the trail the hike initially seems manageable as you walk through some trees on a dirt trail. As soon as you clear the trees you can see the task ahead of you! The trail rises some 1200 feet in about half a mile. Many of the ascent are just short of technical rope climbs. Using both feet and hands is often necessary. Fortunately, most areas have somewhat easier ascents to the left or right of the main trail. As you climb there are places to stop and rest. These spots also afford excellent viewpoints over the Hudson and the surrounding areas. There are several places where you will be sure you are at the top until you look a little further on and there is another ascent. In most cases there is a slight descent before the next ascent making things more interesting. Finally the trail winds its way around the last part of the mountain fairly close to the edge and makes the last ascent. The top here is fairly flat with plenty of areas to stop and get a snack and marvel at the views!
The trail continues on in a northeast direction toward Sunset Point and South Beacon Mountain. The tower has been completely restored and is safe to climb to the cab. The steps, landings and cab floor are all open grid steel which can be a little disconcerting but perfectly safe. The entire hike is long and would be difficult to complete for some ! As you hike the trail goes through a series of rolling ascents and descents. Shortly after the "top" of the initial, steep climb is a trail to the left. This is the Breakneck Ridge Bypass Trail and offers the first opportunity to shorten the hike. Continuing on the trail there are several places where the paint marking are faint and where woods roads invitingly cross the trail. Stay on the Breakneck Ridge Trail as many of these other side routes take you FAR away from where you want to be. The next cutoff is the Notch trail which leads off to the right and down the ridge back toward Route 9D and Cold Spring. Bear left here to stay on the Breakneck Ridge Trail.
After a few miles the trail forks with a blue trail heading left. You may take this trail but continuing on for less than half a mile will bring you to Sunset Point. At Sunset Point a wooden observation platform looks out over the Hudson River. The view is somewhat the same as from other parts of the ridge. After taking in the view, return to the white Breakneck Ridge Trail north. In less than half a mile this trail intersects the yellow Wilkinson Memorial Trail. Turn right and follow both trails up an old woods road. After only a few hundred feet the white trail turns left and proceeds straight up the mountain. Turn left and get prepared for some more steep rock scrambles. After the first, most strenuous scramble, the trail levels some and continues to the fire tower. Along the way there are some nice lookouts but none compare to the summit vantage point.
The tower has been completely restored and is safe to climb to the cab. The steps, landings and cab floor are all open grid steel which can be a little disconcerting but perfectly safe. The summit is completely treeless and offers a 360 degree unimpeded view in all directions. Up river the Mid-Hudson Bridge can be seen. On a clear day New York City can be seen to the south. Walk around on the summit ridge to get the best views before turning back to retrace your steps. Use caution as you descend the rock scrambles you came up. At the Wilkinson Trail turn right and walk back down to where the Breakneck Ridge Trail parts from the Wilkinson Trail. This time turn right and stay on the yellow Wilkinson Trail to offer some variety. Alternatively follow the white Breakneck Ridge Trail back to Sunset Point and to the Wilkinson Trail from there.
The Wilkinson memorial Trail drops down to Squirrel Hollow Brook where it meets the blue Notch Trail. You could turn right and follow the Notch Trail out to Route 9D but this leaves more than a mile of walking along a busy highway. Turn left and follow the Wilkinson and Notch Trail for a little more than half a mile on a slightly uphill trek. At this point the Wilkinson Trail makes a sharp right and separates from the Notch Trail. Turn right to head back to where you parked the car. This trail heads mostly downward toward the river for about three miles. It has varied terrain through small clearings and darker forests. In the last mile there is a slight climb to the open summit of Sugarloaf Mountain. From here the trail descends sharply for several hundred feet. After this the trail continues to descend but the pitch moderates some and this is aided by several switchbacks at the upper end. The further you descend the gentler the pitch becomes until the trail ends abruptly on Route 9D less than a half mile north of where you parked.
Hudson Highlands: Breakneck Ridge to Sunset Point
| Quick Look | ||||
|---|---|---|---|---|
| Difficulty | Round trip | Total climb | Internet Maps | |
| 6.0 mi. | 2100 ft. | AllTrails | ||
 Get on State Route 9D on the east side of the Hudson River. Between Beacon and Cold Spring is a tunnel where the road passes under the railroad tracks. Just north of the tunnel is a parking lot which is often full on the weekends. Park along the road if the lot is filled. Walk south on 9D on the west side of the road. Just before the tunnel is another area to park. Turn off here and follow the trail UP! Your adventure is about to begin!
The first thing you will notice is that the views start immediately! Storm King Mountain is just across the river. Upriver you can see Bannerman Island with its castle. Looking north the United States Military Academy at West point can be seen. As you turn around to walk further up the trail the hike initially seems manageable as you walk through some trees on a dirt trail. As soon as you clear the trees you can see the task ahead of you! The trail rises some 1200 feet in about half a mile. Many of the ascent are just short of technical rope climbs. Using both feet and hands is often necessary. Fortunately, most areas have somewhat easier ascents to the left or right of the main trail. As you climb there are places to stop and rest. These spots also afford excellent viewpoints over the Hudson and the surrounding areas. There are several places where you will be sure you are at the top until you look a little further on and there is another ascent. In most cases there is a slight descent before the next ascent making things more interesting. Finally the trail winds its way around the last part of the mountain fairly close to the edge and makes the last ascent. The top here is fairly flat with plenty of areas to stop and get a snack and marvel at the views!
The trail continues on in a northeast direction toward Sunset Point and South Beacon Mountain. The tower has been completely restored and is safe to climb to the cab. The steps, landings and cab floor are all open grid steel which can be a little disconcerting but perfectly safe. The entire hike is long and would be difficult to complete for some ! As you hike the trail goes through a series of rolling ascents and descents. Shortly after the "top" of the initial, steep climb is a trail to the left. This is the Breakneck Ridge Bypass Trail and offers the first opportunity to shorten the hike. Continuing on the trail there are several places where the paint marking are faint and where woods roads invitingly cross the trail. Stay on the Breakneck Ridge Trail as many of these other side routes take you FAR away from where you want to be. The next cutoff is the Notch trail which leads off to the right and down the ridge back toward Route 9D and Cold Spring. Bear left here to stay on the Breakneck Ridge Trail.
After a few miles the trail forks with a blue trail heading left. You may take this trail but continuing on for less than half a mile will bring you to Sunset Point. At Sunset Point a wooden observation platform looks out over the Hudson River. The view is somewhat the same as from other parts of the ridge. After taking in the view, turn around and head back to where the blue trail split off. After only a few hundred feet on the blue trail, the yellow blazes of the Wilkinson Memorial Trail show up on the left. Turn here to head back to where you parked the car. This trail heads mostly downward toward the river for about three miles. It has varied terrain through small clearing and darker forests. In the last mile there is a slight climb to the open summit of Sugarloaf Mountain. From here the trail descends sharply for several hundred feet. After this the trail continues to descend but the pitch moderates some and this is aided by several switchbacks at the upper end. The further you descend the gentler the pitch becomes until the trail ends abruptly on Route 9D less than a half mile north of where you parked.
 (The image at the left shows the profile of the hike. Remember that all vertical profiles are
relative!)
(The image at the left shows the profile of the hike. Remember that all vertical profiles are
relative!)
Hudson Highlands: Canada Hill
| Quick Look | ||||
|---|---|---|---|---|
| Difficulty | Round trip | Total climb | Internet Maps | |
| 9.0 mi. | 2130 ft. | AllTrails | ||
 Get on State Route 9D on the east side of the Hudson River. Drive to a point just north of the Bear Mountain Bridge. Turn east on South Mountain Pass Road. About .7 miles up this narrow, dirt road is a small parking area on the right. The Appalachian Trail crosses here. Walk up the road and turn left into the woods to start the hike on the Appalachian Trail.
The first .2 miles of the trail are a little steep going about 160 feet. After this, the AT turns right and continued to climb steeply for another .2 miles gaining around 300 feet from the start of the hike. In several places the trail blazes all but disappear so that staying on the trail is difficult. Once you are up on the ridge the trail becomes a wide woods road for some distance. There aren't too many views from the ridge but the open forest especially near the top of Canada Hill is very pretty. You will pass by Canada Hill at about .8 miles and the trail continues toward the northeast. Around .9 miles, the Osborn Loop Trail appears on the right but you should stay on the AT. At 1.3 miles, a yellow trail comes in from the left but you should continue on the AT. Along the way there may seem to be the possibility of some viewpoints but all are blocked by trees. At 2.4 miles, the blue trail appears straight ahead and the AT turns right. Turn on the AT and start down off the ridge. Watch for the yellow Carriage Connector Trail which is further down the hill than you might expect. The yellow trail lies on a wide woods "road" that heads north where an unmarked path turns right and to the south to get to the White Rock lookout. The problem is that you have to hike more than a half mile north to pick up the path and then back a half mile on the path to the viewpoint. Since the viewpoint is just above the junction of the AT and the yellow trail it is possible to bushwhack up to the path and save some useless backtracking. Turn right off the trail and begin a rather steep ascent through some brush that can be thick at times. The path lies between the first climb and the cliffs directly ahead! Turn right on the path and hike to the top of the hill and to the viewpoint. The viewpoint looks south across Camp Smith, Anthony's Nose and the Hudson. When you are done, hike around the hill on the path. When the path gibes out, bushwhack down the hill and pick up the path again. Follow the path which follows a road back to the yellow trail.
As you walk along the yellow trail, notice that the road is supported by a stone wall on the right side. The construction is old but has stood the test of time. Further along the stone wall support changes to the left side of the trail where a stream would have cut into the road. The wall is higher and much more impressive here. The yellow trail ends at about 4.3 miles and you should continue straight ahead on the blue trail. Almost immediately you will see stone pillars with pipe railing on the left side of the road near a 90 degree turn. The pillars have depressions on top that act as planters. On a small hill to the right of the trail is a wooden gazebo with a stone foundation. It seems that the east side of the Hudson always "had money". As you continue the hike you will come to a junction with a red trail to Sugarloaf Hill. The trail is a dead end and the climb is short but steep gaining 200 foot over .2 miles. After the climb, the trail flattens and it is another .25 miles to the end of the hill and the viewpoint. The lookout points south and there are a few annoying trees in the way. The Bear Mountain Bridge is visible but it seems pretty far away! When you are done, head back down the hill. At the trail junction, turn right and head out on the trail at 5.5 miles into the hike. The blue trail runs between the hills and along a brook but at about 6 miles it starts to climb the ridge again. At 7.0 miles continue on the yellow trail toward Curry Pond. Curry Pond is small but pretty. Walk around the pond and follow the yellow trail as it starts the final ascent back to the AT on the ridge. The trail passes through some dense laurel, crosses a small stream and then makes a short but steep ascent through a cleft in the rock ledge. It flattens at the top and at 7.8 miles you will be back on the AT. There is about 1.3 miles of hiking left to get back to the car.
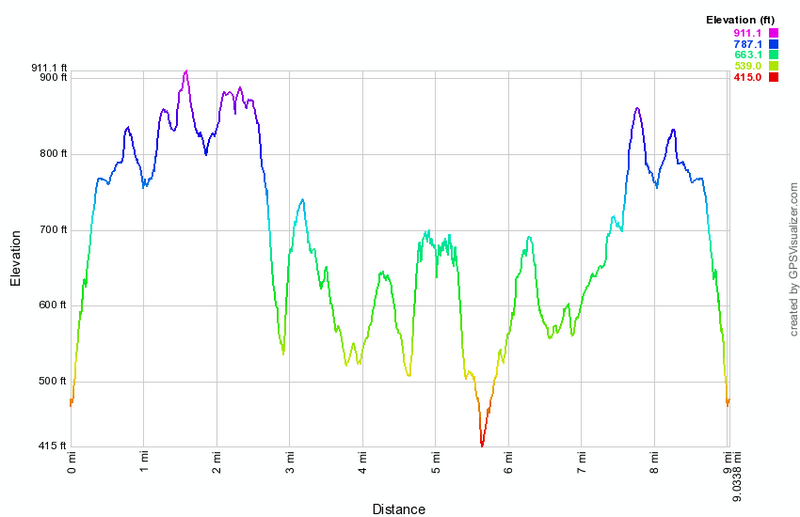 (The image at the left shows the profile of the hike. Remember that all vertical profiles are relative!)
Hudson Highlands: Fishkill Ridge - Overlook Trail to Lambs Hill
| Quick Look | ||||
|---|---|---|---|---|
| Difficulty | Round trip | Total climb | Internet Maps | |
| 4.3 mi. | 1635 ft. | AllTrails | ||
 Take I84 to exit 12. Follow Route 52 west for .2 miles from I84 to Old Glenham Road. Turn left and after .9 miles turn left on Maple Street. Follow it as it becomes Washington Avenue. Turn left on Old Town Road and drive .4 miles to Sunnyside Road. Drive to the end of Sunnyside Road and turn left into the well-marked parking area. To begin the hike walk out the far end of the parking area passing a kiosk with some interesting information about the Fishkill Ridge. The first part of the trail is a woods road that begins with a gentle grade. The trail soon turns left and begins to parallel a deep ravine to the right as it starts to climb. At around .3 miles there is a large conglomerate boulder. Just after the boulder the trail turns left away from the ravine and continues to climb with grades over 20%. Soon the trail abruptly turns right heading back toward the ravine. Walk on the level for a short distance and then walk downhill to cross the ravine. After crossing the small creek in the ravine, make a sharp right and start to climb. The trail is well marked which is fortunate since there are many paths and woods roads that cross the trail at different spots. You will begin to see some views of the Hudson River through the trees and begin to wonder if you will ever get any clear views. At about 1.1 miles begin to ascend an open rock face. Looking back over your shoulder will reveal an amazing open view of the Hudson River! Walk a little farther to the top of the climb and stop to take in the view. At 1.4 miles the trail levels a little and rolls some until at 1.7 miles there is another nice overlook. Walk to the top of the hill where the Overlook Trail ends at the white Fishkill Ridge Trail. Turn left to head toward Lambs Hill. Over the next .3 miles you will descend one small hill and climb another until at 2.0 miles you will be at the base of Lambs Hill. The trail heads straight for a cliff and then parallels the cliff before making a sharp right to go over the top. After climbing over the cliff, climb up an open rock face to the top of Lamb's Hill. There are some nice views from the top of the hill including the Hudson to the west and the Beacon Reservoir hidden in the trees to the southwest. When you are done, turn around and retrace your route to the car. Be careful on the downhill especially when there are leaves, ice or snow on the trails!

(The image at the left shows the profile of the hike. Remember that all vertical profiles are relative!)
Hudson Highlands: Fishkill Ridge - Pocket Road to Fishkill Flag
| Quick Look | ||||
|---|---|---|---|---|
| Difficulty | Round trip | Total climb | Internet Maps | |
| 5.1 mi. | 2025 ft. | AllTrails | ||
 Take I84 to exit 11. Head south on Route 9D and turn left on Main St. Follow it to E Main Street. Turn right and follow East Main St to Pocket Road which is a dead end. Near the end is a gate that controls access to part of the City of Beacon's water supply. Park in the turnout just before the gate where the number of parking spaces is very limited. Walk through the gate and up the access road which passes by a large water storage tank and then a small reservoir. After the reservoir, the trail begins to follow Dry Brook which and trail grade averages about 15% with some steeper spots. There were several spots on the trail that are eroded and others than require walking along slanted rocks which ay be difficult when the trail is wet or icy or covered in snow. You will cross Dry Brook several times and at .75 miles there is a final crossing. we crossed it for the last time as we continued east. At this point the brook is flowing from the south out of Beacon Reservoir and there is a series of cascades with a waterfall at the top. Continue walking east on the trail, gaining elevation until the trail crosses the road to the reservoir at .9 miles. Turn left on the road and then almost immediately right into the forest. Follow the trail as it begins to ascend an unnamed hill. Over the next .3 miles gain 380 feet making an average grade of 24% despite the switchbacks! At 1.2 mile you will arrive at the junction with the Overlook Trail that ascends from the Sunnyside Road trailhead. Continue heading east as the trail rolls over several small hills before climbing to the top of Lambs Hill at 1.7 miles. The trail goes over the top of Lambs Hill and descends the other side to Dozer Junction at 1.9 miles. Dozer Junction gets its name from a bulldozer parked at the junction. The white Fishkill Ridge Trail continues straight ahead. Turn right on a short blue connector trail. At 2.2 miles there is a low spot and then the junction with the yellow Wilkinson Memorial Trail. Turned right to follow the trail to the southwest and start to watch for an unmarked trail to the hill with the flag. At 2.5 miles the Wilkinson Memorial Trail makes a sharp left heading eastward. Continue straight ahead and turn right on an unmarked but prominent trail. Walk uphill staying right at a fork in the path and you will see the flag ahead just over the top of the hill. When you have taken in the view, retrace your route back to the car. Be careful on the descent since wet conditions and slippery leave scan make the down harder than the up! Of, course there are many other options. Perhaps the best one is to hike out the Fishkill Ridge on the white trail. This will add about 3 miles to your hike and there are some nice views along t5he way!
When you are done, turn around and retrace your route to the car. Be careful on the downhill especially when there are leaves, ice or snow on the trails!
Take I84 to exit 11. Head south on Route 9D and turn left on Main St. Follow it to E Main Street. Turn right and follow East Main St to Pocket Road which is a dead end. Near the end is a gate that controls access to part of the City of Beacon's water supply. Park in the turnout just before the gate where the number of parking spaces is very limited. Walk through the gate and up the access road which passes by a large water storage tank and then a small reservoir. After the reservoir, the trail begins to follow Dry Brook which and trail grade averages about 15% with some steeper spots. There were several spots on the trail that are eroded and others than require walking along slanted rocks which ay be difficult when the trail is wet or icy or covered in snow. You will cross Dry Brook several times and at .75 miles there is a final crossing. we crossed it for the last time as we continued east. At this point the brook is flowing from the south out of Beacon Reservoir and there is a series of cascades with a waterfall at the top. Continue walking east on the trail, gaining elevation until the trail crosses the road to the reservoir at .9 miles. Turn left on the road and then almost immediately right into the forest. Follow the trail as it begins to ascend an unnamed hill. Over the next .3 miles gain 380 feet making an average grade of 24% despite the switchbacks! At 1.2 mile you will arrive at the junction with the Overlook Trail that ascends from the Sunnyside Road trailhead. Continue heading east as the trail rolls over several small hills before climbing to the top of Lambs Hill at 1.7 miles. The trail goes over the top of Lambs Hill and descends the other side to Dozer Junction at 1.9 miles. Dozer Junction gets its name from a bulldozer parked at the junction. The white Fishkill Ridge Trail continues straight ahead. Turn right on a short blue connector trail. At 2.2 miles there is a low spot and then the junction with the yellow Wilkinson Memorial Trail. Turned right to follow the trail to the southwest and start to watch for an unmarked trail to the hill with the flag. At 2.5 miles the Wilkinson Memorial Trail makes a sharp left heading eastward. Continue straight ahead and turn right on an unmarked but prominent trail. Walk uphill staying right at a fork in the path and you will see the flag ahead just over the top of the hill. When you have taken in the view, retrace your route back to the car. Be careful on the descent since wet conditions and slippery leave scan make the down harder than the up! Of, course there are many other options. Perhaps the best one is to hike out the Fishkill Ridge on the white trail. This will add about 3 miles to your hike and there are some nice views along t5he way!
When you are done, turn around and retrace your route to the car. Be careful on the downhill especially when there are leaves, ice or snow on the trails!
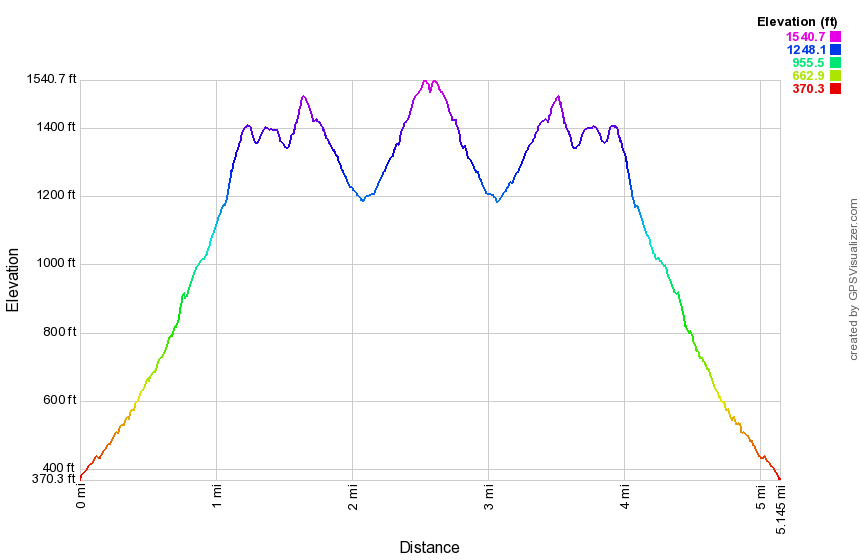
(The image at the left shows the profile of the hike. Remember that all vertical profiles are relative!)
Hudson Highlands: Fishkill Ridge - Pocket Road to Fishkill Flag
| Quick Look | ||||
|---|---|---|---|---|
| Difficulty | Round trip | Total climb | Internet Maps | |
| 7.2 mi. | 1850 ft. | AllTrails | ||
 Take I84 to exit 13. Head south on Route 9 for 3 miles and watch for Old Albany Post Road on the right. Turn right and drive about a quarter mile to Reservoir Road on the right. Notice the three yellow disks on the telephone pole at the end of the road indicating the beginning of the Wilkinson Memorial Trail. Finding a place to park can be a problem. Although there is a public right-of-way on all the streets and roads the local residents seem to be adverse to parking on the side of the road. An alternative plan is to park at Nicola's Restaurant on Route 9. Be sure to ask for permission to park and to park as far away from the restaurant as possible. From the parking lot, cross Route 9 and turn left. Walk to Old Albany Post Road and turn left. Walk to Reservoir Road and turn right to begin the hike on the trail. After a short distance, there is a gate blocking the road and to the right is a DEC facility. Pass through the gate and start into the forest starting the climb toward the ridge heading west. Noticed that the trees in this area are huge both in height and in girth. Some are so large that they appear to be first growth. At .9 miles there is a small reservoir or lake. Walk around to the north shore following the trail to continue the hike. The trees actually seemed to be bigger on the north side of the lake. From the lake to 1.45 miles the trail is almost flat rolling a little but after that it begins to climb. At 1.6 miles there are some switchbacks which make the climb a little easier. The grade still averages 19% until the Fishkill Ridge at 2 miles. At this point the Wilkinson memorial Trail turns left. Head right on the white Fishkill Ridge Trail. Walk on the trail following it northeast as it actually descends some until a stream crossing at 2.8 miles. Along the way notice some fantastic stone walls. Many maps indicate viewpoints along the trail but most are now blocked by trees. Don't worry as there are better views ahead on the trail. At 2.8 miles begin to climb still heading northeast. There are more stone walls and other evidence the area was settled at some time. At 3.0 miles the trail begins a sweeping turn to the north and at 3.3 miles it makes a sharp turn heading southwest but still gaining elevation. As you climb, you will see you are approaching an open vista. Soon the trail reaches the top of Bald Hill, the highest point on the hike at 1490 feet, with an almost 360 degree view. Although this elevation pales in comparison to the Catskills it is over 1200 feet above the valley. The views are fantastic in all directions. Perhaps the most surprising sight is a small table and rustic rocking chair on the top of the hill. In the valley to the east of the ridge there is a massive sand and gravel operation with terraces cut into the hill. Walk a little farther for some different angles of the same views. From the top of the hill the rest of the hike is mostly downhill with a few small climbs along the way but no more significant viewpoints. At 4.6 miles there is an open rock that at one point may have had a view. The trail heads down off the rock to the south and then loops clockwise around the rock ending up in a short but tricky descent to Dozer Junction. The junction is named for a bulldozer that sits at the junction. I have been unable, despite several research attempts, to find out why the bulldozer was abandoned there. Turn left on the blue trail and head downhill to the yellow Wilkinson Memorial Trail. Along the way watch for more stone walls, several foundations, extensive woods roads and some farm equipment including disk and spring-tooth harrows. Turn left at the yellow trail to follow the trail back to the car. Part of the trail is relatively narrow with a high rock wall on the left and a dropoff on the right. The trail goes up and over some rocks. At 5.4 miles you will be back at the junction with the Fishkill Ridge Trail. Turn right to stay on the yellow Wilkinson Memorial Trail. The descent goes quickly and once you are back at the trailhead retrace your route back to the car
When you are done, turn around and retrace your route to the car. Be careful on the downhill especially when there are leaves, ice or snow on the trails!
Take I84 to exit 13. Head south on Route 9 for 3 miles and watch for Old Albany Post Road on the right. Turn right and drive about a quarter mile to Reservoir Road on the right. Notice the three yellow disks on the telephone pole at the end of the road indicating the beginning of the Wilkinson Memorial Trail. Finding a place to park can be a problem. Although there is a public right-of-way on all the streets and roads the local residents seem to be adverse to parking on the side of the road. An alternative plan is to park at Nicola's Restaurant on Route 9. Be sure to ask for permission to park and to park as far away from the restaurant as possible. From the parking lot, cross Route 9 and turn left. Walk to Old Albany Post Road and turn left. Walk to Reservoir Road and turn right to begin the hike on the trail. After a short distance, there is a gate blocking the road and to the right is a DEC facility. Pass through the gate and start into the forest starting the climb toward the ridge heading west. Noticed that the trees in this area are huge both in height and in girth. Some are so large that they appear to be first growth. At .9 miles there is a small reservoir or lake. Walk around to the north shore following the trail to continue the hike. The trees actually seemed to be bigger on the north side of the lake. From the lake to 1.45 miles the trail is almost flat rolling a little but after that it begins to climb. At 1.6 miles there are some switchbacks which make the climb a little easier. The grade still averages 19% until the Fishkill Ridge at 2 miles. At this point the Wilkinson memorial Trail turns left. Head right on the white Fishkill Ridge Trail. Walk on the trail following it northeast as it actually descends some until a stream crossing at 2.8 miles. Along the way notice some fantastic stone walls. Many maps indicate viewpoints along the trail but most are now blocked by trees. Don't worry as there are better views ahead on the trail. At 2.8 miles begin to climb still heading northeast. There are more stone walls and other evidence the area was settled at some time. At 3.0 miles the trail begins a sweeping turn to the north and at 3.3 miles it makes a sharp turn heading southwest but still gaining elevation. As you climb, you will see you are approaching an open vista. Soon the trail reaches the top of Bald Hill, the highest point on the hike at 1490 feet, with an almost 360 degree view. Although this elevation pales in comparison to the Catskills it is over 1200 feet above the valley. The views are fantastic in all directions. Perhaps the most surprising sight is a small table and rustic rocking chair on the top of the hill. In the valley to the east of the ridge there is a massive sand and gravel operation with terraces cut into the hill. Walk a little farther for some different angles of the same views. From the top of the hill the rest of the hike is mostly downhill with a few small climbs along the way but no more significant viewpoints. At 4.6 miles there is an open rock that at one point may have had a view. The trail heads down off the rock to the south and then loops clockwise around the rock ending up in a short but tricky descent to Dozer Junction. The junction is named for a bulldozer that sits at the junction. I have been unable, despite several research attempts, to find out why the bulldozer was abandoned there. Turn left on the blue trail and head downhill to the yellow Wilkinson Memorial Trail. Along the way watch for more stone walls, several foundations, extensive woods roads and some farm equipment including disk and spring-tooth harrows. Turn left at the yellow trail to follow the trail back to the car. Part of the trail is relatively narrow with a high rock wall on the left and a dropoff on the right. The trail goes up and over some rocks. At 5.4 miles you will be back at the junction with the Fishkill Ridge Trail. Turn right to stay on the yellow Wilkinson Memorial Trail. The descent goes quickly and once you are back at the trailhead retrace your route back to the car
When you are done, turn around and retrace your route to the car. Be careful on the downhill especially when there are leaves, ice or snow on the trails!
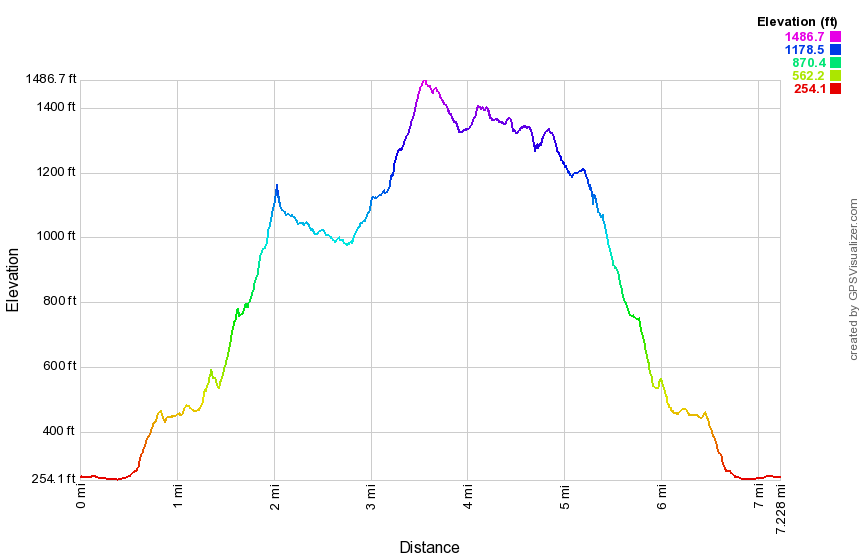
(The image at the left shows the profile of the hike. Remember that all vertical profiles are relative!)
Hudson Highlands: Mount Beacon and Scofield Overlook
| Quick Look | ||||
|---|---|---|---|---|
| Difficulty | Round trip | Total climb | Internet Maps | |
| 5.3 mi. | 1730 ft. | AllTrails | ||
(The image shows the profile of the hike. Remember that all vertical profiles are relative!)
Hudson Highlands: Mount Beacon and Scofield Ridge
| Quick Look | ||||
|---|---|---|---|---|
| Difficulty | Round trip | Total climb | Internet Maps | |
| 7.3 mi. | 2590 ft. | AllTrails | ||
At about 4.4 miles the yellow Wilkinson Trail takes a hard right and starts to descend off the ridge. Turn left on a blue trail but avoid the white Fishkill Ridge Trail which extends out along Fishkill Ridge. The blue trail is short and at 4.7 miles you will be at Dozer Junction where the blue trail ends at the white Fishkill Ridge Trail that has looped around the ridge. Dozer Junction is aptly named since there is a bulldozer at the meeting of the trails. Turn left on the white Fishkill Ridge Trail as it ascends Lambs Hill for some more views. At 5.5 miles there will be another lookout and a junction with the red Overlook Trail. Stay to the left and continue to follow the white trail down the ridge. At around 5.7 miles you will cross over a road that goes to the Beacon Reservoir. The trail marking can be confusing here so look across the road to pick up the blazes and continue on the trail. For the next .5 miles the trail runs along a stream and there may be some waterfalls on the stream and the small tributaries depending on the volume of water. At 6.1 miles the white trail continues to the right. Bear left on the yellow Wilkinson Trail which will return you on a woods road to the top of the stairs which lead back down to the parking lot.
Hudson Highlands: Mount Taurus and Little Stony Point
| Quick Look | ||||
|---|---|---|---|---|
| Difficulty | Round trip | Total climb | Internet Maps | |
| 5.6 mi. | 1525 ft. | AllTrails | ||
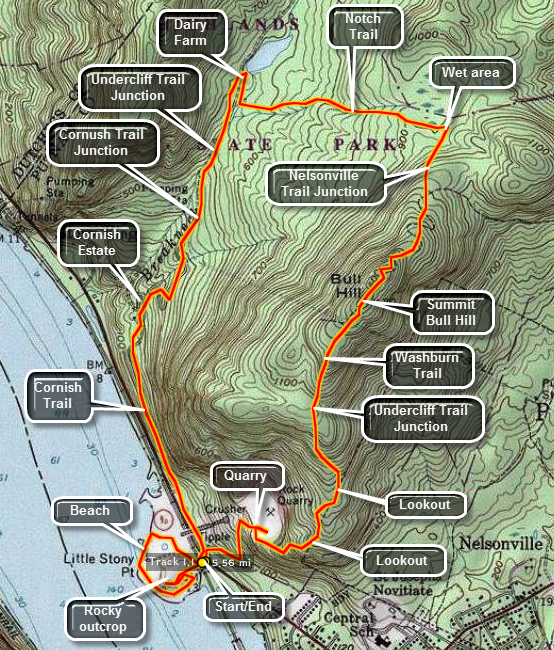 Get on State Route 9D on the east side of the Hudson River. Between Beacon and Cold Spring is a tunnel where the road passes under the railroad tracks. Just south of the tunnel there are parking lots on both sides of the road at Little Stony Point. They are often full on the weekends. Park along the road if the lots are filled. The white blazed Washburn Trail leaves from the north end of the parking lot on the east side of the road. The trail starts as a rather broad road and goes uphill at a pretty good incline. In less than half a mile the trail turns to the right at the top of the hill and continues as trail not road. This is the site of an old stone quarry which appears as a "scar" on the landscape from Storm King or Breakneck Ridge. Walk around in the quarry and then return to the trail which follows the western and southern rim of the "crater". As you rise above the quarry take some time to look down into it for another perspective.
As you climb the trail don't ignore the views to your left. As you walk up the trail the views down to the Hudson and to the south toward West Point and Stony Point become better and better. Just before the trail turns up into the woods and away from the river, a lookout sits just to the right of the trail on a rocky ledge. It is worth the time to walk to this lookout and take in the views to the south. From this point the trail turns into the woods and begins a steeper climb towards the summit of Mount Taurus. Along the way views across the river become prevalent. At the top of one of the steeper sections the yellow Undercliff Trail crosses the Washburn Trail. This trail is a relatively new trail constructed by the NY-NJ Trail Conference. It connects Breakneck Ridge in the north to Nelsonville farther south. As you make the final climb up to Mount Taurus several lookouts provide views to the north and west. The summit of Bull Hill has too many trees to provide a clear viewpoint. As you descend Mount Taurus, there is a very nice lookout on the right on a spur trail. It is worth the short stroll out to this open area which gives pretty views to the south. As the Washburn trail descends an old woods road other lookouts provide more views to the north and west.
With a quarter mile the trail leaves the road to the right and continues on straight Down the hill while the road switches back and forth. The trail and road intersect several times until the green Nelsonville Trail leaves to the right. Bear left and continue your hike on the blue Notch Trail. This trail continues the descent and shortly makes a hard left and heads for Breakneck Brook. All along this trail there are signs that this area was once extensively settled. The trail becomes wider as it joins a woods road .The road is flanked by rows of stone and many stonewalls can be seen. At Breakneck Brook The notch Trail turns right and eventually heads up to Breakneck Ridge. The red Brook Trail turns left. before taking the red trail, turn right on the Notch Trail to investigate the ruins of a 19th century dairy farm. The ruins include many recognizable farm buildings including a stone barn with a stucco covered silo and a milking parlor. Just beyond the barn is a small pond with a long, low cement dam. When you have exhausted your curiosity, return to the Brook Trail.
The red Brook Trail is pleasant as it parallels Breakneck Brook. After a very short distance, the yellow Undercliff Trail crosses the Brook Trail. After another short section the Brook Trail continues out to Route 9D. The blue Cornish Trail bears left and eventually leads back to the parking area at Little Stony Point. Follow the Cornish Trail down to the river as it widens and becomes a paved driveway for the former Cornish Estate. A large cistern appears on the right and then the remains of a greenhouse. Not too much father along are the remains of the main house which was ravaged by fire. Vegetation and vines have recaptured most of the structure giving it a surreal appearance. The paved driveway continues down parallel to the river and the railroad tracks until it ends at a gate on Route 9D. Keep on the path as it winds its way back to the parking lots.
At the parking area, take the time to walk around Little Stony Point. This is an area of land that pushes out into the Hudson. Try turning right after crossing over the train tracks. This path will take you to a beautiful sandy beach right on the Hudson with incredible views north toward Storm King, Breakneck ridge and Pollepel Island. Continue on around the point in a counterclockwise direction. Take in the views as they change from north to west and then south. The fact that you are at river level gives an entirely different feel than viewing the same area from "above". As you walk notice the large rock outcropping on you left. This makes an excellent vantage point. Continue on around to the point where you started. Just as you see the footbridge over the tracks there is a trail to the left that leads to the top of the rock outcrop. It is an easy walk with only a few rough spots. Your reward are some beautiful views of the river below. When you are done looking up and down the river, retrace your steps to the car.
 (The image at the left shows the profile of the hike. Remember that all vertical profiles are
relative!)
(The image at the left shows the profile of the hike. Remember that all vertical profiles are
relative!)
Hudson Highlands: Scofield and Fishkill Ridges
| Quick Look | ||||
|---|---|---|---|---|
| Difficulty | Round trip | Total climb | Internet Maps | |
| 10.7 mi. | 3380 ft. | AllTrails | ||
 Park at the parking lot for Mount Beacon Park just south of the main center of Beacon on Route 9D. The hike starts on some groomed walkways and heads east on the red Casino Trail and up a series of metal stairs to a woods road at about .5 miles. Along the way look to you right and you will see the remains of the track of the elevated Otis Railway that took patrons to the casino that was perched on the lookouts at the top of the trail. The woods road winds back and forth through several switchbacks to mitigate the steepness of the mountain. The trail is eroded in many places with loose rocks.There are some viewpoints on the way up but the best ones are at the top. At about 1.2 miles you will be near the top of the mountain. Watch for the ruins of a red brick building. This housed the donkey engines which polled the cars of the elevated railway to the top. Some of the machinery is still present. You may be able to find pieces of track and cables. Walk to the viewpoints and imagine what is was like when the casino was in operation. You can inspect the foundations and get some idea of the size of the casino before getting back on the trail and heading southeast to about 2 mile. Turn right here on the white Breakneck Ridge Trail and follow it on a steep ascent to the South Beacon fire tower. The tower has been completely restored and is safe to climb to the cab. The steps, landings and cab floor are all open grid steel which can be a little disconcerting but perfectly safe. The view from the tower is 360 degrees. Retrace your steps to the Casino trail and walk to the junction with the yellow Wilkinson Trail. Turn left to begin to walk along Scofield Ridge The ridge is just over the county line and is the highest point in Putnam County. The trail may not pass over the highest point on the ridge and there is a lot of debate over where that point is located. You may want to bushwhack a little off the trail to find the highest spot and take in some great views. At about 4.5 miles a short side trail leads to a fantastic lookout which is worth the brief walk. The trail takes some sharp turns and descends steeply in spots crossing some other trails, paths and woods roads. At about 5 miles the yellow Wilkinson Trail start to descend off the ridge. Bear left on the white Fishkill Ridge Trail. This trail starts by traveling parallel to the ridge as it slowly rises in to the 6.3 mile point. This walk of about 1.25 miles along the ridge has some possible viewpoints especially near the turn at the end but better things are to come. The trail now turns almost 180 degrees and continues to rises almost to the top of Bald Hill;. The views from here are unobstructed. After this point the trail continues to rise and fall with a few more viewpoints along the way. At 7.8 miles there is another viewpoint and just passed this you will be at Dozer Junction. This trail junction has a large, yellow bulldozer! Continue on the white Fishkill Ridge Trail as it ascends Lambs Hill for some more views. At 8.6 miles there will be another lookout and a junction with the red Overlook Trail. Stay to the left and continue to follow the white trail down the ridge. At around 9 miles you will cross over a road that goes to the Beacon Reservoir. The trail marking can be confusing here so look across the road to pick up the blazes and continue on the trail. For the next .5 miles the trail runs along a stream and there may be some waterfalls on the stream and the small tributaries depending on the volume of water. At 9.5 miles the white trail continues to the right. Bear left on the yellow trail which will return you on a woods road to the top of the stairs which lead back down to the parking lot.
 (The image at the left shows the profile of the hike. Remember that all vertical profiles are
relative!)
(The image at the left shows the profile of the hike. Remember that all vertical profiles are
relative!)
Huggins Lake
| Quick Look | ||||
|---|---|---|---|---|
| Difficulty | Round trip | Total climb | Internet Maps | |
| 3.6 mi. | 900 ft. | AllTrails | ||
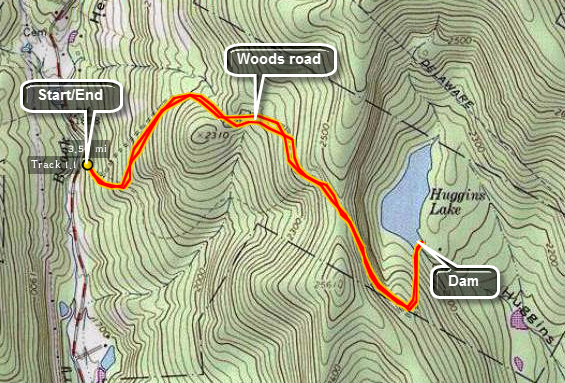 Head north from Livingston Manor on the Beaverkill Road. Watch for the signs for the Beaverkill State Campsites and turn left on Campsite Road. At the bottom of the hill turn right to go down to the river. Cross the Beaverkill on the historic covered Bridge. The road will intersect Berry Brook Road. Turn right on Berry Brook Road and drive 2 miles north to the parking area on the right. The trail is not marked but travels its entirety along a woods road. The walk is easy and the lake is in a pretty setting. The road rises gently for 1.2 miles and then turns to drop down to the lake. Walk to the dam for a good look at the lake. Snakes like to sun themselves on the concrete dam. There are informal paths around the lake which you can explore before returning to the parking area.
 (The image below shows the profile of the hike. Remember that all vertical profiles are
relative!)
(The image below shows the profile of the hike. Remember that all vertical profiles are
relative!)
Huggins Lake Bushwhack
| Quick Look | ||||
|---|---|---|---|---|
| Difficulty | Round trip | Total climb | Internet Maps | |
| 4.0 mi. | 955 ft. | AllTrails | ||
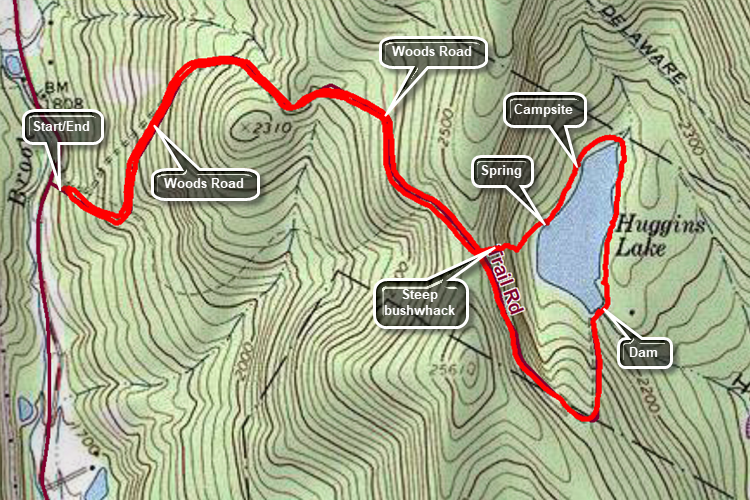 Head north from Livingston Manor on the Beaverkill Road. Watch for the signs for the Beaverkill State Campsites and turn left on Campsite Road. At the bottom of the hill turn right to go down to the river. Cross the Beaverkill on the historic covered Bridge. The road will intersect Berry Brook Road. Turn right on Berry Brook Road and drive 2 miles north to the parking area on the right. The trail is not marked but travels along a woods road to the lake. The walk out on the woods road is relatively easy and the lake is in a pretty setting. The road rises gently for 1.2 miles and then turns to drop down to the lake. Walk to the dam for a good look at the lake. Snakes like to sun themselves on the concrete dam. When you are don at the dam, start around the lake on some informal paths. At point you may have to bushwhack. Stay as close to the shore as you can. As you round the northern end the shoreline heads southwest. You will find a spring with a manmade box outlining it. Just after this spring turn right up the hill and get ready for a steep climb heading west. This is a bushwhack so your experience may vary but the climb is about .12 miles with a gain of 200 feet. This means the climb averages a 30% to 35% grade! At the top of the hill you should be able to walk right out to the trail. Turn right and walk back to the parking area on the woods road.
 (The image below shows the profile of the hike. Remember that all vertical profiles are relative!)
Huntersfield and Ashland Pinnacle (Partridge Rd)
| Quick Look | ||||
|---|---|---|---|---|
| Difficulty | Round trip | Total climb | Internet Maps | |
| 7.2 mi. | 1876 ft. | AllTrails | ||
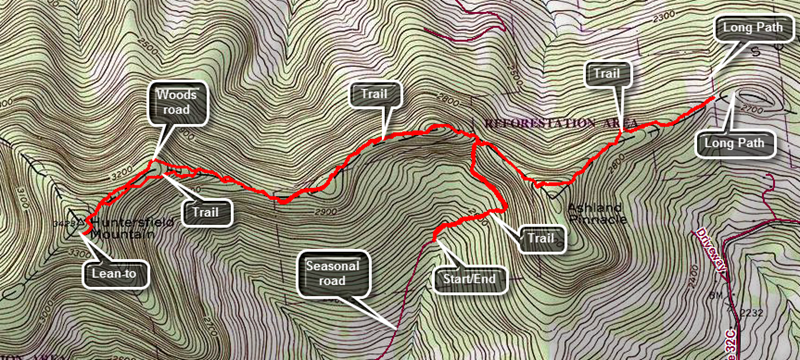 From Route 23 in Prattsville turn north on Washington Street which is Route 10. Continue east for about 6.5 miles to Partridge Road, Turn left and head north on the paved road. The road turns to rough pavement and then gravel but never deteriorates to the point that a car would not be able to make the trip. After 1.6 miles, the road comes to a dead end in a rather large parking area. The trail is obvious and leaves the north end of the parking area as a woods road with yellow blazes. The yellow blazes seem to follow the woods road up toad the ridge but the markers are few and far between. The trail is marked for no motorized vehicles but there are obvious ATV trails. Simply follow the woods road and ATV tracks as they lead up to the ridge. The initial heading is northeast but at .3 miles the trail levels off and begins heading northwest and then north to the ridge at .65 miles. The yellow trail ends here. Turn left to follow the red blazes west as the trail continues to climb until about .9 miles. After coming to the top of a small hill start to descend the other side. You may find the aqua blazes of the Long Path in some place as this was once part of that trail. The trail rolls as it drops a little and then comes to the top of another small hill at 1.3 miles. The trail follows the ridge line and is sited mostly along wide woods roads which makes walking pretty easy. At 1.75 miles the trail, for some reason, veers right into the woods and then rejoins the woods road about 100 feet ahead. Continue to follow the woods road but be careful at about 1.9 miles as the trail turns left off the woods road but the turn is not well marked. This again appears to be for no reason as it rejoins the same woods road 2.35 miles! At 2.45 miles there is a junction with a yellow spur trail to the lean-to. Turn left and head over to the lean-to. There is a viewpoint cut out in front of the lean-to looking south to the Catskills. Head back along the yellow trail and watch for a viewpoint on the right that looks east toward Ashland Pinnacle. The bench that once stood here has rotted away. Return to the trail and turn east on the red trail to return the way you came. You should be able to make good time as you are mostly descending. You will "roll" over the hills you encountered on the trip out and at 4.4 miles you will be at the junction with the trail back to the car. Continue straight ahead on the red trail. Over the next quarter mile the trail ascends to the shoulder of Ashland Pinnacle along a woods road. Immediately after this point the trail begins to descend and drops off the ridge a little. It soon regains the ridge and over .8 miles drops 340 feet of elevation. At 5.5 miles the trail comes to a clearing where the Long Path comes in from the east and turns north to drop of the ridge to South Mountain Road. Turn around and head back the way you came climbing a little at first. When you reach the yellow trail back to the car at 6.6 miles, turn left and follow your route back to the car.
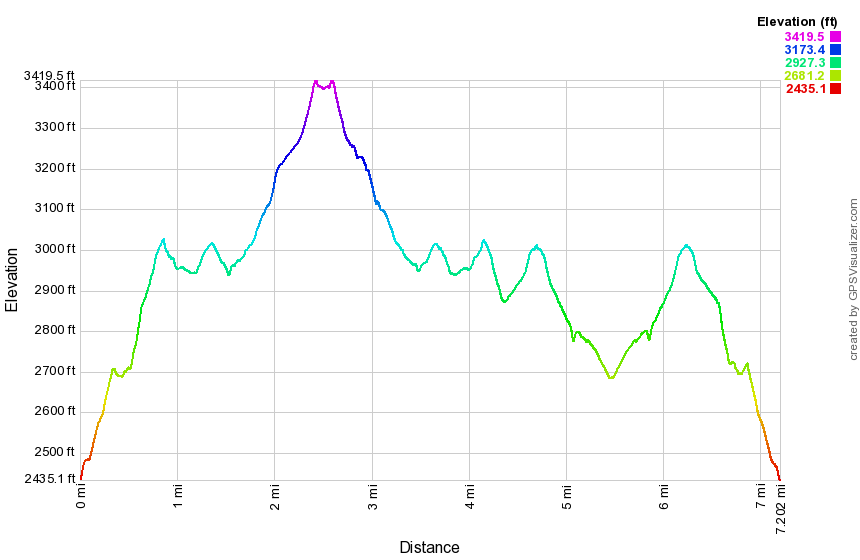 (The image below shows the profile of the hike. Remember that all vertical profiles are
relative!)
(The image below shows the profile of the hike. Remember that all vertical profiles are
relative!)
Jensen Ledges (Long Eddy)
| Quick Look | ||||
|---|---|---|---|---|
| Difficulty | Round trip | Total climb | Internet Maps | |
| 6.0 mi. | 730 ft. | AllTrails | ||
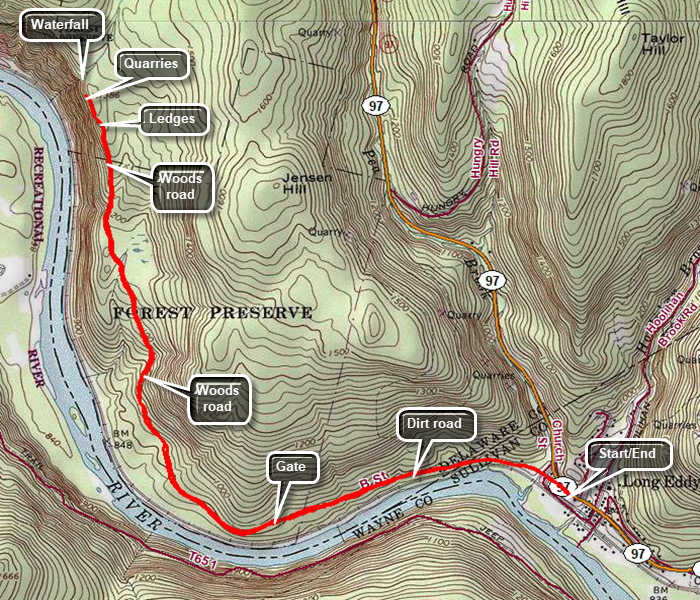 CAUTION: The area of the Ledges and the waterfall can be dangerous! Pay attention to where you are and do not go to close to the edge of the Ledges or the stream. People have been seriously injured and killed in this area.
Drive to Long Eddy on Route 97. Park at the Basket Historical Society on the west side of the road across from the Post Office. Walk north briefly on Route 97 and turn left on Kinney Road. Continue straight ahead as Kinney Road becomes Acid Factory Road. Walk 1 mile along Te dirt road to a gate. After the gate, the trail begins and stays on a woods road. Until 1.6 miles the trail is relatively flat with the Delaware River and the train tracks on the left. At 1.6 miles the trail begins to climb at about an 8% grade. The trail levels and then gains elevation again until it levels at 2.7 miles near the highest point on the trail. When the trail splits, bear left and you will be at the Ledges at 2.9 miles. Enjoy the view and then continue to walk along the path that parallels the edge of the ledges. Within a few hundred feet, there will be a bluestone quarry and many left over stones which some visitors have fashioned into "furniture" and cairns. Walking another short distance will bring you to the edge of a stream where a water fall cascades down to the river. When you have finished exploring, taking pictures and enjoying the views, turn around and follow the route back to the car.
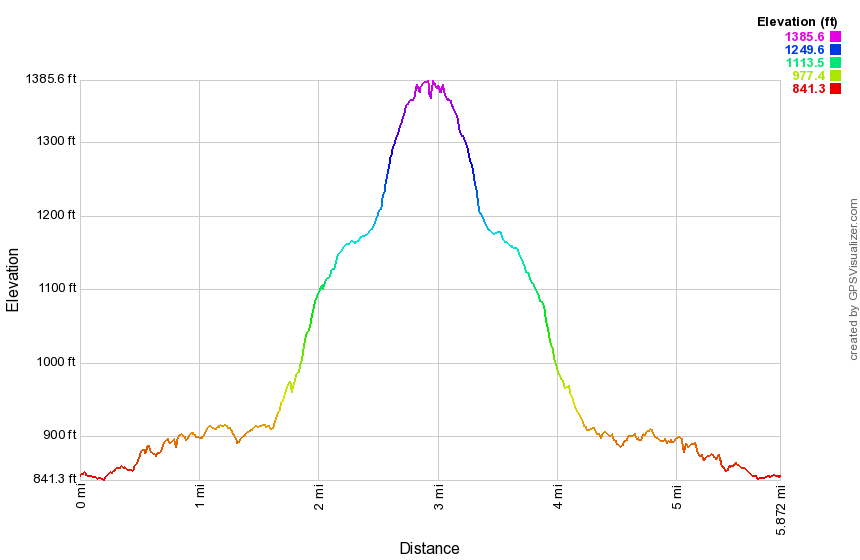 (The image at the left shows the profile of the hike. Remember that all vertical profiles are relative!)
Jensen Ledges (Lordville)
| Quick Look | ||||
|---|---|---|---|---|
| Difficulty | Round trip | Total climb | Internet Maps | |
| 2.7 mi. | 688 ft. | AllTrails | ||
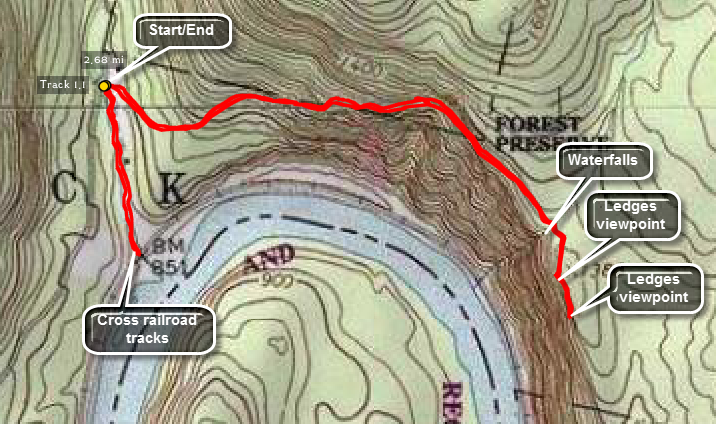
CAUTION: The area of the Ledges and the waterfall can be dangerous! Pay attention to where you are and do not go to close to the edge of the Ledges or the stream. People have been seriously injured and killed in this area.
From Route 97 near Hancock, NY turn south on Lordville Road near Somerset Lake. The road heads south to the Delaware River and crosses to Equinunk, PA. Just before the bridge crossing turn left on Bouchouxville Road. This dirt road becomes narrow and very rough but ends in a small parking area. From the parking area get on the woods road that heads east and up the ridge. As you climb, keep looking to your right for some views down to the river. After walking only .9 miles, you will cross a small stream that cascades down the ledges and empties into the river. If there is enough water volume, it is worth working your way down the side of the falls to get some pictures. Back on the main trail, cross the brook and walk a few hundred feet before turning right and walking out to the first viewpoint. At this viewpoint, you will have beautiful views down to the river and beyond. This area has a HUGE rock cairn that sits atop a "pile" of laid up stone! There may also be some stone "furniture" just behind the viewpoint is the remains of a stone quarry. Walk a little further east and there is another viewpoint. Retrace yours steps back down to the car. Walk along the trail down to the river along a private property easement. At the railroad tracks cross carefully and walk down to the river. After taking pictures, return to the car.
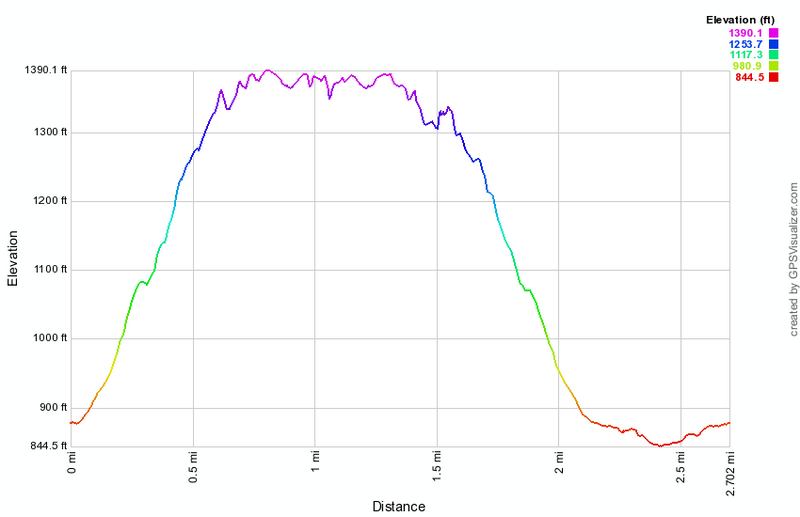 (The image at the left shows the profile of the hike. Remember that all vertical profiles are relative!)
Jockey Hill
| Quick Look | ||||
|---|---|---|---|---|
| Difficulty | Round trip | Total climb | Internet Maps | |
| 5.7 mi. | 662 ft. | AllTrails | ||
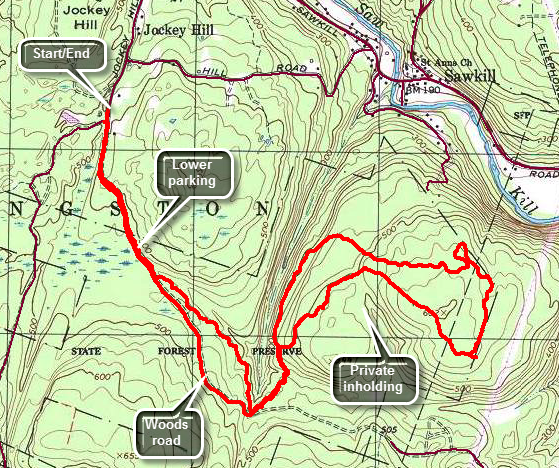 Bluestone State Forest is near Kingston. There are two sets of trails in the area that are used for both hiking and mountain biking. There are three trail loops near Onteora Lake and another set of trails just east of Onteora Lake on Jockey Hill. Drive west on Route 28 from Kingston watching for Morey Hill Road on the right. Turn right on Morey Hill Road. Drive north until Morey Hill Road meets Sawkill Road. Turn right and watch for Jockey Hill Road on the right. Turn right to head south on Jockey Hill Road. Bear left when the road seems to split and you will be at the end of the paved road in what looks like a dead end. You may park on the side of the road or in the cul-de-sac. You may also continue on the dirt and gravel road marked Woods Road as this leads to the lower parking area and is NOT a private road. (The distance given here are from the upper parking area.) Walk down Woods Road about .5 miles to the lower parking area. Continue straight ahead and out the far end of the parking area passing a gate. This is where the yellow blazes start. The trail followed the woods roads to about .7 miles or .15 miles from the lower parking area. Here the trail turns left into the woods. The trail parallels the road through mixed evergreen and hardwood forests for the next .65 miles rolling some but mostly descending. At 1.3 miles the trail turns left 90 degrees changing from southeast to northeast. The hiking now is mostly through hardwood forest and at 1.6 miles the trail splits to the start of the loop. Stay to the left and descend slightly before turning east at 2.0 miles and beginning a climb. The climb looks impressive on a contour profile but it lasts only to about 2.6 miles and gains just 175 feet! At this point the trail does a funny little loop to the north to avoid a rather steep descent over some rocks. Soon you will be headed south to about 3.2 miles. At his point another trail or road goes off to the left. It is important to follow the blazes since there are many of these woods roads and paths that cross the blazed trail. The trail turns west first heading northwest and then southwest to walk around a small private inholding. At 3.4 miles the trail passes over the highest elevation on the hike at 600 feet. From here it begins to descend until you are back at the start of the loop at 4.2 miles. Continue to follow the blazes or hike out to the road at 4.5 miles. Walking the road back offers a different experience. It is about .75 miles back to the lower parking area and then another .5 miles back to your car.
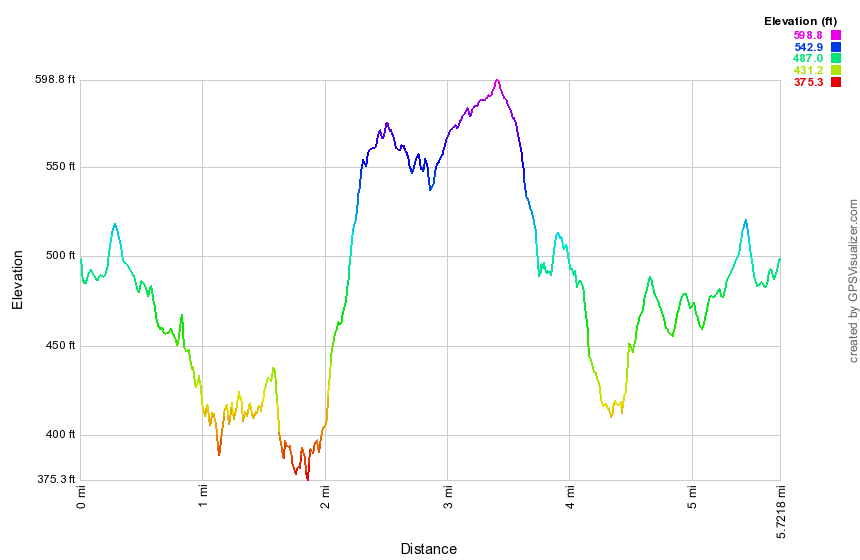 (The image at the left shows the profile of the hike. Remember that all vertical profiles are relative!)
John Boyd Thacher State Park
| Quick Look | ||||
|---|---|---|---|---|
| Difficulty | Round trip | Total climb | Internet Maps | |
| 6.3 mi. | 1008 ft. | AllTrails | ||
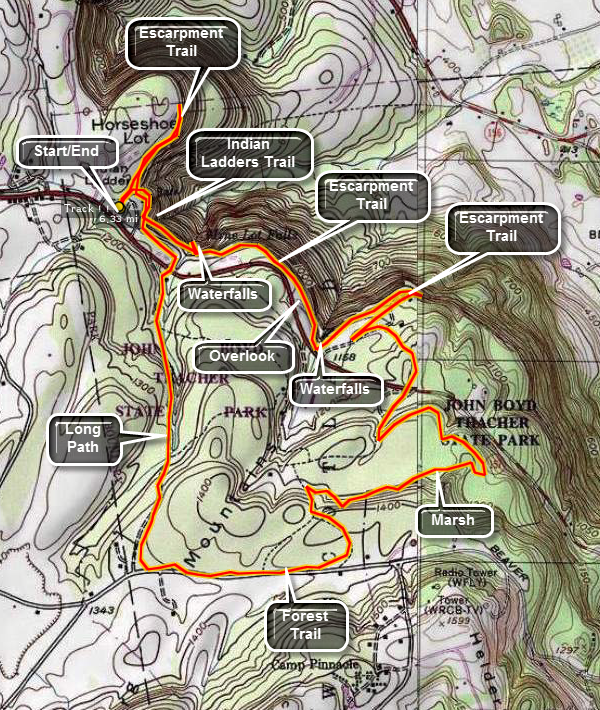 The main hiking attraction in the park is the Indian Ladder Trail along the Helderberg Escarpment.
This trail extends around the rim of the escarpment and descends into the gorge below the rim.
Other trails run throughout the park. The Long Path runs through one section. Most of these
trails are wide and well-maintained and relatively flat. An overlook area allows motorists
to park their cars and take in the beauty of the escarpment and the gorge. This area is a
favorite of "birders" since eagles and hawks frequent the area to ride the updrafts. The park
contains the Helderberg Escarpment which has two deposits of Devonian limestone. It is rich in
fossils from a shallow see that covered this area during that period. This escarpment is the one
pictured in the movie "Last of the Mohicans".
The main hiking attraction in the park is the Indian Ladder Trail along the Helderberg Escarpment.
This trail extends around the rim of the escarpment and descends into the gorge below the rim.
Other trails run throughout the park. The Long Path runs through one section. Most of these
trails are wide and well-maintained and relatively flat. An overlook area allows motorists
to park their cars and take in the beauty of the escarpment and the gorge. This area is a
favorite of "birders" since eagles and hawks frequent the area to ride the updrafts. The park
contains the Helderberg Escarpment which has two deposits of Devonian limestone. It is rich in
fossils from a shallow see that covered this area during that period. This escarpment is the one
pictured in the movie "Last of the Mohicans".
Start at the main parking lot at the park and find the Indian Ladder Trail. Descend the steps into the gorge. A fenced path runs along the limestone cliffs. Cracks are obvious in the limestone layers. Areas where the rock has been eroded away by water are clear. Small caves and underground streams riddle the rock face. Two different waterfalls cascade off the escarpment onto the trail below. Walk behind the falls but be careful since the limestone can be VERY slippery when wet. One area of the trail is almost obscured by overhanging rock. Climb out of the gorge to the escarpment rim. The trail continues along the rim in both directions. From the rim the views of the surrounding countryside and the other rim of the escarpment are magnificent! To extend the distance of the hike, cross over the main park road when you come out of the gorge and look for the forest trail. This trail start out by heading south but turns west until it intersects the Long Path. Turn right on the Long Path and continue north to the area of the gatehouse. Cross the main park road to walk back to the car.
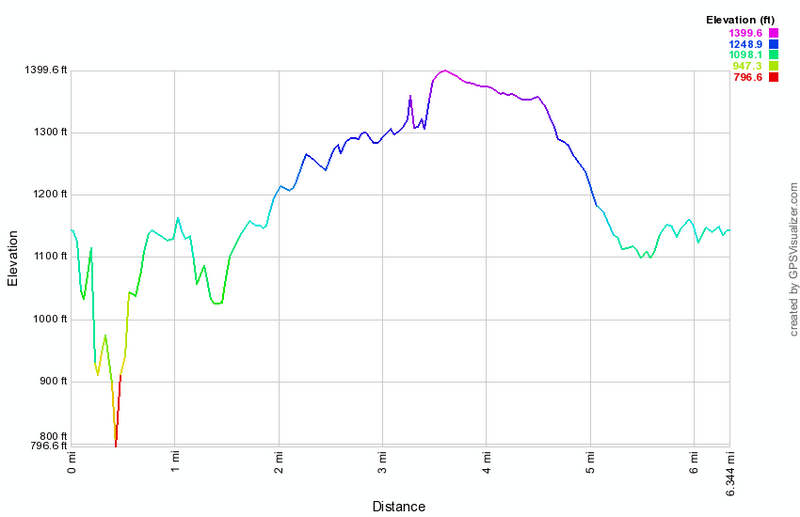 (The image at the left shows the profile of the hike. Remember that all vertical profiles are
relative!)
(The image at the left shows the profile of the hike. Remember that all vertical profiles are
relative!)
John Boyd Thacher State Park Escarpment
| Quick Look | ||||
|---|---|---|---|---|
| Difficulty | Round trip | Total climb | Internet Maps | |
| 4.6 mi. | 550 ft. | AllTrails | ||
 The main hiking attraction in the park is the Indian Ladder Trail along the Helderberg Escarpment.
This trail extends around the rim of the escarpment and descends into the gorge below the rim.
Other trails run throughout the park. The Long Path runs through one section. Most of these
trails are wide and well-maintained and relatively flat. An overlook area allows motorists
to park their cars and take in the beauty of the escarpment and the gorge. This area is a
favorite of "birders" since eagles and hawks frequent the area to ride the updrafts. The park
contains the Helderberg Escarpment which has two deposits of Devonian limestone. It is rich in
fossils from a shallow see that covered this area during that period. This escarpment is the one
pictured in the movie "Last of the Mohicans".
The main hiking attraction in the park is the Indian Ladder Trail along the Helderberg Escarpment.
This trail extends around the rim of the escarpment and descends into the gorge below the rim.
Other trails run throughout the park. The Long Path runs through one section. Most of these
trails are wide and well-maintained and relatively flat. An overlook area allows motorists
to park their cars and take in the beauty of the escarpment and the gorge. This area is a
favorite of "birders" since eagles and hawks frequent the area to ride the updrafts. The park
contains the Helderberg Escarpment which has two deposits of Devonian limestone. It is rich in
fossils from a shallow see that covered this area during that period. This escarpment is the one
pictured in the movie "Last of the Mohicans".
Start at the main parking lot at the park and find the Indian Ladder Trail. Descend the steps into the gorge. A fenced path runs along the limestone cliffs. Cracks are obvious in the limestone layers. Areas where the rock has been eroded away by water are clear. Small caves and underground streams riddle the rock face. Two different waterfalls cascade off the escarpment onto the trail below. Walk behind the falls but be careful since the limestone can be VERY slippery when wet. One area of the trail is almost obscured by overhanging rock. Climb out of the gorge to the escarpment rim. The trail continues along the rim in both directions. From the rim the views of the surrounding countryside and the other rim of the escarpment are magnificent! Continue the hike by turning left at the top of the stairs and following the trail along the escarpment. After a short walk, you will come to the scenic overlook which had a nice view north to Albany. At the end of the parking area walk along the edge of the woods and the pick up the trail along the escarpment again. As you walk along the escarpment you can see where you have been and where you were going! Eventually you will run out of fence and trail in pine forest. The trail ends at a sheer dropoff that gives a nice view of some stone blocks separating from the main cliff. You will be at about 1.7 miles. Head back the way you came. AT the Indian Ladder Trail, walk across the top of the escarpment to where you start down to the Indian Ladder Trail. Take the trail to the left that continues in the opposite direction along the escarpment. This trail has a few viewpoints that look down at the Indian Ladder Trail and some that look out over the valley toward Albany. Some of the views were the same as from the other end of the escarpment but at a different angle and with different lighting. Continue to follow the trail along the fence until at about 3.8 miles it starts to drop down a little. You will emerge from the woods near the Hailes Cave picnic area. Walk up to Hailes Cave Road and turn left to walk back toward the car.
 (The image at the left shows the profile of the hike. Remember that all vertical profiles are relative!)
Kelly Hollow
| Quick Look | ||||
|---|---|---|---|---|
| Difficulty | Round trip | Total climb | Internet Maps | |
| 3.7 mi. | 667 ft. | AllTrails | ||
 From NYC Route 9/10 on the south side of the Pepacton Reservoir take the Millbrook Arena Road southeast for about 5 miles. Watch for the trailhead sign for Kelly Hollow on the right. Pull into the small lot and park. The trail begins at the back of the parking area just beyond the kiosk. The entire trail network is marked as a cross country ski trail with yellow markers. As you enter the forest, follow the yellow markers to the left. This trail heads south and southeast for about 1.2 miles gaining some elevation as you go. The trail parallels a brook which may be almost dry or a rushing torrent depending on the season. This part of the trail is mostly a wide woods road. At 1.2 miles the trail turns almost 180 degrees and heads north and then southwest until about 2 miles. The overall effect takes you west but avoids an ascent and descent over a shoulder of Millbrook Ridge. This part of the trail is more trail than road and leads to an area where there is lean-to. At the lean-to is a pit privy and a beaver pond. After the lean-to, the trail loops around the pond and then heads south back to the Millbrook Road. This part of the trail is again a woods road in most places and parallels a branch of the stream. In one area a nice waterfall depends largely on seasonal rainfall. Just before you get to the road there will be a historic cemetery on your left. Walk out to the road and turn right. Walk about .25 miles back to the parking area. The whole trip is under 4 miles. There is a route marked "Short Loop".
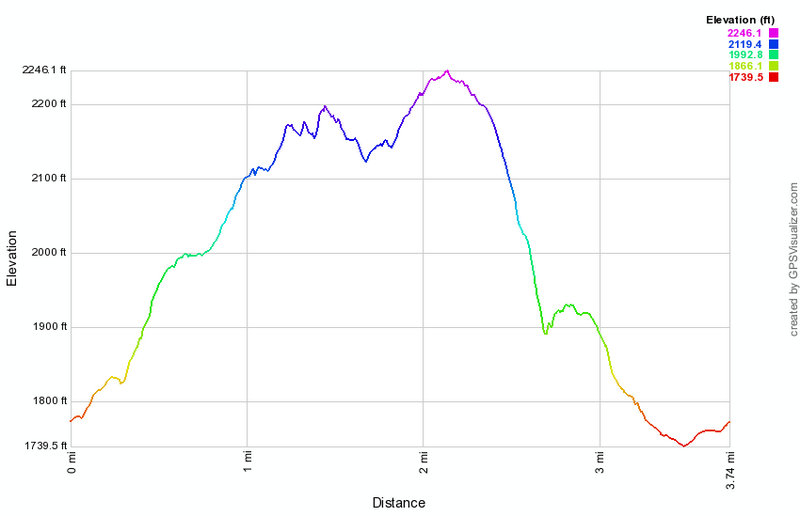 (The image below shows the profile of the hike. Remember that all vertical profiles are relative!)
Kelly Hollow and Millbrook Ridge
| Quick Look | ||||
|---|---|---|---|---|
| Difficulty | Round trip | Total climb | Internet Maps | |
| 5.6 mi. | 1705 ft. | AllTrails | ||
 From NYC Route 9/10 on the south side of the Pepacton Reservoir take the Millbrook Arena Road southeast for about 5 miles. Watch for the trailhead sign for Kelly Hollow on the right. Pull into the small lot and park. The trail begins at the back of the parking area just beyond the kiosk. The entire trail network is marked as a cross country ski trail with yellow markers. Start to the left up the more eastern trail which eventually leads to the beaver pond. The trail crosses a small stream and then passes through a gate as it follows an old woods road. After only .3 miles a road heads down toward the stream. It is not a marked trail but follow it down to the stream bed. There are unmarked paths on both sides of the stream. You can cross to the other side depending on the height and width of the water. Walk up the near side and take some pictures if you like. In some places the path may be almost blocked by trees and debris but you can find a way around them in each case. At about .8 miles, you may see a falls ahead and one on a small tributary to the left. Walk across the stream which will be smaller now and then walk over to the tributary to the falls. Walk back to the main stream where the falls forms a lower, smaller drop and an upper, higher drop. Shortly after this you will find a bridge across the stream that is part of the short loop. Take the trail up to the western branch of the main trail and start southwest and then south toward the beaver pond. The trail gains some elevation as it goes. The pond has a substantial dam and a beaver lodge. There is a lean-to with a privy near the outlet. Head down the trail toward the parking area and look for some nice view to the west of the hills beyond. On the right a hill or ridge rises from the trail. This is Millbrook Ridge that separates Kelly Hollow from the area near Alder Lake! Turn right or south-southwest and start UP the hill. The climb to the top of the ridge is about 1 mile but there is an 1100 foot elevation gain! There are at least three places where the land levels making you believe you are at the top. Sadly there mare few views along the way and the summit is a broad wooded plateau without much to see. At the top Alder lake will be to the southwest with Beecher Lake to the southeast. One at the top turn around and follow your route back to the main trail. Turn right on the main trail and walk back to the parking area. The trail crosses the stream again and then passes through several groves of large evergreen trees.
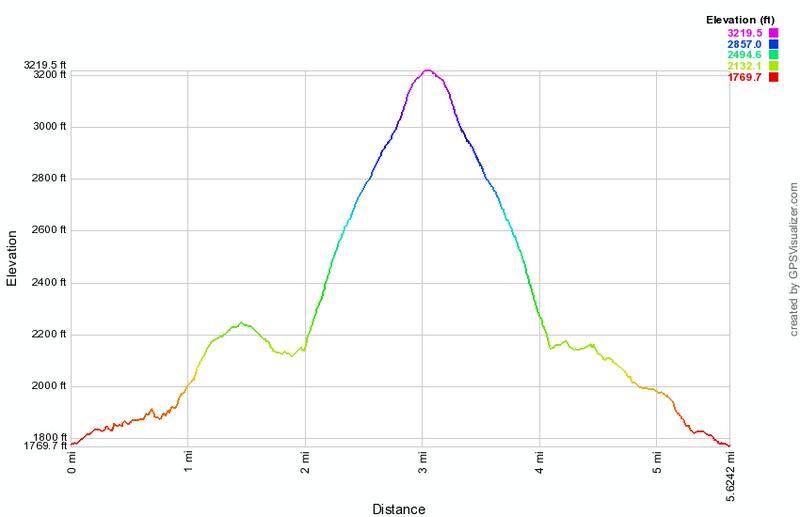 (The image below shows the profile of the hike. Remember that all vertical profiles are relative!)
Kelly Hollow Figure 8
| Quick Look | ||||
|---|---|---|---|---|
| Difficulty | Round trip | Total climb | Internet Maps | |
| 4.3 mi. | 670 ft. | AllTrails | ||
 From NYC Route 9/10 on the south side of the Pepacton Reservoir take the Millbrook Arena Road southeast for about 5 miles. Watch for the trailhead sign for Kelly Hollow on the right. Pull into the small lot and park. The trail begins at the back of the parking area just beyond the kiosk. The entire trail network is marked as a cross country ski trail with yellow markers. Start to the left up the more eastern trail which eventually leads to the beaver pond. The trail crosses a small stream and then passes through a gate as it follows an old woods road. After only .3 miles a road heads down toward the stream to a designated campsite which is worth checking out for subsequent adventures. Walk back up to the main trail and turn right. A short distance up the trail is a trail on the right that crosses over to the western section of the trail. Turn right and walk across the bridge and up the hill to the main trail. Turn left on this branch of the main trail and start southwest and then south toward the beaver pond. The trail gains some elevation as it goes. The pond once had a substantial dam and a beaver lodge but the beavers are gone and the pond will soon be a beaver meadow. Continue to walk around the pond to the lean-to and privy near the outlet. Take a moment if you wish to enjoy the quiet solitude. When you are ready get back on the main trail and head down the trail toward the parking area and look for some nice view to the west of the hills beyond. On the right a hill or ridge rises from the trail. This is Millbrook Ridge that separates Kelly Hollow from the area near Alder Lake! You will pass through some tall pine trees on the way back toward the parking area. Watch for the left turn onto the crossover trail you used before. Turn left on this trail and walk down across the bridge and up the hill on the other side. This time turn right on the main trail to walk downhill. With a little more than a half mile you will see a cemetery on the left. This is the Middletown Cemetery and there are several gravestone with special markers designated the interred as Civil War veterans. One grave has a marker indicating the deceased had fought in the Revolution and had died in 1792! After looking around, continue out the access road to Millbrook Road. Turn right and walk the final .3 miles back to the access road to the parking area on the right.
(The map at the right shows the parking area and the hiking route in anticlockwise direction.)
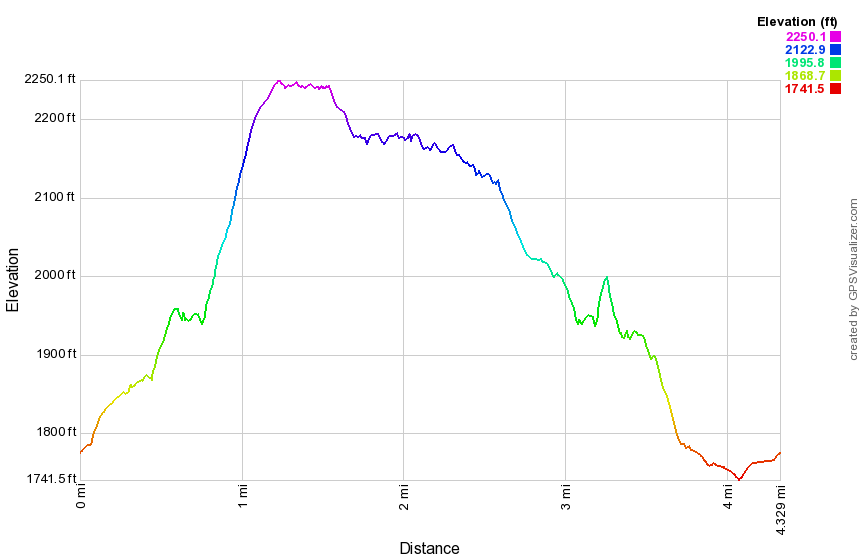 (The image below shows the profile of the hike. Remember that all vertical profiles are relative!)
Lake Superior State Park
| Quick Look | ||||
|---|---|---|---|---|
| Difficulty | Round trip | Total climb | Internet Maps | |
| 4.2 mi. | 432 ft. | AllTrails | ||
 From Route 17B between Monticello and Fosterdale or County Route 55 between White Lake and Eldred turn on Dr. Duggan Road. From 17B the parking area will be passed the main entrance for Lake Superior State Park and on your right. From 55 the parking area will be before the main entrance for Lake Superior State Park and on your left. Park and walk to the left of the pavilion and into a field at the top of the hill. Walk across the field to Indian Field Road and turn right. There will be POSTED signs on your left but none on the right. Watch for POSTED signs to appear on your right and turn into the woods on a woods road just before the signs start. This is the Rocky Run Road which is part of the old Newburgh-Cochecton Turnpike. Walk along the wide woods road keeping the POSTED signs on your left for about 2 miles to the paved Pucky Huddle Road. Turn right on the road and walk several hundred feet to where Mallory Brook crosses under the road. The rest of the hike is a bushwhack down the brook and along the lake shore. You may return the way you came on the woods road or continue on the "whack".
Walk along the brook on the left side since the right has some rather steep cliffs in places. You may find a woods road or a path to use. Cross the brook before you get to the lakeshore as it begins to get wider there. Walk along the sore of the lake remembering to stop to take pictures when you like. You may find several places where people have pulled up a boat and camped. The stands of laurel near the lake may be thick and hard to push through at times so just walk further away from the shore. As you work your way closer to the outlet, you will see the beach on the opposite shore. You will also find more defined paths to walk on. At the outlet of the lake continue on the path that parallels the swampy brook that connects Lake Superior to the small pond where you parked. Keep an eye out for blue heron and beavers. You have the opportunity to take the "low road" around the shore of the pond or the "high road" on the ridge above the pond. Once at the dam at the lower end of the pond you will be a stone's throw from the parking area and your car.
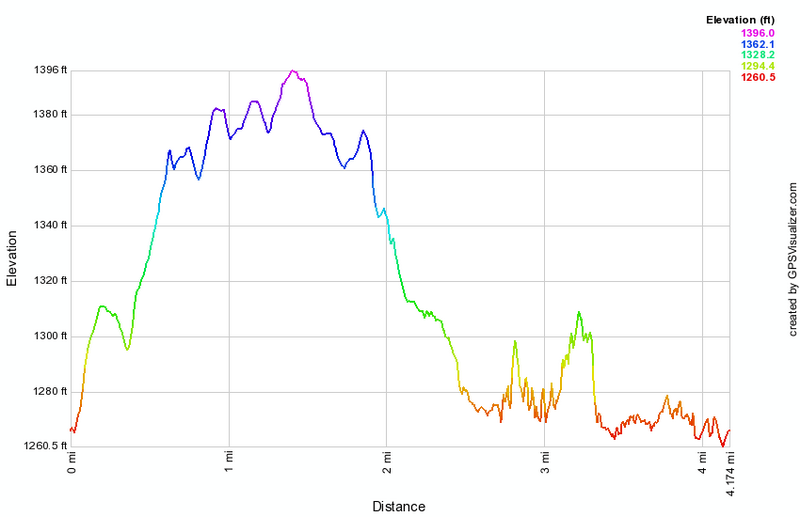 (The image at the left shows the profile of the hike. Remember that all vertical profiles are relative!)
Lake Superior State Park
| Quick Look | ||||
|---|---|---|---|---|
| Difficulty | Round trip | Total climb | Internet Maps | |
| 4.4 mi. | 355 ft. | AllTrails | ||
 From Route 17B between Monticello and Fosterdale or County Route 55 between White Lake and Eldred turn on Dr. Duggan Road. From 17B the parking area will be passed the main entrance for Lake Superior State Park and on your right. From 55 the parking area will be before the main entrance for Lake Superior State Park and on your left. Park and walk to the left of the pavilion and into a field at the top of the hill. Walk across the field to Indian Field Road and turn right. There will be POSTED signs on your left but none on the right. Watch for POSTED signs to appear on your right and turn into the woods on a woods road just before the signs start. This is the Rocky Run Road which is part of the old Newburgh-Cochecton Turnpike. Walk along the wide woods road keeping the POSTED signs on your left for about 2 miles where the state land ends and private property begins. Turn around and walk back about .8 miles. Pick a spot and head north and slightly downhill toward the lakeshore. At times you may have to work your way through laurel or thick brush. Once at the shore turn right and walk along the shore of the lake remembering to stop to take pictures when you like. You may find several places where people have pulled up a boat and camped. The stands of laurel near the lake may be thick and hard to push through at times so just walk further away from the shore. As you work your way closer to the outlet, you will see the beach on the opposite shore. You will also find more defined paths to walk on. At the outlet of the lake continue on the path that parallels the swampy brook that connects Lake Superior to the small pond where you parked. Keep an eye out for blue heron and beavers. Also watch for some very large ant hills! You have the opportunity to take the "low road" around the shore of the pond or the "high road" on the ridge above the pond. Once at the dam at the lower end of the pond you will be a stone's throw from the parking area and your car.
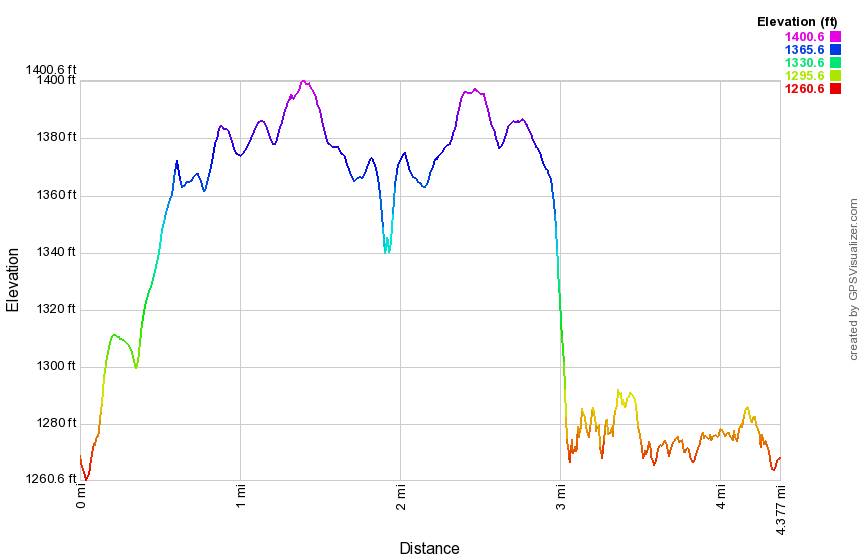 (The image at the left shows the profile of the hike. Remember that all vertical profiles are relative!)
Landing Road to High Tor
| Quick Look | ||||
|---|---|---|---|---|
| Difficulty | Round trip | Total climb | Internet Maps | |
| 12.0 mi. | 2610 ft. | AllTrails | ||
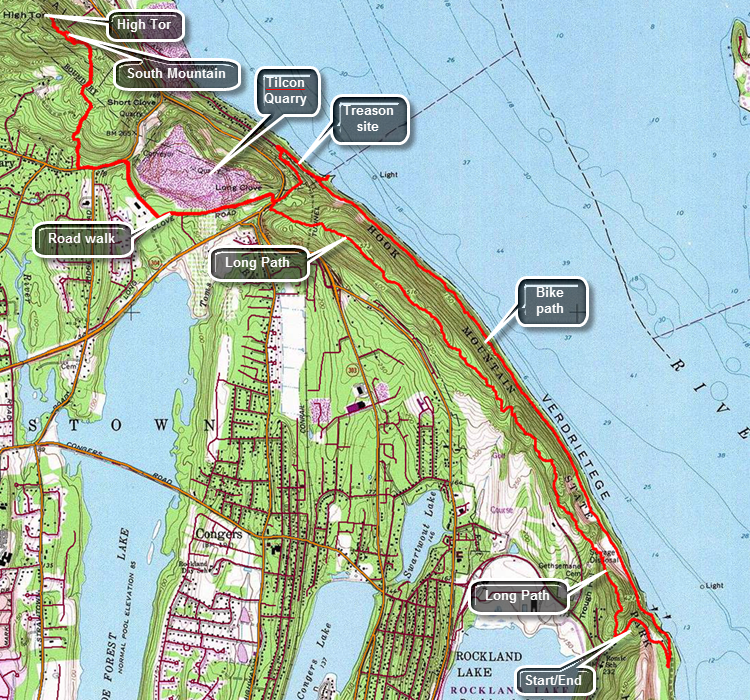
Take exit 12, Palisades Center, off the NYS Thruway. After getting off the exit watch for signs for Route 303 north. Watch for Lake Road on the right at a stop light. Turn right and followed Lake Road to Route 9W. Cross 9W to pick up Rockland Lake Road and drive around the southern tip of the lake and north along the eastern shore. At the intersection with Landing Road turn right onto Landing Road and park in the small lot. Look for the aqua blazes of the Long path on the north side of the parking area. The trail immediately begins a climb from the parking area as it passes by the Wells Family Cemetery. Within about .25 miles there is a high point but the trail immediately starts down the other side. This pattern continues all along the ridge. Along the ridge you may find a few limited viewpoints shown on some maps and mentioned in some trail description. Almost all of these points are now obscured by trees. You may try walking off the trail to find lookouts but it may be best to wait for High Tor! At 2.7 miles the trail hits the highest point on the ridge and starts down toward Lost Clove and Route 9W. On the way down there is a white blazed trail called the Treason Trail on the right. Descend to Route 9W where there is a small parking area. Straight across Route 9W is Lost Clove Road which is closed to traffic for some distance. Cross Route 9W and hike on Lost Clove Road passing the Tilcon Quarry on the right. The basalt that makes up most of the Palisades has been quarried here since 1920 and the operation is huge. Soon Last Clove Road becomes open to traffic and the Long Path then turns right on Scratchup Road to get to Old Route 303 or the Haverstraw Road. Turn left on Old Route 303 and start hiking west being very careful as the road has almost no shoulder and there can be a lot of traffic. Hike for about a quarter mile until the blazes indicate a right turn into the woods to begin the assault on High Tor. The trail is very rocky and poorly blazed in a few spots. After an initial climb the trail levels a little and then starts a gentle ascent passing a house on the left as it makes its way up toward the ridge. Hike almost directly north and at 5 miles descend a little to the junction with the spur trail to the left to High Tor Vineyards. Continued a little farther north and then follow the trail as it turns northwest to start the ascent up what is sometimes called South Mountain. You can chose to ascend through a rock scramble to the very top or follow the blazes of the Long Path around to the south side for an easier route. Follow the blazes to the final climb to the top of High Tor. The trail climbs the south side of the tor to the top with good views in all directions. From the summit the Hudson is just below with the village of Haverstraw at the base of the tor. To the south is Deforest Lake in the foreground with several other lakes further away including Rockland Lake. When you are ready, head back the way you came. Follow the trail back to Old Route 303 and from there walk back to Route 9W. You may now hike back over the Hook Mountain ridge or walk down to the bike path along the Hudson. Walk through the gate and follow the path to the left down to the railroad tracks. Carefully cross the tracks and watch for a path leading down to the bike path that runs along the river from Haverstraw to Nyack. Once on the bike path turn right to walk south to your car. Within a short distance there is a sign marking the spot where Benedict Arnold and John Andre discussed the betrayal of the fort at West Point. A little farther along there is a tunnel to the right that allows the trains to pass under the Hook Mountain ridge. At 8.3 miles there are some ruins down near the water. Walk down a path to the shores of the Hudson. The ruins aren't very old and aren't very interesting. All along the entire bike path are small stone buildings which look like they may have been bathhouses or restrooms. You may walk to the waters edge where you will be almost at sea level. When you are done, walking back up to the bike path and turn left to head south again. The path actually rolls some unlike the southern portion which is very flat. Eventually you will walk up a little hill a junction. Turning to the left takes you to Nyack. Turn right and follow the paved road up the hill and back to the parking area.
 (The image at the left shows the profile of the hike. Remember that all vertical profiles are relative!)
Lenape Ridge Trail
| Quick Look | ||||
|---|---|---|---|---|
| Difficulty | Round trip | Total climb | Internet Maps | |
| 7.1 mi. | 1502 ft. | AllTrails | ||
 The trailhead is on Route 6 north just outside Port Jervis. There is a pulloff going up the hill on the right hand side by the Town of Deerpark sign. If you go as far as the power lines you have gone too far. Walk across the road and look for three red rectangles on a tree for the beginning of the Trail. The trail enters the woods and quickly connects to a woods road. There Rae many roads and informal paths in the area so be careful to follow the red trail markers. At .4 miles the trail abruptly makes a 90 degree turn northeast. The trail makes another 90 degree turn to the northwest at 1.2 miles and then starts to ascend to the ridge. At 1.6 miles there is a lookout to the north and wet and down into the Conrail cut through rocks. For the next 1.9 miles the trail follows the ridge line and dips and rises and some impressive rock formations. The red Minisink Trail ends at this point at a junction with the white Lenape Ridge Trail. Turn left on the white trail to hike back along the southeastern side of the ridge. The trail begins to climb to the highest point on the ridge at 4.2 miles and some nice viewpoints to the south and east are found here. Another lookout is at 4.5 miles above Heinlein Pond. From here the tower at High Point is clearly visible. The trail now begins a long descent off the ridge until at 5.3 miles it ends at the red Minisink Trail. Turn right here and follow the trail back to where your car is parked.
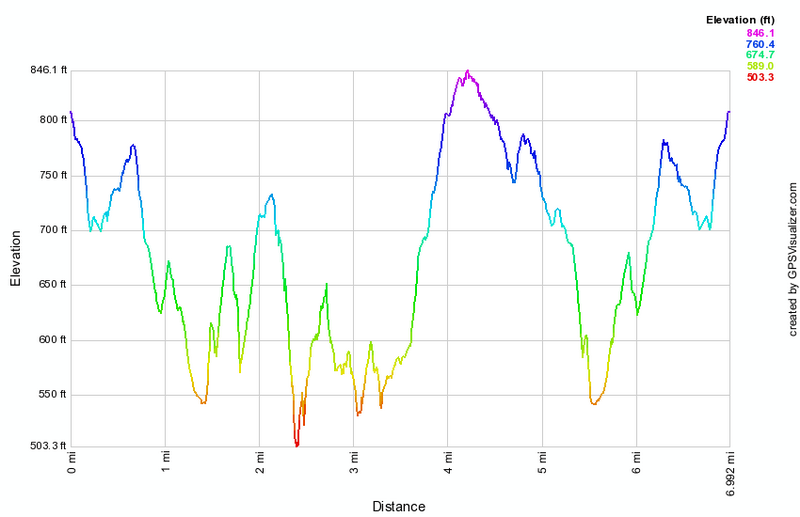
(The image at the left shows the profile of the hike. Remember that all vertical profiles are relative!)
Little Pond Loop
| Quick Look | ||||
|---|---|---|---|---|
| Difficulty | Round trip | Total climb | Internet Maps | |
| 2.8 mi. | 330 ft. | AllTrails | ||
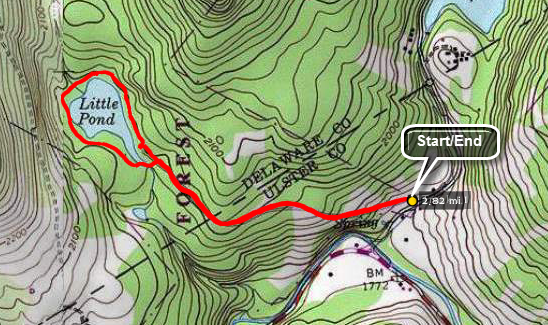 Take the Beaverkill Road from Livingston Manor and drive for about twenty minutes to the intersection
with Barkaboom Rd. Drive up the Barkaboom Rd and park near the start of the access road to Little Pond State Park. When the park is open, be careful not to block the entrance. During the winter, parking here is not a problem as long as it is plowed and you do not block the access for snow plowing. Walk up the access road and around the pond on the hiking trail in either direction. Walk back down the access road to the car.
Take the Beaverkill Road from Livingston Manor and drive for about twenty minutes to the intersection
with Barkaboom Rd. Drive up the Barkaboom Rd and park near the start of the access road to Little Pond State Park. When the park is open, be careful not to block the entrance. During the winter, parking here is not a problem as long as it is plowed and you do not block the access for snow plowing. Walk up the access road and around the pond on the hiking trail in either direction. Walk back down the access road to the car.
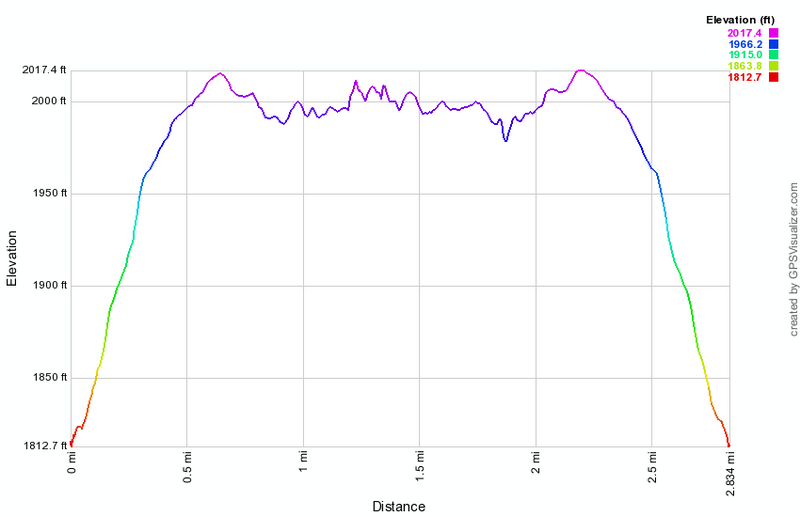 (The image below shows the profile of the hike. Remember that all vertical profiles are relative!)
Little Pond Loop Around Pond (from parking area)
| Quick Look | ||||
|---|---|---|---|---|
| Difficulty | Round trip | Total climb | Internet Maps | |
| .9 mi. | 65 ft. | AllTrails | ||
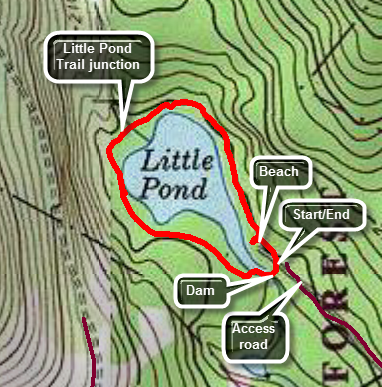 From Livingston Manor, NY drive north on Old RT 17 for 1.3 miles to the Beaverkill Road on the right. Turn right on the Beaverkill Road and drive 10.8 miles to the intersection with Barkaboom Road on the left. Drive up the Barkaboom Rd to the access road for Little Pond State Campgrounds on the left. Turn left and follow the access road to the gatehouse. Pay the day use fee and park in the parking area near the bathhouses. To start the hike walk toward the bathhouses to pick up the trail that runs along the eastern shore of the pond. This path is paved in places and covered with crushed stone the rest of the way. Continue to follow this path visiting the beach or lookout platform if you want. As you near the upper outlet end of the pond you will cross several bridges over some streams. You will also find the yellow blazed Little Pond Trail which turns to the right. Stay to the left and continue around the pond until the path turns slightly to the left and crosses the outlet dam. There is a nice view of the pond and Cabot Mountain from the walkway over the dam. Continue a little farther until you are back at your car. NOTE: When the campgrounds are closed, you may park at the bottom of the access road just off Barkaboom Road. This will add almost 2 miles to your hike. The road is a long uphill on the way in but all downhill on the return trip.
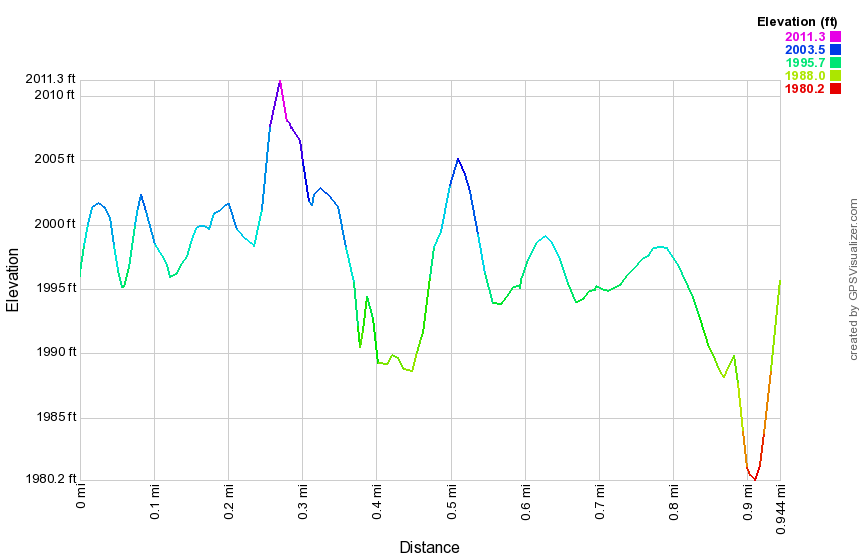 (The image below shows the profile of the hike. Remember that all vertical profiles are relative!)
Little Pond to Berry Brook Road
| Quick Look | ||||
|---|---|---|---|---|
| Difficulty | Round trip | Total climb | Internet Maps | |
| 10.4 mi. | 3150 ft. | AllTrails | ||
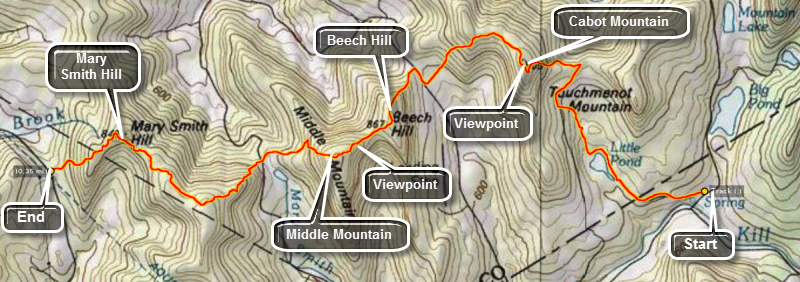 From Roscoe, drive north on Route 206 for about 3 miles. Turn right on Berry Brook/Holiday Brook Road and rive another 7.5 miles to the parking area for the Mary Smith Trail on the right. Leave one car here then drive to the end of the road and turn right on Route 30. When Route 30, turns left and crosses the bridge, turn right on the NYC roads. Drive about 2 miles and then turn right on Barkaboom Road. Drive almost to the end of Barkaboom Road to the access road for the Little Pond State Campsites. Park near the start of the access road to Little Pond State Campsites when the campsites are closed. When the campsites are open, drive up to the campsites, pay the fee and park in the lot.This description includes mileages from the beginning of the access road. Subtract 1 mile if you park in the parking area at the campsites.
From the bathrooms at the campsite walk on the loop trail on the north side of the lake to the head or inlet end of the lake. Turn right on the yellow Little Pond trail and walk 1.2 miles to the junction with the red Touch-Me-Not Trail. There is a nice viewpoint near the top of the Little Pond Trail. There is the foundation of an old house in this area and it seems this would be a beautiful spot to have a house although the access would be difficult! At the junction with the red Touch-Me-Not Trail turn left to climb Cabot Mountain. In the spring, summer and fall this climb is punctuated by nettles and prickers. In the winter, there is usually a lot of snow or a layer of thick ice. Eventually you will run out of "up" and you will be on the flat part of the trail that winds across the top of Cabot. At 3.6 miles there is a viewpoint on the left over Little Pond. You will have already gained 1150 feet from the car with the 480 feet over the last .5 miles on the climb up Cabot. The average grade in this climb is 25%!
Walk across the flat area on Cabot and then begin the first descent. After the first short descent, we walk across another flat area and then began the long, steep descent to Beech Hill Road. From the highest point on Cabot Mountain you will have hiked 1.25 miles and dropped 700 feet! You will now be 4.7 miles into the hike and should turn right and walk .2 miles on Beech Hill Road. Turn left on a private road and walk a short distance before turning left up the trail. You are now on the Middle Mountain Trail and climbing up Beech Hill. Many times on the hike you will climb to the "top" of a hill only to find that it is a false summit and there is more climbing to do. The walk up Beech Hill is like this with a little rise just before the actual summit. The walk from the private road to the summit of Beech Hill is about .6 miles and gains about 460 feet along the way. You will now descend Beech Hill so that you can ascend Middle Mountain! It is about .7 miles between the two summits but you drop 150 feet to then climb 280 feet to get to the top of Middle Mountain. At this point you will have hiked 6.25 miles and are ready for the descent down Middle Mountain to parking area on Mary Smith Hill Road. The descent down Middle Mountain is about 1 mile and you drop 730 feet to the parking area.
You are now ready to start the last section of the trail having already hiked 7.25 miles. The first .4 miles of the Mary Smith Trail averages a 24% grade gaining 480 feet. You will continue the climb to near the top of an unnamed hill that is higher than Mary Smith Hill. The trail actually never hits the top of this hill but travels along the north shoulder but still gets above 2900 feet. The summit of the hill is well over 2900 feet making it almost as high as Cabot and Middle Mountains! From the high point descend a little over 250 feet over the next mile to the base of Mary Smith Hill which is your last major climb. At about 9.3 miles you may want to stop at the Middle Mountain Lookout for some nice views.You will next hit the highest point of 2700 feet on Mary Smith Hill with only a downhill portion to complete the hike. At the bottom of the descent you are only .25 miles from the parking area. Although the drive back to your other car is annoying, at least you are driving and not walking!
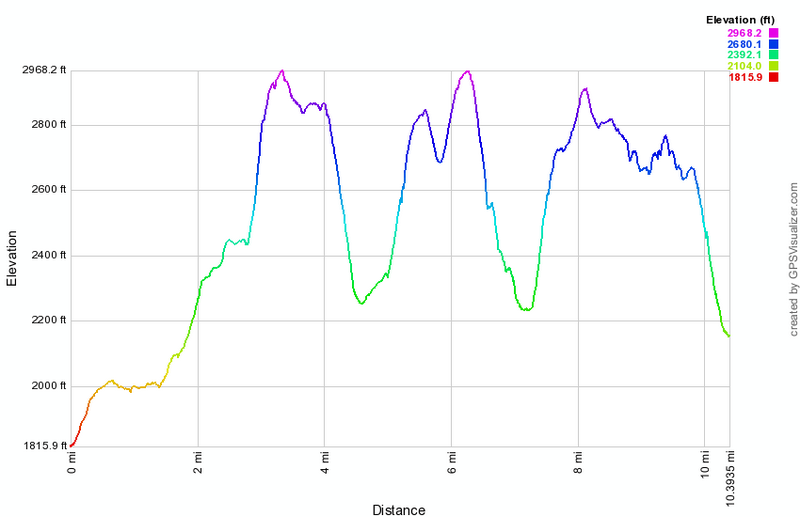 (The image at the left shows the profile of the hike. Remember that all vertical profiles are relative!)
Little Pond Vista Loop
| Quick Look | ||||
|---|---|---|---|---|
| Difficulty | Round trip | Total climb | Internet Maps | |
| 3.3 mi. | 830 ft. | AllTrails | ||
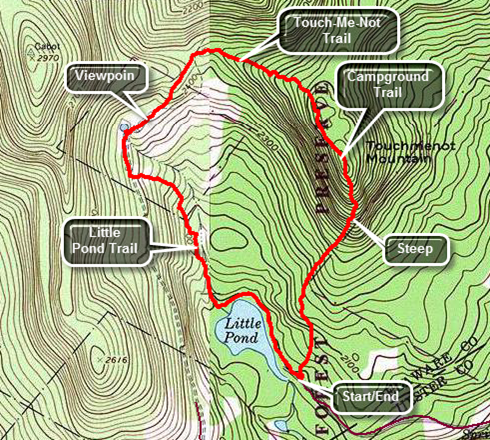 From Livingston Manor, drive toward on Old Route 17. Turn right on the Beaverkill Road and drive 10.5 miles to the Barkaboom Road. Bear left and in a few hundred feet turn left on the access road to Little Pond State Campgrounds. Drive to the gatehouse, pay the $6 day use fee and park in the parking area.
From the parking area walk passed the bathrooms at the campsite and walk on the loop trail on the east side of the lake to the head or inlet end of the lake. The walk is only .5 miles. Turn right on the yellow Little Pond Trail and walk 1.2 miles to the junction with the red Touch-Me-Not Trail. The Little Pond Trail opens into a filed at 1.3 miles. This is the site of an old homestead. There is a pond to the left of the trail and a little farther along a foundation. There is a nice viewpoint as the trail rises. At the junction with the red Touch-Me-Not Trail turn right and walk east .5 miles to the junction with the blue Campground Trail at 2.15 miles. The trail climbs 280 feet and there are several interesting passages over and between large rocks. At the trail junction bear right on the blue Campground Trail to return to the parking area. The trail gains a little elevation and then starts to descend. In about .8 miles the trail loses 780 feet averaging an 18% grade. Several areas are much steeper and care should be taken especially if the trail is wet or covered in ice or snow.
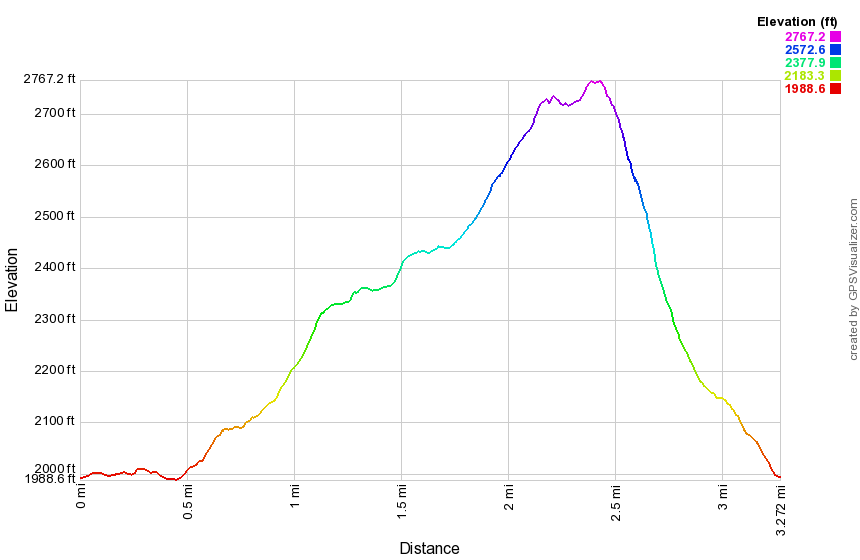 (The image at the left shows the profile of the hike. Remember that all vertical profiles are relative!)
Little Pond Vista Loop and Cabot Mountain
| Quick Look | ||||
|---|---|---|---|---|
| Difficulty | Round trip | Total climb | Internet Maps | |
| 4.6 mi. | 1405 ft. | AllTrails | ||
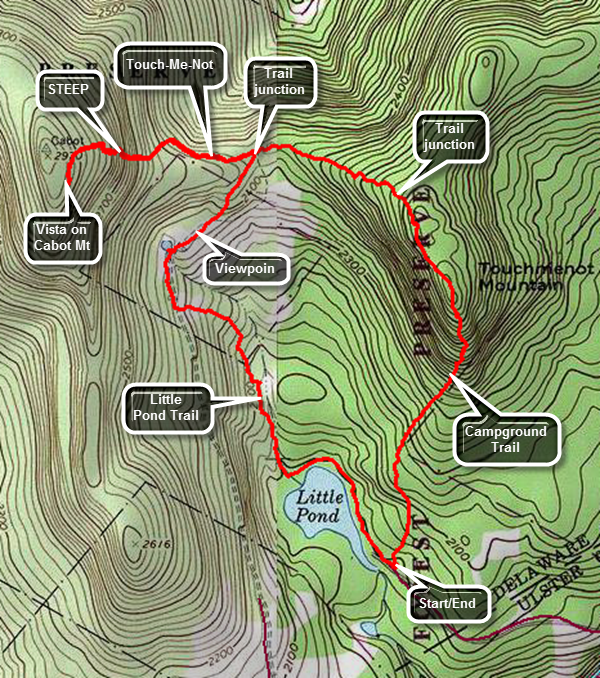 From Livingston Manor, drive toward on Old Route 17. Turn right on the Beaverkill Road and drive 10.5 miles to the Barkaboom Road. Bear left and in a few hundred feet turn left on the access road to Little Pond State Campgrounds. Drive to the gatehouse, pay the day use fee and park in the parking area.
From the parking area walk passed the bathrooms at the campsite and walk on the loop trail on the east side of the lake to the head or inlet end of the lake. The walk is only .5 miles. Turn right on the yellow Little Pond Trail and walk 1.3 miles to an area where the trail open out into a field with a nice view (vista) of the valley below and the surrounding hills. There is a small pond on the left and the foundation of an old farmhouse on the right. Continue to the junction with the red Touch-Me-Not Trail at 1.7 miles. At the junction with the red Touch-Me-Not Trail turn left and follow the red blazes to the base of Cabot Mountain. The climb up Cabot is very steep in places and there can be loose rock and dirt which makes the ascent more difficult. From the start of the climb to the end is only .3 miles but the elevation gain is 450 feet which means the ascent averages about 27%. Follow the red markers up through the rocks and across a more level space to the last short ascent. Walk the level area to the Beaverkill Vista. This rock outcrop gives a nice view of Little Pond below. After taking in the view retrace your steps back down the mountain to the trail junction.CAUTION: The return trip down the mountain can be more challenging than the climb! From the junction with the Little Pond Trail continue straight ahead to follow the Touch-Me-Not Trail for .5 miles to the junction with the blue Campground Trail at 3.5 miles. In this short distance the Touch-Me-Not Trail climbs 280 feet and you will find several interesting passages over and between large rocks. At the trail junction bear right on the blue Campground Trail to return to the parking area. The trail gains a little elevation and then starts to descend. In about .8 miles the trail loses 780 feet averaging an 18% grade. Several areas are much steeper and care should be taken especially if the trail is wet or covered in ice or snow. The trail exits the forest just behind the bathhouses and the parking lot where you left your car. NOTE: This route works equally well in reverse!
 (The image at the left shows the profile of the hike. Remember that all vertical profiles are relative!)
Long Path: Woodland Valley to Phoenicia
| Quick Look | ||||
|---|---|---|---|---|
| Difficulty | Round trip | Total climb | Internet Maps | |
| 7.1 mi. | 2180 ft. | AllTrails | ||
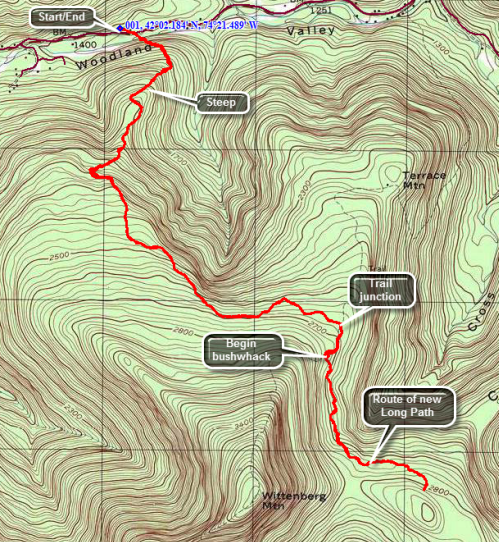 The Long Path currently extends from Fort Lee, NJ to John Thatcher park near Albany, NY. Plans exist to continue the trail north to Lake Placid. In someplace the trail contains long walks on public roads. Efforts are being made to relocate these sections to existing trails or to create new trails. The section represented here is not complete yet. It will extend from near the junction of the trail to Terrace Mountain on the Wittenberg Trail over Cross Mountain, Mount Pleasant, and Rohmer Mountain to Phoenicia.
Park at the Woodland Valley Campsites on Woodland Valley Road being sure to pay the parking fee during the season. Head across the road to the bridge that crosses the creek. Be ready for an immediate climb as you make your way up the trail to Wittenberg Mountain. Over the next 1.9 miles from the bridge you will gain almost 1400 feet before the trail begins to level off. Even after the trail is no longer climbing continuously there will be several ups and downs. At 2.5 miles you will be at the junction with the trail to Terrace Mountain and a lean-to to the left. Turn right and walk about .2 miles to a large tree across the trail which has been cut and the center section moved. Look into the woods on your left for orange flagging. Once the trail is completed it will extend out to the main trail and be prominently marked. Follow the flagging for as far as you like and then turn around. The flagging may change to pink in wetlands areas. Pink flagging may also lead to a trail crew camp. If you park a car at the other end of the trail you should be able to follow the flagging through to Route 28 near Phoenicia. This is a bushwhack for much of the way so be prepared with maps and compass. During the summer of 2013 you may meet crews from the trail conference who are working to complete this project by the fall of 2013.
 (The image at the left shows the profile of the out and back hike. Remember that all vertical profiles are relative!)
Long Pond: Basily Road from Flugertown Rd
| Quick Look | ||||
|---|---|---|---|---|
| Difficulty | Round trip | Total climb | Internet Maps | |
| 6.0 mi. | 578 ft. | AllTrails | ||
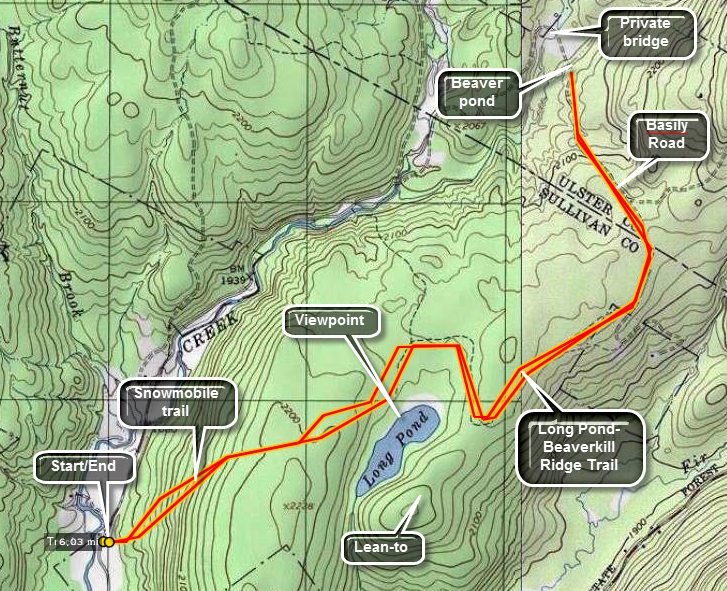 The area around Long Pond has several snowmobile trails that are ideal for hiking. They are wide and
well maintained being free from blow downs. I am looking forward to snow shoeing this area during the
winter. There are several options for longer or shorter hikes.
The area around Long Pond has several snowmobile trails that are ideal for hiking. They are wide and
well maintained being free from blow downs. I am looking forward to snow shoeing this area during the
winter. There are several options for longer or shorter hikes.
Take DeBruce Road from Livingston Manor for about nine miles then turn left on Flugertown Rd. just passed the hamlet of Willowemoc. The parking area for Long Pond is about 1 mile up on the right. The road is well paved. The first part of the trail is a short ascent. It looks a LOT steeper on the profile below than it really is! After about a mile, you can turn right and walked down to the pond. This is the nicest view of the pond that is right on the trail. Another .25 miles will bring you to a T. Left goes out to Flugertown Rd. and right leads to the lean-to and the other trails. If you like, turn right and walk about .65 miles to the lean-to. If you are so inclined, skip the lean-to and go straight ahead. After about a mile the trail intersect Basily Road. Turn left and follow the road. At the next intersection continue straight ahead and down a hill. Do NOT turn right as this leads toward Black Bear Road at Round Pond. After about half a mile you will be at the beaver pond. If the pond is low enough continue on and make a left onto Flugertown Road at the intersection. Follow this back to the parking area. If the pond is too high, turn around and retrace your steps to the car. Several variations are available.
 (The image at the left shows the profile of the hike. Remember that all vertical profiles are
relative! This trail does have a little climb at the beginning and a slight descent at the end but the
rest is almost flat!)
(The image at the left shows the profile of the hike. Remember that all vertical profiles are
relative! This trail does have a little climb at the beginning and a slight descent at the end but the
rest is almost flat!)
Long Pond: Basily Road to Flugertown Road Loop
| Quick Look | ||||
|---|---|---|---|---|
| Difficulty | Round trip | Total climb | Internet Maps | |
| 6.0 mi. | 597 ft. | AllTrails | ||
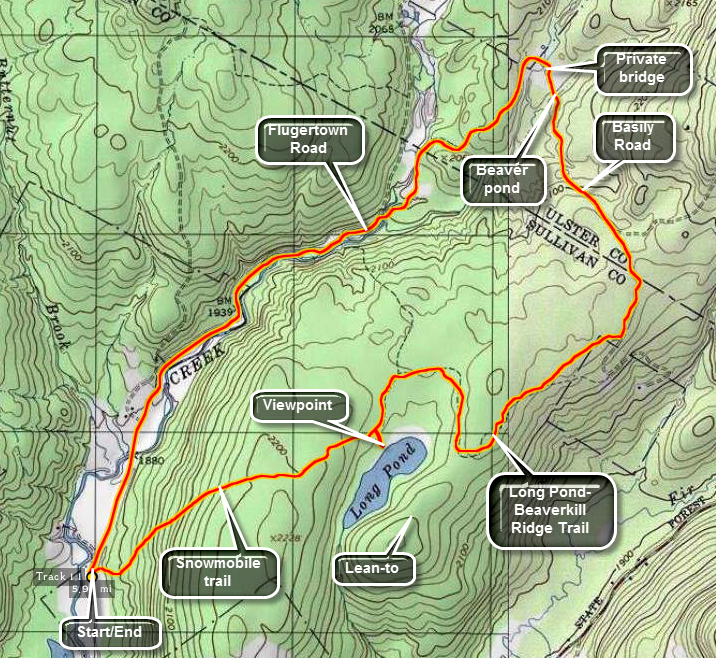 The area around Long Pond has several snowmobile trails that are ideal for hiking. They are wide and
well maintained being free from blow downs. There are several options for longer or shorter hikes.
The area around Long Pond has several snowmobile trails that are ideal for hiking. They are wide and
well maintained being free from blow downs. There are several options for longer or shorter hikes.
Take DeBruce Road from Livingston Manor for about nine miles then turn left on Flugertown Rd. just passed the hamlet of Willowemoc. The parking area for Long Pond is about 1 mile up on the right. The road is well paved. The first part of the trail is a short ascent. It looks a LOT steeper on the profile below than it really is! After about a mile, you can turn right and walked down to the pond. This is the nicest view of the pond that is right on the trail. Another .25 miles will bring you to a T. Left goes out to Flugertown Rd. and right leads to the lean-to and the other trails. If you like, turn right and walk about .65 miles to the lean-to. If you are so inclined, skip the lean-to and go straight ahead. After about a mile the trail intersect Basily Road. Turn left and follow the road. At the next intersection continue straight ahead and down a hill. So NOT turn right as this leads toward Black Bear Road at Round Pond. After about half a mile you will be at the beaver pond. Cross the shallow water here in any way you like. Walking across the dam may work. At this point you may well be on private land. Head for the bridge across the field. The bridge is actually private and you should cross at the "ford" just to the left of the bridge. The water here is a little wider and deeper than at the beaver pond! After crossing the creek. stay on Basily Road which at this point is unpaved. It is a little over two miles back to the parking area. Eventually Basily becomes Flugertown and the road is paved. Several pull-offs and small parking areas mark places where the snowmobile trails intersect the road.
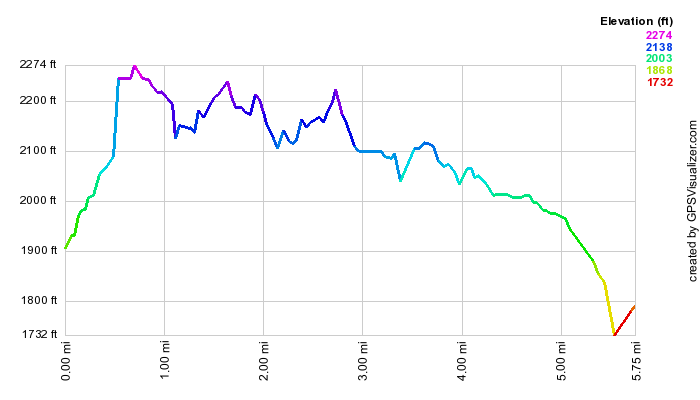 (The image at the left shows the profile of the hike. Remember that all vertical profiles are
relative! This trail does have a little climb at the beginning and a slight descent at the end but the
rest is almost flat!)
(The image at the left shows the profile of the hike. Remember that all vertical profiles are
relative! This trail does have a little climb at the beginning and a slight descent at the end but the
rest is almost flat!)
Long Pond: Figure 8 (road)
| Quick Look | ||||
|---|---|---|---|---|
| Difficulty | Round trip | Total climb | Internet Maps | |
| 7.2 mi. | 760 ft. | AllTrails | ||
 The area around Long Pond has several snowmobile trails that are ideal for hiking. They are wide and well maintained being free from blow downs. There are several options for longer or shorter hikes.
Take DeBruce Road from Livingston Manor for about nine miles then turn left on Flugertown Rd. just passed the hamlet of Willowemoc. The parking area for Long Pond is about 1 mile up on the right. The road is well paved. The first part of the hike is a road walk on Flugertown Road on a paved section for about .5 miles and then on a gravel road for another mile. After 1.5 miles, turn right on the trail which is, at first, marked as a snowmobile trail. Cross over a bridge and then another bridge before starting a short but steep climb. The trail heads south for about a half mile to a trail junction. The trail is often wet and muddy even in relatively dry weather. At the trail junction, turn left an follow the snowmobile trail. At 2.6 miles a trail to the right leads to a lean-to. Continue on the main trail until it meets a woods road at 3.3 miles. Turn left on Basily Road as it heads north before crossing a stream at 4.2 miles. The stream comes out of a beaver pond and is present all year round. At this point the route crosses private land belonging to the Peters Hunting Camp. It seems that the camp will allow most people to pass through their land but permission should be obtained from the owners. Continue on the road crossing the private bridge or fording Willowemoc Creek if it is low enough. Continue of the dirt and gravel road as it makes a sharp turn to the left, ascends briefly and the descends as it follows the creek heading southwest. At 5.25 miles, turn left on the snowmobile trail where you turned earlier. Again, cross the two bridges and climb the hill. At the trail junction at 5.9 miles, turn right on the trail heading southwest. After .2 miles, a short spur trail to the left leads down to the shores of Long Pond. Watch for red-winged blackbirds that frequent the pond. Return to the main trail and turn left continuing southwest. The trail rolls some but is mostly flat and can have wet and muddy spots. At 6.6 miles the trail begins a short but steep descent back to the parking area.
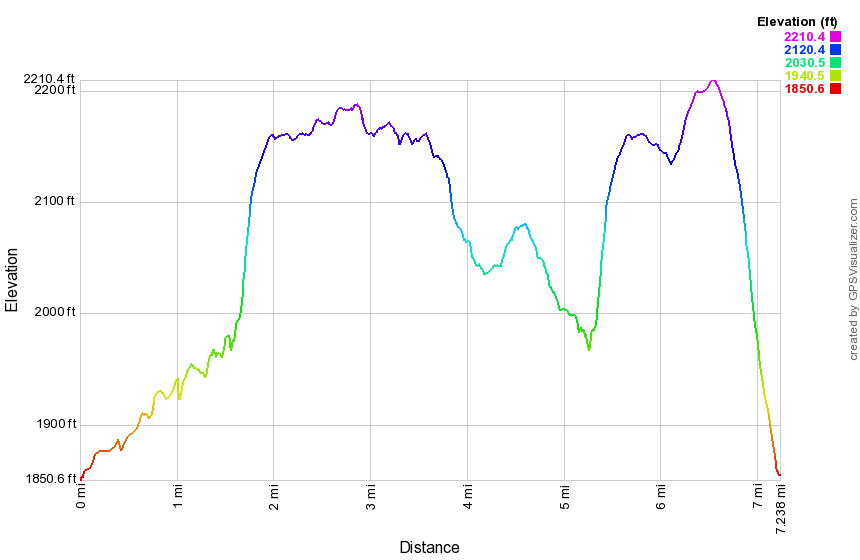 (The image at the left shows the profile of the hike. Remember that all vertical profiles are relative!)
Long Pond: Figure 8 (trail)
| Quick Look | ||||
|---|---|---|---|---|
| Difficulty | Round trip | Total climb | Internet Maps | |
| 7.2 mi. | 760 ft. | AllTrails | ||
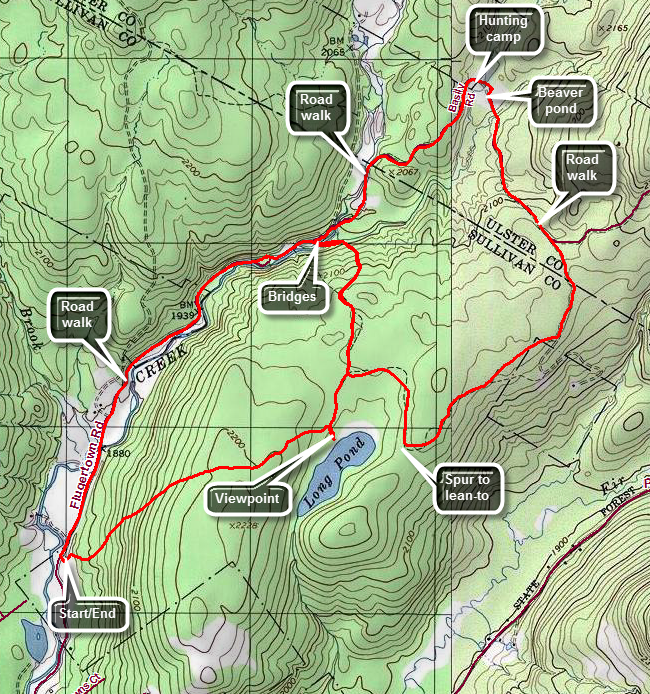 The area around Long Pond has several snowmobile trails that are ideal for hiking. They are wide and well maintained being free from blow downs. There are several options for longer or shorter hikes.
Take DeBruce Road from Livingston Manor for about nine miles then turn left on Flugertown Rd. just passed the hamlet of Willowemoc. The parking area for Long Pond is about 1 mile up on the right. The road is well paved. The first part of the trail is a short ascent. It looks a LOT steeper on the profile below than it really is! After about a mile, turn right and walk down to the pond. This is the nicest view of the pond that is right on the trail. Another .25 miles will bring you to a T at 1.3 miles. Turn left to hike out to the road as part of the figure 8 loops. This part of the trail is relatively flat and there usually are some large muddy areas along the way. At 1.6 miles the trail begins to descend to cross a long bridge across a stream. Continue on the trail crossing another ridge and arriving at Flugertown Road at 2.0 miles. Turn right and begin to hike toward Basily Road as it goes from pavement to dirt. The road gains a little elevation along the way it breaks out of the woods near the Peter's Hunting Camp. Continue on the road to where a private bridge crosses the stream. The hunting camp allows hikers to cross the bridge and their land as long as they stay on the trail. Skirt the edge of the tilled ground and fields and head toward the beaver pond. When the beavers have been at work and the road can be more of a stream than a road. Stay to the right and stay dry by using the small footbridge. Continue on the road on the other side to complete the upper loop. The road continues to gain elevation and at 3.6 miles stay to the right as Basily Road headed left to Wild Meadow Road. Shortly after this turn right into the woods on the snowmobile and hiking trail. This part of the trail is pretty flat which means that standing water causes some muddy areas. At 4.6 miles pass the spur trail on the left to the lean-to. Continue on the main trail passing areas where there is sometimes more mud. At 5.0 miles you will be back at the first trail junction where you started the figure 8 earlier. Turn right and again follow the trail toward Flugertown Road. Continue out to the road and turn left to head back to the car. The road goes from gravel to paved to well paved. At 7.15 miles turn left into the parking area.
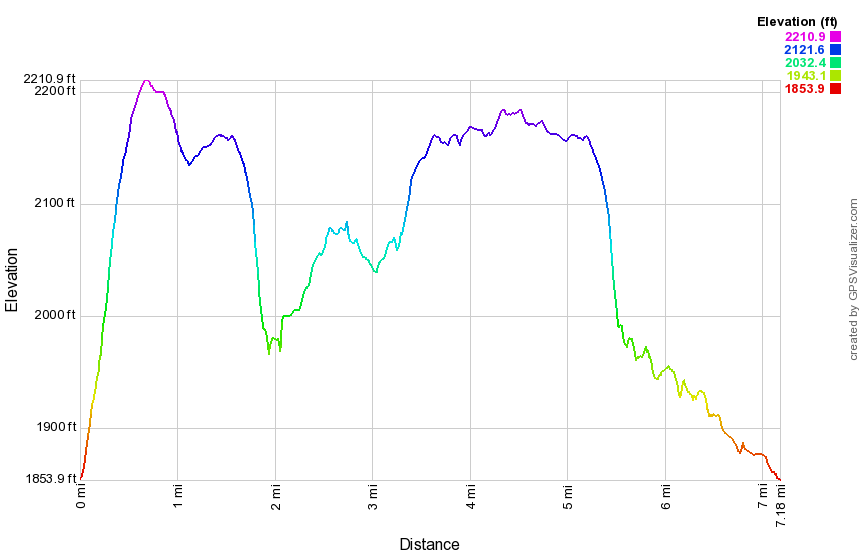 (The image at the left shows the profile of the hike. Remember that all vertical profiles are relative! This trail does have a little climb at the beginning and a slight descent at the end but the rest is almost flat!)
Long Pond: Flugertown Road to Basily Road Loop
| Quick Look | ||||
|---|---|---|---|---|
| Difficulty | Round trip | Total climb | Internet Maps | |
| 6.0 mi. | 562 ft. | AllTrails | ||
_map.png) The area around Long Pond has several snowmobile trails that are ideal for hiking. They are wide and
well maintained being free from blow downs. There are several options for longer or shorter hikes.
The area around Long Pond has several snowmobile trails that are ideal for hiking. They are wide and
well maintained being free from blow downs. There are several options for longer or shorter hikes.
Take DeBruce Road from Livingston Manor for about nine miles then turn left on Flugertown Rd. just passed the hamlet of Willowemoc. The parking area for Long Pond is about 1 mile up on the right. The road is well paved. Start by walking out of the parking area and turning right to head north on Flugertown Road passing by some open fields and some streams that cross the road. The road changes from pavement to gravel and at 1.6 miles a snowmobile trail to the right leads to Long Pond. In this same area the Willowemoc-Hardenburgh Trail meets the road. Continue on the road and at some point the name officially changes to Basily Road. At 2.4 miles the road descends and turns right to cross a creek on a private bridge near the Peter's hunting camp. The owners have opened the bridge to hiking and snowmobile traffic so please respect their property. Cross the field and head toward the swampy area and beaver pond on the other side. Around 3.1 miles Basily Road bears left but you should bear right on a snowmobile trail. A little further along at 3.5 miles a road continues straight ahead but you should follow the snowmobile trail by bearing to the right. A spur trail to the Long Pond lean-to branches to the left at 4.2 miles. You may visit the lean-to but there are no views. To get the best views of the pond turn left on an unmarked path at 4.8 miles and walk down to the shores of the pond. The north end of the pond has some of the oldest bogs in the Catskills approaching 14,000 years. During the spring and summer winged blackbirds can be seen in the reeds. Back on the main trail walk up a short hill and then down the hill to your car. This last 1.2 miles section goes quickly.
_gra.png) (The image at the left shows the profile of the hike. Remember that all vertical profiles are relative!)
(The image at the left shows the profile of the hike. Remember that all vertical profiles are relative!)
Long Pond: Black Bear to Flugertown
| Quick Look | ||||
|---|---|---|---|---|
| Difficulty | Round trip | Total climb | Internet Maps | |
| 4.9 mi. | 532ft. | AllTrails | ||
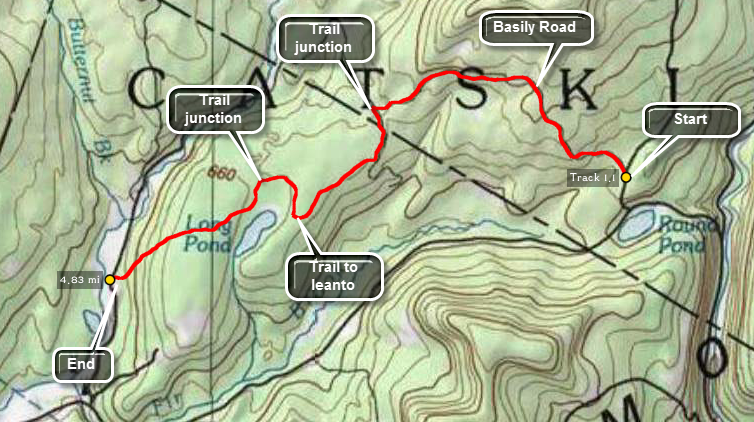 The area around Long Pond has several snowmobile trails that are ideal for hiking. They are wide and
well maintained being free from blow downs. There are several options for longer or shorter hikes.
The area around Long Pond has several snowmobile trails that are ideal for hiking. They are wide and
well maintained being free from blow downs. There are several options for longer or shorter hikes.
This hike requires two cars OR you make park a car at either end and double the mileage! Take DeBruce Road from Livingston Manor for about fourteen miles then turn left on Black Bear Rd. near Round Pond. The parking area is up the hill on the right. The first part of the hike is on Basily Road which is seasonally maintained. After about 1.15 miles the road turns into a woods road which is also a snowmobile trail. From this point on the walking is almost flat or downhill! At about 2 miles into the hike you will come to a T. Turn left at the T and the woods road become more of a trail. At 2.15 miles there is a spur trail to thee left that goes to the lean-to. At 3.55 miles there will be a trail junction. Bearing right will take you out to Flugertown Road and back to your car. Bear left and continue on the trail to the parking area on Flugertown Road.
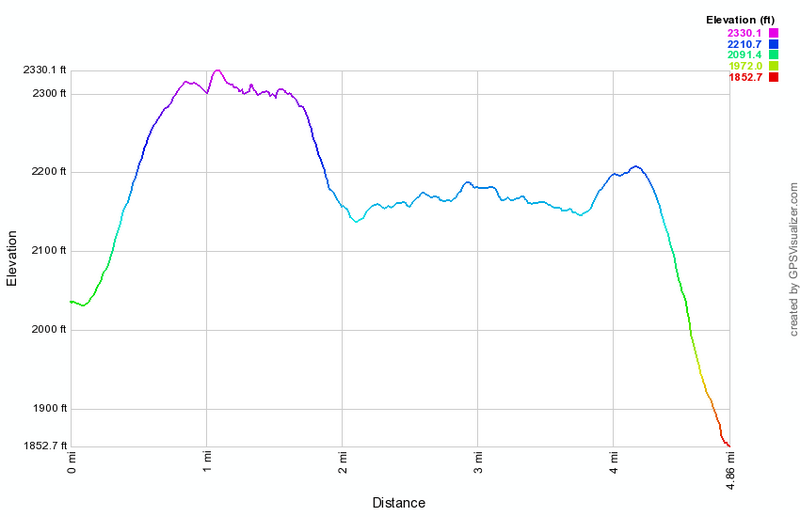 (The image at the left shows the profile of the hike. Remember that all vertical profiles are
relative! This trail does have a little climb at the beginning and a slight descent at the end but the
rest is almost flat!)
(The image at the left shows the profile of the hike. Remember that all vertical profiles are
relative! This trail does have a little climb at the beginning and a slight descent at the end but the
rest is almost flat!)
Long Pond: Flugertown Rd to Mongaup Pond Loop
| Quick Look | ||||
|---|---|---|---|---|
| Difficulty | Round trip | Total climb | Internet Maps | |
| 9.8 mi. | 2210 ft. | AllTrails | ||
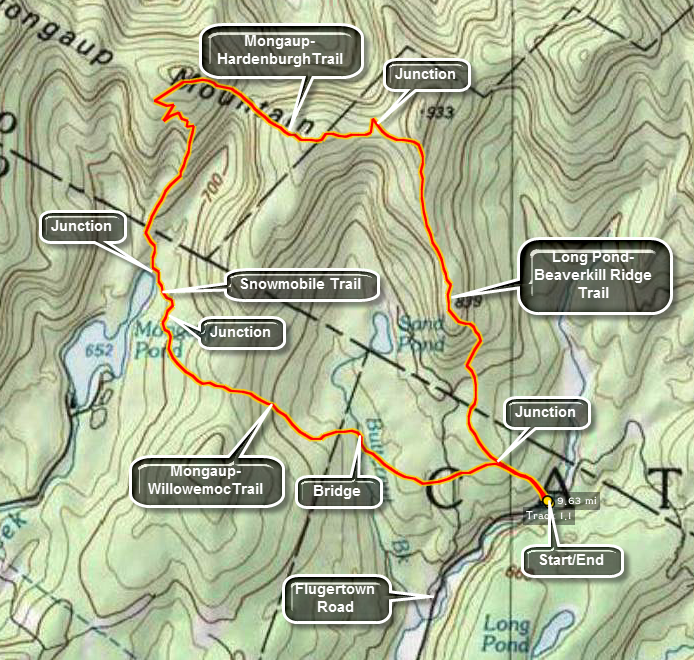 Take DeBruce Road from Livingston Manor for about nine miles then turn left on Flugertown Rd. just
passed the hamlet of Willowemoc. After 1.3 miles, the road turns to gravel. Go another 1.1 miles and park somewhere along the edge of the road. There are no formal parking areas here but there are enough areas to park a few cars. The trail begins on the left side of the road. Depending on where you parked, you may have to walk one way or the other to find the trail. The trail begins as a gradual uphill through some pine forest and after .5 miles the red marked Long Pond Beaverkill trail goes to the right and the yellow marked Mongaup Willowemoc trail heads left. The latter is the shorter way to Mongaup and by far the easier walk.
Take DeBruce Road from Livingston Manor for about nine miles then turn left on Flugertown Rd. just
passed the hamlet of Willowemoc. After 1.3 miles, the road turns to gravel. Go another 1.1 miles and park somewhere along the edge of the road. There are no formal parking areas here but there are enough areas to park a few cars. The trail begins on the left side of the road. Depending on where you parked, you may have to walk one way or the other to find the trail. The trail begins as a gradual uphill through some pine forest and after .5 miles the red marked Long Pond Beaverkill trail goes to the right and the yellow marked Mongaup Willowemoc trail heads left. The latter is the shorter way to Mongaup and by far the easier walk.
Turn right on the red marked trail. This trail wanders back and forth and up and down through hardwood forest and pine trees. Several areas are almost completely overgrown with briars making it slow going and difficult at times. There are a few areas of nettles. During wetter times the trail sports several muddy areas. About halfway up the trail to the Mongaup Hardenburgh Trail, you will pass Sand Pond on your right. You will never know it though since the trail has no views at all. The trail begins an ascent near its end to gain elevation to the Mongaup Ridge. After about 3 miles, the trail ends on the Mongaup Ridge at the blue marked Mongaup Hardenburgh Trail. Turn left here toward Mongaup Pond Campsites.
This trail is a little more used but the markers are few and far between. Also, there are several steep descents and ascents along the way as the trail ascends the various Mongaup Mountains. There are even several switchbacks! At 6.1 miles, the trail turns right at Mongaup Pond. Turn left here on the wide snowmobile trail. Cross four wooden bridges. After the fourth look for the well-marked yellow-blazed Mongaup Willowemoc Trail on your right. Turn here. This is also a snowmobile trail so it is wide and fairly well groomed with some blowdowns across the path in some areas. At abut 1.7 miles a large wooden bridge crosses Butternut Creek. This creek flows well even in drier weather and has some beautiful areas along its banks. From this point it is about 1.1 miles back to the junction with the Long Pond Beaverkill Trail. On the way several woods roads and trail cross the one you are on. Ignore these and stay on the yellow marked trail. At the trail junction, turn right and hike the .5 miles back to the car.
 (The image at the left shows the profile of the hike. Remember that all vertical profiles are
relative!)
(The image at the left shows the profile of the hike. Remember that all vertical profiles are
relative!)
Long Pond: Flugertown Rd to Mongaup Pond One Way
| Quick Look | ||||
|---|---|---|---|---|
| Difficulty | Round trip | Total climb | Internet Maps | |
| 8.6 mi. | 1800 ft. | AllTrails | ||
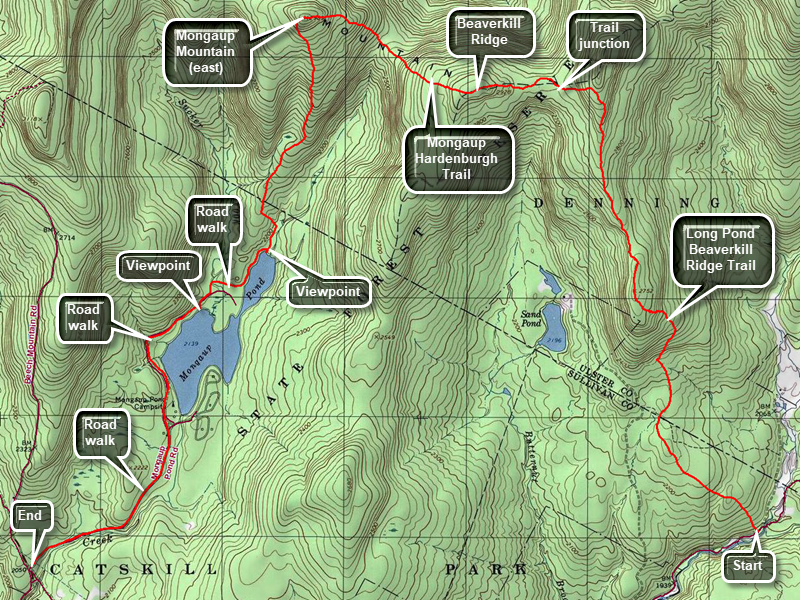 This route requires a car spot at Mongaup Pond and a drop off at Long Pond
Take DeBruce Road from Livingston Manor for six miles then turn left on Mongaup Road. Drive to where the road splits and stay right. Park one car on the right side of the road in the small pulloff. Drive back out to DeBruce Road, turn left and drive about 3 miles to Flugertown Rd. just passed the hamlet of Willowemoc and turn left. After 1.3 miles, the road turns to gravel. Go another 1.1 miles to where the Long Pond Beaverkill Ridge Trail meets the road on the left. Have your ride drop you here. The trail begins as a gradual uphill through some pine forest and after .5 miles the red marked Long Pond Beaverkill trail goes to the right and the yellow marked Mongaup Willowemoc trail heads left. The latter is the shorter way to Mongaup and by far the easier walk.
Turn right on the red marked trail. This trail wanders back and forth and up and down through hardwood forest and pine trees. Several areas are almost completely overgrown with briars and bush making it slow going and difficult at times. There are a few areas of nettles. During wetter times the trail sports several muddy areas. There may also be blowdowns along the way and the trail may be poorly marked. About halfway up the trail to the Mongaup Hardenburgh Trail, you will pass Sand Pond on your left. You will never know it though since the trail has no views at all. The trail begins an ascent near its end to gain elevation to the Beaverkill Ridge. After 2.9 miles, the trail ends on the Beaverkill Ridge at the blue marked Mongaup Hardenburgh Trail. Turn left here toward Mongaup Pond Campsites.
This trail is a little more used but the markers are few and far between. Also, there are several steep descents and ascents along the way as the trail ascends some bumps on the Beaverkill Ridge with the final ascent being the steepest up the easternmost Mongaup Mountain. At the top of the mountain the trail turns south and starts to descend to Mongaup Pond. There are even several switchbacks along the way! At 6.1 miles, the trail turns right at Mongaup Pond and continues out to the campground road. Turn right on the road and continue to follow the roads around the west side of the pond and out to the campground entrance. From here walk 1.1 miles out the access road to where you parked your car.
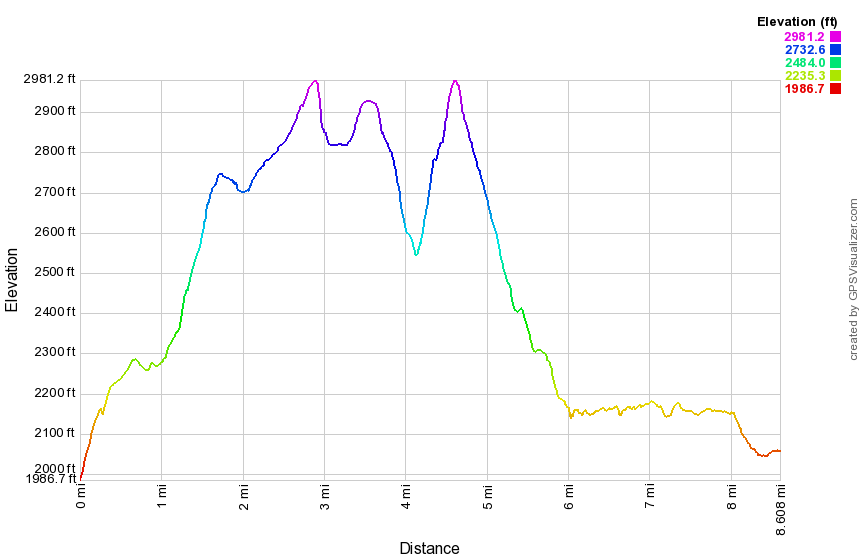 (The image at the left shows the profile of the hike. Remember that all vertical profiles are relative!)
Long Pond: Flugertown Rd to Mongaup Pond Loop (clockwise)
| Quick Look | ||||
|---|---|---|---|---|
| Difficulty | Round trip | Total climb | Internet Maps | |
| 9.8 mi. | 2225 ft. | AllTrails | ||
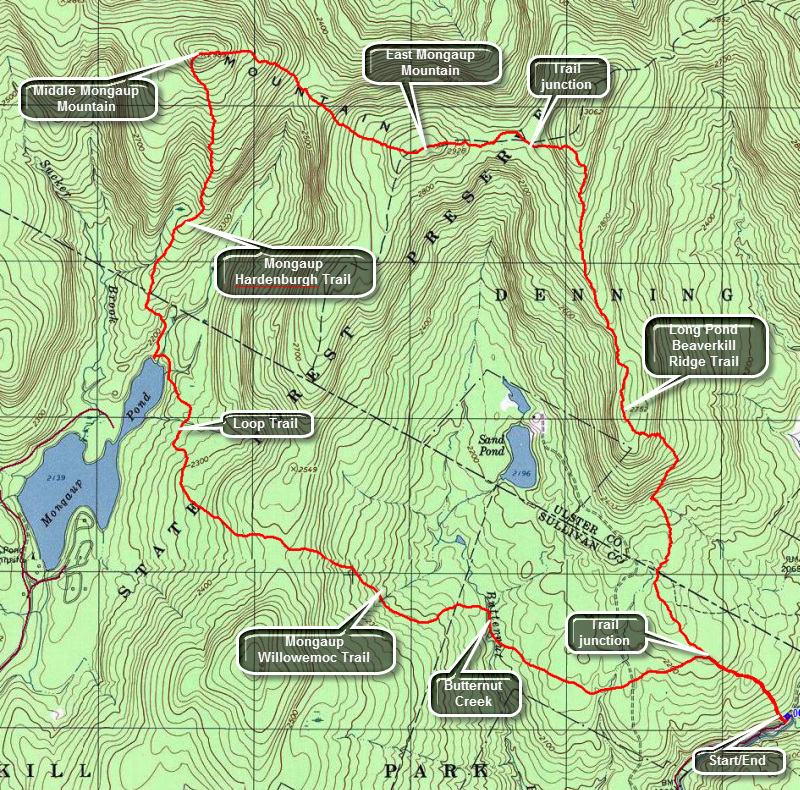 Take DeBruce Road from Livingston Manor for about nine miles then turn left on Flugertown Rd. just passed the hamlet of Willowemoc. After 1.3 miles, the road turns to gravel. Go another 1.1 miles and park somewhere along the edge of the road. There are no formal parking areas here but there are enough areas to park a few cars. The trail begins on the left side of the road. Depending on where you parked, you may have to walk one way or the other to find the trail. The trail begins as a gradual uphill through some pine forest and after .5 miles the red marked Long Pond Beaverkill Trail goes to the right and the yellow marked Mongaup Willowemoc trail heads left. The latter is the shorter way to Mongaup and by far the easier walk.
Turn left on the yellow marked trail. The hiking trail in this area is also a snowmobile trail so it is wide and well-maintained with no blowdowns to block your path. Soon you will cross the private road to Sand Pond and then hit a low point as you crossed Butternut Creek, the outlet to Sand Pond. Walk along the creek for a short distance and then cross one of the sturdy bridges at around 1.5 miles. After the creek, the trail begins an ascent of over 400 feet before descending to the shores of Mongaup Pond. There are some rocky sections along the way. A hike of 3.2 miles brings you to the trail around Mongaup Pond where you should turn right to head toward the upper end of the pond and the Mongaup Hardenburgh Trail. The trail around the pond is always wet and usually muddy in spots. After about .5 miles watch for the blue Mongaup Hardenburgh Trail on your right. The Mongaup Hardenburgh Trail ascends the Mongaup Mountains and the climb is interesting in spots. The first part of the trail to Middle Mongaup Mountain is well marked and maintained. For 1.5 miles the trail heads almost directly north gaining over 800 feet to the top of Middle Mongaup Mountain. There are some steep but short climbs along the way but at 5.1 miles you will be at the summit which is just under 3000 feet. When you start down the other side of the mountain and you may notice that the trail is less distinct, less well marked and that there are quite a few blowdowns on the trail. After descending over 400 feet and you will regain almost all of that to reach the top of East Mongaup Mountain at 6.2 miles. There is another short descent and ascent to get to the trail junction with the Long Pond Trail back to the car. At 6.9 miles look for the turn which has no sign and only some faded red markers. Once you turn onto the Long Pond Trail you may find that there had been little maintenance on the trail in some time. There are some major blockages and some areas have few markers to guide the way. Any area exposed to sun will have untamed prickers in a tangled mass across the trail. In several places the blowdowns and the poor marking combine to make the trail hard to follow. Some parts of the trail become more like a bushwhack! From trail junction to trail junction you drop 850 feet in 2.5 miles. When you hit the junction with the Mongaup Willowemoc Trail, turn left to descend the last .5 miles back to Flugertown Road.
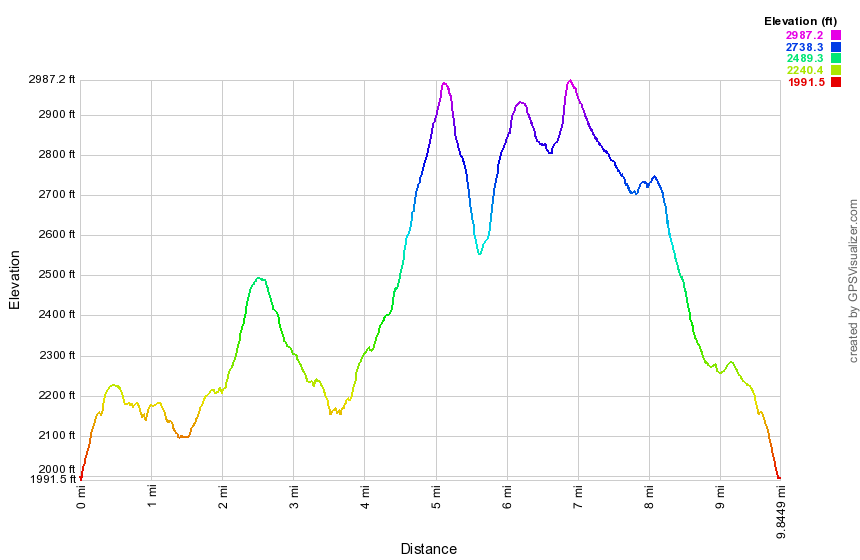 (The image at the left shows the profile of the hike. Remember that all vertical profiles are relative!)
Long Pond: Flugertown Rd to Round Pond
| Quick Look | ||||
|---|---|---|---|---|
| Difficulty | Round trip | Total climb | Internet Maps | |
| 10.4 mi. | 855 ft. | AllTrails | ||
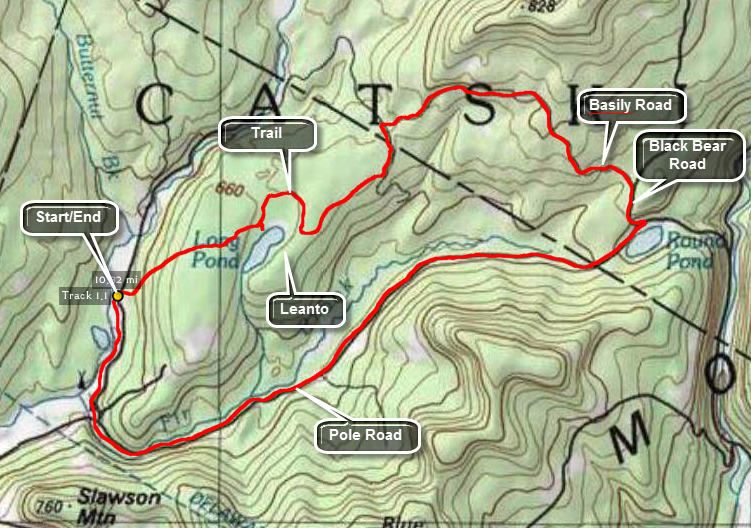 Take DeBruce Road from Livingston Manor for about nine miles then turn left on Flugertown Rd. just passed the hamlet of Willowemoc. Drive up the road and watch for the trailhead Parking area on the right. Get on the snowmobile and cross a bridge. The trail rises for the first .6 miles and then drops slightly until, at 1 mile there is a short side trail to the right. Walk down to Long Pond to see a small but pretty pond. The north end of the pond has some of the oldest bogs in the Catskills dating back 14,000 years to the time the last glacier receded. Back on the main trail walk another .2 miles to the junction with the red Long Pond-Beaverkill Range Trail. The trail flattens out and at 2.5 miles the trail meets a woods road. Around 2.9 Niles the trail turns right as it meets Basily Road. The trail on Basily Road rises slightly and then, at .3 miles, begins a serious drop down to a trail head on Black Bear (Wild Meadow) Road. At the road make a right and continue down to Pole Road at 5.4 miles. Turn right on Pole Road and begin a long 4.1 mile walk back to Flugertown Road. Turn right on Flugertown Road and walk .85 miles back to the car.
 (The image at the left shows the profile of the hike. Remember that all vertical profiles are
relative!)
(The image at the left shows the profile of the hike. Remember that all vertical profiles are
relative!)
Long Pond: Flugertown Rd
| Quick Look | ||||
|---|---|---|---|---|
| Difficulty | Round trip | Total climb | Internet Maps | |
| 5.0 mi. | 476 ft. | AllTrails | ||
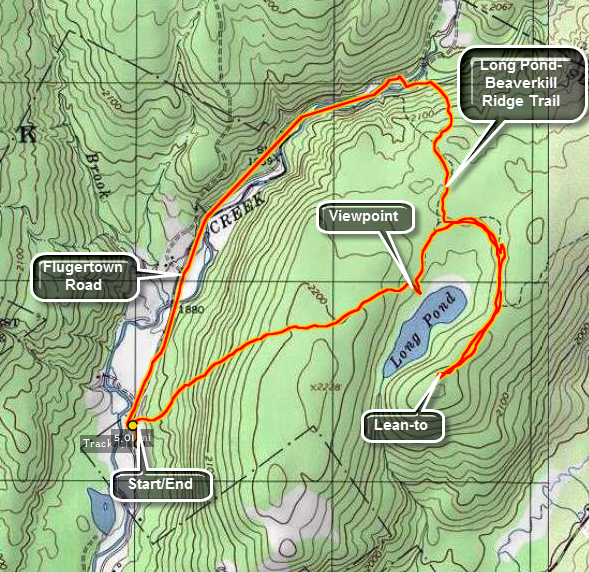 The area around Long Pond has several snowmobile trails that are ideal for hiking. They are wide and
well maintained being free from blow downs. I am looking forward to snow shoeing this area during the
winter. There are several options for longer or shorter hikes.
The area around Long Pond has several snowmobile trails that are ideal for hiking. They are wide and
well maintained being free from blow downs. I am looking forward to snow shoeing this area during the
winter. There are several options for longer or shorter hikes.
Take DeBruce Road from Livingston Manor for about nine miles then turn left on Flugertown Rd. just
passed the hamlet of Willowemoc. The parking area for Long Pond is about 1 mile up on the right. The
road is well paved. The first part of the trail is a short ascent. It looks a LOT steeper on the
profile below than it really is! After about a mile, you can turn right and walked down to the pond.
This is the nicest view of the pond that is right on the trail. Another .25 miles will bring you to
a T. Left goes out to Flugertown Rd. and right leads to the lean-to and the other trails. Turn right
and walk about .65 miles to the lean-to. Be sure to make the turn onto the spur trail to the lean-to.
It is clearly marked but missing it leads to a VERY long walk. After the lean-to, retrace your steps to
the T and continue straight ahead for about .6 miles to the road. The trail winds some but is well marked
and is downhill all the way. Take a left on Flugertown Rd. and walk the 1.5 miles back to the car.
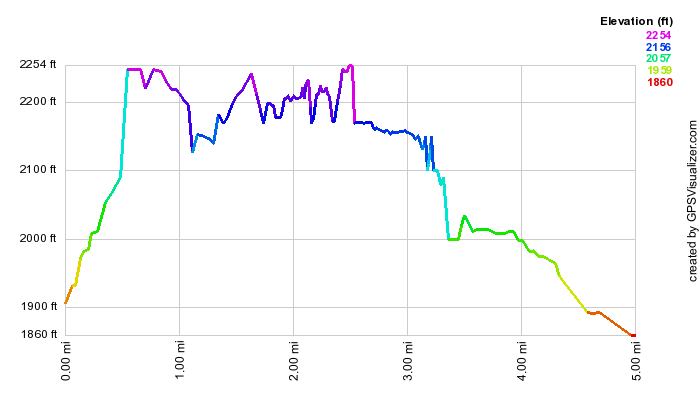
(The image at the left shows the profile of the hike. Remember that all vertical profiles are relative! This trail does have a little climb at the beginning and a slight descent at the end but the rest is almost flat!)
Long Pond: Lollipop Loop
| Quick Look | ||||
|---|---|---|---|---|
| Difficulty | Round trip | Total climb | Internet Maps | |
| 6.3 mi. | 770 ft. | AllTrails | ||
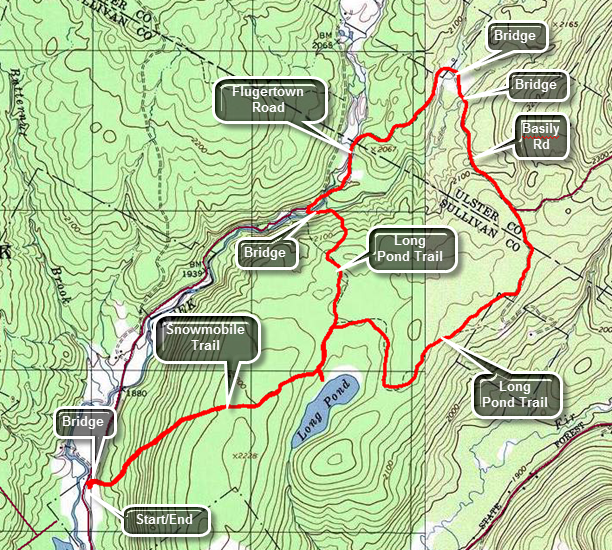 The area around Long Pond has several snowmobile trails that are ideal for hiking. They are wide and well maintained being free from blow downs. Snowshoeing during the winter is a pleasure since the trail are well packed in most places. There are several options for longer or shorter hikes.
Take DeBruce Road from Livingston Manor for about nine miles then turn left on Flugertown Road just passed the hamlet of Willowemoc. The parking area for Long Pond is about 1 mile up on the right. The road is well paved to this point but not far beyond there is a "Seasonal Maintenance" sign. The first part of the trail is a short ascent. It looks a LOT steeper on the
profile below than it really is! After about a mile, you can turn right and walked down to the pond. This is the nicest view of the pond that is right on the trail. Another .25 miles will bring you to a T trail junction. Turn left and walk north toward the road. The trail descends almost 200 feet along the way which means some more uphills on the return trip. Descend to the bridges across the streams and follow one of the paths out to Flugertown Road. During the winter the road will be covered in ice and snow. In the other seasons it is a dirt and gravel road with a few pullouts to park your car. Turn right to start the loop part of the hike. In the next .75 miles gain a little over 100 feet until you are at a spot on the road overlooking the Peters Hunting Camp. The hunting camp is private property but they generously allow hikers and snowmobilers to use their bridge and cross their property. Be respectful of their land so that they will continue to allow this privilege. Continue down the road and cross the bridge changing direction from northeast to almost due south. A little further on, cross a small bridge over the outlet of a beaver pond. At 3.6 miles the road splits with Basily Road heading left toward Wild Meadow Road and Round Pond. Head right to continue on Basily Road. At the 4 mile point turn right following the Long Pond Trail that completes the loop and takes you back to the parking area. Continue to hike southwest and at 4.6 miles pass the trail to the lean-to on the left. At 5.1 miles you will complete the loop by arriving at the trail junction where you turned to start the loop. All that remains is to hike back to the car by reversing your route from earlier. Hike uphill a little passing the turn to Long Pond and at 5.7 miles reach the top of the descent back to the parking area. Hike another .6 miles back to the car.
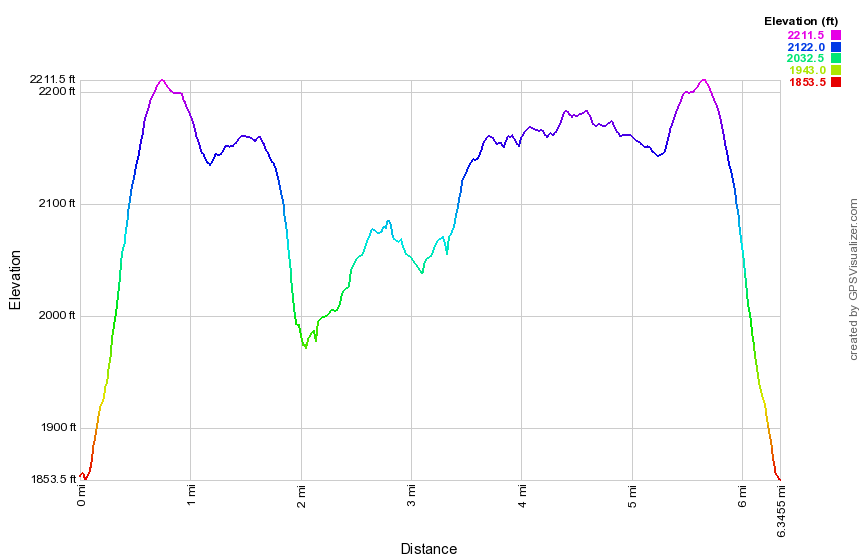 (The image shows the profile of the hike. Remember that all vertical profiles are relative! This trail does have a little climb at the beginning and the a descent of the same hill at the end!)
Long Pond: Long Pond Beaverkill Ridge Trail (Out and Back)
| Quick Look | ||||
|---|---|---|---|---|
| Difficulty | Round trip | Total climb | Internet Maps | |
| 6.1 mi. | 1180 ft. | AllTrails | ||
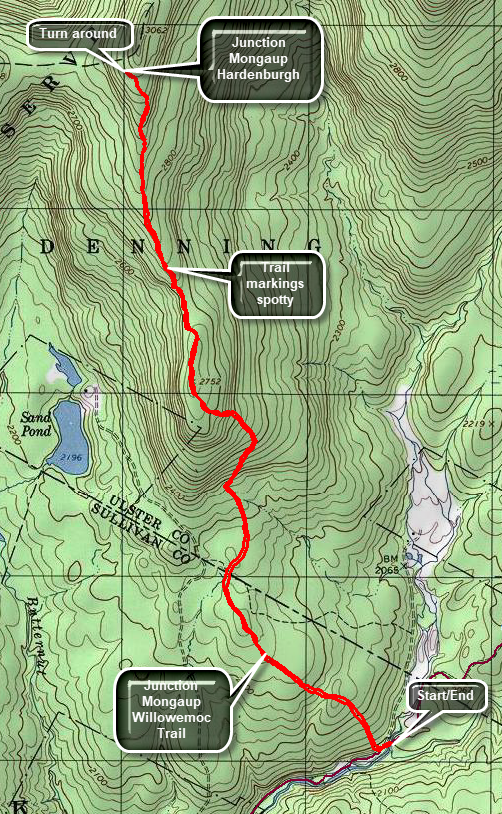 The area around Long Pond has several snowmobile trails that are ideal for hiking. They are wide and well maintained being free from blow downs. Snowshoeing during the winter is a pleasure since the trail are well packed in most places. There are several options for longer or shorter hikes.
Take DeBruce Road from Livingston Manor for about nine miles then turn left on Flugertown Road just passed the hamlet of Willowemoc. Drive 2.4 miles on Flugertown Road. After crossing a small bridge, park in one of the spots on the right of the road. To begin the hike, walk back down the road a few hundred feet and turn right on the trail. The trail climbs a little and then descends only to climb again to the trail junction at .4 miles. At .4 miles turn right to stay on the Long Pond-Beaverkill Ridge Trail. The red trail markers can be hard to find at times as the trail is not used as often as others. At 1.25 miles the rail turns right along the base of the ridge. Shortly after this the trail crosses from the Willowemoc Wild Forest into the Big Indian Wilderness but, more importantly, it begin to climb. Over the next .5 miles it gains 400 feet with an average of a 15% grade. At 1.6 miles the trail turns almost due west and then at 1.7 miles it heads north. At 1.8 miles the trail hits a high point and starts a little descent to 2.1 miles where it starts to climb again. Over the next .8 miles the trail continues to ascend always heading north. The grade averages only 6% but the walk can seem long. After 3 miles the trail ends at the junction with the Mongaup Hardenburgh Trail. To finish the hike, turn around and retrace your steps. Be careful on the descents which can be steep in places with some loose rocks.
 (The image shows the profile of the hike. Remember that all vertical profiles are relative! This trail does have a little climb at the beginning and the a descent of the same hill at the end!)
Long Pond: Out and Back
| Quick Look | ||||
|---|---|---|---|---|
| Difficulty | Round trip | Total climb | Internet Maps | |
| 2.3 mi. | 430 ft. | AllTrails | ||
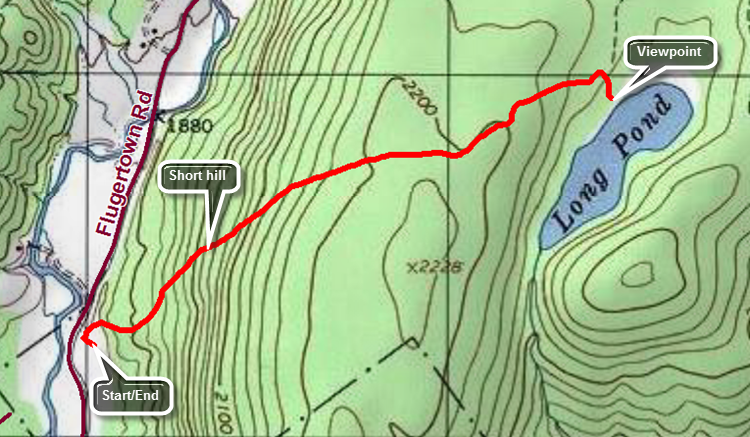 The area around Long Pond has several snowmobile trails that are ideal for hiking. They are wide and well maintained being free from blow downs. Snowshoeing during the winter is a pleasure since the trail are well packed in most places. There are several options for longer or shorter hikes.
Take DeBruce Road from Livingston Manor for about nine miles then turn left on Flugertown Road just passed the hamlet of Willowemoc. The parking area for Long Pond is about 1 mile up on the right. The road is well paved to this point but not far beyond there is a "Seasonal Maintenance" sign. Start the hike by walking over the bridge and up the hill on the snowmobile and hiking trail. The first part of the trail is a short ascent. It looks a LOT steeper on the profile below than it really is! After about a mile, turn right and walk down to the pond. This is the nicest view of the pond that is right on the trail. When you are done, walk back up to the main trail and turn left. Retrace your steps to the car enjoying the long downhill!
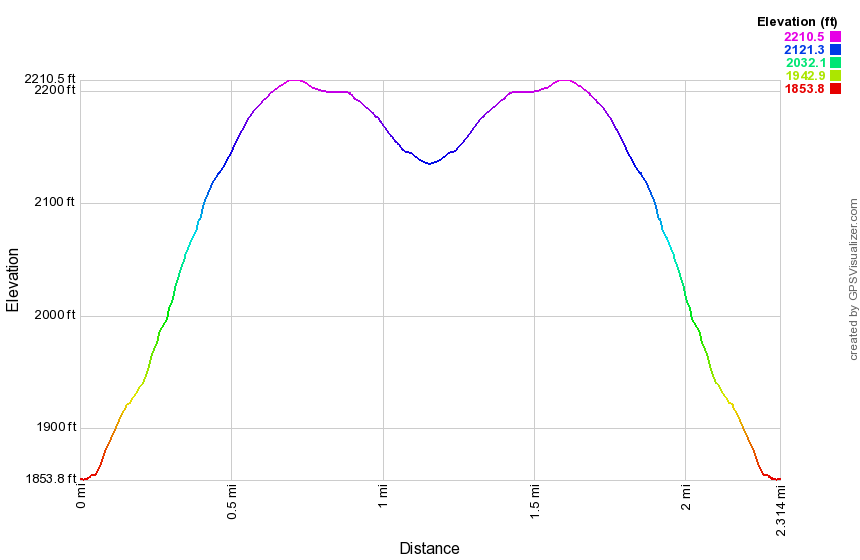 (The image shows the profile of the hike. Remember that all vertical profiles are relative!)
Long Pond: Short Loop
| Quick Look | ||||
|---|---|---|---|---|
| Difficulty | Round trip | Total climb | Internet Maps | |
| 3.5 mi. | 405 ft. | AllTrails | ||
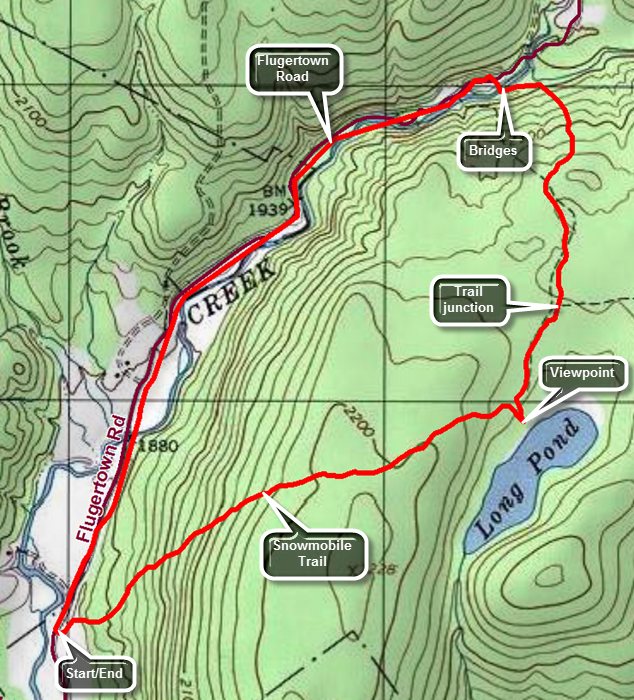 The area around Long Pond has several snowmobile trails that are ideal for hiking. They are wide and well maintained being free from blow downs. Snowshoeing during the winter is a pleasure since the trail are well packed in most places. There are several options for longer or shorter hikes.
Take DeBruce Road from Livingston Manor for about nine miles then turn left on Flugertown Road just passed the hamlet of Willowemoc. The parking area for Long Pond is about 1 mile up on the right. The road is well paved to this point but not far beyond there is a "Seasonal Maintenance" sign. Start the hike by walking over the bridge and up the hill on the snowmobile and hiking trail. The first part of the trail is a short ascent. It looks a LOT steeper on the profile below than it really is! After about a mile, turn right and walk down to the pond. This is the nicest view of the pond that is right on the trail. Another .25 miles will bring you to a T trail junction. Turn left and walk north toward the road. The trail descends almost 200 feet along the way. Descend to the bridges across the streams and follow one of the paths out to Flugertown Road. During the winter the road will be covered in ice and snow. In the other seasons it is a dirt and gravel road with a few pullouts to park cars. Turn left to start the loop back to the parking area. Since the road is lightly traveled it is almost like walking on a nice flat trail but watch out for the occasional car. The walk back along the road is a little more than 1.5 miles and goes very quickly.
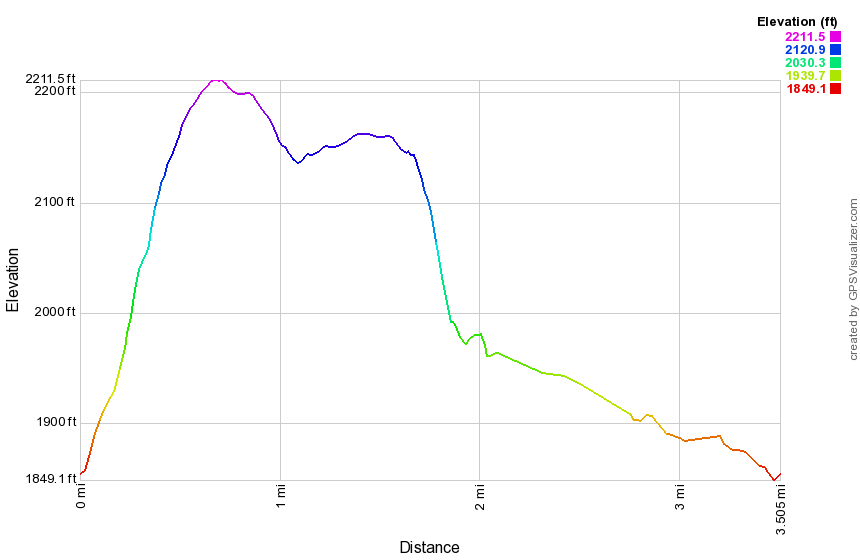 (The image shows the profile of the hike. Remember that all vertical profiles are relative!)
Long Pond Ironworks
| Quick Look | ||||
|---|---|---|---|---|
| Difficulty | Round trip | Total climb | Internet Maps | |
| 4.4 mi. | 745 ft. | AllTrails | ||
 This trail in Hewitt, New Jersey traces the Hansclever Iron Trail near the Monksville Reservoir. It is rich in history.
Take the Greenwood Lake Turnpike east from the intersection with Lakeside Road at the south end of Greenwood Lake. Drive a little more than three miles east and park at the visitor's center for the Long Pond Iron works. There are some groomed paths to the left of the visitor's center that wander between some historic building. Watch for thee blue blazes of the Sterling Ridge Trail which runs in conjunction with the Highlands Trail. At about .45 miles the trail turns right and crosses the Wanaque Reservoir on a bridge. Before making the turn be sure to inspect the ruins of the iron furnaces that dates back to the American Revolution! When you cross the river bear to the right on the yellow Hasenclever Iron Trail. This trail follows one of the routes used to transport iron ore from the mines to the furnace. Along the trail you will find placards explaining some of the historic spots. At abbot miles you will walk1 up a hill and a woods road turns to the left. Make the turn and continue northwest on the road until about 2.5 miles. In this Rae you will find the Patterson Mine. Watch for "rusty" rocks which are the tailing from the mines. There will be one or two shallow pits on the left of the road. On the right side of the road there are two or three deeper pits and a trench. Be careful around these since they are often filled with water and the sides are unstable. Back on the road continue to walk downhill until 2.8 miles when the woods road meets the Sterling Ridge Trail. Turn left on the trail to get back to the parking area. Along the way the trail parallels the Wanaque River which is a popular swimming area.
 (The image at the left shows the profile of the hike. Remember that all vertical profiles are relative!)
Loyalsock Trail: Smith's Knob
| Quick Look | ||||
|---|---|---|---|---|
| Difficulty | Round trip | Total climb | Internet Maps | |
| 4.7 mi. | 1482 ft. | AllTrails | ||
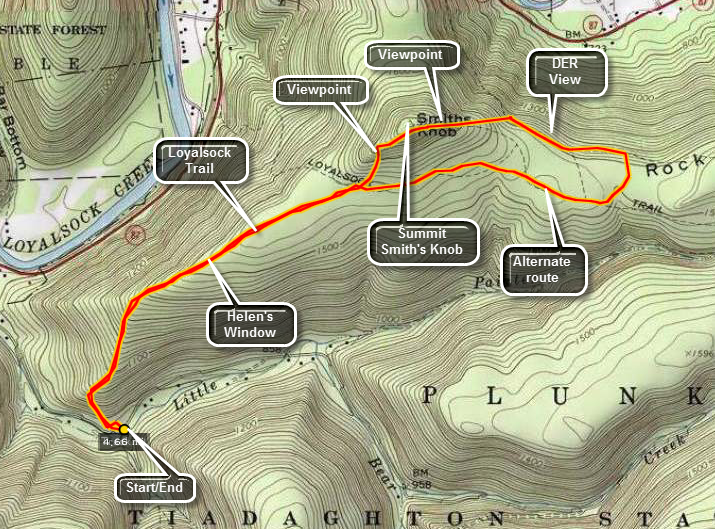 The Loyalsock Trail is a 59.3 mile trail in north central Pennsylvania in Lycoming and Sullivan counties . It stretching from the western trailhead just north of Montoursville to the eastern trailhead just north of LaPorte. It is well maintained by the Alpine Club Of Williamsport and is well marked with a distinctive yellow LT on a red can lid. The trail passes through main different geological and ecological areas and each is as interesting as the next. The hike described here starts near the western trailhead and takes and out and back and loop route to Smith's Knob.
Get on Route 87 going north from Williamsport. At between 9 and 10 miles the trailhead for the start of the Loyalsock Trail will appear as a pulloff on Route 87. Just passed this pull off is Little Bear Creek Road on the right. Turn onto this road and in less than 1 mile you will see a sign on the left for the Loyalsock trail to Smith's Knob. Just passed the bridge to the maintenance barns and across from the ranger's house is a pull off for several cars. Park here and then walk back down the road to the sign. Turn right up the hill, sign in at the register and begin your hike.
The first part of this hike is a long uphill with only a few places to catch your breath. At about .7 miles there is a viewpoint called Helen's Window that exposes a long, straight section of Loyalsock Creek. The trail continues until about 1.6 miles when it turns right onto an old woods road. This continues for about .1 miles where the trail turns left and begins a steep assault on Smith's Knob. At this point an alternate route continues straight ahead and is marked with a red X on a yellow background.
After climbing the short but steep slope the trail turns right toward the top of Smith's Knob. Near the pond on the right is a view to the right of the trail. There is no real view from the top but continue to walk east on the trail. When the trail begins to descend walk off the trail toward the obvious viewpoint to the left. This lookout offers beautiful views up and down Loyalsock Creek. At this point you may return the way you came or continue on the trail to complete the loop.
The descent on the other side of Smith's Knob is steep and eroded with several switchbacks. A little further along the trail is another Lookout called the DER View. This lookout offers more views up and down Loyalsock Creek and Loyalsock Valley. Continue on the trail being sure to stay on the marked LT trail. Be on the lookout for the trail marked by the red X's. This will be a sharp right turn and may have a NO HORSES sign marking it. This alternate route is not as well traveled as the main trail. There are several blowdowns and the markings are spread out further. This trail meets a woods road and travels along it for a short distance. Soon the road turns left and the trail bears right. In only a short distance the trail leads back to the junction with the main trail where the main trail turned up Smith' Knob. Follow the main trail back to your car.
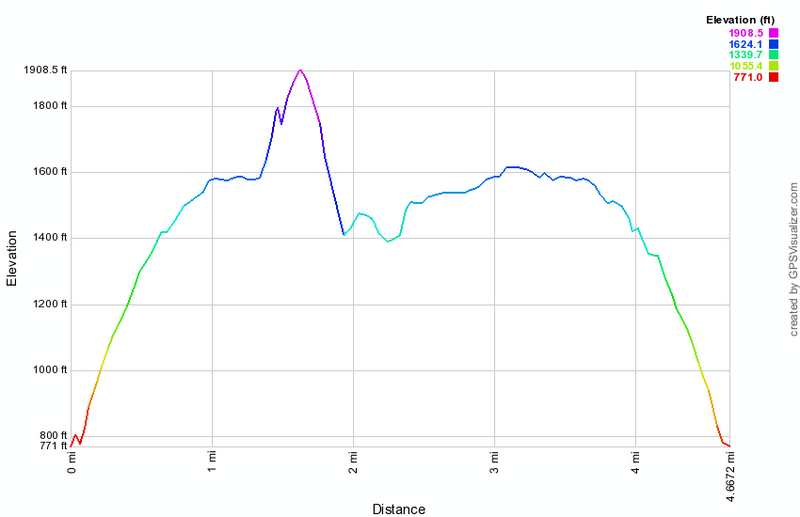 (The image at the left shows the profile of the hike. Remember that all vertical profiles are
relative!)
(The image at the left shows the profile of the hike. Remember that all vertical profiles are
relative!)
Loyalsock Trail: Sock Rock
| Quick Look | ||||
|---|---|---|---|---|
| Difficulty | Round trip | Total climb | Internet Maps | |
| 6.2 mi. | 1460 ft. | AllTrails | ||
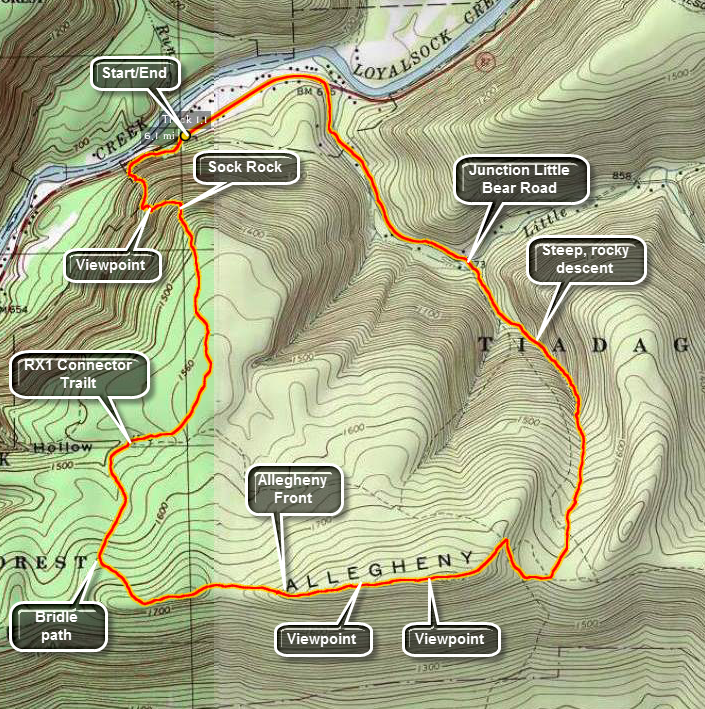 The Loyalsock Trail is a 59.3 mile trail in north central Pennsylvania in Lycoming and Sullivan counties . It stretches from the western trailhead just north of Montoursville to the eastern trailhead just north of LaPorte. It is well maintained by the Alpine Club Of Williamsport and is well marked with a distinctive red LT on a yellow plastic. Each mile from the beginning of the trail is also denoted at the closest markers. The trail passes through main different geological and ecological areas and each is as interesting as the next. The hike described here starts at the western trailhead and is a loop that includes the Allegheny Front. This first part of the trail takes in Sock Rock and has some great views especially when there are fewer leaves on the trees
Get on Route 87 going north from Williamsport. At between 8 and 9 miles the trailhead for the start of the Loyalsock Trail will appear as a pulloff on Route 87. Pull off and park here. The hike is STEEP right from the start giving you no chance to "warm up". After .4 miles the trail turns right as it meets an old woods road and there is a brief respite. Almost immediately the trail turns left off the road and up the ridge. A little further up the trail is a limited lookout on the right side of the trail. The overall .6 mile section to Sock Rock is an average of a 29% grade! There are some impressive ledges along the way but Sock Rock itself doesn't look much like a sock and there are no views! The trail turns right after Sock Rock but continues to climb steeply for another .25 miles. After the climb, the level part of the trail is welcome! At 1.55 miles the Red X-1 trail crosses. The Red X trails connect different parts of the Loyalsock Trail in different areas acting as shortcuts. There are eleven of them in all and can be interesting adventures in their own right. All, true to their name, are marked with red X's. Continue on the main trail and at 2 miles the Loyalsock Trail turns left. A woods road is to the right and straight ahead is a bridle path to allow horses access to the plateau. After this point the trail begins to climb some but it is hardly noticeable when compared to the initial climb. You are now walking west to east along the Allegheny Front. Looking for viewpoints which are few during the seasons when there are leaves on the trees. At about 2.9 miles there is a limited viewpoint. The trail is interesting in this area as it ascends and you will be walking very close to the edge of the Front. As you continue on another viewpoint, the best yet, opens up on a rock ledge with nice views to the south. A short path leads down to a lower rock shelf with an even better view. Be careful to watch for rattlesnakes sunning themselves on the rocks! They will rapidly vacate the area on your approach as long as you do not surprise them. From "Rattlesnake Rock" the trail begins to descend gently for about .5 miles until it takes a sharp left and heads down a rocky drainage. The hike down this part of the trail can be tricky as the rocks may be mossy, damp and slippery in places. Watch for some very tall and very straight trees along this route. These trees may not have be first growth but they are old. Loggers in this area harvested white pine for ship masts and when the white pines were done they turned to hemlocks. The hemlock bark was used for tanning and, many times, the rest of the tree lay unused. Over the next 1.2 miles the trail drops over 950 feet and the total drop from the highest point is over 1100 feet. The trail crosses Little Bear Road at the bottom of the descent. Turn left and start to walk back out to Route 87. The Loyalsock Trail continues on your left and goes up and over Smith's Knob. You can hike this loop using the Painter Run Trail on your return if you still have the time and energy. Walk .8 miles out to Route 87, turned left and walk .5 miles to the your car to complete the loop.
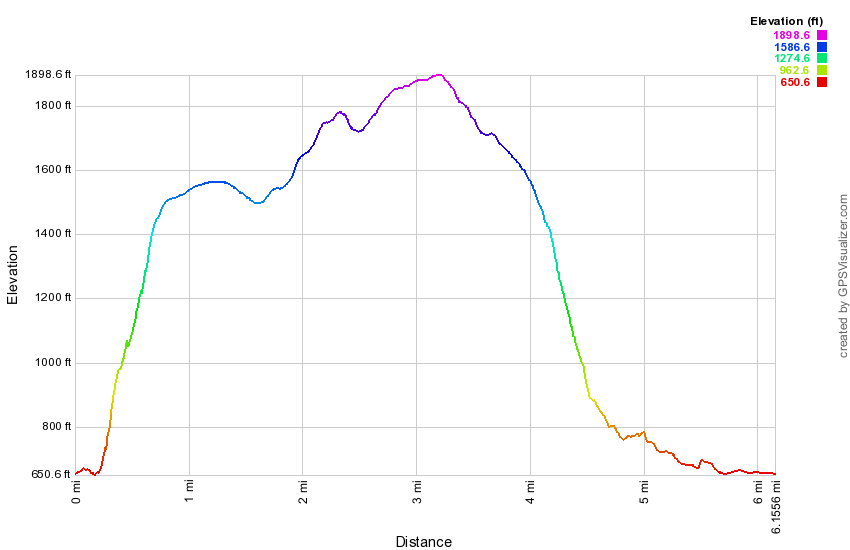 (The image at the left shows the profile of the hike. Remember that all vertical profiles are
relative!)
(The image at the left shows the profile of the hike. Remember that all vertical profiles are
relative!)
Lundy Quarry to Upper Cherrytown Road
| Quick Look | ||||
|---|---|---|---|---|
| Difficulty | Round trip | Total climb | Internet Maps | |
| 12.0 mi | 1230 ft | AllTrails | ||
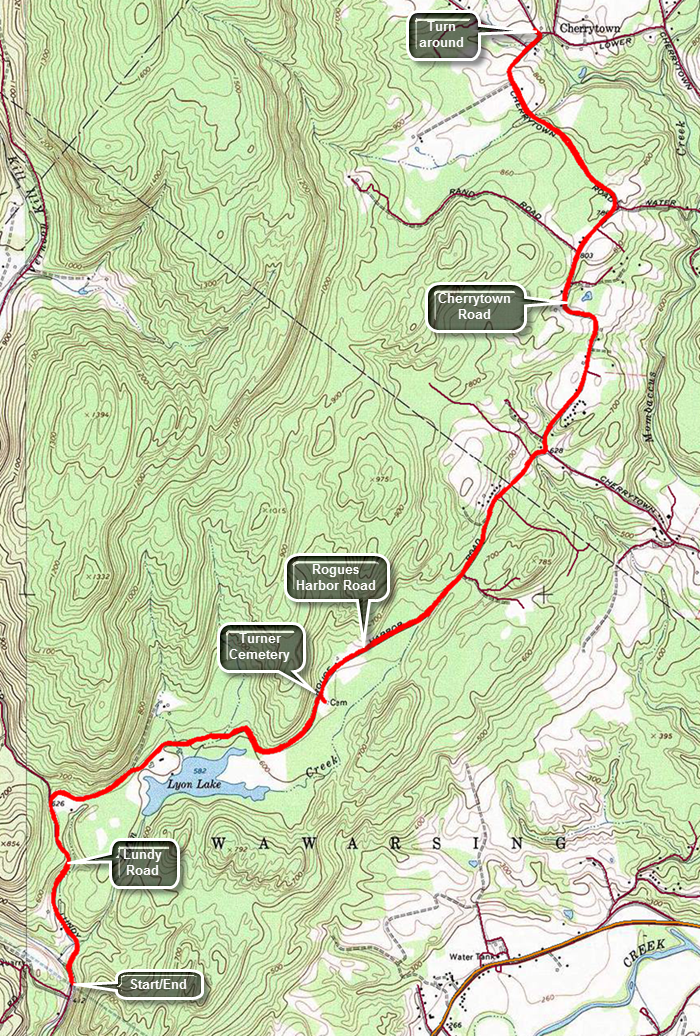 Turn north on Lundy Road off Route 209 just northeast of the Wawarsing Post Office. Continue on Lundy Road for about 1.4 miles to the quarry and park on the right side of the road.Walk north on Lundy Road which is a mixture of dirt and gravel. It winds through some nice evergreen forests for about .8 miles to the intersection with Rogues Harbor Road. The area feels remote and the walk is slightly uphill gaining about 230 feet. Turn right on Rogues Harbor Road which heads ENE. Within .3 miles, a high wooden fence appears on the right which blocks the view of Lyon Lake. This is a rather upscale and private club or community. The fence extends for more than .5 miles or the entire length of the lake. After this the trail seems flat but does roll some. There is a slight climb to the intersection with Woodland Ridge Road. Along the way at 2.3 miles there is a sign that reads "Turner Cemetery" and points south into the woods along a faint path. The road surface changes to pavement as you descend to Cherrytown Road at 3.7 miles. Turn left on paved Cherrytown Road and immediately start uphill although the ascent is not steep. From the turn onto Cherrytown Road you will gain another 200 feet to the intersection with Mount Laurel Road where the road levels. From Mount Laurel Road it is another 1.2 miles to the intersection with Upper Cherrytown Road. Along the way there are many small farms many with horses and other farm animals. At the intersection turn left on Upper Cherrytown Road and walk a short distance before turning around and starting the hike back. The remaining portion of this section is only 3 miles for a round trip of 6 miles.
 (The image at the left shows the profile of the hike. Remember that all vertical profiles are relative!)
Manorkill Falls to Mine Kill Falls
| Quick Look | ||||
|---|---|---|---|---|
| Difficulty | Round trip | Total climb | Internet Maps | |
| 11.9 mi. | 1760 ft. | AllTrails | ||
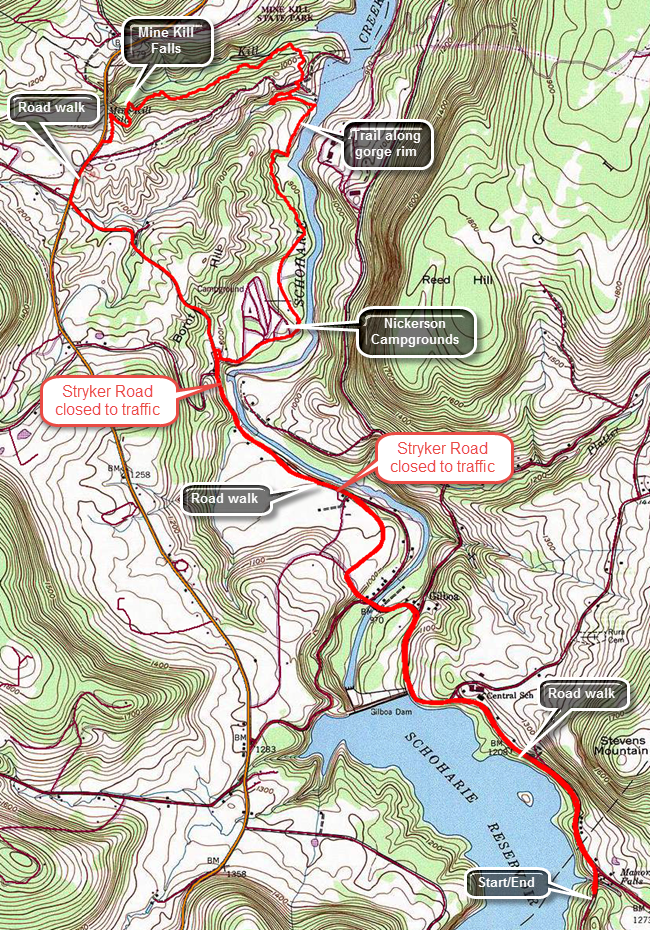
Head north on Route 30 through Margaretville, Roxbury and Grand Gorge. In about 5 miles after Grand Gorge turn right on Route 990V. Drive about 3 miles to Conesville and turn right on the Prattsville Road. Just after crossing the bridge, park on the side of the road. Walk back across the bridge to Route 990V and turn left to hike the shoulder of the road back toward Gilboa. The road has a lot of traffic and in most places the shoulder is wide enough. The road rolls a little until you pass the Gilboa-Conesville School on the right at about 1 mile. Just after this the road narrows for the ongoing construction on the dam. Start a descent to the post office. Just after the post office there is a small display of fossils found when excavating the reservoir. More fossils are in a small museum on Stryker Road. The museum in only open on summer weekends from 12:00 PM to 4:30 PM! The descent continues to 1.9 miles where you cross Schoharie Creek on a road bridge. From here walk up hill to the right turn onto Stryker Road. Stryker Road is now a dead end from both directions and is closed to through traffic. Walking on Stryker Road is a pleasure since the traffic is light. You will pass a large farm on the left that seems to have exotic animals. At about 2.6 miles there is a barrier that blocks traffic. Be careful as you walk around the barrier to the left as the right side of the road is collapsing into Schoharie Creek. There is more erosion downstream. Continue to walk down the road and at 3.1 miles there are a series of rock ledges at the side of the road. The second set is more interesting and shows that the road has all but disappeared. A little farther along the road is down to a single track for walking! From the road you can see a huge area of erosion ahead where an entire hillside seems to be in danger of collapsing into the creek! Shortly after this is another barrier as the road starts to ascend and moves away from the creek. Continue toward the Nickerson Park Campgrounds and at 3.5 miles turn into the campground. Follow the aqua blazes behind the store and down the main camp road. At one point you will cut to the right off the road onto a trail but then come right back to the road after a short distance. Just follow the blazes which are pretty clear through the campgrounds. Eventually you will run out of campground roads and enter the woods on a trail at about 4.4 miles. The trail can be muddy in spots and at about 4.75 miles there is a short but steep climb. At the top the trail levels and makes a sharp right turn to head directly for Schoharie Creek. At 4.9 miles there is a nice viewpoint upstream and down to the water at least 50 feet below. This continues for about a quarter of a mile. Soon the trail descends steeply and then makes a sharp left turn to run along the banks of a small stream parallel to the main creek. Walk upstream and watch for a rock shelf on the edge of the water which gives a nice view up and down the stream. Continue to walk upstream until a set of stepping stones crosses the stream. On the other side walk along the bank back downstream until the trail cuts up the bank. At the top of the climb you will be at a powerline right-of-way where the trail markers lead to the right and then left up the bank to the woods. At 5.8 miles you will be within sight of the Mine Kill and the trail makes a hard left and parallels the stream. The trail keeps climbing and at 6.7 miles passes the cutoff to the lower part of Mine Kill Falls. It is a quick walk to the parking area near the top of the falls. You will be at about 7 miles now and returning by reversing your route will make a 14 mile hike. To cut some mileage and make an easier walk continue out the entrance road to Route 30. Turn left and walk only about .4 miles on Route 30 to Stryker Road. It is another mile to the campgrounds on Stryker Road. Once you are back at the campground road, simply reverse the walk from earlier in the morning.
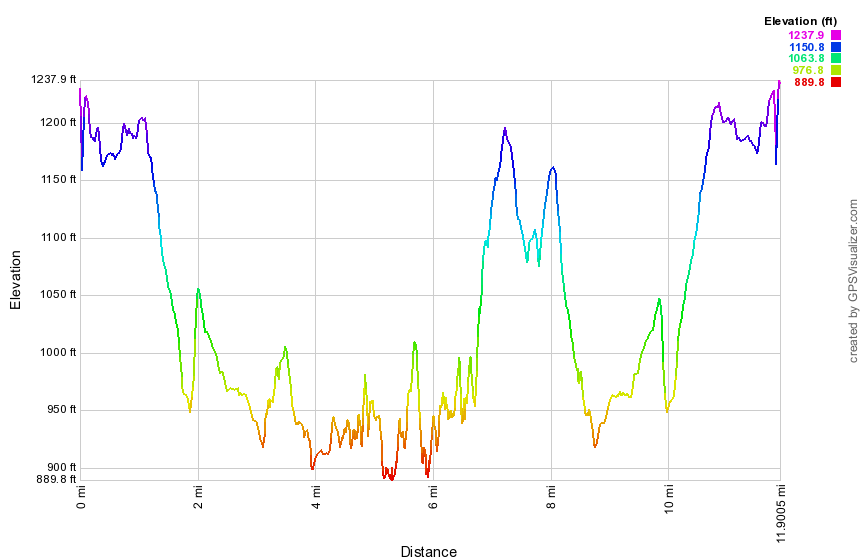 (The image below shows the profile of the hike. Remember that all vertical profiles are
relative!)
(The image below shows the profile of the hike. Remember that all vertical profiles are
relative!)
Mary Smith: Mary Smith Hill Road to Berry Brook Road
| Quick Look | ||||
|---|---|---|---|---|
| Difficulty | Round trip | Total climb | Internet Maps | |
| 6.3 mi. | 1949 ft. | AllTrails | ||
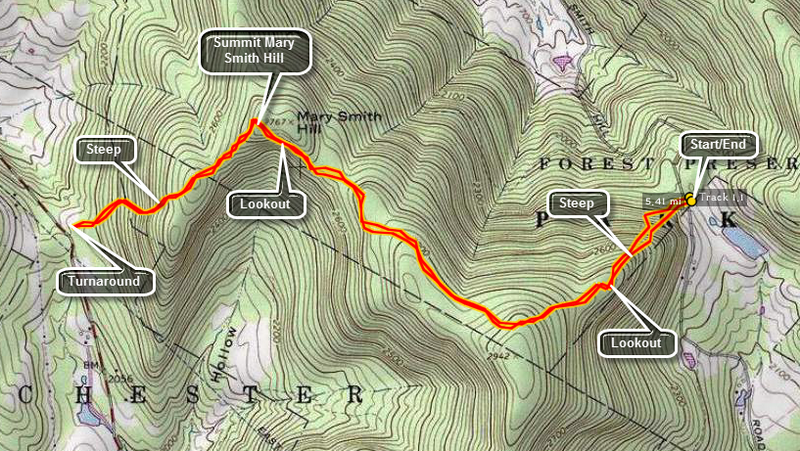 Turn onto Mary Smith Hill Road in the hamlet of Lew Beach. Travel for about 2.5 miles and park at the
parking area on the right. Do NOT be fooled! The road narrows and changes to dirt but IS passable. Get
on the red blazed Mary Smith Trail across the road. Be prepared to climb some rather steep terrain in
the first half to three quarters of a mile. At the half mile point is a nice lookout to the south.
Continue on to the maximum elevation on the trail at a little over 2900 feet. This hill has no name.
Descend into a col and then climb to the top of Mary Smith Hill. Here there is another lookout to
the south. Continue down the other side of Mary Smith Hill to the parking area on Berry Brook Road.
There are some interesting rock formations along the way and at least one rather steep descent.
In the summer, the trail is overgrown with briars. The briars coupled with nettles make the trip over
the hill unpleasant if not impossible. At Berry Brook Road turn around at retrace your steps. The
round trip is 6.6 miles by the signs and 6.3 miles by my GPS.
Turn onto Mary Smith Hill Road in the hamlet of Lew Beach. Travel for about 2.5 miles and park at the
parking area on the right. Do NOT be fooled! The road narrows and changes to dirt but IS passable. Get
on the red blazed Mary Smith Trail across the road. Be prepared to climb some rather steep terrain in
the first half to three quarters of a mile. At the half mile point is a nice lookout to the south.
Continue on to the maximum elevation on the trail at a little over 2900 feet. This hill has no name.
Descend into a col and then climb to the top of Mary Smith Hill. Here there is another lookout to
the south. Continue down the other side of Mary Smith Hill to the parking area on Berry Brook Road.
There are some interesting rock formations along the way and at least one rather steep descent.
In the summer, the trail is overgrown with briars. The briars coupled with nettles make the trip over
the hill unpleasant if not impossible. At Berry Brook Road turn around at retrace your steps. The
round trip is 6.6 miles by the signs and 6.3 miles by my GPS.
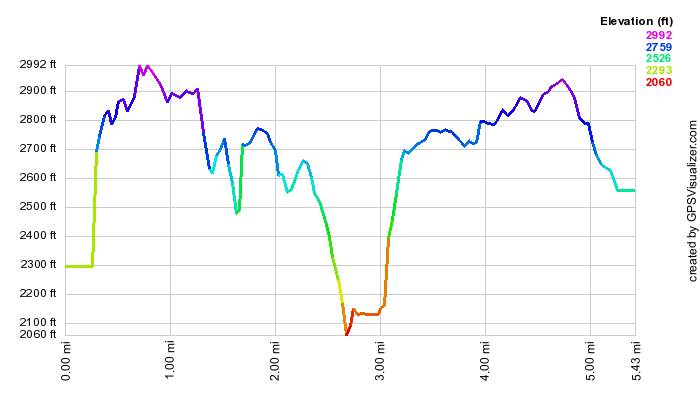
(The image at the left shows the profile of the hike.)
Mary Smith: Berry Brook Road to Mary Smith Hill Road
| Quick Look | ||||
|---|---|---|---|---|
| Difficulty | Round trip | Total climb | Internet Maps | |
| 6.3 mi. | 1949 ft. | AllTrails | ||
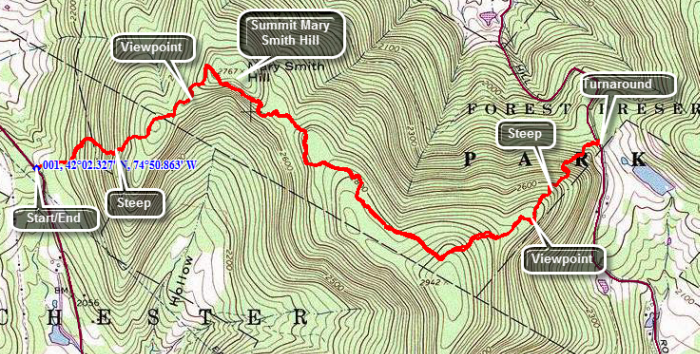 Head north on the Beaverkill Road for about 5.2 miles and turn left on Campsite Road. At the fork in the road bear right and cross the Beaverkill Covered Bridge. At the intersection with Berry Brook Road turn right and drive another 3.7 miles to the parking area on the right. The first .6 miles of the trail are pretty steep gaining a little over 500 feet. The surface has some loose rocks which can slip underfoot. After climbing to the top of the first, unnamed hill you will descend a little before starting up Mary Smith Hill. At .9 miles the trail makes a sharp right turn swinging from ENE to SE and then ascending Mary Smith Hill. You will walk through several areas where you pass between or climb over large rocks. Just before the top of Mary Smith Hill there is a lookout which has a limited view to the south. Continue on the main trail little farther along the trail to the top of the next unnamed hill. As you continue on the trail to Mary Smith Road you will drop 685 feet in less than a mile. If you have a car waiting on Mary Smith Hill Road, you will not have to deal with the return climb. If you are doing and out and back hike be ready to climb back up the hill from Mary Smith Hill Road on your way back to your car on Berry Brook Road.
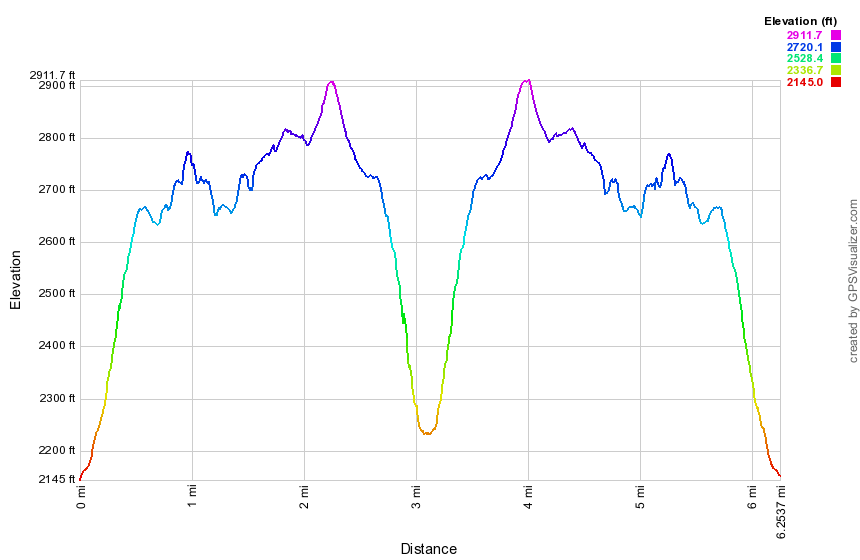
(The image at the left shows the profile of the hike.)
Mary Smith: Berry Brook to Split Rock
| Quick Look | ||||
|---|---|---|---|---|
| Difficulty | Round trip | Total climb | Internet Maps | |
| 2.6 mi. | 760 ft. | AllTrails | ||
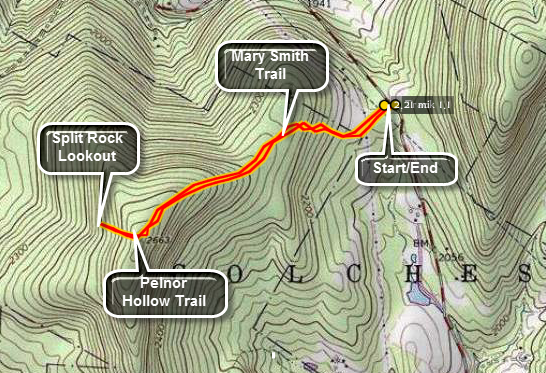 This short hike doesn't gain much elevation but leads to a nice lookout and an interesting rock formation.
Head out of Roscoe on Route 206. Turn right on Berry Brook Road just after the county line and drive for around 8 miles to the trail head parking on the right. Cross the road to get on the Mary Smith Trail heading west southwest. After about .1 miles on a woods road, you will cross a power line right-of-way. Watch for the trail as it continues through a grassy area and into the woods. The trail ascends some until about .45 miles when it levels off if only briefly. In only .2 miles the trail again ascends for the next .5 miles to 1.15 miles where it meets the Pelnor Hollow Trail. Turn right and after a short distance you will be faced with a VERY STEEP downhill section. At 1.3 miles you will arrive at the Split Rock Lookout with some great views to the west. Notice the house across the way on the ridge. When you have taken in the view, return the way you came. This time the steep downhill is a steep uphill!
(The map above shows the parking area and the out and back hiking route.)
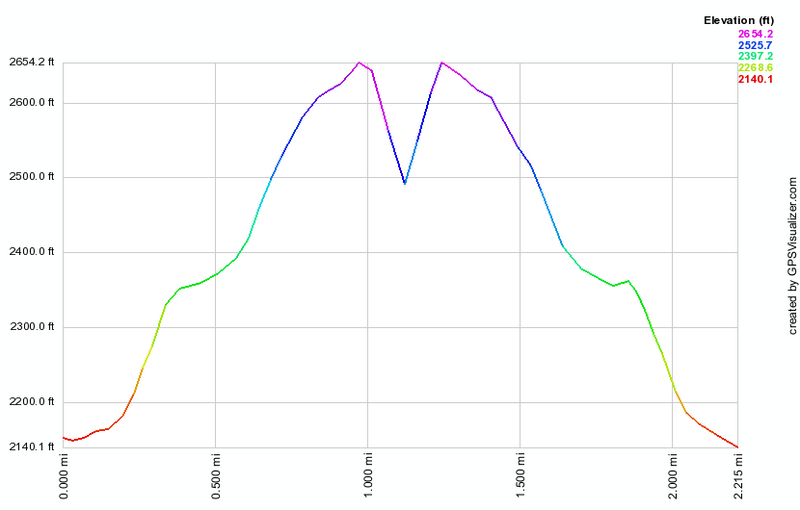 (The image at the left shows the profile of the hike. Remember that all vertical profiles are
relative!)
(The image at the left shows the profile of the hike. Remember that all vertical profiles are
relative!)
Mendon Ponds Park - East Esker Ridge Trail
| Quick Look | ||||
|---|---|---|---|---|
| Difficulty | Round trip | Total climb | Internet Maps | |
| 5.2 miles | 660 ft. | AllTrails | ||

Mendon Ponds Park's unique complex of glacial features helped to make it a National Natural Historic Landmark in 1969. There is a 550 acre nature preserve, and 30 miles of self guided trails full of wildlife. At the northwestern end of the line of other glacial ponds and lakes near the kettle hole called the "Devil's Bathtub" in the park, there is a sphagnum moss peat bog, and the buildup of moss has created a floating island in the middle of the lake. Due to the acidity buildup and lack of decay caused by the sphagnum moss, the bog is home to a number of carnivorous plants, including sundew and pitcher plants. Like much of New York State the topography here was shaped by several different ice sheets that covered the area in the past. The Finger Lakes are some of the most prominent features but everywhere you look there are glacial formations if you know what to look for. Mendon Ponds has several esker ridges formed when glacial streams deposited sediment. It has at least two kettle lakes formed when large blocks of ice dropped off receding glaciers, formed indentations in the soil, melted and left ponds and lakes behind. There are several kame hills formed when unsorted deposits lying on the glacier were deposited in a "heap" as the glacier melted.
A map of the park describes the marked trails and some of the features you will find. None of the trails are difficult but some can be muddy since part of the park is a wetland. In addition to the marked trails there are MANY "informal" trails which can be misleading but most reconnected to the marked trail system at some point. A good choice to see a variety of glacial features is the East Esker Ridge Trail marked at 4.7 miles in length on the map.
Once in the Rochester/Rush area find Rt 65 or Clover Street. The entrance to the park is just south of I-90 and is well marked. Turn into the park on Canfield Road and proceed to the first four corners. Turn right here onto Douglas Road. Look for the Canfield Woods or Stewart signs. Canfield Woods is the first BIG parking area on you right just across from the park office. This is the best place to park and, by the way, entrance and parking are FREE! Walk back up the entrance and across the road to a chain link fence which is the start of the green East Esker Ridge Trail. You may notice a blue marking on a tree since part of the trail is shared with the North Meadow Trail. Turn right and start your walk along the trail as it roughly parallels Douglas Road.
You will find that as you walk a familiar theme develops. At times you will walk up onto esker ridges and walk along the tops with a dropoff on either side. Other areas of the trail are sited between ridges or up and over kame hills. Along the way you will see several different ponds and walk through both hardwood and evergreen forests. The highest point in the park (820 ft.)) is on the trail in the last quarter of the hike. Walk along the trail for about .25 miles and you will come out of the forest into an opening. Straight ahead are some rolling kame hills. Reenter the forest trail and continue walking over the rolling topography. At about .7 miles you will walk down a hill and along Round Pond. To the left is a high hill you might want to climb. The trail doesn't offer much of a view of the pond but just as you start back into the trees there is and informal trail that ascends an esker ridge on the right. Walk along this trail if you like to get some limited views down onto the pond.
Back on the main trail, hike .35 miles east between several ridges until the trail abruptly turns west. After .6 miles you will descend to Douglas Road at the Calvary Shelter. If you actually get to the shelter you have gone too far, so turn around and take your first right to stay on the trail as it continues .45 miles south to Pond road and the other major trailhead for this trail. The trail at this point has just taken you through some open fields and it turns quickly left to head first north and west. The trail gains some elevation here as it first ascends, descends and then climbs several ridges. Be on the lookout for a small spur trail to the right which leads to a wooden bench along the way. This bench offers a spot to relax and look out over the surrounding hills and valleys. Also watch for a small blue marker labeled 23 on your left. This is the highest spot in the park at 820 ft!
After 1.2 miles of walking along the ridge, you will descend and then ascend once again. The trail continues north but then starts to turn left until you are walking due east. On your left will be a large water tank and the trail will lead around it after about.75 miles. The trail now turns into a wide road paved with crushed gravel and leads directly back to the trailhead where you started after .3 miles.
Another interesting place to visit is the kettle hole called the Devil's Bathtub. From the parking area turn right on Douglas Road and continue south until the intersection with Pond Road. Turn right on Pond Road and watch for the Devil's Bathtub Parking area on the right. Drive up and park. When you get out of the car, notice the view to Deep Pond on your right. Find the sign that says "Devil's Bathtub" and head down the wooden stairs to this kettle pond. There is a wooden walkway along the edge of the pond but no real view down onto the pond to take it all in. The trails here are NOT well marked but you can head around the pond on the aqua trail and informal trials until you meet the light blue Grasslands Trail. If you stay on the aqua trail, it turns to the right away from the Devil's Bathtub and takes you along the shore of Deep Pond. Either walk is worthwhile.
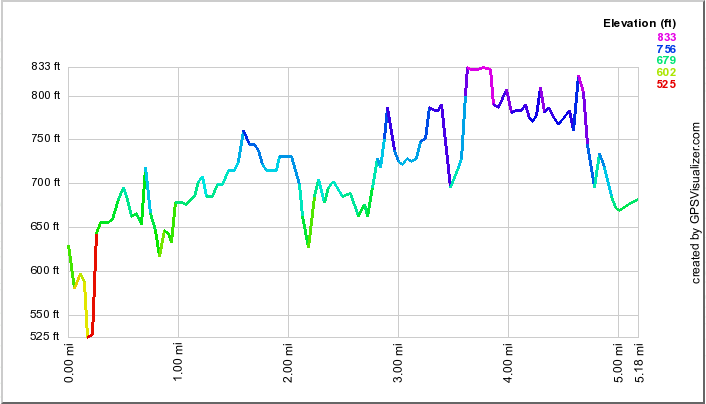 (The image at the left shows the profile of the hike. Remember that all vertical profiles are
relative! Although this profile looks menacing, the elevation gains are seldom more than 50 ft!)
(The image at the left shows the profile of the hike. Remember that all vertical profiles are
relative! Although this profile looks menacing, the elevation gains are seldom more than 50 ft!)
Middle Mountain Trail: Mary Smith to Beech Hill
| Quick Look | ||||
|---|---|---|---|---|
| Difficulty | Round trip | Total climb | Internet Maps | |
| 4.2 mi. | 1750 ft. | AllTrails | ||
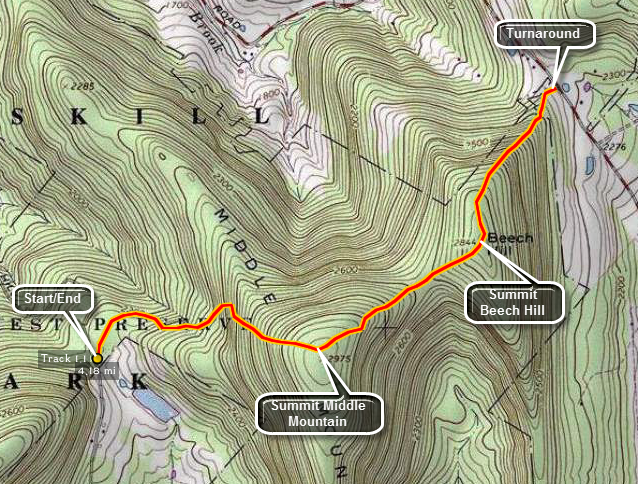
Turn onto Mary Smith Hill Road in the hamlet of Lew Beach. Travel for about 2.5 miles and park at the parking area on the right. Do NOT be fooled! The road narrows and changes to dirt but IS passable. Get on the red blazed Middle Mountain trail. Be prepared to climb! This isn't a 3500 and it is only 4.2 miles round trip but there is some climbing to do. About a miles walk brings you to the top of Middle Mountain at 2975 feet. There is nothing much to see here but .1 miles further on is a BEAUTIFUL view. Continue on the same trail for a little less than a mile to Beech Hill. There is a descent and ascent between the two hills. Another half mile will put you on Beech Hill Road. Return to your car by reversing the hike.

(The image below shows the profile of the loop hiking route. Remember that all vertical profiles are relative!)
Middle Mountain Trail: Mary Smith Hill Road to Cabot Mt
| Quick Look | ||||
|---|---|---|---|---|
| Difficulty | Round trip | Total climb | Internet Maps | |
| 7.8 mi. | 2660 ft. | AllTrails | ||
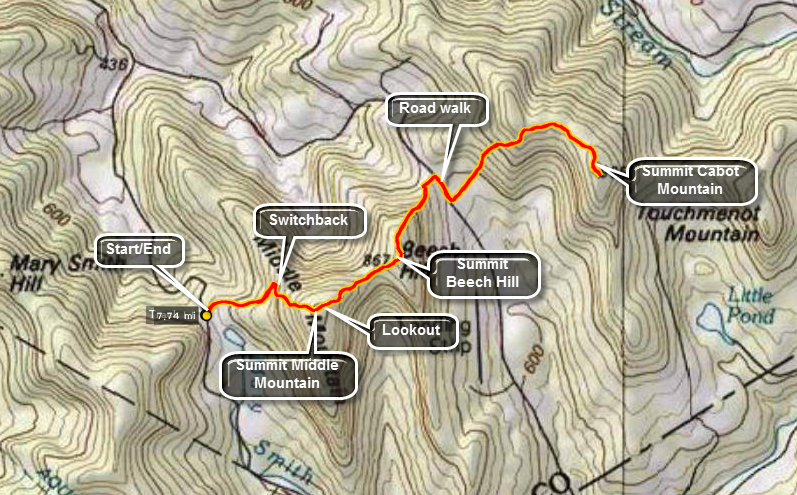
Turn onto Mary Smith Hill Road in the hamlet of Lew Beach. Travel for about 2.5 miles and park at the parking area on the right. Do NOT be fooled! The road narrows and changes to dirt but IS passable. From the parking area get on the red blazed Middle Mountain trail. Be prepared to climb! This isn't a 3500 but it is a true Catskills trail with rocks, roots, prickers, nettles, damp places, wet spots and blowdown! The climb up Middle Mountain gets steep in a few places and there are several large trees across the trail and many smaller branches. Between .5 miles and .6 miles the trail winds its way up over a rocky patch. At the top of the climb the trail levels and makes a big switchback before heading back toward the summit. From the summit of Middle Mountain the trail loses almost 300 feet to the col with Beech Hill. The climb to Beech Hill isn't long but can be tiring. In .6 miles the trail drops over 500 feet and ends on a small private road. Turn right on the road and walk out to Beech Hill Road. Turn right at the end of the road and walk to the trail head for the Touch Me Not Trail to Cabot Mountain. You now have to walk 2.5 miles over hilly, rough trail. The hike up Cabot starts along a woods road with POSTED signs on both sides. The first .25 miles aren't bad but then the trail gets serious. The trail gets steep in spots. In .5 miles the trail ascends about 600 feet and then levels off for a pleasant walk of .35 miles to the last climb. Ascend another 125 feet over the next .3 miles to get to the summit before turning around to walk back. The hike back is a matter of reversing course along the same trails. You get a break hiking down Cabot Mountain and then walking along a relatively flat area to the foot of Beech Hill. At the foot of Beech Hill you will be 6.2 miles into the hike. Start the climb up Beech Hill and then head down Beech Hill to the col with Middle Mountain. Continue up to the highest point the trail reaches on Middle Mountain and soon you will be going down Middle Mountain, through the switchback, over the rocks and toward the parking area.
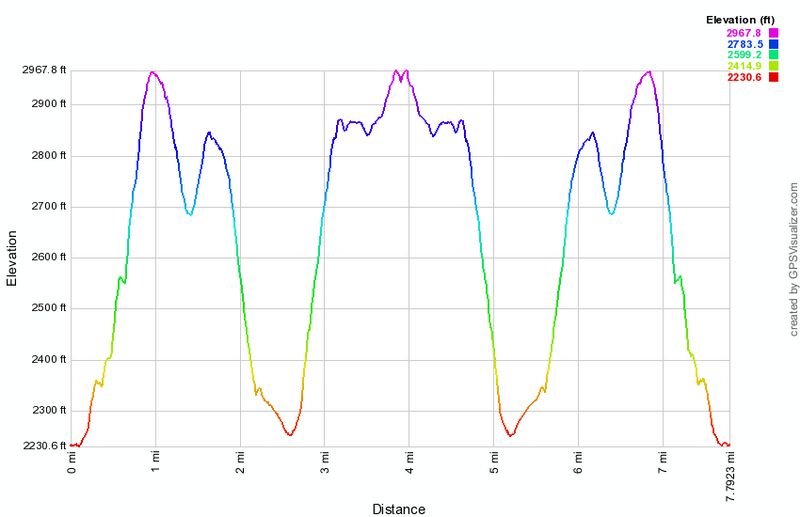 (The image at the left shows the profile of the loop hiking route. Remember that all vertical profiles are
relative!)
(The image at the left shows the profile of the loop hiking route. Remember that all vertical profiles are
relative!)
Middleburgh Cliffs
| Quick Look | ||||
|---|---|---|---|---|
| Difficulty | Round trip | Total climb | Internet Maps | |
| 4.8 mi. | 1220 ft. | AllTrails | ||
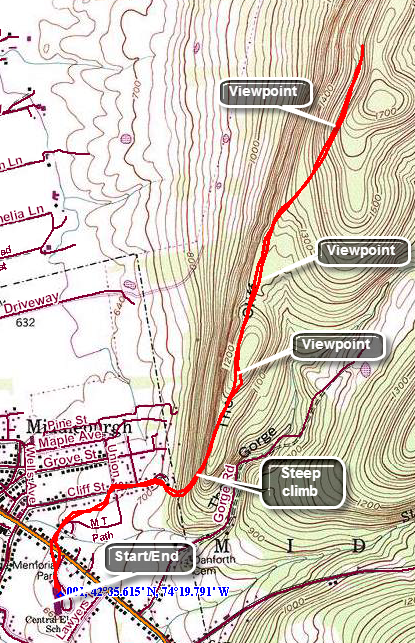
The area around Middleburgh is best known for Vroman's Nose and Thacher Park but the Middleburgh Cliffs also offer a nice view of the Schoharie Plain and Vroman's Nose itself.
In the village of Middleburgh turn south and east on Route 145 from Route 30. Within less than .5 miles watch for a school on your right. As long as school is not in session, you may park in the school lot. If school is in session, park legally on the street. Walk across Route 145 and slightly to the left look for Staub Lane. Turn left on Union Street and then right on Cliff Street. As you walk, you should notice the aqua blazes of the Long Path on telephone poles. Where Cliff Street ends the Long Path ascends a rather steep bank that is eroded. Climb up the bank and follow the Long Path as it makes a short but steep climb over the next .6 miles. After passing over and through some rocks, the trail descends some and then rises again. At about 2.2 miles the trail levels off at around 1600 feet. It follows the cliffs for some distance and you can walk as far as you like. All along the way there are views into and over the valley with some being better than others. Watch especially for views of Vroman's Nose. When you have had enough, turn around and retrace you path to the car.

(The image below shows the profile of the loop hiking route. Remember that all vertical profiles are relative!)
Middleburgh to Treadlemire Road
| Quick Look | ||||
|---|---|---|---|---|
| Difficulty | Round trip | Total climb | Internet Maps | |
| 11.5 mi. | 2370 ft. | AllTrails | ||
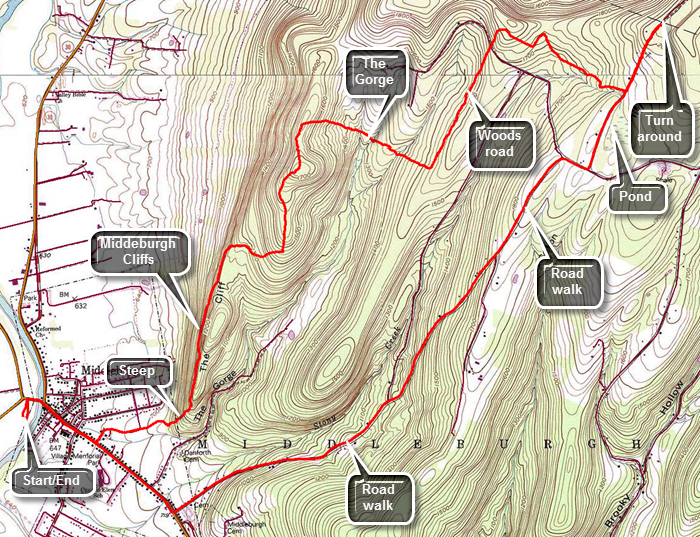
Head north on Route 30 through Margaretville, Roxbury, Grand Gorge, North Blenheim and Middleburgh. We turned right and then left to follow Route 30 through Margaretville, Roxbury, Grand Gorge and North Blenheim. Turn into Rotary Park just before the Route 30 bridge in Middleburgh. Walk behind the building near Route 30 and cross the bridge. Turn right on Main Street (Route 145 east) and walked about .6 miles until Straub Lane appears on the left. Turn left on Straub Lane and continue to follow it until it becomes MT Path. Continued to follow the aqua blazes toward the ridge in front of you. The blazes lead behind the last house and up a faint road toward a shale pit and a steep bank. The trail continues up the steep bank and starts to climb to the top of the cliffs. The blazes are very clear and the trail is usually cleared. You will find a dirt trail that ascends to a rock outcrop. At this point there is a narrow passage between the rocks which requires a big first step and then some upper body strength to get through the upper part of the passage. There is a nice viewpoint at the top with views of Middleburgh and Vromans Nose. Continue to walk along the cliffs on a nice wide woods road which continues to ascend. At about 2.2 miles turn west and then north again as the blazes continue to follow well-established wood roads. Other roads and paths cross at different points but the blazes are always clear. After reaching a high point at 3.2 miles turn from north to ESE onto a trail and off the woods road to descend to "The Gorge". Continue to descend eventually picking up another woods road and at 3.9 miles crossing "The Gorge". There is a pretty good sized ravine but the stream often has little or no water. At 4 miles make a right turn on woods road and start toward the northeast. Cross Durfee Road at 4.8 miles and begin a slight ascent. At 4.9 miles make another right turn and start to walk southeast. Just after the 5 mile point turn left on another woods road and watch for old well on the right side of the trail. This was constructed in the 1930's so that fire fighters could fill there "Indian tanks" from this water source. Around 5.5 miles turn onto a trail which parallels a streambed. Pass through some hemlocks and walk passed a house on the left before coming to Treadlemire Road at 5.9 miles. Turn left on Treadlemire Road and walk to the parking area about .5 miles up the road. Turn around here and walked back down Treadlemire Road. You may choose to return the same way you came or walk the roads back to the car. Continue down Treadlemire Road and turn right on Cotton Hill Road. You will now be on a long downhill walk back to Route 145 into Middleburgh. The road is paved and there are several short climbs. The trip to Route 145 is 3 miles of descent totaling almost 1200 feet! At Route 145 turn right and walked 1.1 miles back through Middleburgh to your car.
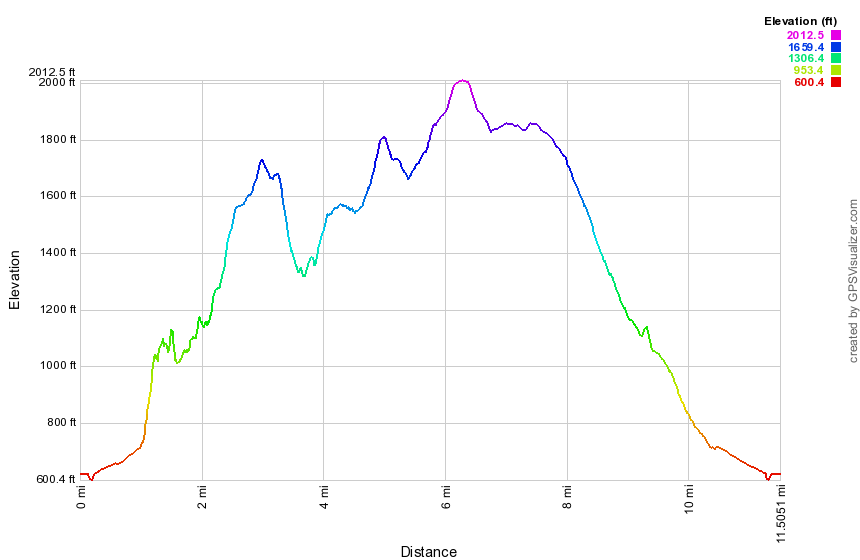 (The image below shows the profile of the hike. Remember that all vertical profiles are relative!)
Mine Kill Falls to Creamery Road
| Quick Look | ||||
|---|---|---|---|---|
| Difficulty | Round trip | Total climb | Internet Maps | |
| 8.8 mi. | 1467 ft. | AllTrails | ||
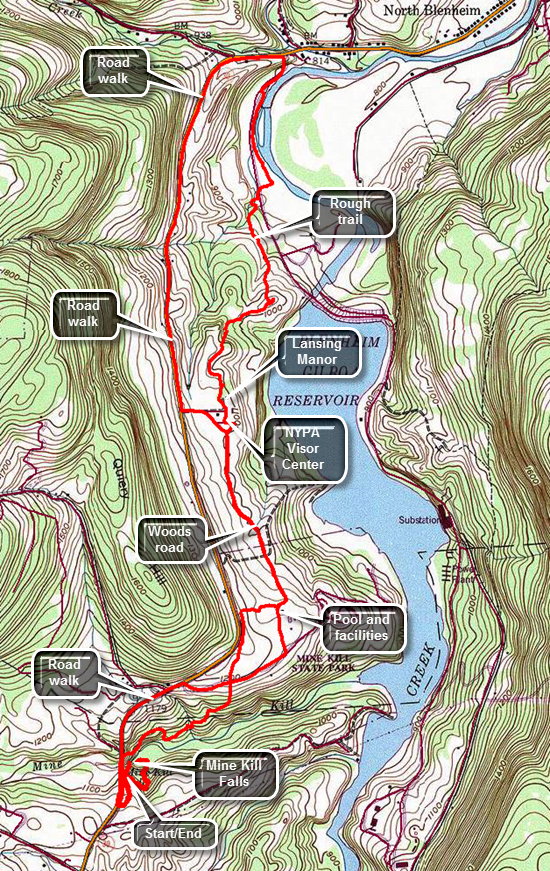
Head north on Route 30 through Margaretville, Roxbury and Grand Gorge. In about 6 miles watch for the entrance to Mine Kill Falls. Turn right to park in the parking area. If you want to view the falls, walk down the wooden stairs to the overlook platform. You may also walk back up to the top of the stairs and turn left to walk to the base of the falls. This part of the trail is also part of the Long Path. This walk will be about .85 miles. When you are ready, walk back toward the parking area. The Long Path has been rerouted to cross the Mine Kill on the Route 30 bridge as the crossing downstream proved to be unreliable. Walk out the entrance road for the park to Route 30 and turn right to cross the bridge. Just after the bridge the Long Path descends a steep bank on the right. The trail begins to descend through some evergreens and parallels the Mine Kill for about .5 miles. After a low point, the trail then starts to turn ENE and away from the creek. It begins to ascend gaining about 250 feet over the next .4 miles. At the top you will break out of the woods at the main access road into Mine Kill State Park. The Long Path continues straight ahead along a path mowed in the grass and parallels Route 30. The markings are pretty easy to follow. The park seems to be well-used and has a disk golf course to complement the pool, ball fields and courts. At 1.2 miles the Long Path turns right and heads downhill a little toward the soccer fields and picnic grove. Bear to the left toward a break in the trees which is a woods road where you will turn left at 1.4 miles. The path is clearly labeled and blazed. Walking this path is easy on the feet and you will soon come out of the trees to an open field with a series of cedar trees. The trees have been planted and protected by fencing to allow the deer to forage but not destroy the trees. Walked slightly up hill through the field to the Visitor's Center for the Blenheim-Gilboa Power Project. At about 2.1 miles into the hike you will pass the solar array and windmill. Walk over to the flagpole for a beautiful view down the Schoharie Valley and into the lower reservoir. Water is pumped from the lower to the upper reservoir during off peak hours. During high demand hours the water is released and turns turbines to generate power. From the flagpole walk in back of the Visitor's Center and then head a little left to walk in front of Lansing Manor. As you leave Lansing Manor, the blazes became harder to spot but the idea is to walk around the edge of the "lawns" to a break in the woods. There are paint blazes but you have to really strain to see them. At 2.6 miles enter the woods and find that the trail changes. The Long Path begins to drop dramatically and it is obvious the trail is not much used or maintained. At 2.8 miles you may have to fight your way through weeds and briars to a microwave tower. Just passed this point there is a nice lookout to the dam on the reservoir. Continue the descent through the woods and at 3.45 miles you will come to the New York Power Authority North Access Road. There is a small parking area. Cross the road and head to the left. Watch for the blazes that indicate you should cross the road and head down another steep bank as the trail nears Schoharie Creek again. There is a jumble of weeds and vines but these are usually cut back. Walk about .4 miles on the trail sandwiched between the road and the creek. At 3.9 miles the Long Path climbs to the road on a set of stairs. Turn right at the top and walk outside the guardrail to Route 30. You may turn around and reverse your route or use the roads for part of the return trip. Turn left on Route 30and be prepared for an ascent from the North Access Road almost all the way to Lansing Manor. At Lansing Manor you may continue on Route 30 but cutting back down to the rail is a better option. Walk the woods road back to Mine Kill. At the park walk out passed the pool to the main entrance road and then to Route 30. Turn left on Route 30 and hike the last .7 miles back to the car.
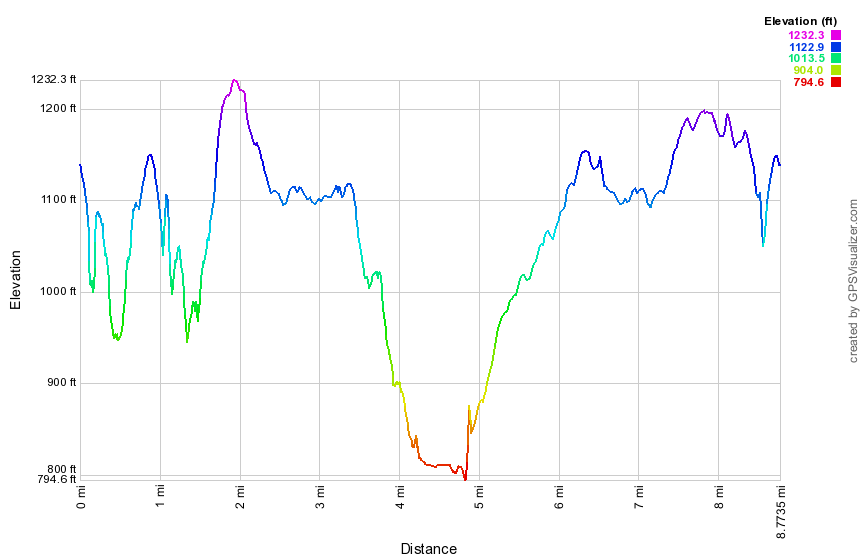 (The image below shows the profile of the hike. Remember that all vertical profiles are
relative!)
(The image below shows the profile of the hike. Remember that all vertical profiles are
relative!)
Mink Hollow Trail
| Quick Look | ||||
|---|---|---|---|---|
| Difficulty | Round trip | Total climb | Internet Maps | |
| 5.0 mi. | 1185 ft. | AllTrails | ||

Drive along Route 28 to Mount Tremper. Turn north on Route 212 and follow it to Lake Hill just before Cooper Lake. Turn north onto Mink Hollow Road and drive to the parking area at the end. The road is paved to the parking area.Walk out of the parking area and up the road until the trail veers to the right. Follow the blazes as the trail gets pretty rocky and crosses over several streambeds. At about .5 miles the trail seems to become wider and is clear of rocks but soon you will be again walking along the bank of the stream where the trail has been eroded to only a narrow track. After this, you will again be on very rocky ground following the dark blue blazes. The blazes can be few and far between in some spots and at one point the trail seems to split and there is a blaze on tree that sits right in the middle without indicating a turn. Stay to the right and you will pick up the trail as it begins to climb more steeply. The rocks may have quite a bit of moss which makes getting a good footing important. The hike is 2.3 miles of ascent up to the Devil's Path and gains 1120 feet over the 2.3 miles. The trail begins to level off near the Mink Hollow lean-to. Walk it to the Devil'S Path at 2.5 miles to complete the "out" part of the hike. Turned around and retrace your route back to the parking area.

(The image at the left shows the profile of the hike. Remember that all vertical profiles are relative!)
Minnewaska: Castle Point - Hamilton Point
| Quick Look | ||||
|---|---|---|---|---|
| Difficulty | Round trip | Total climb | Internet Maps | |
| 8.6 mi | 1083 ft | AllTrails | ||
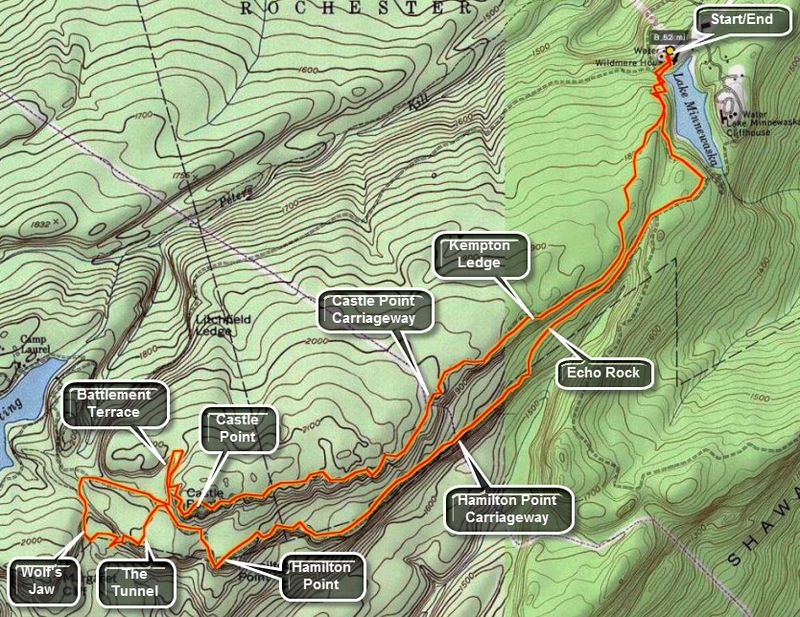
Park at the parking lot in Minnewaska State Park on NY 55 just outside of Gardiner and New Paltz. The cost is $6. Walk toward the lake and follow the red blazed Minnewaska Carriageway. Ignore the first junction with the Upper Awosting Carriageway and continue to the blue blazed Castle Point Carriageway. Turn right here where a sign marks the way. The carriageways are not in good shape for carriages but allow hikers to make excellent time. Watch for the views along the way. Looking to your left you will shortly see Patterson's Pellet. In a little while the ledges and cliffs that make up the Gertrude's Nose Trail and Gertrude's Nose itself come into view. Stay on this until carriageway as it slowly ascends to Castle Point. The views along the way are nice but those from the Point are superb. As you continue on the aqua blazes of the Long Path can be found along with the blue blazes you have been following. The trails run concurrently for some time as they snake through Battlement Terrace. From the Terrace the view of Lake Awosting is magnificent. The lake is very blue and about 1.5 miles long. The trail passes beneath the imposing rocks of the Terrace and meets the yellow blazed Hamilton Point Carriageway. The aqua blazes continue almost straight ahead as the Long Path breaks off here. At this point the carriageway turns left to Hamilton Point or right toward Lake Awosting. You can make several choices here depending on your conditioning and the time you have. Turn right on the carriageway and descend gradually until an unmarked trail turns off to the left. The trail is obvious but there are no signs or blazes. This trail leads to the Wolf's Jaw were impressive slabs of rock hang over the trail. This short spur trail meets the Long Path again as it descends from the Hamilton Point Carriageway. Turn left on this trail and cross a small creek. You will start to ascend back toward the Carriageway. You reward for taking this route is The Tunnel. This is an area where the rocks have cracked and others have fallen on top of them forming a sort of "tunnel". The passage is narrow particularly with a full pack! After The Tunnel is a low rock overhang. The trail then ascends back to the yellow blazed Hamilton Point Carriageway where you should turn right. The trail descends some and them climbs to Hamilton Point which gives more spectacular views of the ravines below and the ridges on the others side. Continuing along there are more views especially at Echo Rock. Shortly after this the carriageway meets The Millbrook Mountain Carriageway. Continue on the yellow blazes until they meet the red blazed Minnewaska Lake Carriageway. Turn left an continue on around the lake back to the parking area.
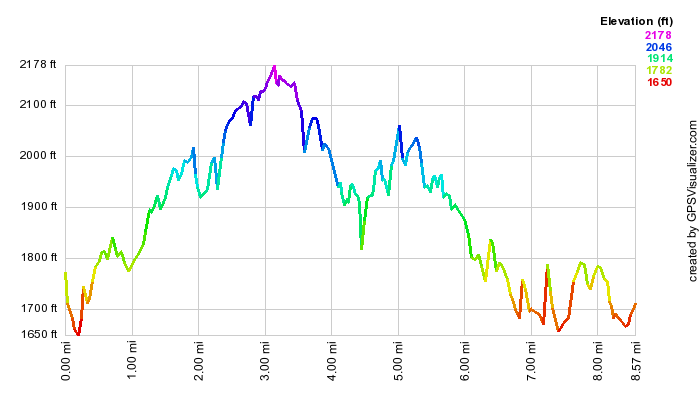 (The image at the left shows the profile of the hike. Remember that all vertical profiles are
relative!)
(The image at the left shows the profile of the hike. Remember that all vertical profiles are
relative!)
Minnewaska: Dickie Barre to Old Minnewaska Trail
| Quick Look | ||||
|---|---|---|---|---|
| Difficulty | Round trip | Total climb | Internet Maps | |
| 7.2 mi | 1460 ft | AllTrails | ||
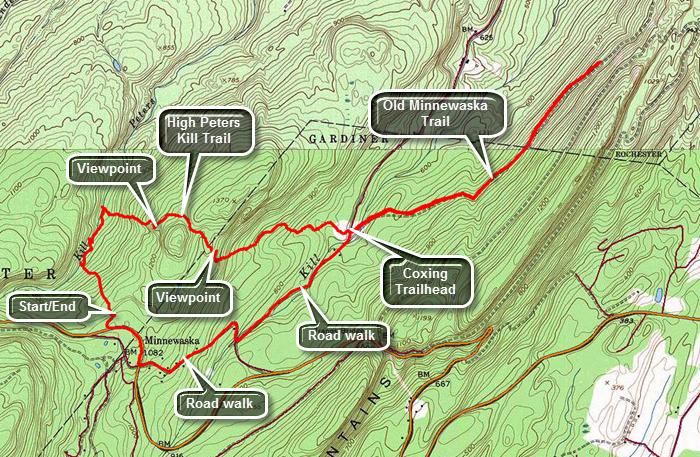
Park at the parking lot for the main office of Minnewaska State Park on NY 55 1.1 miles east of the main entrance. This is sometimes referred to as the Peters Kill parking area. The cost to park is $8 and the hours are 9 a.m. to 5 p.m. Head out on the Red Loop Trail from the western end of the parking area. The trail is flat for the first few hundred feet and then begins to drop towards the Peters Kill and parallels. At about .3 miles there is a path down to the stream which you may use to investigate the Peters Kill. There are several others along the way and it is your choice whether or not to use them. Turn right when you get to the yellow connector trail and follow it down to the blue High Peters Kill Trail. The SRT is co-aligned with this trail at this point. When the yellow trail ends at the High Peters Kill Trail, you should turn right but you may want to turn left and walk down to the stream to investigate the bridge there. Head east on the blue trail as it continues along the Peters Kill. Over the first .75 miles of the hike there will be a loss of over 350 feet in elevation. The trail then begins to climb toward Dickie Barre, one of the premier rock climbing areas. For the next .25 miles the trail gains about 370 feet and averages over a 21% grade. There are some steep dropoffs on the right and a hint of a nice view but it is hard to get a clear view through the trees. At just over 1 mile there are some ledges to the right of the trail which have some excellent views to the south, east and west. To the west and east are some of the cliffs that draw rock climbers to the area. Behind the cliffs on the right or to the west rise some mountains. Head back to the main trail and follow it around to the north side of the hill without actually hitting the top. At 1.3 miles the trail hits its maximum elevation of 1270 feet as it passes between higher areas to both the left and right. At this point it begins to descend toward the Coxing Trailhead in the Mohonk Preserve. The descent heads south to about 1.6 miles where the trail turns northeast and east. There are stone steps that form part of the descent. It isn't far to the trailhead which is about 2.4 miles into the hike and some 590 feet below the highest point. Cross the road to get on the Old Minnewaska Trail. This is in the Mohonk Preserve which charges $12 per day for hikers. This is a "use fee" nit a parking fee and all hikers are required to pay or become members. The Visitors Center is on Route 44/55 on the way to New Paltz and Gardiner. The trail is relatively flat compared to the High Peters Kill Trail. Within a couple hundred feet where there is a bridge over the Coxing Kill. There are signs in the area explaining the contributions of the Smiley family and one denoting the foundation of the Enderly house. Continue east northeast on the trail until about 4 miles. On the left or to the north there are some mountains but the view is limited until just before the turnaround point. Of course, you can choose to turn around at the Coxing Trailhead or walk even farther along the Old Minnewaska Trail. Back at the trailhead turn left on Clove Road at about 5.5 miles. Walk on Clove Road with the Coxing Kill on the right side of the road. Continue up Clove Road to the intersection with Trapps Road and turn right. At Route 44/55 turn right and walk about .3 miles on the main road back to the parking area. The road walk is shorter and easier than the trail. You can choose to make the hike a true "out-and-back" by simply reversing your route out.
 (The image shows the profile of the hike. Remember that all vertical profiles are
relative!)
(The image shows the profile of the hike. Remember that all vertical profiles are
relative!)
Minnewaska: Gertrude's Nose and Millbrook Mountain
| Quick Look | ||||
|---|---|---|---|---|
| Difficulty | Round trip | Total climb | Internet Maps | |
| 6.5 mi | 1177 ft | AllTrails | ||
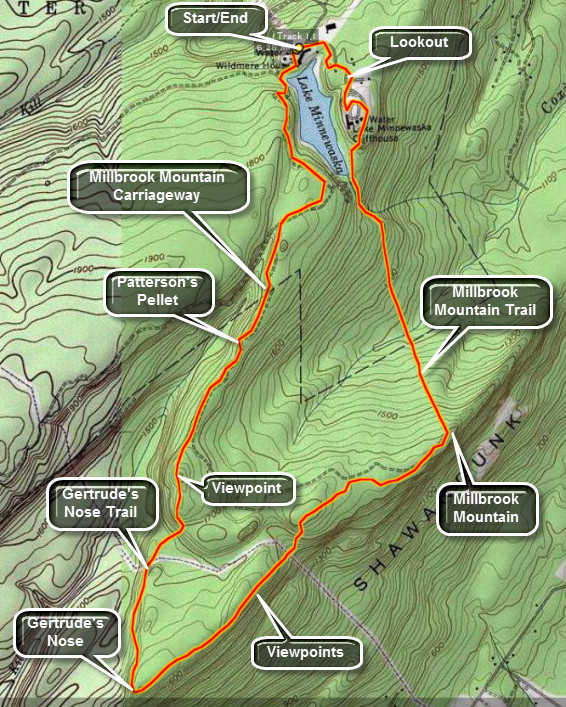
Park at the parking lot in Minnewaska State Park on NY 55 just outside of Gardiner and New Paltz. The cost is $6. Walk toward the lake and follow the red blazed Minnewaska Carriageway. Ignore the first junction with the blue blazed Castle Point Carriageway and continue to the junction with the yellow blazed Millbrook Mountain Carriageway. Along the way watch for Patterson's Pellet, a large glacial erratic which is rather famous. It has its own sign! Stay on this until the red blazed Gertrude's Nose trail leaves to the right. Be prepared for a more difficult hike as this is a trail and it starts to rise and fall almost immediately. Within less than a mile you will be at Gertrude's Nose. Continue on the red trail as it follows the cliff face and warps around onto Millbrook Ridge. In slightly more than a mile you will be on the highest point of the ridge, Millbrook Mountain. At this point you can follow the yellow blazed Millbrook Mountain Carriageway back. Watch for the red blazed Millbrook Mountain Trail as it turns left or north. This trail is often wet especially when it has rained. You may feel like you are hiking down a stream bed until you cross Coxing Kill and start to ascend again. The ascent is rather long and steep at times. The last part of the trail parallels the outlet of Lake Minnewaska. At the end of the trail turn right on the red blazed Minnewaska Carriageway. Follow this "road" as it winds its way around the lake and back to the parking area. There are several nice viewing areas overlooking the lake including a gazebo set high on a rock ledge. There is also a small wooden arch bridge that passes over another part of the carriageway.
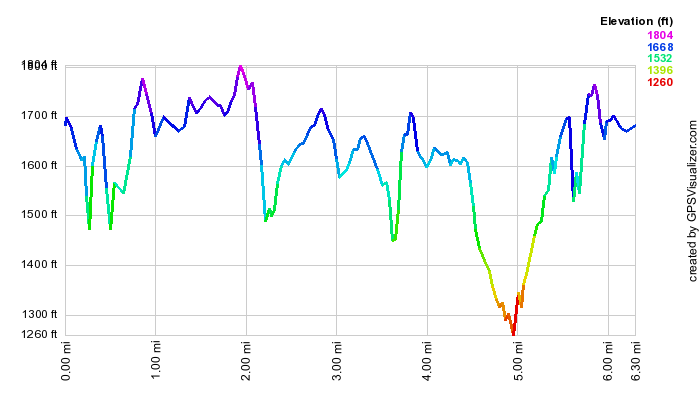
(The image at the left shows the profile of the hike. Remember that all vertical profiles are relative!)
Minnewaska: Gertrude's Nose Long Loop
| Quick Look | ||||
|---|---|---|---|---|
| Difficulty | Round trip | Total climb | Internet Maps | |
| 12.0 mi | 1996 ft | AllTrails | ||
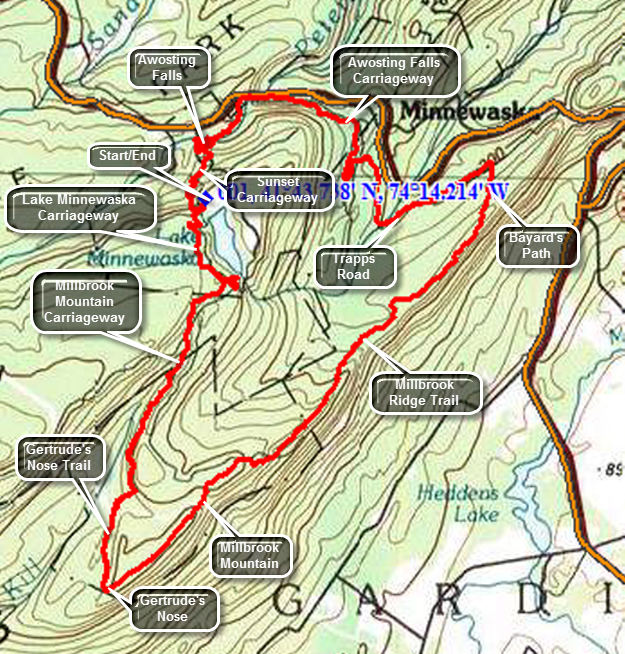
Park at the parking lot in Minnewaska State Park on NY 55 just outside of Gardiner and New Paltz. The cost is $6. Walk toward the lake and follow the red blazed Lake Minnewaska Carriageway. Ignore the first junction with the blue blazed Castle Point Carriageway and continue to the junction with the yellow blazed Millbrook Mountain Carriageway. Along the way watch for Patterson's Pellet, a large glacial erratic which is rather famous. It has its own sign! Stay on this until the red blazed Gertrude's Nose trail leaves to the right. Be prepared for a more difficult hike as this is a trail and it starts to rise and fall almost immediately. Within less than a mile you will be at Gertrude's Nose. Continue on the red trail as it follows the cliff face and wraps around onto Millbrook Ridge. You will descend into a ravine and cross a power line right-of-way. Just after this watch for a deep hole off the trail to the right. In warmer weather the air from this hole will be MUCH cooler than the surrounding air. In slightly more than a mile you will be on the highest point of the ridge, Millbrook Mountain. At this point follow the blue blazed Millbrook Ridge Trail as it follows the ridge heading toward the Trapps. The trail can be interesting at times as it covers some slippery and slated rock faces. Watch for views down across valley on the right and over to the Catskills on the left. Eventually the trail begins to descend and at about 7.5 miles Bayard's Path cuts off to the left. It descends from the ridge and meets Trapps Road. Turn left on Trapps Road and enjoy the walk on this wide and flat surface. At about 8.5 miles you will cross the Coxing Kill and the road will then start a continuous uphill climb. It will go through a hairpin turn and then cross Lyons Road at about 9.5 miles. Just beyond the crossing Trapps Road ends and becomes Awosting Falls Carriageway. At 10.3 miles you will get very close to Route 44/55 at an access point from that road where the Peters Kill crosses under the road. From here it is only about a .5 mile walk along the Peters Kill to Awosting Falls. Walk passed the falls and up the path until you are almost at the park road. Turn left on the Sunset Carriageway which climbs back to the parking area over the next .8 miles and 350 feet of vertical gain.
 (The image below shows the profile of the hike. Remember that all vertical profiles are relative!)
Minnewaska: Jenny Lane Loop
| Quick Look | ||||
|---|---|---|---|---|
| Difficulty | Round trip | Total climb | Internet Maps | |
| 10.0 mi | 1735 ft | AllTrails | ||
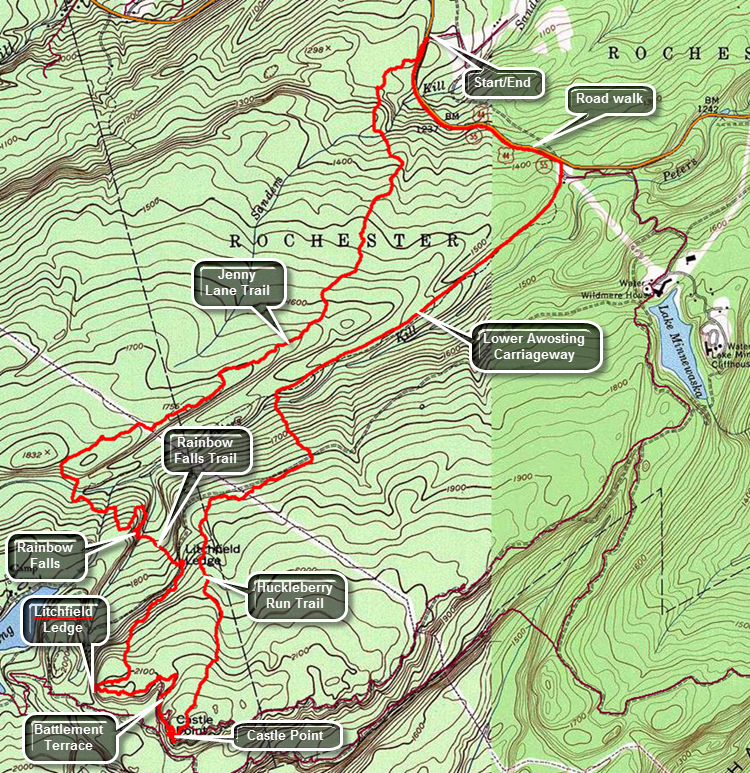
Park at the Jenny Lane parking area near Minnewaska State Park just north of the main entrance on Route 44/55. Walk out to the road and turn left or south. Walk a few hundred feet along the road watching for the SRT blazes on the other side. They can be hard to spot the first time you visit the area. There are rattlesnakes in this area and throughout the park. Be careful to avoid them as they usually give a loud warning. The walk along the Jenny Lane Trail is generally pleasant even though there are no major viewpoints. The trail is generally well-maintained but brush can encroach in some areas. Near the highest point on the trail is a limited viewpoint to the Peters Kill below. It is in this area that the trail begins to travel over more exposed rock which can be very slippery when wet or icy. At 2.8 miles turn right on the Lower Awosting Carriageway and walk over the causeway over the Peters Kill. Just after the bridge, the trail turns left into the woods and quickly begins ascending again. The rock faces here can be slippery and the trail meets a stream which can be hard to cross when the water is high. After the stream, continue to climb over open rock. Look over your shoulder for an excellent view of the Catskills. Follow the trail as it winds its way down the other side of the ridge toward Rainbow Falls. Along the way there is another viewpoint across to the next ridge. The descent down to Rainbow Falls is steep requiring some rock scrambling. It is only a short walk to Rainbow Falls which has a very seasonal flow. During dry weather there may be no falls at all. In the winter icicles hang from the cliffs and ice piles up in layers at the bottom of the falls. The trail passes directly below the falls and may be very slippery in winter but the area is easy to bypass. After the falls, the trail crosses a small stream and then meets the Upper Awosting Carriageway. Continue on the Rainbow Falls Trail by crossing the carriageway and following the orange blazes. Shortly after starting up the trail there is another nice viewpoint of the cliffs with the Catskills behind them. Continue to gain elevation until at 4.7 mile you arrive at Litchfield Ledge which has some more nice views. A little further along is another nice view of the cliffs that make up the Battlement Terrace and Castle Point. Continue along the trail until it ends at the Castle Point Carriageway where it turns left and heads up the hill toward Castle Point. The carriageway is easy to walk on and is sited along the edge of the cliffs giving ever better views from the Battlement Terrace to Castle Point. Soon the Huckleberry Run Trail starts on the left. You can turn here or walk the few hundred feet up to Castle Point. for views of Hamilton Point, Gertrude's Nose and the valley below. At this point the hiked has covered 5.6 miles. Once on the Huckleberry Run Trail there a few short ascents before it heads down to the Upper Awosting Carriageway. The trail is generally well marked but doesn't have any viewpoints over the 1.6 miles. After crossing the carriageway, the trail begins to lose elevation quickly. Just before the Peters Kill, the yellow blazes of the Mossy Glen Trail appear on the right. You may take this trail as it hugs the bank of the Peters Kill until very near the Lower Awosting parking area. Continued straight ahead on the Huckleberry Run Trail over open rock down to the stream. The bridge is a little downstream and is a single large log which has been squared off and has hand rails. Cross the bridge and head up to the Lower Awosting Carriageway. The Huckleberry Run Trail continues straight ahead to the Jenny Lane Trail. Turn right at the 7.5 mile mark and head toward the Lower Awosting parking area about 1.5 miles away. Once at the parking area walk out to the road and turn left to walk the shoulder back to Jenny Lane.
 (The image shows the profile of the hike. Remember that all vertical profiles are relative!)
Minnewaska: Lake Awosting and Mossy Glen
| Quick Look | ||||
|---|---|---|---|---|
| Difficulty | Round trip | Total climb | Internet Maps | |
| 9.8 mi | 1263 ft | AllTrails | ||
 Park at the Lake Minnewaska lower parking area on Routes 44/55. Walk to the end of the parking area to pick up the Lower Awosting Carriageway. This extends 2.75 miles to the shores of Lake Awosting where it meets the Lake Awosting Carriageway. Turn left and continue on the carriageway passing the junction with the green Upper Awosting Carriageway on the left. This allows you to visit the best viewpoints over Lake Awosting to the west and north. The views extend all the way to the Catskills. The lake extends about 1.1 miles to the west. The high acidity prevents most flora and fauna from inhabiting the lake. As you walk
around the lake a ranger's cabin appears on the right side of the path. The carriageway rises as you continue. This
allows good views of the rocky "beach" on the opposite shore. Return to the junction and take the Upper Awosting Carriageway east for about 1.4 miles watching for the Blueberry Run Trail where it crosses the Carriageway. Turn left, walk a short distance and then turn right on the Mossy Glen Trail. This trail runs along the Peters Kill and will take you back to the Lower Awosting Carriageway in about a\1.2 miles. Walk back to the car.
Park at the Lake Minnewaska lower parking area on Routes 44/55. Walk to the end of the parking area to pick up the Lower Awosting Carriageway. This extends 2.75 miles to the shores of Lake Awosting where it meets the Lake Awosting Carriageway. Turn left and continue on the carriageway passing the junction with the green Upper Awosting Carriageway on the left. This allows you to visit the best viewpoints over Lake Awosting to the west and north. The views extend all the way to the Catskills. The lake extends about 1.1 miles to the west. The high acidity prevents most flora and fauna from inhabiting the lake. As you walk
around the lake a ranger's cabin appears on the right side of the path. The carriageway rises as you continue. This
allows good views of the rocky "beach" on the opposite shore. Return to the junction and take the Upper Awosting Carriageway east for about 1.4 miles watching for the Blueberry Run Trail where it crosses the Carriageway. Turn left, walk a short distance and then turn right on the Mossy Glen Trail. This trail runs along the Peters Kill and will take you back to the Lower Awosting Carriageway in about a\1.2 miles. Walk back to the car.
 (The image at the left shows the profile of the hike. Remember that all vertical profiles are relative!)
Minnewaska: Lake Awosting to Lake Minnewaska
| Quick Look | ||||
|---|---|---|---|---|
| Difficulty | Round trip | Total climb | Internet Maps | |
| 12.5 mi | 1550 ft | AllTrails | ||
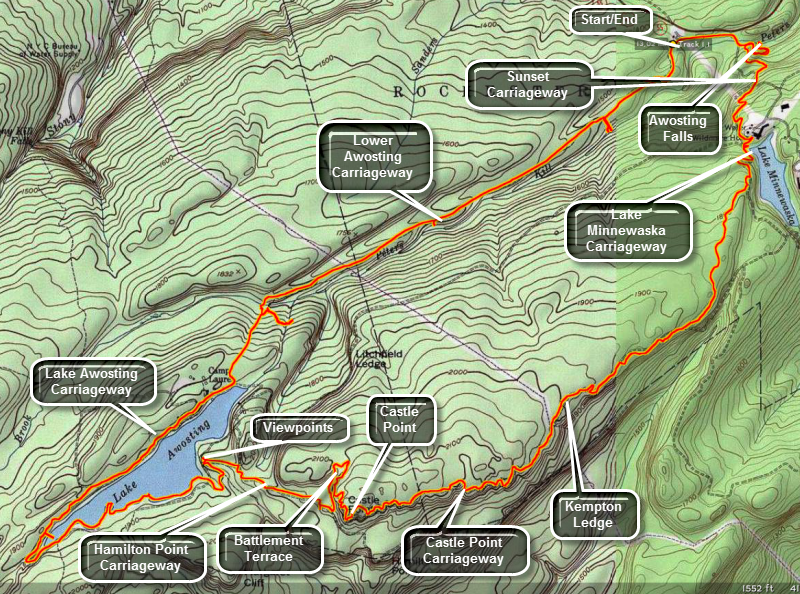 Drive into the main gate at Minnewaska State Park. After paying the fee turn right and park in the lot at the end of the road. Walk out of the southwest end of the lot on the Lower Awosting Carriageway. The walk along the carriageway is pleasant even though the path climbs for about 2.3 miles where it crosses the Peters Kill. Continue on the carriageway to 2.9 miles where there is a junction with the Lake Awosting Carriageway. Turn right and start around the lake in an anticlockwise direction. As you walk around the lake there will be some viewpoints to take pictures of the lake and the cliffs beyond. Continue around the southeast end of the lake and start back toward the northeast. The trail around the lake is relatively flat and passes across the "beach". The trail begins to rise to some viewpoints around 5.6 miles. At 5.9 miles turn right on the yellow Hamilton Point Carriageway. At 6.5 miles turn left on the blue Castle Point Carriageway. You will pass below Castle Point on a switch back and then walk through the Battlements before getting to Castle Point. Take some time to enjoy the expansive views from Castle point before continuing along the carriageway and, ultimately, back to the car. Along the way there will be numerous viewing points, some named and some unnamed. At 8.8 miles you can stop at Kempton''s Ledge. Echo Rock is below an to your right on the Hamilton Point Carriageway. Across Palmaghatt Ravine is another large boulder called Patterson's Pellet. Continue along the carriageway until at 10.5 miles you meet the red Lake Minnewaska Carriageway. Before coming down the hill to the lake notice a nice view of the Catskills through an open field. Turn right at the junction and walk around the lake stopping at the beach if you would like. The view of the lake from the beach is nice and the cliff house across the lake makes a nice picture. Walk up the hill and take a left on the orange Sunset Carriageway. Walk down the hill until you meet the red trail and turn right to walk down to Awosting Falls on the Peters Kill at 11.8 miles. Take some pictures and enjoy the view before retracing your path back up the hill. Walk straight on the red trail to the park roads and turn right to go to the entrance. Turn left and walk down the road to the parking lot and your car.
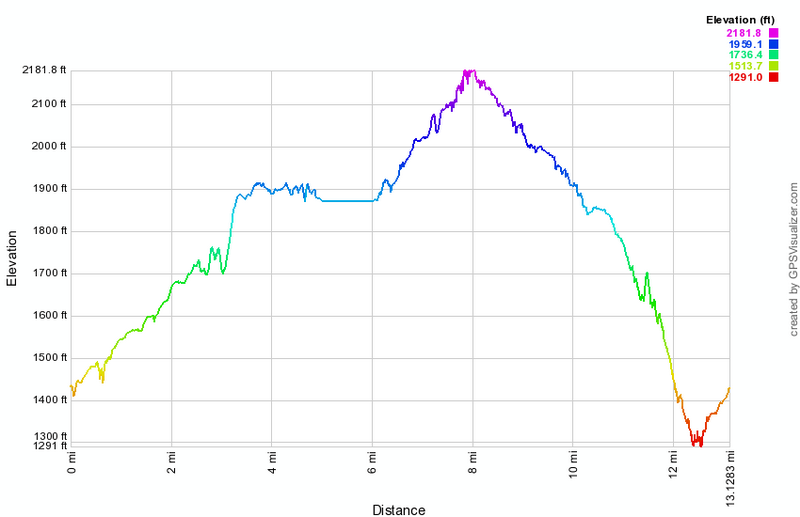 (The image at the left shows the profile of the hike. Remember that all vertical profiles are relative!)
Minnewaska: Lake Minnewaska to Lake Awosting
| Quick Look | ||||
|---|---|---|---|---|
| Difficulty | Round trip | Total climb | Internet Maps | |
| 9.9 mi | 1150 ft | AllTrails | ||
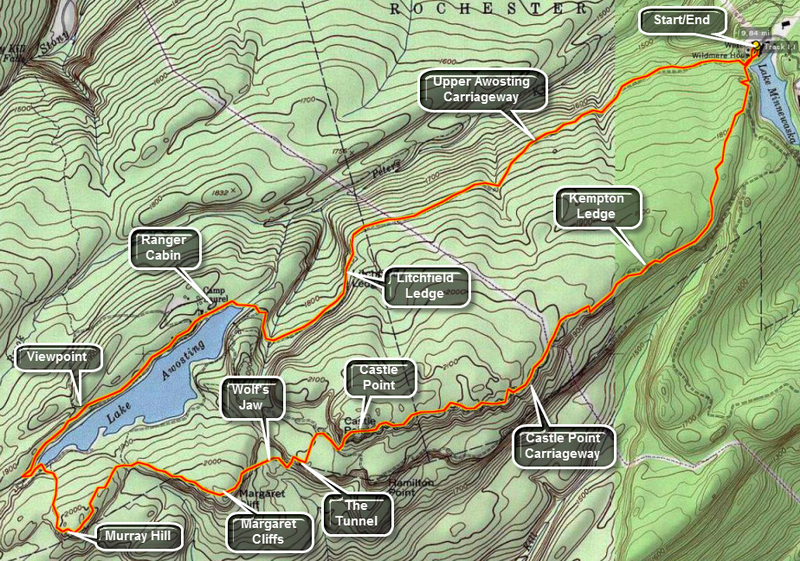 Park at the Lake Minnewaska upper parking area on Routes 44/55. Walk to the upper end of the lake and turn right
toward the western shore of the lake. After walking down the hill, turn right onto the green blazed Upper Awosting
Carriageway. There are many other possible carriageways and trails to use to get to the lake. After about 3.5 miles,
the black blazes of the Lake Awosting Carriageway will become evident. Along the way several interesting landmarks
can be seen and several trail options exist. At about 3.0 miles there is a lookout that gives a view of Rainbow Falls.
The "falls" is simply a cataract off a cliff and the volume of water determines how impressive it is. In the same area
the Long Path heads off to the right down to the base of the falls and on to the Lower Awosting Carriageway. Turning
left on the long path as it crosses the Upper Awosting carriageway will take you up onto Litchfield Ledge but this
makes getting to the lake more difficult. On the carriageway you will pass under the Ledge and can see the impressive
rock cliffs rise above you.
Park at the Lake Minnewaska upper parking area on Routes 44/55. Walk to the upper end of the lake and turn right
toward the western shore of the lake. After walking down the hill, turn right onto the green blazed Upper Awosting
Carriageway. There are many other possible carriageways and trails to use to get to the lake. After about 3.5 miles,
the black blazes of the Lake Awosting Carriageway will become evident. Along the way several interesting landmarks
can be seen and several trail options exist. At about 3.0 miles there is a lookout that gives a view of Rainbow Falls.
The "falls" is simply a cataract off a cliff and the volume of water determines how impressive it is. In the same area
the Long Path heads off to the right down to the base of the falls and on to the Lower Awosting Carriageway. Turning
left on the long path as it crosses the Upper Awosting carriageway will take you up onto Litchfield Ledge but this
makes getting to the lake more difficult. On the carriageway you will pass under the Ledge and can see the impressive
rock cliffs rise above you.
When the black blazes appear, turn right (north) and Lake Awosting will appear very shortly. The lake extends about 1.1 miles to the west. The high acidity prevents most flora and fauna from inhabiting the lake. As you walk around the lake a ranger's cabin appears on the right side of the path. The carriageway rises as you continue. This allows good views of the rocky "beach" on the opposite shore. As you round the western end of the lake keep a sharp eye out for the aqua blazes of the Long path on the right. There is no sign and the first few blazes are very faint! Turn left and the top of the path and then right at the next "junction". You will be headed for Murray Hill which appears in about .5 miles. From here views to the west reveal the Sam's Point Preserve. To the west are Margaret Cliff, Castle Point and Hamilton Point. Continue on the Long Path for about 1.5 miles and pass by Margaret Cliff which has similar views to Murray Hill. Be prepared for a steep descent into the ravine below over a rocky trail. From the bottom the Long Path again begins to ascend toward the Hamilton Point Carriageway. The total distance is about a mile but along the way there are several interesting formations. Just before crossing the stream at the bottom of the ravine, an unmarked trail goes to the left. A short distance up this trail is the Wolf's Jaw where a rock formation hangs over the trail. Continuing on the Long Path brings you to The Tunnel. Here cracks in the rocks have been given a rock "roof" forming a short but narrow tunnel. After The Tunnel, the Long Path continues its ascent (steep at times) up to the Hamilton Point Carriageway.
This carriageway leads back to the parking area. The distance is about 4 miles and it offers some good views and several attractions such as Echo Rock. After several hundred feet on the carriageway, the Long Path turns left, enters the woods and approaches the base of the cliff that is Castle Point. The Long Path works its way up to this upper level through a series of ledge and foot and hand holds. Some are more challenging than others! From castle Point the views of Lake Awosting, Sam's Point, Gertrude's Nose and the other surrounding features is truly impressive. After taking in the view, continue on the blue-blazed carriageway back to Lake Minnewaska and the parking area. This is a distance of about 4 miles most of which is downhill. This is good since you are now in your ninth mile of the hike.
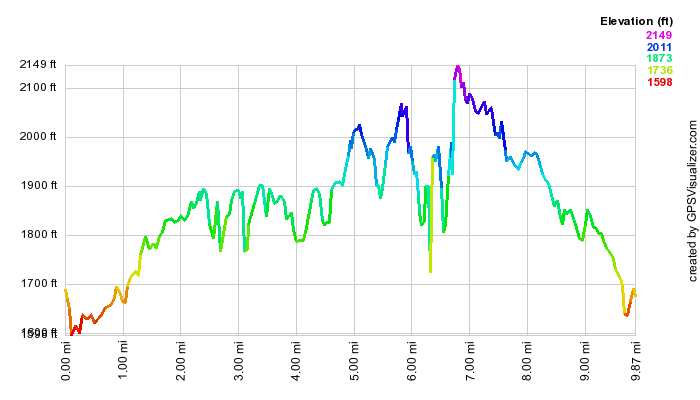 (The image at the left shows the profile of the hike. Remember that all vertical profiles are
relative!)
(The image at the left shows the profile of the hike. Remember that all vertical profiles are
relative!)
Minnewaska: Millbrook Mountain from Lake Minnewaska
| Quick Look | ||||
|---|---|---|---|---|
| Difficulty | Round trip | Total climb | Internet Maps | |
| 6.2 mi | 1090 ft | AllTrails | ||

Park at the main parking area for Lake Minnewaska State Park. Walk to the lake and down the Lake Minnewaska Carriageway to the left. Continue on the carriageway as it runs along the western shore of the lake. At the southern end of Lake Minnewaska watch for the red Millbrook Mountain Trail heading south. Over the next .7 miles the trail descends over 350 feet to The Coxing Kill. It then start to ascend up to Millbrook Mouton gaining back the 350 feet in .5 miles. At this point you may walk out along the ridge on the Gertrude's Nose trail for a bit for more spectacular views. Return to Millbrook Mountain and turn onto the yellow Millbrook Mountain Carriageway which initially heads west and south but then loops around to head northeast back to the lake. The carriageway is almost flat gaining a little over 125 feet in 2.8 miles before descending back to the lake. Be sure to take a look at Patterson's Pellet, a large glacial erratic, along the way.
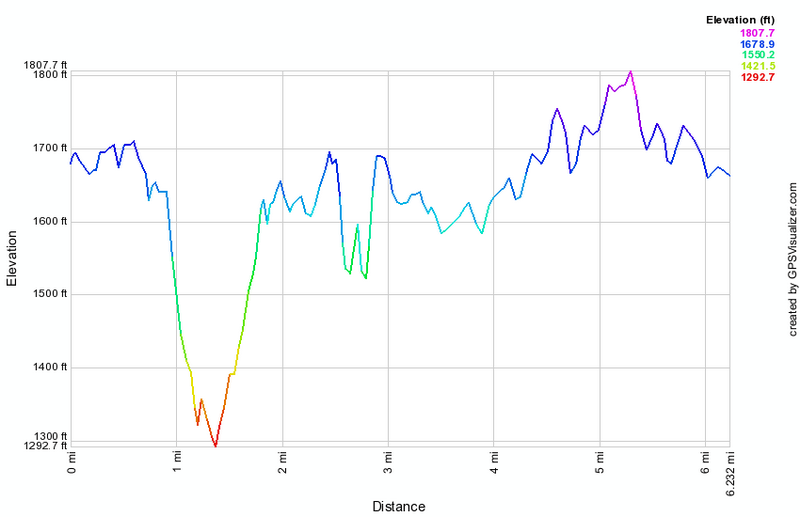
(The image above shows the profile of the hike. Remember that all vertical profiles are relative!)
Minnewaska: Millbrook Mountain from the Trapps
| Quick Look | ||||
|---|---|---|---|---|
| Difficulty | Round trip | Total climb | Internet Maps | |
| 7.9 mi | 1100 ft | AllTrails | ||
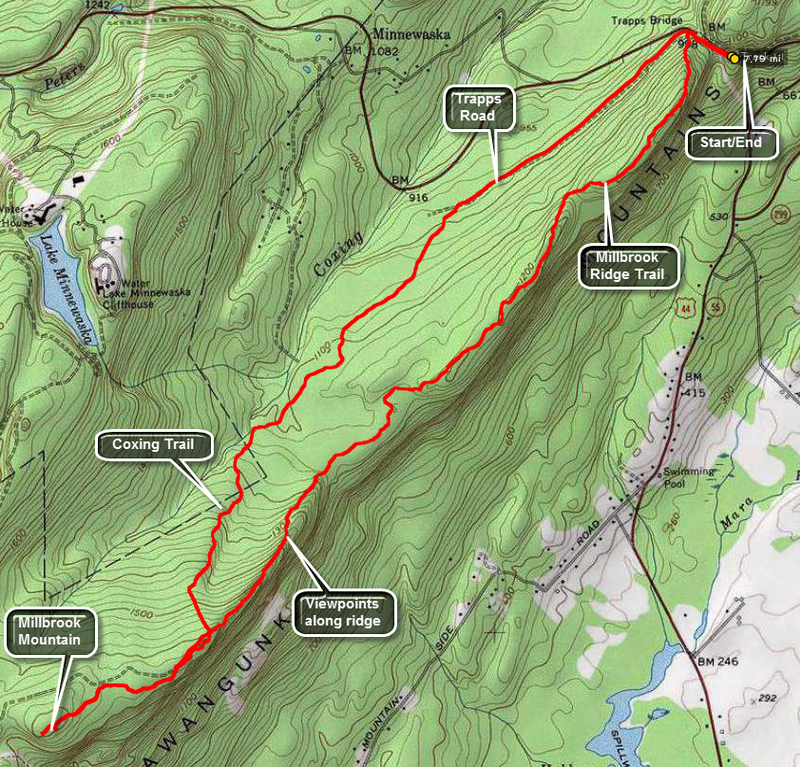
WARNING: The Town of Gardiner appears to be issuing parking tickets for cars parked at The Trapps lot for longer than a half hour.
Park at the Trapps parking area on Route 44/55 or, as an alternative, park at the Mohonk Preserve Visitor's Center or the paid parking lot west of the iron bridge. Walk to the iron bridge and head up to the left to the carriageway. After a few hundred feet turn left and up the ridge on the Millbrook Mountain Trail. The trail has a few ups and downs over the next 2 miles but the main attraction are the views from several spots along the ridge. Over the next .8 miles the trail climbs 470 feet to Millbrook Mountain but the views are even more spectacular! Technically at this point you are at the point marked as Millbrook Mountain but there are more views ahead if you stay on the trail for another .7 miles. When you return to Millbrook Mountain, you can simply retrace your path to the parking area but this is a little boring. Turn north on the red Millbrook Mountain Trail and start to descend. In the middle of this descent watch for the blue Coxing Kill Trail on the right. Turn onto this trail which descends for 1.75 miles until it meets the Trapps Road. You may want to avoid this trail in wet weather as the lower part can be very wet. Turn right on the Trapps Road which will return you to the iron bridge in about 1 mile.
 (The image at the left shows the profile of the hike. Remember that all vertical profiles are relative!)
Minnewaska: Millbrook Ridge and Gertrude's Nose (Loop)
| Quick Look | ||||
|---|---|---|---|---|
| Difficulty | Round trip | Total climb | Internet Maps | |
| 9.7 mi | 1490 ft | AllTrails | ||
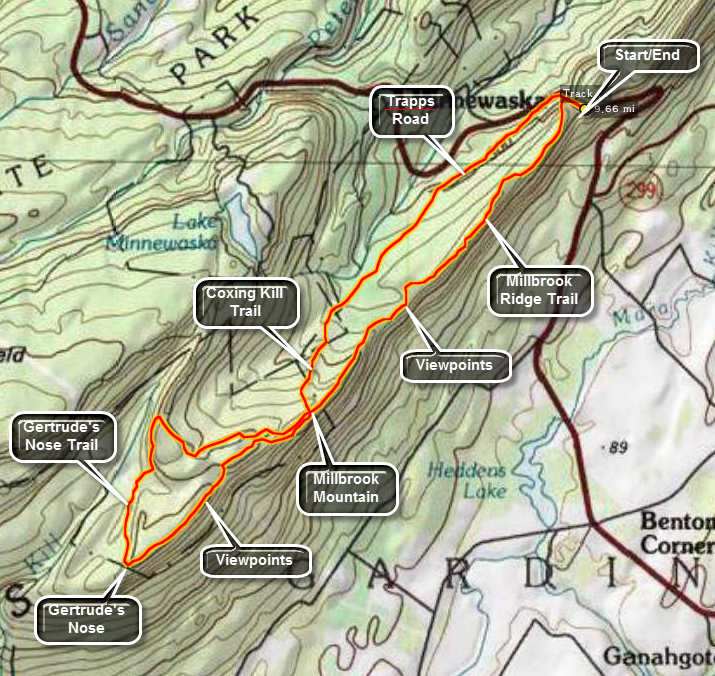
WARNING: The Town of Gardiner appears to be issuing parking tickets for cars parked at The Trapps lot for longer than a half hour.
Park at the Trapps parking area on Route 44/55 or, as an alternative, park at the Mohonk Preserve Visitor's Center or the paid parking lot west of the iron bridge. Walk up to the Bridge and follow the "To Trails" signs. Look for the blue blazes for the Millbrook Ridge Trail on your right after a VERY SHORT distance. This trail ascends Millbrook Ridge and heads toward the highest point called Millbrook Mountain. You will pass several intersecting trails on your right, most notably Bayard's and Millbrook Mountain Trail. Keep to your left on the ridge and continue following the blue blazes for about 2.7 miles. Stop to take in the wonderful views of the valleys and mountains beyond. The walk is sometimes along the cliff edge and at other times through the forest further in from the ridge line. As you get closer to Millbrook Mountain the ascent becomes steeper and more difficult as it traverses rocky outcroppings. You may be fooled several times into thinking you are at the top! At the intersection of the Millbrook Ridge Trail and the red Millbrook Mountain Trail is the highest point on the ridge, Millbrook Mountain. The Millbrook Mountain Carriageway also meets these trails at this point. The maps indicate that the Gertrude's Nose Trail starts here with red blazes. The blue blazes actually continue with few if any red blazes until you reach the Nose. You will hike for about another 1.7 miles until the trail opens onto a exposed rock face.
Gertrude's Nose is an amazing rock formation with deep cracks and spectacular views of the surrounding valley and mountain ranges. There are easier ways to get to the Nose but the Millbrook Ridge is the most fun! Follow the red blazes as they lead you past many steep dropoffs and some additional cracks and crevices. Be careful as many of the cracks are deep and wide enough to accommodate a person! The walk along the exposed rocks continues for about .5 miles as the trail descends slightly to a small ravine before climbing again. The climb involves several short but sometimes steep areas and ends at the yellow blazed Millbrook Mountain Carriageway after about .5 miles. Turning left here will take you on a longer route to Patterson's Pellet overlooking Lake Minnewaska and almost to the shores of the lake itself. It then joins the Millbrook Mountain Trail. This is definitely the LONGEST way back so TURN RIGHT on the carriageway to ascend Millbrook Mountain again. This time the ascent is very gentle compared to the last time! At the top turn left onto the red blazed Millbrook Mountain Trail. Watch for the blue blazes of the Coxing Trail on your right in less than .2 miles. This trail is often wet after it rains and you may want to return the same way you came up on the Millbrook Ridge Trail. Follow the Coxing Trail for 1.6 miles until it meets Trapps Road. Turn right here on this wide carriageway and walk 1.0 miles back to the bridge. From here walk down the shoulder of Route 55 to the parking area.
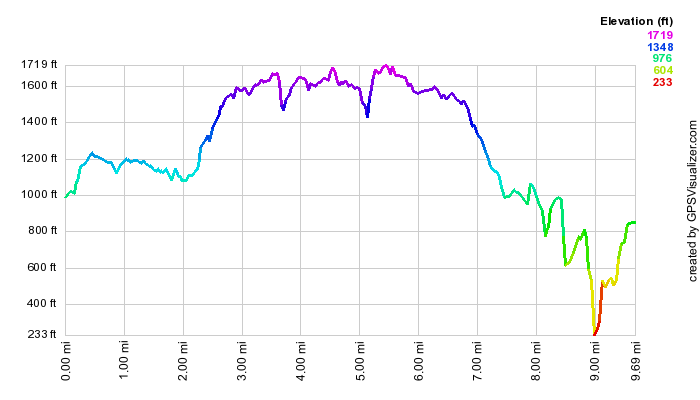 (The image at the left shows the profile of the hike. Remember that all vertical profiles are
relative!)
(The image at the left shows the profile of the hike. Remember that all vertical profiles are
relative!)
Minnewaska: Millbrook Ridge and Gertrude's Nose (Out and Back)
| Quick Look | ||||
|---|---|---|---|---|
| Difficulty | Round trip | Total climb | Internet Maps | |
| 9.7 mi | 1632 ft | AllTrails | ||
 A variation of this hike is to stay on the Millbrook Ridge Trail when you arrive at Millbrook Mountain. This adds about 150 feet to the climbing distance and .1 miles to the hike. It is drier than the Coxing Trail in wet weather. Descending Millbrook Mountain can be challenging because of the sometimes steep descents on the open rock faces.
Park at the Trapps parking area on Route 44/55 or, as an alternative, park at the Mohonk Preserve Visitor's Center or the paid parking lot west of the iron bridge. Walk up to the Bridge and follow the "To Trails" signs. Look for the blue blazes for the Millbrook Ridge Trail on your right after a VERY SHORT distance. This trail ascends Millbrook Ridge and heads toward the highest point called Millbrook Mountain. You will pass several intersecting trails on your right, most notably Bayard's and Millbrook Mountain Trail. Keep to your left on the ridge and continue following the blue blazes for about 2.7 miles. Stop to take in the wonderful views of the valleys and mountains beyond. The walk is sometimes along the cliff edge and at other times through the forest further in from the ridge line. As you get closer to Millbrook Mountain the ascent becomes steeper and more difficult as it traverses rocky outcroppings. You may be fooled several times into thinking you are at the top! At the intersection of the Millbrook Ridge Trail and the red Millbrook Mountain Trail is the highest point on the ridge, Millbrook Mountain. The Millbrook Mountain Carriageway also meets these trails at this point. The maps indicate that the Gertrude's Nose Trail starts here with red blazes. The blue blazes actually continue with few if any red blazes until you reach the Nose. You will hike for about another 1.7 miles until the trail opens onto a exposed rock face.
Gertrude's Nose is an amazing rock formation with deep cracks and spectacular views of the surrounding valley
and mountain ranges. There are easier ways to get to the Nose but the Millbrook Ridge is the most fun! Follow the
red blazes as they lead you past many steep dropoffs and some additional cracks and crevices. Be careful as many of the cracks are deep and wide enough to accommodate a person! The walk along the exposed rocks continues for about .5 miles as the trail descends slightly to a small ravine before climbing again. The climb involves several short but sometimes steep areas and ends at the yellow blazed Millbrook Mountain Carriageway after about .5 miles.
Turning left here will take you on a longer route to Patterson's Pellet overlooking Lake Minnewaska and almost to
the shores of the lake itself. It then joins the Millbrook Mountain Trail. This is definitely the LONGEST way back so TURN RIGHT on the carriageway to
ascend Millbrook Mountain again. This time the ascent is very gentle compared to the last time! At the top the red blazed Millbrook Mountain Trail turns left. Continue straight ahead on the Millbrook Ridge Trail and hike 2.7 miles back to the iron Bridge. From here walk down the shoulder of Route 55 to the parking area.
 (The image at the left shows the profile of the hike. Remember that all vertical profiles are
relative!)
(The image at the left shows the profile of the hike. Remember that all vertical profiles are
relative!)
Minnewaska: Peters Kill from Jenny Lane
| Quick Look | ||||
|---|---|---|---|---|
| Difficulty | Round trip | Total climb | Internet Maps | |
| 6.3 mi | 1030 ft | AllTrails | ||
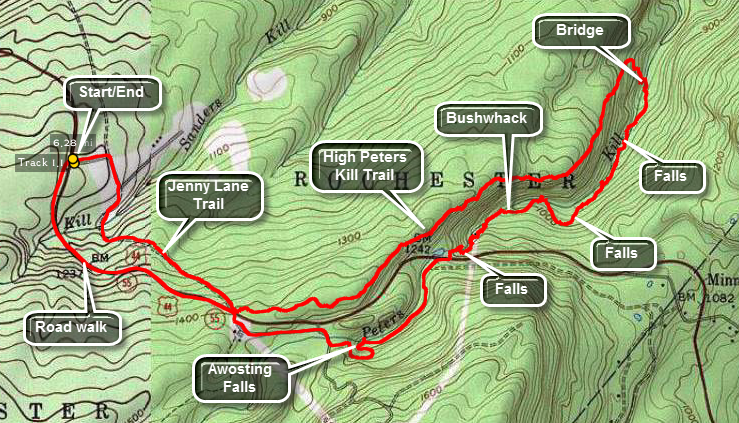 Park at the Jenny Lane parking area on Routes 44/55 on the left just before the main entrance to the park heading toward New Paltz. Walk down the road and follow the blazed trail for about a mile where the trail comes out to the road. This is where the High Peters Kill Trail begins. This trail follows the ridge along the Peters Kill as it works its way down to the stream. Along the way there will be views to Mohonk and beyond. You may be able to hear the stream at times and catch a glimpse of it below. The walk along the trail is a little less than two miles and drops 600 feet before crossing a bridge. The trail continues along the Peters Kill but another option is to bushwhack up the stream bed and along the banks. This is the best way to take in all the interesting sites. There are several small falls with two of the larger ones near where the stream crosses under the road about 1.4 miles from the bridge you crossed. The last falls has the highest drop but the volume is usually small. A little below this at the penultimate falls there is an old power generation plant. Still visible are the wooden pipers and some of the controls can be seen inside the building. When you reach the road cross over to the Awosting Falls Carriageway. Within half a mile from the road, you will be at the falls. Follow the carriageway up to the main gatehouse. You may walk the trail back to the car or simply use the road.
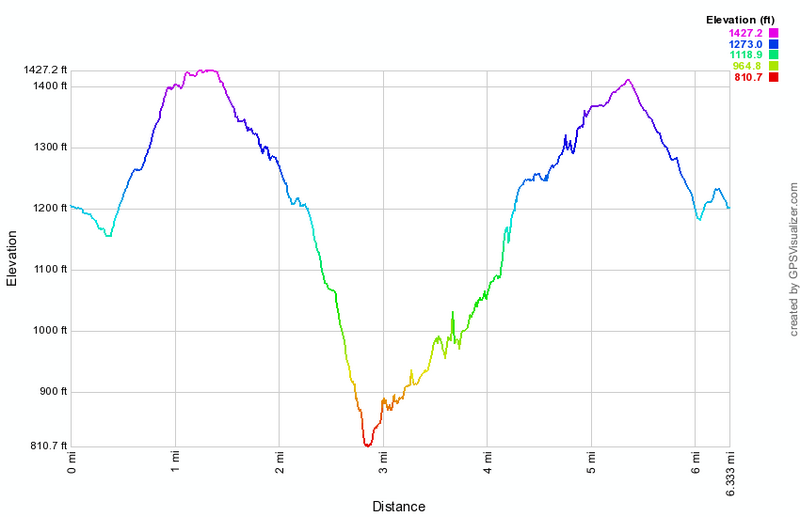 (The image at the left shows the profile of the hike. Remember that all vertical profiles are relative!)
Minnewaska: Stony Kill Falls
| Quick Look | ||||
|---|---|---|---|---|
| Difficulty | Round trip | Total climb | Internet Maps | |
| 1.2 mi | 218 ft | AllTrails | ||
 Begin on Route 44/55 that runs from Route 209 toward Gardiner and New Paltz. Watch for the sign for the Hudson valley
Resort. Across from this sign turn onto Minnewaska Trail. Quickly make a left turn onto Rock Haven Road. Follow this
road until it narrows and the pavement deteriorates. Turn left on Shaft 2A Road. Drive to the end and park by the
gate. Notice that parking is VERY limited. Do NOT park others in! Go around the gate and head down the dirt road.
Notice the fenced in area on the right. This is Shaft 2A which is an access shaft to the aqueduct that carries water
from the mountains to New York City. Across from the shaft is an old helipad. Con tune walking through the
abandoned slate quarry toward the opposite side. At this point any "formal" trail ends but you will be on the
banks of the Stony Kill. Turn right and pick your way upstream. You may cross the stream at several points. Within
minutes you can hear and then see the Stony Kills Falls. The water drops over 80 from the top of a cliff to a
pool below. The volume varies with the season and the rainfall but at any time it is still beautiful. Explore the
bottom of the falls and the pool. be careful since the rocks can be slippery from being wet, being icy, or being
covered with moss. When you are done exploring, retrace your steps to the car
Begin on Route 44/55 that runs from Route 209 toward Gardiner and New Paltz. Watch for the sign for the Hudson valley
Resort. Across from this sign turn onto Minnewaska Trail. Quickly make a left turn onto Rock Haven Road. Follow this
road until it narrows and the pavement deteriorates. Turn left on Shaft 2A Road. Drive to the end and park by the
gate. Notice that parking is VERY limited. Do NOT park others in! Go around the gate and head down the dirt road.
Notice the fenced in area on the right. This is Shaft 2A which is an access shaft to the aqueduct that carries water
from the mountains to New York City. Across from the shaft is an old helipad. Con tune walking through the
abandoned slate quarry toward the opposite side. At this point any "formal" trail ends but you will be on the
banks of the Stony Kill. Turn right and pick your way upstream. You may cross the stream at several points. Within
minutes you can hear and then see the Stony Kills Falls. The water drops over 80 from the top of a cliff to a
pool below. The volume varies with the season and the rainfall but at any time it is still beautiful. Explore the
bottom of the falls and the pool. be careful since the rocks can be slippery from being wet, being icy, or being
covered with moss. When you are done exploring, retrace your steps to the car
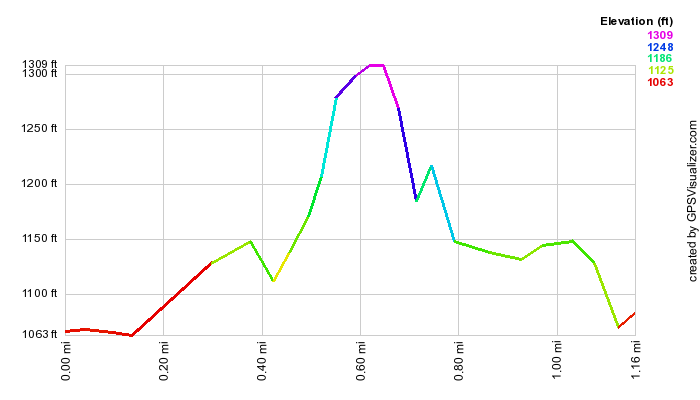
(The image at the left shows the profile of the hike. Remember that all vertical profiles are relative!)
Minnewaska: Three Falls on the Peters Kill (Minnewaska Parking)
| Quick Look | ||||
|---|---|---|---|---|
| Difficulty | Round trip | Total climb | Internet Maps | |
| 3.6 mi | 680 ft | AllTrails | ||
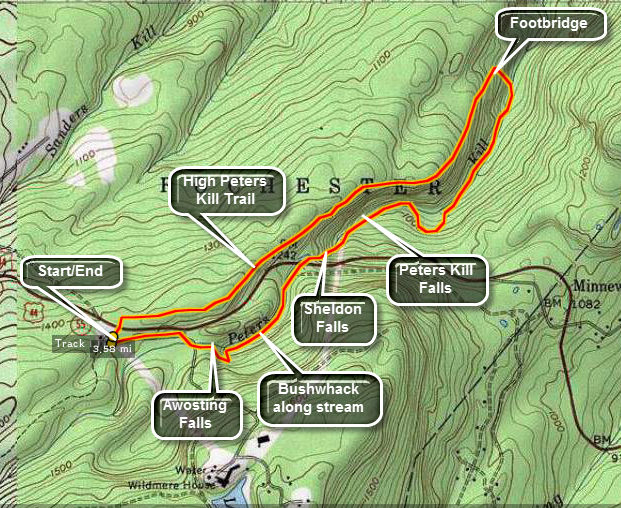 Park at the Lake Minnewaska lower parking area on Routes 44/55. Walk back to the gatehouse and turn right. Cross
the small bridge on the road which spans the Peters Kill. Turn left on the Awosting Falls Carriageway. Within half
a mile from where you parked, you will be at the falls. Follow the carriageway down to the base of the falls for
an even more impressive view! Continue on the carriageway until you can see the stream going under Routes 44/55.
At this point cross the road and follow the stream. You will almost immediately be at Sheldon Falls. Continue
along the south and east side of the stream. There is no trail for some time but several paths are obvious. In
about .2 miles you will see the ruins of a stone building. This is an old power plant. At some point, depending on
your individual route, you will pick up a red-marked trail. About .2 miles passed the power plant is
Peters Kill Falls. The red trail turns to a yellow one for a short distance and this ends at the blue-blazed
High Peters Kill Trail. Cross the bridge here and get ready for a 400 to 500 foot climb onto the ridge. The climb
is eased by many twists and turns. Continue on this trail back to the parking area. The total distance from the
bridge to the parking area is about 1.6 miles.
Park at the Lake Minnewaska lower parking area on Routes 44/55. Walk back to the gatehouse and turn right. Cross
the small bridge on the road which spans the Peters Kill. Turn left on the Awosting Falls Carriageway. Within half
a mile from where you parked, you will be at the falls. Follow the carriageway down to the base of the falls for
an even more impressive view! Continue on the carriageway until you can see the stream going under Routes 44/55.
At this point cross the road and follow the stream. You will almost immediately be at Sheldon Falls. Continue
along the south and east side of the stream. There is no trail for some time but several paths are obvious. In
about .2 miles you will see the ruins of a stone building. This is an old power plant. At some point, depending on
your individual route, you will pick up a red-marked trail. About .2 miles passed the power plant is
Peters Kill Falls. The red trail turns to a yellow one for a short distance and this ends at the blue-blazed
High Peters Kill Trail. Cross the bridge here and get ready for a 400 to 500 foot climb onto the ridge. The climb
is eased by many twists and turns. Continue on this trail back to the parking area. The total distance from the
bridge to the parking area is about 1.6 miles.
 (The image at the left shows the profile of the hike. Remember that all vertical profiles are
relative!)
(The image at the left shows the profile of the hike. Remember that all vertical profiles are
relative!)
Minnewaska: Three Falls on the Peters Kill (Peters Kill Parking)
| Quick Look | ||||
|---|---|---|---|---|
| Difficulty | Round trip | Total climb | Internet Maps | |
| 4.6 mi | 980 ft | AllTrails | ||
 A slightly different approach to this same loop is shown here. Park at the Peters Kill parking area on Routes 44/55.
Walk back to the picnic area and go straight ahead on the red blazed Peters Kill Loop Trail. Descend a rather long
steep hill to the Peters Kill. As you start your walk you will notice "Climbers Only!" areas to the right and left.
Look ahead as you descend the hill for a nice view of the distance peaks and ridges. At the base of the hill turn
right on a yellow blazed trail. Follow this along the Peters Kill until it intersects with the blue blazed Peters
Kill High Trail. Turning right leads to the Lost City which is a series of high stone monoliths that are a favorite
of climbers. Cross the bridge here and get ready for a 400 to 500 foot climb onto the ridge. The climb
is eased by many twists and turns. Continue on this trail back to the parking area. The total distance from the
bridge to the lower Minnewaska parking area is about 1.6 miles. Be sure to take in the views of the opposite rim of
the gorge. When the leaves are few the Peters Kill sometimes can be spotted below. A view of the Trapps also presents
itself at one point. Cross Routes 44/55 with great care and enter the lower Minnewaska parking area. Follow the road
to the gatehouse and turn right. Cross the small bridge on the road which spans the Peters Kill. Turn left on the
Awosting Falls Carriageway. Within half a mile , you will be at the top of the falls. Follow the carriageway down to
the base of the falls for an even more impressive view! Continue on the carriageway until you can see the stream
going under Routes 44/55. At this point cross the road and follow the stream. You will almost immediately be at
Sheldon Falls. These falls are a series of cascades over some well-worn rock formations. Continue carefully picking
your way along the south and east side of the stream. There is no trail for some time but several paths are obvious.
The rocks may be slippery at times and several areas require some balance and jumping (landing) ability. In
about .2 miles you will see the ruins of a stone building. This is an old coal-fired power plant. At some point,
depending on your individual route, you will pick up a red-marked trail. About .2 miles passed the power plant is
Peters Kill Falls. The red trail then meets up with the red-blazed trail back to the parking area.
A slightly different approach to this same loop is shown here. Park at the Peters Kill parking area on Routes 44/55.
Walk back to the picnic area and go straight ahead on the red blazed Peters Kill Loop Trail. Descend a rather long
steep hill to the Peters Kill. As you start your walk you will notice "Climbers Only!" areas to the right and left.
Look ahead as you descend the hill for a nice view of the distance peaks and ridges. At the base of the hill turn
right on a yellow blazed trail. Follow this along the Peters Kill until it intersects with the blue blazed Peters
Kill High Trail. Turning right leads to the Lost City which is a series of high stone monoliths that are a favorite
of climbers. Cross the bridge here and get ready for a 400 to 500 foot climb onto the ridge. The climb
is eased by many twists and turns. Continue on this trail back to the parking area. The total distance from the
bridge to the lower Minnewaska parking area is about 1.6 miles. Be sure to take in the views of the opposite rim of
the gorge. When the leaves are few the Peters Kill sometimes can be spotted below. A view of the Trapps also presents
itself at one point. Cross Routes 44/55 with great care and enter the lower Minnewaska parking area. Follow the road
to the gatehouse and turn right. Cross the small bridge on the road which spans the Peters Kill. Turn left on the
Awosting Falls Carriageway. Within half a mile , you will be at the top of the falls. Follow the carriageway down to
the base of the falls for an even more impressive view! Continue on the carriageway until you can see the stream
going under Routes 44/55. At this point cross the road and follow the stream. You will almost immediately be at
Sheldon Falls. These falls are a series of cascades over some well-worn rock formations. Continue carefully picking
your way along the south and east side of the stream. There is no trail for some time but several paths are obvious.
The rocks may be slippery at times and several areas require some balance and jumping (landing) ability. In
about .2 miles you will see the ruins of a stone building. This is an old coal-fired power plant. At some point,
depending on your individual route, you will pick up a red-marked trail. About .2 miles passed the power plant is
Peters Kill Falls. The red trail then meets up with the red-blazed trail back to the parking area.
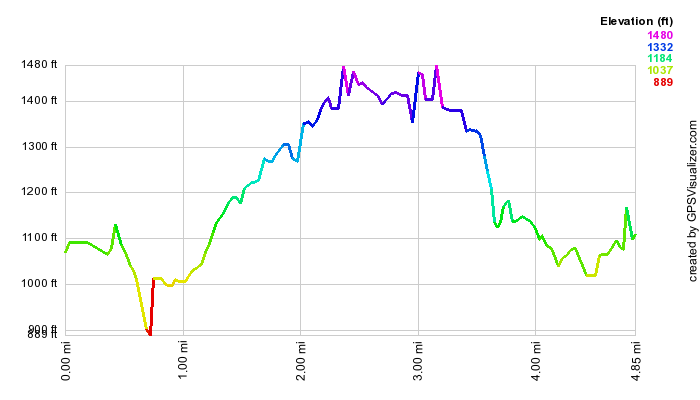 (The image at the left shows the profile of the hike. Remember that all vertical profiles are
relative!)
(The image at the left shows the profile of the hike. Remember that all vertical profiles are
relative!)
Minnewaska: Tunnel Loop
| Quick Look | ||||
|---|---|---|---|---|
| Difficulty | Round trip | Total climb | Internet Maps | |
| 7.8 mi | 1364 ft | AllTrails | ||
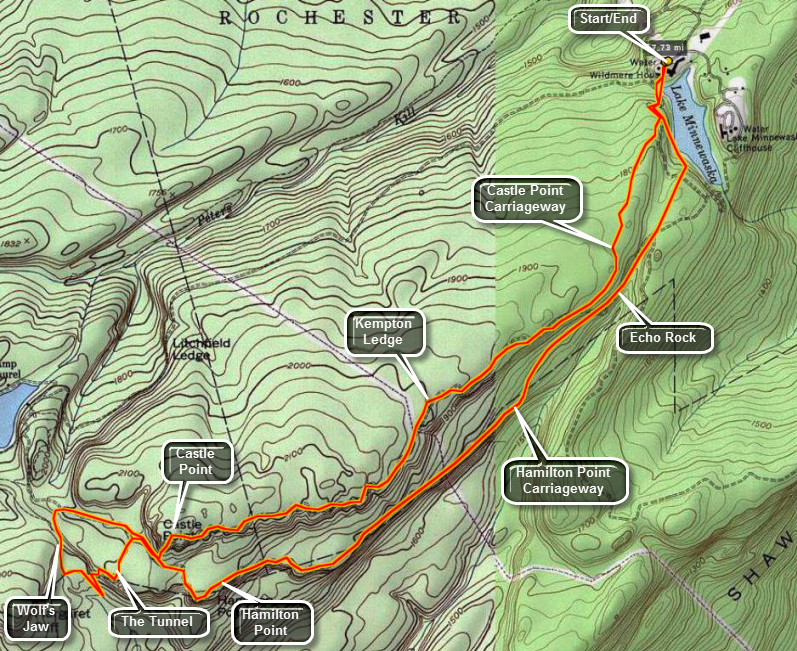 Park at the Lake Minnewaska upper parking area on Routes 44/55. Walk to the upper end of the lake and turn right
toward the western shore of the lake. After walking down the hill, turn left and walk on the carriageway around
the lake. Pass the turn to the Upper Awosting Carriageway(green)) and the next one to the Castle Point Carriageway
(blue). At the next Y in the path turn right onto the yellow-blazed Hamilton Point Carriageway. Continue on this
path and you will pass Echo Rock and several other good lookouts over the Palmaghatt Ravine. Of course the best
views are from Hamilton Point itself which is about 3 miles from the parking area.
Park at the Lake Minnewaska upper parking area on Routes 44/55. Walk to the upper end of the lake and turn right
toward the western shore of the lake. After walking down the hill, turn left and walk on the carriageway around
the lake. Pass the turn to the Upper Awosting Carriageway(green)) and the next one to the Castle Point Carriageway
(blue). At the next Y in the path turn right onto the yellow-blazed Hamilton Point Carriageway. Continue on this
path and you will pass Echo Rock and several other good lookouts over the Palmaghatt Ravine. Of course the best
views are from Hamilton Point itself which is about 3 miles from the parking area.
Keep on the yellow path as it descends down after Hamilton Point. After a walk of less than one mile the Castle Point Carriageway branches to the right and ascends to Castle Point. The Long Path (aqua) turns left into the woods. Continue on the yellow path for about half a mile until and unmarked but obvious trail turns to the left. This trail passes under the Wolf's Jaw. Just after the Wolf's Jaw watch for the aqua blazes of the Long Path on the left. Turn onto the Long Path and cross the small stream. The trail immediately begins to wind its way upwards back to the junction on the Hamilton Point Carriageway. The most interesting point along the way is The Tunnel. The passageway is narrow but very short. It can be wet and, unless you are willing to get very low, packs may be a problem. The trail then makes several rather significant ascents spaced with a few flat areas before you are back a the carriageway.
Turn right and follow the yellow and aqua blazes for about 500 feet. At this point the Long Path turns left into the woods. Be prepared to do some real climbing. You must be able to get some good hand and footholds and pull yourself up in several places. The reward is an exhilarating feeling when you get to the wonderful views on top of Castle Point. From here you can see Lake Awosting, the Sam's Point Preserve and you can look across the ravine at the Gertrude's Nose trail and Millbrook Mountain. Follow the blue-blazed carriageway for about 4 miles back to the parking area. Along the way take in some of the views from Kempton ledge and other unnamed viewpoints. As you approach the lake a view open up on the left. Several Catskill peaks can be seen even when a haze is lying on them.
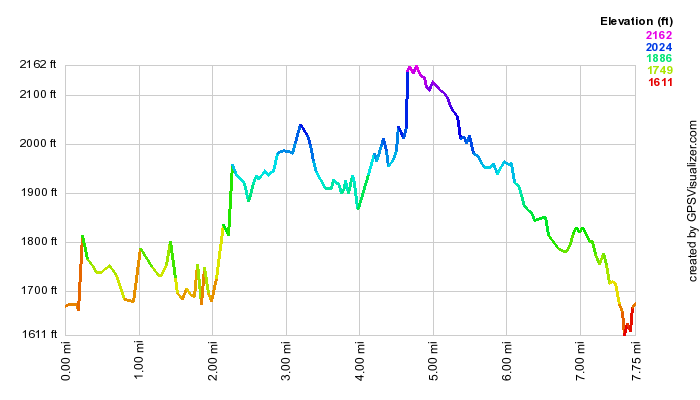 (The image at the left shows the profile of the hike. Remember that all vertical profiles are
relative!)
(The image at the left shows the profile of the hike. Remember that all vertical profiles are
relative!)
Mohonk: Coxing and Old Minnewaska Trail
| Quick Look | ||||
|---|---|---|---|---|
| Difficulty | Round trip | Total climb | Internet Maps | |
| 5.2 mi | 900 ft | AllTrails | ||
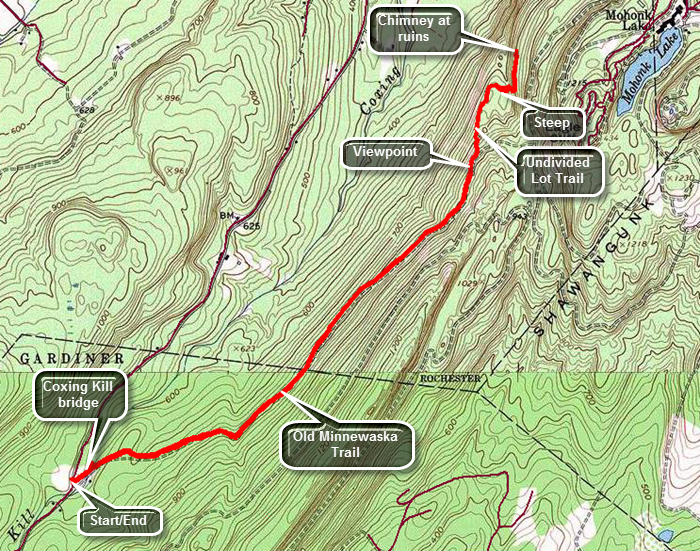 From Route 209, turn onto Route 44/55 heading over the mountain toward New Paltz. Pass the main entrance to Minnewaska Park and continue until Trapps Road appears on the left just after the Minnewaska park office. At the intersection with Clove Road turn left and drive down to the Coxing Trailhead. If the lot is open, drive in and park. To park here you must be a member of the Mohonk Preserve or pay a $12 per person usage fee. If the gates are closed, be sure to park so you are not blocking the entrance. Cross the road to get on the wide Old Minnewaska Trail heading toward the bridge over the Coxing Kill. After crossing the Coxing Kill ,the Old Minnewaska Trail ascends gently with a few rolling stretches. At about .7 miles there is a spot which was the site of a bridge that once spanned a stream. There isn't much of a stream left and the bridge no longer exists. Descend the bank and then ascend the other side. Soon some views to the north and west appear to the left of the trail although there are trees blocking the view. Several unobstructed views open up and you may stop if you wish. At about f2 miles there is a sign indicating that the Old Minnewaska Trail continues straight ahead and the Undivided Lot Trail turns to the left. H to the left as the trail turns from a woods road to a trail along open rock faces. Immediately begin to descend over rock outcroppings losing about 150 feet of elevation until you are at the base of a cliff band. The trail follows a route that ascended along and through the cliffs. In most seasons this is a short and easy ascent. In winter it can be more challenging! The climb begins at about 2.4 miles and is only 80 feet of vertical gain but it is a 25% grade. Soon the trail levels at the top and you can see a stone chimney ahead which is the turn around point. Walk to the chimney and then turn around and begin the return trip. The descent of the cliffs is easier than the ascent even in winter. You may want to stop at some of the unobstructed lookouts as the view is breathtaking. At 3.1 miles turn right to get on the Old Minnewaska Trail. The trail ascends briefly before beginning the long descent toward the trailhead. At 5 miles cross the bridge over the Coxing Kill. You may want to walk a little downstream to get a view of the bridge. Back on the main trail walk over to the kiosk and read some of the information about the Smiley family and the ecology of the Coxing Kill. Walk back to the car at the trailhead parking.
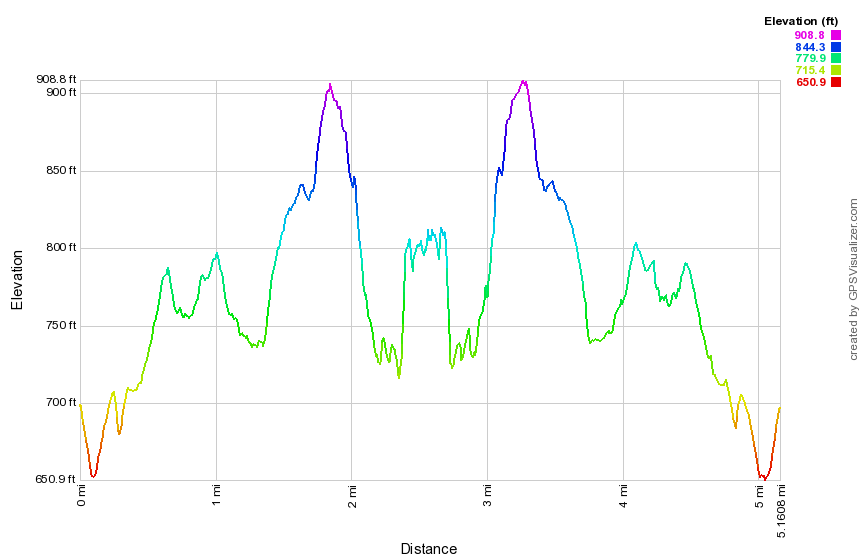 (The image shows the profile of the hike. Remember that all vertical profiles are relative!)
Mohonk: Overcliff - Sky Top - Undercliff
| Quick Look | ||||
|---|---|---|---|---|
| Difficulty | Round trip | Total climb | Internet Maps | |
| 7.2 mi | 1250 ft | AllTrails | ||
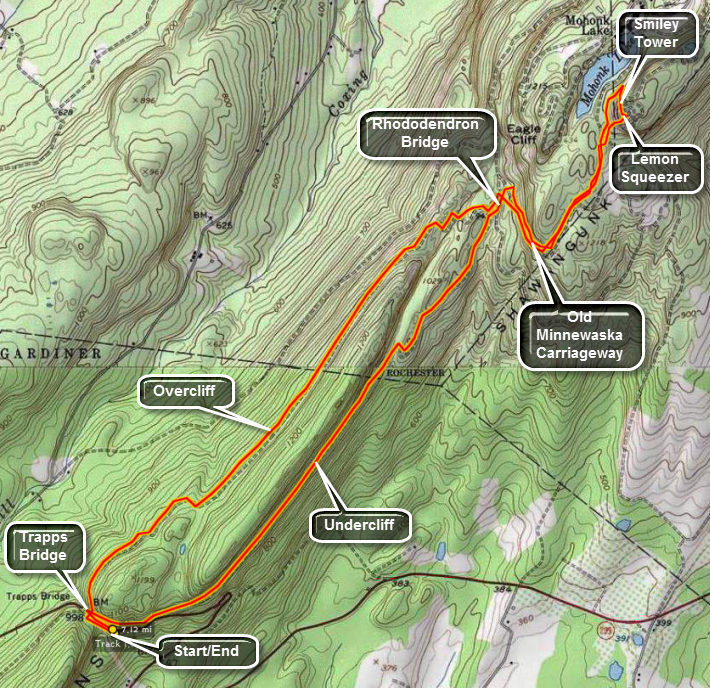 Park at the Trapps parking area on Routes 44/55 just before the hairpin turn. Walk up the road and cross the Trapps
Bridge. At the fork in the path, turn left onto the Overcliff Carriageway. The signs are generally informative
but DO NOT always match the descriptions in the guidebooks or the names used on maps. After about 2.5 miles Overcliff
ends at the Rhododendron Bridge. Cross the Bridge and turn left on the Old Minnewaska Carriageway. Do not make any
turns off this path for at least a mile. The carriageway begins to ascend and makes some turns right after the
bridge as it winds its way upward. There are some nice views along the way. Bypass the left turn onto Long
Woodland Drive and the right onto Home Farm Road. Shortly after this Short Woodland bears left and Lake Shore Road
goes right. Take the right onto Lake Shore and then the next right onto Forrest Drive. Look for the Spring House on
the left. Walk up the trail behind the spring house and watch for the red arrows that mark the path to the Crevice.
WARNING: The Crevice is narrow and steep. Climbing with a pack on your back may be impossible. There are ladders at
some points but other places require finding hand and foot holds. The last part is the hardest since it is the most
narrow and requires some strength to boost your body up onto the rock ledge at the top. You may use the Spring Path
route that is usually used as the return route. The Crevice is one way only up! See the end of this description.
At the top of the Crevice is a wide rock ledge that offers a great view of the surrounding area. You can also
look over the edge at the talus slopes below. A bridge over the Crevice offers a peek down into the depths you have
just conquered. The fun is not quite over. After crossing the bridge, another near vertical ascent is required. At
the top is a set of stairs and the paths to the Smiley Tower. The Tower offers a 360 degree view of the area.
Perhaps the most striking view is of Mohonk Lake and the Mohonk Mountain House. From the Tower head to the opposite
side from the crevice. Head down Sky Top Path to the stairs down to the Labyrinth. Along this short .2 mile path
are several gazebos and benches that overlook the lake. The path through the labyrinth is marked by the red arrows
that lead to the Crevice. You may follow these or go down to the Spring Path to make life easier. If you want to
avoid the Crevice altogether you may use the Spring Path to get to the Tower and then retrace your steps back to the
spring on the same path. The spring is only about .25 miles from the stairs. Return on from the spring to the
Rhododendron Bridge the same way you came. This distance is about one miles. Turn left over the Bridge on the
Undercliff Carriageway. In 2.3 miles you will be back at the Trapps Bridge. Along the way watch for groups climbing
the cliffs and boulders along the trail. This is a favorite spot for climbers from all around.
Park at the Trapps parking area on Routes 44/55 just before the hairpin turn. Walk up the road and cross the Trapps
Bridge. At the fork in the path, turn left onto the Overcliff Carriageway. The signs are generally informative
but DO NOT always match the descriptions in the guidebooks or the names used on maps. After about 2.5 miles Overcliff
ends at the Rhododendron Bridge. Cross the Bridge and turn left on the Old Minnewaska Carriageway. Do not make any
turns off this path for at least a mile. The carriageway begins to ascend and makes some turns right after the
bridge as it winds its way upward. There are some nice views along the way. Bypass the left turn onto Long
Woodland Drive and the right onto Home Farm Road. Shortly after this Short Woodland bears left and Lake Shore Road
goes right. Take the right onto Lake Shore and then the next right onto Forrest Drive. Look for the Spring House on
the left. Walk up the trail behind the spring house and watch for the red arrows that mark the path to the Crevice.
WARNING: The Crevice is narrow and steep. Climbing with a pack on your back may be impossible. There are ladders at
some points but other places require finding hand and foot holds. The last part is the hardest since it is the most
narrow and requires some strength to boost your body up onto the rock ledge at the top. You may use the Spring Path
route that is usually used as the return route. The Crevice is one way only up! See the end of this description.
At the top of the Crevice is a wide rock ledge that offers a great view of the surrounding area. You can also
look over the edge at the talus slopes below. A bridge over the Crevice offers a peek down into the depths you have
just conquered. The fun is not quite over. After crossing the bridge, another near vertical ascent is required. At
the top is a set of stairs and the paths to the Smiley Tower. The Tower offers a 360 degree view of the area.
Perhaps the most striking view is of Mohonk Lake and the Mohonk Mountain House. From the Tower head to the opposite
side from the crevice. Head down Sky Top Path to the stairs down to the Labyrinth. Along this short .2 mile path
are several gazebos and benches that overlook the lake. The path through the labyrinth is marked by the red arrows
that lead to the Crevice. You may follow these or go down to the Spring Path to make life easier. If you want to
avoid the Crevice altogether you may use the Spring Path to get to the Tower and then retrace your steps back to the
spring on the same path. The spring is only about .25 miles from the stairs. Return on from the spring to the
Rhododendron Bridge the same way you came. This distance is about one miles. Turn left over the Bridge on the
Undercliff Carriageway. In 2.3 miles you will be back at the Trapps Bridge. Along the way watch for groups climbing
the cliffs and boulders along the trail. This is a favorite spot for climbers from all around.
 (The image at the left shows the profile of the hike. Remember that all vertical profiles are
relative!)
(The image at the left shows the profile of the hike. Remember that all vertical profiles are
relative!)
Mohonk: Spring Farm (Chapel and Undivided Lot)
| Quick Look | ||||
|---|---|---|---|---|
| Difficulty | Round trip | Total climb | Internet Maps | |
| 6.7 mi | 1538 ft | AllTrails | ||
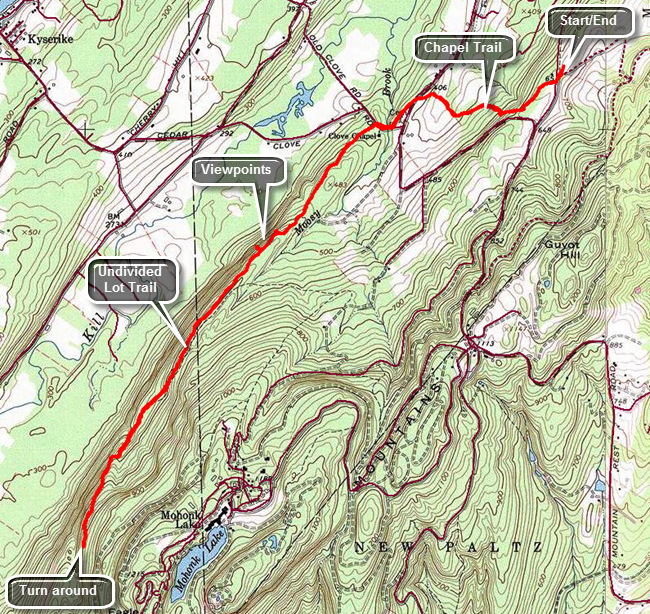
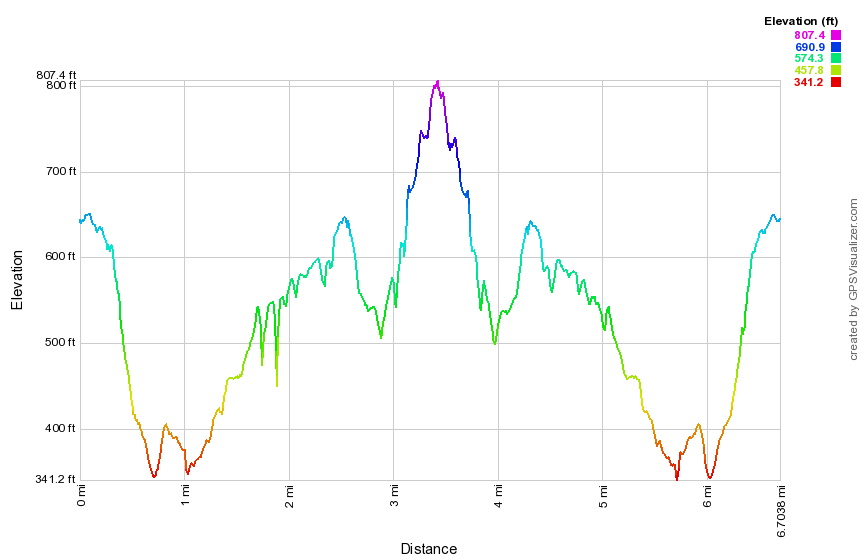 Just outside of New Paltz on Route 299 turn north on Springtown Road. After a short distance turn left onto Mountain Rest Road. Mountain Rest Road eventually becomes Mohonk Road. Continue passed the entrance to the Mohonk Mountain House. After about a mile, turn right on Upper Knolls Road at the sign for the Spring Farm Trailhead at the point where the main road makes a sweeping turn to the left. Stop at small gatehouse and show your membership pass or pay $12 each to hike. Park in the parking lot close to the gatehouse. Walk back toward the gatehouse and start out on Upper Knolls Road to begin your hike. Just passed the gatehouse, turn right onto the Chapel Trail which passes through a field to the woods. Walk through the woods and down a small hill to a stream crossing and then climb back up the other side. The trail climbs briefly and then starts another descent. After walking through some woods, the trail passes close to a field and along an elevated walkway. Ascend a small hill, crossed a powerline right-of-way and arrive at Mohonk Road. Cross to the other side bearing a little to the left to pick up the trail. The blazes on the trail may be faded in some spots and turns are not always clearly marked. After a short walk downhill, arrive at Clove Road and turn right walking west to a small parking area with a chapel on a hill. Continue west a short distance on the road until you find the triangle of blazes that is the start of the Undivided Lot Trail. Continue on the trail which ascends much of the way. Soon the red blazed Stokes Trail heads off to the left. Stay to the right on the blue Undivided Lot Trail. At 1.8 miles the trail comes very close to the edge of the ridge and there is a good view to the northwest. As is often the case, there is a better lookout a few hundred feet further along with a short path to the right. At 2.6 miles we begin a descent and then an ascent at 3.0 miles. The ascent isn't that steep but it seems to hang on the edge of the ridge with a steep dropoff on the right side. The trail starts to level off at the top and at about 3.5 miles there is a chimney to the left of the trail and an old foundation. This is the turn around point for this hike although you could continue farther or turn around earlier. To complete the hike reverse your route on the way out to make a true out-and-back hike.
(The image shows the profile of the hike. Remember that all vertical profiles are relative!)
Mongaup Hardenburgh Trail from Beaverkill
| Quick Look | ||||
|---|---|---|---|---|
| Difficulty | Round trip | Total climb | Internet Maps | |
| 7.7 mi. | 2022 ft. | AllTrails | ||
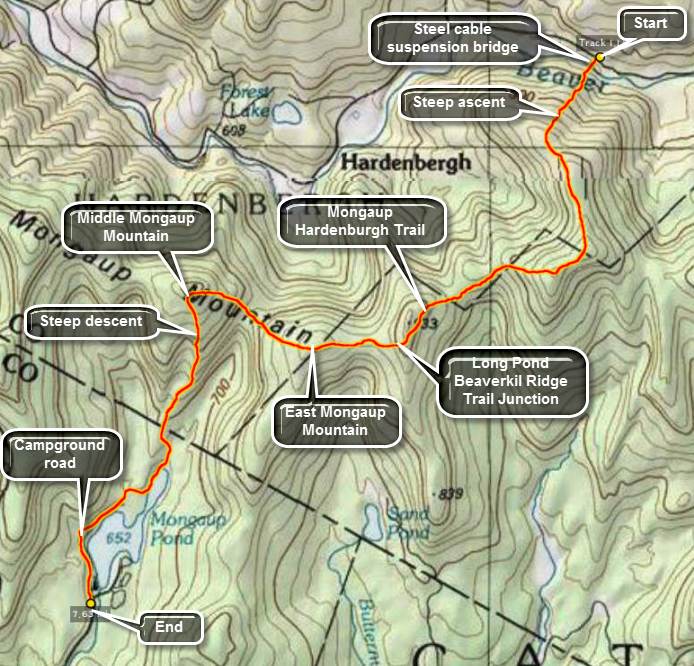 Take the Beaverkill Rd. toward the Lew Beach and Turnwood area. Keep driving even when the road turns
to gravel and dirty. After about 30 minutes you will see the Zen Monastery on the left. After this
is the parking area for Cradle Rock Ridge on the right. Continue on until you see the small parking area
for the Mongaup Hardenburgh Trail on the Right. Park your car and sign in at the register. The hike through
to Mongaup Pond is about 6.5 miles. You, of course, can turn around at any point and return to your car. You
can park another car at the end of the trail at the Mongaup Campgrounds. Just after the trail register you
cross the Beaverkill on a rather unique steel cable suspension bridge. The bridge has wooden decking which
is showing its age but still seems safe. You now begin a long and sometimes challenging ascent of the
Beaverkill ridge. The highest point on the ridge is almost 3200 feet! The trail offers very few views
of the valleys surrounding the ridge. After about two miles the trail opens up into a small clearing.
Walk to the left of the trail to a rock ledge. The views to the east are the only ones you will find
on this hike! As you continue you will descend the Beaverkill Ridge and then ascend east Mongaup Mountain.
At the three mile mark just before this ascent a red marked trail to Long Pond branches to the left. There
are no signs to mark this trail but the markers are clear. After ascending east Mongaup you descend quite
a bit before ascending Middle Mongaup Mountain. At this point you may decide to go off trail for less than
half a mile to ascend the main summit of Mongaup Mountain. The trail continues down now to the state
campgrounds. At the T-junction at Mongaup Pond turn right and stay on the blue trail until you reach the
loop road. Turning right is the shortest way to the park entrance. After less than a mile, you will see
the main buildings.
Take the Beaverkill Rd. toward the Lew Beach and Turnwood area. Keep driving even when the road turns
to gravel and dirty. After about 30 minutes you will see the Zen Monastery on the left. After this
is the parking area for Cradle Rock Ridge on the right. Continue on until you see the small parking area
for the Mongaup Hardenburgh Trail on the Right. Park your car and sign in at the register. The hike through
to Mongaup Pond is about 6.5 miles. You, of course, can turn around at any point and return to your car. You
can park another car at the end of the trail at the Mongaup Campgrounds. Just after the trail register you
cross the Beaverkill on a rather unique steel cable suspension bridge. The bridge has wooden decking which
is showing its age but still seems safe. You now begin a long and sometimes challenging ascent of the
Beaverkill ridge. The highest point on the ridge is almost 3200 feet! The trail offers very few views
of the valleys surrounding the ridge. After about two miles the trail opens up into a small clearing.
Walk to the left of the trail to a rock ledge. The views to the east are the only ones you will find
on this hike! As you continue you will descend the Beaverkill Ridge and then ascend east Mongaup Mountain.
At the three mile mark just before this ascent a red marked trail to Long Pond branches to the left. There
are no signs to mark this trail but the markers are clear. After ascending east Mongaup you descend quite
a bit before ascending Middle Mongaup Mountain. At this point you may decide to go off trail for less than
half a mile to ascend the main summit of Mongaup Mountain. The trail continues down now to the state
campgrounds. At the T-junction at Mongaup Pond turn right and stay on the blue trail until you reach the
loop road. Turning right is the shortest way to the park entrance. After less than a mile, you will see
the main buildings.
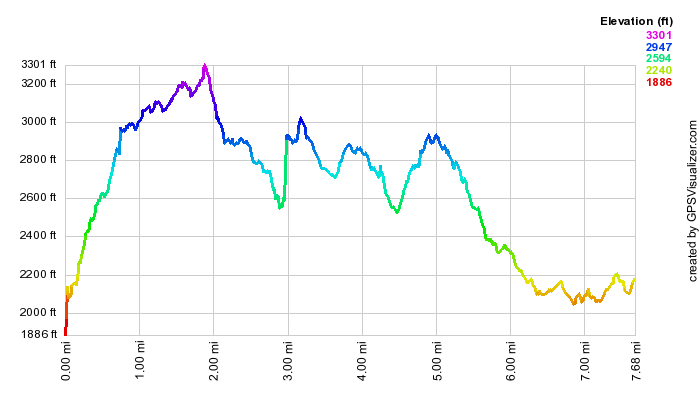 (The image at the left shows the profile of the hike. Remember that all vertical profiles are
relative!)
(The image at the left shows the profile of the hike. Remember that all vertical profiles are
relative!)
Mongaup Hardenburgh Trail from Mongaup to Long Pond Beaverkill Ridge Junction
| Quick Look | ||||
|---|---|---|---|---|
| Difficulty | Round trip | Total climb | Internet Maps | |
| 8.1 mi. | 1925 ft. | AllTrails | ||
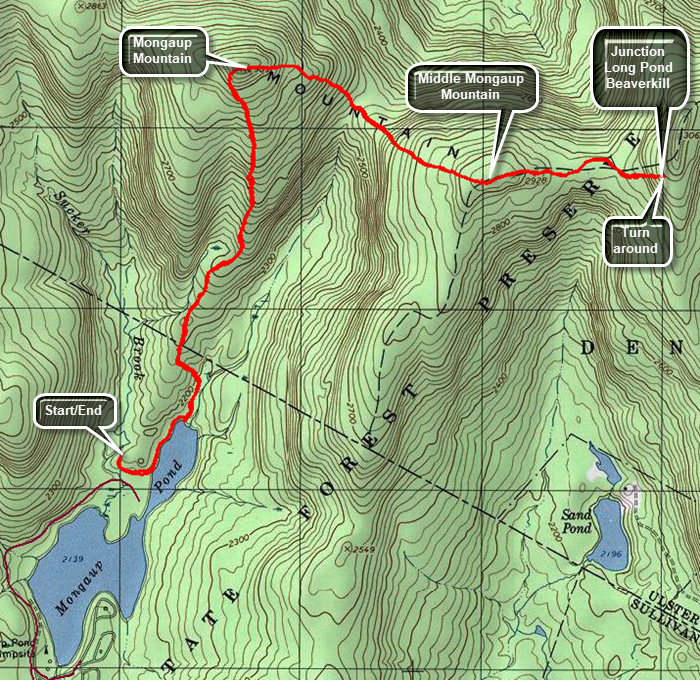 From Livingston Manor drive out the DeBruce Road about 6 miles to Mongaup Road. Turn left and continued up the road to the point where it splits. Stay right on Mongaup Pond Road to head for the campgrounds. At the campgrounds, pull over and park on the right. Ask the attendant if you can park near the trailhead in the field by campsite 161. Pay the entrance fee and follow the attendant's instructions for parking. Walk back out to the road and turn left. Watch for the trail which goes off to the left after only a tenth of a mile. There is no sign for the trail but it is marked with blue trail markers. Follow the trail as it follows the shore of the pond with glimpses of the water along the way. At about .4 miles at the northern end of the pond, turn left just before the bridge to start the climb up Mongaup Mountain. You will gain 830 feet over 1.5 miles with an average grade of 11%. At the top of the mountain the trail turns from heading north to southeast and east. From the top of Mongaup Mountain you will descend 385 feet of .5 miles for an average grade of 15%. Almost immediately the trail begin the climb up Middle Mongaup Mountain. Again the distance is about .5 miles and the elevation gain is 370 feet. There is a short flat area at the top of Middle Mongaup before another descent on the other side. This descent is short and leads to another for a long time area before the final climb to the trail junction on Beaverkill Ridge. The final climb is short but steep with some parts coming close to a 30% grade. When you reach the junction, turn around and follow the same route in reverse back to your car.
 (The image at the left shows the profile of the hike. Remember that all vertical profiles are
relative!)
(The image at the left shows the profile of the hike. Remember that all vertical profiles are
relative!)
Mongaup Pond
| Quick Look | ||||
|---|---|---|---|---|
| Difficulty | Round trip | Total climb | Internet Maps | |
| 3.0 mi. | 235 ft. | AllTrails | ||
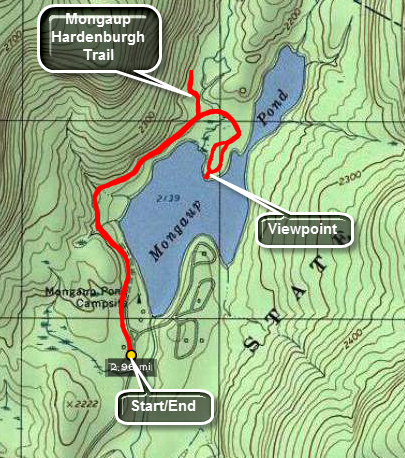 This hike can be easy or difficult depending on the conditions. In two feet of fresh snow the going is tough. Under most other conditions it is an easy walk. Park at the "beach" Parking area at Mongaup Pond or outside the gatehouse when the park is closed. Walk the park roads in clockwise direction around the entire pond or walk as far as you can go and turn around.

(The image above shows the profile of the hike. Remember that all vertical profiles are relative!)
Mongaup Pond Loop (snowmobile)
| Quick Look | ||||
|---|---|---|---|---|
| Difficulty | Round trip | Total climb | Internet Maps | |
| 5.7 mi. | 570 ft. | AllTrails | ||
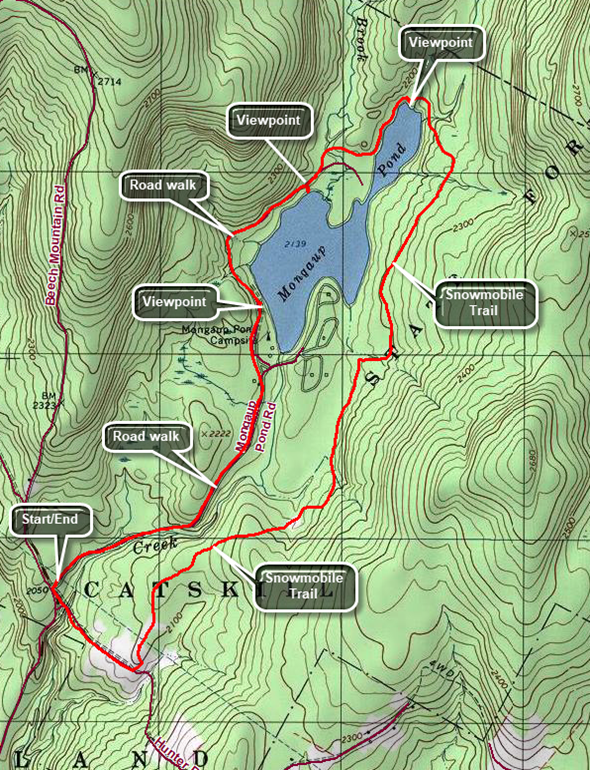 From the hamlet of DeBruce drive north on Mongaup Pond Road. Continue to where the road splits and stay to the right. Park in the small pulloff on the right just after the turn. Walk on the road back toward the intersection and turn left on a woods road that heads down to the stream. Cross the creek on the small "bridge" that is still present and begin to climb a little hill. After .4 miles turn left on the snowmobile trail which can be hard to find as this is not a well-traveled route. The first part of this trail passes through some pines and is usually relatively dry. As you continue to walk the trail may become wet and muddy. This problem is caused by the cliffs and ledges to the right which drain onto the trail and then to a swampy area on the left of the trail. At 1.95 miles the trail turns to the right. To the left is a short trail that runs out to the campgrounds. Turn right and get ready for some more potentially wet areas. Continue to 2.6 miles where the Mongaup Willowemoc Trail comes in from the right. Walk straight ahead and downhill toward the head end of the pond. The trail crosses four different bridges and at 3.1 miles arrives at the junction with the Mongaup Hardenburgh Trail on the right. There is a nice view of the pond from the shore. Continue around the pond on the trail. Walk out to the road and turn right to walk on the campgrounds road along the west side of the pond. toward the point where the snowmobile trail climbs the hill to the Flynn Trail. At 3.7 miles walk off the road to the left to a bench near the shore of pond. The views from here are slightly different than from the head of the pond. Walk back out to the road and continue to walk south on the road. The boat launch is at about 4.4 miles and you may choose to stop or pass by. Again continue on the road passing the bathrooms and pavilions and heading toward the park entrance at 4.6 miles. The walk back to the car along Mongaup Road can be pleasing as it runs parallel to the stream. The first part of the walk undulates a little but the second part is mostly downhill. After about 1.1 miles, you will be back at your car.
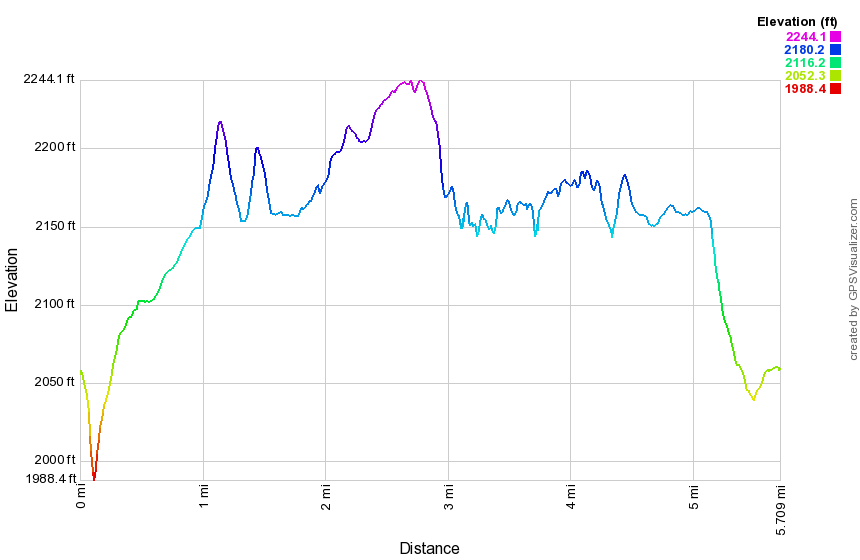
(The image above shows the profile of the hike. Remember that all vertical profiles are relative!)
Mongaup Pond Snowmobile Loop
| Quick Look | ||||
|---|---|---|---|---|
| Difficulty | Round trip | Total climb | Internet Maps | |
| 8.1 mi. | 1200 ft. | AllTrails | ||
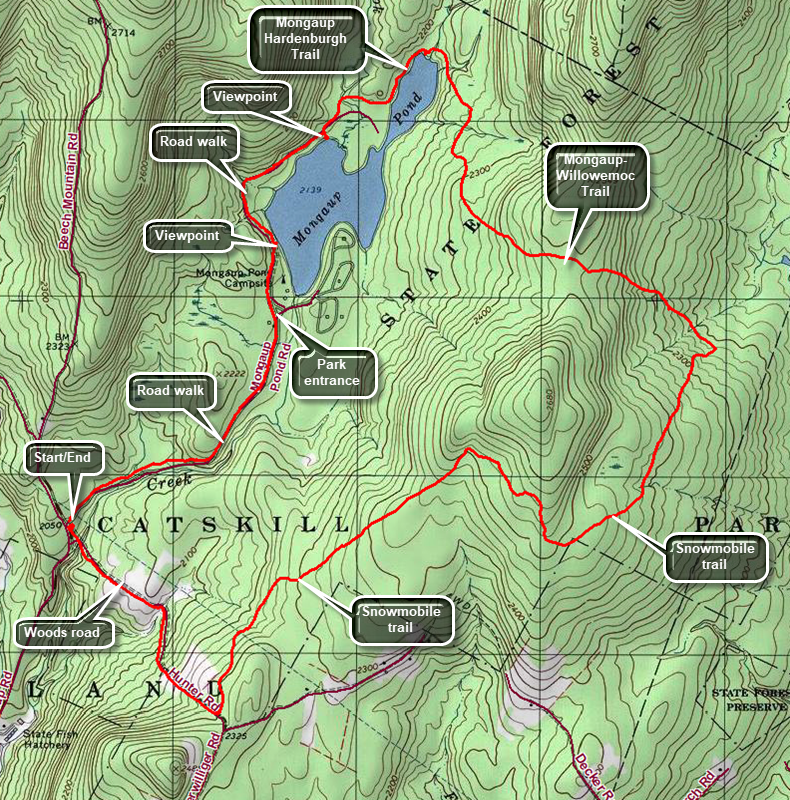 From the hamlet of DeBruce drive north on Mongaup Pond Road. Continue to where the road splits and stay to the right. Park in the small pulloff on the right just after the turn. Walk on the road back toward the intersection and turn left on a woods road that heads down to the stream. Cross the creek on the small "bridge" that is still present and begin to climb a little hill. At the trail junction at .4 miles continue straight ahead. Descend to a swampy area and then ascend another hill for .5 miles. This woods road is rocky and can be wet at times. At 1 mile turn left on the snowmobile trail and walk through and open area that has many ferns in season. The trail then enters the forest. The trail heads northeast and starting at 1.4 miles goes uphill for 1.3 miles turning sharply southeast at 2.35 miles. From the top of the hill begin to descend following the trail as it again turns northeast at 2.9 miles. The total descent is about 1.2 miles and 360 vertical feet which is a gentle grade. At 3.8 miles there is a trail junction. Turn left on the Mongaup Willowemoc Trail and almost immediately begin a .5 mile climb heading northwest. At the top of the hill, start downhill for .65 miles to the junction with a snowmobile trail. Head north and continue walking downhill crossing three or four bridges. At 5.5 miles you will be at the junction with the Mongaup Hardenburgh Trail. Continue around the pond on the trail to the campsite loop road. Turn right to walk out to the main road around the pond. Turn right on the road. In a short distance there is a small bench near the shore of the pond which is a nice viewpoint. Continue on the road walking south along the west side of the pond. There is an observation deck and boat launch which also provides a nice viewpoint. Continue along the road to the park entrance and walk about 1.1 miles on the road back to your car.
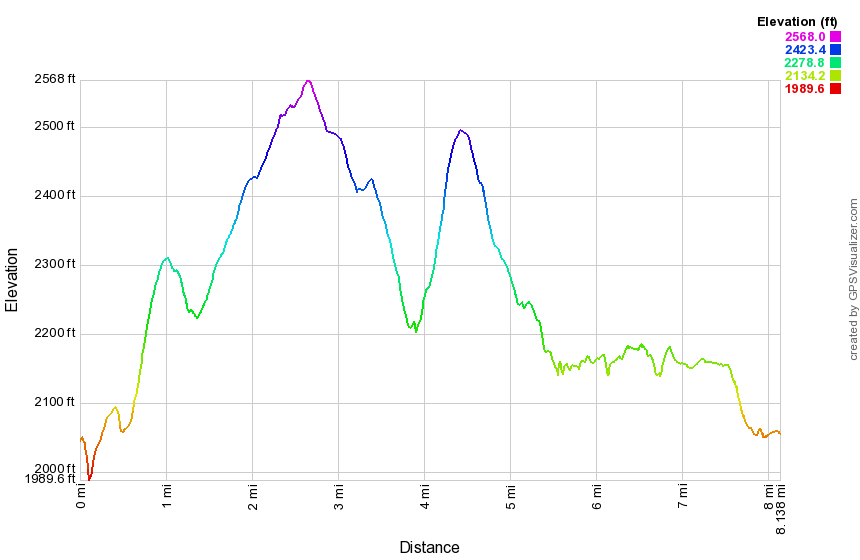
(The image above shows the profile of the hike. Remember that all vertical profiles are relative!)
Mongaup Pond: Flynn Trail, Snowmobile Trail, Campground Roads
| Quick Look | ||||
|---|---|---|---|---|
| Difficulty | Round trip | Total climb | Internet Maps | |
| 6.4 mi. | 960 ft. | AllTrails | ||
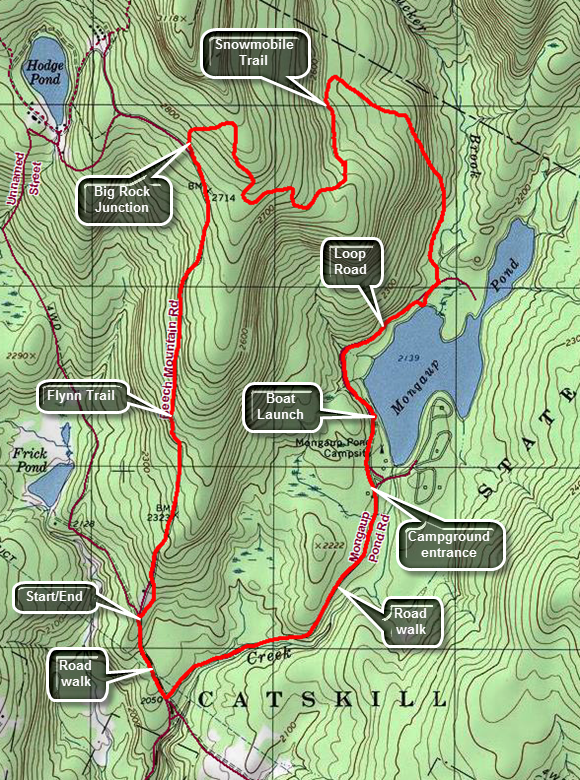 From Livingston Manor head out the DeBruce Road for about 6 miles. Turn left on the Mongaup Road and drive to the intersection with Beech Mountain Road. Stay left toward Frick Pond and park in one of the lots. Cross the road and start your hike on the Flynn Trail. At the end of the woods trail turn right on the woods road which was once an extension of Beech Mountain Road. Start to climb the Flynn Trail heading towards the junction with the Big Rock Trail at 1.7 miles. This is a four-way junction with the Flynn Trail continuing straight ahead and the Big Rock Trail turning to the left. Turn right on the snowmobile trail and climb another hill to the highest point on the hike at 2880 feet. You will now have climbed 735 feet from the parking area and most of the rest of the hike is downhill or flat. The snowmobile trail wanders a little but is all downhill. At 3.1 miles it finally turns southeast and then south toward Mongaup Pond. Just before reaching the pond it becomes more of a woods road and flattens out with a swamp on the left. When you meet the campground roads turn right and walk out to the main loop road. Turn right on the main loop road and walk south along the east shore of Mongaup Pond. There are several places to walk over to the shore including observation deck at 4.75 miles. As you continue on the road, you will come to the main parking area and the bathhouses. Be sure to walk straight ahead toward the entrance to the campgrounds. Pass through the entrance and start walking on the access road. Walk 1.1 miles mostly downhill or flat to the intersection with Beech Mountain Road. Turn right and walk a little more than a quarter mile uphill back to your car.
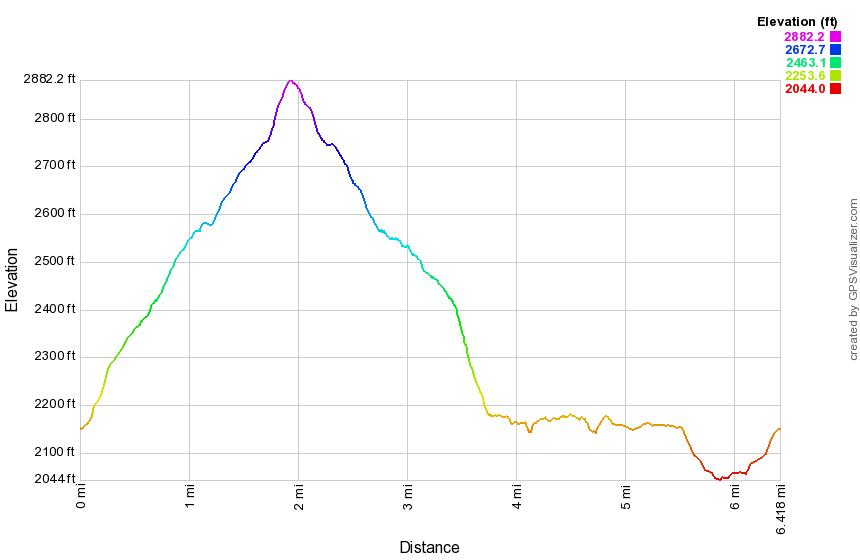
(The image above shows the profile of the hike. Remember that all vertical profiles are relative!)
Mongaup Pond: Flynn Trail, Snowmobile Trails, Mongaup Pond Road
| Quick Look | ||||
|---|---|---|---|---|
| Difficulty | Round trip | Total climb | Internet Maps | |
| 7.3 mi. | 1030 ft. | AllTrails | ||
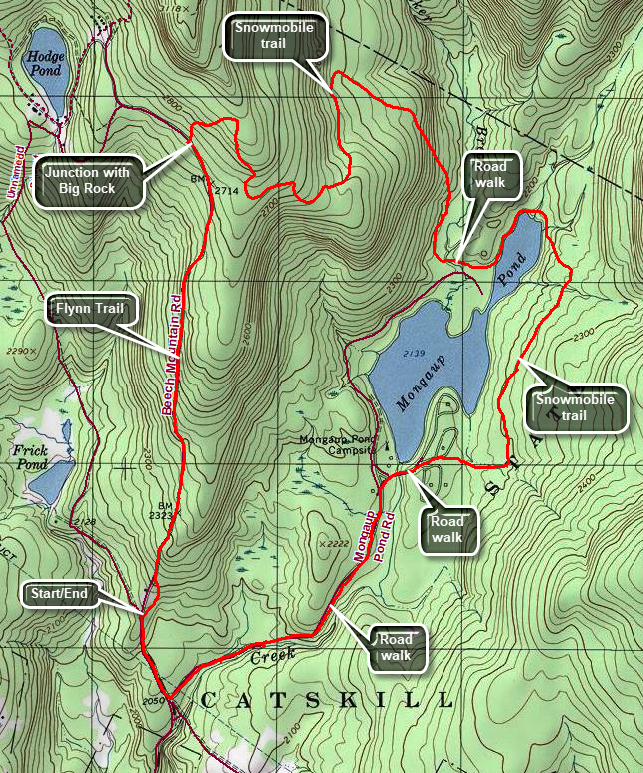 From Livingston Manor head out the DeBruce Road for about 6 miles. Turn left on the Mongaup Road and drive to the intersection with Beech Mountain Road. Stay left toward Frick Pond and park in one of the lots. Cross the road and start your hike on the Flynn Trail. At the end of the woods trail turn right on the woods road which was once an extension of Beech Mountain Road. Start to climb the Flynn Trail heading towards the junction with the Big Rock Trail at 1.7 miles. This is a four-way junction with the Flynn Trail continuing straight ahead and the Big Rock Trail turning to the left. Turn right on the snowmobile trail and climb another hill to the highest point on the hike at 2880 feet. You will now have climbed 735 feet from the parking area and most of the rest of the hike is downhill or flat. The snowmobile trail wanders a little but is all downhill. At 3.1 miles it finally turns southeast and then south toward Mongaup Pond. Just before reaching the pond it becomes more of a woods road and flattens out with a swamp on the left. When you meet the campground roads turn left and walk .15 miles watching for the beginning of the blue Mongaup Hardenburgh Trail on your left. Turn left on the trail and walk north along the western shore of the upper part of Mongaup Pond. At 4.4 the Mongaup Hardenburgh Trail turns left. Continue straight ahead on the snowmobile trail which gains some elevation and passes over three bridges. This part of the trail can be wet. The Mongaup Willowemoc Trail will come in from the left at 4.8 miles. Continue straight ahead on the snowmobile trail which can be muddy at times. At 5.5 miles the snowmobile trail turns left to head for Mongaup Falls. Continue straight ahead crossing a stream and a marshy area to arrive at campsite 38. Walk to the road and bear left to find the main loop road. Turn left and walk out passed the day-use area to the entrance. Pass through the entrance to the campground and begin the return trip to the parking area on Mongaup Pond Road. Walk 1.2 miles mostly downhill or flat to the intersection with Beech Mountain Road. Turn right and walk a little more than a quarter mile uphill back to your car.
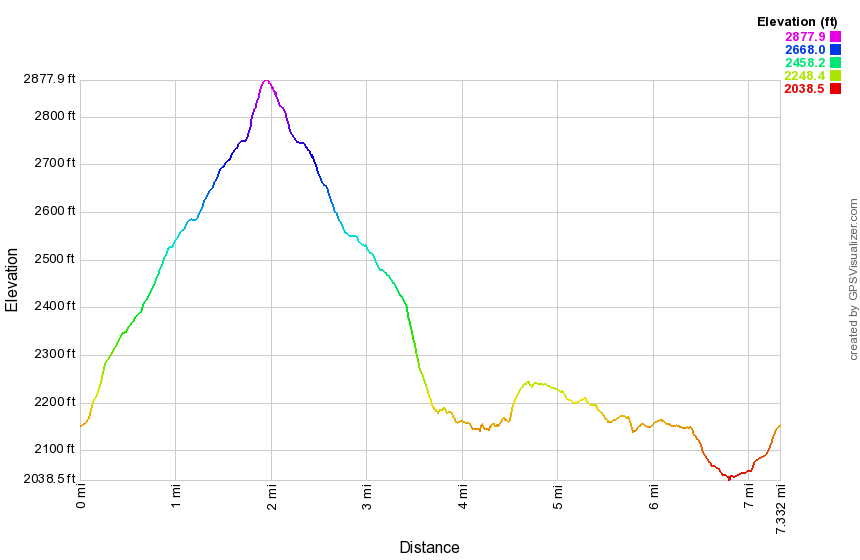
(The image above shows the profile of the hike. Remember that all vertical profiles are relative!)
Mongaup Pond: Snowmobile and Flynn Trail
| Quick Look | ||||
|---|---|---|---|---|
| Difficulty | Round trip | Total climb | Internet Maps | |
| 7.8 mi. | 1150 ft. | AllTrails | ||
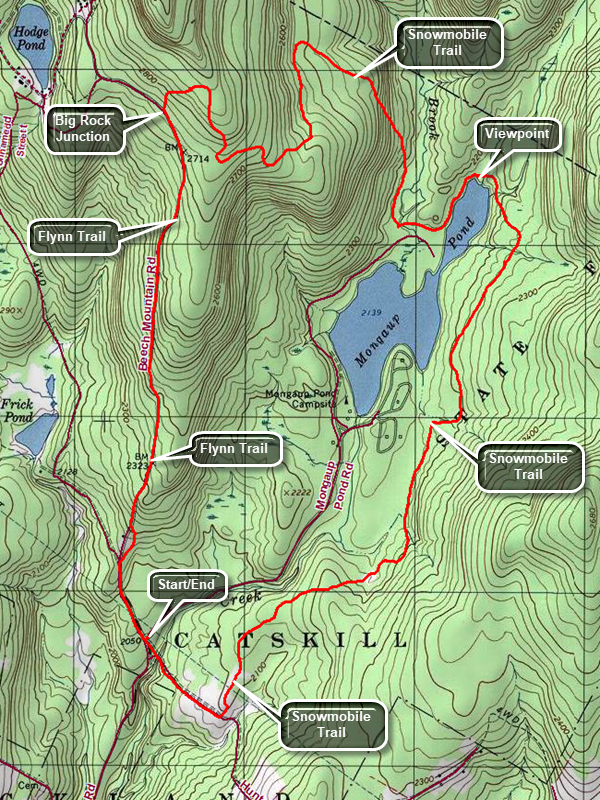 From the hamlet of DeBruce drive north on Mongaup Pond Road. Continue to where the road splits and stay to the right. Park in the small pulloff on the right just after the turn. Walk on the road back toward the intersection and turn left on a woods road that heads down to the stream. Cross the creek on the small "bridge" that is still present and begin to climb a little hill. After .4 miles turn left on the snowmobile trail which can be hard to find as this is not a well-traveled route. The first part of this trail passes through some pines and is usually relatively dry. As you continue to walk the trail may become wet and muddy. This problem is caused by the cliffs and ledges to the right which drain onto the trail and then to a swampy area on the left of the trail. At 1.95 miles the trail turns to the right. To the left is a short trail that runs out to the campgrounds. Turn right and get ready for some more potentially wet areas. Continue to 2.6 miles where the Mongaup Willowemoc Trail comes in from the right. Walk straight ahead and downhill toward the head end of the pond. The trail crosses four different bridges and at 3.1 miles arrives at the junction with the Mongaup Hardenburgh Trail on the right. There is a nice view of the pond from the shore. Continue around the pond on the trail. Walk out to the road and turn right to walk on the campgrounds road along the west side of the pond. After only a tenth if a mile, turn right where there are snowmobile trail markers. The snowmobile trail meanders for 1.8 miles starting out to the northwest, then heading due south before turning west and then north again to the highest point on the hike. In the process it gains over 700 feet and averages a 7.5% grade with some much steeper spots. The trail is eroded and covered in sticks and rocks which make walking difficult. At 5.5 miles you will be at the highest point with an elevation of 2880 feet. From here it is a short walk downhill to the Flynn Trail at the junction with the Big Rock Trail. Turn left on the Flynn Trail and start downhill back to you car. The 1.7 miles hike to the Frick Pond parking area is all downhill or flat. Toward the end of the trail there is a gate marking private property. Walk off the woods road and follow the Flynn Trail into the woods to avoid the private property around the cabin. At the Frick Pond parking area turn left and hike down Beech Mountain Road for .3 miles back to you car.
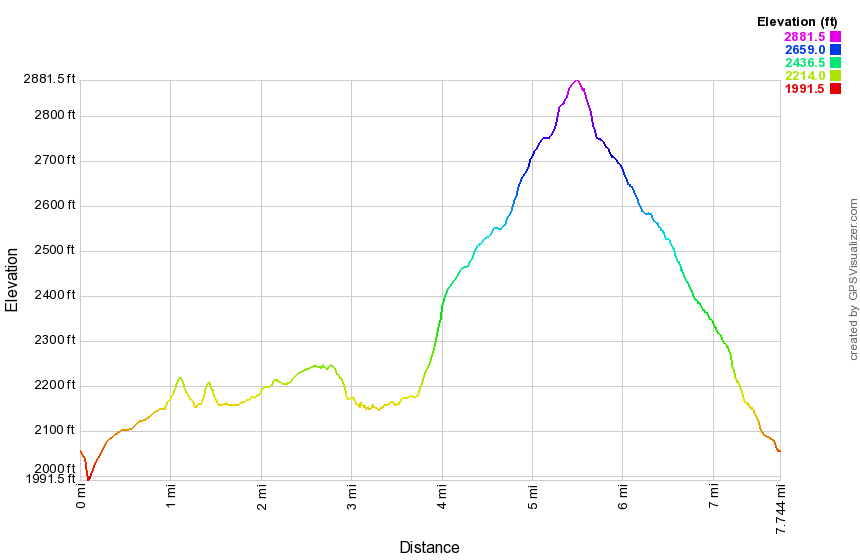
(The image above shows the profile of the hike. Remember that all vertical profiles are relative!)
Mongaup Pond: Flynn Trail and Ledges
| Quick Look | ||||
|---|---|---|---|---|
| Difficulty | Round trip | Total climb | Internet Maps | |
| 3.8 mi. | 675 ft. | AllTrails | ||
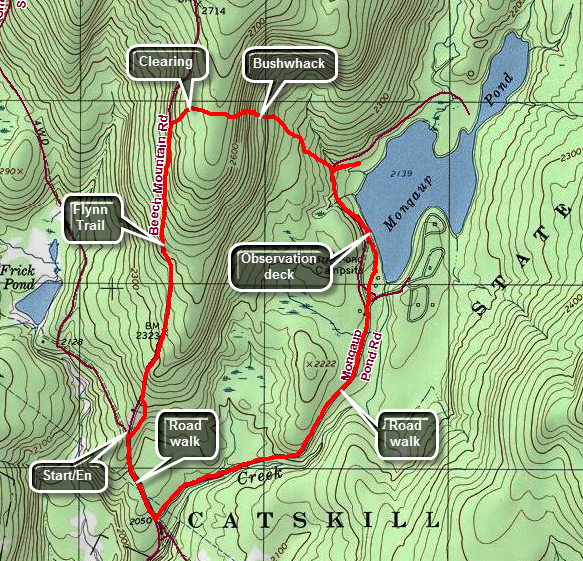 From Livingston Manor head out the DeBruce Road for about 6 miles. Turn left on the Mongaup Road and drive to the intersection with Beech Mountain Road. Stay left toward Frick Pond and park in one of the lots. Cross the road and start your hike on the Flynn Trail. At the end of the woods trail turn right on the woods road which was once an extension of Beech Mountain Road. Start to climb the Flynn Trail to the spot where there is a clearing a little off the trail on the right at 1.15 miles. Turn into the woods and walk up to the clearing. Walk across the clearing heading east and southeast to enter the woods heading in the same direction. In less than a quarter mile from the clearing you will encounter the first series of ridges. Find a path to descend through them. Just before you start down, look ahead and you may be able to see the water of Mongaup Pond about .25 miles away. The grade is pretty steep averaging about 18%. Work your way down through another level of ledges and continue to descend heading east and southeast. Watch for an overgrown woods road heading southeast and follow it. The road parallels a drainage which normally conducts water down toward the pond. Soon you will be at the loop road around the pond. Turn right on the road and walk .3 miles to the observation deck and boat launch. Continue the hike by walking along the shore or the road and out the access road to the campground entrance. Walk Mongaup Road for 1.1 miles to the intersection with Beech Mountain Road. Turn right and walk uphill .3 miles back to the car.
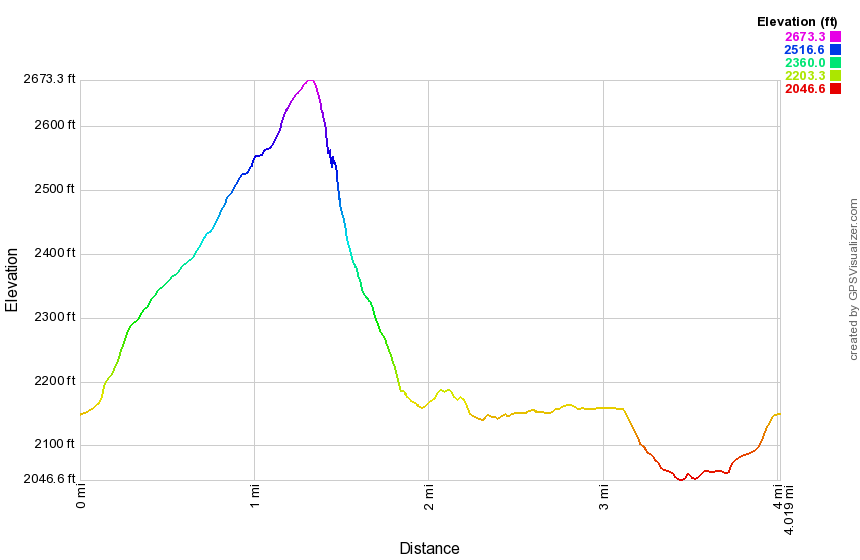
(The image above shows the profile of the hike. Remember that all vertical profiles are relative!)
Mongaup Pond: Flynn and Snowmobile Trails
| Quick Look | ||||
|---|---|---|---|---|
| Difficulty | Round trip | Total climb | Internet Maps | |
| 8.1 mi. | 1190 ft. | AllTrails | ||
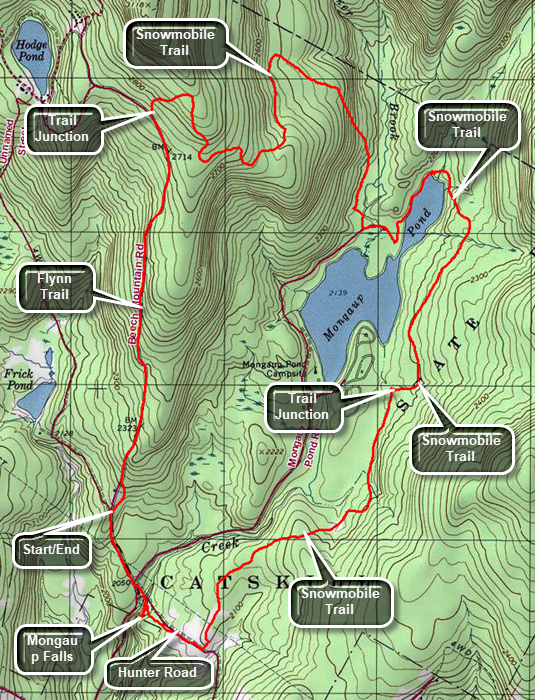 From Livingston Manor head out the DeBruce Road for about 6 miles. Turn left on the Mongaup Road and drive to the intersection with Beech Mountain Road. Stay left toward Frick Pond and park in one of the lots. Cross the road and start your hike on the Flynn Trail. At the end of the woods trail turn right on the woods road which was once an extension of Beech Mountain Road. Start to climb the Flynn Trail heading towards the junction with the Big Rock Trail at 1.7 miles. This is a four-way junction with the Flynn Trail continuing straight ahead and the Big Rock Trail turning to the left. Turn right on the snowmobile trail and climb another hill to the highest point on the hike at 2880 feet. You will now have climbed 735 feet from the parking area and most of the rest of the hike is downhill or flat. The snowmobile trail wanders a little but is all downhill. At 3.1 miles it finally turns southeast and then south toward Mongaup Pond. Just before reaching the pond it becomes more of a woods road and flattens out with a swamp on the left. When you meet the campground roads turn left and walk on the road to a T. Turn left and walk along the road until you see a sign on the right for the blue trail. The trail leads to the shore of the pond. Walk along the shore of the pond on the trail to the very head end of the pond where the trail turns left and heads for Hardenburgh. Continue around the pond on the snowmobile trails and walk up a small hill. After crossing four bridges, you will come to a junction with the Mongaup Willowemoc Trail on the left at 5 miles. Continue straight ahead on the snowmobile trail until another junction at 5.75 miles. Turn left to stay on the snowmobile trail which runs between a swamp area on the right and some ledges on the left. Stay on the snowmobile trail for about 1.5 miles when it meets the old Hunter Road. Walk downhill until jut before the "bridge" over the creek. Turn left and walk along the creek on an informal path to see the upper and lower drops of Mongaup Falls. Retrace your route back to the bridge and turn left to walk up the hill to the road. Walk across the intersection and up the hill on Beech Mountain Road to the parking area and your car.
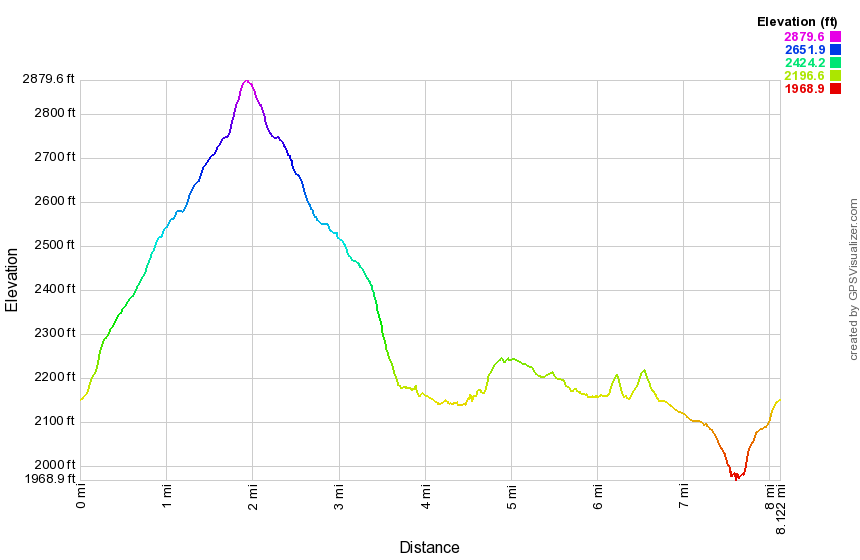
(The image above shows the profile of the hike. Remember that all vertical profiles are relative!)
Mongaup Pond Loop
| Quick Look | ||||
|---|---|---|---|---|
| Difficulty | Round trip | Total climb | Internet Maps | |
| 3.3 mi. | 310 ft. | AllTrails | ||
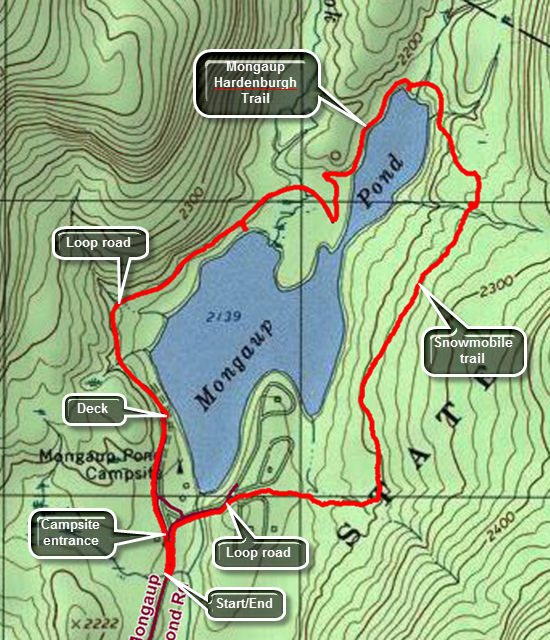 From Livingston Manor head out the DeBruce Road for about 6 miles. Turn left on the Mongaup Road and drive to the intersection with Beech Mountain Road. Stay right toward Mongaup Pond and in a mile pull over and parked in the small parking area just before the entrance to the campgrounds. Walk through the gate and stay to the left to walk along the paved loop road on the western side of the pond. At .35 miles the ere is an observation deck and boat ramp you may want to visit. Continue north on the road. You will find walking the road very easy even though it rolls just slightly. At just less than a mile there is a bench at the edge of the pond which has some nice views. Walk back out to the loop road to continue the hike following it as it curves to the right until there is a T at 1.25 miles. Turn left and follow the road until the sign for the Mongaup Hardenburgh Trail appears on the right at 1.4 miles. Turn right to follow the blue-blazed trail along the west side of the much smaller upper pond. At 1.7 miles the trail turns left to head for Hardenburgh. You may want to walk down to the edge of the pond to take in the view. Instead of following the trail, we continue straight ahead over a bridge on a snowmobile trail around the north end of the pond and south along the eastern shore. The snowmobile trail is not as well maintained as the hiking trail. It is often wet with interspersed areas of mud. At 1.7 miles begin the only assent on the hike which lasts for only .3 miles and gains less than 100 feet. The trail crosses several bridges and at 2.2 miles comes to the junction with the Mongaup Willowemoc Trail. Turning left here leads to Flugertown Road near Long Pond. Continue straight ahead on the snowmobile trail. The trail begins to descend and at 2.8 miles turns due west. Around 2.9 miles a snowmobile trail branches off to the left heading toward Mongaup Falls. Continue straight ahead toward one of the campsite loops. The trail here is often flooded from a blocked culvert and crossing the stream where it narrows is the best idea. The trail leads to a campsite loop road at just over 3 miles. Walk toward the pond passing by campsite 38 to a road intersection. Immediately to the left is the loop road to another campsite. Pass up this road and continued on to the main loop road. Turn left to head back to the car. In minutes you will be at the entrance to the park and your car.
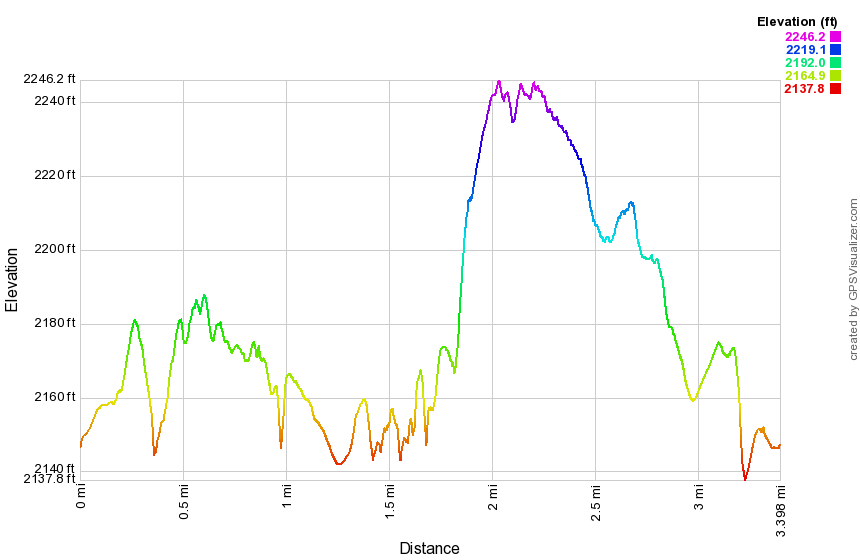
(The image above shows the profile of the hike. Remember that all vertical profiles are relative!)
Mongaup Pond Ledges
| Quick Look | ||||
|---|---|---|---|---|
| Difficulty | Round trip | Total climb | Internet Maps | |
| 7.0 mi. | 1422 ft. | AllTrails | ||
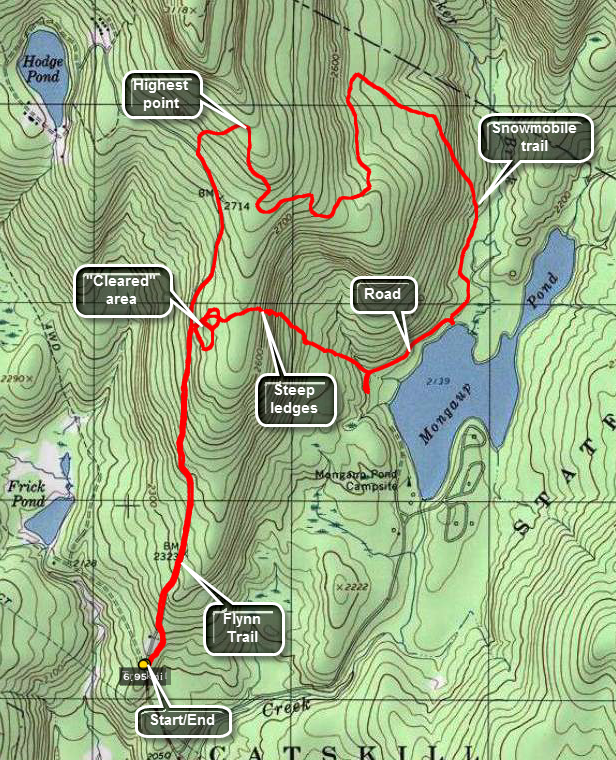 From Livingston Manor take DeBruce Road toward Round Pond. At about 6 miles turn left on Mongaup Road. Where the road splits bear to the left and park at the parking area for Frick Pond. Walk across the road to the beginning of the blue blazed Flynn Trail. Walk through a short section of trail in the woods before the trail breaks out onto a wide woods road. At about 1 mile look for a pile of logs on the right. Walk around the logs and head through the woods to an interesting open area. The area seems to be a bog on top of bedrock! The mosses here are typical of bogs but it doesn't seem possible that they would develop here. Explore this area an notice to the southeast a road that leads back down to the pile of logs. From this point on the hike is a bushwhack until you arrive at Mongaup Pond so directions and mileages will vary. Head to the east of the cleared area and through the woods. After a short walk, you will begin to encounter some impressive ledges. There are several way to get down through the ledges just continue to head east. Take your time to explore this area as it in very interesting. The drop in elevation is around 500 feet in half a mile. Eventually you will be on the road that runs around Mongaup Pond. Turn left and walk about .4 miles on the road. Watch for signs for a snowmobile trail as the road turns to the right. Get on the snowmobile trail and continue to follow it as it will lead back to the Flynn Trail. The first part of this trail runs along the edge of a swamp and is usually wet. Of course, you will have to regain the elevation you lost coming down the ledges! The trail begins to climb at around 3.2 miles. Over the next 1.8 miles the trail rises around 700 feet to an elevation of 2880 feet before descending back to the Flynn Trail. At about 5.3 miles you will be at the intersection of the snowmobile trail, the Flynn Trail and the Big Rock Trail. Turn left on the Flynn Trail which now descends 600 feet over the next 1.7 miles to the parking area.
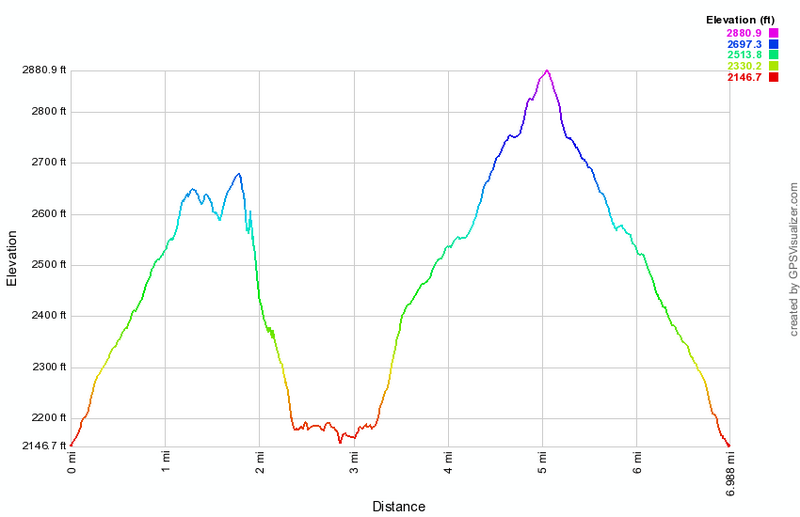
(The image at the left shows the profile of the hike. Remember that all vertical profiles are relative!)
Mongaup Pond Ledges: Up from the Pond
| Quick Look | ||||
|---|---|---|---|---|
| Difficulty | Round trip | Total climb | Internet Maps | |
| 6.4 mi. | 1280 ft. | AllTrails | ||
_map.png) From Livingston Manor take DeBruce Road toward Round Pond. At about 6 miles turn left on Mongaup Road. Where the road splits bear to the left and park at the parking area for Frick Pond. Walk across the road to the beginning of the blue blazed Flynn Trail. Walk 1.7 miles to the junction of the Flynn Trail, the Big Rock Trail and a snowmobile trail. Along the way watch for a pile of logs and a slight clearing off the trail on your right. This will be your return point on the way back. Turn right on the snowmobile trail and climb for another .25 miles to the top of the hill. From here the trail descends for about 2 miles to the loop road at Mongaup Pond State Campsites. The actual distance from the top of the hill to the pond is only .8 miles but the trail meanders considerably. As it nears the pond there is a swampy area to the right and water running off the hill can make the trail very wet. At the loop road turn right and walk along the road for about .5 miles before turning into the woods to head west on a bushwhack back to the Flynn Trail. There is a woods road here to follow for a while but it tends to angle north and you want to head west to the ledges. As you approach the ledges there will be obvious places to climb up through them. When you are near the top, head west to a large clearing just off the Flynn Trail near that pile of logs from earlier in the hike. The area seems to be a bog on top of bedrock! The mosses here are typical of bogs but it doesn't seem possible that they would develop here. Explore this area an notice to the southeast a road that leads back down to the pile of logs. You may follow the road or head directly west to the Flynn Trail. Turn left on the Flynn Trail and walk about 1.2 miles back to your car.
From Livingston Manor take DeBruce Road toward Round Pond. At about 6 miles turn left on Mongaup Road. Where the road splits bear to the left and park at the parking area for Frick Pond. Walk across the road to the beginning of the blue blazed Flynn Trail. Walk 1.7 miles to the junction of the Flynn Trail, the Big Rock Trail and a snowmobile trail. Along the way watch for a pile of logs and a slight clearing off the trail on your right. This will be your return point on the way back. Turn right on the snowmobile trail and climb for another .25 miles to the top of the hill. From here the trail descends for about 2 miles to the loop road at Mongaup Pond State Campsites. The actual distance from the top of the hill to the pond is only .8 miles but the trail meanders considerably. As it nears the pond there is a swampy area to the right and water running off the hill can make the trail very wet. At the loop road turn right and walk along the road for about .5 miles before turning into the woods to head west on a bushwhack back to the Flynn Trail. There is a woods road here to follow for a while but it tends to angle north and you want to head west to the ledges. As you approach the ledges there will be obvious places to climb up through them. When you are near the top, head west to a large clearing just off the Flynn Trail near that pile of logs from earlier in the hike. The area seems to be a bog on top of bedrock! The mosses here are typical of bogs but it doesn't seem possible that they would develop here. Explore this area an notice to the southeast a road that leads back down to the pile of logs. You may follow the road or head directly west to the Flynn Trail. Turn left on the Flynn Trail and walk about 1.2 miles back to your car.
_gra.png) (The image below shows the profile of the hike. Remember that all vertical profiles are relative!)
(The image below shows the profile of the hike. Remember that all vertical profiles are relative!)
Mongaup Pond: Mongaup Falls Loop
| Quick Look | ||||
|---|---|---|---|---|
| Difficulty | Round trip | Total climb | Internet Maps | |
| 8.2 mi. | 1290 ft. | AllTrails | ||
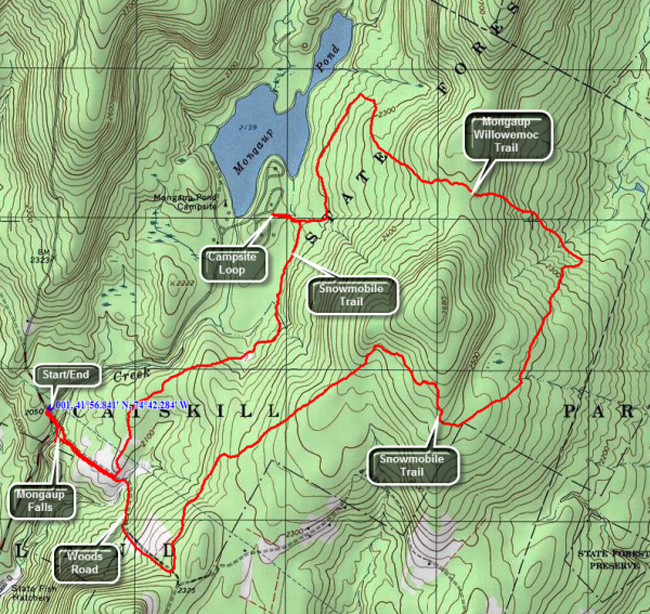 From Livingston Manor take DeBruce Road toward Round Pond. At about 6 miles turn left on Mongaup Road. Where the road splits bear to the right and park in the small pulloff just past the intersection. Walk down the woods road to the stream and cross on the "bridge". Continue straight ahead on the woods road for about .4 miles and then turn left on the snowmobile trail. The trail rolls some but is mostly flat. It runs near the stream at points and can be very wet as water runs down from the ledges on the right. At about 2 miles a trail will lead out to one of the campsite loops at Mongaup State Campgrounds where you may want to take a rest. Back on the main snowmobile trail walk about .7 miles and watch for the yellow Mongaup Willowemoc hiking trail on the right. Turn here and start the first real climb of the hike ascending 260 feet over the next .7 miles as you climb the ridge that surrounds the pond. From the top of the ridge you will then descend the other side of the ridge. In another .6 miles, about 4.2 miles into the hike, turn right on the snowmobile trail to head southwest. This trail climbs about 400 feet over the next 1.2 miles to the shoulder of a hill on the east side of the pond. From that point the trail mostly descends with a few slight climbs over the next 1.7 miles where it meets the woods road you were on at the beginning of the hike. Turn right to head northwest for about a mile until you are back at the main road. Just before crossing the "bridge", walk downstream until you get to a nice falls. There are several different viewpoints for this two-tiered cascade and it is well worth the short trip.
(The map above shows the parking area and the clockwise lollipop hiking route.)
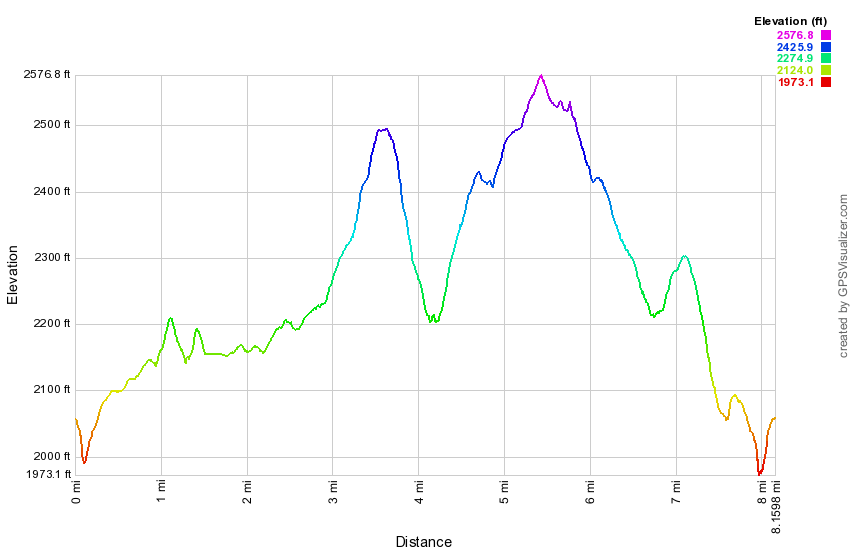 (The image at the left shows the profile of the hike. Remember that all vertical profiles are relative!)
Mongaup Pond: Mongaup Falls Big Loop (counterclockwise)
| Quick Look | ||||
|---|---|---|---|---|
| Difficulty | Round trip | Total climb | Internet Maps | |
| 7.9 mi. | 1250 ft. | AllTrails | ||
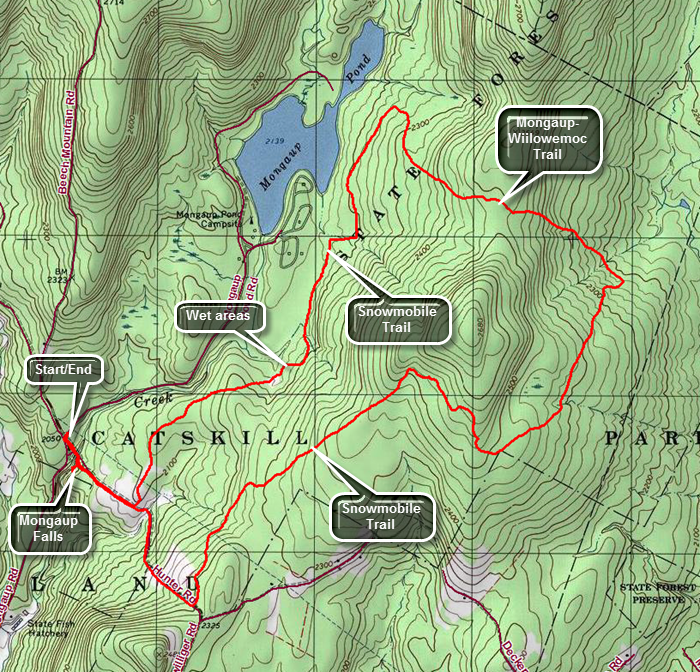 From Livingston Manor take DeBruce Road toward Round Pond. At about 6 miles turn left on Mongaup Road. Where the road splits bear to the right and park in the small pulloff just past the intersection. Walk down the woods road to the stream and cross on the "bridge". At .4 miles pass by a snowmobile trail that you will use on the return trip. There is a short descent followed by a climb on a rocky woods road toward Terwillger Road. At 1 mile turn left as the snowmobile trail where it turns into the woods. The trail drops a little as it heads northeast and then at 1.4 miles it begins to climb again. At 2.35 miles the trail heads southeast to reach the highest point on the trail at 2.7 miles. From here the trail begins to descend and at 2.9 miles the trail again turns northeast and continues dropping in elevation. At 3.8 miles you will reach the Mongaup Willowemoc Trail. Turn left and start heading northwest as you start climbing again over some rocky terrain until the top of a hill at 4.5 miles. Start to descend the other side. and continue the descent until at 5.2 miles the Mongaup Willowemoc Trail ends at a snowmobile trail. Turn left on the snowmobile trail and head southwest. This trail can be very wet in places as it is lower than the land to the east and water drains from the higher land. Continue to walk southwest passing over two small hills. At 7.35 miles arrive at the junction with the snowmobile trail from the start of the hike. Turn right and start to walk downhill and northwest back toward the car. As you approach the small bridge over the stream turn off to the left and walk to Mongaup Falls. The falls has two levels and is well worth the trip. Walk back to the main trail, cross the bridge and walk back up the woods road to the main road and your car.
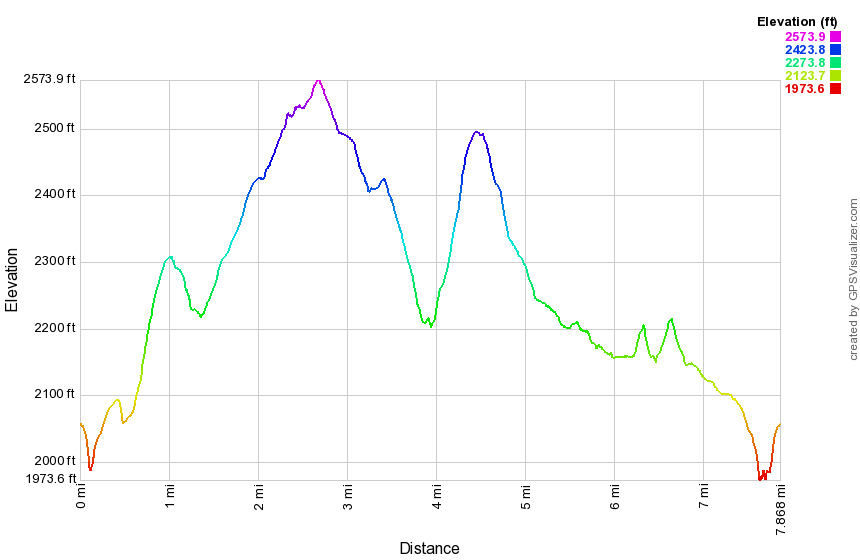 (The image at the left shows the profile of the hike. Remember that all vertical profiles are relative!)
Mongaup Pond: Three Ponds (Frick, Hodge, Mongaup)
| Quick Look | ||||
|---|---|---|---|---|
| Difficulty | Round trip | Total climb | Internet Maps | |
| 9.4 mi. | 1265 ft. | AllTrails | ||
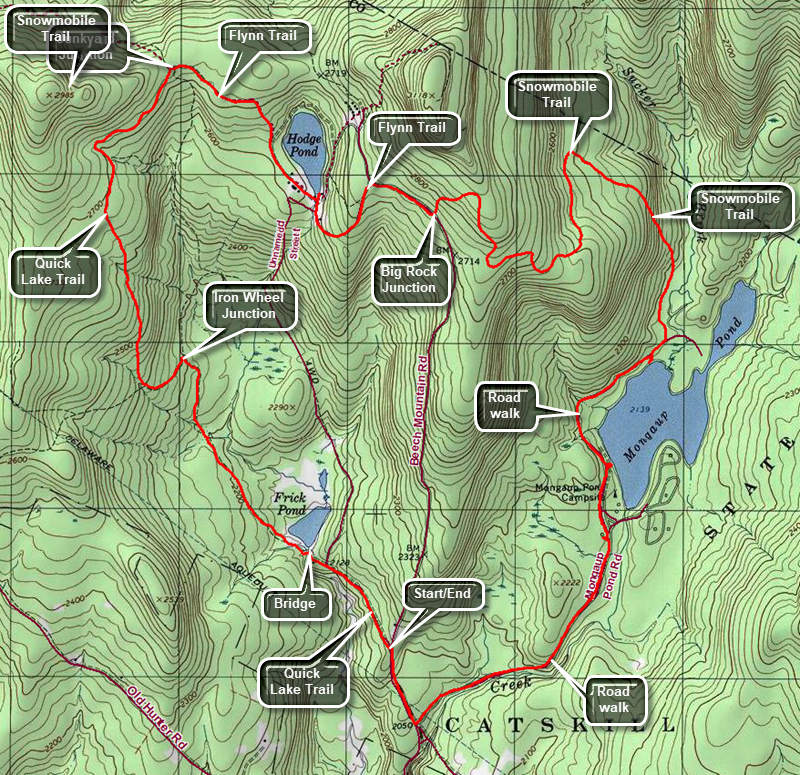 From Livingston Manor head out the DeBruce Road for about 6 miles. Turn left on the Mongaup Road and drive to the intersection with Beech Mountain Road. Stay left toward Frick Pond and park in one of the lots. To start the hike, leave the back of the small lot on a woods road which meets the Quick Lake Trail at the trail register or leave the back of the large lot on the red-blazed Quick Lake Trail. Follow the Quick Lake Trail to Gravestone Junction. Stay left on the Quick Lake Trail and walk down the hill to the bridge across the outlet stream of Frick Pond. This is a nice viewpoint to Beech Mountain on the right which is the highest point in Sullivan County. Continue across the bridge to the junction with the Big Rock Trail. Stay left on the Quick Lake Trail walking through a spruce "tunnel" and crossing a small stream. After 1.5 miles, the Quick Lake Trail turns left at Ironwheel Junction. Continue to follow the trail as it heads north and uphill turning northeast at 2.6 miles and reaching Junkyard Junction at 3.1 miles. The Quick Lake Trail goes to the left at this junction. Turn right on the blue-blazed Flynn Trail which is fairly flat and can be very wet at times. Follow the trail south southeast to a point near the shore of Hodge Pond at 3.6 miles. Follow the Flynn Trail as it turns more south along the western shore of the pond. The first field that you reach was the site of the dining hall for the Beech Mountain Boy Scout Camp. Follow the trail as it passes beneath some trees and comes out into a field at the outlet end of Hodge Pond. Take a break by the pond if you like and then return to the point where the Flynn Trail enters the trees and starts up the hill. At the top of then hill, bear right to stay on the Flynn Trail. Pass through the gate to the intersection with the Big Rock Trail on the right. Turn left on the snowmobile trail and walk to the highest point on the hike. From here the rest of the hike is downhill or gently rolling. Mongaup Pond is south-southwest of the trail junction but the snowmobile trail meanders quite a bit and even heads north before finally joining the loop roads at the campgrounds. Bear to the right on the loop road and walk out to the main campground road. Yarn right on the main road. After a short distance, walk off the road on a path to the left which goes the a bench on the shore of the pond. When you are done, return to the road heading in the same direction you were going. In another .6 miles there is a viewing platform and boat ramp. Continue on the main road toward the park entrance and then out Mongaup Pond Road toward the intersection with Beech Mountain Road. The walk to the intersection is 1.1 miles. Turn right on Beech Mountain Road and walk .3 miles uphill to your car.

(The image above shows the profile of the hike. Remember that all vertical profiles are relative!)
Mongaup Flugertown Loop
| Quick Look | ||||
|---|---|---|---|---|
| Difficulty | Round trip | Total climb | Internet Maps | |
| 12.1 mi. | 2290 ft. | AllTrails | ||
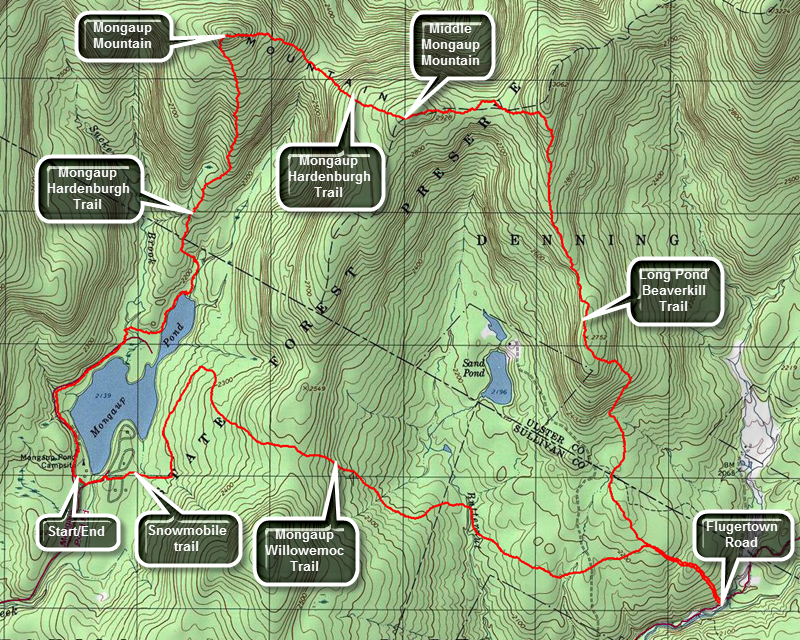 From Livingston Manor take DeBruce Road toward Round Pond. At about 6 miles turn left on Mongaup Road. Where the road splits bear to the left and drive to the entrance of Mongaup State Campgrounds. During the camping season you will have to pay the day use fee but outside of the seasons parking is free. Start hiking on the loop road on the east side of the pond. Turn right off the loop road at Area B and find the connector trail at Campsite 38. (Maps of the campsites are available at the park office.) At the end of the connector turn left or north on the main snowmobile trail. Continue walking north to about 1.1 miles to the junction with the yellow Mongaup Willowemoc Trail. Turn right and start to climb away from the pond. Over the next .7 miles you will gain about 270 feet to the highest point on the trail and then began descending. At 2.75 miles the trail will have descended 390 feet and crosses Butternut Creek, the outlet to Sand Pond, on a bridge. The trail parallels the creek for a short distance and at 3.5 miles crosses the access road to Sand Pond which is a private inholding. The trail has been heading southeast and east but at this point the it turns slightly northeast to meet the Long Pond Beaverkill Ridge Trail at 3.8 miles. Continue straight ahead to walk down to Flugertown Road to complete the Mongaup Willowemoc Trail. If you do not "need" to hike this part of the trail, simply turn left on the Long Pond Beaverkill Ridge Trail. At Flugertown Road turn around and start back up to the trail junction.Flugertiwn Road is the lowest point on the hike and the hike back to the junction ascends 250 feet over half a mil. At 4.8 miles turn right on the Long Pond Beaverkill Ridge Trail and start to head almost due north for 2.5 miles climbing all for most of the trip. The trail is not widely traveled and may not be clearly marked or properly maintained is places. There are several places where very large trees have fallen across the trail and hikers have worked their way around them essentially rerouting the trail. At 7.3 miles the trail ascends to the Beaverkill Ridge at just under 3000 feet of elevation. Turn left on the blue Mongaup Hardenburgh Trail and continue west along the ridge.The trail ascends Middle Mongaup Mountain at 8 miles and with a few limited viewpoints along the way. The descent is steep and can be difficult when it is slippery. In .6 miles you will drop 370 feet to the Col with West Mongaup Mountain with a steep but short climb to the summit. In .5 miles the trail gains 420 feet and just after the summit it turns south and slightly west to head toward Mongaup Pond. Over the 1.5 miles from the summit the drop is 820 feet to the northern shore of Mongaup Pond. The last .2 miles pass along a stream and through some pine trees. Turn right and hike along a wide trail running along the western shore of the upper section of the pond. You will come out on a road that loops through some campsites. From here it is a short walk out to the "main" road. Turn right to continue south toward the parking area eventually turning left to get back to your car.
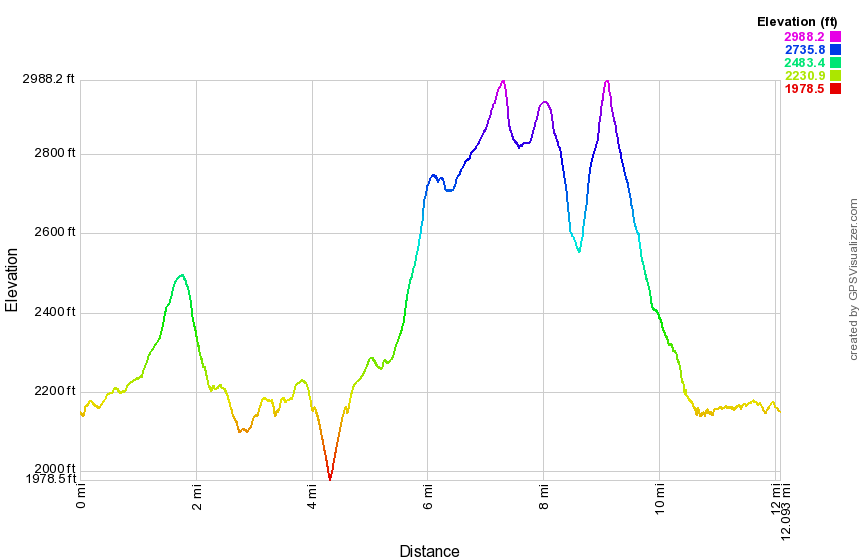 (The image at the left shows the profile of the hike. Remember that all vertical profiles are relative!)
Mongaup River Trail
| Quick Look | ||||
|---|---|---|---|---|
| Difficulty | Round trip | Total climb | Internet Maps | |
| 2.1 mi. | 130 ft. | AllTrails | ||
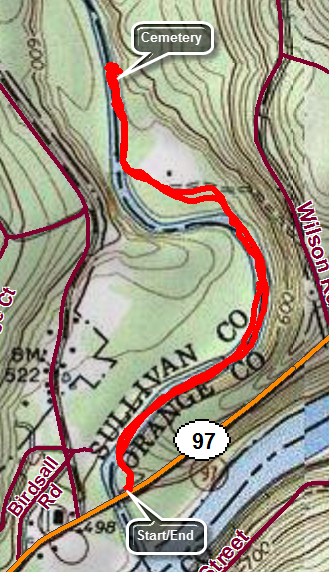
 Drive south on Route 55 toward Eldred. In Eldred turn left at the light on CR-32 (Proctor Road) and drive a little over 5 miles to Glen Spey. Turn right and then left on CR-31 (Upper Mongaup Road). Drive south a little over 5 miles to Route 97. Make a left, cross the bridge over the Mongaup River and make a quick left into the parking area. The trail leaves the right side of the parking area as a flat gravel path paralleling the river. The trail is easy to walk and easy to follow. IN a few places it splits to go around some bushes and then unites just after. You may want to drop down to the water's edge to get a view of the river. The trail remains easy to follow and relatively flat and well maintained for the entire length. Continue to the end of the trail where you will find an old cemetery to the right of the trail. The engraving on the stones is weathered and hard to read but one date is "1882". Turn around to walk back to your car the way you came.
(The image at the left shows the profile of the hike. Remember that all vertical profiles are
relative!)
Drive south on Route 55 toward Eldred. In Eldred turn left at the light on CR-32 (Proctor Road) and drive a little over 5 miles to Glen Spey. Turn right and then left on CR-31 (Upper Mongaup Road). Drive south a little over 5 miles to Route 97. Make a left, cross the bridge over the Mongaup River and make a quick left into the parking area. The trail leaves the right side of the parking area as a flat gravel path paralleling the river. The trail is easy to walk and easy to follow. IN a few places it splits to go around some bushes and then unites just after. You may want to drop down to the water's edge to get a view of the river. The trail remains easy to follow and relatively flat and well maintained for the entire length. Continue to the end of the trail where you will find an old cemetery to the right of the trail. The engraving on the stones is weathered and hard to read but one date is "1882". Turn around to walk back to your car the way you came.
(The image at the left shows the profile of the hike. Remember that all vertical profiles are
relative!)
Mongaup Wetlands
| Quick Look | ||||
|---|---|---|---|---|
| Difficulty | Round trip | Total climb | Internet Maps | |
| 8.2 mi. | 1111 ft. | AllTrails | ||
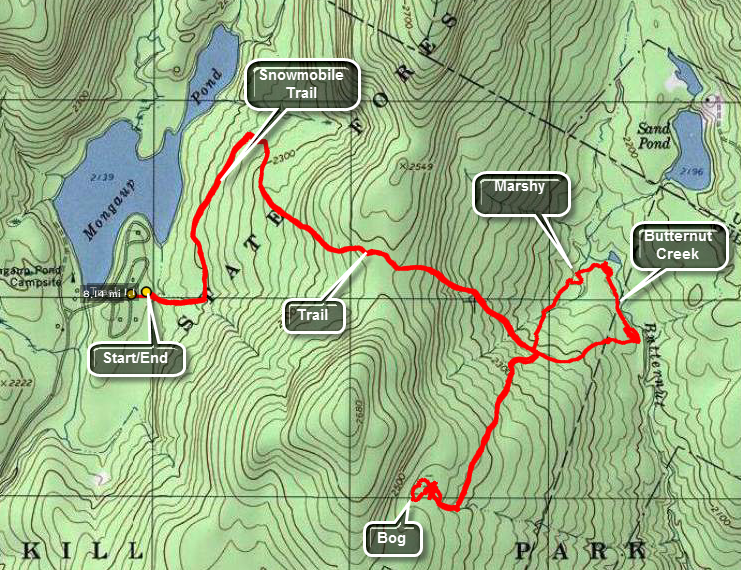 This hike takes in some of the wetlands east of Mongaup Pond. Some of these are being studied by Dr. Mike Kudish as a part of his ongoing project to understand the development of the Catskill forests. The first part of the hike is on snowmobile trail from Mongaup State Park and then on blazed hiking trails. Eventually you must strike out into the woods to get to the two wetlands areas. Your path during the bushwhack may vary significantly from this one.
The easiest way to do this particular hike is to ask the attendant at the gatehouse if you can park at campsite 34 on the east side of the campgrounds. From here find the snowmobile trail that leaves the campsite and walk east and then north. At about .8 miles watch for the yellow Mongaup Willowemoc Trail on the right. Turn on this trail and walk for about 1.3 miles to where a bridge crosses a small creek. There Rae several of these so watch your mileage. If you arrive at Butternut Junction, you have gone too far. Walk about .7 miles southwest and you should be in the area of a small marsh. Walk to the marsh. Walk around the marsh. Inspect the marsh. When done, return to the main trail. Turn left on the main trail and then almost immediately strike off the trail in a northeast direction. A walk of about .25 miles will put you on the "shores" of Butternut Creek which acts as the outlet to Sand Pond. Cross the wetlands and walk downstream along the creek for about .5 miles where you should find the Mongaup Willowemoc Trail again. Turn right and follow your route back to the car.
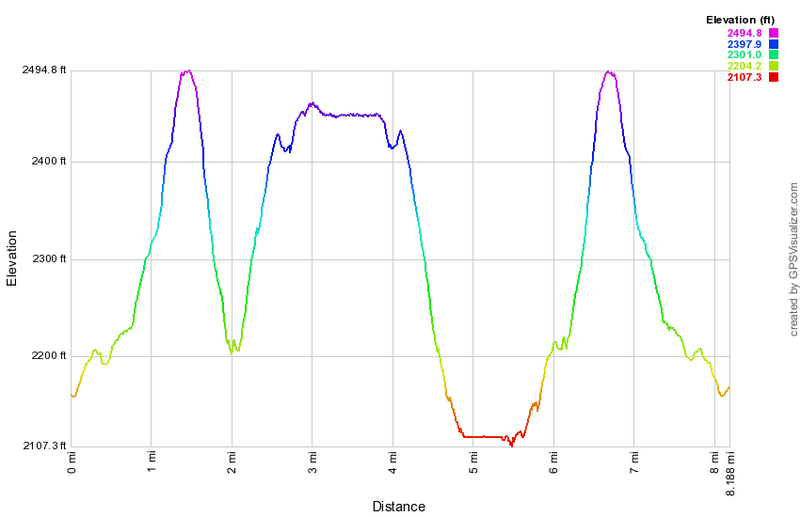 (The image at the left shows the profile of the hike. Remember that all vertical profiles are
relative!)
(The image at the left shows the profile of the hike. Remember that all vertical profiles are
relative!)
Morgan Hill (Big Loop)
| Quick Look | ||||
|---|---|---|---|---|
| Difficulty | Round trip | Total climb | Internet Maps | |
| 12.8 mi. | 2580 ft. | AllTrails | ||
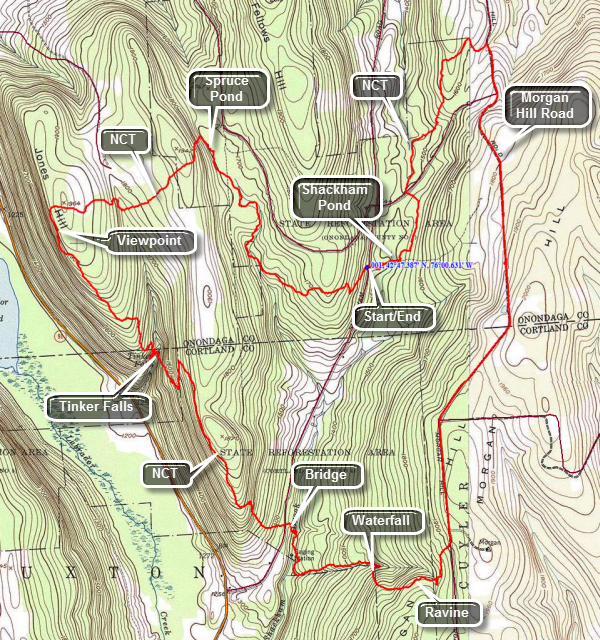
Morgan Hill State Forest sits in the upper northeast corner of Cortland County the lower southeast corner of Onondaga County. It has many miles of trails and woods roads to explore and is crossed by the North Country Trail. The trails are used for both hiking and mountain biking. The area also has several ponds and streams. The streams have some small cascades and one named waterfall, Tinker Falls. The best viewpoint is from Jones Hill. The area also is adjacent to Labrador Pond Unique Area.
From the south take I81 to exit 11. Take Route 13 north for about 10 miles to Route 91 in Truxton. Turned left and drive about 3.6 miles to Shackham Road. Turn right on Shackham Road in Morgan Hill State Forest ,and drive about 2 miles to a pulloff on the right side of the road. DO NOT park at the larger parking area just before this! The North Country National Scenic Trail stretches approximately 4,600 miles from Crown Point on Lake Champlain in eastern New York to Lake Sakakawea State Park in central North Dakota in the United States. Walk to the "beginning" of the trail on your side of the road and head east on the blue-blazed NCT. After only a short distance you will be on the shores of Shackham Pond. The pond is pretty and surrounded by both hardwood and softwood trees. Headed back to the main trail and within a few hundred feet pass across the top of the dam that creates the pond. Hike north through mostly hardwood forest and at about .7 miles you will cross a well-maintained dirt road and entered an evergreen forest. Stop at the trail register and sign in before continuing on the trail. The trail parallels a small stream for some time and may be wet and muddy in places. In this area the trail is almost flat with only a few bumps. Pass by several woods roads and at 1.9 miles the trail will again cross a road before entering the woods. At this point we turn right on the dirt road which becomes Morgan Hill Road. After a slight uphill walk of about .3 miles at 2.2 miles into the hike there is a gate across the road to permit only "seasonal access". Continue straight ahead and be prepared for a rather long walk on this isolated road. At 4.2 miles Eaton Hill Road comes in from the left and it should now be only a half mile or so until the NCT appears on the right at about 4.8 miles. Turn right into the forest and head almost due east along a tributary of Shackham Brook. Sections of the trail here can be VERY muddy. At 5.2 miles walk down the trail into a beautiful ravine. The trail crosses the brook here but you can walk a few hundred feet upstream to a small waterfall. Walk back to where the trail crosses the stream and negotiate the steep bank.
The trail almost immediately meets a woods road and follows it for some distance until the trail heads to the right and down. The trail starts to parallel to the brook and you may notice several small waterfalls. Continue to walk on the trail parallel to the brook until 6.1 miles where there is another nice waterfall off the trail to the left. Continue on the trail toward Shackham Road. A nice footbridge crosses the stream and the streambed here was solid rock. On the other side of the bridge the trail can be VERY wet. Crossed Shackham Road about 6.6 miles into the hike. Your car is only about 1.5 miles up the road but the best part of the hike is yet to come! After crossing the road the trail begins to climb through hardwood forest almost immediately. Over the next .6 miles the trail climbs about 450 feet which is one of the steepest parts of the trail up to this point. At the top of the climb the trail levels a bit as it runs along the shoulder of a hill on the right. After a short walk on relatively flat ground, begin a descent to Tinker Falls. There is one major switchback on the descent and the trail at the bottom is not well marked. Cross the stream above the falls and walk to the edge of the gorge to see the falls below. there is no safe path down to the base of the falls from the top but you can park on Route 91 and walk the short "nature trail" to the falls after completing the loop hike!
Finding the NCT blazes here can be a little problem. The trail comes down some steps on the east side, crosses the stream, goes a little more that 100 feet and then hooks back almost 180 degrees to climb the hill on the other side. Head up the trail. Over the next mile from the top of the falls you will ascend about 430 feet. The trail is never steep but the ascent is continuous. You will cross a dirt road at some point and the trail turns onto it at another. Eventually the trail dips to the right into the woods and leads to the viewpoint on Jones Hill at about 9.6 miles into the hike. The view from this outlook is spectacular! There is a valley below with a few hills and mountain in the distance. Labrador Pond is visible below. You still have about 3 miles to hike and after a short distance, the trail turns right and crosses the top of Jones Hill on private property. Over the next 1.2 miles the trail rolls a little with no major ascents or descents until the walk down to Spruce Pond at around 11 miles. There is a NCT kiosk at the outlet end of the pond.
The last 1.7 miles is mostly downhill with one little bump near the end. The first part of this section of the trail parallels a stream and may be wet and muddy. The very last few feet of the trail before the road can be a muddy quagmire but at least you are now back at your car. If you want to visit the base of Tinker Falls drive back down Shackham road to Route 91. Turn right and drive 1.2 miles north to the parking area for Tinker Falls. Park on the left side of the road in the large parking area. Walk across the road to the trail to the falls which is wide and "paved" with crushed stone. There are several benches along the stream. When you get to the end of the trail, walk up the stone of the streambed to the base of the falls. The amount of water going over the falls varies greatly and it is best to visit after a rainfall. There is even a trail that allows you to walk behind the falls. The round trip walk is about .6 miles
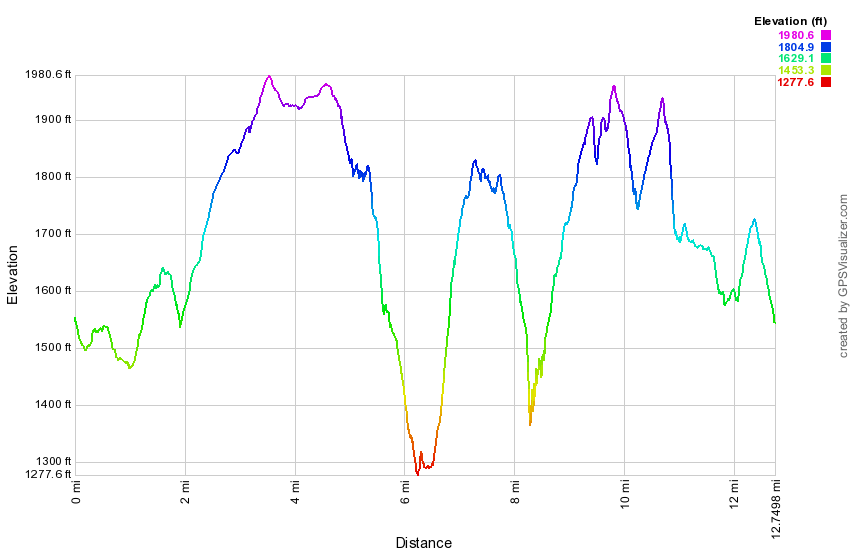 (The image below shows the profile of the loop hiking route. Remember that all vertical profiles are relative!)
Morgan Hill (East Loop)
| Quick Look | ||||
|---|---|---|---|---|
| Difficulty | Round trip | Total climb | Internet Maps | |
| 8.0 mi. | 1075 ft. | AllTrails | ||
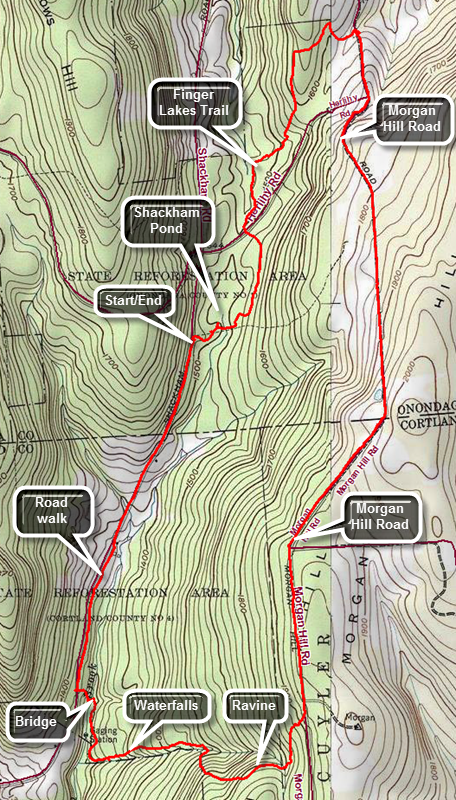
Morgan Hill State Forest sits in the upper northeast corner of Cortland County the lower southeast corner of Onondaga County. It has many miles of trails and woods roads to explore and is crossed by the North Country Trail. The trails are used for both hiking and mountain biking. The area also has several ponds and streams. The streams have some small cascades and one named waterfall, Tinker Falls. The best viewpoint is from Jones Hill. The area also is adjacent to Labrador Pond Unique Area.
From the south take I81 to exit 11. Take Route 13 north for about 10 miles to Route 91 in Truxton. Turned left and drive about 3.6 miles to Shackham Road. Turn right on Shackham Road in Morgan Hill State Forest ,and drive about 2 miles to a pulloff on the right side of the road. DO NOT park at the larger parking area just before this! The North Country National Scenic Trail stretches approximately 4,600 miles from Crown Point on Lake Champlain in eastern New York to Lake Sakakawea State Park in central North Dakota in the United States. Walk to the "beginning" of the trail on your side of the road and head east on the blue-blazed NCT. After only a short distance you will be on the shores of Shackham Pond. The pond is pretty and surrounded by both hardwood and softwood trees. Headed back to the main trail and within a few hundred feet pass across the top of the dam that creates the pond. Hike north through mostly hardwood forest and at about .7 miles you will cross a well-maintained dirt road and entered an evergreen forest. Stop at the trail register and sign in before continuing on the trail. The trail parallels a small stream for some time and may be wet and muddy in places. In this area the trail is almost flat with only a few bumps. Pass by several woods roads and at 1.9 miles the trail will again cross a road before entering the woods. At this point we turn right on the dirt road which becomes Morgan Hill Road. After a slight uphill walk of about .3 miles at 2.2 miles into the hike there is a gate across the road to permit only "seasonal access". Continue straight ahead and be prepared for a rather long walk on this isolated road. At 4.2 miles Eaton Hill Road comes in from the left and it should now be only a half mile or so until the NCT appears on the right at about 4.8 miles. Turn right into the forest and head almost due east along a tributary of Shackham Brook. Sections of the trail here can be VERY muddy. At 5.2 miles walk down the trail into a beautiful ravine. The trail crosses the brook here but you can walk a few hundred feet upstream to a small waterfall. Walk back to where the trail crosses the stream and negotiate the steep bank. The trail almost immediately meets a woods road and follows it for some distance until the trail heads to the right and down. The trail starts to parallel to the brook and you may notice several small waterfalls. Continue to walk on the trail parallel to the brook until 6.1 miles where there is another nice waterfall off the trail to the left. Continue on the trail toward Shackham Road. A nice footbridge crosses the stream and the streambed here was solid rock. On the other side of the bridge the trail can be VERY wet. The trail meets Shackham Road at 6.6 miles into the hike. Turn right and hike 1.5 miles up the road back to your car. This walk is all a slight uphill.
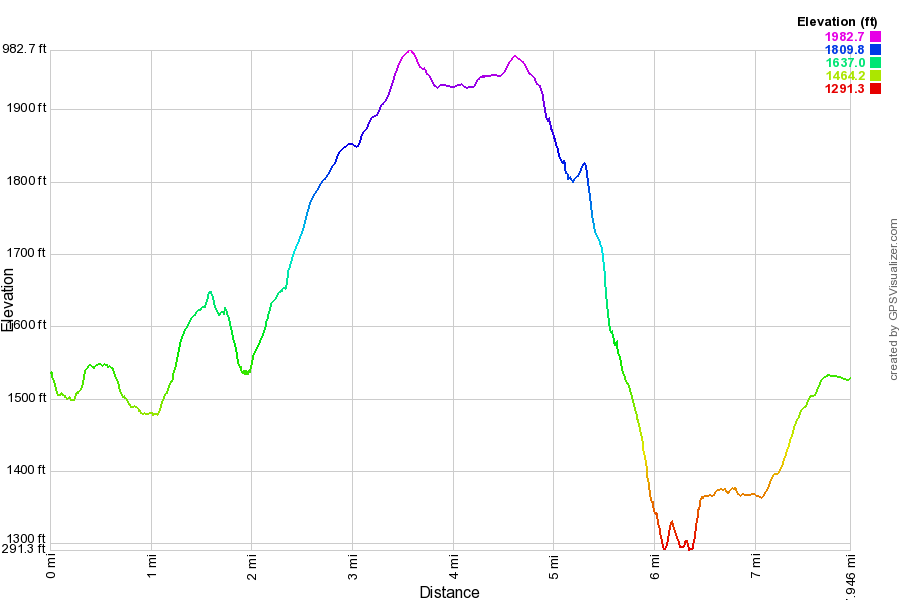 (The image below shows the profile of the loop hiking route. Remember that all vertical profiles are relative!)
Morgan Hill (Jones Hill Loop)
| Quick Look | ||||
|---|---|---|---|---|
| Difficulty | Round trip | Total climb | Internet Maps | |
| 8.0 mi. | 1535 ft. | AllTrails | ||
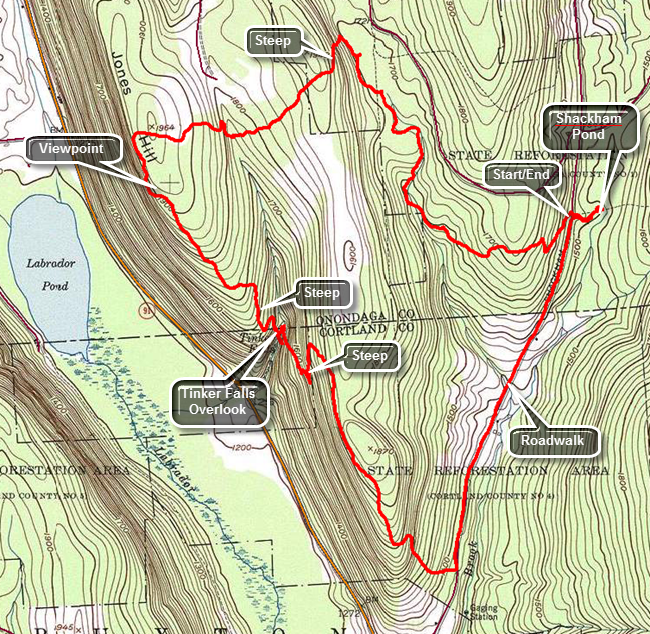
Morgan Hill State Forest sits in the upper northeast corner of Cortland County and the lower southeast corner of Onondaga County. It has many miles of trails and woods roads to explore and is crossed by the North Country Trail. The trails are used for both hiking and mountain biking. The area also has several ponds and streams. The streams have some small cascades and one named waterfall, Tinker Falls. The best viewpoint is from Jones Hill. The area also is adjacent to Labrador Pond Unique Area.
From the south take I81 to exit 11. Take Route 13 north for about 10 miles to Route 91 in Truxton. Turned left and drive about 3.6 miles to Shackham Road. Turn right on Shackham Road in Morgan Hill State Forest ,and drive about 2 miles to a pulloff on the right side of the road. DO NOT park at the larger parking area just before this! The North Country National Scenic Trail stretches approximately 4,600 miles from Crown Point on Lake Champlain in eastern New York to Lake Sakakawea State Park in central North Dakota in the United States.
Cross the road and hike up the trail which can be muddy at times heading toward the top of the first ridge. The first .4 miles is all uphill and gains a little over 150 feet. The trail in this area is pretty generic passing through mostly hardwoods and then some evergreens. Descend the other side of the hill and then walk along as the trail rolls a little. At 1.75 miles come to the shores of Spruce Pond with an earthen dam at one end. From the dam walk along the shore of the pond following the Onondaga Trail which is blazed in light blue and an orange trail that loops around the pond. The trails spilt near the head of the pond. Follow the blue trail and start one of the steepest ascents of the hike which is moderated by some switchbacks as it gains 220 feet in about .25 miles. At the top of the hill, start to descend again losing most of the elevation you gained and crossing a small stream. Much of the hike to this point has been parallel to one small creek or another. The turn and ascent changes your direction to WSW and begins a section of the trail which is on private land. The land is owned by a logging company that has granted permission for hikers to cross their property. Make another ascent to the top of the ridge that overlooks Labrador Pond. Pass over the top of Jones Hill and at 3.1 miles turned south to walk along the ridge. At 3.25 miles there is a viewpoint which looks out of Labrador Pond and the valley and hills below. The trail now follows the edge of the ridge while a dirt road also descends the hill. The trail winds round and crosses the road before joining it for the final descent. From 3.4 miles to 4.3 miles the trail descends toward Tinker Falls. At 3.9 miles the descent becomes steeper. There is a trail to the falls from a parking area on Route 91 which makes access to the base rather easy. In the past there was no way to hike between the top and bottom without following a treacherous and steep path covered in loose dirt and slippery leaves. The Finger Lakes Trail Conference worked on a project to install stone steps on both sides of the falls to allow hikes to travel between the bottom and the top. From the top of the falls walk upstream to the wooden stairs that start the long climb to the top of the next ridge. The .7 mile ascent to the 5.1 mile mark ascends almost 400 feet but has several switchbacks. The switchbacks do moderate the climb but also make the trip longer. Once at the top, begin the downhill hike to Shackham Road. Turn left at the road and begin to walk the road back to your car at the upper parking area. It is about 1.5 miles back to the upper trailhead. As you near the car, turn right on the Onanadoga Trail for a short .15 mile hike to Shackham Pond. Stop on the dam for the best views. At the near end of the dam are some headstones that are all from one family including one for an infant who lived only 18 days. The dates are from the early 18th century. Continue back the way you came to your car.
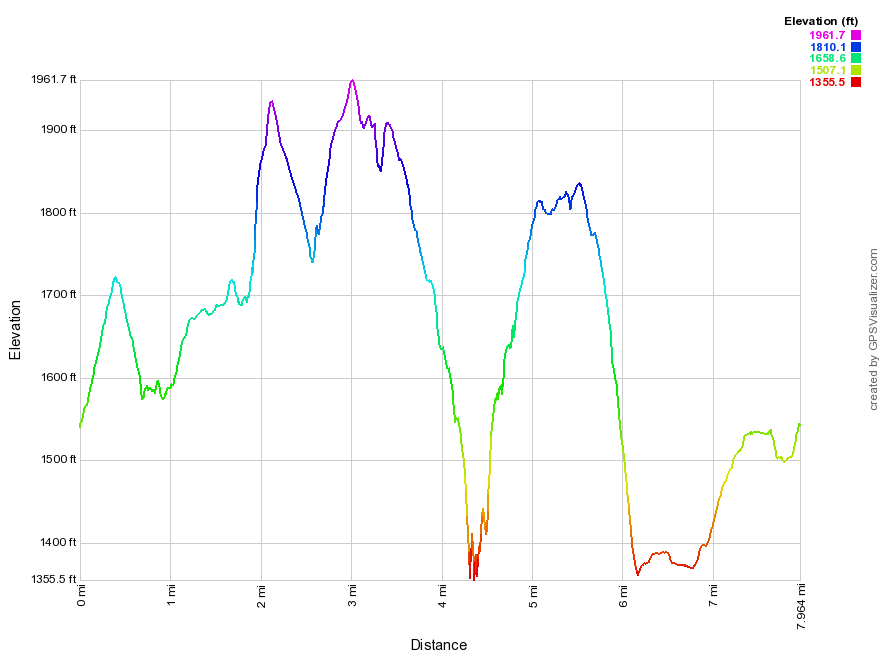 (The image below shows the profile of the loop hiking route. Remember that all vertical profiles are relative!)
Mount Greylock: Hopper Trail
| Quick Look | ||||
|---|---|---|---|---|
| Difficulty | Round trip | Total climb | Internet Maps | |
| 8.5 mi. | 2513 ft. | AllTrails | ||

From Sate Route 7 in Massachusetts take route 43 eat for 2.3 miles. In New Hope turn right on Hopper Road. At 1.4 miles the road splits in a Y with Hopper Road going to the left. Stay left on Hopper Road and drive to the dead end. Park in the parking area at the end of Hopper Road.
The very first part of the trail is an old farm road . This part is flat and the Haley Farm trail leaves to the right and then the Money Brook Trail branches to the left. Stay on the Hopper Trail marked mostly by fading blue blazes. The first mile of the trail nearly parallels the contour lines but constantly and gradually gains elevation. The trail is rooted and rocky in places. Some very large blowdowns have simply been left in place and "steps" have been cut through them. Around 1 mile the trail turns more to the south and starts to gain elevation toward the Greylock ridge. Over the next mile there is a gain of over 900 vertical feet. There are no rock scrambles or anything really steep but the climb is relentless. At 2.0 miles the trail levels some and meets Sperry Road at 2.3 miles. Turn left to hike up Sperry Road passing the campground office. Turn left at 2.6 miles to get back on the Hopper Trail. This part of the trail started innocently enough but then begins to gain elevation again quickly. At about 3.3 miles the Overlook Trail branches to the left. Stay on the Hopper Trail which begins to roughly parallel Rockwell Road. At 3.8 miles cross Rockwell and North Adams Roads and stay on the trail which will now have white markings to indicate that the Appalachian Trail had joined the Hopper Trail. From here it is only about .3 miles to the summit. There were a few more short sections to climb and just before the radio tower is Gore Pond, the highest body of water in the state. After this the trail passes a radio tower and crosses the road. A large stone is inscribed with a quote from Thoreau. Cross the road where there is a metal sculpture that shows all of the Greylock Reservation and the hiking trails. Behind this on the very summit is the War Memorial Tower and to the right is Bascom Lodge. A new road allows people to drive to the summit so the area may be crowded. Walk passed the tower and to the viewpoints on the other side. There are nice views to the east and if you walk down the slope you can get better angles for pictures. The views from the back of Bascom Lodge are also nice. When you have exhausted you exploration of the summit, return the way you came.
 (The image at the left shows the profile of the hike. Remember that all vertical profiles are relative!)
Mount Greylock: Jones Nose
| Quick Look | ||||
|---|---|---|---|---|
| Difficulty | Round trip | Total climb | Internet Maps | |
| 5.9 mi. | 1332 ft. | AllTrails | ||

Take Route 7 south toward Pittsfield from Williamstown. At 13.3 miles from Williamstown in Pittsfield turn left on North Main Street. In less than a mile turn right on Quarry Road and follow the signs for "State Reservation". In .4 miles turn left on Rockwell Road passing the Visitor's Center in another .6 miles. Drive passed the Center and up Rockwell Road. At 4.3 miles watch for a parking area on the right for Jones Nose.
Get on the blue Jones Trail and start to climb through open fields with stunning views to the south down the mountain into the valley and over the hills beyond. The trail soon enters some brush and then trees which obscure the view. In a little less than .5 miles the trail became less steep and at .6 miles the trail forks with the CCC Dynamite Trail heading left and the Jones Nose Trail going right. Bear right and start a steep climb up to the AT which runs across Saddleball Mountain. At about .8 miles a spur trail labeled "view of the Catskills" turns to the left. Walk out to a rock outcrop to take some pictures before returning to the main trail. Just passed 1 mile the Jones Nose Trail ends. Turned left on the AT and head north. The AT runs across the Saddleball Mountain Ridge although not always on top. After about 1.6 miles, you will be back at Rockwell Road. Walk the .9 miles down Rockwell Road to Sperry Road and pick up the CCC Dynamite Trail on the left to get back to Jones Nose. As you walk down Rockwell Road you will find several nice viewpoints to the west. The CCC Dynamite Trail stretches about 1.35 miles from Rockwell Road to Jones Nose and is slightly uphill all the way. This trail can be wet and has several stretches of functional puncheons and plentiful nettles. Turn right on the Jones Nose Trail and walk back to the car.
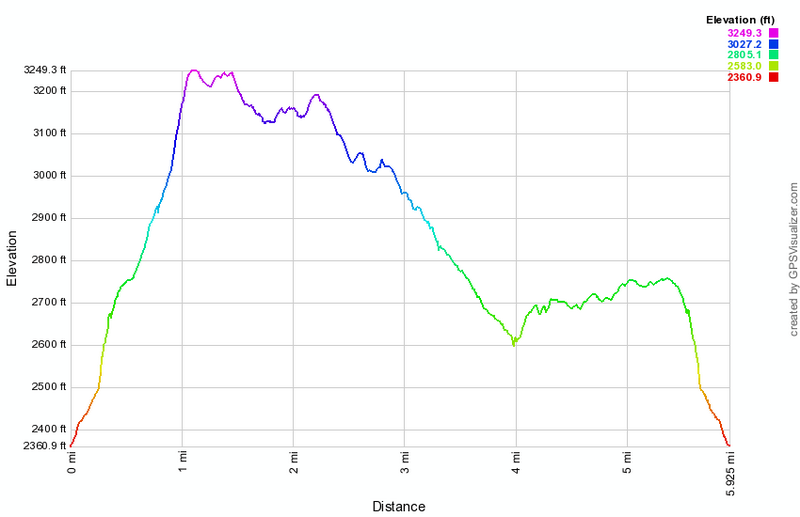
(The image above shows the profile of the hike. Remember that all vertical profiles are relative!)
Mount Greylock: Loop
| Quick Look | ||||
|---|---|---|---|---|
| Difficulty | Round trip | Total climb | Internet Maps | |
| 12.8 mi. | 4666 ft. | AllTrails | ||
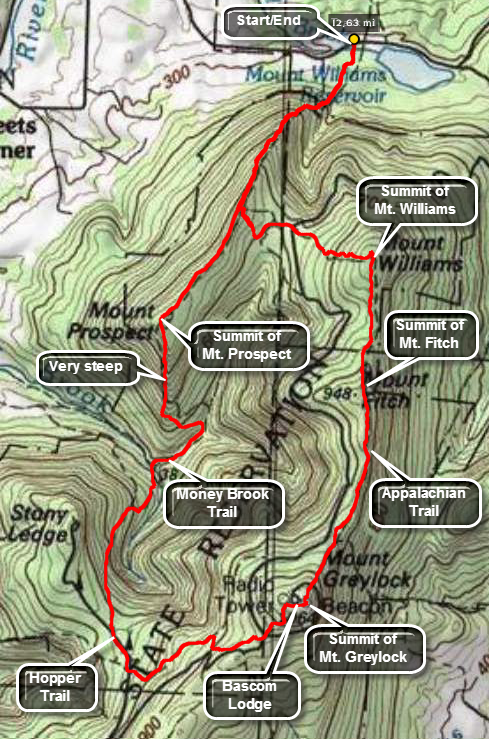
Turn south on Luce Road off Route 2 in Williamstown, MA. Luce Road makes a left and become Pattison Road. Park near the water treatment plant on either side of the road in pulloffs for AT hiking.
Pick up the white blazes of the Appalachian Trail as it heads south toward the Greylock Massif. Walking into the woods the trail is flat for a few hundred feet. After that, the it starts to ascend and gets steeper. In a mile and a half you will experience a vertical gain of 1450 feet and will be at a trail junction with a small viewpoint. The Appalachian Trail turns left here and almost due east to Mt. Williams. This trail junction can be tricky so pay attention to the blazes! The Appalachian Trail begins a descent toward the Wilbur Clearing Lean-to. Just short of the lean-to the trail turns to the left, crosses some elevated walkways and starts to ascend again. The first part to the crossing of Notch Road is gentle but the last section to the top of Mt. Williams is rocky and steeper. Along the way you may see some interesting outcrops of quartz. The viewpoint at the summit of Mt. Williams is pretty grown in and views are spotty at best. Continue to walk along the Appalachian Trail from Mt. Williams to Mt. Fitch. It is almost flat with a slight descent to a col and then the ascent up Mt. Fitch which has an elevation of 3100 feet. The distance is about 1 mile. The AT skirts the summit of Fitch so you may want to bushwhack to the top but there is no view from the summit. Back on the Appalachian Trail continue on toward Greylock on an almost flat with a slight incline. As you approach Mt. Greylock, you will pass the Bellows Pipe Trail and then the Thunderbolt Trail. This area was cleared for access to the old ski slopes and the trail is wide. The trail gets steeper and is strewn with rocks. Near the end a set of steps leads up to and across the road to the summit. After a short, steep section you arrive at the Thunderbolt Shelter which is for day use only. Continue on to the tower at the summit and walk over to the lookouts on the other side. Find the blue Hopper Trail and descend to Gore Pond. At Sperry Road turn right and head down the road and make a right turn to continue on the Hopper Trail. At the next junction take the cutoff trail that leads down to Money Brook and the Money Brook Trail. Cross Money Brook on a bridge and turn right toward Mt. Prospect on the Money Brook Trail. The Money Brook Trail begins to gain some elevation and crosses back and forth over the brook in several places. Just before the Mt. Prospect Trail junction the Money Brook Trail begins a steep ascent. To avoid climbing over Mt. Prospect, continue of the Money Brook Trail to the Wilbur Clearing Len-to and follow the Appalachian Trail back to the car. Turn left at the trail junction and take the Mt. Prospect Trail and head UP Mt. Prospect. After about .25 miles the trail starts a brutal ascent up the mountain. Eventually the trail turns due north and keeps a continuous ascent to the summit. Near the top the trail levels a little and then rises over one more bump to the top. There is one viewpoint along the way. After over 1100 feet of vertical gain in a mile you will arrive at the summit cairn. The trail now starts down the other side of Mt. Prospect but the descent is gentle, quite pleasant and quick. You will next arrive at the trail junction and viewpoint from earlier in the hike. Continue on the Appalachian Trail back to the car.
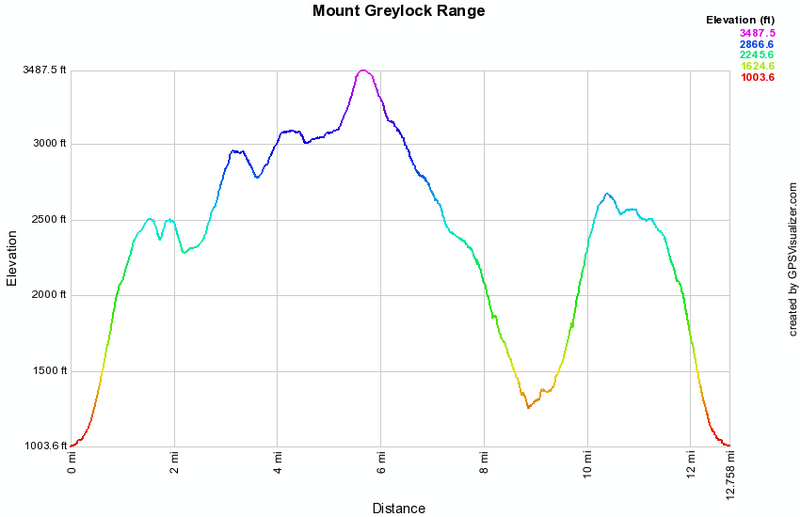 (The image at the left shows the profile of the hike. Remember that all vertical profiles are
relative!)
(The image at the left shows the profile of the hike. Remember that all vertical profiles are
relative!)
Mount Ivy to Route 106
| Quick Look | ||||
|---|---|---|---|---|
| Difficulty | Round trip | Total climb | Internet Maps | |
| 7.5 mi. | 1630 ft. | AllTrails | ||
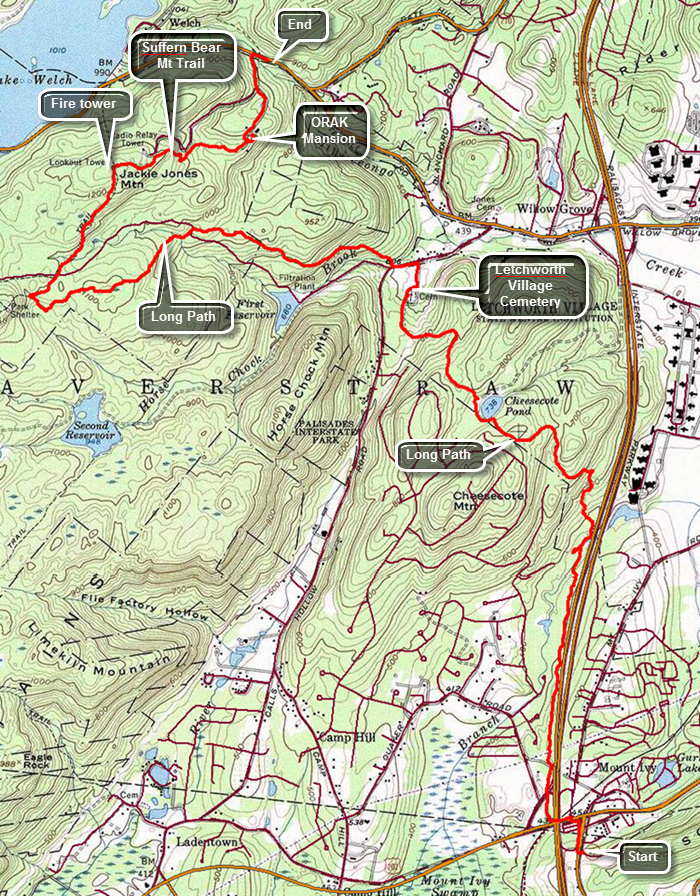
Note: This hike is best done with a car spot as the round trip would be 15 miles over difficult trails.Take the Palisades Parkway to Exit 15 and turn left onto Route 106. Drive to the junction with Route 98 and turn right. The parking area is a short distance up the road on the left. Park one car here. Drive back out to the Palisades Parkway South and take exit 13. Turn left on Route 202 and then right and the next light onto Route 45. The parking area for South Mountain County Park is just up the hill on the left. Walk down Route 45 to the traffic light and cross Route 202 to the other side. Walk under the parkway and then up a bank to the right. Continue through a short stretch of wood and then cross the exit ramp to the parkway and enter the woods on the other side. For the next 1.2 miles the trail follows a narrow strip of woods along the parkway. At 1.65 miles cross a stream by walking along the edge of a "culvert" that conducts the stream under the parkway. At this point the trail begins to turn to the northwest ascending the northern shoulder of Cheesecote Mountain. At about 2.4 miles the trail joins a road which skirts Cheesecote Pond. Turn to the left and follow the blazes around the pond. The trail soon enters the trees again on a woods road. Ascend a small hill and then descend the other side of the hill and head down toward Call Hollow Road. At 3.5 miles there is a cemetery that is marked on the map. There are very few gravestones with most plots being marked only by a small metal marker with a number. As you continue around the cemetery there are some stone benches in front of a monument with a bronze plaque inscribed with a list of names. The plaque has an inscription that read "Those Who Shall Not Be Forgotten". One of the stone benches bears the words "Giving Names to Souls Forgotten No Longer". This is "The Letchworth Village Cemetery 1914-1967". Letchworth Village was a residential institution located in Rockland County built for the physically and mentally disabled of all ages from the newborn to the elderly. It was opened in 1911 and at its peak consisted of over 130 buildings spread out over many acres of land. Many of the residents were placed there by their families and forgotten. Walk out the access road to Call Hollow Road, turn left and walk a few hundred feet up the road before turning right into the woods at 3.7 miles. Cross a stream on a bridge and follow the aqua blazes as best you can. The problem is that the blazes are few and hard to spot among the trees. At 4.6 miles the trail intersects Old Turnpike. Cross the wide woods road to pick up the blazes of the Long Path. Cross a small stream and watch carefully for the blazes on the other side as they are hard to spot. From this point on the trail is poorly marked. The trail continues to ascend and at 5.7 miles comes to an intersection with the yellow blazed Suffern Bear Mountain Trail and a woods road. If you need to "tag" the Big Hill shelter follow the aqua blazes to the left. Walk up to the shelter and then back to this junction. Otherwise make a hard right and follow the yellow blazes. In .7 miles you will be at the top of Jackie Jones Mountain. There is a fire tower here which is not blocked so you may climb to the landing just under the cab. There are a few steps missing and the remaining steps and landing have seen better days. There is a nice view from the top except for the communications complex just to the northeast of the fire tower! To the north of the tower is Lake Welch and farther to the east the Hudson. Get back on the trail and negotiate a few open rock faces until you come to the ruins of the ORAK Mansion at 7.5 miles. This mansion was built in 1923 by George Briggs Buchanan, a vice president of the Corn Products Refining Company, which manufactured Karo syrup. Orak is Karo spelled backwards. After Buchanan died in 1939, his heirs sold the mansion to the park, and it was demolished in 1973. Walk to the right off the trail and into the area that was once the dining room. Little remains except for a rock wall with a door and small round windows. Buchanan had the floor of the dining room built to sway like the deck of a ship and the round widows acted as portholes. Return to the trail and walk down the hill passing the remains of the mansion, the servants quarters and the gatehouse. The trail soon meets the access road for the communications complex and it is less than half a mile to Route 106. Turn right on the road and walk a few hundred feet back to the car.
 (The image at the left shows the profile of the hike. Remember that all vertical profiles are relative!)
Mount Pisgah (PA)
| Quick Look | ||||
|---|---|---|---|---|
| Difficulty | Round trip | Total climb | Internet Maps | |
| 6.6 mi. | 1481 ft. | AllTrails | ||

From Route 220 in Towanda turn west on Route 6. Drive 11 miles west to Route 3019 marked as Wallace or Bailey's Corners Road. Turn north and drive to the T in the road. Left will take you to the county park. Turn right to go to the state park. After a short distance, park in the lot next to Stephen Foster Lake. The lake is formed by a dam on Mill Creek. Start the hike by crossing the road and turning right toward the park. The Mill Creek Trail turns left off the road and starts up a hill for about .4 miles. Stay left on a snowmobile trail at a junction where the Mill Creek Trail turns right. You will soon arrive at the Ridge Trail where you should turn right. The trails are all marked with wooden signs and are well-maintained. After a short distance, the Ridge Trail begins to climb through a forest with one or two marked trails crossing the main trail. The trail continues through open places and then back into forest. It flattens in places and then climbs toward the summit. The trail finally dips a little and at 2.9 miles where it meets the road to the county park at the summit. There are several viewpoints on the way. As it flattens near the top there are some facilities and primitive campsites. Continue to the summit which has a pavilion and two communications towers. In the area facing west there is a nice viewpoint with some benches. A sign on the pavilion describes a lodge and observation tower that once stood on the summit. Retrace your route to the summit but stay on the Ridge Trail and walk out to the road. Cross to the other side and pick up the Oh! Susanna Trail that runs next to Stephen Foster Lake. Take this trail back to the parking area.
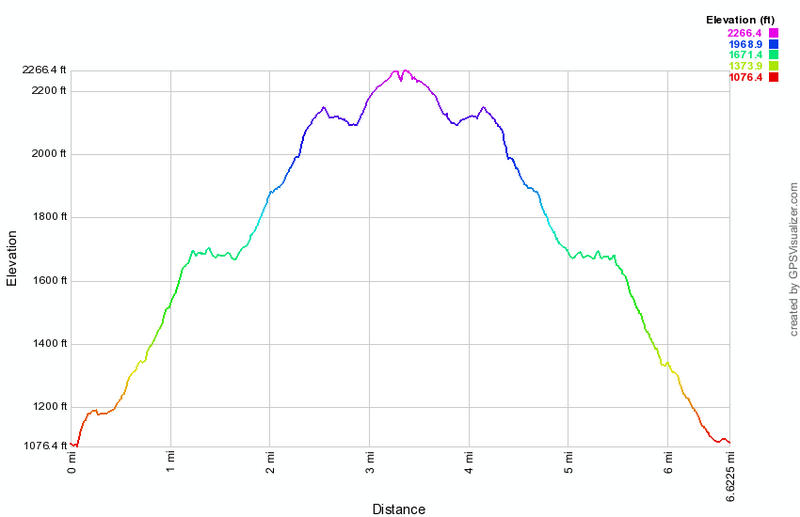 (The image at the left shows the profile of the hike. Remember that all vertical profiles are relative!)
Mount Tobias
| Quick Look | ||||
|---|---|---|---|---|
| Difficulty | Round trip | Total climb | Internet Maps | |
| 2.3 mi. | 700 ft. | AllTrails | ||
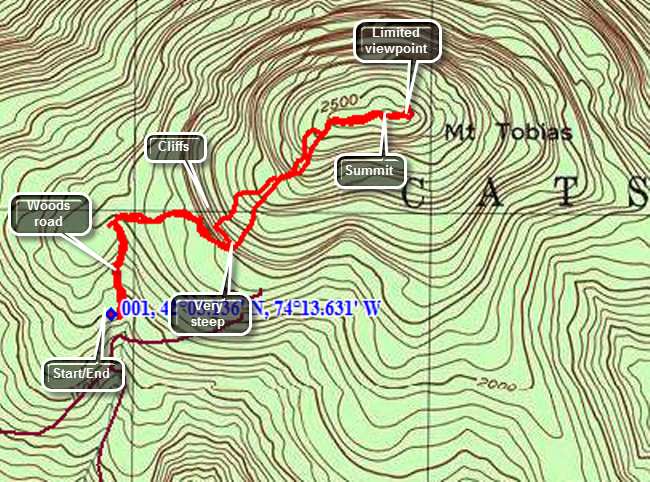 From the junction of Route 28A and 28 just south of Boiceville drive north 1.1 miles and turn right on Winnie Rd. Drive to the end of road and turn right on the Mount Tremper-Wittenberg Road. Drive .2 miles and turn left on Abbey Road which ascends Mount Tobias. Drive about 2.5 miles and watch for a rutted and eroded access road on your left. There is no sign on the road but there is a parking area big enough for a few cars if you can negotiate the "driveway". Park and start your hike on the woods road that leaves the parking area to the north. After only about .25 miles you will notice that the road continues to the north but that Mount Tobias is to the ENE. Turn in that direction and walk a short distance to find some interesting cliffs. Walk to the right at the base of the cliffs until you can find a good place to start up the steep hill. The steep Apr continues for about .5 miles until you reach a flatter part near the summit. The highest point is marked by a cairn and is about a .2 mile walk along relatively flat ground. Clear views are difficult to come by but there are views through the trees at several points on the summit. Return the way you came.
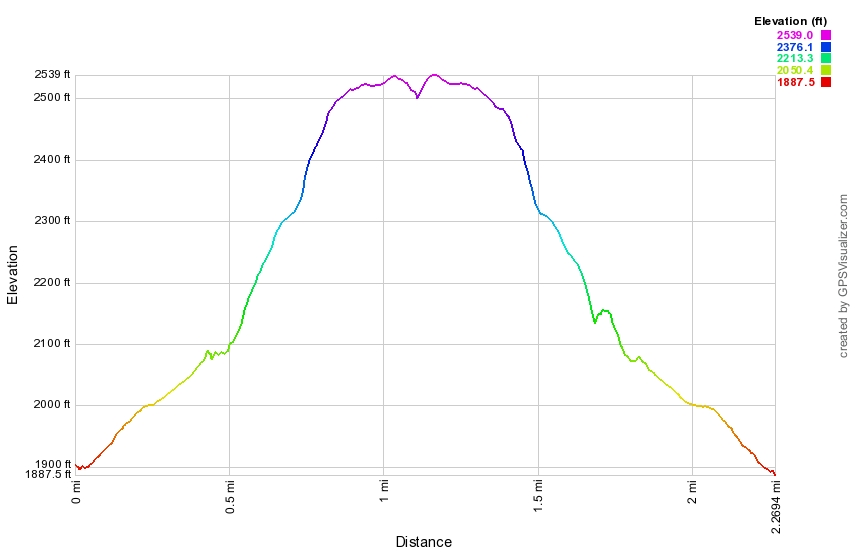 (The image at the left shows the profile of the hike. Remember that all vertical profiles are
relative!)
(The image at the left shows the profile of the hike. Remember that all vertical profiles are
relative!)
Mountain Road to SRT
| Quick Look | ||||
|---|---|---|---|---|
| Difficulty | Round trip | Total climb | Internet Maps | |
| 3.6 mi. | 700 ft. | AllTrails | ||
 Take exit 113 off Route 17/I86 to get on Route 209 south toward Port Jervis. Drive south to the Guymard Turnpike which is a sharp left turn about 1.7 miles south of the junction with Route 211. Follow the winding road over the ridge to Mountain Road. Turn right on Mountain Road and drive 3 miles south to the trailhead on the right. Park slightly south of the beginning of the trail where there is a pullout that can accommodate three or four cars. Walk north along Mountain Road and through a break in the fence. The trail begins as a wide woods road and starts a gentle climb for the first .4 miles. Passed a gravel pit on the right and watch carefully for aqua blazes which are sparse. After .4 miles there is a small pond with a concrete dam impounding the water. A white blazed trail crosses the dam at this point. From the pond continue on the Long Path heading first northeast and then northwest. The trail begins a gentle descent. At .9 miles there is another small pond. Just after this pond make a 90 degree turn to the left still following the Long Path. At 1.2 miles there is yet another pond where you will find the other end of the white trail. The Long Path begins to descend still following woods roads. Over the next .7 miles the trail descends a little over 350 feet until it intersects the Schawangunk Ridge Trail. "Tag" the SRT and then turn around to head back to the car. Ascend the ridge and at 2.7 miles you will be back at the last pond. You may continue to follow the Long Path back to the car. For some variety, turn right and start to follow the white trail. It also follows a road and from it you can see the Long Path as the trails are parallel at times. Cross a gas pipeline right-of-way and arrive back at the first pond you visited. The white trail turns left here and passes over the dam to rejoin the Long Path. Walk back down the woods road to Mountain Road and turn right to get back to the car.
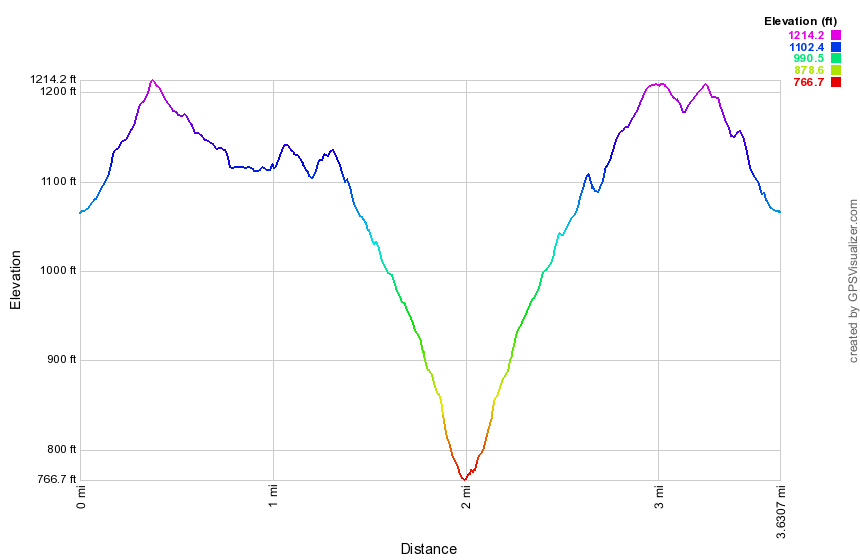 (The image below shows the profile of the hike. Remember that all vertical profiles are relative!)
Mud Pond (Complete Loop)
| Quick Look | ||||
|---|---|---|---|---|
| Difficulty | Round trip | Total climb | Internet Maps | |
| 6.0 mi. | 1130 ft. | AllTrails | ||
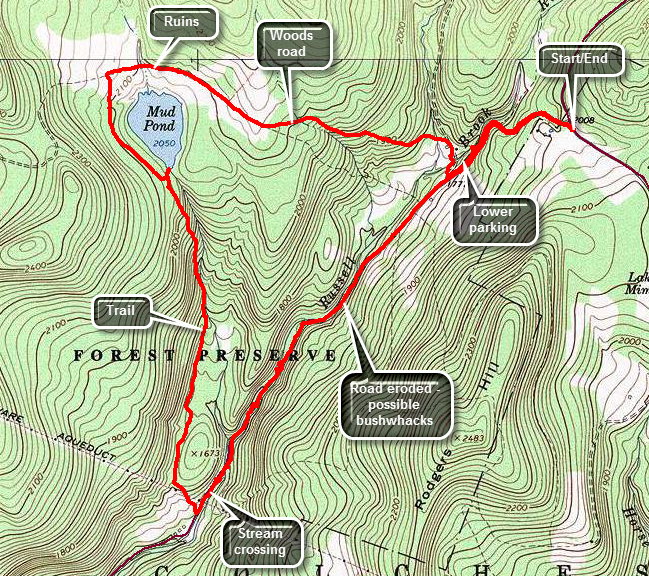 This is one of our favorite trails when we just want to hike. It has several variations for distance and
difficulty. Like most trails, hiking one way is different than hiking in the other direction. We have
take this route more than a dozen times this season and it is interesting to watch the changing
seasons. It is unfortunate that Russell Brook Road is closed due to the frequent floods that have
washed out the road.
This is one of our favorite trails when we just want to hike. It has several variations for distance and
difficulty. Like most trails, hiking one way is different than hiking in the other direction. We have
take this route more than a dozen times this season and it is interesting to watch the changing
seasons. It is unfortunate that Russell Brook Road is closed due to the frequent floods that have
washed out the road.
Turn left on Morton Hill Road on Route 206 just after the Rockland Flats. Bear right up Morton Hill
Road until you see a parking area on the left near the sign indicates Russell Brook Road is closed.
Park here on the side of the road and hike down Russell Brook Road .5 miles to the actual trail head.
Walk down Russell Brook Road .6 miles to lower trailhead parking area. Along the way take a peek at Russell Brook Falls on your right. Continue straight ahead on the road which has been devastated by several floods and is closed just passed the main parking area. When you reach the large boulders that act as a roadblock continue hiking to the first of several deep cuts across the road caused by the erosion of water running off the ridge on the left. Walk through the first and then another larger cut. At about 1.5 miles the road had been completely eroded by the stream. Climb the bank, walk around the eroded area and then slide back down to the road. Continue to hike along the road which is very overgrown with weeds and brush and has a few major blowdowns. At 2.0 miles cross the stream on the stepping stones when the water level is so low. When the water is higher you may have to 1look upstream or downstream for a better crossing or take your shoes off and wade across. In another .2 miles cross under the power lines and turn right on the trail. The trail begins with a short but somewhat steep ascent but then levels off some as it passes by a beaver pond. The trail is not used too much and may need maintenance including additional trail markers which can be very scarce in some areas. Pass by a beaver pond on the left as the trail remains level for some time following the base of a ridge. At about 2.9 miles the trail begins to climb and ascends for .5 miles and gains 375 feet. The trail is parallel to the stream that flows out of Mud Pond. As you near the top of the hill you can see Mud Pond through the trees. Find a path to the pond or just head off through the woods to the clearing near the outlet. This is a nice place to stop for a drink and a snack. Get back on the trail and at 4.0 miles follow the hiking trail as it turns right. A snowmobile trail goes off to the left here. Continue on the trail which follows an old woods road. Watch for some stone foundations on the right from farms that were on this area in the early 20th century. Pass the left turn to the trail around Trout Pond at 4.4 miles. Walk up the short hill and then start down the other side. By the time you reach the trail register box you will have lost the 375 feet of elevation you gained walking up the hill to Mud Pond. Just passed the register box is an impressive area of Japanese knotweed which gets larger every year. Russell Brook Falls is to your left along a short path. The falls are well worth the trip especially if the water is high. It is a short walk out to the parking area and the final part of the hike is to walk back up Russell Brook Road to the car.
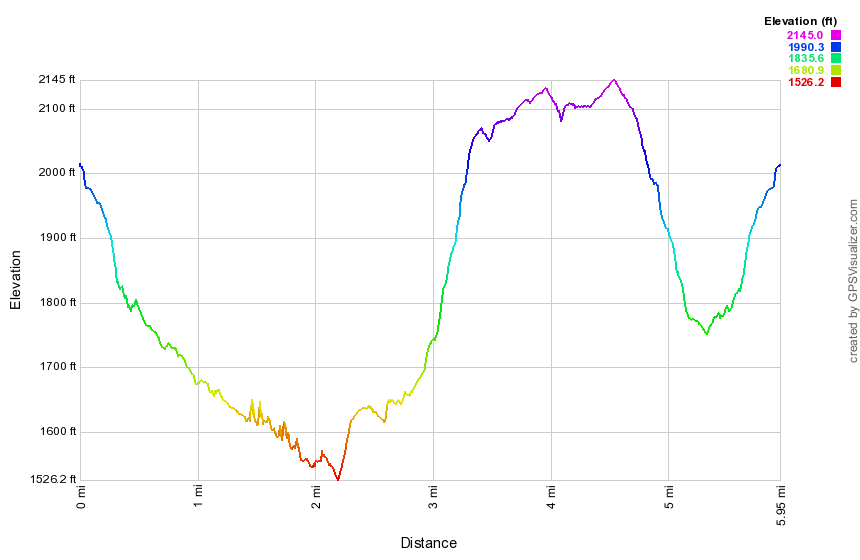 (The image at the left shows the profile of the hike.)
Mud and Trout Ponds (Campbell Brook snowmobile)
| Quick Look | ||||
|---|---|---|---|---|
| Difficulty | Round trip | Total climb | Internet Maps | |
| 8.3 mi. | 1585 ft. | MSR Maps unavailable | AllTrails | |

In Roscoe head north on Route 206 to Morton Hill Road just passed the Roscoe Nursing Home. Turn left on Morton Hill Road and drive to the intersection with Russell Brook Road. Park on the left side of the road to avoid trespassing on private property. Start the hike by walking down Russell Brook Road. The walk down Russell Brook Road to the lower parking area is very enjoyable. You will pass the upper falls on your right and should be able to gauge whether a trip to the falls will be worthwhile. Once you are in the lower lot, turn right onto the trail that goes down to the bridge across Russell Brook. Walk to the trail junction and bear to the left to pass by the large campsite on the right as you head up the hill. The hill is about .8 miles and gains around 400 feet which is enough to work up a sweat. At the next trail junction, turn right to head to Trout Pond. Over the next 1.2 miles the trail gains another 400 feet rising to almost 2500 feet in elevation to the shoulder of Cherry Ridge. From that point head downhill for the next .8 miles losing 460 feet in the process until you are at the bridge across the inlet stream to Trout Pond. Continue over the bridge and passed the lower lean-to on the left. Turn left on the Campbell Brook Trail. Over the next .8 miles of trail you will gain back 430 feet of elevation and will be nearing the junction of the hiking and snowmobile trails. Turn right on the snowmobile trail as it begins to climb a little more than the hiking trail. The trail begins to follow the edge of the hill so for the first .3 miles it heads almost due east. At 4.6 miles the trail turns north. Walk another .3 miles continuing along the edge of the ridge. At 4.9 miles begin to descend heading east and then due north to intersect Campbell Brook Road near the junction with Morton Hill Road. Turn right on Campbell Brook Road and walk about .1 miles to Morton Hill Road. Continued straight ahead to follow the road back to the car.
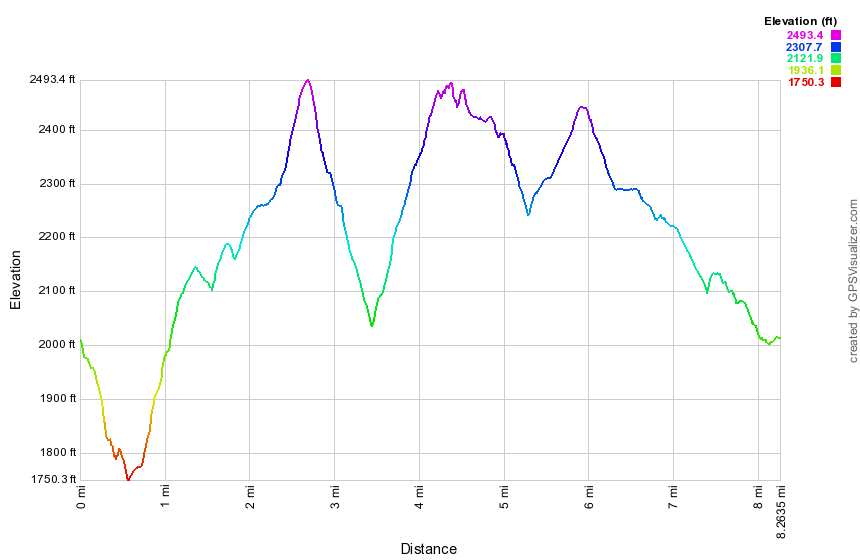
(The image at the left shows the profile of the hike. Remember that all vertical profiles are relative!)
Mud Pond (out and back) and Trout Pond (loop)
| Quick Look | ||||
|---|---|---|---|---|
| Difficulty | Round trip | Total climb | Internet Maps | |
| 8.8 mi. | 1630 ft. | AllTrails | ||

In Roscoe head north on Route 206 to Morton Hill Road just passed the Roscoe Nursing Home. Turn left on Morton Hill Road and drive to the intersection with Russell Brook Road. Turn left and drive down the road to the parking area at the end of the passable road. Leave the parking area on the trail that goes down to the bridge across Russell Brook. Walk to the trail junction and bear to the left to pass by the large campsite on the right as you head up the hill. The hill is about .8 miles and gains around 400 feet which is enough to work up a sweat. At the next trail junction, continue straight ahead on the Mud Pond Trail. As you walk on the trail, watch for the ruins of some farm buildings on the left. The next section of trail is usually wet and can be very muddy. At 1.4 miles the trail turns 90 degrees to the left to head south along the west shore of Mud Pond. There are several campsites on the left side of the trail and at 1.85 miles there is a spur trail to the left which goes to a designated campsite at the outlet dam for Mud Pond. Continue straight ahead down the hill watching for some cascades in the outlet stream in the left. The trail will level and pass by a beaver pond on the right. Shortly after the pond, the trail again descends. This time the trail ends on what was once Russell Brook Road. Turn around and walk back up the hill you just descended! This time turn right at the top of the hill and walk out to Mud Pond. After a brief rest, turn around and walk back out to the main trail. Turn right, slog through the mud to the trail junction at 5.25 miles. Turn left to stay on the Mud Pond Trail. The trail ascends 1.1 miles gaining 400 feet at a moderate 6% grade. The trail begins to descend and at 6.6 miles it turns right to head east toward Trout Pond. At the pond cross the bridge over the inlet stream and turn right on the Trout Pond Trail to walk south along the east side of Trout Pond. You may want to stop of the "beach" at the outlet end. Continue on the main trail to the trail register and junction. Turn left on the next path that leads to Russell Brook Falls. Walk out toward the falls and down the bank to get to the stream bed. This gives you the best view of the falls. When you are done, turn around and walk back out to the main trail. Turn left, cross the bridge and walk back up to the parking area.

(The image at the left shows the profile of the hike. Remember that all vertical profiles are relative!)
Neversink Unique Area: Cold Spring Road
| Quick Look | ||||
|---|---|---|---|---|
| Difficulty | Round trip | Total climb | Internet Maps | |
| 5.7 mi. | 822 ft. | AllTrails | ||

From Broadway in Monticello, NY turn onto St. John Street. Drive 7.45 miles from Broadway to the parking area on the left with a typical yellow on brown sign. The sign indicates that this parking area would allow access to the Neversink Unique Area. The trail leaves the parking area and is well worn but you may not see any blazes. Within a few hundred feet there is a trail register and red blazes begin to appear. Walk slightly uphill for .4 miles to the point where another trail comes in from the left. This trail is almost completely overgrown and has not been used for some time. Continue to walk along the wide marked trail until at .55 miles the trail begins to descend which continues for some time. At 1.1 miles the trail may be wet and muddy for about a quarter of a mile. There may be several blowdowns along the way. Continue downhill and bear left and downhill when the trail splits at 1.4 miles. The trail begins to get very rocky but is still easy to follow. At 1.7 miles you will come to an open area and the blazes seem to disappear! Look to the left as the trail bends downhill at this point. Looking back at the trees behind you may help as blazes may be on the other side of the trees. The trail continues to head south following a woods road until at 2.1 miles it ends at a jeep road with blue markers. Turn left and watch out for wet and muddy areas. The trail continues downhill until at 2.3 miles you will come to Little Eden Brook. Cross the brook using stepping stones or a log. The trail levels off a little and at 2.6 miles a marker on a stake indicates a turn to the right toward the river. A wide jeep road continues straight ahead and also turns up the hill to the left. Turn right and walk along the road downhill and toward the river. The trail begins to parallel the river and there is a good place to walk down to the river's edge at 2.75 miles. There are several other places where you may walk down to the river. Head back up to the trail and walk back the way you came. Watch for a sign on a tree a little off the trail toward the river. The sign says "Unsafe Bridge" and "Scheduled for Demolition". The floods damaged the bridge and it was removed. Work your way down a trail to the river's edge once again. Work your way upstream along the shore to a place where you can see that the river splits upstream and the land along the river becomes too narrow to walk. Return along the river's edge to the path up to the trail.Walked back up to the point where you turned down to the river. Turn left and walk back to the red trail crossing Little Eden Brook again. Turn right on the red trail and begin a long uphill trek back to the parking area. At 3.9 miles you will be in the area where the trail markers were difficult to follow on the way out. Continue following the trail and the markers which are much clearer on the way back than the way out. Continue to hike uphill on the trail passing through the wet and muddy area. Pass the "other" trail at 5.3 miles and continue back to the parking area and your car.

(The image above shows the profile of the hike. Remember that all vertical profiles are relative!)
Neversink Unique Area: Denton and Mullet Falls (counterclockwise)
| Quick Look | ||||
|---|---|---|---|---|
| Difficulty | Round trip | Total climb | Internet Maps | |
| 4.6 mi. | 930 ft. | AllTrails | ||

Take the Rock Hill exit 109 off State Route 17 and turn right. Drive south on Katrina Falls Road. Park in the small parking area at the end of the road. Walk through the gate and onto the woods road which is the blue trail that parallels the Neversink River. A spur trail to the river goes right at .5 miles but stay to the left crossing a bridge over Wolf Creek. At the top of the hill turn right to start the loop in a counterclockwise direction. The trail rolls some and the begins a gentle climb passing another spur trail to the river at 1.2 miles. At 1.35 miles cross a bridge over Mullet Brook and walk uphill to the spur trail down to Denton Falls at 1.4 miles. Walk down the spur trail to the river being careful to follow the sparse and widely spaced yellow blazes. At 1.7 miles you can descend to some rock on the edge of the river. Be careful since the water can be swift and the rocks slippery! When you are ready walk back up the spur trail to the main trail. Turn right on the main trail and bear left at the next junction to stay on the main trail. The trail to the right at this junction leads over 2 miles downstream to High falls. The trail now starts an ascent to the highest point on the hike. At 2.1 miles a spur trail to Mullet Brook Falls leads to the left. Turn here and walk .15 miles to the falls. After exploring the falls, walk back up the spur trail and turn left to ascend to the upper bridge over Mullet Brook. The trail has been heading east for some time but at 2.9 miles turns left and heads north crossing the brook at 3 miles. At 3.2 miles you will have pass through the highest point on the hike and will be at a trail junction. Bearing right here leads out to the Wolf Lake Multiple Use Area. Bear left heading west and start down the hill back to the trail junction above the Wolf Lake Creek bridge. From the top of the hill to the junction the trail drops over 400 feet in .85 miles turning north at around 3.6 miles. At 4 miles you will be back at the trail junction with the main trail. Bear to the right and walk back over the bridge and up the hill to the parking area.

(The image above shows the profile of the hike. Remember that all vertical profiles are relative!)
Neversink Unique Area: Mullet and Denton Falls (clockwise)
| Quick Look | ||||
|---|---|---|---|---|
| Difficulty | Round trip | Total climb | Internet Maps | |
| 4.6 mi. | 900 ft. | AllTrails | ||

Take the Rock Hill exit off State Route 17 and turn right. Drive south on Katrina Falls Road. Park in the small parking area at the end of the road. Walk through the gate and onto the woods road which is the blue trail that parallels the Neversink River. A spur trail to the river goes right at .6 miles but stay to the left crossing a bridge over Wolf Creek. Turn left to start the loop in a clock wise direction. The trail starts out flat but soon begins to climb. Over the next .9 miles gain almost 400 feet over a gentle but persistent ascent, At 1.6 miles there is another trail junction. The trail to the left leads out to the Wolf Lake Multiple Use Area. Turn right to continue on the main trail which from this point on is mostly flat or downhill. After making the turn, the trail heads south and soon crosses Mullet Brook on the upper bridge. As the trail descends the hill toward the Neversink Gorge, watch for the short spur trail to the right which goes down to Mullet Brook Falls at 2.25 miles. Turn right and walk down to the falls. If you decide to walk out onto the rocks below the falls, be careful of your footing as the mist from the falls can make the rocks slippery at any time but especially during the colder months. Head back out to the main trail and turn right. At 2.6 miles there is a junction with the trail to the left that leads to High Falls. Turn right and almost immediately turn left on the spur trail down to Denton Falls on the Neversink. The trail is about .3 miles and loses 180 feet. If you chose to walk out onto the rocks near the falls, be careful since the are often wet and slippery and can be icy during the winter. Start back up the hill to the main trail turning left at the top to head for the lower bridge on Mullet Brook. This bridge may be in disrepair so be VERY careful crossing it. It is not clear if the DEC intends to repair the bridge, construct a new one or remove it entirely! Continue your hike on the main trail as it stays level for a long time and even descends a little as you pass the trail junction where you started the loop earlier. At 4 miles cross the bridge over Wolf Brook and continue on the main trail as it ascends UP the hill to the parking area.
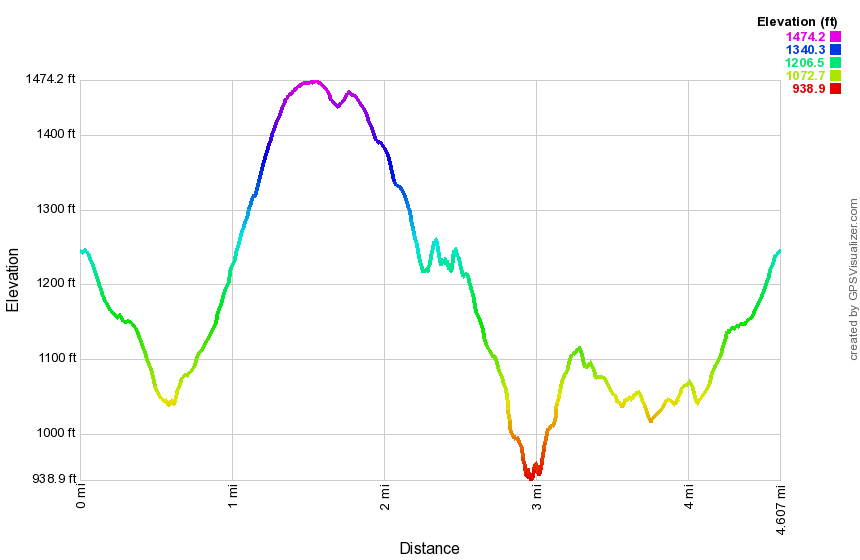
(The image above shows the profile of the hike. Remember that all vertical profiles are relative!)
Neversink Unique Area: Denton and Mullet Falls (Wolf Lake)
| Quick Look | ||||
|---|---|---|---|---|
| Difficulty | Round trip | Total climb | Internet Maps | |
| 5.8 mi. | 1060 ft. | AllTrails | ||

Take the Rock Hill exit off State Route 17 and turn right. Drive south on Katrina Falls Road. Park in the small parking area at the end of the road. Walk through the gate and onto the woods road which is the blue trail that parallels the Neversink River. A spur trail to the river goes right at .6 miles but stay to the left crossing a bridge over Wolf Creek. Another trail goes to the left at .7 miles but stay on the blue trail which will bring you to another bridge at just under 1.4 miles. This bridge crosses Mullet Brook downstream of the falls. At about 1.4 miles another yellow spur trail heads right down to the river. This trail is .3 miles but steep in places and leads down to Denton Falls. After taking in the view at the falls, get back on the main trail and turn right. Within a few feet, is the next trail junction. The right fork goes to High Falls which is over 2 miles away and adds over 4 miles to the hike. The left fork would allow us to complete the loop without the added distance. After a brief discussion, we both decided to skip High Falls as it is not much different than Denton Falls. Head left to start to loop back to the parking area. After a short uphill of less than .1 miles, turn left onto the yellow spur trail that leads to Mullet Brook Falls. Descend to the falls over the .15 mile trail. Walk back to the main trail and turn left to continue the loop. Walk uphill for the next .5 miles to where the trail levels some and then makes a sharp left turn. There are several others paths in the area so be careful to follow the trail markers. At just less than 3 miles, cross Mullet Brook again on a bridge further upstream than the falls. At 3.1 miles the main trail turns to the left. Continue straight ahead on the yellow spur trail. After .5 miles, arrive at a parking area near Wolf Lake. The road from the parking lot is absolutely straight heading north toward Wolf Lake Road. As you walk along the road a powerline appears from the east and turns north along the road. The road turns right to head to Wolf Lake. Continue on the right-of-way on a short bushwhack to the road. Cross a brook just before the road and then turn left and walk the .5 miles out to Katrina Falls road. Turn left and walk the final .7 miles to the car.

(The image above shows the profile of the hike. Remember that all vertical profiles are relative!)
Neversink Unique Area: Mullet and Denton Falls (from Wolf Lake parking)
| Quick Look | ||||
|---|---|---|---|---|
| Difficulty | Round trip | Total climb | Internet Maps | |
| 4.3 mi. | 886 ft. | AllTrails | ||
Take the Rock Hill exit off State Route 17 and turn right. Drive south on Katrina Falls Road to just before the Dead End sign. Turn left on Wolf Lake Road and after a short distance turn right on the gravel access road. Parking at the lower parking area is probably safest but there is a long, boring hike up the gravel road to the actual trail. Drive up the gravel road but be prepared for some washouts along the way. Park in the small parking area at the end of the road. Find the yellow blazed trail at the end of the road. The hike in on the side trail is only .6 miles and it is downhill. This means the return trip to the car will be uphill at the end of the hike! After about .6 miles you will arrive at the junction with the red trail. Turn left and walk along the trail until at .7 miles you cross the upper bridge over Mullet Brook. Follow the trail as it makes a sharp right turn and heads downhill. At 1.25 miles the yellow blazed spur trail to Mullet Brook Falls turns right. The spur trail is less than .2 miles and you will soon be at the base of the falls. The falls are always nice but are a more impressive site after a rain storm has swollen the creek. Be careful if you choose to walk out on the rocks to the base of the falls! The rocks can be very slippery from the spray from the falls. Head back out to the main trail and turn right to walk downhill to the junction where the red trail meets the blue trail at 1.6 miles. The blue trail stretches from the Katrina Falls parking area all the way south to High Falls where it ends. Future plans may included blazing this trail farther south along existing woods roads to reach the southern part of the Neversink Unique Area. Turn right on the blue trail and then almost immediately turned left on the yellow spur trail to Denton Falls. Continue down the yellow trail to the river . The trail is about .3 miles long but over that length it loses 175 feet to the lowest point on the hike at the Neversink River. At the river, you may walk out onto the rocks to get various views. When the water is lower it is possible to work your way along the rocks so that you can stand facing the falls. Be careful as the wet and mossy rocks can be very slippery. After taking in the views, walk up the bank and head up the yellow trail back to the blue trail. Turn left to continue around the loop. Take care when you cross the lower bridge over Mullet Brook as it can be slippery. Continue to hike the blue trail until at 2.9 miles you come to the trail junction where the blue trail bends to the left and the red trail begins. Turn right on the red trail and head back to your car. Be prepared for an uphill trip! The trail heads south and then at about 3.4 miles turns to the east. At 3.8 miles you will be back at the trail junction with the yellow trail to the Wolf Lake parking area. You will have gained over 400 feet in .9 miles. The climb is never steep but it is continuous. Turn left on the yellow trail and continue to climb back toward the parking area gaining another 140 feet over the half mile back to the car.
(The image above shows the profile of the hike. Remember that all vertical profiles are relative!)
Neversink Unique Area: High Falls
| Quick Look | ||||
|---|---|---|---|---|
| Difficulty | Round trip | Total climb | Internet Maps | |
| 7.8 mi. | 1608 ft. | AllTrails | ||

Take the Rock Hill exit off State Route 17 and turn right. Drive south on Katrina Falls Road. Park in the small parking area at the end of the road. Walk through the gate and onto the woods road which is the blue trail that parallels the Neversink River. A spur trail to the river goes right at .6 miles and another trail goes to the left at .7 miles. Stay on the blue trail for about 1.4 miles until another yellow spur trail heads right down to the river. This trail is .3 miles but steep in places and leads down to Denton Falls. After taking in the view at the falls, get back on the main trail. From this point on the trail is more of a trail as the woods road heads left but you will stay right following the blue blazes. At 2.7 miles the trail climbs to the highest point on the hike and then descends to 4.0 miles where a short yellow spur trail leads down to High Falls. When you have completed your exploration of the falls retrace your route back to the car.
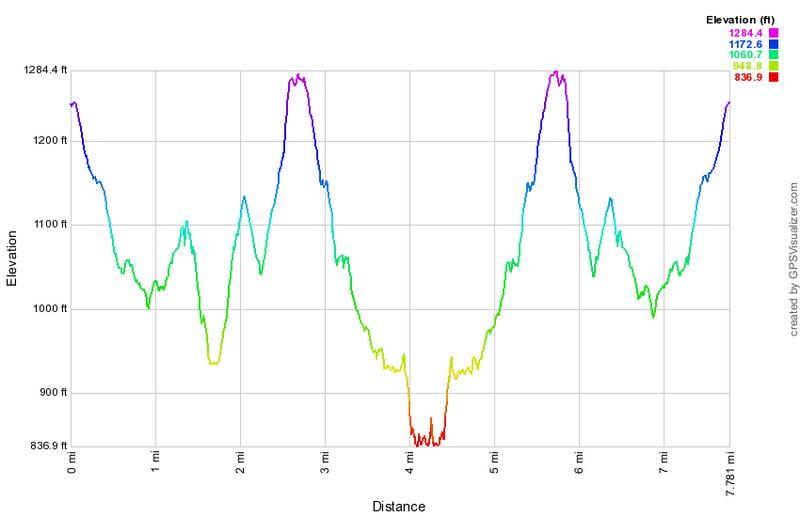
(The image above shows the profile of the hike. Remember that all vertical profiles are relative!)
Neversink Unique Area: Loop
| Quick Look | ||||
|---|---|---|---|---|
| Difficulty | Round trip | Total climb | Internet Maps | |
| 10.2 mi. | 1945 ft. | AllTrails | ||

Take the Rock Hill exit off State Route 17. Drive south on Katrina Falls road. Park in the small parking area at the end of the road. Walk through the gate and onto the woods road which is the blue trail that parallels the Neversink River. A spur trail to the river goes right at .6 miles and another trail goes to the left at .7 miles. Stay on the blue trail for about 1.4 miles until another yellow spur trail heads right down to the river. This trail is .3 miles but steep in places and leads down to Denton Falls. After taking in the view at the falls, get back on the main trail. From this point on the trail is more of a trail as the woods road heads left but you will stay right following the blue blazes. At 2.7 miles the trail climbs to the highest point on the hike and then descends to 4.0 miles where a short yellow spur trail leads down to High Falls. When you have completed your exploration of the falls retrace your route back to the trail junction near Denton Falls. Turn right on the red trail to begin a loop. After only a few hundred feet take the yellow spur trail to the left that goes down to Mullet Brook Falls. The trail is less than .2 miles but the falls, when there has been some rain, is very pretty. Walk back to the red trail and turn left to continue the loop. The trail gains some elevation until at 7 miles it intersects a woods road. Be sure to turn left here or you will be headed south into uncharted territory. In about .3 miles the red trail turns left. Continue straight ahead on the woods road to a parking area at about 8 miles. Walk down the dirt road until the road turns right towards Wolf Lake. Walk straight ahead on the power line right-of-way and cross a little stream to get to Wolf Lake Road. Turn left on the road and walk to Katrina Falls Road. Turn left on Katrina Falls Road to get back to the parking area. The whole road walk is about a mile.
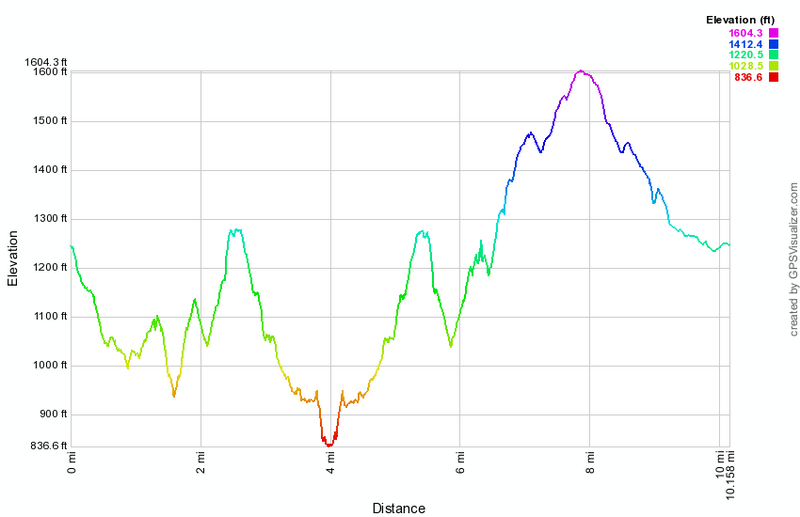 (The image at the left shows the profile of the hike. Remember that all vertical profiles are relative!)
Neversink Unique Area: Middle
| Quick Look | ||||
|---|---|---|---|---|
| Difficulty | Round trip | Total climb | Internet Maps | |
| 10.3 mi. | 1885 ft. | AllTrails | ||

Take the Rock Hill exit off State Route 17. Drive south on Katrina Falls road. Park in the small parking area at the end of the road. Walk through the gate and onto the woods road which is the blue trail that parallels the Neversink River. A spur trail to the river goes right at .6 miles and another trail goes to the left at .7 miles. Stay on the blue trail for about 3.4 miles until a yellow spur trail heads right down to High Falls. When you have completed your exploration of the falls return to the main trail. The blue blazed trail ends here and any further exploration to the south will be a bushwhack. In some places there seem to be roads or trails but this can be confusing since many lead nowhere. Careful exploration will allow you to find a woods road that leads to the "southern" part of the Neversink Unique Area. Once you find the woods road, the hike is about 1.75 miles to an old hunting camp. There are several woods roads that cross the one you are hiking but stay generally straight. of course, if you stray, you can simply turn around and hike back the way you came. There is a dirt road at the hunting shack and this is as good a place as any to stop. If you have more time or want to do a car spot, you could do part or all of the southern loop. When done, return the same way you came.
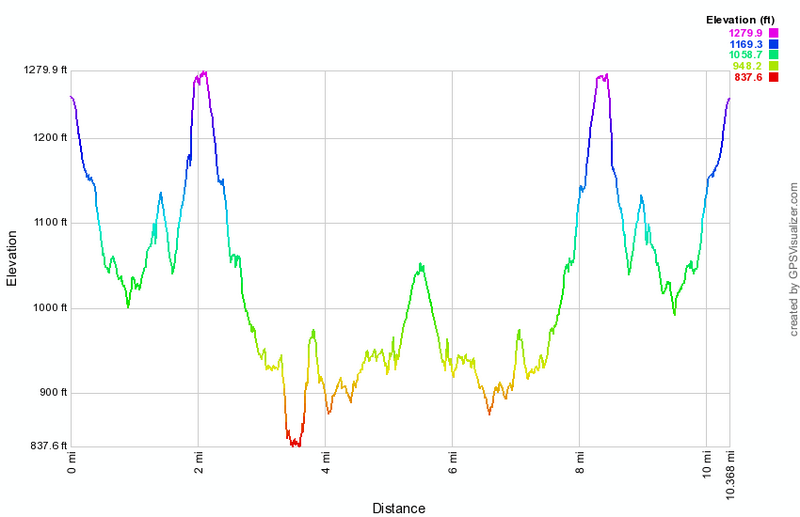
(The image above shows the profile of the hike. Remember that all vertical profiles are relative!)
Neversink Unique Area: Mullet Falls Loop
| Quick Look | ||||
|---|---|---|---|---|
| Difficulty | Round trip | Total climb | Internet Maps | |
| 4.1 mi. | 850 ft. | AllTrails | ||

Take the Rock Hill exit off State Route 17. Drive south on Katrina Falls road. Park in the small parking area at the end of the road. Walk through the gate and onto the woods road which is the blue trail that parallels the Neversink River. A spur trail to the river goes right at about .5 miles. After crossing Wolf Brook on a small wooden bridge the trail splits. Stay left and walk through some evergreens mixed with hardwoods. Over the next .75 miles the trail ascends to the top of a ridge and then levels out at 1.4 miles. The trail rolls a little and makes a sweeping right turn to the south at 1.5 miles. At 1.7 miles you will cross Mullet Falls Brook well above the falls on a wooden bridge. At 1.75 miles be sure to follow the main trail as it turns right and heads west. The trail descends now and at 2.3 miles a spur trail heads off to the right. Turn right on this trail and walk less than a quarter mile to the falls. When you are in front of the falls, you are facing east so the best time to be there to take pictures is in the early morning before the sun rises over the ridge or in the afternoon when the sun is behind you. The water falls about 20 feet in a nice pool below. When you are ready turn around and walk back to the main trail. Turn right and stay on the main trail as it turns right at 2.75 miles. At 3.5 miles you will be back at the intersection where you bore to the left to start the loop. Walk the final .6 miles uphill back to the car.
 (The image at the left shows the profile of the hike. Remember that all vertical profiles are relative!)
Neversink Unique Area: Mullet and High Falls Loop
| Quick Look | ||||
|---|---|---|---|---|
| Difficulty | Round trip | Total climb | Internet Maps | |
| 8.1 mi. | 1766 ft. | AllTrails | ||

Take the Rock Hill exit off State Route 17. Drive south on Katrina Falls road. Park in the small parking area at the end of the road. Walk through the gate and onto the woods road which is the blue trail that parallels the Neversink River. A spur trail to the river goes right at about .5 miles. After crossing Wolf Brook on a small wooden bridge the trail splits. Stay left and walk through some evergreens mixed with hardwoods. Over the next .75 miles the trail ascends to the top of a ridge and then levels out at 1.4 miles. The trail rolls a little and makes a sweeping right turn to the south at 1.5 miles. At 1.7 miles you will cross Mullet Falls Brook well above the falls on a wooden bridge. At 1.75 miles be sure to follow the main trail as it turns right and heads west. The trail descends now and at 2.3 miles a spur trail heads off to the right. Turn right on this trail and walk less than a quarter mile to the falls. When you are in front of the falls, you are facing east so the best time to be there to take pictures is in the early morning before the sun rises over the ridge or in the afternoon when the sun is behind you. The water falls about 20 feet in a nice pool below. When you are ready turn around and walk back to the main trail. Turn right and stay on the main trail until it splits at 2.7 miles. Turn left on the red trail that parallels the river to High Falls. This trail is more trail than road and may have brush encroaching on the trail and occasional blowdowns. The trail rolls some but at 3.3 miles it descends 2.4 miles to the Neversink River. Depending on the water level you may be able to walk out onto the rock shelf that faces the falls for the best view. When you are ready, retrace your route back to the trail junction. Continue straight ahead to get back to the parking area. There is a yellow spur trail to Denton Falls on the left just after the trail junction. You will cross a bridge over Mullet Brook and walk another .7 miles back to the intersection where you bore to the left to start the loop. Walk the final .6 miles uphill back to the car.
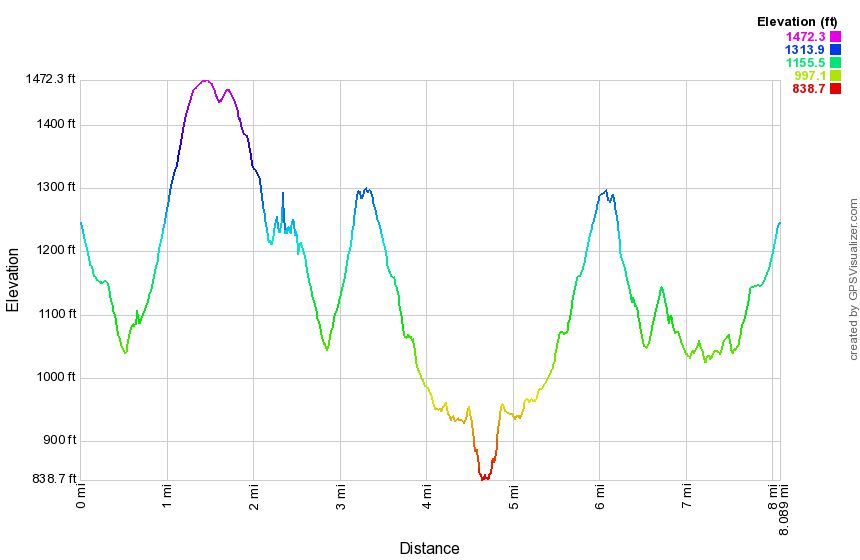 (The image at the left shows the profile of the hike. Remember that all vertical profiles are relative!)
Neversink Unique Area: Neversink River out and back)
| Quick Look | ||||
|---|---|---|---|---|
| Difficulty | Round trip | Total climb | Internet Maps | |
| 1.4 mi. | 292 ft. | AllTrails | ||

Take the Rock Hill exit off State Route 17. Drive south on Katrina Falls road. Park in the small parking area at the end of the road. Walk through the gate and onto the woods road which is the blue trail that parallels the Neversink River. Walk downhill to the first trail junction at .6 miles and turn right on the yellow blazed spur trail. This trail is about .25 miles and leads down to a nice rapids on the river. Take some time to enjoy the water but know that it is NOT safe to swim here. When you are done, turn around and retrace your steps back to the parking area.
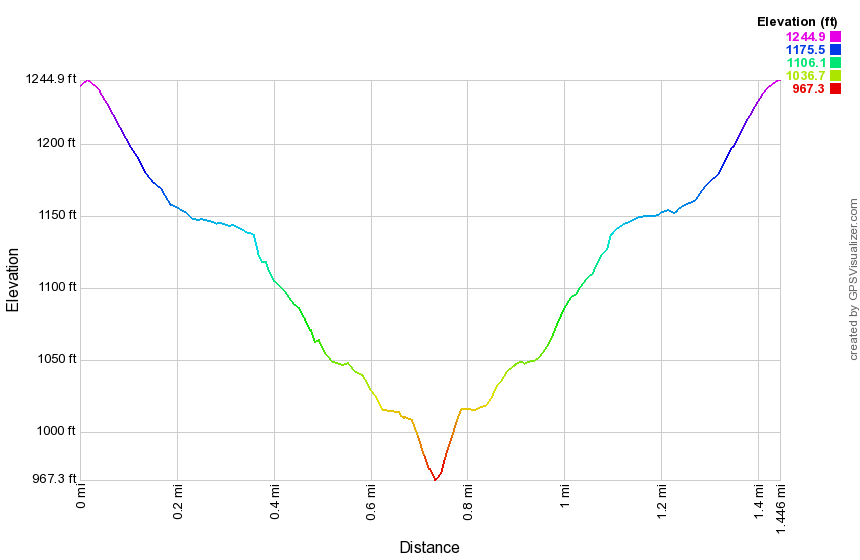
(The image above shows the profile of the hike. Remember that all vertical profiles are relative!)
Neversink Unique Area: North (clockwise)
| Quick Look | ||||
|---|---|---|---|---|
| Difficulty | Round trip | Total climb | Internet Maps | |
| 6.0 mi. | 1240 ft. | AllTrails | ||

>Take the Rock Hill exit 109 off State Route 17 and turn right. Drive south on Katrina Falls Road. Park in the small parking area at the end of the road. Walk through the gate and onto the woods road which is the blue trail that parallels the Neversink River. A spur trail to the river goes right at .6 miles but stay to the left crossing a bridge over Wolf Creek. Turn left to start the loop in a clockwise direction. The trail starts out flat but soon begins to climb. Over the next .9 miles gain almost 400 feet over a gentle but persistent ascent. At 1.6 miles there is another trail junction. The trail to the left leads out to the Wolf Lake Multiple Use Area. Turn right to continue on the main trail which from this point on is mostly flat or downhill. After making the turn, the trail heads south and soon crosses Mullet Brook on the upper bridge. As the trail descends the hill toward the Neversink Gorge, watch for the short spur trail to the right which goes down to Mullet Brook Falls at 2.25 miles. Turn right and walk down to the falls. If you decide to walk out onto the rocks below the falls, be careful of your footing as the mist from the falls can make the rocks slippery at any time but especially during the colder months. Head back out to the main trail and turn right. At 2.6 miles there is a junction with the trail to the left that leads to High Falls. Turn right and almost immediately turn left on the spur trail down to Denton Falls on the Neversink. The trail is about .3 miles and loses 180 feet. If you chose to walk out onto the rocks near the falls, be careful since the are often wet and slippery and can be icy during the winter. Start back up the hill to the main trail turning left at the top to head for the lower bridge on Mullet Brook. At 3.5 miles turn left on a spur trail that leads .25 miles down to the river. After inspecting the rapids on the river, turn around and return to the main trail and turn left on the main trail. Continue your hike on the main trail as it stays level for a long time and even descends a little as you pass the trail junction where you started the loop earlier. At 4 miles cross the bridge over Wolf Brook and continue on the main trail to the junction at 4.6 miles. Turn left and walk .25 miles down to the river. You may walk along the shore for some distance. When you are done exploring, return to the spur trail and walk back to the main trail. Turn left and follow the trail as it ascends up the hill to the parking area.

(The image above shows the profile of the hike. Remember that all vertical profiles are relative!)
Neversink Unique Area: North
| Quick Look | ||||
|---|---|---|---|---|
| Difficulty | Round trip | Total climb | Internet Maps | |
| 5.6 mi. | 1240 ft. | AllTrails | ||
Take the Rock Hill exit off State Route 17. Drive south on Katrina Falls road. Park in the small parking area at the end of the road. Walk through the gate and onto the woods road which is the blue trail that parallels the Neversink River. A spur trail to the river goes right at .6 miles and another trail goes to the left at .7 miles. Stay on the blue trail for about 1.2 miles until another yellow spur trail heads right down to the river. This trail is .25 miles and leads down to a nice rapids on the river. Go back to the main trail and walk about .2 miles to another yellow spur trail on the right. This trail is .3 miles long but steep in places and leads down to Denton Falls. After taking in the view at the falls, get back on the main trail and walk to a trail junction where the blue trail bears right. Bear left on the red trail to begin a loop. After only a few hundred feet take the yellow spur trail to the left that goes down to Mullet Brook Falls. The trail is less than .2 miles but the falls, when there has been some rain, is very pretty. Walk back to the red trail and turn left to continue the loop. The trail gains some elevation until at 3.4 miles it intersects a woods road. Be sure to turn left here or you will be headed south into uncharted territory. In about .3 miles the red trail turns left again and follows a woods road. Hike for another mile and you will be back at the junction with the blue trail where you should turn right. In just over .1 miles another yellow spur trail turns left and goes .25 miles down to the river. Follow this trail and then return the same way. Reverse your route to get back to the car.
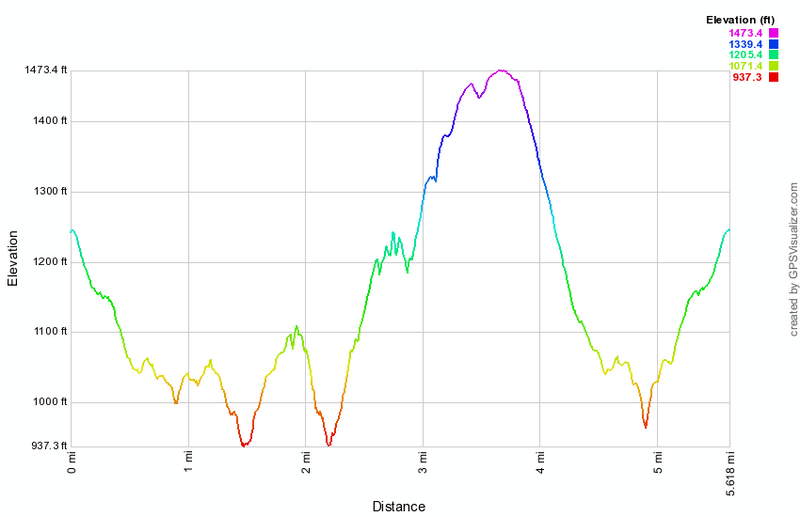
(The image above shows the profile of the hike. Remember that all vertical profiles are relative!)
Neversink Unique Area: North to South
| Quick Look | ||||
|---|---|---|---|---|
| Difficulty | Round trip | Total climb | Internet Maps | |
| 8.0 mi. | 1360 ft. | AllTrails | ||

This hike requires a car spot at the Skinner's Road trailhead unless you want to hike over 16 miles out and back! Take the Rock Hill exit off State Route 17. Drive south on Katrina Falls Road to the dead end. Park in the small parking area at the end of the road. Walk through the gate and onto the woods road which is the blue trail and parallels the Neversink River. A spur trail to the river goes right at .6 miles and another trail goes to the left at .7 miles. Stay on the blue trail and in about 1.4 miles another yellow spur trail heads right down to the river to Denton Falls. Walk passed this trail to a junction. Bear right on the blue trail heading for High Falls. From this point on the trail is more of a trail than a woods road. At 2.0 miles the trail climbs to Aa high point and then descends some before ascending slightly to 3.35 miles where a short yellow spur trail leads down to High Falls. Continue passed this trail on a woods road that starts out looking much like the rest of the woods roads you have been on. For the next mile you will have to try to stay on the woods road that will lead you through this area. Staying close to the ridge that rises to the left seems to help. At around 4.6 miles you should cross a stream nears it head at which point the road becomes more distinct. If you run into the stream further downstream, walk up the bank or the bed until you find the road. Continue to follow this prominent road to a dilapidated hunter's cabin at about 5 miles. The road splits here with the left taking you up the ridge. Continue to the right along a well-define road to the next left turn at 5.7 miles. Turn left here on "Peterson's Turnpike" and climb for .5 miles gaining 450 feet at a 17% grade. At the top of the ridge the road turns southeast and levels. The rest of the hike is flat or downhill. Pass by Bear Swamp on the left at 6.6 miles and Ash Swap at 7.3 miles. When you enter the clearing bear to the left and continue out to the trailhead and downhill.

(The image at the left shows the profile of the hike. Remember that all vertical profiles are relative!)
Neversink Unique Area: South
| Quick Look | ||||
|---|---|---|---|---|
| Difficulty | Round trip | Total climb | Internet Maps | |
| 6.6 mi. | 985 ft. | AllTrails | ||

Take the Wurtsboro exit off State Route 17. Drive south on Route 209 to Westerbrookville. Turn right on Pine Kill Road until David Rhodes Road appears on the left. Turn left over the small bridge and up a hill. Turn left on Skinner Road which starts as a paved road and slowly deteriorates to a DIRT TRACK. Make sure you have a high clearance vehicle and four wheel drive in all but the driest conditions. Park in the small parking area at the end of the road being careful to avoid a large rock that can hide in the tall grass. There are NO TRAILS in this area although there is a register box. Your hike will be along woods roads for the entire length but most are unmarked and it is possible to make "wrong" turns. Just out of the parking area woods road bears to the right and heads northwest for about 2.7 miles along a ridge. At this point the road seems to split. One branch continues staring ahead toward the northern part of the Neversink Unique Area. Turn left as that branch of the road descend almost 500 feet in the next .85 miles to a hunting shack. At the hunting shack turn left on another road. Walk along this road for .7 miles at which point another road heads to the left and UP the ridge. In .6 miles the steep climb gains nearly 500 feet back to the ridge. Continue along the road for about .4 miles and at 5.25 miles you should be back at the woods road to the parking area.
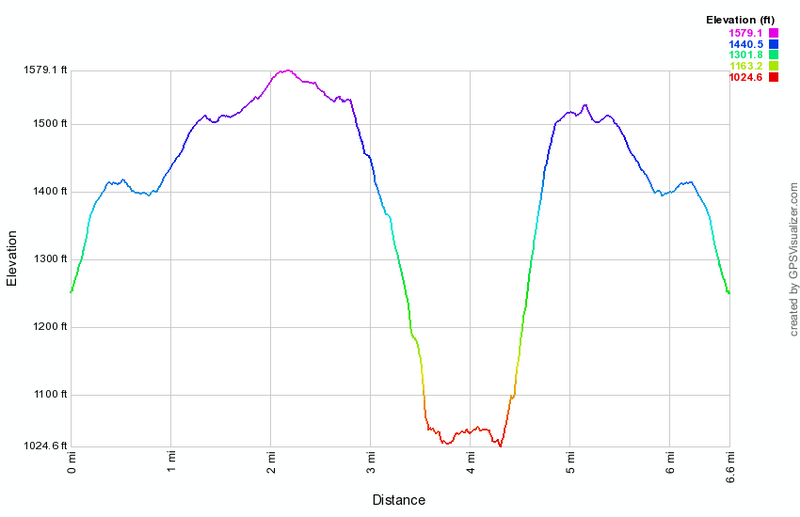
(The image at the left shows the profile of the hike. Remember that all vertical profiles are relative!)
Neversink Unique Area: Three Falls
| Quick Look | ||||
|---|---|---|---|---|
| Difficulty | Round trip | Total climb | Internet Maps | |
| 8.8 mi. | 1986 ft. | AllTrails | ||

Take the Rock Hill exit off State Route 17. Drive south on Katrina Falls road. Park in the small parking area at the end of the road. Walk through the gate and onto the woods road which is the blue trail that parallels the Neversink River. A spur trail to the river goes right at .6 miles and another trail goes to the left at .7 miles. Stay on the blue trail for about 1.4 miles until another yellow spur trail heads right down to the river. This trail is .3 miles but is steep in places and leads down to Denton Falls. After taking in the view at the falls, get back on the main trail. From this point on the trail is more of a trail as the woods road heads left but you will stay right following the blue blazes. At 2.7 miles the trail climbs to the highest point on the hike and then descends to 4.0 miles where a short yellow spur trail leads down to High Falls. When you have completed your exploration of the falls retrace your route back to the trail junction near Denton Falls. Turn right on the red trail to begin a loop. After only a few hundred feet take the yellow spur trail to the left that goes down to Mullet Brook Falls. The trail is less than .2 miles but the falls, when there has been some rain, is very pretty. Walk back to the red trail and turn left to continue the loop. The trail gains some elevation until at 7 miles it intersects a woods road. Be sure to turn left here or you will be headed south into uncharted territory. In about .3 miles the red trail turns left. Another trail continues straight ahead to a parking area near Wolf Lake. Continue on the red trail as it heads downhill and eventually meets the blue trail at 8.2 miles. Turn right here to head back up the hill to the parking area after crossing Wolf Brook.
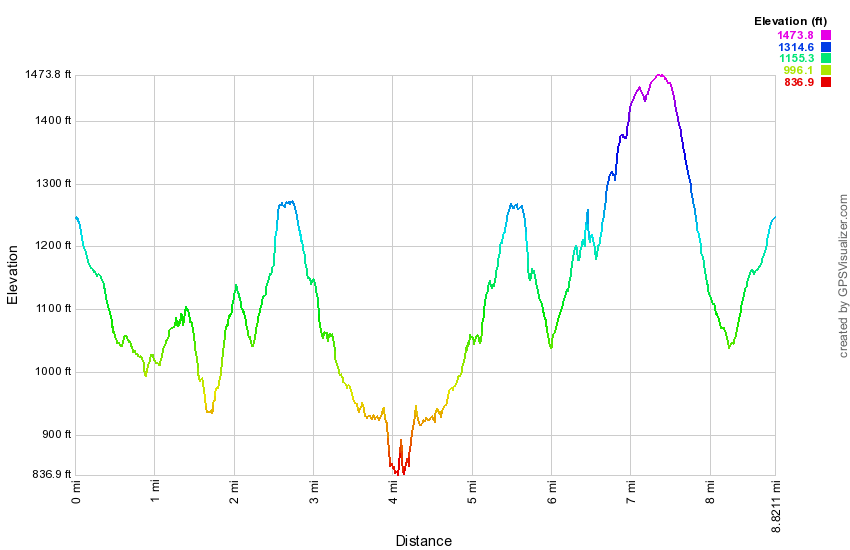 (The image at the left shows the profile of the hike. Remember that all vertical profiles are relative!)
Neversink Unique Area: Three Falls (Wolf Lake)
| Quick Look | ||||
|---|---|---|---|---|
| Difficulty | Round trip | Total climb | Internet Maps | |
| 7.7 mi. | 1680 ft. | AllTrails | ||

Take the Rock Hill exit off State Route 17. Drive south on Katrina Falls Road. Just before the dead end, turn left on Wolf Lake Road and drive to the Wolf Lake Multiple Use Area parking lot on the right. Drive through the gate and continue on the Powerline Access Road. Park at the end of the road in the small parking area. Walk out the back of the parking area on the yellow trail. The first .6 miles of the trail is a spur trail that connects the parking area with the main trail system. The trail is all downhill at the beginning of the hike and all uphill at the end. At the junction turn left to begin your hike down to Mullet Brook Falls. At .7 miles cross the bridge over Mullet Brook. Just after the stream the trail turns sharply to the right and begins heading west as it continues to descend. You will reach the spur trail to Mullet Brook Falls at 1.25 miles. Turn right to begin the short walk to the falls. The trail ends at the falls which depend greatly on the amount of rain that has fallen. When you are finished admiring t5he falls, turn around and walk back out to the main trail. Turn right and walk to the next trail junction at 1.65 miles. Turn left and start toward High Falls on the main Neversink River. The distance to the falls is a little over 2 miles and can be challenging although the destination is worth the trip. High Falls is only slightly higher and more impressive than Denton Falls and the latter is just off the main trail. The first .2 miles of the trail are a slight downhill followed by .35 miles of uphill. The trail levels briefly and then begins the long descent to the river. Over the next 1.35 miles you will drop almost 500 feet to the edge of the river. Along the way the trail meanders back and forth to mitigate what would otherwise be a steep descent on the way out and an equally steep climb on the way back. At 2.7 miles the trail makes a turn to the left and followed the river as it starts to flow almost due south. As you approached the last and steepest descent to the river a path goes off to the left. This path leads to informal paths and trails that continue south along the river to a parking area and trailhead near Westerbrookville. The distance to the southern parking area is another 4.7 miles with other routes possible. Some tentative plans to connect and expand the trail system have been around for a while but nothing has come of them. Worked your way down to the falls and along the edge of the river on the rocks if it is safe. Get your fill of the falls and then head back up the trail in the opposite direction. At 5.7 miles you will be back at the trail junction with the main loop trail. Turn left to walk to the spur trail to the falls. Turn left on the spur trail and walk downhill to the falls. There are several points where the trail is usually damp but you may find a mud pit in wetter weather. There are also several highly eroded areas with protruding tree roots and rocks. Work your way down to the river's edge and along the rocks to a point in front of the falls. Take in your third falls of the day before packing up and returning up the hill to the main trail. At the top of the hill turn right on the main trail and stay left at the next trail junction. From the junction with the trail to High Falls to the junction with the spur trail to the parking area is 1.1 miles uphill gaining 550 feet. Turn right on the yellow spur trail to the car and walk the last half mile uphill back to the parking area.
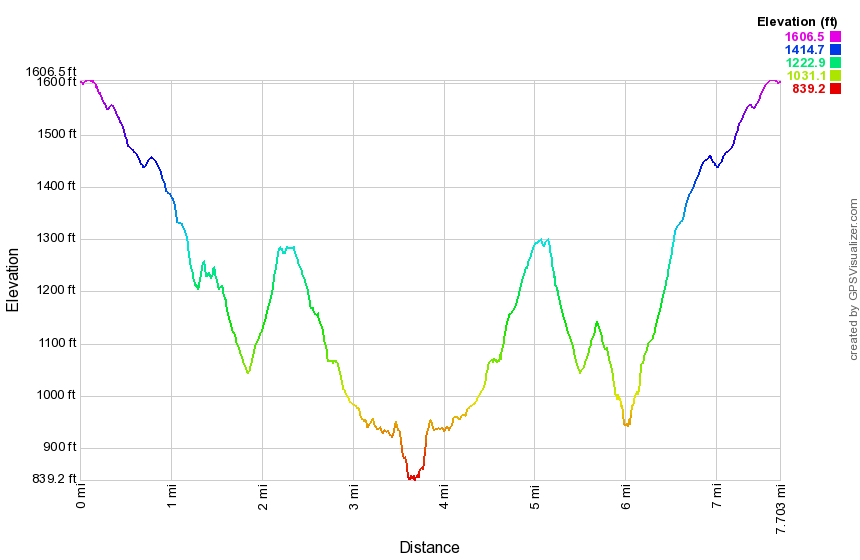 (The image at the left shows the profile of the hike. Remember that all vertical profiles are relative!)
New Jersey Border to Nyack
| Quick Look | |||
|---|---|---|---|
| Difficulty | Round trip | Total climb | Internet Maps |
| 10.5 mi. | 1720 ft. | AllTrails | |
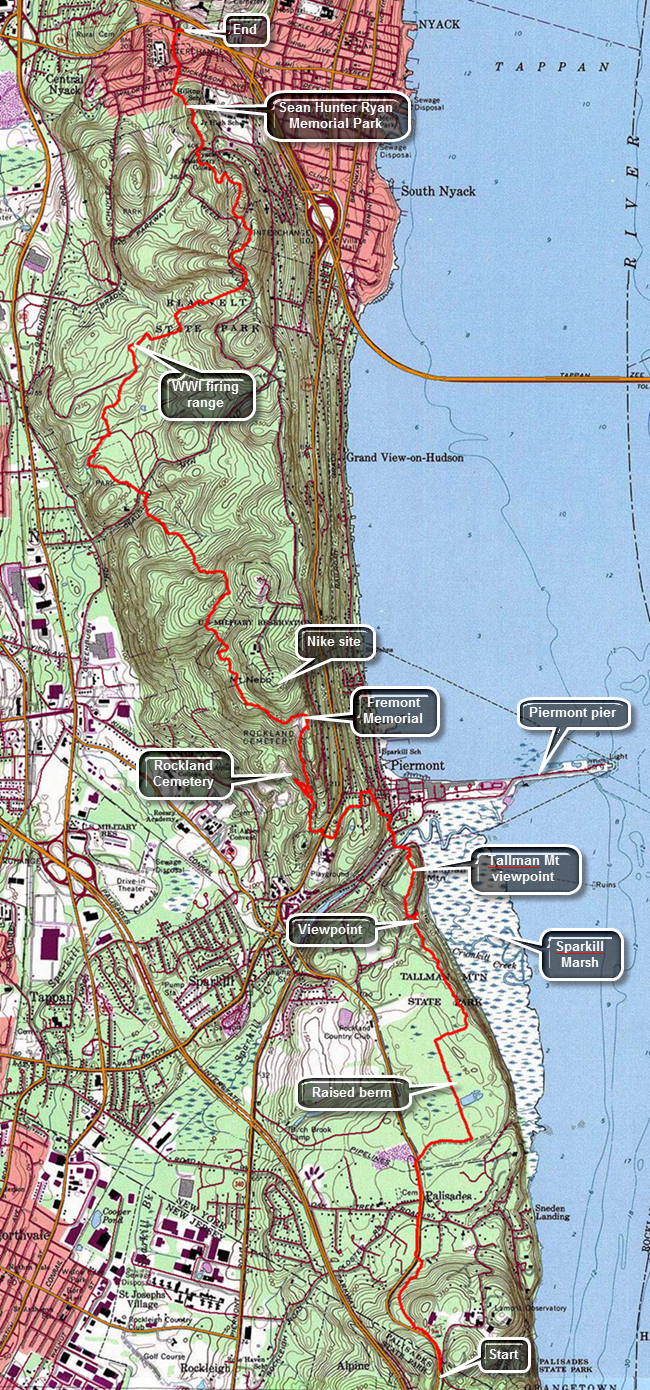
This hike is 10.5 miles ONE WAY. Unless you feel you can cover 21 miles, you will need to arrange a car spot or a ride.Take exit 11, Nyack, off the NYS Thruway. Turn left at the traffic light at the end of the exit onto Route 59. Park in a parking lot in one of the strip malls as close to where you turned as possible. Be sure to park away from any stores. Drive another car or get a ride to the Lamont-Doherty Observatory entrance which is south on Route 9W at the New York-New Jersey border to begin your hike. Walk passed then gatehouse down the sidewalk to find the aqua blazes of the Long Path. The first .7 miles of the trail heads downhill and parallels Route 9W passing through some hardwood forest and eventually meeting Route 9W. The traffic on 9W can be heavy at times but the road has wide shoulders. Head north on the road until 1.2 miles where the trail crosses the road to the parking area for Tallman State Park on the other side. The trail begins as a wide woods road and bike path with a firm surface which makes it easy to walk. Walk east and then turn north at 1.5 miles on what is more like a hiking trail. For the next .5 miles the trail follows along a raised walkway with lower wetlands on both sides. Some areas are just marshy while others have small ponds. At 2 miles turn east again and then start heading NNW along the edge of the escarpment. Look to the right to see the Hudson River and some views of the large Sparkill marsh below. Trees limit the photographic opportunities until the trail descends a hill to an area with benches at about 2.9 miles. From this area walk up a paved walkway and then turn onto a trail to get to the plateau that makes up what is called Tallman Mountain. Walk passed the shelter at the top on a paved roadway to a lookout just north of the shelter. Tallman Mountain has a maximum elevation of only 171 feet. From here you can still see the marsh below as well as views of the Tappan Zee Bridge and the village of Piermont below. The most interesting feature is a long spit of land that juts out into the river from Piermont. This is the mile long Piermont pier that was a terminus for the Erie Railroad. It also served as a point for ferry service to Dobbs Ferry on the other side of the river. Walk a little farther to find another lookout that has views down into Piermont. Back on the main trail walk down a steep hill to the road. Cross Sparkill Creek on a bridge and start walking north on Piermont Avenue passing some small shops. The trail is well-marked by aqua blazes and soon they will indicate a left turn onto a side street. Walk up Tate Street and near the top turn left up a set of stairs to Ash Street. At the corner across from you is the old Erie Railroad station for Piermont. The building is over 100 years old but has been resided. Follow the blazes on Ash Street west to Piermont Place. Head south on Piermont Place and then west on Crescent Road. Crescent Road is a dead end but the trail follows an old fire road at the end which heads south and then west to Route 9W. Turn right on Route 9W and then almost immediately left on Castle Road. Follow Castle Road for a short distance until the blazes indicated a right turn into the woods. Continue on the trail passing through some woods but still climbing. The trail eventually leads to the roads that run through the Rockland County Cemetery. Turned right almost 180 degrees and ascend to the top of the hill through a switchback. Follow the roads heading north along the escarpment and pass by many impressive grave markers. At 5 miles the Long Path passes the memorial for John C. Fremont. Fremont was a colorful figure who had a checkered career as an adventurer, politician, and military officer. Continue to follow the road until the blazes indicate a turn to the right. The trail heads west and then north continuing to climb and leaving the Rockland County Cemetery land to cross property marked as "Military Reservation". The Long Path skirts the summit of Mount Nebo and then reaches a high point at 585 feet on the shoulder of another unnamed hill. At about 5.75 mile an orange trail branches off to the right. The trail goes to Mount Nebo which was once the site of a Nike missile silo that protected New York City. It is now a recreation area. The trail starts to descend through hardwood forests as it enters Clausland Mountain County Park. At 7 miles cross Clausland Mountain Road and enter Tackamack Town Park which is maintained by the Town of Orangetown. Head northwest for about .25 miles to a small pond where the trail turns northeast and at 7.5 miles crosses Marisco Court to enter Blauvelt State Park. This is the first time on the hike that there is an evergreen forest as the trail begins to swing to the northeast. At about 8 miles you will cross over a low cement wall and turn to the right. Soon you will come to a higher cement wall. These are the remains of a World War I firing range and target walls. The tunnels connecting the two still remain here underground. Begin another ascent crossing a few streams along the way some with and some without bridges. At 8.8 miles cross North Tweed Boulevard and continue to climb to the highest point on the hike at about 625 feet. Some maps indicate a viewpoint here but there isn't too much to see. There is a large amount of broken glass on the rocks where inconsiderate people had found breaking bottles irresistible! Descend from this high point only to climb another and then another as you head generally north toward Nyack. Leave Blauvelt State Park and cross Bradley Hill Road at 9.8 miles. Make a quick ascent and then start the final descent into town. You are now in Sean Hunter Ryan Memorial Park. Sean Hunter Ryan was a Rockland County resident who died with his climbing partner, Philip Otis, on Mount Rainier in 1995. The two young men were park rangers involved in a rescue mission under extremely dangerous cognition. They remain the only two rangers to die on a rescue mission on Rainier. The trail comes to Towt Street where you should walk downhill to Waldron Avenue. Walk down the street and out to Route 59. Cross Route 59 and walk back to your car.
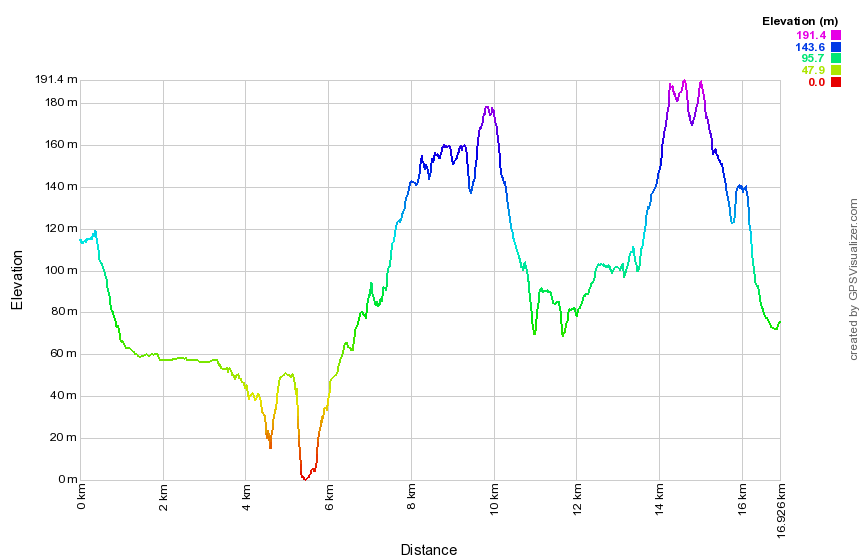 (The image at the left shows the profile of the hike. Remember that all vertical profiles are relative!)
Ninham Fire Tower
| Quick Look | ||||
|---|---|---|---|---|
| Difficulty | Round trip | Total climb | Internet Maps | |
| 1.4 mi. | 385 ft. | AllTrails | ||

From Carmel, NY head east on Route 301. After crossing over the West Branch Reservoir, turn right on Gypsy Trail Road (Route 41). From the north take Route 301 from the Taconic Parkway and head west on Route 301. Turn left on Gypsy Trail Road just before crossing the reservoir. Drive about 2.3 miles to Mount Ninham Court on the left. DO NOT park at the Ninham Multiple Use parking area on the right at about 2.0 miles. After turning onto Mount Ninham Court, drive to the end and park in the small lot. Two roads leave the parking area. Use the gated road to the right. Before leaving the parking area, observe the stone chamber in the side of the hill. There are several of these in the area and their origin is a mystery. Walk up the road which will take you to the fire tower. There is another chamber on the right. There are many stone walls on the mountain. Many of these wall have stones much larger than the typical stones found in walls. After walking .75 miles and gaining 380 feet, you will be at the tower. It is hard to get a picture of the tower as it is surrounded by trees and communications towers. The tower seems safe to climb and the cab is open but without a roof. When you are done, retrace your steps to the car or explore a little in the area.
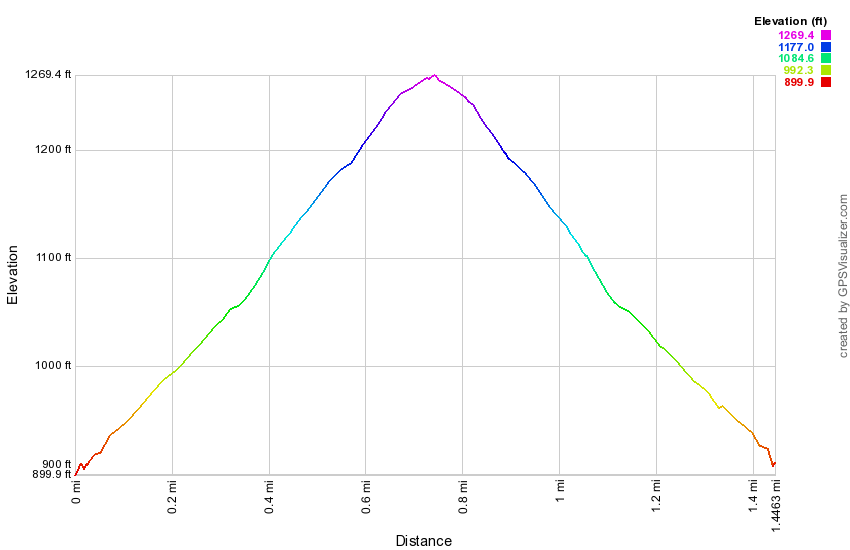 (The image at the left shows the profile of the hike. Remember that all vertical profiles are relative!)
North Lake South Lake: Escarpment Trail to Catskill Mountain House
| Quick Look | ||||
|---|---|---|---|---|
| Difficulty | Round trip | Total climb | Internet Maps | |
| 6.2 mi. | 1193 ft. | AllTrails | ||
 The hiking trails around the North Lake South Lake Campgrounds may be the most scenic in the Catskills.
As you hike the Escarpment Trail the history and the views just seem to get better with every passing
mile. Many spots have names like Inspiration Point and Artist's Rock. Even places that aren't
named have beautiful views of the Hudson River and surrounding countryside.
The hiking trails around the North Lake South Lake Campgrounds may be the most scenic in the Catskills.
As you hike the Escarpment Trail the history and the views just seem to get better with every passing
mile. Many spots have names like Inspiration Point and Artist's Rock. Even places that aren't
named have beautiful views of the Hudson River and surrounding countryside.
Turn north on North Lake Road (CR 18) from Rt 23A in the town of Haines Falls. After about 1 mile, turn right on Scutt Road just before the entrance to the state campgrounds. Turn right into the parking area. Walk across Scutt Road to the beginning of the blue marked Escarpment Trail. Several different trails intersect the Escarpment Trail at different places. Some of these trails are horse trails or snowmobile trails and not all are well marked. After 1.2 miles of descent, the trail turns sharply left and ascends. At this bend is the Layman Monument erected to a fire fighter who perished fighting a forest fire in 1900. There is a limited view from this spot that hints at what is to come. In just over half a mile the trail passes by Sunset Rock (South) and just beyond that Inspiration Point. This part of the trail is a constant ascent but not a steep one. These two lookouts have some nice views of Kaaterskill Clove and the mountains on the other side. Kaaterskill High Peak and Round Top are just across the clove and farther to the north the ski slopes on Hunter Mountain are visible. You can also see a number of houses that seem to hang on the side of the mountain across the clove. This is Twilight Park. A careful look to the east along the Clove reveals a glint of water; the Hudson River. The trail continues its ascent and in less than a mile turns sharply left to ascend South Mountain at about 2.6 miles. The trail straight ahead is a horse trail that leads down to the Palenville Overlook. Near the top of South Mountain is the site of the Kaaterskill House, one of the many hotels and rooming houses that were so prevalent throughout the Catskills. At this point the Escarpment Trail turns sharply right. To see the Site of the Kaaterskill House, turn left on the red marked Scutt Road Trail and explore the are to find what is left of the foundation. Retrace your steps and get back on the Escarpment Trail. The trail has several ups and downs and at one point makes a sharp right and heads toward Split Rock and Boulder Rock. Be sure to stay on the blue trail. A red trail continues straight ahead and cuts out both of these sites. These two rocks are DEFINITELY worth the extra time. At Split Rock the trail passes by several places where large pieces of rock have split off the main formation. Boulder Rock is a large boulder just sitting on a rocky shelf. This site gives the first and one of the best views of the Hudson River. Continuing downhill the trail now leads to the site of the Catskill Mountain House where a large boarding house once stood overlooking the Hudson. There is now an open field and a sign commemorating the structure. The views are fantastic and many people like to picnic here or just sit and enjoy the views. For those who want to hike less, parking is available at North Lake Beach and the walk is less than half a mile up a very gradual incline. The trail continues down to the lake and through several picnic areas skirting the eastern end of the campgrounds. To complete this hike continue down the access road to a parking area. Turn left and walk out the access road to the parking area. Continue to walk the park roads always bearing to the right to walk around South Lake. The road will cross over the dam at the southern end of South Lake. Continue on the road up the hill bearing to the left to the entrance to the park. Walk out the entrance and turn left on Scutt Road. Walk down the road to the parking area on the right.
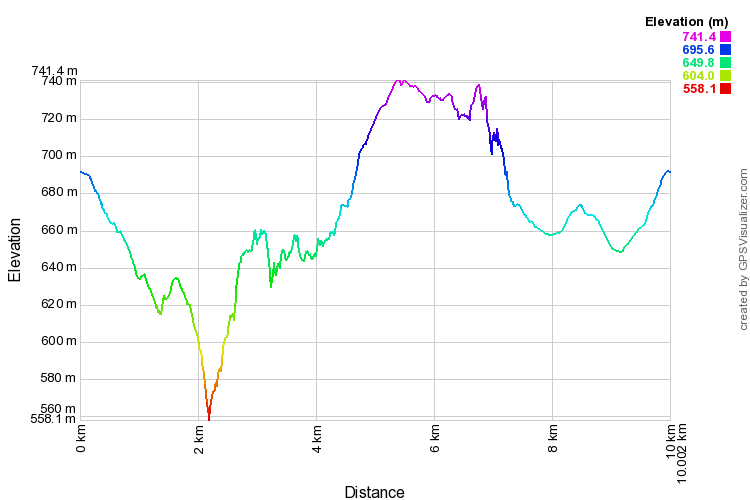 (The image at the left shows the profile of the hike. Remember that all vertical profiles are
relative!)
(The image at the left shows the profile of the hike. Remember that all vertical profiles are
relative!)
North Lake South Lake: Escarpment, Mary's Glen, Rock Shelter Trails
| Quick Look | ||||
|---|---|---|---|---|
| Difficulty | Round trip | Total climb | Internet Maps | |
| 9.4 mi. | 2030 ft. | AllTrails | ||
 The hiking trails around the North Lake South Lake Campgrounds may be the most scenic in the Catskills.
As you hike the Escarpment Trail the history and the views just seem to get better with every passing
mile. Many spots have names like Inspiration Point and Artist's Rock. Even places that aren't
named have beautiful views of the Hudson River and surrounding countryside.
The hiking trails around the North Lake South Lake Campgrounds may be the most scenic in the Catskills.
As you hike the Escarpment Trail the history and the views just seem to get better with every passing
mile. Many spots have names like Inspiration Point and Artist's Rock. Even places that aren't
named have beautiful views of the Hudson River and surrounding countryside.
Turn north on Rt 18 from Rt 23A in the town of Haines Falls. After about 1 mile, turn right on Schutt Road just before the entrance to the state campgrounds. Turn left into the parking area. Walk across Schutt Road to the beginning of the blue marked Escarpment Trail. Several different trails intersect the Escarpment Trail at different places. Some of these trails are horse trails of snowmobile trails and not all are well marked. After 1.2 miles of descent, the trail turns sharply left and ascends. At this bend is the Layman Monument erected to a fire fighter who perished fighting a forest fire in 1900. There is a limited view from this spot that hints at what is to come. In just over half a mile the trail passes by Sunset Rock (South) and just beyond that Inspiration Point. This part of the trail is a constant ascent but not a steep one. These two lookouts have some nice views of Kaaterskill Clove and the mountains on the other side. A careful look to the east along the Clove reveals a glint of water; the Hudson River. The trail continues its ascent and in less than a mile turns sharply left to ascend South Mountain. Near the top of South Mountain is the site of the Kaaterskill House, one of the many hotels and rooming houses that were so prevalent throughout the Catskills. At this point the Escarpment Trail turns sharply right. To see the Site of the Kaaterskill House, turn left on the red marked Schutt Road trail. Retrace your steps and get back on the Escarpment Trail. The trail has several ups and downs and at one point makes a sharp right and heads toward Split Rock and Boulder Rock. Be sure to stay on the blue trail. A red trail continues straight ahead and cuts out both of these sites. These two rocks are DEFINITELY worth the extra time. At Split Rock the trail passes by several places where large pieces of rock have split of the main formation. Boulder Rock is a large boulder just sitting on a rocky shelf. This site gives the first and one of the best views of the Hudson River. Continuing downhill the trail now leads to the site of the Catskill Mountain House. Where a large boarding house once stood overlooking the Hudson, there is now an open field and a sign commemorating the structure. The views are fantastic and many people like to picnic here or just sit and enjoy the views. For those who want to hike less, parking is available at North Lake Beach and the walk is less than half a mile up a very gradual incline. The trail continues down to the lake and through several picnic areas skirting the eastern end of the campgrounds. At this point it starts and ascent that will total 450 feet. Most areas are gentle but several are short but steep. Artist's Rock is about .75 miles from the Catskill Mountain House site and offers excellent, unobstructed views of the Hudson and the small towns below. In a little more than a half mile, a yellow marked trail hooks back around to Sunset Rock (North) and Lookout Rock. The views of the two lakes from here are beautiful! This area also offers an opportunity to climb to the area without using the trail. Several chimneys and cracks provide short but challenging climbs. Back on the trail another .2 miles leads to Newman's Ledge with more great views of the Hudson River Valley. The trail has been ascend sing sharply for some time since Artist's Rock and continues to do so. Hike .6 more miles and Find Badman Cave at the junction with the Rock Shelter Trail. The "cave" is more like Badman Overhanging Rock Shelter. The Escarpment Trail Ascends sharply here and the levels off some. In .7 miles there is a junction with the Mary's Glen Trail. Turn left staying on the Escarpment trail toward North Point. The hike to the Point is only .3 miles but some of it is very steep with some rock scrambles. Once on North Point you will know that your work was worth it. From this high point you can see spectacular views of the Hudson River and the surrounding communities. Return to the junction with the Mary's Glen Trail and turn right. This trail descends for .8 miles. At the junction with the Rock Shelter trail turn right on the yellow marked Rock Shelter Trail. The 1.3 mile walk back to the car is punctuated by rocks and roots without many views.
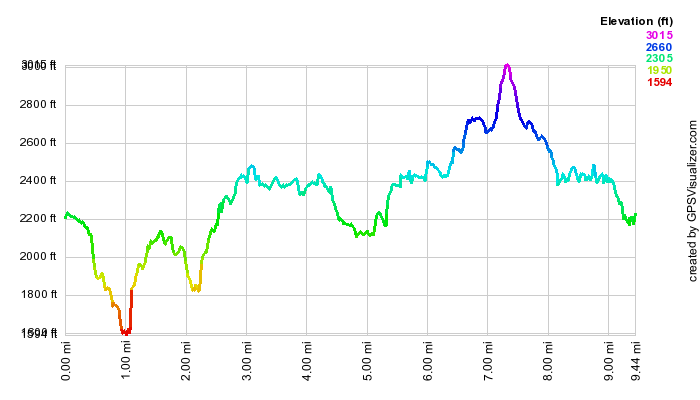 (The image at the left shows the profile of the hike. Remember that all vertical profiles are
relative!)
(The image at the left shows the profile of the hike. Remember that all vertical profiles are
relative!)
North South Lake: Escarpment Loop Anticlockwise (No North Point)
| Quick Look | ||||
|---|---|---|---|---|
| Difficulty | Round trip | Total climb | Internet Maps | |
| 12.5 mi. | 2575 ft. | AllTrails | ||
_map.png) The hiking trails around the North Lake South Lake Campgrounds may be the most scenic in the Catskills.
As you hike the Escarpment Trail the history and the views just seem to get better with every passing
mile. Many spots have names like Inspiration Point and Artist's Rock. Even places that aren't
named have beautiful views of the Hudson River and surrounding countryside.
The hiking trails around the North Lake South Lake Campgrounds may be the most scenic in the Catskills.
As you hike the Escarpment Trail the history and the views just seem to get better with every passing
mile. Many spots have names like Inspiration Point and Artist's Rock. Even places that aren't
named have beautiful views of the Hudson River and surrounding countryside.
Turn north on Rt 18 from Rt 23A in the town of Haines Falls. After about 1 mile, turn right on Schutt Road just before the entrance to the state campgrounds. Turn left into the parking area. Walk across Schutt Road to the beginning of the blue marked Escarpment Trail. Several different trails intersect the Escarpment Trail at different places. Some of these trails are horse trails of snowmobile trails and not all are well marked. After 1.2 miles of descent, the trail turns sharply left and ascends. At this bend is the Layman Monument erected to a fire fighter who perished fighting a forest fire in 1900. There is a limited view from this spot that hints at what is to come. In just over half a mile the trail passes by Sunset Rock (South) and just beyond that Inspiration Point. This part of the trail is a constant ascent but not a steep one. These two lookouts have some nice views of Kaaterskill Clove and the mountains on the other side. A careful look to the east along the Clove reveals a glint of water; the Hudson River. The trail continues its ascent and in less than a mile turns sharply left to ascend South Mountain. Straight ahead at this point, a horse trail descends toward the Palenville Lookout. This is a steep trail but the lookout is worth the effort. The horse trail follows the ledges for some time until at about 3.9 miles it turns sharply left to descend to the level below. After a steep but short descent be sure to turn right and walk out to the lookout at about 4.5 miles. There are several viewpoints here with some giving a better view back up Kaaterskill Clove and others a view down to Palenville and out over the Hudson River. After you have rested and taken pictures retrace your steps all the way back to the Escarpment Trail. Make a right to walk up toward South Mountain. Near the top of South Mountain is the site of the Kaaterskill House, one of the many hotels and rooming houses that were so prevalent throughout the Catskills.
At this point the Escarpment Trail turns sharply right. The trail has several ups and downs and at one point makes a sharp right and heads toward Split Rock and Boulder Rock. Be sure to stay on the blue trail. A red trail continues straight ahead and cuts out both of these sites. These two rocks are DEFINITELY worth the extra time. At Split Rock the trail passes by several places where large pieces of rock have split of the main formation. Boulder Rock is a large boulder just sitting on a rocky shelf. This site gives the first and one of the best views of the Hudson River. Continuing downhill the trail now leads to the site of the Catskill Mountain House. Where a large boarding house once stood overlooking the Hudson, there is now an open field and a sign commemorating the structure. The views are fantastic and many people like to picnic here or just sit and enjoy the views. For those who want to hike less, parking is available at North Lake Beach and the walk is less than half a mile up a very gradual incline. The trail continues down to the lake and through several picnic areas skirting the eastern end of the campgrounds. At this point it starts and ascent that will total 450 feet. Most areas are gentle but several are short but steep. Artist's Rock is about .75 miles from the Catskill Mountain House site and offers excellent, unobstructed views of the Hudson and the small towns below. In a little more than a half mile, at 9.4 miles into the hike, a yellow marked trail hooks back around to Sunset Rock (North) and Lookout Rock. The views of the two lakes from here are beautiful! This area also offers an opportunity to climb to the area without using the trail. Several chimneys and cracks provide short but challenging climbs. Back on the trail another .2 miles leads to Newman's Ledge with more great views of the Hudson River Valley. The trail has been ascending sharply for some time since Artist's Rock and continues to do so. Hike .6 more miles and find Badman Cave at the junction with the Rock Shelter Trail. The "cave" is more like Badman Overhanging Rock Shelter. The Escarpment Trail ascends sharply here and the yellow Rock Shelter Trail branches to the left. Turn left on the Rock Shelter Trail. At about 11.0 miles make a sharp right and then a quick left to stay on the Rock Shelter Trail. Along this trail you may find several small waterfalls in wetter weather. In the winter the ledges are often covered in ice. After the turns, there is about a 1.4 mile walk back to the car which is punctuated by rocks and roots without many views.
_gra.png) (The image at the left shows the profile of the hike. Remember that all vertical profiles are relative!)
(The image at the left shows the profile of the hike. Remember that all vertical profiles are relative!)
North Lake South Lake: Escarpment Clockwise Loop
| Quick Look | ||||
|---|---|---|---|---|
| Difficulty | Round trip | Total climb | Internet Maps | |
| 7.7 mi. | 1603 ft. | AllTrails | ||
 The hiking trails around the North Lake South Lake Campgrounds may be the most scenic in the Catskills.
As you hike the Escarpment Trail the history and the views just seem to get better with every passing
mile. Many spots have names like Inspiration Point and Artist's Rock. Even places that aren't
named have beautiful views of the Hudson River and surrounding countryside.
The hiking trails around the North Lake South Lake Campgrounds may be the most scenic in the Catskills.
As you hike the Escarpment Trail the history and the views just seem to get better with every passing
mile. Many spots have names like Inspiration Point and Artist's Rock. Even places that aren't
named have beautiful views of the Hudson River and surrounding countryside.
Turn north on Rt 18 from Rt 23A in the town of Haines Falls. After about 1 mile, turn right on Schutt Road just before the entrance to the state campgrounds. Turn left into the parking area. Walk up Schutt Road and across Route 18 to pick up the yellow Rock Shelter Trail. Walk through the woods and over roots and rocks for 1.3 miles. Turn left on the red Mary's Glen Trail and climb just less than 2 miles to the blue Escarpment Trail. Turn left and continue to climb to North Point. It is only .25 miles but requires some rock scrambling in places to get up to several fantastic lookouts over the lakes and across to the Hudson River. When you have taken in the view, climb back down the Escarpment Trail but continue straight ahead at the trail junction. At 3.25 miles Badman Cave will be just off the trail on your right. A little further on at 3.4 miles you will be at Newman's Ledge. Just passed this point a short yellow spur trail leads up to Lookout Rock and Sunset Rock. These viewpoint offer great views over the Hudson and the two lakes, respectively. Back on the main trail at 4.3 miles you will pass by Artist Rock and then begin to descend to a parking area for the beach at the east end of North Lake. A slight climb places you in an open field with expansive views of the Hudson River. This was once the site of the Catskill Mountain House. After admiring the view and indulging in some thoughts about the past, get back on the Escarpment Trail and head for Boulder Rock and Split Rock at around 5.4 miles. Continue on the Escarpment Trail until the junction at 6.3 miles. Here the Escarpment trail turns left at you should go straight ahead on the red Schutt Road Trail. This trail ends after less than a mile at the Escarpment Trail.unr right and walk to Schutt Road. Cross the road to the parking area.
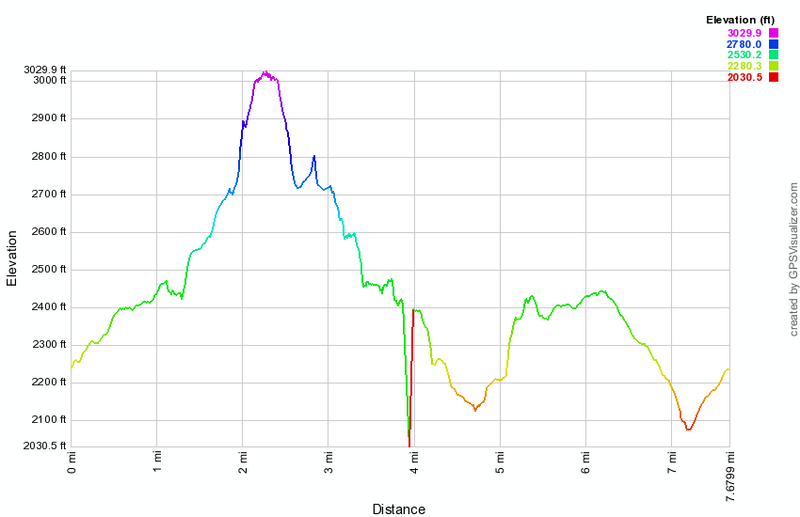 (The image at the left shows the profile of the hike. Remember that all vertical profiles are
relative!)
(The image at the left shows the profile of the hike. Remember that all vertical profiles are
relative!)
North South Lake: Kaaterskill and Bastion Falls Loop
| Quick Look | ||||
|---|---|---|---|---|
| Difficulty | Round trip | Total climb | Internet Maps | |
| 3.5 mi. | 1125 ft. | AllTrails | ||
 Bastion and Kaaterskill Falls are a popular destination for sightseers in the Catskills. Kaaterskill Falls may be the highest falls in New York State. Even when the volume of water is low both falls are pretty. The parking area for the falls is on Route 23A just east of Haines Falls and west of Palenville. The parking area is small compared to the amount of people who want to use it especially on the weekends. From the parking area walk down the road toward the east. BE CAREFUL as you walk down the road because many of the drivers are not! In a short distance a stone bridge crosses Spruce Creek.Turn left an step over or under the guard rail. The falls next to the road are Bastion Falls. Depending on the water level you may be able to walk down to the creek bed and look upstream. The trail continues up the creek for about .5 miles to the base of Kaaterskill Falls. The lower and upper falls comprise a drop of about 260 feet. The formal trail ends at this point but many informal paths continue to the top of the falls.
The first climb intersects a horizontal trail that leads to the amphitheater between the two falls. Turn left on this path but be careful as you approach the area between the falls. This area is often VERY wet and the rocks can be VERY slippery. The climb to the top of the falls is STEEP and eroded and very difficult at times. At the top of the falls there are great views down to the pool at the bottom of the falls and down the clove formed by Spruce Creek. At any point you can reverse your path back to the car. At the top of the falls you may also be able to cross over to the other side which offers different views. Many times the water is too high to cross.
Continue on up along Spruce Creek for about .75 miles to the main road into North South Lake Campgrounds. As you walk you will find some of the trails at the campgrounds. Walk along the road the road for about .5 miles and turn left on Laurel House Road. Walk .6 miles down Laurel House Road to the parking area at the dead end. Walk along any of the paths to the top of the falls. At one time the Laurel House stood near the end of the road overlooking the falls. Follow one of the informal paths along the "right" rim of the falls and begin a STEEP and sometimes difficult descent down the west side of the creek. If you stay near the creek, you will be able to find a path to the area between the falls. Keep descending and find an area to cross the creek. This is never particularly safe but will not be possible when the water is high! After crossing the creek, use the trail to return to Route 23A and to your car.
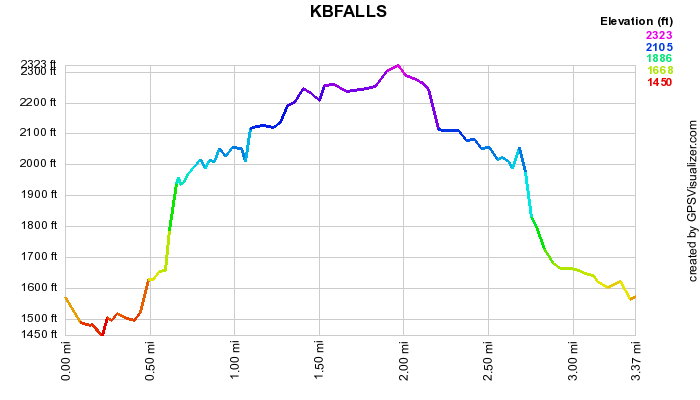 (The image at the left shows the profile of the hike. Remember that all vertical profiles are
relative!)
(The image at the left shows the profile of the hike. Remember that all vertical profiles are
relative!)
North South Lake: Kaaterskill and Bastion Falls (Laurel House)
| Quick Look | ||||
|---|---|---|---|---|
| Difficulty | Round trip | Total climb | Internet Maps | |
| 2.6 mi. | 1165 ft. | AllTrails | ||
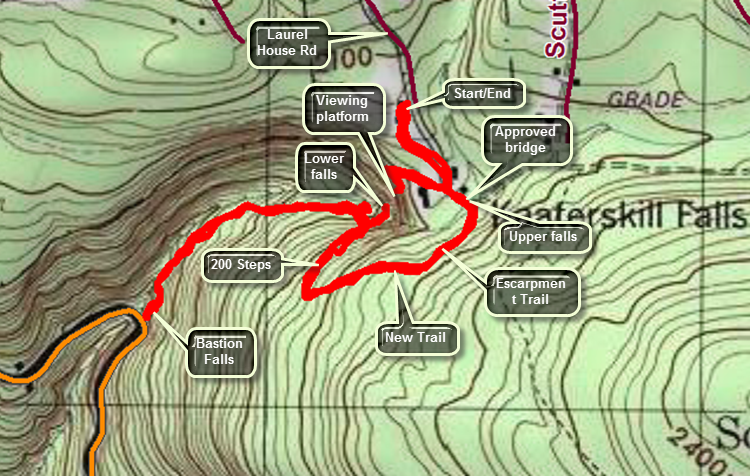 Bastion and Kaaterskill Falls are a popular destination for sightseers in the Catskills. Kaaterskill Falls may be the highest falls in New York State. Even when the volume of water is low both falls are pretty. The main parking area for the falls is on Route 23A just east of Haines Falls and west of Palenville. The parking area is small compared to the amount of people who want to use it especially on the weekends. Another parking area is at the end of Laurel House Road which is a right hand turn off the access road to North South Lake State Campgrounds. This is a newer lot constructed in 2016 and allows much safer access to the falls area. Trails constructed in 2015 and 2016 lead to a viewing platform over the upper falls and clove. A trail finished in 2016 allows hikers to hike along the Escarpment Trail and then descend to the lower falls using the trail and a 200 stone step staircase. There is even access to the pool at the base of the upper falls. Caution: The falls area has been the site of numerous injuries and deaths! It is important that visitors wear appropriate hiking footwear and obey the signs that indicate dangerous areas. Mist people who fall do not survive. Most fatalities and injuries are the result of unwise decisions made by the deceased.
From the parking area walk down the yellow trail and continue to follow it to the viewing platform. When you are done admiring the view from the platform, walk back up the trail and watch for a path to the right at .4 miles that leads down to Spruce Creek. As of August 5, 2016, there is no bridge in place but the creek is easily forded in low water conditions by hopping from stone to stone. A 120 foot bridge is planned for installation before the end of 2016. After crossing the stream walk to the right if the old bridge and up to the blue Escarpment Trail. Turn right on the trail and follow it until yellow blazes appear on the right at about .6 miles. Follow this trail down the steep bank being careful to watch your footing. Several switchbacks mitigate the steep grade and you will soon reach a 200 stone step staircase installed by an ADK crew. At about .9 miles a path to the pool below the upper falls leads to the right. This path can be very slippery so watch your footing. DO NOT use any other informal or unmarked paths as they cause erosion and are not safe. The path end at the pool and allows a close-up view of the upper falls and a beautiful view down the clove. Return to the main trail and continue down the steps to the viewpoint below the lower falls. From this viewpoint it is possible to see both the upper and lower falls from several angles. When you are done viewing the beauty of the falls, continue on the main trail as it parallels the creek and heads down to Route 23A. Although there is less danger of falling and sustaining a serious injury, be careful as you hike because the trail is very uneven. When you reach Route 23A, you will be at Bastion Falls which is easily visible from the road. More than one visitor has made the mistake of thinking these falls are Kaaterskill Falls! When the water volume is high, Bastion falls can be a roaring cascade but it is pretty even during dry spells. Turn around at 1.5 miles and get ready for the return climb since the change in elevation from Bastion falls to the parking area is 650 feet! When you cross Spruce Creek, continue up the path to the trail. Turn right and walk the trail back to the parking area.
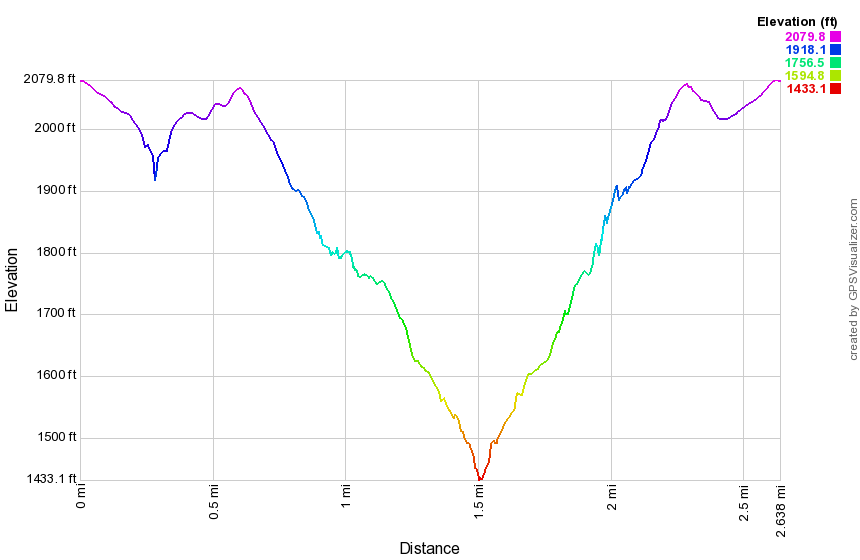 (The image at the left shows the profile of the hike. Remember that all vertical profiles are relative!)
North South Lake: Kaaterskill and Bastion Falls Out and Back
| Quick Look | ||||
|---|---|---|---|---|
| Difficulty | Round trip | Total climb | Internet Maps | |
| 1.5 mi. | 370 ft. | AllTrails | ||
 Bastion and Kaaterskill Falls are a popular destination for sightseers in the Catskills. Kaaterskill Falls may be the highest falls in New York State. Even when the volume of water is low both falls are pretty. The parking area for the falls is on Route 23A just east of Haines Falls and west of Palenville. The parking area is small compared to the amount of people who want to use it especially on the weekends. From the parking area walk down the road toward the east. BE CAREFUL as you walk down the road because many of the drivers are not! In a short distance a stone bridge crosses Spruce Creek. Turn left and step over the guard rail. The falls next to the road are Bastion Falls. Depending on the water level you may be able to walk down to the creek bed and look upstream. The trail continues up the creek for about .5 miles to the base of Kaaterskill Falls. The lower and upper falls comprise a drop of about 260 feet. The formal trail ends at this point but many informal paths continue to the top of the falls. The informal paths are TOO DANGEROUS to climb and many people have been injured and several have lost their lives. DO NOT climb beyond the fencing that is now in place! When you are done enjoying the falls, turn around and retrace your steps to the car. If you would like a view from the top of the falls, drive west on Route 23 and turn right onto the road to the North South Lake Campgrounds. Watch for Laurel House Road on the right just before the entrance to the campgrounds. Drive to the end of the road and park in the lot. The trail to the top of the falls leads out of the back of the parking area. The trail to the right is a rail trail and the map is on the signboard in the kiosk.
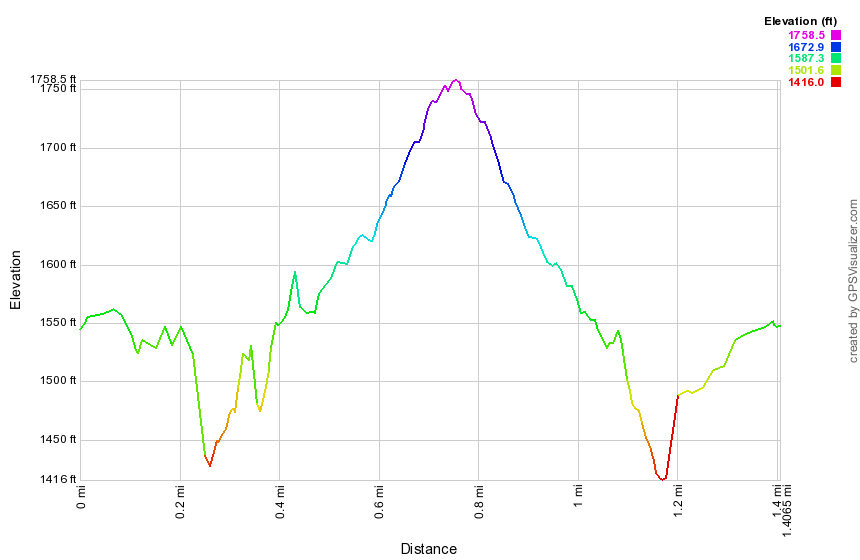 (The image at the left shows the profile of the hike. Remember that all vertical profiles are
relative!)
(The image at the left shows the profile of the hike. Remember that all vertical profiles are
relative!)
North Lake South Lake: Lake Loop (Counterclockwise)
| Quick Look | ||||
|---|---|---|---|---|
| Difficulty | Round trip | Total climb | Internet Maps | |
| 4.2 mi. | 315 ft. | AllTrails | ||
 The hiking trails around the North Lake South Lake Campgrounds may be the most scenic in the Catskills. The yellow loop trail around both lakes may seem easy but it has some terrific views of the lake and the surrounding mountains.
Turn north on Rt 18 from Rt 23A in the town of Haines Falls. After about 1 mile, turn right on Schutt Road just before the entrance to the state campgrounds. Turn right into the parking area. Walk across Schutt Road to pick up the Blue Escarpment Trail. There are a lot of rock and roots to step around and the trail can be very wet in places. Cross the old railroad bed and descend to cross two streams on bridges. At the trail junction turn left on a ski trail and walk out to the loop road. Turn left and walk on the loop road down to the dam at the south end of South Lake. Walked to the right of the dam to get on the yellow trail. The trail is cut through the woods and there are many roots to trip over. Followed one of the paths down to the lake shore to get a nice look from water level. Continue on the yellow trail until you reach the first beach near the north end of South Lake at 1.7 miles. Follow the trail through the beach area passing the buildings and walk up the stairs. Stay to the left to find the yellow blazes. Just .1 miles from the beach is a point of land that juts out into the water. This is the area that separates the two lakes and there are nice views in both directions as well as across the lake. Back on the trail follow a walkway or road along the shore of North Lake to the beach at North Lake at 2.2 miles. Continue on around the lake for a new set of views. From 1.8 miles back to the dam at 3.5 miles the trail follows roads or paths. It is easy walking with very few ups or downs. Walk back to the dam to complete the loop. At this point you may retrace your route from earlier or use the park roads to get back to your car. Turn around at the dam and head back the way you just came passing kiosk and sign on the right. The hike back from the dam is only about .75 miles.
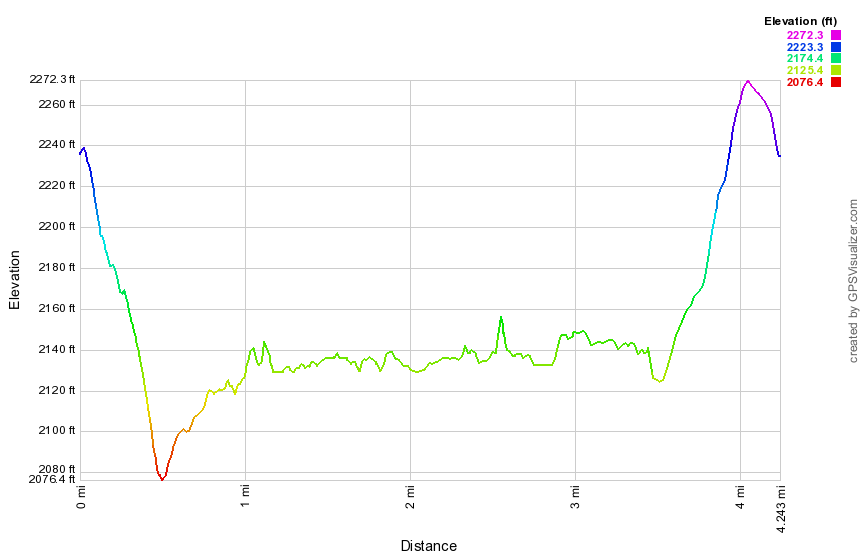 (The image at the left shows the profile of the hike. Remember that all vertical profiles are
relative!)
(The image at the left shows the profile of the hike. Remember that all vertical profiles are
relative!)
North Lake South Lake: North Point and Ashley Falls
| Quick Look | ||||
|---|---|---|---|---|
| Difficulty | Round trip | Total climb | Internet Maps | |
| 5.6 mi. | 1068 ft. | AllTrails | ||
 The hiking trails around the North Lake South Lake Campgrounds may be the most scenic in the Catskills. As you hike the Escarpment Trail the history and the views just seem to get better with every passing mile. Many spots have names like Inspiration Point and Artist's Rock. Even places that aren't named have beautiful views of the Hudson River and surrounding countryside.
Turn north on Rt 18 from Rt 23A in the town of Haines Falls. After about 1 mile, turn right on Schutt Road just before the entrance to the state campgrounds. Turn right into the parking area. Walk up Schutt Road and cross the main road to the campgrounds to the start of the yellow Rock Shelter trail. This may be one of my least favorite trails since it winds its way over rocks and roots for about 1.3 miles to the red Mary Glen Trail. There isn't much to see along the trail. Turn left on the Mary's Glen trail toward North Point. This trail ascends for about .8 miles to join the blue Escarpment Trail near North Point. The hike to the Point is only .3 miles but some of it is very steep with some rock scrambles. Once on North Point you will know that your work was worth it. From this high point you can see spectacular views of the Hudson River and the surrounding communities. North Point has at least three different "levels" and the best view may be from the highest one. Reverse your path and return the .3 miles back to the junction with Mary's Glen Trail.
This time stay on the Escarpment Trail by bearing left and in about .7 miles descend a rock slope to the trail junction with the Rock Shelter trail. On your right will be Badman's Cave which is more of a rock overhang than a cave. Turn right on the Rock Shelter Trail and walk downhill .4 miles back to the junction with the Mary's Glenn Trail. Right at the junction there is a seasonal waterfall to the right which comes off the ledges. Turn right and flow the blazes of the Mary's Glen Trail downhill. Watch for more seasonal waterfalls to the right of the trail. The real prize is Ashley Falls and you will arrive at the top of the falls at about 4.2 miles just before you cross a log bridge over the stream. You may get some views from the top before crossing the bridge and starting down the trail toward the bottom of the falls. As you descend there are several paths to the left that allow you to get some different views of the falls. At the vase of the trail a yellow spur goes to the left to the base of the falls. Note that Ashley falls despite its impressive height may be completely dry when there has been no rain! Walk back to the Mary's Glen Trail and continue out to the park road at 4.5 miles. Turn right and walk the paved park roads back to the main gate. Turn left on Scutt Road and walk back to the car. The walk on the road is about 1.1 miles.
 (The image at the left shows the profile of the hike. Remember that all vertical profiles are
relative!)
(The image at the left shows the profile of the hike. Remember that all vertical profiles are
relative!)
North Lake South Lake:
North Point, Stoppel Point, Escarpment Trail, Palenville Lookout
| Quick Look | ||||
|---|---|---|---|---|
| Difficulty | Round trip | Total climb | Internet Maps | |
| 14.4 mi. | 3000 ft. | AllTrails | ||
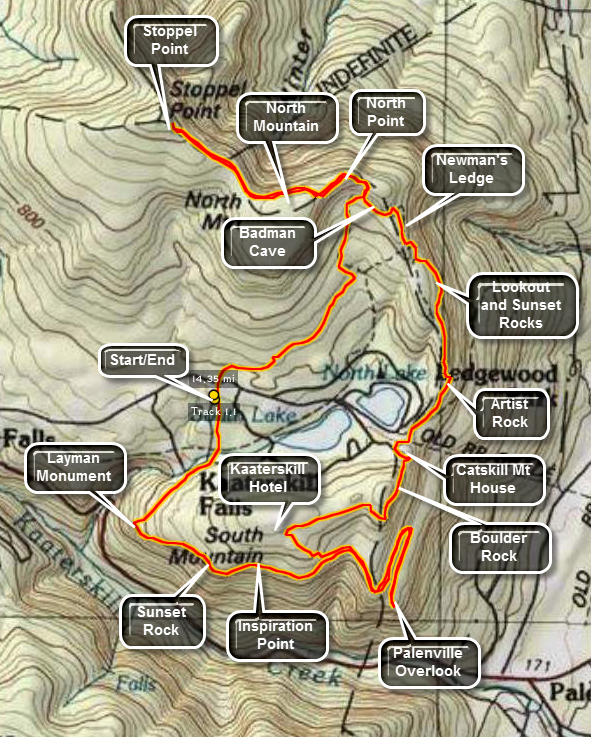 The hiking trails around the North Lake South Lake Campgrounds may be the most scenic in the Catskills.
As you hike the Escarpment Trail the history and the views just seem to get better with every passing
mile. Many spots have names like Inspiration Point and Artist's Rock. Even places that aren't
named have beautiful views of the Hudson River and surrounding countryside.
The hiking trails around the North Lake South Lake Campgrounds may be the most scenic in the Catskills.
As you hike the Escarpment Trail the history and the views just seem to get better with every passing
mile. Many spots have names like Inspiration Point and Artist's Rock. Even places that aren't
named have beautiful views of the Hudson River and surrounding countryside.
Turn north on Rt 18 from Rt 23A in the town of Haines Falls. After about 1 mile, turn right on Schutt Road just before the entrance to the state campgrounds. Turn left into the parking area. Walk up Schutt Road and cross the main road to the campgrounds to the start of the yellow Rock Shelter trail. This may be one of my least favorite trails since it winds its way over rocks and roots for about 1.3 miles to the red Mary Glen Trail. There isn't much to see along the trail. Turn left on the Mary's Glen trail toward North Point. This trail ascends for about .8 miles to join the blue Escarpment Trail near North Point. The hike to the Point is only .3 miles but some of it is very steep with some rock scrambles. Once on North Point you will know that your work was worth it. From this high point you can see spectacular views of the Hudson River and the surrounding communities. North Point has at least three different "levels" and the best view may be from the highest one. Stay on the Escarpment Trail as it levels off slightly and passes by North Mountain. The trail rolls some before climbing to Stoppel Point after about 1.8 miles. Stopple Point offers great views to the northeast and on a clear day buildings in Albany are visible. Continue on for less than a mile to a plane crash on the right side of the trail and watch for another lookout to the south on the right side of the trail as you return. From Stopple Point reverse your path and return 1.8 miles to North Point and the .3 miles back to the junction with Mary's Glen Trail.
This time stay on the Escarpment Trail and in about .7 miles descend a rock slope to the trail junction with the Rock Shelter trail. On your right will be Badman cave which is more of a rock overhang than a cave. Stay on the Escarpment trail by bearing to the left and pass by a small swampy area on the right of the trail. In about .5 miles you will be at Newman's Ledge which offers now limited views. From Newman's Ledge the trail descends steeply for a bit. Watch for a yellow spur trail to the right which leads to Lookout Point and Sunset Rock North. The views of the two lakes from Sunset Rock are beautiful! Lookout Point offers more views of the Hudson to the east. This area also offers an opportunity to climb to the area without using the trail. Several chimneys and cracks provide short but challenging climbs. Return to the main trail and pass under several rock overhangs along the base of the lookouts you just visited. In .5 miles you will be at Artist Rock. This viewpoint offers spectacular views of the Hudson Valley and is often used by photographers and artists. The trail continues to descend to the beach and parking area at the extreme east end of North Lake. Go through the parking lot and head toward the iron gate to stay on the Escarpment Trail and ascend the .25 miles to the site of the former Catskill Mountain House where a large boarding house once stood overlooking the Hudson. There is now an open field and a sign commemorating the structure. The views are fantastic and many people like to picnic here or just sit and enjoy the views. It is easy to see why this was such a popular Catskill destination with a cog railway and road for carriages.
In about .5 miles the Escarpment trail bears left to go toward Boulder Rock and Split Rock. DO NOT take the red cutoff trail or you will miss these two sights. Boulder Rock is a large boulder just sitting on a rocky shelf. This site gives one of the best views of the Hudson River. At Split Rock the trail passes by several places where large pieces of rock have split of the main bedrock formation. Continue on for about .7 miles to the junction with the Schutt road trail near the site of the former Kaaterskill Hotel. This was another popular hotel and boarding house that once stood in the area. Turn sharply left to descend on the Escarpment Trail for about .4 miles. Here the Escarpment Trail meets the Harding Road Trail and a horse trail. Turn left on the Harding Road and horse trail to start the hike to the Palenville Lookout. When the Harding Road Trail turns right DO NOT follow it but stay on the horse trail. There will be few marking on the horse trail so follow it carefully. When the trail splits follow the fork to the right. The trail is flat is places and then descends. It starts out heading northeast but then bends southeast before turning northeast again! After .8 miles, there is a switchback that sends you southwest and descends VERY STEEPLY. At the base of this switchback the trail splits. Make a SHARP RIGHT here to head toward the Palenville Lookout! In another .5 miles you will descend again to the Lookout. The views from here are phenomenal. To the right you can see Kaaterskill High Peak and Round top and up into Kaaterskill Clove. Straight out from the lookout is the Hudson while looking left gives you a view more toward the north. Laid out below, so close you could almost reach out and touch it, is the small town of Palenville. Hikers have used some of the local flagstones to build several chairs on the lookout. A few informal paths lead northeast along the escarpment but none have better views that right at the lookout. Retrace your steps for about 1.3 miles back to the Escarpment Trail.
After walking along the path bounded by laurel for about .8 miles you will be at Inspiration Point with a further .2 miles putting you at Sunset Rock South. Both of these viewpoint offer great views across Kaaterskill Clove and down into the clove itself. The high Peak and Round Top are right across from these lookouts. The houses of Twilight Park seems to had on the edge of the mountain. From Sunset Rock the trail starts to descend for about .5 miles with some descents being steep. The trail then turn sharply right to head back to the Schutt Road lot. At this bend is a stone monument with a plaque commemorating the death of a firefighter who was killed fighting a fire in the early 20th century. From the Layman Memorial the trail ascends and then flattens. It passes by several side trail. Stay on the Escarpment Trail for 1.2 miles and cross Schutt Road to get back to the car. This 15 mile hike is long (obviously) with several challenging ascent and descents. However, once you have done this hike there isn't much around North South Lake that you have missed!
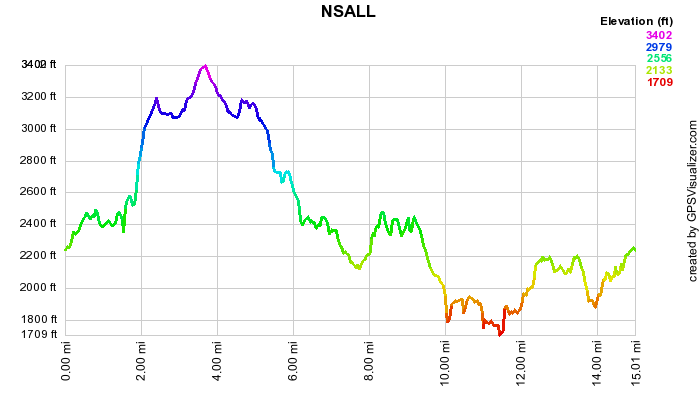 (The image at the left shows the profile of the hike. Remember that all vertical profiles are
relative!)
(The image at the left shows the profile of the hike. Remember that all vertical profiles are
relative!)
North South Lake: Palenville Lookout
| Quick Look | ||||
|---|---|---|---|---|
| Difficulty | Round trip | Total climb | Internet Maps | |
| 7.8 mi. | 1300 ft. | AllTrails | ||
 The hiking trails around the North Lake South Lake Campgrounds may be the most scenic in the Catskills.
As you hike the Escarpment Trail the history and the views just seem to get better with every passing
mile. Many spots have names like Inspiration Point and Artist's Rock. Even places that aren't
named have beautiful views of the Hudson River and surrounding countryside.
The hiking trails around the North Lake South Lake Campgrounds may be the most scenic in the Catskills.
As you hike the Escarpment Trail the history and the views just seem to get better with every passing
mile. Many spots have names like Inspiration Point and Artist's Rock. Even places that aren't
named have beautiful views of the Hudson River and surrounding countryside.
Turn north on Rt 18 from Rt 23A in the town of Haines Falls. After about 1 mile, turn right on Schutt Road just before the entrance to the state campgrounds. Turn left into the parking area. Walk across Schutt Road to the beginning of the blue marked Escarpment Trail. Several different trails intersect the Escarpment Trail at different places. Some of these trails are horse trails of snowmobile trails and not all are well marked.
Stay on the blue Escarpment trail for about .65 miles as it descends slightly and crosses an old railroad grade. Cross a bridge and then make a quick left on the a right onto the red Schutt Road Trail. Stay on this trail for about .25 miles and then turn onto a yellow trail on the right. Continue on the yellow trail for .35 miles before turn left on the blue Escarpment Trail. In about .35 miles you will be at Sunset Point which is marked with a sign. Another .35 miles brings you to a sign that announces Inspiration Point. In about .55 miles the Escarpment Trail turns sharply left and the red Harding Road Trail continues straight ahead. Walk on the Harding Road trail for several hundred feet until it turns right in a near 180 degree bend and head DOWN.
At this point continue ahead on the horse trail for .85 miles as it winds and switchbacks its way down. At the base of a steep, short hill turn right and walk .55 miles out to the Palenville Lookout. After taking in the sights retrace your steps back to where you took the right and turn right. Walk along the horse trail for .8 miles looking for some trail up to the higher levels. At this point a snowmobile trail heads up toward the beach area of North Lake. From hear walk .15 miles up to the empty field that was the site of the Catskill mountain House. Retrace your steps back to the roads that loop around the lakes and turn left to follow the roads .6 miles to the west, outlet end of South Lake. Take in the view and then continue .5 miles back to the gatehouse. Walk .1 miles out passed the gatehouse and turn left on Schutt Road. Walk .15 miles down Schutt Road and back to the car.
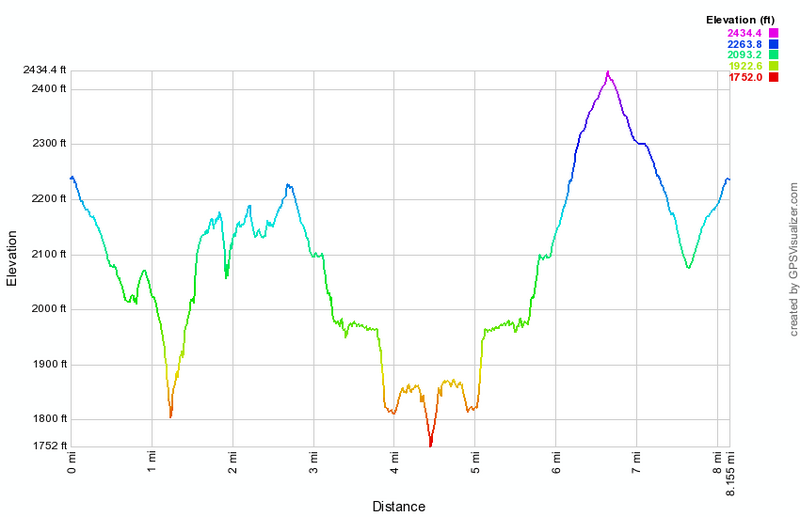 (The image at the left shows the profile of the hike. Remember that all vertical profiles are relative!)
North South Lake: Palenville Lookout (Big Loop)
| Quick Look | ||||
|---|---|---|---|---|
| Difficulty | Round trip | Total climb | Internet Maps | |
| 7.9 mi. | 1195 ft. | AllTrails | ||
 The hiking trails around the North Lake South Lake Campgrounds may be the most scenic in the Catskills.
As you hike the Escarpment Trail the history and the views just seem to get better with every passing
mile. Many spots have names like Inspiration Point and Artist's Rock. Even places that aren't
named have beautiful views of the Hudson River and surrounding countryside.
The hiking trails around the North Lake South Lake Campgrounds may be the most scenic in the Catskills.
As you hike the Escarpment Trail the history and the views just seem to get better with every passing
mile. Many spots have names like Inspiration Point and Artist's Rock. Even places that aren't
named have beautiful views of the Hudson River and surrounding countryside.
Turn north on Rt 18 from Rt 23A in the town of Haines Falls. After about 1 mile, turn right on Schutt Road just before the entrance to the state campgrounds. Turn left into the parking area. Walk across Schutt Road to the beginning of the blue marked Escarpment Trail. Several different trails intersect the Escarpment Trail at different places. Some of these trails are horse trails of snowmobile trails and not all are well marked.
Stay on the blue Escarpment trail for about .65 miles as it descends slightly and crosses an old railroad grade. Cross a bridge and then make a quick left on the a right onto the red Schutt Road Trail. Stay on this trail for about .25 miles and then turn onto a yellow trail on the right. Continue on the yellow trail for .35 miles before turn left on the blue Escarpment Trail. In about .35 miles you will be at Sunset Point which is marked with a sign. Another .35 miles brings you to a sign that announces Inspiration Point. In about .55 miles the Escarpment Trail turns sharply left and the red Harding Road Trail continues straight ahead. Walk on the Harding Road trail for several hundred feet until it turns right in a near 180 degree bend and head DOWN.
At this point continue ahead on the horse trail for .85 miles as it winds and switchbacks its way down. At the base of a steep, short hill turn right and walk .55 miles out to the Palenville Lookout. After taking in the sights retrace your steps back to where you took the right and turn right. Walk along the horse trail for .8 miles looking for some trail up to the higher levels. At this point a snowmobile trail heads up toward the beach area of North Lake. From hear walk .15 miles up to the empty field that was the site of the Catskill mountain House. Retrace your steps back to the roads that loop around the lakes and turn left to follow the roads .6 miles to the west, outlet end of South Lake. Take in the view and then continue .5 miles back to the gatehouse. Walk .1 miles out passed the gatehouse and turn left on Schutt Road. Walk .15 miles down Schutt Road and back to the car.
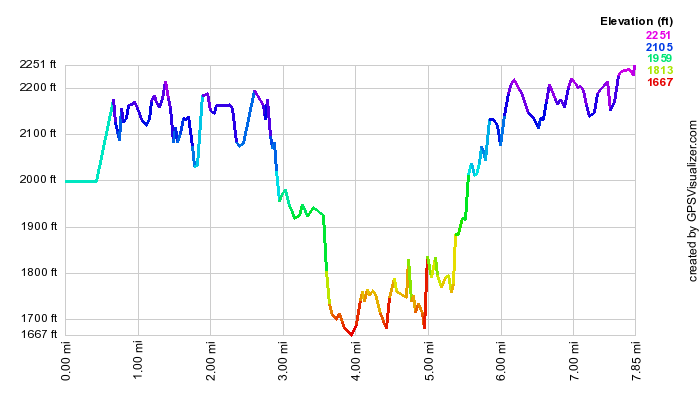 (The image at the left shows the profile of the hike. Remember that all vertical profiles are
relative!)
(The image at the left shows the profile of the hike. Remember that all vertical profiles are
relative!)
North South Lake: Palenville Lookout (Sleepy Hollow)
| Quick Look | ||||
|---|---|---|---|---|
| Difficulty | Round trip | Total climb | Internet Maps | |
| 8.8 mi. | 2007 ft. | AllTrails | ||
 The hiking trails around the North Lake South Lake Campgrounds may be the most scenic in the Catskills.
As you hike the Escarpment Trail the history and the views just seem to get better with every passing
mile. Many spots have names like Inspiration Point and Artist's Rock. Even places that aren't
named have beautiful views of the Hudson River and surrounding countryside.
The hiking trails around the North Lake South Lake Campgrounds may be the most scenic in the Catskills.
As you hike the Escarpment Trail the history and the views just seem to get better with every passing
mile. Many spots have names like Inspiration Point and Artist's Rock. Even places that aren't
named have beautiful views of the Hudson River and surrounding countryside.
This hike requires two cars for a car shuttle or you will have to double the mileage! Turn north on White Road just west of Palenville on Route 23A. Bear left and park one car in the parking area. Drive back down White Road to Route 23A and turn left. Take the next left on Bogart Road Drive to the junction with Mountain House road and turn left. Drive to the gate and park on the side of the road but DO NOT block the gate. Get on the wide woods road that leads up to the escarpment. The first 1 mile of the hike parallels Stony Brook and there are numerous falls and rapids along the way. Many of these falls are on private property. At 1 mile the trail turns to the left and crosses Stony Brook on a bridge. At this point there is a rock upstream from the bridge that, in the Legend of Sleepy Hollow, was Rip Van Winkle's resting place. This was also the site of the Rip Van Winkle house. The trail now heads generally south with one large switchback as it continues its ascent for the next 1.9 miles. Watch to your left along the way for several nice viewpoints. At 3.3 miles the trail crosses of right-of-way which was originally cut for the Otis Elevating Railway. The railway hauled passengers from the valley to the Catskill Mountain House. This area of the trail is often VERY wet. At 3.8 miles there is a trail junction and you should continue straight ahead to go to the Palenville Lookout which is about a .5 mile walk. At the main part of the lookout there is the remains of a foundation and some stone furniture that hikers have constructed. The view from here is outstanding particularly on a clear day. Palenville is just below but you can see out to the Hudson and beyond. You may walk along the escarpment to the left for some additional views. When you are ready, walk back up the trail and turn on the path to the left that takes you out to another lookout. This viewpoint better allows you to look back up Kaaterskill Clove. Back on the main trail walk to the trail junction, turn left and get ready for a short but steep ascent that approaches a 30% grade! The horse trail will continue to climb for the next .85 miles to a trail junction. Turn left on Harding Road. This road was constructed to bring materials to the plateau to build the Kaaterskill Hotel owned by George Harding. This road props 00 feet over the next 2.4 Niles and has several switchbacks that were needed to allow horse drawn wagons to make the grade. Watch to your right along the way for viewpoints. There is at least one stream crossing but you will not get your feet wet. At the end of the road a short trail takes you the additional .5 miles to the parking area.
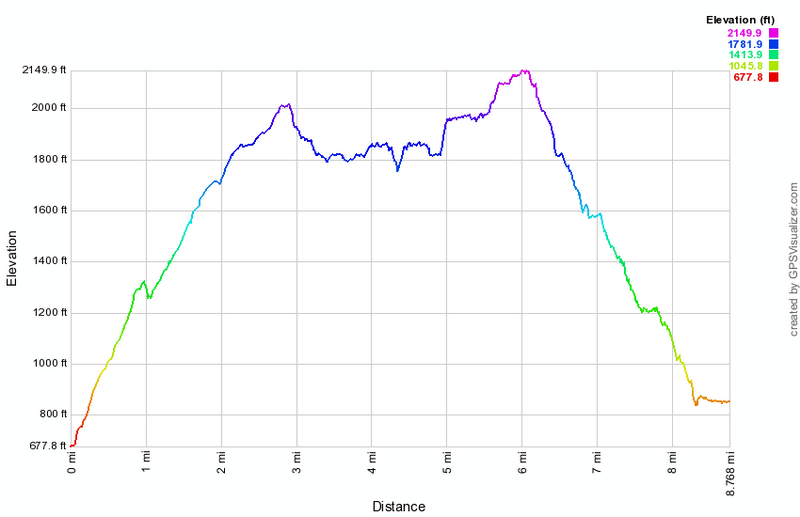 (The image at the left shows the profile of the hike. Remember that all vertical profiles are relative!)
North South Lake: Stoppel Point
| Quick Look | ||||
|---|---|---|---|---|
| Difficulty | Round trip | Total climb | Internet Maps | |
| 7.6 mi. | 1496 ft. | AllTrails | ||
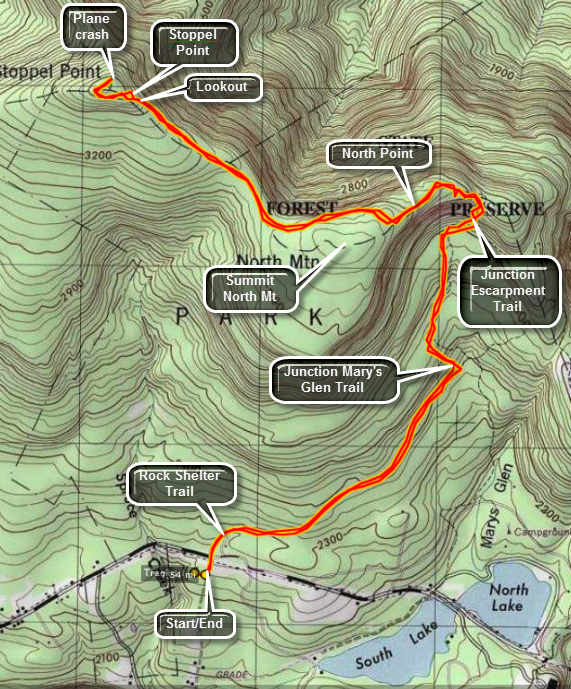 The hiking trails around the North Lake South Lake Campgrounds may be the most scenic in the Catskills.
As you hike the Escarpment Trail the history and the views just seem to get better with every passing
mile. Many spots have names like Inspiration Point and Artist's Rock. Even places that aren't
named have beautiful views of the Hudson River and surrounding countryside. There are many combinations of paths that
can ;lead to Stopple Point. This path is the shortest and most direct.
The hiking trails around the North Lake South Lake Campgrounds may be the most scenic in the Catskills.
As you hike the Escarpment Trail the history and the views just seem to get better with every passing
mile. Many spots have names like Inspiration Point and Artist's Rock. Even places that aren't
named have beautiful views of the Hudson River and surrounding countryside. There are many combinations of paths that
can ;lead to Stopple Point. This path is the shortest and most direct.
Turn north on Rt 18 from Rt 23A in the town of Haines Falls. After about 1 mile, turn right on Schutt Road just before the entrance to the state campgrounds. Turn right into the parking area. Walk up Schutt Road and across CR-18 to the yellow marked Rock Shelter Trail. Follow this trail for 1.3 miles where it intersects the Mary's Glen Trail. Turn left and follow the Mary's Glen Trail .8 miles to the blue blazed Escarpment Trail. Turn left on the Escarpment Trail toward North Point. Be prepared to CLIMB as you ascend .2 miles to North Point. Take in the views of the lakes and campgrounds below. Stay on the Escarpment Trail as it rises for another .35 miles to an area near the summit of North Mountain. Continue on the Escarpment Trail for another 1.4 miles to an open rock ledge which is Stoppel Point. Enjoy the views to the north and east before turning around and retracing your steps. If you want, continue on the Escarpment Trail for another .5 miles to the wreckage of an old airplane before turning around.
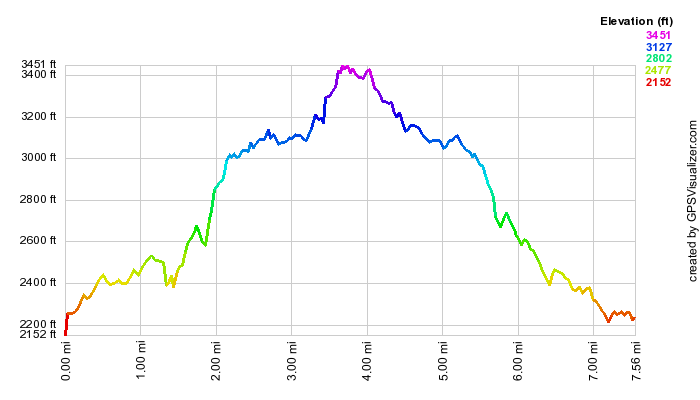 (The image below shows the profile of the hike. Remember that all vertical profiles are
relative!)
(The image below shows the profile of the hike. Remember that all vertical profiles are
relative!)
Norvin Green State Forest: Lower Trail
| Quick Look | ||||
|---|---|---|---|---|
| Difficulty | Round trip | Total climb | Internet Maps | |
| 7.2 mi | 1544 ft | AllTrails | ||

The hiking trails in Norvin Green State Forest in northern New Jersey are many and varied. The area contains several mines, great views from various high points and some seasonal waterfalls. By combining trails in different ways many different hikes can be constructed with varying lengths and degrees of difficulty. Park at the parking lot at the Weis Education Center on Snake Den Road. The first part of the hike winds its way through the recreational area of the park and around a rather unique pool. The pool is formed from a natural pool in the stream and has been fenced and "improved" for swimming. Follow the green Otter Hole trail along the stream and across a bridge until you reach a trail junction. Take the yellow trail Mine Trail toward the Roomy Mine. The yellow Mine Trail climbs a small hill and then winds through some nice open woods. There is a seasonal falls along the way formed on Blue Mine Brook. Around .9 miles look for a new orange cutover trail to get to the Roomy Mine. This trail may not be marked on some maps. The previous access from Snake Den Road has been closed by the owner of this private property. The orange trail follows an old mine road to the entrance of the Roomy Mine. The signs outside the mine caution that the mine is closed and should not be entered due to a resident bat population. Disturbing the bats while they are hibernating can seriously affect their fat stores which may make it impossible for them to complete their hibernation. Also, there is a concern about the white nose fungus which can be transmitted from mine to mine and cave to cave. Stay outside the mine to take pictures. You may venture up the slippery rocks to look down into the airshaft near the entrance! Back on the trail. the orange trail soon rejoins the yellow and red dot trails. It is a short walk to the Blue Mine. This mine is almost completely flooded and it is hard to get an idea from the adit how big it was. One look at the extensive tailings piles near the mine gives an indication that TONS of material were removed. Cross the bridge and take the red dot WCI, blue Hewitt Butler and Highlands trails as they start a short but steep climb to the Wyanokie High Point at around 2.5 miles. Just over the bridge is the stone foundation remains of some building from long ago. The trails to the High Point switchback several times but the elevation gain is not that great. The High Point seems so high since it has a much greater elevation that the surrounding terrain although it may not be the highest point in the park! The trail levels near the top and there are some nice views. The Wanaque Reservoir dominates the view to the east while small villages dot the valleys and hillsides in the other directions. Continue the final climb to the very top over bare rock with only a few scrub pines. The view from here is 360 degrees and a short walk around the top allows photographing the landscape without any intervening vegetation. Following the Hewitt Butler and Highlands Trails as they head toward Yoo Hoo Point. The trails descend rather steeply off Wyanokie High Point, wander through some woods and then ascend again to Yoo Hoo Point. Along the way the red WCI trail leaves to the right but stay straight on the trail. Yoo Hoo Point is named for its close proximity to the Wyanokie High Point. The two are close enough that you could yell to another person on the other viewpoint and be heard and seen! Continue on to the trail junction with the yellow Carris Hill Trail which actually starts almost at the top of Carris Hill at about 3.25 miles. Carris Hill may be the highest spot along these trails. At the top of Carris Hill follow the yellow Carris Hill Trail which works its way along a ridge to some nice lookouts directly to the south and east. As you continue the views from the southern tip of the Carris Hill Ridge were very nice! Descend Carris Hill toward Posts Brook and a trail junction with The Posts Brook and Lower Trails at 4 miles. Take the white Lower Trail as it heads north. The trail was an Eagle project and undulates slightly but is the easiest way back to the parking area.Watch for the red WCI Trail at 5.3 miles and turn right retracing your path passed the Blue and Roomy Mines. From here follow your earlier route in reverse back to the Weis Center.
 (The image at the left shows the profile of the hike. Remember that all vertical profiles are
relative!)
(The image at the left shows the profile of the hike. Remember that all vertical profiles are
relative!)
Norvin Green State Forest: Otter Hole
| Quick Look | ||||
|---|---|---|---|---|
| Difficulty | Round trip | Total climb | Internet Maps | |
| 8.3 mi | 1677 ft | AllTrails | ||
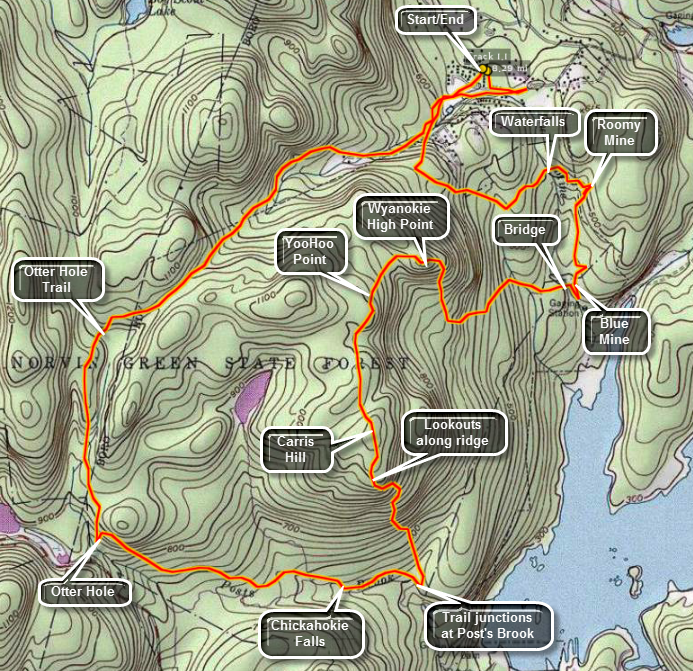
The hiking trails in Norvin Green State Forest in northern New Jersey are many and varied. The area contains several mines, great views from various high points and some seasonal waterfalls. By combining trails in different ways many different hikes can be constructed with varying lengths and degrees of difficulty. Park at the parking lot at the Weis Education Center on Snake Den Road. Walk out of the driveway of the Weis Center and turn RIGHT. The trail access from Snake Den Road to the left has been closed by the owner of the property. The problem with the trails in the park is that there are quite a few and many run together in different places. All are well marked with paint blazes and some even have signs pointing to attractions. Watch for signs for the Highlands Pool which is a natural pool that has been developed for use by adding a fence, a cement apron and a lifeguard. You should now be on the yellow Mine Trail walking beside a stream and through a hardwood forest. At the trail kiosk continue on the yellow trail which will take you toward the Roomy and Blue mines. Along the way the trail passes above Wyanokie Falls. Continue on the yellow trail until the orange blazed Cutoff Trail bears to the left on an old, reinforced mine road which leads directly to the Roomy Mine. The Roomy Mine can be entered through a low and narrow opening but signs warn against it because of the white nose disease that is decimating the bat population. You may walk up the hill to a shaft that looks down into the mine. Follow the orange trail until its junction with the Red Dot and yellow Mine Trails. Turned left or south and after a short walk you will be at a bridge over Blue Mine Brook at the junction with the Highlands Trail. The mine entrance is straight ahead just after the bridge. On your left will be some very large tailing dumps. The Blue Mine is completely flooded and it is impossible to see much in the dark opening. Returning to the Bridge and the Highlands Trail which runs concurrently with the red WCI Trail. Stay on the trail passing junctions with the yellow Mine Trail and the white Lower Trail. A short but steep stretch of trail climbs toward the Wyanokie High Point at 2.95 miles. This is a bald half dome with 360 degree views dominated by an unobstructed view of the Wanaque Reservoir. Continue on the Highlands Trail as it runs along with the blue Hewitt-Butler Trail. The descent from the High Point is pretty dramatic but not too difficult and is followed by a brief descent and some flat section. It then climbs again to another high area called Yoo-Hoo Point. I suspect it got its name from its close proximity to the High Point. It is close enough to yell a greeting to someone standing there! Start to descend down the other side and then ascend toward Carris Hill. At the junction with the yellow Carris Hill Trail, bear left to follow this trail. The trail flattens out and opens up onto an area of bare rock with some trees and a large glacial erratic. There are views to the south especially as you descend the hill. The descent to Posts Brook is steep in some parts until it cuts to the right across some open rock and continues behind the large rock outcrop. Walking out onto the rock gives of the best views in the park. The Wanaque Reservoir is just below with the dam clearly visible with some nice islands and arms of land jutting out into the water. Walk behind the rock and continue your descent toward the Posts Brook Trail. Turn right on the Posts Brook Trail at 4.4 miles and approach Chikahoki Falls in another .3 miles. The trail follows closely along the brook until it reaches a small pool. Water runs over a large rock outcrop and into the pool forming the falls. The falls vary seasonally from a trickle to crashing water. Continue on the Highlands and Hewitt-Butler Trails to Otter Hole where there another small waterfall. Walk passed the green Otter Hole Trail and continue down the blue trail to Otter Hole at 5.75 miles. Return to the green Otter Hole Trail and turn left to head north. There are a few lookouts along the way but none have much of a view. The trail ascends for the next 1 mile and then starts a descent for the next 1.45 miles. It passes by the Highlands Pool and leads back to the Weis Center.
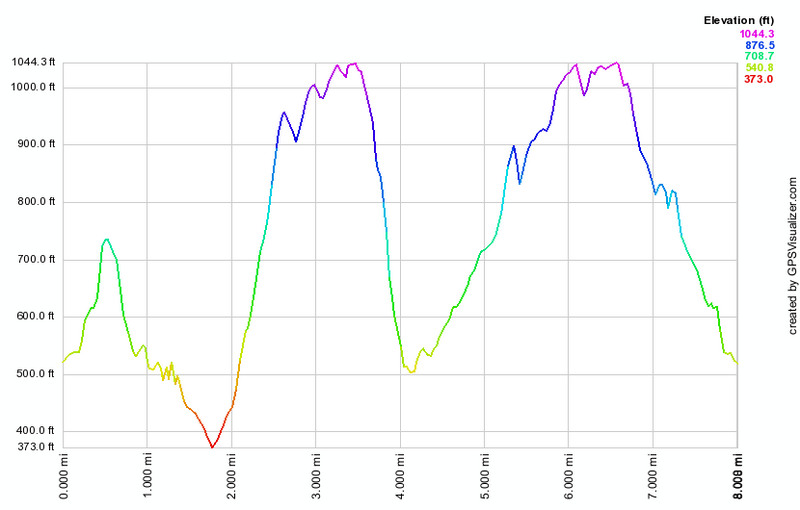 (The image at the left shows the profile of the hike. Remember that all vertical profiles are relative!)
Norvin Green State Forest: Wyanokie High Point and the Mines
| Quick Look | ||||
|---|---|---|---|---|
| Difficulty | Round trip | Total climb | Internet Maps | |
| 4.4 mi | 1053 ft | AllTrails | ||
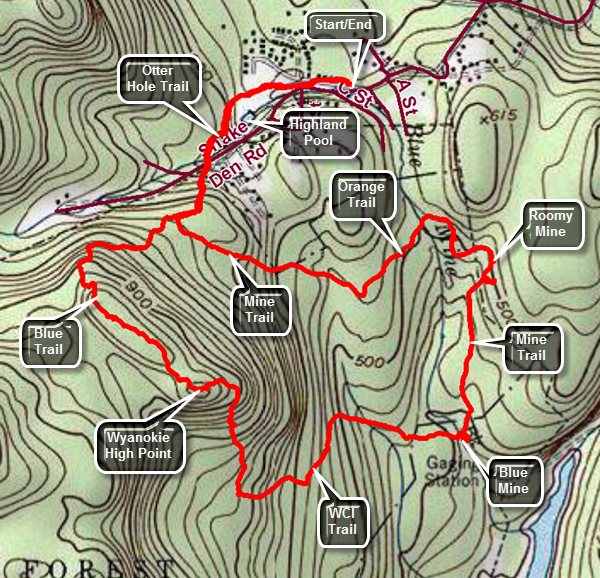
The hiking trails in Norvin Green State Forest in northern New Jersey are many and varied. The area contains several mines, great views from various high points and some seasonal waterfalls. By combining trails in different ways many different hikes can be constructed with varying lengths and degrees of difficulty. Park at the parking lot at the Weis Education Center on Snake Den Road. Walk out of the driveway of the Weis Center and turn RIGHT. The trail access from Snake Den Road to the left has been closed by the owner of the property. The problem with the trails in the park is that there are quite a few and many run together in different places. Not all are well marked with paint blazes but there are some signs pointing to "attractions". Watch for signs for the Highlands Pool which is a natural pool that has been developed for use by adding a fence, a cement apron and a lifeguard. Walk passed the pool and turn left into the woods to follow the green Otter Hole Trail. The trail is rocky and can be difficult to hike especially on snowshoes. At .45 miles cross the extension of Snake Den Road and continue straight ahead on the blue HB trail toward the Wyanokie High Point. The trail to this point ascends very gently. The blue trail begins a more serious ascent with a grade approaching 15%. Ascend to a nice viewpoint with a single glacial erratic. Continue on the trail as it loops around and heads toward the High Point. There are several lookouts along the way but the view from the High Point is best. You may wonder which place is the High Point but you will know it when you get there! After descending a little you will see a huge, rocky mass ahead. Walk the trail to the base and find a sign labeled "High Point". Ascend a narrow path and climb over some open rocks to the High Point. The view is beautiful and largely open in all directions. The Wanaque Reservoir is clearly visible below to the east. It may be a little difficult to find the red WCI Trail which is aligned with the Highlands Trail at this point. Walk to the east towards the reservoir and down the open rock to the left. You should soon be able to pick up blazes and the trail. The trail is much easier to follow when there is no snow on then ground. By 1.9 miles you will have completed the descent from the High Point and the red trail makes a sharp turn to the right. Follow the trail passing by a white trail on the right. Soon a yellow trail appears on the left which is the quickest way back to the car. Continue straight ahead on the red trail which leads the Blue Mine. At 2.25 miles cross a stream on a small bridge and turn right to visit the Blue Mine which is one of the numerous abandoned iron mines found in northern New Jersey. The mine itself is mostly underwater with only the initial adit exposed. Headed north on the yellow and red trails and where the trail spilt stay to the right on the yellow trail. At 2.6 miles turned left on the orange trail which leads to the Roomy Mine. The walk to the Roomy Mine at 2.8 miles is just slightly uphill. Signs outside the Roomy Mine warn hikers to stay out of the mine from September 15 to April 15 to protect the bats which hibernate there. Continue along on the orange trail. The trail that leads directly out to the Weis Center has been closed by the landowner so be careful to followed the orange trail as it leads out to the yellow Mine Trail. Turn right on the yellow trail at 3.1 miles and descend slightly to cross a small brook. From this point the yellow trail begins to ascend a small hill. The uphill is only a 13% grade and lasts for about .3 miles. At the top of the hill cross a stream with a small waterfall and a little farther along turn right onto the blue trail. Descend the hill to Snake Den Road and continue across the road on the Green Otter Hole Trail. Walk down the trail along the brook and pass the Highlands Pool retracing your route from earlier back to your car.
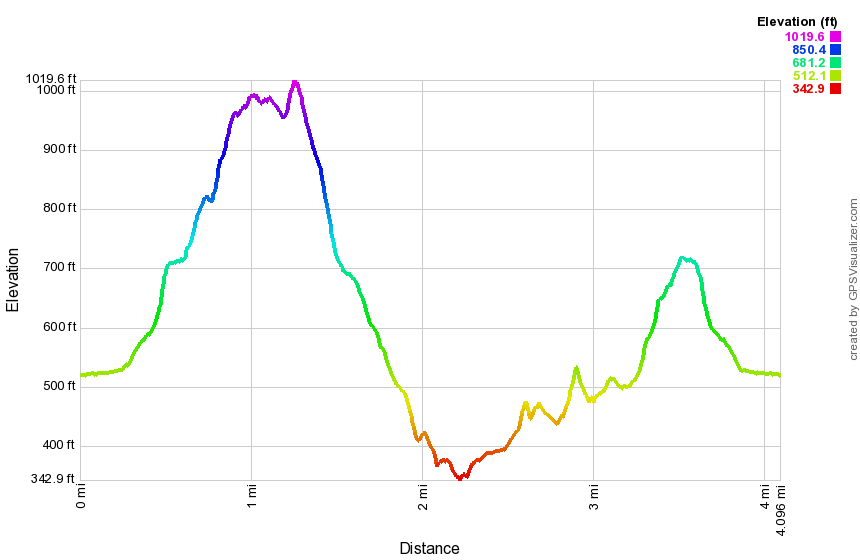 (The image at the left shows the profile of the hike. Remember that all vertical profiles are relative!)
Depot Hill to Nuclear lake
| Quick Look | ||||
|---|---|---|---|---|
| Difficulty | Round trip | Total climb | Internet Maps | |
| 5.9 mi. | 1420 ft. | AllTrails | ||

This hike is really from Route 20 to Nuclear Lake and back.Take the Taconic State Parkway north off I84 and then take the next exit for Route 52 toward Carmel. At the Stormville Post Office turn left on Route 216 and follow it to Route 55. Turn right on Route 55 and within 1.8 miles turn left on Old Route 55. Follow Old Route 55 to Dodge Road and turn left. Follow Dodge Road to the end and turn left on Route 20 which is locally called West Dover Road. Within one mile you will find the point where the AT crosses the road. On the right side of the road is the Dover Oak which is said to be the largest oak tree on the AT. Cross the road to get on the AT which at first descends to a wet area which is crossed by some puncheons. After this the trail begins a rather steep ascent to a shoulder of West Mountain and a viewpoint called the Cat Rocks. The ascent is .7 miles and you will gain over 600 feet. There are several switchbacks that moderate the climb. Passed the Telephone Pioneers Shelter side trail on the way up. At the top of the climb the trail levels out at the highest point which is around 1250 feet. At .9 miles a side trail on the right leads to an extensive open rock face. This is the Cat Rocks and there is about a 180 degree view to the east. Walk back up to the AT and continued west toward Nuclear Lake for about 2 miles. From the viewpoint the trail drops some elevation to about 1.8 miles where you cross some puncheons across a marshy area at an elevation of almost 1100 feet. Having a marshy area like this at a higher elevation is unusual. Gained some more and then at about 2 miles start to drop toward the lake. Over the next mile you lose about 350 feet on a gentle grade with a few steeper parts and switchbacks mixed in. At almost exactly 3 miles you will come to the loop trail where you may turn around for the return trip or continue for an additional 2 miles around the lake.
 (The image at the left shows the profile of the hike. Remember that all vertical profiles are relative!)
Nuclear Lake from Route 20
| Quick Look | ||||
|---|---|---|---|---|
| Difficulty | Round trip | Total climb | Internet Maps | |
| 7.8 mi. | 1700 ft. | AllTrails | ||

Take the Taconic State Parkway north off I84 and then take the next exit for Route 52 toward Carmel. At the Stormville Post Office turn left on Route 216 and follow it to Route 55. Turn right on Route 55 and within 1.8 miles turn left on Old Route 55. Follow Old Route 55 to Dodge Road and turn left. Follow Dodge Road to the end and turn left on Route 20 which is locally called West Dover Road. Within one mile you will find the point where the AT crosses the road. On the right side of the road is the Dover Oak which is said to be the largest oak tree on the AT. Cross the road to get on the AT which at first descends to a wet area which is crossed by some puncheons. After this the trail begins a rather steep ascent to a shoulder of West Mountain and a viewpoint called the Cat Rocks. The ascent is .7 miles and you will gain over 600 feet. There are several switchbacks that moderate the climb. Passed the Telephone Pioneers Shelter side trail on the way up. At the top of the climb the trail levels out at the highest point which is around 1250 feet. At .9 miles a side trail on the right leads to an extensive open rock face. This is the Cat Rocks and there is about a 180 degree view to the east. Walk back up to the AT and continued west toward Nuclear Lake for about 2 miles. From the viewpoint the trail drops some elevation to about 1.8 miles where you cross some puncheons across a marshy area at an elevation of almost 1100 feet. Having a marshy area like this at a higher elevation is unusual. Gained some more and then at about 2 miles start to drop toward the lake. Over the next mile you lose about 350 feet on a gentle grade with a few steeper parts and switchbacks mixed in. At almost exactly 3 miles you will come to the loop trail where you should bear to the left on the loop trail around the lake. The trail stays pretty far away from the water and from the cliffs that line the eastern shore. This trail starts out fairly flat but soon becomes rocky with a few short but steep ascents and descents. At one point a path to the right leads to a very nice lookout with views of the small island and the rest of the lake. Continue on the main trail and you will soon cross the access road to the lake. Re-enter the trees and rejoin the AT at about 4 miles into the hike. Bear right on the AT. It is almost exactly 2 miles around the lake. At 4.3 miles into the hike you will get another look at the lake and be able to walk down to the shore. In the early 1970's there was an explosion at a small research facility on the shores of the lake. This scattered a small amount of radioactive material in the surrounding forest. The material was cleaned up and subsequent testing showed no more radiation than normal background. Shortly after the facility was closed and the building razed. Head back to the AT again and the trail becomes very rocky and descends to very near the shore of the lake. Continue around the lake and at 4.9 miles the AT turns left. Follow the AT 2.9 miles back to the car.
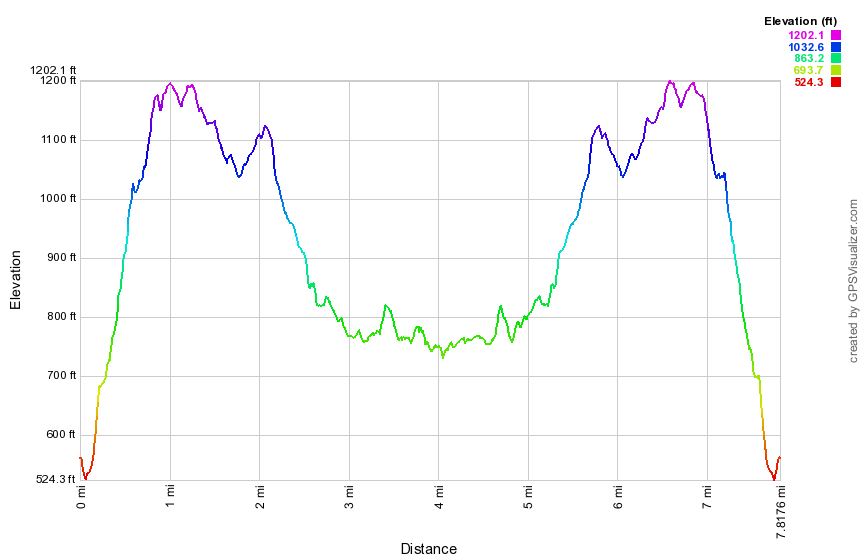 (The image at the left shows the profile of the hike. Remember that all vertical profiles are relative!)
Nuclear Lake from Route 55
| Quick Look | ||||
|---|---|---|---|---|
| Difficulty | Round trip | Total climb | Internet Maps | |
| 4.4 mi. | 620 ft. | AllTrails | ||

Take the Taconic State Parkway north off I84 and then take the next exit for Route 52 toward Carmel. At the Stormville Post Office turn left on Route 216 and follow it to Route 55. Turn right on Route 55 and within 1.5 miles find an AT parking area on the right side of the road. Walk southeast on Route 55 for about 100 feet to where the AT crosses the road. Turn left into the woods. The distance from Route 55 to Nuclear Lake appears to be about .6 miles but the trail keeps winding this way and that extending the distance to 1.2 miles. You will eventually come to the first junction with the loop trail even though the lake is not in view. The AT so far has been level in most places and rocky in a few others but there has been very little up or down. Stay on the AT along the west side of the lake. At 1.5 miles into the hike you will get a look at the lake and be able to walk down to the shore. In the early 1970's there was an explosion at a small research facility on the shores of the lake. This scattered a small amount of radioactive material in the surrounding forest. The material was cleaned up and subsequent testing showed no more radiation than normal background. Shortly after the facility was closed and the building razed. Head back to the AT again and the trail becomes very rocky and descends to very near the shore of the lake. Continue around the lake and at 2.2 miles the AT turns left. Bear to the right on the loop trail around the lake. The trail stays pretty far away from the water and from the cliffs that line the eastern shore. This trail starts out fairly flat but soon becomes rocky with a few short but steep ascents and descents. At one point a path to the right leads to a very nice lookout with views of the small island and the rest of the lake. Continue on the main trail and you will soon cross the access road to the lake. Re-enter the trees and complete the loop by rejoining the AT at 3.25 miles into the hike. It is almost exactly 2 miles around the lake and you only have the 1.2 mile walk back to the car to go. As you near Route 55 you may take the blue shortcut trail on the right back to the parking area to avoid hiking along the main road.
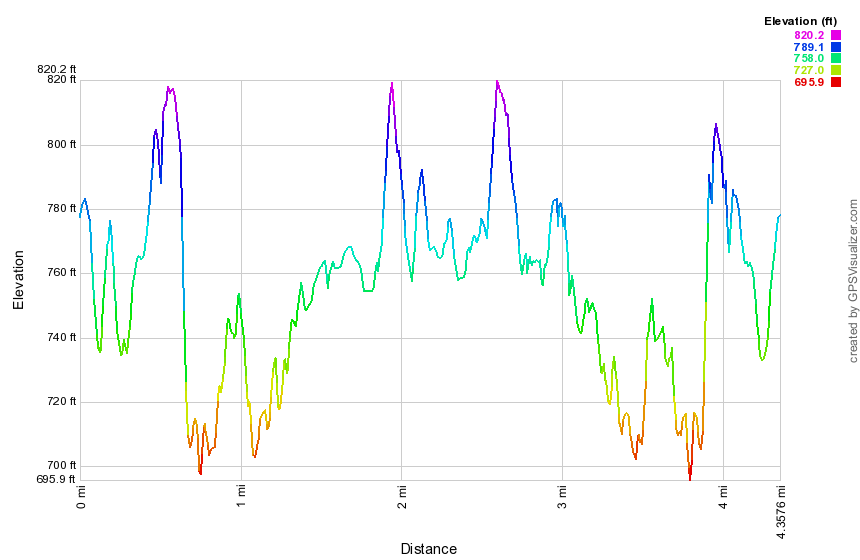 (The image at the left shows the profile of the hike. Remember that all vertical profiles are relative!)
Nyack to Landing Road
| Quick Look | ||||
|---|---|---|---|---|
| Difficulty | Round trip | Total climb | Internet Maps | |
| 10.8 mi. | 2070 ft. | AllTrails | ||
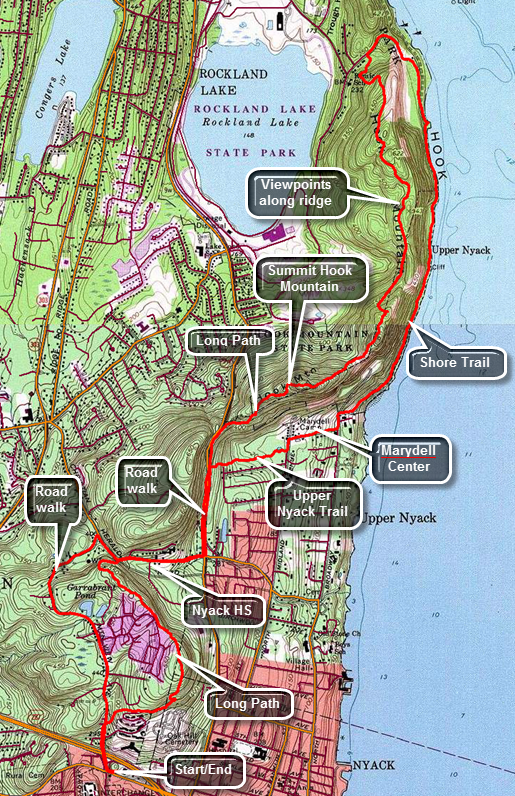
Take exit 11, Nyack, off the NYS Thruway. Turn left at the traffic light at the end of the exit onto Route 59. Park in a parking lot in one of the strip malls as close to where you turned as possible. Be sure to park away from any stores. Walk west on Route 59 to Mountainview Avenue and turn right to head north. The bridge over I87 has a very narrow sidewalk but after that there sidewalks until the trail cuts right into the wood at .3 miles. Walk through a strip of forested land that is bordered on either side by houses and apartment buildings. The Long Path begins to head east and at about .6 miles skirts Oak Hill Cemetery. The Hudson River and Tappan Zee Bridge are visible through the trees. The views are good but much better views are to come! Follow the trail as it turns left and starts up a hill to a water tank. The trail begins to head north and then northwest rolling a little. At about 1.4 miles look to your right to see Nyack High School. At this point the trail starts a somewhat steep descent to Christian Herald road at 1.7 miles. Passed through a gate, turn right and walk on the sidewalk along the road. Continue on the sidewalk passing the high school and the Ramah Jewish Day Camp on the way to the intersection with Route 9W. At 9W turn left to hike north .4 miles. There are no sidewalk but the shoulder is wide. At 2.5 miles cross the road and pass through an opening in the guardrail. A short distance into the woods a white trail comes in from the right. This is the Upper Nyack Trail which you will use to hike a loop on the way back. The Long Path continues on a wide woods road which parallels Route 9W. The road is well constructed with stone laid up to support the road surface. The trail begins to gain elevation as it heads northeast and away from 9W. At 2.8 miles you enter Rockland Lake State Park. There are a few lookouts but continue to the top of Hook Mountain. At 3.25 miles you will reach the summit and the highest point on the hike. The views were spectacular in all directions. Of course the dominant view is the Hudson River to the east as well as the village of Nyack. You can see the Tappan Zee Bridge and the construction being done to create the new span. The Hudson is at its widest here and these views make that very clear. To the north is Rockland Lake. Walk down off the summit of Hook Mountain and then start up the next rise. Near the top are some more nice views. CAREFULLY walk to the edge of the cliff for a really breathtaking experience. At 4 miles begin your final ascent and at 4.7 miles gain another high point with some views. The views were much the same as from the other lookouts. Descend from the final high point to the west side of the ridge and again walk on a wide woods road. To the left is Rockland Lake. The trail descends steeply at times with a few switchbacks as it heads toward Landing Road. The final part of this descent is over a very rocky area and brings you to two old foundations. Walk out to the parking area and read the sign that gives the history of the Knickerbocker Ice Company. The company used the pure waters of Rockland Lake for ice and was one of the largest companies in the area. Turn right on Landing Road walk down the park road to the Shore Trail which is a bike path along the Hudson. The bike path begins as a paved road which leads down to the waters edge to a picnic area. After this the path is stone dust which is much softer on the feet. At 7.4 miles you will be at the Nyack Beach State Park parking area. Continue by walking up the hill from the parking area turning left on North Broadway to begin the Upper Nyack Trail. Almost immediately turn right on Larchdale Avenue and walked passed the Marydell Faith and Life Center. Marydell was founded by the Sisters of Our Lady of Christian Doctrine to provide a place for disadvantaged youth during the summer. At the end of Larchdale turn left on North Midland Avenue and after a few hundred feet follow the white blazes into the woods at 8 miles. The Upper Nyack Trail heads east for .4 miles and gains enough elevation to meet the Long Path near Route 9W. Turn left on 9W and head back to the intersection with Christian Herald Road. Turn right at the intersection and walked back passed Nyack High School. The trail turns left into the woods just after the high school and you may retrace your route to the car. If you want to stay on the roads, continue on Christian Herald Road to Mountainview Avenue. Make the left turn and start up the road. For the most part you will have a good view of oncoming traffic and after a short climb there will be sidewalks. Continue on Mountainview Avenue to Route 59. Turn left and walk back to your car.
 (The image at the left shows the profile of the hike. Remember that all vertical profiles are relative!)
Onteora Lake
| Quick Look | ||||
|---|---|---|---|---|
| Difficulty | Round trip | Total climb | Internet Maps | |
| 7.1 mi. | 884 ft. | AllTrails | ||
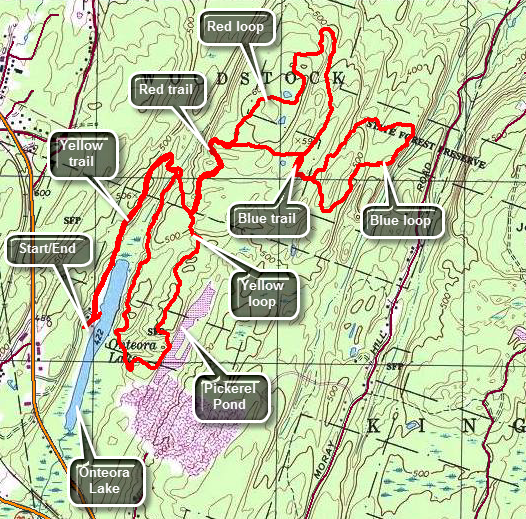 Bluestone State Forest is near Kingston. There are two sets of trails in the area that are used for both hiking and mountain biking. There are three trail loops near Onteora Lake and another set of trails just east of Onteora Lake on Jockey Hill. Drive west on Route 28 from Kingston. The parking area is clearly marked on the right with a sign for Onteora Lake. Drive through the gate at the far end of the upper parking area to get to the lower lot. Begin your hike by heading out on the yellow trail which starts north on the west side of the lake. The first part of the trail has been made handicapped accessible and has a few picnic tables. The trail then shifts to a woods road which begins to get rocky pretty quickly. At .7 miles the trail turns around the north end of the lake and changes from northeast to almost due south. At .8 miles the yellow trail splits. Stay to the left. At .9 miles turn left at the junction with the red trail to begin the red loop. All three loops are "lollipops" with a "handle" that leads in to the loop and then back out again. At 1.3 miles you will be at the point where the red loop starts. Stay left as the trail climbs from the point where the red trail starts and reaches the highest point on the hike at 1.6 miles. Along the way the trail has some ups and downs but only gains a little over 200 feet from the point where the yellow loops splits. There are no real views along the way but the trail passes through some boulders and is generally fun to hike. The blazes are spaced a little farther apart than usual but this may be because it is maintained by the mountain bike club and they move a little faster than hikers. As you continue on the red loop the trail gets considerably rockier and more narrow in some areas. There are a few blowdowns across the trail. Some are low enough to jump on a bike but others require dismounting. At 2 miles the red loop makes a turn and heads south climbing another hill. At 2.5 miles the blue trail appears on the left. Turn here to access the blue trail loop. The handle of this trail is the shortest and in about .15 miles the trail splits to begin the loop. Stay to the left immediately dropping about 100 feet as you head north and east. At 3.1 miles the trail turns southeast to loop back to where the blue trail started and gains the elevation lost at the beginning. The blue trail is by far the rockiest of the three trails and has areas where even the most experienced mountain biker would have problems. Once you are back at the trail junction with the red trail continue almost straight ahead to get back onto the red trail. DO NOT turn left on the well-used path as it is not part of the blazed loops. The red trail goes east for about .25 miles to the point where the red trail splits. Turn left and follow the handle .4 miles southwest back to the yellow trail. Turn left on the yellow trail which heads southwest for about .6 miles to the shores of Pickerel Pond. This pond is more interesting in some ways than Onteora Lake. The yellow trail follows the western shore of the pond for a short distance and then turns west at 5.3 miles to cross over to the eastern shore of Onteora Lake. Once on the shore of the lake the trail heads northeast for.7 miles back to the point where the yellow trail splits. The trail is sited on a ridge that runs along the eastern shore and does not offer many views. The trail rolls up and down a little and at one point passes between some rocks and up an incline. At 5.6 miles turn left to head back to the parking area on the yellow trail retracing your path from earlier. Watch for obvious signs of bluestone quarrying.
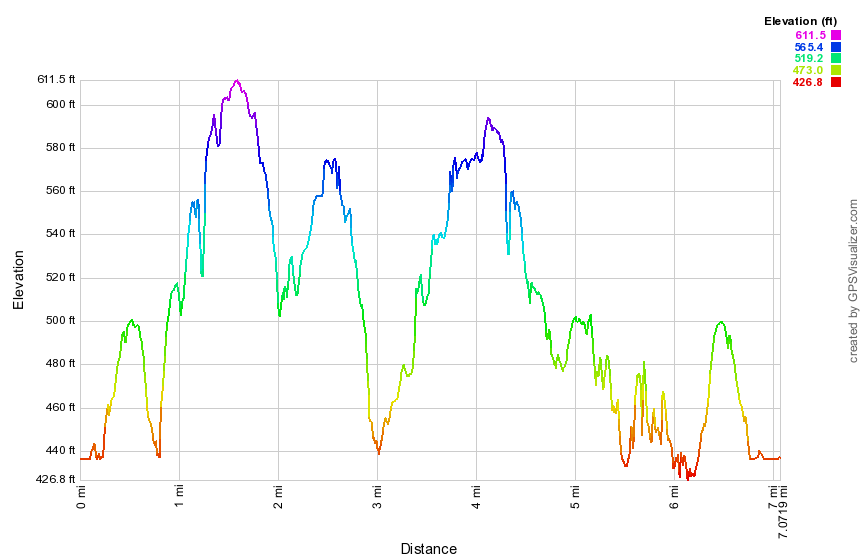 (The image at the left shows the profile of the hike. Remember that all vertical profiles are
relative!)
(The image at the left shows the profile of the hike. Remember that all vertical profiles are
relative!)
Otter Falls
| Quick Look | ||||
|---|---|---|---|---|
| Difficulty | Round trip | Total climb | Internet Maps | |
| 2.0 mi. | 320 ft. | AllTrails | ||
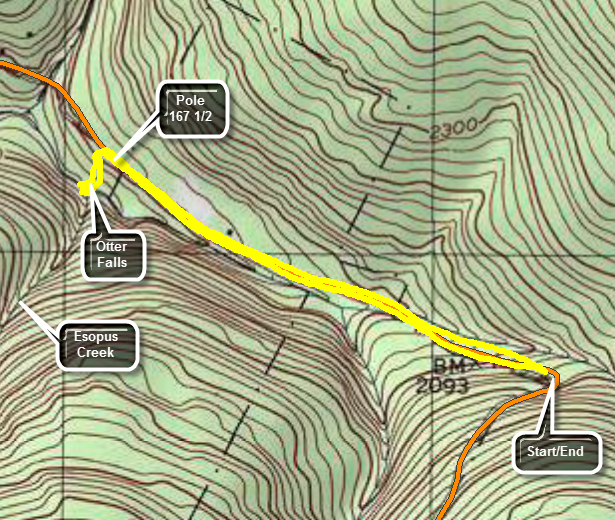 Otter Falls is located on as stream labeled as Esopus Creek on most maps which seems to originate at Winnisook Lake. marshal's has a TOTAL drop of about 0 feet as the water flows over the rocks into a pool below which is 6' to 8' deep even in dry conditions. The safest and best way to get to Otter Falls is to park at the trailhead for Giant Ledge on Route 47. Walk downhill and north on Route 47 toward Big Indian for about .85 miles. Check the labels on the telephone poles for the number 167 1/2. There are POSTED signs along the left side of the road and the maple trees are connected by plastic tubing indicating a substantial sugaring operation. Around .75 miles the POSTED signs give way to State Forest Preserve signs. A short distance further is Pole 167 1/2 and just a little farther along is a rather well-defined leading into the woods on the left. The path remains easy to follow although it is unmarked as it heads west into the woods and toward the stream for about 600 feet. When you get to the stream feel free to explore and enjoy the cool water. When you are finished, retrace your route back to the car.
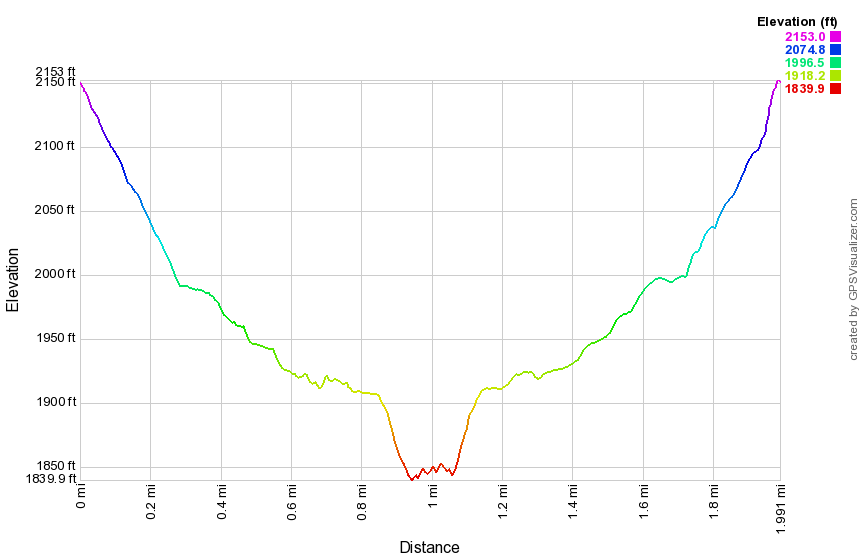 (The image at the left shows the profile of the hike. Remember that all vertical profiles are relative!)
Overlook Mountain: Kaaterskill PA
| Quick Look | ||||
|---|---|---|---|---|
| Difficulty | Round trip | Total climb | Internet Maps | |
| 10.6 mi. | 2236 ft. | AllTrails | ||
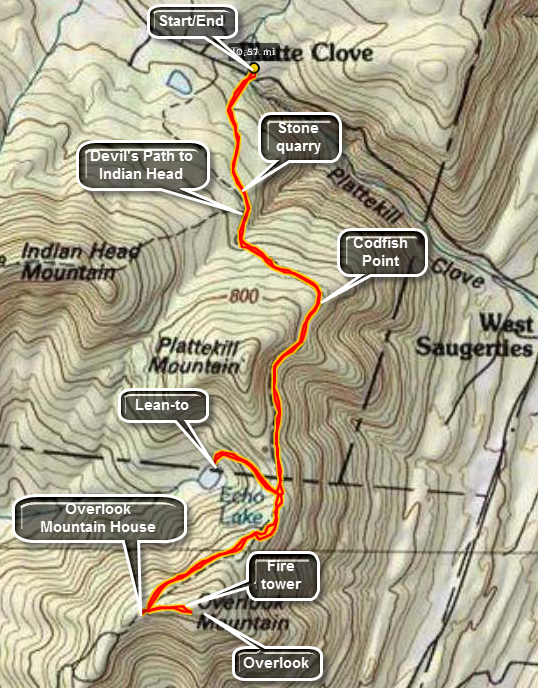 There are two trails that lead to Overlook Mountain and the sites found there. One trail comes up from
Meads Road and is about 5 miles or less round trip. This trail is actually an access road to the
WTZA-TV transmission tower and the state fire tower at the top of the mountain. The trail described
Here starts at or near the Kaaterskill PA and then continues across The Catskill Center Platte Clove
Preserve. This trail is almost 11 miles long round trip but offers the opportunity to visit
Echo Lake.
There are two trails that lead to Overlook Mountain and the sites found there. One trail comes up from
Meads Road and is about 5 miles or less round trip. This trail is actually an access road to the
WTZA-TV transmission tower and the state fire tower at the top of the mountain. The trail described
Here starts at or near the Kaaterskill PA and then continues across The Catskill Center Platte Clove
Preserve. This trail is almost 11 miles long round trip but offers the opportunity to visit
Echo Lake.
In Tannersville, find Platte Clove Road. Travel along this road until you find a pull-off on the
right for the Catskill Center Platte Clove Preserve. Parking here is limited. If there are no spaces,
continue for a short distance and turn into the Kaaterskill parking area on the left. Sign in at the trail
register. The first feature of the trail you will notice is a reconstruction of a post and tenon bridge
across the creek. The Catskill Center has provided "labels" for some of the trees and handy signs to
explain the role of the bluestone quarries in this area. After about a mile the red-blazed Devil's
Path begins on the left. Continue straight ahead on the blue-blazed Overlook Trail. In just .2 miles
you will be at the Devil's Kitchen lean-to. Another 2 miles brings you to the turn-off to Echo Lake.
This spur trail is blazed in yellow and is about .6 miles long. The descent and subsequent ascent
is steep and rocky. Echo Lake is a beautiful, natural lake surrounded by mountains. There is a lean-to
on the shore. Continue another 1.5 miles to the ruins of the Overlook Mountain Mountain House and the
WTZA-TV tower. The ruins are interesting and only the stone building blocks remain. A trail continues
.5 miles up to the Overlook Fire Tower. This tower sits on a prominent rock plateau. It offers
spectacular views of the Ashokan Reservoir, the Mountain House ruins and the surrounding hills and
valleys. Try to pick a clear day to that your view and the pictures you take are not cloudy by the haze
that can hang in the air. Return the same way you came for a round-trip of just under 11 miles.
(The map above shows the parking area and the out and back hiking route. A stop by Echo Lake is shown on the way back.)
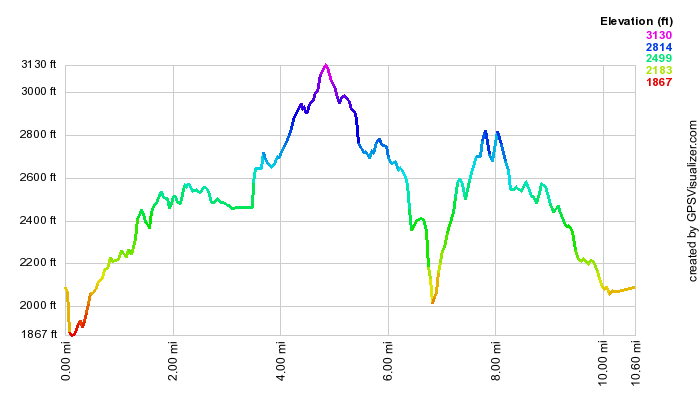 (The image at the left shows the profile of the hike. Remember that all vertical profiles are
relative!)
(The image at the left shows the profile of the hike. Remember that all vertical profiles are
relative!)
Overlook Mountain: Meades Mountain Road
| Quick Look | ||||
|---|---|---|---|---|
| Difficulty | Round trip | Total climb | Internet Maps | |
| 4.7 mi. | 1409 ft. | AllTrails | ||
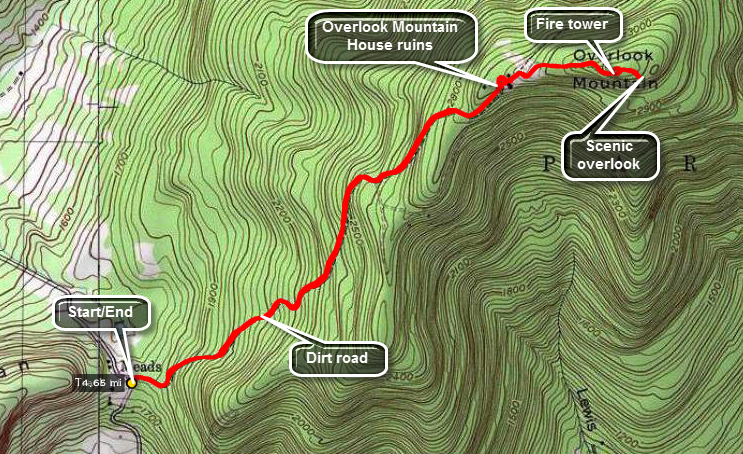 There are two trails that lead to Overlook Mountain and the sites found there. One trail comes up from
Meads Road and is about 5 miles or less round trip. This trail is actually an access road to the
WTZA-TV transmission tower and the state fire tower at the top of the mountain. The trail described
Here starts at or near the Kaaterskill PA and then continues across The Catskill Center Platte Clove
Preserve. This trail is almost 11 miles long round trip but offers the opportunity to visit
Echo Lake.
There are two trails that lead to Overlook Mountain and the sites found there. One trail comes up from
Meads Road and is about 5 miles or less round trip. This trail is actually an access road to the
WTZA-TV transmission tower and the state fire tower at the top of the mountain. The trail described
Here starts at or near the Kaaterskill PA and then continues across The Catskill Center Platte Clove
Preserve. This trail is almost 11 miles long round trip but offers the opportunity to visit
Echo Lake.
Finding the trailhead for the Meades Mountain Road route may be the hardest part of the hike. Head south and east from Phoenicia on Route 28. In about 4 miles turn east on Route 212. Route 212 heads generally east. Just passed Cooper's Lake turn left on Church Road. At the T turn left and then turn/bear right on Meades Mountain Road which may also be marked McDaniel Road. Drive for about 2.5 miles until a parking area appears on the left. Park your car and get on the access road to the tower. After walking about 1.75 miles on the road, the ruins of the Overlook Mountain House will be straight ahead. Look around the ruins. When done continue on the trail on the other side. The trail from Platte Clove and Echo lake will come in on the left. In about .4 miles you will be at the cabin. Turn left to go to the fire tower. On the way back walk behind the cabin and walk to the viewpoint that give Overlook Mountain its name. Follow the road back to your car.
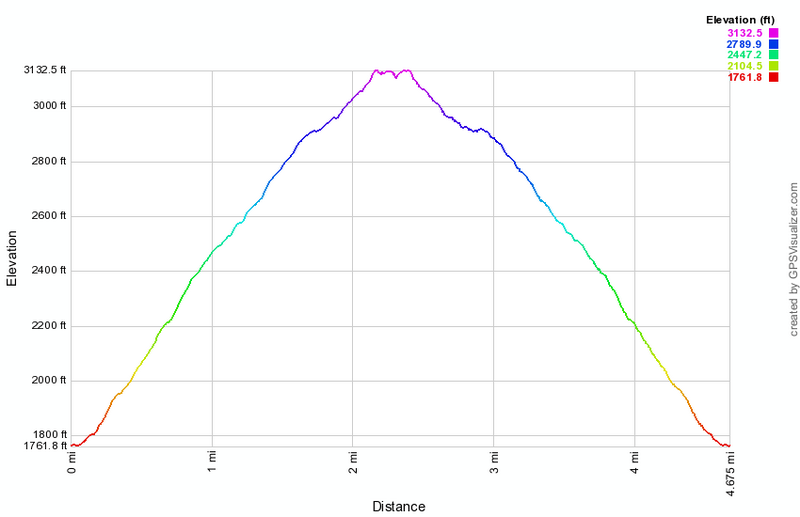 (The image at the left shows the profile of the hike. Remember that all vertical profiles are
relative!)
(The image at the left shows the profile of the hike. Remember that all vertical profiles are
relative!)
Palmer Hill
| Quick Look | ||||
|---|---|---|---|---|
| Difficulty | Round trip | Total climb | Internet Maps | |
| 3.3 mi. | 630 ft. | AllTrails | ||
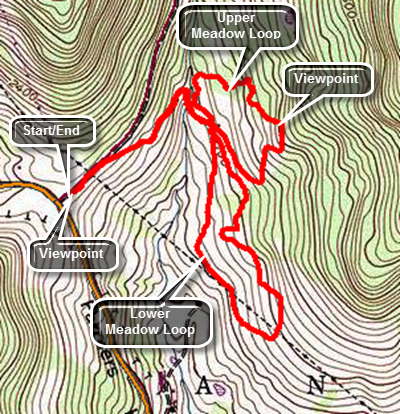
Exit Route 17 at Roscoe and head north on Route 206 to the Pepacton Reservoir. Turn right at the T on Route 30 and follow it all the way to Route 28. Turn left toward Andes and soon you will be climbing Palmer Hill. Watch for Finkle Road on the right and pull into the parking area. The view from the parking area is great. A signboard shows a picture of the view with all the peaks and hills labeled. All the peaks from Balsam Lake and Graham through Doubletop and Balsam are visible. The trail leaves the far end of the parking area and the first half mile descends to a small brook. The trail passes through wide corridors which have been mowed through the grass and then enters the woods on an old road. Just after the brook crossing are the foundations from a farm and then the first trail junction. The trail junction is sort of a "times square" since at this point you can choose to do the upper meadow or lower meadow or any combination. For some it is better to get the climbing in at the beginning of the hike and so turn left to start to the upper meadow. The trail shortly enters the woods and begins a half mile ascent to the highest point on the hike. The vertical gain is only about 250 feet and the average grade is around 9%. There are a few steeper areas which are between 15% and 20% for short distances. Along the way there are some nice stone walls as you loop in a clockwise direction. At the high point there is a field with some since views of the surrounding hills. The trail then begins to descend for about .4 miles back to the trail junction losing around 200 feet. Turn left at the junction and almost immediately bear right at another split in the trail. Continue to descend through paths mowed through the fields. At 1.85 miles you will hit the lowest spot on the hike and walk beneath some powerlines for a short distance. You will leave and then rejoin the powerlines. At 2.1 miles you will complete the turn and start back toward the trail junction. The route roughly parallels your path on the way out but winds through the trees with a few ups and downs. By 2.75 miles you will be back at the trail junction. Continue back up the woods road and to the car.
 (The image below shows the profile of the hike. Remember that all vertical profiles are
relative!)
(The image below shows the profile of the hike. Remember that all vertical profiles are
relative!)
Parksville Rail Trail Loop
| Quick Look | ||||
|---|---|---|---|---|
| Difficulty | Round trip | Total climb | Internet Maps | |
| 2.8 mi. | 230 ft. | AllTrails | ||
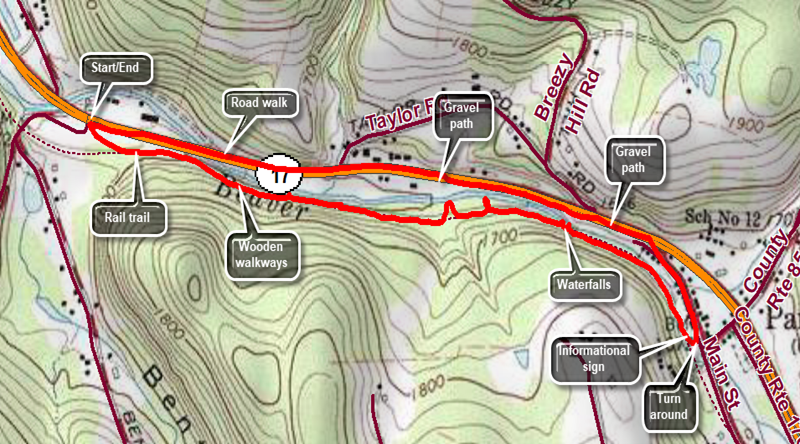
Exit Route 17 at exit 98 Parksville and proceed through the first four way intersection to the second. Turn left and drive on Old Route 17 for about 1.4 mils. Park in the parking area on the left just before Fox Mountain Road. Start your hike on the gravel covered rail trail that runs between the Little Beaverkill on the left and State Route 17 on the right. This trail follows the route of the O&W Railroad which played an interesting and historic role in Sullivan County history. The trail is almost completely flat and passes over several bridges and wooden walkways. There are many opportunities to walk down to the stream bed to take pictures. About 2/3 of the way along the trail there is a nice falls which can be viewed from high on the trail or by working your way down to the stream bed. At the end of the trail is a small garden o n the right with a sign that explains the history of the railroad and Parksville. Turn left and then left again on Main Street. Walk on Main Street until it meets Old Route 17. Turn left and walk on the gravel path through two parking areas. At the second parking area the gravel path ends. Walk on the shoulder of the road back to your car
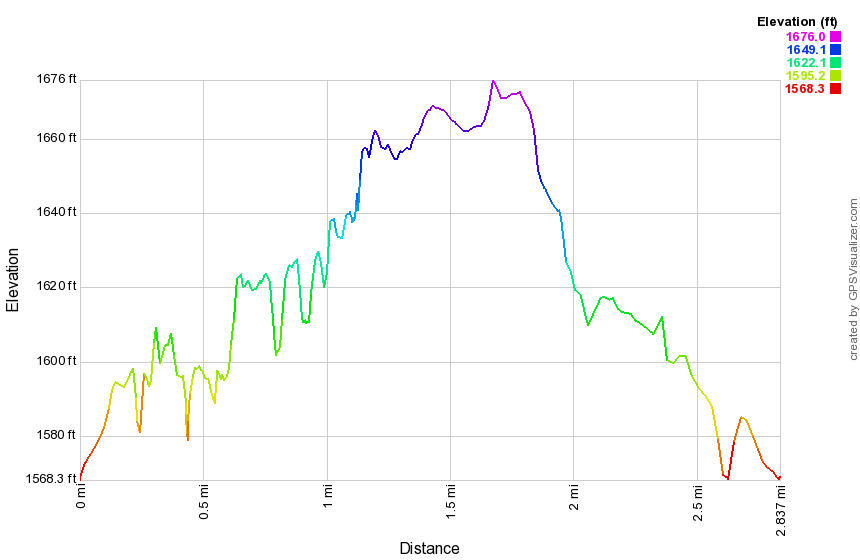 (The image shows the profile of the hike. Remember that all vertical profiles are relative!)
Parksville Rail Trail Out and Back (Fox Mt)
| Quick Look | ||||
|---|---|---|---|---|
| Difficulty | Round trip | Total climb | Internet Maps | |
| 2.6 mi. | 230 ft. | AllTrails | ||
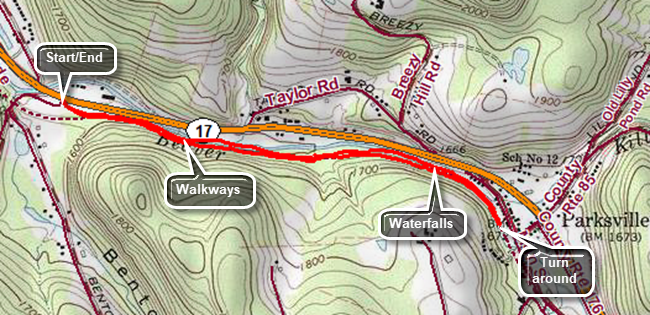
Exit Route 17 at exit 98 Parksville and proceed through the first four way intersection to the second. Turn left and drive on Old Route 17 for about 1.4 mils. Park in the parking area on the left just before Fox Mountain Road. Start your hike on the gravel covered rail trail that runs between the Little Beaverkill on the left and State Route 17 on the right. This trail follows the route of the O&W Railroad which played an interesting and historic role in Sullivan County history. The trail is almost completely flat and passes over several bridges and wooden walkways. There are many opportunities to walk down to the stream bed to take pictures. About 2/3 of the way along the trail there is a nice falls which can be viewed from high on the trail or by working your way down to the stream bed. At the end of the trail is a small garden on the right with a sign that explains the history of the railroad and Parksville. To return to your car just turn around and hike back along the trail.
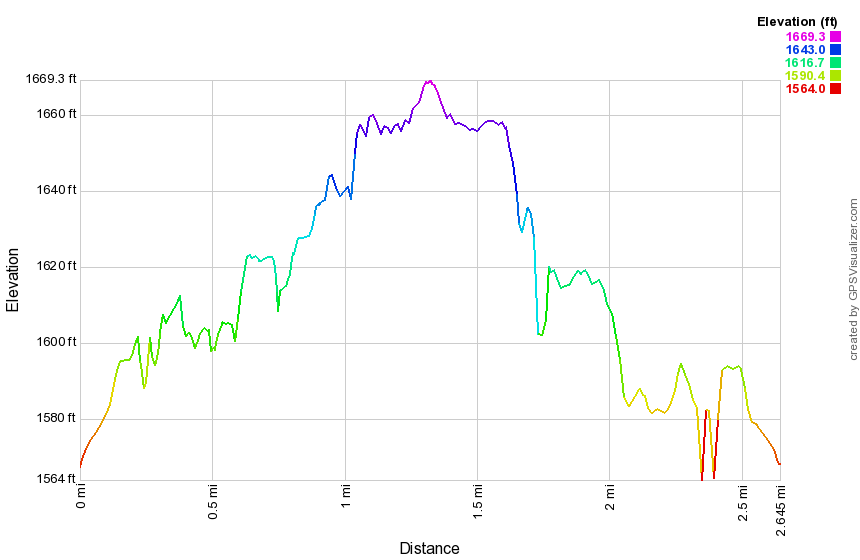 (The image shows the profile of the hike. Remember that all vertical profiles are relative!)
Parksville Rail Trail Out and Back (Parksville)
| Quick Look | ||||
|---|---|---|---|---|
| Difficulty | Round trip | Total climb | Internet Maps | |
| 2.8 mi. | 230 ft. | AllTrails | ||
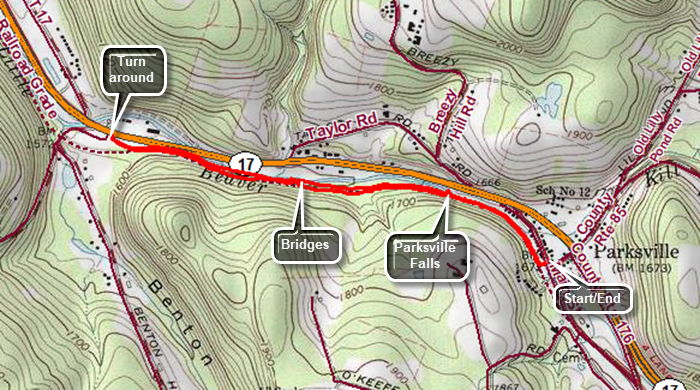
Exit Route 17 at exit 98 Parksville and proceed to the first four way intersection. Turn left and park along the side of the street where space is available. As an alternative drive through the first intersection to the second and park in the larger lot on the right. Walk from here to the trailhead. Start your hike on the gravel covered rail trail that runs between the Little Beaverkill on the right and State Route 17 on the left. At the beginning of the trail is a small garden on the left with a sign that explains the history of the railroad and Parksville. The trail follows the route of the O&W Railroad which played an interesting and historic role in Sullivan County history. The trail is almost completely flat and at .4 miles you will come to Parksville Falls. You can carefully walk down to the stream bed above and below the falls to get a clear view. At .8 miles the trail passes over several bridges and wooden walkways. Just after the walkways is a nice view upstream on the Little Beaverkill. There are many opportunities to walk down to the stream bed to take pictures. You may find some markers left over from the railroad days. At the end of the trail is the western parking area for the rail trail. To return to your car just turn around and hike back along the trail.
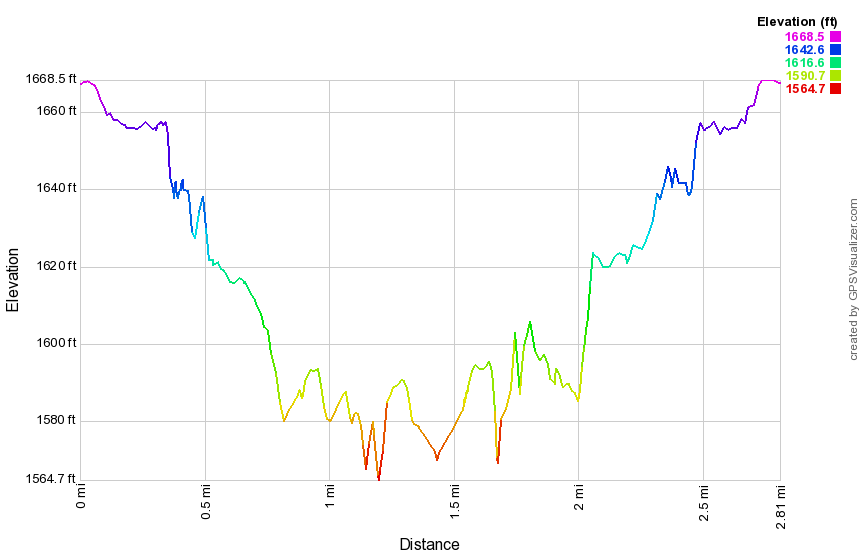 (The image shows the profile of the hike. Remember that all vertical profiles are relative!)
Parksville Rail Trail (Old Liberty Rd)
| Quick Look | ||||
|---|---|---|---|---|
| Difficulty | Round trip | Total climb | Internet Maps | |
| 3.4 mi. | 230 ft. | AllTrails | ||
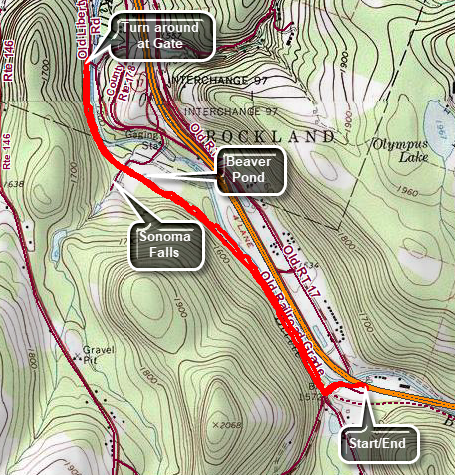
Exit Route 17 at exit 98 Parksville and proceed to the second four way intersection. Turn left and continue along Service Road to the parking lot across from the gas station near Fox Mountain Road. Begin your hike by exiting the parking lot and turning left and the left again on Fox Mountain Road. Walk under State Route 17 and over the bridge that span a small stream, the Little Beaverkill. Hop over the guard rail on the right to start out on a well-defined path. Watch on your right for what remains of the trestle that carried trains over the stream. Walk up a small cline to the main railroad bed. The trail is very obvious and is flat and extends for some distance. As you walk, you may find some "treasures" of past years including a Volkswagon Bug on the right side of the trail. When you come to the gate across the trail at about 1 mile, simply walk around the end and continue to walk along the trail parallel to the river. Watch for a small pond on the right with a red building with all the windows boarded up. At 1.3 miles there will be a driveway on the left which leads to Sonoma Falls. This is private property so DO NOT HIKE without permission. Some local business people bought the property and built a cider mill and market. They took the time to construct some hiking trails along the stream. There are at least five different falls which increase in height as you continue upstream. The main building is still intact with the original lettering. There is also a stock pond on the property. A trail extends along the left side of the stream from which you can get a good view of most of the falls. Continue straight ahead on the main trail which intersects Old Liberty Road about .4 miles from Sonoma Falls where there is a gate. Look to your left as you walk to see the rock cuts that allowed the railroad to pass through. The trail continues passed this point as it parallels the road on the left side. The trail comes to another trestle that passes over Old Liberty Road near the intersection with Dahlia Road. Another trestle carried the tracks over the river to the other side. A project is the planning stage to connect all the sections of rail trail so that they are continuous from Parksville to Livingston Manor.
 (The image shows the profile of the hike. Remember that all vertical profiles are relative!)
Parksville Rail Trail to Sonoma Falls
| Quick Look | ||||
|---|---|---|---|---|
| Difficulty | Round trip | Total climb | Internet Maps | |
| 4.0 mi. | 335 ft. | AllTrails | ||
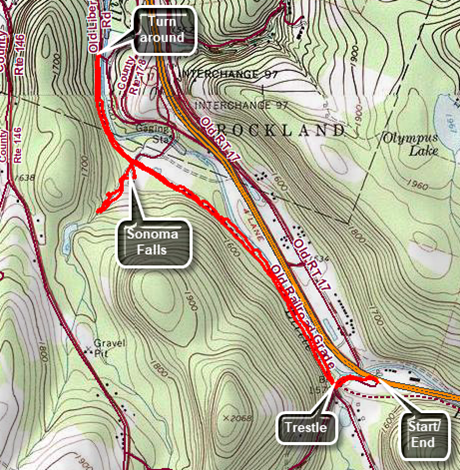
Exit Route 17 at exit 98 Parksville and proceed to the second four way intersection. Turn left and continue along Service Road to the parking lot across from the gas station near Fox Mountain Road. Begin your hike by exiting the parking lot and turning left and the left again on Fox Mountain Road. Walk under State Route 17 and over the bridge that span a small stream, the Little Beaverkill. Hop over the guard rail on the right to start out on a well-defined path. Watch on your right for what remains of the trestle that carried trains over the stream. Walk up a small cline to the main railroad bed. The trail is very obvious and is flat and extends for some distance. As you walk, you may find some "treasures" of past years including a Volkswagon Bug on the right side of the trail. When you come to the gate across the trail at about 1 mile, simply walk around the end and continue to walk along the trail parallel to the river. Watch for a small pond on the right with a red building with all the windows boarded up. At 1.3 miles there will be a driveway on the left which leads to Sonoma Falls. This is private property but it is difficult to find out who owns it as none of the signs have a name of a telephone number. The town supervisors for Liberty and Rockland believe it is acceptable to walk around the property. At one time there was a campground on the property. Some local business people bought the property and built a cider mill and market. They took the time to construct some hiking trails along the stream. There are at least five different falls which increase in height as you continue upstream. The main building is still intact with the original lettering. There is also a stock pond on the property. A trail extends along the left side of the stream from which you can get a good view of most of the falls. When you are done, return to the main trail and turn left. The trail intersects Old Liberty Road about .4 miles from Sonoma Falls where there is a gate. Look to your left as you walk to see the rock cuts that allowed the railroad to pass through. The trail continues passed this point as it parallels the road on the left side. The trail comes to another trestle that passes over Old Liberty Road near the intersection with Dahlia Road. Another trestle carried the tracks over the river to the other side. A project is the planning stage to connect all the sections of rail trail so that they are continuous from Parksville to Livingston Manor.
 (The image shows the profile of the hike. Remember that all vertical profiles are relative!)
Peekamoose Road from Peekamoose to Long Path Turn
| Quick Look - Peekamoose Road | |||||
|---|---|---|---|---|---|
| Difficulty | Round trip | Total climb | Internet Maps | ||
| 1.0 mi. | 159 ft. | AllTrails | |||
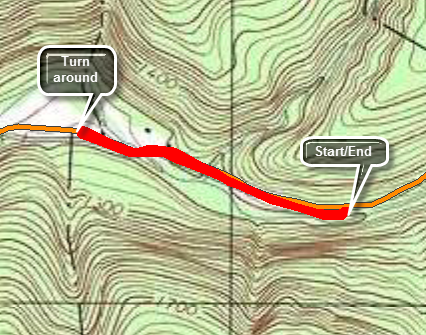
This hike connects the hike over Table and Peekamoose Mountains with the next section of the Long Path with a short walk along Peekamoose Road. This short walk could be included as part of a longer hike on either section.
Turn onto Route 52A near the TriValley School. Stay on the road until the hamlet of Sundown where the road turns left. Bear to the left on Peekamoose Rd. and continue on the road until parking areas begin to show up on the left. The parking area most use to climb the Peekamoose is the sixth marked spot and indicates the beginning of the Peekamoose-Table trail. Park here and walk on the road following the aqua blazes of Long Path. In .5 miles there will be a small parking area on the right and the Long Path will turn left near a very large boulder. The Long Path continues over Bangle hill to Vernooy Kill Falls and Cherrytown Road. Turn around and walk back to the car.

Pelnor Hollow: Pelnor Hollow Road and Little Spring Brook Trails
| Quick Look | ||||
|---|---|---|---|---|
| Difficulty | Round trip | Total climb | Internet Maps | |
| 5.8 mi. | 1287 ft. | AllTrails | ||
 This hike requires a carspot and shuttle. There is no parking at the end of Pelnor Hollow Road. Areas of these trails may not be well-maintained or well marked.
From Livingston Manor, drive west on State Route 17 and get off at Exit 94 for Roscoe. Follow Route 206 north through Roscoe and Rockland heading toward Downsville. Just before starting up Brock Mountain turn right on Little Spring Brook Road and drive to the parking area at the end. Drop a car here and drive back out Little Spring Brook Road. Turn left on Route 206 and, after a short distance left, on Beaverkill Valley Road. Pass Prince Hall and the Craige Claire iron bridge. Watch for Pelnor Hollow Road on the left right after Dundas Castle. Turn left and rive to the end of the road passing many "No Parking" and "Keep Out" signs to make you feel welcome. After about a mile, the road effectively ends at a gate. This is where your hike begins and where the driver should drop you off. DO NOT park a car in this area as it is private property. It is best to have someone drop you at the end of the road. If you must park, find a wide place along the road further down the hill. Although the road continues after the gate, it is NOT RECOMMENDED that you attempt to drive it.
Stay on the road which is an easement through private property. The road may be wet and muddy in places and is eroded with rocks in many spots. Pass over two bridges that cross small streams. After a short walk you will arrive at the cabin on the left side of the trail which is the last building on the road. There are state land signs just after the cabin. The road deteriorates but is still passable and leads to a wide spot in the trail where the road definitely ends. A sign indicates that the lean-to is .5 miles up the trail. The trail narrows from woods road width to trail width as it enters a hardwood forest. The walk to the lean-to may seem longer than a half mile but the trail flattens. At 1.5 miles there is a lean-to on the left of the trail. A sign at the lean-to indicates distances which is unusual out in the middle of nowhere. Continue passed the lean-to and begin a climb up one of two hills on the Pelnor Hollow Trail. Sections of this trail may be poorly maintained with patches of briars. The trail may also be poorly blazed. From the lean-to the walk is about .8 miles to the top of the hill gaining around 470 feet. Watch for some interesting glacial erratics and rock formations along the trail. You will now descend briefly before climbing the next hill. The walk from hilltop to hilltop is about 1.35 miles. In this area, at about 3.8 miles, you will find the junction with the red-blazed Mary Smith Trail. Turn left to continue on the Pelnor Hollow Trail.
Over the next .15 miles the trail drops 160 feet to Split Rock Lookout. The grade is 21% and requires some careful foot placement so carefully descend. The trail loops north to avoid a ravine or hollow and then comes back to the south. Over the next miles the trail descends 470 feet. Although the grade is only 9%, there are some steeper places and it can be tricky when the numerous rocks are wet. The trail eventually flattens and passed through a pine plantation before ending at a trail junction with the Campbell Mountain Trail and the Little Spring Brook Trail. Take a look at the signs here. The DEC has been known to post signs with errors but the ones here are ridiculous. The signs give incorrect trail names and incorrect distances. For seasoned hikers they may not be a problem but for those new to hiking this area they are completely confusing. Turn left of the Little Spring Brook Trail and start to walk down the woods road toward the pond. At the upper end of the pond the trail can disappear as the pond has gotten larger over the years since the trail was marked. Watch for a path along the right side of the pond and follow it. If you lose the path, simply continue to skirt the pond. You may want to walk down to the shore of the pond as it is a beautiful place. Continue to follow the path or make your own until you pass the mouth of the outlet end of the pond and the stone wall. There are some beautiful stone walls and a large culvert to take the brook beneath what once was a much larger road. Once you walk over the culvert the trail follows the old road which is very eroded. The trail should be to the left of the brook. The trail can be wet as the brook spreads out in places. The trail is very rocky which makes it difficult to hike. Continue out the trail and a short stretch of road to where your car is parked.
 (The image shows the profile of the hike. Remember that all vertical profiles are relative!)
Pelnor Hollow: Pelnor Hollow Road to Mary Smith Hill Road
| Quick Look | ||||
|---|---|---|---|---|
| Difficulty | Round trip | Total climb | Internet Maps | |
| 8.0 mi. | 2278 ft. | AllTrails | ||
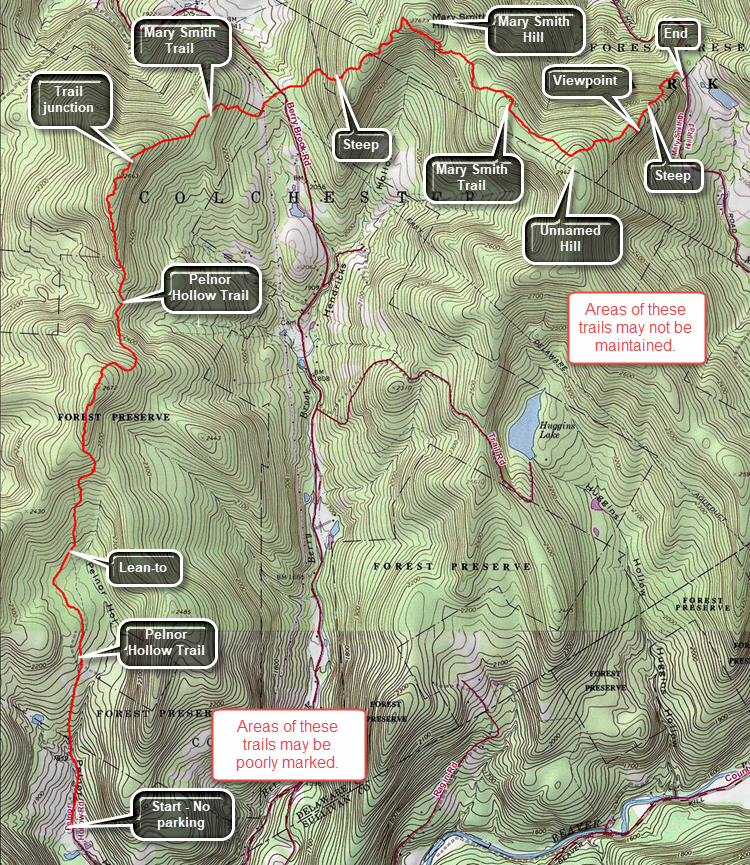 This hike requires a carspot and shuttle. There is no parking at the end of Pelnor Hollow Road. Areas of these trails may not be well-maintained or well marked.
From Livingston Manor, drive north on Old Route 17 toward Roscoe. Turned right on the Beaverkill Road and drive north to Lew Beach> Turn left on Mary Smith Hill Road just passed the firehouse. After a few miles, the paving ends and the road becomes packed dirt. After 3 miles, there is a small parking area on the right where the trail crosses the road. Park one car here. Drive back down Mary Smith Hill Road to the Beaverkill Road and turn right. Drive back to the Beaverkill Campground Road and turn right. Where the road splits at the bottom of the hill, turn left on Carigie Claire Road until it passes over the iron bridge and meets Beaverkill Valley Road. Turn right and drive until Pelnor Hollow Road appears on the left. Turn left and begin the uphill drive on a dirt road. After about a mile, the road effectively ends at a gate. This is where your hike begins and where the driver should drop you off. DO NOT park a car in this area s it is private property. It is best to have someone drop you at the end of the road. If you must park, find a wide place along the road further down the hill. Although the road continues after the gate, it is NOT RECOMMENDED that you attempt to drive it.
Stay on the road which is an easement through private property. The road Amy be wet and muddy in places and is eroded with rocks in many spots. Pass over two bridges that cross small streams. After a short walk you will arrive at the cabin on the left side of the trail which is the last building on the road. There are state land signs just after the cabin. The road deteriorates but is still passable and leads to a wide spot in the trail where the road definitely ends. A sign indicates that the lean-to is .5 miles up the trail. The trail narrows from woods road width to trail width as it enters a hardwood forest. The walk to the lean-to may seem longer than a half mile but the trail flattens. At 1.5 miles there is a lean-to on the left of the trail. A sign at the lean-to indicates distances which is unusual out in the middle of nowhere. Continue passed the lean-to and begin a climb up one of two hills on the Pelnor Hollow Trail. Sections of this trail may be poorly maintained with patches of briars. The trail may also be poorly blazed. From the lean-to the awl is about a mile to the top of the hill gaining around 500 feet. Watch for some interesting glacial erratics and rock formations along the trail. You will now descend briefly before climbing the next hill. The walk from Hilltop to hilltop is about 1.4 miles. In this area you will find the junction with the red-blazed Mary Smith Trail. Turn right on this trail.
The trail is mostly downhill for 1.1 miles to Berry Brook Road. It may be wet and muddy in spots and there are some interesting twists and turns. You will walk out of the woods to a power line right-of-way. Cross the right-of-way and head a little to the left to pick up the trail on the other side. Walk out to the road and immediately cross following the trail into the woods. The trail almost immediately begins to climb and the climb gets steeper. The trail has some very steep areas but a few switchbacks help mediate the climb. There are some massive boulders and other rock formations along the trail. For about .4 miles the grade is 20% and then the trail levels some. At 5.9 miles you will be at the highest point of the trail on Mary Smith Hill. Now you will begin to descend and then hike through a trail section that rolls a little along the ridge. At 7.1 miles you will be at the top of an unnamed hill which is about 150 feet higher than Mary Smith Hill. From this point it is downhill all the way but the downhill is steep. From the top of the hill descend to a viewpoint at 7.5 miles which has a view to the south. From the viewpoint the descent lasts only .4 miles but loses 500 feet on a 23% grade. At the bottom of the descent is a primitive camping area, fire ring and the parking lot with your car.
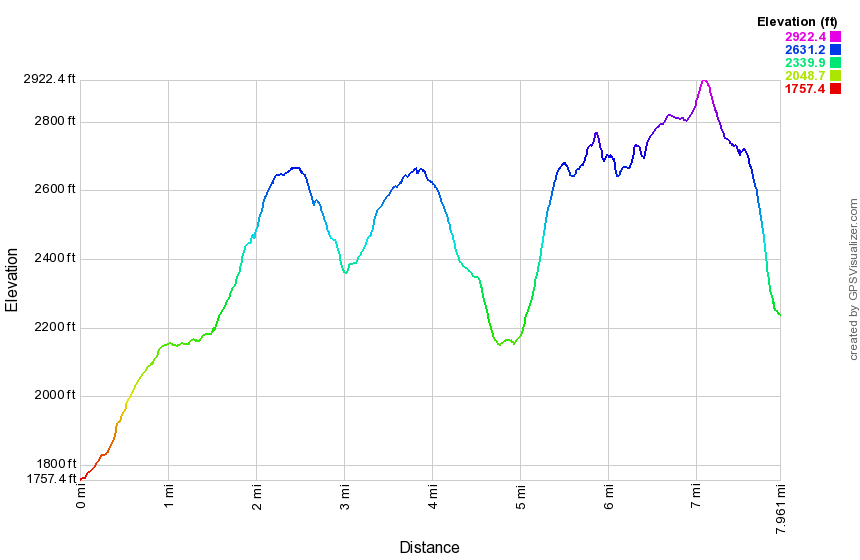 (The image below shows the profile of the hike. Remember that all vertical profiles are relative!)
Pelnor Hollow: Pelnor Hollow Road to Lean-to
| Quick Look | ||||
|---|---|---|---|---|
| Difficulty | Round trip | Total climb | Internet Maps | |
| 4.0 mi. | 830 ft. | AllTrails | ||
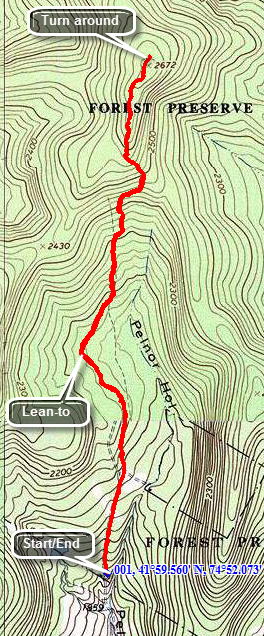 This short hike doesn't gain much elevation but leads to a nice, secluded lean-to.
Head out of Roscoe on Route 206. Turn right on Berry Brook Road just after the county line and drive for around 3 miles. Turn left on Pelnor Hollow Road. Pelnor Hollow Road turns to a dirt road quickly and soon becomes a "track" which is barely passable by car. The road functionally ends at a small cabin on the left. You may turn around at the cabin and back up the road to park. Be aware that this is probably NOT a good idea. There area two alternatives to driving this part of the road and parking at the end. You may try to get permission to park from the homeowner just before the dirt road ends. Another possibility is to park further down the road and walk the extra mile or so up the track and passed the cabin.
From the last cabin on the road walk slightly uphill on a wide woods road which travels through mostly hardwood forest with a couple of open spots. After about .3 miles a sign shows .5 miles to the lean-to. Continued to hike until the lean-to appears on the left of the trail at just less than 1 mile. You may continue on the trail but be aware that in pricker season this can be a bloody affair. The trail is not well maintained and although the terrain is not difficult the briars can be deadly. In late fall and winter the going is considerably easier and many choices are possible. The junction with the Mary Smith Trail is about 2.3 miles away. At that junction it is possible to turn right on the Mary Smith Trail and hike about 1.2 miles to Berry Brook road. You can also hike a short distance to the Spilt Rock Lookout. Beyond the lookout is the junction with the Spring Brook Trail or the opportunity to hike through to Route 206. How far you want to go just depends on you.
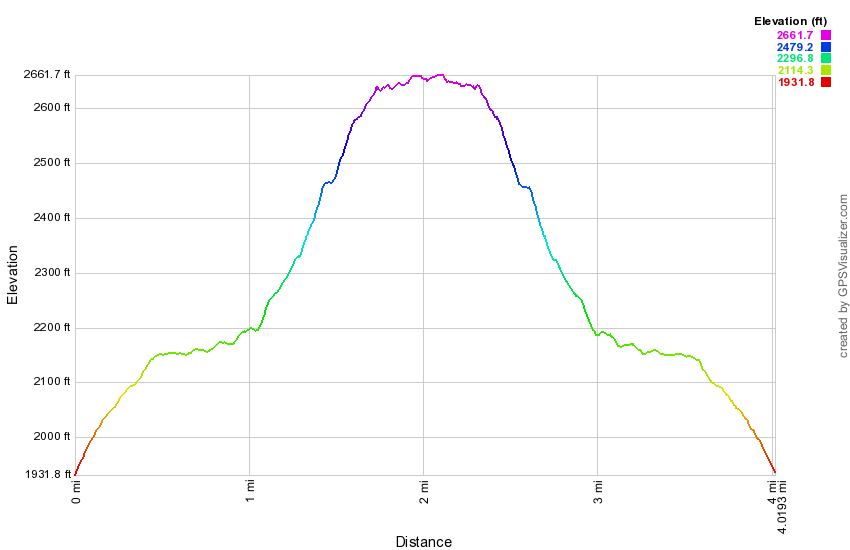 (The image below shows the profile of the hike. Remember that all vertical profiles are relative!)
Pelnor Hollow: Mary Smith Trailhead to Lean-to
| Quick Look | ||||
|---|---|---|---|---|
| Difficulty | Round trip | Total climb | Internet Maps | |
| 7.2 mi. | 1844 ft. | AllTrails | ||
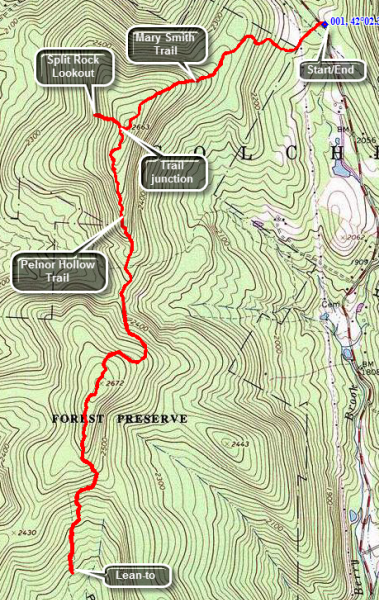
Head north from Roscoe on Route 206. Turn right on Berry Brook Road just after the county line and drive for around 8 miles to the trail head parking on the right. Cross the road to get on the Mary Smith Trail heading west southwest. After about .1 miles on a woods road, you will cross a power line right-of-way. Watch for the trail as it continues through a grassy area and into the woods. The trail ascends some until about .45 miles when it levels off if only briefly. In only .2 miles the trail again ascends for the next .5 miles to 1.15 miles where it meets the Pelnor Hollow Trail. At this point you may choose to turn left and go directly to the lean-to or you may visit the Split Rock Lookout. To visit the lookout turn right and after a short distance you will be faced with a VERY STEEP downhill section. At 1.3 miles you will arrive at the Split Rock Lookout with some great views to the west. Notice the house across the way on the ridge. When you have taken in the view, return the way you came to the trail junction and continue straight ahead. The hike to the lean-to is a pleasant walk through hardwood forest. There are some limited views of other ridges but none that allow photography. You will be treated to a large number of glacial erratics along the way. The prickers in spring and summer can be fierce so this hike is better left to late fall or winter. You will hike down from the trail junction losing about 300 feet before climbing the next hill and then hiking down to the Lena-to losing 465 feet. The total distance to the lean-to from the trail junction is 2.3 miles. Retrace your steps back to the junction with the Mary Smith Trail. Turn right and hike the 1.2 miles back to the car.
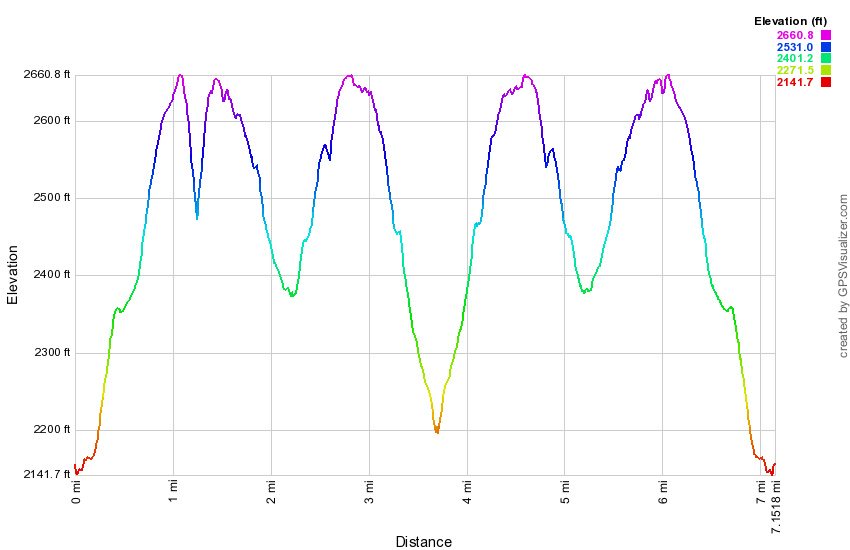 (The image below shows the profile of the hike. Remember that all vertical profiles are
relative!)
(The image below shows the profile of the hike. Remember that all vertical profiles are
relative!)
Platte Clove Preserve: The Falls
| Quick Look | ||||
|---|---|---|---|---|
| Difficulty | Round trip | Total climb | Internet Maps | |
| 2.0 mi. | 300 ft. | AllTrails | ||
This short hike doesn't gain much elevation but leads to a series of falls in Platte Clove. Park at the Platte Clove Preserve "cabin" on Platte Clove Road just west of the Kaaterskill High Peak parking area. Walk toward the cabin and down the road next to it. Follow the trail down to the stream bed. It is steep in places but the distance is minimal. At the dead end you will be looking at Plattekill Falls. The .2 mile walk brings you to one of the most beautiful falls in the Catskills. The "look" of the falls varies during each season so visit at least four times! Walk back up the path to the cabin but continue to walk passed on the trail. The falls below the king post bridge is Old Mill Falls. You may observe the falls from the near side or cross over the bridge to see it from the far shore. Taking pictures from the rocks downstream from the falls allows some great shots but BE CAREFUL on the slippery rocks!
Platte Clove to Kaaterskill Parking
ft.
| Quick Look | |||||
|---|---|---|---|---|---|
| Difficulty | Round trip | Total climb | Internet Maps | ||
| 1.0 mi. | 325 | AllTrails | |||
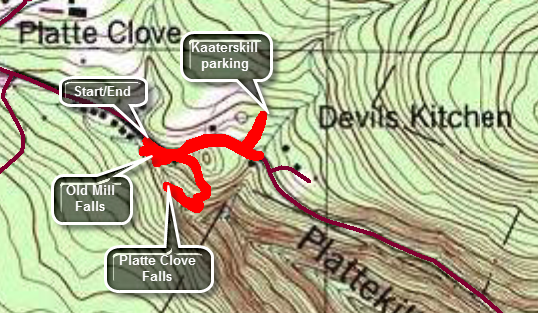
This hike connects the section of the Long Path that comes over Kaaterskill from Palenville with the section that goes through the Platte Clove Preserve and over the Devil's Path. It includes a hike to the two falls in the Preserve.
Turn onto Bloomer Rd. off Route 23A just west of Tannersville. At the Y in the road bear left onto Platte Clove Rd. Continue on this road passed the Catskill Bruderhof and pull over to park by the Platte Clove Preserve. Begin the hike by walking along the road for about .2 miles to the access road for the parking area for Kaaterskill High Peak. Walk up the access road to the register box and then turn around and walk back to the Platte Clove Preserve. Before returning to your car, turn left and walk passed the front of the cabin and down to Platte Clove Falls. Walk back up the trail after your visit to the falls and take one of the informal paths to the right of the cabin and follow it down to the stream. There is a rock outcropping in the stream that makes a nice spot to take pictures of Old Mill Falls and the kingpost bridge that crosses the stream just above the falls.
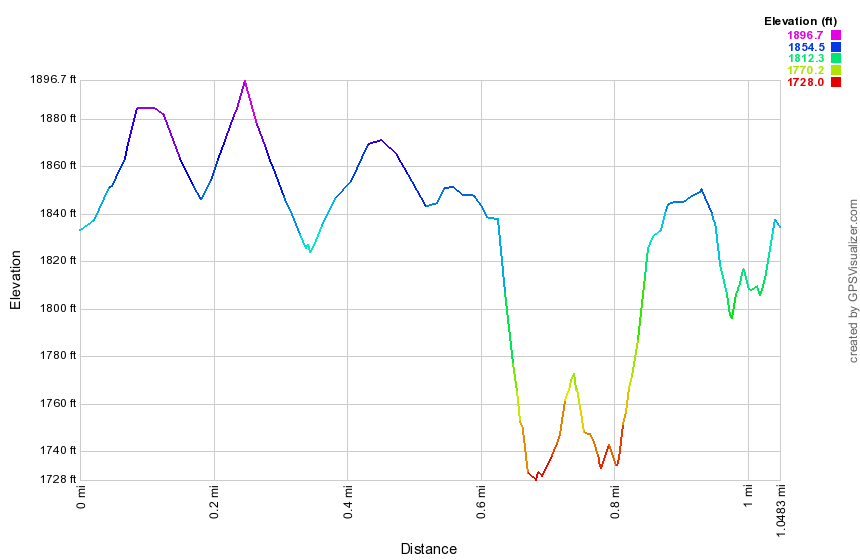
(The image above is the vertical profile for entire hike.)
Poet's Ledge and Wildcat Falls
| Quick Look | |||||
|---|---|---|---|---|---|
| Difficulty | Round trip | Total climb | Internet Maps | ||
| 7.1 mi. | 2386 ft. | AllTrails | |||
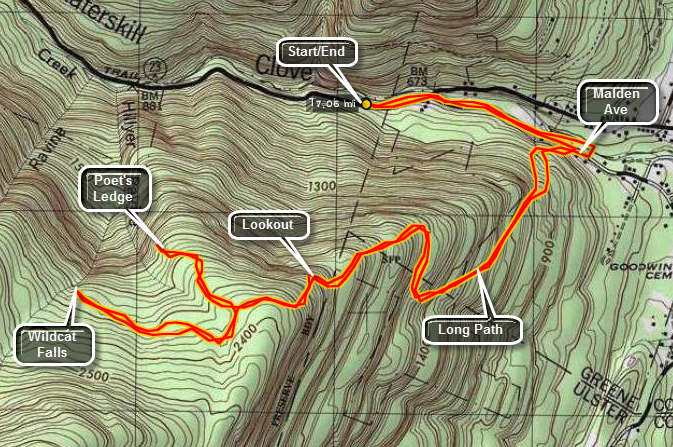
This trail is part of the Long Path stretching from Fort Lee, NJ to Thacher Park near Albany. Poet's Ledge and Wildcat Falls are two point of interest on the trail. Beyond Wildcat Falls is Buttermilk Falls. The trail leads to the snowmobile trail that run around Kaaterskill High Peak and Round Top. A bushwhack from the snowmobile trail leads up to the High Peak.
Take Route 23A from Palenville toward Haines Falls if you are coming from the east or from Haines Falls to Palenville if coming from the west. Park on the north side of 23A near Palenville near where the road cross Kaaterskill Creek. Walk on the road to the east and cross over to a "street" that goes to the right just before the road crosses the creek. Watch for the aqua blazes of the Long Path. This street is now blocked and closed to traffic. It has been overgrown with vegetation and only the paved surface here and there separates it from any other trail. On the other end of this short path you will be back on paved road. The blazes will continue for a short distance and the direct you to turn up a short street/driveway. Blue markers now appear in addition to the blaze. After a few feet, the trail turns onto a woods road and into the forest.
The path ascends on the wood road, leveling at times, but always continuing upward. After less than a mile, the trail again cuts right and starts serious climb up! The trail has several switchbacks and there are hints of views to the right. Continue on this trail which levels at times and then becomes much steeper. in about 1.25 miles there is an obvious lookout to the right. The lookout gives a glimpse of the Clove below and the mountains to the north. Continue on the main path for another half mile. At this point a sign points to a yellow spur trail that DESCENDS to Poet's Ledge. The descent is worth it since the view is very nice. As you descend you will pass a large, flat expanse of rock with several fire circles. There is a view from here but this is NOT Poet's Ledge. After another short descent through some rocks you will be on the Ledge.
The Ledge gives an unobstructed view of Kaaterskill Clove and Route 23A below. To the left is South Mountain and the Escarpment Trail. On the right looming above the Ledge is Kaaterskill High Peak. The Ledge is at 2200 feet but the mountain is another 1400 feet of vertical gain. After visiting Poet's Ledge and returning to the main trail you may retrace your steps to the car. You may also choose to visit Wildcat Falls, Buttermilk Falls and the High Peak itself.
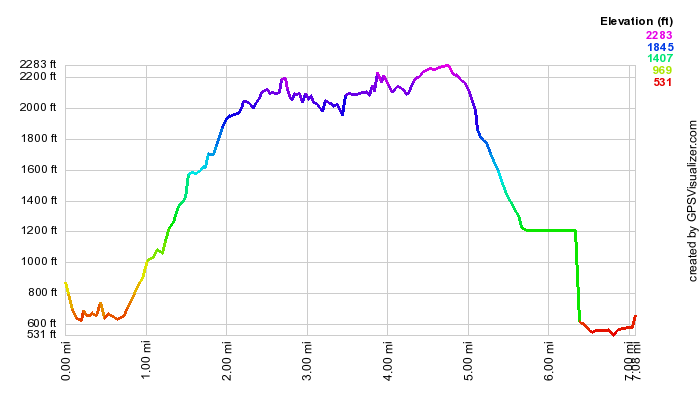 (The image at the left is the vertical profile for the out and back hike so it has a symmetrical appearance.
)
(The image at the left is the vertical profile for the out and back hike so it has a symmetrical appearance.
)
Pratt's Rock
| Quick Look | ||||
|---|---|---|---|---|
| Difficulty | Round trip | Total climb | Internet Maps | |
| 1.0 mi. | 330 ft. | AllTrails | ||

Prattsville is a wide spot in the road just east of Grand Gorge. The area has some nice hiking trails including the Long Path over Huntersfield Mountain and a park containing Pratts Rock. Pratt was a local businessman and politician. He commissioned a stone cutter to carve various images in a rocky cliff. These images are still there and are very interesting. The view from the top of Pratts Rock is equally impressive. There are several ways to find the parking area. Drive north for 15 miles west from Hunter on Route 23A and Route 23. The parking area is on the right. Drive 10.6 miles west on Route 23 from the village of Windham. The parking area will be on the right. Drive 5.4 miles southeast on Route 23 from the junction of Route 30 and Route 23 in Grand Gorge. The parking are will be on the left.
From the parking area hike up to the information kiosk and then through the park. The trail is marked and at some point you should be able to see the cliffs with their whitewashed images through the trees. Stay on the trail as it winds around behind the "rock". Shortly you will be on the viewpoint above the images. The views here are magnificent particularly those down to Schoharie Creek and across the valley. You may walk along the edge of the cliffs as more viewpoints at different angles lie along this path. When you have had enough, you may continue straight ahead and inspect some small "caves" in the cliffs at the top. From here you can drop down a short, steep path that warps around to the front of Pratt Rock. You may also double back the way you came and follow another, more gentle path down to the viewing area below the images. From the images a trail leads back down into the park and to the parking area.
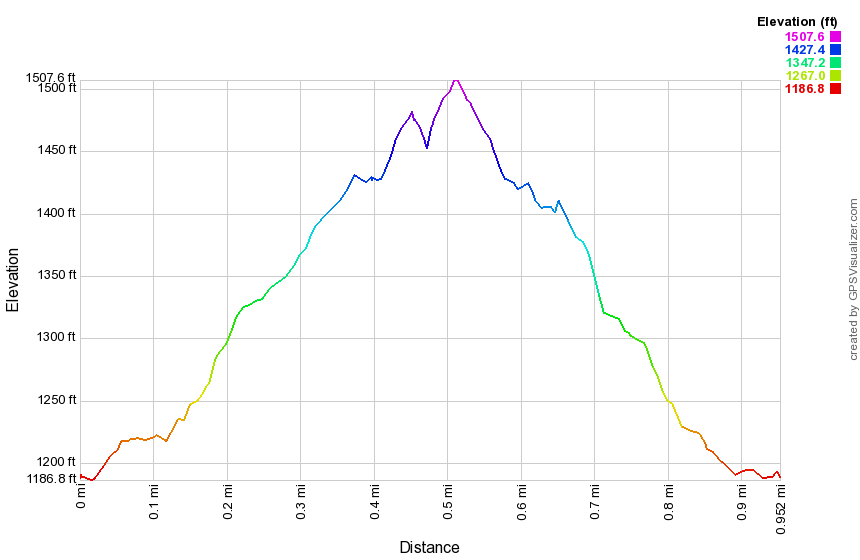 (The image at the left shows the profile of the hike. Remember that all vertical profiles are relative!)
Pratt Rock extended
| Quick Look | ||||
|---|---|---|---|---|
| Difficulty | Round trip | Total climb | Internet Maps | |
| 3.2 mi. | 1100 ft. | AllTrails | ||

Prattsville is a wide spot in the road just east of Grand Gorge. The area has some nice hiking trails including the Long Path over Huntersfield Mountain and a park containing Pratts Rock. Pratt was a local businessman and politician. He commissioned a stone cutter to carve various images in a rocky cliff. These images are still there and are very interesting. The view from the top of Pratts Rock is equally impressive. There are several ways to find the parking area. Drive north for 6 miles from the junction of Route 23A and Route 42 west of Hunter. Turn right on Route 23 and drive for .5 miles. The parking area is on the left. Drive 9 miles west on Route 23 from the village of Windham. the parking area will be on the right. Drive 14 miles on Route 23 from the junction of Route 30 and Route 23 in Grand Gorge. Turn left in Prattsville to stay on Route 23. The parking are will be on the left after .5 miles.
From the parking area hike up to the information kiosk and then through the park. The trail is marked and at some point you should be able to see the cliffs with their whitewashed images through the trees. Stay left at the first trail junction as the trail winds around behind the "rock". There is a short but steep uphill. Shortly you will be on the viewpoint above the stone carvings. The views here are magnificent particularly those down to the Schoharie Creek and across the valley. Walk along the edge of the cliffs as more viewpoints at different angles lie along this path. The rest of this hike is on some unmarked paths and woods roads with a little bushwhack thrown in. Watch for some paths ahead of you that follow along the base of some low cliffs. At some point find a path to the top of these rocks. Walk the path along the edge of the cliffs which become higher generally headed east. There are several more viewpoints along the way. There is a woods road on the left that heads northeast and then north and intersects a power line right-of-way. You may choose to bushwhack to the top of the ridge on the east side of the road. There is no view from this ridge but there are some more impressive cliffs and rock overhangs. When you intersect the power line right-of-way, turn right and ascend to the top of the ridge heading east. You may descend some from the top of the ridge. Turn around when you feel like it and follow the woods road and paths back to the area of Pratt Rock. From here you can drop down a short, steep path that wraps around to the front of Pratt Rock. You may also continue along the cliffs to the first viewpoint. If you go a little farther, you will find an informal path on the left that leads down to the carvings. From the carvings a trail leads back down into the park and to the parking area.
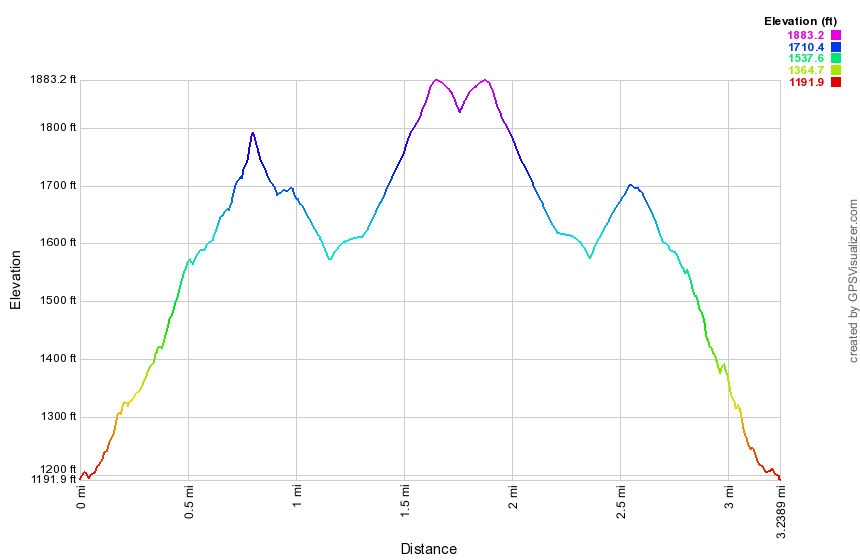 (The image at the left shows the profile of the hike. Remember that all vertical profiles are relative!)
Pyramid Mountain
| Quick Look | ||||
|---|---|---|---|---|
| Difficulty | Round trip | Total climb | Internet Maps | |
| 4.8 mi | 844 ft | AllTrails | ||
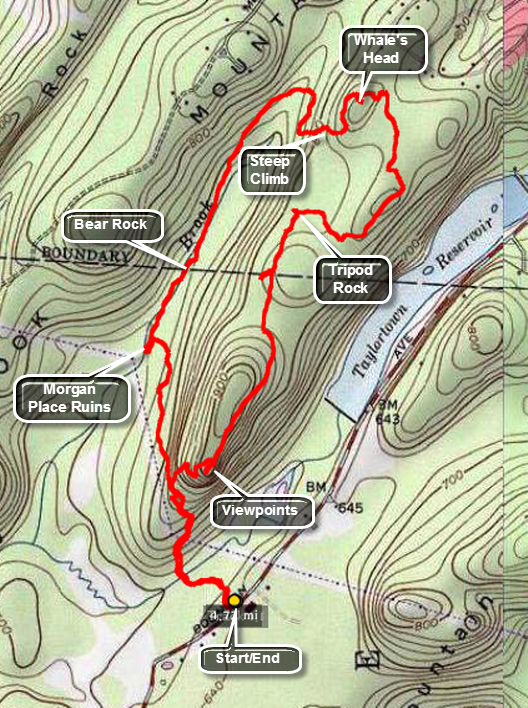
From New Jersey Route 23 turn south and west on Boonton Avenue. Drive 4 miles passing the Taylortown Reservoir on the right. Park at the parking lot on Boonton Ave. just south and west of the Taylorsville Reservoir. Walk to the northwest corner of the parking lot and look for the kiosk. The blue Menenm Trail begins behind the kiosk and heads north. At .2 miles the trail crosses a brook and shortly after a yellow trail comes in from the right. Stay on the blue trail and start an ascent that crosses under some power lines. At .47 miles a white trail comes in from the left but stay on the blue trail. At .54 miles bear right on Red Trail South and descend to Stony Brook at just less than 1 mile. Turn left on the white trail and walk about 50 feet to inspect the ruins of Morgan Place. Turn around and continue straight ahead on the white trail until a trail junction with the Blue and yellow trails at 1.3 miles. At this junction is Bear (Bare) Rock. This is a huge boulder which may be the biggest in New Jersey. Native Americans used shelters on both sides of the rock. After inspecting this boulder, continue straight ahead on the blue Mennen Trail heading northeast. At 1.9 miles turn sharply right onto a red-white trail and after a short walk merge onto the Red Trail North and make a short, steep ascent to the ridge. At the top of the climb at 2.2 miles is Whale Head Rock and just after that Eagle Cliff. The trail undulates for the next .4 miles until it meets the white Kinnelon-Boonton Trail at 2.8 miles. Turn right and continue on this trail for about .4 miles until you come to Tripod Rock. This is a 150+ ton boulder that sits perched atop three smaller stones. A controversy has developed over whether this is a natural or man-made occurrence! The trail ascends some until at 3.3 miles a side trail on the right leads to Lucy's Overlook. Get back on the main trail and ignore any side trails along the way. The trail markings turn to blue and you should follow them back to the parking lot. At 4.0 miles a side trail leads to an impressive lookout and the highest point on the trails. It is worth the side trip. From here the trail drops steeply to the trail junction where you turn left to get back to the car.
 (The image at the left shows the profile of the hike. Remember that all vertical profiles are
relative!)
(The image at the left shows the profile of the hike. Remember that all vertical profiles are
relative!)
Quick Lake from Frick Pond
| Quick Look | ||||
|---|---|---|---|---|
| Difficulty | Round trip | Total climb | Internet Maps | |
| 13.7 mi. | 2400 ft. | AllTrails | ||
_map.png) The area around Frick Pond, Hodge Pond and Quick Lake is covered with trails. There are numerous
possibilities for short of long hikes. The area is "relatively" flat and there are no "views".
There is, however, some beautiful scenery.
The area around Frick Pond, Hodge Pond and Quick Lake is covered with trails. There are numerous
possibilities for short of long hikes. The area is "relatively" flat and there are no "views".
There is, however, some beautiful scenery.
Take DeBruce Road from Livingston Manor for about six miles then turn left on Mongaup Rd. Where the road splits bear left on Beech Mountain Rd. and park in the parking lot on the left. Find the red-blazed Quick Lake trail and follow it for .5 miles to the junction with the yellow-blazed Logger's Loop. Bear left and walk down the hill to the outlet of Frick Pond where you should cross the stream on the bridge. At the next trail junction bear right on the Quick Lake trail. At 1.5 miles you will be at Iron Wheel Junction where the Logger's Loop Trail turns right. Stay on the Quick Lake Trail by bearing left and walk up the hill about .2 miles to a junction with a snowmobile trail. Turn left here for the fastest route to Quick Lake. It is possible to continue north to Junkyard Junction and then turn left on the Quick Lake Trail but this adds distance to an already long hike! The rest of your hike will alternate between snowmobile trail and the Quick Lake Trail. At some points the signs and blazes are confusing but as long as you are headed generally north and west toward Quick Lake you will get there. Follow the snowmobile trail until about 4.3 miles where you will meet the Quick Lake trail again. Turn left here and follow the Quick Lake trail as you now turn west toward Quick Lake. Stay on the trail until about 6.3 miles where the trail turns right and heads north to make a big loop before heading south to the lake. At this point continue on the snowmobile trail as it starts a long descent to Quick Lake. Near the lake you will again pick up the Quick Lake Trail. Visit the lean-to by Quick Lake and take some pictures. The "lake" is very low at times and is rather small. When you are ready, retrace your route back to the car. You may want to try some variations but remember that the route described here is already over 13 miles long!
_gra.png) (The image at the left shows the profile of the hike. Remember that all vertical profiles are relative!)
(The image at the left shows the profile of the hike. Remember that all vertical profiles are relative!)
Quick Lake Trail to Quick Lake
| Quick Look | ||||
|---|---|---|---|---|
| Difficulty | Round trip | Total climb | Internet Maps | |
| 14.3 mi. | 2200 ft. | AllTrails | ||
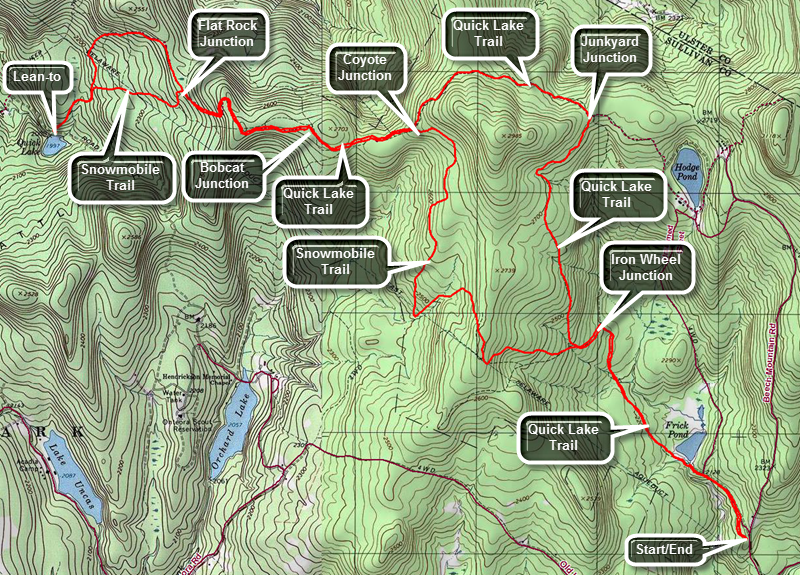 The area around Frick Pond, Hodge Pond and Quick Lake is covered with trails. There are numerous possibilities for short of long hikes. The area is "relatively" flat and there are no "views". There is, however, some beautiful scenery.
Take DeBruce Road from Livingston Manor for about six miles then turn left on Mongaup Rd. Where the road splits bear left on Beech Mountain Rd. and park in the parking lot on the left. Find the red-blazed Quick Lake trail and follow it for .5 miles to the junction with the yellow-blazed Logger's Loop. Bear left and walk down the hill to the outlet of Frick Pond where you should cross the stream on the bridge. At the next trail junction bear right on the Quick Lake trail. At 1.5 miles you will be at Iron Wheel Junction where the Logger's Loop Trail turns right. Stay on the Quick Lake Trail by bearing left and walk up hill to Junkyard Junction at 3.1 miles. Turn left to follow the red-blazed Quick Lake Trail toward Coyote Junction. At 4.3 miles you will arrive at Coyote Junction where a snowmobile trail comes in from the left. Continue through this junction staying on the hiking trail and heading toward Bobcat Junction. At 4.9 miles you will be at Bobcat Junction where the snowmobile trail turns right. Bear left staying on the hiking trail heading for Flat Rock Junction at 5.8 miles. The trail to this point has been a gentle uphill followed by some rolling sections. At 5.5 miles the trail begin to descend all the way to Quick Lake. In 1.7 miles the trail loses 675 feet which must be ascended on the way back! Flat Rock Junction can be confusing since the snowmobile trail crosses the hiking trail making it a four-way junction. Continue straight across the junction on the Quick Lake Trail and continue your descent. At At 6.8 miles a snowmobile merges from the left with the hiking trail and both continue another .4 miles to Quick Lake. When you arrive at Quick Lake, watch for the lean-to on the left well above the water. Turn left onto the side trail to walk to the lean-to. The volume of Quick Lake is generally low and in the spring, summer and early fall it is a haven for insects.
When you are done, turn around and hike .4 miles back uphill to the point where're trail splits. Stay right to hike the snowmobile trail for some variety. The trail continues uphill to 8.1 miles where it meets the Quick Lake trail. Bear slightly right on the Quick Lake Trail and retrace your route back to Bobcat Junction. Bear right at Bobcat Junction and head toward Coyote Junction. You will be at Coyote Junction at 9.56 miles. Bear right onto the snowmobile trail which begins to descend. Over the next Over the next 1.1 miles you will head south while dropping 390 feet in elevation. The trail then turns east before turning south and then east again. You are now descending to the Quick Lake trail at 12.1 miles. Turn right and follow the trail back to Iron Wheel Junction at 12.4 miles. Turn right and retrace your route back through the spruce tunnel to the bridge at the outlet to Frick Pond. Walk up the hill to Gravestone junction and continue straight ahead to the trail register. Turn right and walk back out to the parking lot.
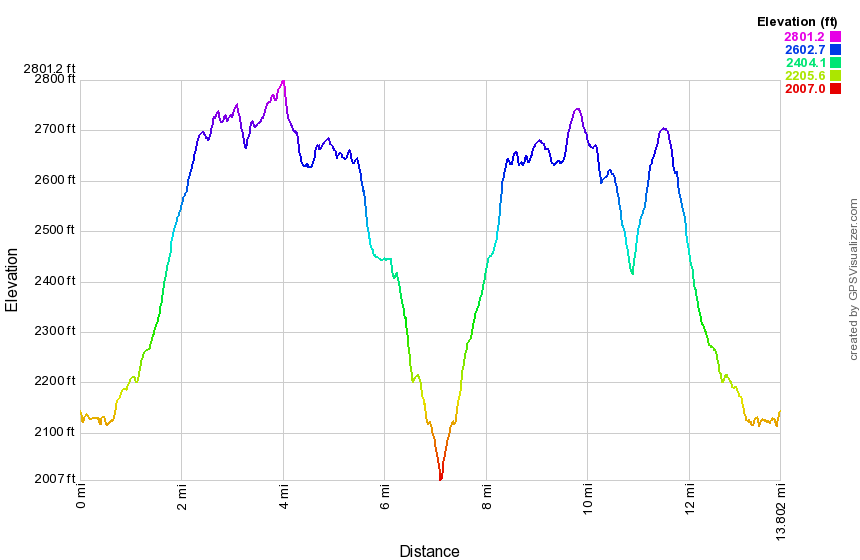 (The image at the left shows the profile of the hike. Remember that all vertical profiles are relative!)
Ramapo Fire Tower
| Quick Look | ||||
|---|---|---|---|---|
| Difficulty | Round trip | Total climb | Internet Maps | |
| .6 mi | 110 ft | AllTrails | ||
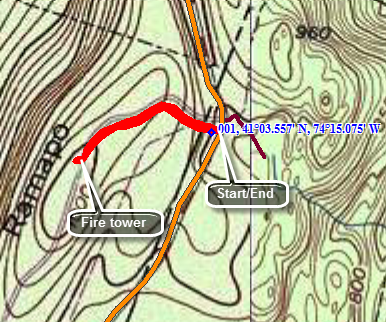
From Ringwood head south on the Greenwood Lake Turnpike which is also known as Ringwood Avenue. Turn left on Skyline Drive and continue for about 2.6 miles. Pull over at the end of a road marked as "Private Driveway" across the road from a gated access to the gas pipeline. Park away from the gate. Walk up the driveway for about .3 miles to the tower. If an observer is present get permission to climb the tower. There are excellent views of the Wanaque Reservoir to the west. Turn facing east and you will see a great view of the New York City skyline. The skyline is clearly visible without a camera but a zoom lens helps. Walk back to your car when you are done.
 (The image at the left shows the profile of the hike. Remember that all vertical profiles are relative!)
Ramapo State Forest: VanSlyke Mansion
| Quick Look | ||||
|---|---|---|---|---|
| Difficulty | Round trip | Total climb | Internet Maps | |
| 9.6 mi | 1928 ft | AllTrails | ||
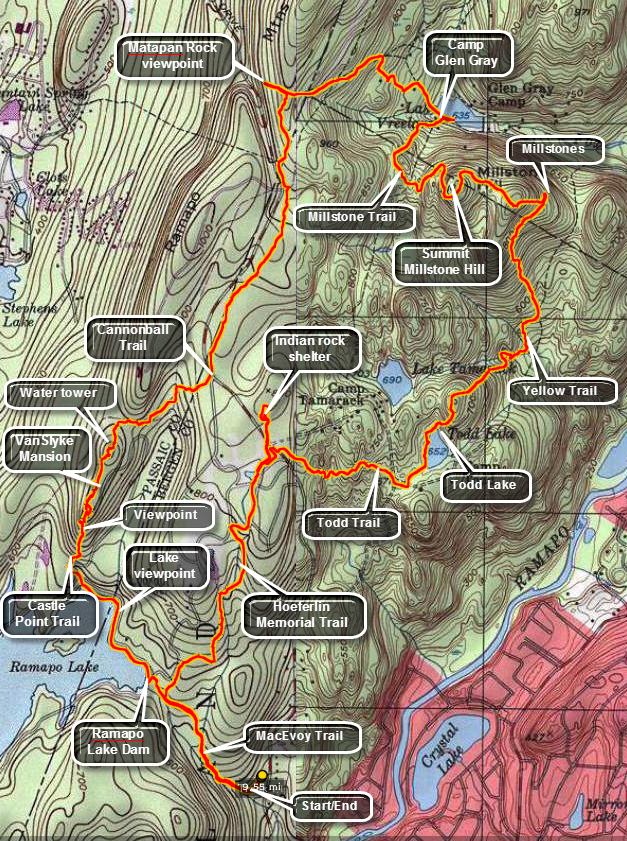
This hike has a little something for everyone. There is the ruins of the VanSlyke mansion in the Ramapo State Forest along with Matapan Rock, Camp Glen Gray, the Millstones and a paleo-Indian rock shelter.
Get off I287 at exit 57 and head north on Skyline Drive. Park at the first parking lot on Skyline Drive. The parking lot see a lot of use and can be very rough. Start your hike on the blue MacEvoy Trail which gains some elevation as it parallels what a stream or stream bed depending on the amount of rainfall. The first .6 miles of the trail is rocky with roots and a 200 foot elevation gain. Pass by trail junction with the white Todd Trail and the yellow Hoeferlin Memorial Trail. You will arrive at the shore of Ramapo Lake and join a paved and completely flat road. There is a dam on the lake and found a private inholding with lake rights in the middle of the state forest. The inholding has the name "Bear Run" and the house and grounds are impressive! At the north end of the lake there is a junction with the white blazed Castle Point Trail and the white on red C Cannonball trail. Turn north on the Castle Point Trail and stay on it when the two trails split almost immediately. Over the next .3 miles the Castle Point Trail rises about 250 feet and there are several viewpoints off the trail which give excellent views of Ramapo Lake to the south and the Wanaque Reservoir to the west. There is a rock outcrop near the top of the trail and a stone wall with mortar. Hop up and over the wall to the grounds of the VanSlyke Mansion! Several sites on the Internet have the history of this mansion which is roughly contemporary with the Cornish Estate near Beacon and the ORAK Mansion in Harriman Park. They are all evidence that there were always those who had more money than others and weren't afraid to spend it. It is easy to imagine the original view unhindered by the current trees. A long road and driveway leads up to the mansion and is still in good shape. It is obvious that fire played a part in the demise of the estate as the remaining woodwork shows signs as does some of the stone. There is a large brick chimney, a few ceramic tiles and a covered buggy/car port. Get back on the main trail and watch for pipes that run to the water tower. There will be a cement structure on the left with pipes, valves and stairs. This was once the swimming pool! There is another viewpoint along the way and then the water tower. The stone structure of the tower is largely intact and is impressive. There is an entrance on the east side and inside there are still some wooden supports and a wooden "ceiling". There is no tank to be seen but you may notice several long iron "cables" lying on the ground which served as "hoops" for a wooden "barrel" on the top of the tower. The tank was filled by rain water and gravity allowed the water to feed downhill to the swimming pool and house. When you are done exploring, start down off the ridge and find the coaligned Hoeferlin Memorial and Cannonball Trails as they cross over Skyline Drive at 2.4 miles. The trails head north toward Matapan Rock. Like many of the trails in New Jersey, these trail are never very far from a road or at least the noise from a highway. At one point the trails descend into an area where there are fences from a utility company. Keep a careful eye on the blazes as they all but disappear. In about a mile from crossing Skyline Drive, you will come across the red blazed Matapan Rock Trail. Turn right or west and walk out to this open rock face. The views are extensive but take in mostly large houses on the opposing hills and in the valleys below. Head back on the Matapan Rock Trail toward Camp Glen Gray and Lake Vreeland. The blazes here can be confusing. As the red trail ends you should find an orange trail. If the orange blazes are absent, turn right on a woods road in the direction of the camp. The buildings of the Boy Scout camp begin to show up and then shore of the lake. The lake is used by the boy scouts but is also open to the public and is often crowded. Follow the orange trail SOUTH until it intersects the white Millstone Trail. Turn left and follow the trail over Millstone Hill. There are several glacial erratics on the way to the summit just .7 miles from the lake. As you descend the next .3 miles you will came to a trail junction and a sign that says "Millstones". There are several worked stones that look as if they might have been destined to be small millstones. What is not clear is why they are in this area. Turn to the south on the yellow blazed Yellow Trail. The trail wanders up and down over some hills and has several switchbacks before Todd lake which is another small pond with lily pads and frogs. At the white Todd Trail turn right or west to follow the Todd Trail to Skyline Drive and the junction with the yellow Hoeferlin Memorial Trail. To visit the Indian Rock shelter DO NOT cross the road but walk down the shoulder of Skyline Drive until you pick up the trail. You will soon see a sign painted on the rocks pointing the way. The "shelter" is not too large with simply a rock overhang. All the artifacts have been removed. This must have been a very temporary shelter as it is very exposed. You can walk up the hill along the rock outcrop to look for other shelters. Followed the yellow trail back to the road and cross Skyline Drive. Continued to follow the trail until it ends at the blue MacEvoy Trail where you should we turn left or east and head back to your car.
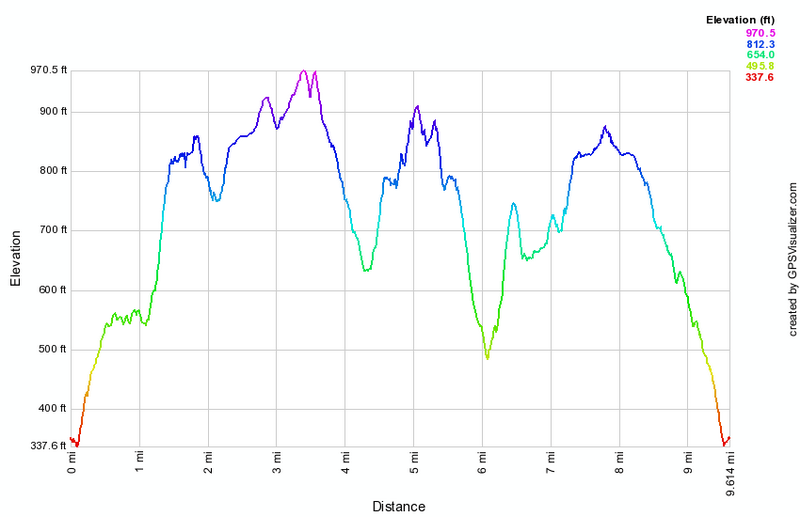 (The image at the left shows the profile of the hike. Remember that all vertical profiles are relative!)
Rehor Road Parcel (Long Loop)
| Quick Look | ||||
|---|---|---|---|---|
| Difficulty | Round trip | Total climb | Internet Maps | |
| 6.5 mi. | 1437 ft. | AllTrails | ||
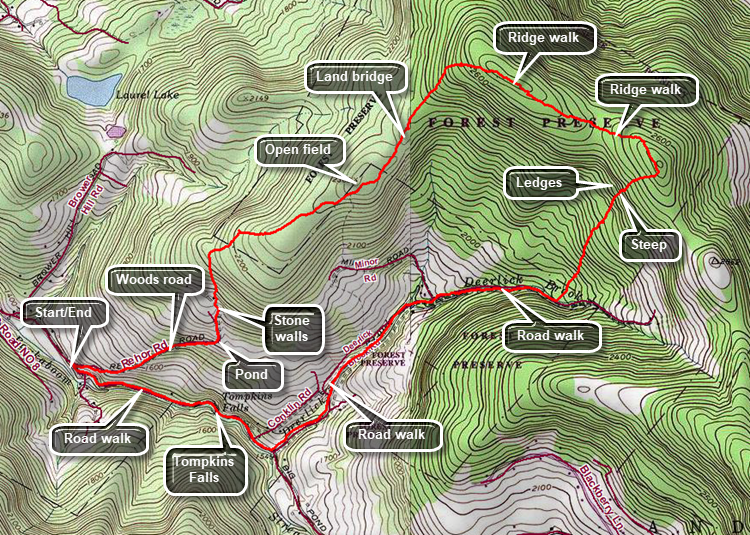
Caution: This hike is a bushwhack and has no marked trails. The hike can be shortened by parking a car on Deerlick Brook Road near the intersection with Minor Rd.) From the intersection of Barkaboom Rd and Beaverkill Road in Lew Beach, drive 4.2 miles passing Deerlick Brook Road on the right and Tompkins Falls on the left. Rehor Road is unmarked but has a gate and several DEP signs. Park on the side of the road but do not block the gate. Follow Rehor Road as it climbs up a hill. The road is wide and, although abandoned, seems to be maintained. The first .65 miles of the road climbs at about 12% which is not difficult but does get the blood flowing. The general direction is east and slightly northeast. At .65 miles the road turns 90 degrees to the left and there is a small pond on the right. Follow the road as it continues uphill making a slight turn to the right. At .8 miles There is a left turn in the road and some interesting stone walls. Turn right off the trail to continue north working your way up the hill. There is a stone wall going up the hill with a road beside it. Followed the road using the principle of "go up". The road levels and seems to end in an open spot. Head northeast through several stands of briars. Head toward higher ground at the top of another small hill. Continue northeast toward even higher and pass through some more prickers. Bear a little to the right for a route that has fewer briars and eventually leads to an open field at the top of a subpeak! There are no real views but the open field is surprising and looks as if someone must have been clearing it as the trees have not been able to reclaim the area. Near the top of the hill is a small structure that has collapsed. Walk toward a stand of evergreen trees to the northeast. Head out on a woods road but bear to the left as the road starts down the hill. Continue to the northeast through an open patch and up to the top of the ridge. Walk along a "bridge" of land that falls off on both sides. Enter the woods and walk uphill toward the top of the west-east ridge. Watch for several different rock formations that are interesting. Continue to the top of the ridge which is rather flat and at around 2.4 miles turn ESE to follow the ridge. The walking is mostly through open hardwood forest and easier than the briar patches you encountered earlier. Hit a high point of a little over 2660 feet and then descend off the ridge before ascending to another bump. At 3.25 miles turn southeast and continue to the highest point on this part of the ridge. There were some nice views to the north but it was impossible to get any good pictures. Continue to the highest point on the bump and then head down to Deerlick Brook Road. Turn south-southwest and start down a steep slope that averages 18%. Along the way there is an impressive set of ledges and rock outcrops. Continue down the hill until and you will hear water and see the road. Work your way around some springs that cause wet areas and are the source of some small streams. Continue to hike out to the road crossing some small streams. On the road turn right and head west and then southwest following the road. Passed Minor Road and and continue 1.5 miles to Barkaboom Road. At Barkaboom Road turn right and walk west-northwest toward your car. Pass Tompkins Falls and continue back to your car on the right at the beginning of Rehor Road.
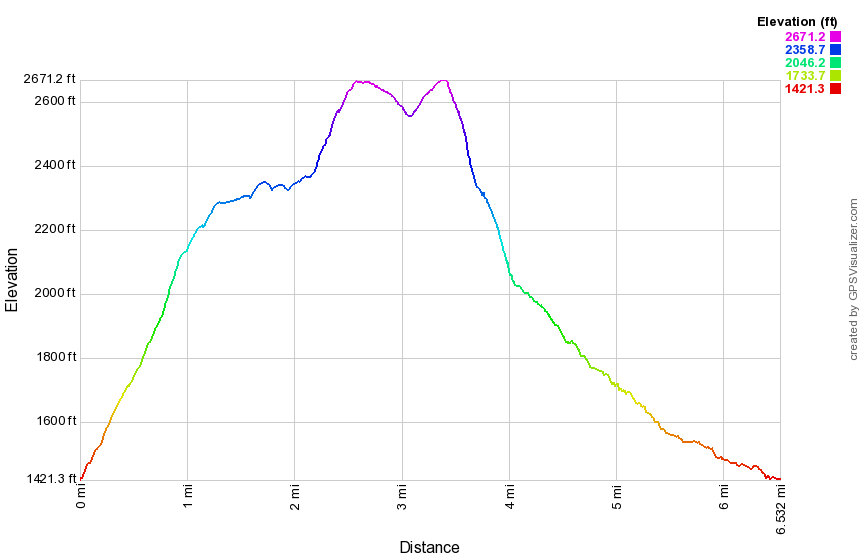 (The image below shows the profile of the loop hiking route. Remember that all vertical profiles are
relative!)
(The image below shows the profile of the loop hiking route. Remember that all vertical profiles are
relative!)
Rehor Road Parcel (Short Loop)
| Quick Look | ||||
|---|---|---|---|---|
| Difficulty | Round trip | Total climb | Internet Maps | |
| 2.3 mi. | 997 ft. | AllTrails | ||
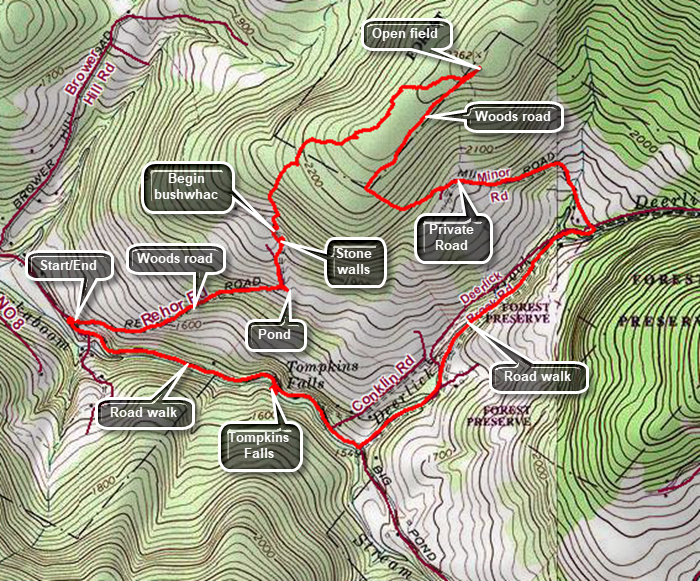
Caution: This hike is a bushwhack and has no marked trails. The route shown crosses private property. Be sure to obtain permission BEFORE you hike! From the intersection of Barkaboom Rd and Beaverkill Road in Lew Beach, drive 4.2 miles passing Deerlick Brook Road on the right and Tompkins Falls on the left. Rehor Road is unmarked but has a gate and several DEP signs. Park on the side of the road but do not block the gate. Follow Rehor Road as it climbs up a hill. The road is wide and, although abandoned, seems to be maintained. The first .65 miles of the road climbs at about 12% which is not difficult but does get the blood flowing. The general direction is east and slightly northeast. At .65 miles the road turns 90 degrees to the left and there is a small pond on the right. Follow the road as it continues uphill making a slight turn to the right. At .8 miles There is a left turn in the road and some interesting stone walls. Turn right off the trail to continue north working your way up the hill. There is a stone wall going up the hill with a road beside it. Followed the road using the principle of "go up". The road levels and seems to end in an open spot. Head northeast through several stands of briars. Head toward higher ground at the top of another small hill. Continue northeast toward even higher and pass through some more prickers. Bear a little to the right for a route that has fewer briars and eventually leads to an open field at the top of a subpeak! There are no real views but the open field is surprising and looks as if someone must have been clearing it as the trees have not been able to reclaim the area. Near the top of the hill was a small structure that has collapsed. When you are done looking around, head down the hill to the southwest following a woods road. The road is easy to follow and continues to head southwest. At 2.3 miles the road abruptly turns left and continues more steeply downhill. At the private gravel road at 2.8 miles turn left and walk down Minor Road to Deerlick Brook Road. At 3.1 miles turn right and walk downhill on Deerlick Brook Road to Barkaboom Road. Turn right to start back to the car. After .3 miles, Tompkins Falls will be on the left. Continue on Barkaboom Road to your car.
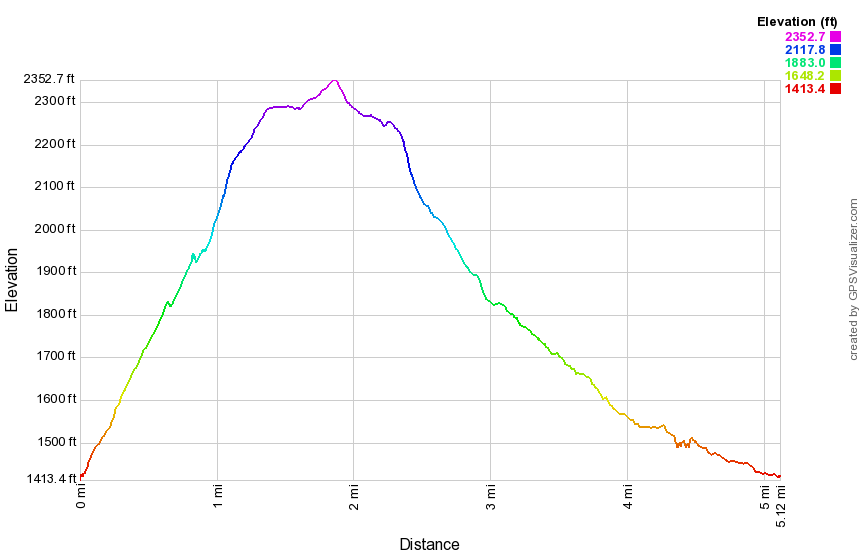 (The image below shows the profile of the loop hiking route. Remember that all vertical profiles are
relative!)
(The image below shows the profile of the loop hiking route. Remember that all vertical profiles are
relative!)
Ricketts Glen
| Quick Look | ||||
|---|---|---|---|---|
| Difficulty | Round trip | Total climb | Internet Maps | |
| 7.3 mi. | 1560 ft. | AllTrails | ||

There are several different access points to this park depending on the activity you want. Even if you are hiking there are several different ways to approach the hike. One parking area is on Pennsylvania Route 118 west of Wilkes-Barre. The trail is on the north side of the road. Walk northeast on the trail and enjoy the wide, clear trail. Notice that there are many very large evergreen and hardwood trees still standing along the path. You will cross over the creek on small bridges until a larger bridge crossing at about .4 miles. At .85 miles the trail splits. The more difficult route goes down to follow the creek bed while the more moderate trail goes up and avoids the rough rocks. The trails meet at the first falls, Murray Reynolds at about 1.45 miles. There are three falls in quick succession before you arrive at Waters Meet at 1.7 miles. This is where the two glens, Ganoga Glen and Glen Leigh meet. You can go either way. Turn left and start up Ganoga Glen.
The trail starts to ascend now with many beautiful waterfalls occurring one after another. Each has its own character and is interesting in its own right. Take care as you walk on the trail. Springs in the hillsides make the trail muddy and slippery in many places. The trail passes close to the top of some of the falls and some of the drops are considerable. At 2.33 miles you will be at Ganoga Falls which is the highest in the park at just under 100 feet. After walking by these falls there will be several more before you reach the top of the glen. At 2.63 miles turn right onto the Highlands Trail to cut across to Glen Leigh. At 3.1 miles you will be at Midway Crevasse where the trail passes between several large outcroppings of sandstone. At 3.5 miles turn right to walk down the Glen Leigh Trail.
At 3.95 miles you will be at Huron falls which is the highest in Glen Leigh. This is followed by Ozone which is one of the nicest. Although the falls in Glen Leigh are not as high as the ones in Ganoga Glen, Glen Leigh gives you more of the feeling you are in a glen or gorge. The rock walls on either side seem to rise more sharply. At 4.35 miles you will be back at Waters Meet. From here you can retrace your steps until you are back at the road at 5.9 miles. Cross Route 118 and find a path to the right of the parking lot. Follow this path, the Evergreen Trail down to Adams Falls which has cut extensively through the bedrock. At this point you can return to your car to complete the 6.5 mile hike. You can also complete the Evergreen Trail which is only about a mile long. One this trail you will find some trees that were growing when Columbus discovered America.
 (The image at the left shows the profile of the hike. Remember that all vertical profiles are
relative!)
(The image at the left shows the profile of the hike. Remember that all vertical profiles are
relative!)
Riddell State Park: Blue Trail
| Quick Look | ||||
|---|---|---|---|---|
| Difficulty | Round trip | Total climb | Internet Maps | |
| 5.0 mi. | 858 ft. | AllTrails | ||

From Davenport Center on Route 23 follow Pine Lake Road north until it intersects Charlotte Creek Road. Turn left and drive .3 miles to Hartwick College's Pine Lake Center, on the left. You may also take exit 16 off I88 and follow Rt 47 until it become Rt 11. In West Davenport Rt 11 turns south. Continue on Charlotte Creek Road to the Pine Lake Center on the right. Ask at he office if it is OK to park in their lot. Cross the road and start up the hill following the trail that is marked Mud Lake. At the top of the hill turn left and continue to follow the Mud Lake signs. Almost immediately after turning left, turn right and follow the Tornado Trail. The trails are poorly marked and the blazes do not match the colors of the trails on the map! There has been little trail maintenance and this remains true on most of the trails. You will reach a T at .7 miles. Walk slightly to the right of the two signs carved onto dogs on the ground and look for some saplings which mark the start of the Blue Trail. The Blue Trail is marked in some places with white blazes and you may see some pink or orange flagging. This "trail" is not for beginners as it is little used and poorly marked! Walk down through the woods to pick up the white blazes on the Blue Trail. The blazes are far apart and some are missing. The site of an old steam mill is marked on the map but there seems to be nothing remaining. Just passed this area the trail starts to follow a woods road and it becomes more distinct with somewhat better blazing. This does not last! Eventually the blazes all but disappear. The trail generally heads north and uphill. At one point there is a rock shelf overhang. From that point on the trail is almost impossible to find. Finally at 2.45 miles the path swings more northeast. As you are walking and trying to spot blazes you may suddenly come to a wide trail which is the trail to Mud Lake. Turning left takes you around the north end of Mud Lake but this route is also NOT marked. Turn right and followed the Mud Lake Trail back to the junction with the Tornado Trail. From here walk straight out to the woods road and turn left and follow your previous route back to the car.
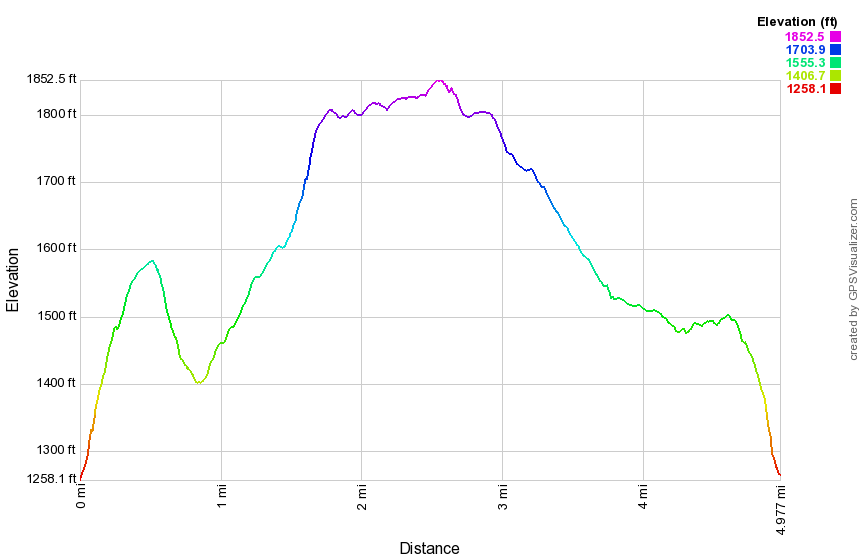 (The image at the left shows the profile of the hike. Remember that all vertical profiles are
relative!)
(The image at the left shows the profile of the hike. Remember that all vertical profiles are
relative!)
Riddell State Park: Mud Lake
| Quick Look | ||||
|---|---|---|---|---|
| Difficulty | Round trip | Total climb | Internet Maps | |
| 6.1 mi. | 1040 ft. | AllTrails | ||

From Davenport Center on Route 23 follow Pine Lake Road north until it intersects Charlotte Creek Road. Turn left and drive .3 miles to Hartwick College's Pine Lake Center, on the left. You may also take exit 16 off I88 and follow Rt 47 until it become Rt 11. In West Davenport Rt 11 turns south. Continue on Charlotte Creek Road to the Pine Lake Center on the right. Ask at he office if it is OK to park in their lot. Crossed the road and start up the hill following the trail that is marked Mud Lake. At the top of the hill turn left and continued to follow the Mud Lake signs. Almost immediately after turning left, turn right and follow the Tornado Trail. The trails are poorly marked and the blazes do not match the colors of the trails on the map! There has been little trail maintenance and this remains true on most of the trails. You will reach a T at .7 miles. Turn right following the Mud Lake signed carved into a log on the ground! At .9 miles turn right off the main Mud Lake Trail to follow the Jacy Henderson Memorial Trail which was created in 2004. The "trail" consists of yellow paint splashed on trees and not much more! There are trees across much of the trail and the paint blazes are hard to see. The trail doesn't get much use so the trail bed is hard to follow. As the trail turns from northeast to northwest it runs through some briars and the blazes disappear. The blazes continue as you descend the hill heading north. You will have to follow them as the trail crosses a stream and marshy area. At 2.1 miles you will be back at the main trail. Turn right and follow some white paint blazes and random orange markers. At 2.4 miles, as you approach the pond, a sign post points to Mud lake one way and Route 58 in the opposite direction. Turn right and head to Mud Lake. When you get near the lake a few orange disks lead to a path toward the shore of the lake. The area is very marshy but some boards and sticks have been thrown down haphazardly. Be careful as you approach the shore of the lake as you are walking on a thick layer of sphagnum moss. After inspecting the lake, return to the point where you headed down to the lake. The park map shows a trail circling the north end of the lake but there are no blazes. There is a sort of a trail and some old pink and orange flagging. Follow this flagging and the path around to the north of the lake heading first northwest and then turning WSW. The flagging falters in several spots but continue to follow the path and begin looking for a connector trail on the left which will take you southeast and back toward the lake to complete the loop. If you do not find the connector trail, you may end up at I88! Fortunately, the trail improves some and at 3.4 miles there is a set of signs at a trail junction. Turn left on the connector trail back toward Mud Lake. At 4 miles you will be back at the junction with the Mud Lake Trail. Turn right follow the Mud Lake Trail back toward the car. At 4.3 miles you will pass the point where the Jacy Henderson Memorial Trail branches off. Stay on the Mud Lake Trail to cover some ground you did not covered on the way out. At 5.2 miles pass the memorial and the beginning of the trail. At 5.4 miles you will arrive at the Tornado Trail which will take you back to the parking area. Continue straight ahead on the Mud Lake Trail which eventually becomes a road. Continue down the road turning right and walking back down to the car where you ascended the hill at the beginning of the hike.
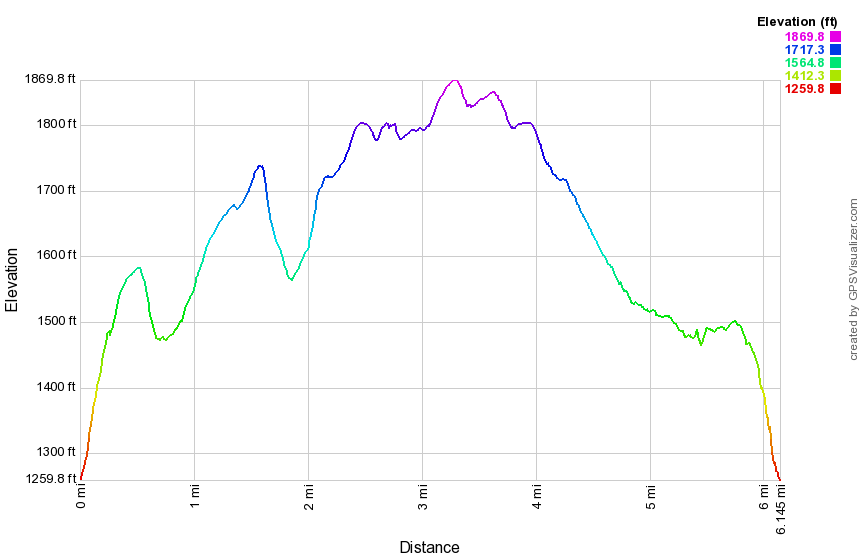 (The image at the left shows the profile of the hike. Remember that all vertical profiles are
relative!)
(The image at the left shows the profile of the hike. Remember that all vertical profiles are
relative!)
Riggsville to Cherrytown Road
| Quick Look | ||||
|---|---|---|---|---|
| Difficulty | Round trip | Total climb | Internet Maps | |
| 6.0 mi | 1695 ft | AllTrails | ||
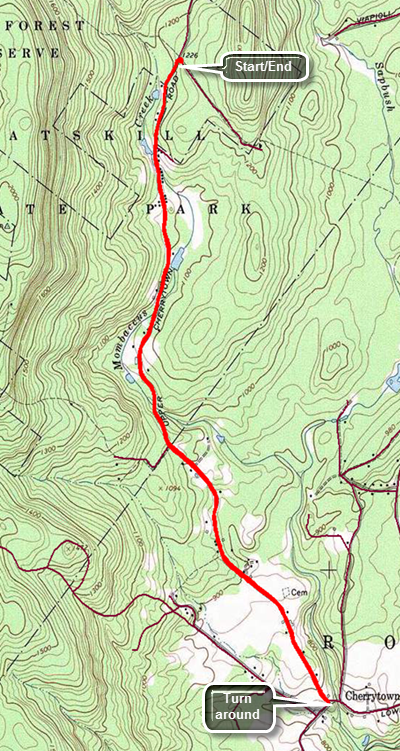 Turn north on Samsonville Road off Route 209 just east of Kerhonksen. Drive 1.25 miles and then turn left on Cherrytown Road. Continue on Cherrytown Road for 3.5 miles to the intersection with Upper Cherrytown Road. Bear left here and follow Upper Cherrytown Road for 3 miles where there is a parking area on the right side of the road. Leave the parking area and turn left. Walk 3 miles south on the road to the intersection of Upper Cherrytown Rd and Cherrytown Rd. The walk in slightly downhill and you will lose about 500 feet along the way. At the intersection turn around and walk the 3 miles back uphill to the car.
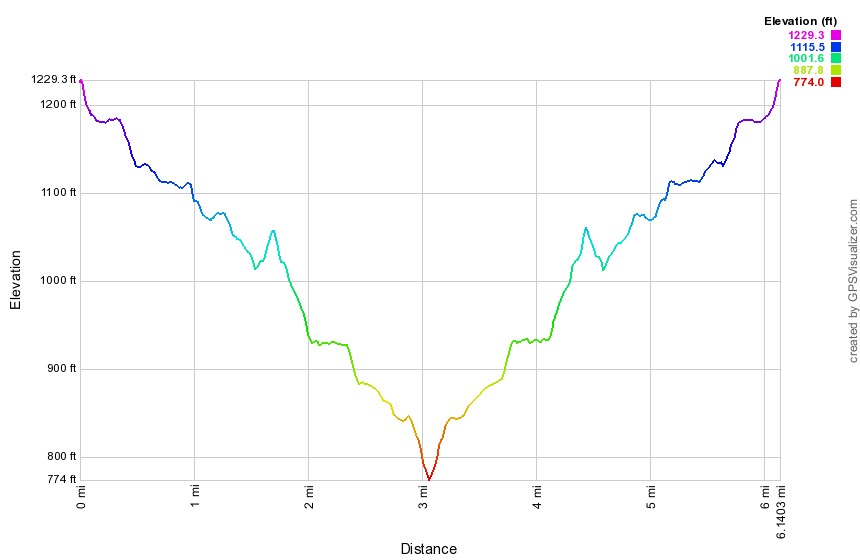 (The image at the left shows the profile of the hike. Remember that all vertical profiles are relative!)
Ramapo State Forest: Ringwood Manor
| Quick Look | ||||
|---|---|---|---|---|
| Difficulty | Round trip | Total climb | Internet Maps | |
| 3.1 mi | 375 ft | AllTrails | ||
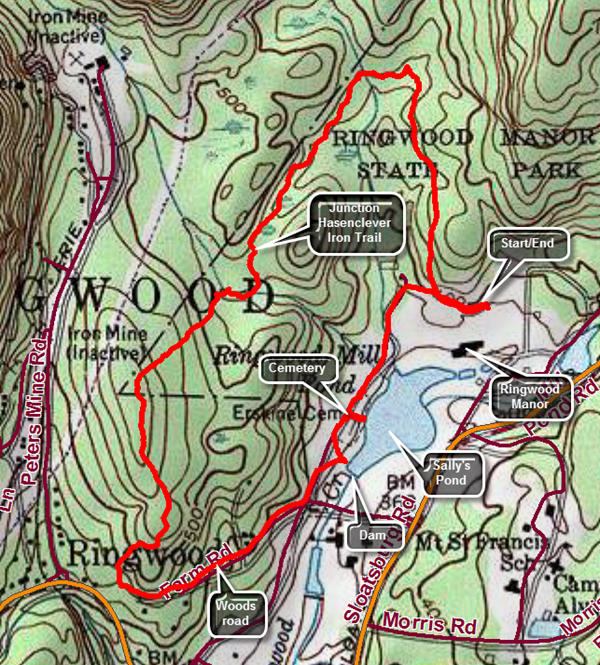
This hike has a little something for everyone including a visit to a historic mansion and the chance to walk around the grounds plus a hike on the property with a visit to a pond and a cemetery. I highly recommend a tour of the manor house first followed by a walk around the grounds and a hike on the loop trail. Take State Route 17 to exit 131 at Harriman. From take Route 17 south through Tuxedo to the village of Sloatsburg. Turn right on Sterling Mine Road and continued until the sign for Ringwood Manor on the right. Drive in the entrance stopping to pay the parking fee at the gate. Walk over to the park office in the manor house and pay an additional fee for the tour. While waiting for the tour stroll around the grounds and the gardens. On the front lawn there are some interesting articles. There is a large chain which is supposed to be from the chain use to block the Hudson River during the Revolution but it is not. There is a Civil War era mortar with an iron base which made it sturdier than those made with a wooden base. There is also a small cannon from the USS Constitution, Old Ironsides. The Ringwood area produced much of the iron for the American colonies throughout the Revolution and after it as well. The once belonged to Robert Erskine who was the cartographer for Washington during the Revolution. After his death, the land was sold to the Ryerson family who built a modest 10 room house in 1810 and continued to mine iron. This part of the house still stands. In 1853 the 19,000 acres of land was purchased by Peter Cooper and this included the Ringwood Manor area. Cooper bought the land to exploit the iron mining and to add it to the holdings of the very successful Cooper Hewett Company. At some point Mrs. Hewett decided to expand the existing house starting in 1864 until it had over 50 rooms and more than 20 fireplaces. Her hand in the design can be seen in most of the rooms as Mr. Hewett had a say in only three of the rooms! The Hewetts also improved the grounds of the manor with gardens. The house was lighted by gas lamps been after electricity became popular. At one time the family owned 40 custom made carriages of different types. Photography is not allowed inside the house. The tour includes the rooms of the first and second floors. The building from the outside is not that impressive but the inside is magnificent. Much of the building and the furnishing are original as are the numerous collections the family accumulated. The guides are very informative about the house, the grounds and the people who lived there. It is definitely a place to visit and go back to visit again. The family donated the house and grounds to the State of New Jersey in 1938. The tour lasts almost exactly and hour an 15 minutes.When you are ready to hike, walk to the back of the manor house to a gate in the fence. Walk through the gate and to the left following the blue blazes. Head west until the blazes direct you to turn right or north at .1 miles. The trail starts uphill gently as a wide and almost flat trail. Pass by some very large trees and at .25 miles the white connector trail heads off to the right. Stay left on the blue trail. At .5 miles the trail heads west and then at .7 miles it turns southwest. Cross a couple of small streams and then approached the area where the yellow Hasenclever Iron Trail crosses the blue trail. This trail connects many of the iron mines in northern New Jersey and there is one marked on the map. Just before the point where the trail crosses there is a pit that is not marked on the map. It looks very much like a small mine except there are no tailings. Continue along the main trail to 1.15 miles where the yellow trail crosses. Just beyond this point cross a larger stream after which the trail runs parallel to the stream for a short distance. It then turns more to the southwest and begins to climb. At 1.55 miles the trail reaches the highest spot and begins to descend and head due south. The trail is rocky in places which makes walking difficult. At 1.9 miles the trail makes a loop so that at 2.1 miles it heads northwest on a woods road. The road continues to descend and at 2.5 miles breaks out of the trees. There is a pond off to the right. Walk over to the pond which has a rather substantial stone dam. On the map it is labeled as Sally's Pond after one of the Hewett children but it served as a mill pond. Walk back up toward the road and to a cemetery on the right. There are two graves surrounded my an iron fence. These are the graves of Robert Erskine and one of his workers. Walked down toward the shore of the pond and to find the graves of some of the Hewett family. Abram and Sarah Hewett are buried in Green-Wood Cemetery in New York City as he was mayor and a three term congressman. Continue back to the point that you started on the blue trail and from there walk back to your car. As you drive away from the manor, take a moment to stop at the carriage house. The carriage house is well laid out with three different carriages in good condition and several displays related to equestrian events.
 Roarback Brook and Vinegar Hill
| Quick Look | ||||
|---|---|---|---|---|
| Difficulty | Round trip | Total climb | Internet Maps | |
| 3.2 mi. | 770 ft. | AllTrails | ||
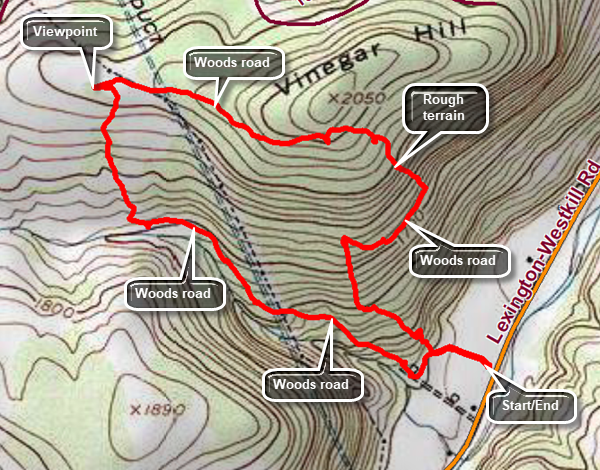
Caution: This hike is a bushwhack and has no marked trails. There is private property in the area so make sure you plan accordingly. The description here is general and is only one possibility. From Route 28 in Shandaken drive north on Route 42 passing Spruceton Road on the right. Watch for the small parking area on the left. Park in the lot and follow the path that is mowed through the grass behind the kiosk. Follow this path for about .2 miles. Turn right here on a woods road that parallels Roarback Brook. The road goes up hill and then levels off. At .9 miles the road ends in a field where you can walk down to the brook. Walk another 200 feet to a rocky area with a stone wall. Turn due north here and walk north to about 1.1 miles to a stone wall that borders a field. Walk along the stone wall on the woods side to avoid the briars in the field. At the top of the hill find the right-of-way for the powerline and a road that will lead you to a nice lookout if you turn left. The viewpoint is at least 270 degrees and show all of Beech ridge to the west. Turn around a look for a road that enters the woods. Follow the road making sure to take the left fork at all intersections. The roads end south of the summit of Vinegar Hill which is on private property. From here had southeast. You will pass through an area where trees have been cut and left on the ground. This is by far the most difficult part of the bushwhack. You should run into a woods road which will take you southeast briefly. As soon as the road turns to the right and starts uphill head south. You should meet the route you used to walk in. Turn left and walk back out to the parking lot.
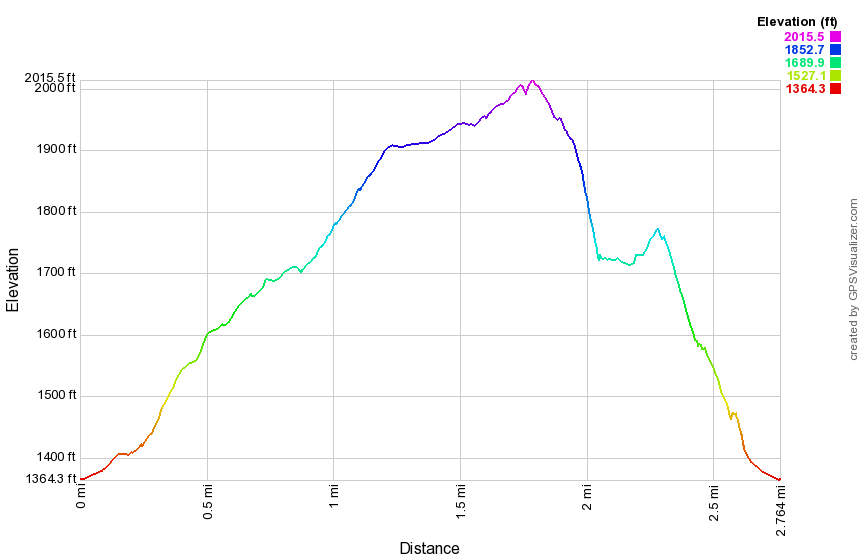 (The image below shows the profile of the loop hiking route. Remember that all vertical profiles are relative!)
Rochester Hollow
| Quick Look | ||||
|---|---|---|---|---|
| Difficulty | Round trip | Total climb | Internet Maps | |
| 3.9 mi. | 1100 ft. | AllTrails | ||

From Route 28 between Big Indian and Highmont look for Matayas Road. The road just west of this road is the access road to Rochester Hollow. Turn north and go to the end of the road to the parking area. This is a particularly popular spot during winter when people use it for cross country skiing and snowshoeing. To start the hike simply begin to walk up the wide woods road. The road parallels a brook. Watch along the way for some stone columns. At 1.7 miles the road turns sharply west. Walk straight ahead into the woods to find some interesting ruins. When you have finished exploring, return the way you came.
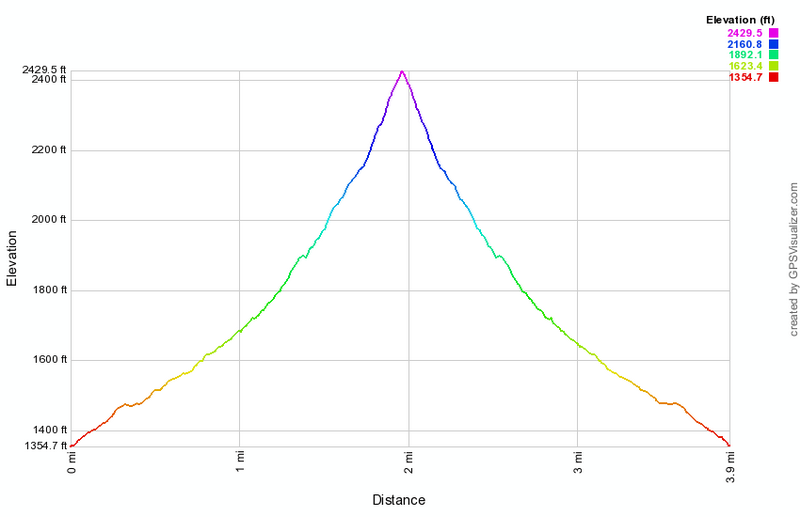
(The image at the left shows the profile of the hike. Remember that all vertical profiles are relative!)
Rochester Hollow Loop
| Quick Look | ||||
|---|---|---|---|---|
| Difficulty | Round trip | Total climb | Internet Maps | |
| 6.2 mi. | 1262 ft. | AllTrails | ||
_map.png)
From Route 28 between Big Indian and Highmont look for Matayas Road. The road just west of this road is the access road to Rochester Hollow. Turn north and go to the end of the road to the parking area. This is a particularly popular spot during winter when people use it for cross country skiing and snowshoeing. To start the hike simply begin to walk up the wide woods road. The road parallels a brook. Watch along the way for some stone columns. At 1.7 miles the road turns sharply west. Walk straight ahead into the woods to find some interesting ruins. When you have finished exploring, continue on around the bend and look for a monument to John Burroughs on the right. Follow the trail around and out to Rose Mountain Road. You will pass a lean-to on the right. A short stretch of this trail passes through PRIVATE PROPERTY so make sure you obtain permission to hike here. If you cannot obtain permission, turn around and retrace your route back to the car. Once you make the left turn onto Rose Mountain Road it is about 1.4 miles down to Route 28 where you will turn left. Walk .6 miles back to the access road and another .3 miles back to the parking area.
_gra.png)
(The image above shows the profile of the hike. Remember that all vertical profiles are relative!)
Rock Rift Fire Tower
| Quick Look | ||||
|---|---|---|---|---|
| Difficulty | Round trip | Total climb | Internet Maps | |
| 3.9 mi. | 1300 ft. | AllTrails | ||
 Take exit 87A on the Quickway, State Route 17, and watch for signs for Route 268 North. Drive to the end of Route 268 where it meets Route 10 and turn right. Drive about 1.2 miles and park in the boat launch on the south side of the road across from Fish Brook Road. If you are coming from the west on Route 10 watch for the signs for Route 268 and then follow these directions. From the east on Route 10 drive about 10 miles from Walton passing the parking area on the south side of the road. Continue to the boat launch area and park there. Walk west on Route 10 for about .2 miles crossing over Fish Brook. Watch for a woods road on the north side of the road that heads up the hill. The road is the old access road to the tower and sits on a narrow strip of land purchased by the Conservation Department for that purpose. This land is now part of the Cannonsville Watershed and is owned by New York City. It was recently opened to hikers and the Finger Lakes Trail Conference has done a nice job of moving the trail from road walks to woods walks wherever possible. Be sure to avoid private property! Walk from the parking area west about .25 miles and watch for a woods road on the right. This trail is considered a spur trail and is marked in blue but there are presently no signs on Route 10. The blue trail leads up through a meadow and, after a short distance, meets the main trail which is blazed in white. Continue to follow the white blazes straight ahead. The first 1.25 miles and the last .2 miles of this route are gently sloped. The half mile in between averages a 25% grade with some spots being even steeper! From the tower reverse your steps back to the car.
(The map on the right shows the parking area and the hiking route in an out and back and anticlockwise direction.)
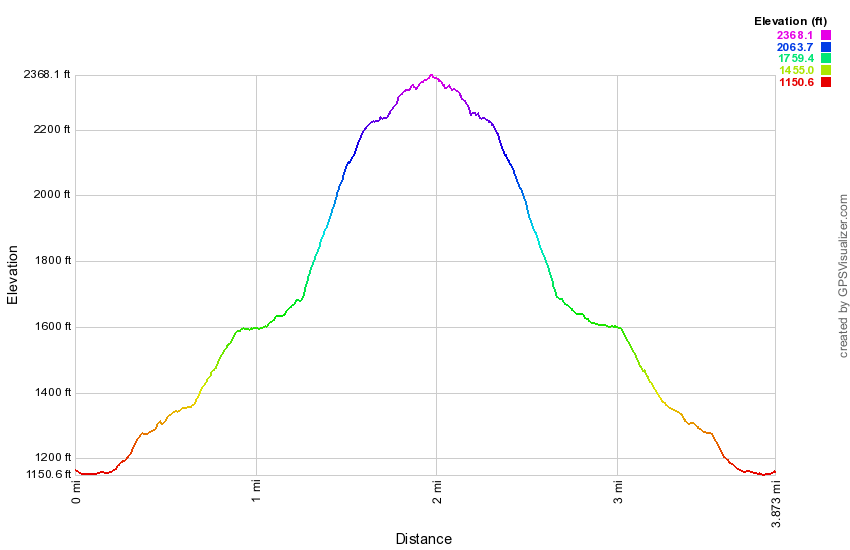 (The image at the left shows the profile of the hike. Remember that all vertical profiles are relative!)
Rock Rift Fire Tower (Apex)
| Quick Look | ||||
|---|---|---|---|---|
| Difficulty | Round trip | Total climb | Internet Maps | |
| 5.3 mi. | 1205 ft. | AllTrails | ||
 Take exit 87A on the Quickway, State Route 17, and watch for signs for Route 268 North. Drive to the end of Route 268 where it meets Route 10 and turn left into the parking lot. Cross the road and turn left and walk north on Route 10 a very short distance to the first section of guardrail. This is where the trail starts! The beginning of the trail is rather steep but it soon levels off and begins to descend a little. The trail rolls through some gullies and is sometimes hard to follow. At .85 miles the trail crosses a road and then enters a field where the trail is usually mowed with stake in the middle with a marker. Finally at 1.2 miles it turns left onto the woods road that once acted as an access road to the tower. The climb to the tower is steep in places but the crew who constructed the trail built in a few switchbacks to help. Over the next 1.5 miles you will be headed due north gaining a total of over 1400 feet from the parking area. The difference in elevation from the point where you turned onto the woods road is over a 1000 feet and several ascents are more than a 25% grade. At 2.7 miles you will be at the base of the tower. The bottom flight of stairs has been removed from the tower to discourage anyone from ascending and the cab is in disrepair. There is a plan to restore the tower which would be a wonderful project. To return retrace your route back to the point where you turned onto the trail north to the tower. Continue straight ahead and walk down to Route 10. Turn right and walk the shoulder of the road for 1 mile back to the parking area.
(The map on the right shows the parking area and the hiking route in an out and back and anticlockwise direction.)
 (The image at the left shows the profile of the hike. Remember that all vertical profiles are relative!)
Rock Rift Fire Tower Loop
| Quick Look | ||||
|---|---|---|---|---|
| Difficulty | Round trip | Total climb | Internet Maps | |
| 6.7 mi. | 1750 ft. | AllTrails | ||
 Take exit 87A on the Quickway, State Route 17, and turn right at the end of the exit. Turn left on Route 268 North. Drive to the end of Route 268 where it meets Route 10 and turn left into the parking lot. Cross the road and turn left and walk north n Route 10 a very short distance to the first section of guardrail. This is where the trail starts! The beginning of the trail is rather steep but it soon levels off and begins to descend a little. The trail rolls through some gullies and finally at 1.25 miles turns left onto the woods road that once acted as an access road to the tower. The climb to the tower is steep in places but the crew who constructed the trail built in a few switchbacks to help. Over the next 1.5 miles you will be headed due north gaining a total of over 1400 feet from the parking area. The difference in elevation from the point where you turned onto the woods road is over a 1000 feet and several ascents are more than a 25% grade. At 2.8 miles you will be at the base of the tower. The bottom flights of stairs have been removed from the tower to discourage anyone from ascending and the cab is in disrepair. There is a plan to restore the tower which would be a wonderful project. The next part of the trail heads passed the tower and starts to descend. Although the trail generally loses elevation there are times when it climbs again. At about 3.1 miles the trail joins a dirt road and follows it to a bluestone quarry at 3.4 miles. Stone is still being cut here but it is not in operation every day. Continue on the road through the other side of the quarry. Soon there is a turn to the right which may not marked but is pretty obvious. Continue to follow various woods roads for the most part. Occasionally the trail will cut through the woods to get to the next road. At 3.7 miles the trail heads south instead of west and remains on then ridge where the elevation is still over 2100 feet. At 4.2 miles the trail again turns west and begins a steep descent toward Faulkner Road. Over the next .7 miles you will lose 750 feet of elevation for an average grade of 25%. When you reach the junction with the previous trail, turned left on the "old" trail at 4.9 miles and follow the blue blazes downhill for another .2 miles to Route 10. Turn left on Route 10 and start walking south and east on the wide shoulders. The walk back to the car is only 1.6 miles.
(The map on the right shows the parking area and the hiking route in an out and back and anticlockwise direction.)
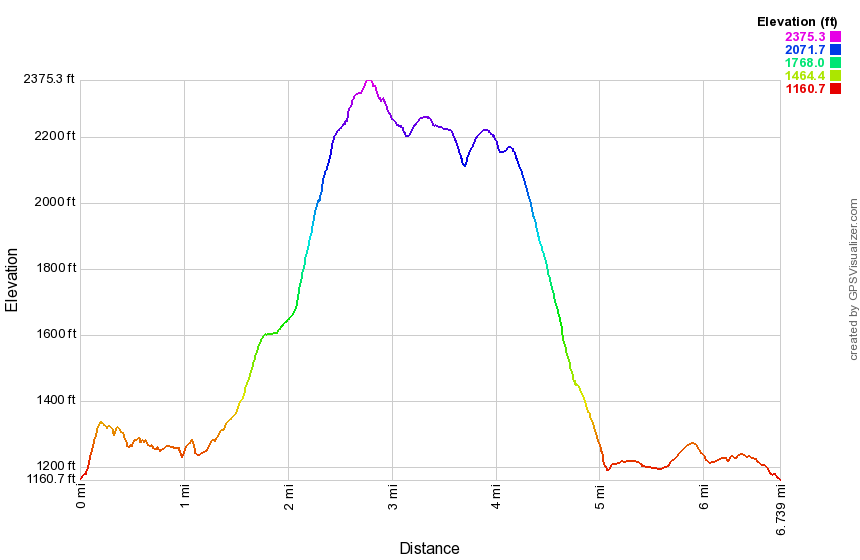 (The image at the left shows the profile of the hike. Remember that all vertical profiles are relative!)
Romer Mt: Long Path from Lane Street
| Quick Look | ||||
|---|---|---|---|---|
| Difficulty | Round trip | Total climb | Internet Maps | |
| 7.4 mi. | 1960 ft. | AllTrails | ||

Turn onto Woodland Valley Road from Route 28 west of Phoenicia. After crossing the bridge over the Esopus Creek turn left on High Street even though there may be no sign. Watch for Lane Street on your right after about .5 miles. Turn right on Lane Street and drive to the end and make a right to cross over a small stream. Park in the parking area. This trail was created to move the Long Path from a road walk which was all the way from Tremper Mountain to Woodland Valley Campgrounds to a trail hike. The trail ascends the shoulder of Romer Mountain and then stays on the ridge over Mount Pleasant and Cross Mountain. It joins the trail to Wittenberg just south of the trail junction with the trail to the Terrace Mountain lean-to. It is best hiked with a car spot so that you can hike all the way from one end to the other rather than turning around somewhere in the middle or hiking over 15 miles. The trail ascends the shoulder of Romer Mountain using a series of switchbacks. There aren't many views along the way but the walk is pleasant. At the beginning of the summer in 2013 the trail crews have finished about 3 miles from Lane Street and have started at the other end. The projected completion is in the fall of 2013.
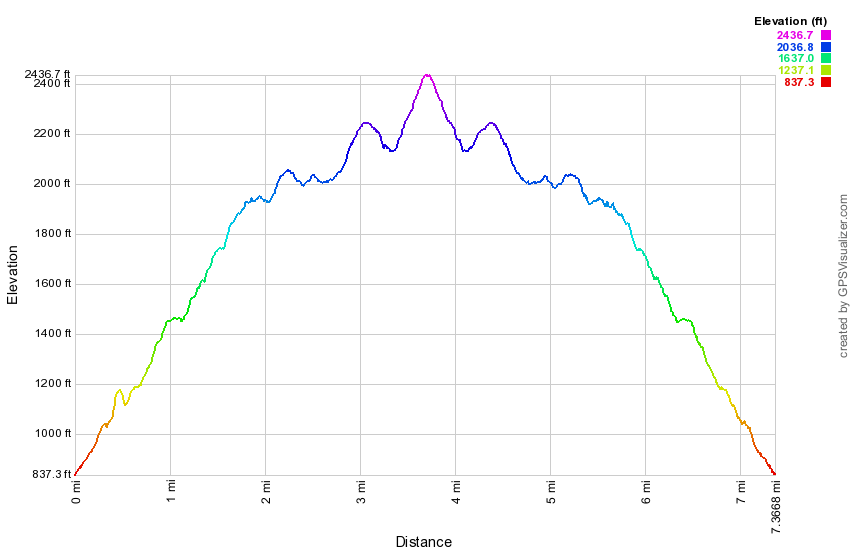
(The image below shows the profile of the out and back hike. Remember that all vertical profiles are relative!)
Romer Mt: Long Path from Woodland Valley to Lane Street
| Quick Look | ||||
|---|---|---|---|---|
| Difficulty | Round trip | Total climb | Internet Maps | |
| 11.2 mi. | 2805 ft. | AllTrails | ||

This hike requires a car spot or a drop off as the one-way distance is 11.2 miles! Turn onto Woodland Valley Road from Route 28 west of Phoenicia . After crossing the bridge over the Esopus Creek turn left on High Street even though there may be no sign. Watch for Lane Street on your right after about .5 miles. Turn right on Lane Street and drive to the end and make a right to cross over a small stream. Park one car in the parking area. Drive back on Woodland valley Road to the Woodland Valley Campgrounds. Park another car in the lot here and pay the parking fee at the booth or have someone drop you at the lot. Walk across the road and through some campsites to find the beginning of the trail on a ridge that crosses a stream. The first mile of trail from the bridge gains 920 feet at an almost 18% grade. The trail continues to ascend for another .75 miles before leveling off some. Once the trail levels off it has only a few ups and downs until the junction with the trail to Terrace Mountain at 2.5 miles. Turn right at this junction and start toward Wittenberg. The new trail is about .2 miles further along the main trail on the left at 2.7 miles. Turn left onto the new trail which has blue markers indicating that it is an extension of the Pine Hill - West Branch Trail. There is also an official Long Path marker as well.The surface of the trail is smooth and flat at the beginning but changes to rocky and back to smooth any number of times. At 3.5 miles you may see a path that leads to the site of the camp the trail crew used when they stayed in the woods to work on the trail! At 3.5 miles descend the first staircase which is very nicely constructed. Remember that the trail crew members were working only with hand tools and the stones and rocks available around them! Walk along the edge of a dropoff and at 3.7 miles you will come upon an open rock face with beautiful views to the north and east. Turn to my left to see the imposing bulk of Wittenberg looking down at you. To the north are the mountains of the Devil's Path. The views are spectacular! Continue on your way down the rock face and descend for the next quarter mile. You are actually still on a ridge and lose only about 250 feet. Watch to your right for possible lookouts. At 4.75 miles you will start to ascend Cross Mountain. There is a limited lookout on the right with some views of the Ashokan Reservoir. A few hundred feet further along there is another, better viewpoint. If you climb a little more and there is a third lookout with the best views of all. Get back on the main trail and continue over the top of Cross Mountain and then down the other side. You will skirt the summit of Mount Pleasant at about 6.5 miles into the hike. There is another great lookout on the left of the trail with an almost 180 degree field of view. Only the view to the north is partially blocked. From the lookout there is a drop of about 600 feet to the 8 mile point where there is a slight climb over an unnamed bump. Once you are over the top of Romer Mountain there is less than 3 miles to the car and it is all downhill. Near the bottom, a series of switchbacks turns a quarter mile hike into almost of mile of trail!
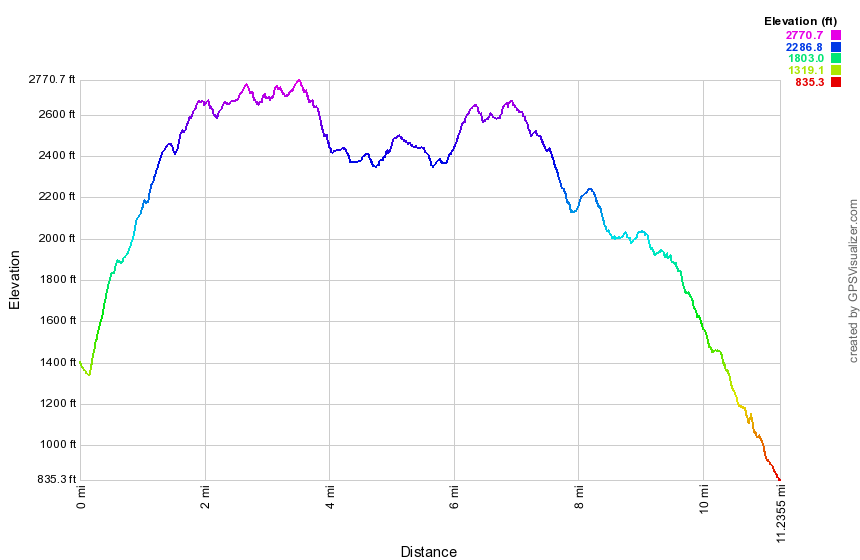
(The image below shows the profile of the out and back hike. Remember that all vertical profiles are relative!)
Round Top: Livingston Manor Lower Trail
| Quick Look | ||||
|---|---|---|---|---|
| Difficulty | Round trip | Total climb | Internet Maps | |
| .6 mi. | 190 ft. | AllTrails | ||

This trail is entirely sited on land owned by the Town of Rockland. There is lower loop trail blazed with yellow paint and a steeper, upper loop to the summit of Round Top blazed in blue paint.
Park in Livingston Manor and walk to Orchard street which is a side street off Rock Avenue. The trail starts at the top of the hill behind the Presbyterian Church. The most direct route to the top is the road on the left of the cemetery but this is also the steepest. Walking straight up Orchard Street into the cemetery and following the road to the highest point is not as steep. The entrance to the trail is marked by the traditional triangle of yellow paint blazes. Walk into the forest along an old woods road. At the trail junction you may walk straight ahead up a rather steep but short hill. At the top of the hill there is a short spur trail to the left which leads to a rock ledge. This lookout gives a nice view over the hamlet of Livingston Manor including the Livingston Manor school. After enjoying the view you may simply walk back down the hill or continue on around the loop which consists of a short stretch of new trail and woods roads that lead back to the first trail junction. Along the way there are some interesting rock ledges. At the beginning of the hike you may also turn right at the junction and walk the loop around to the viewpoint. This way is not as steep.

(The image below shows the profile of the out and back hike. Remember that all vertical profiles are relative!)
Round Top: Livingston Manor Upper Trail
| Quick Look | ||||
|---|---|---|---|---|
| Difficulty | Round trip | Total climb | Internet Maps | |
| .7 mi. | 285 ft. | AllTrails | ||

This trail is entirely sited on land owned by the Town of Rockland. There is lower loop trail blazed with yellow paint and a steeper, upper loop to the summit of Round Top blazed in blue paint.
Park in Livingston Manor and walk to Orchard street which is a side street off Rock Avenue. The trail starts at the top of the hill behind the Presbyterian Church. The most direct route to the top is the road on the left of the cemetery but this is also the steepest. Walking straight up Orchard Street into the cemetery and following the road to the highest point is not as steep. The entrance to the trail is marked by the traditional triangle of yellow paint blazes. Walk into the forest along an old woods road. At the trail junction walk straight ahead up a rather steep but short hill. At the top of the hill there is a short spur trail to the left which leads to a rock ledge. This lookout gives a nice view over the hamlet of Livingston Manor including the Livingston Manor school. After enjoying the view continue on the yellow trail as it wanders through the forest and up a mostly gentle grade to a trail junction with the blue blazed upper trail. Continue straight ahead on the blue trail up the steep ascent to the summit of Round Top. Follow the blue trail across the summit and won the other side where the blue trail meets the yellow trail. Continue straight ahead to follow the yellow trail down to a woods road that leads back to the first trail junction. Turn left and walk back out to the trailhead.
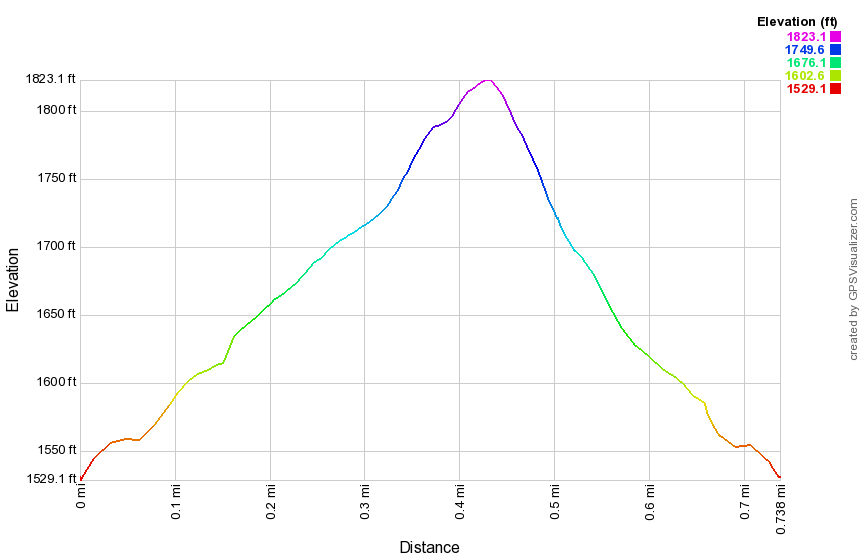
(The image below shows the profile of the out and back hike. Remember that all vertical profiles are relative!)
Round Top: Figure 8
| Quick Look | ||||
|---|---|---|---|---|
| Difficulty | Round trip | Total climb | Internet Maps | |
| 1.7 mi.(from trailhead) | 520 ft. (from trailhead) | AllTrails | ||

This trail is entirely sited on land owned by the Town of Rockland. There is lower loop trail blazed with yellow paint and a steeper, upper loop to the summit of Round Top blazed in blue paint.
Park in Livingston Manor and walk to Orchard Street which is a side street off Rock Avenue. The trail starts at the top of the hill behind the Presbyterian Church. The most direct route to the top is the road on the left of the cemetery but this is also the steepest. Walking straight up Orchard Street into the cemetery and following the road to the highest point is not as steep. The entrance to the trail is marked by the traditional triangle of yellow paint blazes. Walk into the forest along an old woods road. At the trail junction walk straight ahead up a rather steep but short hill. At the top of the hill there is a short spur trail to the left which leads to a rock ledge. Be careful on this spur trail as there is a "crack" you must cross. This lookout gives a nice view over the hamlet of Livingston Manor including the Livingston Manor school. After enjoying the view go back to the trail and head away from the viewpoint on a slight uphill following the trail as it makes a sharp right turn. After a short distance, the yellow trail makes a right turn and heads down. Turn left here into the woods and you should see a triangle of blue paint blazes which marks the beginning fate upper trail. Follow the blue blazes up the hill. The trail turns right at the top of the hill and then left. Continue to follow the blazes across the summit to the point where the trail heads back down to the lower trail. Turn left on the lower trail and walk back to the sharp right turn. Turn right and walk down the woods road to the first trail junction. You have now walked a figure 8. Turn around and walk back up the woods road to the sharp left turn. Turn left on the yellow trail and walk a short distance to a sharp left turn. Turn right into the woods and follow the blue blazes up the hill to the summit of Round Top. At the top of the hill follow the ribbons to the right turn and then the left turn. Follow the blue blazes back down to the lower trail. Turn right on the lower trail and walk a short distance to a sharp left turn. Turn left and follow the lower trail to the viewpoint. Turn left and walk back down the hill to the first trail junction. You have now walked another figure 8 in reverse. Continue straight ahead to the trailhead. Walk back to where you parked your car

(The image below shows the profile of the out and back hike. Remember that all vertical profiles are relative!)
Route 10 to Barlow Notch
| Quick Look | ||||
|---|---|---|---|---|
| Difficulty | Round trip | Total climb | Internet Maps | |
| 8.2 mi | 1864 ft | AllTrails | ||
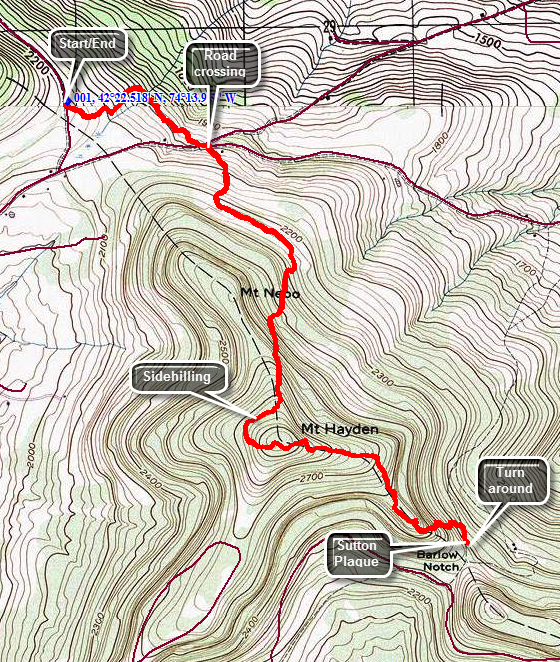 In the village of Windham find Route 21 north. Drive 4.5 miles north and turn right onto Route 10. Route 10 will make a sharp left up a hill. Park in the first pulloff on the right. The trail crosses just south of the pulloff. The first .7 miles of trail descends through some hardwoods and then is flat until the junction of Cunningham and Sutton Roads. Walk across the road intersection and pick up the trail on the other side. It starts out on an old road but quickly turns right into the forest and over the next 1.2 miles gains over 850 feet. The trail passes east of the summit of Mount Nebo in a generally south or southeast direction. You will start to ascend Mount Hayden by sidehilling around the west shoulder and passing the summit. The trail turns sharply east and climbs the final 125 feet to the top. There are no viewpoints along the way although there are some places where views might be available when the leaves are off the trees. The summit of Mount Hayden is 2.1 miles into the hike. Along some parts of the trail blazes are few and far between in some critical places. Over the next mile the trail heads first east and then southeast on a one mile descent to Barlow Notch. You will lose 675 feet and walk through some steep sections and some switchbacks. Near the bottom of the descent the trail meets a woods road which is actually marked on some maps and GPS devices. Continue on the trail watching for the Sutton plaque on the left side of the trail. The plaque is not far from where the trail meets the woods road about 3.1 miles from the car. Turn around and follow the trail back toward the car. By the time you get back to Cunningham Road and climb the last .7 miles to Route 10 the ascent may seem a little more challenging than you thought it might be.
 (The image at the left shows the profile of the hike. Remember that all vertical profiles are relative!)
Route 10 to South Mountain Road
| Quick Look | ||||
|---|---|---|---|---|
| Difficulty | Round trip | Total climb | Internet Maps | |
| 12.8 mi | 2730 ft | AllTrails | ||
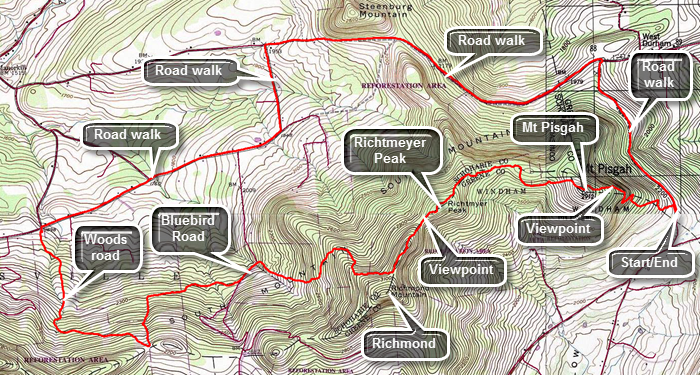 In the village of Windham find Route 21 north. Drive 4.5 miles north and turn right onto Route 10. Route 10 will make a sharp left up a hill. Park in the first pulloff on the right about .6 miles after Route 21 merges with Route 10. The trail crosses just north of the pulloff. For the first .7 miles the trail wound its way up the eastern shoulder of on Mount Pisgah. A short distance from the road there is a set of low cliffs but the trail turns right and then leads us up through a gap in the rocks. Several switchbacks use old woods road to ascend the mountain. At about .7 miles the trail starts along the northern shoulder of the mountain. At .75 miles the trail turns to the left and stars the climb to the summit of Mount Pisgah. Just at this point there is a limited viewpoint to the north. Pass across the summit at about 1 mile but don't expect any views as the summit is overgrown with pine trees. Descend from the summit about 200 feet to a col and then begin to climb to Richtmeyer Peak which is slightly higher than Mount Pisgah. Most of the forest here is hardwood with some evergreens mixed in. At 2.3 miles cross over the summit. Just passed the top there is a limited view to the south toward the Blackhead range. The trail has been heading west most of the hike but now shifts to the southwest on the descent off Richtmeyer and towards the northern peak of Richmond. At 2.65 miles you will be at the highest point of the day at over 3100 feet. Continue southwest toward the main peak of Richmond. At 2.9 miles the trail turns west and becomes a little wet as it hugs the northern shoulder of Richmond. The Long Path does not go over the main peak of Richmond but it is a short bushwhack to the summit. Pass by the summit and at 3.1 miles the trail heads north on the start of a steep descent. The trail loses 860 feet in a mile. After the descent the trail eventually hits a woods road and then Bluebird Road at 4.1 miles. Turn left on Bluebird Road for about .2 miles where the Long Path turns right into the woods again. Initially it follows a woods road which soon becomes a trail heading west. At 4.6 miles begin to ascend gently to 5 miles. Here the trail turns south and begins to ascend much more steeply on a 20% grade. There are hardwood forests here that give way to a pine plantation. In .4 miles gain 390 feet coming out into an open area at the top. The old route of the Long Path to Ashland Pinnacle and Huntersfield is ahead slightly to the right and marked in red. The Long Path turns right and starts down a dirt road toward South Mountain Road. The road starts to the west before turning north and in 1.4 miles meets South Mountain Road. At this point you may turn around and retrace your route back to the car. Walking the local roads back to the car is shorter and much easier. Turn right on South Mountain Road to walk the 1.75 miles to Toles Hollow Road. There are some nice views of the route you just hiked on the right. Just before your turn there are some views to the north. Turn left and walk downhill briefly and then uphill to the Durham Road. At 9 miles into the hike turn right onto the Durham Road to head east for about 2.5 miles to Route 10. The views to the north along this route are beautiful. Over the 2.5 mile walk you will hike up over a "bump" but then descend down the other side. At 11.6 miles turn right onto Route 10 for the final 1.2 mile walk back to the car. There is still some elevation gain although it isn't much. Watch for some nice views to the east. Continue on the road back to the car.
 (The image at the left shows the profile of the hike. Remember that all vertical profiles are relative!)
Route 32 to Heritage trail
| Quick Look | ||||
|---|---|---|---|---|
| Difficulty | Round trip | Total climb | Internet Maps | |
| 8.7 mi. | 1832 ft. | AllTrails | ||
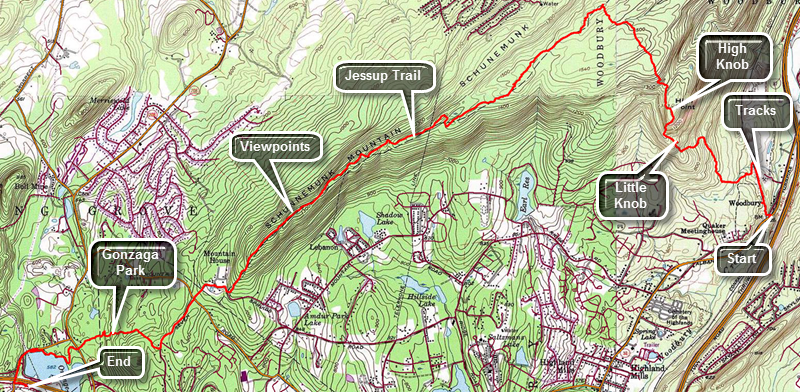 This route is a one way hike from east to west. This requires a you to spot a car at the end or get a ride. The 17.4 mile roundtrip would be VERY difficult.Drop a car in the Heritage Trail parking area at exit 129E off Route 17. Drive another car or get a ride to the beginning of the hike. Take the last exit before the Harriman toll plaza heading south and east on Route 17. Take Route 32 north about 4 miles through the hamlet of Highland Mills. Park at the corner of Evans Drive and Highland Mills. Walk .2 miles north and east on Route 32 being very careful as the road is heavily traveled. Turn left just after you walk under the railroad trestle and watch for some stone steps that ascend to the railroad tracks and right-of-way. Walk about .4 miles along the tracks. It is easier to cross to the opposite side of the tracks where there is a much smooth surface. Watch the aqua blazes and turn off the tracks onto a woods road. At .8 miles the aqua blazes point to the right as the trail turns off the woods road. The trail now begins an ascent that ends on the Schunnemunk Ridge. The trail heads generally northwest with some detours around cliffs and ledges. At 1.4 miles there is a lookout dubbed Little Knob. There are some good views to the south and east. The next climb is to the top of High Knob which has an elevation of over 1300 feet. The train trestle is at an elevation slightly below 500 feet. The trail now begins to climb very steeply with some sections requiring you to grab onto a root or pull yourself up over rocks. As you climb watch for views to the west and north. The primary view in the foreground is Kiryas Joel, an ultraorthodox Jewish community. At 1.7 miles reach the top of High Knob and where the views are breathtaking! The views are expansive in almost all directions. Back on the main trail start down off High Knob. The trail is sited along the edge of High Knob and drops only about 100 feet before starting to climb again to the ridges. At 2.75 miles the Long Path meets the yellow Jessup Trail on the main Schunnemunk Ridge. On your trip up the ridge there are several other paths and trails that cross the Long Path including the Woodbury Park Trail which is still marked with faint red blazes. You will also cross Dark Hollow Brook walking through hardwood forests with a predominance of oak trees. Turn left on the Jessup Trail being careful to avoid the orange blazed Western Ridge Trail. Over the next 3.6 miles the trail heads southwest. Most of the time you will be descending and any ascents are short. The trail is well-maintained and the further you go the more it looks like a woods road. The state park ends at about 3.4 miles and you will soon pass an antennae park. From that point on there are very limited views to the east but excellent views to the west and north. One viewpoint has a picnic table and fire ring. The Catskills and Shawangunks are clearly visible. The yellow blazes are easy to follow but someone has added fluorescent green paint which is even more visible! At 6.4 miles the rail meets paved Seven Spring Road and turns right and then quickly left. It is a short walk to a gate and Gonzaga Park. This park is being developed by Orange County. It was originally the site of the Seven Springs Mountain House in the early 1900's. It was a popular retreat for vacationers and later became the Gonzaga monastery and catholic retreat center. All that remains today the well enclosure, a large octagonal chapel once attached to the monastery and a smaller chapel in the woods. Walk down to the entrance to the park and cross Seven Springs Mountain Road. Watching for the blazes on the road and the point where they make a right turn into the woods at 7.1 miles. The hike is not completely flat after this turn and there were still some small ups and downs on the way to Route 208. There were many well-constricted stone walls in the area and some foundations from an old homestead very close to Route 208. Cross the road at 7.8 miles and walk about .2 miles to the shores of Orange Rockland Lake. Along the way you will have to negotiate a few ledges and one steep but short descent. Turn right at the lakeshore to follow the trail to Museum Village Road. Turn left on the road and follow it until you cross over Route 17. Turn left and walk back down to the parking area. This the final section is only about .4 miles.
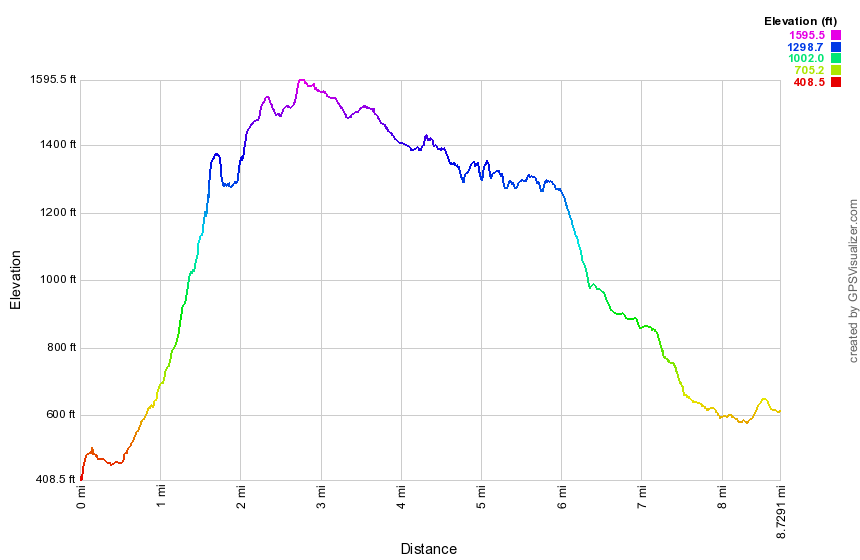 (The image below shows the profile of the hike. Remember that all vertical profiles are relative!)
Route 52 to Depot Hill
| Quick Look | ||||
|---|---|---|---|---|
| Difficulty | Round trip | Total climb | Internet Maps | |
| 9.2 mi. | 1690 ft. | AllTrails | ||

Take the Taconic State Parkway north off I84 and then take the next exit for Route 52. Turn right off the exit and follow it through Stormville and until it passes under I84 again. About .5 miles up a hill there will be an AT parking area in the woods on the left side of the road. Park in the lot and walk back out to Route 52 and follow it about 125 feet south to where the trail crosses the road. Turn left into the woods. The trail climbs a little before leveling off and passes along the edge of an open area. There are some very limited views. Within 15 minutes from the start of the hike re-enter the woods and to find very large maple tree about 20 feet in circumference! Continue hiking and in less than a mile come out onto a side street where the trail follows the road to the right. Continued to follow the blazes and turn left onto Mountain Top Road which takes you over I84. The road comes to a T on the other side. Continue straight ahead on the AT as it enters the woods. Walk down a set of stone steps and across a brook on a bridge. This is at about 1.4 miles into the hike. The trail the surface becomes rockier and where there are fewer rocks there are more roots. The hike is generally a gentle ascent heading for Mount Egbert. At around 3.4 miles there is a viewpoint with limited views especially when the leaves or on the trees. Resume the hike which becomes steeper as you scale Mount Egbert whose summit is at about 3.6 miles. Just after the summit of Egbert begin a descent and you will find a short side trail to the Morgan Stewart Shelter on the right. Continue along the trail on a long descent with a series of ups and downs. Despite the literature there are no more views! At 4.6 miles you will enter a low area with some marshy ground and many insects in the appropriate seasons. You may turn around here or hike to Depot Hill Road at about 5 miles. This road is barely a gravel track where the AT crosses.
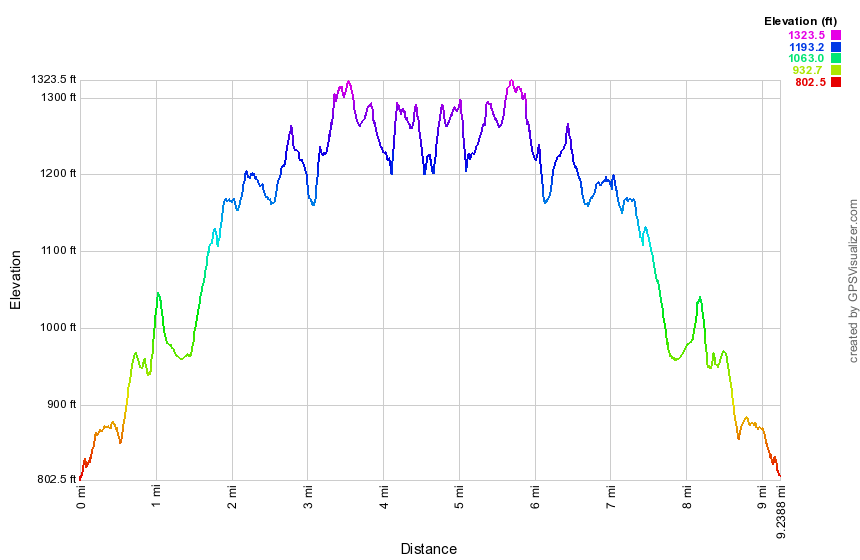 (The image at the left shows the profile of the hike. Remember that all vertical profiles are relative!)
Russell Brook Bushwhack
| Quick Look | ||||
|---|---|---|---|---|
| Difficulty | Round trip | Total climb | Internet Maps | |
| 3.6 mi. | 1035 ft. | AllTrails | ||
_map.png) This is one of our favorite trails when we just want to hike. It has several variations for distance and
difficulty. Like most trails, hiking one way is different than hiking in the other direction. We have
take this route more than a dozen times this season and it is interesting to watch the changing
seasons. It is unfortunate that Russell Brook Road is closed due to the frequent floods that have
washed out the road.
This is one of our favorite trails when we just want to hike. It has several variations for distance and
difficulty. Like most trails, hiking one way is different than hiking in the other direction. We have
take this route more than a dozen times this season and it is interesting to watch the changing
seasons. It is unfortunate that Russell Brook Road is closed due to the frequent floods that have
washed out the road.
Turn left on Morton Hill Road on Route 206 just after the Rockland Flats. Bear right up Morton Hill
Road until you see a parking area on the left near the sign indicates Russell Brook Road is closed.
Park here and hike down Russell Brook Road .3 miles to a gated snowmobile trail on the right. Turn here an walk along the snowmobile trail until the trail turns left at .6 miles. You may turn left an follow the snowmobile trail up and over the ridge and then down to the pond. Continue straight ahead to begin a bushwhack that parallels Russell Brook in a northeast direction. At about 1 mile find a place to cross the stream and head north and then northwest and west to climb over a hill. The way is steep in places with over a 23% grade. From the top of the hill head west to get down to Cable's Lake. You may find several different woods roads in this area which will make the descent easier. Once on the trail turn left and head back on the trail to the main trailhead on Russell Brook Road. Walk up Russell Brook Road to get back to the parking area on Morton Hill Road.
_gra.png) (The image below shows the profile of the hike. Remember that all vertical profiles are relative!)
(The image below shows the profile of the hike. Remember that all vertical profiles are relative!)
Ryan Road to Old Stage Road
| Quick Look | ||||
|---|---|---|---|---|
| Difficulty | Round trip | Total climb | Internet Maps | |
| 5.5 mi. | 480 ft. | AllTrails | ||
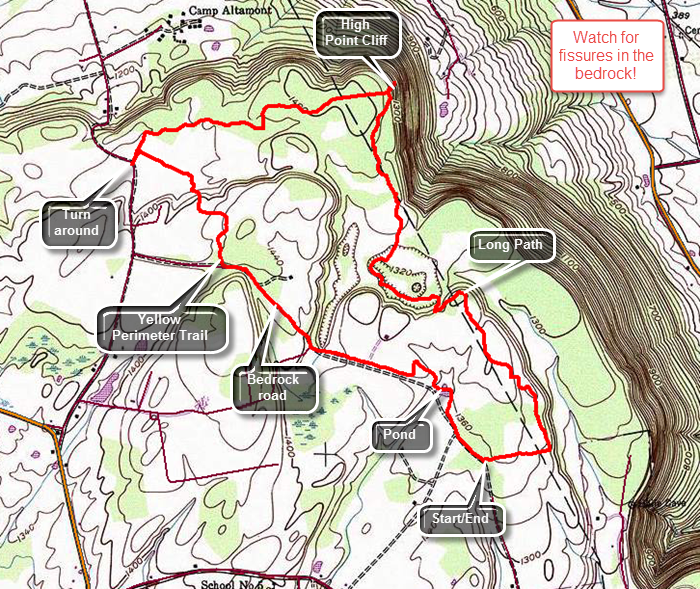
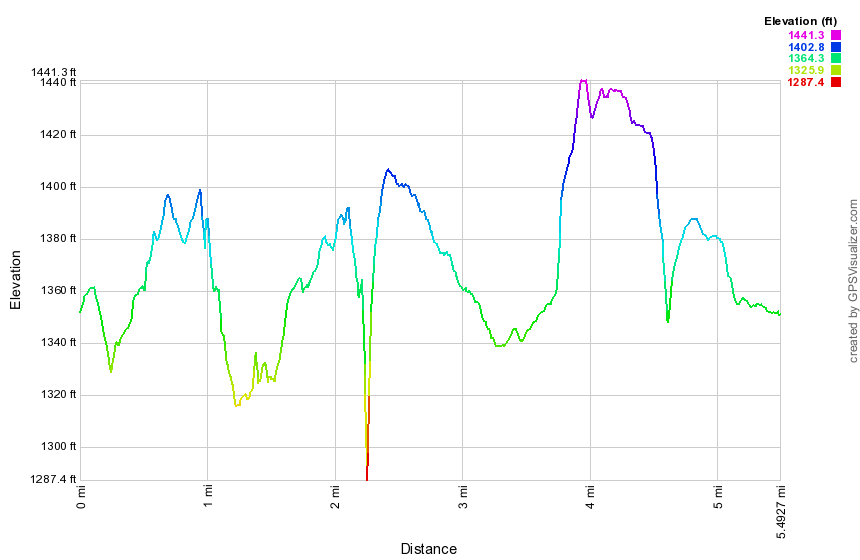 (The image at the left shows the profile of the hike. Remember that all vertical profiles are relative!)
Salt Springs SP Falls
| Quick Look | ||||
|---|---|---|---|---|
| Difficulty | Round trip | Total climb | Internet Maps | |
| 1.7 mi. | 300 ft. | Alltrails | ||

Get off I-81 for at exit 1. Turn right off the exit and after a short distance turn left on NY-7 South and then west for 3 miles. Turn right on PA-29 South and drive 6.4 miles to State Route 4008. Turn right and after a short distance left into the park. Park in the lot farthest away from Chadwick House. Walk out to the road you came in on. Turn right and walk upstream on the road bearing slightly to the right. The Gorge Trail starts as a very steep climb as evidenced by a rope on the side of the trail. This first climb is only .1 miles but it had a 20% grade. The trails here are poorly blazed and the signage is almost non-existent. There are three different falls near the beginning of the trail but it is hard to see the first two from the rim. You can hear the first falls but may find it hard to get a glimpse of it from the rim. Walk a little farther and the second falls appears through a break in the trees. At about half a mile the third falls which isn't quite as high as the first two appears. It has two drops and usually has a good volume. You can take pictures from the trail but the best shots are from in front of the lower drop. Be careful if you decide to work your way down to a rock shelf below the lower drop. Try to follow the blazes which head away from the stream and up the bank to a field. Walk along the edge of the field briefly and then head back down toward the stream. Within a short distance, you will see a road and a bridge. Turn left on the road, walk across the bridge and turn left onto a path or trail. There may not be blazes here but after a walk through the weeds you should see a trail with red blazes. Follow this trail until it abruptly ends and then turn right up the hill on an informal path that leads up the steep bank. Walk the path which runs above the creek until you see a viewing platform. Climb the hill to get to the platform which has a sign that explains the gorge. The platform has no view. Walk on the boardwalk until you find a white blazed path which is part of the Hemlock Trail. There are some hemlocks in this forest that are estimated to be 500 years old. Like all hemlocks in the northeast they are threatened by the hemlock woolly adelgid. Continued on the trail as it descend to the stream again. Find an sign placed next to a "pool". This was one of the salt springs that gave the park its name. The sign explains that the spring has been frequented by native Americans and by white settlers. It was eventually turned into a commercial venture. Today the spring has seen better days but does have some water bubbling up from far below the ground. To walk to the first falls find a path along the eastern bank. The trip is not easy as the rocks are slippery and there is only a very informal path. Eventually you should make it to a point almost in front of the first falls. After taking pictures or just hanging out, walk back the way you came. As you come back to the picnic area, find the very large stepping stones with a rope to grip. Walk across the creek and back to your car.
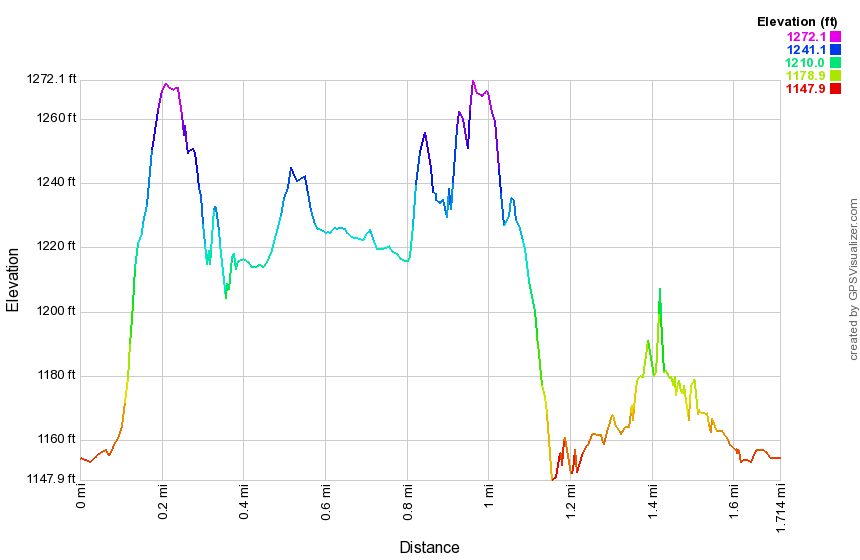 (The image at the left shows the profile of the hike. Remember that all vertical profiles are
relative!)
(The image at the left shows the profile of the hike. Remember that all vertical profiles are
relative!)
Sam's Point: All Points
| Quick Look | ||||
|---|---|---|---|---|
| Difficulty | Round trip | Total climb | Internet Maps | |
| 10.3 mi. | 1403 ft. | AllTrails | ||
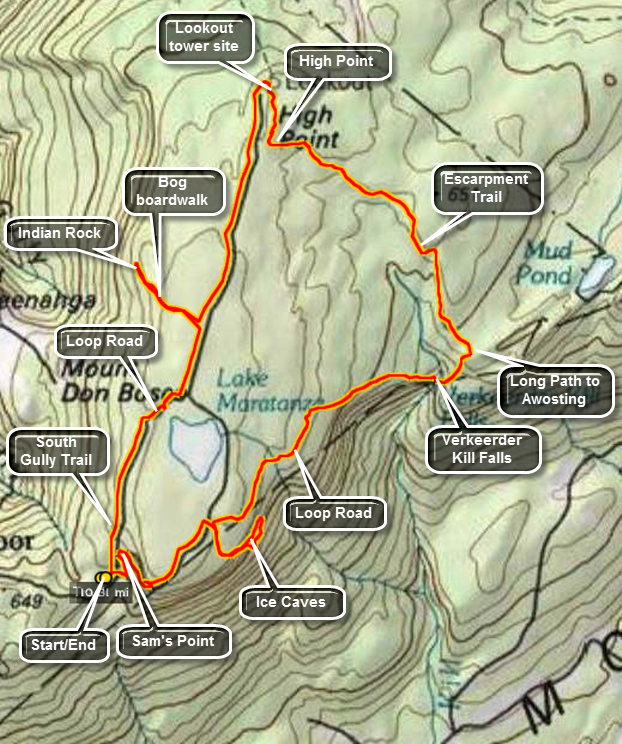 The hiking trails throughout the Sam's Point Preserve vary from open carriageway to narrow "maintained"
trails through the brush, over the bogs and around many interesting rock formations. There are
several different variations in length from the trail through the Ice Caves and to Sam's Point which
is about 4 miles to the 10.5 mile complete loop. The ecology is a pine barrens with some hardwood
sections and many boggy areas. Verkeerder Kill falls is well worth the visit as are the Ice Caves.
These "caves" are actually tectonic caves formed when part of the mountain pulled away forming
deep crevices in the rock.
The hiking trails throughout the Sam's Point Preserve vary from open carriageway to narrow "maintained"
trails through the brush, over the bogs and around many interesting rock formations. There are
several different variations in length from the trail through the Ice Caves and to Sam's Point which
is about 4 miles to the 10.5 mile complete loop. The ecology is a pine barrens with some hardwood
sections and many boggy areas. Verkeerder Kill falls is well worth the visit as are the Ice Caves.
These "caves" are actually tectonic caves formed when part of the mountain pulled away forming
deep crevices in the rock.
Park in the lot at the Visitor's Center at Sam's Point. Be sure you pay the parking fee or buy a pass that is good for a year. As you walk toward the trails, you may bear to the left or right. Bear to the left and begin to hike up the loop road on a gentle grade. Watch on your left for some of the shacks used by blueberry pickers in years gone by. These shacks are all but gone but hark back to an era when berry picking was a commercial venture. At about .3 miles the South Gully Trail branches left off the loop road. This trail leads down to Route 52 and is a hike all by itself. There are several waterfalls and cascades along the trail as it parallels a stream. Continue to walk along the loop road. At about 1.0 mile there will be a short side trail that goes to the shore of Lake Maratanza. Depending on the level of the lake, this may or may not prove interesting. At this point you will start to see TV and other communications towers on your left. The High Point Carriageway bears to the left off the loop road at 1.2 miles. Bear left and at 1.6 miles turn left on the trail to Indian Rock. The Rock is a large glacial erratic from which there are very good views. The first part of this trail is a boardwalk since it passes over a bog. Continue to walk on the trail following the blazes on the rocks carefully. The blazes may be hard to follow but the trip is 1.0 mile detour is worth the effort. Back on the carriageway, continue north to 3.85 miles and turn right on the High Point Trail which makes a steep but short ascent. Near the top of this ascent is where the fire tower was located. Turn right to stay on the High Point Trail and walk through the scrub to High Point. A USGS marker is embedded in the rock at this location. Continue the hike by dropping down the ledge and walking the High Point Trail along the escarpment to 6.25 miles. Along the way there are some fantastic views! The Long Path continues straight ahead on its way to Lake Awosting. Turn right a make a steep descent on the Verkeerder Kill Falls Trail. At 6.5 miles you will be at the lowest point on the hike. Here you will be looking down into the ravine formed by the falls. The falls are best viewed when there has been some rain. Since you will now have to cross over the stream above the falls to continue the hike, avoid this route when there have been massive amounts of rain. Observing the falls from each side gives slightly different views. Continue on the trail and be prepared to hike UP the trail for the next 1.7 miles until the trail ends on the access road to the ice caves at 8.25 miles. Walk down the heavily eroded road to the entrance to the "caves". Walk carefully on the wooden ladders and rocky path through this area. Constant use has polished both wood and stone making it very slippery. Upon exiting the caves walk up the road to the loop road and turn left at 9.25 miles. Walk on the road until another side trail appears on the right. Walk this trail out to Sam's Point to take in more views and to see if you can spot your car in the lot. Walk back out to the main trail and down to the Visitor's Center and your car.
 (The image at the left shows the profile of the hike. Remember that all vertical profiles are
relative!)
(The image at the left shows the profile of the hike. Remember that all vertical profiles are
relative!)
Sam's Point: Around Lake Awosting
| Quick Look | ||||
|---|---|---|---|---|
| Difficulty | Round trip | Total climb | Internet Maps | |
| 13.6 mi. | 1755 ft. | AllTrails | ||
 The hiking trails throughout the Sam's Point Preserve vary from open carriageway to narrow "maintained" trails through the brush, over the bogs and around many interesting rock formations. There are
several different variations in length from the trail through the Ice Caves and to Sam's Point which is about 4 miles to the 10.5 mile complete loop. The ecology is a pine barrens with some hardwood
sections and many boggy areas. Verkeerder Kill falls is well worth the visit as are the Ice Caves. These "caves" are actually tectonic caves formed when part of the mountain pulled away forming
deep crevices in the rock.
The hiking trails throughout the Sam's Point Preserve vary from open carriageway to narrow "maintained" trails through the brush, over the bogs and around many interesting rock formations. There are
several different variations in length from the trail through the Ice Caves and to Sam's Point which is about 4 miles to the 10.5 mile complete loop. The ecology is a pine barrens with some hardwood
sections and many boggy areas. Verkeerder Kill falls is well worth the visit as are the Ice Caves. These "caves" are actually tectonic caves formed when part of the mountain pulled away forming
deep crevices in the rock.
Park at the Visitors Center at the Sam's Point Preserve and start out on the Loop Road to the right. Hike up the Loop Road passing the spur trail to Sam's Point on the left. This hike is already long but you may visit the lookout if you wish. Turn right on the road that goes down to the ice caves. Turn then a left onto the Verkeerder Kill Falls Trail which has the aqua blazes of the Long Path. This trail has some beautiful views out over the flat valley on your right. Straight ahead on the trail you will see the cliffs of Castle Point and Hamilton Point at Minnewaska State Park and the blue waters of Lake Awosting. The trail drops 500 feet in about 1.75 miles to the lowest point on the hike at Verkeerder Kill Falls at 2.9 miles into the hike. There are lookouts on both sides of the falls. The falls are more interesting when there has been some rainfall but this makes crossing the stream above the falls more dangerous! After observing the falls from the far side, continue on the trail as it rises to a trail junction over the next .3 miles. Turn right to stay on the Long Path and head to Lake Awosting. Older maps show this part of the trail as "Closed" or "Do not enter" but the land has been purchased by the Preserve and is now open to the public. The trail at first passes over mostly open rock and hikers have constructed many small cairns along the way. After about 1.1 miles Mud Pond or Lake Haseco came into view at 3.9 miles with a nice viewpoint overlooking the water. As you continue on the trail, a path to the right goes down to the shore of the pond. Back on the trail there is a wooden walkway over some muddy areas and Fly Brook. After another mile at about 5 miles you will be at a lookout over Lake Awosting at the southwestern end of the lake. Follow the short side path to the left and down to the Lake Awosting Carriageway around the lake. This route leaves the aqua blazes of the Long Path and is marked in black. Turn right on the carriageway to walk anticlockwise around the largest of the three sky lakes. There are several nice viewpoints along the shore that offer points to take pictures. Some of the viewpoints are on areas of land that jut out into the lake which has an incredible deep blue color. You will pass by the stone "beach" and on the other side of the beach the carriageway ascends to viewpoints above the lake which are stunning! This will be at about 6.75 miles into your hike. Continue on the carriageway as it wraps around the outlet end of the lake and starts to head southwest. The path along the opposite shore of the lake is more direct. You will pass a ranger's cabin and then the final viewpoint near the end of the lake. Walk back up the path to return to the lookout over the lake and the aqua blazes of the Long Path. The lake is about 3.6 miles round and you will now be at about 8.6 miles into the hike. Follow the Long Path back to Verkeerder Kill Falls at 10.8 miles. Cross over the stream and begin a long 1.75 mile climb back to the road above the ice caves. The trail gains elevation and passes over a lot of uneven and large rocks which you may remember from the hike down to the falls. Turn right at the road and then left at the loop road to get back down to the Visitors Center.
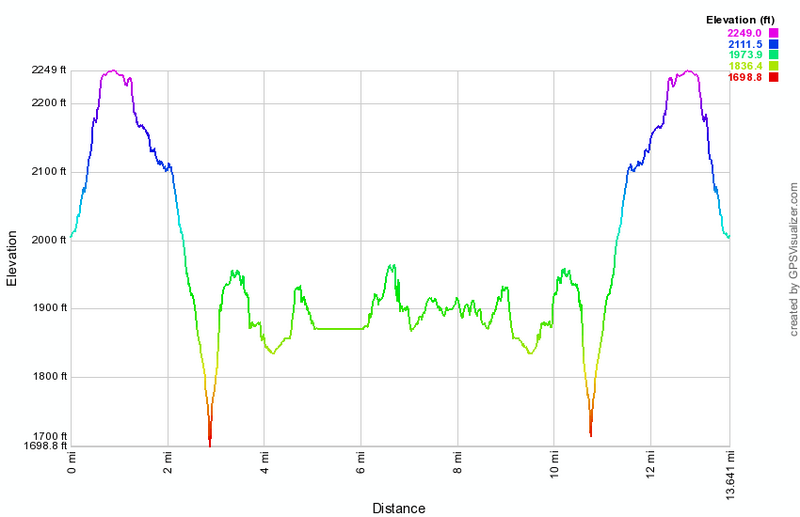 (The image at the left shows the profile of the hike. Remember that all vertical profiles are
relative!)
(The image at the left shows the profile of the hike. Remember that all vertical profiles are
relative!)
Sam's Point: Berme Road to Berrypickers Path
| Quick Look | |||
|---|---|---|---|
| Difficulty | Round trip | Total climb | Internet Maps |
| 5.8 mi | 445 ft | AllTrails | |
Take Route 52 through Ellenville heading east over the mountain. Just before the road began its trip up the mountain, turn left on Berme Road and drive about 4 miles to where the Long Path crosses the road. There is room for one or two cars to park on the side of the road. Follow the aqua blazes through hardwood forests consisting mostly of oak trees. The trail is pretty easy to follow as it uses woods roads and is pretty well marked. At .7 miles turn left on another woods road which is also marked as the Lower Mine Hole Trail coming up from Foordmore Road. The trail is rocky and layers of oak leaves can make it slippery underfoot. The trail heads south and continues climbing toward the ridge. At about 1.4 miles the trail turns west to avoid some ledges and then turns south again. At an elevation of about 1230 feet the typical Sam's Point and Shawangunk vegetation appears. There are now open rock faces with scrub pine and the transition is sudden and stunning. Keep looking back over your shoulder as viewpoints begin to appear. From some lookouts you can see the valley below and the mountains of the Catskills beyond to the north. Keep an eye out for the side trail on the right to Jacob's Ladder which you may want to visit. Also watch for a path on the left to Panther Rock which is a great lookout. The trail is marked with a sign saying "Panther Rock" and is blazed in white. It is only a few hundred feet out to Panther Rock but it is certainly worth the trip. Climb up to the top of Panther Rock and find views similar to other viewpoints but unobstructed and more expansive. Continue heading southwest and climbing. Just after Panther Rock descend a little and cross a stream before climbing again. At 3.4 miles you will hit the Smiley Carriageway. Turn left and walk to the beginning of the Berrypickers Trail which is only about a quarter mile away. Once you are at the beginning of the Berrypickers Path, head back down along the same path you used on the way up.
(The image shows the profile of the hike. Remember that all vertical profiles are relative!)
Sam's Point: Berrypickers Trail Double Loop
| Quick Look | ||||
|---|---|---|---|---|
| Difficulty | Round trip | Total climb | Internet Maps | |
| 10.9 mi. | 965 ft. | AllTrails | ||
 The hiking trails throughout the Sam's Point Preserve vary from open carriageway to narrow "maintained"
trails through the brush, over the bogs and around many interesting rock formations. There are
several different variations in length from the trail through the Ice Caves and to Sam's Point which
is about 4 miles to the 10.5 mile complete loop. The ecology is a pine barrens with some hardwood
sections and many boggy areas. Verkeerder Kill falls is well worth the visit as are the Ice Caves.
These "caves" are actually tectonic caves formed when part of the mountain pulled away forming
deep crevices in the rock.
The hiking trails throughout the Sam's Point Preserve vary from open carriageway to narrow "maintained"
trails through the brush, over the bogs and around many interesting rock formations. There are
several different variations in length from the trail through the Ice Caves and to Sam's Point which
is about 4 miles to the 10.5 mile complete loop. The ecology is a pine barrens with some hardwood
sections and many boggy areas. Verkeerder Kill falls is well worth the visit as are the Ice Caves.
These "caves" are actually tectonic caves formed when part of the mountain pulled away forming
deep crevices in the rock.
Park in the lot at the Visitor's Center at Sam's Point. Be sure you pay the parking fee or buy a pass that is good for a year. As you walk toward the trails, you may bear to the left or right. Bear to the left and begin to hike up the loop road on a gentle grade. Watch on your left for some of the shacks used by blueberry pickers in years gone by. These shacks are all but gone but hark back to an era when berry picking was a commercial venture. At about .3 miles the South Gully Trail branches left off the loop road. This trail leads down to Route 52 and is a hike all by itself. There are several waterfalls and cascades along the trail as it parallels a stream. Continue to walk along the loop road. At about 1.0 mile there will be a short side trail that goes to the shore of Lake Maratanza. Depending on the level of the lake, this may or may not prove interesting. At this point you will start to see TV and other communications towers on your left. The High Point Carriageway bears to the left off the loop road at 1.2 miles. Bear left and at 1.6 miles turn left on the trail to Indian Rock. The Rock is a large glacial erratic from which there are very good views. The first part of this trail is a boardwalk since it passes over a bog. Continue to walk on the trail following the blazes on the rocks carefully. The blazes may be hard to follow but the trip is 1.0 mile detour is worth the effort. Back on the carriageway, continue north to the trail junction with the High Point Trail and the Smiley Carriageway at about 3.85 miles. Continue straight ahead on the carriageway but be aware that it is not well-marked in places and can have some very wet spots along the way, The path descends to about 4.75 miles where it begins to rise some. At 5.15 miles informal pathways lead off to the left to Napanoch Point. You may bushwhack out to the area or save this trip for later. After this the carriageway turns east and at 5.5 miles the Berrypicker's Path branches off to the right. Make the turn and be prepared for a 1.8 mile uphill walk across open rock and through scrub pines. Along the way hikers have created cairns and other designs with stones. At the end of this trail you will be in the area where there was once a fire tower. Descend to the High Point Carriageway and turn left to start back to the Visitors Center. At 98.7 miles the spur trail to Indian Rock will be on your right. When you reach the Loop Road at 9.1 miles, turn left to complete the loop around Lake Maratanza. At 9.4 miles you will pass very close to the shore of the lake on the Loop Road. When you reach 9.9 miles, the road to the ice caves turns left. Stay on the Loop Road passing by the spur trail to Sam's Point at 10.3 miles. Walk the final .5 miles down to your car.
 (The image at the left shows the profile of the hike. Remember that all vertical profiles are relative!)
Sam's Point: Greater Ice Caves
| Quick Look | ||||
|---|---|---|---|---|
| Difficulty | Round trip | Total climb | Internet Maps | |
| 4.9 mi. | 1576 ft. | AllTrails | ||
 The hiking trails throughout the Sam's Point Preserve vary from open carriageway to narrow "maintained"
trails through the brush, over the bogs and around many interesting rock formations. There are
several different variations in length from the trail through the Ice Caves and to Sam's Point which
is about 4 miles to the 10.5 mile complete loop. The ecology is a pine barrens with some hardwood
sections and many boggy areas. Verkeerder Kill falls is well worth the visit as are the Ice Caves.
These "caves" are actually tectonic caves formed when part of the mountain pulled away forming
deep crevices in the rock.
The hiking trails throughout the Sam's Point Preserve vary from open carriageway to narrow "maintained"
trails through the brush, over the bogs and around many interesting rock formations. There are
several different variations in length from the trail through the Ice Caves and to Sam's Point which
is about 4 miles to the 10.5 mile complete loop. The ecology is a pine barrens with some hardwood
sections and many boggy areas. Verkeerder Kill falls is well worth the visit as are the Ice Caves.
These "caves" are actually tectonic caves formed when part of the mountain pulled away forming
deep crevices in the rock.
This hike is a bushwhack to the Greater Ice Caves which were never a commercial venture. They are much more impressive than the caves on top of the Sams Point plateau. Take Route 52 through Ellenville towards Cragsmoor. Just before the road heads up the mountain turn left on Berme Road. Just before the fire station on the right, turn right and park in the upper parking area. Walk to the kiosk and look for a path that's heads up through a quarry. After this the path is a bushwhack that follows some woods roads and then a barely discernible path to the caves. This is VERY steep in places. Many of the caves are accessible but be careful since a slip could mean a serious injury. One or more of the caves will have ice far into the summer.
 (The image at the left shows the profile of the hike. Remember that all vertical profiles are relative!)
Sam's Point: Ice Caves and Indian Rock
| Quick Look | ||||
|---|---|---|---|---|
| Difficulty | Round trip | Total climb | Internet Maps | |
| 6.4 mi. | 800 ft. | AllTrails | ||
 The hiking trails throughout the Sam's Point Preserve vary from open carriageway to narrow "maintained"
trails through the brush, over the bogs and around many interesting rock formations. There are
several different variations in length from the trail through the Ice Caves and to Sam's Point which
is about 4 miles to the 10.5 mile complete loop. The ecology is a pine barrens with some hardwood
sections and many boggy areas. Verkeerder Kill falls is well worth the visit as are the Ice Caves.
These "caves" are actually tectonic caves formed when part of the mountain pulled away forming
deep crevices in the rock.
The hiking trails throughout the Sam's Point Preserve vary from open carriageway to narrow "maintained"
trails through the brush, over the bogs and around many interesting rock formations. There are
several different variations in length from the trail through the Ice Caves and to Sam's Point which
is about 4 miles to the 10.5 mile complete loop. The ecology is a pine barrens with some hardwood
sections and many boggy areas. Verkeerder Kill falls is well worth the visit as are the Ice Caves.
These "caves" are actually tectonic caves formed when part of the mountain pulled away forming
deep crevices in the rock.
For this hike, park at the Conservation Center lot and pay the $7 fee for one time use or buy a yearly pass for $40. Head toward the Loop Road and bear right up the hill toward Sam's Point. Visit Sam's Point the next time you come since this hike is long enough already. After about a mile on the loop road, turn right onto Ice Caves Road and continue straight ahead on the road that goes to the ice caves entrance. This road is highly eroded so be careful as you negotiate the path. The ice caves have various wooden stairs and walkways throughout their length which can be slippery when wet. A few places require you to squeeze through narrow spaces. When you come out of the caves, spend a few minutes looking east. You will see Lake Awosting and the cliffs of Castle And Hamilton Points. All of these features are in Minnewaska State Park. Walk back up the road to the loop road and turn right.
The walk now is on the once paved and maintained Loop Road as is almost flat. You will pass by Lake Maratanza on your left which is one of the :sky Lakes". The pH is too low to allow most living things to live in the lake. The lake acts as an emergency source of water for Ellenville. Continue on around the lake until a road branches to the right. This is a carriageway that leads to High Point or the Smiley Carriageway. Walk about .4 miles and watch for a trail on the left to Indian Rock. The trail begins with a series of boardwalks. The area can be very wet which makes the boardwalks helpful but many times it is dry. It is a little more than .5 miles to Indian Rock with a loss of about 90 feet. The trail may be hard to follow as the blazes are mostly painted on the rocks. Indian Rock is a large boulder set on other rocks with a cavity below. It is possible to enhance your view by CAREFULLY climbing to the top. Either way, there is a nice view of the valley below. When you are done retrace your route back to the carriageway and back out to the Loop Road. Turn right to complete the loop back to the parking area. You will pass several transmission and microwave towers along the final 1.2 miles of the hike.
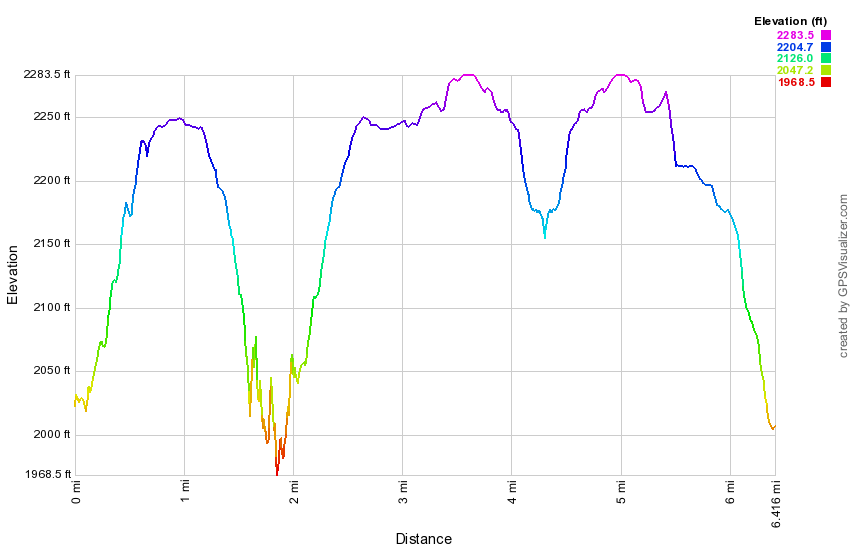 (The image at the left shows the profile of the hike. Remember that all vertical profiles are relative!)
Sam's Point: Lake Awosting Loop on Berrypicker's Path
| Quick Look | ||||
|---|---|---|---|---|
| Difficulty | Round trip | Total climb | Internet Maps | |
| 13.3 mi. | 1412 ft. | AllTrails | ||
 The hiking trails throughout the Sam's Point Preserve vary from open carriageway to narrow "maintained"
trails through the brush, over the bogs and around many interesting rock formations. There are
several different variations in length from the trail through the Ice Caves and to Sam's Point which
is about 4 miles to the 10.5 mile complete loop. The ecology is a pine barrens with some hardwood
sections and many boggy areas. Verkeerder Kill falls is well worth the visit as are the Ice Caves.
These "caves" are actually tectonic caves formed when part of the mountain pulled away forming
deep crevices in the rock.
The hiking trails throughout the Sam's Point Preserve vary from open carriageway to narrow "maintained"
trails through the brush, over the bogs and around many interesting rock formations. There are
several different variations in length from the trail through the Ice Caves and to Sam's Point which
is about 4 miles to the 10.5 mile complete loop. The ecology is a pine barrens with some hardwood
sections and many boggy areas. Verkeerder Kill falls is well worth the visit as are the Ice Caves.
These "caves" are actually tectonic caves formed when part of the mountain pulled away forming
deep crevices in the rock.
For this hike, park at the Conservation Center lot and pay the $7 fee for one time use or buy a yearly pass for $40. Head toward the Loop Road and bear right up the hill toward Sam's Point. Visit Sam's Point the next time you come since this hike is long enough already. After about a mile on the loop road, turn right onto Ice Caves Road and then left onto the Verkeerder Kill Falls Trail. Again, save the Ice Caves for another day when you will be hiking less than 13 miles! The Verkeerder Kill Falls Trail drops to the falls at one of the lowest points on the hike after about 1.7 miles. Along the way there are some nice views and various birds can be seen riding the air currents.
To continue on the hike CAREFULLY cross the Kill above the Falls. This can be easy or very difficult depending on the water level. Walk along the edge of the ravine to get the best look at the falls. When you have had your fill. walk back to the Long Path and continue the hike. In a short distance, the trail climbs steeply but briefly up to the escarpment. In .2 miles you will be at the trail junction where the High Point Trail turns left to go to High Point and then heads back to the parking area. Turn right here to stay on the Long Path and follow its aqua markers. The trail continues through the pine barrens environments and over rocky outcroppings. In. .7 miles a small but beautiful pond with the misleading name of Mud Pond will appear on the right. Continue passed the pond for about another mile and you will be on a rocky cliff overlooking Lake Awosting. This is a good place to stop for a moment or longer.
Continue on the Long Path until you see a path down to the road around Lake Awosting. Go down the path and turn left a the bottom. Hike clockwise around the lake for 1.2 miles. Just as the ranger cabin comes into view turn left on the Smiley Carriageway. This is not marked with any blazes and can be hard to follow the first time you are on it. In .7 miles you will cross Fly Brook which can run high at times. Immediately after the brook turn left up the hill toward Stony Kill. After 1.1 miles you will cross the Stony Kill which usually has little or no volume so close to its source. After this the carriageway becomes steeper and very rocky in places. As it flattens at the top it is not unusual to find a large amount of standing water on the path.
In .9 miles the Berrypicker's Path turns left and is marked with rock cairns and old pots and pans. This is listed as an unmaintained trail but seems to be well marked. In additional to light blue blazes, hikers have set up many rock cairns and added many fanciful stone designs. The trail lasts for 1.75 miles at which point it meets the High Point Trail on the left. The views from here are good in all directions. Walk on the High Point Trail for a short distance. You can continue to High Point and return or descend on the right directly to the Smiley Carriageway. The carriageway joins the Sam's Point Loop Road after 1.7 miles. Turn right on the loop road and walk 1.1 miles back to the Conservation Center.
 (The image at the left shows the profile of the hike. Remember that all vertical profiles are
relative!)
(The image at the left shows the profile of the hike. Remember that all vertical profiles are
relative!)
Sam's Point: Lake Awosting Loop on Smiley Carriageway
| Quick Look | ||||
|---|---|---|---|---|
| Difficulty | Round trip | Total climb | Internet Maps | |
| 13.1 mi. | 2000 ft. | AllTrails | ||
 The hiking trails throughout the Sam's Point Preserve vary from open carriageway to narrow "maintained"
trails through the brush, over the bogs and around many interesting rock formations. There are
several different variations in length from the trail through the Ice Caves and to Sam's Point which
is about 4 miles to the 10.5 mile complete loop. The ecology is a pine barrens with some hardwood
sections and many boggy areas. Verkeerder Kill falls is well worth the visit as are the Ice Caves.
These "caves" are actually tectonic caves formed when part of the mountain pulled away forming
deep crevices in the rock.
The hiking trails throughout the Sam's Point Preserve vary from open carriageway to narrow "maintained"
trails through the brush, over the bogs and around many interesting rock formations. There are
several different variations in length from the trail through the Ice Caves and to Sam's Point which
is about 4 miles to the 10.5 mile complete loop. The ecology is a pine barrens with some hardwood
sections and many boggy areas. Verkeerder Kill falls is well worth the visit as are the Ice Caves.
These "caves" are actually tectonic caves formed when part of the mountain pulled away forming
deep crevices in the rock.
Park in the lot at the Visitor's Center at Sam's Point. Be sure you pay the parking fee or buy a pass that is good for a year. As you walk toward the trails, you may bear to the left or right. Bear to the left and begin to hike up the loop road on a gentle grade. Watch on your left for some of the shacks used by blueberry pickers in years gone by. These shacks are all but gone but hark back to an era when berry picking was a commercial venture. At about .3 miles the South Gully Trail branches left off the loop road. This trail leads down to Route 52 and is a hike all by itself. There are several waterfalls and cascades along the trail as it parallels a stream. Continue to walk along the loop road. At about 1.0 mile there will be a short side trail that goes to the shore of Lake Maratanza. Depending on the level of the lake, this may or may not prove interesting. At this point you will start to see TV and other communications towers on your left. The High Point Carriageway bears to the left off the loop road at 1.2 miles. At about 1.5 miles a trail to the left leads to Indian Rock. Although this glacial erratic is interesting and has a nice view, save it for another, shorter hike. Continue north on the carriageway to 2.75 miles where there is a junction with the High Point Trail and the Smiley Carriageway. Continue straight ahead on the carriageway but be aware that it is not well-marked in places and can have some very wet spots along the way, The path descends to about 3.85 miles where it begins to rise some. At 4.15 miles informal pathways lead off to the left to Napanoch Point. Come back again to visit this area. After this the path turns from north to east. At 4.5 miles the Berrypicker's Path branches off to the right after which the carriageway rises and falls several times until it reaches Fly Brook at 6.6 miles. A trail to the upper part of Stony Kill Falls turns to the left while you should bear to the right and cross Fly Brook. Follow the carriageway which becomes more well-defined bearing left at a T. This will lead to the shores of Lake Awosting near the ranger's cabin at 6.6 miles. Turn right on the Lake Awosting Carriageway to continue anticlockwise around the lake. Near the inlet end there are several nice viewpoints. Just after rounding the end of the lake, find a path to the right at about 8.55 miles which leads to the Long Path. Turn right on the aqua blazed Long Path to head southwest toward Verkeerder Kill Falls. At 9.5 miles you will pass by Mud Pond or Haseco Lake which is the source of Fly Brook. Some wooden walkways help to cross a few wet areas. Part of the trail here passes through some laurel tunnels before ascending to some rocky outcrops which overlook the lake. The trail continues along these outcrops until it descends to the falls at 10.5 miles. Be careful crossing the stream above the falls. You will now hike 1.5 miles and gain 450 feet to the road that goes the ice caves. Along the way the trail is rocky and can be wet. There are some nice views of the valley below and some of Lake Awosting and Castle Point if you look back over your shoulder. Turn right on the road and walk up to the Loop Road. Turn left and walk about 1 mile back to where you are parked.
 (The image at the left shows the profile of the hike. Remember that all vertical profiles are
relative!)
(The image at the left shows the profile of the hike. Remember that all vertical profiles are
relative!)
Sam's Point: Lake Awosting via Long Path
| Quick Look | ||||
|---|---|---|---|---|
| Difficulty | Round trip | Total climb | Internet Maps | |
| 9.1 mi. | 1290 ft. | AllTrails | ||
 The hiking trails throughout the Sam's Point Preserve vary from open carriageway to narrow "maintained"
trails through the brush, over the bogs and around many interesting rock formations. There are
several different variations in length from the trail through the Ice Caves and to Sam's Point which
is about 4 miles to the 10.5 mile complete loop. The ecology is a pine barrens with some hardwood
sections and many boggy areas. Verkeerder Kill falls is well worth the visit as are the Ice Caves.
These "caves" are actually tectonic caves formed when part of the mountain pulled away forming
deep crevices in the rock.
The hiking trails throughout the Sam's Point Preserve vary from open carriageway to narrow "maintained"
trails through the brush, over the bogs and around many interesting rock formations. There are
several different variations in length from the trail through the Ice Caves and to Sam's Point which
is about 4 miles to the 10.5 mile complete loop. The ecology is a pine barrens with some hardwood
sections and many boggy areas. Verkeerder Kill falls is well worth the visit as are the Ice Caves.
These "caves" are actually tectonic caves formed when part of the mountain pulled away forming
deep crevices in the rock.
Park at the Visitors Center at the Sam's Point Preserve and start out on the Loop Road to the right. Hike up the Loop Road passing the spur trail to Sam's Point on the left. This hike is already long but you may visit the lookout if you wish. Turn right on the road that goes down to the ice caves. Turn then a left onto the Verkeerder Kill Falls Trail which has the aqua blazes of the Long Path. This trail has some beautiful views out over the flat valley on your right. Straight ahead on the trail you will see the cliffs of Castle Point and Hamilton Point at Minnewaska State Park and the blue waters of Lake Awosting. The trail drops 500 feet in about 1.75 miles to the lowest point on the hike at Verkeerder Kill Falls at 2.6 miles into the hike. There are lookouts on both sides of the falls. The falls are more interesting when there has been some rainfall but this makes crossing the stream above the falls more dangerous! After observing the falls from the far side, continue on the trail as it rises to a trail junction over the next .3 miles. Turn right to stay on the Long Path and head to Lake Awosting. Older maps show this part of the trail as "Closed" or "Do not enter" but the land has been purchased by the Preserve and is now open to the public. The trail at first passes over mostly open rock and hikers have constructed many small cairns along the way. After about 1.1 miles Mud Pond or Lake Haseco came into view at 3.5 miles with a nice viewpoint overlooking the water. As you continue on the trail, a path to the right goes down to the shore of the pond. Back on the trail there is a wooden walkway over some muddy areas and Fly Brook. After another mile at about 5 miles you will be at a lookout over Lake Awosting at the southwestern end of the lake. Turn around and follow the Long Path back to Verkeerder Kill Falls at 6.5 miles. Cross over the stream and begin a long 1.75 mile climb back to the road above the ice caves. The trail gains elevation and passes over a lot of uneven and large rocks which you may remember from the hike down to the falls. Turn right at the road and then left at the loop road to get back down to the Visitors Center.
 (The image at the left shows the profile of the hike. Remember that all vertical profiles are
relative!)
(The image at the left shows the profile of the hike. Remember that all vertical profiles are
relative!)
Sam's Point: Main Loop
| Quick Look | ||||
|---|---|---|---|---|
| Difficulty | Round trip | Total climb | Internet Maps | |
| 8.8 mi. | 1220 ft. | AllTrails | ||
 The hiking trails throughout the Sam's Point Preserve vary from open carriageway to narrow "maintained"
trails through the brush, over the bogs and around many interesting rock formations. There are
several different variations in length from the trail through the Ice Caves and to Sam's Point which
is about 4 miles to the 10.5 mile complete loop. The ecology is a pine barrens with some hardwood
sections and many boggy areas. Verkeerder Kill falls is well worth the visit as are the Ice Caves.
These "caves" are actually tectonic caves formed when part of the mountain pulled away forming
deep crevices in the rock.
The hiking trails throughout the Sam's Point Preserve vary from open carriageway to narrow "maintained"
trails through the brush, over the bogs and around many interesting rock formations. There are
several different variations in length from the trail through the Ice Caves and to Sam's Point which
is about 4 miles to the 10.5 mile complete loop. The ecology is a pine barrens with some hardwood
sections and many boggy areas. Verkeerder Kill falls is well worth the visit as are the Ice Caves.
These "caves" are actually tectonic caves formed when part of the mountain pulled away forming
deep crevices in the rock.
Park in the lot at the Visitor's Center at Sam's Point. Be sure you pay the parking fee or buy a pass that is good for a year. As you walk toward the trails, you may bear to the left or right. Bear to the right on the Loop Road toward Sam's Point. This hike leaves out many of the "attractions" in favor of a slightly shorter(?) hike. As you ascend the road there will be good views from open rocks ledges on the right. Pass by the side path to Sam's Point and continue on to the road. Turn right on the road that goes down to the ice caves. Turn then a left onto the Verkeerder Kill Falls Trail which has the aqua blazes of the Long Path. This trail has some beautiful views out over the flat valley on your right. Straight ahead on the trail you will see the cliffs of Castle Point and Hamilton Point at Minnewaska State Park and the blue waters of Lake Awosting. The trail drops 500 feet in about 1.75 miles to the lowest point on the hike at Verkeerder Kill Falls at 2.9 miles into the hike. There are lookouts on both sides of the falls. The falls are more interesting when there has been some rainfall but this makes crossing the stream above the falls more dangerous! After observing the falls from the far side, continue on the trail as it rises to a trail junction over the next .3 miles. Bear left on the red High Point Trail. For the next 2 miles this trail follows the edge of the escarpment on its way to High Point. The trail has some fantastic views over the valley and you can always take a look back at where you have been and ahead to where you are going. As the trail approaches High Point it passes through some brush. The trail here may be wet depending on the recent rainfall and the brush may be thick. The red blazes are painted on the rocks and may be hard to see. At about 5.4 miles, you will climb a steep spot and be on High Point which is marked by a USGS benchmark. Continue on the trail for another .3 miles to an area where there was once a fire observation tower. You can still see the iron moorings of the tower embedded in the rock. Walk down the trail to where it ends on the High Point Carriageway. Turn left to start back to the Visitors Center. The carriageway gains some elevation until and 7.25 miles the spur trail to Indian Rock appears on the right. Continue on the carriageway to the Loop Road at 7.6 miles. Turn right on the road in the area where there are several communications towers. The road now continuously descends over the next 1.2 miles until you are back in the parking lot. Along the way you may see what remains of the sheds used by blueberry pickers back in the day when that was a commercial enterprise. At 8.5 miles the South Gully Trail will be on the right. This trail is a nice hike on its own and is part of the Long Path. When the South Gully Trail gets to Route 52, It connects to the Shawangunk Ridge Trail.
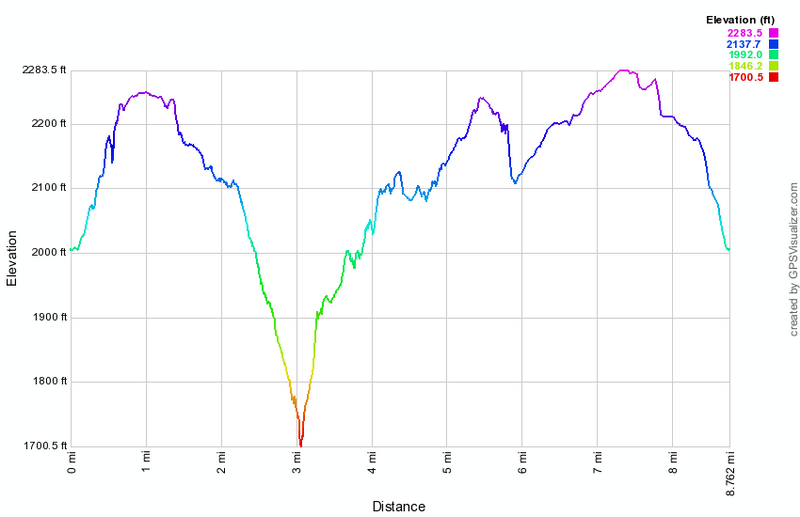 (The image at the left shows the profile of the hike. Remember that all vertical profiles are relative!)
Sam's Point: Napanoch Point and Berrypicker's Trail
| Quick Look | ||||
|---|---|---|---|---|
| Difficulty | Round trip | Total climb | Internet Maps | |
| 10.9 mi. | 1137 ft. | AllTrails | ||
 The hiking trails throughout the Sam's Point Preserve vary from open carriageway to narrow "maintained"
trails through the brush, over the bogs and around many interesting rock formations. There are
several different variations in length from the trail through the Ice Caves and to Sam's Point which
is about 4 miles to the 10.5 mile complete loop. The ecology is a pine barrens with some hardwood
sections and many boggy areas. Verkeerder Kill falls is well worth the visit as are the Ice Caves.
These "caves" are actually tectonic caves formed when part of the mountain pulled away forming
deep crevices in the rock.
The hiking trails throughout the Sam's Point Preserve vary from open carriageway to narrow "maintained"
trails through the brush, over the bogs and around many interesting rock formations. There are
several different variations in length from the trail through the Ice Caves and to Sam's Point which
is about 4 miles to the 10.5 mile complete loop. The ecology is a pine barrens with some hardwood
sections and many boggy areas. Verkeerder Kill falls is well worth the visit as are the Ice Caves.
These "caves" are actually tectonic caves formed when part of the mountain pulled away forming
deep crevices in the rock.
Park in the lot at the Visitor's Center at Sam's Point. Be sure you pay the parking fee or buy a pass that is good for a year. As you walk toward the trails, you may bear to the left or right. Bear to the left and begin to hike up the loop road on a gentle grade. Watch on your left for some of the shacks used by blueberry pickers in years gone by. These shacks are all but gone but hark back to an era when berry picking was a commercial venture. At about .3 miles the South Gully Trail branches left off the loop road. This trail leads down to Route 52 and is a hike all by itself. There are several waterfalls and cascades along the trail as it parallels a stream. Continue to walk along the loop road. At about 1.0 mile there will be a short side trail that goes to the shore of Lake Maratanza. Depending on the level of the lake, this may or may not prove interesting. At this point you will start to see TV and other communications towers on your left. The High Point Carriageway bears to the left off the loop road at 1.2 miles. At about 1.5 miles a trail to the left leads to Indian Rock. Although this glacial erratic is interesting and has a nice view, save it for another, shorter hike. Continue north on the carriageway to 2.75 miles where there is a junction with the High Point Trail and the Smiley Carriageway. Continue straight ahead on the carriageway but be aware that it is not well-marked in places and can have some very wet spots along the way, The path descends to about 3.85 miles where it begins to rise some. At 4.15 miles informal pathways lead off to the left to Napanoch Point. Turn left here for a short bushwhack out to this viewpoint. You may also find some areas where there have been campfires. Return to the main path and at 4.4 miles another path heads left or north toward Jacob's Ladder. You may turn here and walk about .4 miles since there are some views on this descent. Turn around and walk back to the main carriageway and turn left. At 5.6 miles the Berrypicker's Path branches off to the right. Make the turn and be prepared for a 1.8 mile uphill walk across open rock and through scrub pines. Along the way hikers have created cairns and other designs with stones. At the end of this trail you will be in the area where there was once a fire tower. Before descending back to the High Point Carriageway, follow the High Point Trail .3 miles to High Point. A USGS marker is embedded here in the stone. Retrace your path and descend to the High Point Carriageway and turn left to start back to the Visitors Center. At 9.3 miles the spur trail to Indian Rock will be on your right. When you reach the Loop Road at 9.7 miles turn right. The communications towers will be on your right. At 10.6 miles you will pass by the South Gully Trail and the berrypicker's shacks. From here it is a short walk to your car.
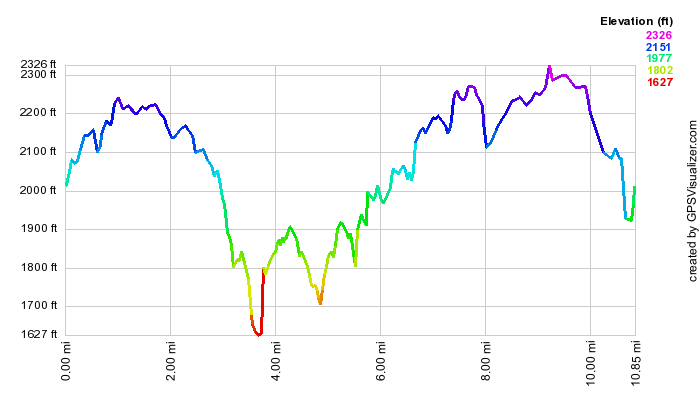 (The image at the left shows the profile of the hike. Remember that all vertical profiles are
relative!)
(The image at the left shows the profile of the hike. Remember that all vertical profiles are
relative!)
Sam's Point: South Gully Trail and Loop
| Quick Look | ||||
|---|---|---|---|---|
| Difficulty | Round trip | Total climb | Internet Maps | |
| 8.2 mi. | 1977 ft. | AllTrails | ||

Take New York State Route 52 east from Ellenville. The road will begin to climb the Shawangunk Ridge as soon as you leave town. The road winds up along the ridge and there are several pulloffs on the way up. On a clear day park at one of these areas and enjoy the view of the valley and the Catskills beyond. Just as the road leaves town look on the left as you pass over a bridge. There is a beautiful waterfall with small rapids below it. Watch for a sign on the right that says Cragsmoor and turn to the left at this road. Follow Cragsmoor Road to the hamlet of Cragsmoor and bear left near the library and post office. Watch for the turn to the right onto Sam's Point Road. Follow the road to the Conservation Center parking area. Be sure to put your pass in the window or pay the fee at the Center.
Walk toward the beginning of the loop road and bear to the left. Walk up the hill and pass the first set of Berrypicker shacks. Watch for the aqua markers of the long path. Three of these markers on the left side of the road mark the start of the South Gully Trail which will be part of the Long Path. Turn left onto the trail. The trail passes some of the shacks and then starts a LONG descent toward Route 52. In about .7 miles you will cross Gully Road. Along the way there are several small but pretty cascades but nothing compared to what awaits AFTER crossing the road. Turn left on Gully Road and walk just slightly up the hill and across the road. Pick up the trail again.
For the next 1.5 miles you will be treated to the roar of the stream that passes through the gully. The volume will depend on the season and the amount of rain. There are MANY opportunities to walk off the trail and down to the stream to take pictures, wade on a hot day or just enjoy the views. Many of the cascades show parallel layers of sedimentary rocks of varying hardness. As the water falls over the rocks they erode and fall to the base of the cascade. The last half mile of the trail is slightly uphill and then flat out to Route 52. The return hike is slightly more strenuous as you retrace your steps UP 1400 feet back to the Sam's Point Loop Road. At the road you can continue on around the lake as shown in the map here. You can also extend the hike with any of the many "side trips" that are available or go directly back to the Conservation Center.
 (The image at the left shows the profile of the hike. Remember that all vertical profiles are
relative!)
(The image at the left shows the profile of the hike. Remember that all vertical profiles are
relative!)
Sam's Point: South Gully Trail Only
| Quick Look | ||||
|---|---|---|---|---|
| Difficulty | Round trip | Total climb | Internet Maps | |
| 6.1 mi. | 2143 ft. | AllTrails | ||

Take New York State Route 52 east from Ellenville. The road will begin to climb the Shawangunk Ridge as soon as you leave town. The road winds up along the ridge and there are several pulloffs on the way up. On a clear day park at one of these areas and enjoy the view of the valley and the Catskills beyond. Just as the road leaves town look on the left as you pass over a bridge. There is a beautiful waterfall with small rapids below it. About 1.1 miles from this waterfall Route 52 will cross South Gully on a bridge. At the end of the bridge is a wide shoulder on the left side of the road. Turn around and park on the wide shoulder by the guardrail. This is where the trail begins. The first part of the trail drops a little from the road to the stream that forms South Gully. At the bottom of the descent, you may walk over to the stream and take some pictures before getting back on the trail. There are MANY small waterfalls and rapids along the stream! In some places the trail almost disappears and you must sidehill. Slippery leaves and pine needles makes this section of trail interesting. You may want to walk down to the stream at several points along the way to take pictures of some of the small waterfalls and rapids. At about 2.1 miles you will come to South Gully Road. Walk out to the road and turn left. Walk across the road and downhill for a short distance before picking up the trail on the other side.
From South Gully Road the trail becomes a little steeper before leveling off near the top of the plateau. Over the first 2 miles you will gain just over 300 feet. In the next mile to the junction with the loop road, the gain is almost 700 feet. At around 3 miles you will reach the Loop Road at Sam's Point. Turn around and retrace your route back to the car at 9.2 miles.
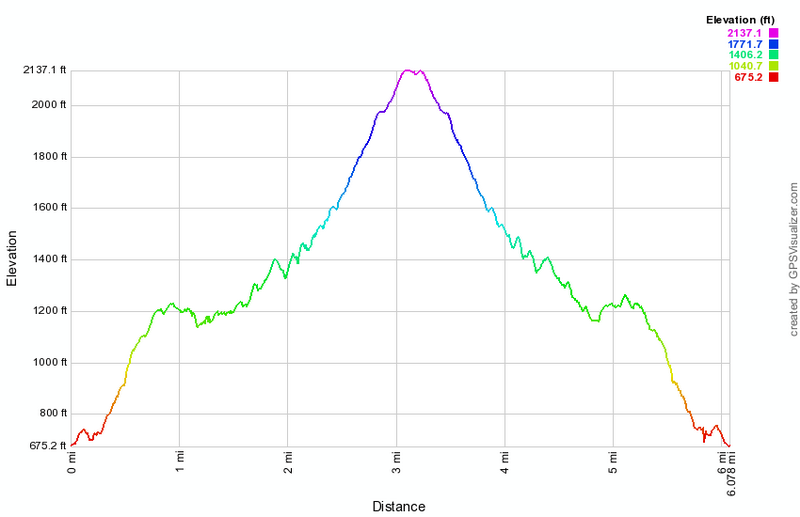 (The image at the left shows the profile of the hike. Remember that all vertical profiles are relative!)
Sam's Point: South Gully Trail and Lake Loop
| Quick Look | ||||
|---|---|---|---|---|
| Difficulty | Round trip | Total climb | Internet Maps | |
| 9.2 mi. | 2470 ft. | AllTrails | ||
_map.png)
Take New York State Route 52 east from Ellenville. The road will begin to climb the Shawangunk Ridge as soon as you leave town. The road winds up along the ridge and there are several pulloffs on the way up. On a clear day park at one of these areas and enjoy the view of the valley and the Catskills beyond. Just as the road leaves town look on the left as you pass over a bridge. There is a beautiful waterfall with small rapids below it. About 1.1 miles from this waterfall Route 52 will cross South Gully on a bridge. At the end of the bridge is a wide shoulder on the left side of the road. Turn around and park on the wide shoulder by the guardrail. This is where the trail begins. The first part of the trail drops a little from the road to the stream that forms South Gully. At the bottom of the descent, you may walk over to the stream and take some pictures before getting back on the trail. There are MANY small waterfalls and rapids along the stream! In some places the trail almost disappears and you must sidehill. Slippery leaves and pine needles makes this section of trail interesting. You may want to walk down to the stream at several points along the way to take pictures of some of the small waterfalls and rapids. At about 2.1 miles you will come to South Gully Road. Walk out to the road and turn left. Walk across the road and downhill for a short distance before picking up the trail on the other side.
From South Gully Road the trail becomes a little steeper before leveling off near the top of the plateau. Over the first 2 miles you will gain just over 300 feet. In the next mile to the junction with the loop road, the gain is almost 700 feet. At around 3 miles you will reach the Loop Road at Sam's Point. Turn left and start to walk around the Lake Maratanza. Hiking on the road is easy compared to the trail. The road surface is flat and it is almost level with only a slight elevation gain. A series of cliffs will appear on your right. When a path appears on the right, you may want to take the path as there are some very nice views from the top of these cliffs. Go back to the path and continue on around the lake in a clockwise direction. On the far side of the lake the road runs right next to the water and you can get some unobstructed views of the water. Continue on passed the road on the left that goes down to the ice caves. Turn right at the next path and walk up to the overlook at Sam's Point. Go back to the road and turn right to walk down to an area near the Visitor's Center where you will turn right to get back up to the South Gully Trail at 6.3 miles. Turn left onto the trail and retrace your route back to the car at 9.2 miles.
_gra.png) (The image at the left shows the profile of the hike. Remember that all vertical profiles are relative!)
(The image at the left shows the profile of the hike. Remember that all vertical profiles are relative!)
Sam's Point: South Gully Trail Road Loop
| Quick Look | ||||
|---|---|---|---|---|
| Difficulty | Round trip | Total climb | Internet Maps | |
| 9.2 mi. | 2470 ft. | AllTrails | ||
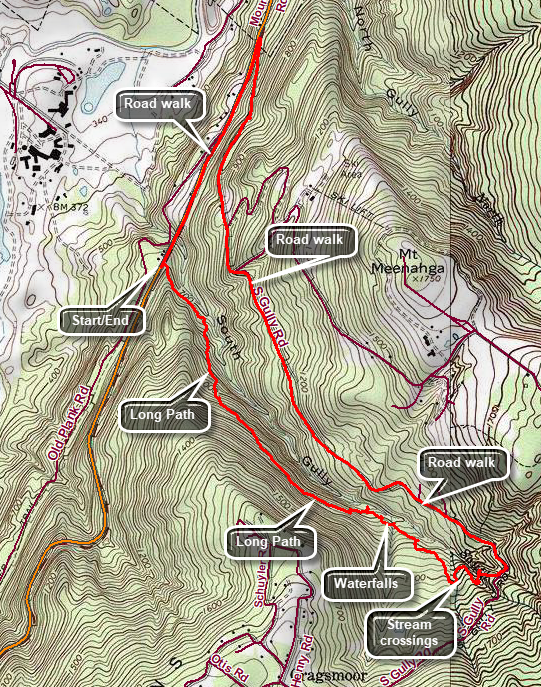
Take New York State Route 52 east from Ellenville. The road will begin to climb the Shawangunk Ridge as soon as you leave town. The road winds up along the ridge and there are several pulloffs on the way up. On a clear day park at one of these areas and enjoy the view of the valley and the Catskills beyond. Just as the road leaves town look on the left as you pass over a bridge. There is a beautiful waterfall with small rapids below it. About 1.1 miles from this waterfall Route 52 will cross South Gully on a bridge. At the end of the bridge is a wide shoulder on the left side of the road. Turn around and park on the wide shoulder by the guardrail. This is where the trail begins. The first part of the trail drops a little from the road to the stream that forms South Gully. At the bottom of the descent, you may walk over to the stream and take some pictures before getting back on the trail. There are MANY small waterfalls and rapids along the stream! In some places the trail almost disappears and you must sidehill. Slippery leaves and pine needles makes this section of trail interesting. You may want to walk down to the stream at several points along the way to take pictures of some of the small waterfalls and rapids. At about 2.1 miles you will come to South Gully Road. Walk out to the road and turn left to walk down South Gully Road for 2.4 miles to Route 52. Turn left on Route 52 and walk .9 miles back to the car.
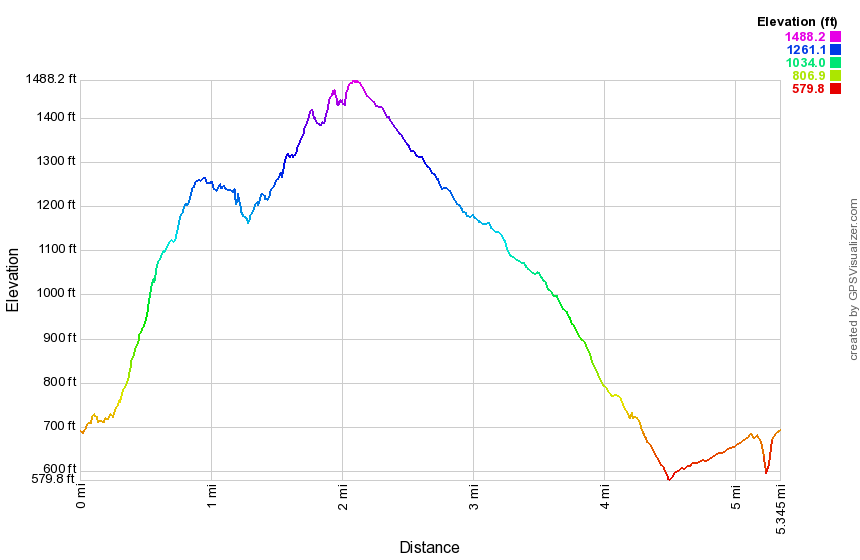 (The image at the left shows the profile of the hike. Remember that all vertical profiles are relative!)
Sam's Point: Verkeerder Kill Falls and Lake Loop
| Quick Look | ||||
|---|---|---|---|---|
| Difficulty | Round trip | Total climb | Internet Maps | |
| 6.8 mi. | 885 ft. | AllTrails | ||
 The hiking trails throughout the Sam's Point Preserve vary from open carriageway to narrow "maintained" trails through the brush, over the bogs and around many interesting rock formations. There are several different variations in length from the trail through the Ice Caves and to Sam's Point which is about 4 miles to the 10.5 mile complete loop. The ecology is a pine barrens with some hardwood sections and many boggy areas. Verkeerder Kill falls is well worth the visit as are the Ice Caves. These "caves" are actually tectonic caves formed when part of the mountain pulled away forming deep crevices in the rock.
Park in the lot at the Visitor's Center at Sam's Point. Be sure you pay the parking fee or buy a pass that is good for a year. As you walk toward the trails, you may bear to the left or right. Bear to the right on the Loop Road toward Sam's Point. This hike leaves out many of the "attractions" in favor of a slightly shorter hike. As you ascend the road there will be good views from open rocks ledges on the right. At the top of the climb as the road levels there will be a side path to Sam's Point. Turn left here and walk out to this spectacular viewpoint. When you are done retrace your steps and continue on to the road. Turn right on the road that goes down to the Ice Caves. Turn at the first left onto the Verkeerder Kill Falls Trail which has the aqua blazes of the Long Path. This trail has some beautiful views out over the flat valley on your right. Straight ahead on the trail you will see the cliffs of Castle Point and Hamilton Point at Minnewaska State Park and the blue waters of Lake Awosting. The trail drops 500 feet in about 1.75 miles to the lowest point on the hike at Verkeerder Kill Falls at 3.1 miles into the hike. There are lookouts on both sides of the falls. Walk toward the falls on the near side and find a ledge that acts as a viewpoint. The falls are more interesting when there has been some rainfall but this makes crossing the stream above the falls more dangerous! After observing the falls from the near side, continue on the trail as it crosses the creek above the falls. BE CAREFUL as slipping here in high water could have disastrous results! On the far side walk along the chasm to the lookouts. These viewpoints give a different view of the falls and the valley beyond. There is often a rainbow from this side. When you are done retrace your route to the road that leads down to the Ice Caves. Turn right on the loop road and walk passed the east side of Lake Maratanza. Continue on the loop road as it rounds the lake. Pass by the carriage road that leads toward High Point. As the loop road continues around the lake, you will see communications towers on the west side of the road. Further along you will see the remains of berrypickers shacks that are now the subject of an archaeological study. As you descend on the loop road, the South Gully trail will be on the right. The trail paralleled South Gully and crosses Route 52. This is the route of the Long Path which continues across Route 52 to pick up the Shawangunk Ridge Trail that heads toward Wurtsboro. You will pass one ore shack on the right and then almost immediately arrive back at the Visitor's Center.
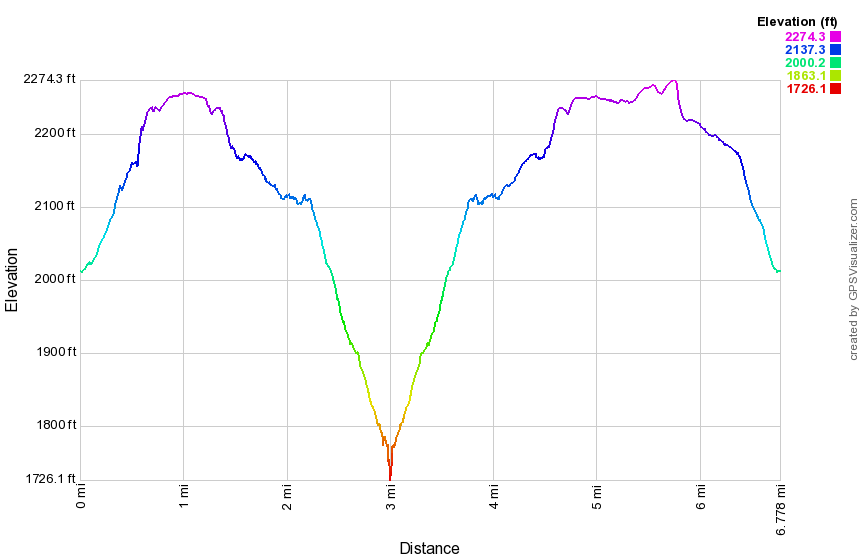 (The image shows the profile of the hike. Remember that all vertical profiles are relative!)
Sam's Point: Verkeerder Kill Falls (Out and Back))
| Quick Look | ||||
|---|---|---|---|---|
| Difficulty | Round trip | Total climb | Internet Maps | |
| 6.0 mi. | 850 ft. | AllTrails | ||
_map.png) The hiking trails throughout the Sam's Point Preserve vary from open carriageway to narrow "maintained"
trails through the brush, over the bogs and around many interesting rock formations. There are
several different variations in length from the trail through the Ice Caves and to Sam's Point which
is about 4 miles to the 10.5 mile complete loop. The ecology is a pine barrens with some hardwood
sections and many boggy areas. Verkeerder Kill falls is well worth the visit as are the Ice Caves.
These "caves" are actually tectonic caves formed when part of the mountain pulled away forming
deep crevices in the rock.
The hiking trails throughout the Sam's Point Preserve vary from open carriageway to narrow "maintained"
trails through the brush, over the bogs and around many interesting rock formations. There are
several different variations in length from the trail through the Ice Caves and to Sam's Point which
is about 4 miles to the 10.5 mile complete loop. The ecology is a pine barrens with some hardwood
sections and many boggy areas. Verkeerder Kill falls is well worth the visit as are the Ice Caves.
These "caves" are actually tectonic caves formed when part of the mountain pulled away forming
deep crevices in the rock.
Park in the lot at the Visitor's Center at Sam's Point. Be sure you pay the parking fee or buy a pass that is good for a year. As you walk toward the trails, you may bear to the left or right. Bear to the right on the Loop Road toward Sam's Point. This hike leaves out many of the "attractions" in favor of a slightly shorter(?) hike. As you ascend the road there will be good views from open rocks ledges on the right. At the top of the climb as the road levels there will be a side path to Sam's Point. Turn left here and walk out to this spectacular viewpoint. When you are done retrace your steps and continue on to the road. Turn right on the road that goes down to the ice caves. Turn at the first left onto the Verkeerder Kill Falls Trail which has the aqua blazes of the Long Path. This trail has some beautiful views out over the flat valley on your right. Straight ahead on the trail you will see the cliffs of Castle Point and Hamilton Point at Minnewaska State Park and the blue waters of Lake Awosting. The trail drops 500 feet in about 1.75 miles to the lowest point on the hike at Verkeerder Kill Falls at 3.1 miles into the hike. There are lookouts on both sides of the falls. Walk toward the falls on the near side and find a ledge that acts as a viewpoint. The falls are more interesting when there has been some rainfall but this makes crossing the stream above the falls more dangerous! After observing the falls from the near side, continue on the trail as it crosses the creek above the falls. BE CAREFUL as slipping here in high water could have disastrous results! On the far side walk along the chasm to the lookouts. These viewpoints give a different view of the falls and the valley beyond. There is often a rainbow from this side. When you are done retrace your route. You may skip Sam's Point this time or visit it again especially if the light or sky has changed.
_gra.png) (The image at the left shows the profile of the hike. Remember that all vertical profiles are relative!)
(The image at the left shows the profile of the hike. Remember that all vertical profiles are relative!)
Schooleys Mountain
| Quick Look | ||||
|---|---|---|---|---|
| Difficulty | Round trip | Total climb | Internet Maps | |
| 3.2 mi | 688 ft> | AllTrails | ||
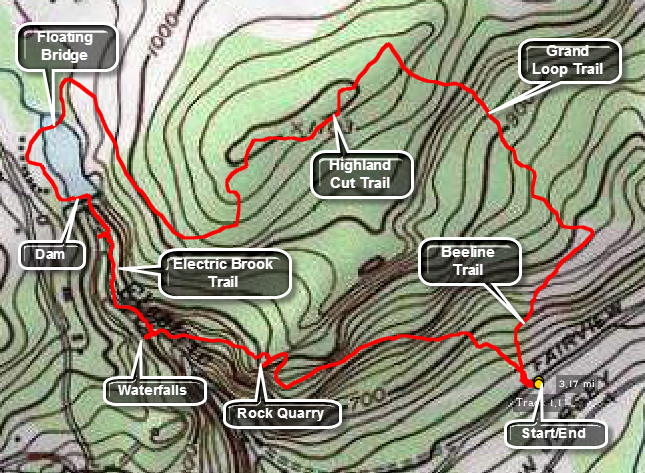
Exit Interstate 80 at exit @7A And proceed south on State Route 206 to Chester. Turn right on County Route 513. In Long Valley turn right onto Route 517 and make a QUICK left onto Fairview Avenue Watch for the Langdon Palmer Fishing Area parking lot on the right-hand side of the road. Cross the road to a trail junction where you can turn left or right. Most of the marked trail lead to the left but you will return that way. Bear right on the unblazed Beeline Trail which makes a gentle but steady ascent until it meets the yellow Grand Loop Trail at .5 miles. Several woods roads and paths cut across the trail but continue on the Grand Loop Trail. Continue straight ahead on this trail passing an exploratory iron mine pit on the right and left turn where the Grand Loop Trail splits. Continue to climb through green hardwood forest and turn left on the Highland Cut Trail at .85 miles to head. Climb slightly until at about 1.2 miles into the hike you will start to descend to the picnic area at George Lake. At the lake cross the parking area and fields to get to the bridge across the upper end of the lake. This can be confusing but you may walk to the shoreline and turn right or north until you see the bridge. The floating bridge is near the beach area and crosses George Lake. Walk south on the other side of the lake to the bridge over the dam. The Falling Water Trail parallels Electric Brook on the north side. The trail descends steeply and you will pass over a large outcrop and arrive at the main falls at 2.4 miles. The falls have an upper and lower half and are very dependent on the volume of water in the creek. The trail continues to the south and east ascending a short hill. At around 2.6 miles you will be at the top of a quarry. Many of the rocks here show signs of being "worked" with drill or hammer marks. The area is quite large. The trail descends passing the Boulder Gorge Trail and shortly meeting the Patriots Path which turns left or east and descends for .5 miles back to the parking area.
 (The image at the left shows the profile of the hike. Remember that all vertical profiles are
relative!)
(The image at the left shows the profile of the hike. Remember that all vertical profiles are
relative!)
Schunemunk Mountain: High Knob
| Quick Look | ||||
|---|---|---|---|---|
| Difficulty | Round trip | Total climb | Internet Maps | |
| 3.4 mi | 1240 ft | AllTrails | ||
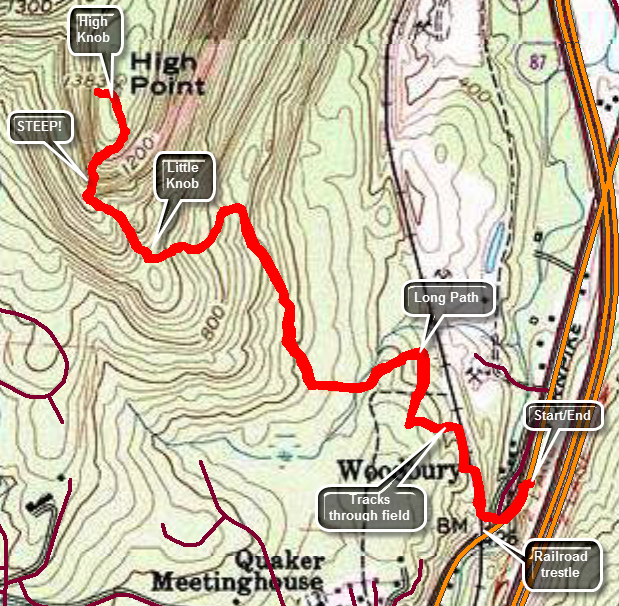 This hike is only 3.4 miles round trip but there are some VERY steep sections which can be difficult going both up and down.From the Woodbury Commons shopping mall, take Route 32 north through Woodbury and Highland Mills. Watch for a railroad trestle over the road. The trail start just north of the trestle. Just before the railroad trestle Evans Lane goes off to the left. You may be able to park on Evans Lane. The owner of the antique store just north of the trestle may let you park but be sure to ask him before you do. Start your hike by walking to the end of the private drive just north of the railroad trestle watching for the aqua blazes of the Long Path. Walk up the stone steps to the road that runs under the trestle. Cross the road and walk up the incline next to the trestle. There is a chain link fence along the right-of-way to discourage people from crossing over the tracks. The fence ends after a short distance by flaring up the bank from the tracks. DO NOT pass around the end of the fence to continue on the railroad right-of-way. Currently there may be no way to do this hike legally. The Long Path may have to be rerouted do to the new fencing. The trails in the fields to the left are on the property of Highland Stone whose office is just north on Route 32. Ask their permission before using the route described here. Turn left to walk out into the fields and find a path. Turn right and follow the trail which at first parallels the railroad tracks but then begins to head west. At about .4 miles turn right on the first trail that goes in that direction. In .1 miles you will be back on the Long Path and should make an immediate left to begin to climb. The surface of the trail is well-worn as this is a popular hike. It can be very dry with many loose stones. The trail is easy to follow and has a gentle slow at the beginning. At 1.25 miles you will be in the area of Little Knob and will have gained over 600 feet. Little Knob is to the right of the trail and there are informal paths that go to the top. You may visit Little Knob but the best views are on the trail up High Knob and from the top. Over the next .3 miles gain 420 feet until the trail finally levels as it approaches the highest spot on High Knob. This is an average of a 28% grade and some spots are even steeper! As you climb the view to the south and west comes into view. Immediately below is the village of Kiryas Joel with rows of neatly placed houses. Beyond are mountains and hills which are often shrouded in a haze. Be careful as you climb as some parts of the trail are rather exposed. Continue up until the trail levels and we were on top. The views from the top are especially nice looking north and east. To the north is the Newburgh-Beacon Bridge and North Beacon Mountain with its transmission towers. When you have taken in the views, you can continue to the Schunemunk Ridge where there are many possible loops. To return, turn around and work your way carefully back down the steep section to the easier trail below. Retrace your route back to the car.
 (The image at the left shows the profile of the hike. Remember that all vertical profiles are relative!)
Schunemunk Mountain: HilMar Counterclockwise
| Quick Look | ||||
|---|---|---|---|---|
| Difficulty | Round trip | Total climb | Internet Maps | |
| 6.8 mi | 1853 ft | AllTrails | ||
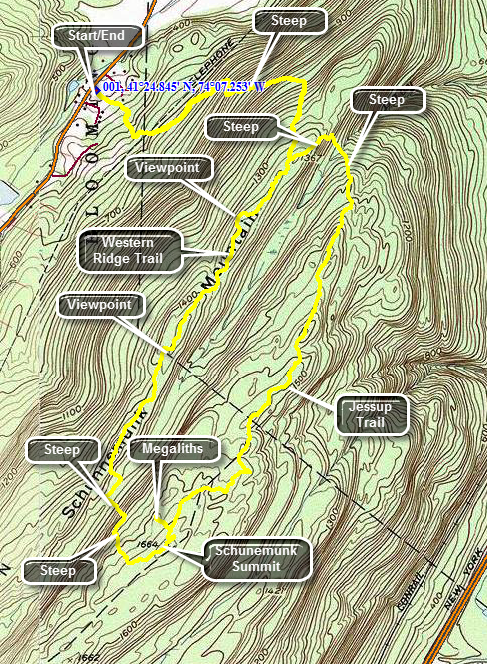 Take Route 94 to Salisbury Mills near Washingtonville. Turn east on Orrs Mills Road and after only .3 miles turn south on Clove Road. In about 1.3 miles watch for the HilMar Lodge on the left. The parking area is a few hundred feet beyond the entrance and is marked "Hiker Parking". From the parking area orange markers are visible as you look toward the woods. This trail is now called the Western Ridge Trail and is the one you should use to get to the western ridge of Schunemunk. The first part of the trail starts out with a very gentle slope and meanders through a hardwood forest at the base of the ridge. It starts heading southeast and then turns to the east. The trail becomes steeper as it climbs to the ridge but several switchbacks help. At about a mile the trail turns almost due south and ascends to the ridge where the Barton Swamp Trail ascends from the area between the two ridges. The walk to the ridge covers about 1.25 miles with an ascent of 970 feet. The walk along the western ridge is about 1.3 miles. Much of the time you will hike on slabs of conglomerate smoothed by glacial action. In other places the trail requires balancing on a ridge of the same rock. The trees are mostly dwarf pines shaped by their exposure to the winds on the ridge. Most of the time it is clear you are on a ridge as you can see both sides of it. To the east is a view of the eastern ridge and to the west lie the flatlands of Orange County. At 1.6 miles into the hike there is a viewpoint that gives a spectacular view to the west. The near view is of the flat land of Orange County which was once farms but is slowly changing to housing. In the distance to the west and north are the peaks of the Catskills. At the base of the ridge on the west is a large sand and gravel pit. As you continue to walk along the ridge another viewpoint appears at 2.2 miles. After this the trail descends along a rock face. Watch for the blue blazes of the trail that takes you down to the area between the ridges and then up to the eastern ridge. The descent is short but tricky and soon you will be on the red Barton Swamp Trail that runs the length of the area between the two ridges. Turn right and walk a short distance until the two trails split and follow the blue trail up to the eastern ridge. This ascent is considerably longer than the descent since the eastern ridge is higher. There are many places where you will have to scramble up the rocks. In .3 miles you gain 275 feet to where the trail moderates some on the ridge. At the top of the ridge you will find the Jessup Trail which is marked with its own yellow blazes. It also has the aqua blazes of the Long Path and signs designating it as part of the Highlands Trail. Turn left and within a few hundred feet you will be standing on the highest point on either ridge at 1664 feet. This is also the highest point in Orange County. Continue on the main trail for about 500 feet more and watch for the spur trail to the left that leads to the Megaliths. These are huge masses of rock that have split from the main rock of the ridge. The walk out to the megaliths is short and well worth the visit. Back on the main trail head north on the eastern ridge. The rest of the hike will be downhill except for the climb from the area between the ridges back up to the western ridge. At 3.8 miles you will pass the junction with the Dark Hollow Trail and at 4.6 miles you will find the junction with the Sweet Clover Trail. Stay on the Jessup Trail as it works its way north and starts to descend the north end of the ridge. From several viewpoints you can see the Hudson River and the Newburgh Beacon Bridge. At 5.3 miles you will have descended to the area between the ridges where the Jessup Trail continues off to the right. Follow the red Barton Swamp Trail as it climbs 200 feet in .25 miles to the eastern ridge. Within a few hundred feet from the top you will be back at the junction with the Western Ridge Trail that takes you back to your car.
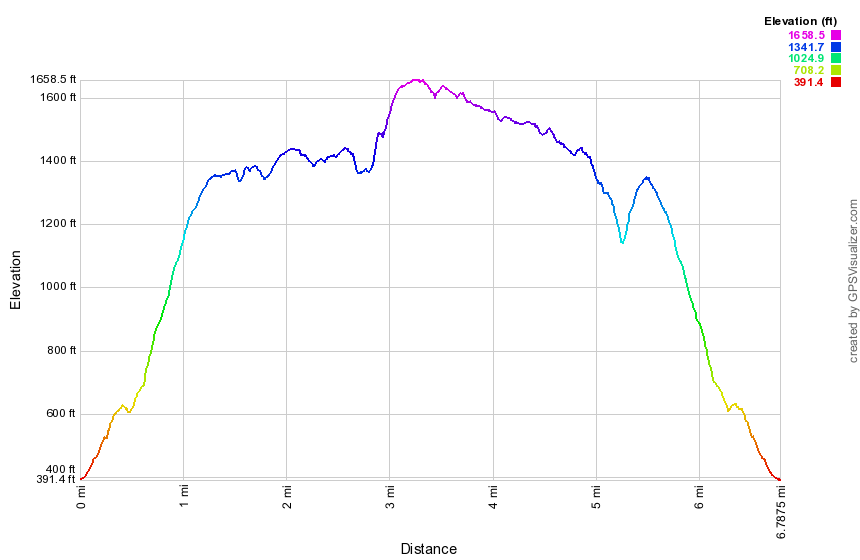 (The image at the left shows the profile of the hike. Remember that all vertical profiles are relative!)
Schunemunk Mountain: Otterkill to Dark Hollow
| Quick Look | ||||
|---|---|---|---|---|
| Difficulty | Round trip | Total climb | Internet Maps | |
| 8.2 mi | 2053 ft | AllTRails | ||
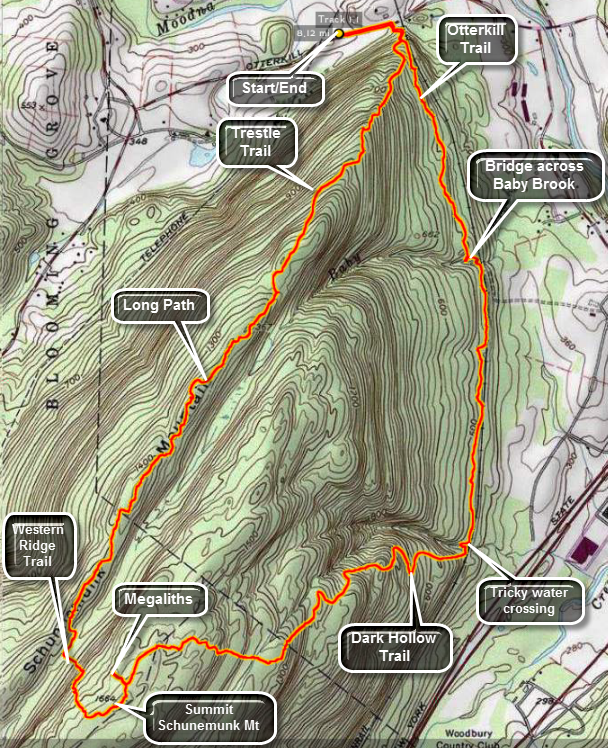 Park at trail head parking area on Otterkill Road just outside of Salisbury Mills in Orange County.
The parking area is easily in sight of the Metro North train trestle. Walk on the road toward the
trestle. In less than .25 miles and just before the trestle, cross the road an enter the woods.
The trail immediately begins to climb up a hill on a wide trail or woods road. At the first
junction keep to the left to get on the red Otterkill Trail. After about 1.5 miles of fairly easy walking,
you will arrive at the junction with the yellow-blazed Jessup Trail and the aqua-blazed Highland Trail.
At this point a bridge crosses Baby Brook. The brook runs under the tracks through a short but interesting
tunnel. There is also a small waterfall at this location. The Otterkill Trail parallels the railroad tracks for 2.1 miles. Although the total ascent amounts to 300 feet the change in elevation from one end to the other is 10 feet! It is flat but rolls a little. This does not mean that it is boring. As you start out on the trail and ascend a little rise there is a lookout to the east. This viewpoint is not very high but offers a nice view of the hills to the east. There is an extensive network of stone walls in this area. Some of these wall are low but many are built up. These remnants of a past way of life are interesting. The solid construction of these walls makes them permanent and a real indication that someone worked hard and sweated hard to farm the land. At 1.2 miles the trail turns sharply to the left on one of the many woods roads in the park. Baby Brook is straight ahead with a bridge to get you to the other side. There is a tunnel here to carry the railroad over the brook. There is also a small falls below the bridge. Continue along the trail until at 2.4 miles there is another nice falls and a crossing of Dark Hollow Brook that has no bridge. This crossing is easy when the weather has been dry but more difficult under wet conditions. Almost immediately after the crossing the Otterkill Trail ends and the dark Hollow Trail starts up the mountain to the right. The Dark Hollow Trail follows an old woods road generally southeast and up the ridge. The road is eroded and very rocky in places It makes several switchbacks in places as the grade would have been too steep for horse drawn wagons otherwise. At about 2.9 miles there is a nice lookout after a short climb. The views to the east and north are very nice. Continue to hike after I took some pictures. In some spots the trail leaves the road and makes a short climb up to the next level to rejoin the same road. This cuts a little distance and avoids the long switchbacks. These "shortcuts" also make the hike more interesting. As the trail climbs two things happen. First, there were at least four places where you seem to be on the top of the ridge. Second, the maps show two crossings of Dark Hollow Brook but there are at least four. At 3.6 miles there is another viewpoint on top of a massive rock outcrop. Climb again and the trail flattens at about 3.8 miles in an open area with incredible views in all directions except to the west. This might be the best viewpoint in the whole park. Continue on the trail and at about 4 miles you will be at the end of The Dark Hollow Trail at Dark Hollow Junction. Turn left onto Jessup Trail which is also the Highlands trail to head toward the Megaliths. The Jessup Trail winds its way along the eastern ridge over many open rock faces with scrub pines. This is an entirely different ecology than at the lower elevations. At times the trail climbs over rock outcrops and at others dives into the pines. At 4.3 miles the spur trail to the Megaliths turns right. Approach quietly since the local vultures often hang out on the rocks surveying the countryside below. Back on the main Jessup Trail turn right and at 4.6 miles turn right onto the blue Western Ridge Trail. This trail is routed over some open rocks faces before it starts to descends the ridge. Just at the point it starts the descent is another nice viewpoint. On the descent the trail becomes very narrow and hen the rocks are damp this can be quite a challenge. Continue down the Western Ridge Trail until it bottoms out a Barton Swamp. There is some old corduroy here to help you across. Once on the other side of the swamp turn right on the red Barton Swamp Trail and then turn left almost immediately to head up to the western ridge. The trail here runs right along an open rock face pitched at about 40 degrees. It soon turns up to the safety of the ridge but the first part is interesting. Once on the ridge there are places where the trail is sited directly on top of a knife edge of rock. There are a few ups and down to keep things interesting. There are also several informal paths which can mislead hikers who do not pay attention. The further you walk along the ridge the better the views become. There is a nice lookout at 5.6 miles and then the Sweet Clover`Trail comes over from the eastern ridge at 6 miles. Just passed this junction another lookout gives a nice view of the valley. Prominent in the view are a sand and gravel pit to the southwest and a lake with homes to the north. Head to the next trail junction and turn to the right to follow the Jessup Trail briefly. When the Jessup Trail meets the Trestle Trail continue straight ahead on the Trestle Trail. This trail is always rocky with small pebbles which like to roll making the footing tricky. At 7.45 miles walk out to a memorial bench which has a great view. Head down the trail to the road and your car.
Park at trail head parking area on Otterkill Road just outside of Salisbury Mills in Orange County.
The parking area is easily in sight of the Metro North train trestle. Walk on the road toward the
trestle. In less than .25 miles and just before the trestle, cross the road an enter the woods.
The trail immediately begins to climb up a hill on a wide trail or woods road. At the first
junction keep to the left to get on the red Otterkill Trail. After about 1.5 miles of fairly easy walking,
you will arrive at the junction with the yellow-blazed Jessup Trail and the aqua-blazed Highland Trail.
At this point a bridge crosses Baby Brook. The brook runs under the tracks through a short but interesting
tunnel. There is also a small waterfall at this location. The Otterkill Trail parallels the railroad tracks for 2.1 miles. Although the total ascent amounts to 300 feet the change in elevation from one end to the other is 10 feet! It is flat but rolls a little. This does not mean that it is boring. As you start out on the trail and ascend a little rise there is a lookout to the east. This viewpoint is not very high but offers a nice view of the hills to the east. There is an extensive network of stone walls in this area. Some of these wall are low but many are built up. These remnants of a past way of life are interesting. The solid construction of these walls makes them permanent and a real indication that someone worked hard and sweated hard to farm the land. At 1.2 miles the trail turns sharply to the left on one of the many woods roads in the park. Baby Brook is straight ahead with a bridge to get you to the other side. There is a tunnel here to carry the railroad over the brook. There is also a small falls below the bridge. Continue along the trail until at 2.4 miles there is another nice falls and a crossing of Dark Hollow Brook that has no bridge. This crossing is easy when the weather has been dry but more difficult under wet conditions. Almost immediately after the crossing the Otterkill Trail ends and the dark Hollow Trail starts up the mountain to the right. The Dark Hollow Trail follows an old woods road generally southeast and up the ridge. The road is eroded and very rocky in places It makes several switchbacks in places as the grade would have been too steep for horse drawn wagons otherwise. At about 2.9 miles there is a nice lookout after a short climb. The views to the east and north are very nice. Continue to hike after I took some pictures. In some spots the trail leaves the road and makes a short climb up to the next level to rejoin the same road. This cuts a little distance and avoids the long switchbacks. These "shortcuts" also make the hike more interesting. As the trail climbs two things happen. First, there were at least four places where you seem to be on the top of the ridge. Second, the maps show two crossings of Dark Hollow Brook but there are at least four. At 3.6 miles there is another viewpoint on top of a massive rock outcrop. Climb again and the trail flattens at about 3.8 miles in an open area with incredible views in all directions except to the west. This might be the best viewpoint in the whole park. Continue on the trail and at about 4 miles you will be at the end of The Dark Hollow Trail at Dark Hollow Junction. Turn left onto Jessup Trail which is also the Highlands trail to head toward the Megaliths. The Jessup Trail winds its way along the eastern ridge over many open rock faces with scrub pines. This is an entirely different ecology than at the lower elevations. At times the trail climbs over rock outcrops and at others dives into the pines. At 4.3 miles the spur trail to the Megaliths turns right. Approach quietly since the local vultures often hang out on the rocks surveying the countryside below. Back on the main Jessup Trail turn right and at 4.6 miles turn right onto the blue Western Ridge Trail. This trail is routed over some open rocks faces before it starts to descends the ridge. Just at the point it starts the descent is another nice viewpoint. On the descent the trail becomes very narrow and hen the rocks are damp this can be quite a challenge. Continue down the Western Ridge Trail until it bottoms out a Barton Swamp. There is some old corduroy here to help you across. Once on the other side of the swamp turn right on the red Barton Swamp Trail and then turn left almost immediately to head up to the western ridge. The trail here runs right along an open rock face pitched at about 40 degrees. It soon turns up to the safety of the ridge but the first part is interesting. Once on the ridge there are places where the trail is sited directly on top of a knife edge of rock. There are a few ups and down to keep things interesting. There are also several informal paths which can mislead hikers who do not pay attention. The further you walk along the ridge the better the views become. There is a nice lookout at 5.6 miles and then the Sweet Clover`Trail comes over from the eastern ridge at 6 miles. Just passed this junction another lookout gives a nice view of the valley. Prominent in the view are a sand and gravel pit to the southwest and a lake with homes to the north. Head to the next trail junction and turn to the right to follow the Jessup Trail briefly. When the Jessup Trail meets the Trestle Trail continue straight ahead on the Trestle Trail. This trail is always rocky with small pebbles which like to roll making the footing tricky. At 7.45 miles walk out to a memorial bench which has a great view. Head down the trail to the road and your car.
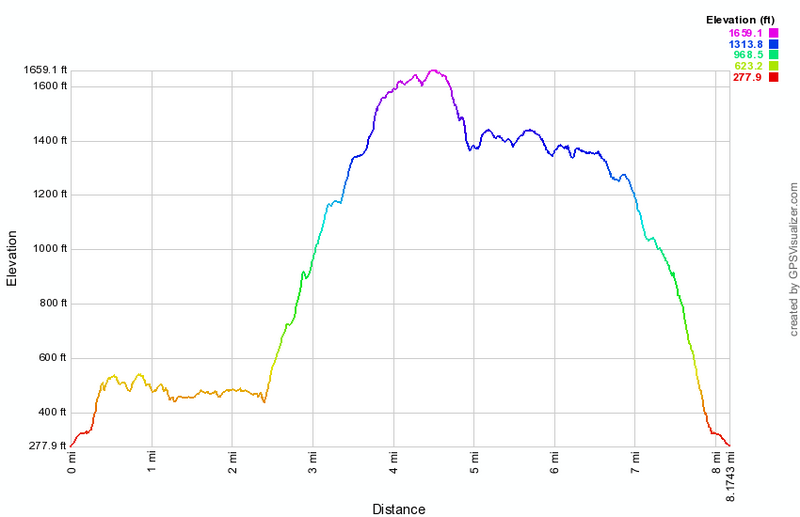 (The image at the left shows the profile of the hike. Remember that all vertical profiles are relative!)
Schunemunk Mountain: Trestle to Jessup Trails (Clockwise)
| Quick Look | ||||
|---|---|---|---|---|
| Difficulty | Round trip | Total climb | Internet Maps | |
| 6.7 mi | 1838 ft | AllTrails | ||
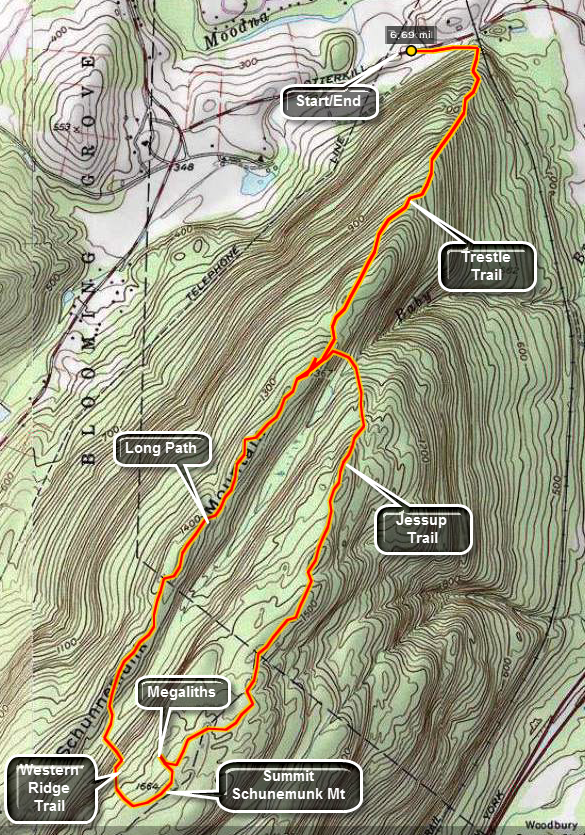 Park at trail head parking area on Otterkill Road just outside of Salisbury Mills in Orange County.
The parking area is easily in sight of the Metro North train Trestle. Walk on the road toward the
trestle. In less than .25 miles and just before the trestle, cross the road an enter the woods.
The trail immediately begins to climb up a hill on a wide trail or woods road. At the first
junction keep to the right to stay on the Trestle Trail which is marked with white blazes. After
about 1.2 miles of steady climbing, you will arrive at the junction with the red-blazed Jessup Trail.
You are on the western ridge. Turn left and be prepared to descend quickly across and over bare
rock faces. CAUTION: These rocks can be very slippery when wet or when covered
with snow or ice! After about .15 miles of descent cross Baby Brook and ascend to the
eastern ridge. The crossing of Baby Brook can be tricky for some at high water but usually poses
no real impediment. The ascent is steep and again is over much exposed rock.
Park at trail head parking area on Otterkill Road just outside of Salisbury Mills in Orange County.
The parking area is easily in sight of the Metro North train Trestle. Walk on the road toward the
trestle. In less than .25 miles and just before the trestle, cross the road an enter the woods.
The trail immediately begins to climb up a hill on a wide trail or woods road. At the first
junction keep to the right to stay on the Trestle Trail which is marked with white blazes. After
about 1.2 miles of steady climbing, you will arrive at the junction with the red-blazed Jessup Trail.
You are on the western ridge. Turn left and be prepared to descend quickly across and over bare
rock faces. CAUTION: These rocks can be very slippery when wet or when covered
with snow or ice! After about .15 miles of descent cross Baby Brook and ascend to the
eastern ridge. The crossing of Baby Brook can be tricky for some at high water but usually poses
no real impediment. The ascent is steep and again is over much exposed rock.
The Jessup Trail runs across the eastern ridge and alternates between areas of rock and forest. Most of the rocky areas are tilted and offer little or no vegetation to assist in your traverse. Some parts of the trail are routed up and over substantial boulders or outcroppings. Other parts take you along thin spines of conglomerate. If you have the time, look carefully at the rock. At first it looks similar to that in the Shawangunks. On closer inspection the conglomerate has a pink tingle from hematite deposits. It also has more defined and larger white quartz crystals and is "rougher" in appearance. Be careful as you are hiking to put your safety before your geological studies. The trail continues to ascend for about 1.5 miles. At this point it flattens somewhat and a spur trail with white markings goes off to the left. This trail leads to the Megaliths. These are larger blocks of rock which have broken off from the bedrock and have fallen in place. They are worth the trip since the whole walk is less than a quarter mile!
Back on the main trail there is slight ascent to the highest point on Schunemunk Mountain at 1664 feet. It seems much higher and like you have done more climbing. This may be because the trail head elevation is only 250 feet. within .35 miles the Western Ridge Trail turns right. Follow these blue marks down into Barton Swamp to the red blazed Barton Swamp Trail. Part of this area is on private land so stay on the trail as you negotiate your way through this swamp. Stay on the red and blue blazes for less than a quarter mile where the Western Ridge trail ascends directly up to the top of the western ridge. This ascent is short but very steep and the rocks seem smoother and slippery than on the eastern side.
At the top of the ridge turn right and look for the aqua blazes of the Long Path. Stay on the
Long Path for about 1.25 miles. The Long Path is much like the Jessup Trail on the eastern ridge.
It passes over areas of bare rock and through areas of forest. On this ridge there seems to be
more forest and less rock which makes the hiking easier. The elevation change is also not as
pronounced as on the eastern ridge. After 1.25 miles look for the red blazes of the Jessup Trail
on the right. Turn onto the trail and follow it for about .2 miles. At this point you will see the
white blazes of the Trestle Trail on the left and you will be at the junction where you turned
at the beginning of the hike. Turn left on the Trestle Trail and descend back to the road and to
your car at the parking area. Be careful on the descent since the trail is steeper than you might
think. Descending the trail gives you a good idea of why ascending required so much effort at the
beginning of the hike!
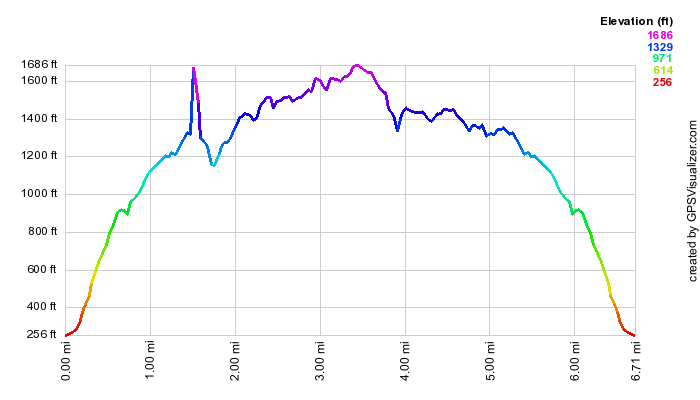 (The image at the left shows the profile of the hike. Remember that all vertical profiles are
relative!)
(The image at the left shows the profile of the hike. Remember that all vertical profiles are
relative!)
Schunemunk Mountain: Trestle to Long Path (Anticlockwise)
| Quick Look | ||||
|---|---|---|---|---|
| Difficulty | Round trip | Total climb | Internet Maps | |
| 6.5 mi | 1797 ft | AllTrails | ||
Park at trail head parking area on Otterkill Road just outside of Salisbury Mills in Orange County.
The parking area is easily in sight of the Metro North train Trestle. Walk on the road toward the
trestle. In less than .25 miles and just before the trestle, cross the road an enter the woods.
The trail immediately begins to climb up a hill on a wide trail or woods road. At the first
junction keep to the right to stay on the Trestle Trail which is marked with white blazes. After
about 1.2 miles of steady climbing, you will arrive at the junction with the red-blazed Jessup Trail.
You are on the western ridge. Turn right walk a VERY short distance to another trail junction with the Long Path where the Jessup Trail ends. Turn left to stay on the Long Path and walk the western ridge. Over the next 1.3 miles the Long Path stays on the western ridge and your walk is almost flat with a few ups and downs across the open conglomerate rock face. At 2.7 miles the blue Western Ridge Trail comes up to the ridge from Barton Swamp below. Turn left here and follow the blazes down into the swampy area and up to the eastern ridge. Near the top of the ascent the Western Ridge Trail ends at the red Jessup Trail on the eastern Ridge. Turn left and in a few hundred feet you will be at the summit of Schunemunk Mountain. A USGS seal embedded in the rock and an inscription noting the site of a fire tower mark this point. In .25 miles a short side trail to the left leads to the Megaliths. These are larger blocks of rock which have broken off from the bedrock and have fallen in place. Back on the main trail you will walk a gentle descent for about 1.6 miles until at 5 miles you reach a crossing of Baby Brook. The trail is steeper but shorter up the other side to the junction with the Trestle Trail. Turn right on the white Trestle Trail and walk the 1.4 miles back to the car.
They are worth the trip since the whole walk is less than a quarter mile!

(The image at the left shows the profile of the hike. Remember that all vertical profiles are relative!)
Schunemunk Mountain: Trestle to Otterkill to Jessup Trails
| Quick Look | ||||
|---|---|---|---|---|
| Difficulty | Round trip | Total climb | Internet Maps | |
| 8.0 mi | 1818 ft | AllTrails | ||
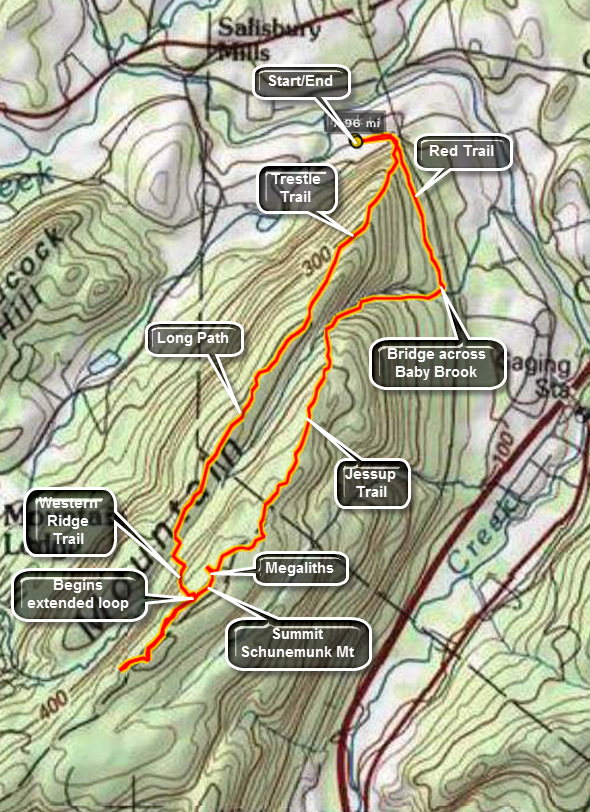 Park at trail head parking area on Otterkill Road just outside of Salisbury Mills in Orange County.
The parking area is easily in sight of the Metro North train Trestle. Walk on the road toward the
trestle. In less than .25 miles and just before the trestle, cross the road an enter the woods.
The trail immediately begins to climb up a hill on a wide trail or woods road. At the first
junction keep to the left to get on the Red Trail. After about 1.5 miles of fairly easy walking,
you will arrive at the junction with the yellow-blazed Jessup Trail and the aqua-blazed Highland Trail.
At this point a bridge crosses Baby Brook. The brook runs under the tracks through a short but interesting
tunnel. There is also a small waterfall at this location. Turn right to pick up the Jessup-Highland Trail.
These trails parallel Baby Brook for some distance. There are several small rapids or waterfalls along the way
but most are hidden by thick brush. At one spot the trail passes closer to the brook and there is another small
cascade at this location. As you climb to the eastern ridge you can see the ridge looming over you. At the next
junction turn left and follow the Jessup-Highland trail. The ascent is steep and again is over much exposed rock.
Park at trail head parking area on Otterkill Road just outside of Salisbury Mills in Orange County.
The parking area is easily in sight of the Metro North train Trestle. Walk on the road toward the
trestle. In less than .25 miles and just before the trestle, cross the road an enter the woods.
The trail immediately begins to climb up a hill on a wide trail or woods road. At the first
junction keep to the left to get on the Red Trail. After about 1.5 miles of fairly easy walking,
you will arrive at the junction with the yellow-blazed Jessup Trail and the aqua-blazed Highland Trail.
At this point a bridge crosses Baby Brook. The brook runs under the tracks through a short but interesting
tunnel. There is also a small waterfall at this location. Turn right to pick up the Jessup-Highland Trail.
These trails parallel Baby Brook for some distance. There are several small rapids or waterfalls along the way
but most are hidden by thick brush. At one spot the trail passes closer to the brook and there is another small
cascade at this location. As you climb to the eastern ridge you can see the ridge looming over you. At the next
junction turn left and follow the Jessup-Highland trail. The ascent is steep and again is over much exposed rock.
The Jessup Trail runs across the eastern ridge and alternates between areas of rock and forest. Most of the rocky areas are tilted and offer little or no vegetation to assist in your traverse. Some parts of the trail are routed up and over substantial boulders or outcroppings. Other parts take you along thin spines of conglomerate. If you have the time, look carefully at the rock. At first it looks similar to that in the Shawangunks. On closer inspection the conglomerate has a pink tingle from hematite deposits. It also has more defined and larger white quartz crystals and is "rougher" in appearance. Be careful as you are hiking to put your safety before your geological studies. The trail continues to ascend for about 1.5 miles. At this point it flattens somewhat and a spur trail with white markings goes off to the left. This trail leads to the Megaliths. These are larger blocks of rock which have broken off from the bedrock and have fallen in place. They are worth the trip since the whole walk is less than a quarter mile!
Back on the main trail there is slight ascent to the highest point on Schunemunk Mountain at 1664 feet. It seems much higher and like you have done more climbing. This may be because the trailhead elevation is only 250 feet. Within .35 miles the Western Ridge Trail turns right. Continue straight ahead for .75 miles to the junction with the Long Path. Turn around and walk back to the junction with the orange blazed Western Ridge Trail. Follow the orange marks down into Barton Swamp and along Barton Swamp Trail. Part of this area is on private land so stay on the trail as you negotiate your way through this swamp. Stay on the this trail for less than a quarter mile where the orange Western Ridge trail ascends directly up to the top of the western ridge. This ascent is short but very steep and the rocks seem smoother and slipperier than on the eastern side.
At the top of the ridge turn right and follow the orange blazes of the Western Ridge Trail. Stay on this
trail for about 1.25 miles. The Western Ridge is much like the Jessup Trail on the eastern ridge. It passes over areas of bare rock and through areas of forest. On this ridge there seems to be
more forest and less rock which makes the hiking easier. The elevation change is also not as pronounced as on the eastern ridge. After 1.25 miles look for the red blazes of the Jessup Trail
on the right. Turn onto the trail and follow it for about .2 miles. At this point you will see the
white blazes of the Trestle Trail on the left and you will be at the junction where you turned
at the beginning of the hike. Turn left on the Trestle Trail and descend back to the road and to
your car at the parking area. Be careful on the descent since the trail is steeper than you might
think. Descending the trail gives you a good idea of why ascending required so much effort at the
beginning of the hike!
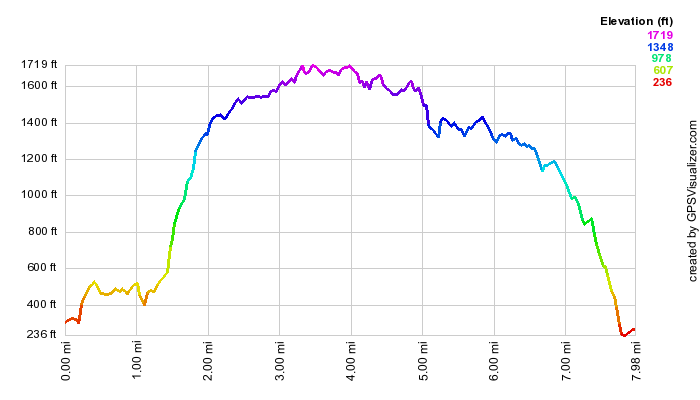
(The image at the left shows the profile of the hike. Remember that all vertical profiles are relative!)
Schunemunk Mountain: Trestle to Western Ridge (Out and Back)
| Quick Look | ||||
|---|---|---|---|---|
| Difficulty | Round trip | Total climb | Internet Maps | |
| 5.5 mi | 1412 ft | AllTrails | ||
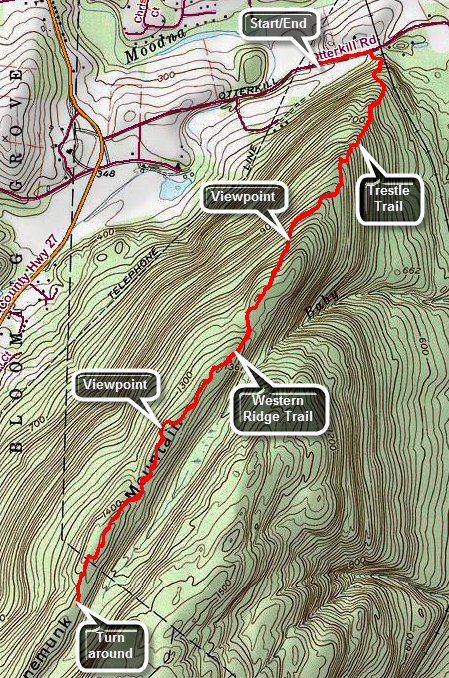 Park at trail head parking area on Otterkill Road just outside of Salisbury Mills in Orange County. The parking area is easily in sight of the Metro North train Trestle. Walk on the road toward the trestle. In less than .25 miles and just before the trestle, cross the road an enter the woods. The trail immediately begins to climb up a hill on a wide trail or woods road. At the first junction keep to the right to stay on the Trestle Trail which is marked with white blazes. Near the top of the climb watch for spur trail on the right that leads to a bench and a nice viewpoint. After about 1.2 miles of steady climbing, you will arrive at the junction with the red-blazed Jessup Trail. You are on the western ridge. Turn right walk a VERY short distance to another trail junction with the orange-blazed Western Ridge Trail where the Jessup Trail ends. Turn left to stay on the Western Ridge Trail and walk the western ridge. Over the next 1.3 miles the Western Ridge Trail stays on the western ridge and your walk is almost flat with a few ups and downs across the open conglomerate rock face. Watch for a nice lookout with open views to the north and west. The Catskills are visible in the distance. Below the lookout there is a sand and gravel operation next to beautiful Lenni Lenape Lake. At 2.7 miles Western Ridge Trail descends to Barton Swamp below. Turn around here and retrace your steps back to the parking area.
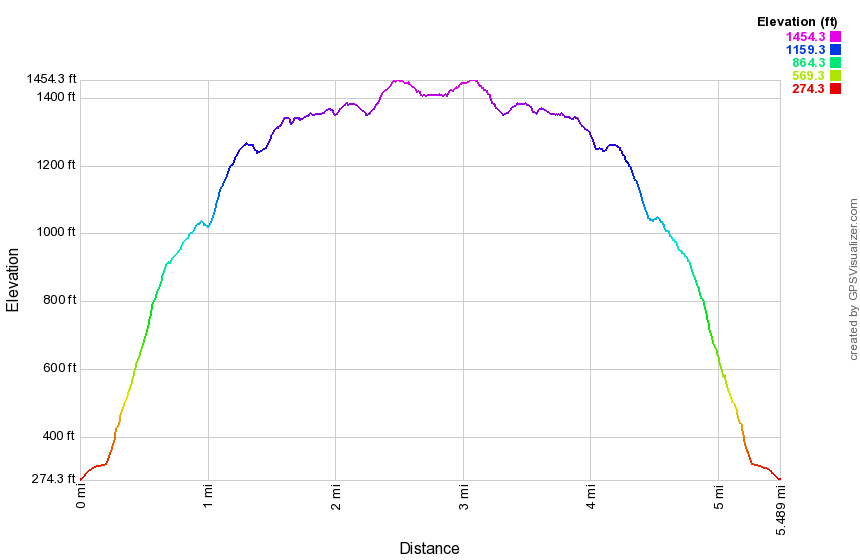
(The image at the left shows the profile of the hike. Remember that all vertical profiles are relative!)
Samuel's Point
| Quick Look | ||||
|---|---|---|---|---|
| Difficulty | Round trip | Total climb | Internet Maps | |
| 4.7 mi. | 2135 ft. | AllTrails | ||

From Grahamsville, turn onto Route 52A near the TriValley School. Stay on the road until the hamlet of Sundown where the road turns left. Bear to the right on Peekamoose Rd. and continue on the road looking for Moonhaw Rd. on the left. From Route 28, turn west on Route 28A and then head south. Turn right and head west on Watson Hollow Road, the road that goes to Peekamoose and Sundown. Watch for Moonhaw Road on the right after about mile. Turn onto Moonhaw Rd. and drive to the end. Park on the right just before the gates to the private driveway.
Since this is a bushwhack all the way your route may vary. From the parking area, cross Wittenberg Brook and turn left to walk parallel to the brook on a woods road. If you have the right woods road, you should be able to walk north for about 1 miles before heading to the east and UP the steep side of the mountain. As you climb try to steer toward the col between Samuel's Point to the east an the hill to the west. Once in the col, turn east toward Samuel's Point which is only .5 miles away. As you start to get into heavy stands of laurel, cut around them and head south as they are too thick to get through easily. Walk around the laurel and start to head up toward the highest point you can see which is Samuel's Point. Many of the views of the Ashokan Reservoir are bloat by trees but you can walk around to find some views between them. Walk to the edge of the ledges and then head north to walk counterclockwise around the edge. You may get some nice views from here. When you are done, retrace your steps back to the car.
(The map above shows the parking area and the out and back hiking route.)
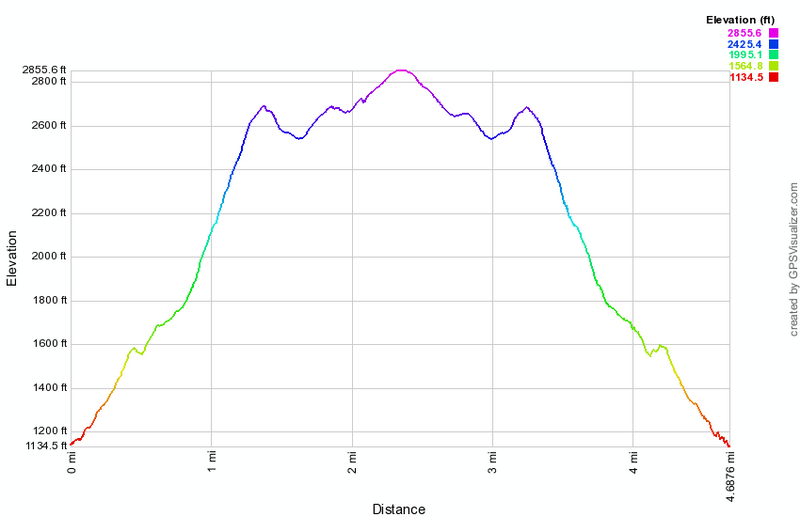 (The image at the left shows the profile of the hike. Remember that all vertical profiles are relative!)
Segar Trail
| Quick Look | ||||
|---|---|---|---|---|
| Difficulty | Round trip | Total climb | Internet Maps | |
| 6.3 mi. | 1560 ft. | AllTrails | ||
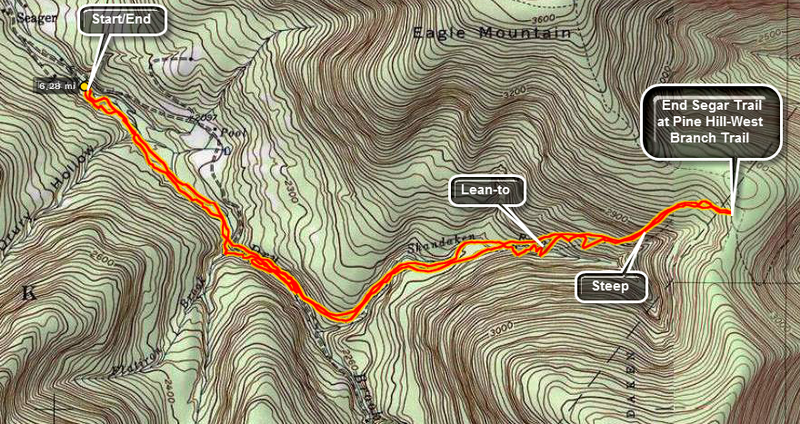 Finding this trail head can be challenging depending on your approach. The easiest way is to go to
Arkville on Rt. 28. Turn south onto Dry Brook Road. Take this road ALL the way to the dead end and
park at the trail head. Get on the yellow trail and follow it carefully. Pay attention to the yellow
trail markers and the signs. Several old logging roads intersect the trails and can mislead you if
you are not paying attention. This trail also runs through private property. Be sure to respect
the rights of the property owners! There are at least four stream crossing that can prove difficult
if not impossible when the water is high. Be prepared to wade, get wet or turn back! Nettles during
the spring and summer are plentiful but can be avoided. From this trail it is possible to approach
Doubletop, the highest peak in the Catskills without a trail, from several directions. The trail
intersects the Pine Hill-West Branch Trail at its highest point. Turning left leads to Eagle after
about 1 mile. Turning right takes you to Big Indian. Remember that the trail DOES NOT go to the
top of Big Indian. The actual summit is about .25 miles north of the highest point on the trail.
Finding this trail head can be challenging depending on your approach. The easiest way is to go to
Arkville on Rt. 28. Turn south onto Dry Brook Road. Take this road ALL the way to the dead end and
park at the trail head. Get on the yellow trail and follow it carefully. Pay attention to the yellow
trail markers and the signs. Several old logging roads intersect the trails and can mislead you if
you are not paying attention. This trail also runs through private property. Be sure to respect
the rights of the property owners! There are at least four stream crossing that can prove difficult
if not impossible when the water is high. Be prepared to wade, get wet or turn back! Nettles during
the spring and summer are plentiful but can be avoided. From this trail it is possible to approach
Doubletop, the highest peak in the Catskills without a trail, from several directions. The trail
intersects the Pine Hill-West Branch Trail at its highest point. Turning left leads to Eagle after
about 1 mile. Turning right takes you to Big Indian. Remember that the trail DOES NOT go to the
top of Big Indian. The actual summit is about .25 miles north of the highest point on the trail.
 (The image at the left shows the profile of the hike. Remember that all vertical profiles are
relative!)
(The image at the left shows the profile of the hike. Remember that all vertical profiles are
relative!)
Shaupeneak Ridge: Blue, Yellow, Orange, Aqua Trails
| Quick Look | ||||
|---|---|---|---|---|
| Difficulty | Round trip | Total climb | Internet Maps | PDF Map |
| 5.8 mi. | 825 ft. | AllTrails | PDF Maps | |

To get to the Poletown Road trailhead for Shaupeneak Ridge, drive north or south on Route 9W to the hamlet of Esopus. Old Post Road travels west from Route 9W and is just across from Parker Avenue. After making the turn, cross the railroad tracks and drive 1.7 miles on Old Post Road to where the road makes a sharp left turn. Continue straight ahead on Popletown Road and drive .8 miles to the trailhead on the left. Leave the parking area on the blue trail heading southwest to start a clockwise loop around the pond. The trail starts off as a gravel path which is very even and well groomed. Almost immediately there is an area with two benches and a nice view over Louisa Pond. Continue along the blue trail to the kayak launch within a few hundred feet. We walk down to the shore for another view of the pond. Get back on the blue trail and walk over a wooden walkway after which the trail becomes more like a trail rather than a path. Walk through a rocky area and then enter a pine forest at the outlet end of the lake to the southwest. The trail here can be slippery when it is wet or damp. At about .4 miles you will arrive at the beaver dam that impounds the water for the pond. There is another nice view over the entire pond. Continue on around the pond by walking up a hill and heading northeast. The blazes for the orange trail will appear on the left but this trail will be saved for later in the hike. Continue along the blue trail and passed the second junction with the orange trail and the beginning of the green trail. Continue on the blue trail back to the parking area at 1.35 miles. Find the yellow trail that heads up the bank from the parking area. This trail parallels the blue trail around the pond but is a little further away and travels along a series of rock ledges. At the start of the trail there is a sign that explains the significance of stone walls. This trail has a series of these signs with some being more informative and understandable than others. The trail is short and soon descends to meet the blue trail. Turn left and start clockwise around the lake again. At 1.85 miles turn left onto the orange trail which heads south and then turns west. At 2.15 miles there is a deep gorge and the trail swings north to loop around the top of this area. Follow the trail continuing to gain elevation as it eventually heads west and then south again along the ravine. Eventually you will be at a point directly across from where you started the loop. The detour is a little over .3 miles to get to a point 170 feet away from where you started! The trail goes west a short distance and then heads north. Watch for the crossover trail that connects the orange to the green trail and is marked with orange and green blazes. At 2.75 miles the crossover trail turns off to the left and heads north to the green trail. It drops elevation for its entire .2 mile length. When you hit the green trail, turn left and follow the green trail to 3.1 miles where the aqua trail begins on the left.Turn left and followed the trail until it splits within a few hundred feet. Head left first heading south.Pass through an open forest where the forest floor is covered in ferns. Continue south to about 3.6 miles where the trail makes an almost 180 degree turn north. At 3.85 miles the trail makes a large loop to the west before heading northeast. The aqua trail is another trail that, like the green trail, was created for both mountain biking and hiking. There are some impressive rock ledges along the way which makes the walk interesting despite the lack of expansive views. At 4.4 miles you will be back at the point where the aqua trail splits. Walk out to the green trail and turn right to retrace your steps back to the crossover trail. Turn right and climb out of the hollow to the ridge. Once back at the junction with the orange trail, turn left to complete the loop of this trail. This trail also has no views but is an interesting walk along a high set of rock ledges. Soon you will be at the junction with the blue trail. Turn left to go around the northern end of the wetland since this is a better part of the blue trail. The last .4 miles of the hike went quickly is a part of the trail you walked earlier and should go quickly.
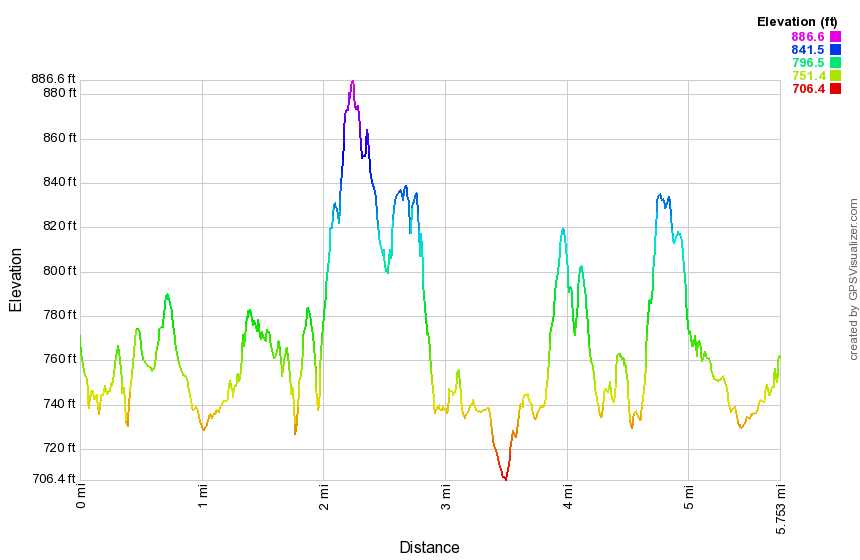
(The image at the left shows the profile of the hike. Remember that all vertical profiles are relative!)
Shaupeneak Ridge: White, Red, Green Trails
| Quick Look | ||||
|---|---|---|---|---|
| Difficulty | Round trip | Total climb | Internet Maps | PDF Map |
| 6.8 mi. | 1345 ft. | AllTrails | PDF Maps | |

To get to the Old Post Road trailhead for Shaupeneak Ridge, drive north or south on Route 9W to the hamlet of Esopus. Old Post Road travels west from Route 9W and is just across from Parker Avenue. After making the turn, cross the railroad tracks and look for a sign for the parking area on the right. Leave the parking area on the white trail passing the kiosk which has trail maps for the entire ridge. The trail is well packed and travels first through an open area and then enters the woods. Immediately start to gain elevation although the trail is not steep. At .65 miles a purple trail branches off to the right. Follow it several hundred feet where it ends at a waterfall. The waterfall may be almost absent in dry weather and all you may see is the rocky stream bed. Return to the white trail, turn right and continued to climb. Much of the hike seems to be of the "roots, rocks, trees" variety although it is very pretty. Over the final mile of the white trail, you will climbed 560 feet for an average of about a 10% grade. At the top of the white trail turn right on the red trail and immediately come to a lookout to the Hudson River. Leave the viewpoint to continue on the red trail hiking west and descending some. At 2.4 miles the red trail ends at the blue trail. Turn right and follow the blue trail as it heads northwest around the north end of the pond. At 2.5 miles the green trail begins turning right and is a loop constructed by mountain bikers. The trail includes some rock ledges. Begin a short descent along a woods road. On the right there is an extensive network of stone walls and, at one point, a road built up of rock near a small pond. Continue along the green trail until it forks and turn right at 2.6 miles to take the more northern route. The trail begins to ascend slightly and heads southwest. Along the way you will pass through an area that has some very tall trees and where the ground is covered with a dense layer of ferns. Continue on the trail passing some nice rock ledges and some stone paved steps. There are also some logs that had been flattened on top for the more skilled bike riders. Watch for a garden gnome on the left side of the rail in a small "cave" under a boulder! At 3.4 miles the green trail makes an almost 180 degree turn to head back toward its origin and the aqua trail branches to the right. Follow the green trail to complete the entire green loop! Continue on the green trail back to the blue trail and turn left to follow the trail down the east shore of Louisa Pond. When you arrive at the parking area for Shaupeneak Ridge on Popletown Road, turn left and walk out to the entrance of the lot. Cross the road to pick up the more southern branch of the red trail at 4.65 miles. Walk .55 miles over this part of the red trail which rolls a little but gains some elevation. At 5.2 miles turn right on the white trail to follow it southeast back to the cars. The trail is a descent all the way except for one small climb.
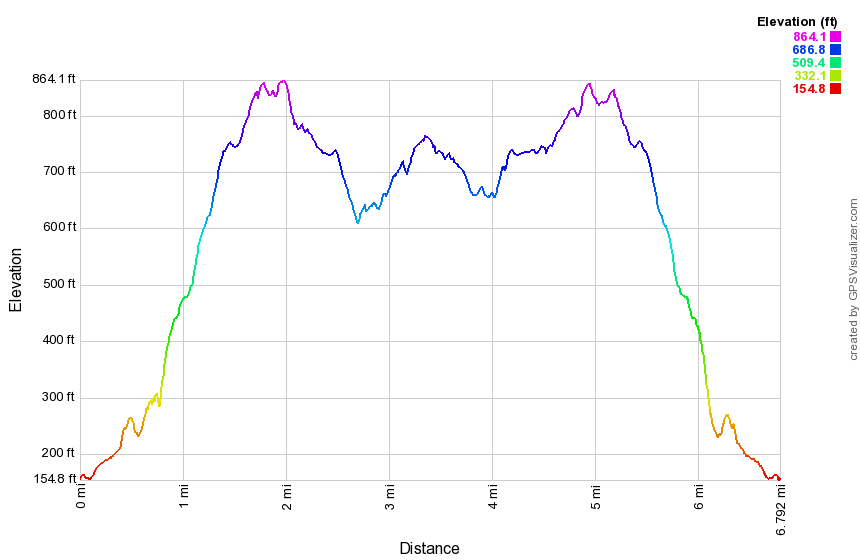
(The image at the left shows the profile of the hike. Remember that all vertical profiles are relative!)
Shavertown Parcel
| Quick Look | ||||
|---|---|---|---|---|
| Difficulty | Round trip | Total climb | Internet Maps | |
| 4.7 mi. | 1050 ft. | AllTrails | ||
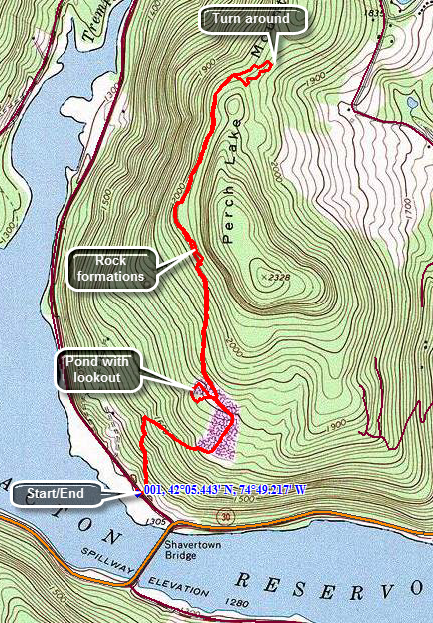 Drive to the north end of the bridge that crosses the Pepacton Reservoir. Head northwest of BWS Road #4 which is also County Route 1 and is sometimes know as the Tremperskill Road. The trailhead is just .15 miles up this road on the right. You may park off the road on the left or at the boat launch at the end of the bridge. Cross the road to begin your hike. The first .25 miles of the trail climbs 200 feet as it heads directly north and up the side of Perch Lake Mountain. Soon the trail turns right on an old access road and continues to climb through the forest for another .25 miles. You will break out into a field and the trail levels a little. Along this part of the trail you may see some meteorological instruments with solar panels for power. The trail now turns northeast and descends to the edge of a small pond at .85 miles. In the summer, the pond may have both pink and white water lilies growing in it as well as cattails around the edge. Walk around the pond on the west side to an outstanding lookout over the Pepacton. Continue around the pond and walk back to the trail that you came in on. Turned left at the sign that marks the turn for the extra 1.5 miles. This trail follows another woods road and gains a little over 200 feet in the next .5 miles. Watch for trail markers carefully! At around 1.5 miles into the hike the trail dips to the left off the woods road to travel through an area with large boulders. Many are covered by interesting mosses and lichens. Once the trail rejoins the road it remains pretty flat for the next .8 miles. The trail begins to turn around the mountain heading a little to the east. Follow the trail markers carefully and stay on the trail as the DEP land is surrounded by private property! The trail makes a little loop and then comes back to the trail you came in on. Follow this trail back the way you came to the car.
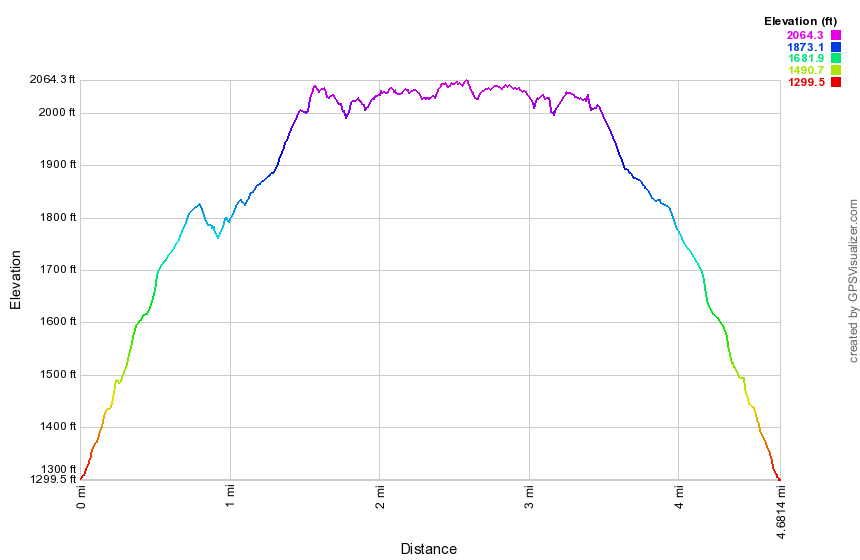 (The image at the left shows the profile of the hike. Remember that all vertical profiles are
relative!)
(The image at the left shows the profile of the hike. Remember that all vertical profiles are
relative!)
Shavertown Trail
| Quick Look | ||||
|---|---|---|---|---|
| Difficulty | Round trip | Total climb | Internet Maps | |
| 1.6 mi. | 540 ft. | AllTrails | ||
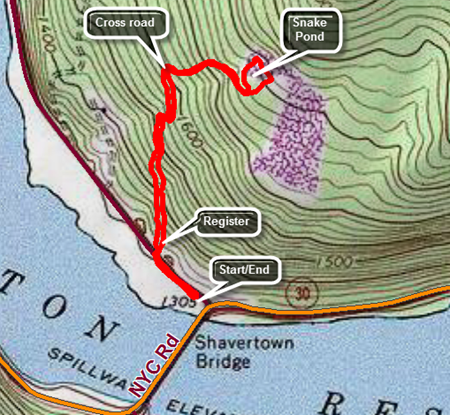 Drive to the north end of the bridge that crosses the Pepacton Reservoir. Head northwest of BWS Road #4 which is also County Route 1 and is sometimes know as the Tremperskill Road. Turn into the small parking area on the left just after the turn. The trailhead is just a few hundred feet further up this road on the right. Cross the road to begin your hike. There is a trail register at the beginning of the trail with some trail maps from the Catskill Mountain Club. The first .25 miles of the trail climbs 200 feet as it heads directly north and up the side of Perch Lake Mountain. Soon the trail meets an old access road where the old trail used to turn right and follow the road. The new trail continues on the other side of the road. climb up the bank and follow the trail blazes as the trail winds through several switchbacks up to Snake Pond. The initial forest is pine tree but they quickly give way to open hardwood forest. There are several wet areas to cross but these are made easier by stepping stones. Be careful when it is wet as the stones may be slippery. The trail comes out of the forest just below the pond where the is a nice view of the Pepacton Reservoir. Follow the trail up the hill and then turn left over a little footbridge as you walk to the shores of the pond. The view of the reservoir is better from here and you can also view the pond. The pond has some fish and plenty of frogs. There are reeds and rushes around the shore which support a population of redwing blackbirds. Walk around the pond clockwise crossing the overflow at the head end on another bridge. Continue around the pond until you are back where you started at the viewpoint over the reservoir. Follow the trail back the way you came to the car.
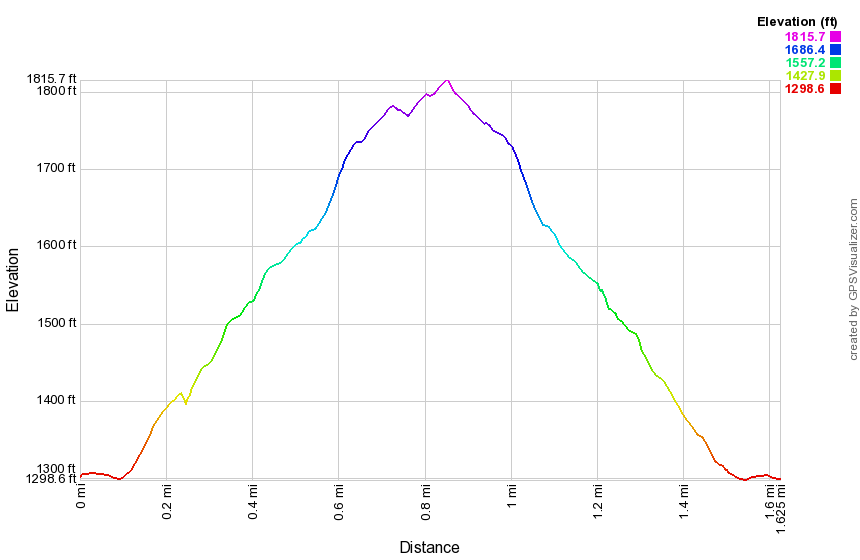 (The image at the left shows the profile of the hike. Remember that all vertical profiles are
relative!)
(The image at the left shows the profile of the hike. Remember that all vertical profiles are
relative!)
Shavertown Trails (newest)
| Quick Look | ||||
|---|---|---|---|---|
| Difficulty | Round trip | Total climb | Internet Maps | |
| 3.3 mi. | 1030 ft. | AllTrails | ||
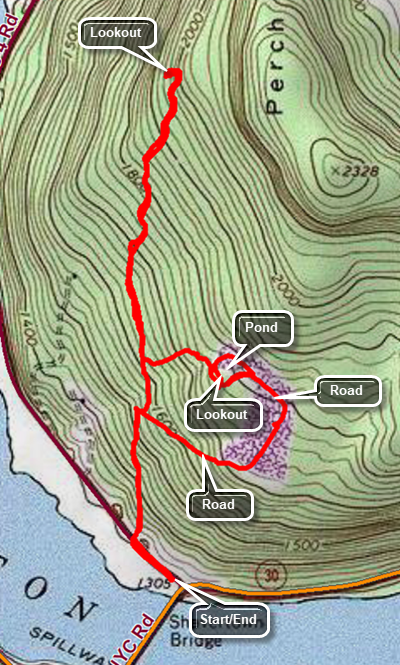 Note: Logging north of Snake Pond and west of PerchLake Mountain have closed the CMC trail in that area. The CMC has created a new trail that heads north off the Snake Pond loop and provides a beautiful lookout over the Pepacton Reservoir and the Tremperskill Valley.
Drive to the north end of the bridge that crosses the Pepacton Reservoir. Turn left and park in the lot. Start your hike by turning left on the road which is BWS Road #4 or County Route 1 or the Tremperskill Road. The trailhead is just .15 miles up this road on the right. Cross the road to begin your hike. The first .25 miles of the trail climbs 200 feet as it heads directly north and up the side of Perch Lake Mountain. At .4 miles the trail comes to a woods road and continues directly across that road. In .1 miles the trail to the Tremperskill lookout turns to the left. Follow this trail as it begins a climb to the lookout. The trail, at times, follows old woods roads and begins to seriously ascend at .7 miles. Over the next .5 miles the trail gains 345 feet averaging a 14% grade with some short sections as much as 22%. At the top of the climb the trail turns west and descends slightly to the lookout. When you are done enjoying the view, retrace your steps back to where this section of trail began. Turn left and walk uphill .2 miles to a bench just below Snake Pond. There is a nice view from this area but there is a better view from the shores of the pond. Walk up to the shores of the pond and gaze west to the Pepacton. Continue your hike by walking around the pond and up the gravel road. The gravel road continues down through a field where there are some meteorological instruments. The trail then enters the woods on the woods road and continues downhill for a total of .5 miles from the pond. Turn left on the trail that brought you up from the road. Walk down the trail to the road, turn left and walk back to the parking area.
Note: Logging north of Snake Pond and west of PerchLake Mountain have closed the CMC trail in that area. The CMC has created a new trail that heads north off the Snake Pond loop and provides a beautiful lookout over the Pepacton Reservoir and the Tremperskill Valley.
Drive to the north end of the bridge that crosses the Pepacton Reservoir. Turn left and park in the lot. Start your hike by turning left on the road which is BWS Road #4 or County Route 1 or the Tremperskill Road. The trailhead is just .15 miles up this road on the right. Cross the road to begin your hike. The first .25 miles of the trail climbs 200 feet as it heads directly north and up the side of Perch Lake Mountain. At .4 miles the trail comes to a woods road and continues directly across that road. In .1 miles the trail to the Tremperskill lookout turns to the left. Follow this trail as it begins a climb to the lookout. The trail, at times, follows old woods roads and begins to seriously ascend at .7 miles. Over the next .5 miles the trail gains 345 feet averaging a 14% grade with some short sections as much as 22%. At the top of the climb the trail turns west and descends slightly to the lookout. When you are done enjoying the view, retrace your steps back to where this section of trail began. Turn left and walk uphill .2 miles to a bench just below Snake Pond. There is a nice view from this area but there is a better view from the shores of the pond. Walk up to the shores of the pond and gaze west to the Pepacton. Continue your hike by walking around the pond and up the gravel road. The gravel road continues down through a field where there are some meteorological instruments. The trail then enters the woods on the woods road and continues downhill for a total of .5 miles from the pond. Turn left on the trail that brought you up from the road. Walk down the trail to the road, turn left and walk back to the parking area.
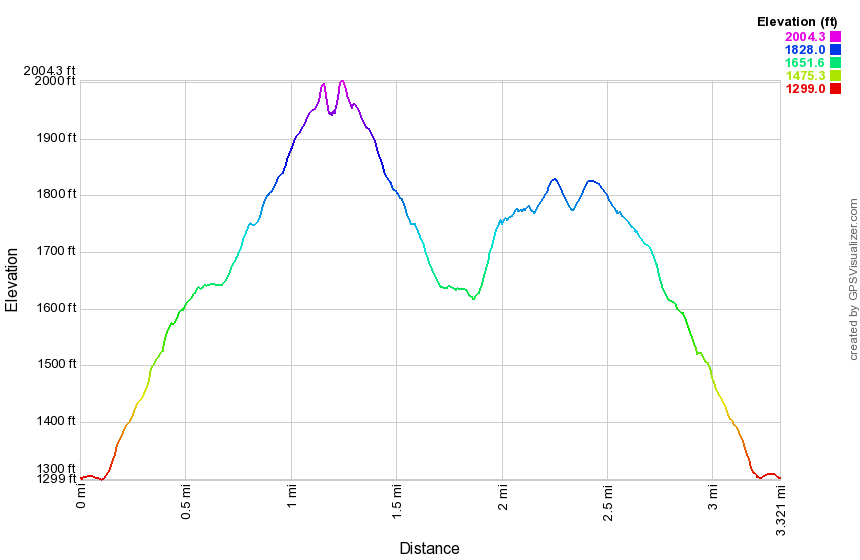 (The image at the left shows the profile of the hike. Remember that all vertical profiles are
relative!)
(The image at the left shows the profile of the hike. Remember that all vertical profiles are
relative!)
Shawangunk Ridge Trail: Basha Kill Southern Loop
| Quick Look | ||||
|---|---|---|---|---|
| Difficulty | Round trip | Total climb | Internet Maps | |
| 10.4 mi. | 520 ft. | AllTrails | ||
 The Basha Kill is a 2400 acre wetland and wildlife preserve in the southern part of Sullivan County. Among other things it is home to at least 50 species of birds and especially bald eagles. The remains of the Port Jervis to Kingston branch of the O&W forms a rail trail on the southeastern shore. On the northwestern shore is the D&H Canal and the towpath. The two can be combined for a loop using Haven Road to cross the marsh on the northern end and Otisville Road to swing around the southern end.
Take Route 17/I 86 to exit 113 and head south on Route 209. After about 1.7 miles Haven Road appears on the left. Turn left here and drive to the parking area on the left to park. Start your hike by walking east on Haven Road through the marsh toward the rail trail on the eastern shore. Turned left or north on the rail trail. The trail here is relatively firm even when it has been raining. After about a mile watch for a trail to an observation tower and turn left on this unmarked trail. Within .1 miles you will be at the tower which is more of an observation platform. There are nice views over the marsh to the north and west. At Haven Road cross to the other side and to follow the rail trail south. The trail can be VERY wet in places especially after it rains so you may have to cross from one side to the other or use the banks to make it through this area. The banks are covered in barberry and some other thorny brush so making progress can be slow and painful. The rail trail dries out after this but still may have a few muddy spots along the way. There are views of the marsh all along the way. The trail is extremely straight which is not surprising given that it is the old railroad bed. At 3.7 miles there is one of the larger parking areas just off South Road and near the Basha Kill Winery. The water is more open in this area and people like to canoe or kayak from here. When you leave the parking area, continue on the trail which is often wet and muddy. In about .4 miles the Long Path markings appear to head to the right off the rail trail but this may be a dead end. Continue to head south on the rail trail and watch for a sign that says "Long Path". At about 4.3 miles the trail again may became wet and muddy. Turn left off the trail and walk out to the road. AVOID private property postings as there are a few in the area. Once on the road, continue south and at 4.5 miles the road will cross a small stream. Look to the left and see a beautiful waterfall. The posting in the area is unclear so read carefully before proceeding! Walk to the base of the falls and get a view of the water flowing down over a wall of rock. Walk back out to the road to continue. Walking on the road goes quickly and in about another mile at 5.5 miles into the hike there is a small parking area on the right with an observation deck. The deck gives a nice view of a stream flowing out of the Basha Kill. Turn right out of the parking area and walk to the intersection. Turn right on Otisville Road which runs out to Route 209. The D&H Canal towpath should intersect the road just before Route 209. If you cannot find the towpath, walk out to Route 209 and turn right on the road. Walk .2 miles on the road, to a sign for the Basha Kill and turn right down this dirt road. As you approached a flat area a path turns left across a field and into the trees. As you enter the trees and walk up a small incline turn right. This is the towpath. The canal and the towpath have an interesting history and I am sorry to say I don't know enough about it. The canal ran to the left or west of the towpath and in many places the canal is still very obvious. There are still stone walls on either side of the canal and even the trees that now grow in it cannot hide it. Head north and then east to get around a hill before heading north for most of the rest of the trip. The canal is now dry in most places but in some areas there is water which hints at the original purpose. In a few places you will see bridges of rock built across the canal. After the canal was no longer in use, these bridges were built across it to reach the towpath and the Basha Kill. At 7.5 miles a dirt road runs down to the Stonefield parking area and this continuous for about .35 miles. Continue on the towpath when the road turns into a parking area and at 8.25 miles there will be a bridge that was built over the original canal. The span of the bridge no longer exists but the stonework that made up the abutments is still there. Also present are the stone walls that lined the lane that leads up to the bridge. A little further on the trail crosses a chasm on a wood bridge. Just to the left is another stone bridge that crossed the canal. At 10.1 miles there is a gate which leads out onto Towpath Road. This short road soon intersects Haven Road. Turn right and walk .3 miles back to the car.
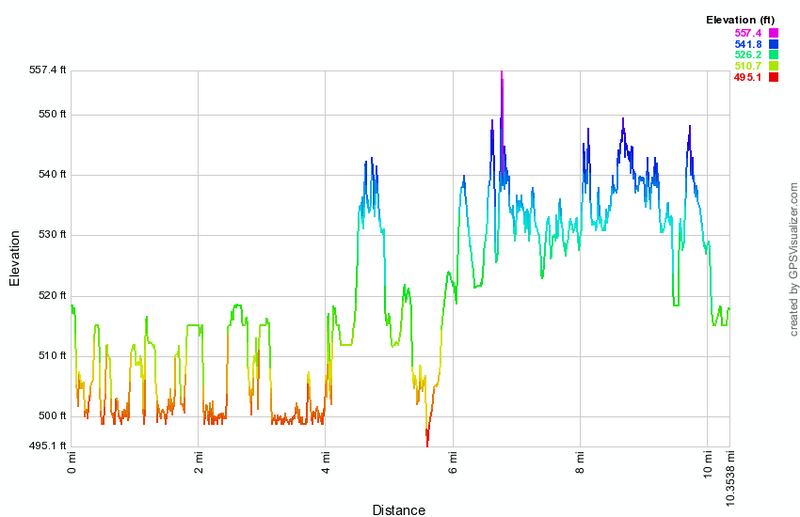 (The image at the left shows the profile of the hike. Remember that all vertical profiles are relative!)
Shawangunk Ridge Trail: Basha Kill to Guymard Turnpike
1376 ft.
| Quick Look | ||||
|---|---|---|---|---|
| Difficulty | Round trip | Total climb | Internet Maps | |
| 12.0 mi. | AllTrails | |||
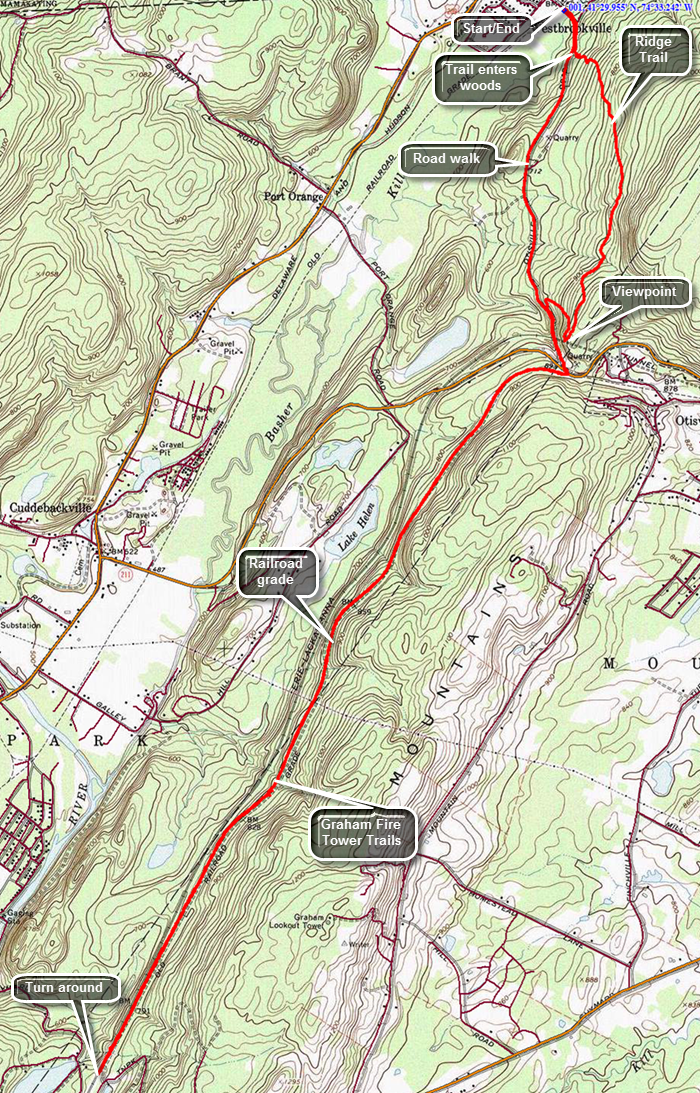 Take the Quickway (Route 17/I86) to the exit for Route 209 in Wurtsboro and head south toward Port Jervis. After about 6 miles and turn left on Route 61 toward Otisville. Just before the bridge over the Basha Kill park in a small lot on the right side of the road. Start your hike by heading southeast on Route 61 and crossing over the bridge across the Basha Kill. The Long Path and Shawangunk Ridge Trails are co-aligned here and you should pick them up at the corner of Indian Orchard Road. Follow the markings southeast on Route 61 for about .25 miles to the point where the trail enters the forest on the left side of the road. The bank is very steep and the trail goes through several switchbacks as it climbs toward the top of the ridge. Over the next .75 miles you will gain over 400 feet. The trail may be lightly used and the markers can be hard to spot so pay careful attention as you hike! The trail meanders back and forth and at about 1.75 miles you will hit the highest point at 1035 feet. The trail never actually hits the highest point on the ridge which seems to be about 1200 feet. As you walk along the ridge, there are no opportunities for views and not much of any interest. Around 1 mile the trail turns onto a wide and well-maintained woods road but this only lasts until about 1.25 miles when the trail turns into the woods. At 1.8 miles start a slight descent and find that the trail seems to split with the marked trail going to the right. Go to the left to find a nice viewpoint over the valley below. Go back to the main trail and begin a descent to the road. In .2 miles you will drop a little over 200 feet and at the end you will be at Route 61. There are NO MARKERS here to indicate which way to turn! Turn left and walk up the hill to the junction with Route 211. There is a parking area at the intersection with some blazes. Cross the road diagonally to the left and pick up the trail which follows the old railroad bed for the rest of hike out. The railroad bed runs southwest and parallel to the existing Conrail tracks. It is very level and very straight for most of its length. The surface varies from hard-packed cinders to areas that have angular stones which makes walking more difficult. There are a few areas where water has accumulated but these are easily avoided. Sometimes it runs under the cover of trees but in other places it is completely open. Shortly after the beginning of the railroad bed a huge powerline comes in from the west and then follows the course of the railroad bed for some distance. At one point the two part for a short distance but then join again. At about 4.4 miles the powerline joins another and leaves the railroad bed. About half a mile beyond this point or 4.9 miles into the hike watch for the trail markers for the trails to the Graham Fire Tower on the left. Both the white Tower Trail and the red Ravine Trail originate in the same place but take different approaches to the top. At about 4.9 miles there is an open area on the left side of the trail and you will see two trees with markers. One tree has three red markers for the beginning of the Tower Trail and the other has three white markers for the beginning of the Ravine Trail. You now have a choice to make. You may turn around here and return to your car. You may hike to the fire tower and then return to your car. You can continue to hike on the main trail to Guymard before you turn around. Hiking to Guymard adds another 1.7 miles to your trip and there isn't much to see. It may help you complete a section of the Long Path and the Shawangunk Ridge Trail. On your return trip you may want to use Route 61 to get back to the car to avoid the hike up and over the ridge again. The hike is, of course, a road hike but it is all downhill, the shoulders are wide and it is only 1.7 miles.
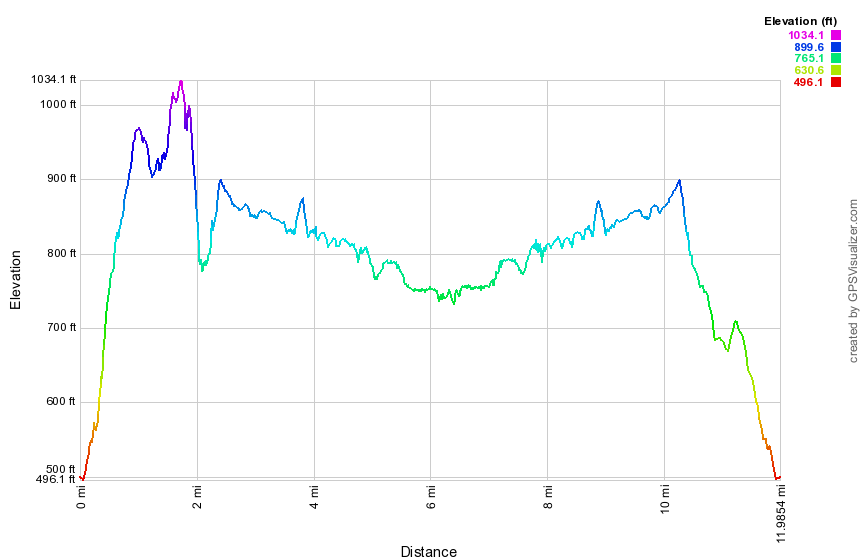
(The image above shows the profile of the hike. Remember that all vertical profiles are relative!)
< Shawangunk Ridge Trail: Ellenville
| Quick Look | ||||
|---|---|---|---|---|
| Difficulty | Round trip | Total climb | Internet Maps | |
| 3.4 mi. | 1286 ft. | AllTrails | ||
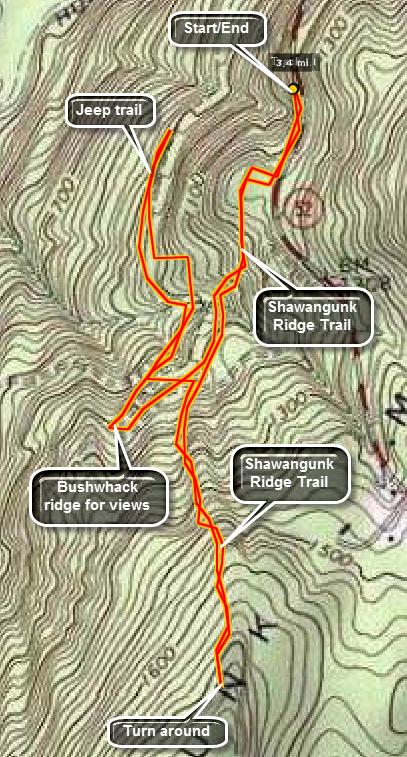 The Shawangunk Ridge Trail runs from High Point State Park in New Jersey to Sam's Point Preserve, The hike may be broken into sections. This section is an out and back hike from Route 52 outside of Ellenville near the Sam's Point Preserve.
Park in the pull off 1.7 miles south of South Gully on Route 52 heading out of Ellenville. Walk along side the road for about .2 miles and turn right into the woods on the Shawangunk Ridge Trail. At .55 miles there is a confusing junction but this offers some options. Bearing slightly right and up the ridge leads to a series of views but not much else. Turning sharply tot the right leads down along Old Route 52 but requires a very long walk to reach any real destination. Continuing straight ahead keeps you on the Shawangunk Ridge Trail. The trail climbs to near the highest point on the ridge over the next .7 miles. It then rolls along the ridge toward Ellenville. Walk as far as you like and then return to your car.
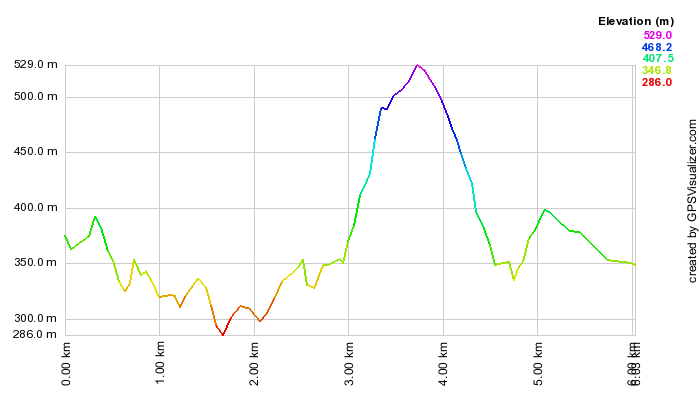
(The image above shows the profile of the hike. Remember that all vertical profiles are relative!)
Shawangunk Ridge Trail: Graham Fire Tower
| Quick Look | ||||
|---|---|---|---|---|
| Difficulty | Round trip | Total climb | Internet Maps | |
| 5.3 mi. | 800 ft. | AllTrails | ||
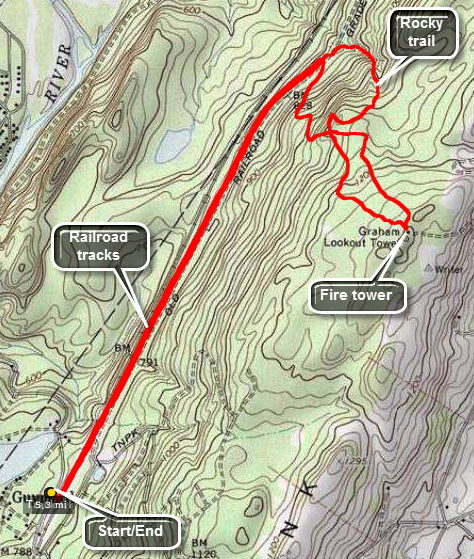 Drive to the hamlet of Godeffroy on Route 209 about 5.5 miles north of Port Jervis. Watch for the Guymard Turnpike on the east side of the road. Turn onto the turnpike and drive about .7 miles to a T. Turn right to follow the turnpike as it ascends and passes by one end of Guymard Lake. In about .2 miles park on the side of the road. The train tracks are active so look and listen before crossing to the other side to pick up the Shawangunk Ridge trail. Turn left and head northeast on the wide and flat woods road that parallels the Conrail tracks. After 1.7 miles of absolutely flat walking, look for red blazes going up the hill to the right and turn onto another woods road. The road wanders up the mountain heading south, then east, then southeast. At a little over 2 miles you will cross the white trail that you will use on the way back. The fire tower shares the top of the hill with cell towers and a nice little cabin. There is an access road for the cell towers which would probably be the quickest and easiest route to the top. The entire first flight of treads on the tower is missing from the steps to discourage anyone from climbing on the now closed tower! Find the blazes of the white trail to start back to the car. At some points this trail comes very close to the edge of the cliff but there are no real views. The white trail twists and turns but heads generally north. This route is much more of a trail than the red blazed woods road you used on the way up. Parts of it are rough as it gets little use. The last .3 miles are a rather steep descent along a small stream. In this section there is barely a trail and lots of rocks to negotiate. After slightly over a mile, you will be back on the SRT just slightly north of the turn for the red trail. Turn left and enjoy the flat hike back to the car.
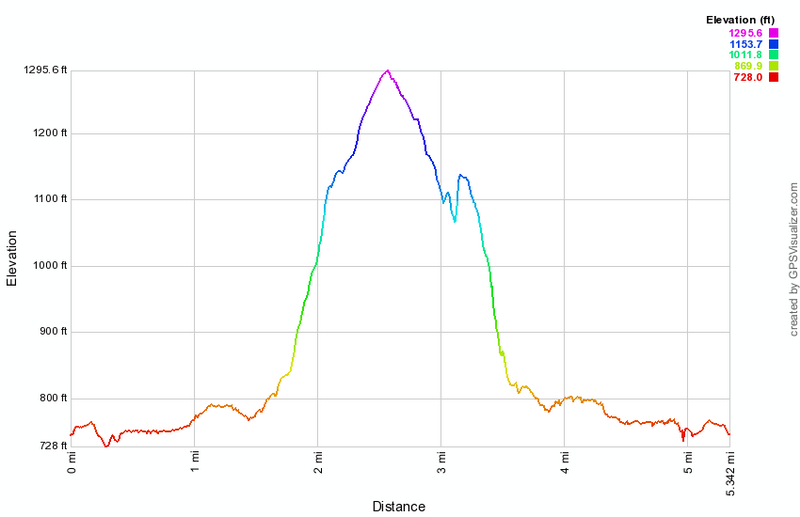
(The image at the left shows the profile of the hike.)
Shawangunk Ridge Trail: Guymard Turnpike to Hawthorne Lake
| Quick Look | ||||
|---|---|---|---|---|
| Difficulty | Round trip | Total climb | Internet Maps | |
| 10.4 mi. | 1794 ft. | AllTrails | ||
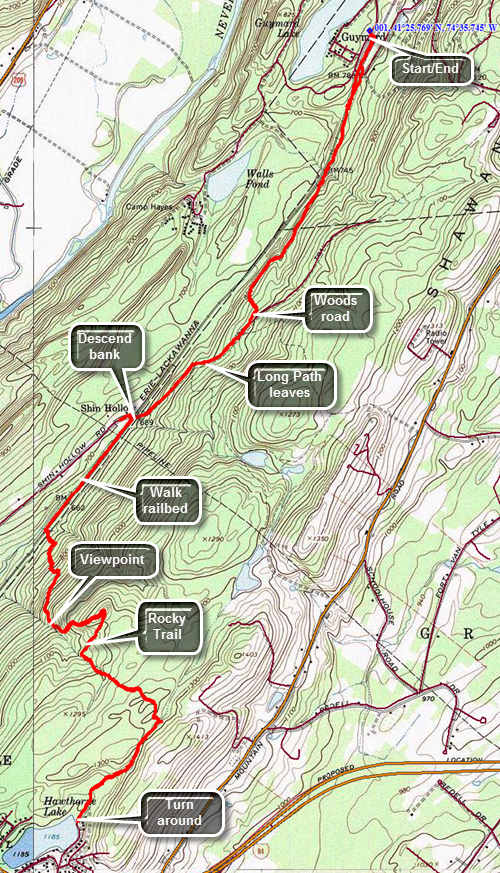 Drive to the hamlet of Godeffroy on Route 209 about 5.5 miles north of Port Jervis. Watch for the Guymard Turnpike on the east side of the road. Turn onto the turnpike and drive about .7 miles to a T. Turn right to follow the turnpike as it ascends and passes by one end of Guymard Lake. In about .2 miles park on the left side of the road. The train tracks are active so look and listen before crossing to the other side to pick up the Shawangunk Ridge Trail. Once you cross the tracks look for the aqua blazes of the Long Path on the left side of the right-of-way just before the underpass. Follow the trail down to a ditch and then up and across the Guymard Turnpike. Enter the woods on the other side of the turnpike. From this point on the trail rises and falls a little as you walk through both hardwood and softwood forest. Areas of the trail can be muddy and there are several small streams to cross and a few small "ponds". At 1.6 miles you will come to a woods road where you should turn right. Posted signs on both sides of the trail are a reminder to stay on the trail. At one point the Long Path cuts off to the left and the blazes change from the aqua Long Path blazes to the dark blue of the SRT. At 2.3 miles you will come to an old wooden bridge over the tracks and the trail blazes indicated a right turn. The bridge has been condemned and one look will tell you why! The trail descends the bank on the right side of the bridge. At the bottom turn left and walk along the right-of-way. The trail cuts into the woods near a stream at about 3.1 miles. Turn left and immediately start the biggest ascent of the day. Over the next .8 miles the trail climbs about 600 feet through several switchbacks and areas of very challenging trail. At times it seems you are walking in a rocky stream bed. At 3.6 miles there is an open rock face which serves as a nice lookout. You are now in Huckleberry Ridge State Forest. After finishing the climb there is a slight descent and then another ascent. There is one area of puncheons that can be very slippery. At 5.25 miles you will break out of the woods into the parking area near Hawthorne Lake. Just before the parking area is an unmarked trail to the right that goes near the shore of the lake. This is an out and back hike so turn around and retrace your steps when you are ready.

(The image at the left shows the profile of the hike.)
Shawangunk Ridge Trail: Haven Road to Wurtsboro VFW
ft.
| Quick Look | ||||
|---|---|---|---|---|
| Difficulty | Round trip | Total climb | Internet Maps | |
| 9.1 mi. | 400 | AllTrails | ||
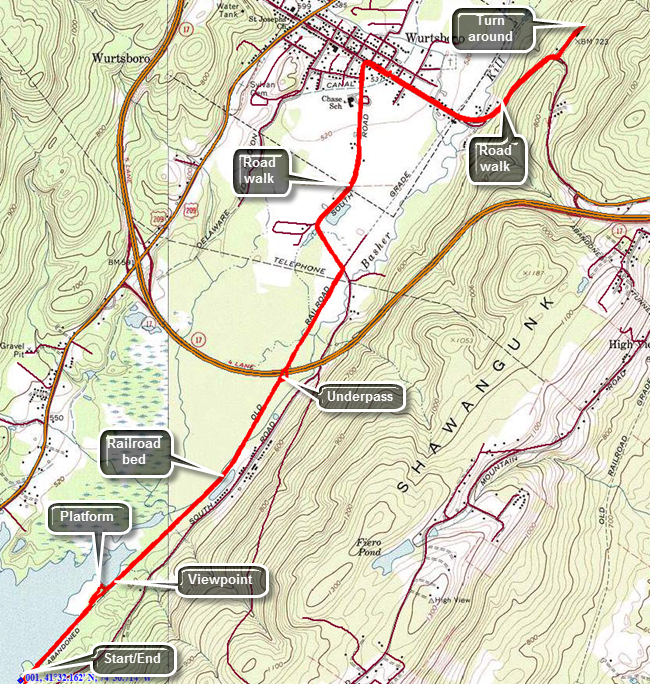 Take the Quickway (Route 17/I86) to the exit for Route 209 in Wurtsboro and head south toward Port Jervis. After about 2 miles turn left on Haven Road. Follow the road as it crosses over the Basha Kill. At the first intersection turn left and park in the large lot. Head northeast on the old railroad bed which makes up a good part of the SRT in this area. There are no blazes for either the SRT or Long Path but the route is clear as it simply follows the railbed. Within a short distance there is a nice viewpoint over the Basha Kill to the ridges beyond. You may encounter a few wet areas on the trail and some mud. There were also several places where old wooden bridges were cross the water. These bridges are slowly deteriorating and the whole atmosphere is one of neglect. At 1.8 miles there is an underpass beneath the highway allows hikers and wildlife to pass under the highway without a problem! At 2.3 miles the trail ends and the road walk begins. Turn left on South Road which eventually turns into Pennsylvania Avenue. It is rather pleasant walking on the flat and level road. As you near town, you will come across the D and H Canal Linear Park. A sign explains that Wurtsboro was named after Maurice Wurts who was the president and founder of the D and H Canal. There is also a stone snubbing post that was used to control the coal barges. When you arrive at Sullivan Avenue, the main street of Wurtsboro, turn right and head southeast, crossing the old railroad bed again at 3.8 miles. To this point the hike has been nearly flat gaining only 100 feet. This changes as you leave the Village of Wurtsboro and head up the hill to VFW Road. In truth the "climb" is only about 200 feet in .7 miles making an average grade of only 6%. Make the left turn onto VFW Road and hike a short distance to the post. The tail enters the woods from the parking area just beyond the post. The return trip is simply a reverse of the route from the way out since no viable loop options exist.
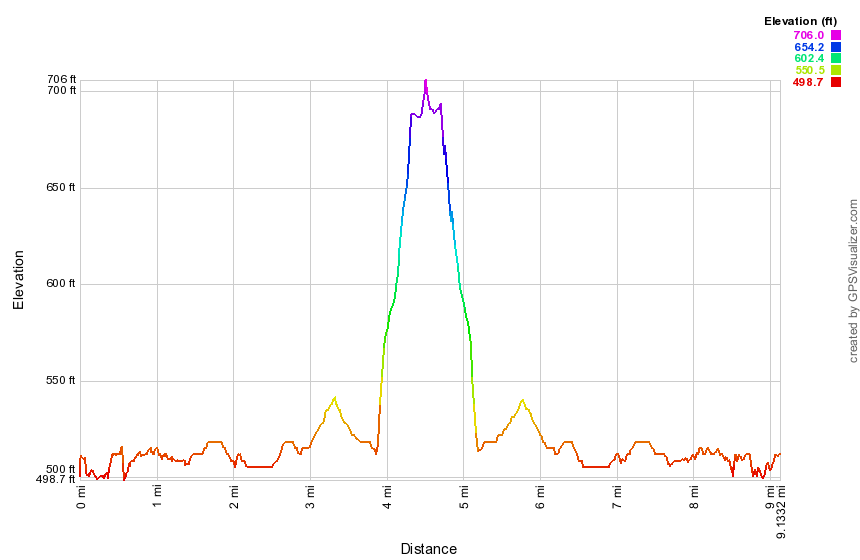
(The image above shows the profile of the hike. Remember that all vertical profiles are relative!)
Shawangunk Ridge Trail: South Gully to Shawangunk SF
| Quick Look | ||||
|---|---|---|---|---|
| Difficulty | Round trip | Total climb | Internet Maps | |
| 6.9 mi. | 1594 ft. | AllTrails | ||
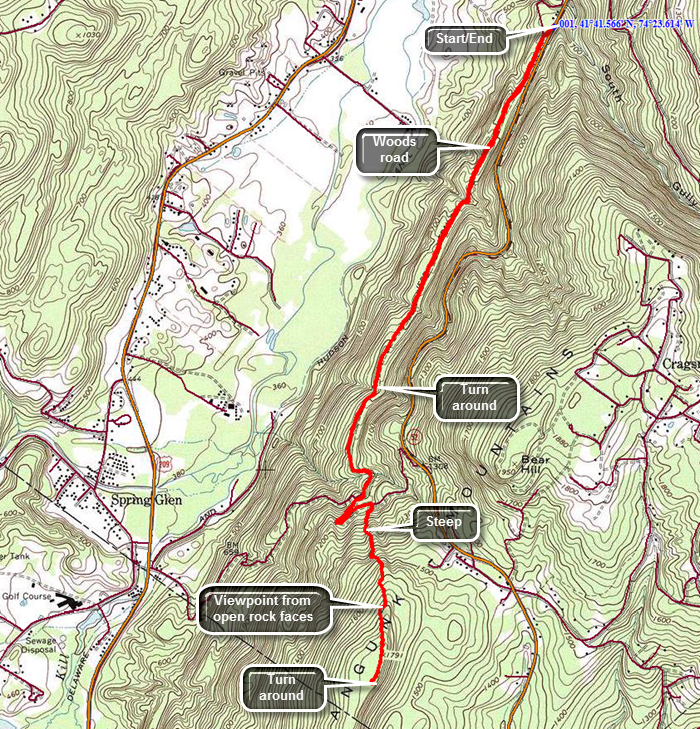 The Shawangunk Ridge Trail runs from High Point State Park in New Jersey to the Mohonk Preserve. The hike may be broken into sections. This section is an out and back hike from the South Gully Trail on Route 52 outside of Ellenville near the Sam's Point Preserve to the top of the first ridge.
Take Route 52 out of Ellenville and drive up the mountain heading toward Pine Bush. Pull over just after the South Gully bridge. Turn around and park on the wide shoulder near the trailhead. Cross the road to pick up the Long Path and SRT heading south. The trail descends from the road and the trail markings immediately disappear at a T! Turn left on what is marked on the maps as Old Route 52 and find the aqua blazes of the Long Path which seem to alternate with the dark blue blazes of the SRT. The road is wide and grassy at this point and is mostly uphill. Continue on the road which became MUCH rockier in places and continues to head uphill on a very slight grade. You will cross several small streams heading generally southwest. At 2.4 miles the trail suddenly turns 180 degrees and heads northeast to avoid descending into a deep ravine. At 2.6 miles you will reach a trail junction with the yellow connector trail which continues straight ahead to a parking area on Route 52. Turn right to stay on the Long Path and SRT. The trail immediately begins to climb up a ridge and is at times steep. There are open rock faces to climb over and some can be a little slippery from the accumulation of pine needles. Within a short distance there is an open rock face with some nice views to the west and north. The ascent continues for another .6 miles and gains 675 feet with an average grade of right around 20% but with some areas nearly 30%. You can turn around when you like but it is worth it to continue to the highest point on the ridge. In two or three more spots there are open views from rock faces. The trail begins to level off at 3.25 miles and can be quite overgrown by laurel and scrub oak. Walked a little farther to 3.5 miles and then turned around to head back
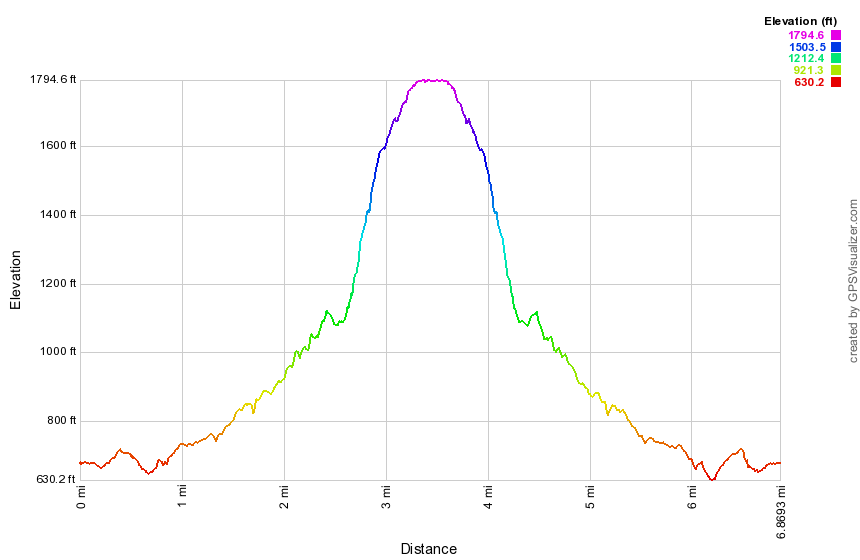
(The image above shows the profile of the hike. Remember that all vertical profiles are relative!)
Shawangunk Ridge Trail: Wurtsboro
| Quick Look | ||||
|---|---|---|---|---|
| Difficulty | Round trip | Total climb | Internet Maps | |
| 2.4 mi. | 660 ft. | AllTrails | ||
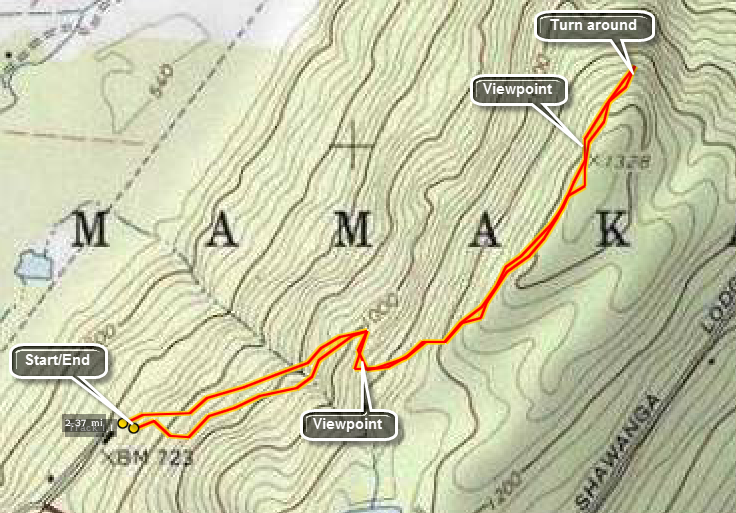 The Shawangunk Ridge Trail runs from High Point State Park in New Jersey to Sam's Point Preserve, The hike may be broken into sections. This section is an out and back hike from the VFW on VFW Road off Sullivan Avenue outside of Wurtsboro. Find the trail behind the VFW and begin to climb almost 600 feet in the next mile. As you climb onto the more exposed part of the ridge near the top, watch for views of the Catskills, the Basha Kill Wetlands and the valley below. Walk along the ridge for as long as you like but be aware that this is out and back. At about 1.2 miles the trail starts a serious descent and this may be a good time to turn around. Follow your path back to the car.
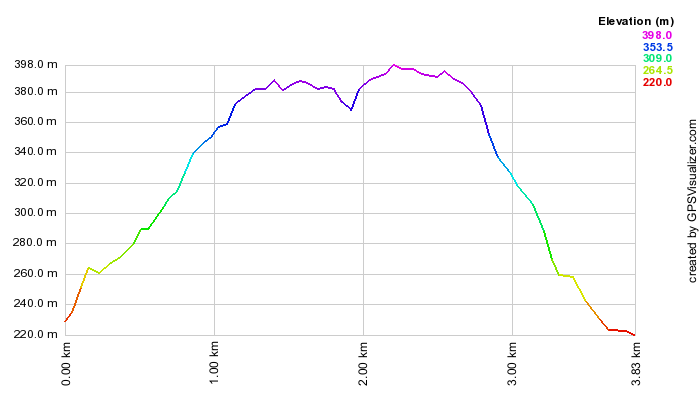 (The image below shows the profile of the hike. Remember that all vertical profiles are relative!)
Shawangunk Ridge Trail: Wurtsboro to Ellenville
| Quick Look | ||||
|---|---|---|---|---|
| Difficulty | Round trip | Total climb | Internet Maps | |
| 8.6 mi. | 2730 ft. | AllTrails | ||
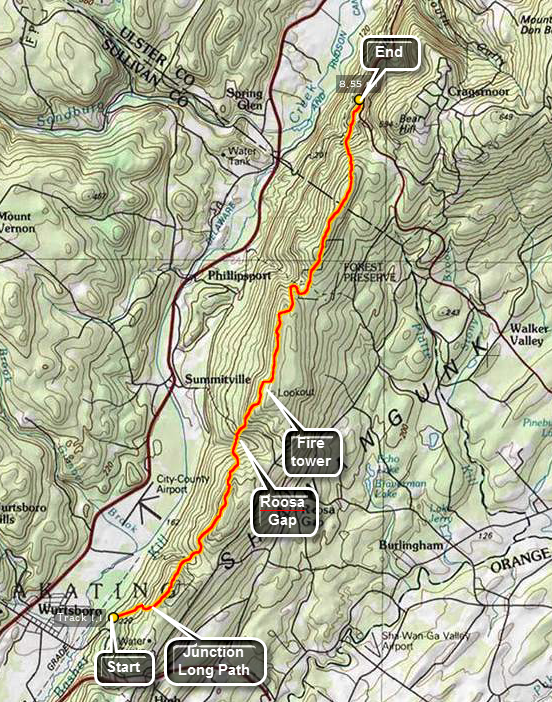 The Shawangunk Ridge Trail runs from High Point State Park in New Jersey to Sam's Point Preserve, The hike may be broken into sections. This section is a through hike from Wurtsboro north to Route 52 outside of Ellenville near the Sam's Point Preserve.
Park a car in the pull off 1.7 miles south of South Gully on Route 52 heading out of Ellenville. Drive to the VFW in Wurtsboro on VFW Road off Sullivan Avenue. You may use back roads to get to Wurtsboro or drive there on Route 209. The trail starts with a nice "warm up" of 600 feet of elevation gain over the first .95 miles. From here there are views of the Basha Kill to the southwest and the Catskills to the north. The Wurtsboro Airport and the massive Kohl's Distribution Center dominate the valley below. Immediately after the climb the trail descends into the next gap on the ridge. The descent is a little steep in places losing 400 feet in .45 miles. There is a small stream at the bottom just before the next climb. Over the next.9 miles the trail rises 470 feet but the reward are the views from the ridge. The views of the Catskills and the ridge across from the Shawangunk Ridge dominate the views. From this ridge you begin a steep descent to the lowest point on the route except for the very beginning. The trail drops 600 feet in the next .85 miles to Roosa Gap. There is another small stream here surrounded by ferns in season. Watch for the flowers from tulip trees in the spring and summer. The next section of the trail is a .7 mile climb that gains 725 feet. After this, the trail continues to rise but does so very gently for the next .8 miles. In the first part you will cross Roosa Gap Road. As you climb the ridge you can look back at the ridge you just left. At 5.15 miles the trail descends again and then begins to climb. The climb is gentle at first but then steepens some. This climb lasts 1.8 miles and rises to 780 feet, the highest point on this section of the trail. This part of the trail skirts the edge of the ridge before crossing over to the highest point. Along the way some interesting rock formations present themselves. One rock tower stands away from the edge of the cliff and is very interesting.
From the highest point the trail drops VERY steeply, losing 700 feet of elevation in about .5 miles. The trail makes its way down to the woods road that is the Old Route 52. The Long Path heads north from here as the road turns left. Pick up the yellow trail that leads UP to Route 52 where your car is parked. This trail is less than 1 mile long and passes over a small stream with a waterfall. From that point there is a short but steep ascent to the main road. As you turn left on Route 52 to get back to the parking area, watch for hang gliders plying the air currents above the area. Also take advantage of the beautiful views from the parking areas along the road. Don't forget to go get your other car in Wurtsboro!
 (The image at the left shows the profile of the hike. Remember that all vertical profiles are relative!)
Shenandoah Mountain to Route 52
| Quick Look | ||||
|---|---|---|---|---|
| Difficulty | Round trip | Total climb | Internet Maps | |
| 8.5 mi. | 2322 ft. | AllTrails | ||

This hike describes a one way hike that requires a pickup at the end because the round trip distance would be over 16 miles.
Take the Taconic State Parkway south off I84 and then take the Miller Hill Road exit. Turn right off the exit and then left on Hortontown Road. Watch for Long Hill Road on the right and drive uphill. The road makes a sharp right and turns into a dirt road. Pass under some powerlines and the parking area will be on the right side of the trail at the apex of the road. If you need to go to the top of Shenandoah Mountain, cross the road and hike on a fairly gentle ascent for about .4 miles. Tag the summit and return to the car to begin the real hike! From the parking area headed north on the AT. From Long Hill Road the trail descends with only a few small ascents along the way. There are no real views on this section. At 1.4 miles cross a power line right-of-way. The trail quickly re-enters the woods still heading downhill but turning more to the northeast. At 2.7 miles the trail starts a steep descent to the lowest point on the hike at 370 feet. Cross a stream and then another on bridges before ascending toward Hortontown Road at 3.25 miles. This area of the trail has several stretches of puncheons used to cross wet ground. Just before crossing the road a nice hiker's cabin is just off the trail to the right. There is a privy on the left side of the trail. Cross the road and the climb for about .25 miles before crossing under the Taconic Parkway on Miller Hill Road. Just after the parkway, turn left on Rock Ledge Road. The trail almost immediately turns right into the woods.
For the next mile or so the trail gains about 500 feet in elevation as it follows along the western shoulder of the Hosner Mountain ridge. A blue trail heads down the mountain at one point. Eventually the trail levels off a little with only a few ups and downs. Just before passing by the summit of Hosner Mountain at 5.4 miles, there is a very nice lookout to the left of the trail looking west and north. There are mountains in the background and farmland below. Several small villages dot the landscape. At 6.3 miles the trail begins to descend and there is another small lookout on the right of the trail to the east and south. For the next .7 miles the trail loses about 460 feet of elevation and travels over some slick rocks. Cross Hosner Mountain Road 7 miles into the hike. Just after the road cross another stream on a bridge and then begin to climb! Over the next .65 miles gain about 450 feet as the trail skirts the summit of Stormville Mountain. There are MANY short switchbacks which cut the steepness of the ascent but became annoying after a while. After a brief descent there is another ascent before the descent to Route 52 where you can wait for your ride.
 (The image at the left shows the profile of the hike. Remember that all vertical profiles are relative!)
Shenandoah NP: Rocky Mount
| Quick Look | ||||
|---|---|---|---|---|
| Difficulty | Round trip | Total climb | Internet Maps | |
| 10.2 mi. | 3300 ft. | AllTrails | ||
 Shenandoah National Park is packed with hikes of all difficulties all of which have their own charm and interesting points. Many of these start on Skyline Drive and, therefore, the first and last parts of the hike are down and up respectively. Some water crossings can be challenging since they are meant for horses and have no bridges. The heat in the late spring, summer and early fall can be oppressive. Always be prepared.
The parking area for Rocky Mount is on the west side of Skyline Drive approximately 20 miles from the southern terminus. Headed north there is a ninety degree turn in the road just after this parking area. Park in the roadside pulloff and walk north until the trail signs appear on the left. The first 1.1 miles descend down from Skyline Drive and then there is a brief ascent of .3 miles to the top of a small hill. After this, the trail descends another .85 miles to the trail junction for the loop. Going left will take you up the front of the mountain first. Heading right takes you to the "back" of the mountain with several crossings of Gap Run. After turning right the trail crosses Gap Run at least five times without the benefit of any bridges. When the water is high it may be necessary to get wet, through some stone in the run or find a convenient downed tree across the water. From the junction the trail goes another 2.4 miles to the lowest point at the last crossing of Gap Run. From Skyline Drive the ascent has been 1535 feet! The ascent up to the summit of Rocky Mount now begins. It is steep in some places but there are switchbacks to help lessen the gradient. There may be some seasonal stream crossing but all are manageable. The hike up the back side of the mountain has several talus fields and offers some views of surrounding mountains. Savor these views as there are none from the summit. The ascent to the summit is 2 miles and almost 1500 feet. Over the top of the summit there are some limited views. The descent to the trail junction is about 1.25 miles but you are not done yet. There is still the 2.25 mile and 850 foot climb back to the car.
 (The image below shows the profile of the "lollipop" hike. Remember that all vertical profiles are relative!)
Ski Plattekill
| Quick Look | ||||
|---|---|---|---|---|
| Difficulty | Round trip | Total climb | Internet Maps | |
| 3.2 mi. | 1230 ft. | AllTrails | ||
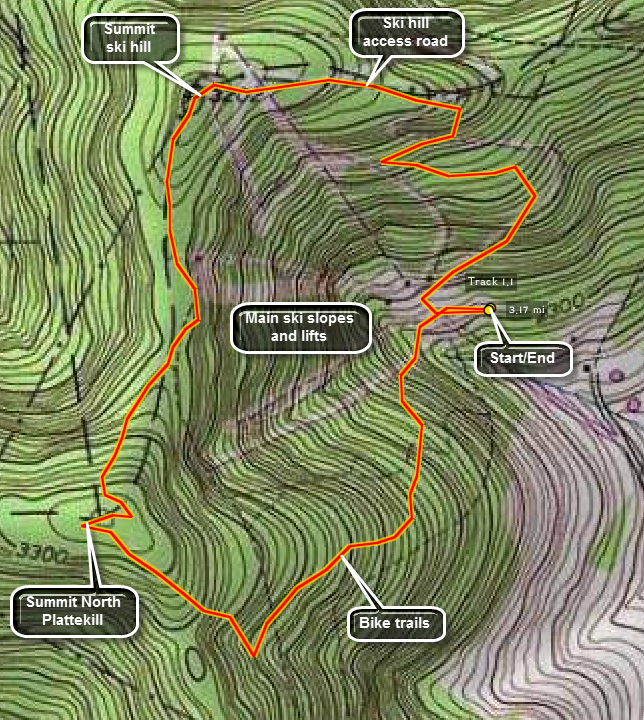 Walking the trails at the Ski Plattekill ski hills is interesting. The view is great and even in the summer the hill is used for downhill mountain biking.
Head north from Margaretville on Route 30 through Halcottsville. Watch for signs for Ski Plattekill turn west off Route 30 and follow Upper Meeker Hollow Road until Lower Meeker Hollow Road bears left. Continue on Lower Meeker Hollow Road until you are at the ski center, Park in the parking lot and go to the office to check in. The people at the office are very polite and usually offer a map of the hill and suggestions on where to hike. One way to start is to head up the beginners hill on the left as you walk out the back of the lodge. Take the Overlook Trail toward North Plattekill. Try to avoid going too high up the slope as you will hit some rather steep ski runs. The map from the ski hill only shows the ski runs at not the extensive network of bike trails. The bike trails toward North Plattekill are truly impressive! They are steep and rocky with many jumps. Some have padded trees. Continue to walk UP and head for the highest point on North Plattekill. Watch for good views as you climb. When you get near the highest point, you may have to go off trail to find the exact location. You may return the way you came but it is better to walk across the top of the ski hill and descend by the Powder Puff Trail on the other side. In this way you can look down many of the ski runs and chair lifts to get the best views. This route also climbs the second highest point on the slopes. The Plunge has some nice views but it may not be too clear how to get across the top of the rest of the hill. Keep walking on trails, paths or bushwhack your own way to the central slopes area with the Blockbuster. The views are magnificent from here since it is a steep run and the hill falls away quickly. In addition, there is no lift to mar the view. Start down the Powder Puff Trail which is long but very gentle. At one point, as the slope turns, the steep main slopes will be in front of you. Follow this path back to the office and the parking area.
 (The image at the left shows the profile of the hike. Remember that all vertical profiles are relative!)
Sonoma Falls
| Quick Look | ||||
|---|---|---|---|---|
| Difficulty | Round trip | Total climb | Internet Maps | |
| 2.0 mi. | 150 ft. | |||
Finding this hidden gem is easy but just knowing it is there is HARD! I have lived in Livingston Manor and did not know how beautiful these falls were until a recent visit! The area recently changed hands and the new owners have opened a small store and will eventually have a cider press in operation. Behind the store is a series of falls with a rustic pathway along the stream to the top.
Exit State Route 17 (The Quickway), soon to be I86 at exit 97 for Morsston. If you are heading west turn left off the exit and go back under the main road. Take a left and then your first right. Turn right at the next road and pass over a small bridge. The dead end road to the falls is the next left. For those traveling east, take a right off the exit and then take your next left. Follow the directions for those traveling west.
Snow Ridge Drive to Middleburgh![]()
![]()
| Quick Look | ||||
|---|---|---|---|---|
| Difficulty | Round trip | Total climb | Internet Maps | |
| 11.7 mi. | 2360 ft. | AllTrails | ||
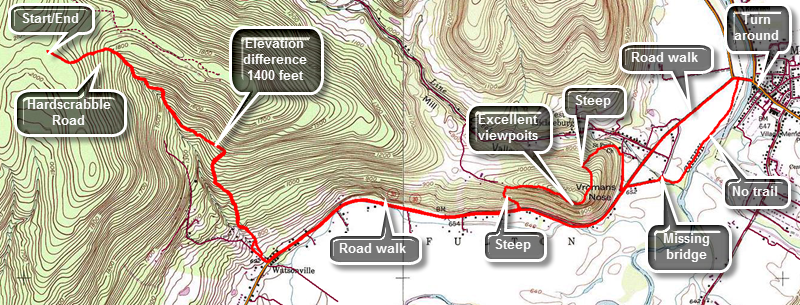
Head north on Route 30 through Margaretville, Roxbury and Grand Gorge. After passing through North Blenheim, watch for West Fulton Road on the left. Turn left on West Fulton Road and drive about 3 miles to the four corners in West Fulton. Turn right on Patria Road and drive the length of the road to the intersection with Greenbush Hill Road. Turn right and drive about .7 miles and turn right on Snow Ridge Drive. The "Private Property" signs on this road refer to the land and not the road since there is a state right-of-way. Where the road splits, stay right on the unnamed access road. The road is barely wide enough for one car! Within a short distance watch for a small, grassy parking area on the left. Head out the back of the parking area on the red trail. Within a few hundred feet you will come to the Long Path. Turn left and walk along a stone wall and immediately start to descend. Continue to hike downhill from an elevation of over 2000 feet and to Route 30 with an elevation of under 700 feet. This means that you lose over 1400 feet on the way out and have to regain the same elevation at the end of the hike. At about .5 miles turn right onto Hardscrabble Road which was abandoned many years ago.It is now overgrown and is not as well-defined as some other woods roads. As you continue to hike the blazes may become older, fewer and farther between. At about 1.8 miles exit the woods and start to walk down through a field watching for views of Vroman's Nose on the left. Continue straight ahead down the hill where some paths cross. At the road turn left to walk down to Route 30. Turn left on Route 30 to hike east toward Middleburgh. The traffic on Route 30 can be heavy but there is a nice wide shoulder. At 3.75 miles watch for the red trail on the left side of the road at the base of Vroman's Nose. The red trail is by far the steepest access to Vroman's Nose gaining over 400 feet in just the first .2 miles and averaging over a 30% grade. In places there really isn't much of a trail and the footing is unstable. It would be foolish to attempt this ascent without hiking boots and poles! The trip from the road to where the trail levels out is about .5 miles and the vertical gain is over 500 feet. As you begin to walk along the edge, various lookouts came into view but the best views are from the top. The views include the broad fields down below and the hills beyond with views stretching south to the Catskills. As you reach the end of the flat portion and begin your descent follow the aqua blazes down the very eroded trail. Vroman's Nose is a victim of its own success. A great many people visit this remarkable attraction but little has been done to improve or maintain the trails. Near the bottom continue to follow the aqua blazes to the right rather than the other trails that lead back to the parking area. At around 5 miles you will come out onto Church Street. Turn right to walk out to Route 30 where you should turn left. If you are attempting to hike this section, I suggest you do NOT follow the various trail descriptions or the route that I describe below! Turn left on Route 30 at the end of Church Street and stay on Route 30 into Middleburgh. There are problems with the trail that make hiking the actual route very frustrating. They are another example of the miscommunication between those marking the trails and those who write the descriptions. If you choose to try to follow the exact route of the Long Path, immediately turn right onto Mulberry Lane. Walk down this short and straight street for about .2 miles where it abruptly ends at a sign that says "Bridge Closed". There is no "new snowmobile bridge" across Line Creek. It seems to have been washed out some time ago. There was a short span on the other side and it is easy to cross Line Creek when the water is low. Walk over the span on the other side and turn right to walk along the edge of the field. This may be easier when the field does not have corn stalks 7 feet high! It is impossible to walk in the "woods" between the field and the creek. As you near Schoharie Creek, there are still no blazes and the situation is the same. Around 6 miles into the hike you will finally break out into an open area along the field and walk through some weeds to the Rotary Park. Continue through the park to the road bridge across Schoharie Creek on Route 30. Turn right and walk over the bridge to the intersection with Route 145 and then turned around to start back. You may retrace your exact path but this will require another trip back along the field and another ascent and descent of Vroman's Nose. An alternative is to follow Route 30 all the way back to Hardscrabble Road which also cuts a little mileage leaving you fresh for the 2 mile uphill trek at the end. At 9.5 miles into the hike you will be back at Hardscrabble Road. Turn right and walk a little way up the road then turn right again onto the path through the field. The final climb from Route 30 is 1440 feet over 2.1 miles
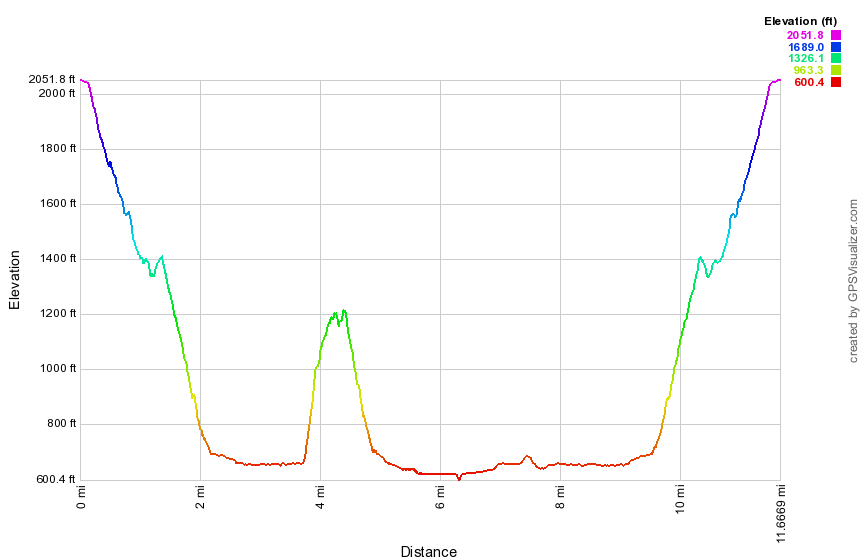 (The image below shows the profile of the hike. Remember that all vertical profiles are relative!)
South Mountain Road to Conesville
| Quick Look | ||||
|---|---|---|---|---|
| Difficulty | Round trip | Total climb | Internet Maps | |
| 7.4 mi. | 750 ft. | |||
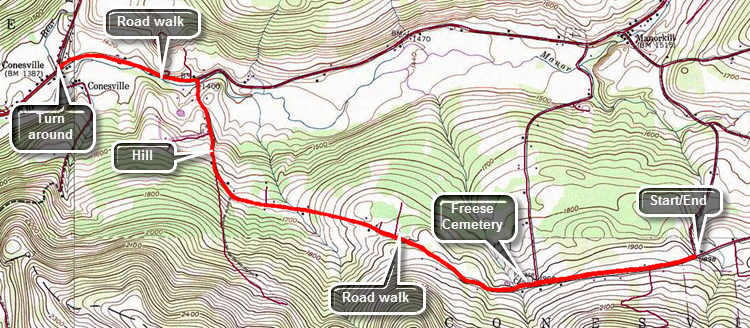
Head north on Route 30 through Margaretville, Roxbury and Grand Gorge. In about 5 miles after Grand Gorge turn right on Route 990V. Pass the Schoharie Reservoir heading east towards Conesville. After passing the turnoff for the Prattsville Road near Manor Kill Falls, drive another 3.8 miles through Conesville and turned right on South Mountain Road. Drive three miles to Cook Road on the right and a CCC or woods road directly across from it. Park on the woods road as far to one side as you can or park on the shoulder of Cook Road. Start walking back toward Potter Mountain Road on South Mountain Road. The trip out is mostly downhill making the return trip an uphill climb. There are a few interesting "attractions" along then road. Within the first half mile there is a cemetery on the right which seems to show more care than some of the others on the trail. Some houses along the road are obviously occupied while others seem to be second homes or deserted. Some of the houses are new and well-kept while others are older and run down. One house has a wrought iron fence around it and what were once tennis courts on the other side of the road. Everything is slowly decaying but there is no "For Sale" sign on the property. There is even one farm along the road. From Haner Road the South Mountain Road descends more steeply. It is almost exactly 3 miles to the intersection of South Mountain Road with Potter Mountain Road, the extension of Route 990V in this area. Turn left on Potter Mountain Road and walk .7 miles into Conesville to Champlin Road on the left. Since there are some opportunities to park in the area, this is a good place to turn around and walk back to the car. It also leaves a reasonable hike from Conesville to Manorkill Falls and back.
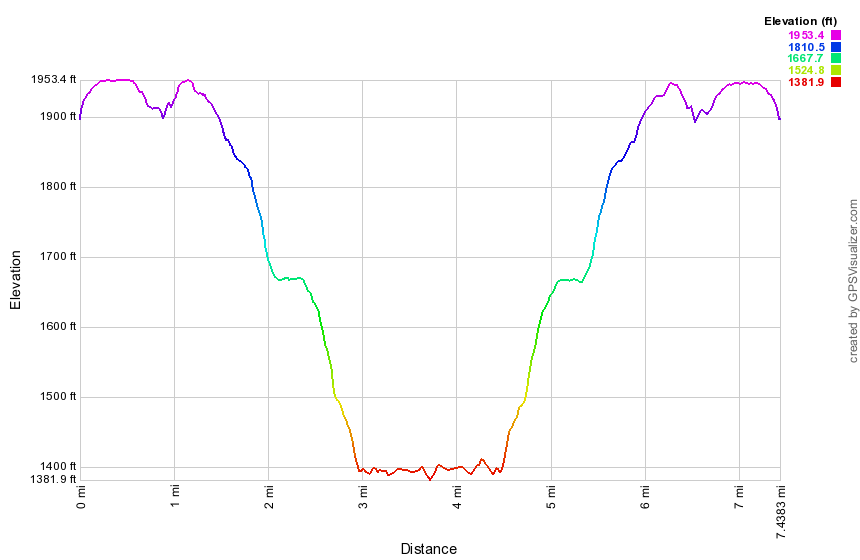 (The image below shows the profile of the hike. Remember that all vertical profiles are relative!)
Splitrock Reservoir: Complete Loop
| Quick Look | ||||
|---|---|---|---|---|
| Difficulty | Round trip | Total climb | Internet Maps | |
| 11.3 mi. | 1879 ft. | AllTrails | ||

Caution: This route may be hard to follow. You may take any route from your location that ends up at the south end of the reservoir!
From I-287 North take exit 43. At the end of the ramp turn left and then right onto Fanny Rd. Follow Fanny Road to Powerville Road. Turn left on Valley Road and then right on Rockaway Valley Road. Bear left onto Split Rock and follow it to the parking area at the south end of the reservoir. If you are traveling south, there is no exit 43, so you'll want to check directions from where you are. Park only park in the designated lot as you will get ticketed if you park along the road. This parking area is the only legal boat launch area and this is a popular canoeing, kayaking and fishing area. Turn right out of the parking area onto the road and walk over the old bridge over the outlet dam. As you walk up the road, look for the beginning of the white blazed Four Birds Trail up the hill on the right. This may be hard to find so you can turn into the woods at any place and then scramble up the hill to the ridge to find the trail. In general the trail climbs up and down over some low hills with the constant changes in elevation providing a challenge. The trail markings are VERY poor especially where there are turns. The trail follows the reservoir shore for some time and then heads into the woods only to come back toward the shore. At about 1.75 miles the trail begins a more serious ascent of a small hill which does not offer any unobstructed views. At about 3 miles the trail runs parallel to the shore and if you walk down to near the waters edge, the views are spectacular. Just after this spot there is an opening in the trees and you may be able to see a fairly new house high on the opposite shore. At 4.5 miles the trail curves around an arm of the reservoir that almost looks like a beaver pond. A little further along the trail, you will walk across the outlet from Dunham Pond. In wetter seasons this area might be tricky. A little further along is an unmarked trail to the left and a wooden sign that says Winnebago. If you walk up this trail, you will be on the shores of Dunham Pond in only a few minutes. There is an impressive stonework bridge and spillway at the outlet of the pond. This may be private property so you may want avoid the area altogether. Back on the main trail, you can see a set of cliffs on the opposite side of the reservoir through the trees. These are Indian Cliffs which have one of the best lookouts on the reservoir. Somewhere around 6 miles there will be a right turn onto the blue Splitrock Trail which heads across the northern end of the reservoir. The trail passes by Misty Pond which may not be marked on all maps. At 6.7 miles into the hike you will arrive at the climb up to the cliffs. Standing on Indian Cliffs gives you a view over most of the reservoir, Misty Pond and the rest of the surrounding countryside. After this, the trail starts to descend from the cliffs and drops quite a bit of elevation. The trail heads toward the Charlottesburg Road, a wide woods road frequented by mountain bikers. At about 7.3 miles you will intersect the road. It is hard to follow the blue Splitrock Trail markings in this area. If the trail is well marked stay on the trail but it is also possible to stay on the "road" as it pass close to the reservoir.This route has some nice views of the reservoir even though you are at water level. Eventually some houses will come into view and the trail marking became clearer. They head over some rocks and up toward a ridge. It is your choice to follow the trail or the road. By staying on the road you will pas by some sandy beaches and may even find a "split rock" along the way. The woods road has a gate near the end and a parking area. At this point the road changes to gravel and is accessible by car. There doesn't seem to be any trail here so stay on the road to walk back to the parking area. There are some nice views on the way out to Splitrock Road. There is a side road that may be a shortcut but it also may be on private property. At the end of the road turn right on Splitrock Road and walk a little less than a mile back to the parking lot.
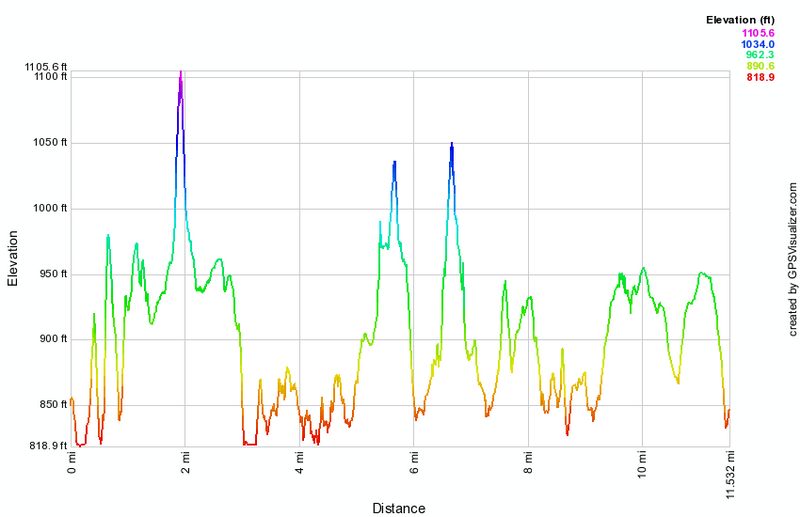 (The image at the left shows the profile of the hike. Remember that all vertical profiles are relative!)
Spruce Mountain Trail
| Quick Look | ||||
|---|---|---|---|---|
| Difficulty | Round trip | Total climb | Internet Maps | |
| 3.0 mi. | unknown | PDF map | ||
The Spruce Mountain Trail is on the grounds of the Spruce Lake Retreat Center on Route 447 near Canadensis, PA. The hiking trails are usually only available to guest ant the retreat center but arrangements may be made to hike the trails. Walk from the main lodge toward and in front of the program center. Turn left after the program center and before Carroll Cottage. Pick up the trail immediately. The initial part of the trail is gravel and well-maintained. Within a few hundred feet, the Lower Falls is on the left. There is an informal path to the base of the falls where you can get a better view. Continue on the main yellow-blazed trail to a road. Turn left an then immediately right onto the yellow-blazed Spruce Mountain Trail. The trail begins by following a stream but after a short distance the trail has been relocated away from the streambed due to flooding and erosion. Bushwhacking up the stream bed and following the faded yellow blazes allows you to see more small water falls before the Upper Falls but the relocated trail is definitely safer and avoids crossing the stream. Follow the trail as it ascends toward the Upper Falls. As you approach the Upper Falls, the trail can be very wet during most seasons and icy in the winter. It actually passes very close to the waterfalls. Just before the ascent another informal path on the right leads to a clearer view of the falls. At the top of the falls follow the trail as it runs left to ascend Spruce Mountain. The grade is moderate but by no means easy although there are several switchbacks. At the highest point on the trail you may be able to get some views depending on the season. Continue downhill a little farther where there is a rock ledge which gives and unobstructed view of the Spruce Lake Retreat Center in the valley. The view seems to go on forever with some mountains both near and far. The map from the center seems to indicate that the trail continues on from this point but the blazes fade and POSTED signs appear. Turn around a retrace your route back to the Upper and Lower Falls and the Retreat Center.
Stage Road to Beaver Dam Road
| Quick Look | ||||
|---|---|---|---|---|
| Difficulty | Round trip | Total climb | Internet Maps | |
| 7.3 mi. | 640 ft. | AllTrails | ||
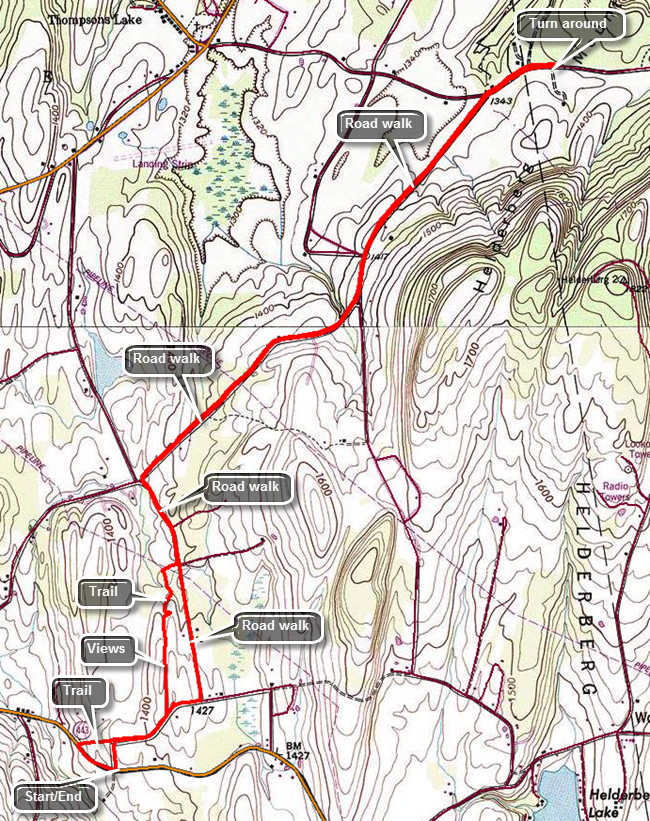
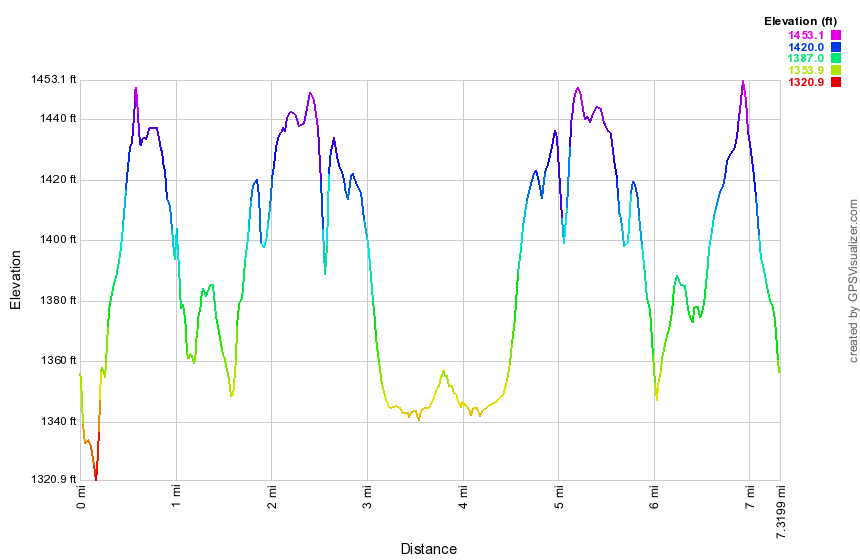 (The image at the left shows the profile of the hike. Remember that all vertical profiles are
relative!)
(The image at the left shows the profile of the hike. Remember that all vertical profiles are
relative!)
Sterling Forest: Bare Rock Loop
| Quick Look | ||||
|---|---|---|---|---|
| Difficulty | Round trip | Total climb | Internet Maps | |
| 10.7 mi. | 2145 ft. | AllTRails | ||

Take Route 17A from Warwick, NY south and east toward Greenwood Lake. In Greenwood Lake bear left as Route 17A climbs the ridge. Park in the large parking area near the top of the ridge where the Allis Trail crosses the road.
Park at the lot for the Sterling Ridge and Sterling Valley Trails. Take the yellow Sterling Valley Loop Trail out of the parking area just passed a gate> In a short distance turn right and up to the ridge on the blue Sterling Ridge Trail. This trail climbs for about .25 miles and then travels along the ridge with a few ups and downs. At about 2 miles there is a nice viewpoint overlooking Sterling Lake. At about 2.3 miles the orange blazed Bare Rock Trail branches off to the right. The Bare Rock Trail stays rather level for a short distance and then begins to descend somewhat. After descending the trail rises toward a ridge that parallels Greenwood Lake. The trail stays off the ridge and you will wonder if it ever gets to the lookout. At 3.7 miles a clearly marked side trail drops to the viewpoint on the east side of Greenwood Lake. The viewpoint is VERY nice allowing views of the lake and the Bellvale-Bearfort Ridge. Back up on the main trail turn right to continue the loop hike. For the next 1.6 miles the trail climbs over a hill and then begins a descent to the junction with the green blazed West Valley Trail and the red blazed Fire Tower Trail. The trails here are poorly marked and may cause some confusion. In addition, a beaver dam has flooded the area immediately ahead on the green trail. The best option is to find a way across Jennings Creek and then walk through the woods (bushwhack) to the top of the ridge where you can pick up the Sterling Ridge Trail. You may find a woods road or a white blazed trail up to the ridge but these are not on most maps. Once on the Sterling Ridge and Highlands Trail you will ascend an interesting part of the trail to a lookout and then descend before tackling the steep trail up to the tower. The part of the trail up to the tower is only .4 miles but gains almost 300 feet. Whether the tower is open or closed seems to be a hit-or-miss situation! There are good views of both Greenwood Lake and Sterling Lake. Descend the red Fire Tower Trail until you hit the red Fire Tower Connector trail at 7.75 miles and turn north. In a short distance you will find the Sterling Lake Loop Trail headed north along the lake shore. Walk 1.2 miles along the shore to the junction with the yellow Sterling Valley Loop Trail. Before going to the left on this trail and back up to the car bear to the right and go down to a nice viewpoint on the lake. There is a small point of land that sticks out into the lake. Walk back to the trail junction and turn right. The last 1.6 miles starts out flat along a wide road and then begins to ascend near the end to regain the elevation of the parking lot.
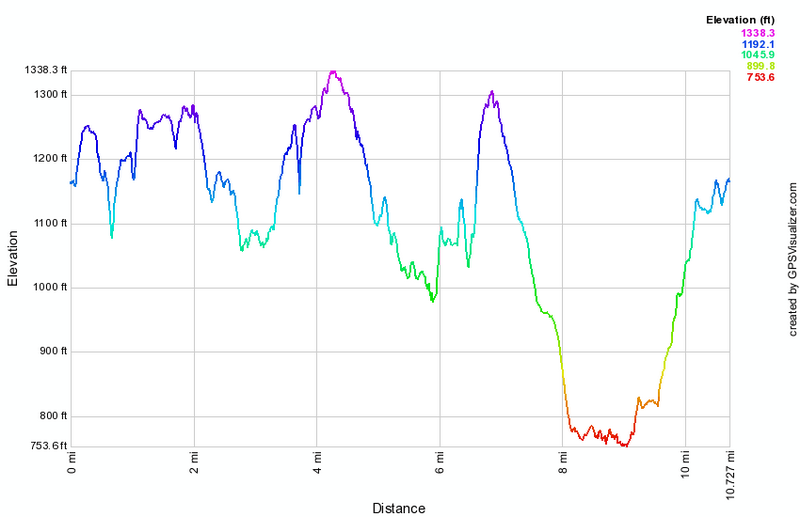 (The image at the left shows the profile of the hike. Remember that all vertical profiles are relative!)
Sterling Forest: Complete Loop
| Quick Look | ||||
|---|---|---|---|---|
| Difficulty | Round trip | Total climb | Internet Maps | |
| 9.2 mi. | 1467 ft. | AllTrails | ||

From Route 17A near Indian Reservoir, take Long Meadow Road south. Pass the entrance to the Sterling Forest Visitor's Center on Old Forge Road and continue south for another 1.5 miles. A road that leads to the seasonal parking area will be on the right. You may have to park outside the gate if the road is closed for the winter. Walk to the far end of the parking area and continue on Lakeville Road. Watch for the three red blazes on your left that signal the beginning of the Fire Tower Trail. This trail climbs rather gently through open forest to Sterling Ridge. After about 1.4 miles you will be at the fire tower. This tower is believed to be the only active fire tower left in New York State. A ranger is assigned to the tower to watch for fires in southern New York and northern New Jersey. The ranger is NOT always on duty so call ahead to the Visitor's Center to find out if the tower will be open. When a ranger is not on duty, a locked gate blocks access to the tower. The views from Sterling Ridge are limited in most areas but the views from the tower are great in all directions.
Once you are satisfied that you have seen all you can from the tower, find the blue blazes of the Sterling Ridge Trail as they head north toward Route 17A. Most of the views from the ridge are blocked by trees but just after the tower there are some nice views down to Sterling lake. This is a nice place to stop and take some pictures and to have lunch or a snack. After this the trail wanders up and town, crosses a power line right-of-way and then meets the orange Bare Rock Trail after 1.25 miles. This trail comes up from Sterling Lake near the Visitor's Center and is a good "bail out" I time becomes limited. Continue for 1.85 miles on the Sterling Ridge Trail to the parking area near Route 17A. This route goes some distance passed the head of Sterling lake before turning back toward the lake.
Turn right on yellow Sterling Valley Loop Trail which heads back toward the lake. Continue 1.3 miles to Sterling Lake and the blue Sterling Lake Loop Trail. Where these two trails meet is a nice view of the lake. The Lake Loop trail is nearly flat and eventually joins some of the local roads that serve private residences in the area and allow access for authorized vehicles in the park. After .55 miles the orange Bare Rock Trail begins on the right and the Sterling Lake Loop Trail turns left to Visitor's Center. In this area there are the ruins of the Sterling Forge and Furnace. The blue trail cuts across the out let of Sterling Lake. From the bridge that cross by the dam and spillway there are nice views of the lake and the outlet stream.
Continue straight ahead on Fire Tower Connector Trail for .55 miles to the Fire Tower Trail. Turn left and retrace your steps from earlier in the hike. Walk .5 miles back to the parking area and, if necessary, down the access road to your car on Long Meadow Road.
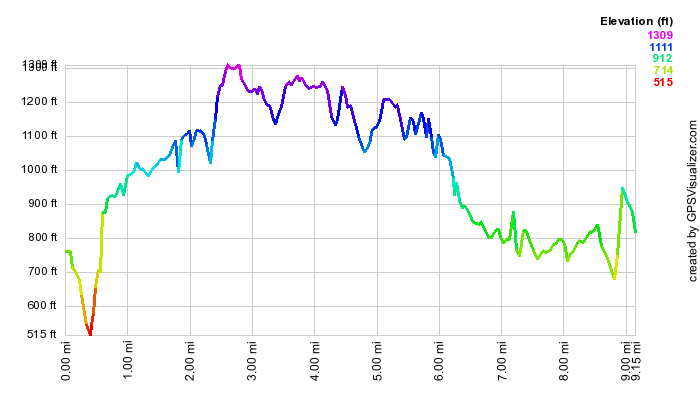 (The image at the left shows the profile of the hike. Remember that all vertical profiles are
relative!)
(The image at the left shows the profile of the hike. Remember that all vertical profiles are
relative!)
Sterling Forest: AT from Fitzgerald Falls to Little Dam Lake
| Quick Look | ||||
|---|---|---|---|---|
| Difficulty | Round trip | Total climb | Internet Maps | |
| 9.6 mi. | 2280 ft. | AllTrails | ||
 The parking area for the start of this hike is on Orange County Route 5 which may be marked as Dutch Hollow Road, Mountain Lakes Road or Lakes Road. Take Route 17A west from the New York State Thruway or south and east from New York State Route 17 (Quickway). Drive toward Greenwood Lake. From the east drive between the two parts of Greenwood Lake on Route 17A. At the junction with Route 210 bear right before going up the hills. This is Lakes Road. From the Quickway turn right at the bottom of the hill just before entering Greenwood lake. If you reach the Route 210 junction you have gone too far. About 4 miles north on Lakes Road an power line crosses the road. Park just south of this in the pullout by the side of the road. The trail begins here. There is only room here for a few cars. If this area is full, you may be able to park just north of the power lines. Watch for NO PARKING signs. The trail leaves from the eastern side of the road and crosses under the power lines.
Cross a small footbridge and follow the white blazes of the AT as you will all day. The trail crosses Trout Brook which may be a problem when the water is high. No areas are very deep but the crossing is WIDE. In less than .25 miles you will be at Fitzgerald Falls. The falls is formed as Trout Brook cascades down from the ridge above. The trail climbs the rocky ledge next to the brook on the right hand side. In the next half mile you will cross Trout Brook or its small tributaries 4 or 5 times. The trail will gently rise for 1.3 miles until it meets the Highlands Trail marked in blue with the diamond trail markers. The Highlands Trail heads south. At this point there is an AT trail register box. Sign in and read some of the comments made by others. Turn right onto the Highlands Trail and walk a hundred feet for a nice lookout. Return to the trail register and continue east on the AT.
For about .75 miles walk the ridge toward the Mombasha High Point. The trail climbs slightly for the entire length and a little more steeply as you come to the high point. As you approach this point the trail abruptly turns right and follows the edge of a rocky ledge. The trail is well marked but don't miss this sharp turn. At the high point you will have views of the surrounding area. Walk a little further and Mombasha Lake can be seen to the east and north. The view is blocked by trees but when the leaves are not present the lake can be clearly seen. Descend the AT from the high point. The descent is steep at first and then moderates. Some areas are not very well marked so watch ahead for the white blazes. The trail heads south for .5 miles and then turns east again for .25 miles before reaching Route 91. Near the end of the trail it crosses a brook and ascends toward the road. This area can be marshy when it is wet. There is a boardwalk that starts shortly after the stream and continues almost to the road. A small pond appears on the left as you approach the road.
Cross Route 91 and continue on the At over a rocky path that may once have been a stone wall. The trail switches to a smoother and flatter woods road before crossing another stream and ascending slightly. Mombasha Lake is visible on the left and Kloibers Pond is hidden on the right. From here the trail starts to ascend for .85 miles to the shoulder of Buchanan Mountain. The trail turns south for a while and then east as it approaches the mountain. The actual ascent up the mountain becomes steeper passing over and through a rocky area as it reaches the highest point on this part of the trail. From here the trail again starts a descent until it meets a large wall or ridge of rock. You may think that the trail turns to avoid this but, in fact, this is the last climb. It may be the most demanding on this part of the trail. It is rocky and steep and large trees may lay across parts causing you to find creative ways over or around them. One place requires squeezing under and around a large tree across the path. Further up some pretty high steps make the use of hands almost mandatory. This is all made more interesting when the trail is wet or icy!
At the top of the climb the trail levels off and then almost immediately starts to descend for .2 miles to East Mombasha Road. At the road cross over and continue to follow the AT down to the lake. There is room to park along the side of this road. The trail heads almost due south for about .3 miles where there is a footbridge that crosses the area between the two parts of the lake. The AT continues on passed the lake. Follow it for a few hundred feet to get a better view of the lake. At this point you may continue on the AT as far as you want but you have already walked 5 miles and there are 5 miles to go back to the car. The trip back is much the same as the trip out. You will be more tired and the descents become ascents and vice versa.
 (The image at the left shows the profile of the hike. Remember that all vertical profiles are
relative!)
(The image at the left shows the profile of the hike. Remember that all vertical profiles are
relative!)
Sterling Forest: AT from Mt. Peter to Fitzgerald Falls (and Beyond)
| Quick Look | ||||
|---|---|---|---|---|
| Difficulty | Round trip | Total climb | Internet Maps | |
| 10.1 mi. | 2237 ft. | AllTrails | ||

The parking area for the start of this hike is on Route 17A. Take Route 17A west from the New York State Thruway or south and east from New York State Route 17 (Quickway). Drive toward Greenwood Lake. At the top of the hill just passed Mt. Peter, pull into the roadside parking area where the AT crosses the road. The trail is just across the road from the parking area.
Cross the road and turn right as the AT (white blazes) turns in that direction. The blue trail in the opposite direction goes to Mt. Peter. The trail is generally open and easy to follow. There may be several ponds along the way depending on the season. Blowdowns can be a nuisance as they are not always promptly cleared. At 1.3 miles the AT goes up and over a rock outcrop than can be very slippery when wet or icy. The view from top is nice. Avoid this route by using the Highlands Trail to bypass the outcrop. The Highlands Trail turns left off the AT just before the rocks and rejoins the AT not too far to the northeast. The trail heads northeast along the ridge and loses and gains some elevation as it goes. At 1.7 miles another rock outcrop is easily bypassed by the Highlands trail to right. At about 2.3 miles there is a spur trail to the left which goes to the Wildcat Shelter. At 2.9 miles the blue Highlands Trail continues straight ahead. Turn right on the AT as it descends from the ridge to Lakes Road. Cross Lakes Road and pick up the AT directly across the road. You will cross a wooden bridge over Trout Creek. Your next stop is Fitzgerald falls at 3.9 miles. This would be a good place to turn around but you may continue as far as you like since the AT is headed to Maine! Continue on the AT by climbing the steps next to the right of the falls. At the top of the falls walk along the creek until you see the At blazes as they head up to the right. Continue to follow the AT blazes which can be hard to spot at times. You will be on Avery rocky part of the trail which ascends the ridge to a trail junction. At the junction the Highlands Trail heads south while the AT continues northeast and east toward Little Dam Lake. You can continue but turning around here will make the hike very close to 10 miles.
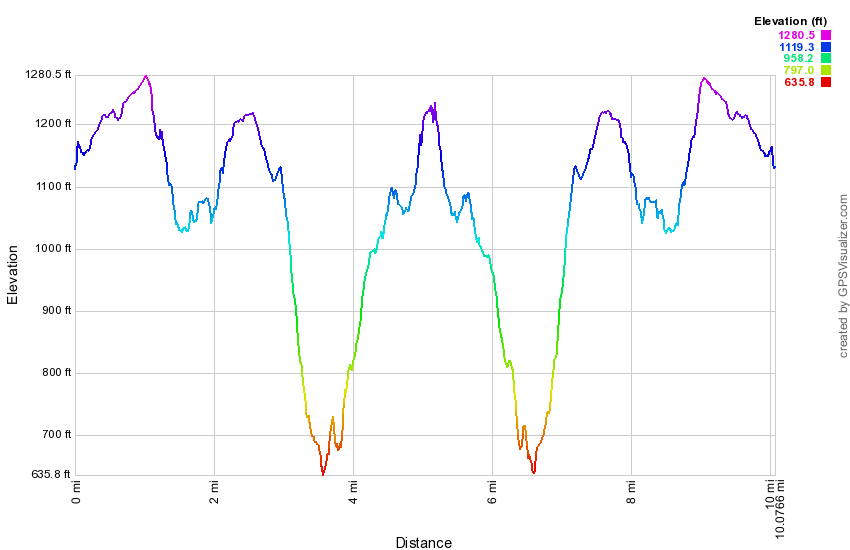 (The image at the left shows the profile of the hike. Remember that all vertical profiles are relative!)
Stewart State Forest (Swamp Figure 8)
| Quick Look | ||||
|---|---|---|---|---|
| Difficulty | Round trip | Total climb | Internet Maps | |
 |
6.7 mi. | 700 ft. | AllTrails | |

Find Ridge Road from Route 17K. One way to do this is to take exit 116 east off State Route 17. Turn left on Route 17K and drive 15 miles to Ridge Road which will be on the right. Drive south on Ridge Road for .9 miles and turn left onto Maple Ave. Make an immediate right into the parking lot. This area has several multipurpose trails, many woods roads and a maze of bike trails. This hike is a figure 8 which includes the Great Swamp boardwalk and Buchanan Hill. The trails are not well marked but are easy to follow. The trails roll over low hills with grades of less than 10%.
Start the hike by walking out the blue blazed Scofiled Trail at the back left corner of the parking area. The trail heads south and slightly uphill. The trail is pretty well maintained through a sea of prickers and what look, at times, like Japanese knotweed. There are some small hills to help you get warmed up. After a mile or so, there may be some wet and muddy areas on the trail. At 1.4 miles there is a small pond on the right of the trail. The pond is not marked on maps but is formed by an obvious man-made dam. At 1.6 miles a yellow trail appears on the left. This trail leads to the swamp boardwalk. Turn left and start walking downhill. After .25 miles you will at the beginning of the boardwalk. The boardwalk is very impressive and the construction very sturdy. It includes steel pipes to anchor it in the swamp, stainless steel cables between pipes, and a composite decking. You will enjoy walking along the boardwalk and stopping to take in the view and look for critters. When you reach the end of the boardwalk continue walking on the trail to another section of boardwalk. At the end of this section continue on a dirt road to Maple Avenue. Turne right and almost immediately turn left on the blue blazed Buchanan Hill Trail. Walk downhill to another small pond. Continue your walk passing the end of the pond to a fork in the trail. There is a single blue blaze on a tree in the middle of the fork which gives no indication of which way to go! Choose right and begin to climb up a small hill and then descend the other side. The descent can be wet and muddy. Within a short distance, the trail begins the long but gentle climb up to the top of Buchanan Hill. The trail here may not as well maintained with some briars across the path. From 2.9 miles to 3.4 miles you will climb 150 feet along a gentle 6% grade. Before reaching the summit plateau, you may want to stop to get some pictures of the mountains to the east on the other side of the Hudson. The trail continues as a wide swathe cut through the tall grass and brush across the top of the hill. There are some marker posts as there are other wide swathes cut at times in different directions. The trail eventually enters the woods again but remains wide and easy to follow. After hiking another.7 miles, you will be at Maple Avenue which is 4.1 miles into the hike. Turn right and start the 2.5 mile road walk back to the car. the road is closed to most traffic year-round and is slightly uphill. With about .4 miles to go the road changes to pavement which leads through a gate back to the parking area.

(The image at the left shows the profile of the hike. Remember that all vertical profiles are relative!)
Stissing Mountain
| Quick Look | ||||
|---|---|---|---|---|
| Difficulty | Round trip | Total climb | Internet Maps | |
| 1.9 mi. | 940 ft. | AllTrails | ||

There are several possible access points for Stissing Mountain. It is unclear whether all have an easement over private property. The access from Lake Road is in the Thompson Pond area owned by the Nature Conservancy and featured on their website. Thompson Pond is an "ancient pond" formed as a kettle lake. From Pine Plains, take Route 199 west. Just outside of town turn left on Lake Road. From the west take Route 199 east and turn right on Lake Road just before you enter Pine Plains. Drive about 1.5 miles on Lake road to the FIRST parking area on the left. Directly across the road is a gated woods road that is the access to Stissing Mountain. Walk through the gate and start up the woods road or path net to it. After hiking only .25 miles the road splits. The left branch is steeper but a little shorter. Bear left to ascend to the tower. From the fork in the trail it is only another .5 miles but the elevation gain is 620 feet with an average grade of 23%. Parts of the trail level off some so the steeper parts can be quite steep. The tower affords the only real view from the summit and it seems sturdy enough as you climb. The view from the top is well worth the climb. There are great views to the east over Stissing Pond and Thompson Pond. When you have taken in the view and taken some pictures descend the tower for the trip back. To make a loop, walk passed the tower and take the trail that branches to the left. This is a short, steep descent which can be icy. At the bottom of this descent turn right and head down the trail which parallels the one you ascended. This part can be wet and part way down you will cross a small stream. About .8 miles from the tower you will be back at the stone cairn that marks the fork in the trail. Retrace your path back to the parking area.
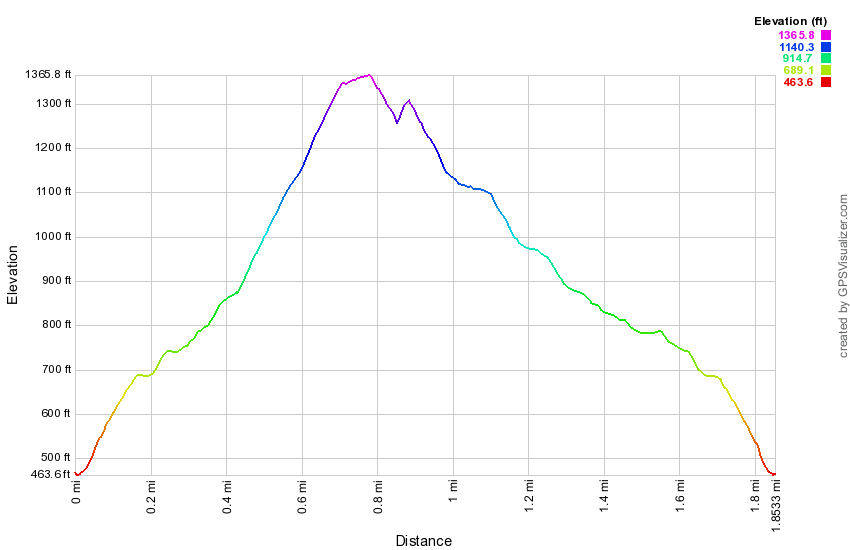 (The image at the left shows the profile of the hike. Remember that all vertical profiles are relative!)
Stonetown Circular
| Quick Look | ||||
|---|---|---|---|---|
| Difficulty | Round trip | Total climb | Internet Maps | |
| 10.4 mi | 2698 ft | AllTrails | ||
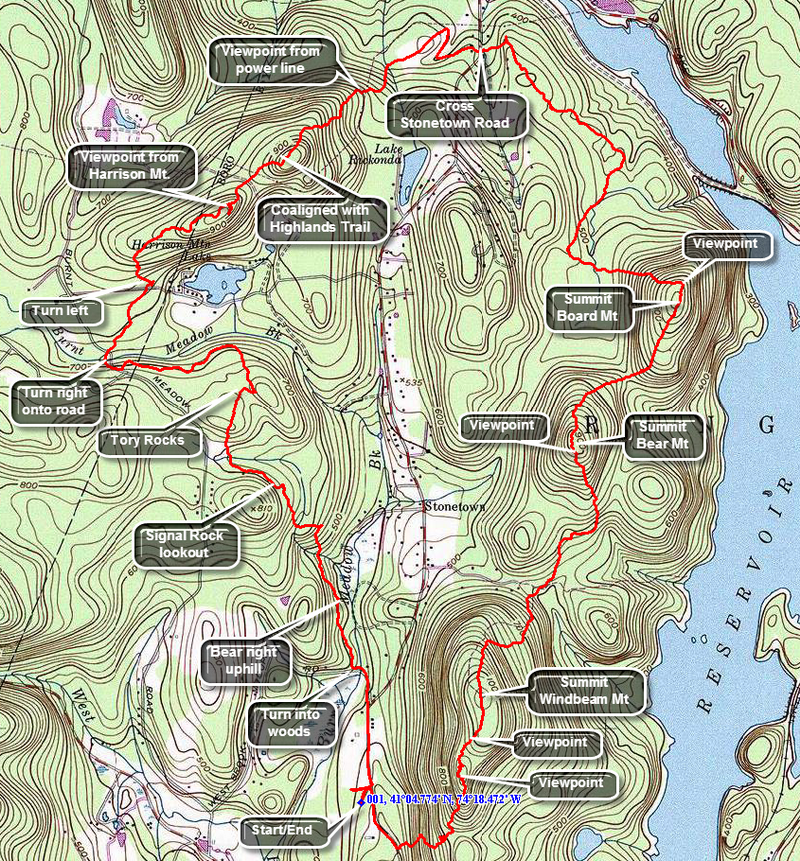
Turn south onto Stonetown Road from the Greenwood Lake Turnpike about 1.5 miles east of the historic Long Pond Ironworks. Park at the parking lot for the Stonetown Recreation Center on Mary Roth Drive off Stonetown Road near the intersection with West Brook Road. To actually get to the trail you must walk out to Stonetown Road, turn left, and hike a little over .25 miles north. At this point Magee Road bears to the left near the firehouse. Walk down Magee Road until it makes a sharp left and crosses a stream on a bridge. Watch for trail blazes which are a red triangle on a white background for the Stonetown Circular. Unfortunately, after the first blazes on the road there are no more blazes until AFTER the first fork in the trail. This problem was is repeated MANY times throughout the hike where the trail is poorly marked and blazes too far apart to help a first-time hiker. At the first fork bear left and climb to the first viewpoint at Signal Rock, about 1.5 miles into the hike. The view of Windbeam from here is good. Continue to climb up to the to top of Signal Rock and descend down the other side to head for the Tory Rocks at 2.0 miles into the hike. After the Tory Rocks the trail descends to a junction with the orange Sonoma Trail on the left. It may be difficult to find the Stonetown Circular blazes in this area. Make a ninety degree turn to the right and head down the road and across a bridge over a small stream. Pick up the red triangles and head back into the woods. You will soon be ascending Harrison Mountain where, at about 3.85 miles, a woods road runs off to the right. Walk up to an excellent viewpoint to the north and east. Back on the main trail you will cross a power line right of way and arrive at a junction with the Horse Pond Mountain Trail. At this junction the Stonetown Circular is coaligned with the Highlands Trail. From this point on the trail is well marked both by the red triangles and the aqua blazes of the Highlands Trail. From the top of Harrison Mountain there is a 500 foot descent over the next .6 miles. Along the way you will again cross the power line where there are good views down to the Monksville Reservoir. Continue on the flat part of the trail along the edge of the reservoir until you cross Stonetown Road to start back over three mountains. The next 1.25 miles are pretty flat to the base of Board Mountain. There is a nice lookout with a view down to the Monksville Dam. At 6.7 miles you begin to climb Board Mountain. The vertical gain is only 350 feet but it was over only .4 miles! The view from the top of Board Mountain was good. The descent of Board Mountain is gentle at the start but soon becomes very steep. After dropping 200 feet, there is an ascent of another 300 feet to the top of Bear Mountain. Near the summit there is a high rock with some good views. The descent into the col between Bear and Windbeam drops 400 feet over the next .7 miles into the col. From the col you start up Windbeam, the highest of the three mountains and a peak on the NJ1K list. The .6 mile climb gains 540 feet. The highest point of Windbeam has no views but there are excellent views to both the east and west a little further along the ridge. The trail dips and then ascends several times. There are good views of the reservoirs along the way. After descending into the col between Windbeam and Little Windbeam, the Highlands Trail and the Stonetown Circular separate. Stay on the red blazes of the Stonetown Circular and descend the steep trail to Stonetown Road. Once on Stonetown Road, turn right and walk up the road about .3 miles to Mary Roth Drive where your car is parked.
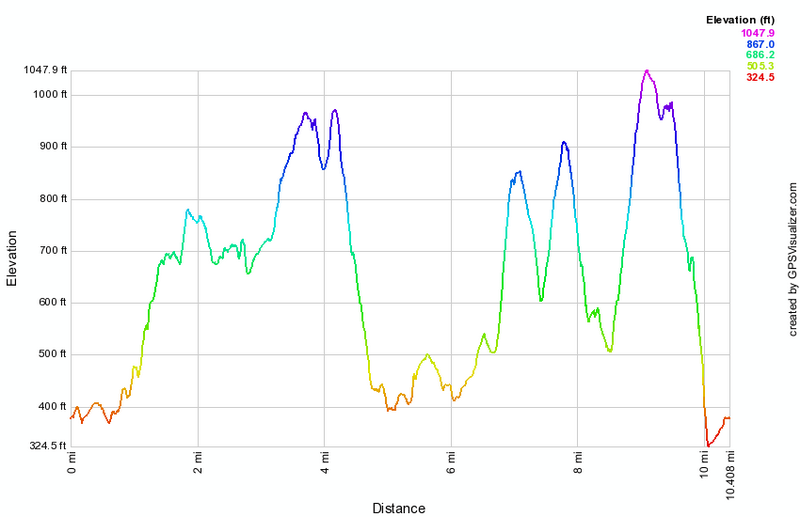 (The image at the left shows the profile of the hike. Remember that all vertical profiles are relative!)
Storm King: All Points Loop from 9W
| Quick Look | ||||
|---|---|---|---|---|
| Difficulty | Round trip | Total climb | Internet Maps | |
| 8.6 mi. | 3201 ft. | AllTrails | ||
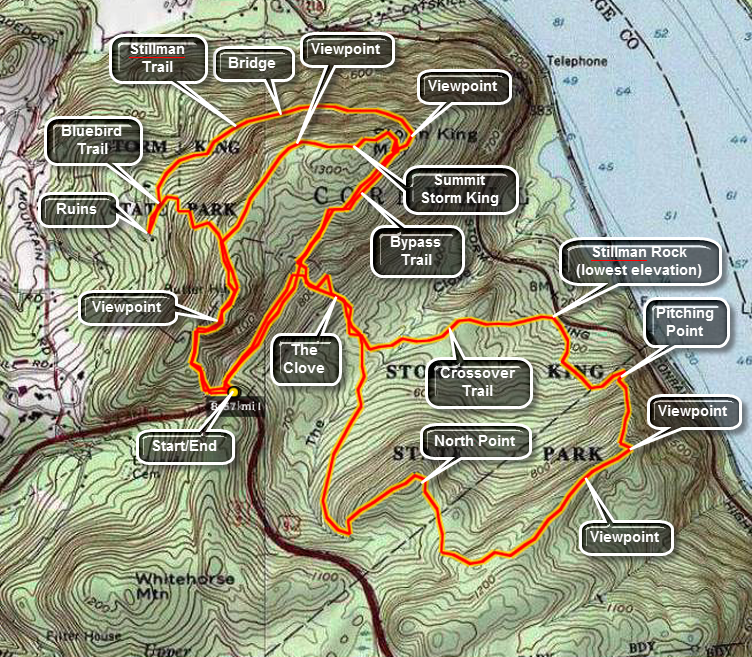 Get on Route 9W on the west side of the Hudson River heading north from West Point toward Newburgh. Between West Point and Newburgh are several parking areas. The "second" parking area on the east side of the highway has a large parking area and is on a rather sharp left hand turn. Heading south you will have to go beyond the area and turn around further down the road since this is a "no turns" part of Route 9W. This approach is easier than parking on Storm King Highway since the ascent is less but not it is as steep or steeper than the trail up from Storm King Highway! Get on the orange trail at the north end of the parking lot and immediately begin to climb. You will pass through an area that has stone pillars that were the "gateway" for some large estate. After this the trail really begins to get steep with only a few flatter sections until near the top. There are areas of exposed rock face and others that require some rock scrambling using feet and hands. As the trail ascends there are some viewpoints along the way but none compare to the ones near and at the top. Keep climbing! After only a little more than half a mile on the trail, it ends at the junction with the yellow blazed Stillman Trail. Turn right here and continue to climb. In a short distance a series of rock ledges open up with great views of Route 9W, the parking area and south on the Hudson. North Point is also visible below and this is an area you may soon visit. After taking in the views and taking some pictures continue on the Stillman Trail bypassing the left turn onto the Bluebird trail and, alter, the right onto the Howell Trail. After the Howell Trail, the Stillman Trail bears left. With half a mile the views from Storm King open up so that you can see north up the Hudson and to the west and east. Each view is better than the next until you are right on top of Storm King with a COMPLETELY open view. This happens just before the trail begins to descend. From this vantage point the Newburgh-Beacon Bridge is visible to the north. To the east is Breakneck Ridge and North and South Beacon Mountains. Pollepel Island is visible with Bannerman Castle. Boats can be seen in marinas lining the river and plying the waters. The views depend on the amount of haze and fog present but on a clear day you can see well beyond the bridge.
The options at this point are many. The shortest is probably back to the car the way you came but this misses some other spectacular views. Perhaps the longest route is the one described in detail here which includes trekking the Orange, Stillman, Bypass, Howell, Stillman Springs, Crossover, and Bluebird Trails! Some of these are use more than once!
Continue on the Stillman Trail as it travels east and slightly south. At the junction with the white marked Bypass Trail turn onto the white trail. The Stillman Trail hooks sharply left and heads back north and west. Continue west on the bypass trail for less than half a mile where it meets the blue blazed Howell Trail. Turn left onto the Howell Trail which you will be on for several miles. The trail descends into The Clove through a series of switchbacks and then climbs out of The Clove to higher ground. The trail widens into a woods road as it winds its way toward North Point passing the junction with the Bobcat Trail. North Point has been burned over at least once and shows it by the being relatively open with many dead trees. There is a large rock near the top which marks the best viewpoint. From here there are wonderful views north toward the bridge and beyond. From North Point you can also look down on Storm King Highway, Bannerman Castle and across the river to Breakneck Ridge. From North Point the Howell Trail continues on around this elevated area. The views change so that you can see south toward West Point with good views down onto the river. The trail near the end descends rather sharply to Pitching Point which looks directly down to the river. The slop then moderates as you descend through open forest to the lowest point on the hike, Storm King Highway.
At the Stillman Springs Rock, picked up the white blazed Stillman Springs Trail which heads north and west. You may continue on this trail until it meets the Howell Trail again or you may look for the Crossover Trail. The markings for the Crossover Trail WERE red but have been painted over in gray signifying that the trail is no longer maintained. I decided to try to follow it just for something different to do. After a short walk up from Storm King Highway, the marks of the Crossover Trail appear on the right. The trail is a little hard to follow and you may find yourself staring intently through the forest at times. A short distance along the trail is an open, grassy clearing on the right. This appears to be a pond in wetter weather. The Crossover Trail is short. When you get to the Howell Trail turn right. The Howell Trail will again take you through The Clove and back up to the Bypass Trail. Turn right on the Bypass Trail and continue to the Stillman Trail.
At the Stillman Trail you may want to go BACK to the top of Storm King by turning left. Sometimes the views later in the day are clearer as the haze burns off. Whether you take this side trip or not get back on the Stillman Trail as it makes a sharp turn around Storm King and heads north and west. The trail at this point passes through some evergreen trees giving the walk a different feel. There are some viewpoints along the way and many switchbacks as the trail skirts and then descends the north slope of the mountain. Along the way is a bridge attached to a rock face to get across a small ravine. Watch for the Bluebird Trail on the left marked with red and blue paint. You can turn left on the Bluebird Trail or right on an old woods road. Down the road are some ruins of moderate interest. The Bluebird Trail ascends back to near the top of Storm King and the ascent is steep at times.
When the Bluebird Trail ends, turn right on the Stillman Trail and retrace your path from earlier in the day. Be sure to stop at the various lookouts as the light will be different. These views can look MUCH different in the afternoon than in the morning! Descend the yellow Stillman Trail and watch for the orange trail back to the parking area on Route 9W. The orange trail turns to the left. Be careful as you descends since some areas are VERY steep and accidents more often occur on descents! The entire route is about 8 miles but your time can vary greatly depending on the number of stops and their length.
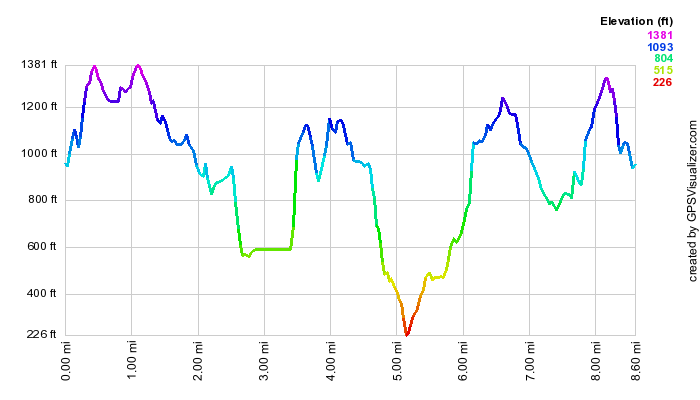 (The image at the left shows the profile of the hike. Remember that all vertical profiles are
relative!)
(The image at the left shows the profile of the hike. Remember that all vertical profiles are
relative!)
Storm King: Bobcat Trail Loop from 9W
| Quick Look | ||||
|---|---|---|---|---|
| Difficulty | Round trip | Total climb | Internet Maps | |
| 8.4 mi. | 3138 ft. | AllTrails | ||
_map.png) Get on Route 9W on the west side of the Hudson River heading north from West Point toward Newburgh. Between West Point and Newburgh are several parking areas. Watch for a small parking area on the east side of the highway with a small kiosk. This is the trailhead for the Bobcat Trail. The Bobcat Trail descends from the Route 9W parking area to a junction with the blue blazed Howell Trail that ascends to North Point. The Bobcat Trail is a little over a quarter mile long to the junction with the Howell Trail. Turn right at the junction to climb up and over North Point. Take some pictures of Storm King and the upper Route 9W parking area. You can see how the Storm King Highway really DOES hang on the edge of the mountain! The trail makes a right turn after North Point and heads southeast until it again rises to a point higher than North Point. After this the trail turns northeast and descends a ridge line towards the river. From this ridge there are views down to the river and across the river to the Hudson Highlands especially to Mount Taurus and Little Stony Point. Walk along this ridge for .65 miles until you are on a lookout on a cliff right above the river. You will be about 1.7 miles into the hike and ready to start the decent down to the Storm King Highway. From the lookout down to Pitching Point the trail drops over 500 feet in .4 miles with an average grade of over 20%. At the bottom of the steep descent the trail turns sharply to the left. Turn to the right and walk a short distance out to Pitching Point. The views here are actually not as good as from the top but it is interesting to look at the highway less than 300 feet away and almost straight down! Back on the main trail and walk about .4 miles downhill to the Storm King Highway. The trail ends/begins at a parking area near Stillman Springs. The Storm King land was donated to the Palisades Interstate Park Commission by the Stillman family in 1922 and there is an inscription near a spring that commerce this act. Walk north along the highway and then immediately pick up the white blazed Stillman Spring Trail at about 2.5 miles into the hike and 850 feet lower than your starting point.
Get on Route 9W on the west side of the Hudson River heading north from West Point toward Newburgh. Between West Point and Newburgh are several parking areas. Watch for a small parking area on the east side of the highway with a small kiosk. This is the trailhead for the Bobcat Trail. The Bobcat Trail descends from the Route 9W parking area to a junction with the blue blazed Howell Trail that ascends to North Point. The Bobcat Trail is a little over a quarter mile long to the junction with the Howell Trail. Turn right at the junction to climb up and over North Point. Take some pictures of Storm King and the upper Route 9W parking area. You can see how the Storm King Highway really DOES hang on the edge of the mountain! The trail makes a right turn after North Point and heads southeast until it again rises to a point higher than North Point. After this the trail turns northeast and descends a ridge line towards the river. From this ridge there are views down to the river and across the river to the Hudson Highlands especially to Mount Taurus and Little Stony Point. Walk along this ridge for .65 miles until you are on a lookout on a cliff right above the river. You will be about 1.7 miles into the hike and ready to start the decent down to the Storm King Highway. From the lookout down to Pitching Point the trail drops over 500 feet in .4 miles with an average grade of over 20%. At the bottom of the steep descent the trail turns sharply to the left. Turn to the right and walk a short distance out to Pitching Point. The views here are actually not as good as from the top but it is interesting to look at the highway less than 300 feet away and almost straight down! Back on the main trail and walk about .4 miles downhill to the Storm King Highway. The trail ends/begins at a parking area near Stillman Springs. The Storm King land was donated to the Palisades Interstate Park Commission by the Stillman family in 1922 and there is an inscription near a spring that commerce this act. Walk north along the highway and then immediately pick up the white blazed Stillman Spring Trail at about 2.5 miles into the hike and 850 feet lower than your starting point.
The Stillman Spring Trail starts at the highway and heads west and southwest back toward the Howell Trail. Along its .7 mile length it gains over 400 feet. You may find the short Crossover Trail on the right but this has been "and can be hard to find. When you reach the Howell Trail, turn right to head toward "The Clove", the low point between North Point and Storm King. The Clove has two different streams running through it. At 3.45 miles you should be at the bottom and ready to start the climb up toward Storm King. The trail rises 550 feet in .5 miles to a junction with the white Bypass Trail. Turn right on the Bypass Trail as it has some nice views to the south which you cannot get from the summit of the mountain. The walk along the Bypass Trail presents some very nice views and there are several opportunities to take alternate routes which visit different viewpoints. There is a nice lookout at the junction of the Bypass Trail and the Stillman Trail. When you reach the lookout, walk up to a large open rock for some nice views. Continue on the Stillman Trail which wraps around the north side of Storm King Mountain. In many places the trail really hangs on the side of the mountain with a steep drops to the north and little room on the other side. This makes the trail "challenging" when it is wet or icy! At one point you will come to a bridge that spans a spot where there would be no trail without it. From the junction of The Bypass and Stillman Trails is only .9 miles. Turn left on the Bluebird Trail which regains in .5 miles the 480 feet lost on the way down the Stillman Trail. There are numerous switchbacks on the trail but it is still a good climb. At the next trail junction turn left of the Stillman Trail to head over the summit of Storm King. This .7 mile section is relatively flat but does gain almost 100 feet to the summit before dropping back down to the junction with the Bypass Trail. The last viewpoint is the only one really worth the stop since it is much more open than the others.
At 6.5 miles you should be back at the junction with the Bypass Trail where you should turn right to start your trip back. Drop down the Bypass Trail to the junction with the Howell Trail and then continue down through "The Clove". Once you are at the junction with the Stillman Springs Trail continue straight ahead on the Howell Trail back to the junction with the Bobcat Trail just before the Howell Trail climbs North Point. It is only .8 miles from the Stillman Springs junction to the parking area.
_gra.png) (The image at the left shows the profile of the hike. Remember that all vertical profiles are
relative!)
(The image at the left shows the profile of the hike. Remember that all vertical profiles are
relative!)
Storm King: Bypass Loop from 9W
| Quick Look | ||||
|---|---|---|---|---|
| Difficulty | Round trip | Total climb | Internet Maps | |
| 6.4 mi. | 2555 ft. | AllTrails | ||
 Get on Route 9W on the west side of the Hudson River heading north from West Point toward Newburgh. Between West Point and Newburgh are several parking areas. The "second" parking area on the east side of the highway has a large parking area and is on a rather sharp left hand turn. Heading south you will have to go beyond the area and turn around further down the road since this is a "no turns" part of Route 9W. This approach is easier than parking on Storm King Highway since the ascent is less but not it is as steep or steeper than the trail up from Storm King Highway!
Take the orange Butter Hill Trail out of the parking area and watch for the stone columns at the top of the first short climb. At .3 miles right on the yellow Stillman Trail, one of the main trails in the park. Continue climbing up to the top of the Stillman Trail at about .4 miles and then descend to the junction with the blue and red Bluebird Trail at .6 miles. There aren't many views along this trail and the walk is difficult since it alternates between rocky sections and wet areas. There is a woods road along the way that turns left to some ruins. These ruins aren't very old and aren't too impressive but they are only a short distance and right on the road. At 1 mile turn right at the junction with the yellow Stillman Trail. This part of the trail enters some nice evergreen forest and begins to climb on the edge of the mountain. The trail is narrow and in one place a bridge is needed to cross a usually dry "gorge". As the trail climbs it heads toward the river and skirts the summit of Storm King Mountain. There are some nice views of the river below. The Stillman Trail continues to the summit of Storm King where there are some nice views to the north. Retrace your path back down the Stillman Trail to the junction with the white Bypass Trail. The Bypass Trail descends until at about 2.4 miles it meets the blue Howell Trail which heads south. The Howell Trail continues to descend into a low area called The Clove between the higher ground of Storm King on one side and North Point on the other. At 2.7 miles turn left on the red Crossover Trail. This trail is now unofficial and the blazes have been painted over but you can take it anyway. At 3.0 miles you will intersect the white Stillman Spring Trail where you should turn left and continue to descend. The Stillman Spring Trail eventually ends at Stillman Spring on the Storm King Highway. This is the lowest point on the hike and represents an almost 1100 foot drop from Storm King. At the spring pick up the beginning of the blue Howell Trail which starts your long climb to North Point. At 3.6 miles walk straight ahead as the main trail turns right. This will bring you to a nice lookout called Pitching Point. The Howell Trail continues to climb as it heads south and then southwest. The vegetation here is almost all hardwood with a lot of small trees and brush. There are also many open fields. The area around North Point has burned several times accounting for the ecology that is so evident. You will hit the highest point on this part of the southern loop and then descend slightly before climbing to North Point. The area here is very open and there are intriguing views of the river, Polopel Island and Storm King Highway as it winds its way around the mountain. Walk across the open space at the top of North Point. To your right you may be able to spot you car in the parking area further up 9W. Walk down to a wide woods road where the white Bobcat Trail joins from the lower parking area on 9W. Continued on the Howell Trail as it descends into The Clove passing the Stillman Trail at 5.4 miles and the Crossover Trail at 5.6 miles. From this low point in the Clove, the gain in elevation is almost 500 feet over the next .35 miles on the Howell Trail. At the top if the climb turn left on a "proposed" trail which seems to be an extension of the Bypass Trail. There are only a few blazes but the wide road is easy to follow. On your right side will be some really impressive cliffs that make up the foot of Storm King. Continue to hike up a steep little grade to the parking area.
 (The image at the left shows the profile of the hike. Remember that all vertical profiles are
relative!)
(The image at the left shows the profile of the hike. Remember that all vertical profiles are
relative!)
Storm King: Loop from Storm King Highway
| Quick Look | ||||
|---|---|---|---|---|
| Difficulty | Round trip | Total climb | Internet Maps | |
| 5.8 mi. | 2127 ft. | AllTrails | ||
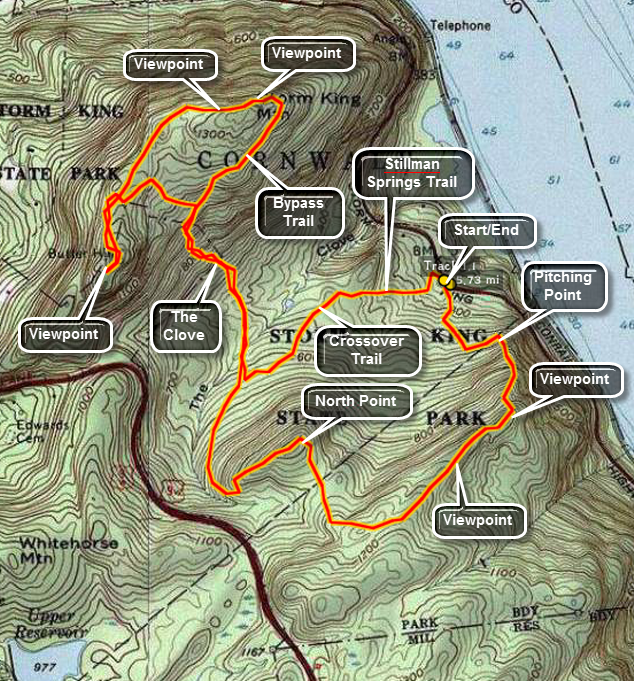 Get on Storm King Highway on the west side of the Hudson River. Between West Point and Cornwall-on-Hudson are several parking areas. The "middle" parking area on the east side of the highway has a spring and a rock with an inscription commemorating the gift of land by the Stillman family. Park here and your adventure is about to begin! The trail to the left of the spring is the blue blazed Howell Trail. This approach is more difficult than parking on 9W since the ascent is greater but not too difficult. The trail ascends to a woods road and then continues upward on an old woods road. After less than a mile, the trail turns right and ascends more steeply along a route involving a couple of switchbacks and some stone steps. Eventually the trail opens up onto some rocks giving you the first of some absolutely spectacular views. This is Pitching Point with views across the river to Breakneck Ridge and Bannerman Castle. Up the river is the Newburgh-Beacon Bridge while downriver you can see West Point. As good as these views are the best is yet to come!
Continue on the Howell Trail and enjoy the various views as they come your way. Look over to Storm King Mountain and down to the highway which appears to hang on its very edge. A little further west and closer is an almost bald, burned over area. This is North Point and the Howell Trail will take you there soon enough. Watch on your left for more views down the Hudson. The quality of the views depends largely on the amount of humidity and haze in the air. Soon the Howell Trail which was headed west takes a sharp turn right and heads north. You will notice more open areas and many dead trees as you ascend to North Point. From North Point you can look northeast toward Storm King Mountain, directly north to Butter Hill or a little west of north and see Route 9W. On 9W is another parking area which allows easier access to trails that ascend Storm King.
The Howell Trail now descends the other side of North Point and joins a woods road for some distance. be sure to STAY ON the blue blazed trail as other trails and unmarked woods roads intersect the Howell trail at several points. One of the trails is the Stillman Springs Trail which you will use on the way back. You will descend into The Clove rather gently but then ascend out of The Clove rather more steeply. The Howell Trail makes an abrupt right near the top of the ascent, joins a woods road and moderates some. After a very short walk, the Howell Trail heads north again. At this point the Bypass Trail, your route on the way back, goes straight ahead. Continue on the blue trail until it meets the yellow blazed Stillman Trail. This is the main trail that accesses Storm King Mountain. Turning right at the junction takes you directly around Storm King. Turn left and head toward Butter Hill for some nice views of the Hudson and Route 9W. You will get to an open rock faces where these views are very obvious. At this point turn around and retrace your steps back to the junction with the Howell Trail. Turn left to continue on the Stillman Trail around Storm King Mountain.
As you hike along the Stillman Trail there are numerous lookouts and viewpoints each more amazing than the next. Most of these views are to the north and east. On a clear day you can see well passed the Newburgh-Beacon Bridge to the north. The fire tower on South Beacon Mountain is clearly visible as is the summit of North Beacon Mountain. The climbers working their way up Breakneck Ridge are an interesting site! As you head south on the trail you will arrive at a point where the Stillman Trail abruptly turns east and then hooks back north and west. The views here are to the east and south toward West Point. As the yellow blazed Stillman Trail makes its turn, the white marks of the Bypass Trail appear on the right. Turn here to head back toward the Howell Trail which will be your way back to your car. The Bypass Trail passes between two low rock ridges as it makes its way back to the Howell Trail. There are views primarily to the south and east but you may have to walk up onto the rock ridge on your left to see them.
After a short walk, turn left on the blue blazed Howell Trail and descend into The Clove. This is the ascent you made earlier so things SHOULD look familiar. The blazes on the red marked Crossover Trail have been painted over to indicate it is no longer available. Continue on the Howell Trail until the white blazes of the Stillman Springs Trail appear on the left. This is mostly an old woods road and the pitch is not too steep. In less than a mile you will be back on Storm King Highway just north of where you are parked. The total distance is under 6 miles and will and will vary based on how many side trips you take. The time can be relatively quick but most people stop for pictures and to marvel at the views.
 (The image at the left shows the profile of the hike. Remember that all vertical profiles are
relative!)
(The image at the left shows the profile of the hike. Remember that all vertical profiles are
relative!)
Storm King: Stillman Loop from 9W
| Quick Look | ||||
|---|---|---|---|---|
| Difficulty | Round trip | Total climb | Internet Maps | |
| 6.8 mi. | 3005 ft. | AllTrails | ||
 Get on Route 9W on the west side of the Hudson River heading north from West Point toward Newburgh. Between West Point and Newburgh are several parking areas. The "second" parking area on the east side of the highway has a large parking area and is on a rather sharp left hand turn. Heading south you will have to go beyond the area and turn around further down the road since this is a "no turns" part of Route 9W. This approach is easier than parking on Storm King Highway since the ascent is less but not it is as steep or steeper than the trail up from Storm King Highway!
Take the orange Butter Hill Trail out of the parking area. Boterberg or Butter Hill is one of the early Dutch names for Storm King since it looked like a lump of butter. This name is still used for the western summit which actually is 40 feet higher at 1380 feet than Storm king itself! There are some nice views from Butter Hill across the river to Little Stony Point, Mount Taurus and Breakneck Ridge. To get to the top of Butter Hill turn right on the yellow Stillman Trail which leads to the summit. Continue over the top on the Stillman Trail and begin to descend into the area between Butter Hill and Storm King. When you meet the red and blue marked Bluebird Trail turn left and begin an interesting descent. The Bluebird Trail descends steeply in places and there aren't many viewpoints. The Bluebird Trail ends with a junction with the Stillman Trail as it come up from Mountain Road in Cornwall. Turn right to walk along the edge of Storm King as the trail slowly ascends the mountain through a series of shallow grades and switchbacks. Cross the Stillman Bridge, a wooden structure which bridges a gap in the trail where there is no ground to speak of but a steep drop off near a vertical rock wall. Right after the bridge is an open wooden staircase. Just after the bridge a series of switchbacks announces the climb up Storm King is almost done. On the way up the Stillman Trail several nice views can be had from a few lookouts. Near the top of the trail there are even more viewpoints as the trail passes by several open rock shelves. The only view that is blocked is to the north! Continue on the Stillman Trail up over the top of Storm King to take in some of the best views especially to the north. Continue on the Stillman Trail down the other side of the mountain. At the junction with the blue Howell Trail turn left and descend through The Clove. There is NOTHING to see as you descend into The Clove. The trail is steep in places . Near the bottom you will cross the small stream that lies at the bottom of The Clove. Just before this crossing you may see the markings of the former Crossover Trail which are now painted over indicating the trail is officially closed. Just after the stream you will see the white marks of the Stillman Spring Trail on the left. Continue on the Howell Trail as it starts to ascend out of the clove rather steeply but then moderates on an old woods road. After this the road ascends more steeply and the trail turns off to the left. At this point the Bobcat Trail comes in from the lower parking area on 9W. Follow the Howell Trail to the left and begin the steep but short hike up to North Point. There are GREAT views here down to and across the river! Continue down the Howell Trail off North Point and walked for a while before the trail starts to head due east towed the river and several nice viewpoints start to appear. These viewpoints are mostly to the south and east and views of West Point are possible. The trail begins to descend again very steeply as it heads down toward the river and the Storm King Highway. The last good lookout is Pitching Point which is less than 500 horizontal feet from the highway. The trail then winds its way away from the road and switches back several times before ending at Stillman Spring. Walked north a hundred feet on the highway before turning left back into the woods on the white Stillman Spring Trail. This trail ascends right from the beginning but never steeply as it heads back to the Howell Trail just above the deepest part of The Clove. At the Howell Trail turn right and hike up out of the Clove toward Storm King. As the trail nears the area where it levels off near the top of the mountain, another trail turns left. This trail is marked in white but is shown as "proposed" on the maps. The maps also show the trail running directly west but it really runs southwest. This trail descend some before ascending and then descending again. The last few hundred feet is a steep climb back to the parking area on 9W.
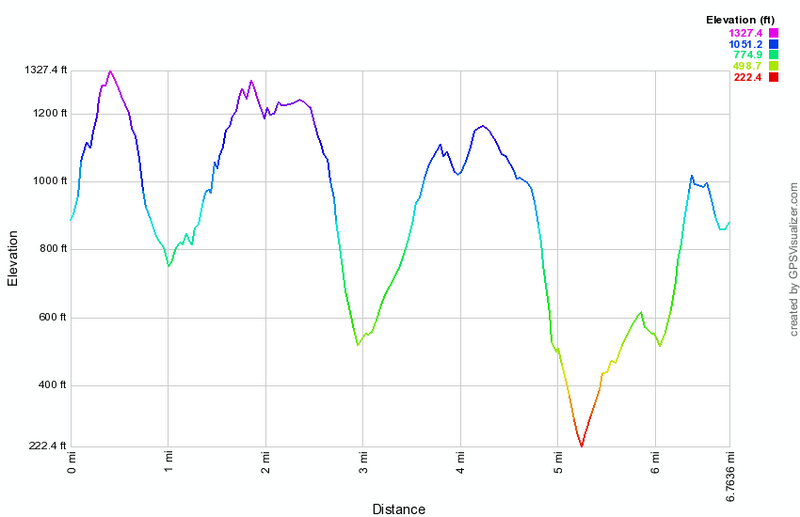 (The image at the left shows the profile of the hike. Remember that all vertical profiles are
relative!)
(The image at the left shows the profile of the hike. Remember that all vertical profiles are
relative!)
Sugar Hill Fire Tower
| Quick Look | ||||
|---|---|---|---|---|
| Difficulty | Round trip | Total climb | Internet Maps | |
| 0.7 mi. | 104ft. | AllTrails | ||
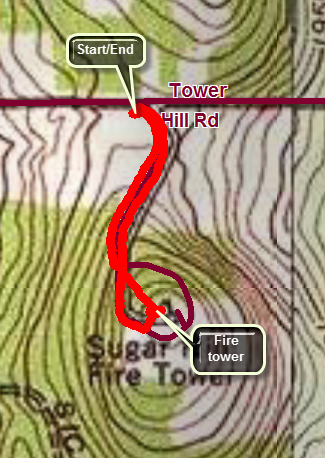 From Watkins Glen take Route 409 north and then turn right on CR-28. When CR-28 turns right After 1.2 miles to head north, turn left on the Mud Lake-Hammondsport Road. Drive 4.75 miles and turn left on CR-21. Drive 1 mile south to Tower Hill Road. Turn right and drive .6 miles to the parking area for Sugar Hill Fire Tower on the left. If the gates to the access road are open, you may drive directly to the parking area at the top. From the lower parking area walk over to the access road and turn left to head to the tower. There is a track in the grass beside the road and you may choose to walk most of the way along that track. As you approached the tower there is a loop around the top which is one way for cars. You may continue straight ahead and walk directly to the tower across the grass. At the top of the hill there is a nice recreation area and ample parking. Once at the top head over to the tower. This tower is a 67'6" International Derrick model 1937 tower and was erected in 1941 by CCC. It was staffed by volunteers until 1951, and then by the State until 1979. The cab is closed all year but the view from the top is still good. The view is even more beautiful in the fall when the leaves change color. The most notable feature is the blue water of Seneca Lake only 6 miles to the east. As you return to turnaround and prepare to leave you may find a USGS marker which indicates the elevation of the hill is officially 2096 feet. Retrace your steps to your car.
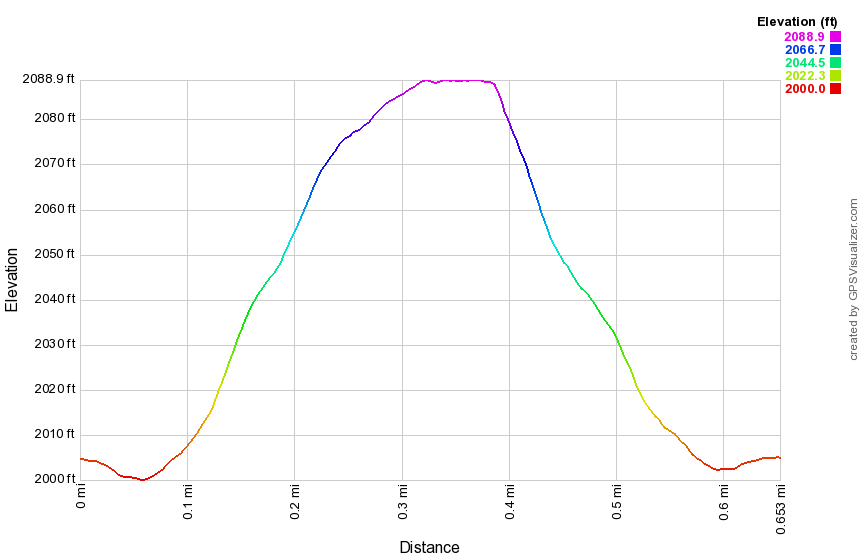 (The image below shows the profile of the "lollipop" hike. Remember that all vertical profiles are relative!)
Sullivan Branch: Waterfall Bushwhack
| Quick Look | ||||
|---|---|---|---|---|
| Difficulty | Round trip | Total climb | Internet Maps | |
| 1.6 mi. | 350 ft. | AllTrails | ||
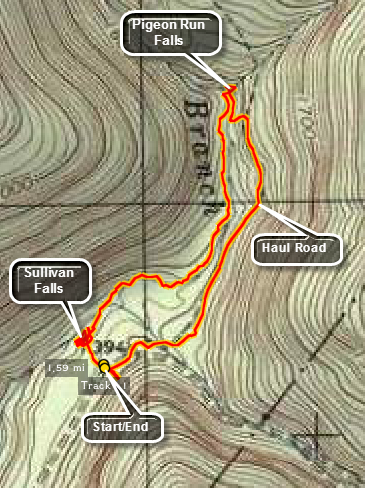
From Route 118 turn north onto Central Road. In Center take a right onto Jamison City Road. In Jamison City turn right onto Sullivan Falls Road to State Game Lands #13. Park in the parking area on the left side of the road about 2.5 miles up the road before a big right hand bend. This road starts as a reasonably paved back road and rapidly deteriorates to a one lane road with many eroded areas near the end.
From the parking area walk down to Sullivan Branch. The trail goes to the top of the falls where the stream has cut an impressive channel and flume through the bedrock. Looking down over the falls you can see the deep green of the plunge pool below. Walk back out the path but this time toward the base of the falls and the pool. The path is obvious but quite steep. Head back up the bank and walk the stream and the bank up to Pigeon Run where there is another falls. As with all of these bushwhacks, high water can make the falls much more enjoyable but the trip almost impossible. Low water conditions make the walking easier but the falls uninteresting. The Sullivan Branch can be clogged by blowdown for a good part of its length requiring you to move to the banks which may also be covered with downed trees and brush. Once you are passed Big Run the conditions should improve some and it is only .6 miles to Pigeon Run. The falls are actually on Pigeon Run in a narrow slot and so are different than most of the other falls on the main streams. Walk back downstream and up the steep left bank to an old haul road. The road is easy to follow and in pretty good shape. Follow it all the way back to the Sullivan Branch Road to within a few hundred feet of your car.
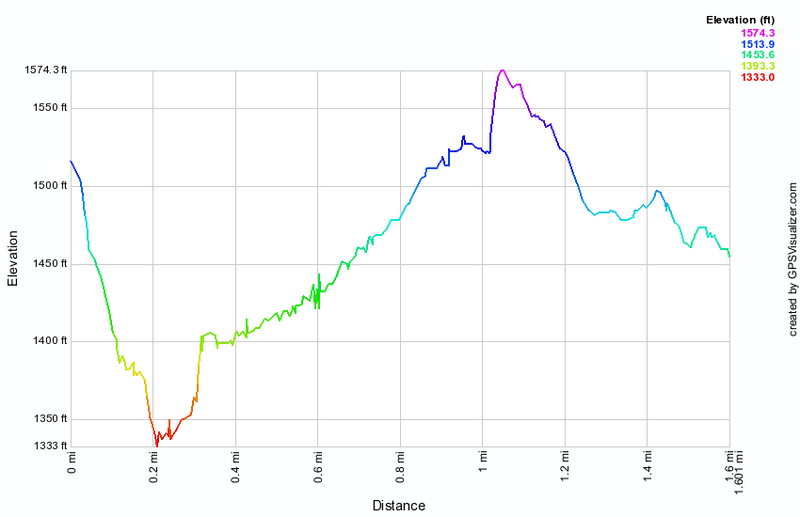 (The image at the left shows the profile of the hike. Remember that all vertical profiles are relative!)
Sullivan County High Point: Quick Lake - Flynn Trails
| Quick Look | ||||
|---|---|---|---|---|
| Difficulty | Round trip | Total climb | Internet Maps | |
| 7.8 mi. | 1316 ft. | AllTrails | ||
 The area around Frick Pond, Hodge Pond and Quick Lake is covered with trails. There are numerous
possibilities for short of long hikes. The area is "relatively" flat and there are no "views".
There is, however, some beautiful scenery.
The area around Frick Pond, Hodge Pond and Quick Lake is covered with trails. There are numerous
possibilities for short of long hikes. The area is "relatively" flat and there are no "views".
There is, however, some beautiful scenery.
Take DeBruce Road from Livingston Manor for about six miles then turn left on Mongaup Rd. Where the road
splits bear left on Beech Mountain Rd. and park in the parking lot on the left. Find the blue-blazed
Flynn Trail and follow it for 1.7 miles to the junction with the yellow-blazed Big Rock Trail which goes
to the left. Continue straight on The Flynn Trail for less than half a mile. Take the jeep trail that goes
to the right as the Flynn Trail turns left toward Hodge Pond. Stay on this trail as it winds its way up
the mountain for a little more than .5 miles. At this point the trail flattens out and then disappears.
Strike off into the woods heading UP. Look for old jeep trails or herd paths to aid your ascent. Wander
around at the top of this mountain until you think you have hit the high point. Much of the area seems to
be the same elevation and there is no marker. This is informally called Beech Mountain and the highest point seems to be on the eastern part of the plateau.
Head back down the mountain until you hit the jeep trail.
From here you can retrace your steps back to the parking area. If you want to do a loop, take a right
on the jeep trail about half way down which will take you to the outlet of Hodge Pond. Pick up the
Flynn Trail and stay on it for a mile. Here the trail ends. Turn left on the red marked Quick Lake Trail.
Stay on this trail for 3.1 miles and it will take you passed Frick Pond back to the parking area.
 (The image at the left shows the profile of the hike. Remember that all vertical profiles are
relative!)
(The image at the left shows the profile of the hike. Remember that all vertical profiles are
relative!)
Taconic: Bash Bish Mountain and Alander Mountain
| Quick Look | ||||
|---|---|---|---|---|
| Difficulty | Round trip | Total climb | Internet Maps | |
| 5.8 mi. | 2030 ft. | AllTrails | ||
 The parking area for this hike is on Falls Road (Route 344) which you can pick up in Copake Falls off Route 22 or by following the signs from Route 41 to Bash Bish Falls. Park in the lot. To get to the falls go to the trail to the right near the kiosk and descend to the fire road that leads to the observation point above the falls. Several different stream of water make up the falls depending on the volume of water. Continue down the steps to the base of the falls. The water falls into a pool at the base of the falls which then drains into the gorge formed by the creek over many years. The gorge is deep and well-cut attesting to the power of the stream when there is a large volume of water. Go back up the stairs and turn right to follow the blue marked trail on a loop back to the car.
Near the parking area is a LARGE outcropping of rock that overlooks the falls and the gorge. The climb up onto this outcropping can be interesting but is well worth the time and effort. The views down the gorge and out to the surrounding area are beautiful. You can follow the guide rails and cables around to look down into the gorge to the stream below. Some foolish people have obviously gone beyond the fencing but you will stay where it is safe. After taking in the views, return to the parking area to begin the hike to Slander Mountain.
From the parking area take the fire road that is at the opposite end of the lot from the Falls Trail. This is the Bash Bish Gorge Trail and is marked with blue paint. You will have to bear right at the end of the road and then find a way to cross over the stream. Depending on the water level, this may be easy or dangerous. The trail markings on both sides are not very clear. Once on the other side ascend the STEEP trail out of the gorge. You may need to use the available tree roots and branches combined with the guide rails and cables. Stop at several points to take in the view including the one down the gorge and the one directly down into the gorge. Continue on the trail but pay attention to where you are going. There are MANY blowdowns along the way which obscure the trail and hikers have taken several different routes around them. Very shortly signs will indicate that you may turn left or right onto the South Taconic Trail. Make sure you turn left and ascend! The trail makes a steep but short ascent to the Alander Mountain Ridge. From here the trail undulates some but most of the climbing is done.
Once you are on the ridge the summit of Lander is about two miles away. The trail passes through hardwood forest. At some spots there is a canopy of mountain laurel and in others you are surrounded by dwarf pines. As you walk it is obvious that the trail drops off on either side. At points the parallel ridges on either side are visible. In the fall, when the leaves are off the trees, views down into the valleys and across the hills are available. Take a quick peek but don't waste too much time since the best views are yet to come. As you approach Alander the trail starts a very moderate climb and begins to open up to low bushes. Views from here are available In all directions except to the south since this direction is still blocked by the mountain. As you ascend the views just keep getting better. Near the top a rock cairn and signs show the various trail options including the Alander Mountain Trail to the Mount Washington State Forest Headquarters. This trail is the shorter, easier way to get to the top! At the summit are the cement pilings that once anchored a long gone tower.
Continue on the trail and look south to see wonderful views of Mount Ashley, Brace Mountain and Mount Frissell. There are also views to both the east and west. Just down the trail you will see another rocky outcropping. Head down the trail making this outcropping your goal. There is slight descent and then ascent to this area. Along the way you can walk back and forth on the mountain to make sure you get every view possible. From the outcropping the mountain drops away making the views even better. Just below this area there is a small granite marker on the trail. This marks the New York-Massachusetts boundary. When you are on the other side of the marker, you are at the highest point in Columbia County, New York. Head back to the summit. You can now simply return to the car or take a side trip.
Turn right onto the Alander Mountain Trail. Within several hundred feet you will see a small cabin. This is an Appalachian Mountain Club cabin which can be used on a first come first served basis. It has a wood stove and several bunk beds. Once you have seen the cabin follow the trail back up to the South Taconic Trail. Follow the South Taconic Trail back to the Bash Bish Gorge Trail across the stream and back to the parking area.
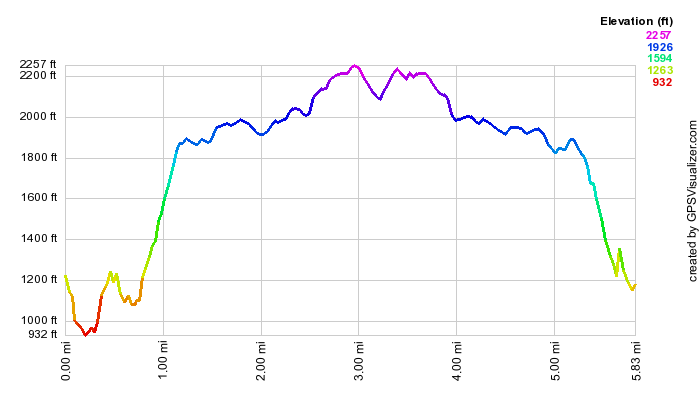 (The image at the left shows the profile of the hike. Remember that all vertical profiles are
relative!)
(The image at the left shows the profile of the hike. Remember that all vertical profiles are
relative!)
Taconic: Berlin Mountain and the Snow Hole
| Quick Look | ||||
|---|---|---|---|---|
| Difficulty | Round trip | Total climb | Internet Maps | |
| 11.4 mi. | 2466 ft. | AllTrails | ||
 The parking area for this hike is on Route 2 at the Petersburg Pass just outside Petersburg, NY and on very near the Massachusetts and Vermont borders.
The parking area is very large and on the right side of the road as you head toward Massachusetts. Sign in at the trail register at the back right of the parking area and head out on the Taconic Crest Trail. The first part of the trail is overgrown with weeds but it soon gives way to a wider trail and woods road. Start a short but steep ascent part way up Raimer Mountain. Once on the crest of the ridge the trail flattens a little before rising to around 2450 feet. The trail then descends toward Berlin Pass. Just before the descent, views of Berlin Mountain can be seen through the trees. The trail drops more than 200 feet to 2230 feet at Berlin Pass before starting up Berlin Mountain. The 1.2 mile climb gains almost 600 feet. When you arrive at the flat, open top of Berlin Mountain, you will be about 2.75 miles into the hike. There will be some good views but how good they are depends on the amount of haze. To the west it is easy to spot Mount Greylock with its two towers. There are profile views of Mount Williams and Mount Fitch to the north of Greylock. Views in the other directions are at least partly blocked by the trees. Return the way you came to the parking area which is about 5.5 miles of hiking.
Cross the road to find the trail on the other side. The first few hundred feet of the hike north are very steep with some steps to make the climb easier. Near the top of the climb there is a trail register and a sign explaining that the area is part of the 2500 acre Hopkins Forest which is owned and maintained by Williams College. There are usually extra trail maps in the bin by the sign! As you start up the trail, another spur trail leads off to the left. Take this trail to get some more views down an old ski slope. There are great views back to Raimer Mountain and to the east and south. Return to the Taconic Crest Trail which is very well maintained in this area. At about .6 miles from the Pass or 6.3 miles into the hike, the Shepard's Well Trail comes in from the right. The main trail continues to rise although gently in most cases. In another .6 miles the Birch Brook Trail joins from the right. After this the trail ascends and there are some excellent views to the west. In another .5 miles the trail briefly crosses into Vermont and then heads back into New York. At 2.5 miles from the Pass or 8 miles into the hike the trail starts to descend. In another .25 miles a red spur trail turns off to the right. This trail leads to the Snow Hole after a short descent. The Snow Hole is a deep cleft in the rock which is supposed to have snow and ice in it until mid-July. Even when there is no snow, the Hole is cool and damp and dark. Retrace your path back to the Taconic Crest Trail and turn left to get back to the car,

(The image at the left shows the profile of the hike. Remember that all vertical profiles are relative!)
Taconic: Mount Everett and Mount Race
| Quick Look | ||||
|---|---|---|---|---|
| Difficulty | Round trip | Total climb | Internet Maps | |
| 8.7 mi. | 3156 ft. | AllTrails | ||
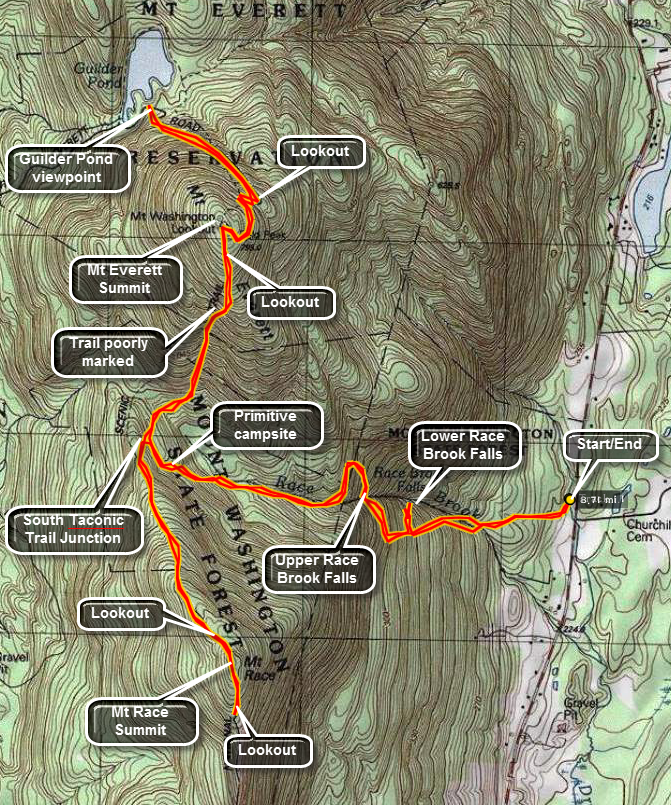 As with most hikes there are several approaches to these mountains. It is even possible to drive with about a mile of the summit of Everett and then hike about 700 feet in elevation to the top. This is the northern approach and misses the beautiful Race Brook Falls! The route from the south through Sage's Ravine is much longer. The approach from the east between the two mountains takes in the falls and both mountains. It is challenging but not too difficult.
The trailhead for this hike is on Massachusetts State Route 41 about 1.5 miles south of the Berkshire School. Park at the trailhead and go into the woods passed the kiosk and onto the blue marked Race Brook Falls Trail. The trail starts out moderately through some hardwood forests which alternate with evergreens along the way. The first brook crossing might be tricky in high water but otherwise is no problem. After only half a mile of moderate incline a side trail leads off to the left. This trail leads to the lower tier of Race Brook Falls. It is well worth the detour and places you at the foot of a 90 foot cataract. The trail is steep in places and blocked by some blowdown which has been there for a while. You can stand at the bottom of the falls and admire both the power and the beauty of the falling water. When you are done, retrace your steps back to the main trail and continue on.
The trail begins to ascend more steeply now through evergreen forest and leads to the upper tier of Race Brook Falls. After only about a quarter mile you are there. This tier is similar to the lower one. It is not quite as high but perhaps more delicate. The trail crosses at the base of the falls. This is no problem in times of low water but can be dangerous or impossible when the water is high. The trail now ascends more sharply up to a more level area. Glimpses of the surrounding hills suggest the views that will be much clearer from the summits! In less than a mile, the platforms of race Brook Primitive Campsite appear. There is one stream crossing that is no problem but does have a two-log bridge! Walk through the campsite and up a set of stone steps. You will soon be at the junction with the white marked South Taconic Trail which is also part of the Appalachian Trail. Turning left leads to Mount Race and right to Mount Everett. The trail is POORLY MARKED in places so be careful to watch where you are going.
Turn right toward Mount Everett. As you walk along the relatively flat trail the first views of Mount Everett appear and although the mountain is not very high it does seem imposing. After only a quarter mile the climb up Everett begins. This is a no-nonsense approach that heads straight up the mountain with few switchbacks to moderate the climb. The trail passes over some open rock outcroppings which can be slippery although it is possible in some cases to pass to one side or the other. None of these areas could be classified as difficult or approaching a rock scramble but they are not easy either. Near the top the trail begins to level out and pass through some interesting ecosystems. Dwarf pines alternate with scrub oak and warm climate species like sassafras can be seen. You will suddenly realize that you are out of the forest and the open views of the surrounding mountains and valley will take your breath away. Immediately behind you on the climb is Mount Race as well as several other mountains and hills.
Near the summit of Everett are the remains of the Mount Washington Observation Tower. All that is left are the cement pylons that anchored the base. You can turn around at this point and retrace your path but walking to the other side if the summit is well worth it. As you walk down the trail a large rock outcropping on the left affords another set of breathtaking views. The trail continues down the north side of the mountain and intersects a fire road. Both the fire road and the trail descend to Guilder Pond. The descent is about 600 feet but only about three quarters of a mile. The pond is very pretty with a loop trail. After a visit to the pond use the trail or the road to climb back to the summit. Follow the trail back down the other side to the junction with the blue trail. Continue straight ahead on the South Taconic Trail that leads to the summit of Mount Race. The initial part of this trail has several steep but short spots. It then ascends continuously to the ridge line that leads to the summit of the mountain. From the trail junction to the summit is a little less than a mile.
As you near the summit the trail opens up and the first thing you notice is Mount Everett directly behind you! Other hills and valleys are also laid out below. After the summit continue southward on the trail. There is a slight descent and a large rock cairn will come into view. At the same time you see the cairn you will notice that there are open views to the south. Walk around this area before returning to the summit. Follow the trail back to the Race Brook Trail where you will make a right and walk back to your car.
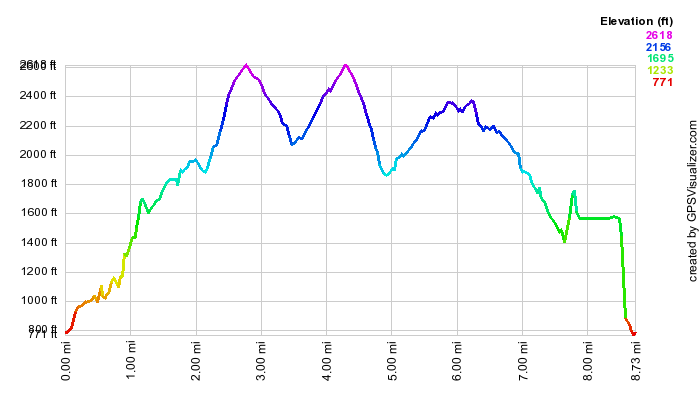 (The image at the left shows the profile of the hike. Remember that all vertical profiles are
relative!)
(The image at the left shows the profile of the hike. Remember that all vertical profiles are
relative!)
Taconic: South Brace Mountain and Brace Mountain
| Quick Look | ||||
|---|---|---|---|---|
| Difficulty | Round trip | Total climb | Internet Maps | |
| 3.3 mi. | 1500 ft. | AllTrails | ||
 These two mountains are actually in New York state and are part of the Taconic State Park. The best way to access the parking area is to go south from Copake Falls or north from Millerton on Route 22. Look for Whitehouse Rd. on the east side of Route 22. Turn onto Whitehouse Road and follow it a short distance to where it ends on Route 63 also called Undermountain Road. Take the next right onto Deer Run Road. After a very short drive up a hill, Deer Run goes straight ahead and comes to a dead end. Take the left onto Quarry Hill Road and watch for the small parking area on the left with a sign that says Taconic State Park. Park here to get on the trail. DO NOT walk up the wide woods road next to the parking area. It is private property and does not lead to the trail.
The white marked South Taconic Trail starts out through a field and then enters a hardwood forest. The initial, gentle hiking belies what is to come! Within a quarter mile the trail begins to parallel a stream. The sights and sounds of the stream are relaxing but the trail begins to climb steeply along the banks of the gully cut by the stream. The trail is poorly marked and you should pay careful attention to where you are going. Other hikers have taken various routes so the actual path of the trail can be obscured. Some of these detours do make the climb easier but some do not. As you near the half mile point the trail gets even more serious with a climb up over sheer rock faces with some tough "ups" particularly for those who are "vertically challenged"! Fortunately, this does not last for long and you are on a much flatter area of the trail. On the way up be sure to carefully look over your shoulder. The views that are revealed of the valley below hint at what can be seen from the top of the mountains.
As the trail levels off there are several areas where you can safely enjoy the views before moving on. The trail from this point on is much flatter with a slight incline as you climb toward South Brace Mountain. Watch the trail markings since it is easy to head the wrong way. The trail does pass over some rocky spines and outcroppings but the incline is not steep enough to be much of a problem. As you ascend South Brace the views become even more magnificent. As you turn around Riga Lake and South Pond will be in front of you on the right. They form an interesting break in the hill and valley terrain that is so common. The summit of South Brace is just ahead at about 1.2 miles.
Continue on the trail for less than half a mile to the summit of Brace. There is a short descent into a col between the two mountains but you will hardly notice it. As you climb up to the top of Brace the most prominent feature on the mountain is a LARGE pile of stones with a permanent windsock attached. Brace Mountain is one of the primary launch points for the Connecticut Hang Gliding Association and other enthusiasts. You may expect to see launches any time you are on the summit. The view to the east, west and north are wonderful so take them in before you start back to the car.
Simply turn around and follow the trail back the way you came up the mountain. Be careful since the descent can be dangerous especially when there are leaves, water, ice or snow on the trail.
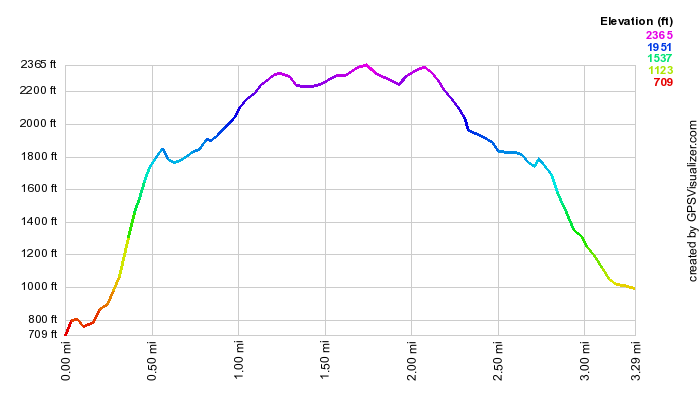 (The image at the left shows the profile of the hike. Remember that all vertical profiles are
relative!)
(The image at the left shows the profile of the hike. Remember that all vertical profiles are
relative!)
Taughannock Falls State Park (NY)
| Quick Look | ||||
|---|---|---|---|---|
| Difficulty | Round trip | Total climb | Internet Maps | |
| 5.0 mi. | 1060 ft. | AllTrails | ||
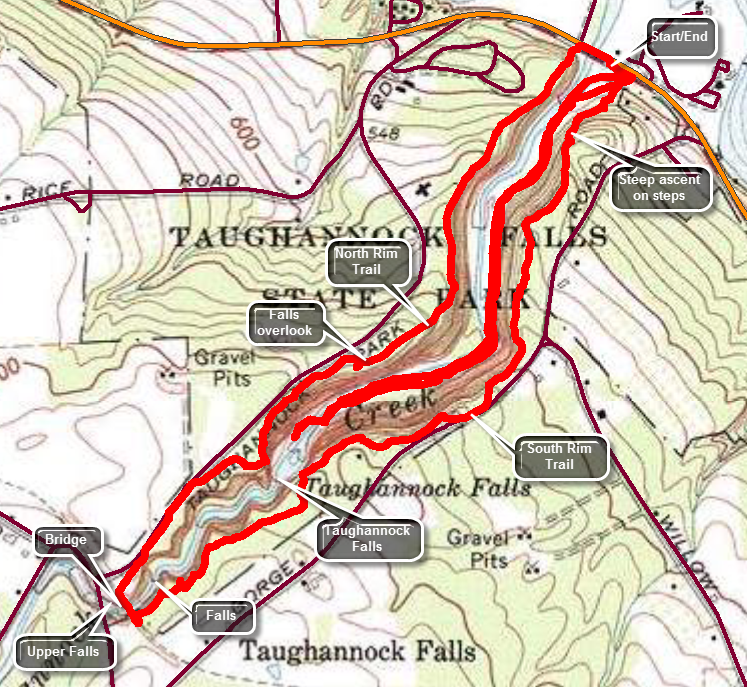
From the junction of Routes 96 and 89 in Ithaca, NY, head north on Route 89. Drive for about 9 miles and watch for signs for Taughannock Falls State Park. Park in the parking area on the west side of the Taughannock Falls State Park.
Walk into the gorge on the Gorge Trail and watch for several small falls along the way. The canyon that has been cut over the years is impressive. A layer of rock acts as the stream bed in many places and shows "waves". In many areas the different hardness of the rock layers is evident in the erosional patterns. You will arrive at the bridge over the stream at the base of the falls. The main falls are certainly high and are listed at 215 feet in mist books. Walk back to the beginning of the Gorge Trail, and start UP to the South Rim Trail. Getting up to the rim requires quite a climb but there were MANY stone steps along the way. Once you are up on the rim, the trail levels out and passes through shaded groves of the hardwood and some evergreen trees. Along the way a few lookouts give interesting views of the canyon below and, eventually, of the falls itself. Soon you will be near the upper reaches of the gorge and a new falls comes into view. Here the gorge widens considerably and the different layers of rock are even more obvious. Soon a bridge comes into view to cross over the stream. The bridge is a little old and has seen better days. From the bridge another falls, as impressive as the main falls in many ways, appears on the left to the southwest of the bridge. The water here also falls a long distance and the volume appears to be as great as the main falls. A little further upstream is another bridge that routes traffic over the stream. Continue on the trail but take the short side trip to the road bridge and back before continuing on the main trail. As you walk along the main trail an occasional view of the gorge will appear. The trail winds along the gorge and even joins the road for a brief time. At the upper access to the park and the gorge is a flight of stone steps to a view of the falls from some stone "benches". Start back down the North Rim Trail to the car. Try to find a view down the gorge and out to Cayuga Lake. Many of the viewpoints are overgrown and the views are obscured by trees and bushes. Continue down the trail looking for viewpoints before descending the steps to the road a little north of the parking area. Walked the road back to the car.
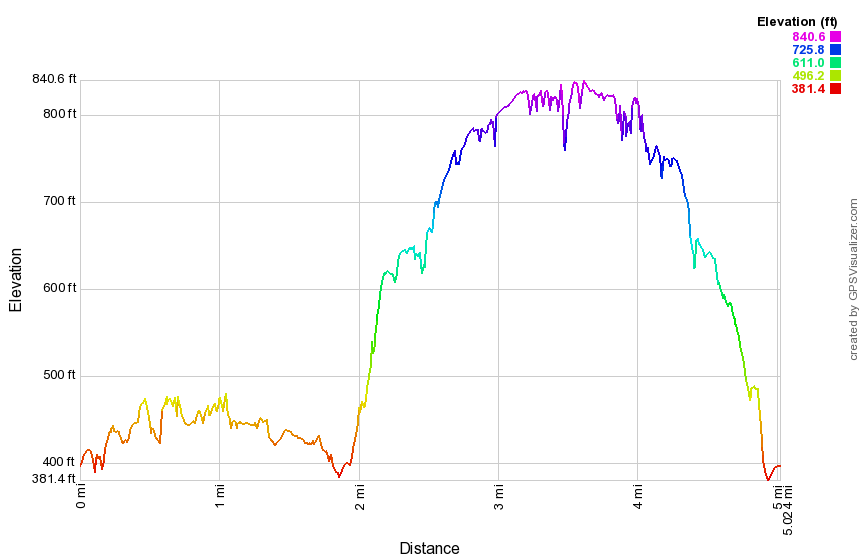 (The image at the left shows the profile of the loop hiking route. Remember that all vertical profiles are relative!)
Tanbark Trail (Phoenicia)
| Quick Look | ||||
|---|---|---|---|---|
| Difficulty | Round trip | Total climb | Internet Maps | |
| 2.3 mi. | 798 ft. | AllTrails | ||
 From Route 28 drive down the main street of Phoenicia watching for a sign for the post office on Ava Maria Mount. Turn left and park just passed the post office on the right side of the street. Walk to the short access road to Parrish Field. Walk straight across the field to a bridge and a sign explaining the trail system. Crossed the bridge and find three bright blue blazes on a tree. Pass between two rocks and immediately turn to the left. DO NOT go straight up the hill unless you like climbing a 40% grade. This turn is NOT well marked. Follow the trail as it goes through a switchback and climbs to the base of some impressive cliffs. The trail is narrow and rough but it is fun to walk below the cliffs. At about .25 miles the trail splits since it is a loop. A sign states that the designers intended hikers to go left so follow the suggestion. The trail now is wider but is still a good climb. At about .5 miles the trail levels off and you arrive at a viewpoint over Phoenicia below. The viewpoint is somewhat blocked by the leaves and has grown up since the trail was constructed. From this viewpoint the trail heads northwest and then swings to the north as it loops round the high ground on the right. The trail begins to descend briefly and then turns again to start north climbing a 20% grade on a rocky woods road. Along the way there are several paths and woods roads so be careful to follow the blazes. Just passed a mile the trail splits again. To the right is a shorter and less strenuous loop without an additional viewpoint. Stay left to hike the longer loop which has another lookout. From this point on the trail is not as well maintained and is poorly marked in places. There were several blowdowns which obscure the correct path. At 1.5 miles the trail turns south and you begin a long descent. At 1.6 miles there is another lookout. The trail narrows again and the descent becomes steeper exceeding 20%. The steep path may have a covering of leaves over loose dirt and rock. At 2 miles you will complete the loop and should turn left to follow the trail back to the base of the cliffs. Continue to follow it along the base of the cliffs. The trail is very narrow and often is slanted down the hill. Continue down through the switchback to where you started and walk across the field to your car.
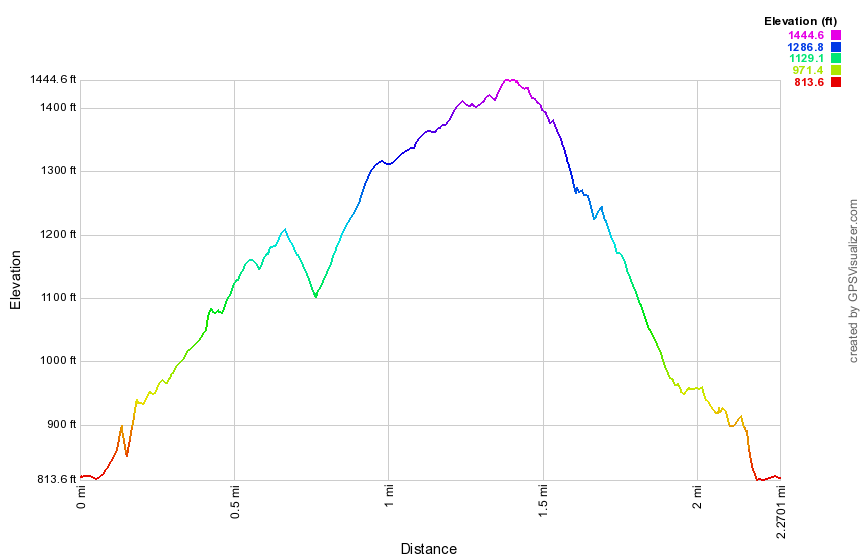 (The image at the left shows the profile of the hike. Remember that all vertical profiles are
relative!)
(The image at the left shows the profile of the hike. Remember that all vertical profiles are
relative!)
Terrace Mountain (Woodland Valley)
| Quick Look | ||||
|---|---|---|---|---|
| Difficulty | Round trip | Total climb | Internet Maps | |
| 6.8 mi. | 2070 ft. | AllTrails | ||
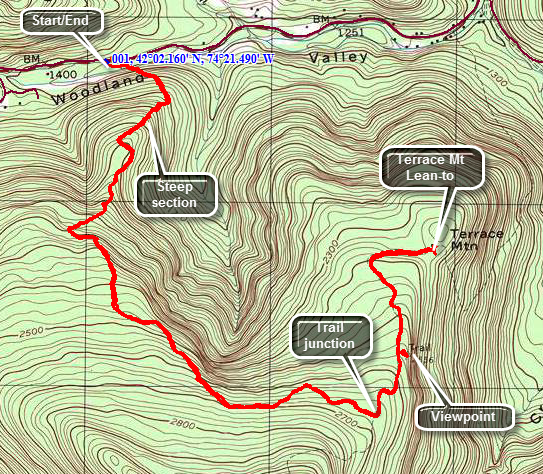 Park at the Woodland Valley Campsites on Woodland Valley Road being sure to pay the parking fee during the season. Head across the road to the bridge that crosses the creek. Be ready for an immediate climb as you make your way up the trail to Wittenberg Mountain. Over the next 1.9 miles from the bridge you will gain almost 1400 feet before the trail begins to level off. Even after the trail is no longer climbing continuously there will be several ups and downs. At 2.5 miles you will be at the junction with the trail to Terrace Mountain and a lean-to to the left. The trail to Terrace Mountain starts out as a pleasant walk through some hardwoods on an open trail. At about 2.7 miles there is a path to the right of the trail. This path leads to a large open rock face which offers some nice views to the northwest. The shelf of rock is quite large and you can walk to the east to find a large stone fireplace and "chairs". You may also walk along the edge of the rock face and get some more limited views which are better in the late fall or winter. After this path, the trail crosses some open rock and was poorly marked except for some cairns. The forest changes to evergreen trees as you descend. The rest of the walk to the lean-to is about .6 miles but drops over 200 feet. The forest changes back to hardwood until the trail enters a cleared area with the lean-to on the right. The lean-to is minimal but in good shape. The trail stops at the lean-to but once continued on to the Woodland Valley Road. When you are done exploring, retrace your route back to the Woodland valley parking area.
 (The image at the left shows the profile of the hike. Remember that all vertical profiles are
relative!)
(The image at the left shows the profile of the hike. Remember that all vertical profiles are
relative!)
Ticetonyk Mountain (DEC)
| Quick Look | ||||
|---|---|---|---|---|
| Difficulty | Round trip | Total climb | Internet Maps | |
| 3.4 mi. | 1350 ft. | AllTrails | ||
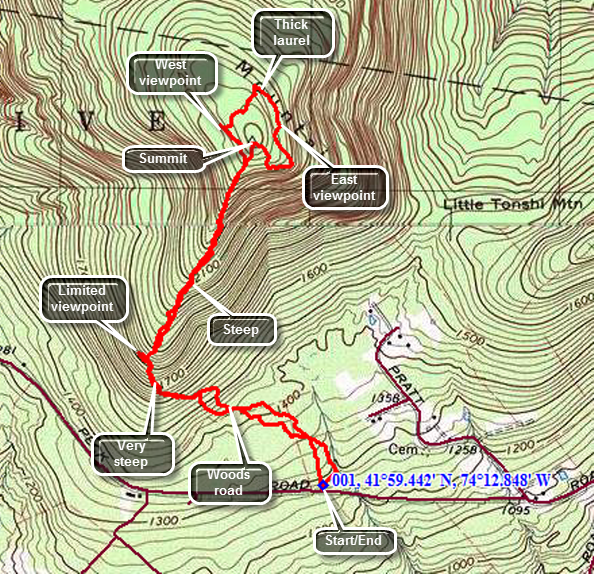 From the intersection of Routes 28A and 28 near Boiceville drive south for .4 miles and turn left on DeSilva Road. Turn left at the end of the road and then turn right on Bostock Mountain Road. After 1.4 miles turn left on Peck Road. Drive 1.2 miles to a small pulloff on the left side of the road. The only sign is a small one in this "parking area" that explains the acquisition of Ticetenyk Mountain. The entire hike is a bushwhack although there are some woods roads and paths to follow. The first part of the hike is along a narrow access corridor of state land that is bordered by private property on both sides. Take the woods road that heads to the left and up a steep hill right out of parking area. Follow the state forest signs and the yellow blazes for about .5 miles and find a woods road that ascends steeply along the western shoulder of the mountain's ridge. Watch for nice views of the Shokan Reservoir which are easier to get in season's with fewer leaves. After about .75 miles you should be at the highest point on the road. The road continues northwest and start down onto private property. Turn off the road into the woods to the right and climb a steep hill. Continue to hike up and to the northeast until about 1.4 miles. Look for the highest point on the summit plateau and you may find the rock with the USGS benchmark. Walk down off the summit to the east or southeast and walk to the edge of the summit plateau. Walk counterclockwise until you find a viewpoint facing east. There will be wide open views and a large rock with many initials and symbols. Walk back to the summit and head west. The viewpoints on the west are mostly blocked by trees but are worth the visit. When you are done, follow your path back to your car.
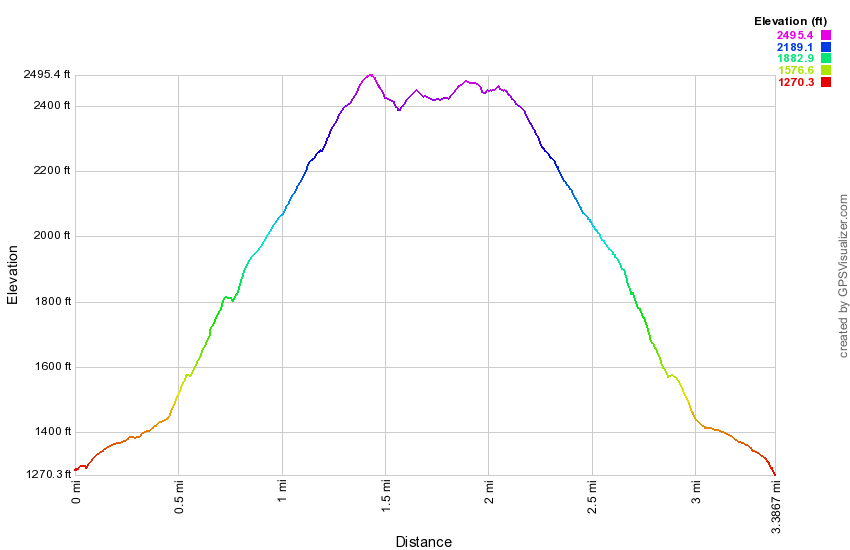 (The image at the left shows the profile of the hike. Remember that all vertical profiles are
relative!)
(The image at the left shows the profile of the hike. Remember that all vertical profiles are
relative!)
Ticetonyk Mountain (DEP)
| Quick Look | ||||
|---|---|---|---|---|
| Difficulty | Round trip | Total climb | Internet Maps | |
| 3.4 mi. | 1350 ft. | AllTrails | ||
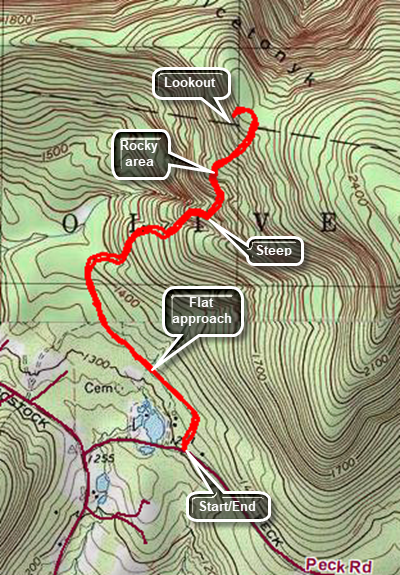 From the intersection of Routes 28A and 28 near Boiceville turn north near Onteora High School on Upper Boiceville Road. At the top of the hill follow the road as it veers to the right. After .75 miles, turn left on Bostock Road. Follow Bostock Road for 1.45 miles and then turn left on Peck Road. After a quarter mile, the parking area will be on your left. Caution: The lot will hold only or 5 cars and the land around it is private property. The trail is well marked with blue markers labeled DEP and CMC. Much of the hike is on an old woods road that goes up the mountain. The first part of the hike for about .65 miles is almost flat and heads first northeast and then northwest. The trail passes the YMCA camp which is on the left. At .65 miles the trail turns to the northeast and begins a strenuous climb. Over the nest .7 miles the trail gains 750 feet with an average grade of 21% before leveling slightly near the top of the climb. The trail is generally in good condition with a few rocky areas especially just before the top. The trail can be slippery when wet and when there are leaves on the trail. This would be an even more challenging trip with ice and snow on the trail. At 1.3 miles a sign points back to the parking area but the best is yet to come. Continue to walk on the trail until it turns left and descends slightly to the lookout. The view is to the west and south where the Ashokan Reservoir is visible. There are several other paths but most are blocked by some branches. When you are done simply turn around and retrace your steps back to the parking area.
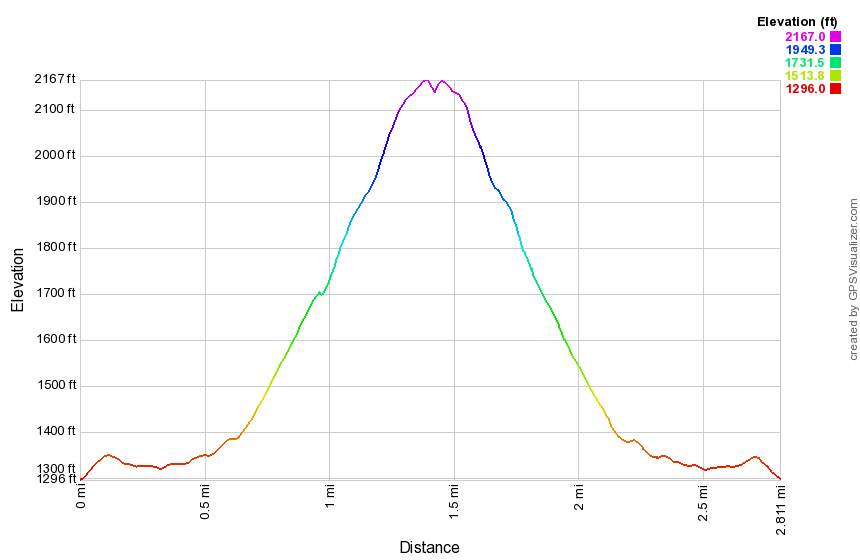 (The image at the left shows the profile of the hike. Remember that all vertical profiles are relative!)
Tors: Little Tor and High Tor
| Quick Look | ||||
|---|---|---|---|---|
| Difficulty | Round trip | Total climb | Internet Maps | |
| 8.5 mi. | 1492 ft. | AllTrails | ||
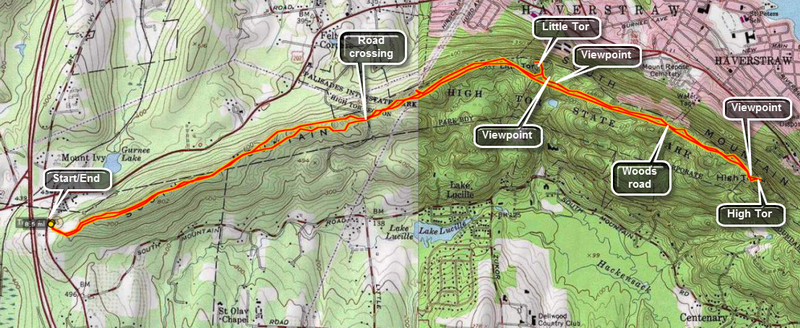
Take the Palisades Parkway to Exit 13 and turn onto Route 202 East. At the first traffic light turn south on Route 45. Just up the hill is a parking lot on the right or east side of the road. Park here. Note the signs warning about ticks and Lyme Disease and be sure to take appropriate precautions. The hike is a relatively straight forward out and back route that follows the Long Path for its entire length. The trail meanders up and down some and back and forth only slightly as it follows the ridge line the entire way. You may cut off the first part of the hike by parking on Route 33 where the Long Path crosses the road. There is room for several cars. Little Tor and High Tor are both east of this parking area and the "trail" is over wide woods roads for the mots part.
From the Route 45 parking area walk east on the Long Path following the aqua blazes. Walk off the trail to the left or right occasionally to enjoy the view. North or left is heavily populated while south or right seems more wild. After 1.75 miles, you will descend to Route 33. Be careful when crossing since both north and south have blind curves and the drivers are always going too fast. At this point the trail becomes a wide road which is often covered with stone chips. The walking is easy and your pace can increase. After only .3 miles a power line crosses the trail and a path leads up and to the left. This is a good lookout to the north but nothing like what is to come. In a little more than 1 mile from Route 33 a wide path turns to the left away from the main trail and leads to Little Tor.
As you walk up the path stop on the edge of the cliff and look at the views laid out below. Now turn back to the path and follow it to the top of Little Tor for the really remarkable 360 degree panorama. The Hudson River is to the east and the jutting rock formation is part of High Tor. When you have taken in all you can, retrace your route to the main trail and walk another 1.25 miles to High Tor. The trail breaks up a little and may be wet in places but this is not really a problem. As you approach High Tor you may wonder how you can climb such a massive piece of rock. Do not fear! The Long Path bends to the right hear and then turns sharply left up the "back" of the tor. This part of the trail is steep in places with some rock scrambling but it is also short and well worth the effort.
After the brief climb, the trail levels some and then ascends to the top of the tor. To the left is a large, flat, open rock outcropping which offers unhindered views of the populated area below. There are also views of the Hudson River and the more forested areas west and south. Immediately to the east rises another prominent rock outcropping which is the top of the tor. Head for this area and ascend over the bare rock face which can be slippery when wet. Near the top you will see four anchors which are all that remain of a tower which housed and airplane beacon. You will now have an unhindered 360 degree view of all that is near and far. On a clear day the view is one of the nicest in the lower Hudson Valley. After getting a drink and a snack, take some pictures and then retrace your route back to the car.
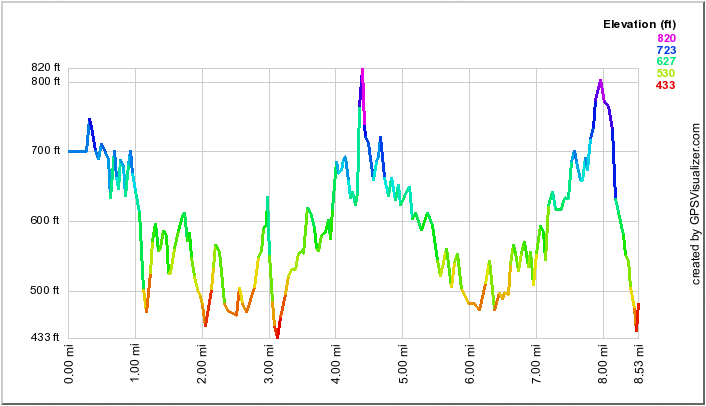 (The image at the left shows the profile of the hike. Remember that all vertical profiles are
relative!)
(The image at the left shows the profile of the hike. Remember that all vertical profiles are
relative!)
Treadlemire Road to Albany County Line
| Quick Look | ||||
|---|---|---|---|---|
| Difficulty | Round trip | Total climb | Internet Maps | |
| 10.8 mi. | 2363 ft. | AllTrails | ||
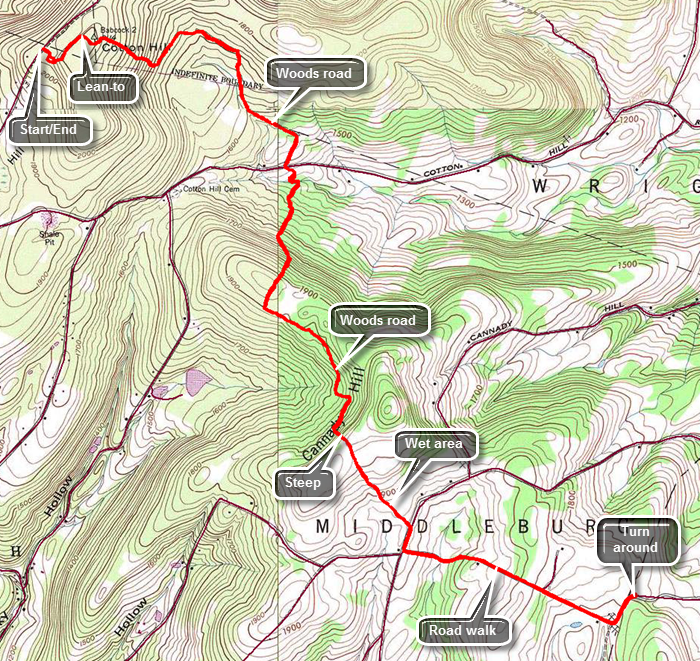
Head north on Route 30 through Margaretville, Roxbury, Grand Gorge, North Blenheim and Middleburgh. Just over the Route 30 bridge in Middleburgh, turn right on Route 145 and follow it to the other side of town. Turn left on Cotton Hill Road and after about 3 miles, make a left on Treadlemire Road. Drive just less than a mile to the parking area on the right. Walk out the back of the parking area on a woods road. After a very short distance, turn left and walk up a trail between two rocks with very interesting sedimentary layers. Within .3 miles walk up a steep but short hill and arrive at the Cotton Hill lean-to. Despite some trail descriptions there are no views from here. After the lean-to, start a descent on a nice combination of trail and woods roads. Watch the blazes carefully as there area numerous other paths and roads that cross the trail. At 1.2 miles you will reach a DEC access road which will lead out to Cotton Hill Road. The trail crosses the road and continues to descend briefly to a bridge across a stream. You will now have descended over 700 feet from the starting point and have covered about 2 miles. Head south and climb a woods road. Near the top of the hill at about 2.4 miles the trail turns off the road to the right and begins an even steeper climb. It soon levels off and then begins to descend. At 2.7 miles the woods road makes a sharp left before breaking out into an open area. Watch for the PortaJon on the left sitting out in the middle of nowhere! Even through this area the blazes are clear. Continue to walk on the woods road along the western side of Canady Hill until about 3.5 miles where the trail turns sharply left and begins a steep ascent. There may be active logging in the area. The trail "climbs over the hill" but never crosses over the summit. You will soon crest the hill and start down the other side. Some trail description talk about a "spectacular view" but there is no view. You are on private land at this point so be sure to only stay on the trail. The trail levels out and for a short distance the area is "very wet". Find some high ground and watch the aqua blazes and you will soon be at Canady Hill Road. Turn right on Canady Hill Road and then made a quick left on Lawton Hollow Road. The road immediately descends and then starts to ascend again. Some trail descriptions mentioned "views" to both the north and south but there are no views. At 5.4 miles there is a gravel pit on the left with a few spaces for parking and just passed this a sign for the Albany County Line. Turn around and retrace your route back to the car. The ascent up Cotton Hill at the end may be steep at times but the steep parts are short!
 (The image below shows the profile of the hike. Remember that all vertical profiles are relative!)
Tremper Mountain: Rt. 40, Phoenicia
| Quick Look | ||||
|---|---|---|---|---|
| Difficulty | Round trip | Total climb | Internet Maps | |
| 6.1 mi. | 2100 ft. | AllTrails | ||
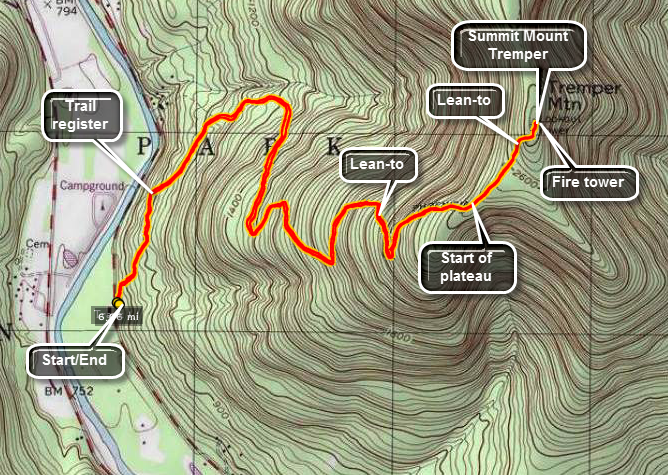 The Tremper Mountain Fire Tower is believed to be the oldest of the reconstructed fire towers in
The Catskills. It was originally constructed elsewhere in 1917 and then moved to its present location.
The trail is mostly along an old road to the summit. It has many switchbacks which make the route
Not as steep as it might be but also add length to the distance. Views of the surrounding mountains
are easily has had from the fire tower.
The Tremper Mountain Fire Tower is believed to be the oldest of the reconstructed fire towers in
The Catskills. It was originally constructed elsewhere in 1917 and then moved to its present location.
The trail is mostly along an old road to the summit. It has many switchbacks which make the route
Not as steep as it might be but also add length to the distance. Views of the surrounding mountains
are easily has had from the fire tower.
From Rt. 28 turn at the sign that indicates the village of Phoenicia. Continue straight through town until the sign for Rt. 40. Continue of Rt. 40 for about 3/4 of a mile. Pass the first parking area on your right. Park at the next parking area on the left. This area has a sign for the Tremper Mountain Fire Tower. Walk over three bridges and up a hill on the stone steps. Don't be surprised at the lack of a trail register at this point. The register is a little over a quarter mile on the trail. From here follow the well-marked red Phoenicia trail to the tower. The trail is an old road to the tower. It has many switchbacks which makes the incline quiet easy but lengthens the hike. It is possible to cut some of the switchbacks or bushwhack the entire way. BE CAREFUL! There are reports of timber rattlesnakes in this area!
The trail eventually reaches a plateau and after a short hike and a short climb you will be at the fire tower. This tower is surrounded by trees until you get near the top. The views are nice but not as interesting as the ones from Overlook, Balsam or Hunter on a nice day. Retrace your trail and you will be back at your car.
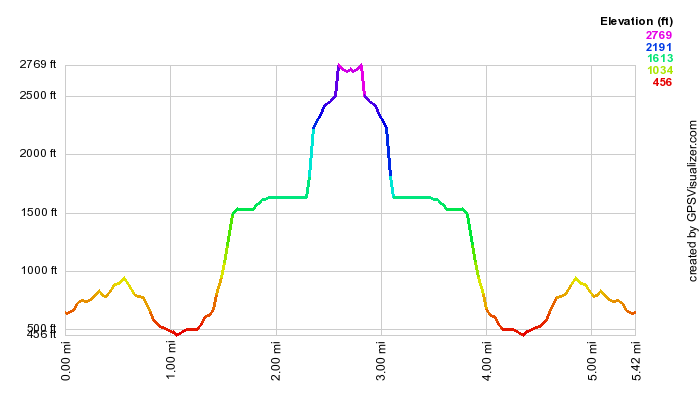 (The image at the left shows the profile of the hike. Remember that all vertical profiles are
relative!)
(The image at the left shows the profile of the hike. Remember that all vertical profiles are
relative!)
Tremper Mountain to Lane Street
| Quick Look | ||||
|---|---|---|---|---|
| Difficulty | Round trip | Total climb | Internet Maps | |
| 4.8 mi. | 250 ft. | AllTrails | ||
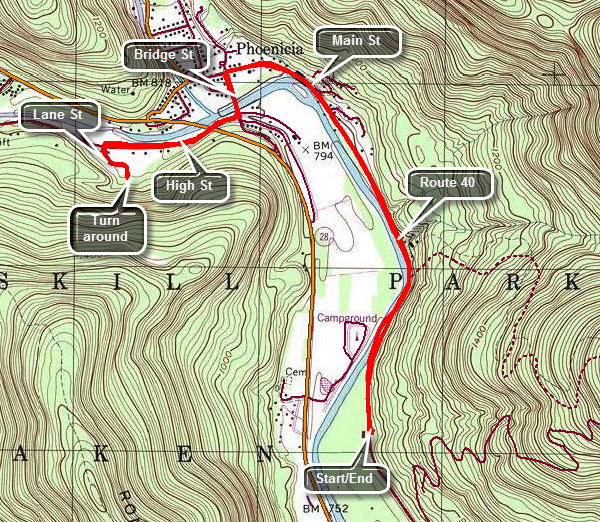 This hike connects the Mount Tremper parking area to the trail over Romer and Cross Mountains that starts at Lane Street in Phoenicia. Turn off Route 28 and drive down the Main Street of Phoenicia which eventually becomes Route 40. Watch for the parking area for Mount Tremper on the right. Park in the lot and hike back toward the village on Route 40. At 1.6 miles turn left on Bridge Street and walked across the Esopus on a road bridge. Just after the bridge turn right on High Street. At 2.2 miles turn left onto Lane Street and walk to the parking area at the end. Turn around and retrace your path back to the parking area.
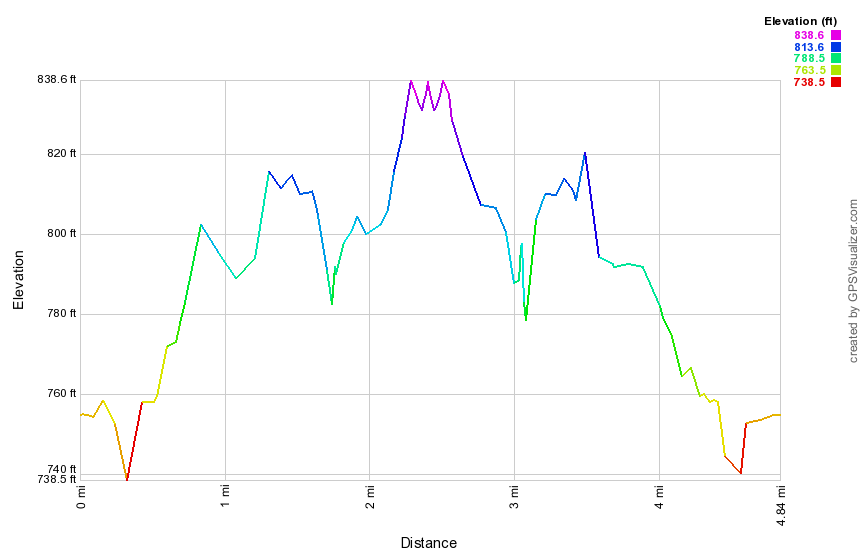 (The image at the left shows the profile of the hike. Remember that all vertical profiles are relative!)
Trout and Around Mud Pond
| Quick Look | ||||
|---|---|---|---|---|
| Difficulty | Round trip | Total climb | Internet Maps | |
| 6.9 mi. | 1264 ft. | AllTrails | ||
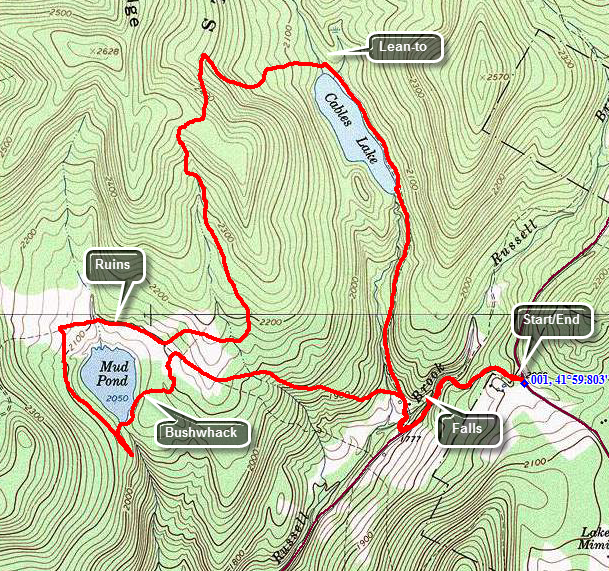 This is one of our favorite trails when we just want to hike. It has several variations for distance and
difficulty. Like most trails, hiking one way is different than hiking in the other direction. We have
take this route more than a dozen times this season and it is interesting to watch the changing
seasons. It is unfortunate that Russell Brook Road is closed due to the frequent floods that have
washed out the road.
This is one of our favorite trails when we just want to hike. It has several variations for distance and
difficulty. Like most trails, hiking one way is different than hiking in the other direction. We have
take this route more than a dozen times this season and it is interesting to watch the changing
seasons. It is unfortunate that Russell Brook Road is closed due to the frequent floods that have
washed out the road.
Turn left on Morton Hill Road on Route 206 just after the Rockland Flats. Bear right up Morton Hill
Road until you see a parking area on the left near the sign indicates Russell Brook Road is closed.
Park here on the side of the road and hike down Russell Brook Road .5 miles to the actual trail head. Go over the bridge and
look to your right to see a beautiful waterfall. Explore this area if you like. Back on the trail you
may go to the left or right. Go to the right and walk another 1.5 miles to the head of Trout Pond. The
trail is a gentle uphill all the way with the last quarter mile along the edge of the lake. At the
head of the lake the trail branches right to Campbell Brook. Bear left but do not go up the hill to the
lean-to since this is a dead end. The trail ascends around the other side of Trout Pond with a moderate
climb to almost 2500 feet on Cherry Ridge. You now walk down to Mud Pond. The total distance from the
lean-to is about 1.7 miles.
At this point you reach a T in the trail. Left goes directly back to the trailhead covering a little over 1 mile plus the half mile back to the car. Turning right takes you around Mud Pond and to the lower trail head on Russell Brook Road. The distance is 2 miles to the lower trail head and another 1.7 miles back to the car. If you can make the distance around Mud Pond there are some interesting things to see. Several old stone foundations can be seen around Mud Pond. A beaver pond can be found on the backside of the pond but there isn't much evidence of activity. As you hike from the lower trail head to the parking area, you can see the devastation the floods have brought to the road. In several places it is hard to tell road from stream!
Turn right here and walk on the wide trail around Mud Pond. You can see the pond to your left most of the time. When the snowmobile trail splits off to the right be sure to stay left. At about .8 miles from the last trail junction watch for a trail or path that leads down to the pond. Walk over the dam and around the pond. This is a bushwhack and you may have to fight through some thick brush. As you circle the pond head northeast and you will intersect the woods road that leads back to the trail register near the start of the hike. Depending on where you intersect the trail it is about .9 miles. From the trail register retrace your route up Russell Brook Road to your car
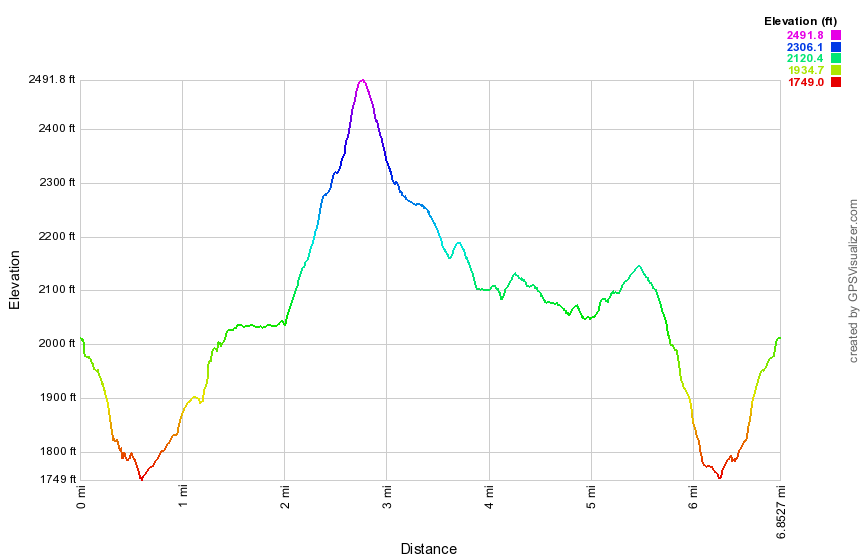 (The image at the left shows the profile of the hike.)
Trout and Mud Pond: Bushwhack Loop
| Quick Look | ||||
|---|---|---|---|---|
| Difficulty | Round trip | Total climb | Internet Maps | |
| 5.8 mi. | 1520 ft. | AllTrails | ||
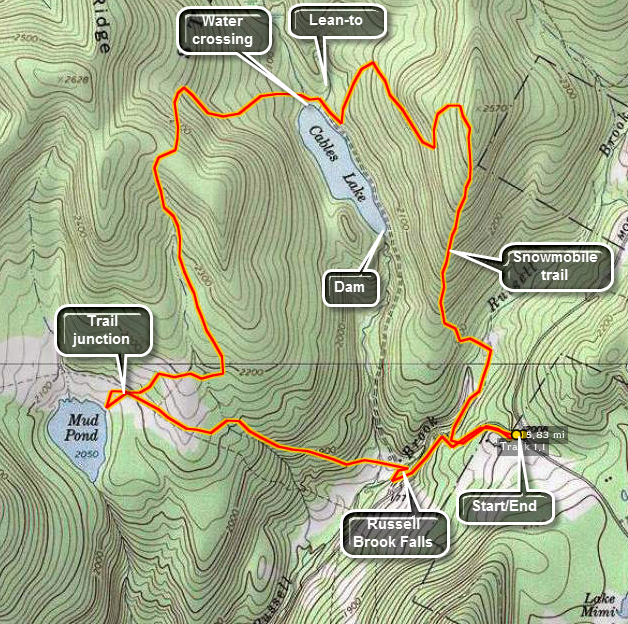 This is one of our favorite trails when we just want to hike. It has several variations for distance and
difficulty. Like most trails, hiking one way is different than hiking in the other direction. We have
take this route more than a dozen times this season and it is interesting to watch the changing
seasons. It is unfortunate that Russell Brook Road is closed due to the frequent floods that have
washed out the road.
This is one of our favorite trails when we just want to hike. It has several variations for distance and
difficulty. Like most trails, hiking one way is different than hiking in the other direction. We have
take this route more than a dozen times this season and it is interesting to watch the changing
seasons. It is unfortunate that Russell Brook Road is closed due to the frequent floods that have
washed out the road.
Turn left on Morton Hill Road on Route 206 just after the Rockland flats. Bear right up Morton Hill
Road until you see a parking area on the left near the sign indicates Russell Brook Road is closed.
Park here and hike down Russell Brook Road .25 miles to the first camping area on the left. Across from he camping area is a gated trail. What is now a snowmobile trail probably follows one of the haul roads built by the Treyz Acid Wood Factory in the early 20th century. This trail is overgrown and in need of maintenance and am not sure it has seen a snowmobile in some time! From the time you get on the trail it ascends for about 1.2 miles to the top of a ridge. For the next .8 miles the trail goes through some switchbacks in a descent west to the trail around Trout Pond. When you intersect the trail turn right and walk a short distance to the lean-tos and the inlet end of the pond. Here the trail branches right to Campbell Brook. Bear left but do not go up the hill to the lean-to since this is a dead end. The trail ascends around the other side of Trout Pond with a moderate climb to almost 2500 feet on Cherry Ridge at 3 miles into the hike. You now walk down the other side to Mud Pond.
At this point you reach a T in the trail as the hiking trail meets a snowmobile trail. Turn right and look for a path down to the shores of Mud Pond. This infrequently visited location has lots of wildlife in and around the pond. Between the shore of the pond and the woods road that serves as hiking and snowmobile trail, there are the ruins of several buildings. Walk back up to the woods road and turn right to get started back to your car. Over the next mile the trail ascends briefly and then drops to the lowest point as you cross the bridge over the outlet to Trout Pond. Turn right at the next trail junction and head out to Russell Brook Road and the lower trailhead parking. As you cross the bridge, look to your left to see Russell Brook Falls. The falls has historical significance so walk over to it if you have the time. It is usually possible to get down into the stream bed and take pictures of the falls without a problem. The stonework is part of two dams used to regulate water flow to an electric generating waterwheel downstream near what is now the Russell Brook Campsite. Once on the road you have an additional .5 miles back up Russell Brook Road to your car.
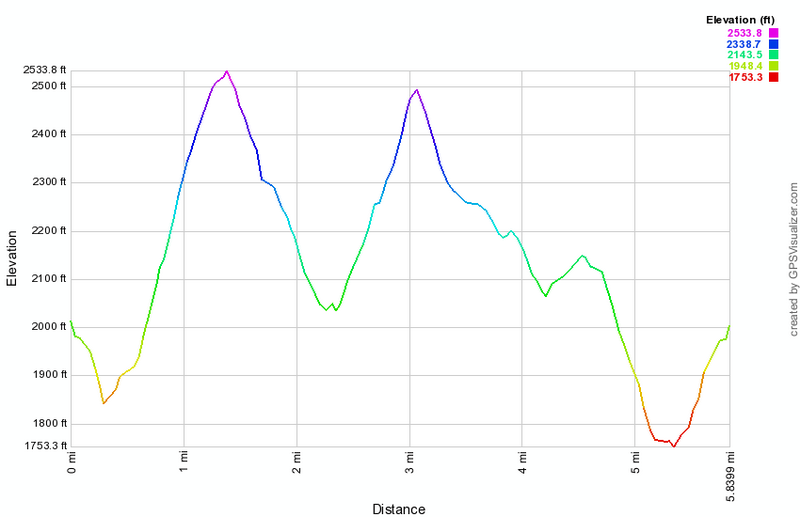 (The image at the left shows the profile of the hike.)
Trout Pond: Complete Trout and Mud Pond Loop
| Quick Look | ||||
|---|---|---|---|---|
| Difficulty | Round trip | Total climb | Internet Maps | |
| 7.6 mi. | 1317 ft. | AllTrails | ||
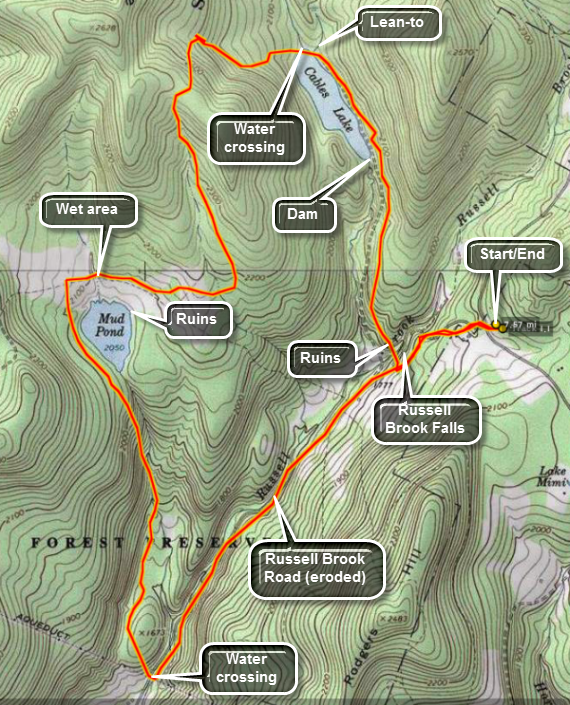 This is one of our favorite trails when we just want to hike. It has several variations for distance and
difficulty. Like most trails, hiking one way is different than hiking in the other direction. We have
take this route more than a dozen times this season and it is interesting to watch the changing
seasons. It is unfortunate that Russell Brook Road is closed due to the frequent floods that have
washed out the road.
This is one of our favorite trails when we just want to hike. It has several variations for distance and
difficulty. Like most trails, hiking one way is different than hiking in the other direction. We have
take this route more than a dozen times this season and it is interesting to watch the changing
seasons. It is unfortunate that Russell Brook Road is closed due to the frequent floods that have
washed out the road.
Turn left on Morton Hill Road on Route 206 just after the Rockland flats. Bear right up Morton Hill
Road until you see a parking area on the left near the sign indicates Russell Brook Road is closed.
Park here and hike down Russell Brook Road .5 miles to the actual trail head. Go over the bridge and look to your right to see a beautiful waterfall. Explore this area if you like. Back on the trail you may go to the left or right. Go to the right and walk another 1.5 miles to the head of Trout Pond. The trail is a gentle uphill all the way with the last quarter mile along the edge of the lake. At the head of the lake the trail branches right to Campbell Brook. Bear left but do not go up the hill to the lean-to since this is a dead end. The trail ascends around the other side of Trout Pond with a moderate climb to almost 2500 feet on Cherry Ridge. You now walk down to Mud Pond. The total distance from the lean-to is about 1.7 miles.
At this point you reach a T in the trail as the hiking trail meets a snowmobile trail. Left goes directly back to the trailhead covering a little over 1 mile plus the half mile back to the car. Turn right to start around Mud Pond. The trail follows the shore of Mud Pond until at 4 miles it turns almost 90 degrees to the south. A snowmobile trail continues straight ahead. This section of the trail can be very wet even when there has been no rain for some time. The trail now follows a stream out of Mud Pond and begins a long and sometimes steep descent of 530 feet over 1.1 miles. At one point you will pass by a beaver pond which often has interesting species of wildlife in and around it. The trail meets Russell Brook Road where you should turn left to walk up the road or what is left of it! In a few hundred feet is the toughest obstacle. You must cross Russell Brook at this point. You may be able to shimmy across a log, tiptoe across stepping stones or just get your feet wet. On the other side there is usually enough road left to walk along it in most places. You should be prepared to wade again or walk up a steep bank to get back to the lower parking area. The total walk up from the "ford" is 1.5 miles plus an additional .5 miles back up Russell Brook Road to your car.
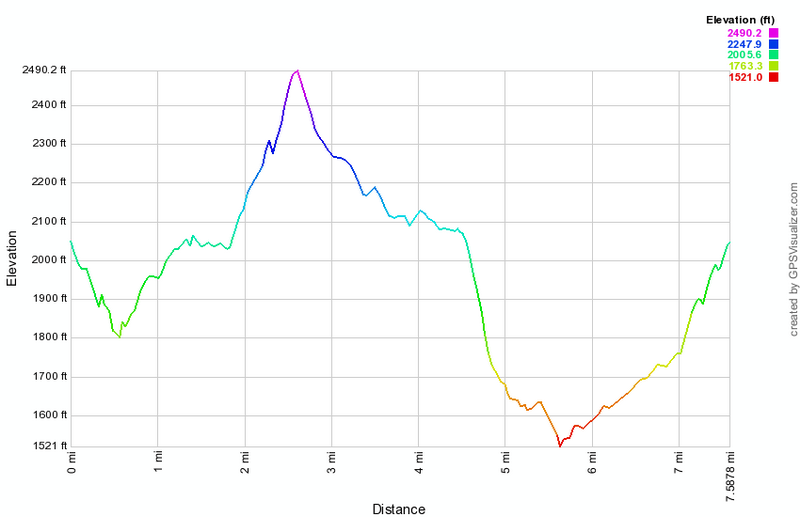 (The image at the left shows the profile of the hike.)
Trout and Mud Pond: Cooks Falls Loop
| Quick Look | ||||
|---|---|---|---|---|
| Difficulty | Round trip | Total climb | Internet Maps | |
| 10.9 mi. | 1872 ft. | AllTrails | ||
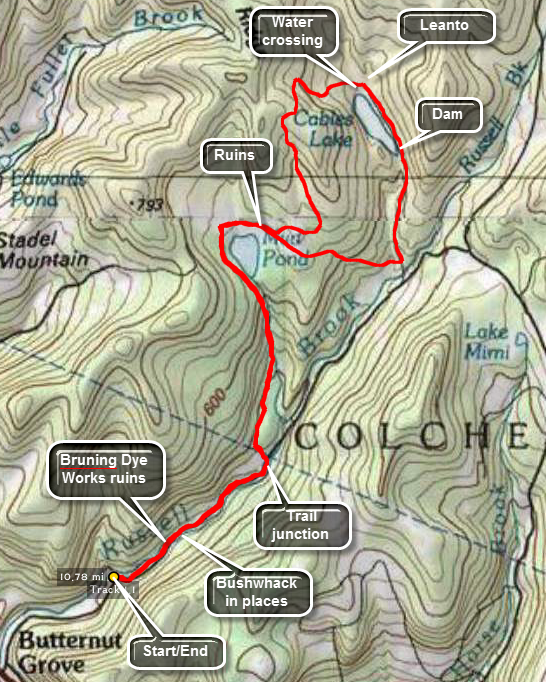 This is one of our favorite trails when we just want to hike. It has several variations for distance and
difficulty. Like most trails, hiking one way is different than hiking in the other direction. We have
take this route more than a dozen times this season and it is interesting to watch the changing
seasons. It is unfortunate that Russell Brook Road is closed due to the frequent floods that have
washed out the road.
This is one of our favorite trails when we just want to hike. It has several variations for distance and
difficulty. Like most trails, hiking one way is different than hiking in the other direction. We have
take this route more than a dozen times this season and it is interesting to watch the changing
seasons. It is unfortunate that Russell Brook Road is closed due to the frequent floods that have
washed out the road.
Take route 17, the Quickway, to the Cooks Falls exit. Get off at the exit and turn right onto Russell Brook Road. Drive passed the Russell Brook Campsites to the small parking lot at the end of the road. The road ends here and your hike begins. Just passed the STOP sign and pile of dirt that signal the end of the road, the road drops away and Russell Brook starts. The brook has eroded the road and is too wide to cross unless it has been VERY dry. If you look ahead, you may be able to see where the road is still intact and from that point on it may be in good shape. The only way to get to that point is to bushwhack and the easiest route is up the hill on the right side of the parking area. Go up the bank and walk along the bank wherever you can find flatter area to avoid sidehilling the whole way. Find a place to descend where you have to cross as little water as possible, If you are fortunate, you will find the road in good condition for some time with parts of the stream on either side or to one side or the other. At one point there is a bridge which seems to be a culvert with metal guard rails. You may also the old foundations from the Hans Bruning Dye Works which produced much of the khaki dye for World War I uniforms. As you continue your hike you may have to negotiate several stream crossings and walk over large stones left from the stream erosion. Numerous blowdowns also may also force us to change directions. At 1.4 miles the trail heads up to the left toward Mud Pond. Turn left here. The trail to Mud Pond is about 2 miles long with the first mile climbing rather steadily. After this, the trail levels some. At about 3 miles the trail turns sharply east while a snowmobile trail heads north. Stay on the trail as it wraps around Mud Pond to the junction with the trail to Trout Pond at 3.5 miles. Turn left to go to Trout Pond.
The trail to Trout Pond ascends to near the top of Cherry Ridge over the next 1.2 miles. After the climb to Cherry Ridge, the next .7 miles of trail descends to the inlet end of Trout Pond. Follow the trail around the shores of Trout Pond to the outlet end and the dam at 5.9 miles. The trail now starts to descend to the area of Russell Brook Falls and loses about 250 feet over the next .75 miles. At the trail junction turn right to start your loop back to Mud Pond. You will cross a bridge and pass by a popular campsite of questionable legality. The trail immediately begins to climb and gains 360 feet over .65 miles. From here the trail descends to the Mud Pond trail junction where you will start your trip back along the same path you used to get there. At 9.5 miles you should be back at Russell Brook and Russell Brook Road. Walk back to your car along this path.
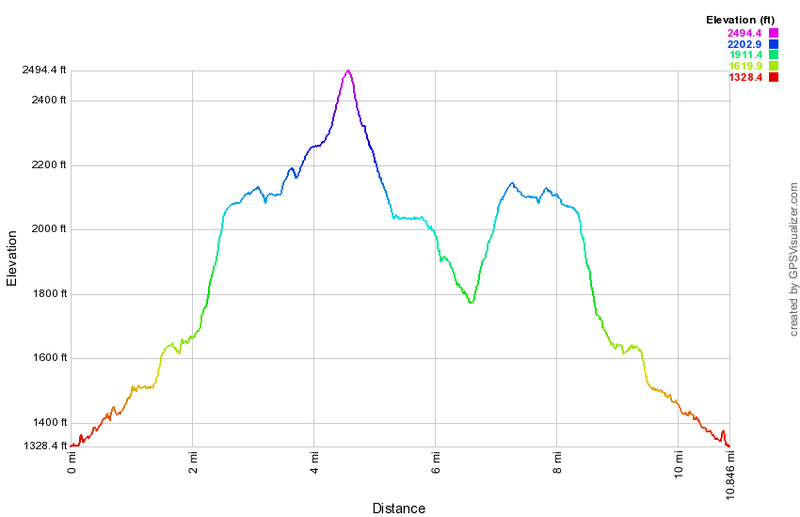 (The image at the left shows the profile of the hike. Remember that all vertical profiles are relative!)
Trout Pond: Bushwhack Loop
| Quick Look | ||||
|---|---|---|---|---|
| Difficulty | Round trip | Total climb | Internet Maps | |
| 4.2 mi. | 782 ft. | AllTrails | ||
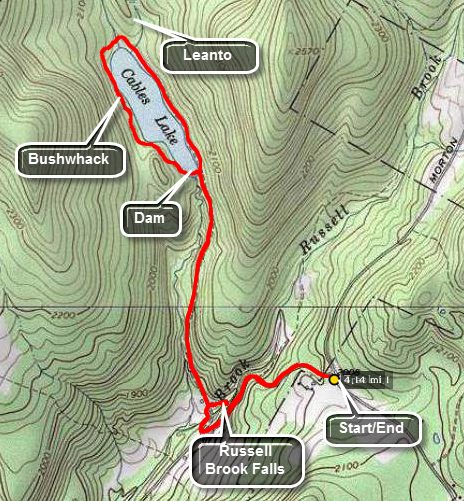 This is one of our favorite trails when we just want to hike. It has several variations for distance and
difficulty. Like most trails, hiking one way is different than hiking in the other direction. We have
take this route more than a dozen times this season and it is interesting to watch the changing
seasons. It is unfortunate that Russell Brook Road is closed due to the frequent floods that have
washed out the road.
This is one of our favorite trails when we just want to hike. It has several variations for distance and
difficulty. Like most trails, hiking one way is different than hiking in the other direction. We have
take this route more than a dozen times this season and it is interesting to watch the changing
seasons. It is unfortunate that Russell Brook Road is closed due to the frequent floods that have
washed out the road.
Turn left on Morton Hill Road on Route 206 just after the Rockland flats. Bear right up Morton Hill
Road until you see a parking area on the left near the sign indicates Russell Brook Road is closed.
Park here and hike down Russell Brook Road .5 miles to the actual trail head. Go over the bridge and look to your right to see a beautiful waterfall. Explore this historical area if you like. Back on the trail you may go to the left or right. Go to the right and walk another 1.5 miles to the head of Trout Pond. The trail is a gentle uphill all the way with the last quarter mile along the edge of the lake. Along the way you may want to stop at the dam at the outlet end of the pond. There are some nice views this end depending on the light. At the head of the lake the trail branches right to Campbell Brook. Bear left on a short spur trail up the hill to the lean-to. This section of trail dead ends here so now you must begin to bushwhack. The easiest route from a navigational standpoint is to stay near the shore of the pond. As you walk around the pond you may encounter some dense laurel stands and some old campsites and fir rings. Eventually you will some to the far side of the dam. Cross the dam here being careful not to slip as you walk across the spillway! Walk out to the trail and turn right to walk back down to the area of the falls. As you come to the bridge across Russell Brook, look to your left to see Russell Brook Falls. The falls has historical significance so walk over to it if you have the time. It is usually possible to get down into the stream bed and take pictures of the falls without a problem. The stonework is part of two dams used to regulate water flow to an electric generating waterwheel downstream near what is now the Russell Brook Campsite. Walk back to the trail and out to the lower trailhead. Once on the road you have an additional .5 miles back up Russell Brook Road to your car.
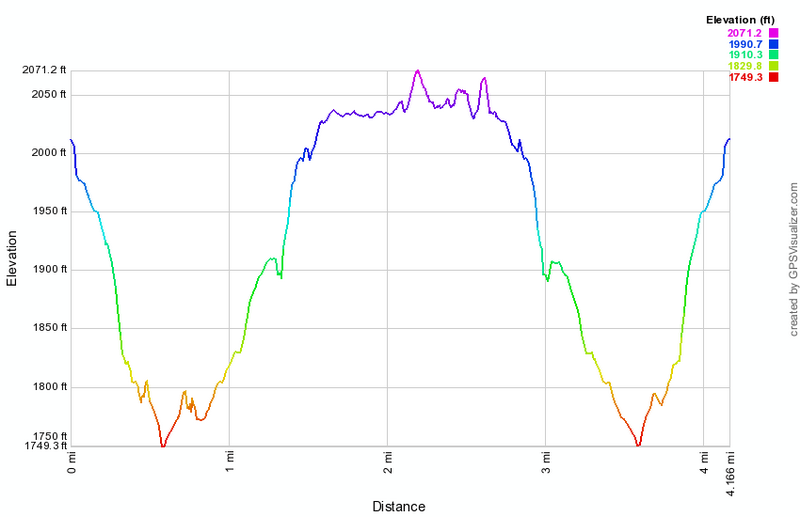 (The image at the left shows the profile of the hike.)
Trout Pond: Campbell Brook and Morton Hill Road Loop
| Quick Look | ||||
|---|---|---|---|---|
| Difficulty | Round trip | Total climb | Internet Maps | |
| 7.1 mi. | 1237 ft. | AllTrails | ||
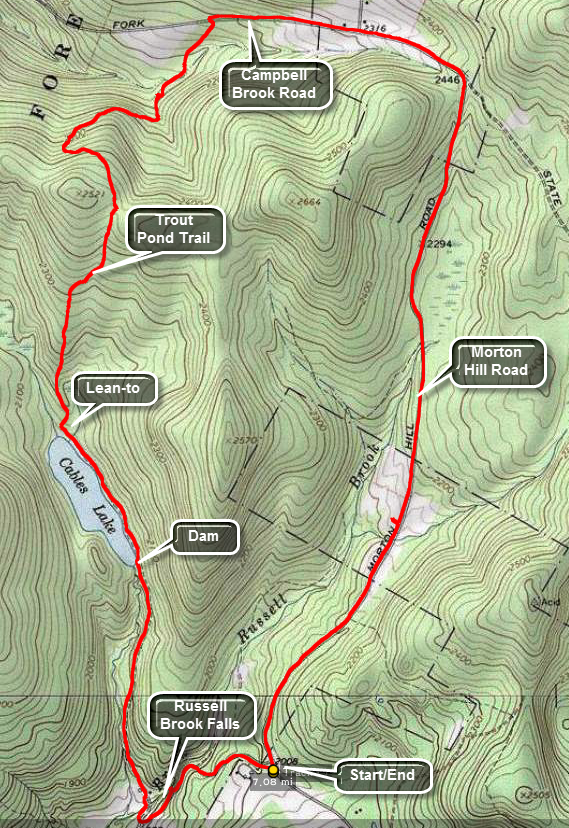 This is one of our favorite trails when we just want to hike. It has several variations for distance and
difficulty. Like most trails, hiking one way is different than hiking in the other direction. We have
take this route more than a dozen times this season and it is interesting to watch the changing
seasons. It is unfortunate that Russell Brook Road is closed due to the frequent floods that have
washed out the road.
This is one of our favorite trails when we just want to hike. It has several variations for distance and
difficulty. Like most trails, hiking one way is different than hiking in the other direction. We have
take this route more than a dozen times this season and it is interesting to watch the changing
seasons. It is unfortunate that Russell Brook Road is closed due to the frequent floods that have
washed out the road.
Turn left on Morton Hill Road on Route 206 just after the Rockland flats. Bear right up Morton Hill
Road until you see a parking area on the left near the sign indicates Russell Brook Road is closed.
Park here and hike down Russell Brook Road .5 miles to the actual trail head. Go over the bridge and look to your right to see a beautiful waterfall. Explore this area if you like. Back on the trail you may go to the left or right. Go to the right and walk another 1.5 miles to the head of Trout Pond. The trail is a gentle uphill all the way with the last quarter mile along the edge of the lake. At the head of the lake the trail branches right to Campbell Brook. Turn right to stay on the Trout Pond Trail. The first .8 miles of this part of the trail is all uphill and rises about 450 feet to the top of a hill. The trail is not used much and would be completely grow in except for the fact that it also acts as a snowmobile trail. At one point, near the top, another snowmobile trail marked "21" heads off to the right. Stayed to left on the blue blazed hiking trail. From here the trail descends to an area where it crosses two brooks on bridges. After that, it ascends slightly to meet Campbell Brook Road. At Campbell Brook Road turn right on Campbell Brook Road. Walk the road until it meets Morton Hill Road. For about .9 miles Campbell Brook Road and Morton Hill Road ascend a hill. After that, the next 2.4 miles is all downhill back to your car.
 (The image at the left shows the profile of the hike. Remember that all vertical profiles are relative!)
Trout Pond: Campbell Brook and Morton Hill Road Loop
| Quick Look | ||||
|---|---|---|---|---|
| Difficulty | Round trip | Total climb | Internet Maps | |
| 8.5 mi. | 1710 ft. | AllTrails | ||
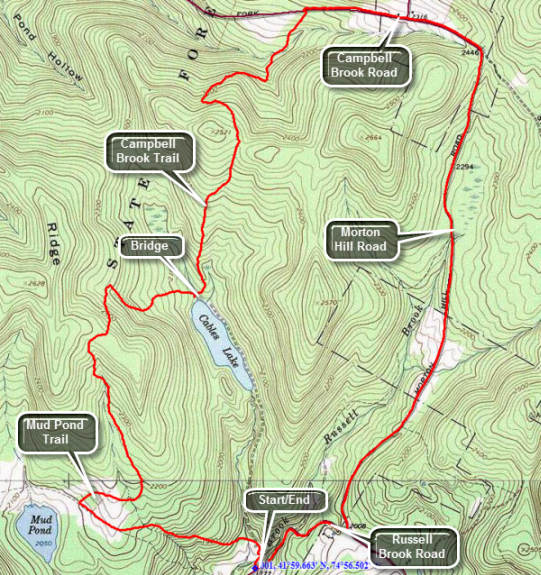 This is one of our favorite trails when we just want to hike. It has several variations for distance and
difficulty. Like most trails, hiking one way is different than hiking in the other direction. We have
take this route more than a dozen times this season and it is interesting to watch the changing
seasons. It is unfortunate that Russell Brook Road is closed due to the frequent floods that have
washed out the road.
This is one of our favorite trails when we just want to hike. It has several variations for distance and
difficulty. Like most trails, hiking one way is different than hiking in the other direction. We have
take this route more than a dozen times this season and it is interesting to watch the changing
seasons. It is unfortunate that Russell Brook Road is closed due to the frequent floods that have
washed out the road.
Turn left on Morton Hill Road on Route 206 just after the Rockland flats. Bear right up Morton Hill
Road until you see a parking area on the left. Turn left and drive down Russell Brook Road to the lower parking area. If Russell Brook Road is closed, be sure to park on the side of the road at the intersection of Morton Hill Road and Russell Brook Road as the parking spot there is on private land.
Park and hike down the woods road to the bridge over Russell Brook. Go over the bridge and look to your right to see a beautiful waterfall. Explore this area if you like. Back on the trail you may go to the left or right. Go to the left and walk up a hill gaining about 400 feet in .8 miles. At the top of the hill descend slightly to a trail junction. Turn right on the blue blazed Mud Pond Trail and hike a mile to the highest point on the hike on the shoulder of Cherry Ridge. Descend .8 miles from this high point to the bridge at the inlet end of Trout Pond. There are two lean-tos in this area which are popular places to camp. As the trail begins to turn to the right around the pond, turn left on the Campbell Brook Trail. You will now hike .8 miles and 430 vertical feet up and the same amount down over a small ridge. At 4.75 miles you will emerge on Campbell Brook Road. Turn right and hike a mile to the intersection with Moron Hill Road. Continue straight ahead on Morton Hill Road and up a small Hill. From the top of the hill walk 2.3 miles north on the road back to the junction with Russell Brook Road. You will lose almost 500 feet along the way. Turn right on Russell Brook Road and hike .5 miles back to the car.
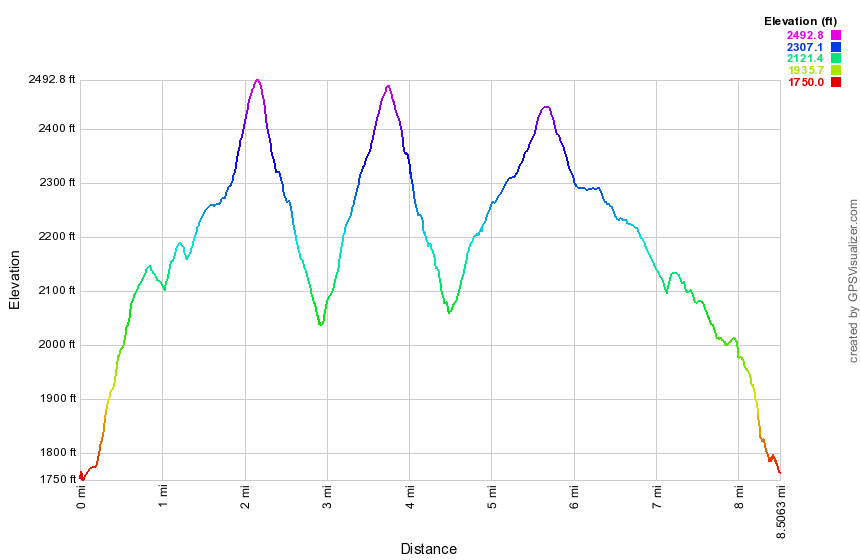 (The image at the left shows the profile of the hike. Remember that all vertical profiles are relative!)
Trout Pond: Campbell Brook and Morton Hill Road Loop (long upper parking)
| Quick Look | ||||
|---|---|---|---|---|
| Difficulty | Round trip | Total climb | Internet Maps | |
| 8.6 mi. | 1680 ft. | AllTrails | ||
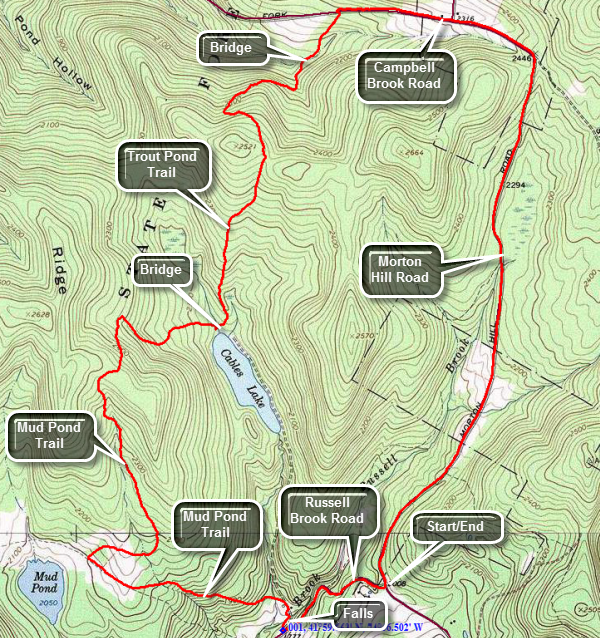 This is one of our favorite trails when we just want to hike. It has several variations for distance and difficulty. Like most trails, hiking one way is different than hiking in the other direction. We have taken this route a dozens of times and it is interesting to watch the changing seasons. It is unfortunate that Russell Brook Road is closed due to the frequent floods that have washed out the road.
Turn left on Morton Hill Road on Route 206 just after the Rockland flats. Bear right up Morton Hill Road until you see a parking area on the left. Turn around and park on the side of the road. DO NOT park in the lot as it is on private property!
Hike down Russell Brook Road watching for a viewpoint over the upper falls on the right side of the road. Stopping at this lookout is wroth a few minutes. Continue down the road to the lower parking area and walk to the woods road that is part of the trail. Turn right on the woods road and walk across the bridge on Russell Brook. Watch for a path on the right that leads to the lower falls. Follow the path to the falls and work your way down to the streambed if you wish. Walk back out the path to the main trail and turn right. Turn left at the trail junction just after the trail register and walk up a hill gaining about 400 feet in .8 miles. At the top of the hill descend slightly to a trail junction. Turn right on the blue blazed Mud Pond Trail and hike a mile to the highest point on the hike on the shoulder of Cherry Ridge. Descend .8 miles from this high point to the bridge at the inlet end of Trout Pond. There are two lean-tos in this area which are popular places to camp. As the trail begins to turn to the right around the pond, turn left on the Trout Pond Trail. You will now hike .8 miles and 430 vertical feet up and the same amount down over a small ridge. At 5.4 miles you will emerge on Campbell Brook Road. Turn right and hike .5 miles to the intersection with Morton Hill Road. Continue straight ahead on Morton Hill Road and up a small hill. From the top of the hill walk 2.3 miles north on the road back to the junction with Russell Brook Road and your car. You will lose almost 500 feet along the way.
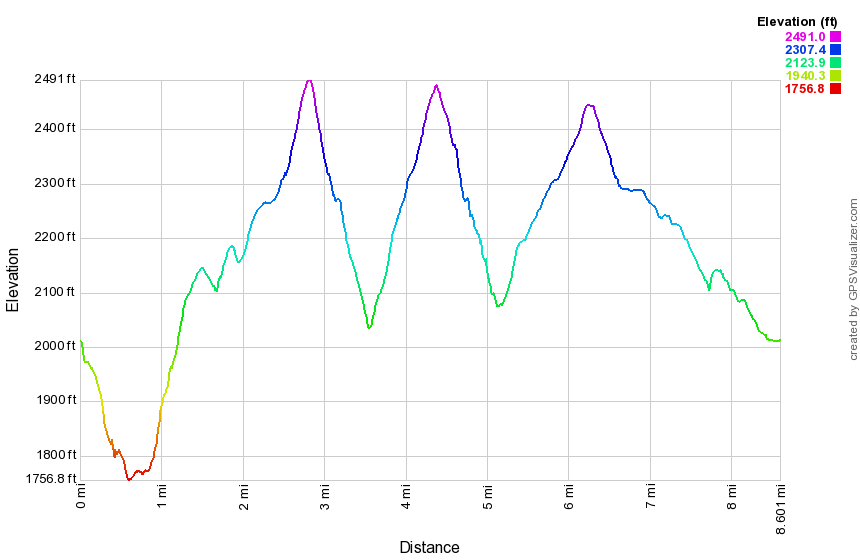 (The image at the left shows the profile of the hike. Remember that all vertical profiles are relative!)
Trout Pond: Campbell Mountain and Morton Hill Road Loop
| Quick Look | ||||
|---|---|---|---|---|
| Difficulty | Round trip | Total climb | Internet Maps | |
| 8.9 mi. | 1679 ft. | AllTrails | ||
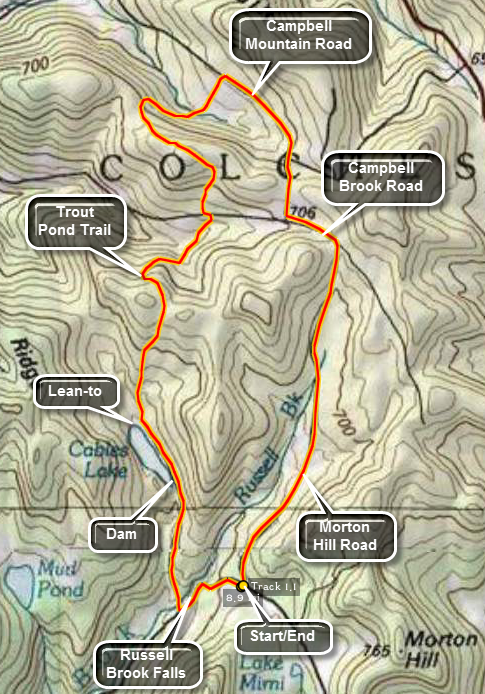 This is one of our favorite trails when we just want to hike. It has several variations for distance and
difficulty. Like most trails, hiking one way is different than hiking in the other direction. We have
take this route more than a dozen times this season and it is interesting to watch the changing
seasons. It is unfortunate that Russell Brook Road is closed due to the frequent floods that have
washed out the road.
This is one of our favorite trails when we just want to hike. It has several variations for distance and
difficulty. Like most trails, hiking one way is different than hiking in the other direction. We have
take this route more than a dozen times this season and it is interesting to watch the changing
seasons. It is unfortunate that Russell Brook Road is closed due to the frequent floods that have
washed out the road.
Turn left on Morton Hill Road on Route 206 just after the Rockland flats. Bear right up Morton Hill
Road until you see a parking area on the left near the sign indicates Russell Brook Road is closed.
Park here and hike down Russell Brook Road .5 miles to the actual trail head. Go over the bridge and look to your right to see a beautiful waterfall. Explore this area if you like. Back on the trail you may go to the left or right. Go to the right and walk another 1.5 miles to the head of Trout Pond. The trail is a gentle uphill all the way with the last quarter mile along the edge of the lake. At the head of the lake the trail branches right to Campbell Brook. Turn right to stay on the Trout Pond Trail. The first .8 miles of this part of the trail is all uphill and rises about 450 feet to the top of a hill. The trail is not used much and would be completely grow in except for the fact that it also acts as a snowmobile trail. At one point, near the top, another snowmobile trail marked "21" heads off to the right. Stayed to left on the blue blazed hiking trail. From here the trail descends to an area where it crosses two brooks on bridges. After that, it ascends slightly to meet Campbell Brook Road at about 3.5 miles into your hike. Cross Campbell Brook Road to stay on the Trout Pond Trail. Over the next.6 miles the trail ascends a hill and then for the next.85 miles it descends until you arrive at Campbell Mountain Road about 5.2 miles into your hike. Turn right on the road and walk 1.1 miles to Campbell Brook Road. Turn left and walk .4 miles to Morton Hill Road where you turn right. After that, walk 2.3 miles downhill back to your car.
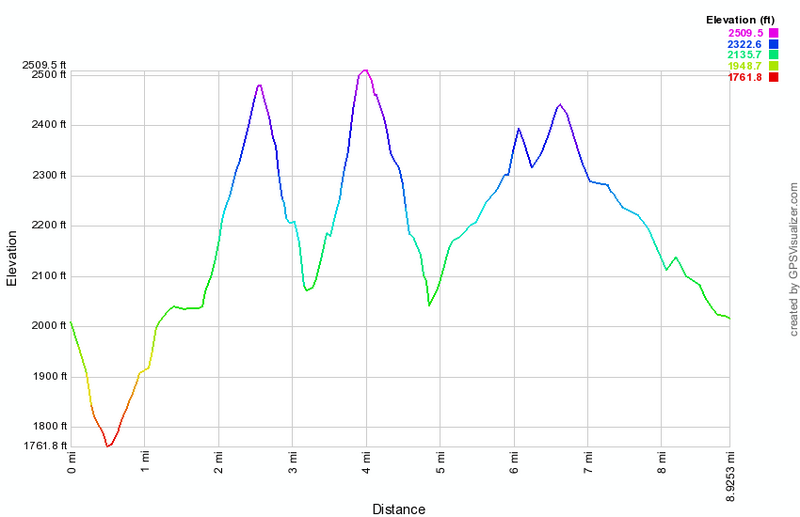 (The image at the left shows the profile of the hike. Remember that all vertical profiles are relative!)
Trout Pond: Clockwise Loop from Morton Hill Road
| Quick Look | ||||
|---|---|---|---|---|
| Difficulty | Round trip | Total climb | Internet Maps | |
| 6.0 mi. | 1237 ft. | AllTrails | ||
_map.png) This is one of our favorite trails when we just want to hike. It has several variations for distance and
difficulty. Like most trails, hiking one way is different than hiking in the other direction. We have
take this route more than a dozen times this season and it is interesting to watch the changing
seasons. It is unfortunate that Russell Brook Road is closed due to the frequent floods that have
washed out the road.
This is one of our favorite trails when we just want to hike. It has several variations for distance and
difficulty. Like most trails, hiking one way is different than hiking in the other direction. We have
take this route more than a dozen times this season and it is interesting to watch the changing
seasons. It is unfortunate that Russell Brook Road is closed due to the frequent floods that have
washed out the road.
Turn left on Morton Hill Road on Route 206 just after the Rockland Flats. Bear right up Morton Hill
Road until you see a parking area on the left near the sign indicates Russell Brook Road is closed.
Park here and hike down Russell Brook Road .5 miles to the actual trail head. Go over the bridge and look to your right to see a beautiful waterfall. Explore this area if you like. Back on the trail you may go to the left or right. Go to the left and start to walk up a rather steep hill toward Mud Pond. After about 2 miles you will be at a trail junction. You may walk straight ahead and then turn left into the woods and walk down to the shore of Mud Pond. Turn right onto the trail that heads over the shoulder of Cherry Ridge to Trout Pond (Cable's Lake). At about 3 miles you will be at the highest point on the hike from which the trail drops down to the lake. At 3.9 miles there is a bridge across the inlet stream for the pond. A trail up and to the right leads to a lean-to while another lean-to is a hundred feet ahead on the left. Continue around the pond on the wide, flat woods road until you get to the outlet end of the lake. From here the trail continues to the trail junction near the false where you started your loop. Retrace your route back to the car
_gra.png) (The image at the left shows the profile of the hike. Remember that all vertical profiles are relative!)
(The image at the left shows the profile of the hike. Remember that all vertical profiles are relative!)
Mud Pond and Trout Pond: Clockwise Loop from Morton Hill Road
| Quick Look | ||||
|---|---|---|---|---|
| Difficulty | Round trip | Total climb | Internet Maps | |
| 7.9 mi. | 1424 ft. | AllTrails | ||
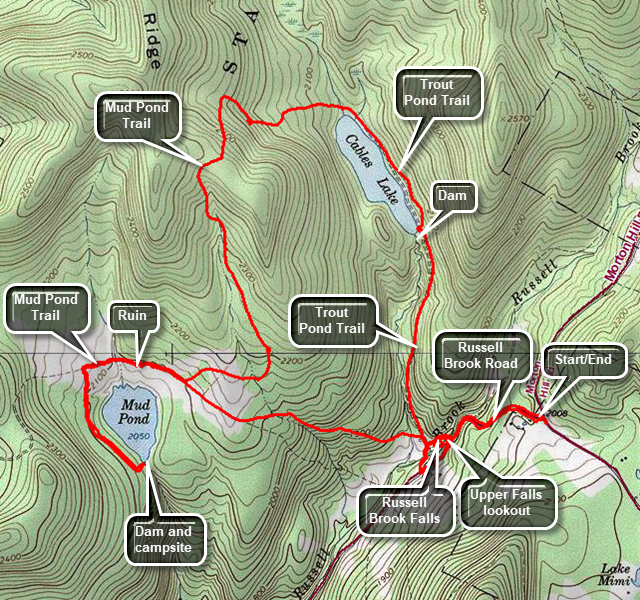 This is one of our favorite trails when we just want to hike. It has several variations for distance and difficulty. Like most trails, hiking one way is different than hiking in the other direction. We have taken this route dozens of times and it is interesting to watch the changing seasons. It is unfortunate that Russell Brook Road is closed after the lower parking area due to the frequent floods that have washed out the road.
Get off Sate Route 17 at exit 94 Roscoe. Get on Route 206 heading north from Roscoe toward Downsville. Turn left on Morton Hill Road on Route 206 just after the Roscoe Nursing Home. Bear right up Morton Hill Road until you see a parking area on the left near the sign indicating Russell Brook Road is closed.
Turn around and park on the side of the road just passed the parking area. What looks like a parking area is private property! Hike down Russell Brook Road .5 miles to the actual trail head. Along the way is a path to a lookout over the upper falls. This is worth visiting. From the lower parking area walk down the woods road and go over the bridge. Look to your right to see a beautiful waterfall which may be hidden by the vegetation. To get to the falls walk a little farther and make a right on an informal path just after the robust stand of Japanese knotweed. Walk on the paths that parallel the stream until a path leads down to the streambed. Use caution as this path is short but steep. When you are done at the base of the falls, retrace your steps toward the main trail but turn right up the hill on another informal path to a beautiful area above the upper and lower falls. There is a somewhat "sketchy" path down to the area in front of the upper falls which is very special. When you are done exploring, retrace your steps to the main trail. Turn right and in a short distance is the trail register and a trail junction. Go to the left and start to walk up a rather steep hill toward Mud Pond. At 2.1 miles into the hike you will be at a trail junction. Walk straight ahead on the Mud Pond Trail which is also a snowmobile trail. You can see Mud Pond through the trees to your left. Continue to walk passing some foundations and stone structures on your left. This trail can be very muddy! Continue to hike until you have passed two designated campsites. At the third campsite, about 2.9 miles into the hike, turn left and walk down to the campsite which is at the dam across the outlet end of the pond. Enjoy the view of the pond. When you are done, retrace your steps back to the trail junction where the Mud Pond Trails turns left. Turn left onto the trail that heads over the shoulder of Cherry Ridge to Trout Pond (Cable's Lake). This trail also can be wet at times. This trail climbs for 1.25 miles to the highest point on the hike at 5.1 miles. From here the trail turns east and drops down to the lake. At 5.9 miles there is a bridge across the inlet stream for the pond. A trail up and to the right leads to a lean-to while another lean-to is a hundred feet ahead on the left. Continue around the pond on the wide, flat woods road until you get to the outlet end of the lake. From here the trail continues to descend to the trail junction near the point where you started your loop. Retrace your route back to the lower parking area and then walk up Russell Brook Road to the car
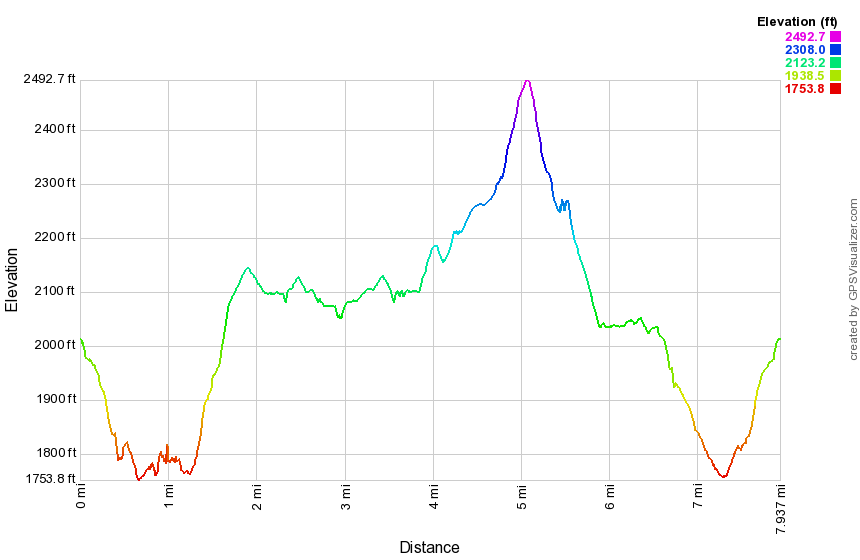 (The image at the left shows the profile of the hike. Remember that all vertical profiles are relative!)
Trout Pond: Counterclockwise Loop from Morton Hill Road
| Quick Look | ||||
|---|---|---|---|---|
| Difficulty | Round trip | Total climb | Internet Maps | |
| 5.1 mi. | 1031 ft. | AllTrails | ||
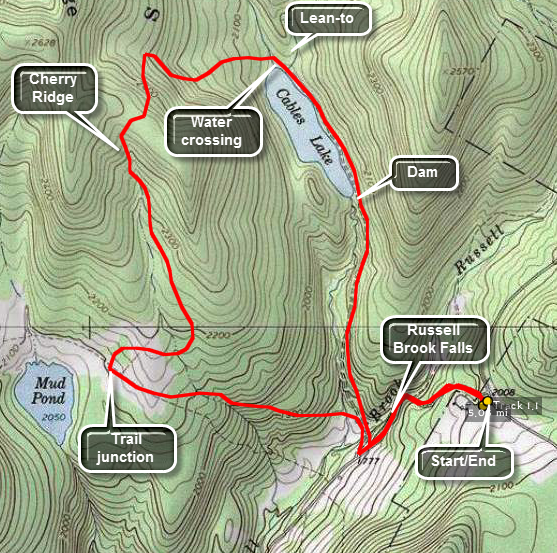 This is one of our favorite trails when we just want to hike. It has several variations for distance and
difficulty. Like most trails, hiking one way is different than hiking in the other direction. We have
take this route more than a dozen times this season and it is interesting to watch the changing
seasons. It is unfortunate that Russell Brook Road is closed due to the frequent floods that have
washed out the road.
This is one of our favorite trails when we just want to hike. It has several variations for distance and
difficulty. Like most trails, hiking one way is different than hiking in the other direction. We have
take this route more than a dozen times this season and it is interesting to watch the changing
seasons. It is unfortunate that Russell Brook Road is closed due to the frequent floods that have
washed out the road.
Turn left on Morton Hill Road on Route 206 just after the Rockland Flats. Bear right up Morton Hill
Road until you see a parking area on the left near the sign indicates Russell Brook Road is closed.
Park here and hike down Russell Brook Road .5 miles to the actual trail head. Go over the bridge and look to your right to see a beautiful waterfall. Explore this area if you like. Back on the trail you may go to the left or right. Go to the right and walk another 1.5 miles to the head of Trout Pond. The trail is a gentle uphill all the way with the last quarter mile along the edge of the lake. At the head of the lake the trail branches right to Campbell Brook. Bear left but do not go up the hill to the lean-to since this is a dead end. The trail ascends around the other side of Trout Pond with a moderate climb to almost 2500 feet on Cherry Ridge. You now walk down to Mud Pond. The total distance from the lean-to is about 1.7 miles.
At this point you reach a T in the trail. Left goes directly back to the trailhead covering a little over 1 mile plus the half mile back to the car. Turning right takes you around Mud Pond and to the lower trail head on Russell Brook Road. The distance is 2 miles to the lower trail head and another 1.7 miles back to the car. If you can make the distance around Mud Pond there are some interesting things to see. Several old stone foundations can be seen around Mud Pond. A beaver pond can be found on the backside of the pond but there isn't much evidence of activity. As you hike from the lower trail head to the parking area, you can see the devastation the floods have brought to the road. In several places it is hard to tell road from stream!
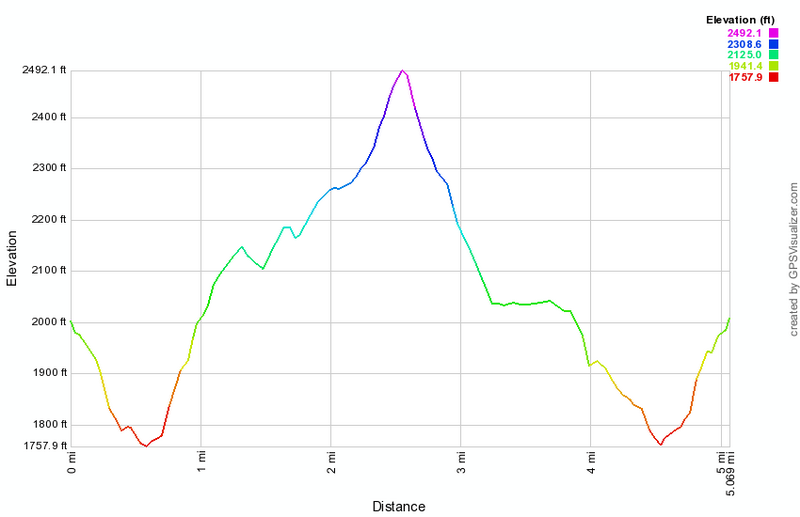 (The image at the left shows the profile of the hike. Remember that all vertical profiles are relative!)
Trout Pond: Counterclockwise Loop from Morton Hill Road (with Mud Pond)
| Quick Look | ||||
|---|---|---|---|---|
| Difficulty | Round trip | Total climb | Internet Maps | |
| 5.9 mi. | 1160 ft. | AllTrails | ||
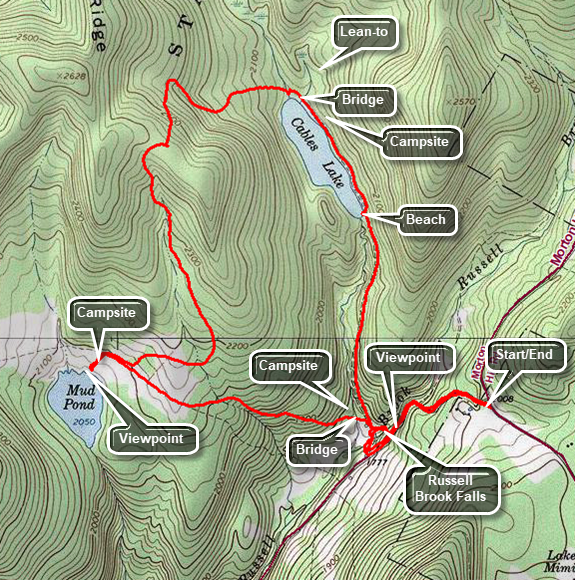 This is one of our favorite trails when we just want to hike. It has several variations for distance and difficulty. Like most trails, hiking one way is different than hiking in the other direction. We have taken this route more than a dozen times this season and it is interesting to watch the changing seasons. It is unfortunate that Russell Brook Road is closed due to the frequent floods that have washed out the road.
Turn left on Morton Hill Road on Route 206 just after the Rockland Flats. Bear right up Morton Hill Road until you see a parking area on the left near the sign indicates Russell Brook Road is closed.
Park here on the side of the road. DO NOT park in the large parking area s it is private property. Hike down Russell Brook Road .5 miles to the actual trail head. Along the way watch for the upper falls of Russell Brook Falls on the right. You may walk carefully down the bank to a viewpoint. From the lower parking area turn right and walk down the woods and cross the bridge. If you look to your right you may catch a glimpse of the lower falls of Russell Brook Falls. Continue on the road and watch for a path on the right just after the large stand of Japanese knotweed. Turn right here and follow the path toward the falls. You may view the falls from the path or carefully work your way down the bank to stand in the stream bed. Work your way back out to the main trail and turn right. Walk another 1.5 miles on a gentle uphill grade to the outlet end of Trout Pond. Walk over to the "beach" to get a good view to the north of the whole pond. Walk another quarter mile along the edge of the lake to the inlet end of the lake. Turn left to cross the bridge. Notice the lean-to on the right. There is another straight ahead on a spur trail that runs uphill. You may want to walk out to the left to the edge of the pond. Back on the main trail bear to the right and do not go up the hill to the lean-to since this is a dead end. The trail ascends around the other side of Trout Pond with a climb to almost 2500 feet on Cherry Ridge. At 2.9 miles you will be at the highest point on the hike and ready to start a descent toward Mud Pond. You will reach a T in the trail. Turn right and walk about 500 feet watching for a path on the right down to Mud Pond. Walk down to the shores of the pond quietly as there is often wildlife in the area. Walk back up to the main trail and turn right continuing slightly uphill. After a short ascent the trail begin to descend again to the area near the falls. The walk back to the trail register is .7 miles and the loss ion elevation is about 400 feet. Pass by large camping area on the left and over a bridge that spans the outlet stream from Trout Pond. Turn right and pass by the register. Walk back over the bridge that crosses Russell Brook and up to the lower parking area. Your car is .5 miles away with an scent of about 225 feet.
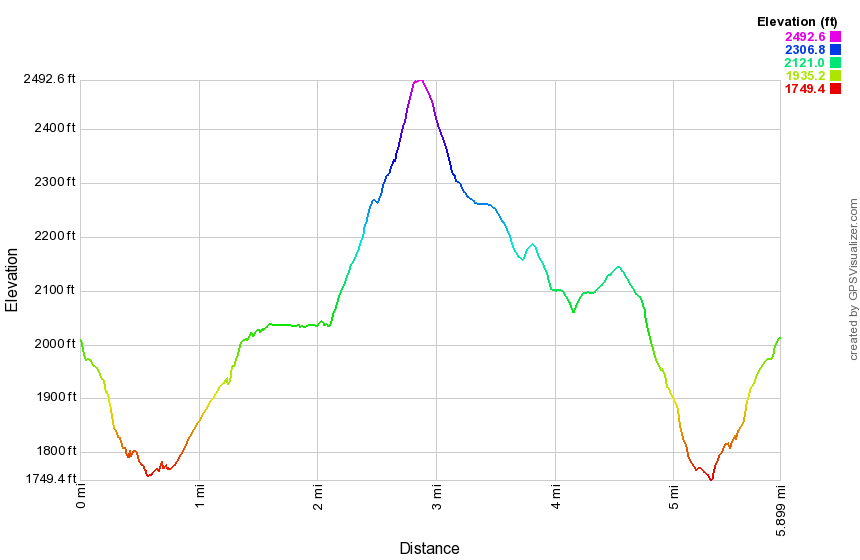 (The image shows the profile of the hike. Remember that all vertical profiles are relative!)
Trout Pond: Lower Parking Clockwise
| Quick Look | ||||
|---|---|---|---|---|
| Difficulty | Round trip | Total climb | Internet Maps | |
| 4.4 mi. | 885 ft. | AllTrails | ||
_map.png) This is one of our favorite trails when we just want to hike. It has several variations for distance and difficulty. Like most trails, hiking one way is different than hiking in the other direction. We have taken this route more than a dozen times this year and it is interesting to watch the changing seasons. It is unfortunate that Russell Brook Road is closed due to the frequent floods that have washed out the road.
This is one of our favorite trails when we just want to hike. It has several variations for distance and difficulty. Like most trails, hiking one way is different than hiking in the other direction. We have taken this route more than a dozen times this year and it is interesting to watch the changing seasons. It is unfortunate that Russell Brook Road is closed due to the frequent floods that have washed out the road.
Turn left on Morton Hill Road on Route 206 just after the Rockland Flats. Bear right up Morton Hill Road until you see Russell Brook Road on the left. The road is a "seasonal maintenance" road so you travel at your own risk. If the road is not navigable, you may park on the side of Morton Hill Road. DO NOT park in the open space at the intersection as this is private property.
From the lower parking area walk down to the wide woods road that is the Trout Pond Trail. Cross the bridge over Russell Brook and walk by a large stand of Japanese knotweed on the right of the trail. Continue on to the first trail junction near the trail register. Turn left and start a climb toward Mud Pond. The climb to the highest point is 370 feet in .7 miles. Descend slightly to the next trail junction and turn right to start a climb to the highest point of the trail on the shoulder of Cherry Ridge. The trail gains 410 feet over 1.1 miles as the trail heads north. After the highest point on the hike, the trail begins to descend toward Trout Pond. At 2.24 miles the trail heads east and continues to descend to Trout Pond. In .7 miles the trail descends 460 feet to the bridge at the inlet end of Trout Pond. Cross the bridge and turn right at the next trail junction to hike a flat section of trail along the east side of the pond. This section of trail is about .6 miles and leads to the outlet end of the pond that has a nice view of the pond. The next .7 miles of trail descends a total of 270 feet back to the first trail junction where there is a trail register. From here, follow the trail .2 miles back to your car with a stop at the falls if you wish.
_gra.png) (The image shows the profile of the hike. Remember that all vertical profiles are relative!)
(The image shows the profile of the hike. Remember that all vertical profiles are relative!)
Trout Pond: Lower Parking Counterclockwise
| Quick Look | ||||
|---|---|---|---|---|
| Difficulty | Round trip | Total climb | Internet Maps | |
| 4.4 mi. | 960 ft. | AllTrails | ||
_map.png) This is one of our favorite trails when we just want to hike. It has several variations for distance and difficulty. Like most trails, hiking one way is different than hiking in the other direction. We have taken this route more than a dozen times this year and it is interesting to watch the changing seasons. It is unfortunate that Russell Brook Road is closed due to the frequent floods that have washed out the road.
This is one of our favorite trails when we just want to hike. It has several variations for distance and difficulty. Like most trails, hiking one way is different than hiking in the other direction. We have taken this route more than a dozen times this year and it is interesting to watch the changing seasons. It is unfortunate that Russell Brook Road is closed due to the frequent floods that have washed out the road.
Turn left on Morton Hill Road on Route 206 just after the Rockland flats. Bear right up Morton Hill Road until you see Russell Brook Road on the left. The road is a "seasonal maintenance" road so you travel at your own risk. If the road is not navigable, you may park on the side of Morton Hill Road. DO NOT park in the open space at the intersection as this is private property.
From the lower parking area walk down to the wide woods road that is the Trout Pond Trail. Cross the bridge over Russell Brook and walk by a large stand of Japanese knotweed on the right of the trail. Continue on to the first trail junction near the trail register. Continue straight ahead at the trail junction toward Trout Pond. The trail is a gentle uphill and passes a path on the left that accesses one of the designated camping areas. Soon you will be at the outlet end of Trout Pond. You may stop a while to enjoy the view from the "beach". Continue on the main trail and walk the flat woods road toward the inlet end of the pond. There are two lean-tos in this area. One is near the trail junction and another on a spur trail to the west of the bridge. At the trail junction near the lower leanto turn left on the blue blazed Mud Pond Trail which climbs the shoulder of Cherry Ridge. From the bridge at the inlet the trail climbs 430 feet over the next .75 miles. The trail heads west from the inlet until turning sharply south at around 2 miles. The highest point on the trail is at 2.2 miles after which most of the rest of the hike is downhill. At 3.3 miles the trail has descended 450 feet from Cherry Ridge to the snowmobile trail near Mud Pond. Turn left here to head east and downhill back toward the parking area. The trail drops another 380 feet over the next .7 miles back to the trail junction. At the trail junction turn right and walk until you see an informal path of the left which leads to the falls. Turn left and walk out to the falls on the informal path descending to the stream bed if you like. Return to the main trail and walk up to the parking area.
_gra.png) (The image shows the profile of the hike. Remember that all vertical profiles are relative!)
(The image shows the profile of the hike. Remember that all vertical profiles are relative!)
Trout Pond: Morton Hill to Route 206 Loop
| Quick Look | ||||
|---|---|---|---|---|
| Difficulty | Round trip | Total climb | Internet Maps | |
| 12.4 mi. | 2406 ft. | AllTrails | ||
This is one of our favorite trails when we just want to hike. It has several variations for distance and
difficulty. Like most trails, hiking one way is different than hiking in the other direction. We have
take this route more than a dozen times this season and it is interesting to watch the changing
seasons. It is unfortunate that Russell Brook Road is closed due to the frequent floods that have
washed out the road.
Turn left on Morton Hill Road on Route 206 just after the Rockland flats. Bear right up Morton Hill
Road until you see a parking area on the left near the sign indicates Russell Brook Road is closed.
Park here and hike down Russell Brook Road .5 miles to the actual trail head. Go over the bridge and look to your right to see a beautiful waterfall. Explore this area if you like. Back on the trail you may go to the left or right. Go to the right and walk another 1.5 miles to the head of Trout Pond. The trail is a gentle uphill all the way with the last quarter mile along the edge of the lake. At the head of the lake the trail branches right to Campbell Brook. Turn right to stay on the Trout Pond Trail. The first .8 miles of this part of the trail is all uphill and rises about 450 feet to the top of a hill. The trail is not used much and would be completely grow in except for the fact that it also acts as a snowmobile trail. At one point, near the top, another snowmobile trail marked "21" heads off to the right. Stayed to left on the blue blazed hiking trail. From here the trail descends to an area where it crosses two brooks on bridges. After that, it ascends slightly to meet Campbell Brook Road at about 3.5 miles into your hike. Cross Campbell Brook Road to stay on the Trout Pond Trail. Over the next.6 miles the trail ascends a hill and then for the next.85 miles it descends until you arrive at Campbell Mountain Road about 5.2 miles into your hike. Cross Campbell Mountain Road and pick up the blue Campbell Mountain Trail. Walk 2 miles up and over Campbell Mountain and then down the other side. The descent has several switchbacks, a lean-to along the way and several water crossings on bridges. When you arrive at Route 206, turn right and walk .7 miles up the hill to Jug Tavern Road. Turn right here and walk 1.5 miles to Campbell Mountain Road. Turn left and walk .4 miles to Campbell Brook Road. Turn left and walk .4 miles to Morton Hill Road where you turn right. After that, walk 2.3 miles downhill back to your car.
(The image at the left shows the profile of the hike. Remember that all vertical profiles are relative!)
Trout Pond: Out and Back
| Quick Look | ||||
|---|---|---|---|---|
| Difficulty | Round trip | Total climb | Internet Maps | |
| 3.0 mi. | 385 ft. | AllTrails | ||
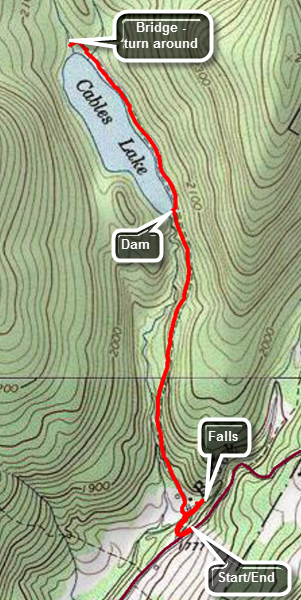 This is one of our favorite trails when we just want to hike. It has several variations for distance and difficulty. Like most trails, hiking one way is different than hiking in the other direction. We have take this route more than a dozen times this season and it is interesting to watch the changing seasons. It is unfortunate that Russell Brook Road is closed due to the frequent floods that have
washed out the road.
This is one of our favorite trails when we just want to hike. It has several variations for distance and difficulty. Like most trails, hiking one way is different than hiking in the other direction. We have take this route more than a dozen times this season and it is interesting to watch the changing seasons. It is unfortunate that Russell Brook Road is closed due to the frequent floods that have
washed out the road.
From Roscoe head north on Route 206 toward Downsville. Turn left on Morton Hill Road off Route 206 just after the Rockland Flats. Bear right up Morton Hill Road until you see a parking area on the left near the sign indicates Russell Brook Road has "Limited Maintenance". Drive carefully down Russell Brook Road and park at the lot at the end of the road where there is a kiosk.
Walk down the road and turn right just passed the kiosk. Walk down the wide woods road to the bridge over Russell Brook. Cross the bridge and continue on the main trail watching for a path to the right just passed a large stand of Japanese knotweed. Turn right here and follow the path that leads toward the lower waterfall. This path continues to a viewpoint over the lower falls. Before you get to the view point turn right and work your way down the bank to the streambed. You will be directly in front of Russell Brook Falls. After taking in the beauty of the falls walk back up the bank and out to the main trail. Turn right on the main trail and walk to the trail register and a trail junction just passed it. Stay right on the blue-blazed Trout Pond Trail which ascends very gently to the outlet of Trout Pond at .9 miles. You may want to walk to the left of the trail at the outlet and visit the “beach” and the dam. There is a nice view of the entire pond from this location. Continue on the main trail for just over .5 miles to the bridge over the inlet of Trout Pond. There is also a nice view from the bridge or the shore at this end. You have now hiked a total of 1.6 miles. Turn around and retrace your steps to the parking area skipping a second trip to the falls on the way back.
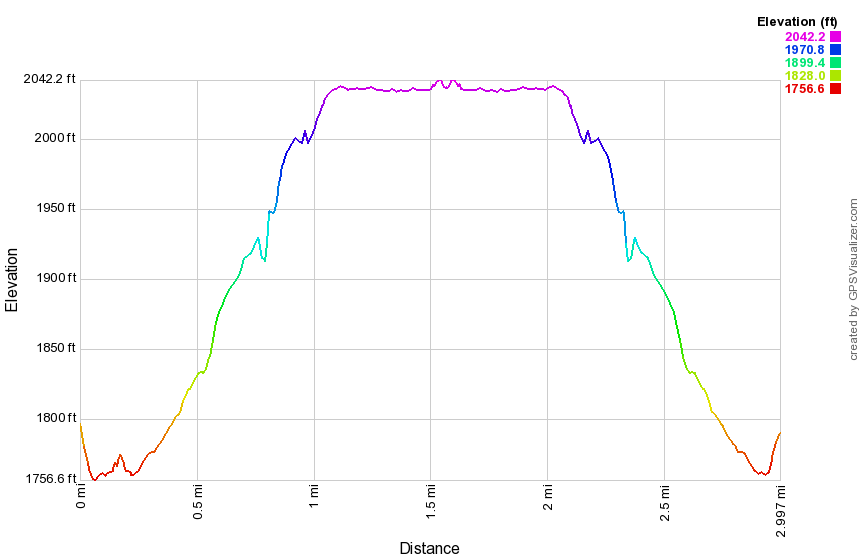 (The image at the left shows the profile of the hike. Remember that all vertical profiles are relative!)
Trout Pond: Russell Brook Falls
| Quick Look | ||||
|---|---|---|---|---|
| Difficulty | Round trip | Total climb | Internet Maps | |
| 0.3 mi. | 385 ft. | AllTrails | ||
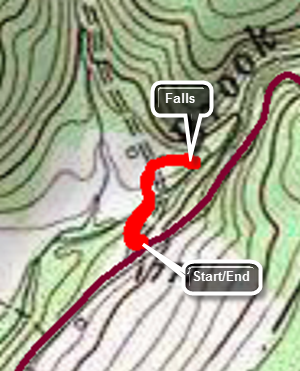 This is one of our favorite trails when we just want to hike. It has several variations for distance and difficulty. Like most trails, hiking one way is different than hiking in the other direction. We have take this route more than a dozen times this season and it is interesting to watch the changing seasons. It is unfortunate that Russell Brook Road is closed due to the frequent floods that have
washed out the road.
This is one of our favorite trails when we just want to hike. It has several variations for distance and difficulty. Like most trails, hiking one way is different than hiking in the other direction. We have take this route more than a dozen times this season and it is interesting to watch the changing seasons. It is unfortunate that Russell Brook Road is closed due to the frequent floods that have
washed out the road.
From Roscoe head north on Route 206 toward Downsville. Turn left on Morton Hill Road off Route 206 just after the Rockland Flats. Bear right up Morton Hill Road until you see a parking area on the left near the sign indicates Russell Brook Road has "Limited Maintenance". Drive carefully down Russell Brook Road and park at the lot at the end of the road where there is a kiosk.
Walk down the road and turn right just passed the kiosk. Walk down the wide woods road to the bridge over Russell Brook. Cross the bridge and continue on the main trail watching for a path to the right just passed a large stand of Japanese knotweed. Turn right here and follow the path that leads toward the lower waterfall. This path continues to a viewpoint over the lower falls. Before you get to the view point turn right and work your way down the bank to the streambed. You will be directly in front of Russell Brook Falls. After taking in the beauty of the falls walk back up the bank and out to the main trail. Turn left and retrace your route back to your car.
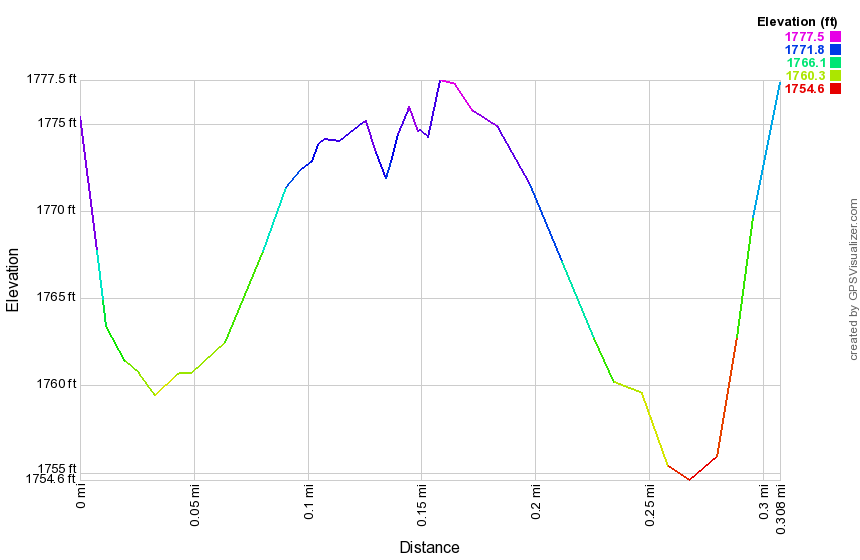 (The image at the left shows the profile of the hike. Remember that all vertical profiles are relative!)
Tunis and Vly Ponds from Quaker Clearing
| Quick Look | ||||
|---|---|---|---|---|
| Difficulty | Round trip | Total climb | Internet Maps | |
| 5.4 mi. | 880 ft. | AllTrails | ||
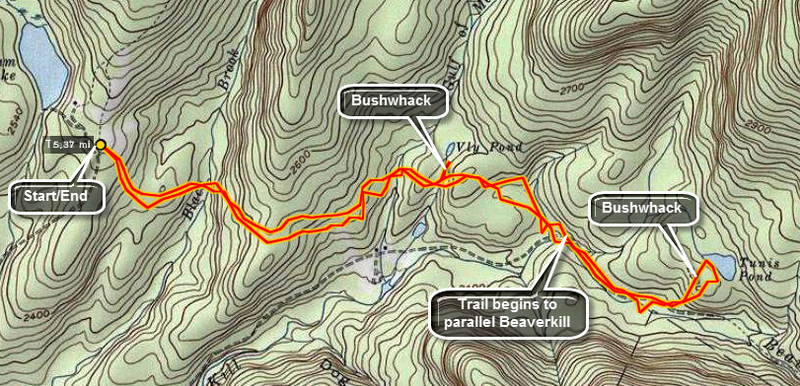 These two small ponds require a bushwhack off the Hardenburgh-Neversink Trail but are well worth the effort.
Park in the Balsam Lake parking area at the end of the Beaverkill Road. The beginning of the trail starts in the upper right corner of the parking area. It passes through a field of ferns and is pretty overgrown but there are some nice views of Balsam Lake Mountain. The register is placed just at the end of the field as the forest begins. Once in the woods, the trail is wide and easy to hike. It descends for about .5 miles to Black Brook and crosses on a bridge. A brief ascent and another descent brings you to the bridge across the Gulf of Mexico Brook at 1.1 miles. A very brief ascent and descent leads to Vly Brook which you can usually step across. At this point Vly Pond is less than .25 miles away. Head out along the creek and until you came to signs of beaver activity. Walk to the edge of the pond where you may be able to walk across the dam if you so desire. Walking around the pond anticlockwise means pushing through some thick balsam and walking over some slick rocks. The reward is a nice view with a few high rocks to stand on. Behind the pond are Balsam Lake and Graham Mountains. Head back out to the main trail and turn left to continue to Tunis Pond. From Vly Pond another ascent and descent brings you to a well-used woods road at 2.0 miles. The trail turns left onto the road and starts to follow the Beaverkill. After walking along the road for about .5 miles, choose a spot to head off into the woods since the road/trail does not lead directly to Tunis Pond. The woods aren't too think and it is only about .25 miles to get to the pond. The walk is uphill since Tunis Pond is said to be the highest named pond in the Catskills! The pond is beautiful and seldom visited. You may walk along the shore in either direction but be prepared for wet, swampy conditions. Toward the lower end of the pond there may be a large beaver house near the middle of the pond. When you are done, head up into the woods and away from the pond. Within only a few minutes and about .3 miles you should be back on the road. Turn right and retrace your route to the car.
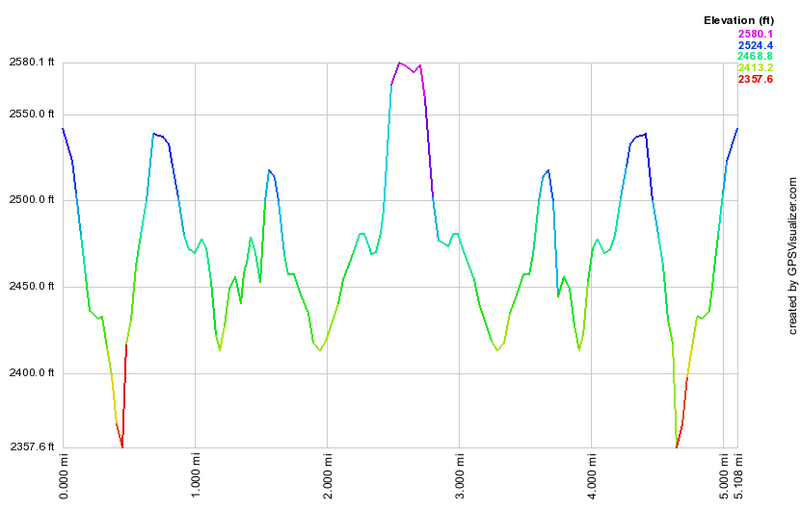 (The image at the left shows the profile of the hike. Remember that all vertical profiles are relative!)
Tunis Pond From Black Bear Road
| Quick Look | ||||
|---|---|---|---|---|
| Difficulty | Round trip | Total climb | Internet Maps | |
| 7.1 mi. | 650 ft. | AllTrails | ||
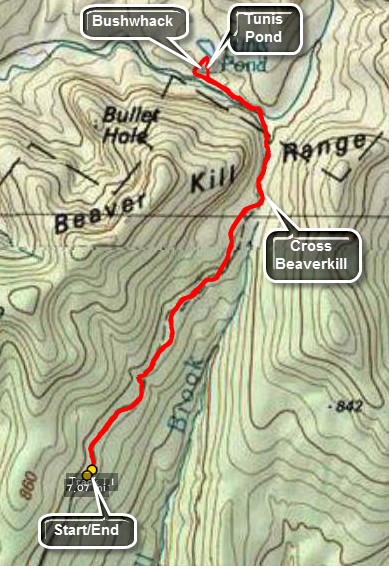 This small pond requires a bushwhack off the Hardenburgh-Neversink Trail but is well worth the effort. It is one of the highest bodies of water in the Catskills. This route is an out and back starting at the end of Black Bear Road. The trail has been eroded in places by streams and crossing can be interesting during periods of higher water.
Park at the end of Black Bear Road (Wild Meadow Road) in the snowplow turnaround as long as there is no snow! Walk down the road which serves as the beginning of the yellow Neversink Hardenburgh Trail in this area. Walk by the hunting camp and continue on the trail on the other side. The trail can be very wet in places. Cross over a brook and head up a little gaining some elevation. The Fall Brook lean-to is about 1.7 miles into the hike. After passing the lean-to, a swampy area appeared on the right of the trail which leads into a series of beaver ponds and beaver meadows. Doubletop Mountain is in the background. This area is the headwaters of Fall Brook which runs south and the Beaverkill which runs north and west. The trail parallels the Beaverkill for a short distance and then ENDS at the edge of the stream. You should be able to pick up the yellow trail markers ahead. The stream has simply eroded away the trail so you will have to find your own way around by bushwhacking up the bank and then back down to the trail. When you reach the point where the trail crosses the stream, you will find no bridge to safely cross. There is one slightly further downstream but it appears to be on private property. You can cross here by wading, rock hopping or looking for a convenient log bridge. Once across pick up the trail on the other side. It is very narrow in several places as it clings to the bank of the stream and in at least one place all but disappears. Only a short distance from the crossing, the trail opens into a little clearing and a very nice bridge cross the stream! Continue down the woods road until you are near Tunis Pond which is on the right side of the trail. You cannot see the pond from the trail so use you navigational and maps skills to plan a short bushwhack. Head to the right of the trail through the woods and climb a little hill to get to Tunis Pond. The climb can be steep but it is short. When you arrive on the shore of the pond you may want to take pictures of this beautiful and secluded place. Walk along the shore in either direction. When you can tear yourself away, head almost directly south and down the hill which is a direct line to the main trail. Turn left on the main trail and retrace your route to the car.
 (The image at the left shows the profile of the hike. Remember that all vertical profiles are relative!)
Tusten Mountain Loop (Clockwise)
| Quick Look | ||||
|---|---|---|---|---|
| Difficulty | Round trip | Total climb | Internet Maps | |
| 3.1 mi. | 640 ft. | AllTrails | ||
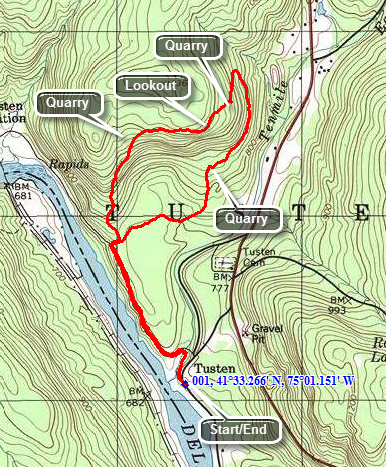 Crawford Road leads to the trailhead and is located 10 miles north of Barryville and 5 miles south or Narrowsburg on State Route 97. Turn onto Crawford Road to head toward the Delaware River. Just down the hill watch for the sign board on the right. Park here to begin your hike.
Walk parallel to the river on Tusten Road which is only open to vehicle traffic from April to December. In about .2 miles you will cross a stone arch bridge. Follow the red TMR (Ten Mile River) and yellow (Scouting symbol) blazes along Tusten Road until a sign points to the trail that begins on the right at about .7 miles. Along the way you will notice a lean-to and tent camping area. There is also a quarry, the first of many, on the right side of the road. As soon as you turn into the woods you will find the register box for the trail. You will have to make a choice of turning left or continuing straight ahead. The trail to the left is somewhat steeper but neither is too really hard. Turn left at the register box and hike to about 1.1 miles. You will gain most of your elevation to this point. Watch for another quarry on the left in the woods as the trail start to level. At about 1.2 miles you should come across a sign that points to the lookout which is just ahead after a short climb. From the lookout you can see the Delaware River in the distance. Continue on the trail and down the other side of the hill. There will be various mall quarries along the way. At about 1.4 miles there will be a large pile of stone on the left from a quarry further up the hill. At the base of a short descent will be another quarry on the right. Here you will again have to choose the steeper trail to the right or the more gradual trail to the left. Turn left and the trail will continue north briefly and then make a 180 degree turn to the south to head back to the trailhead. Along the way you will notice DEC signs that mark the area on the right as "Restricted". At about 2 miles the ""steep" trail will come in from the right. You can follow this trail to the right as it will take you to the largest quarry on the trail. Continue on the main trail back to the register box at 2.5 miles. Turn left and walk south along Tusten road for .6 miles to get back to the parking area.
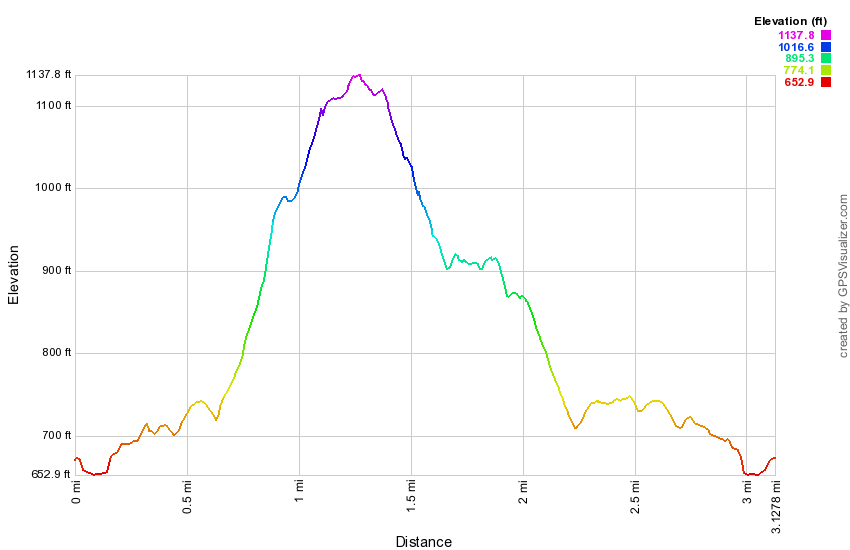 (The image at the left shows the profile of the hike. Remember that all vertical profiles are relative!)
Tusten Mountain Loop (Counterclockwise)
| Quick Look | ||||
|---|---|---|---|---|
| Difficulty | Round trip | Total climb | Internet Maps | |
| 3.0 mi. | 620 ft. | AllTrails | ||
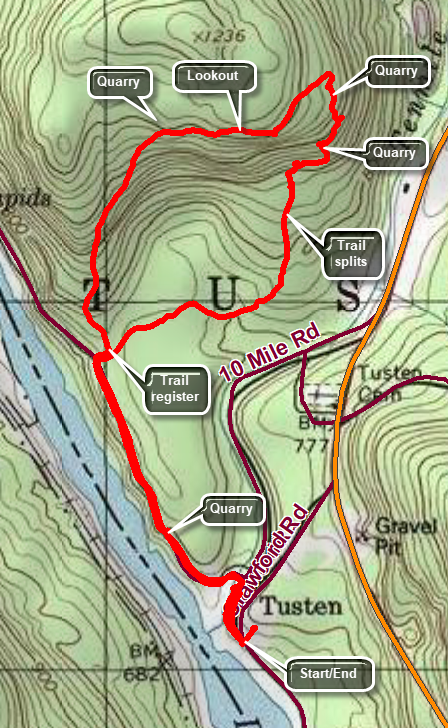 Crawford Road which leads to the trailhead is located 10 miles north of Barryville and 5 miles south or Narrowsburg on State Route 97. Turn onto Crawford Road to head toward the Delaware River. Just down the hill watch for the sign board on the right. Park here to begin your hike.
Walk parallel to the river on Tusten Road which is only open to vehicle traffic from April to December. In about .2 miles you will cross a stone arch bridge. Follow the red TMR (Ten Mile River) and yellow (Scouting symbol) blazes along Tusten Road until a sign points to the trail that begins on the right at about .6 miles. Along the way you will notice a lean-to and tent camping area on the left just after the bridge and another tent camping area further along on the right. There is also a quarry, the first of many, on the right side of the road. As soon as you turn into the woods you will find the register box for the trail. You will have to make a choice of turning left or continuing straight ahead. The trail to the left is somewhat steeper but neither is too hard. Turn right at the register box and hike about 1.2 miles to the point where the trail splits again. The trail to this point is relatively flat passing through an evergreen forest. There is also a small bridge over a stream. At the split in the trail, bear left on the yellow trail and begin to gain elevation. As the trail heads due north you will notice a mound of rock on the right side of the trail. This is the castoff stone from the quarries. Climb the hill as the trail turns right to the top of the pile of stones. On the left side of the trail is one of the quarries which is an extended cut along some cliffs. Walk straight ahead and then turn left following the trail up the hill at about 1.5 miles. Walk to the top of the steep but short climb where the trail turns left. The trail gains a little more elevation and then flattens as it follows the edge of the mountain. Some views are available through the trees but better views are available at the highest point on the trail. Continue heading due west until you come to the last short, steep climb to the highest point on the trail. The lookout here gives an expansive view down to the river and the hills beyond. Continue on the trail along the edge of the summit plateau. At about 1.9 miles, the trail turns to the left and starts to descend to the southwest. The trail widens as it joins a woods road. The descent may go quickly until you are back at the register box. Turn right to walk out to the woods road. Turn left to follow the road and your initial path to get back to your car.
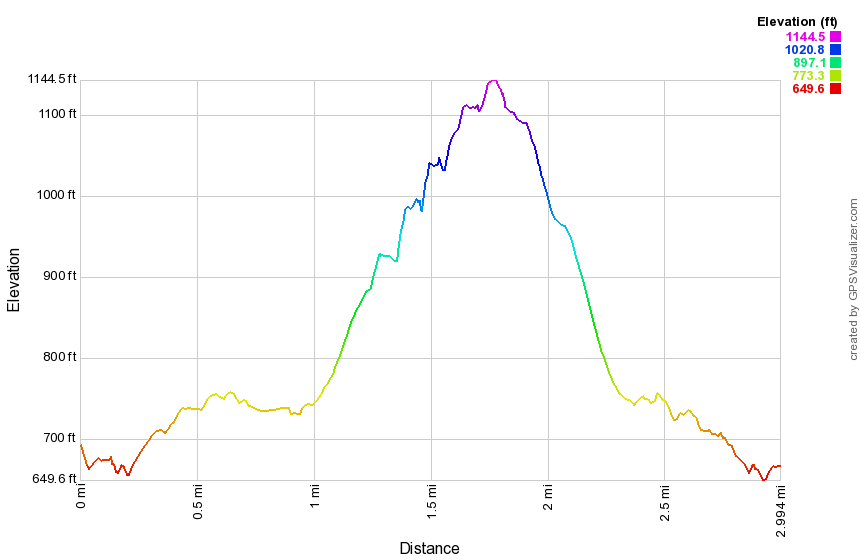 (The image at the left shows the profile of the hike. Remember that all vertical profiles are relative!)
VanCampen's Glen
| Quick Look | ||||
|---|---|---|---|---|
| Difficulty | Round trip | Total climb | Internet Maps | |
| 7.02 mi | 1024 ft | AllTrails | ||
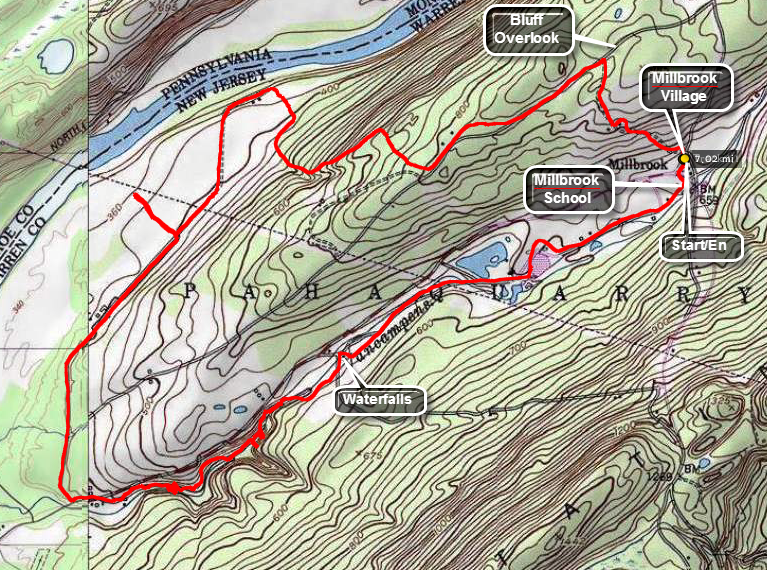
Take I84 to Milford and then Route 6 through Milford to Route 209 to the Delaware Water Gap. Cross the Dingman's Ferry bridge and get on the NPS road through the Delaware Water Gap. Head toward Millbrook Village, a collection of period buildings with some people plying the trade that was once practiced in that building. Park at Millbrook Village find the Orchard Trail that starts right across the road from the parking area. Hike up the Orchard Trail which is blazed in orange. Near the top are some open clearings but after a little more than a half mile the Orchard Trail ends. Start walking on a paved road designated the Hamilton Ridge Trail. Continue along the Hamilton Ridge Trail for another .7 miles until the orange blazed Pioneer Trail appears on the right. Head down the Pioneer Trail toward the river. After only about .2 miles, the trail turns sharply left and a road leads off to the right. Walk down to the bluffs overlooking the river for the best view on the hike. The trail continues to twist and turn and comes pretty close to the river over the next 1.25 miles. In places it may look like no one had been over the trail in some time.Cross a power line right-of-way and just after the right-of-way the trail intersects another road. Bear left on the road and after another mile on the trail/road cross Old Mine Road and walk over to the VanCampen's Glen Parking Area. Walk on the trail into the glen and stop at a waterfall less than a half mile along the stream from the parking area. Climbing a steep bank and continue the hike. The trail runs very close to the stream in some places and the rocks can be slippery. After crossing a bridge, approach another falls. A set of stairs takes the trail to the area above the falls where the trail continues. The stream has cut deeply into the rock above this waterfall. Head up the bank on the trail. The trail intersects a road but signs point out the trail. At the next road crossing there were no signs or blazes and the correct path may not be obvious. Go straight ahead and cross the same power line right-of-way as before. The trail became less distinct as the bushes close in. Some logs will help you to get through the swampy area and find a bridge over the stream. The trail then leads through the Watergate Recreation Area which has a lake and a few ponds. Walk out the access road and pick up the path back to Millbrook Village passing the old Millbrook School No. 82. More buildings will soon appear. Walk out to the road and cross it to the parking area.
 (The image at the left shows the profile of the hike. Remember that all vertical profiles are
relative!)
(The image at the left shows the profile of the hike. Remember that all vertical profiles are
relative!)
Van Wyck Lower Crash
| Quick Look | ||||
|---|---|---|---|---|
| Difficulty | Round trip | Total climb | Internet Maps | |
| 3.5 mi | 1280 ft | AllTrails | ||

Park at the parking lot for Peekamoose and walk towards Sundown to Bear Hole Brook to begin your bushwhack. As you walk up the bank you will find a woods road that heads generally northeast and then due north. This IS a bushwhack and your route could vary greatly but it is usually easier to hike a road or trail even if it is not the most direct route. After about .8 miles head northwest for another .7 miles. To locate the crash you will have to wander around a lot in the area or use the GPS coordinates to find it. The crash is a Korean War era jet. These planes were basically an aluminum tube wrapped around an engine. the Front part of the fuselage is destroyed but the rear is in pretty good shape. The "stars and bars" marking is still evident. The wings sheared off as the plane hit the trees and can be found a distance from the main wreck. When you are finished, you can look for the upper crash of a civilian Cessna or return to your car.
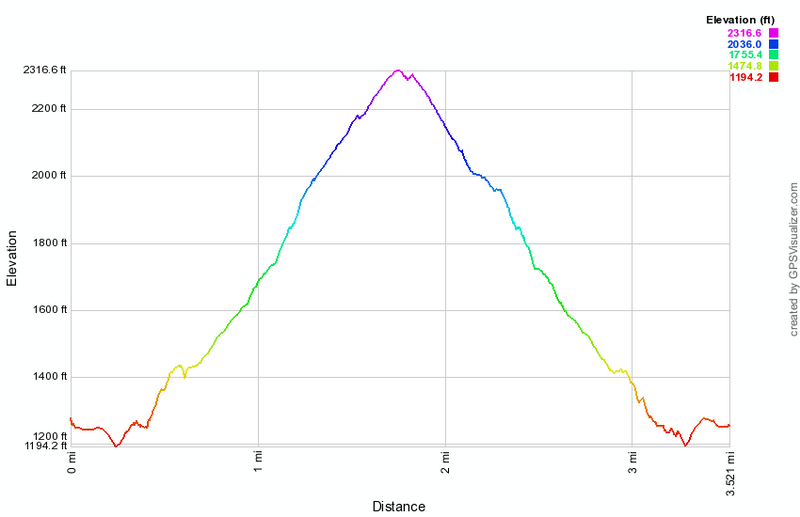
(The image above shows the profile of the hike. Remember that all vertical profiles are relative!)
Vernooy Kill Falls: From Cherrytown Road
| Quick Look | ||||
|---|---|---|---|---|
| Difficulty | Round trip | Total climb | Internet Maps | |
| 3.4 mi | 800 ft | AllTrails | ||
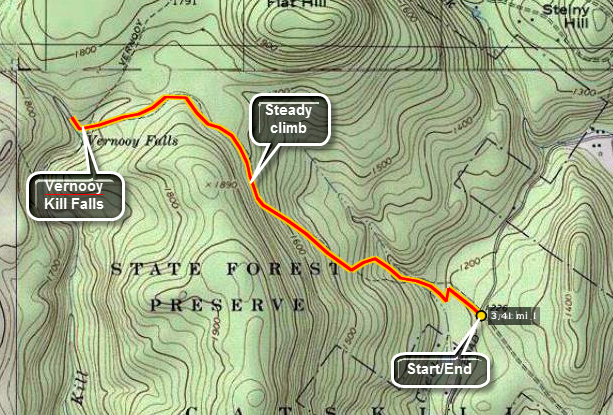 From Route 209 near Kerhonksen, turn onto Ulster County 3. After 1.3 miles turn left onto Cherrytown Road. Drive about
3.5 miles and turn left onto Upper Cherrytown Road. Once on Upper Cherrytown, go 3.1 miles until you see the
state trail head sign on the right. Park and walk across the road to get on the trail. The trail is marked with blue
blazes, snowmobile markers and the occasional aqua blazes of the Long Path. Walk 1.8 miles on this trail until
you are at the bridge at the base of the falls. The falls are more of a set of rapids and cataracts than one
continuous drop of water. Walk upstream on either side to take in all the beauty of the various "steps" to the
falls. There is no formal trail but you will have no trouble finding your way. Near the bridge are the ruins of a
mill built by the Vernooy family that first owned the land. Standing on the rocks in the middle of the stream offers
a great view of the bridge and many of the different steps to the falls. It also offers a good opportunity to fall
in so be careful. After exploring, return to your car the same way you came.
From Route 209 near Kerhonksen, turn onto Ulster County 3. After 1.3 miles turn left onto Cherrytown Road. Drive about
3.5 miles and turn left onto Upper Cherrytown Road. Once on Upper Cherrytown, go 3.1 miles until you see the
state trail head sign on the right. Park and walk across the road to get on the trail. The trail is marked with blue
blazes, snowmobile markers and the occasional aqua blazes of the Long Path. Walk 1.8 miles on this trail until
you are at the bridge at the base of the falls. The falls are more of a set of rapids and cataracts than one
continuous drop of water. Walk upstream on either side to take in all the beauty of the various "steps" to the
falls. There is no formal trail but you will have no trouble finding your way. Near the bridge are the ruins of a
mill built by the Vernooy family that first owned the land. Standing on the rocks in the middle of the stream offers
a great view of the bridge and many of the different steps to the falls. It also offers a good opportunity to fall
in so be careful. After exploring, return to your car the same way you came.
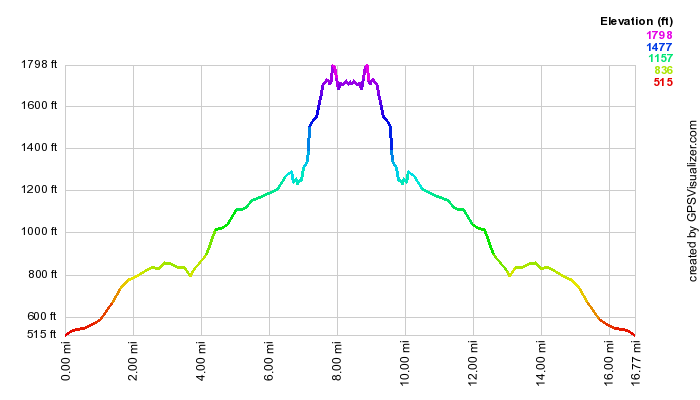 (The image at the left shows the profile of the hike. Remember that all vertical profiles are
relative!)
(The image at the left shows the profile of the hike. Remember that all vertical profiles are
relative!)
Vernooy Kill Falls: Greenville Loop
| Quick Look | ||||
|---|---|---|---|---|
| Difficulty | Round trip | Total climb | Internet Maps | |
| 7.0 mi | 735 ft | AllTrails | ||
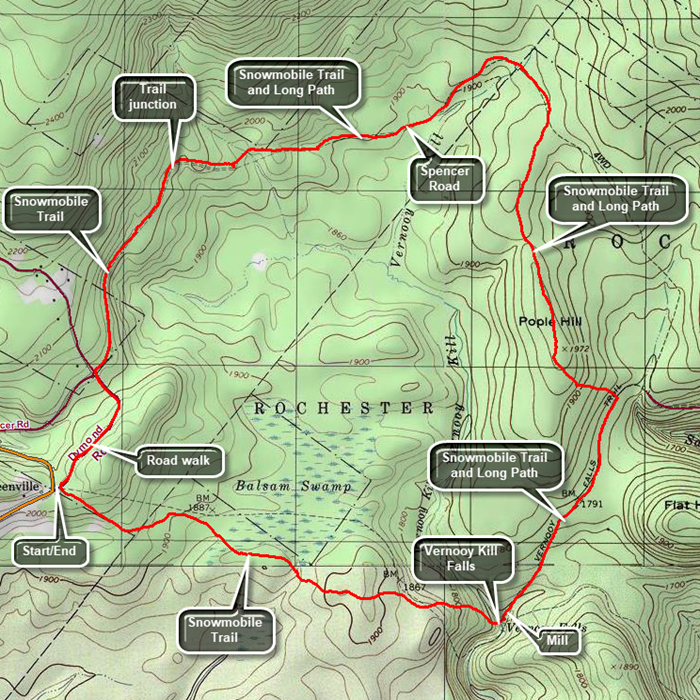 From Route 55 in Grahamsville, turn north onto Route 55A. When Route 55A turns right, continue straight ahead on Sundown Road. In Sundown, cross the bridge and turn right on Greenville Road. Continue up this road to the top of the hill where the road flattens. Turn left on Dymond Road and park in the pulloff on the left. Cross the road to get on the snowmobile trail that heads 1.8 miles to Vernooy Kill Falls. The trail may not be well maintained and can be wet and muddy in spots. There are also areas where the brush closes in on the trail. Some large blowdowns may block the rail and you will have to crawl under them, jump over them or walk around them. The trails rolls up and down a little but predominantly is a descent as the falls are the lowest point on the trail. Cross the Vernooy Kill on the bridge. It is worth spending some time at the falls as they are interesting. The falls are more of a set of rapids and cataracts than one continuous drop of water. Walk upstream on either side to take in all the beauty of the various "steps" to the falls. There is no formal trail but you will have no trouble finding your way. Just downstream from the bridge are the ruins of a mill built by the Vernooy family that first owned the land. Standing on the rocks in the middle of the stream offers a great view of the bridge and many of the different steps to the falls. It also offers a good opportunity to fall in so be careful. After exploring, look for the blazes for the Long Path and the sign for Pople Hill. The Long Path is aligned here with a snowmobile trail that climbs a little and levels off. After .9 miles or at 2.9 miles from the beginning, the snowmobile trail continues straight ahead. Turn left and follow the blazes for the Long Path as it climbs Pople Hill. The climb is not steep and it is short. After this, the trail continues north rolling some although the overall result is a loss of elevation. At 4 miles the trail meets Spencer Road which is unmaintained in the winter. Turn left and walk along the road heading north and then west continuing to descend to 4.7 miles when the ascent begins. At 5.7 miles there are a group of signs indicating that the Long Path turns to the right. Continue to follow Spencer Road until in intersects Dymond Road at 6.6 miles. Turn left on Dymond Road which is paved and maintained. Walk downhill and the uphill for .5 miles to your car.
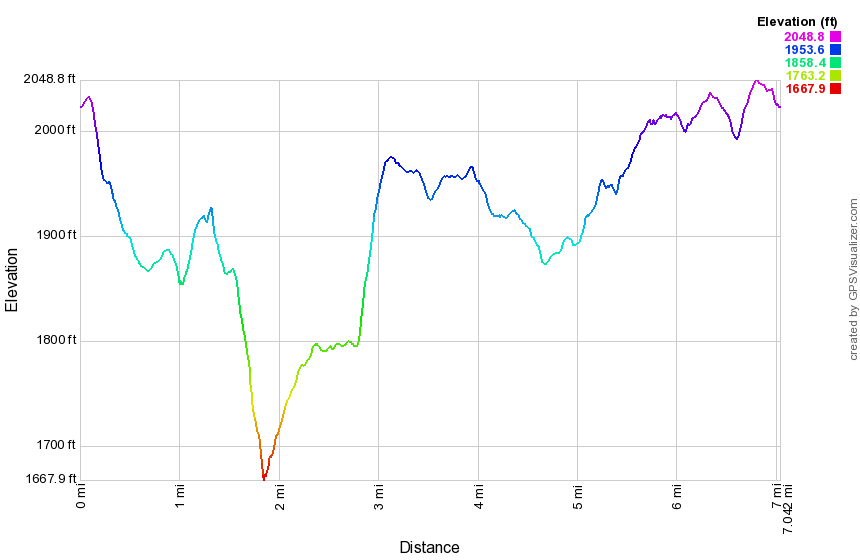 (The image at the left shows the profile of the hike. Remember that all vertical profiles are
relative!)
(The image at the left shows the profile of the hike. Remember that all vertical profiles are
relative!)
Vernooy Kill Falls: From Peekamoose
| Quick Look | ||||
|---|---|---|---|---|
| Difficulty | Round trip | Total climb | Internet Maps | |
| 9.5 mi | 1695 ft | AllTrails | ||
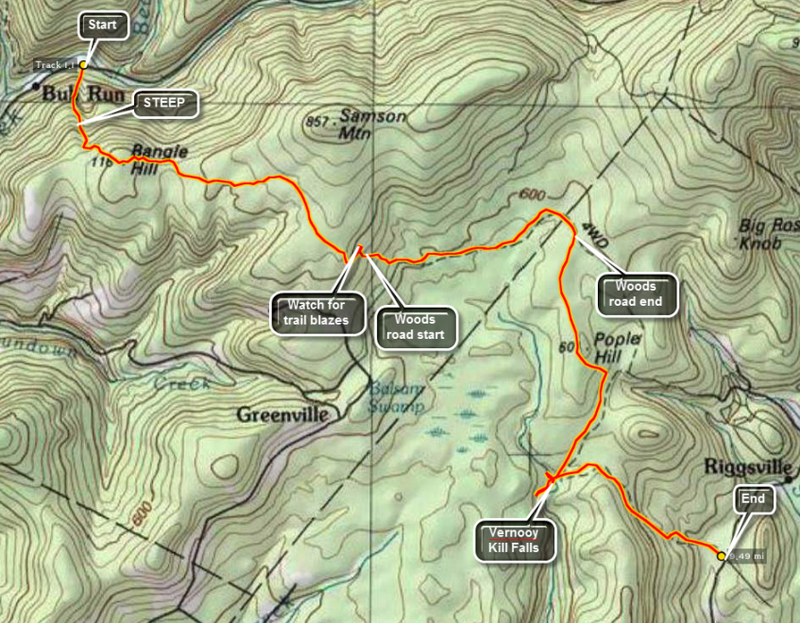 Turn onto Route 52A near the TriValley School. Stay on the road until the hamlet of Sundown where the road turns left. Bear to the left on Peekamoose Rd. and continue on the road until parking areas begin to show up on the left. Watch for a brown and yellow sign on the right for the Long Path toward Cherrytown Road. There is a small parking area opposite the start of this trail. The next parking area on the left is the Upper Peekamoose Parking Area and is much larger. Of course, you may also reach this area by turning onto Peekamoose Road off Route 28A, the road that runs along the south side of the Ashokan Reservoir. Once you are on the trail there is a climb of over 1100 feet in the first mile to the top of Bangle Hill. As you walk up the trail look over your left shoulder for a view of Peekamoose Mountain. There is a small set of ledges near the top of Bangle hill but they are VERY small. From the top of Bangle Hill the trail turns east and descends for some distance until ascending to the highest point just south of Samson Mountain after about 2.4 miles. Turning north hear there is a short, about .6 mile, bushwhack to the top of Samson Mountain. The trail continues to descend and opens up to a wide woods road. At mile 3.2 the trail turns heard to the right off the road. If you continue ahead on the woods road, there is a small stone shed and evidence of other foundations and stone walls.
The trail continues to descends through spruce and hardwood groves until it meets Spencer Road at 3.5 miles. Turn left on the road and walk about 1.3 miles east and northeast until mile 4.8. The trail markers are few and far between but do NOT worry about missing the turn to the right back into the woods and off the road. The trail is well marked but the walk along the road seems long. The trail turns almost due south and descends some until a slight climb to the top of Popel Hill at mile 6.0. Watch for a "witness sign" to your right and a USGS marker apparently in the middle of nowhere. From here the trail turns a little to the southeast before continue south to the falls at mile 7.2. The falls are more of a set of rapids and cataracts than one continuous drop of water. Walk upstream on either side to take in all the beauty of the various "steps" to the falls. There is no formal trail but you will have no trouble finding your way. Near the bridge are the ruins of a mill built by the Vernooy family that first owned the land. Standing on the rocks in the middle of the stream offers a great view of the bridge and many of the different steps to the falls. It also offers a good opportunity to fall in so be careful. After exploring the area of the falls, get back on the trail. You may now hike the 7 miles back to your car or hike out to Cherrytown Road where you had the foresight to park another car for the shuttle. From the falls the trail heads east and then southeast but always descends until you reach the parking area at about mile 9.0.
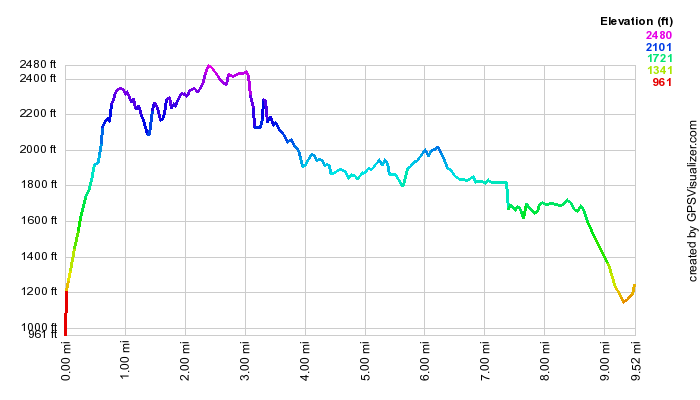 (The image at the left shows the profile of the hike. Remember that all vertical profiles are
relative!)
(The image at the left shows the profile of the hike. Remember that all vertical profiles are
relative!)
Vroman's Nose
| Quick Look | ||||
|---|---|---|---|---|
| Difficulty | Round trip | Total climb | Internet Maps | |
| 1.5 mi. | 585 ft. | AllTrails | ||
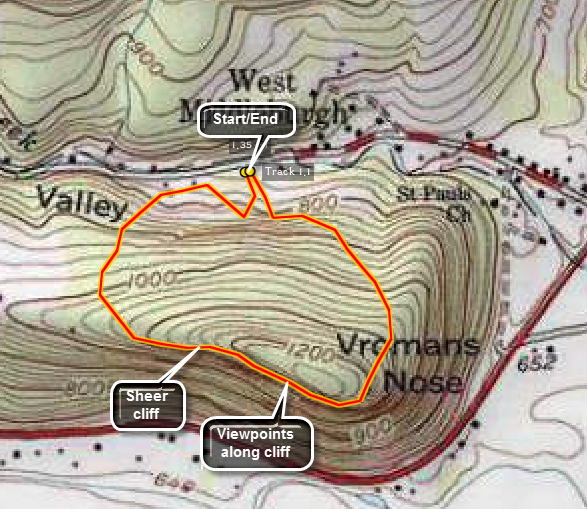
The area around Middleburgh is best known for this hike up Vroman's Nose. This high, rocky prominence stands some 600 ft. above the flat Schoharie plain. The creek shows meanders below. Also in the area are Thacher Park and the Middleburgh Cliffs which also offer a nice view of the Schoharie Plain and Vroman's Nose itself.
From Route 30 through Middleburgh, turn west on West Middleburgh Road. Drive for about .6 miles and park in the lot on the left. Walk up through the field and at the base of the "Nose" make your choice of left or right. The trail makes a large circle over the "Nose" and neither direction is more difficult or easier. You will climb to the top of the rock outcrop with no views other than the trees. Once on the top the views appear one after the other and they are spectacular. When you have taken in all that you can, continue your loop back to the parking area.
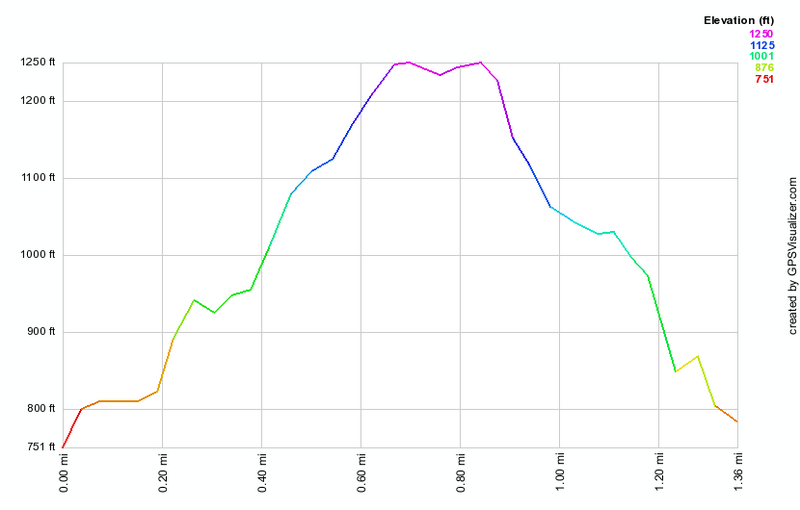
(The image above shows the profile of the loop hiking route. Remember that all vertical profiles are relative!)
Walnut Mt Park: 3 Tiers
| Quick Look | ||||
|---|---|---|---|---|
| Difficulty | Round trip | Total climb | Internet Maps | |
| 4.1 mi | 750 ft | AllTrails | ||
_map.png) Take Route 55 out of Liberty south toward Swan Lake. The road will make a sweeping left turn near the Achieve Nursing Home. Watch for Walnut Mt Road on the right about .6 miles after this sweeping left turn. Turn right onto the road and drive to the end to park. If the gates or closed or you may be hiking after the gates will be closed, park in one of the two areas just outside the gates. During the spring, summer and fall there may be trail amps at the building by the baseball field. You may also obtain maps from Town of Liberty Parks and Recreation on Many Street in Liberty. Walk up the road between the playground and picnic area toward the water tower. Turn right onto the red A1 trail that heads right and up into the woods. Continue on this trail until the junction with the green A4 and follow the A4 by bearing left. At the junction with the red A1 trail turn bear left to follow the red A1 trail. When the red A1 trail branches, turn right as it heads west and north. The red A1 trail eventually turns east and arrives back at the junction with the green A4. You will have completed the lower loop around the mountain and hikes about 1.7 miles. Continue around the mountain again on the green A4 trail by turning right. This time when you arrive at the junction with the A1 trail stay to the right to follow the A4 south until it makes and almost 180 degree turn to head around the mountain. Continue to follow the A4 north and then east as it starts to swing around the summit. On the north side turn right on a bike path as you start to walk down a hill. This will take you toward the summit and a path around the summit plateau. As you approach the rock ledges, look for a path that winds around the summit plateau. Turn right to follow the path in a counterclockwise direction. On the east side of the mountain a bike trail leads up to the summit plateau. It is marked by a sign warning riders that it is an expert trail. Walk up to the summit plateau and turn right to make a counterclockwise loop. You will find a well-constructed "bridge" over a jumble of rocks. The path continues around the edge of the summit until it leads back to the east side where you came up. Walk back down to the white A5 trail and turn right and descended to the green A4 trail. Turn left on the A4 and then right on the A1 which will bring you back to the open field where the A1 splits. Head left on the A1 and back down toward the car. You may want to walk around the filed below the baseball diamond. Walnut Mountain is the site of a Civil War reenactment every summer and you can see some of the split trail fences and gun emplacements.
Take Route 55 out of Liberty south toward Swan Lake. The road will make a sweeping left turn near the Achieve Nursing Home. Watch for Walnut Mt Road on the right about .6 miles after this sweeping left turn. Turn right onto the road and drive to the end to park. If the gates or closed or you may be hiking after the gates will be closed, park in one of the two areas just outside the gates. During the spring, summer and fall there may be trail amps at the building by the baseball field. You may also obtain maps from Town of Liberty Parks and Recreation on Many Street in Liberty. Walk up the road between the playground and picnic area toward the water tower. Turn right onto the red A1 trail that heads right and up into the woods. Continue on this trail until the junction with the green A4 and follow the A4 by bearing left. At the junction with the red A1 trail turn bear left to follow the red A1 trail. When the red A1 trail branches, turn right as it heads west and north. The red A1 trail eventually turns east and arrives back at the junction with the green A4. You will have completed the lower loop around the mountain and hikes about 1.7 miles. Continue around the mountain again on the green A4 trail by turning right. This time when you arrive at the junction with the A1 trail stay to the right to follow the A4 south until it makes and almost 180 degree turn to head around the mountain. Continue to follow the A4 north and then east as it starts to swing around the summit. On the north side turn right on a bike path as you start to walk down a hill. This will take you toward the summit and a path around the summit plateau. As you approach the rock ledges, look for a path that winds around the summit plateau. Turn right to follow the path in a counterclockwise direction. On the east side of the mountain a bike trail leads up to the summit plateau. It is marked by a sign warning riders that it is an expert trail. Walk up to the summit plateau and turn right to make a counterclockwise loop. You will find a well-constructed "bridge" over a jumble of rocks. The path continues around the edge of the summit until it leads back to the east side where you came up. Walk back down to the white A5 trail and turn right and descended to the green A4 trail. Turn left on the A4 and then right on the A1 which will bring you back to the open field where the A1 splits. Head left on the A1 and back down toward the car. You may want to walk around the filed below the baseball diamond. Walnut Mountain is the site of a Civil War reenactment every summer and you can see some of the split trail fences and gun emplacements.
(The map above shows the parking area and the hiking route as a loop.)
_gra.png) (The image at the left shows the profile of the hike. Remember that all vertical profiles are relative!)
(The image at the left shows the profile of the hike. Remember that all vertical profiles are relative!)
Walnut Mt Park: All Trails
| Quick Look | ||||
|---|---|---|---|---|
| Difficulty | Round trip | Total climb | Internet Maps | |
| 5.5 mi | 950 ft | AllTrails | ||
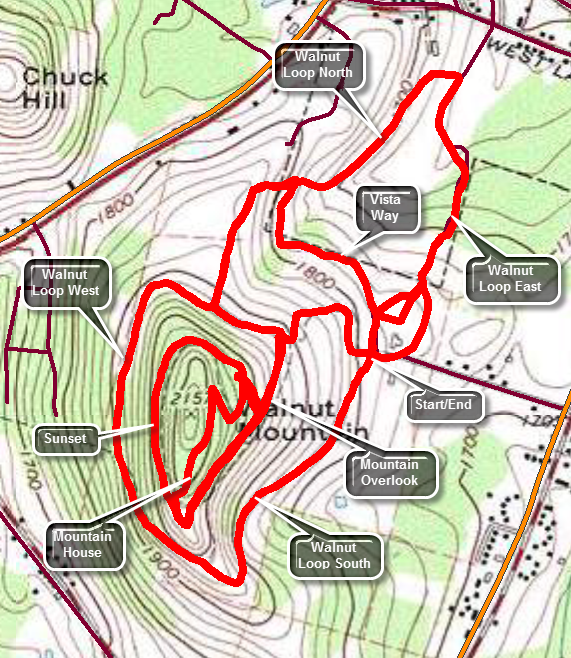 Take Route 55 out of Liberty south toward Swan Lake. The road will make a sweeping left turn near the Achieve Nursing Home. Watch for Walnut Mt Road on the right about .6 miles after this sweeping left turn. Turn right onto the road and drive to the end to park. If the gates or closed or you may be hiking after the gates will be closed, park in one of the two areas just outside the gates. During the spring, summer and fall there may be trail maps at the building by the baseball field. You may also obtain maps from Town of Liberty Parks and Recreation on Many Street in Liberty. Walk from the parking area passed the ballfield to the north to pick up the Walnut Loop East. Watch for the kiosk on the other side of the "field". Walk on the wide trail north toward the West Lake Street parking area. As you approach the parking area, turn left onto the Walnut Loop North and start heading back to the south. This trail starts climbing almost immediately and over the .7 miles to the junction with the Walnut Loop West the trail gains a little over 280 feet. At trail junction turn right on the Walnut Loop West which soon turns south on the west side of the mountain. At about 1.6 miles the trail begins a steep little uphill for about .2 miles to the lower set of picnic tables. Continued passed the tables to get on the Walnut Loop South. Walk down the hill to the area of the old quarry and the new disk golf course. Once in the parking area head down the access road to the beginning of the Walnut Loop East and followed it to where you entered the woods at the beginning of the hike. At this point you have hiked a total of 2.6 miles. Walk back up through the field to the parking area to get to the rest of the trails. From the lower end of the parking area get on the Vista Way heading north. This trail is a little over .3 miles and ends at the Walnut Loop North. Turn left and walk back toward the mountain. This time when you get to the Walnut Loop West turn left and walk down to the Mountain Overlook Trail. Turn right to head south. After .4 miles you'll be at the upper picnic tables and the lookout. Make a hard right onto the Sunset Trail and stay on it as it swung around the west side of the mountain a little higher up than the Walnut Loop West. Continue to follow the Sunset Trail until it starts to descend and the Mountain House Trail turns off to the right. Follow this trail up over the mountain through a switchback and then down to the Sunset Trail near the overlook. Turn left and head back down the Mountain Overlook Trail toward the parking area. At the junction with the Sunset Trail, shoot up to the junction with the Mountain House Trail to say you have covered all the trails. Return to the Mountain House Trail and follow it all the way back to the car.
(The map above shows the parking area and the hiking route as a loop.)
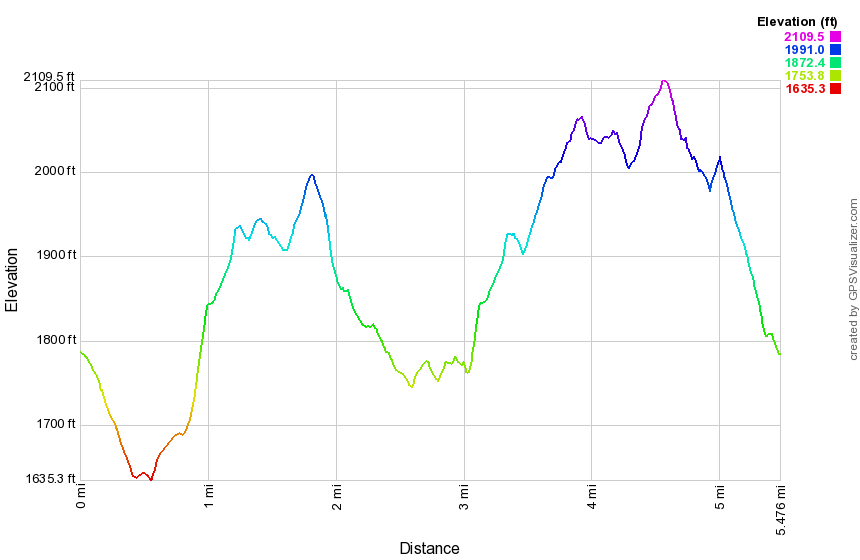 (The image at the left shows the profile of the hike. Remember that all vertical profiles are relative!)
Walnut Mt Park: Main Parking
| Quick Look | ||||
|---|---|---|---|---|
| Difficulty | Round trip | Total climb | Internet Maps | |
| 3.8 mi | 600 ft | AllTrails | ||
_map.png) Walnut Mountain Park is owned and maintained by the Town of Liberty in Sullivan County, NY. It has ball fields, picnic areas and a network of hiking and mountain biking trails. Maps may be available at the park or from Parks and Recreation in the Village of Liberty near the Liberty Elementary School on Main St. To get to the main parking area head south from Liberty on Route 55 toward Swan Lake. Watch for the signs for the park on the right. Turn in and drive to the main parking area. To describe a particular route is probably useless since you can pick your own. The hiking trails are labeled A1 to A5 and are crossed by numerous bike trails marked with colored ribbons. The red A1 trail starts at the main parking area, goes up the hill passed the water tank and then encircles the base of the mountain. The green A4 trail branches from the A1 on the south side of the mountain and circles the summit before leading you up to a spot near the summit. There are paths that head over the summit but there is no view and the summit is a scratchy pricker path. The white A5 trail also forms part of the loop around the summit. You can use the handy bike trails to get between areas also. The orange A2 trail branches from the A1 trail not too far from the parking area and eventually leads to the West Lake Street parking area. The trail makes a 90 degrees right turn along the way which is not well marked. The A2 trail comes back up from that parking area to a spot just below the baseball field. The yellow A3 trail starts at the north end of the main parking area and connects to the A2 trail. You can use any combination of trails to create a longer or shorter hike.
Walnut Mountain Park is owned and maintained by the Town of Liberty in Sullivan County, NY. It has ball fields, picnic areas and a network of hiking and mountain biking trails. Maps may be available at the park or from Parks and Recreation in the Village of Liberty near the Liberty Elementary School on Main St. To get to the main parking area head south from Liberty on Route 55 toward Swan Lake. Watch for the signs for the park on the right. Turn in and drive to the main parking area. To describe a particular route is probably useless since you can pick your own. The hiking trails are labeled A1 to A5 and are crossed by numerous bike trails marked with colored ribbons. The red A1 trail starts at the main parking area, goes up the hill passed the water tank and then encircles the base of the mountain. The green A4 trail branches from the A1 on the south side of the mountain and circles the summit before leading you up to a spot near the summit. There are paths that head over the summit but there is no view and the summit is a scratchy pricker path. The white A5 trail also forms part of the loop around the summit. You can use the handy bike trails to get between areas also. The orange A2 trail branches from the A1 trail not too far from the parking area and eventually leads to the West Lake Street parking area. The trail makes a 90 degrees right turn along the way which is not well marked. The A2 trail comes back up from that parking area to a spot just below the baseball field. The yellow A3 trail starts at the north end of the main parking area and connects to the A2 trail. You can use any combination of trails to create a longer or shorter hike.
_gra.png) (The image at the left shows the profile of the hike. Remember that all vertical profiles are relative!)
(The image at the left shows the profile of the hike. Remember that all vertical profiles are relative!)
Walnut Mt Park: Trail 3
| Quick Look | ||||
|---|---|---|---|---|
| Difficulty | Round trip | Total climb | Internet Maps | |
| 4.1 mi | 715 ft | AllTrails | ||
_map.png) Walnut Mountain Park is owned and maintained by the Town of Liberty in Sullivan County, NY. It has ball fields, picnic areas and a network of hiking and mountain biking trails. Maps may be available at the park or from Parks and Recreation in the Village of Liberty near the Liberty Elementary School on Main St. To get to the main parking area head south from Liberty on Route 55 toward Swan Lake. Watch for the signs for the park on the right. Turn in and drive to the main parking area. To describe a particular route is probably useless since you can pick your own. The hiking trails are labeled A1 to A5 and are crossed by numerous bike trails marked with colored ribbons. The red A1 trail starts at the main parking area, goes up the hill passed the water tank and then encircles the base of the mountain. The green A4 trail branches from the A1 on the south side of the mountain and circles the summit before leading you up to a spot near the summit. There are paths that head over the summit but there is no view and the summit is a scratchy pricker path. The white A5 trail also forms part of the loop around the summit. You can use the handy bike trails to get between areas also. The orange A2 trail branches from the A1 trail not too far from the parking area and eventually leads to the West Lake Street parking area. The trail makes a 90 degrees right turn along the way which is not well marked. The A2 trail comes back up from that parking area to a spot just below the baseball field. The yellow A3 trail starts at the north end of the main parking area and connects to the A2 trail. You can use any combination of trails to create a longer or shorter hike.
Walnut Mountain Park is owned and maintained by the Town of Liberty in Sullivan County, NY. It has ball fields, picnic areas and a network of hiking and mountain biking trails. Maps may be available at the park or from Parks and Recreation in the Village of Liberty near the Liberty Elementary School on Main St. To get to the main parking area head south from Liberty on Route 55 toward Swan Lake. Watch for the signs for the park on the right. Turn in and drive to the main parking area. To describe a particular route is probably useless since you can pick your own. The hiking trails are labeled A1 to A5 and are crossed by numerous bike trails marked with colored ribbons. The red A1 trail starts at the main parking area, goes up the hill passed the water tank and then encircles the base of the mountain. The green A4 trail branches from the A1 on the south side of the mountain and circles the summit before leading you up to a spot near the summit. There are paths that head over the summit but there is no view and the summit is a scratchy pricker path. The white A5 trail also forms part of the loop around the summit. You can use the handy bike trails to get between areas also. The orange A2 trail branches from the A1 trail not too far from the parking area and eventually leads to the West Lake Street parking area. The trail makes a 90 degrees right turn along the way which is not well marked. The A2 trail comes back up from that parking area to a spot just below the baseball field. The yellow A3 trail starts at the north end of the main parking area and connects to the A2 trail. You can use any combination of trails to create a longer or shorter hike.
_gra.png)
(The image above shows the profile of the hike. Remember that all vertical profiles are relative!)
Walnut Mt Park: West Lake Street Parking
| Quick Look | ||||
|---|---|---|---|---|
| Difficulty | Round trip | Total climb | Internet Maps | |
| 4.4 mi | 790 ft | AllTrails | ||
_map.png) Walnut Mountain Park is owned and maintained by the Town of Liberty in Sullivan County, NY. It has ball fields, picnic areas and a network of hiking and mountain biking trails. Maps may be available at the park or from Parks and Recreation in the Village of Liberty near the Liberty Elementary School on Main St. To get to the main parking area head south from Liberty on Route 55 toward Swan Lake. Watch for the signs for the park on the right. Turn in and drive to the main parking area. To describe a particular route is probably useless since you can pick your own. The hiking trails are labeled A1 to A5 and are crossed by numerous bike trails marked with colored ribbons. The red A1 trail starts at the main parking area, goes up the hill passed the water tank and then encircles the base of the mountain. The green A4 trail branches from the A1 on the south side of the mountain and circles the summit before leading you up to a spot near the summit. There are paths that head over the summit but there is no view and the summit is a scratchy pricker path. The white A5 trail also forms part of the loop around the summit. You can use the handy bike trails to get between areas also. The orange A2 trail branches from the A1 trail not too far from the parking area and eventually leads to the West Lake Street parking area. The trail makes a 90 degrees right turn along the way which is not well marked. The A2 trail comes back up from that parking area to a spot just below the baseball field. The yellow A3 trail starts at the north end of the main parking area and connects to the A2 trail. You can use any combination of trails to create a longer or shorter hike.
Walnut Mountain Park is owned and maintained by the Town of Liberty in Sullivan County, NY. It has ball fields, picnic areas and a network of hiking and mountain biking trails. Maps may be available at the park or from Parks and Recreation in the Village of Liberty near the Liberty Elementary School on Main St. To get to the main parking area head south from Liberty on Route 55 toward Swan Lake. Watch for the signs for the park on the right. Turn in and drive to the main parking area. To describe a particular route is probably useless since you can pick your own. The hiking trails are labeled A1 to A5 and are crossed by numerous bike trails marked with colored ribbons. The red A1 trail starts at the main parking area, goes up the hill passed the water tank and then encircles the base of the mountain. The green A4 trail branches from the A1 on the south side of the mountain and circles the summit before leading you up to a spot near the summit. There are paths that head over the summit but there is no view and the summit is a scratchy pricker path. The white A5 trail also forms part of the loop around the summit. You can use the handy bike trails to get between areas also. The orange A2 trail branches from the A1 trail not too far from the parking area and eventually leads to the West Lake Street parking area. The trail makes a 90 degrees right turn along the way which is not well marked. The A2 trail comes back up from that parking area to a spot just below the baseball field. The yellow A3 trail starts at the north end of the main parking area and connects to the A2 trail. You can use any combination of trails to create a longer or shorter hike.
_gra.png) (The image at the left shows the profile of the hike. Remember that all vertical profiles are relative!)
(The image at the left shows the profile of the hike. Remember that all vertical profiles are relative!)
Waneta Lake Loop
| Quick Look | ||||
|---|---|---|---|---|
| Difficulty | Round trip | Total climb | Internet Maps | |
| 1.3 mi | 110ft | AllTrails | ||
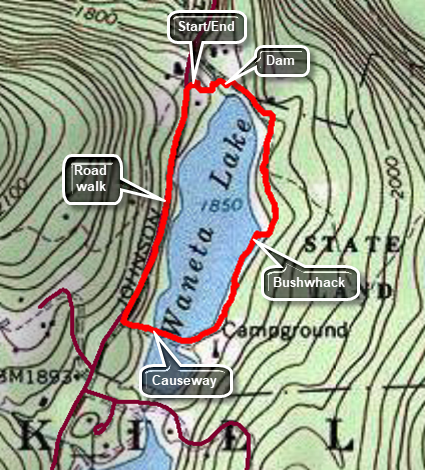 Waneta Lake is a small lake on the Bevaerkill Road just outside of Livingston Manor. It is handicap accessible for fishing and is also used for boating. There are no trails but the bushwhack around the lake is rewarding if short. From Livingston Manor drive north and west on Old Route 17 toward Roscoe. Turn right n the Beaverkill Road and drive 3.1 miles to the parking area for Waneta Lake on the right. Pull into the parking area and park. Begin your hike by walking over to the dam where you can a view of the lake. Walk down the bank downstream of the dam and find some stone to cross to the other side. Walk up the bank and find a nice clearing which has an even better view of the lake. Continue to walk around the east side if the lake on a road until the road turns sharply left. At this point begin to bushwhack by walking through the open woods following the shore of the lake. You may see some yellow DECD trail markers but the trail has not been used or maintained in many years. As you continue you may find a path along the lake shore that seems to be built up from stones. Eventually you may come across one or more fire rings and small "camps. Watch for a path that leads down to the lake and wraps around the southern end. This path passes over a man-made causeway that separates the main part of the lake on the right from a smaller section on the left, Walk out to Beaverkill Road, turn right, and walk the road for .5 miles back to the parking area.
 (The image at the left shows the profile of the hike. Remember that all vertical profiles are relative!)
Warwick Turnpike to State Line
| Quick Look | ||||
|---|---|---|---|---|
| Difficulty | Round trip | Total climb | Internet Maps | |
| 7.2 mi | 1210 ft | AllTrails | ||
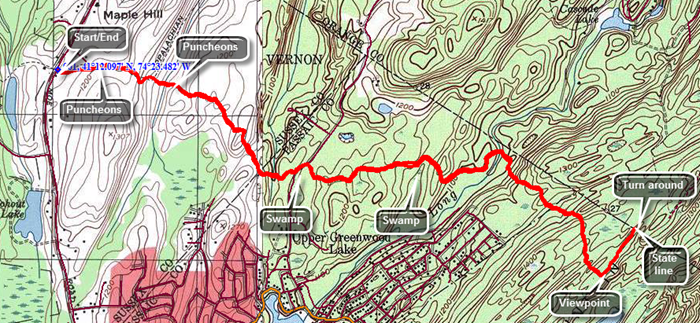
Follow Route 17A through Florida and Warwick until it turns into Route 94. We followed Route 17A through Florida and Warwick until it turned into Route 94. Turn left on Warwick Turnpike and drive about 2.7 miles. Look for a pulloff on the left after the New York-NewJjersey border. The first part of the rail passes over some puncheons and then through some hardwoods passing a field on the left. The trail surface here is packed dirt. After ascending a small hill begin to descended to a wetter area where you may notice an increase in insects. Work your way through some wet spots where small streams crossed and over some puncheons that span muddy ground. Ascend a little and then cross another trail or path. Arrive at Longhouse Drive about 1.5 miles into the hike. Here the trail turns left and follows the road several hundred feet before turning right back into the woods. Head almost due east and for the next 1.1 miles the trail rolls some and switches directions as it avoids two swamps. At 2.6 miles the trail turns southeast and begins to parallel the New York-New Jersey border as it begins to ascend to the ridge. Over the next .5 miles you will gain 285 feet and the terrain begins to look more like the Bearfort-Bellvale Ridge. The trail begins to roll some now and at 3.3 miles ascends to the top of a rock outcrop. There is a view of some water which may be the first view of anything on the hike. At this point the trail turns left to head north directly for the border. As you walk you will come across some blue blazes and an SL marked on the rock. This is the State Line Trail and the border is close at 3.6 miles. Turn around and begin the trek back to the car.
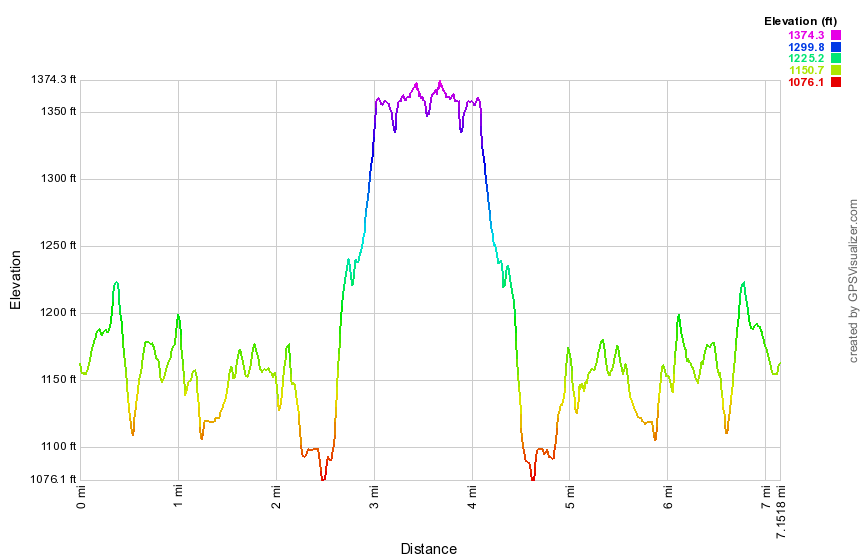 (The image at the left shows the profile of the hike. Remember that all vertical profiles are relative!)
Watkins Glen State Park (NY)
| Quick Look | ||||
|---|---|---|---|---|
| Difficulty | Round trip | Total climb | Internet Maps | |
| 2.4 mi. | 745 ft. | AllTrails | ||
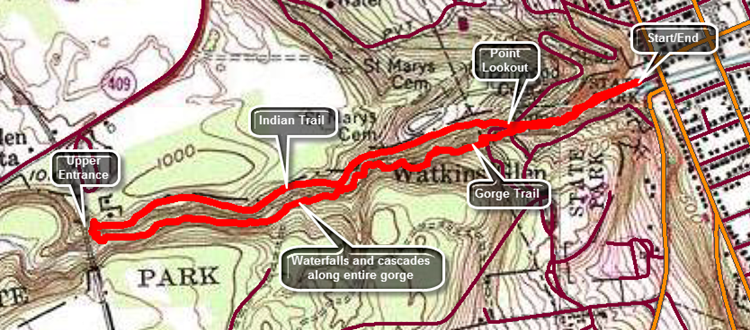
The lower entrance to the park is right on Route 14 or Franklin Street on the west side of Watkins Glen. There is a parking fee if you use their lot. The lot fills quickly especially on weekends. Public parking is available elsewhere in the village.
Walk into the gorge on the Gorge Trail and be prepared to be amazed at the deep chasms, numerous cascades and waterfalls and the other interesting features of the glen. It really is spectacular to see the depth the stream has cut over the years and the formations that have resulted. Bring a camera but don't expect to really capture all the beauty you see around you. Take in all the deep chasms, narrow channels and circular pools cut by the stream. In several places the trail takes you underneath waterfalls and across the stream. The trail is wet in spots and can be slippery. Be prepared for a crowd of people especially on the weekends. Aim to hike midweek and when school is in session if you can. Farther up the glen the stream widens and the flow slows. Almost as impressive as the forces of nature that formed the glen are the manmade structures that allow access. There are walkways cut into the glen and many are paved with some to make them smoother. There are over 800 stone steps from one end to the other which are challenging but easier than climbing without them. There are several bridges that pass across the stream and some are high in the air connecting the north and south rim. When you pass Mile Point Bridge you know you are almost at the upper end of the glen. When you climb the last stone staircase you will have hiked 1.25 mile. You may return the same way you came or turn right at the top of the steps onto the Indian Trail. This trail is not as scenic as the Gorge Trail but is easier to negotiate. Walk downhill back to Point Lookout at 2.2 miles. The Indian Trail ends here as it unsafe past this spot. Descend the steps to the Gorge Trail and return that way to the parking area.
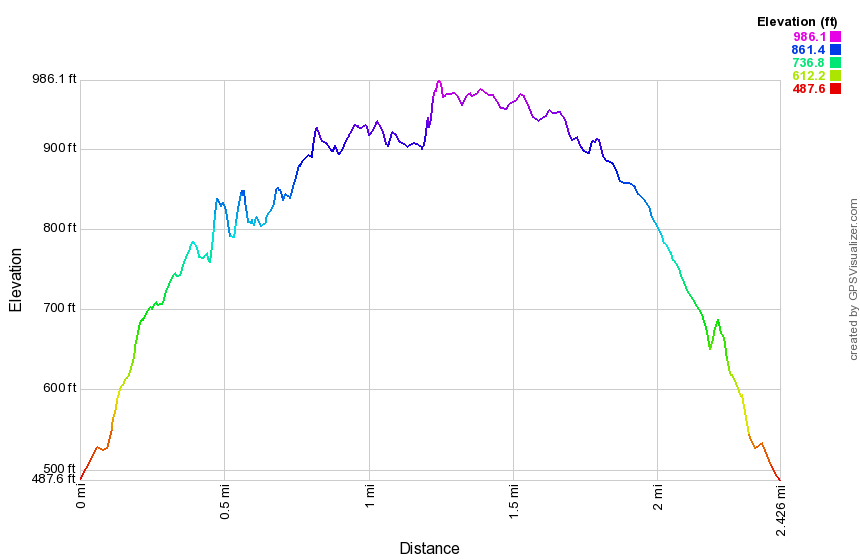 (The image at the left shows the profile of the loop hiking route. Remember that all vertical profiles are relative!)
Wawayanda State Park North
| Quick Look | ||||
|---|---|---|---|---|
| Difficulty | Round trip | Total climb | Internet Maps | |
| 11.4 mi | 1134 ft | AllTrails | ||
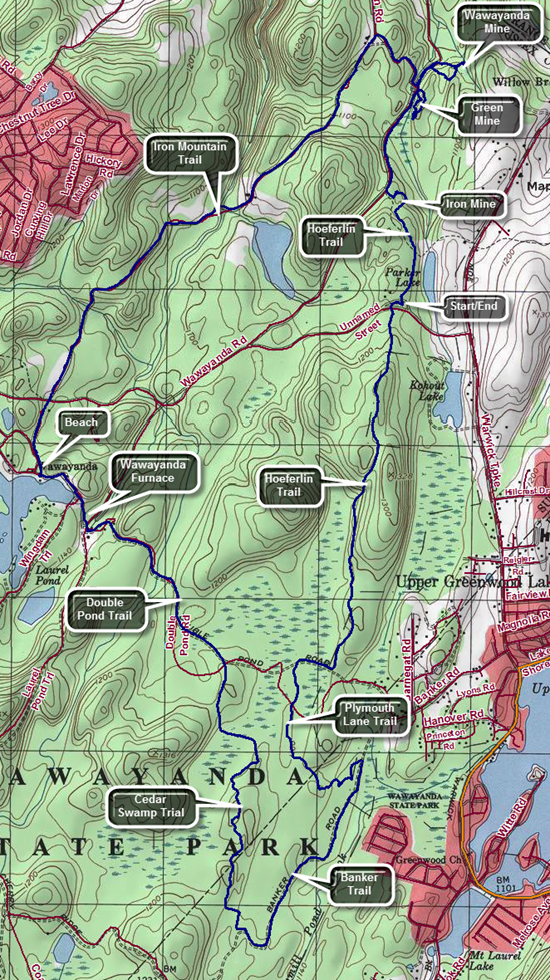
Take State Route 17 to exit 124 and take Route 17A and Route 94 through Florida to Warwick. Continue through Warwick on Route 94 and turn left on the Warwick Turnpike not far outside of town. After 15 miles, arrive at the park access road. Turn right and park near the office. Find the blue Hoeferlin Trail that passes by the iron mines to the right of the office with your back to the access road and parking area. The trail is an almost flat woods road that heads north paralleling the Warwick Turnpike. At .25 miles we cross the AT and continue north. At .45 miles you will be in the vicinity of the first iron mine which is unnamed on the map. Walk off the trail to the right and look for depressions in then ground with piles of rock next to them which are the "tailing" from these explorations. There are a few bigger pits and many small ones. When the United States was first forming and well into the 19th century the only source of iron or implements made from iron was from other countries. This was expensive and, sometimes, an unreliable source. The hills of northern New Jersey and what is now Harriman State Park in New York, as well as some other locations, proved to be a good source of iron until the mid to late 19th century. Walk back out to the trail and continue north. Within a short distance, the trail intersects a gravel road where you should keep to the right to continue north to the Green and Wawayanda Mines. The Green Mine is located at about 1 mile along the trail where the Hoeferlin Trail turns sharply to the left. The mine is on the other side of a creek and swamp and can be accessed after crossing the creek on a bridge. Walk east to the ridge and begin a slight ascent to the top of the ridge. There are a few small depressions but nothing more dramatic than the previous "mine". Walk south along the ridge and until you see some fencing. The fencing surrounds a deeper pit with a collapsed adit. Some paths continue along the ridge and there are areas where the bank has been cut away. A little further south there is another fenced area. This one is much more interesting as the fence is metal and surrounds a deep shaft with stone sides. The adit is filled with water but appears to be quite deep. Head back north to the point where you turned off the road. Where the Hoeferlin Trail heads west, continued north on the old Wawayanda Road. Turned east at about 1.2 miles from the office and watch for paths or a woods road that runs to an area that has been cleared and to a bank that seems to have been mined. Continue up and over the bank still heading east. There are three or four more pits above the bank. Head a little to the north where there is a water filled pit. Turn south again and walk a little to the west watching for another area with a deep cleft in the one bank and an adit cut into the other. The adit is obviously collapsed but the amount of tailings and the work done in the area indicates that it was a significant source of ore. Return to the main trail and walk south to the junction with the Hoeferlin Trail. Turn west to follow the trail northwest to the blue Iron Mountain Trail. At 2.4 miles turn left on the Iron Mountain Trail which is another wide and well-maintained gravel road. Continue along the road crossing the AT again at 3.4 miles. At 4.6 miles cross a park road heading for the boat launch on Wawaynada Lake. Walk up a small hill and across the parking area at the boat launch to the shores of the lake. Head to the left around the end of the lake toward the dam on a pathway. At the dam follow another pathway without crossing the dam. This pathway brings you to a large stone structure on the left side of the trail that is protected behind a chain link fence. Although the wooden roof has seen better days, the rest of the structure is well preserved. This is the Wawayanda Furnace which operated from the 1840's to well passed the Civil War. It processed raw iron ore from the surrounding mines turning it into pig iron which could them be formed into implements. From the furnace, walk a little to the east to pick up the yellow Double Pond Trail. Follow the paved Double Pond Trail as it winds passed several campsites and then immediately turns back into a trail after passing a gate. The trail is rocky and heads uphill a little. At 6.25 miles you will come to the trail junction with the Cedar Swamp Trail. Turn right or south on the Cedar Swamp Trail. Head south and almost immediately you will run into the boardwalk. At times the water may be too ugh to walk to the end of the boardwalk but you can always turn around and retrace your steps. It initially passes over a wide and open swamp which has a small stream in the middle. The boardwalk actually consists of three tiers. The bottom tier is constructed of crosspieces made of a composite material. They are lighter than cement but heavier than wood and appear to be built to resist the decay brought on by being immersed in water. On top of the composite crosspieces are wooden ones and on top of that the wooden decking. Walked along the boardwalk hemmed in by laurel in most places. Enjoy the Atlantic white cedar which is different than the usual red cedar seen in most northeast forests. Eventually the boardwalk ends. Continue to follow the trail until it ends at the green Banker Trail. Turn left to head east and then north. The Banker Trail heads north along the eastern edge of the cedar swamp. It is a well constructed trail but has no real surprises or attractions. As you near the Banker Road trailhead, turn right of the red Plymouth Lane Trail which heads north to connect back to the Double Pond Trail. The trail avoids walking out to Banker Road and using it to get to another trailhead. At 9.6 mile you will hit the Double Pond Trail. Turn right to walk to the beginning of the Hoeferlin Trail. Walk toward the parking area on Double Pond Road and turn left or north just before getting there. A sign marks the beginning of the blue Hoeferlin Trail and indicates the office is 1.8 miles away although it is closer to 1.6 miles. Starting out on the trail it is very rocky as it heads due north. Near the end there are a few small hills just to make the hike memorable. You will break out onto a park road with the office and your car straight ahead.
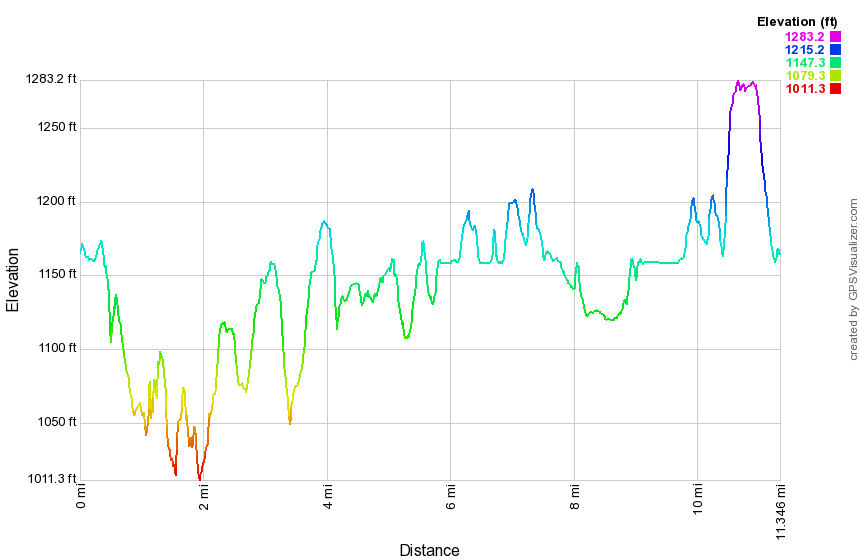 (The image at the left shows the profile of the hike. Remember that all vertical profiles are relative!)
Wawayanda Vista to Warwick Turnpike
| Quick Look | ||||
|---|---|---|---|---|
| Difficulty | Round trip | Total climb | Internet Maps | |
| 8.5 mi | 1940 ft | AllTrails | ||
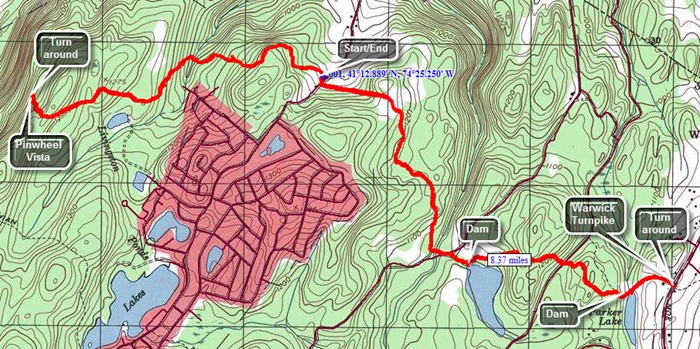
Note: This route begins on Barrett Road and proceeds to the Pinwheel Vista on Wawayanda Mountain where you turn around. You will hike back past your car and to the Warwick Turnpike where you will turn around and hike back to the car.Follow Route 17A through Florida and Warwick until it turns into Route 94. Just before the New Jersey border turn left on Barrett Road. Barrett Road climbs to the top of a ridge. At about 1.4 miles there is a pulloff on the right but there are no sings for the AT. This is the place to park! Begin by ascending a small hill through some hardwoods and then descending the other side. You may hear voices on your left as there is a development of residential housing in that direction. At .8 miles descend to a small creek and cross a small wooden bridge to get to the other side of the stream. The bridge simply lies on the rocks and is tethered by a cable to a steel rod to restrain it during high water! Continue your hike with a fairly steady but easy ascent toward the Pinwheel Vista. At 1.4 miles there is a slight dip and by 1.7 you will hit a high point. There is a "mailbox" that acts as a sign-in for the AT. There is an sign that points left indicating an old lookout about .8 miles away. It may have been a lookout at some point but there is now no view. Continue on a descent to the area just before the "Stairway to Heaven", the staircase that leads down to Route 94. A large stone cairn and blue blazes indicate the side trail to the right to the Pinwheel Vista. Allow some time to take in the beautiful views and snap some pictures before heading back toward the car. As you approach Barrett Road and your car stay on the trail and cross the road. Continued on the AT as it begins an ascent on an old road. At the top of the hill turn off the road to stay on the AT and start to descend a little. The trail begins to roll a little and finally descended to cross Iron Mountain Road and then a small stream. Along the is a beaver lake or pond. At some point you will have entered Wawayanda Park and the trail will be blazed with blue markers as well as the white AT blazes. Ascend a small hill and then descend the other side to cross a park road. The trail starts to ascend and then rolls some. At 5.8 miles pass another beaver pond and then cross another bridge. By now you should hear the traffic and at 6 miles you will be at the Warwick Turnpike. Turn around and follow the trail back to your car.
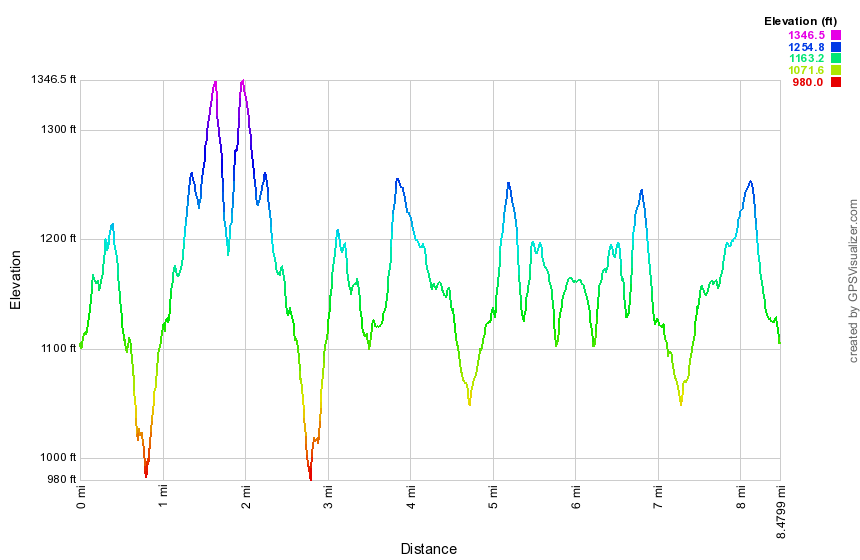 (The image at the left shows the profile of the hike. Remember that all vertical profiles are relative!)
West Fulton to Old Cemetery Road
| Quick Look | ||||
|---|---|---|---|---|
| Difficulty | Round trip | Total climb | Internet Maps | |
| 8.2 mi. | 1388 ft. | AllTrails | ||
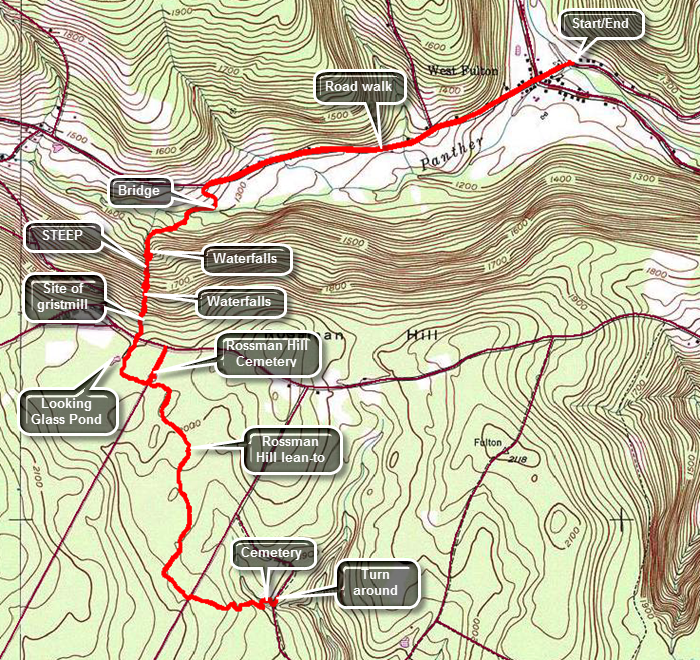
Head north on Route 30 through Margaretville, Roxbury and Grand Gorge. After passing through North Blenheim, watch for West Fulton Road on the left. Turn left on West Fulton Road and drive about 3 miles to the four corners in West Fulton. There is a small picnic area and playground on the right just before the STOP sign. You may park here or turn right at the STOP sign onto Patria Road. After crossing a bridge, park on the left side of the road where the Long Path turns left to go through a field. Walk back to the four corners and continue straight ahead on Sawyer Hollow Road gaining some elevation. At about 1.3 miles we pass a fishing access for Panther Creek and at 1.4 miles the Long Path turns left to descend through a field to Panther Creek. The grass had been mowed to form a wide path down to the creek. Near the creek the trail turns to the right follows the stream for about .1 miles where there is a bridge. The bridge is old but sturdy and built high enough above the creek that it must have withstood many storms. You will be walking through hardwood forest and soon the trail begins to climb and then climb steeply. The trail runs close to a small creek. Over the next .7 miles the trail gains 710 feet with the trail grade average over 17%. When there is a good volume of water in the creek, you can hear that the water flowing over the rocks. If you walk over to the edge of the stream, you can see several cascades and waterfalls. Continued walking up the trail and you will and many of these waterfalls with each one seeming to be nicer than the previous. Any description you read does not do these falls justice as you must seem them yourself. Near the top of the climb is the last water fall and you should notice a stone structure in the streambed. A waterwheel was been mounted here to power a gristmill. As you continue on the trail, it crosses Rossman Hill Road at 2.4 miles. On the other side of the road the trail may be wet in places and you will soon see a pond up ahead. The trail is a little indistinct but leads to the shore of Looking Glass Pond. Make a hard left and enter an evergreen forest. A sign at Rossman Hill Road indicates that the lean-to is about a mile from the road. Shortly after the pond the trail crosses Morey Road which is marked on some maps as Old Cemetery Road. The trail continues almost straight ahead but you may turn left to investigate the Rossman Hill Cemetery. The cemetery is overgrown with high grass and many of the stones are too worn to read. Other markers are legible and show that no one has been buried in the cemetery since the late 1800's. The site of the Methodist Church was just down the road from the cemetery and was disbanded in 1930. No trace of the church remains. Walk back to the Long Path to continue your hike. Shortly you will round a turn in the trail to find the Rossman Hill lean-to. It is in good shape but has no privy. The spring is further down the trail. After the lean-to the trail begins to head south and seems to follow some of the woods roads in the state forest. It veers off the road to the right to traverse some ground which is often wet. You will pass through or walked along a number of stone walls some of which are quite high. At 3.8 miles the trail finally turns east and starts to descend a little more steeply to a stream where there is no bridge. When the water level is low, crossing is no problem. Climb the far bank and you may be able to see a road through the trees. Continue to descend and approach the road where there is another cemetery. This one is smaller and probably older than the one on Rossman Hill. Walk down to the road and turned left to walk to where the trail enters the woods. At this point turn around and retrace your route back to the car as none of the roads in the area offer a shorter route. It should take less time on the way back since the trip is mostly downhill.
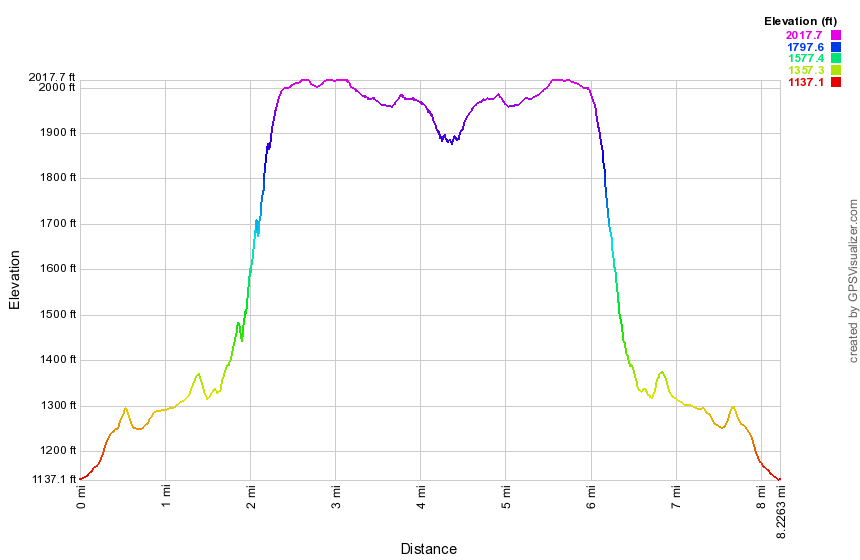 (The image below shows the profile of the hike. Remember that all vertical profiles are
relative!)
(The image below shows the profile of the hike. Remember that all vertical profiles are
relative!)
West Fulton to Snow Ridge Drive
| Quick Look | ||||
|---|---|---|---|---|
| Difficulty | Round trip | Total climb | Internet Maps | |
| 12.9 mi. | 2662 ft. | AllTrails | ||
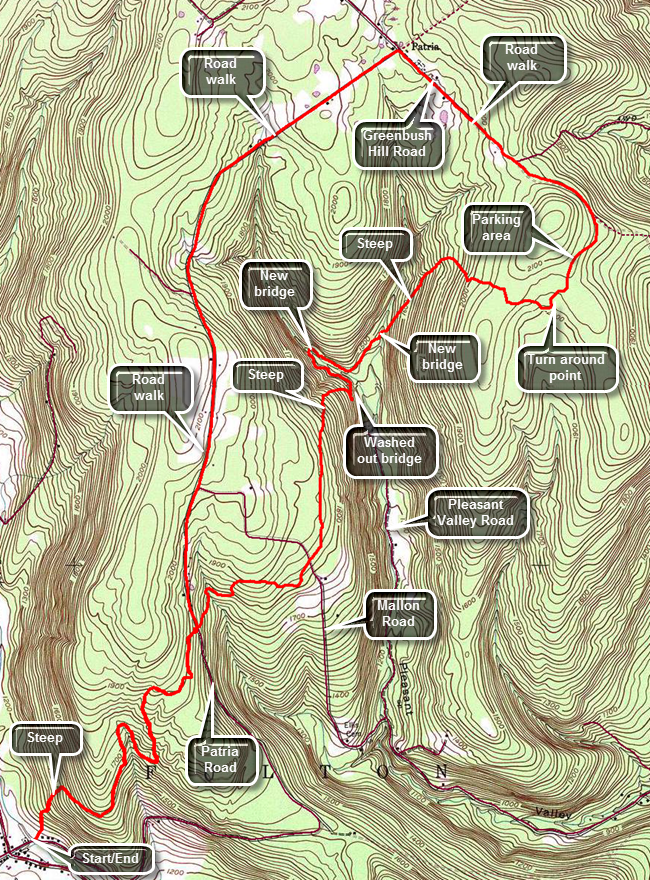
Head north on Route 30 through Margaretville, Roxbury and Grand Gorge. After passing through North Blenheim, watch for West Fulton Road on the left. Turn left on West Fulton Road and drive about 3 miles to the four corners in West Fulton. Turn right on Patria Road and cross a small bridge. Turn around and park on the side of the road where the Long Path turns left to go through a field. Enter the field and hike to a white pine tree with a white blaze. Several more blazes on pine trees lead to a pine forest and an immediate climb to a ridge. Within a little less than a mile the trail gains over 600 feet. The trail in this area is well-marked and easy to find as it follows old woods roads. At about .8 miles you will come out onto a woods road that is obviously being used for some purpose as it has recently been cleared. Turn left to walk uphill and then re-entered the forest on the right. The trail takes a dip at .9 miles and signs that say "State Forest" appear. This is Patria State Forest. Ascended again to about 1.7 miles and then descend a little to cross Patria Road at 2.15 miles. There are quite a few woods roads in the area which cross the trail and other places where the trail continues to follow a woods road. It is important to watch the blazes as the land up to the state forest is private. After crossing Patria Road head downhill where the trail begins to look a little less traveled and the blazes a little older. The trail heads east or northeast near a small seasonal stream through hemlocks. Cross the stream and begin to climb to the ridge again where the trail levels off briefly and crosses Mallon Road at 2.95 miles. Where you cross Mallon Road, there is a small parking area on the other side with a signboard which has seen better days. Entered another reforestation area on a woods road and start to head almost due north until 3.8 miles. The trail starts to descend to Pleasant Valley at 3.4 miles and at 3.8 miles turns east and continues to descend to 3.9 miles. The trail turns right or south and travels along the lip of a steep drop. Pass several roads going down the slope until the trail finally turns onto one of these just short of 4 miles. The road descends to a stream but the trail turns to the left just as the road makes a sharp right to go down to the stream. DO NOT follow the blazes down to the stream as this is the old route. No one has bothered to paint over these blazes and even "official" descriptions may not be updated. Turn left and follow the new blazes as they head upstream to the northwest and in about .25 miles follow them down to a new bridge across the stream. Just after you cross the bridge the trail turns southeast to head back downstream along what may be the old Pleasant Valley Road. Continue to the southeast until about 4.5 miles where the trail turns to the northeast off the "road" to continue on another woods road. The road leads to another new bridge across a large stream at 4.75 miles. After crossing the bridge, start an ascent along a nice woods road through pine forests heading northeast. At 5.2 miles the trail turns southeast but continues to ascend to 5.6 miles. The blazes in this area along this road are VERY few and VERY far between. At the top of the hill, the woods road and snowmobile trail continue straight ahead but the trail turns to the right. When you turn to the right it may be hard to follow the blazes and the trail since it seems to be little used. You will start to descend through a pine forest and may see a stone foundation on your left. Continue ahead until the trail turns to the right. Watch for a red blazed trail on the left which leads to a small parking area on a gravel road that acts as an access road to state land. At this point you may turn around and retrace your route. It may be quicker and more interesting to walk some of the roads. The route is a little longer but the walking is easier. From the parking area turn right on the access road and walk of to Snow Ridge Drive. Continue on this gravel road until it meets Greenbush Hill Road at 6.8 miles. Turn left and walk downhill along the road for about .7 miles where you should turn left onto Patria Road. This road is paved for a short distance but then turns back to gravel when it enters the state forest. The road is not all downhill but continues to ascend and descend hills along its length. For a mile from the intersection the road is completely straight and heads southwest. At 8.6 miles it turns to the south but continues to roll until it heads downhill to meet Mallon Road at 10 miles. The road is paved at this point as you continue downhill to 10.7 miles where the trail crosses. You may continue on Patria Road back to the car or turn right onto the trail. The distance on the road is somewhat longer but may be an easier walk. Turn right onto the trail and start a slight ascent. The trail levels some and then at 11.2 miles begins a long descent back to the car. You may be able to get a nice view as you turn onto the well-developed woods road. From here continue to follow your route from earlier in the day. The descent from the hemlock forest to the field may seem steeper than the ascent did earlier in the day.
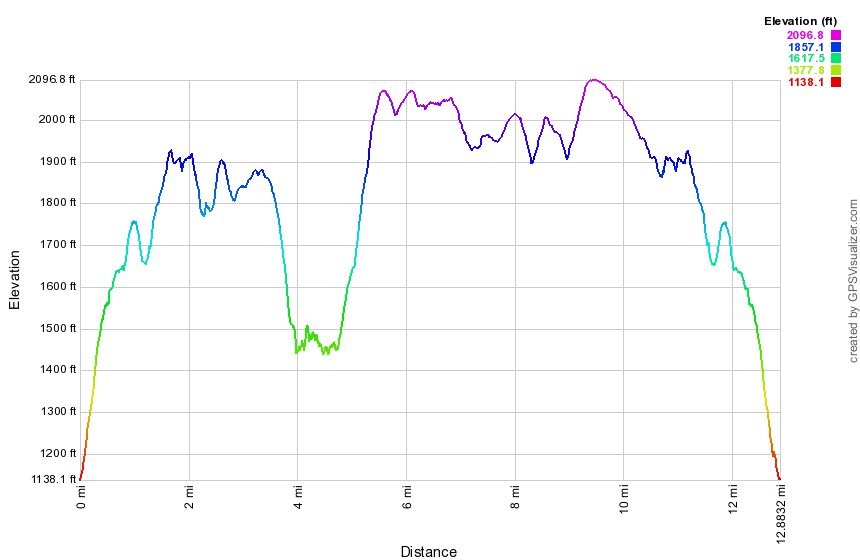 (The image below shows the profile of the hike. Remember that all vertical profiles are relative!)
West Rim Trail: Grand Canyon of PA
| Quick Look | ||||
|---|---|---|---|---|
| Difficulty | Round trip | Total climb | Internet Maps | |
| 7.3 mi. | 1360 ft. | AllTrails | ||
 Pine Creek Gorge is sometimes known as the Grand Canyon of Pennsylvania. The gorge was cut at the end of the last ice age when the receding glacier blocked drainage to the north. The glacial met waters drained southward cutting a deep gorge as several side canyons. Pine Creek is now considerably smaller but the gorge remains. It stretches almost 40 miles from Ansonia in the north to Blackwell in the south. Hikers often hike the West Rim Trail in whole or in part. The trail can be accessed from the northern or southern trailheads or from points along Colton, Painter-Leetonia, and West Rim Roads. Car shuttles are popular as they allow hikers to cover more of the trail. The main trail parallels the gorge and has many viewpoints that allow hikers to look down into the gorge, across to the opposite rim and up and down the gorge. The trail moves away from the rim where tributaries have cut deep side canyons. There are few steep ascents and descent. A rail trail is now in place on the floor of the gorge where the Penn Central tracks used to be. This trail is covered with fine crushed rock and is appropriate for hiking, mountain biking, snowshoeing or cross country skiing. Colton Point State Park occupies the northwest rim and is relatively "wild". Leonard Harrison State Park is found across the gorge on the northeast rim.
This hike covers about 7.5 miles of the West Rim Trail from Bradley Wales Picnic Area in the south to a hairpin turn on Painter-Leetonia Road in the north. Find Ansonia, Pennsylvania on Route 6 and turn south on Colton/Forest Road. As you drive on the road watch for a parking area on the right side of the road and a lookout on the left. This allows you a first look into the gorge. Continue south for 6.5 miles and turn left on Painter-Leetonia Road. At 8.3 miles make another left on Painter-Leetonia Road. Park your car at the hairpin turn at 9.1 miles on Painter-Leetonia Road at the trailhead for the Refuge Trail. Continue south for another 5 miles and watch for a slight turn to the left on Bradley Wales Road. At the end of the road park your car in the parking area.
The West Rim Trail is marked by bright orange paint blazes and starts to the right of the parking area. Walk up the road and watch for a SHARP left turn into the woods. There is a viewpoint almost immediately. Continue to walk on the trail which turns briefly away from the rim to cross an unnamed tributary. Further along at 1.4 miles is a large detour around Ice Break Run. A "blue" trail meets the main trail at the head of the run. These trails lead directly to the park roads and allow quick access to these areas. Just after Ice Break there is another nice lookout. The trail then travels the rim briefly before turning up Little Slate Run at 2.0 miles. This is by far the longest detour as the canyon is the steepest and deepest. Walk to the head of the run, cross the run and hike back down the other side to the gorge rim. Another lookout greets you at this point.
After Little Slate are Tumbling Run, Horse Run and Burdic Run and various viewpoints along the way. After Burdic Run there is a rather long section of trail without any lookouts. The trail travels through some nice pine groves and is mostly flat. Watch for the orange blazes to turn abruptly left and go up and over a hill. DO NOT take this trail. Continue straight ahead on the blue blazed Refuge Trail which is less than .5 miles from the trail junction.
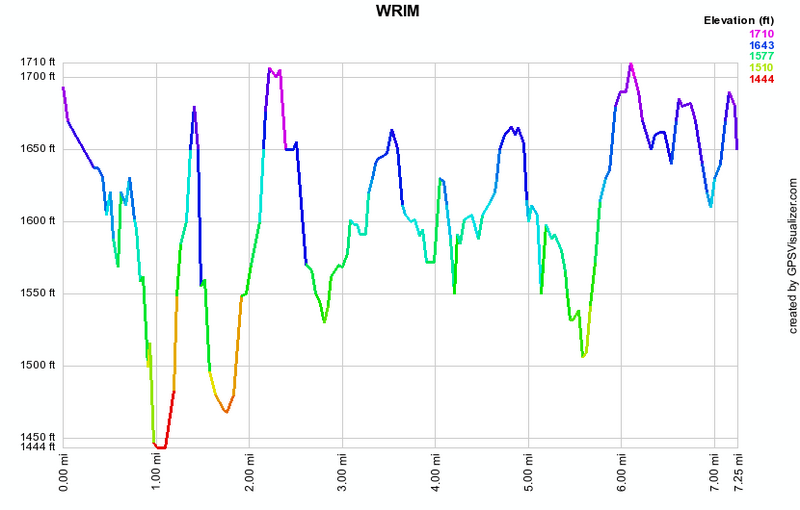 (The image at the left shows the profile of the hike. Remember that all vertical profiles are
relative!)
(The image at the left shows the profile of the hike. Remember that all vertical profiles are
relative!)
Willow Trail to Silver Hollow
| Quick Look | ||||
|---|---|---|---|---|
| Difficulty | Round trip | Total climb | Internet Maps | |
| 11.5 mi | 4880 ft | AllTrails | ||
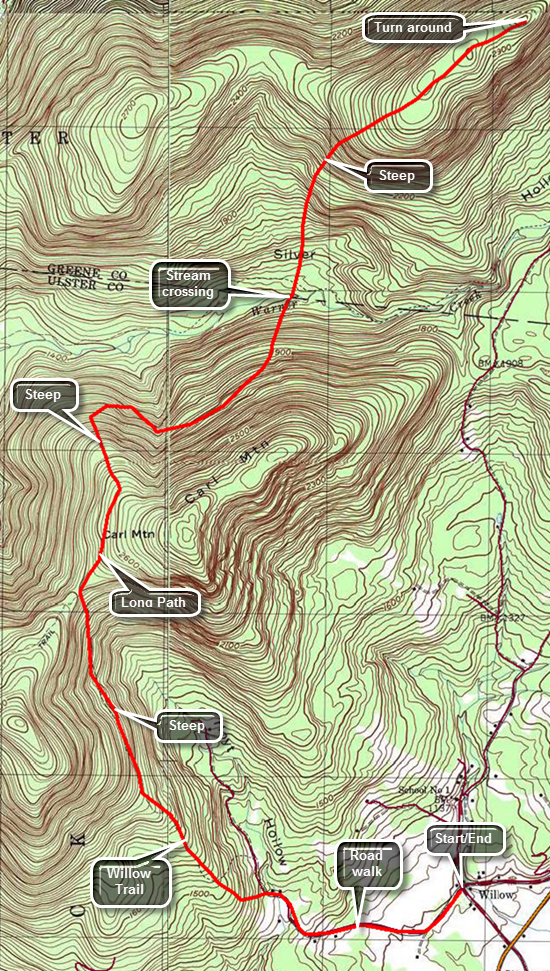 Turn off Route 28 onto the main street in Phoenicia. Continue on Main Street which becomes Route 40 and passes the main parking area for Mount Tremper. At the intersection with Route 212 turn left and drive to VanWagner Road on the left. Turned left on VanWagner Road to get to the small hamlet of Willow. Along the way you will pass the Woodstock Farm Animal Sanctuary on the left. Just passed this is the intersection with Jessup Road which leads to the Willow Trail. On the corner is the Willow Post Office where you will park since there is no parking near the actual trailhead. The post office appears to be a construction trailer with a zip code sign! To begin your hike walk up Jessup Road for about 1.1 miles passing the end of the public road along the way. Turn left onto the woods road that is the first part of the trail. The trail climbs from the post office but after the turn into the woods it begins to ascend more steeply. The grade averages about 15% until it levels off at 2 miles. Along the way the route transitions from the woods road to a trail that, in some cases, hangs right on the edge of the hill. It becomes rocky and the footing can be difficult especially in wet weather. At the two mile mark the trail elevation has increased from about 1100 feet to almost 2100 feet. Along the way you may get some views of the mountains and valleys to the north and east. After a quarter mile of relatively flat walking, the trail again begins to ascend gaining another 400 feet to the trail junction with the Warner Creek Trail at 2.7 miles. At the trail junction turn right to follow the Warner Creek Trail north toward Carl Mountain. At about 2.8 miles the trail begins to drop some as it negotiates a route that does not actually reach the summit of Carl Mountain. The trail descends off the slopes of Carl Mountain until at 4.25 miles it crosses Warner Creek. This can be a tricky crossing when the water is high. Continue on the trail as it begin an ascent up to the ridge. This ascent can be steep at times as it gains 1400 feet in less than a mile. Once the ascent is complete walk along the flat summit of Silver Notch until you are ready to turn around. To complete the out and back hike simply turn around and follow your route back to the car.
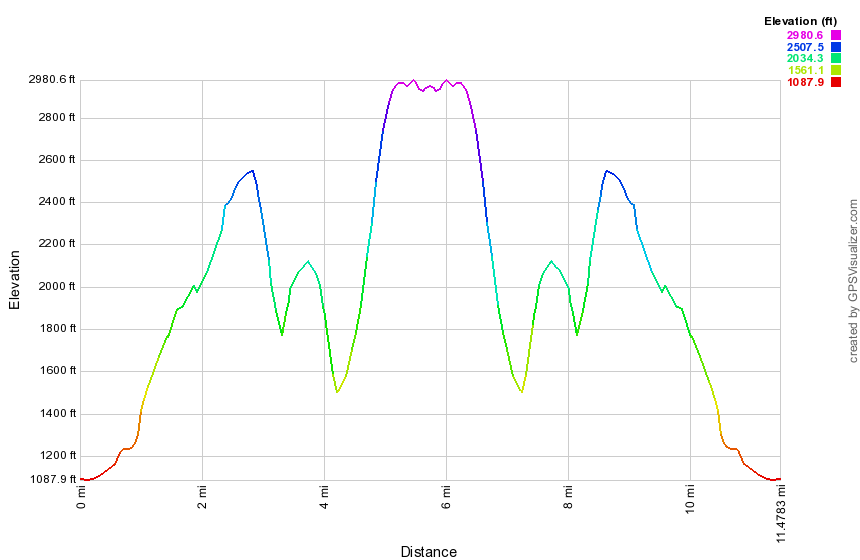 (The image above shows the profile of the hike. Remember that all vertical profiles are relative!)
Willow Trail to Mount Tremper
| Quick Look | ||||
|---|---|---|---|---|
| Difficulty | Round trip | Total climb | Internet Maps | |
| 9.5 mi | 2310 ft | AllTrails | ||
 Turn off Route 28 onto the main street in Phoenicia. Continue on Main Street which becomes Route 40 and passes the main parking area for Mount Tremper. At the intersection with Route 212 turn left and drive to VanWagner Road on the left. Turned left on VanWagner Road to get to the small hamlet of Willow. Along the way you will pass the Woodstock Farm Animal Sanctuary on the left. Just passed this is the intersection with Jessup Road which leads to the Willow Trail. On the corner is the Willow Post Office where you will park since there is no parking near the actual trailhead. The post office appears to be a construction trailer with a zip code sign! To begin your hike walk up Jessup Road for about 1.1 miles passing the end of the public road along the way. Turn left onto the woods road that is the first part of the trail. The trail climbs from the post office but after the turn into the woods it begins to ascend more steeply. The grade averages about 15% until it levels off at 2 miles. Along the way the route transitions from the woods road to a trail that, in some cases, hangs right on the edge of the hill. It becomes rocky and the footing can be difficult especially in wet weather. At the two mile mark the trail elevation has increased from about 1100 feet to almost 2100 feet. Along the way you may get some views of the mountains and valleys to the north and east. After a quarter mile of relatively flat walking, the trail again begins to ascend gaining another 400 feet to the trail junction with the Warner Creek Trail at 2.7 miles. At the trail junction turn left to follow the Warner Creek Trail to Mount Tremper where it ends at the fire tower. The turn is more than 90 degrees and changes the direction of travel from north to west by southwest. Initially the trail ascends some but at 3.2 miles it starts a descent to avoid sidehilling along an unnamed bump before Mount Tremper. At 4 miles another climb begins as the trail turns south and heads toward the fire tower. Over the next .85 miles you will reach a sort of summit plateau and negotiate a short descent before climbing again to reach the tower. The last ascent is about 365 feet. The Warner Creek Trail ends at the tower. To complete the out and back hike simply turn around and follow your route back to the car.
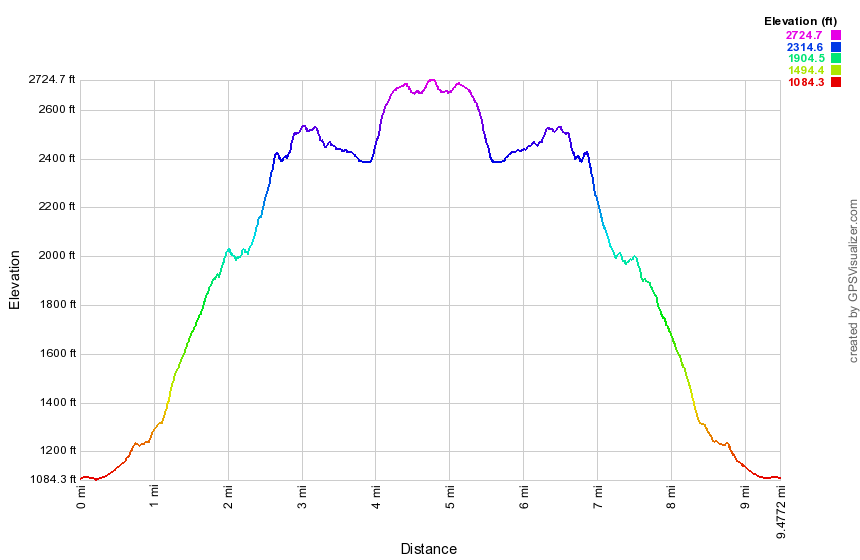 (The image above shows the profile of the hike. Remember that all vertical profiles are relative!)
Willsie Road to East Berne
| Quick Look | ||||
|---|---|---|---|---|
| Difficulty | Round trip | Total climb | Internet Maps | |
| 9.6 mi. | 1180 ft. | AllTrails | ||

 (The image at the left shows the profile of the hike. Remember that all vertical profiles are
relative!)
(The image at the left shows the profile of the hike. Remember that all vertical profiles are
relative!)
Windham to Barlow Notch
| Quick Look | ||||
|---|---|---|---|---|
| Difficulty | Round trip | Total climb | Internet Maps | |
| 8.2 mi | 1864 ft | AllTrails | ||
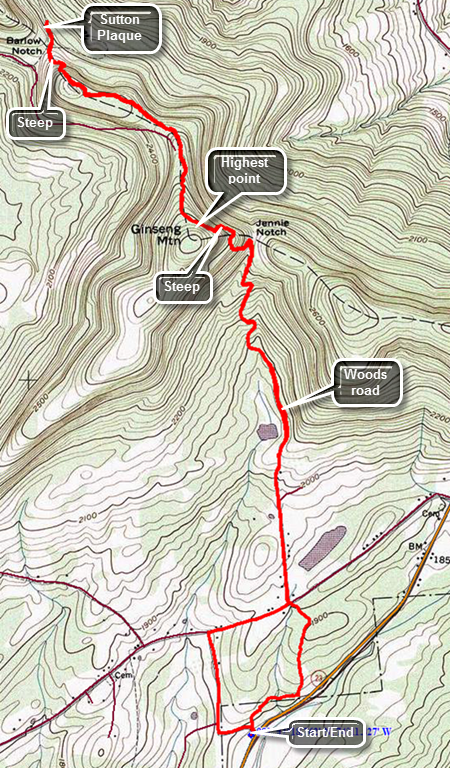 Drive east on Route 23 from the village of Windham. Watch for the Elm Ridge parking area and Cross Road on the left or north side of the road. Park in the parking area and when you are ready walk to Cross Road. Cross the road and find the trail marked with blue plastic discs as well as the aqua blazes of the Long Path. The first .33 miles is pretty flat and actually parallels Route 23. The trail is not always well-maintained and can be overgrown. In addition, the area can be very damp during wet seasons which seems to attract insects. The trail turns north and begins to rise but only slightly. Walking through the evergreens may remind you a little of some of the places over on Windham High Peak. At .75 miles you will come out of the woods and cross Old Road to Jennie Notch Road. The trail follows Jennie Notch Road to where it dead ends. There is a small pond or lake on the right with a mountain behind it which can be quite picturesque. The paved road soon turns to dirt and then ends at about 1.3 miles where there is an open gate. The road actually continues as a grassy lane which is easy to follow even though the blazes are few and far between. Initially the grade of the road is gradual. It is obvious that the road was important and built up with a shale base at some point. You will pass a small pond on the left with some very limited views through the trees. Starting at 1.8 mikes the grade increases until Jennie Notch at about 2.4 miles. Along the way you can see some cliffs on the left which defines part of Ginseng Mountain. There are several switchbacks along the way but at the Notch the trail turns to the left more than 90 degrees. It begins to head up the mountain and soon the grade is 30% or more! This doesn't last very long and between 2.6 and 2.8 miles the trail begins to sidehill along the north shoulder of Ginseng Mountain. The trail levels a little at the top and then starts to descend. The Long Path in this area is overgrown with low briars and nettles and there are several blowdowns. Over the first half mile you will lose about 260 feet from the highest point on the hike. You will be walking along a ridge with no real views. On either side of the trail you can see sky as the ridge is not very wide. In winter there are limited views since the leaves are not a factor. After the descent the trail gains some elevation and then starts the drop to Barlow's Notch. On the descent look to the right for the best view of the day. The trail down to the Notch has several steep places. You will be at he Notch at about 3.9 miles. If you continue to walk a little farther there is a small memorial plaque to local resident Donald Sutton. You will have dropped 530 feet from the top of Ginseng Mountain. Reverse your route and remember that after the climb to the high point on Ginseng Mountain, the return trip is all downhill or flat. At the point where Jennie Notch Road meets Old Road you can reenter the woods or use the roads to return to the car. At the intersection turn right on Old Road, walk down to Cross Road and follow it back to the parking area. The distance on the roads is a little longer but the time is quicker.
 (The image at the left shows the profile of the hike. Remember that all vertical profiles are relative!)
White Rocks to Old Albany Post Rd
| Quick Look | ||||
|---|---|---|---|---|
| Difficulty | Round trip | Total climb | Internet Maps | |
| 9.1 mi. | 2245 ft. | AllTrails | ||

Take Route 9D south from the Newburgh-Beacon bridge to Garrison. Follow Route 403 southeast to Route 9. At Route 9 I turn left and shortly after turn right onto Old West Point Road. A short distance up the road turn right on Graymoor Road. Park on the grassy shoulder of the road where the AT crosses just before the road splits. Graymoor is a Franciscan monastery and retreat. Follow the AT and descend for about .3 miles and then walked another .2 miles to where the trail crosses Route 9 and Route 403. After crossing the roads, there is a sign board or kiosk and then a long elevated walkway across a marshy area. Begin to climb for the next .5 miles to a trail junction on a fairly wide and well-maintained woods road along a small stream. At the trail junction turn left and stay on the AT to the top of the ridge. At 1.4 miles you will top the ridge. Turn left to stay on the AT. Over the next .1 or so miles there will be paths to walk out to the edge of the ridge to various viewpoints. There are places that may have been viewpoints but are now blocked by trees. Turn back and follow your path back to the car. Cross the road and pick up the AT again on the other side. The trail crosses the Old West Point Road and descends to a swampy area before starting to climb again. The trail heads northeast and at 3.9 miles there is a trail to the right that ascends Little Fort Hill. Climb the short trail to find a stone wall which surrounds a small "park". At one end is a small shrine labeled "Virgen Misionera Madre de los Immigrantes"! Turn around to descend the spur trail back to the AT. Turn right on the AT and continue to hike to the northeast. At 4.9 miles another spur trail turns off to the left to ascend Denning Hill. Follow the trail and look for a viewpoint near the end. There is a rock ledge near the end of the trail but, like so many others, the view is now obscured by the trees. Return to the main trail and turned left to continue to the northeast. You will pass by Fort Defiance Hill on your left. At 5.5 miles you will be on top of a ridge where the trail turns sharply to the right and starts down. You will have to drop almost 450 feet to reach the road. As you start down watch for the best viewpoint of the day on an open rock face with an unobstructed view to the south and east. Of course, there isn't much to see except trees! Continue to follow the trail down until it levels off. The trail surface is mostly jagged rocks which makes walking a challenge. Along the way the trail begins to climb along the shoulder of the ridge before the final descent to the road. Continue follow the trail and finally reach the road at 6.3 miles. Turn around and begin the trek back to the car.
 (The image at the left shows the profile of the hike. Remember that all vertical profiles are relative!)
Whites Road to Malden Avenue
| Quick Look | ||||
|---|---|---|---|---|
| Difficulty | Round trip | Total climb | Internet Maps | |
| 2.5 mi. | 366 ft. | |||
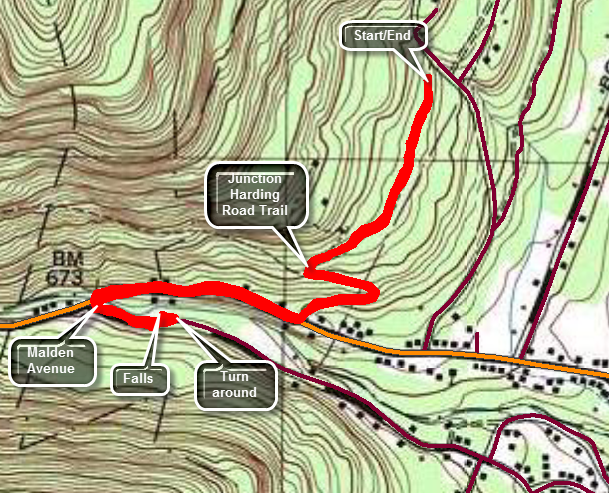 The hiking trails around the North Lake South Lake Campgrounds may be the most scenic in the Catskills. As you hike the Escarpment Trail the history and the views just seem to get better with every passing mile. Many spots have names like Inspiration Point and Artist's Rock. Even places that aren't named have beautiful views of the Hudson River and surrounding countryside.
This hike "connects" the Harding Road Trail to Malden Avenue to complete a section of the Long Path. Turn north on Whites Road just west of Palenville on Route 23A. Drive up the road a little more than half a mile watching for the access road to the parking area on the left. Park in the small lot and head out on the yellow connector trail. The first .4 miles of trail are relatively flat but then the trail begins to lose some elevation to the junction with the red-blazed Harding Road Trail. Turn left and drop some more elevation to the end of the Harding Road Trail at Route 23A. There is a small parking area here with a sign board. Turned right on Route 23A and began to hike to Malden Avenue. The shoulders on Route 23A are very narrow and it can be a little tricky when there is traffic coming down the hill. It is only .35 miles to the turn and at 1 mile turn left on Malden Avenue. You may turn around here or hike down Malden Avenue for some distance. There is a falls on the creek just downstream from the bridge. The land between the trail and the falls is private property so you will have to use the zoom on your camera to take pictures. When you are done, turn around and walk back to the Harding Road Trail. As you ascend the trail, be sure to make the turn on the yellow connector trail. Almost immediately after that turn the yellow trail heads to the right and an unmarked woods road continues straight ahead and up the hill. Be sure to stay on the yellow trail.
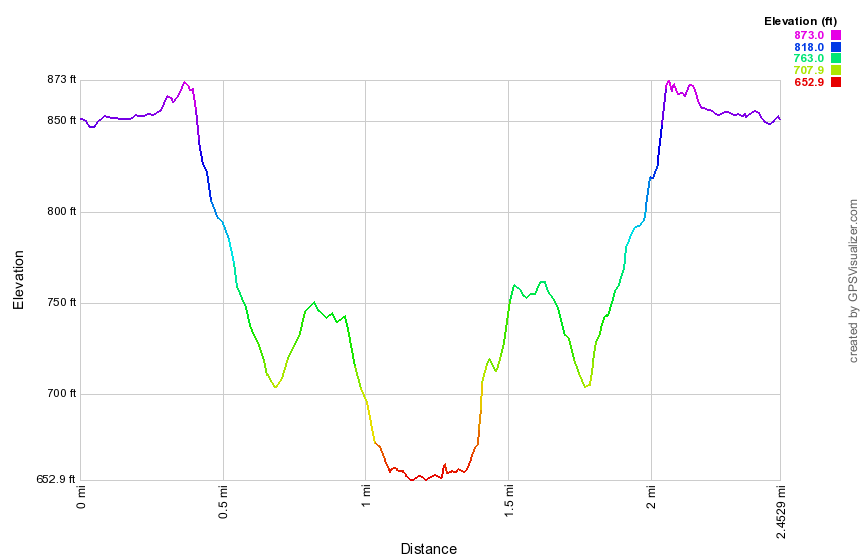 (The image at the left shows the profile of the hike. Remember that all vertical profiles are relative!)
Winter Clove: Rips Rock
| Quick Look | ||||
|---|---|---|---|---|
| Difficulty | Round trip | Total climb | Internet Maps | |
| 5.3 mi | 1218 ft | AllTrails | ||
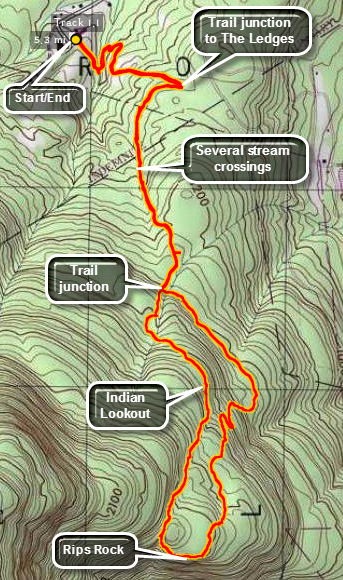 From State Route 32 north of Palenville turn west on County Route 31 Hearts Content Road just north of the Friar Tuck Inn. Turn southwest on Winter Clove Road and stay on Winter Clove Road all the way to the end. Park at the Winter Clove Inn. This is a PRIVATE resort and all the trails start on PRIVATE property. Go to the front desk in the main building and ring the bell. Ask politely if you may park and hike. The Inn will even allow you to take the descriptions they have of their trails.
This hike starts by heading out across the field from the parking area by the building across from the Inn. There will be a sign listing some of the trails available one of which is Rips Rock. Cross the field an enter the trees. A sign will point to the left off the road/trail that you are on. Follow the "Hiking Trails" sign and cross the bridge. The trail will now parallel the creek briefly before turning right up the hill and passing through a switchback or two. The trail marking are a mixture of signs. red and blue paint blotches, red and blue metal tags and orange or pink ribbons. As the trail opens into the next field walk along the right hand side of the field and reenter the trees on the trail or woods road. Shortly the trail will split and you should follow the signs that point right to Rips Rock. Soon the trail heads east and away from the brook through a field and passes by a lean-to. At about .6 miles a trail turns east toward "The Ledges" but you should continue on the trail you are on, first west and then south. You will cross several small streams of running water some of which are on the trail. At .9 miles another sign points to a spur trail to "Lost Pond". Around 1.2 miles another spur trail heads to "Lost Bridge" and just beyond that point is a short trail to the left to a campsite. At 1.5 miles you have the choice of turning left to the "Lower Rips Trail" or continuing on the same trail. Continue on the trail without turning and walk parallel to a small brook that has cut a deep gorge between and into the surrounding rock. At 1.7 miles cut across this brook. The trail begins to level a little and at 2.1 miles you will arrive at an opening in the trees that looks to the east toward the Hudson River. You are walking on the edge of an escarpment but there is another, higher ridge of rock to our right. From this point on the trail is poorly marked as the paint blazes end and only some faded ribbons mark the way. From the Indian Lookout the trail is level but at first but then begins to drop to a small stream not shown on the map. It continues to head south and follows the stream up a hill. The trail is not well-used. At 2.4 miles a significant gorge appears and the trail swings left or southeast and ascends another small hill. It hugs the edge of the top of the hill where several views open up of the opposite side of the hollow where there are interesting rock formations. You may have to slide down a slippery rock and duck under some brush but the reward is a beautiful, expansive lookout toward the east and southeast. A small sign declares "Rips Rock 1,809 feet". The deep chasm immediately to the south is formed by Stony Brook and is sometimes called Rip Van Winkle Hollow. Be careful walking along the narrow trail at the edge of the cliff. Wet rocks and overgrown brush tend to push you dangerously close to the edge. The views just keep getting better until the trail heads left into the woods. The trail leads roughly around the top of the hill and makes a short, steep descent between and over some rocks. The trail now changes character becoming wide and well-used. Continue to descend and pass through a few switchbacks. The trail continues to parallel the one you used on the ascent but at a lower elevation. Once you reach the junction with the trail you used earlier turn right and simply follow your early route in reverse back to the car.
 (The image at the left shows the profile of the hike. Remember that all vertical profiles are relative!)
Winter Clove: Rips Rock, Lost Pond, Ledges
| Quick Look | ||||
|---|---|---|---|---|
| Difficulty | Round trip | Total climb | Internet Maps | |
| 6.2 mi | 1207 ft | AllTrails | ||
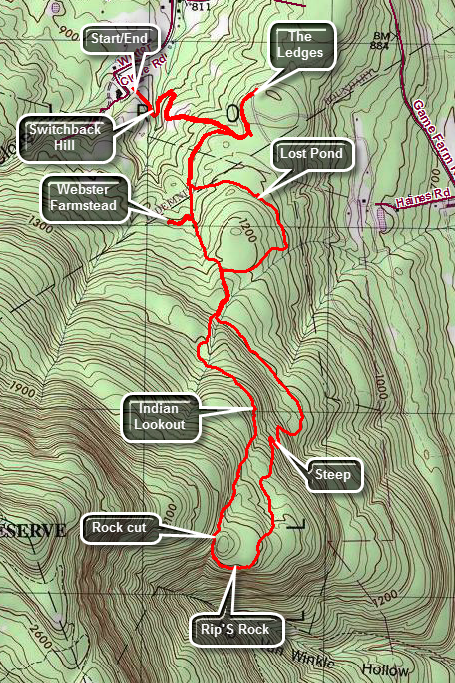 From State Route 32 north of Palenville turn west or left on County Route 31 Hearts Content Road. Turn southwest or left on Winter Clove Road and drive about 1 mile until the road makes a sharp left. Turn left to follow the road all the way to the end. Drive passed the main building of the Winter Clove Inn and park behind the building on the left. This is a PRIVATE resort and all the trails start on PRIVATE property. Go to the front desk in the main building and ring the bell. Ask politely if you may park and hike. The Inn will even allow you to take the descriptions they have of their trails.
This hike starts by heading out across the field from the parking area by the building across from the Inn. There will be a sign listing some of the trails available one of which is Rips Rock. Cross the field an enter the trees. A sign will point to the left off the road/trail that you are on. Follow the "Hiking Trails" sign and cross the bridge. The trail will now parallel the creek briefly before turning right up the hill and passing through a switchback or two. The trail marking are a mixture of signs. red and blue paint blotches, red and blue metal tags and orange or pink ribbons. As the trail opens into the next field walk along the right hand side of the field and reenter the trees on the trail or woods road. Shortly the trail will split and you should follow the signs that point right to Rips Rock. Soon the trail heads east and away from the brook and at about .6 miles a trail turns east toward "The Ledges" but you should continue on the trail you are on. The trail turns west through a field and passes by a warming hut. At about .7 miles the trail turns south an parallels a stream on the right. You may cross several small streams of running water some of which are on the trail. At .9 miles another sign points to a spur trail to "Lost Pond" but you will continue on the main trail. Around 1.2 miles another spur trail heads West or to the right and leads to the Webster farmstead. Turner and walk a short distance to the foundation that marks all that remains of a prominent family in the area. Turn around and walk back to the main trail which now ascends a hill still heading south. At 1.4 miles you have the choice of turning left to the "Lower Rips Trail" or continuing on the same trail. Continue on the trail without turning and walk parallel to a small brook that has cut a deep gorge between and into the surrounding rock. At 1.7 miles cut across this brook. The trail begins to level a little and at 2.0 miles you will arrive at "Indian Lookout", an opening in the trees that looks to the east toward the Hudson River. You are walking on the edge of an escarpment but there is another, higher ridge of rock to our right. From this point on the trail continues to be marked with paint blazes. From Indian Lookout the trail is level at first but then begins to drop to a small stream not shown on the map. It continues to head south and follows the stream up a hill. The trail is seems not to be well-used and there may not be much of a tramway to follow. At 2.4 miles a significant gorge appears and the trail swings left or southeast and ascends another small hill. It hugs the edge of the top of the hill where several views open up of the opposite side of the hollow where there are interesting rock formations. You may have to slide down a slippery rock and duck under some brush but the reward is a beautiful, expansive lookout toward the east and southeast. A small sign at about 2.7 miles declares "Rips Rock 1,809 feet". The deep chasm immediately to the south is formed by Stony Brook and is sometimes called Rip Van Winkle Hollow. Be careful walking along the narrow trail at the edge of the cliff. Wet rocks and overgrown brush tend to push you dangerously close to the edge. The views just keep getting better until the trail heads left into the woods. The trail leads roughly around the top of the hill and makes a short, steep descent between and over some rocks. The trail now changes character becoming wide and well-used. Continue to descend and pass through a few switchbacks. The trail continues to parallel the one you used on the ascent but at a lower elevation. Once you reach the junction with the trail you used earlier turn right and start to follow your early route until at 4.15 miles you reach the turnoff for "lost Pond" on the right. Turn here and follow this trail as it loops around first east and then north and then east again. Watch for the paint blazes as the trail may be hard to spot otherwise. At about 4.6 miles you will notice a clearing to the right of the trail. This was once a pond but in now completely dry and this "Lost". At 4.9 miles you will be back at the main trail. Turn right and continue to follow the trail you were on earlier to 5.25 miles where the main trail turns sharply left. Turn right and follow a short trail out to a dirt road. Turn left on the road and walk north to a dead end avoiding the left fork on the road which heads downhill. To the west on your right is the Great Wall of Manitou consisting of North Mountain, Stoppel Point and the Blackhead Range. When you are ready walk back to the path on the dirt road and follow the main trail back down Switchback Hill and across the field to your car.
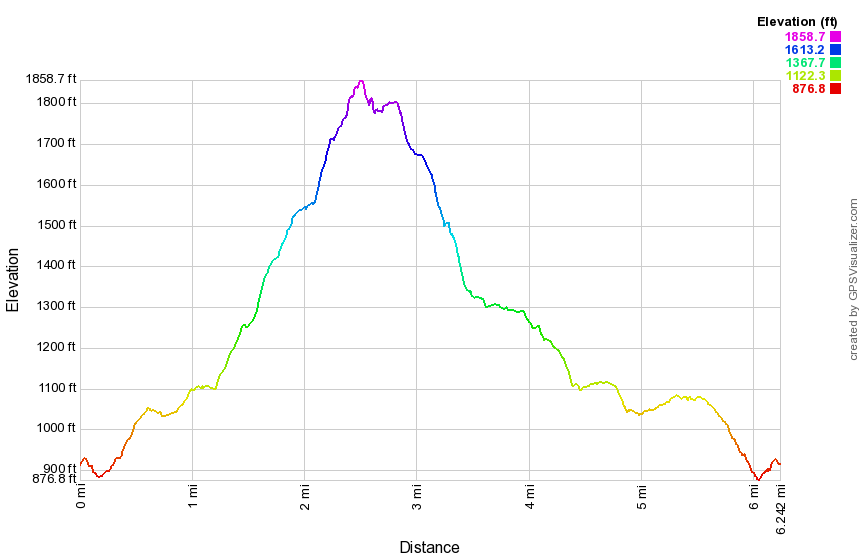 (The image at the left shows the profile of the hike. Remember that all vertical profiles are relative!)
Winter Clove: Stoppel Point
| Quick Look | ||||
|---|---|---|---|---|
| Difficulty | Round trip | Total climb | Internet Maps | |
| 6.6 mi | 2762 ft | AllTrails | ||
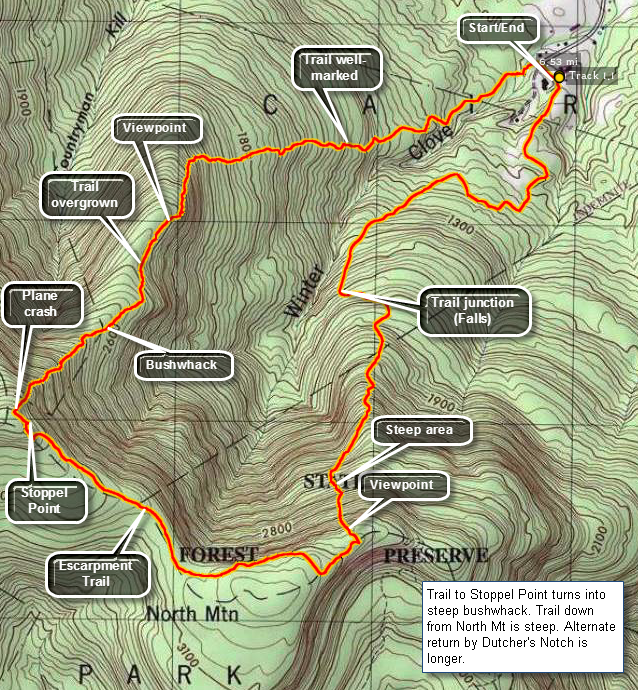 From State Route 32 north of Palenville turn west on County Route 31 Hearts Content Road just north of the Friar Tuck Inn. Turn southwest on Winter Clove Road and stay on Winter Clove Road all the way to the end. Park at the Winter Clove Inn. This is a PRIVATE resort and all the trails start on PRIVATE property. Go to the front desk in the main building and ring the bell. Ask politely if you may park and hike. The Inn will even allow you to take the descriptions they have of their trails.
This hike starts by going past the gazebo on the back lawn of the Inn, crossing the dirt road and walking down to the covered bridge across the stream. Below the bridge is Artist Falls, a destination in itself. Continue across the bridge on the trail and do not turn right on Lovers Loop or left to the Venus Bath. Straight ahead lies the trail you want to Stoppel Point or the Yankee Smith Trail. The further you go the less well defined and marked the trail becomes. At 1.4 miles the trail turns south from its easterly course and continues to gain elevation .At about 1.7 miles the trail flattens some and wanders near the edge of the cliff. From here there are some ices views. Walk back into the woods and pick up the trail if you can. At some point you will have to give up on the trail and navigate your way up over steep terrain and through rocky ledges to Stoppel Point. Most routes seem to come out near the plane crash on the trail. At times, if you look back over your shoulder you may see blazes more easily. Turn left on the trail and walk about .2 miles to the lookout at Stoppel Point. Descend on the trail for about 1.35 miles passing the summit of North Mountain on your right. Watch for a faint path that turns to the left that goes over a large boulder. This trail leads down to Winter Clove and once you find it is better marked than the trail up. From the Escarpment Trail the path leads down to the trail to Winter Clove Falls. At times the descent is steep but there are some views along the way. At about 5 miles the trail turns west from its northerly heading. At 5.2 miles the path intersects the Falls Trail. Turn right and follow the marked trails back to the parking area over the next 1.4 miles.
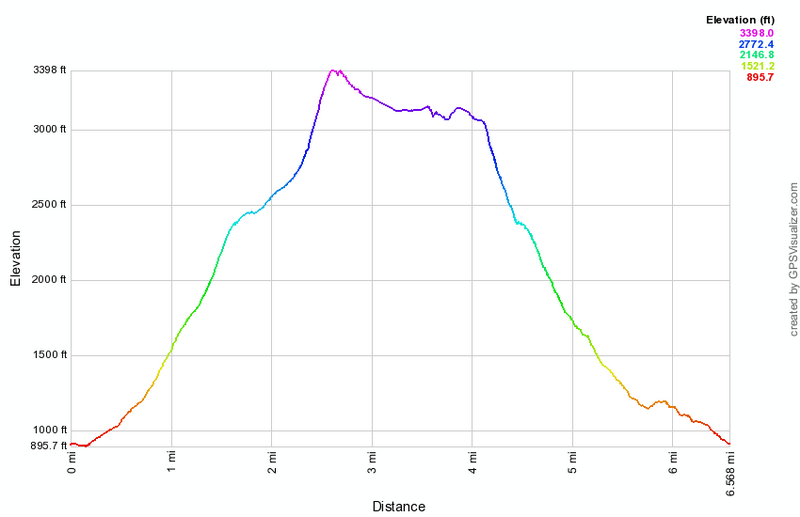 (The image at the left shows the profile of the hike. Remember that all vertical profiles are relative!)
Winter Clove: The Ledges
| Quick Look | ||||
|---|---|---|---|---|
| Difficulty | Round trip | Total climb | Internet Maps | |
| 1.7 mi | 260 ft | AllTrails | ||
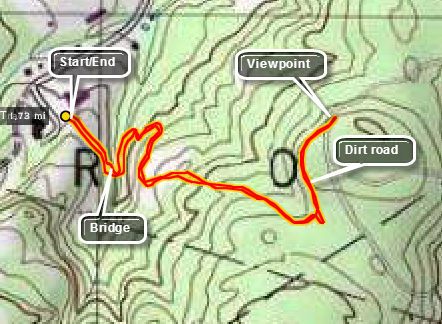 From State Route 32 north of Palenville turn west on County Route 31 Hearts Content Road just north of the Friar Tuck Inn. Turn southwest on Winter Clove Road and stay on Winter Clove Road all the way to the end. Park at the Winter Clove Inn. This is a PRIVATE resort and all the trails start on PRIVATE property. Go to the front desk in the main building and ring the bell. Ask politely if you may park and hike. The INN will even allow you to take the descriptions they have of their trails.
This hike starts by heading out across the field from the parking area by the building across from the Inn. There will be a sign listing some of the trails available one of which is The Ledges. Cross the field an enter the trees. A sign will point to the left off the road/trail that you are on. Follow the "Hiking Trails" sign and cross the bridge. The trail will now parallel the creek briefly before turning right up the hill and passing through a switchback or two. The trail marking are a mixture of signs. red and blue paint blotches, red and blue metal tags and orange or pink ribbons. As the trail opens into the next field walk along the right hand side of the field and reenter the trees on the trail or woods road. Shortly the trail will split and you should follow the signs that point left to The Ledges. The trail will meet a dirt road where you should turn to the left. Follow the dirt road to the end without turning down the hill. The Ledges are at the top of the hill and offer a nice, but low angle view, of the valley. Winter Clove Inn is down to the left. The Great Wall of Manitou is to the left right behind the trail you came up. The distance from the Inn to the Ledges is under one mile. Retrace your path to return to your car.
 (The image at the left shows the profile of the hike. Remember that all vertical profiles are relative!)
Winter Clove: Venus Bath
| Quick Look | ||||
|---|---|---|---|---|
| Difficulty | Round trip | Total climb | Internet Maps | |
| 1.4 mi | 280 ft | AllTrails | ||
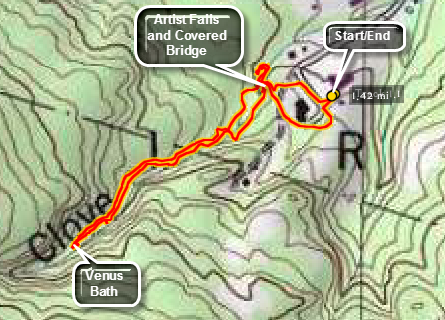 From State Route 32 north of Palenville turn west on County Route 31 Hearts Content Road just north of the Friar Tuck Inn. Turn southwest on Winter Clove Road and stay on Winter Clove Road all the way to the end. Park at the Winter Clove Inn. This is a PRIVATE resort and all the trails start on PRIVATE property. Go to the front desk in the main building and ring the bell. Ask politely if you may park and hike. The Inn will even allow you to take the descriptions they have of their trails.
This hike starts by going past the gazebo on the back lawn of the Inn, crossing the dirt road and walking down to the covered bridge across the stream. Below the bridge is Artist Falls, a destination in itself. The falls forms directly under the bridge but there is a path to the pool at the base of the falls. From this path go back up to the bridge and continue across the bridge on the trail. Do not turn right on Lovers Loop but left to the Venus Bath. for a walk up Kiskatom Brook. There are several interesting rapids along the way. At .45 miles you will pass a footbridge to the other side. Continue on the trail along the creek. At about .8 miles of hiking you will arrive at the Venus Bath. Here a small set of rapids and waterfalls have carved a natural "bath" in the rock. Start back to the car on the same trail but cross the footbridge to the other side. The walk back to the car is only .6 miles.
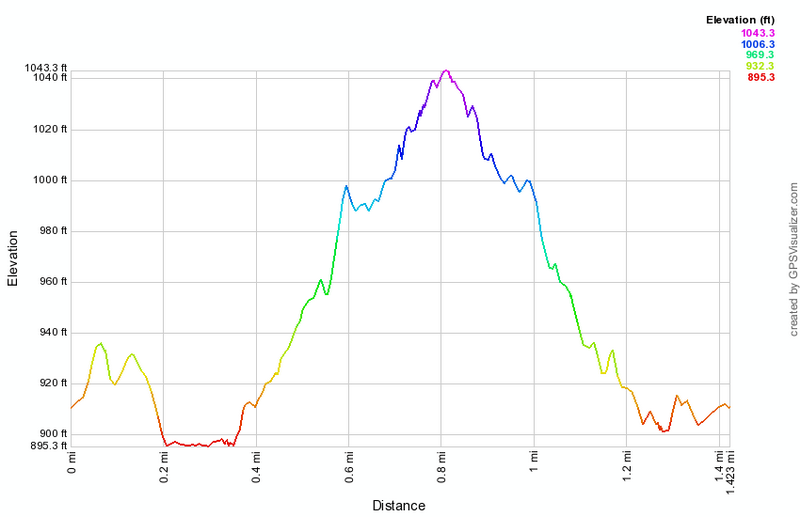 (The image at the left shows the profile of the hike. Remember that all vertical profiles are relative!)
Winter Clove: Winter Clove Falls and Escarpment Loop
| Quick Look | ||||
|---|---|---|---|---|
| Difficulty | Round trip | Total climb | Internet Maps | |
| 12.1 mi | 3642 ft | AllTrails | ||
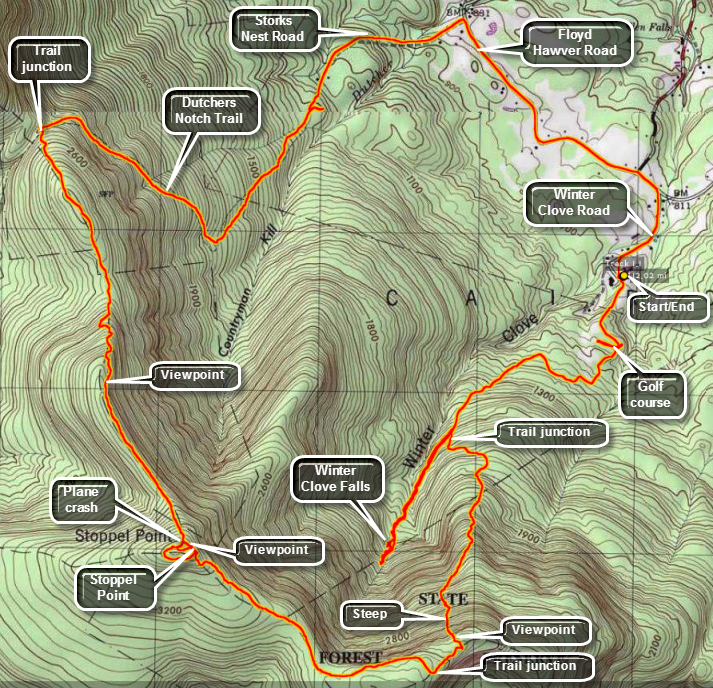 From State Route 32 north of Palenville turn west on County Route 31 Hearts Content Road just north of the Friar Tuck Inn. Turn southwest on Winter Clove Road and stay on Winter Clove Road all the way to the end. Park at the Winter Clove Inn. This is a PRIVATE resort and all the trails start on PRIVATE property. Go to the front desk in the main building and ring the bell. Ask politely if you may park and hike. The INN will even allow you to take the descriptions they have of their trails.
This hike starts by heading out across the field from the parking area by the building across from the Inn. As you walk back toward the Inn there will be a building on the left. Walk up the path next to the building and then up the gravel/dirt road that runs alongside the golf course. When the road splits, take the up branch to the left and walk up to another part of the course. Walk across the course, avoiding the greens, toward the upper left corner of the open space. You are looking for the SIXTH TEE. Pass through some trees and cross two small bridges. Walk down the fairway and take the first trail to your right. Walk up a small hill and then into a field or clearing. Walk along the left side of the field and look on the left for an old sign that says Webster's Pass. Turn left here and walk along an old road. A sign on the right says North Point and Winter Clove Falls. Turn right here at about .6 miles into the hike. From here the trail climbs a little and then starts downhill, At about .8 miles the trail turns to the left at a sign again designating North Point and Winter Clove Falls. From here the trail climbs steadily using old woods roads until at 1.35 miles it splits. Bear to the right toward Winter Clove Falls. Along the way you may hear the roar of the water of a creek to your right and, at times, you may see the water forming small drops and rapids along the way. At 1.65 miles the trail descends a little and crosses an old creek bed with several downed trees. From this point on the trail markers are scarce and a little faded but continue to follow the creek bed.You will keep getting closer to the creek and should see glimpses of the falls ahead. The trail climbs steeply at this point to the top of the falls. There is a view along the clove out into the valley toward the Hudson but how could the view is depends on the lighting and the amount of haze. The falls has two major drops and the water volume controls how impressive they will be. You can carefully work my way down the north bank to the area between the two drops. This is not easy but it does allow you to get a view of the upper drop head-on. Work your way back to the top of the falls. At this point it is worth spending some time bushwhacking further up the stream to some more falls. How far you get on this bushwhack depends on the water level and your own desires. Headed back down the stream and down the trail you came up. Several paths lead down to the stream below the falls but all were very steep. Head back down the trail to where it split at about 2.75 into the hike. Turn right and start up the trail toward North Point. The trail is steep in most places and steeper in others. It is clear this is "the road less traveled" as there is little evidence of use and many of the paint blazes are very faded. At about 3.0 miles the trail turns left and starts an ascent that is about a mile long and gains over 1300'. Parts of the trail follow old roads up the mountain. In other places the trail leaves the roads to take even steeper ascents. Near the top the angle is at least 45 degrees! On the way up the trail you can see the Blackhead Range to the right but the view is obscured by the trees. At around 3.9 miles you will we skirt some cliffs. On top there is one rock that offers an unobstructed view of the mountains. The trail is ill-defined toward the top but at about 4.0 miles into the hike you should hit the Escarpment Trail at 3100 feet slightly northeast of North Mountain. There is a nice viewpoint over North South Lake at this point. Turn right on the trail which is relatively heading toward Stoppel Point. At Stoppel Point you should be about 5.4 miles into the hike and one option is to return the way you came. Continue on the Escarpment Trail and watch for a viewpoint on the left side on the trail toward KHP and Round Top. Continue on to the plane crash. There is a "trail" from the plane crash down a ridge to the Winter Clove Inn but it is hard to find and overgrown. Continue on the Escarpment Trail to the Dutcher Notch Trail. On the way you will pass by Milt's Lookout at about 6.6 miles. From the lookout it is a 600 foot drop over the next 1.1 miles to the Dutcher Notch Trail and the last part of the descent was steep. The Dutcher Notch Trail follows a road that was the main connection between the farms in the Jewett Valley and the markets near the Hudson in Catskill and Cairo. The road was sited at the lowest point in the Wall of Manitou. Since the wagons could not ascend or descend directly due to the elevation gain over a short distance the road on the east side had to have a sweeping switchback. The trail stars slightly to the east but then turns southeast nearly paralleling the escarpment. It is interesting to walk down this trail below the escarpment where you were earlier. The road is so eroded in places that the trail travels along the high bank often on stone walls. After about a mile and 770 feet of descent the trail swings toward the northeast and continues to descend. It begins to follow a stream bed and enters private property with an easement. Continue on the trail as it passed across the lawn of a private residence and through a locked gate onto paved road at about 9.7 miles. After about .5 miles on Storks Nest Road turn right on Floyd Hawver Road. Hike a little more than 1.1 miles on Hawver Road before turning right on Winter Clove Road. After walking .5 miles on Winter Clove Road you will be back at the Inn and your car.
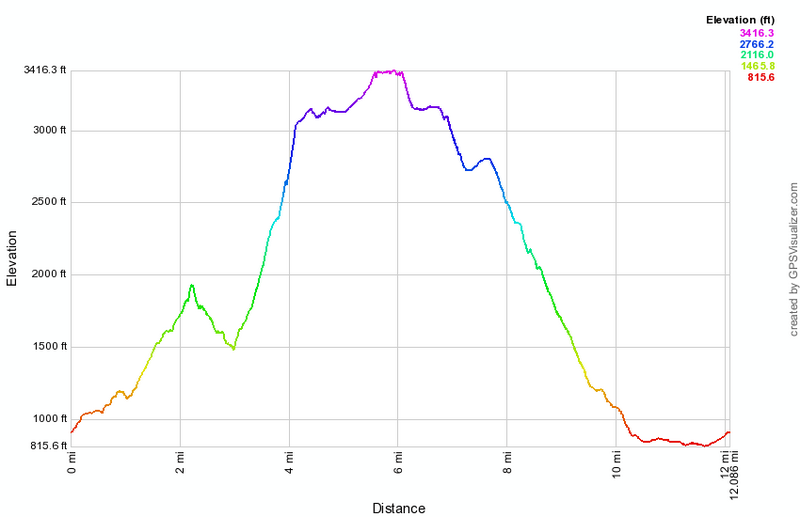 (The image at the left shows the profile of the hike. Remember that all vertical profiles are relative!)
Winter Clove: Yankee Smith and Lover's Loop
| Quick Look | ||||
|---|---|---|---|---|
| Difficulty | Round trip | Total climb | Internet Maps | |
| 4.1 mi | 720 ft | AllTrails | ||
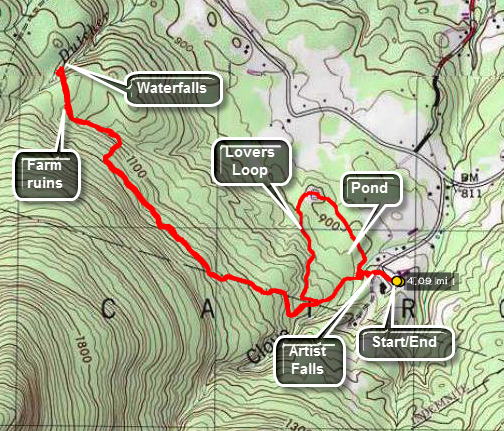 From State Route 32 north of Palenville turn west on County Route 31 Hearts Content Road just north of the Friar Tuck Inn. Turn southwest on Winter Clove Road and stay on Winter Clove Road all the way to the end. Park at the Winter Clove Inn. This is a PRIVATE resort and all the trails start on PRIVATE property. Go to the front desk in the main building and ring the bell. Ask politely if you may park and hike. The Inn will even allow you to take the descriptions they have of their trails.
This hike starts by going past the gazebo on the back lawn of the Inn, crossing the dirt road and walking down to the covered bridge across the stream. Below the bridge is Artist Falls, a destination in itself. Continue across the bridge on the trail and do not turn right on Lovers Loop but continue on the trail marked Yankee Smith. This trail leads to an area of stone walls that were built around the time of the American Revolution. The trail is blazed with red paint and is relatively easy to follow. It makes some twists and turns along the way. The first mile is a steady ascent followed by a drop. At 1.25 miles the trail begins to drop and some stone walls appear. Watch closely for the blazes and continue to follow them until about 1.5 miles where a smiley face on a tree announces the end of the trail. In the area is an impressive network of stone walls. The walls are on either side of a lane formed by more stone walls. Follow the lane which continues for several hundred feet before joining a woods road. Continue straight ahead through the forest and down an embankment to a stream with a nice waterfall. Sheba and I bushwhacked down the hill to the creek. Climb back up the hill to the road and return to the lane. Hike back down the lane and pick up the trail back at the "smiley face". The trail is blazed in blue for the return trip. At 3.0 miles into the hike you will be at a trail junction with the Stoppel Point Trail. Continue straight heading back toward Winter Clove Inn. At 3.1 miles turn left on the Lovers Loop trail and head north toward the pond. You will arrived at the small pond at 3.6 miles. Continue around the loop and you will end up back near Artist Falls. Continue back to your car.
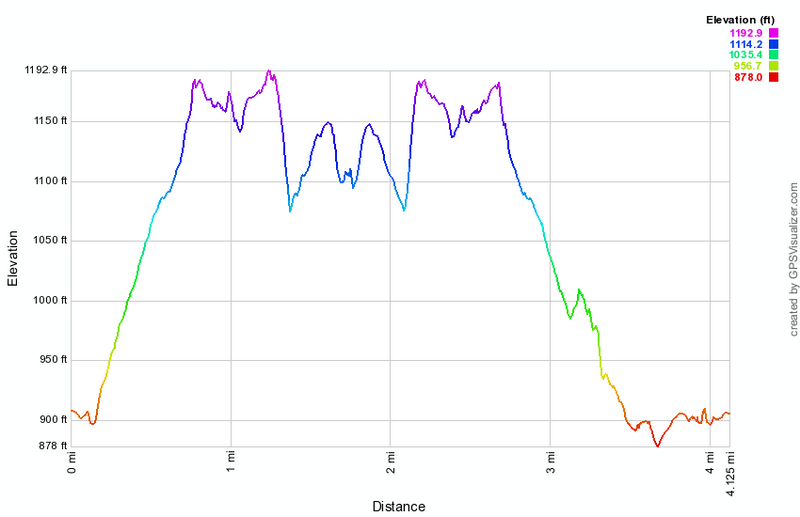 (The image at the left shows the profile of the hike. Remember that all vertical profiles are relative!)
Woodpecker and Millbrook Ridges
| Quick Look | ||||
|---|---|---|---|---|
| Difficulty | Round trip | Total climb | Internet Maps | |
| 7.5 mi. | 2000 ft. | AllTrails | ||
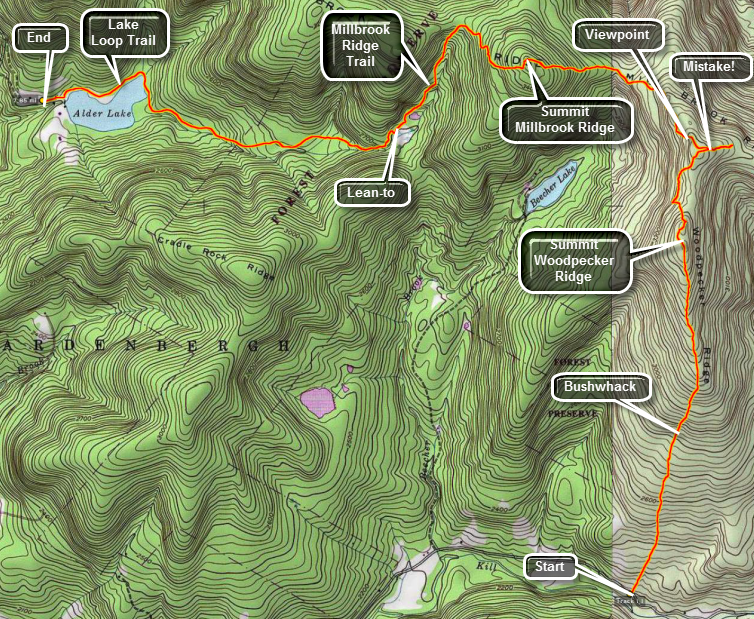
Woodpecker Ridge is one of the more western CHH peaks located in the Town of Hardenburgh in Ulster County. It is only accessible by bushwhacking. One way to hike this peak is to hike the Millbrook Ridge Trail that runs between Alder Lake and Balsam Lake Mountain. The high point on the ridge is less than a mile from where the Millbrook Ridge Trail passes by Woodpecker Ridge Another route is to park at the trailhead for the Mongaup Hardenburgh Trail and cross the road. From Livingston Manor (Exit 96 from I86) drive north and west on Old Route 17. Turn right on Beaverkill Road and continue on this road through the hamlets of Lew Beach and Turnwood. Watch for the road sign for Alder Creek Road on your left. Drive to the end of the road and turn right into the access road for Alder Lake. Park one car in the lot here. Drive back out to the Beaverkill Road and turn left to continue north. Watch for a sign for Cradle Rock Ridge on the right. Continue passed this sign until you see a small parking area for the beginning of the trail on your right. Park here and walk down the trail to the Beaverkill. Take some pictures of the suspension bridge over the river here. Return to your car, cross the road and enter the woods.
Head UP and almost due north for a little over two miles. The woods are mostly open with only a few rocky areas. Once the terrain flattens out it is a long walk to the highest point. There may be some viewpoints for Balsam Lake Mountain on the eastern side of the summit plateau. A little clearing opens up on top of the plateau. Continue due north until about 2.7 miles where you should hit the Millbrook Ridge trail. The MOST IMPORTANT thing to remember is to stay on the high ground of the ridge. Dropping off the ridge means you will simply have to regain that lost elevation. Turn left or west on the Millbrook ridge Trail. As you walk along the trail watch carefully for the marking as they sometimes are hard to spot. After a short distance there will be a lookout right on the trail. Below the lookout is Beecher Lake which has a Buddhist Monastery on its shores. There are also nice views of the surrounding hills. Continue your walk passing through a Col and climbing to the highest point on Millbrook Ridge at just under 4 miles into the hike. The elevation here is around 3470 feet leaving it 30 feet short of a Catskill 35. From here the trip to Alder Lake is all downhill with two minor bumps. At 5.25 miles there is a lean-to which looks out over a beaver meadow. This is a nice place to stop for a break before the final push to Alder Lake. Continue down the trail until you near Alder Lake and intersect the loop trail at 6.6 miles. Turn right and head around the lake to your car.
 (The image shows the vertical profile of the entire one way hiking route.)
York River State Park Virginia: Pumunkey Tower
| Quick Look | ||||
|---|---|---|---|---|
| Difficulty | Round trip | Total climb | Internet Maps | |
| 5.4 mi | 330 ft | AllTrails | ||
 York River State Park in Virginia is on the York River which is a tidal estuary at that point. It is 11 miles west of Williamsburg, Virginia. There are many small creeks and salt marshes in the park. All of these offer habitats for varying kinds of wildlife including eagles and ospreys. The park also has historical significance as it was part of the Taskinas Plantation going as far back as the 13 colonies. It was a place where growers would gather their products, especially tobacco, for shipment back to England. The park is quite flat with only a few hills. It has an extensive trail network for hiking, mountain biking and horseback riding. Some trails are designated for more than one use while some are reserved for only one. The entire park covers 2550 acres and has over 25 miles of trails, a visitor's center and picnic shelters.
To get to the park take I-64 and get off at exit 231B for Croaker. Go north on Route 607 (Croaker Rd.) for one mile, then right on Route 606 (Riverview Rd.) about one and a half miles to the park entrance. Take a left turn into the park. DO make the turn onto Riverview Road. Going straight ahead will take you to the boat launching area. DO NOT give up when it seems like Riverview is the wrong way. You will get to the park entrance. The day that I was at the park was technically late winter but looked more like early spring. The skies were overcast and threatening rain with temperatures in the high 40's to mid 50's. Stop at the entrance to pay the use fee to the attendant or place it in an envelope and deposit in the "off" season. The maps available are barely adequate if you have not been here before but make more sense after you walk around for a while.
Park the car near the visor's center and walk to the right of the building toward the kiosk. Start out on the Woodstock Pond Trail. After a few hundred feet, turn left and walk down the stairs to the shore of the river. The beach here is sandy and there are nice views up and down the shire and across the river. Walk back up to the main trail, turn left and walk past Woodstock Pond on the right. Stop at the pond for a moment if you want and then take your next left on The Mattaponi Trail that leads down to a bridge across a salt marsh. The trail leads to a wooden lookout deck which gives nice views of the river but better views are available from just off the deck. Take the side trail marked Fossil Beach which leads down to the river edge. This is definitely worth the short side trip. Walking on the beach you may find a fossil but you will surely enjoy the views of the high, sandy bluffs and the river. Go back up the side trail and out to the Mattaponi Trail and turn left to walk out to the Woodstock Pond Trail. At the trail junction walk over to the old brick foundation of the summer home of a prominent Williamsburg doctor. Walk out to the Backbone Trail and turn left.
Walk generally south following the Backbone Trail for about .85 miles ignoring all the crossing trails until you get to the Pumunkey Trail on the left. This trail is about .85 miles long and will take you down to an observation 'tower' at the edge of the river. The 'tower' is an elevated platform perhaps 10 feet high so don't get too exited. When you have finished "observing", walk back out the Pumunkey Trail to the Backbone Trail and turn right. Follow the Backbone Trail for 1.4 miles back to the car. There are many other options that would include more trails and point of interest along the way. Consult the map from the park entrance booth and read the description of the hike below.
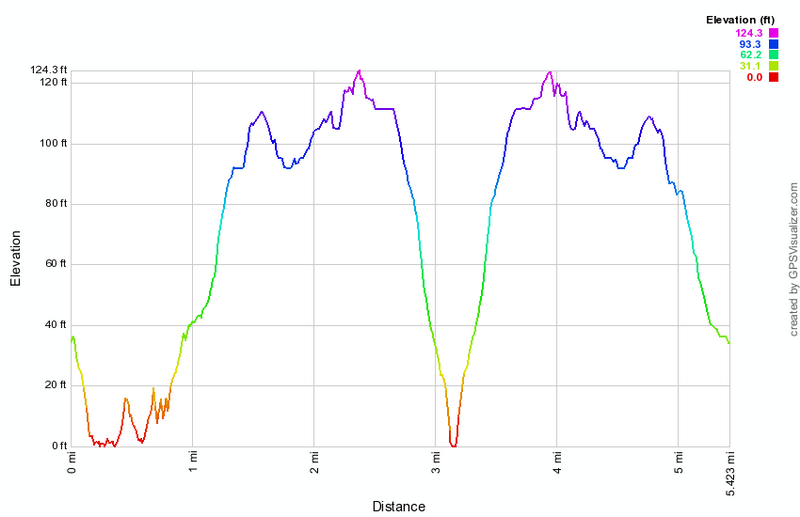 (The image at the left shows the profile of the looping hike. Remember that all vertical profiles are relative!)
York River State Park Virginia: Taskinas Loop
| Quick Look | ||||
|---|---|---|---|---|
| Difficulty | Round trip | Total climb | Internet Maps | |
| 10.7 mi | 704 ft | AllTrails | ||
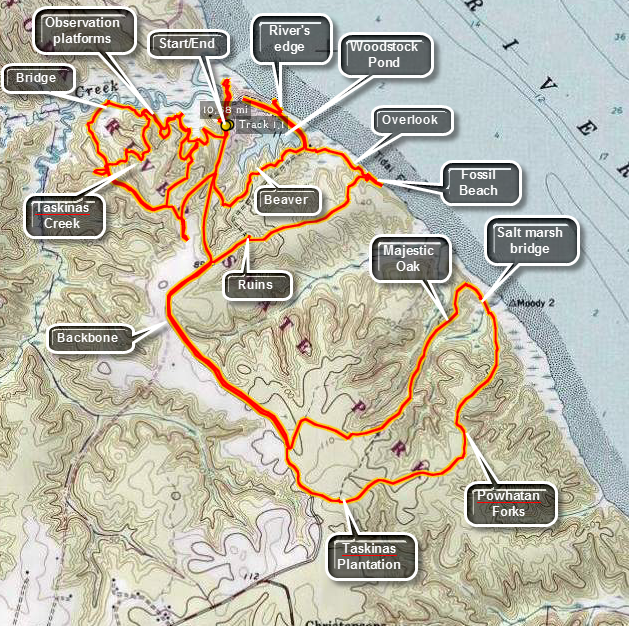 York River State Park in Virginia is on the York River which is a tidal estuary at that point. It is 11 miles west of Williamsburg, Virginia. There are many small creeks and salt marshes in the park. All of these offer habitats for varying kinds of wildlife including eagles and ospreys. The park also has historical significance as it was part of the Taskinas Plantation going as far back as the 13 colonies. It was a place where growers would gather their products, especially tobacco, for shipment back to England. The park is quite flat with only a few hills. It has an extensive trail network for hiking, mountain biking and horseback riding. Some trails are designated for more than one use while some are reserved for only one. The entire park covers 2550 acres and has over 25 miles of trails, a visitor's center and picnic shelters.
To get to the park take I-64 and get off at exit 231B for Croaker. Go north on Route 607 (Croaker Rd.) for one mile, then right on Route 606 (Riverview Rd.) about one and a half miles to the park entrance. Take a left turn into the park. DO make the turn onto Riverview Road. Going straight ahead will take you to the boat launching area. DO NOT give up when it seems like Riverview is the wrong way. You will get to the park entrance. The day that I was at the park was technically late winter but looked more like early spring. The skies were overcast and threatening rain with temperatures in the high 40's to mid 50's. Stop at the entrance to pay the use fee to the attendant or place it in an envelope and deposit in the "off" season. The maps available are barely adequate if you have not been here before but make more sense after you walk around for a while.
The Taskinas Creek Trail was marked 'Closed due to storm damage.' but is fairly easy to hike although missing some bridges. The trail parallels the creek for a distance and has wooden platforms with benches to observe the wildlife. About a mile into the hike a bridge crosses the creek and is twisted but sound. From this point on the trail heads through the forest and over some hills to an area about 1.74 miles from the beginning where you can go straight ahead head back to the parking area to find another trail. You may also choose to turn right and walk the ?new" trails that cover some of the same ground you already walk through. Be prepared to bushwhack at some point until the trails are completed. Once back at the trail junction go straight ahead out to the road and walk back toward the parking area. Just short of the parking area make a right onto the Backbone Trail, a multi-use trail that runs the length of the park. In a few hundred feet make and immediate left onto the Beaver Trail and at the end another left onto the Woodstock Pond Trail. Walk passed Woodstock Pond and take a right down some steps to the shore of the river. Spend some time on the sandy beach before heading back the way you came passing Woodstock Pond. Take the next left onto the Mattaponi Trail that leads down to a bridge across a salt marsh. The trail leads to a wooden lookout deck which gives nice views of the river but better views are available from just off the deck. Take the side trail marked Fossil Beach which leads down to the river edge. This is definitely worth the short side trip. Walking on the beach you may find a fossil but you will surely enjoy the views of the high, sandy bluffs and the river. Go back up the side trail and out to the Mattaponi Trail and turn left to walk out to the Woodstock Pond Trail. At the trail junction walk over to the old brick foundation of the summer home of a prominent Williamsburg doctor. Walk out to the Backbone Trail. You will have walked 6 miles and turning right will bring you back to the parking area. Turn left on the Backbone Trail.
Walk generally south following the Backbone Trail for about .85 miles ignoring all the crossing trails until you get to the Pumunkey Trail on the left. Turn left here walk .1 miles and turn right on the Spurr Trail. Walk .15 miles and turn left on the Majestic Oak Trail. About .6 miles down this trail, as you head for the river, will be a large oak tree with a plaque explaining its significance. Continue on the trail and walk over a wooden causeway across another salt marsh. The trail continues to loop around and heads away from the river. DO NOT turn left unless you want to lengthen the 10 mile hike! Take the first right which will be the Powhatan Forks Trail. At the next right will be a gate and the foundations of the Taskinas Plantation. All that remains are shallow impressions and some bricks. DO NOT turn here but continue straight ahead to the Backbone Trail. Turn right and stay on this trail all the way back to the park road and your car about 1.5 miles away.
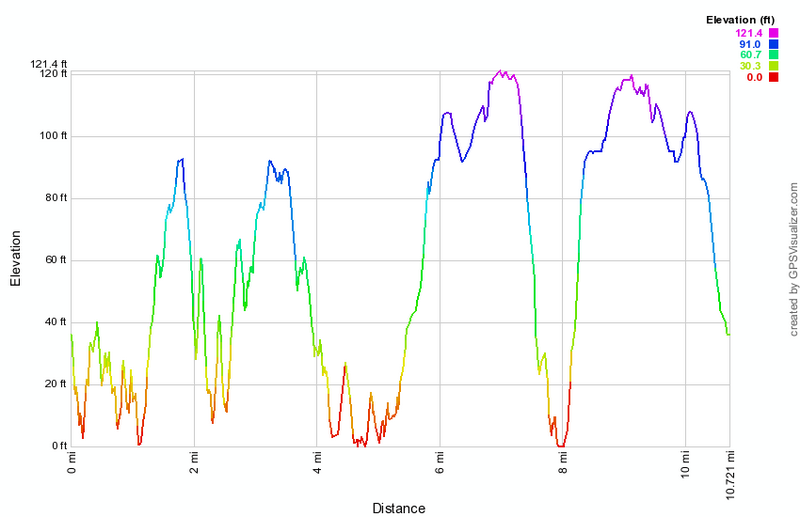 (The image at the left shows the profile of the looping hike. Remember that all vertical profiles are relative!)